

Would you like to save this?
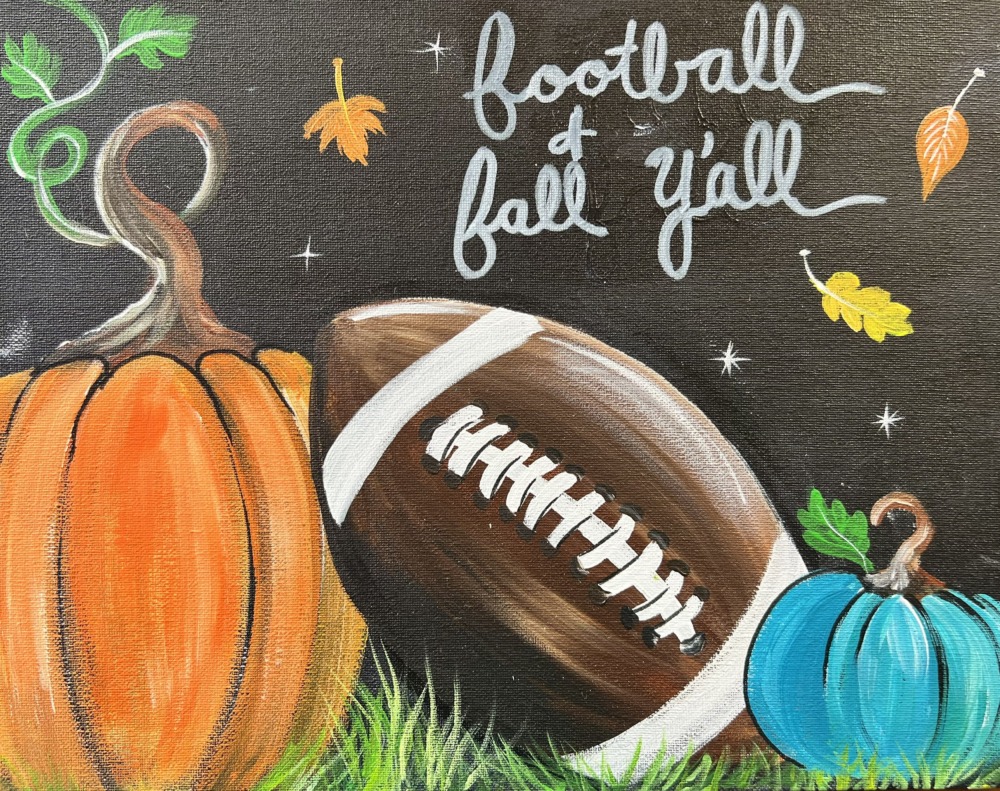
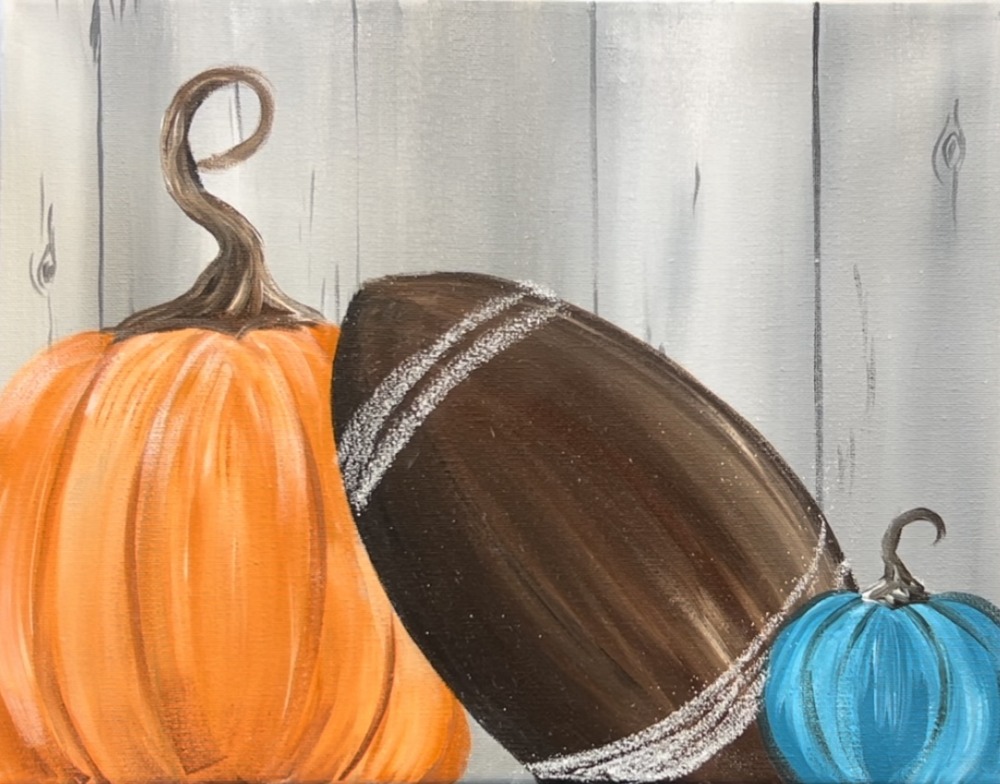
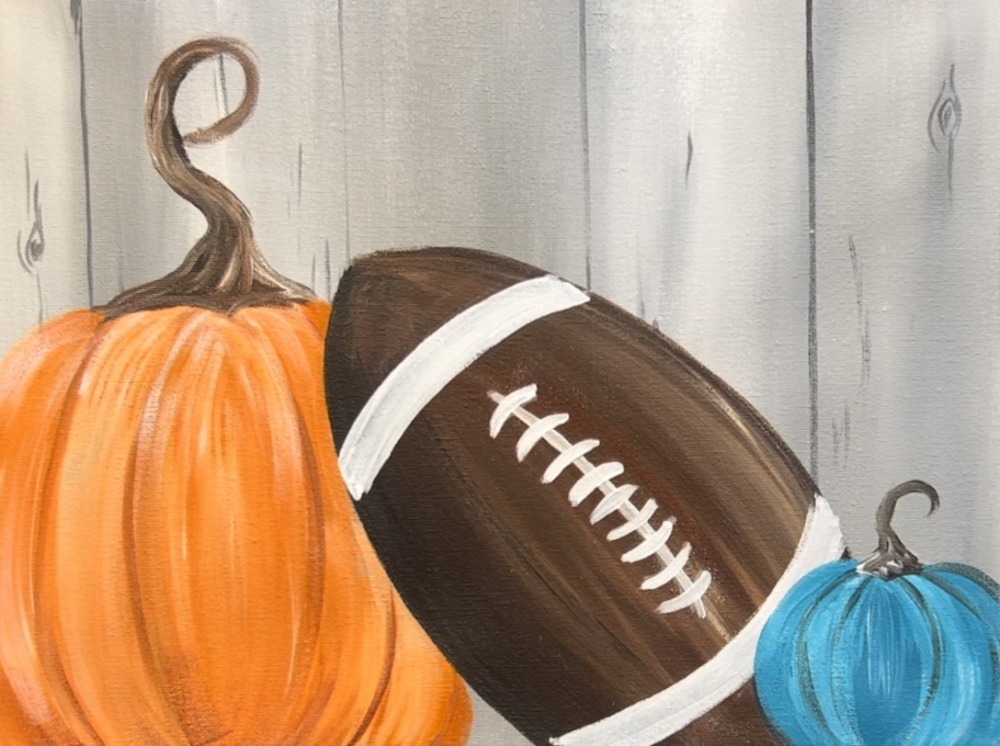
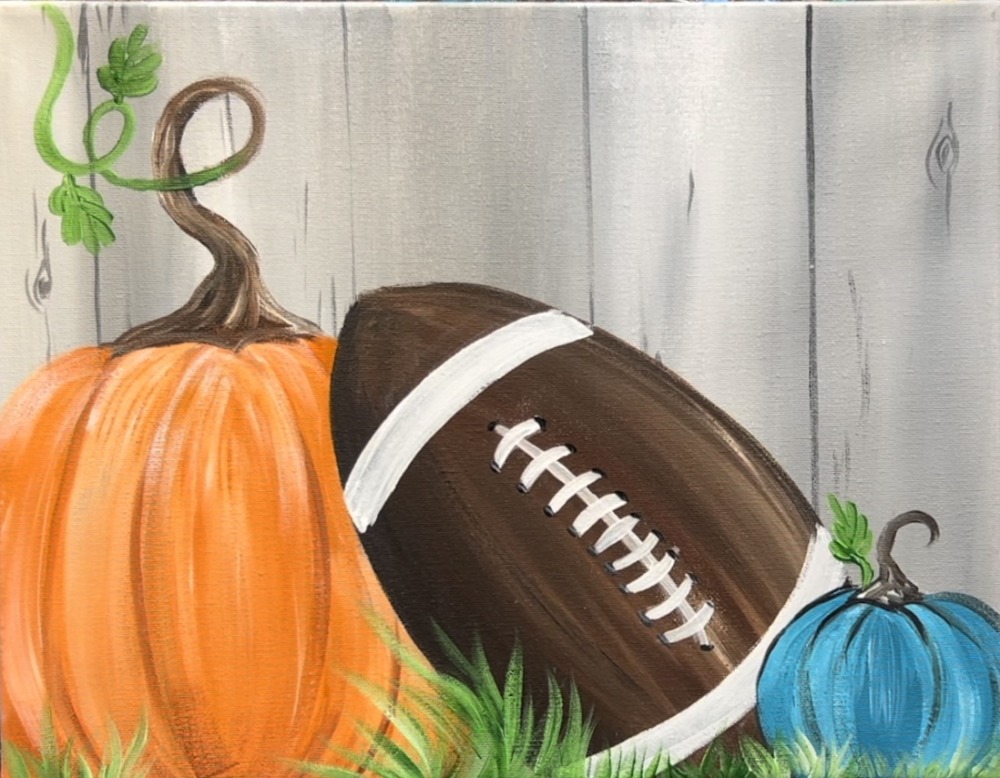
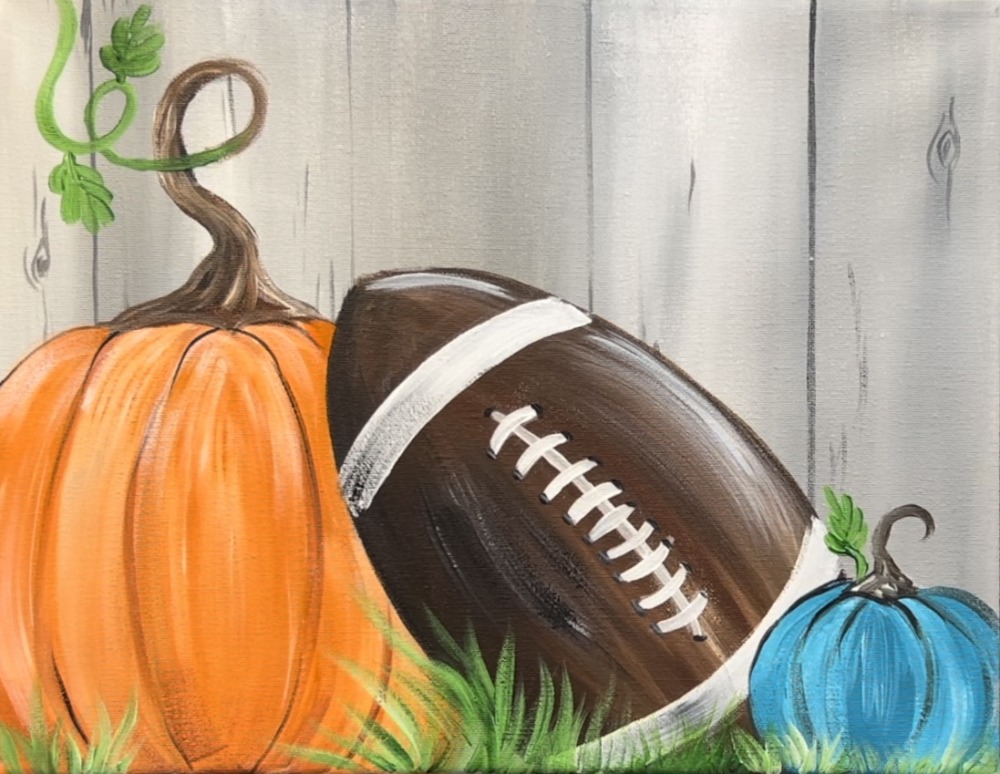
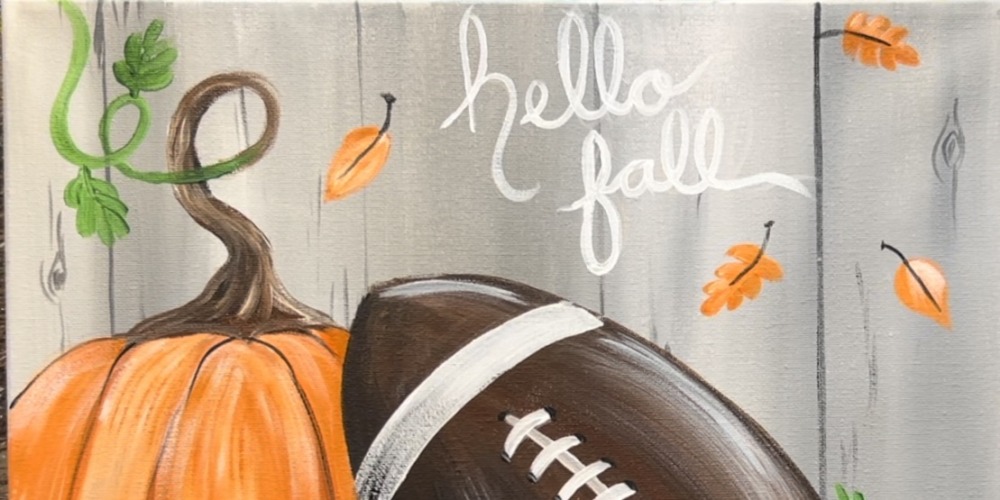
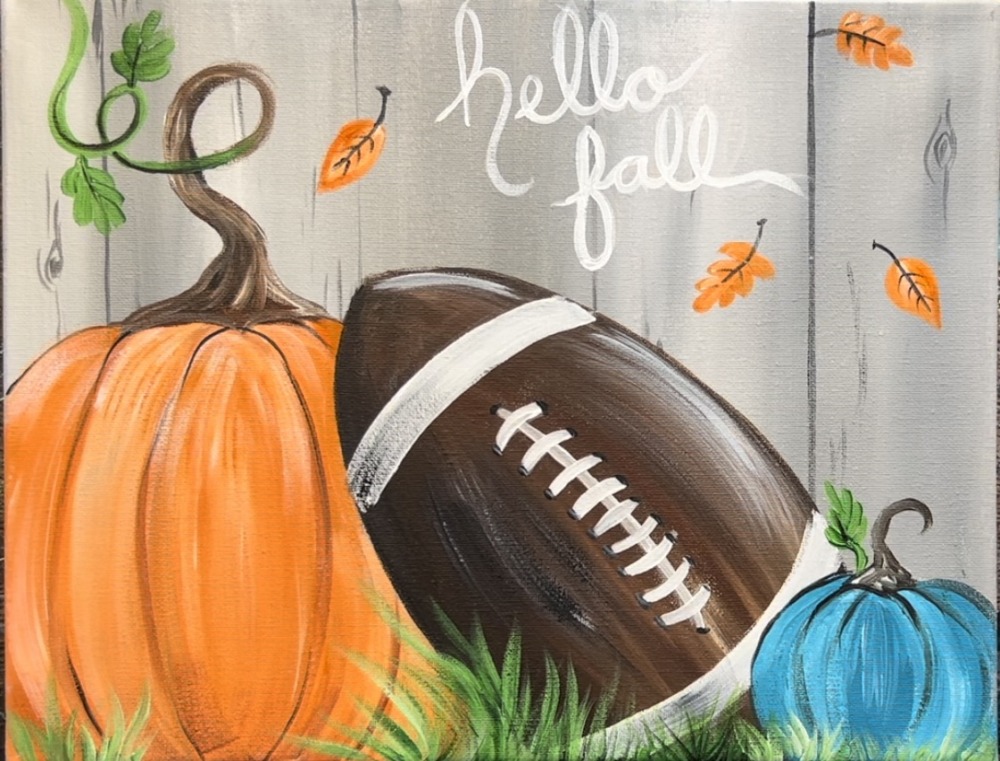
This fun acrylic painting tutorial will show you how to paint a fall still life scene with pumpkins, football, falling leaves and a faux fence background. Alternative wording for this painting could be “hello football” or “football & fall y’all”.

You can also change the colors of the pumpkins to match a favorite team’s colors! Or, even add a little flag with a team logo somewhere in this painting.
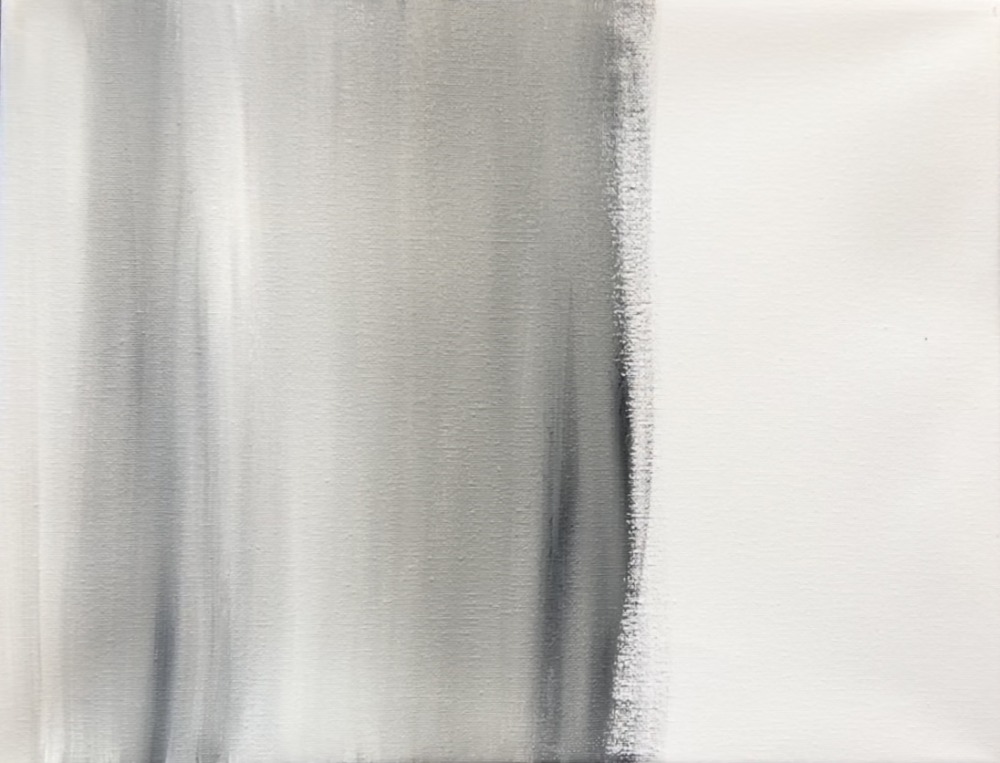
As a design alternative, you can do the background with black! This one below is what the design was going to be originally before I decided on the gray fence.
I did a “Payne’s Grey” background. This simplifies the painting a bit by making the background a solid color.
Enjoy and happy painting!
See Also…
Materials
"Fall Football" Acrylic Painting Tutorial
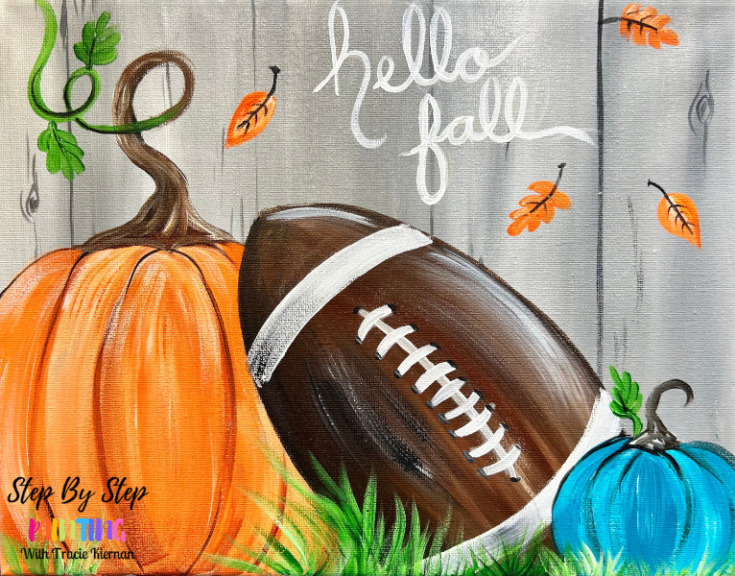
The wording of this can also be "Hello Football". This acrylic painting tutorial will show you how to paint a simple still life scene with two pumpkins and a football with gray wooden fence in the background and falling leaves.
Materials
- 11 x 14 Canvas
- Acrylic Paint
- Paint Brushes
- White Chalk
- Water Cup
- Protected Workspace
- Paint Palette
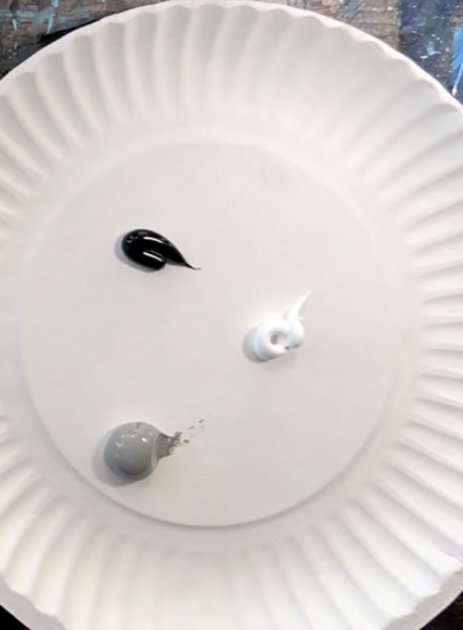
Colors
- Titanium White
- Mars Black
- Neutral Gray Value 5
- Cadmium Orange Hue
- Hooker's Green Hue
- Turquoise Blue
- Burnt Sienna
- Raw Umber
Brushes
Color Palette
I used Liquitex BASICS acrylics for this. If you are using a different brand, you can use the color chart below to help you match colors.
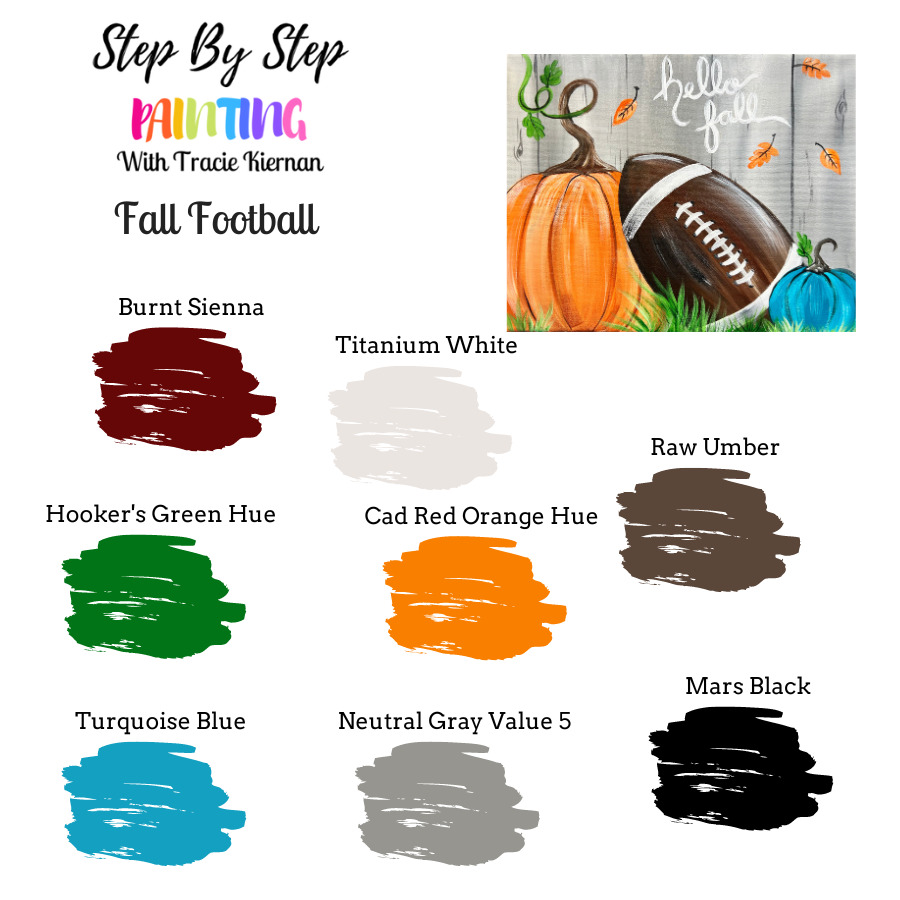
*If you don’t have “neutral gray value 5”, you can mix a gray by mixing 4 parts white with 1 part black. You can also do a black background. This eliminates the need for gray.
Craft Paint Conversion
If you are using craft paints, such as Apple Barrel Craft Paints, I would recommend subbing to:
- Black
- White
- Jack-O-Lantern
- Bimini Blue
- Shamrock Green
- Nutmeg Brown
- Melted Chocolate
Directions At A Glance

Video
Step By Step Directions
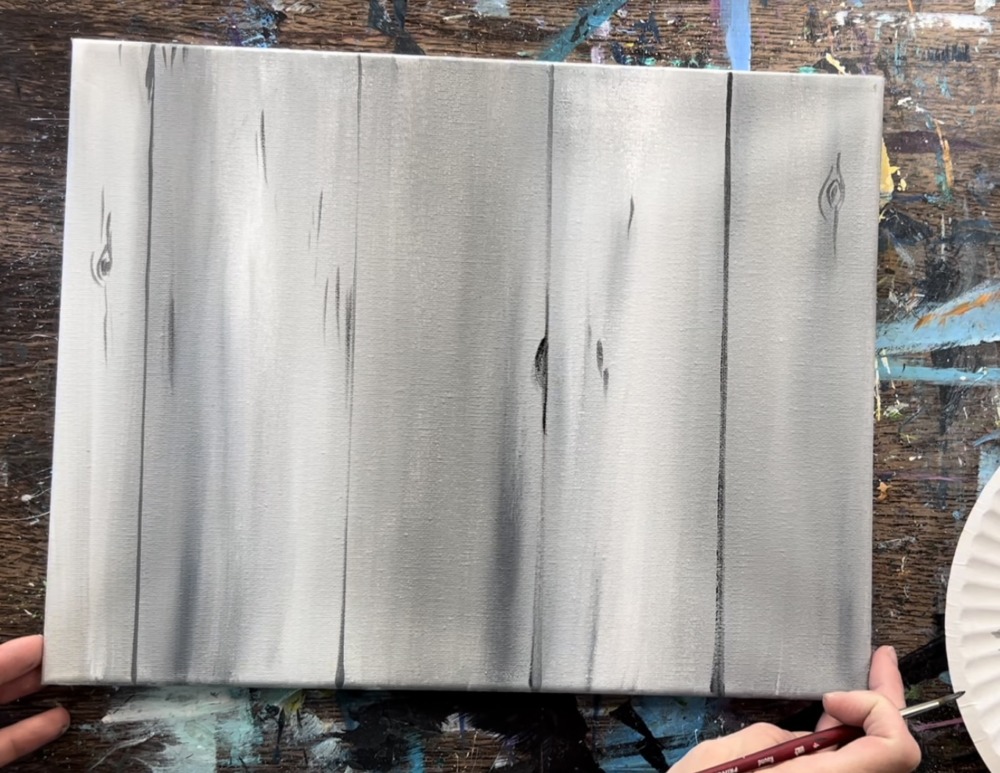
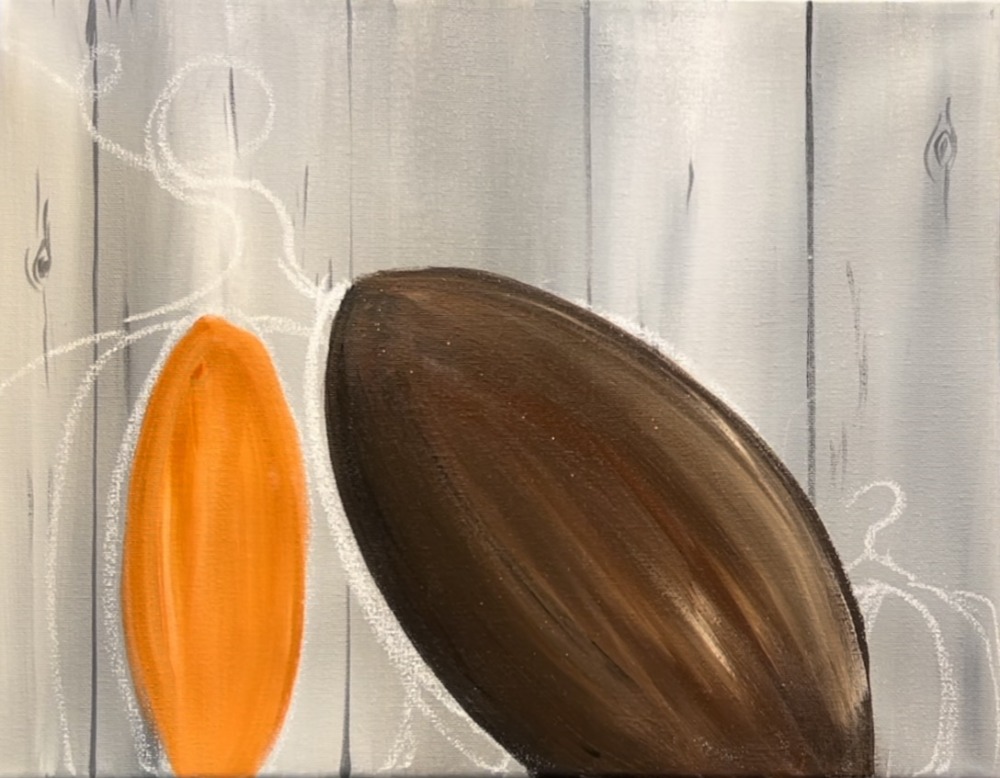
1. Paint The Background
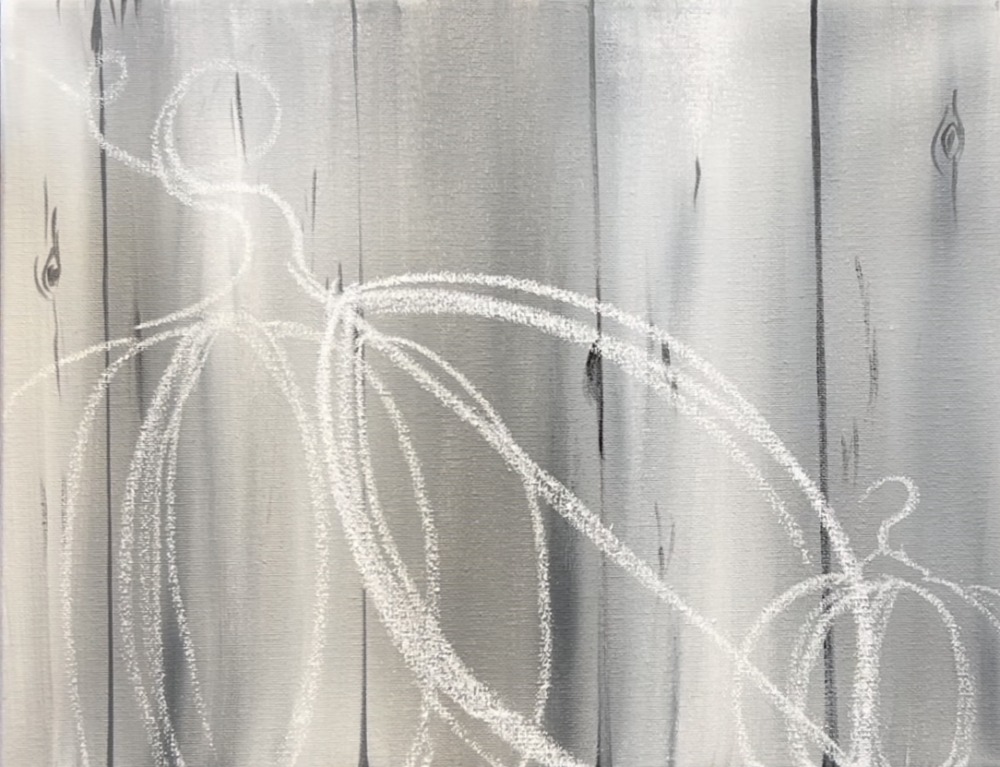
The background of this painting is a “faux gray wood” fence. It is achieved by blending different shades of gray on the canvas and then painting vertical lines to divide it into different panels.
Load your palette with the colors: neutral gray, titanium white and mars black.
Load your 3/4″ flat wash brush in titanium white and neutral gray. Paint up and down strokes using the full width of the brush. Mix tiny bits of black into it to make some areas slightly darker. Try not to “over blend this” and allow the colors to mix on the canvas to create streaks of different shades of gray.
If needed, you can thin the paint down with a little bit of water. This will help with the blending and flow of the paint so it covers the canvas quicker.

Let this dry a bit before painting the vertical lines in the fence panels.
Use a ruler, a 3/8″ angle brush and dark gray paint color to paint vertical Iines to divide up the fence area into panels. To make the dark gray, mix the neutral gray color with a little bit of black.
Line up your ruler with the edge of the canvas so that it is perpendicular. Then paint the vertical lines. Try to make the panels evenly spaced apart, however, they don’t have to be perfect.

If the tone of the gray changes a bit, that is okay. Also the lines do not have to be the same thickness. The variation actually helps the fence look a bit more “rustic”.

Next, use a #4 round brush to paint wood texture on the fence panel. Paint little “knots” in the wood using the dark gray color. Also, paint little vertical line marks throughout the fence panels. Do this mostly at the top because the bottom half of the canvas will be covered with the pumpkins and football.

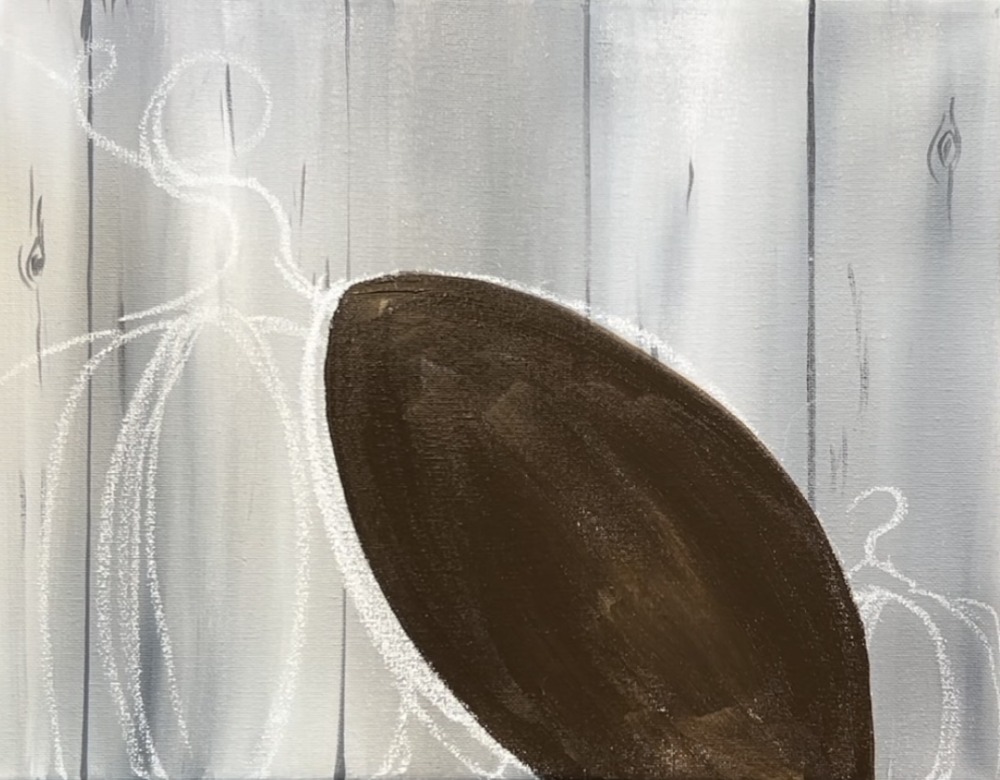
2. Draw Pumpkins & Football With Chalk
Wait until the canvas is completely dry before doing this step. I used a piece of white chalk to draw the two pumpkins and the football. You can also use a white chalk pencil or a regular drawing pencil.
Start with the large pumpkin on the lower left. Draw a center oval that is narrow and tall. It is taller than half the size of the canvas. The pumpkin also gets “cut off” on the bottom edge of the canvas.
Then draw two curved lines on each side of the center oval shape.
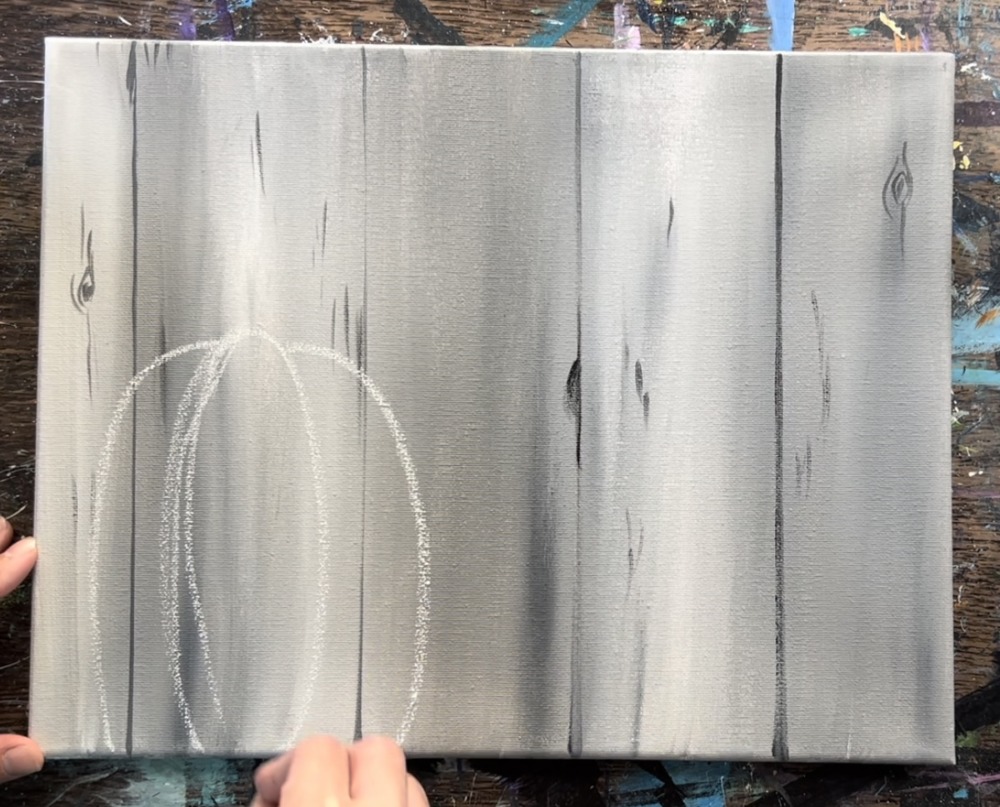
Draw two more curved lines or “pumpkin bumps” on each side again.

Then draw the stem so that it is positioned right on the top of the pumpkin. Draw it so it spirals around and goes off the edge of the canvas.

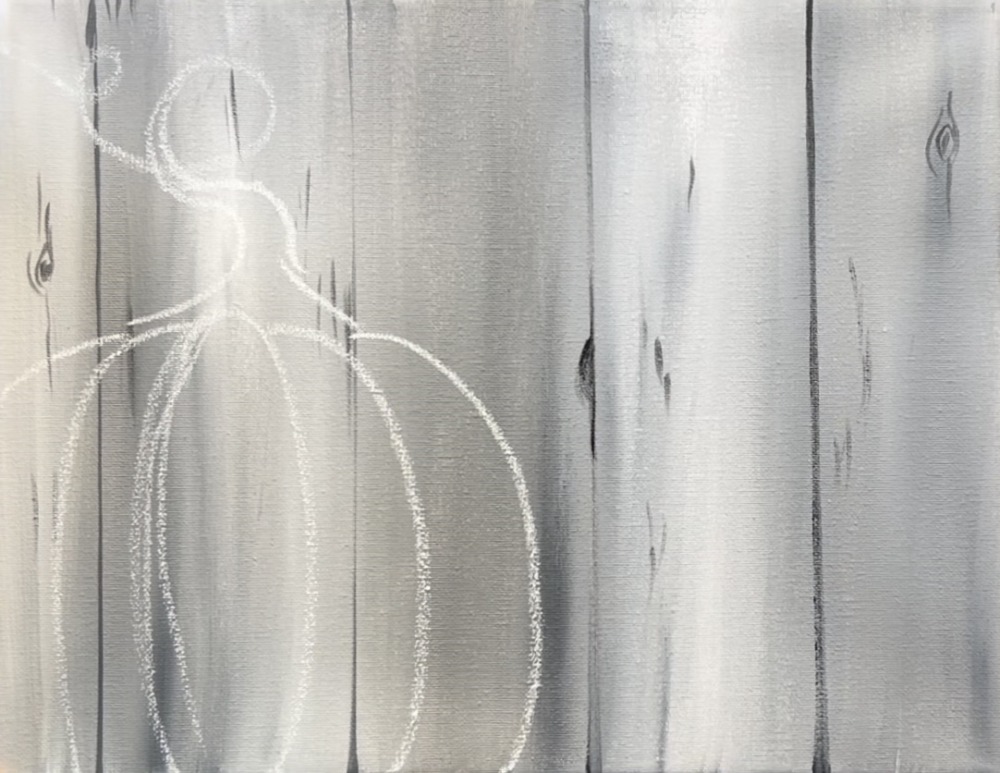
Repeat the steps for drawing another pumpkin on the lower right of the canvas. Make this pumpkin much smaller.
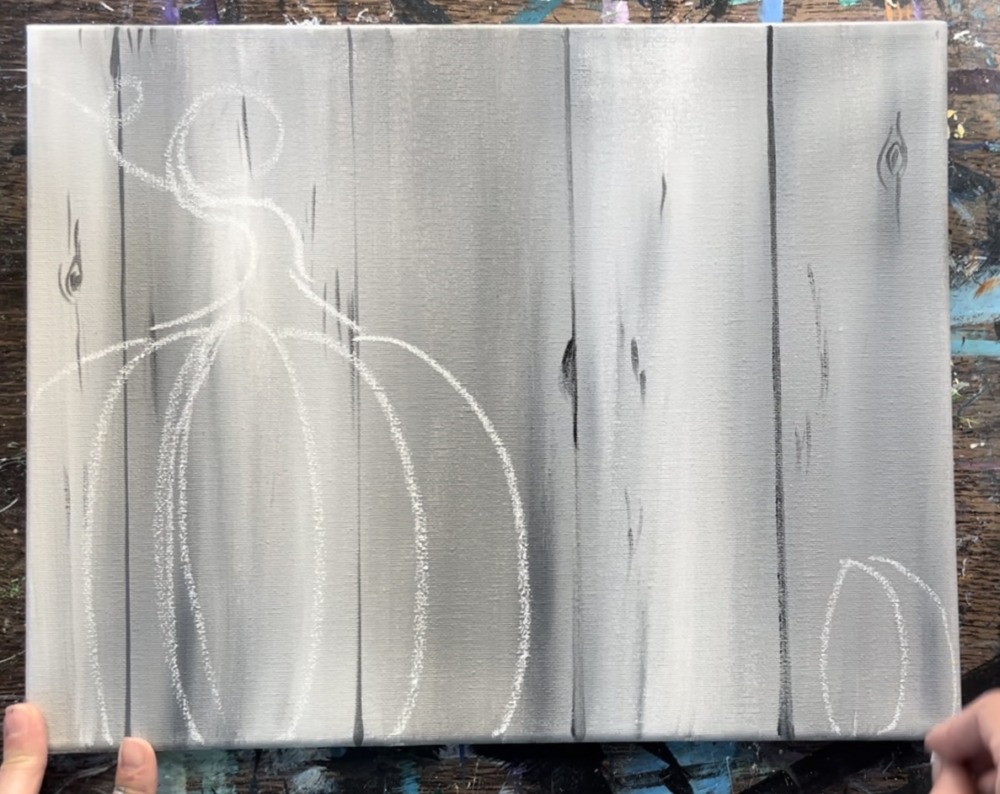

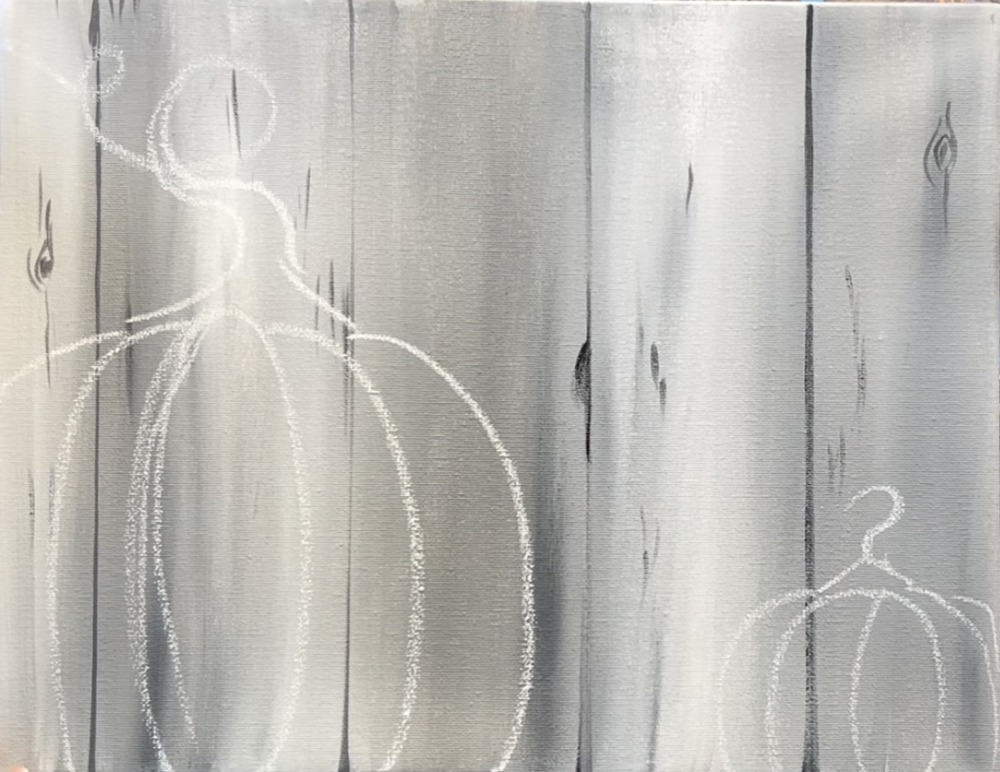
Next, draw the football so that it is overlapping the large pumpkin on the right. Start by drawing a long, diagonal line that tangents the large left pumpkin at the top and crosses the small pumpkin on the lower right.
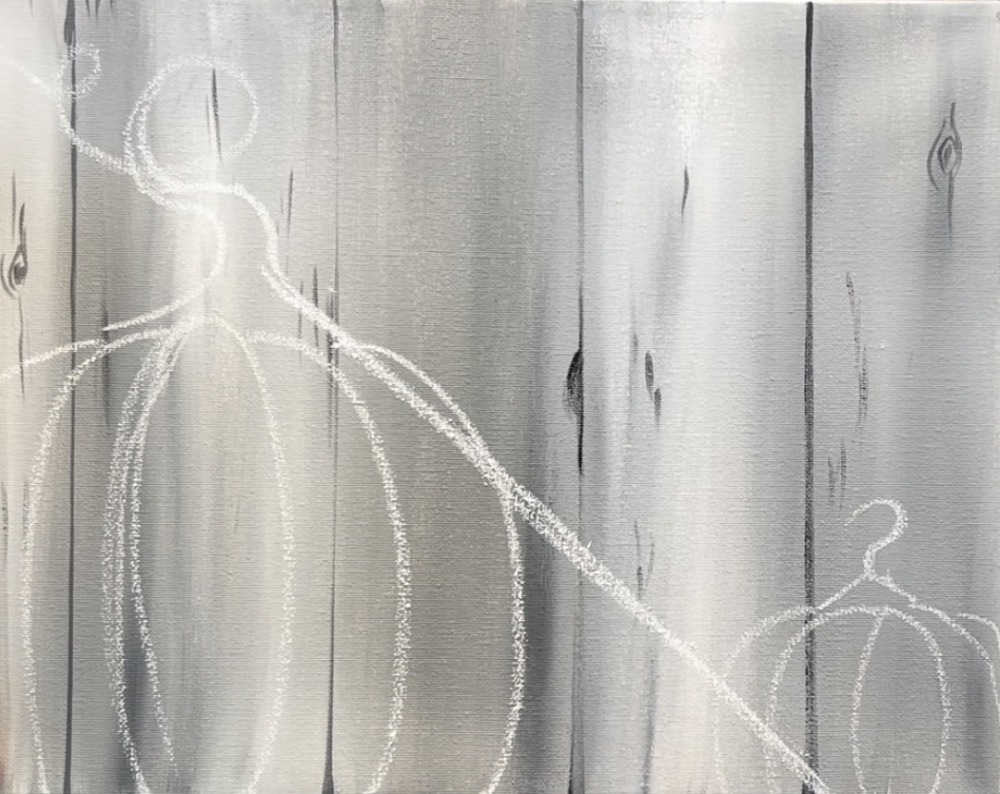
Then sketch two curved lines on each side of the diagonal line and goes off the edge of the canvas on the bottom.

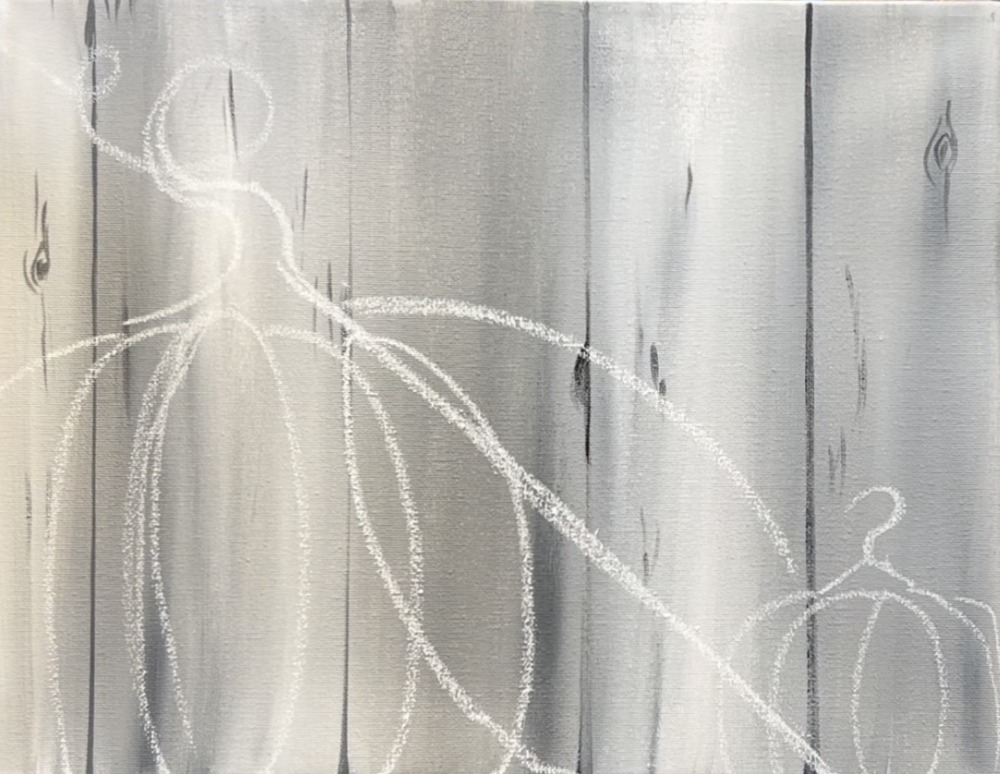
You may have to draw this curve several times until you achieve the shape you want. Overlap the pumpkin on the lower right.
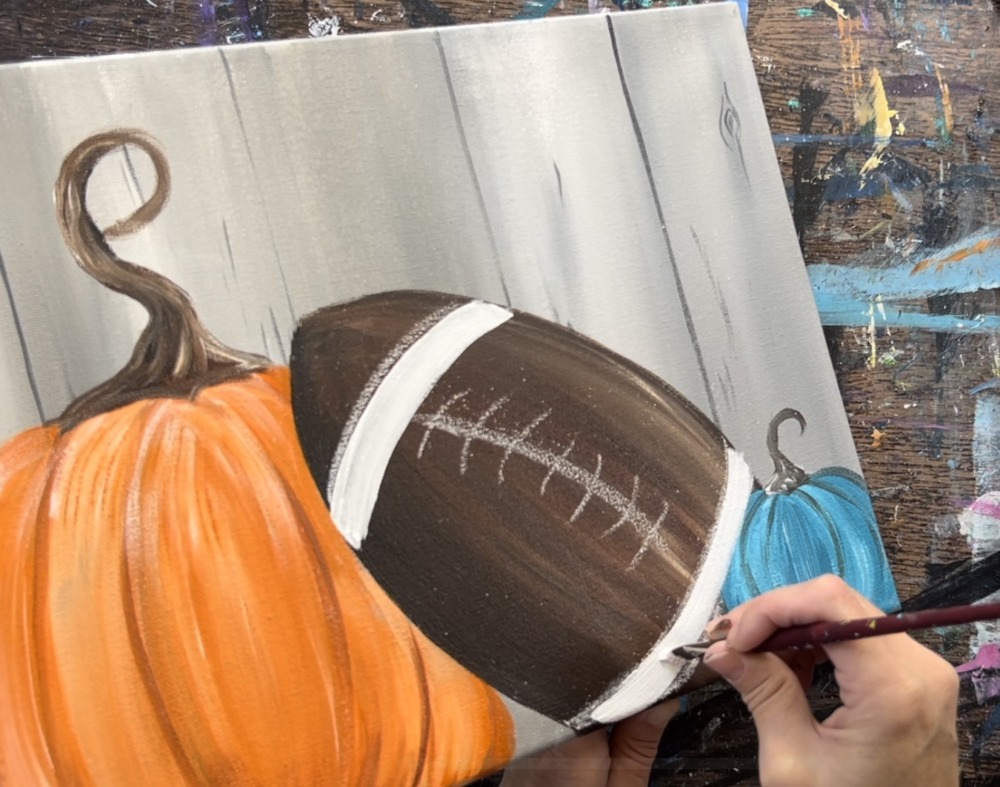
3. Paint The Football
Load your palette with the colors: raw umber and burnt Sienna. Use the 3/4″ flat wash brush and load it into just the darker brown. Paint the entire football a solid coat of the dark brown.
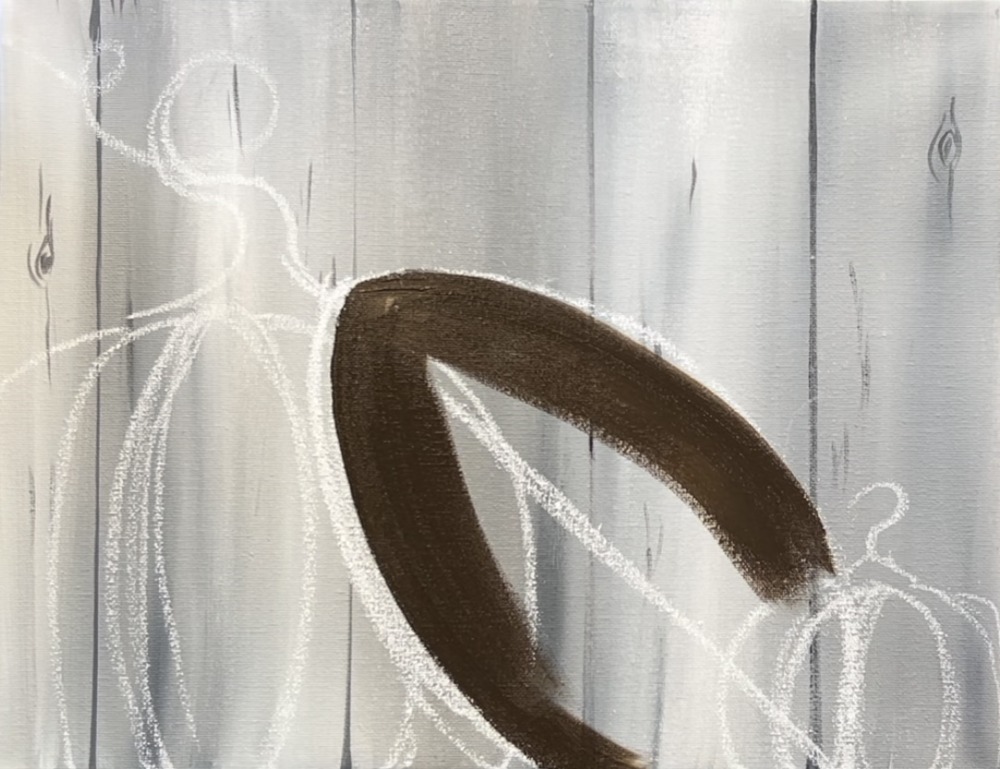
Use the tip of the brush to define the shape. Make sure your strokes are curving opposite directions on the sides of the football. By establishing the direction of your strokes, you start to create some form in this shape.
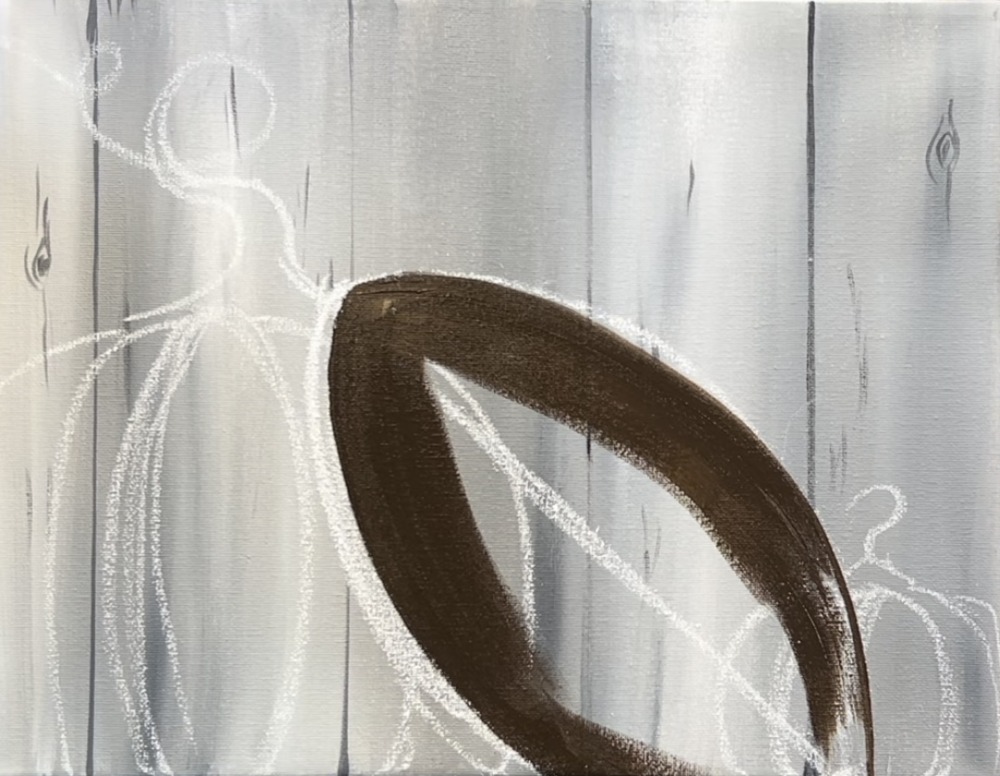
Next, wipe the brush off. Load burnt Sienna (reddish brown) on your brush. Apply a layer of burnt Sienna over the first layer of brown. Make sure your strokes are going in the same direction.
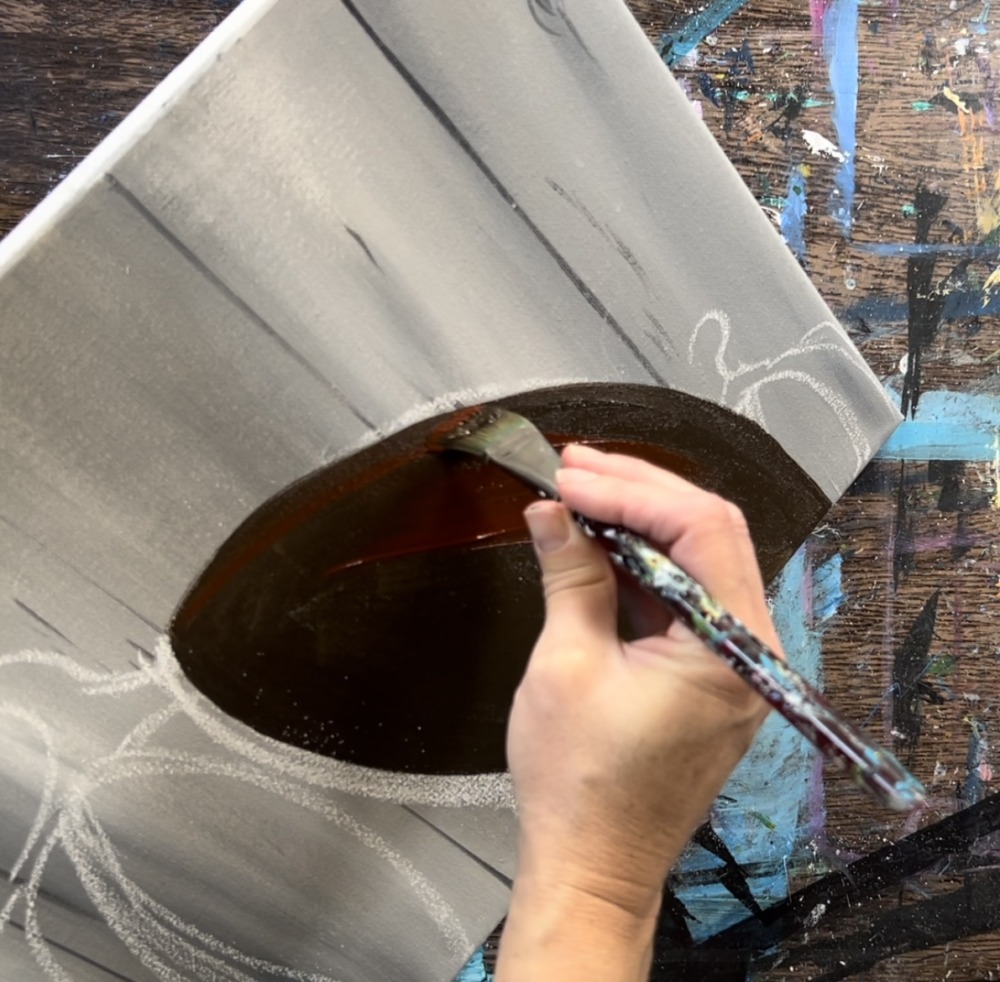
Don’t paint over all of the brown. Let it gently blend with the brown but not all the way.
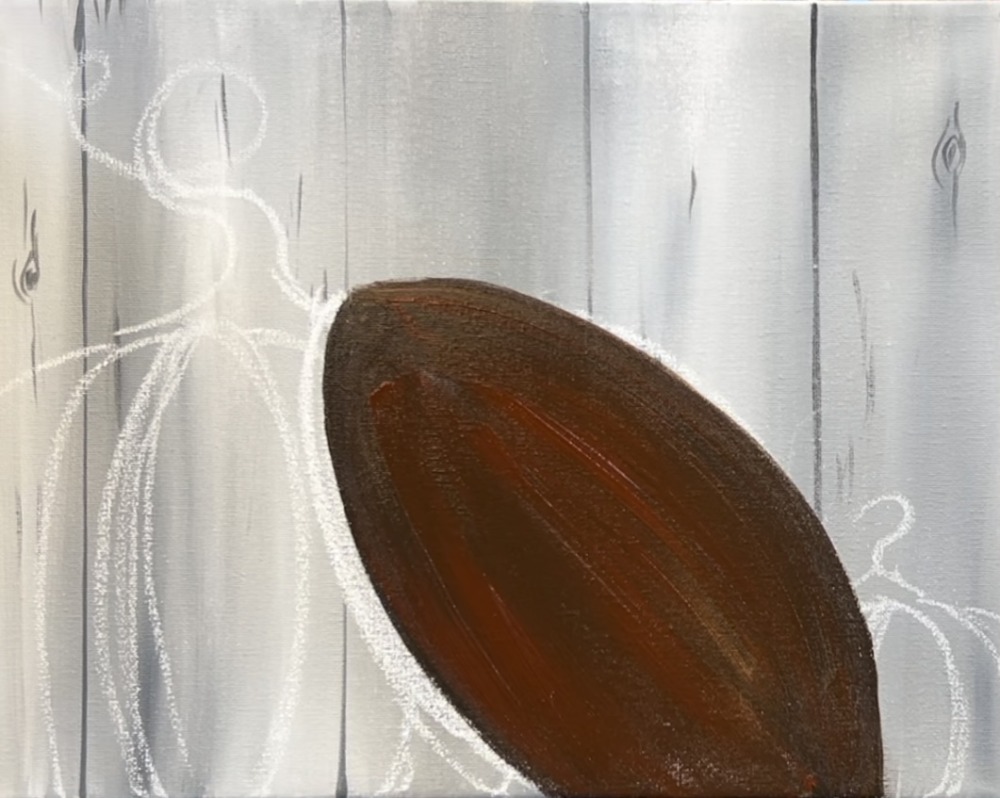
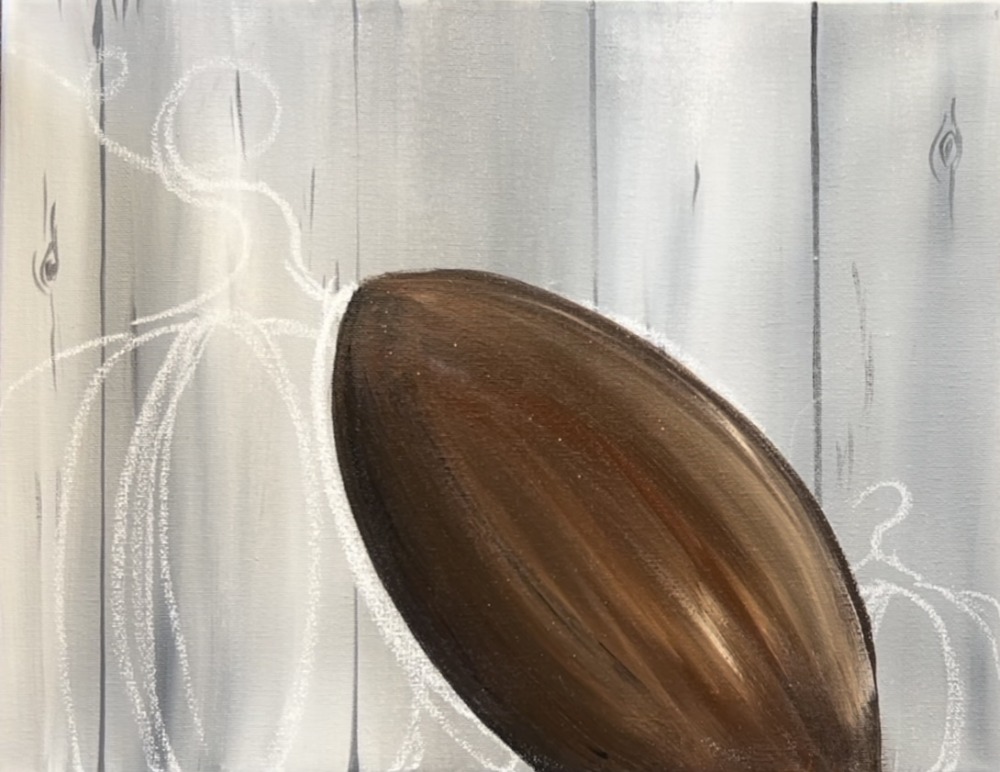
Wipe the brush off again but do not rinse. Load a very small amount of titanium white onto the brush. Gently blend titanium white on the football. This will create streaks of light brown. Make sure your strokes are going curved and opposite directions and try not to let the white blend all the way with the brown.

Next, rinse the brush. Add a very small amount of black to the brush. Blend a little bit of black on the far left edge of the football (the side closest to the large pumpkin). This will create a shadowy area in the football.
4. Paint The Pumpkins
Load your palette with cadmium orange hue and titanium white. Use a #12 bright brush (1/2″ flat) to paint the center oval. Double load your brush in orange and white. Then paint by stroking down and letting the orange and white blend gently.
Next, add a little more titanium white to the brush (with the orange). Paint the next curved shape to the left of the oval shape. Do this by stroking from the top down. Let the white and orange gently blend together but not all the way.
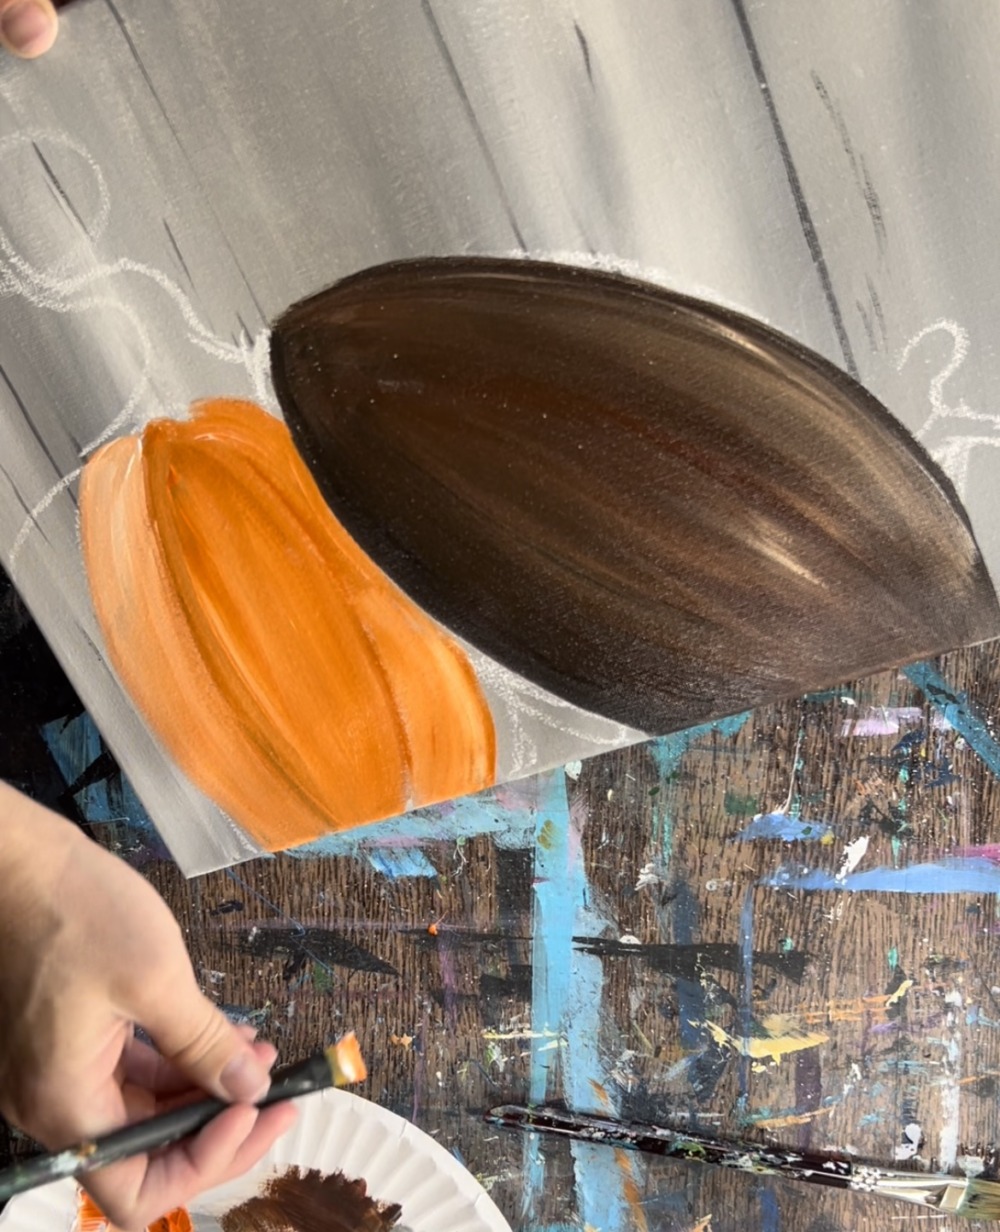
Repeat this for each of the “pumpkin bumps” and alter the color just a little bit by adding more or less white.

To make the lines between each of the “pumpkin bumps” stand out, add a little brown into the orange. You can use either of the browns for this. Then use the tip of the brush to outline the lines/spaces between the bumps so they appear slightly darker and stand out.
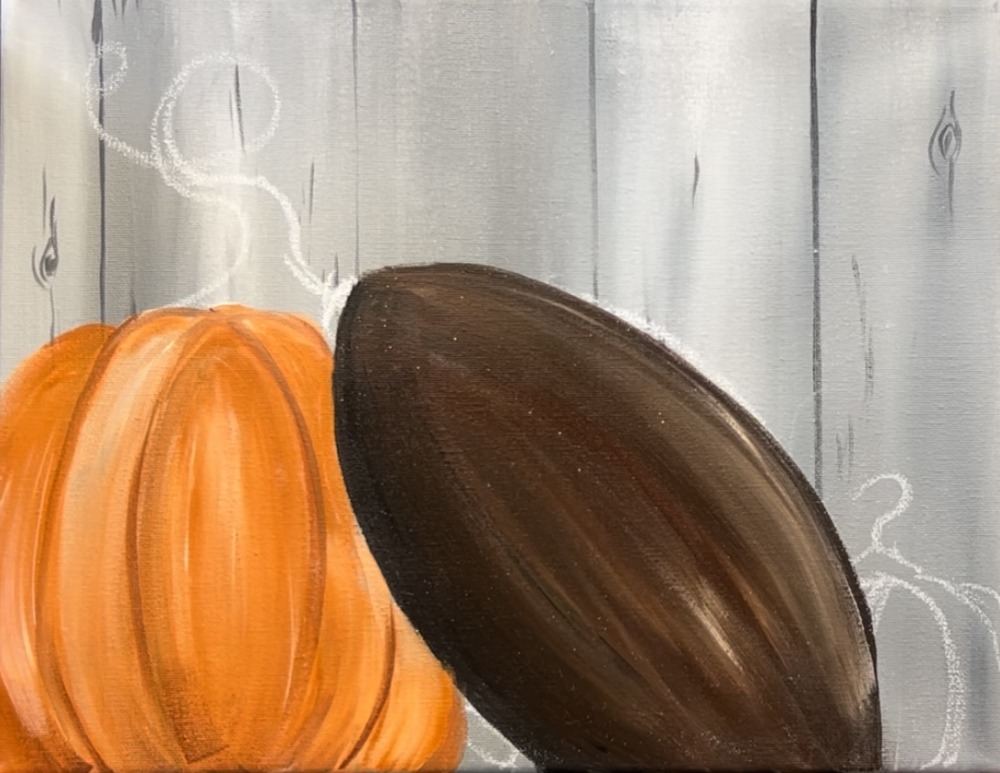
Rinse the 12 bright brush. Then load it into a small amount of titanium white paint. At the top of each of the “pumpkin bumps”, stroke downwards just at the top to create “highlight” at the top of the pumpkin.

Then paint the stem of the pumpkin using a #4 round brush and the color raw umber mixed with a little bit of black. Start by painting just the shape that you drew with the chalk. Paint it solid brown.
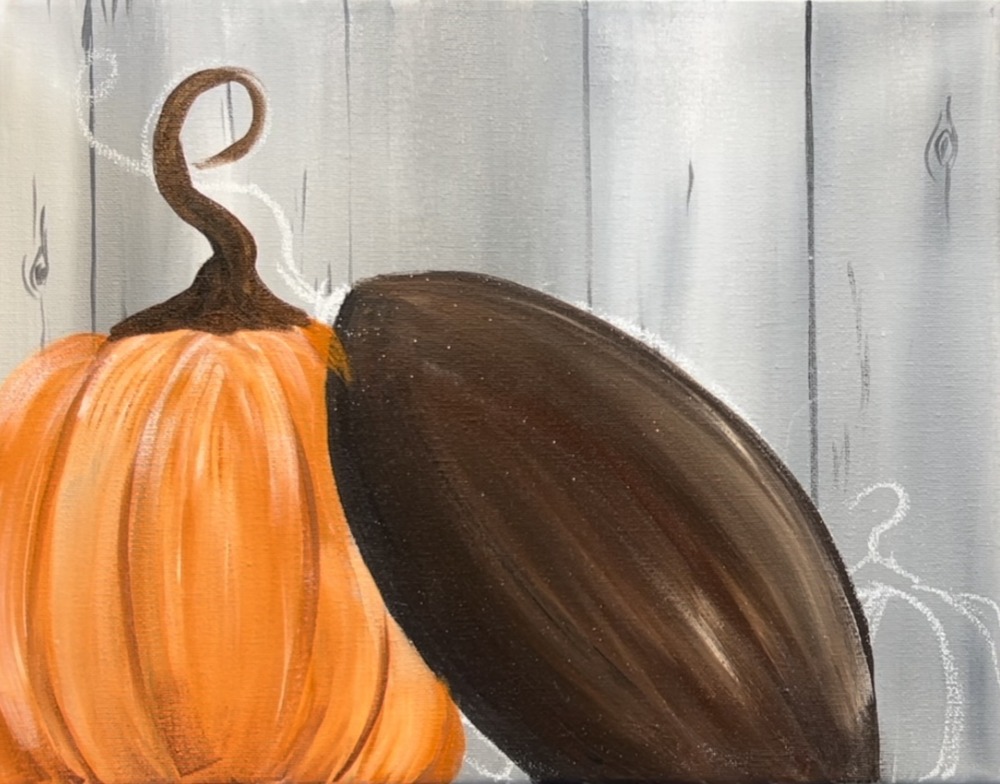
Then, without rinsing the brush, add a small amount of titanium white to the tip of the brush. Add texture in the stem by painting short strokes with the white paint on one side of the stem and let it blend with the brown. The white mixing with the brown will create texture in the stem.

Note: I did not paint the rest of the vine that is attached to this stem. That will be down with green at a later step.
Paint the smaller turquoise pumpkin in the lower right. Load your palette with turquoise blue and more titanium white (if needed). Then use a #4 round brush to paint the pumpkin. Start with the middle “oval” shape. Double load the brush in the turquoise and the white and paint the oval by stroking downwards.
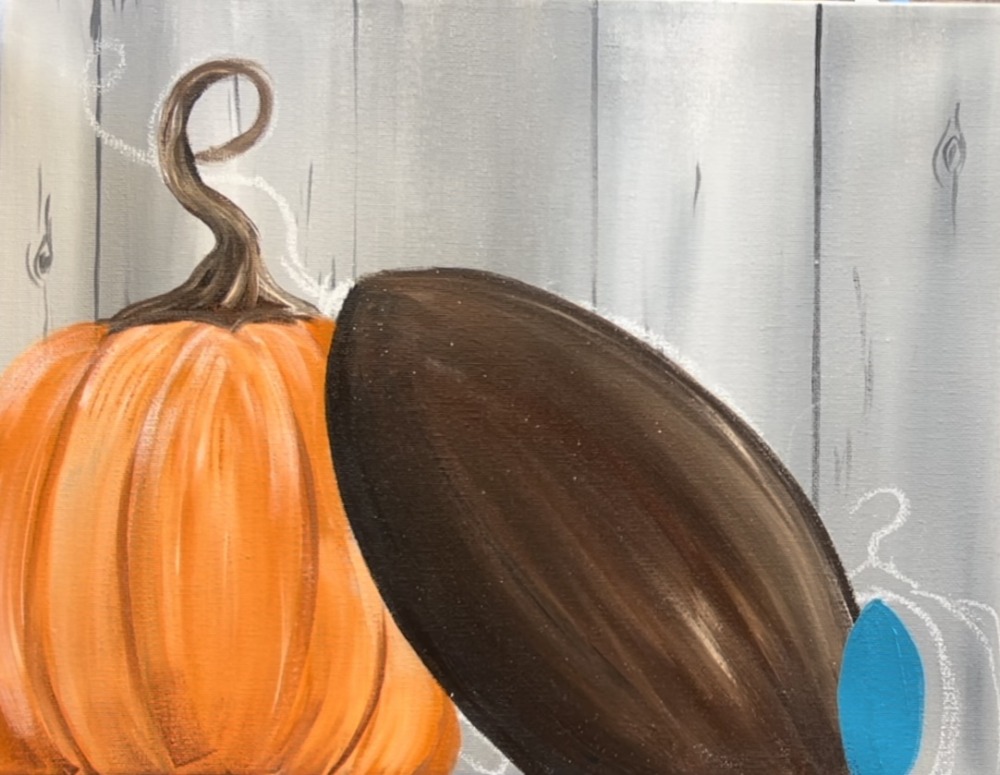
Next, paint each of the curves of the pumpkin. Alter the color by adding a little more or a little less white so that it stands out. Stroke the brush down starting at the top.
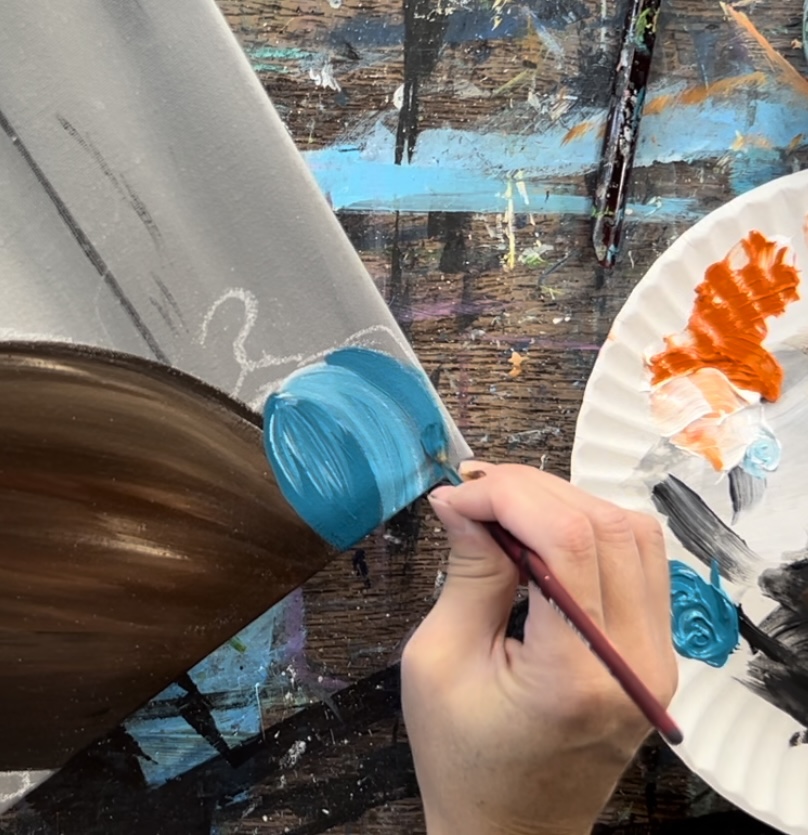
This small pumpkin overlaps the football shape.
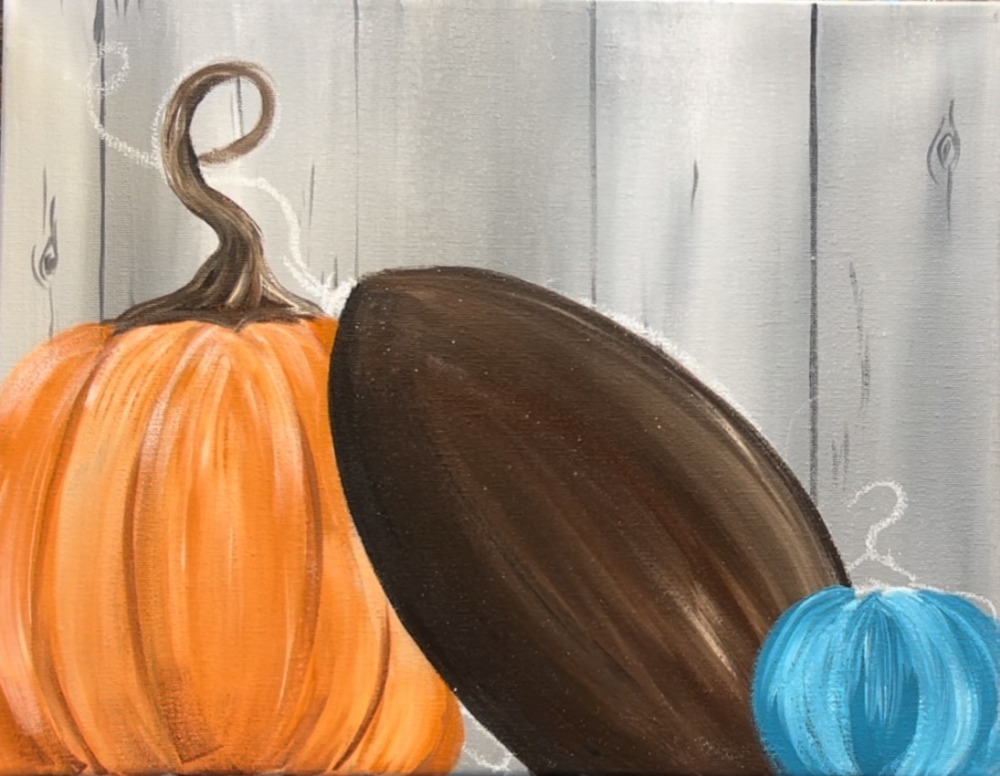
Then paint the dark lines in between the bumps of the pumpkin. Do this by mixing a little brown with the turquoise blue color.
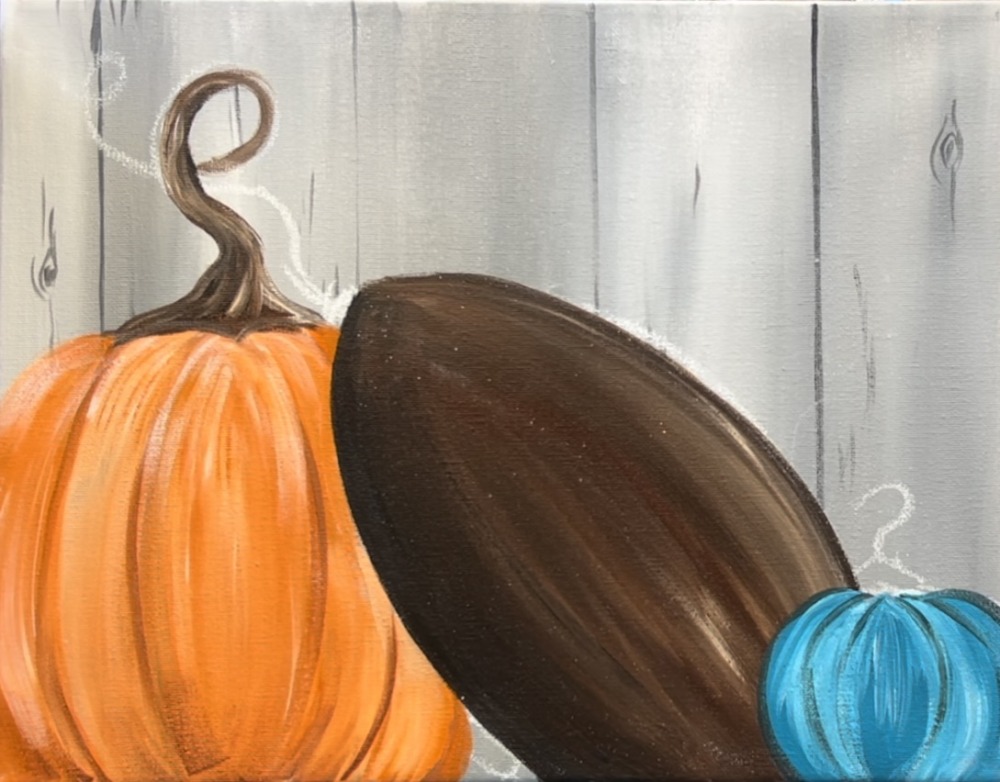
Then paint the stem of this pumpkin by using raw umber and mix a little white in it for highlights.

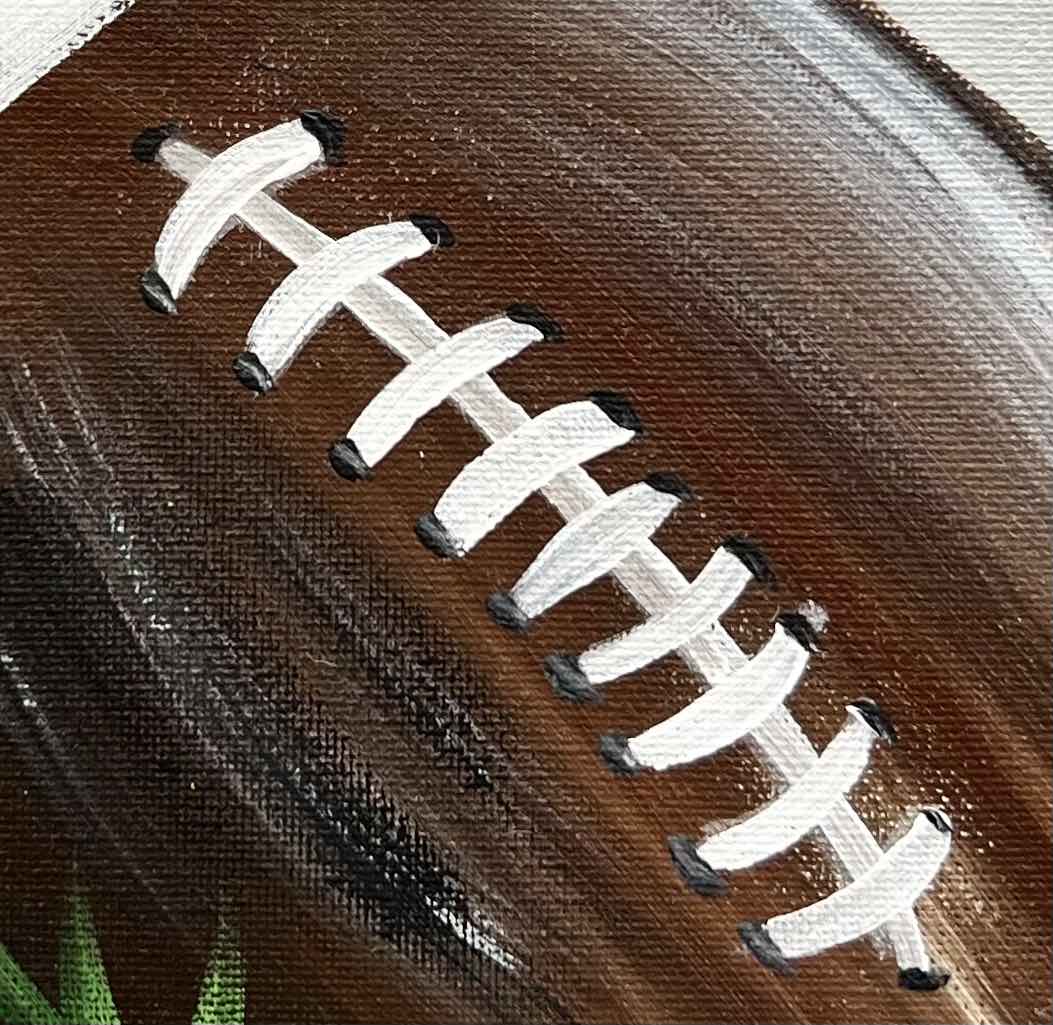
5. Paint Details On Football
Use a piece of chalk to draw the two curved lines on each end of the football.
You can also lightly draw the stitch marks (although, I redid these later with a white paint pen).
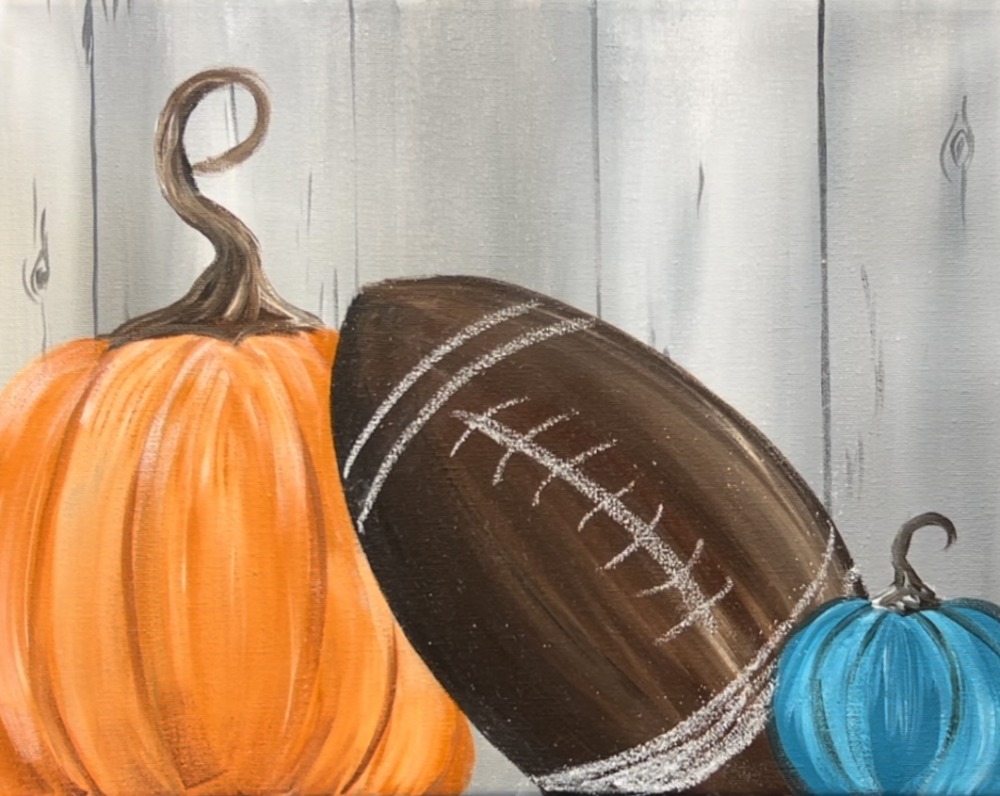
Paint the white lines on the football with a solid coat of titanium white paint. I used a 3/8″ angle brush to paint these lines.
Next, I redid the stitch lines with a white paint pen. Draw a slightly curved line down the middle of the football and then small stitch lines evenly spaced apart down this line.
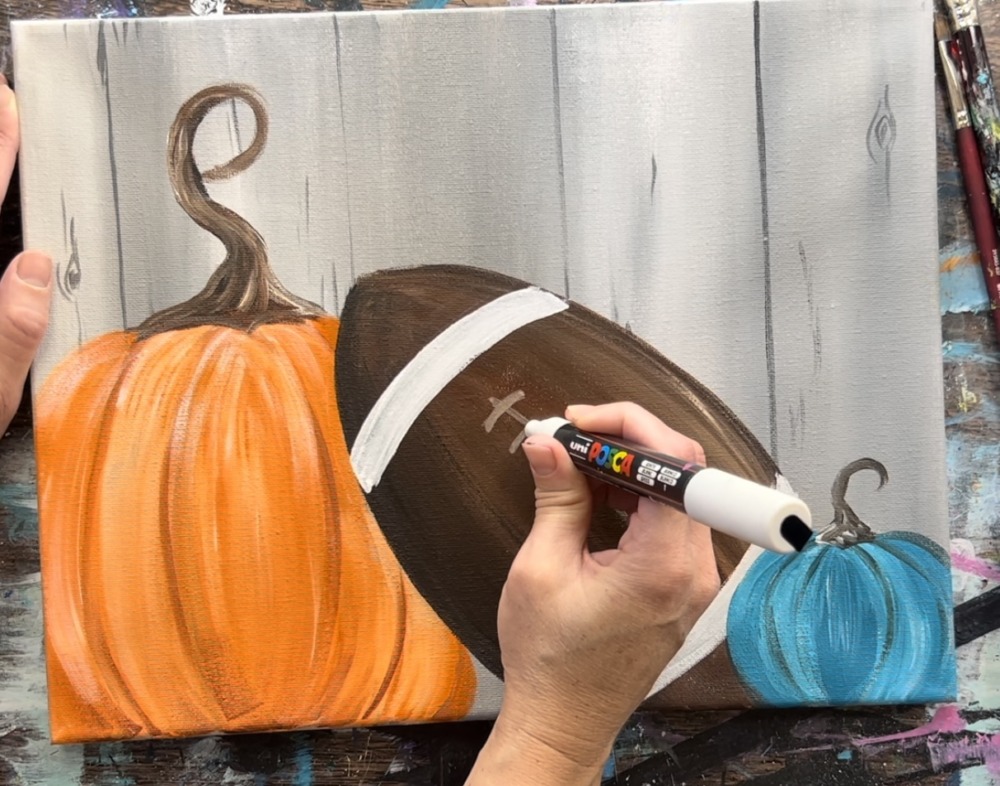
Make sure the lines curve opposite directions on each end of the center line. Tip: the white paint pen will erase with a wet wipe before it dries.

Then, go back over the stitch lines with a #4 round brush and titanium white.
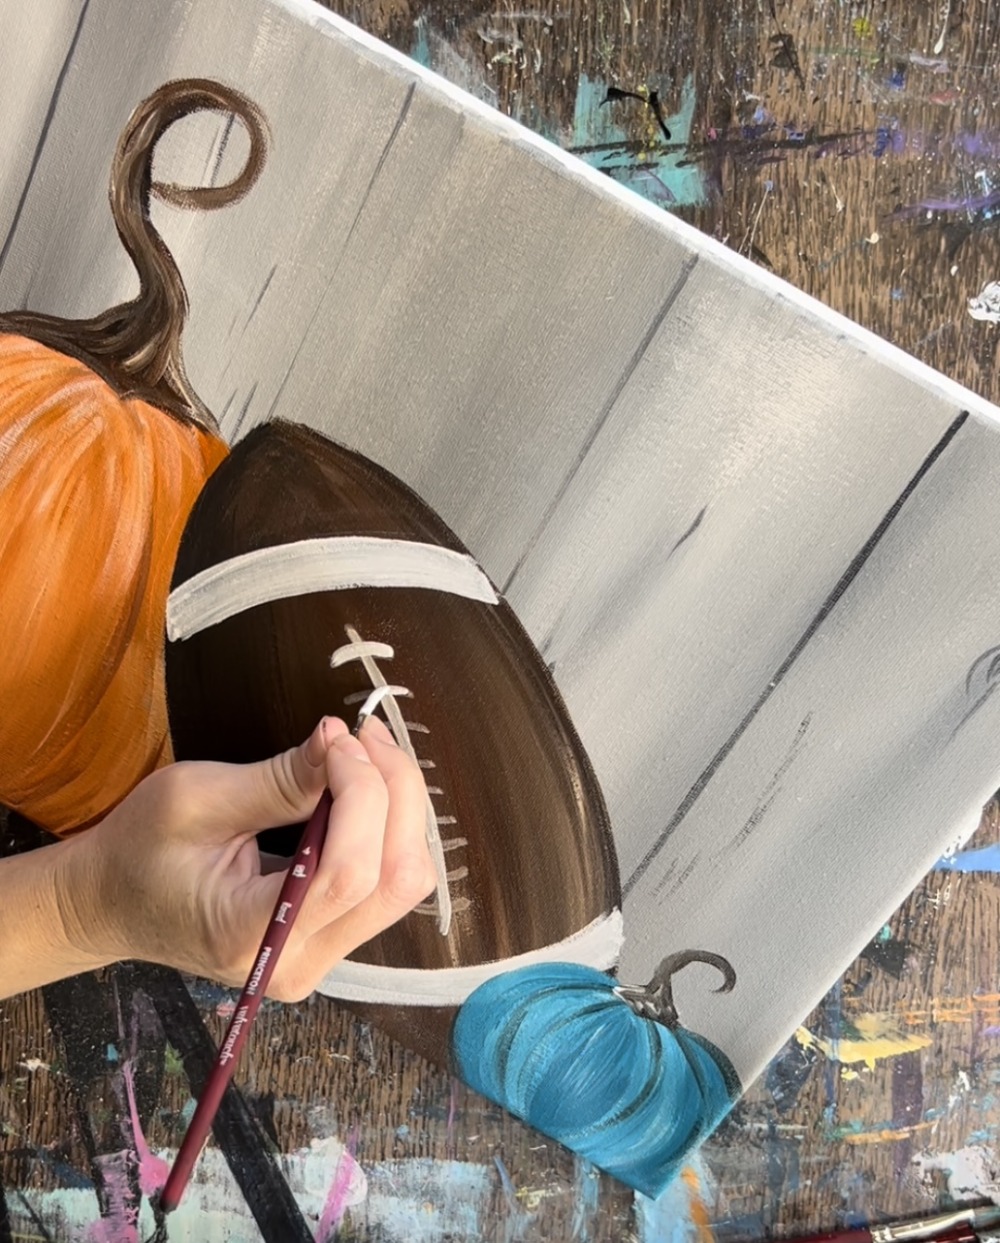
Next, add little black dots (with mars black) on the ends of all of the stitch marks.

6. Paint Pumpkin Leaves & Grass
Load hooker’s green hue permanent onto your palette. Use the #4 round brush to paint the vine that attaches to the pumpkin stem. Paint a little leaf on the smaller turquoise pumpkin.

Paint grass strokes using the #4 round brush and hooker’s green hue. Double load the brush in both white and green and stroke upwards. As you stroke upwards, release the pressure of the brush so the stroke fades out and goes to a point.
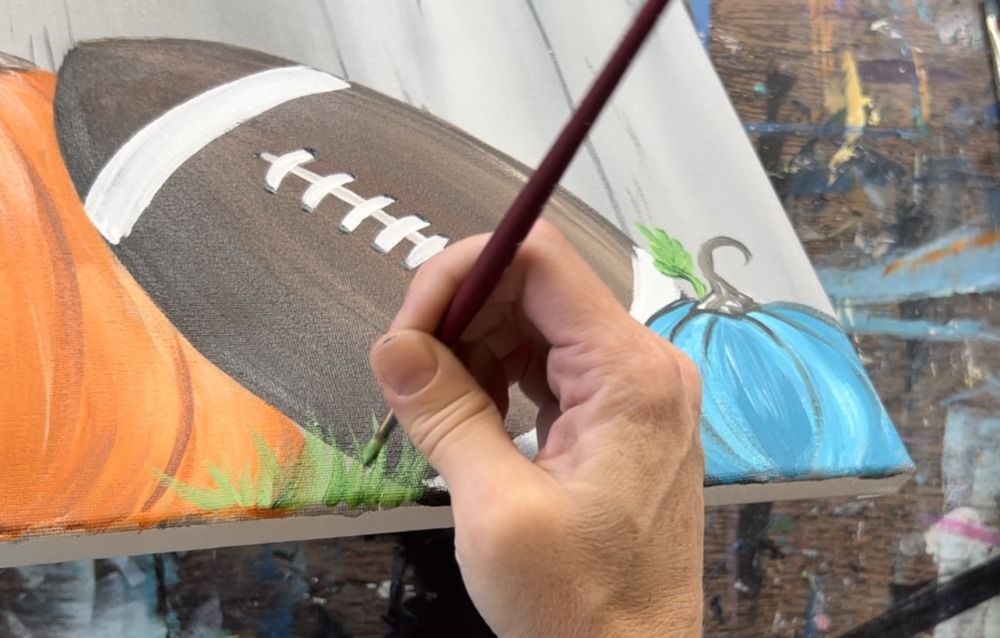
Paint various heights and angles on these grass blades and vary the green and white. I did higher grass blades on the gap area between the football and orange pumpkin.
7. Add Highlight To Football
Use a 12 bright brush and titanium white to create a dry brush highlight stroke on the right side of the football. To do the “dry brush”, load the tip of the brush in a small amount of titanium white and wipe the brush off. Then paint a large curved stroke that contours the right side of the football.

8. Write Wording
I used a white paint pen to write the lettering and then painted over it after I was happy with the size and placement of the letters. You can also sketch your letters out first with a pencil or chalk.
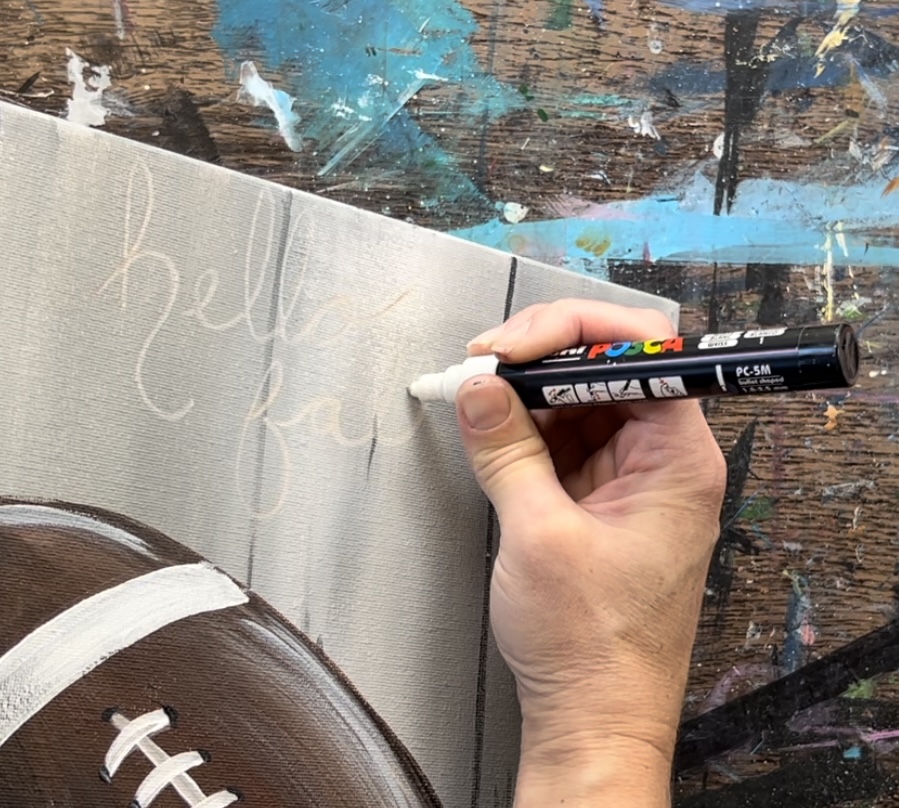
I used titanium white and a #4 round brush to paint my letters.
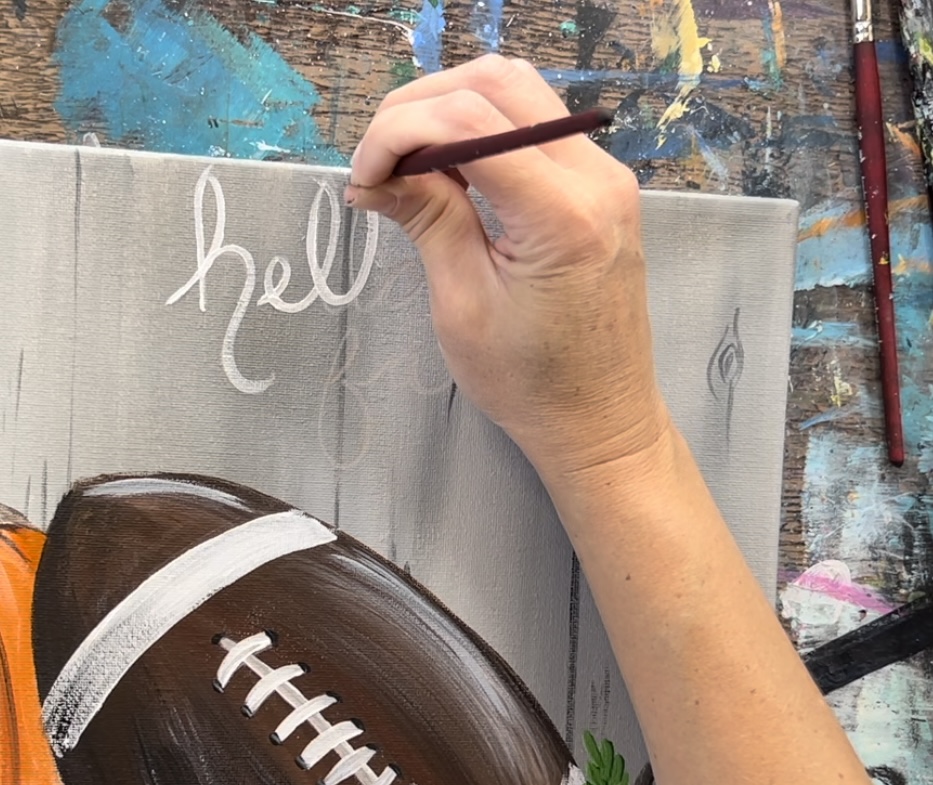
You are welcome to change the lettering and the color of the letters.

9. Paint Falling Leaves
Use a #4 round brush and cadmium orange hue to paint little falling leaves. I did a few different shapes such as a rounded/ pointed leaf and an oak style leaf.

Use titanium white to highlight the leaves a little bit.

Then use mars black (or brown) to paint the stems and veins on the leaves.
Finished
I LOVE this painting!! Is there a template for this particular one?
Thanks so much! Your directions were so clear and detailed and while I am never completely satisfied with my paintings, I do like the way mine turned out. Lots of things I could have done better, but not bad for this beginner!