
“How To Paint A Vintage Pumpkin Truck”
Would you like to save this?
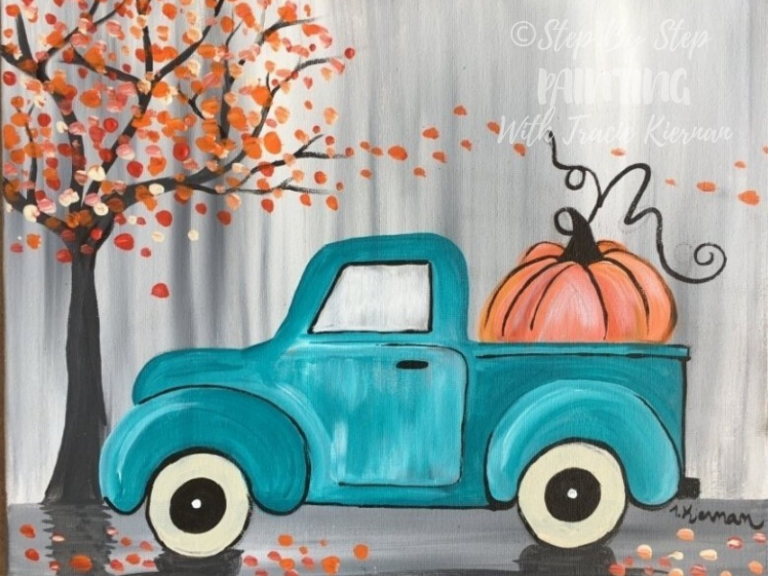
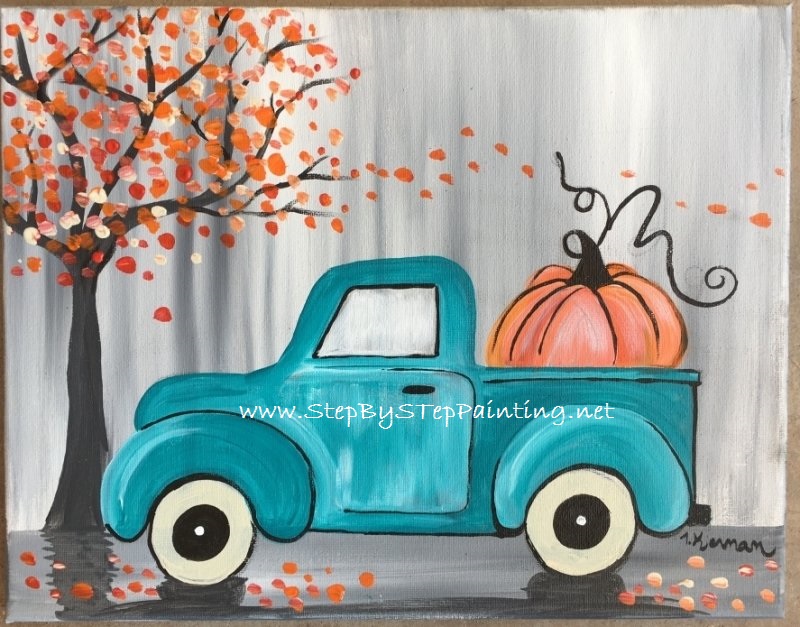
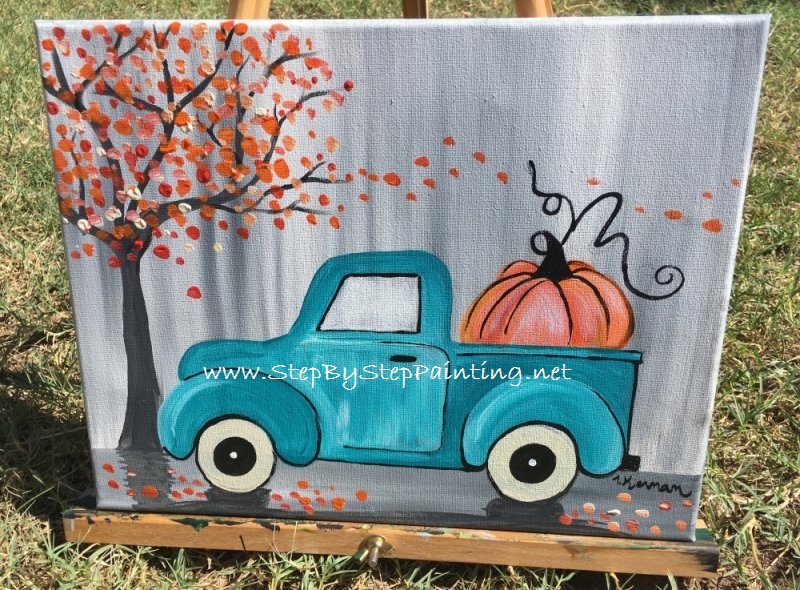
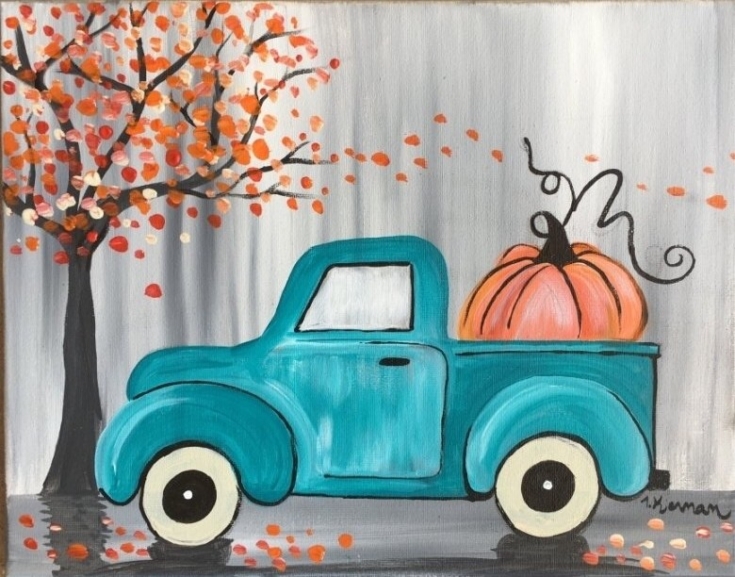
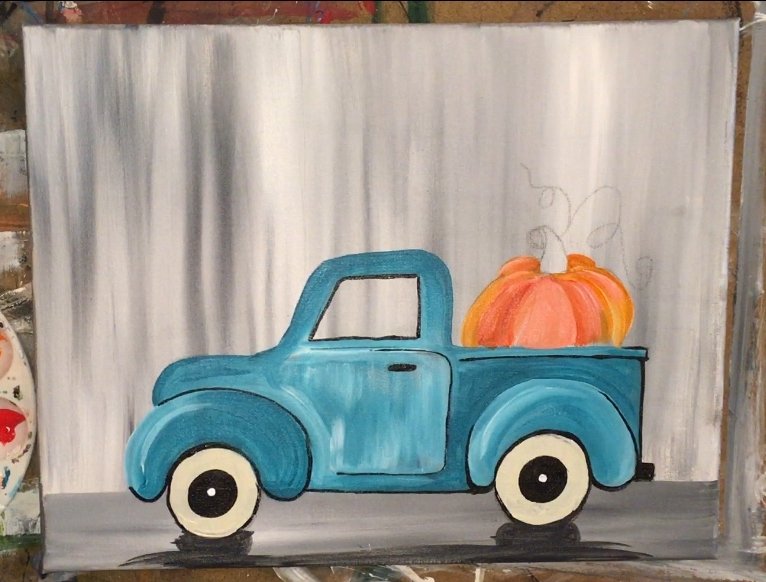
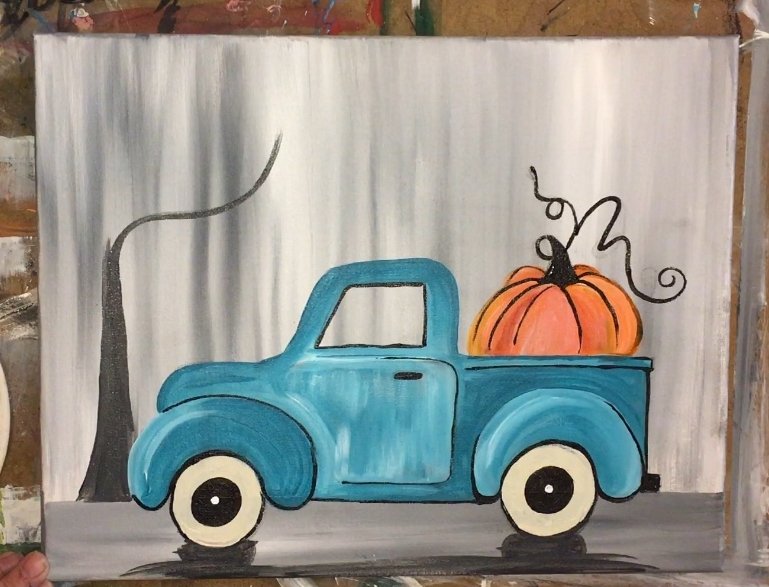
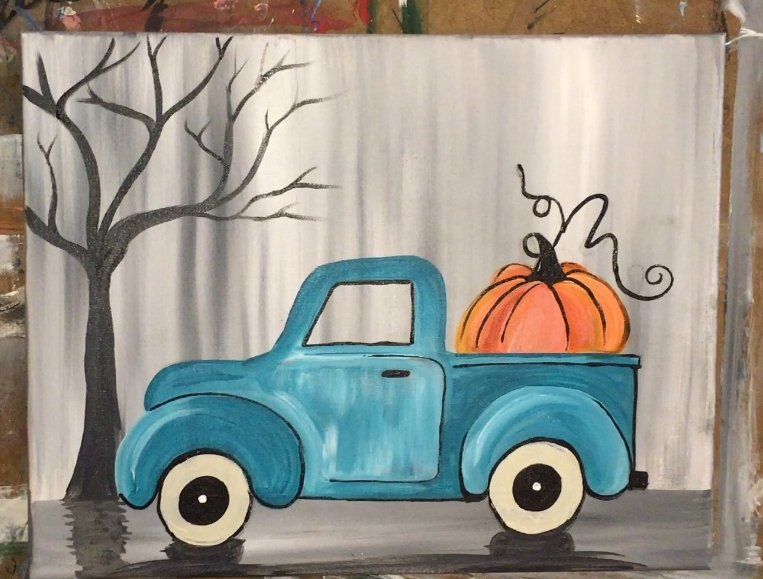
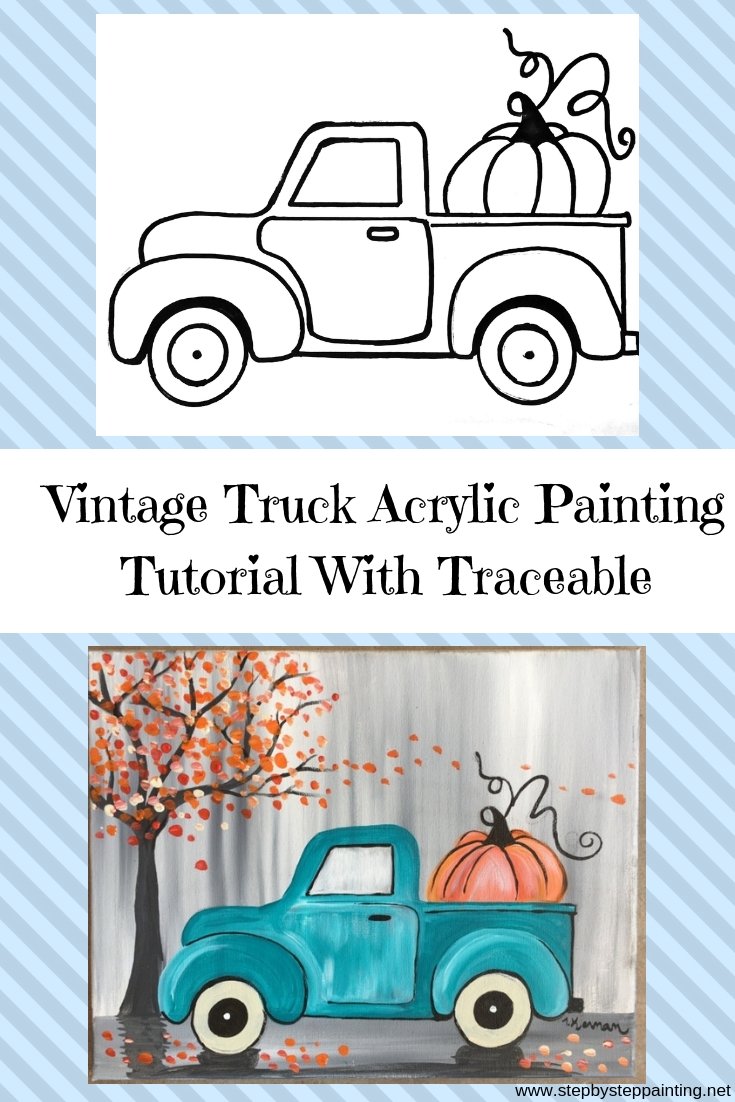
Learn how to paint this absolutely adorable teal vintage truck with a pumpkin in the back! This is probably one of my most popular painting tutorials because it is eye catching and simple! Beginners can learn how to do this with acrylic paints on an 11″ x 14″ stretched canvas (or any size canvas!).
This is the first truck in my five part truck series and, in my opinion, the easiest one! If you’ve been wanting to do this truck, I highly recommend you start with this pumpkin one!
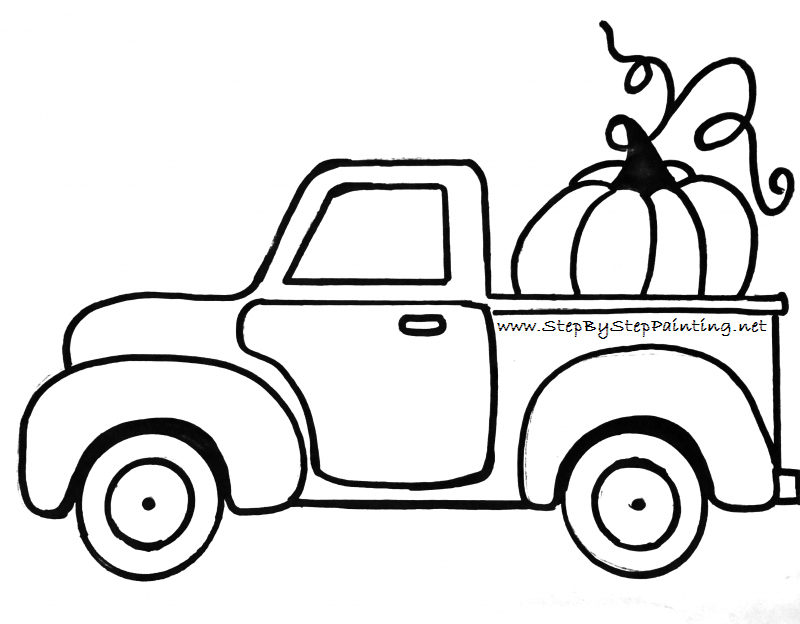
This painting is super easy and you don’t have the draw the truck! I have drawn that for you on a traceable.
I also have an E-Book version of this tutorial! This is a beautifully formatted, PDF File that you can easily print or view on any device. Great for DIY Paint Parties and personal learning.
Enjoy and happy painting!
Materials
How To Paint A Vintage Pumpkin Truck
Paint a teal vintage truck step by step!
Materials
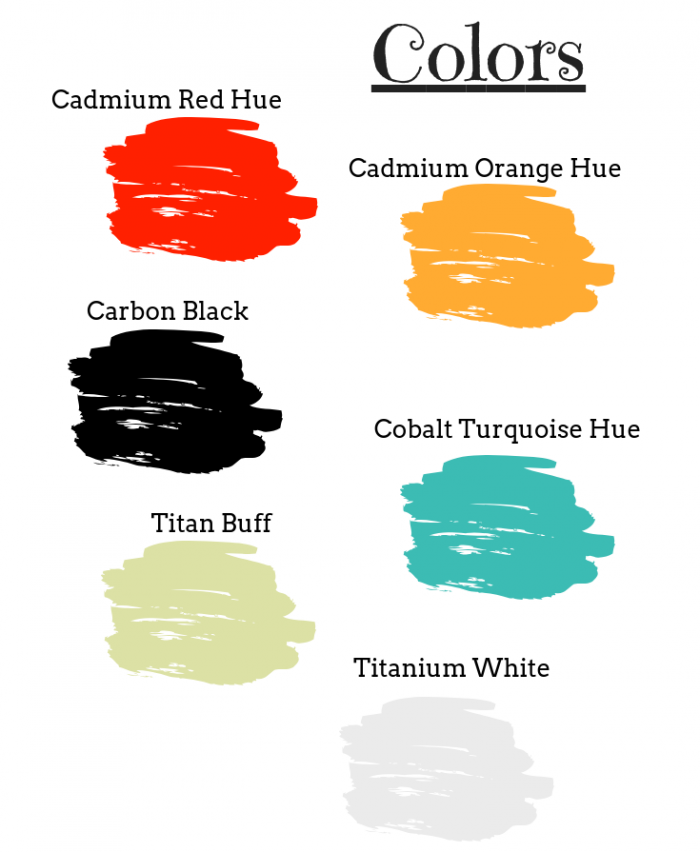
Colors
- Cad Red Hue
- Cad Orange Hue
- Carbon Black
- Cobalt Turquoise Hue (Phthalo Turquoise)
- Titan Buff (unbleached titanium)
- Titanium White
Brushes
Color Palette
Note: when I originally did this painting, I used a paint called “DecoArt Americana” from paint tubes. Since those paints are hard to find (I think they discontinued that line of paint), I am providing the “Liquitex BASICS” color equivalent.
If you are using Liquitex BASICS paints, I would recommend: “Cadmium Red Medium Hue”, “Cadmium Orange Hue”, “Mars Black”, “Turquoise Blue”, “Unbleached Titanium” and “Titanium White”.
Traceable:
If you are painting on 11″ x 14″ canvas, print on standard 8.5″ x 11″ computer paper! Set your print to “Landscape” so the design takes up most of the paper. You can also download my free 11 x 14 PDF template.
Directions At A Glance: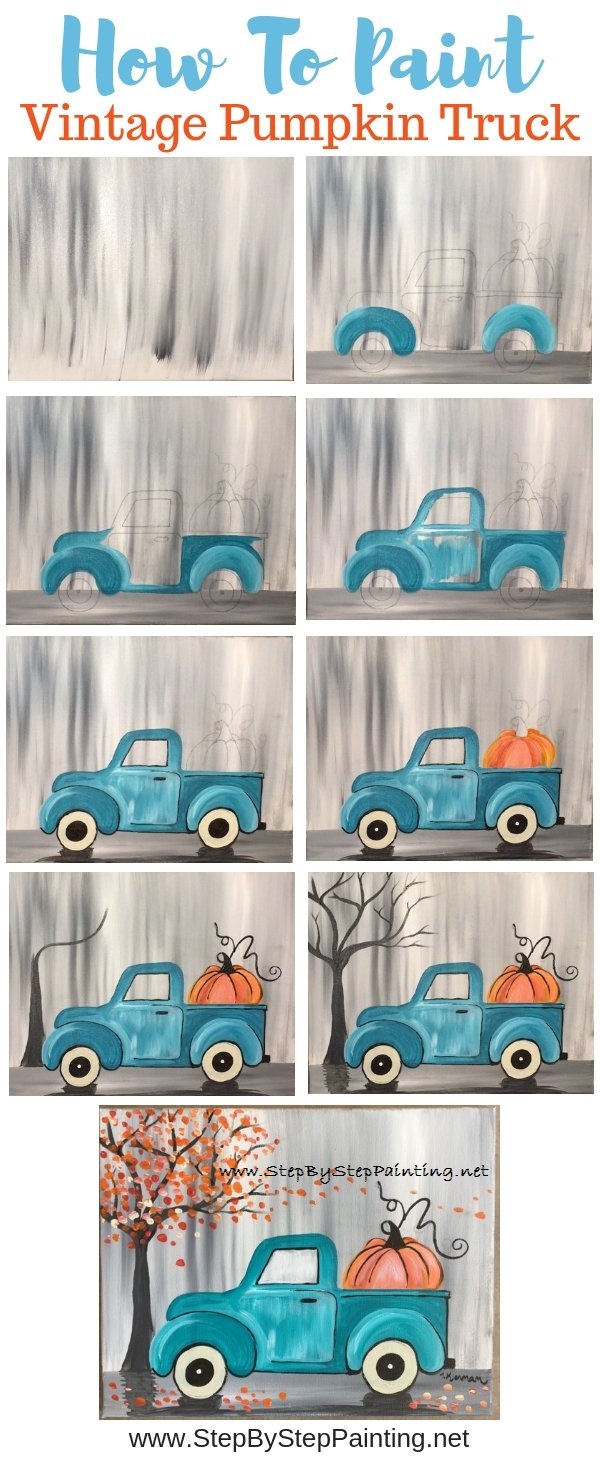

Video:
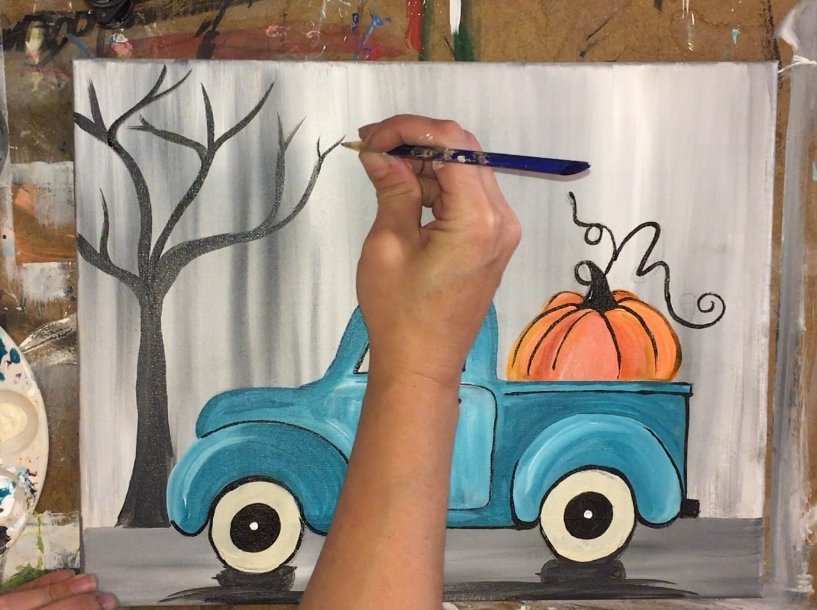
Step By Step Pictures
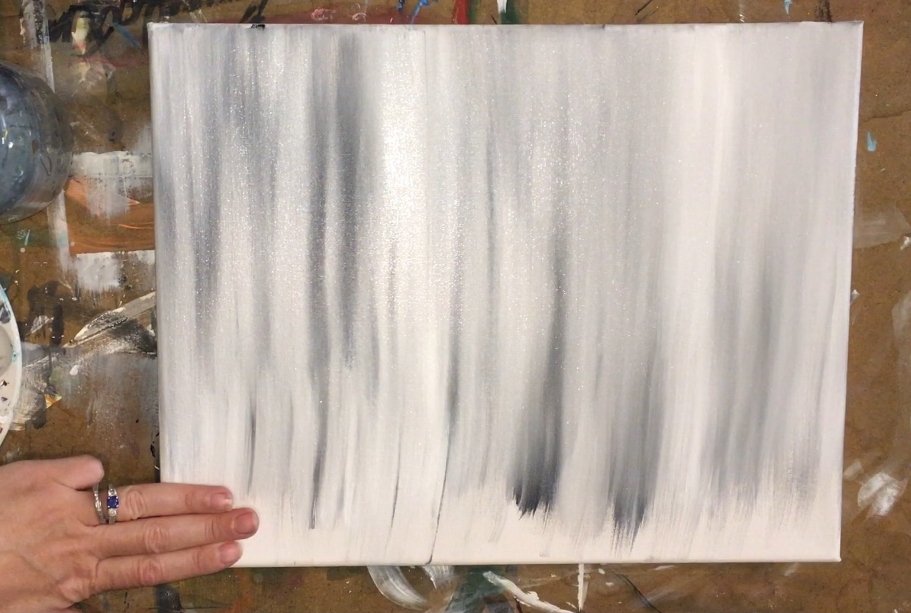
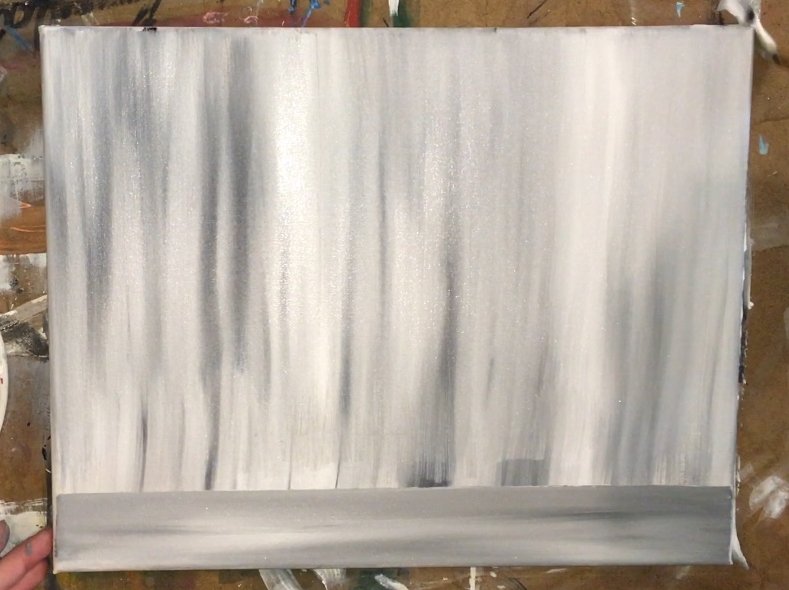
1. Paint the gray background with a 3/4″ Flat, Titanium White and Carbon Black (Mars Black)
First dip your brush in your water and pat dry. Then dip your brush in titanium white. Dip the corner of the brush in black.

Paint up and down, vertical strokes on your canvas. The colors will blend beautifully to form a gray washed background. Try not to over work the paint, it should look “unmixed” and “smooth” but not solid gray.

Continue to fill the canvas with this technique. Re-dip your brush in different amounts of white and black but be careful not to use too much black.
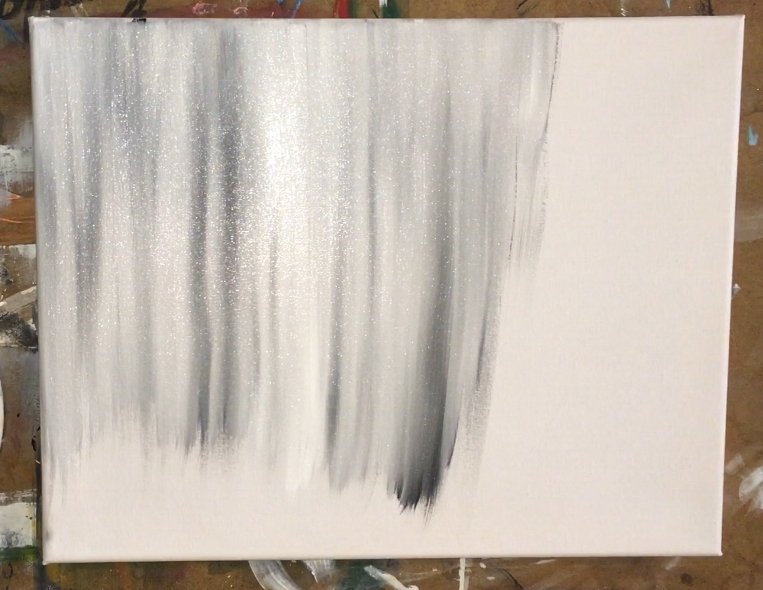
You can occasionally dip your brush in water to help with the flow if the paint feels dry.
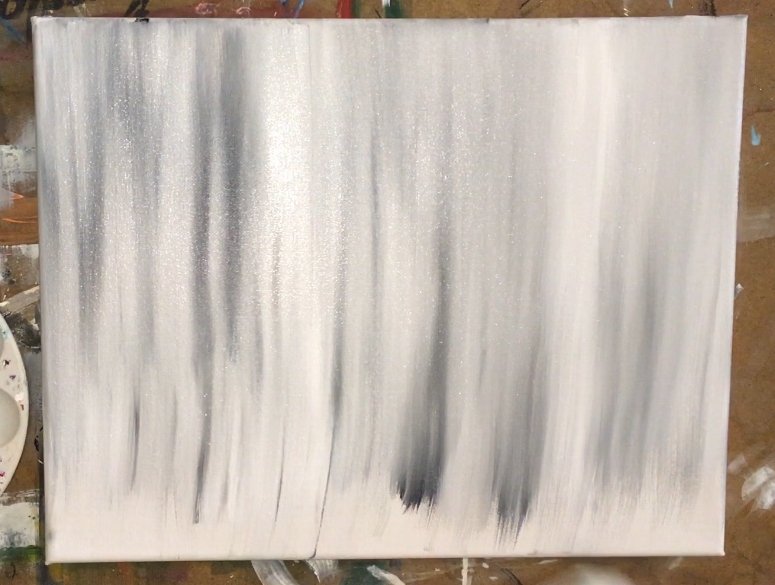
Leave about 3 fingers of space on the bottom.
Use your T-Square ruler to block out the area while you paint horizontal strokes using the same technique. The key is to get a nice crisp horizon line with your ruler.
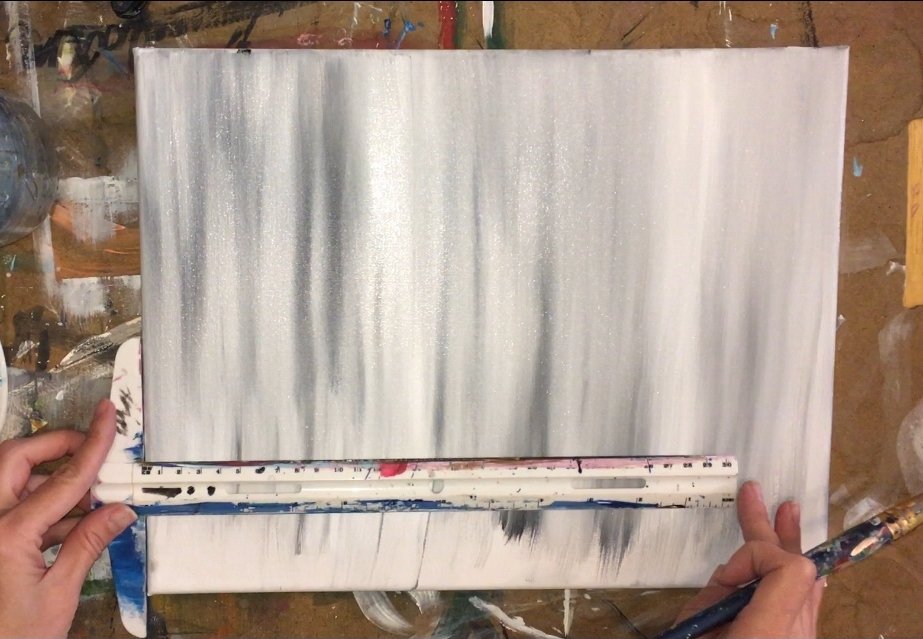
My horizontal strokes had slightly more black to make this bottom area look slightly darker. Use a ruler to make the line nice an crisp.
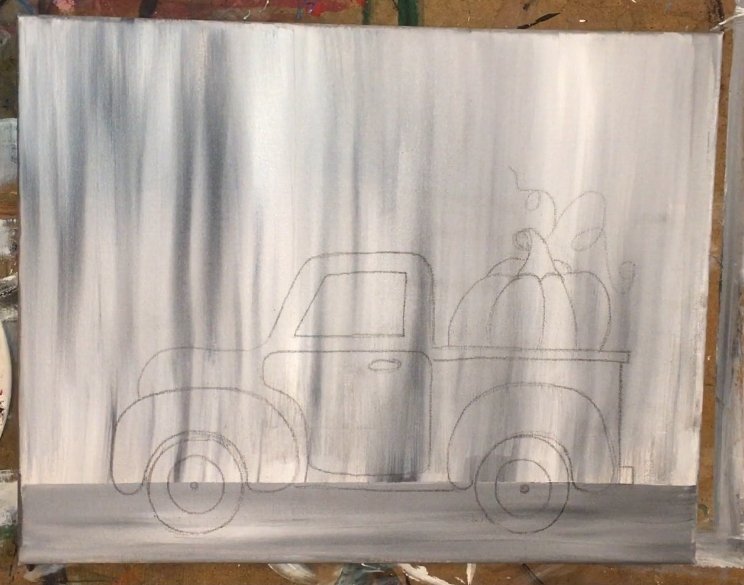
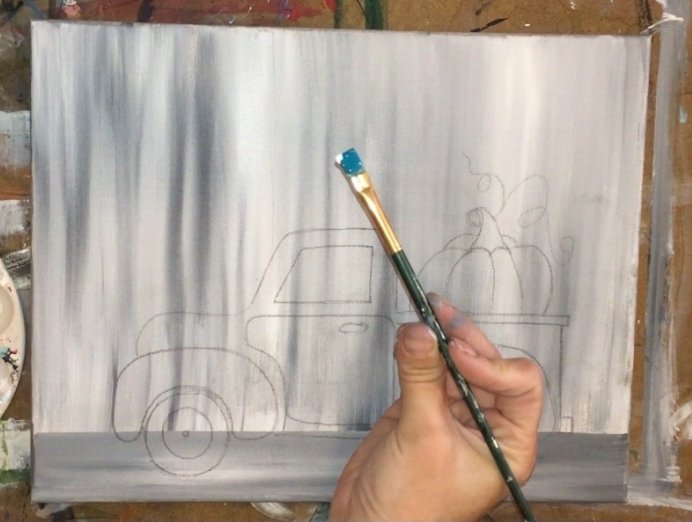
2. Transfer the truck to your canvas using graphite transfer paper.
Print out the truck on a standard computer paper 8.5″ x 11″.
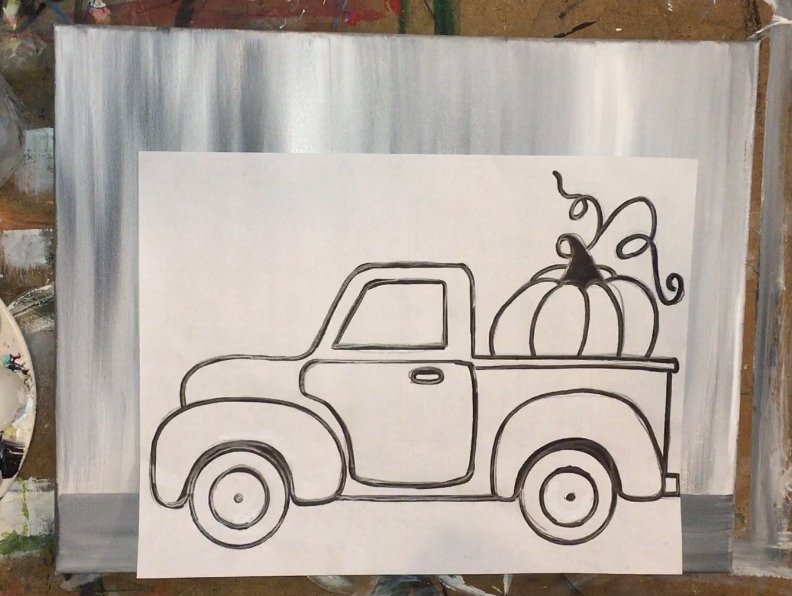
Position the truck so it is in the center bottom of the canvas. See picture for how I placed my truck. Use graphite paper. Place it between the canvas and the printable with the dark side facing down. I recommend you use a thick drawing pencil if possible and press very firmly so it will show up dark enough.
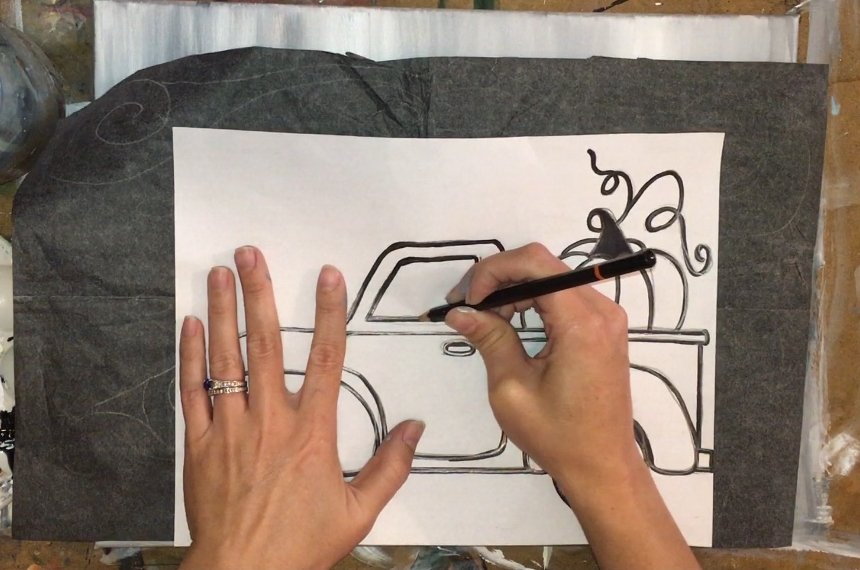
Use transfer paper to draw the truck onto the canvas.You may want to go over the drawing again with pencil to make it darker, or even chalk.
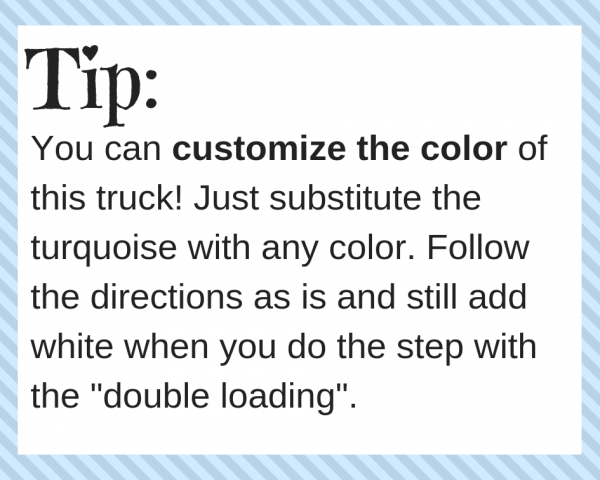
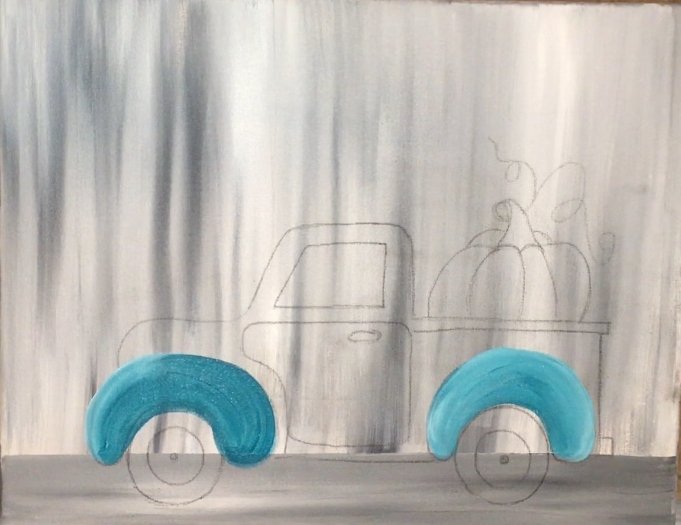
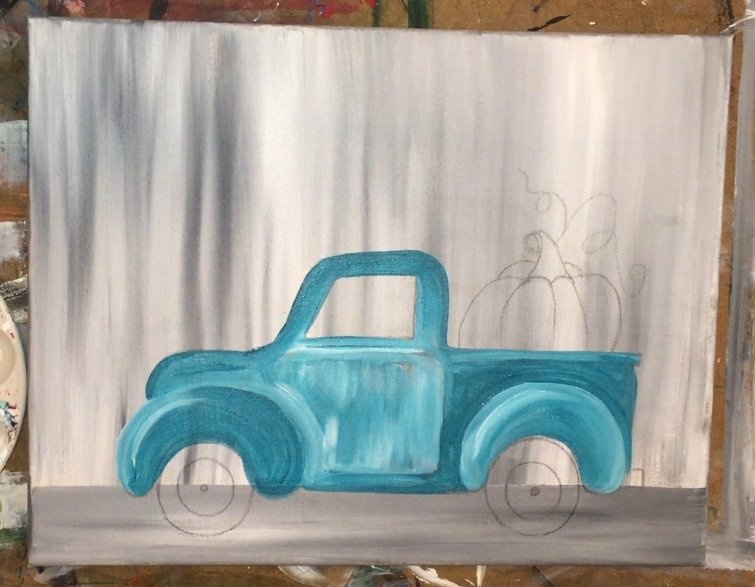
3. Paint the truck using a 1/4″ Flat Brush and Cobalt Turquoise (turquoise blue) + Titanium White.
The trick with this truck is letting turquoise and white mix and blend right on the canvas. Dip your 1/4″ flat brush in cobalt turquoise. Dip the corner in white.
I painted the fenders first.
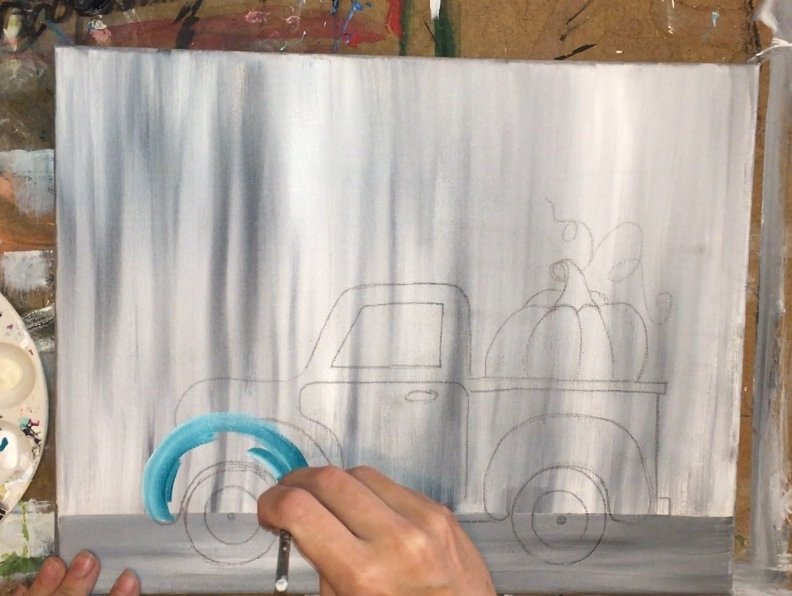
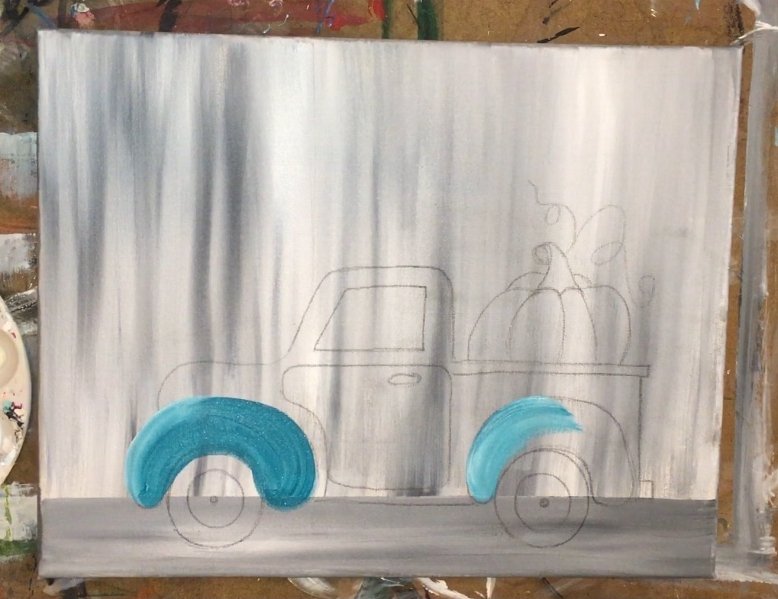
Paint both of those fender “kidney bean” shapes. Allow the turquoise and white to blend together to make an unmixed, color varied technique.
Continue on to the body of the truck.

I purposely made this area of the truck bed darker so it would stand out against the fender. Less white and more turquoise to make the color look darker.

Your strokes should follow the shape of the truck, contouring with the curves.
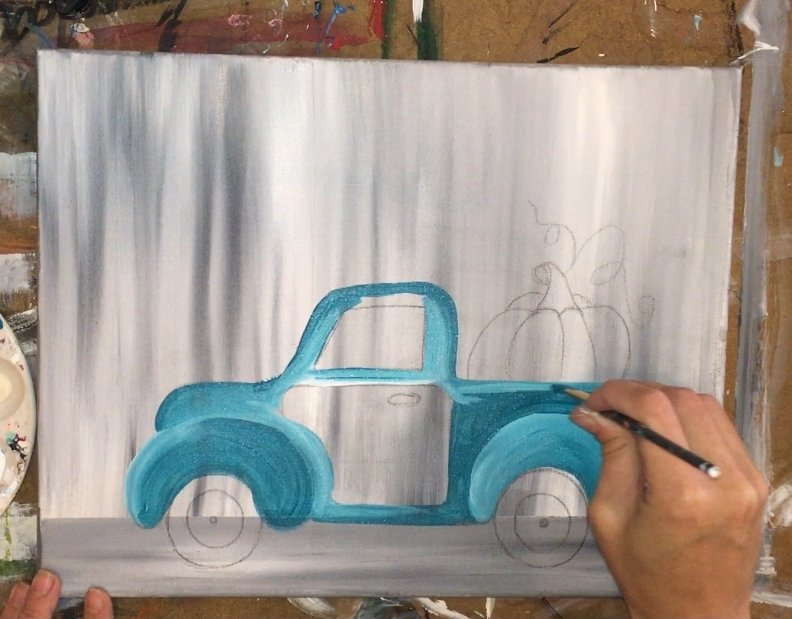
The door specifically went up and down with slightly more white than the other areas of the truck.
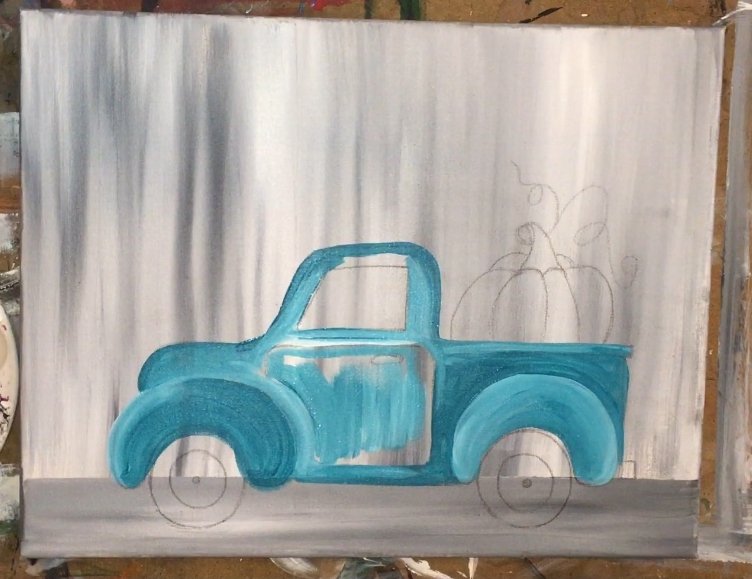
Then I added a little bit more white on the fenders and filled in any left over blank areas on the truck.
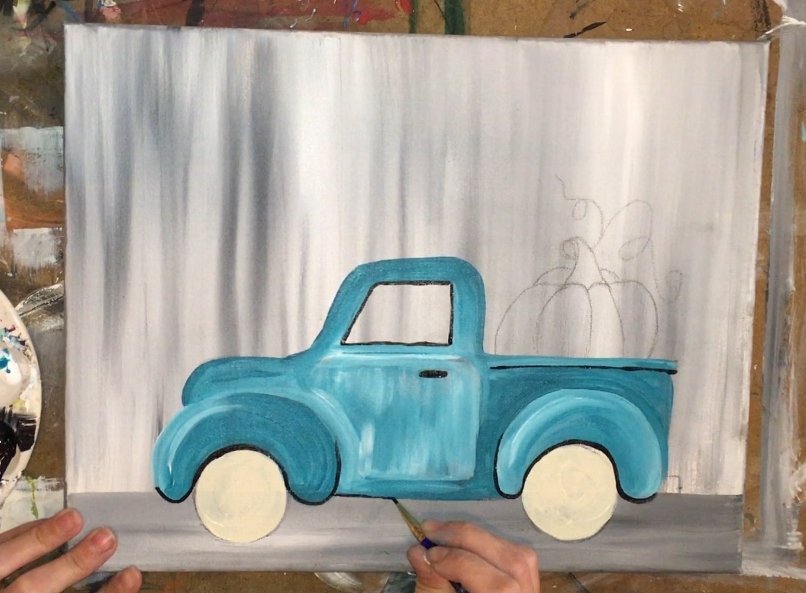
4. Paint The Tires using Titan Buff (unbleached titanium) and the 1/4″ Flat.
I started with my 1/4″ flat brush for this. Use titan buff to paint both wheels a solid coat.
 Paint the tires titan bluff.
—>You will need to wait for that titan buff to dry before adding the black circle in the middle.
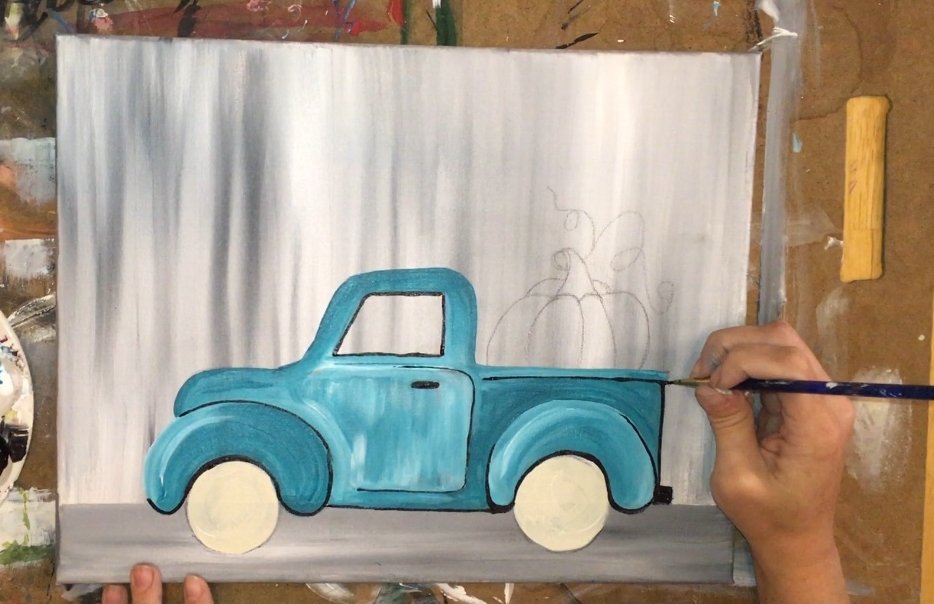
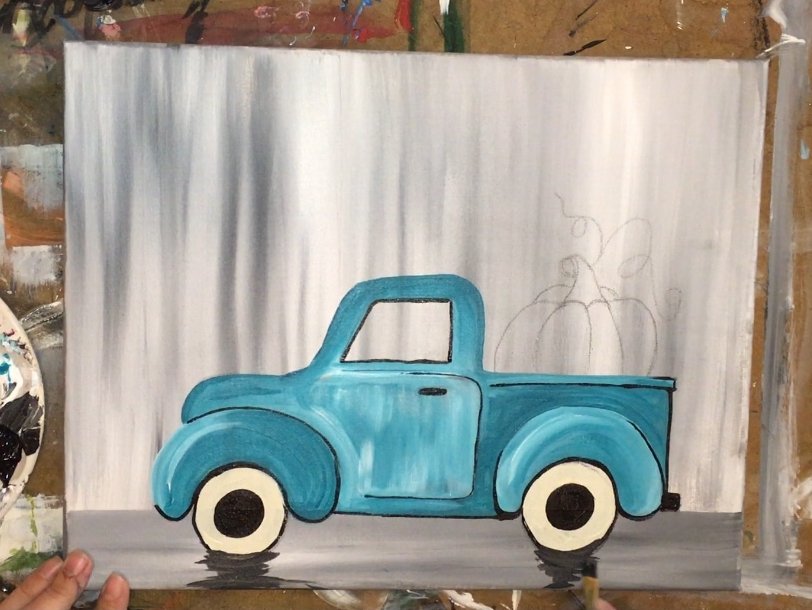
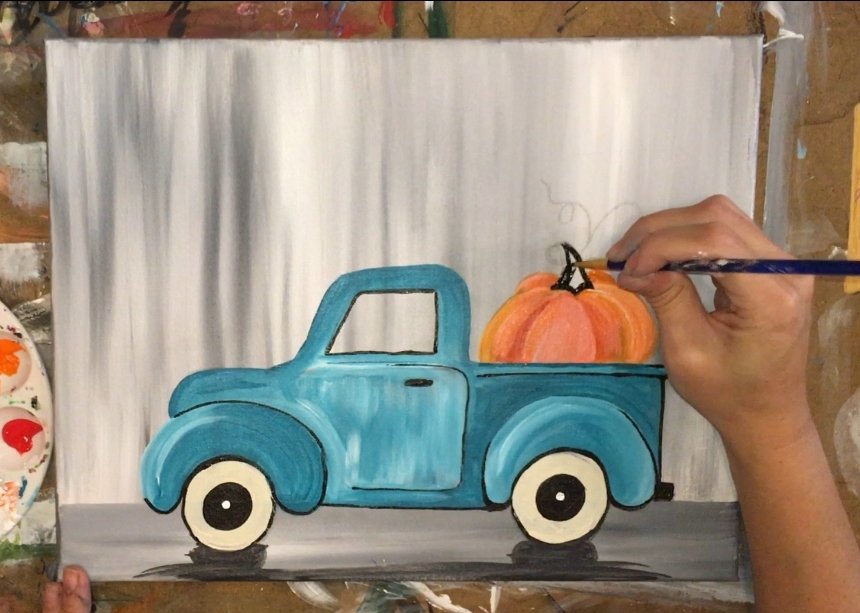
5. Outline some areas of the truck with a tiny detailed brush (5/0).
To make this truck kind of “pop”, I outlined some of the areas with carbon black and a very small round brush. You will need a VERY tiny brush for this step, the smallest one you have! Outline the inside of the window, the door handle, and under the fenders…

Then outline the bottom of the truck between the wheels and on the top area of the truck bed.
Next, outline parts of the door (the right side) and the back exhaust.
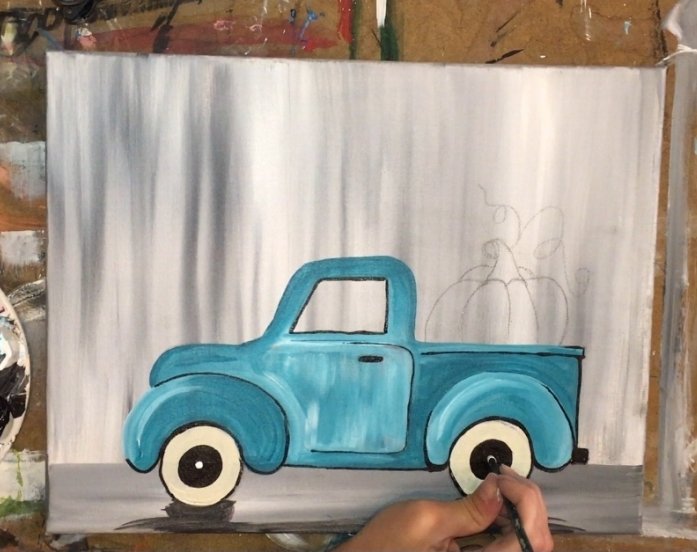
6. Finish the tires.
The titan buff should be dry by now. Use your 1/4″ flat brush to paint a black circle inside of the titan buff circle.
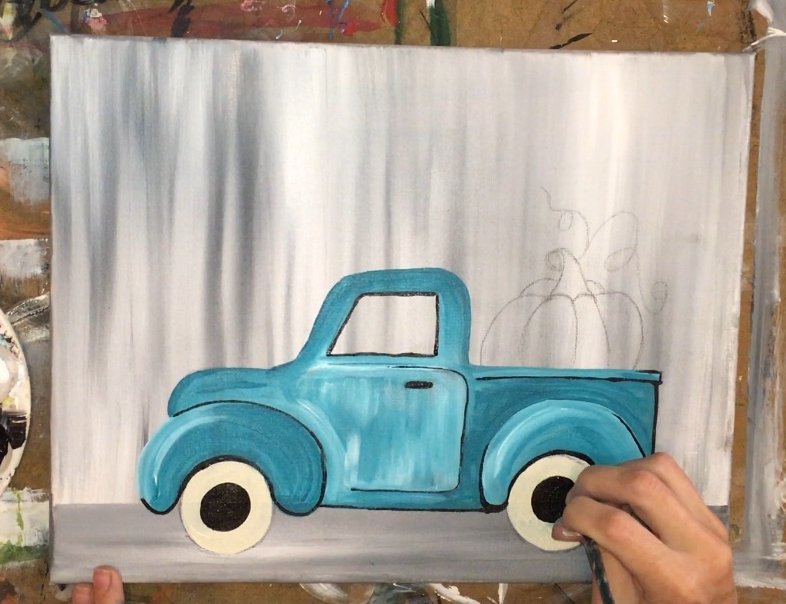
Next outline the outside of the tires with carbon black and your tiny detail brush.
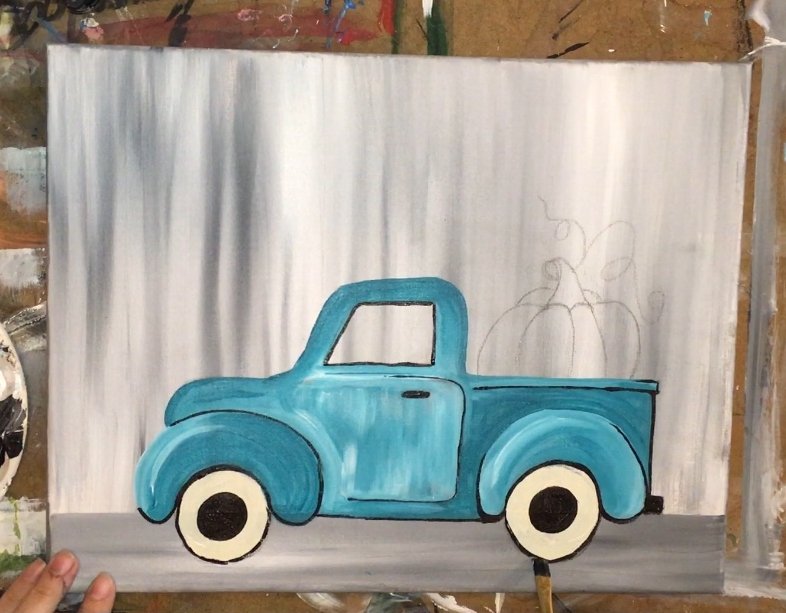
7. Add shadow under the truck.
I used a 1/4″ flat brush for this. Mix a dark gray by mixing black and white on your palette (about equal parts or until you get a good dark gray color). Water the paint down slightly. Use your 1/4″ flat brush to sort of zig-zag a shadow right under the tires. Form an almost circular shape.
Then paint a horizontal shadow area right on the bottom of the canvas.
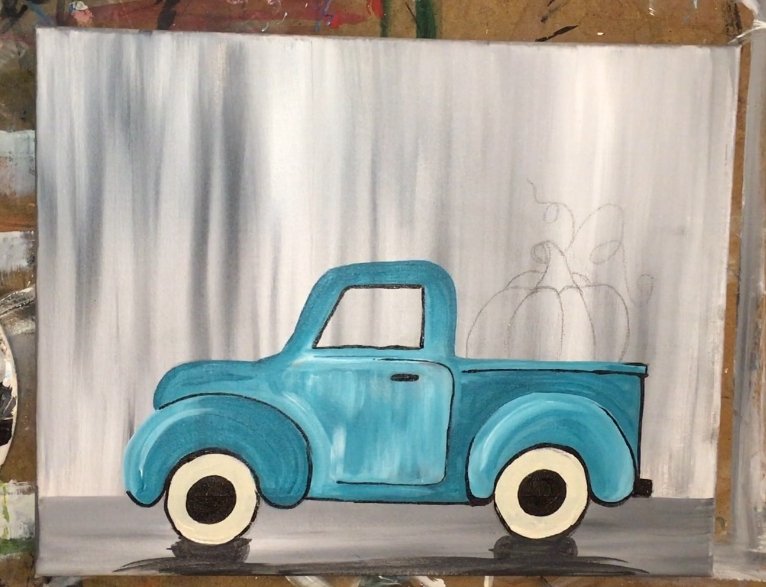
Then use the back of any of your brushes to stamp a titanium white dot in the middle of each of the tires.
8. Paint the pumpkin with cadmium orange hue, cadmium red medium hue and titanium white. Use your 1/4″ flat for this as well.
Dip your 1/4″ flat in white and cadmium orange hue.

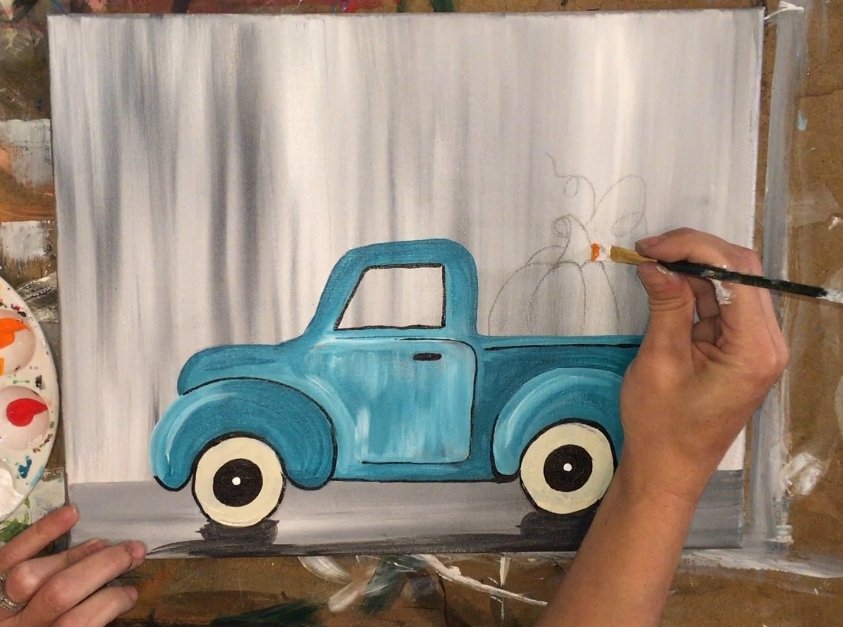
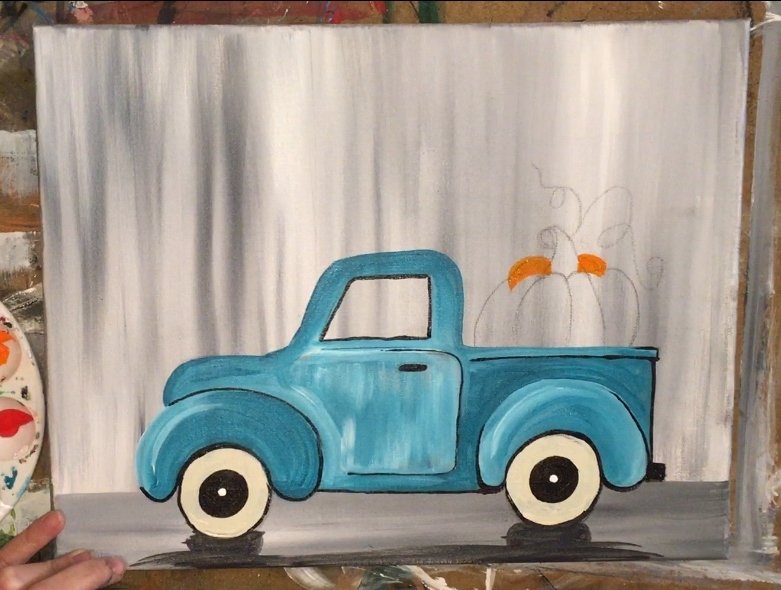
Next paint each of the bumps from the outward and working your way in the middle.
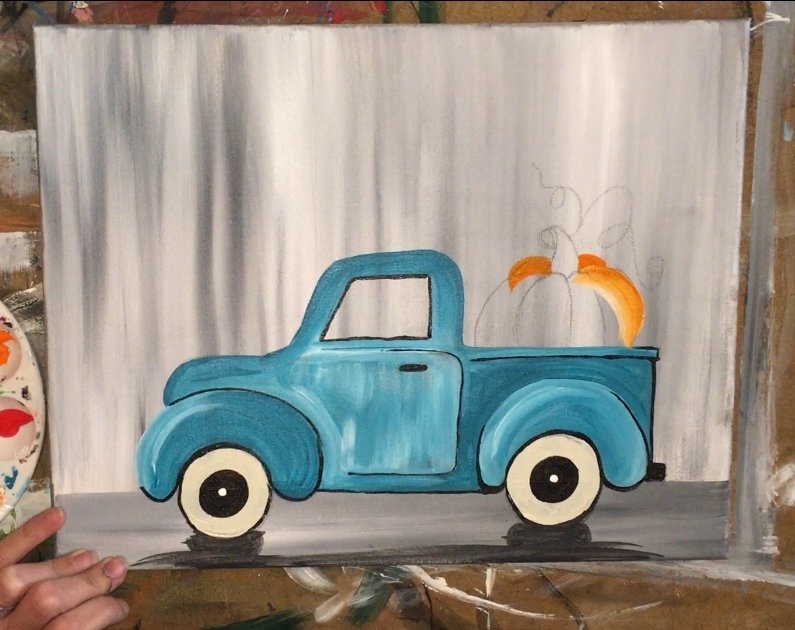
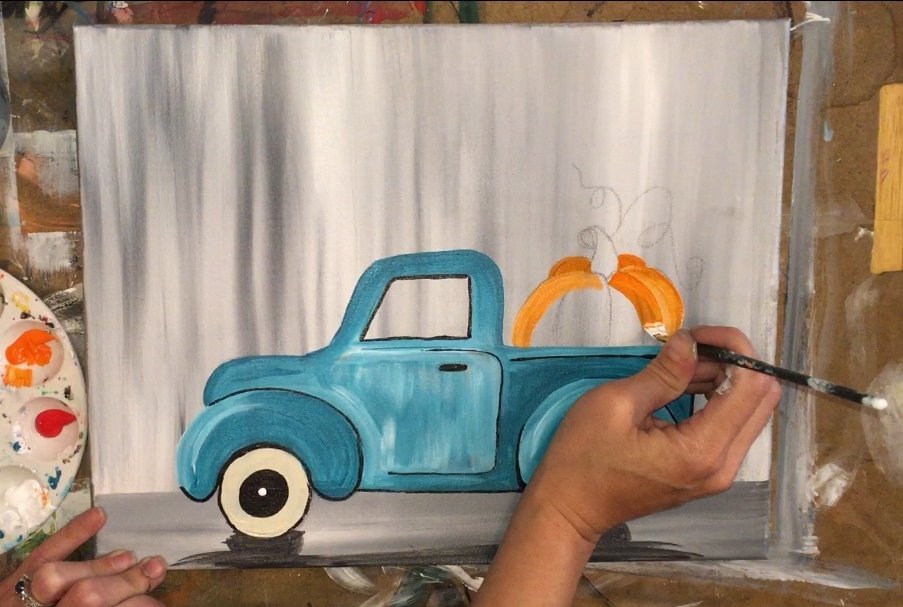
Each time you load the brush, dip it in different combinations of the red, orange and white. This will allow each of the pumpkin bumps to have a slightly different color and stand out.
Also, when painting these pumpkin bumps, start at the top where the stem is and stroke down to form the shape.
 If you overlap the truck bed, it’s no problem! You can always go back over that part with turquoise after the pumpkin dries.
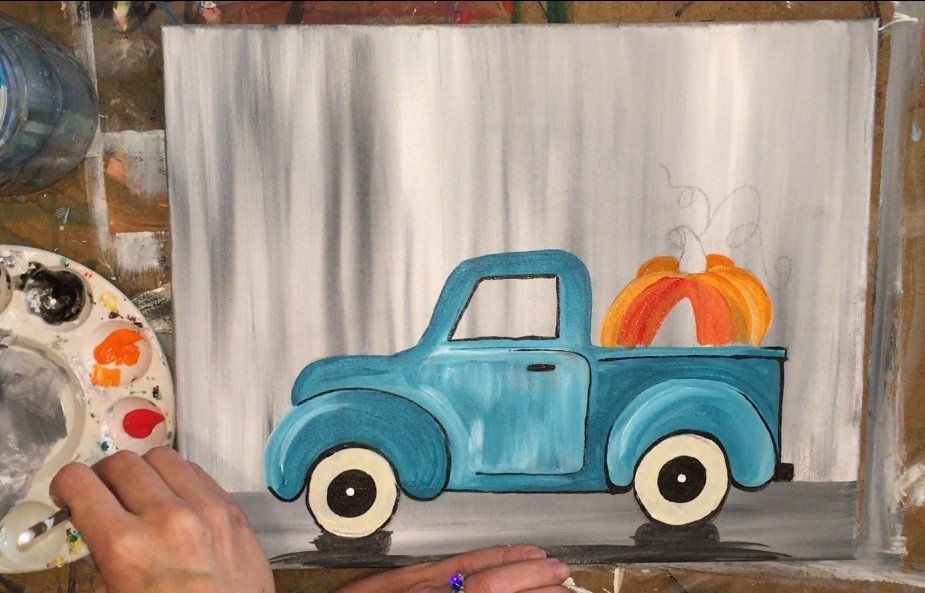
9. Paint the black stem, the vine and the lines on the pumpkin using that tiny detail brush.
Next I used that tiny brush that I used to outline the details on the truck. I painted the stem in carbon black. Then I painted the vine.
I also painted the lines on the pumpkin pretty much how they show up on the traceable.
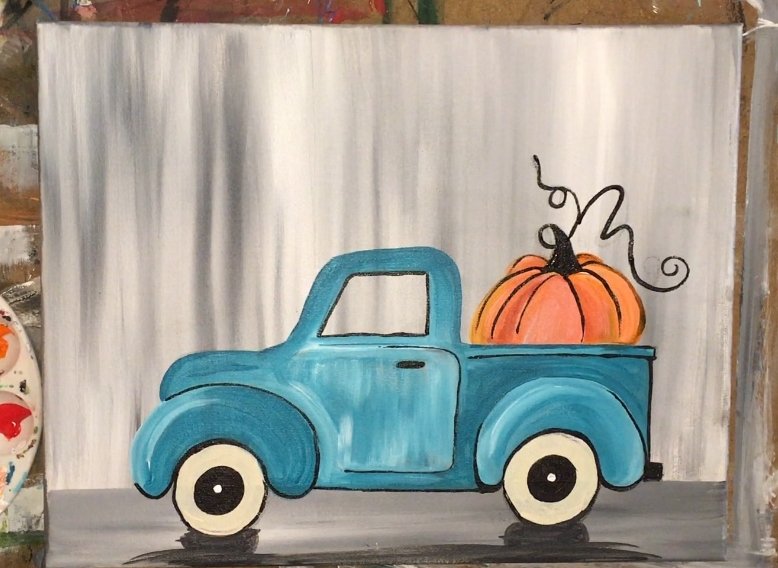
I did not make the lines go all the way down to the truck bed, just “almost all the way down”. You can go all the way down if you’d like!
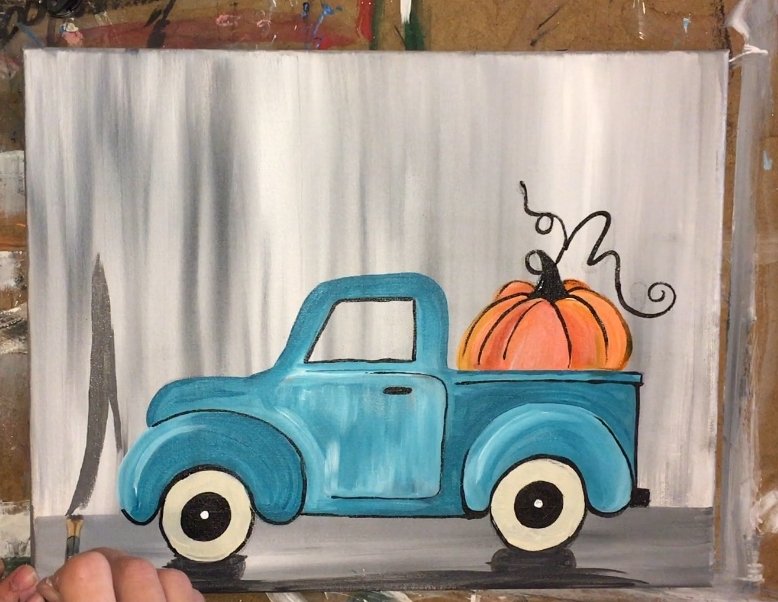
10. Paint the tree.
On your palette, mix a very dark gray. This is pretty much the same shade as the shadow. I mixed about equal parts white and black for this. Use your 1/4″ flat brush to paint the trunk of the tree. A tree trunk starts out thick on the bottom and gets thinner at the top.
Turn your brush on its side to form thinner branches.
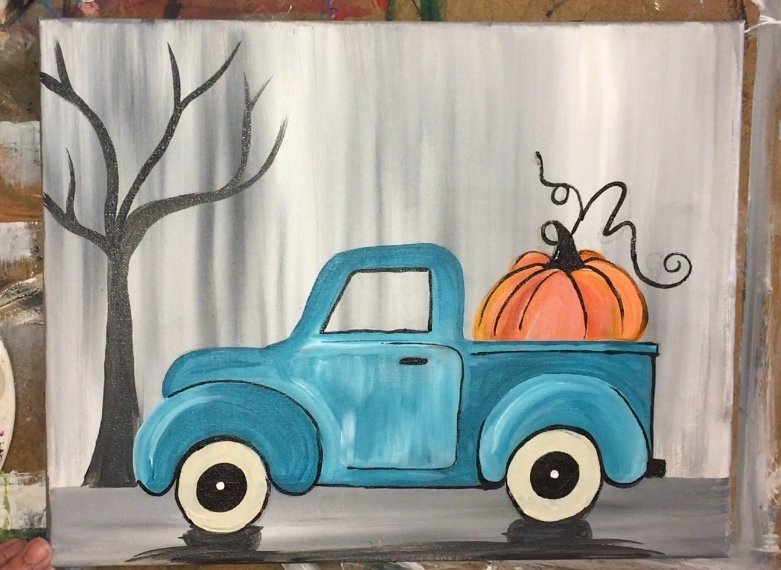
The branches form the letter “Y” as the stem off.
Switch to that tiny detail brush to form smaller stems.
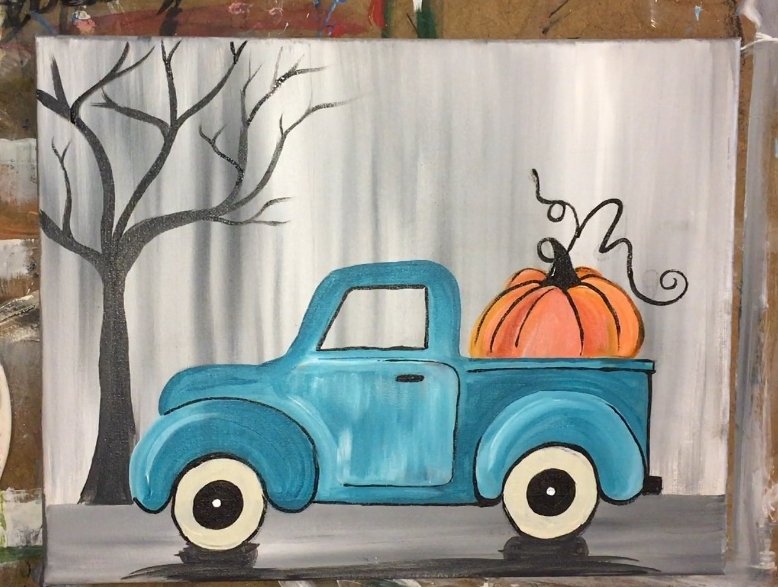
11. Paint the tree shadow.
Use that same dark gray you used for the trunk of the tree. Water it down slightly. Then use your 1/4″ flat brush to paint the shadow.
Paint in left and right zig-zag strokes to form a vertical rectangle directly under that tree trunk.
12. Paint the leaves on the tree.
Use cadmium red hue, cadmium orange hue and titan buff. Also use a #8 round brush.
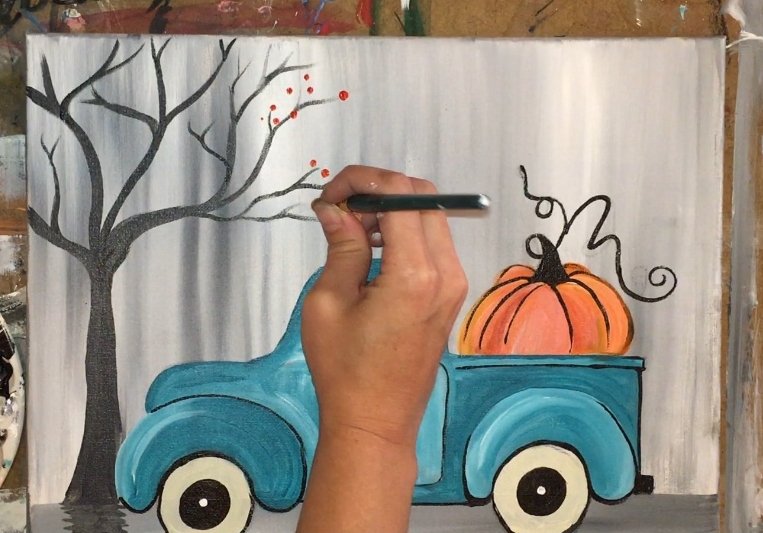
Dot each of the leaves using the tip of that round brush. Dip your brush in all the colors.
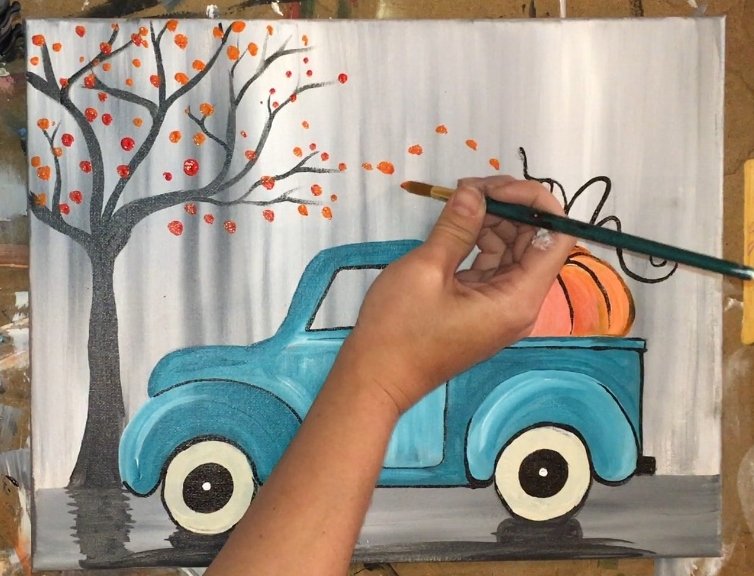
You don’t need to rinse in between colors but try to make sure the leaves all look different and not all the same color. Also, the leaves don’t have to touch the branches.
You can paint some leaves blowing away to the right. Also, you can paint leaves on the ground.
 These pops of orange and red really look nice against that gray!
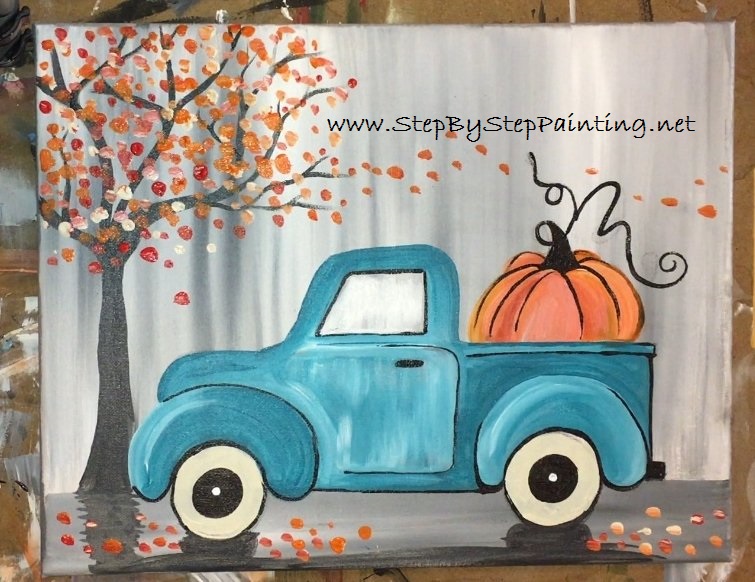
13. Paint the window white.
I used that 1/4″ flat and painted up and down strokes. I did not make his area 100% solid white, some of the gray still showed through.

Finished!
And you have yourself a super adorable teal truck Fall Painting!! I hope you enjoyed, I sure love this painting. Don’t forget to sign your art!
Very nicely done! Absolutely love it!
Thanks Joanne!
Thank you so much for your great instructions. So happy I found you. I just started painting and this has helped Me a lot. Again thank you for posting all of this. Blessings, Pam.
Thank you for sharing this fun tutorial. I can’t wait to try it!
You’re welcome Margie!
Just finished mine! Thanks so much for the tutorial. Would like to do one with truck and Christmas tree. Any chance you will have PDF?
Wahoo! You’re welcome Barbara! I’m definitely planning a truck and Christmas Tree Painting! It’s not available yet but I will have a PDF traceable for it sometime in November.
You are amazing to share with all of us non artist. I am 78 and can’t draw a circle with a quarter but you make me want to try. Thank you.
Thanks Tony!
You are amazing…Love these just discovered you can’t wait to paint them. Thank you so much! Is there a way to print out your directions as well?
Hi Judy! Thanks! You should be able to print them from the internet browser. All images and instructions should print.
Awesome tutorials, definitely the best I’ve ever seen online, thank you so MUCH FUN !!
I’m taking art classes. You blow my teachers away. Lol
Aww well thank you Jeanette!
I used an 18×24 canvas. Thank you so much for the instructions, I love my new wall hanging!!
Oh nice size!! You’re so very welcome, glad you love your new piece of art!!
I am excited to try this, but I was wondering if you have an tips if I want to paint the truck white? Will the background still look good with it? I love the idea of it looking like a rainy day. My husband has an old white ford pick up that I would like to represent on the painting. Thank you!
Yes I think the background would still look fine if you did this truck white. As long as there is enough contrast (background is dark enough) it should be fine! Enjoy!