
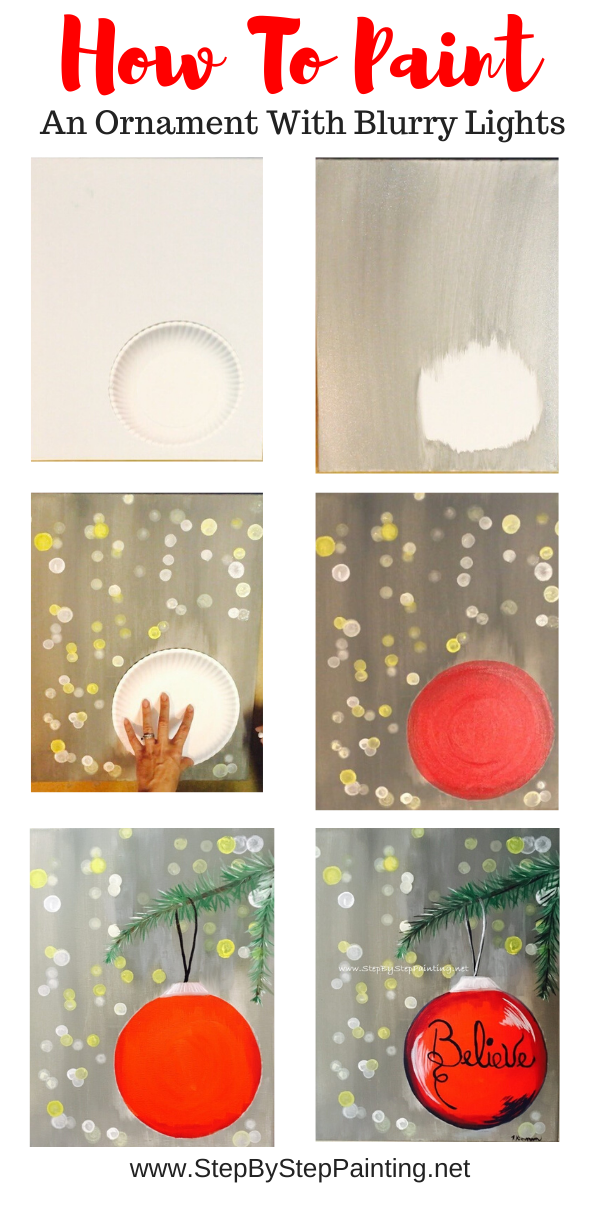
How To Paint An Ornament With Blurry Lights
This is a very easy painting that can be customized with different colors and words on the ornament!
It reminds me of the “Charlie Brown Christmas Tree”, although I wasn’t think about it when I was designing this tutorial!
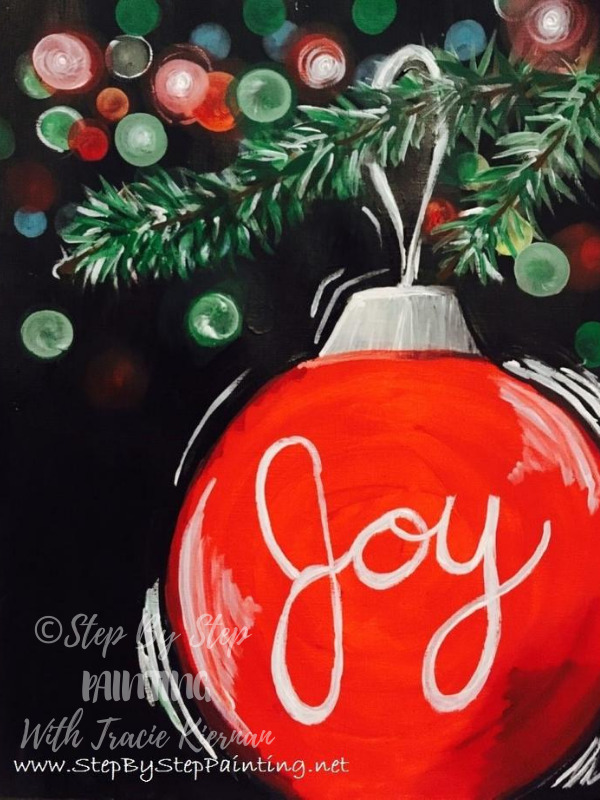
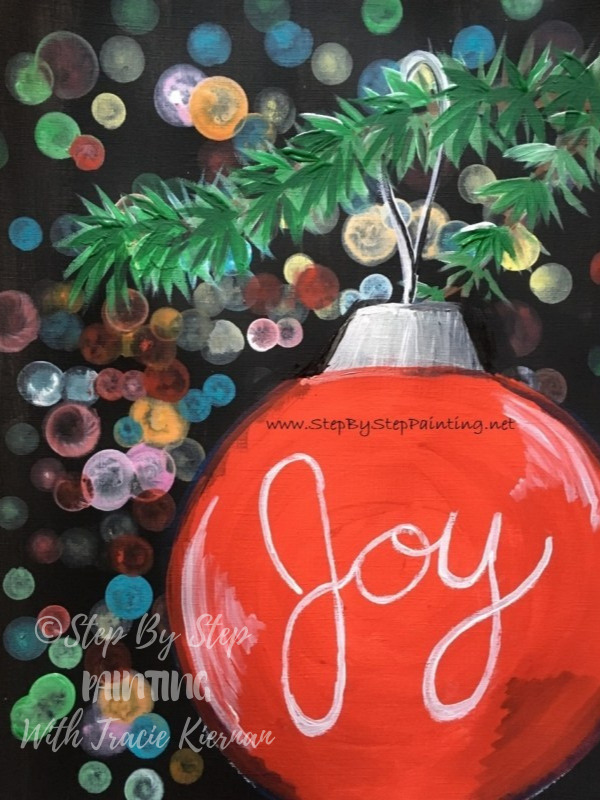
You can also try the design with a black background and substitute the yellow lights with color lights instead
Just follow the steps exactly but paint the background black and add do the lights in different colors.
This Post Contains Affiliate Links
Materials:
How To Paint Ornament with Blurry Lights
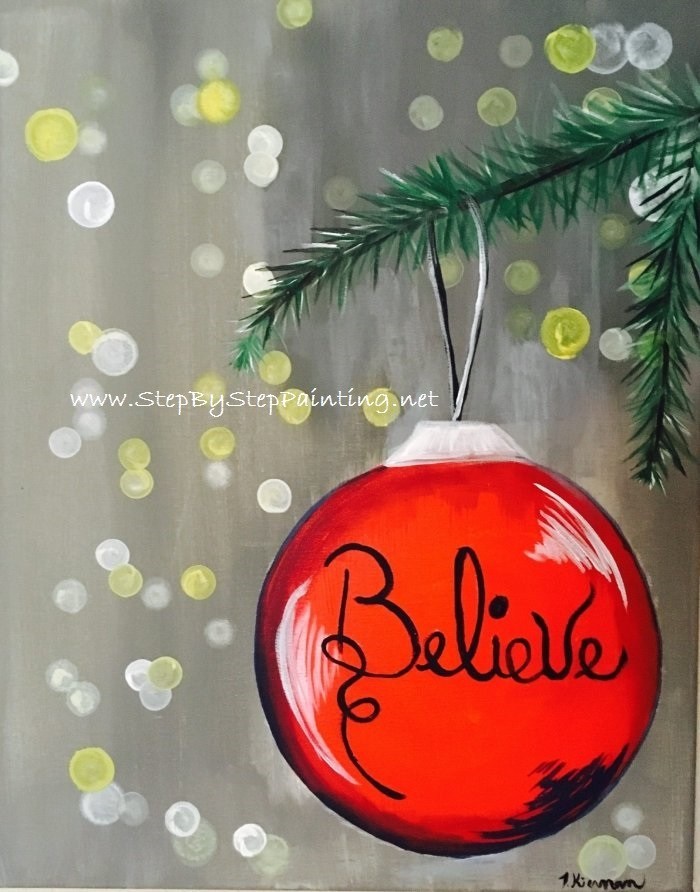
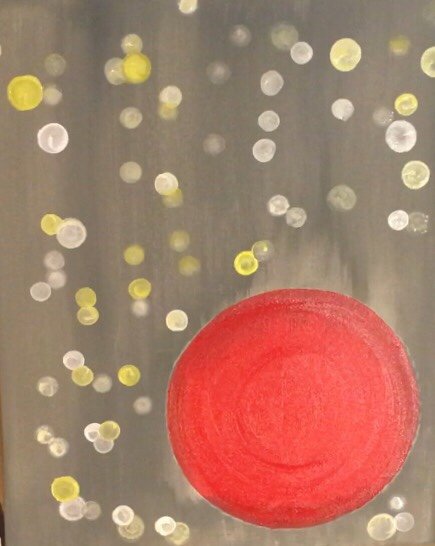
Learn how to paint a large red ornament with a gray background and blurry yellow & white lights. Trace a paper plate for the ornament the follow these easy steps!
Materials
- 16” x 20” Canvas
- Acrylic Paint
- Round Paper Plate (9”)
- Brushes
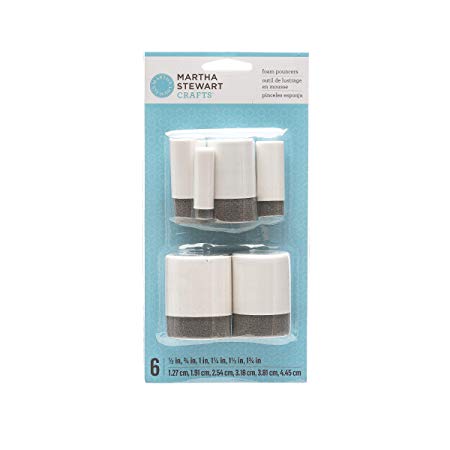
- Round Foam Pouncers (optional)
- White Chalk
Brush Sizes
- 3/4” Flat
- 4 Bright Brush
- 0 Round Brush or 10/0 Liner
Colors
Notes
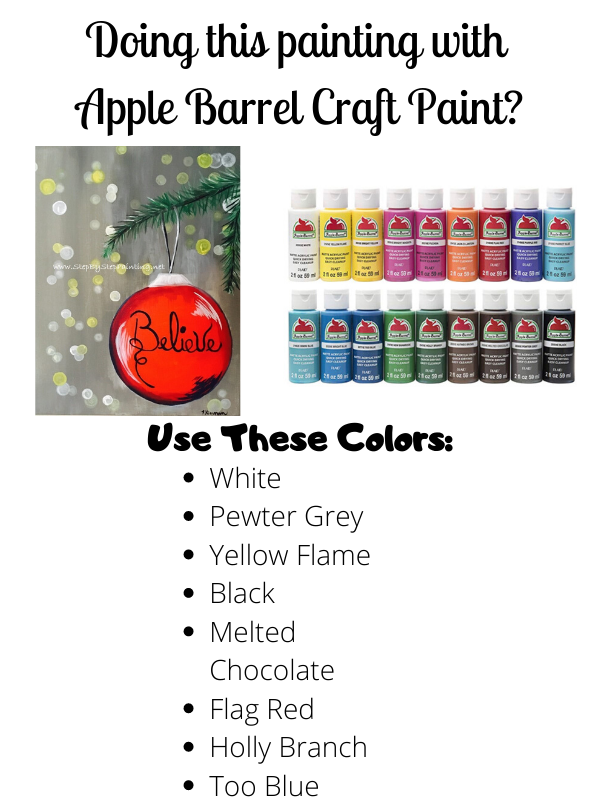
You can use Apple Barrel Craft paints for this painting! Flag red, white, black, pewter gray, yellow flame, nutmeg brown, holly branch and navy.
Color Palette: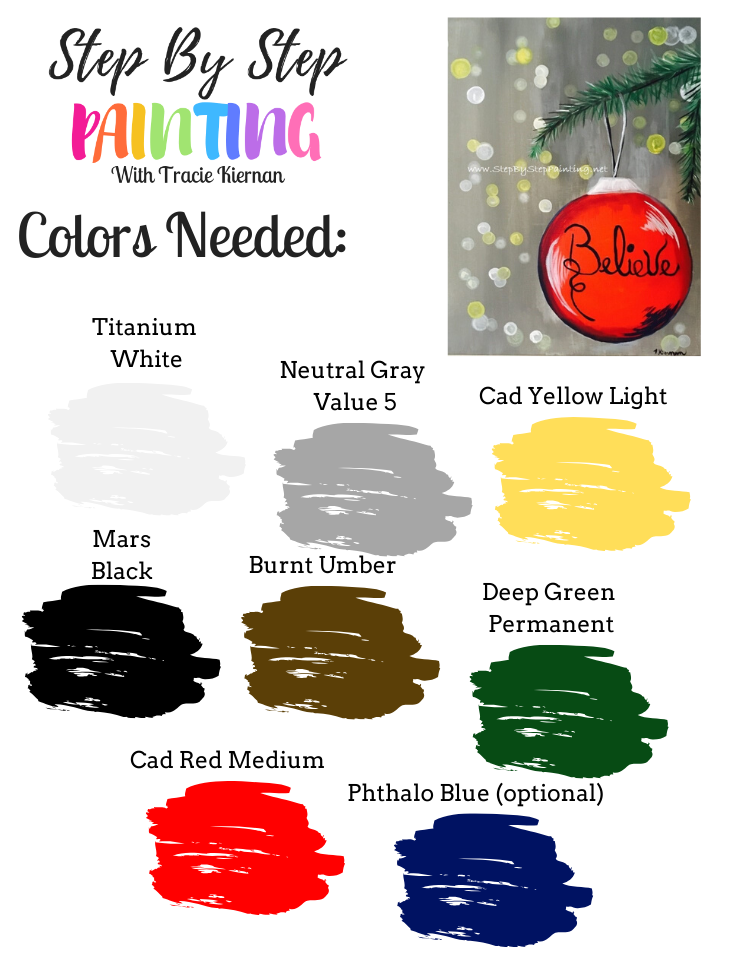

Apple Barrel Color Suggestions:
Directions At A Glance:
Video:
Step By Step Directions:
1. Trace a large paper plate on the lower right corner of the canvas.
First I traced a standard size paper plate on my canvas LIGHTLY with a pencil.
This is only a reference for now because I want to leave most of this area white. Of course if you’re using a smaller canvas, use a smaller circle.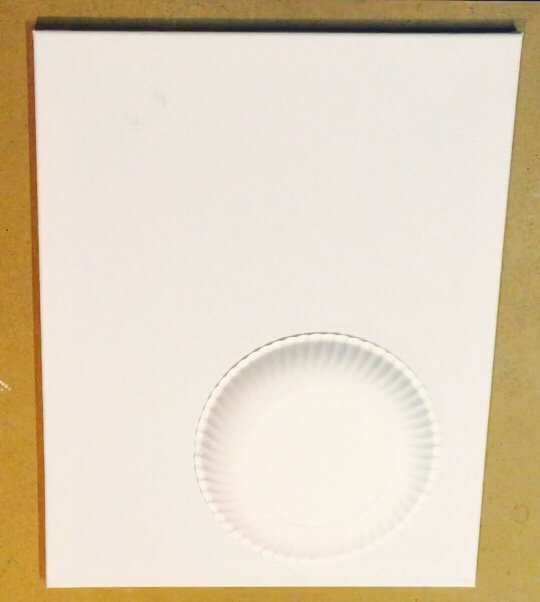
2. Paint the background gray.
Then I painted my entire canvas with a 3/4″ Wash Brush and a “wash” of gray using only up and down strokes.
A wash is water mixed with the paint. I wanted some color inconsistency in the background as well.
Also, don’t worry about keeping that circle perfect! The gray inside the circle is to our advantage when it comes time to “shade” the ornament. 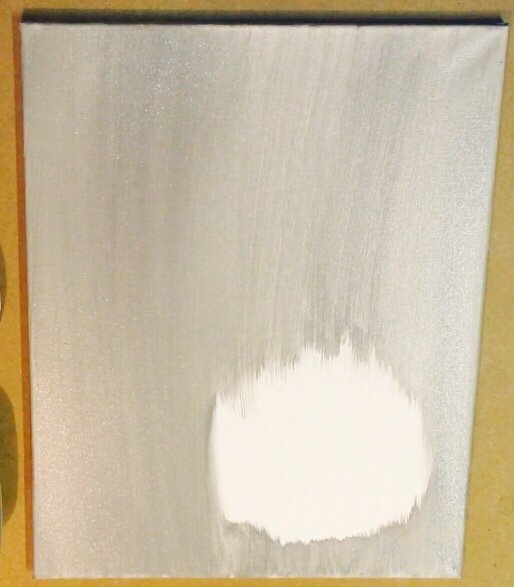
3. Paint circles in the background (aka “Bokeh” lights).
There’s a couple ways you can do this. When I originally did this painting in 2017, I used a “filbert brush” and stamped the brush on its side and turned the brush while the bristles formed a circle.
I used the colors: cadmium yellow light and white. I dipped the brush in varying amounts and even some colors slightly watered down. 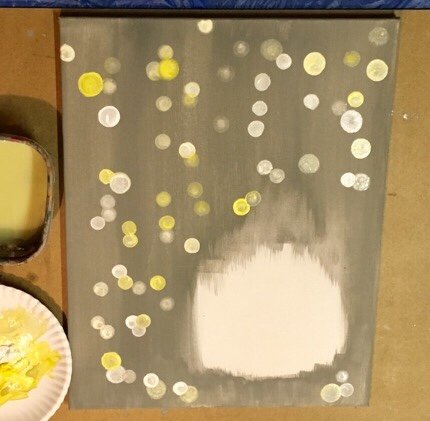
You can also use these Martha Stewart Pouncers to paint the circles.
Simply dip the pouncers in a combo of the cadmium yellow light and titanium white (various amounts).
Press firmly with the pouncer and twist. Try to get the circles to overlap each other in clusters as well.
To make some blurry, you can add a bit of water to the paint. 
4. Then I traced that circle again with chalk!
Likely, you painted over a lot of that circle. Trace the circle again so that we can completely see it. 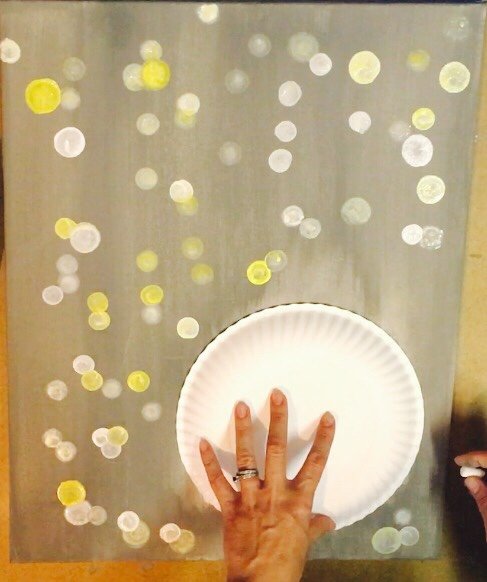
5. Paint the circle “cadmium red medium”.
I used “cad red medium” to paint the entire ornament.
To “cut in”, use a #4 bright brush. Try to make your strokes go in a circle. You can switch to the 3/4″ flat when painting the large area in. 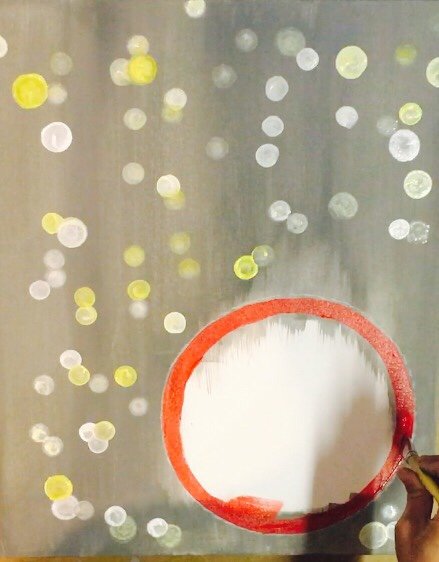
6. Paint the top of the ornament.
Mix white and a little gray together. Paint a trapezoid shape on the top of the circle. You can use any brush to paint this trapezoid. 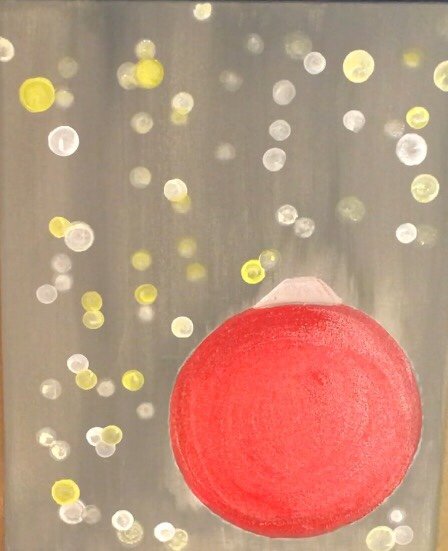
Then I painted a branch with brown and black paint. Use a small round brush or a flat brush.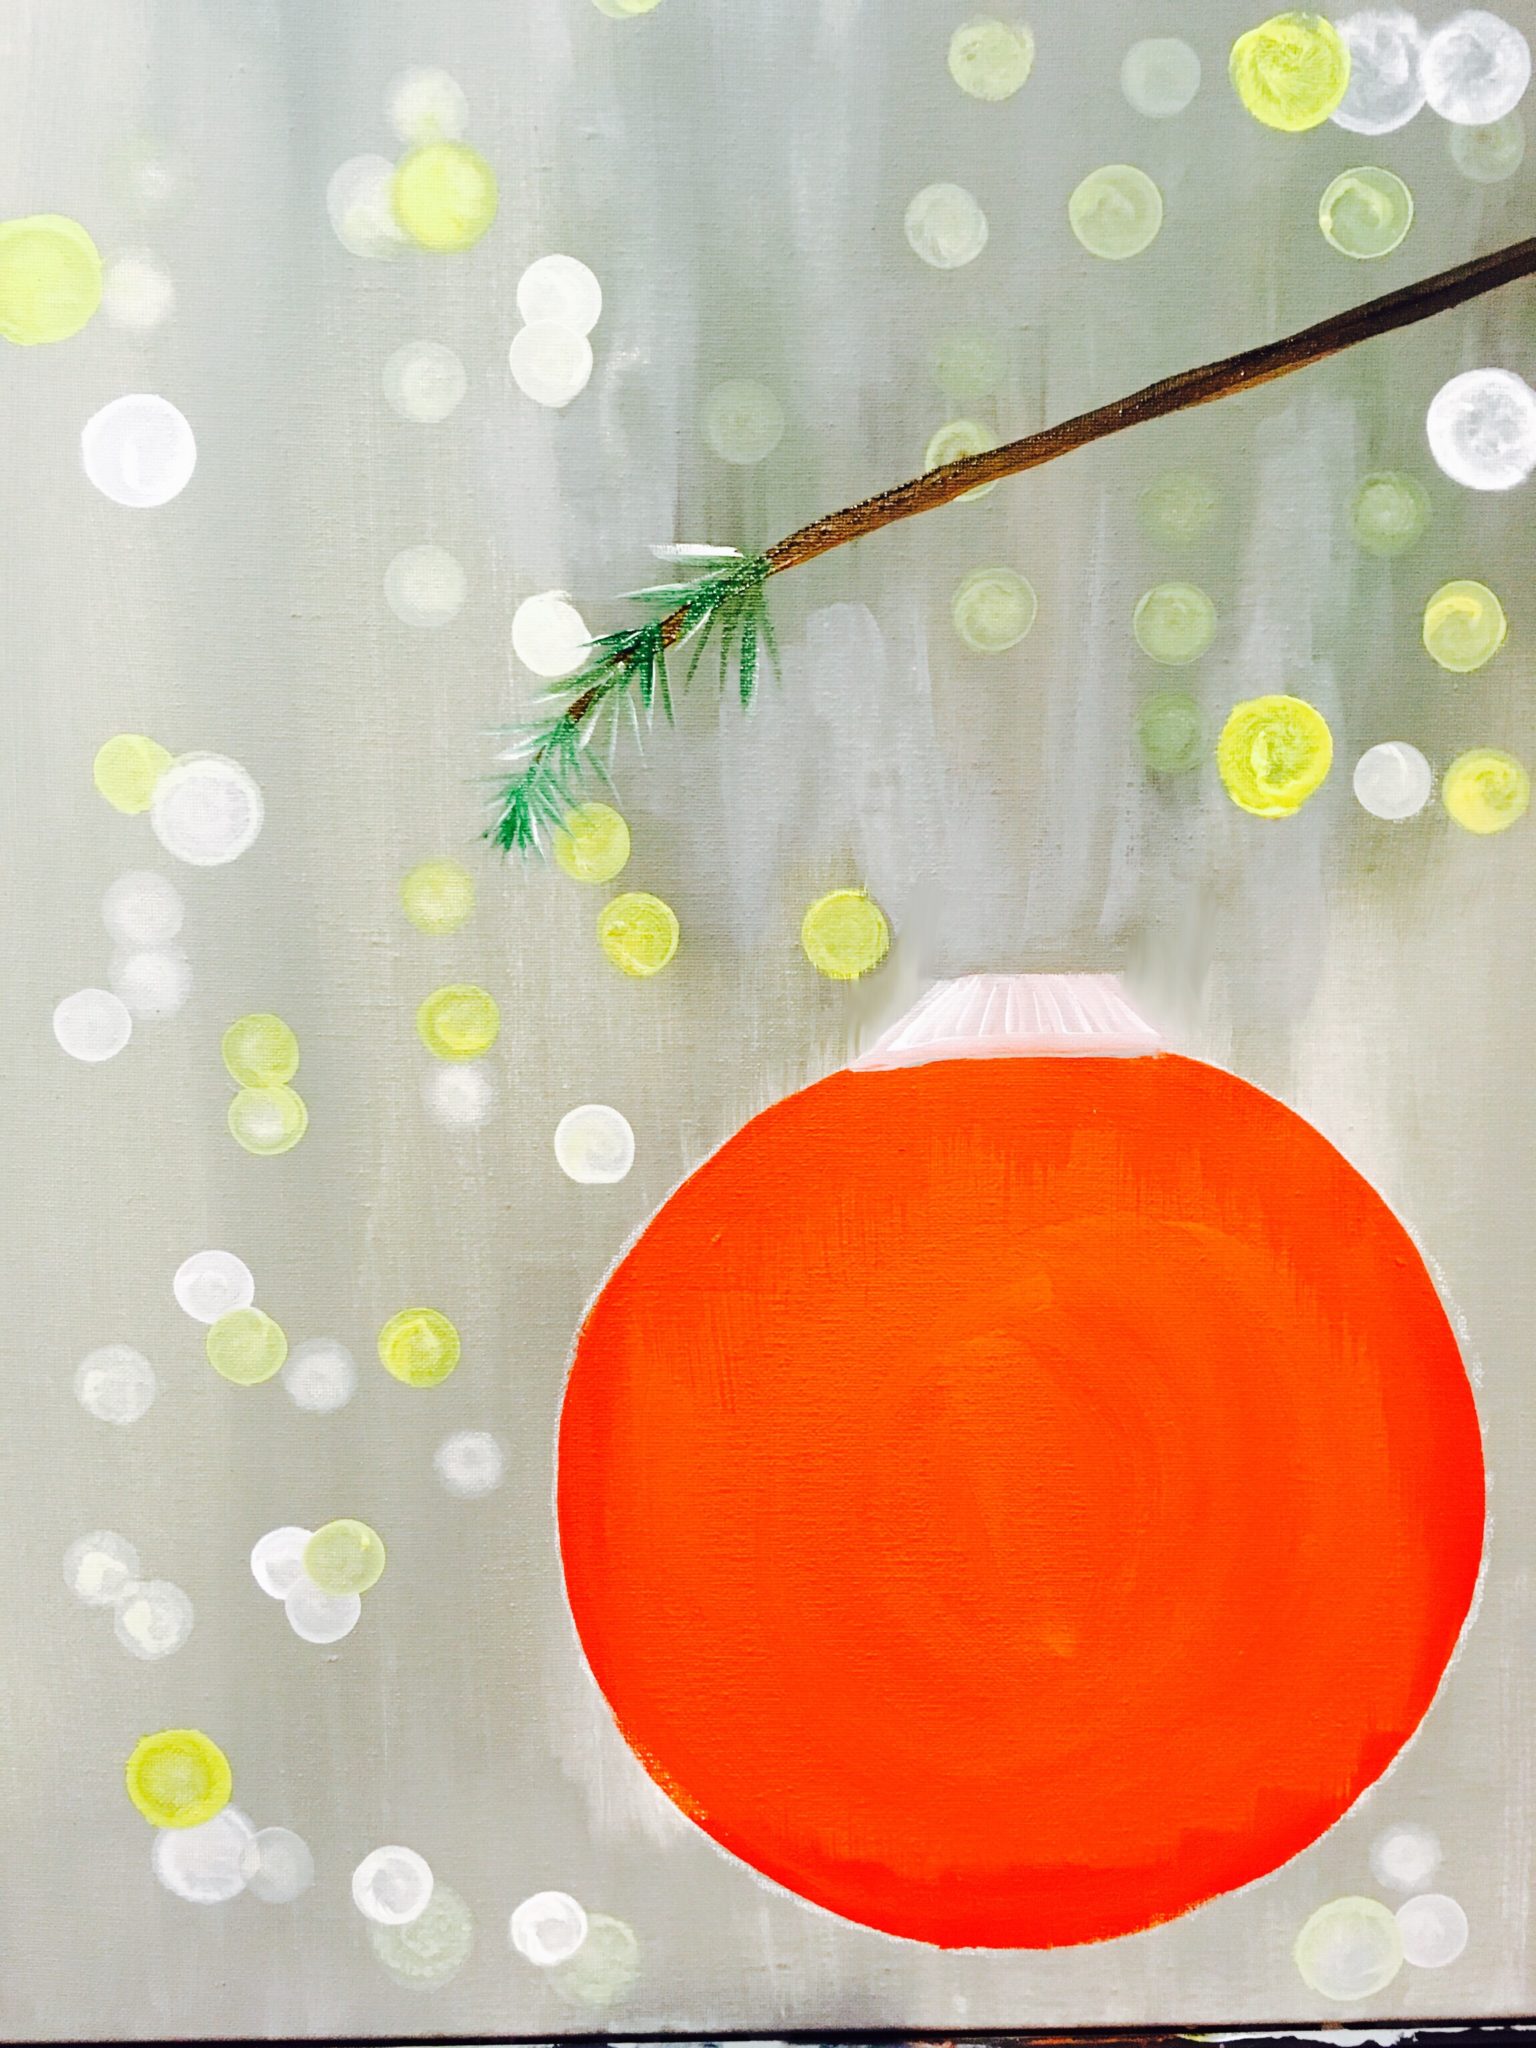
7. Paint the pine needles.
Paint the pine needles all the way from the left of the brush going to the end of the canvas.
Use the colors: deep green permanent and white.
Also use a #0 round brush for the larger needles and a 10/0 liner for the smaller needles.
Note: in the video, I think I used a flat brush. You can do that as well!
Sometimes techniques can be achieved the same way using different brushes.
Also, double load the brush in both the deep green permanent and titanium white. 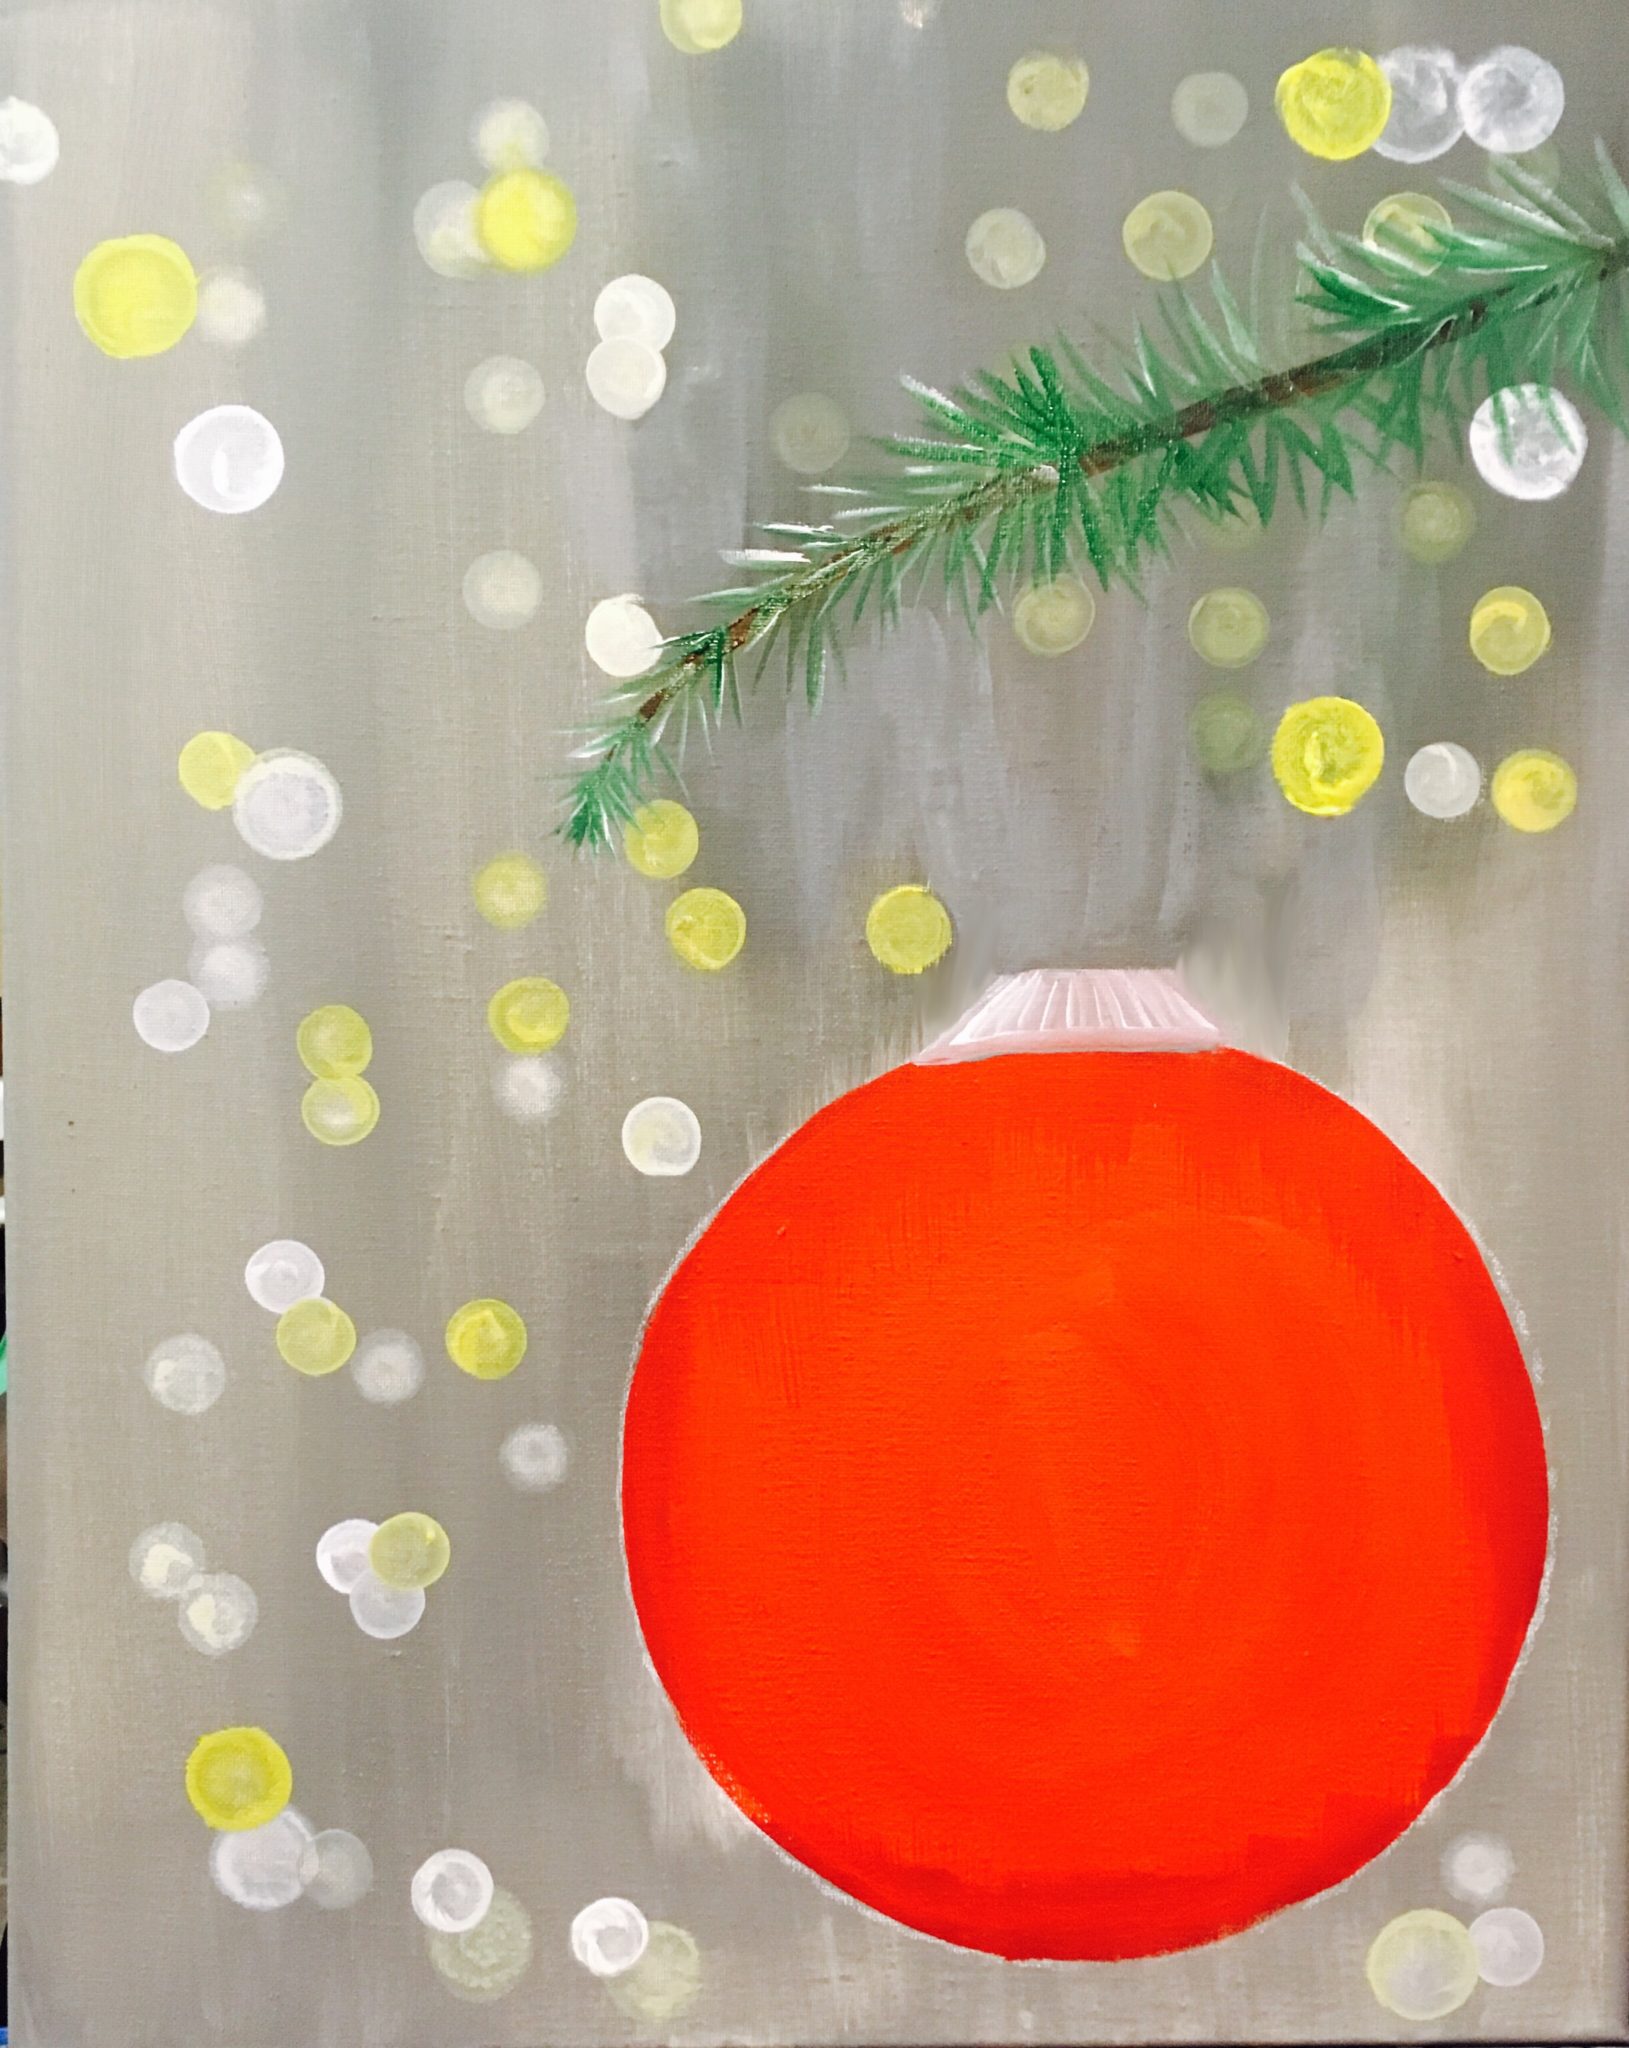
I also painted another branch hanging down. 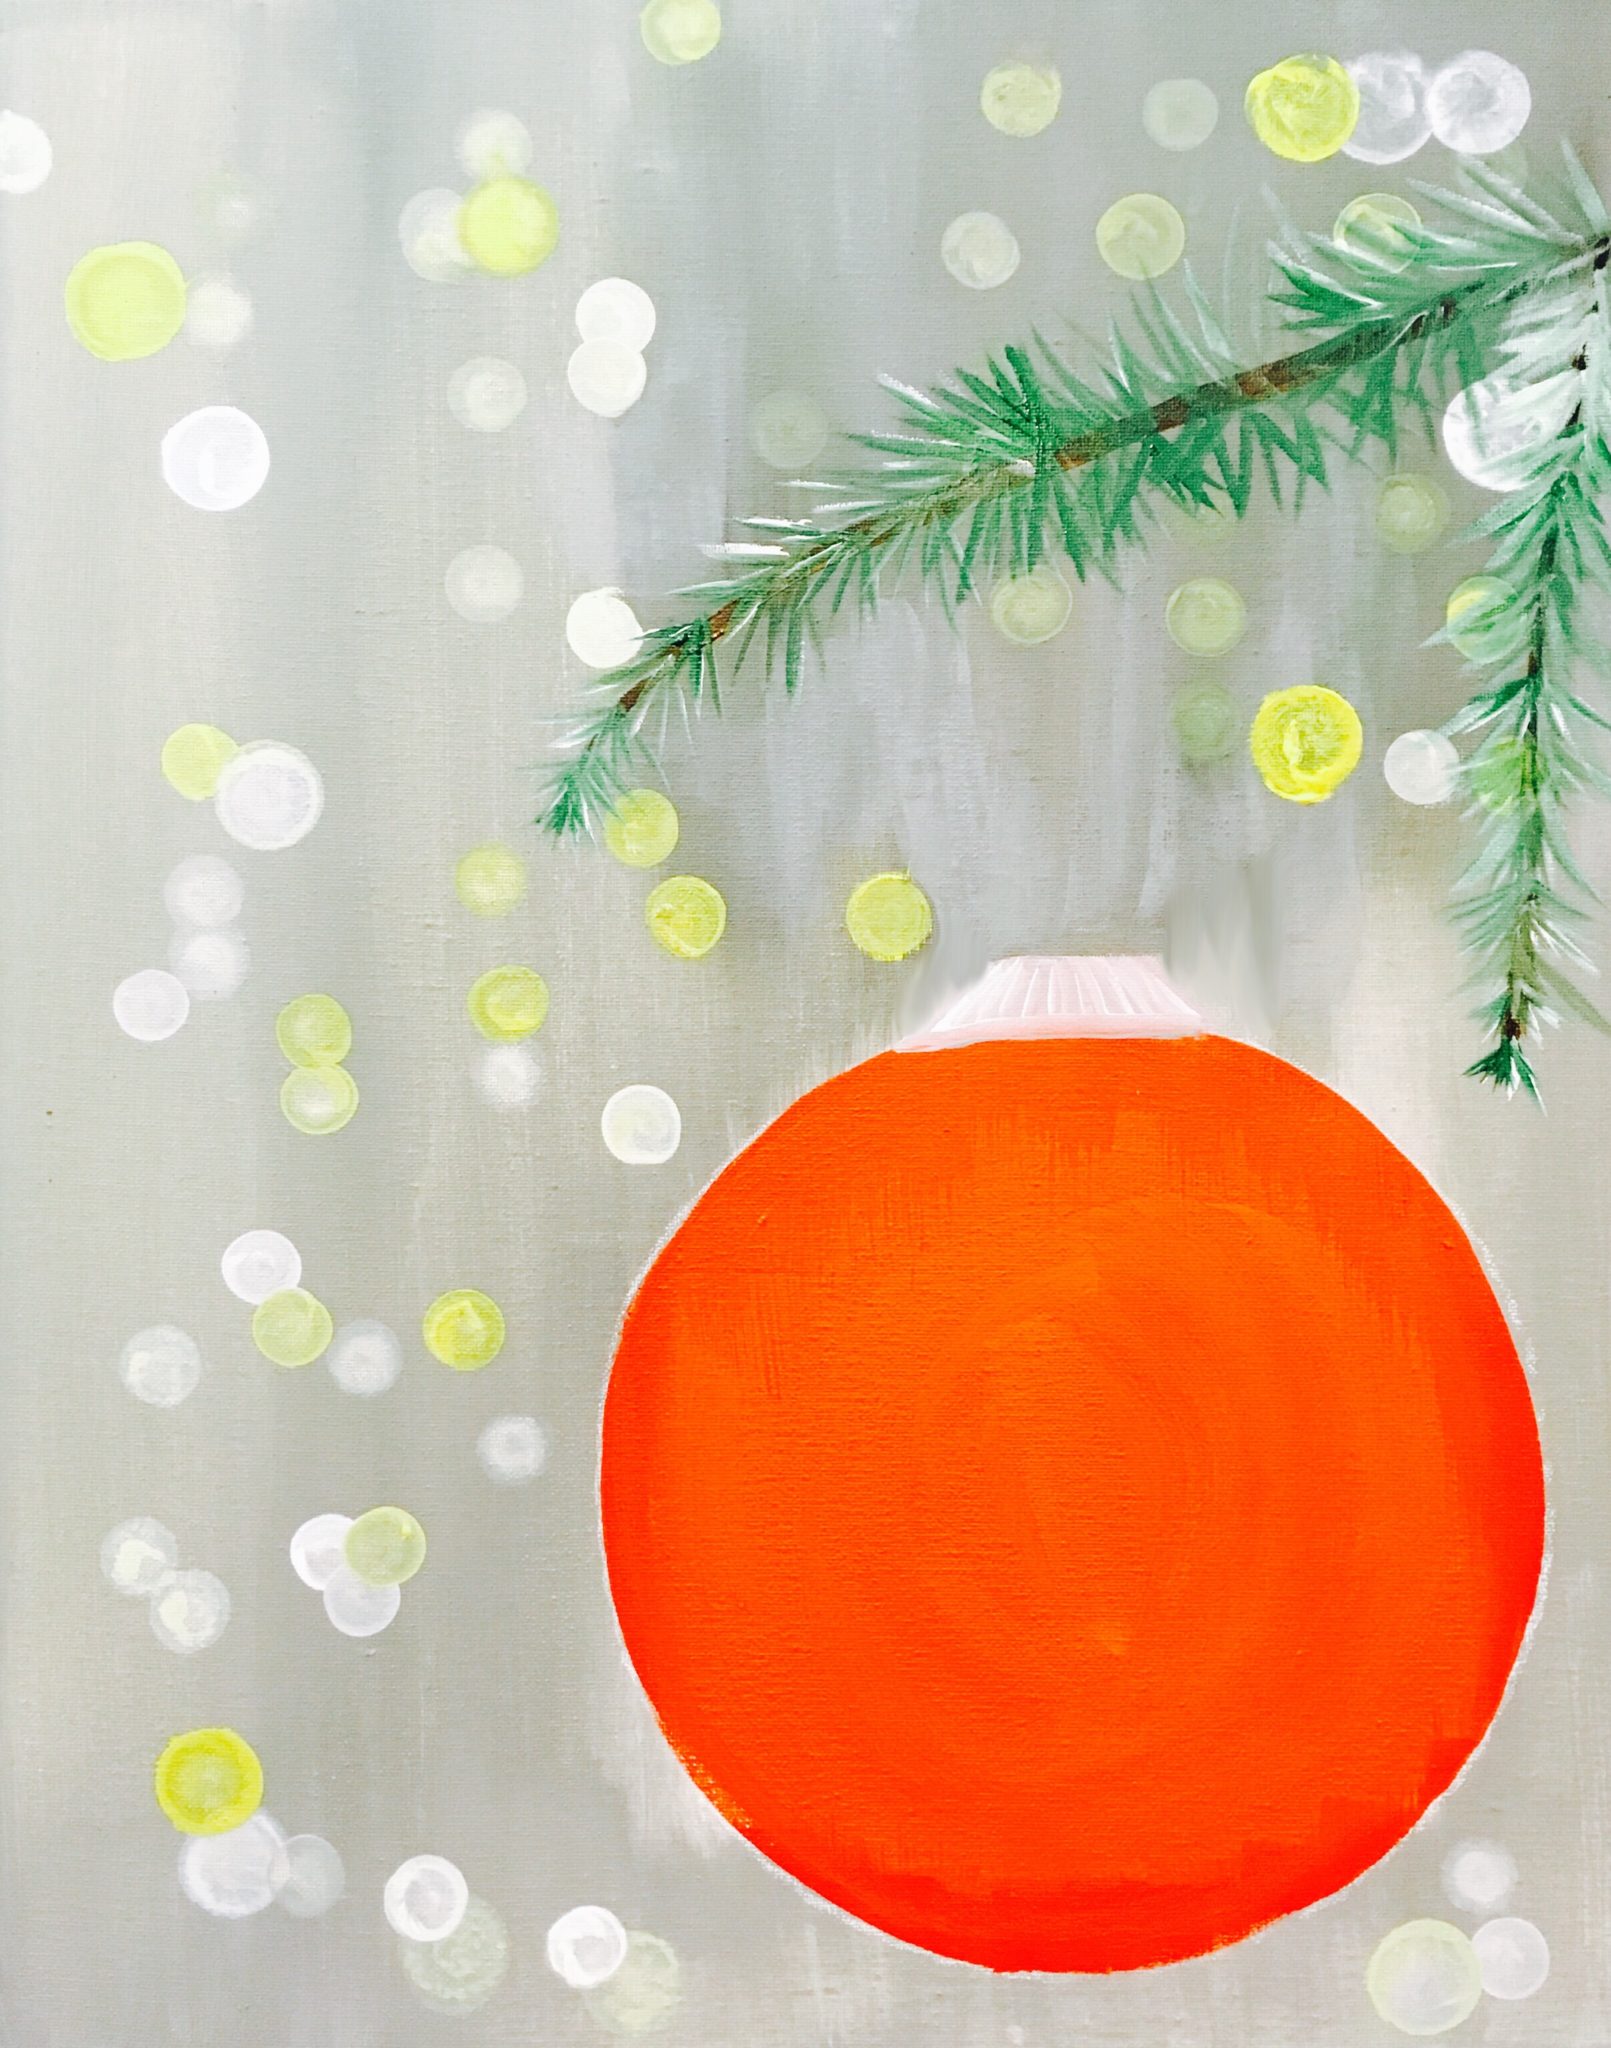
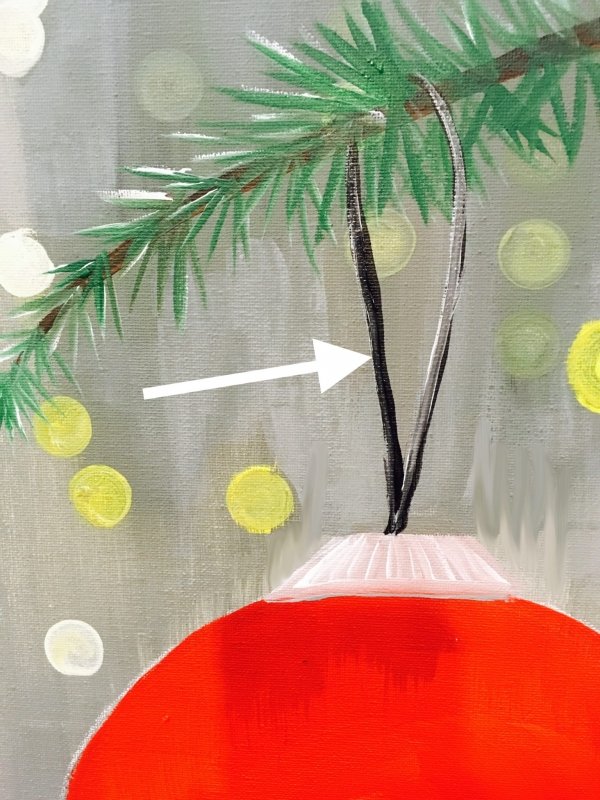
8. Paint the string.
Then I painted the string that goes around the branch using a flat brush (#4 bright).
You can also use a round brush to paint this string. I added some highlight with white paint. 
9. Paint a shadow on the left of the ornament.
Next I used *phthalo blue paint to start the “shading” of the ornament. This was done using the #4 Bright. 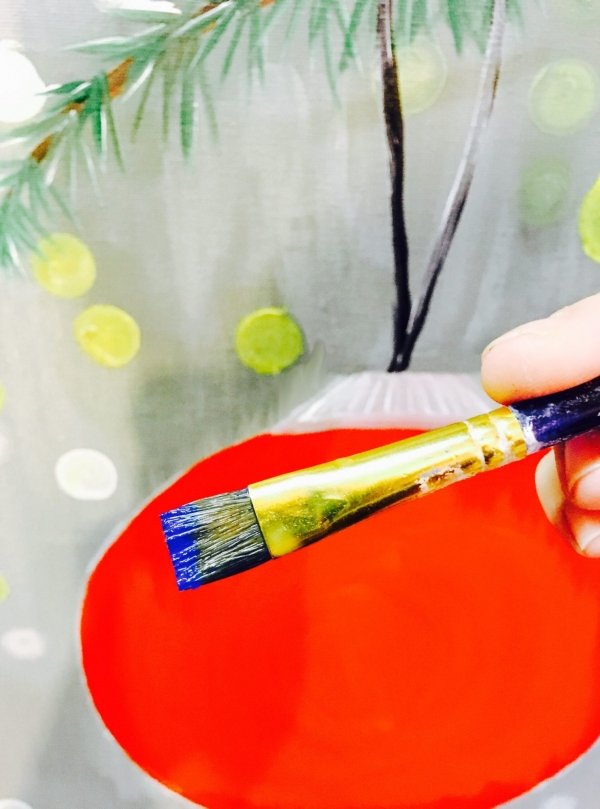
*You can also mix red with a tiny bit of mars black to do this step.
I outlined the entire ornament (lightly, very very thin line). Then the lower left part of the circle was a bit thicker. 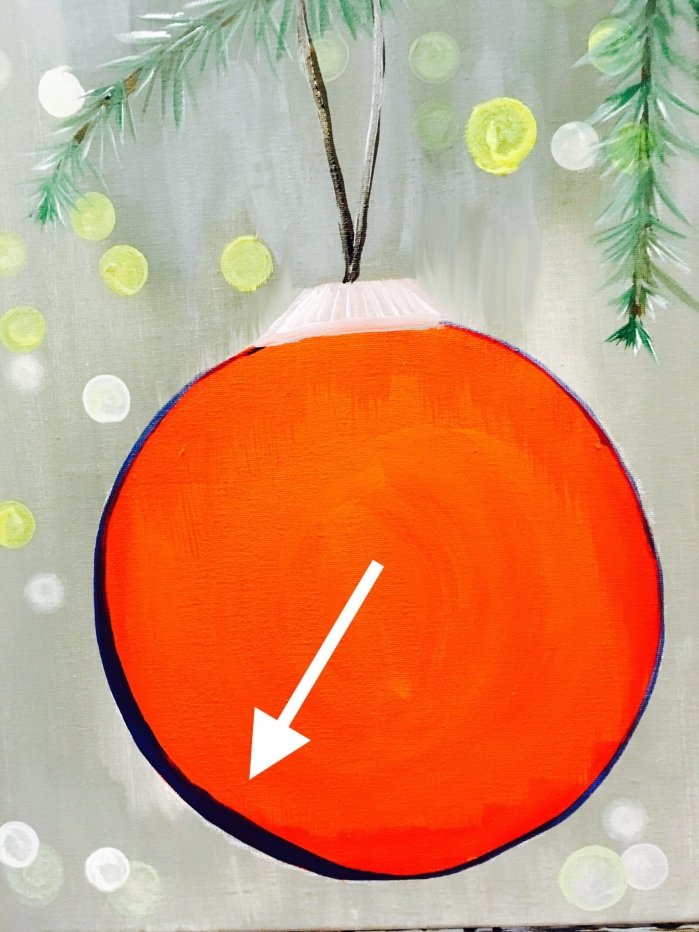
I blended that phthalo blue in to the red just a bit.
I did this by allowing the phthalo blue to become dry on my brush and “dry brushing” the shadow out.
You can also water down the phthalo blue a lot and let it blend out. I believe in the video, I watered that paint down. Both techniques work!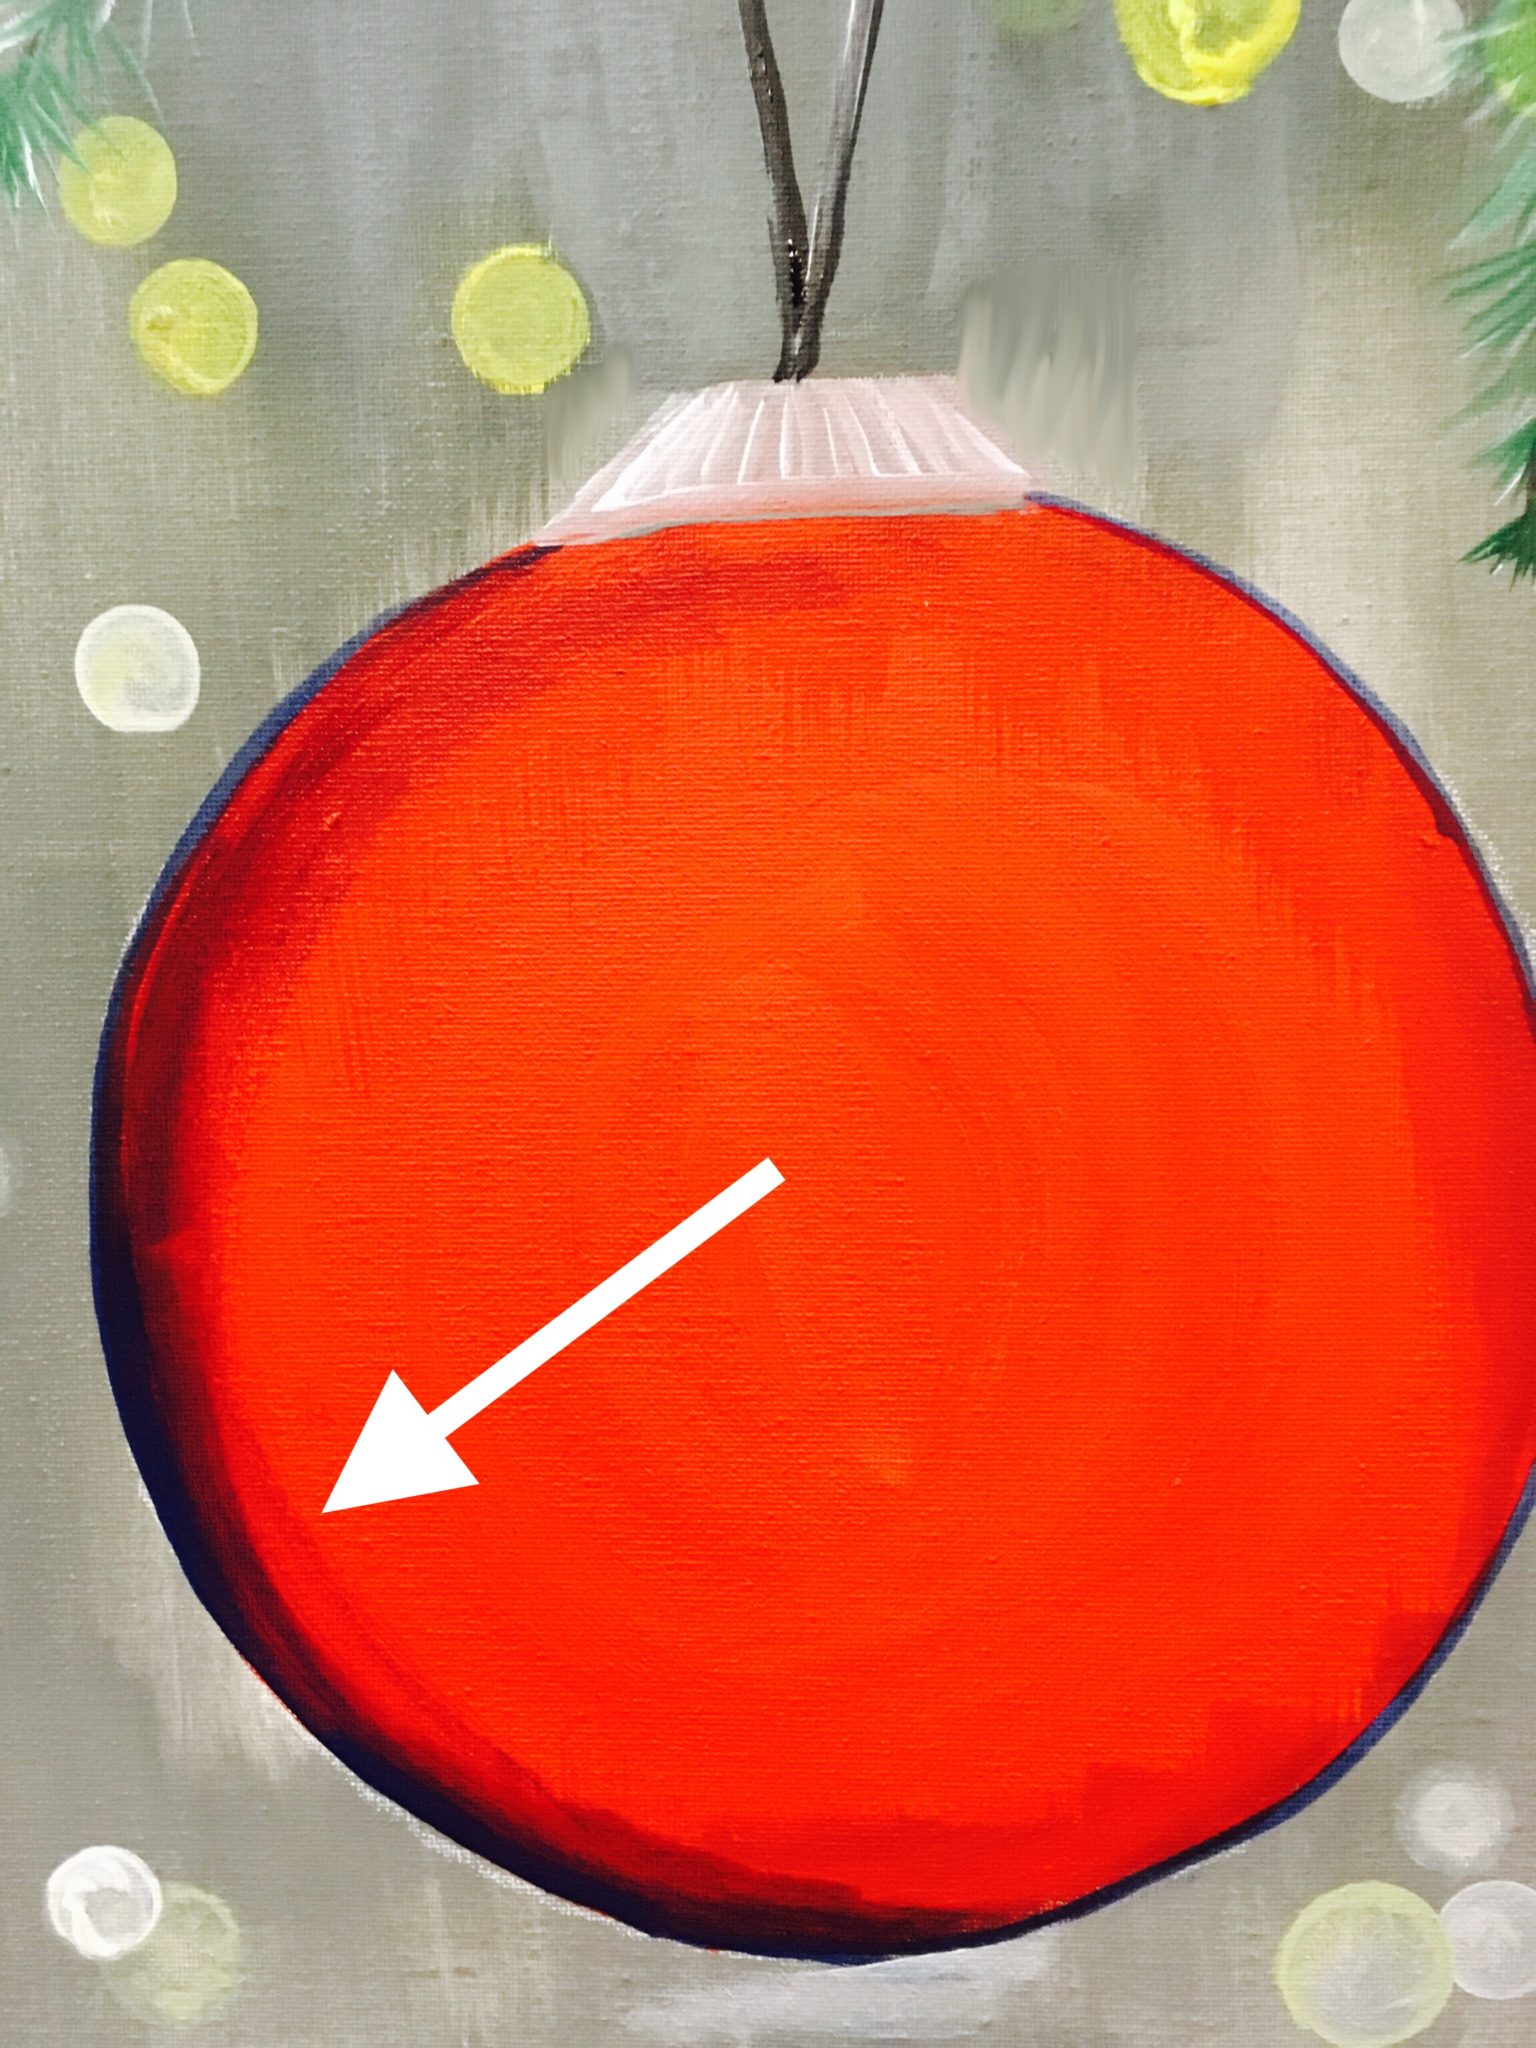
10. Paint a white highlight on upper right and lower left.
Next I painted a white highlight on the right. I started with one line and then some “zig-zags”.
There is another highlight in the lower left as well! Do this with a #0 brush or #10/0 liner. 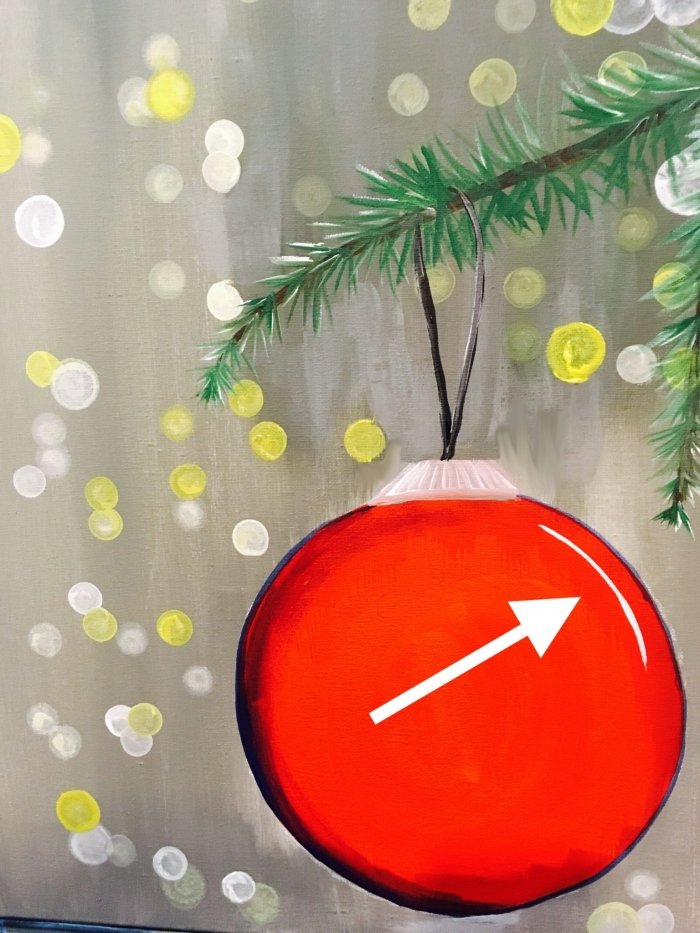
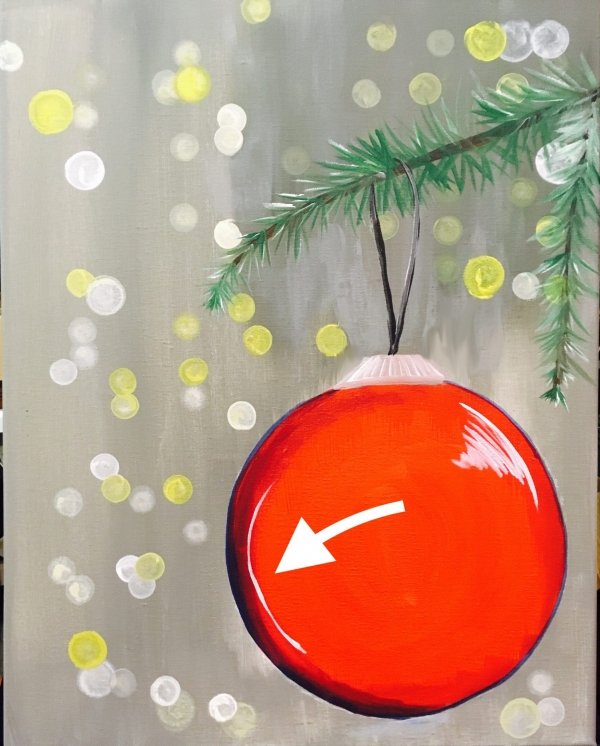
11. Paint another shadow on lower right.
I added one more dark area in the lower right with phthalo blue. 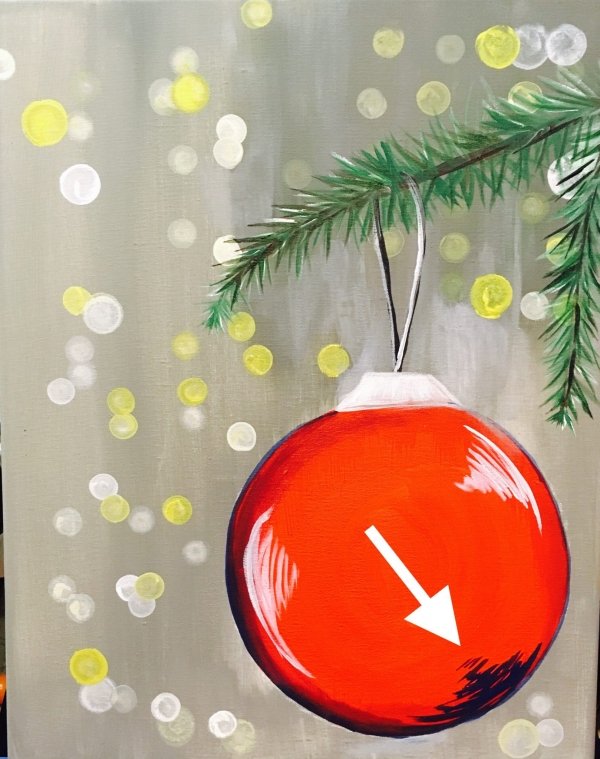
12. Add a word to the ornament.
Finally the lettering! If you’re not into calligraphy (I certainly need practice) then practice on a separate sheet of paper.
Find a font you like and a word or phrase you want.
After practicing on paper, draw your word or phrase with chalk onto the ornament.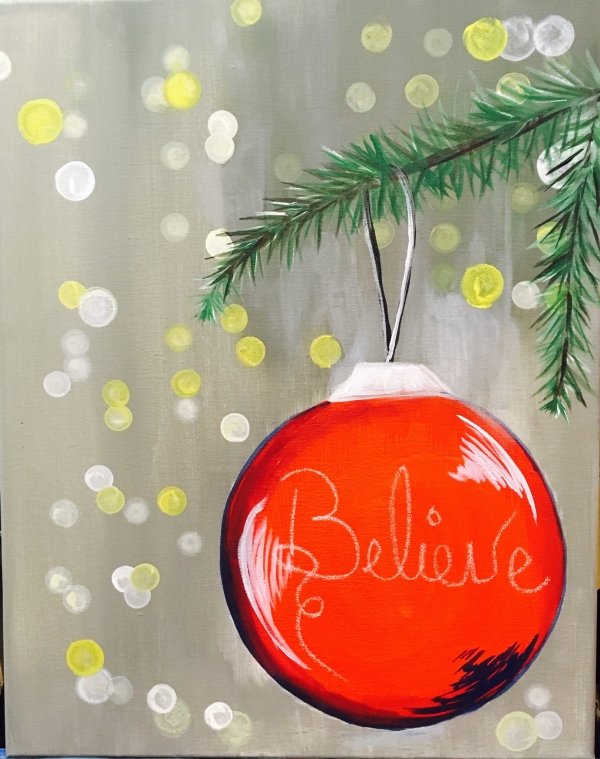
Then use black or another color to paint over the chalk.
Use a 10/0 liner for this or a paint pen. Wait for the word to dry before erasing the chalk!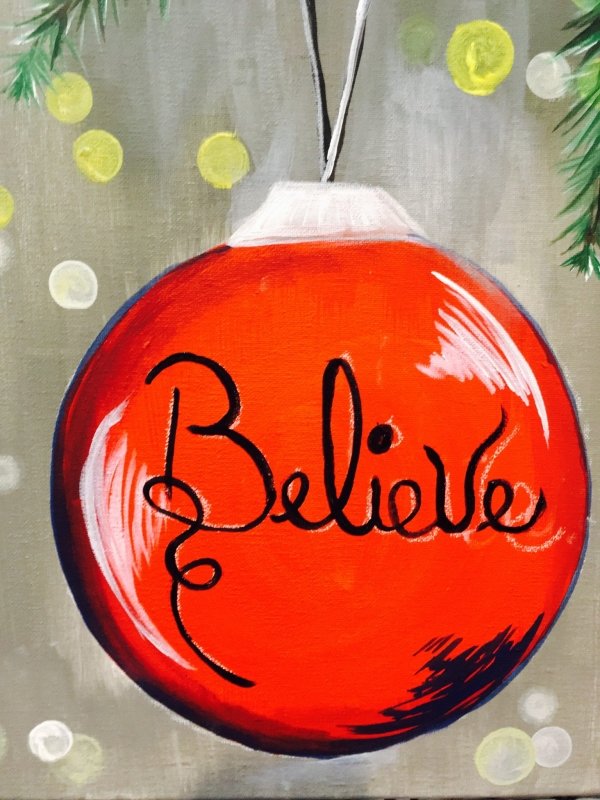
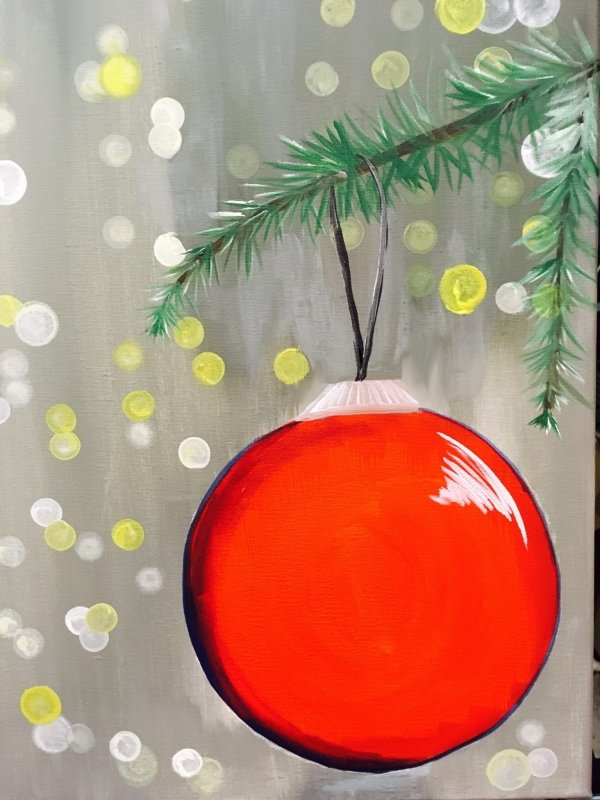
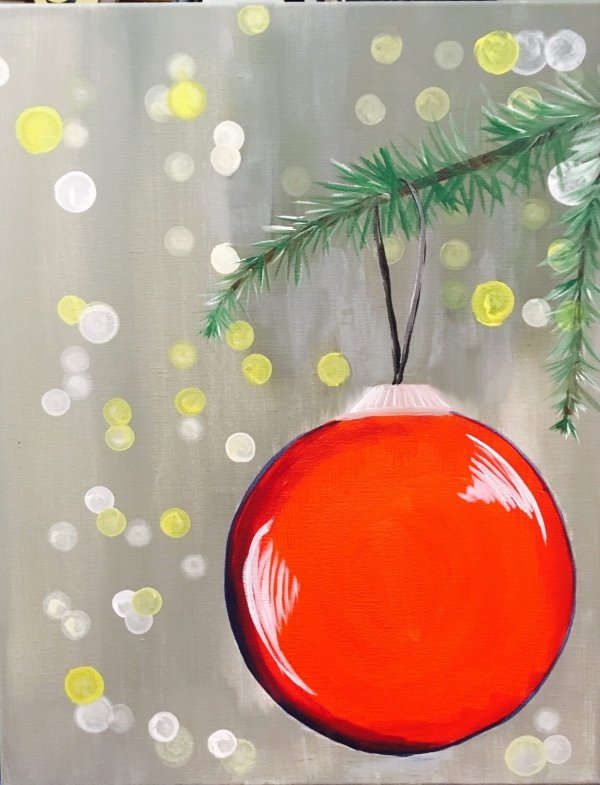
Finished!
And you’re finished! Simple and fun! Share yours on Social Media and/or make another two or three!
Maybe try a black background with colored lights, a blue ornament or different words!
Share Your Art!


Cool! I will try this.
Great!! Hope you enjoy!!
I’ve been watching your tutorials for hours now. Lol
You’ve got me so inspired & I’m so happy I found you on Pinterest!
Thank you so much for sharing your incredible talent.
Thank you so much Sherri!! I’m so glad you are inspired!
How do I get the chalk erased after my word dried?
You can use a clean wet brush to erase the chalk ?
How much paint do you think will be needed for a group of 15.
I typically suggest a quarter ounce per color per person. Less if there is barely any of that color in the painting and an extra tube of a color that shows up more frequently.
Can you please change this to 4×6 please
Lorivane1954@gmail.com