


Would you like to save this?
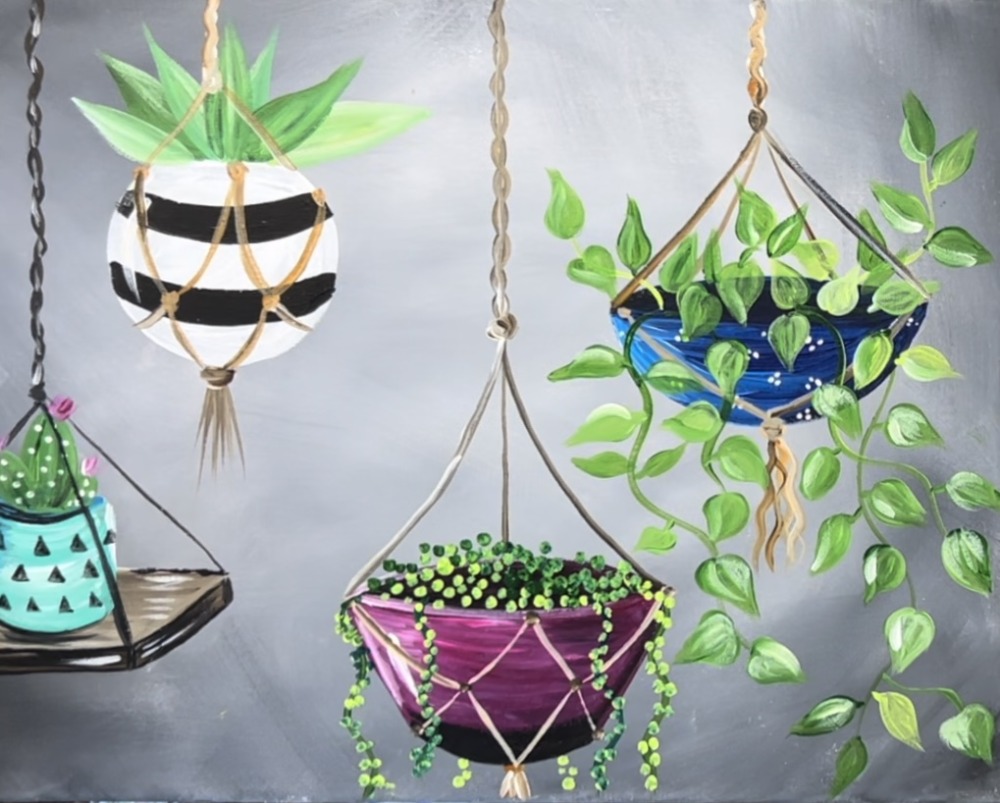
This tutorial demonstrates how to paint hanging decorative pots with macrame style cords filled with house plants and succulents!
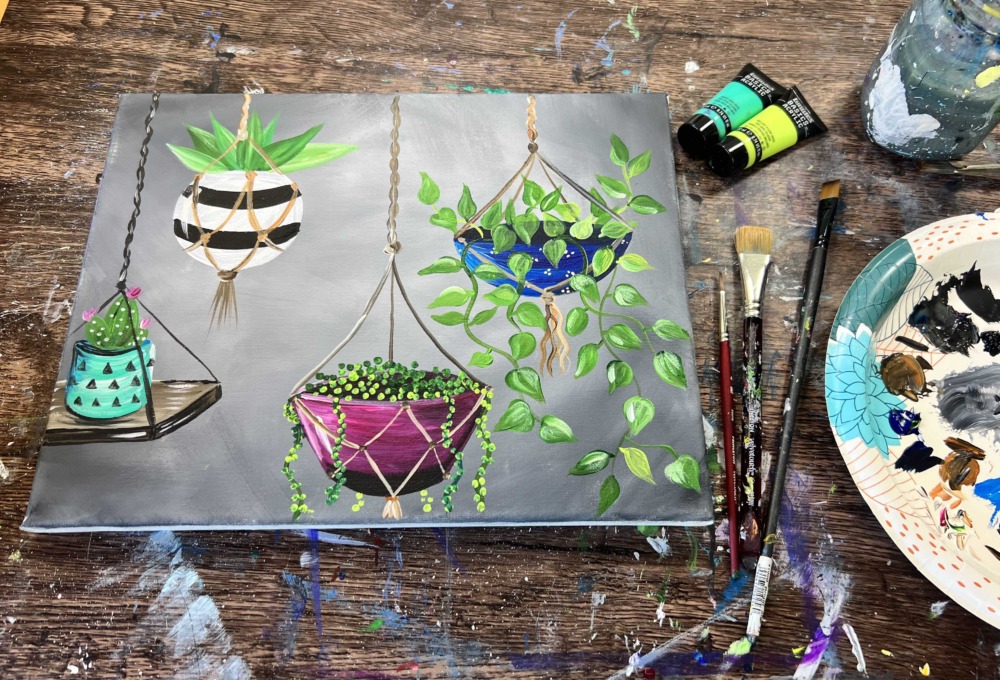
You can customize the patterns, colors and even type of plant in this super relaxing painting.
Enjoy and happy painting!
Materials Needed
How To Paint Hanging Plants & Succulants
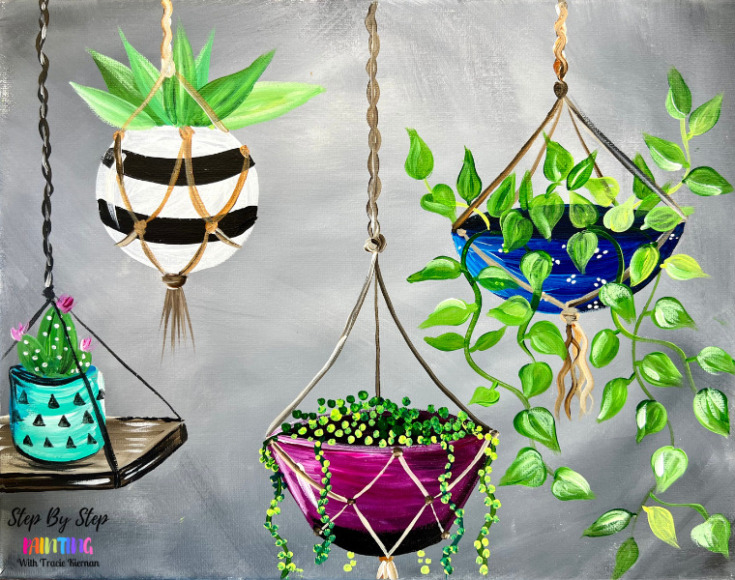
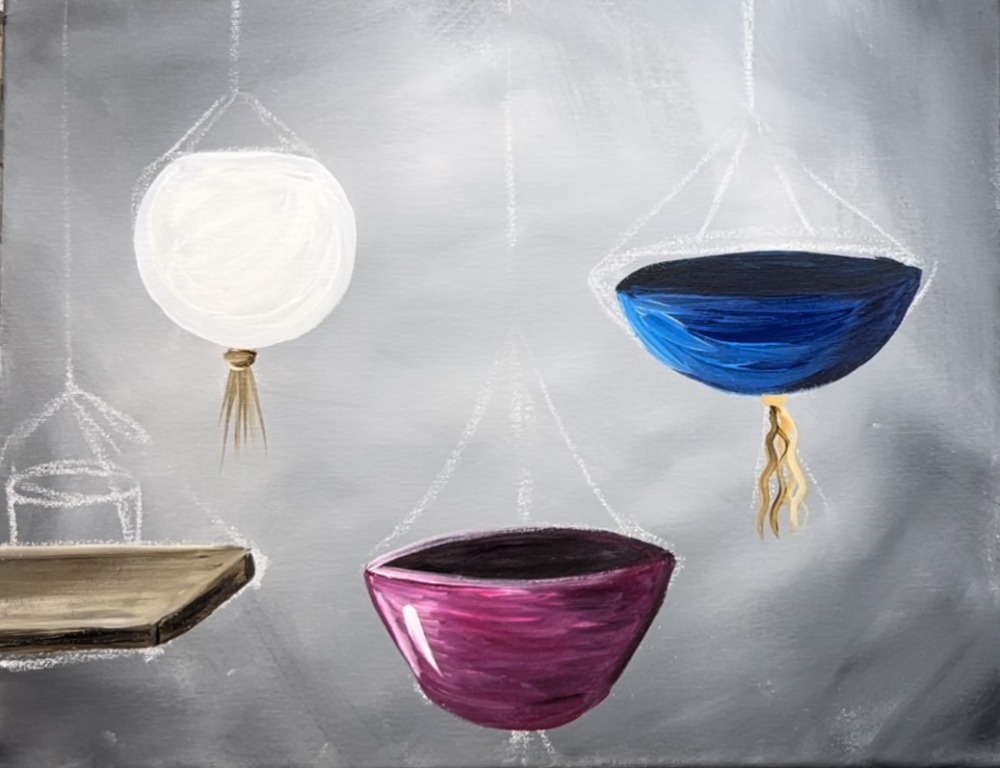
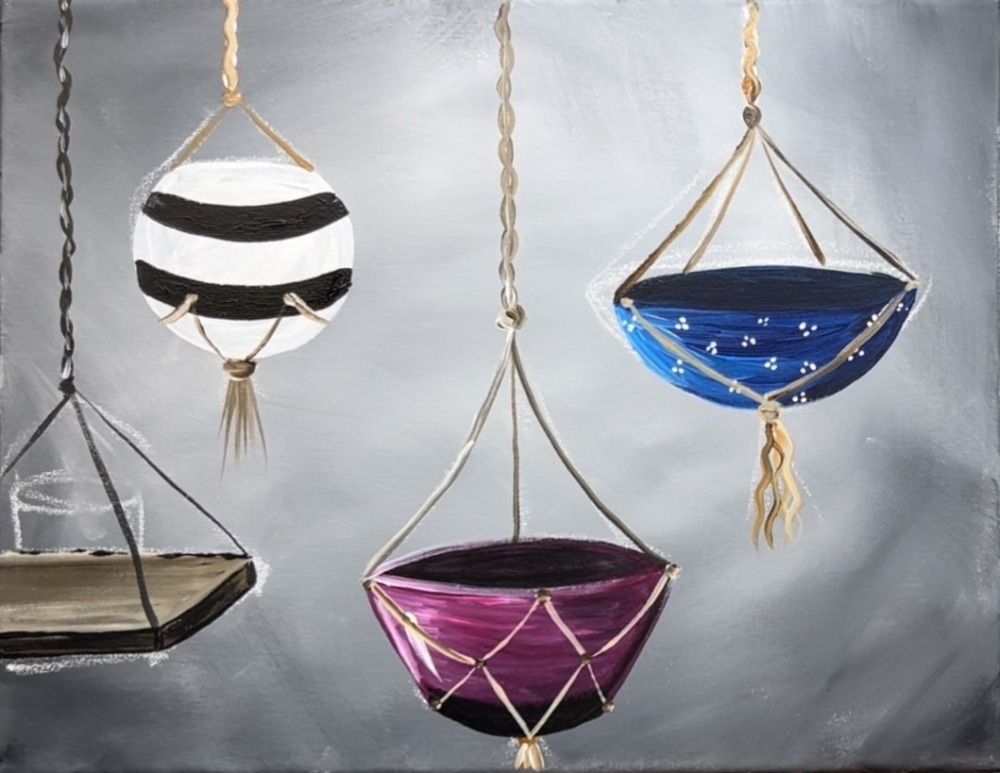
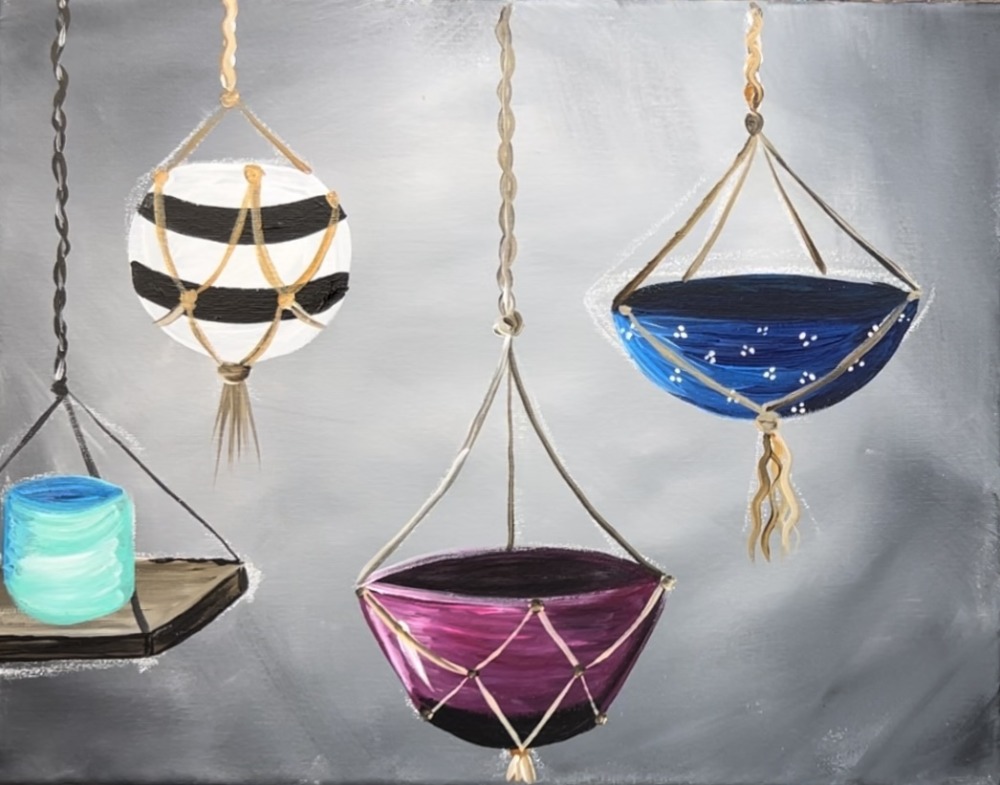
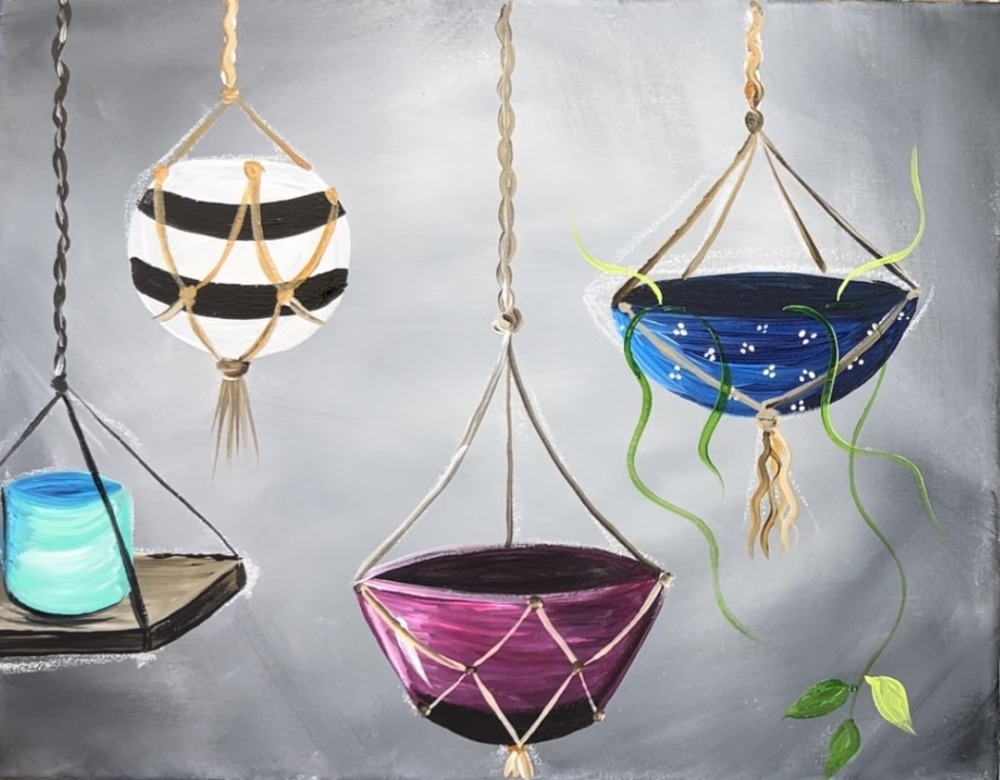
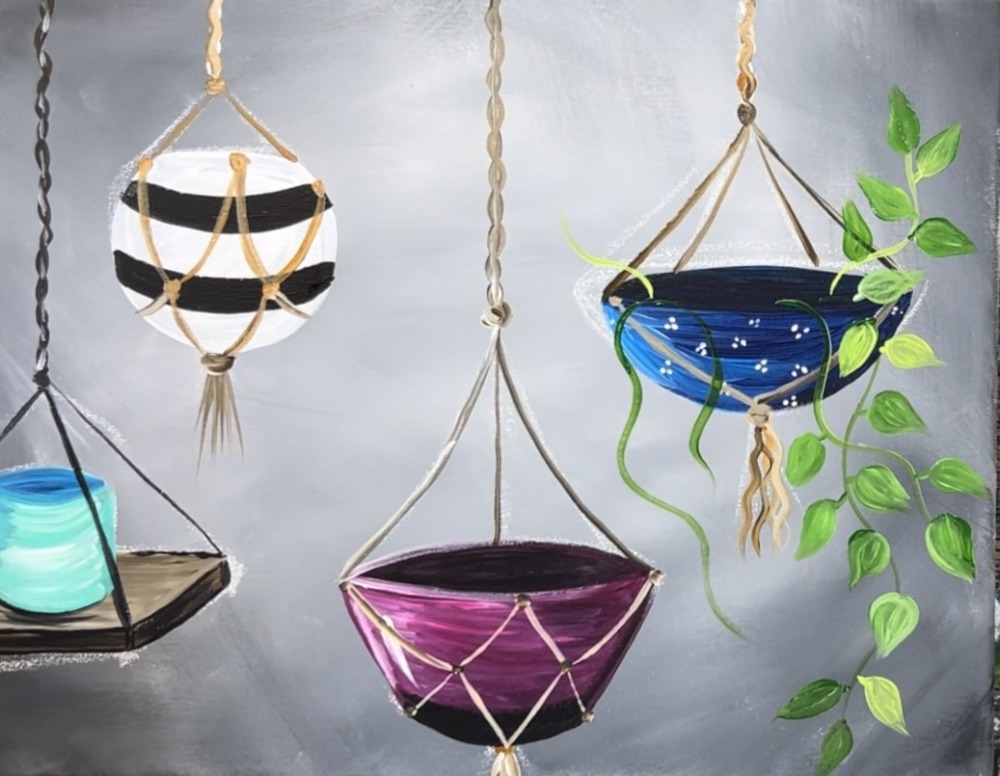
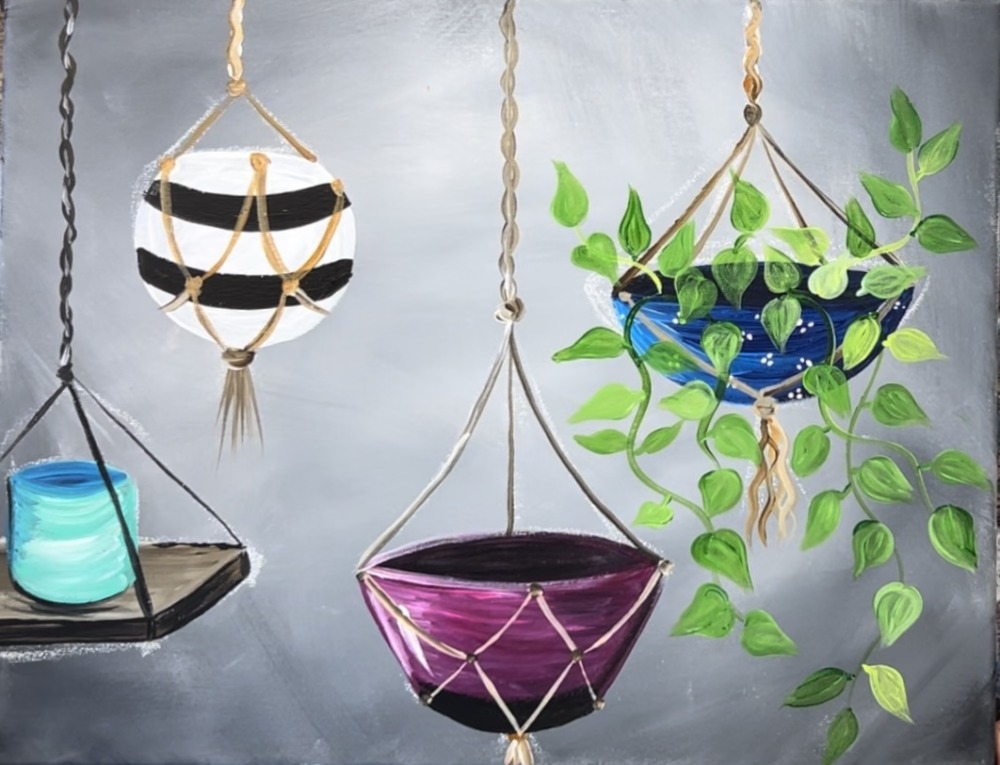
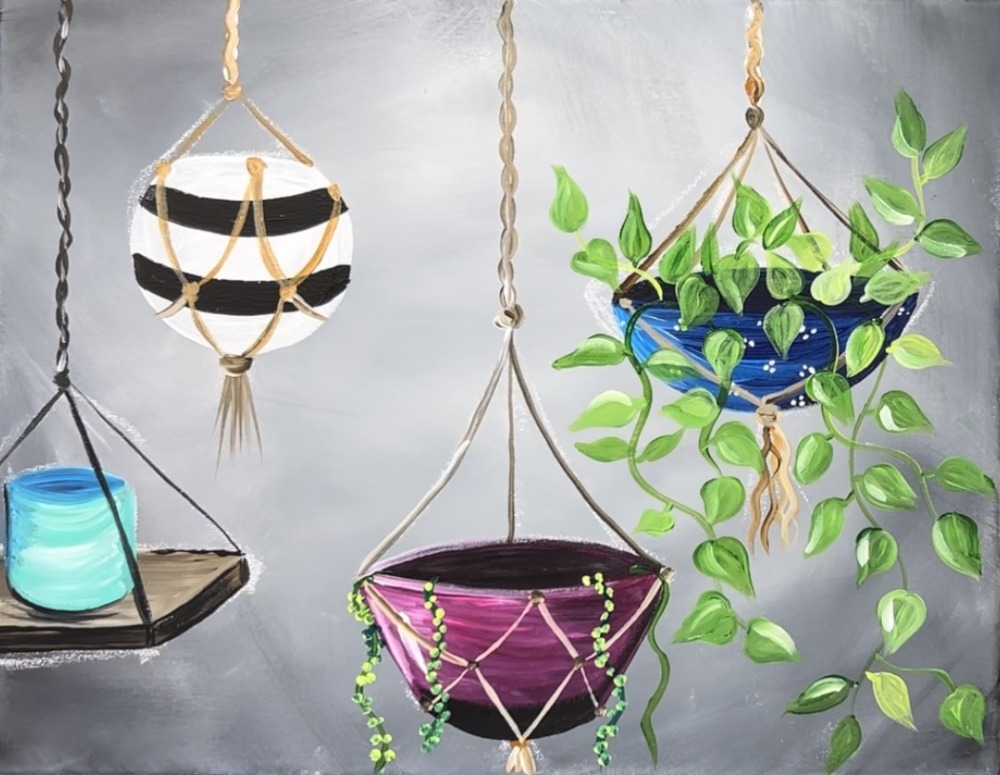
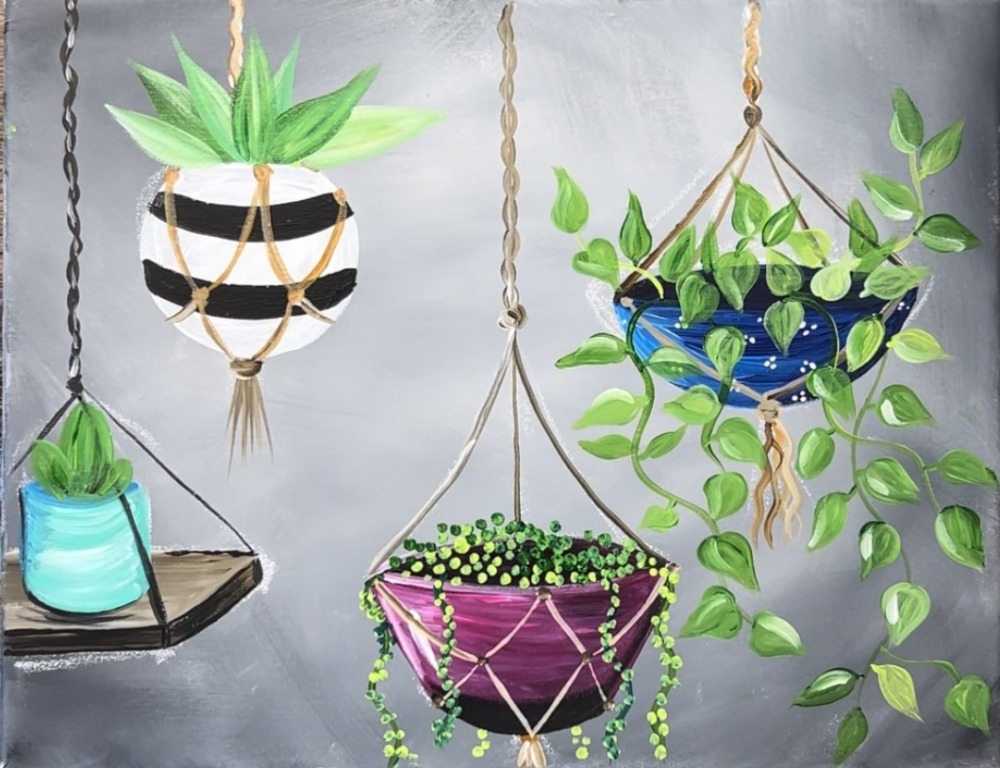
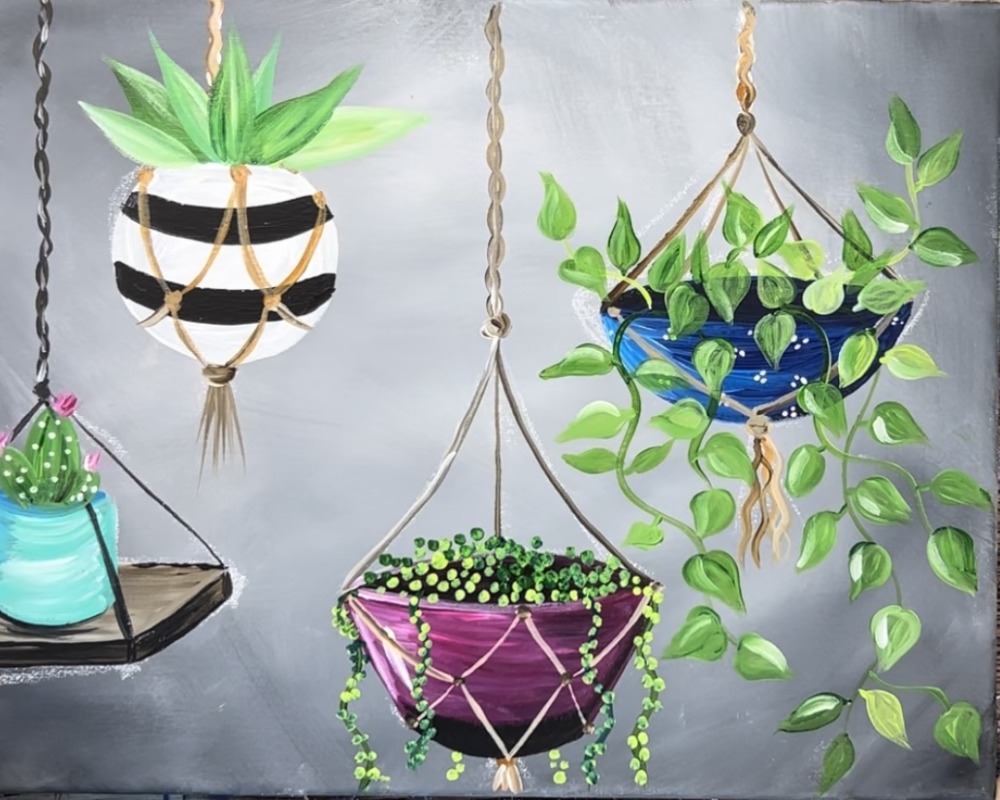
Paint decorative hanging macrame style pots wiht different types of house plants and succulants.
Materials
- 11 x 14 Canvas
- Acrylic Paint
- Paint Brushes
- T-Square Ruler (optional but helpful)
- White Chalk
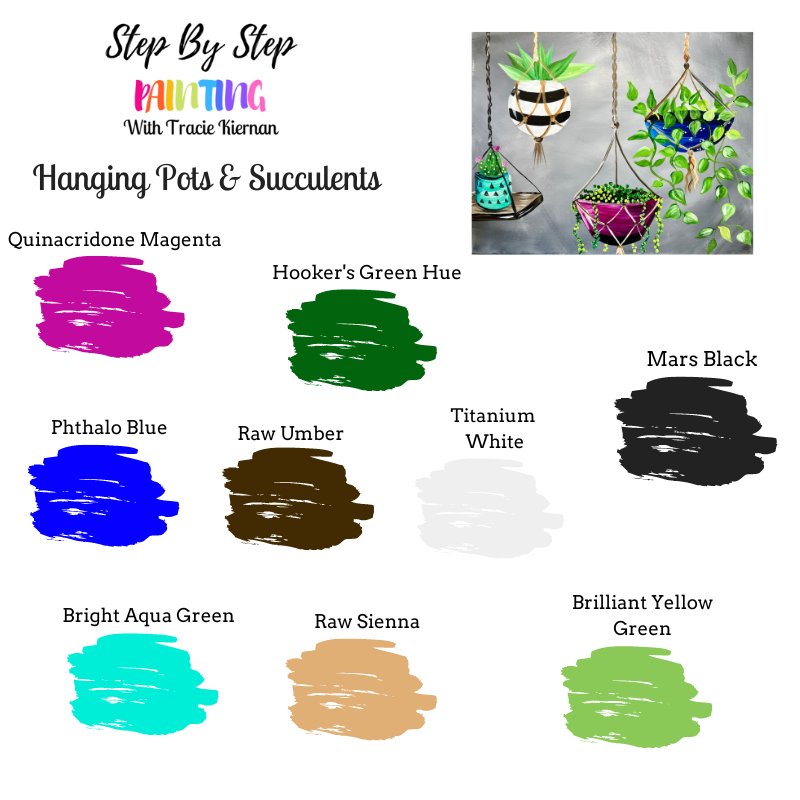
Colors
- Titanium White
- Mars Black
- Quinacridone Magenta
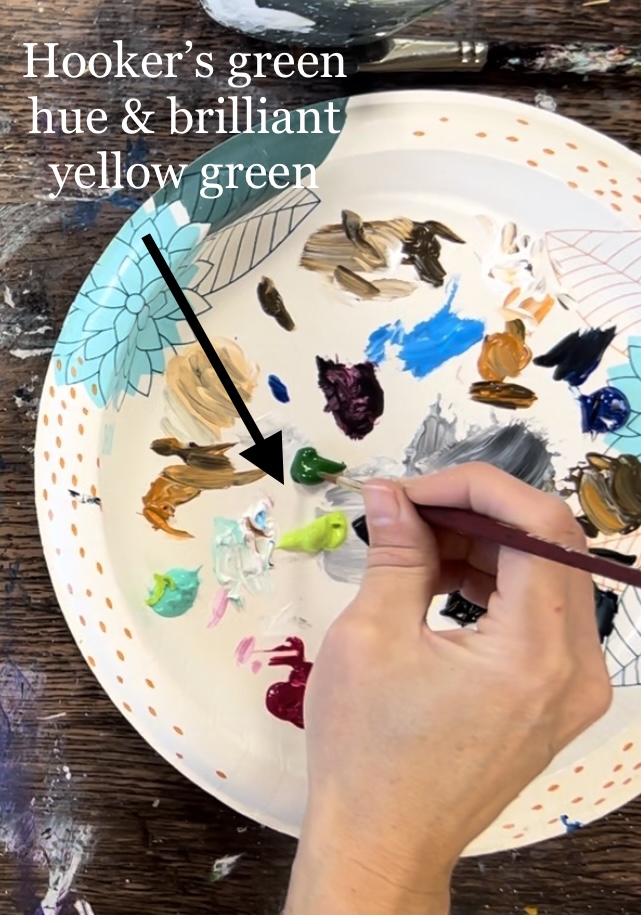
- Hooker's Green Hue Permanent
- Bright Aqua Green
- Brilliant Yellow Green
- Phthalo Blue
- Raw Sienna
- Raw Umber
Brushes
- 3/4 Flat Brush
- 4 Round Brush
- 12 Bright Brush (optional, used very sparingly)
Color Palette
I used Liquitex BASICS brand of acrylics for this tutorial! If you are using a different brand, you can use the color chart below to help you convert colors.
Craft Paint Conversion
If you are using craft paints such as Apple Barrel Craft Paints, I would recommend subbing to:
- White
- Bright Magenta
- Black
- Holly Branch
- Too Blue
- Bimini Blue
- Nutmeg Brown
- Melted Chocolate
- New Shamrock
Directions At A Glance
Video
Step By Step Instructions
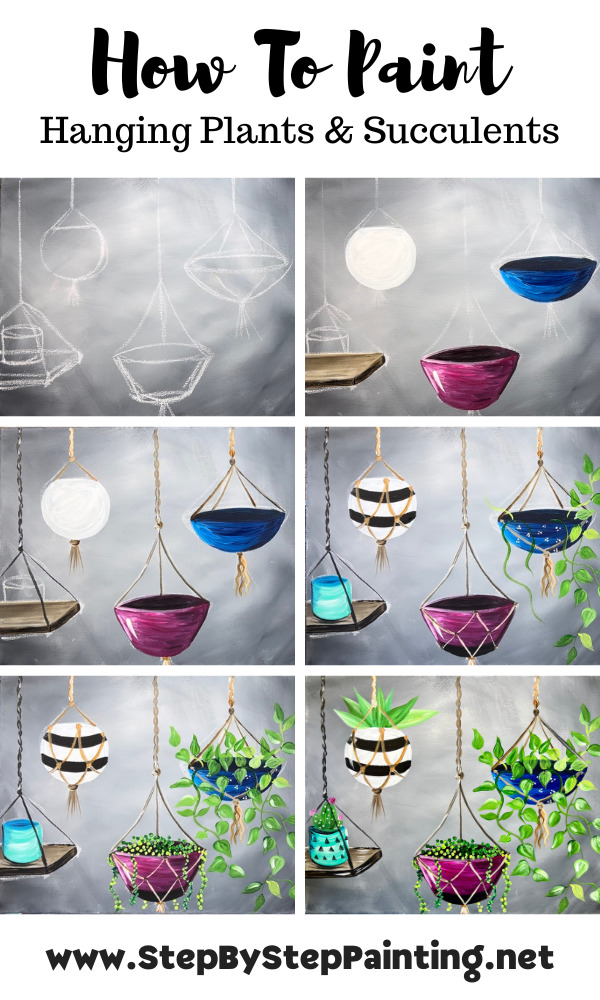
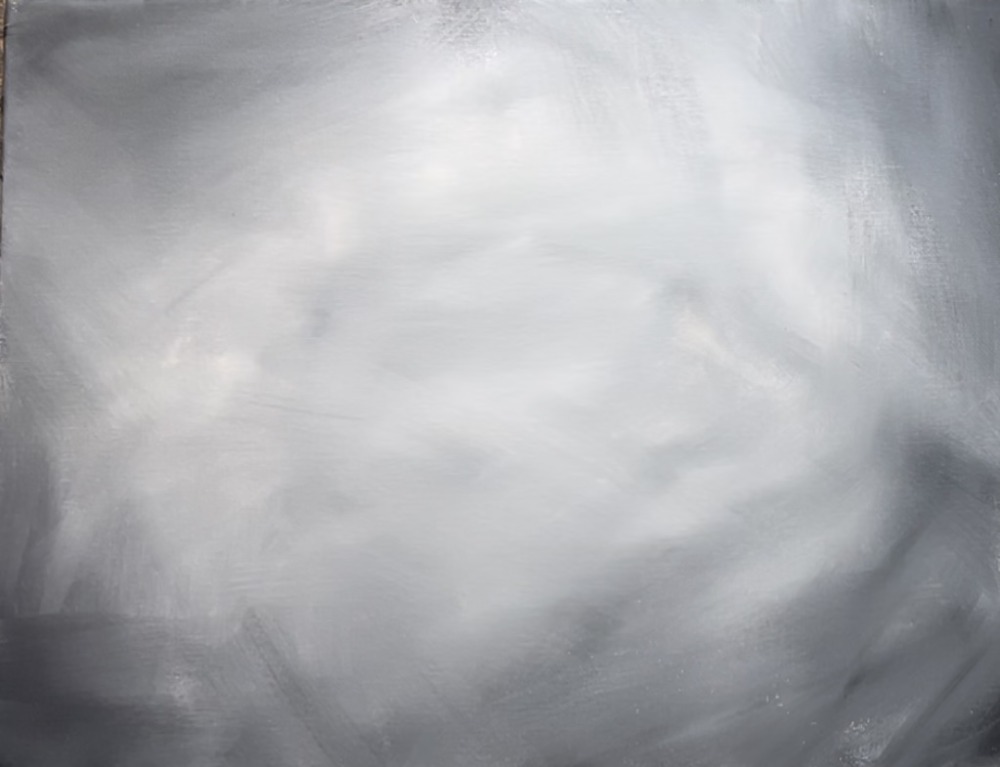
1. Paint the background
This background is a blended background using the color mars black and titanium white. It is a little lighter in the middle and darker on the sides. You can also customize this background with different colors.
Load your palette with titanium white and mars black. Use a 3/4″ flat wash brush and double load it into white and just a small amount of mars black. Start in the center with expressive angle strokes
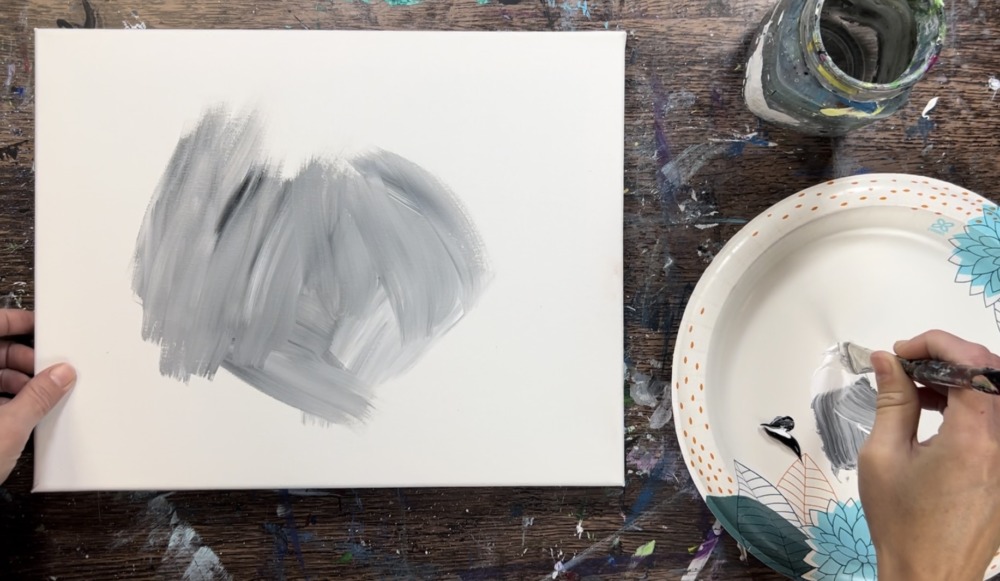
As you approach the sides of the canvas, gradually add more black to the brush so that it blends darker. You’ll only need small amounts of mars black. Continue to paint with expressive, angle strokes that blend the colors on the canvas. It is okay to not over blend the colors.
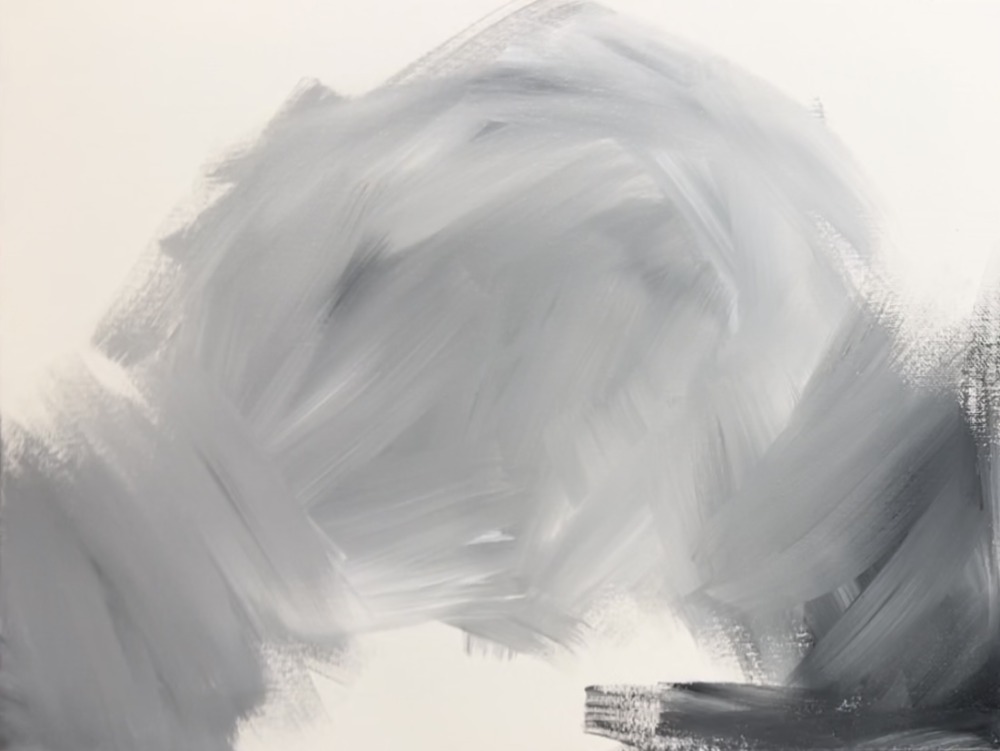
You can go back over your strokes softly with the 3/4″ flat to blend the harsh angles so they look more soft.
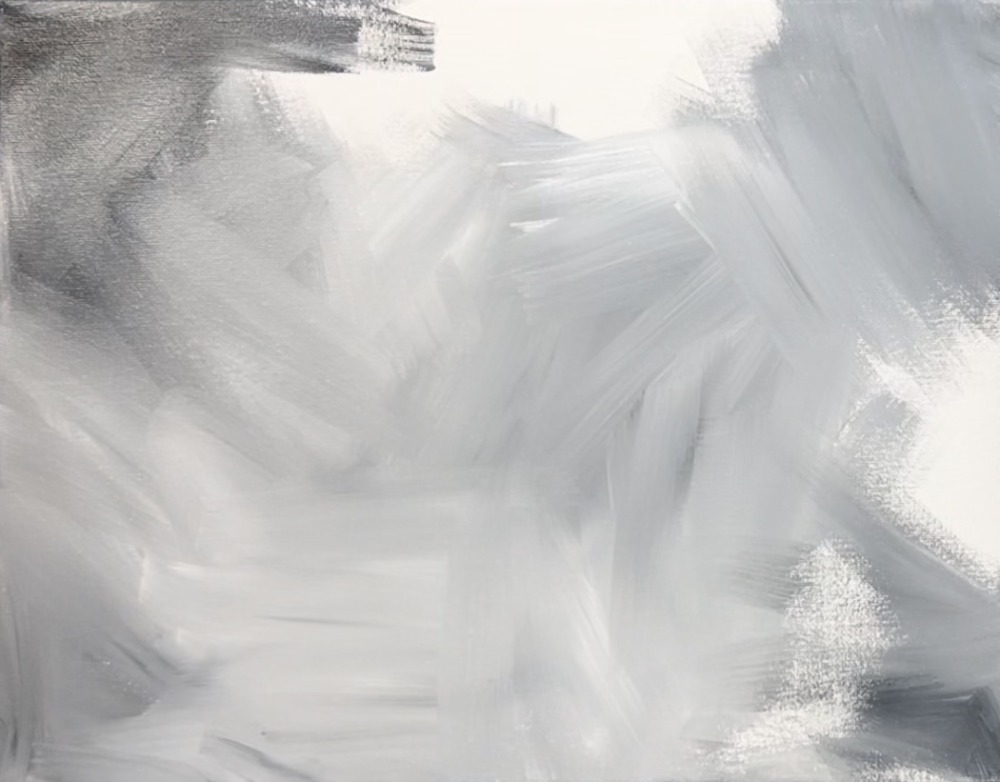
Fill the entire canvas. Then let this dry before proceeding to the next step.
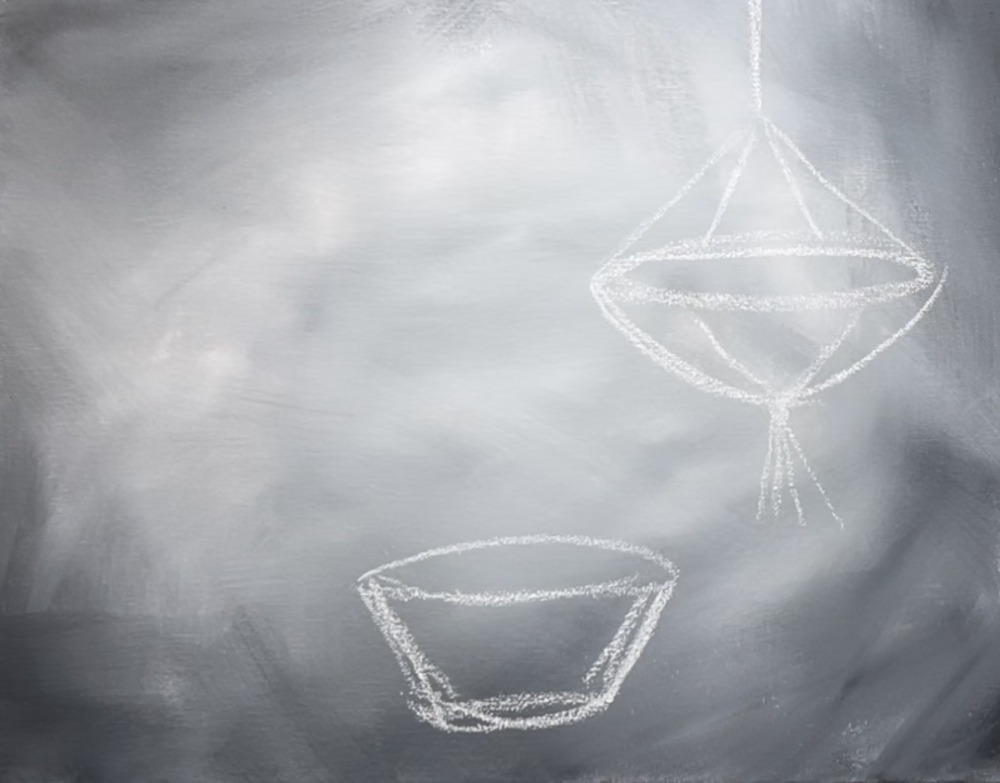
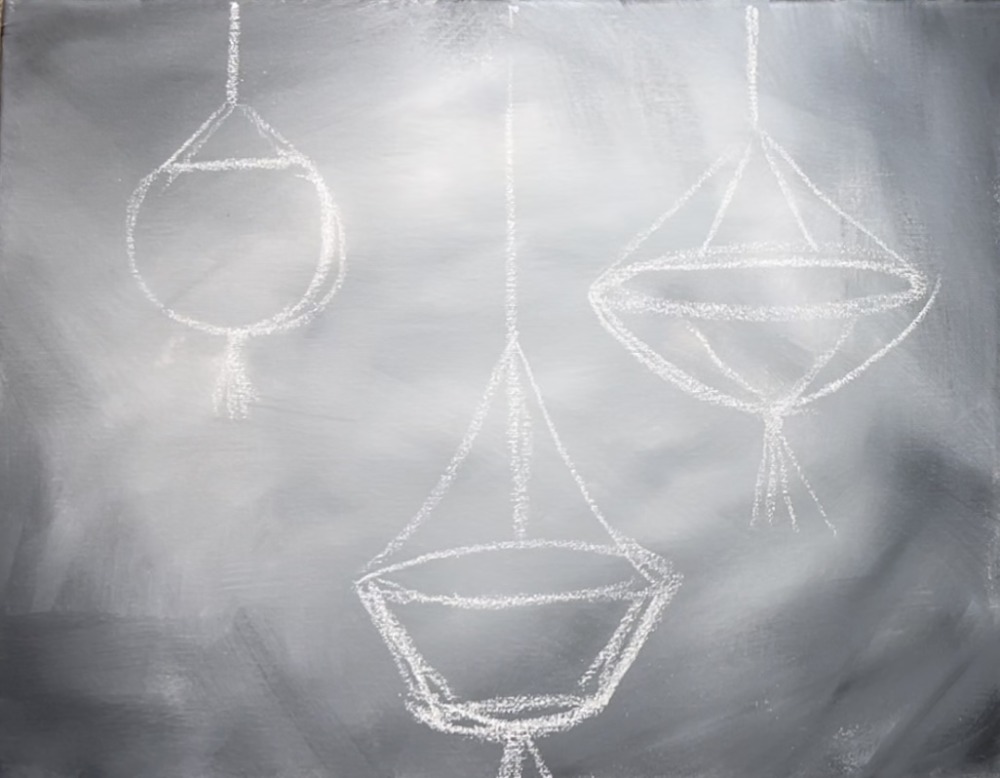
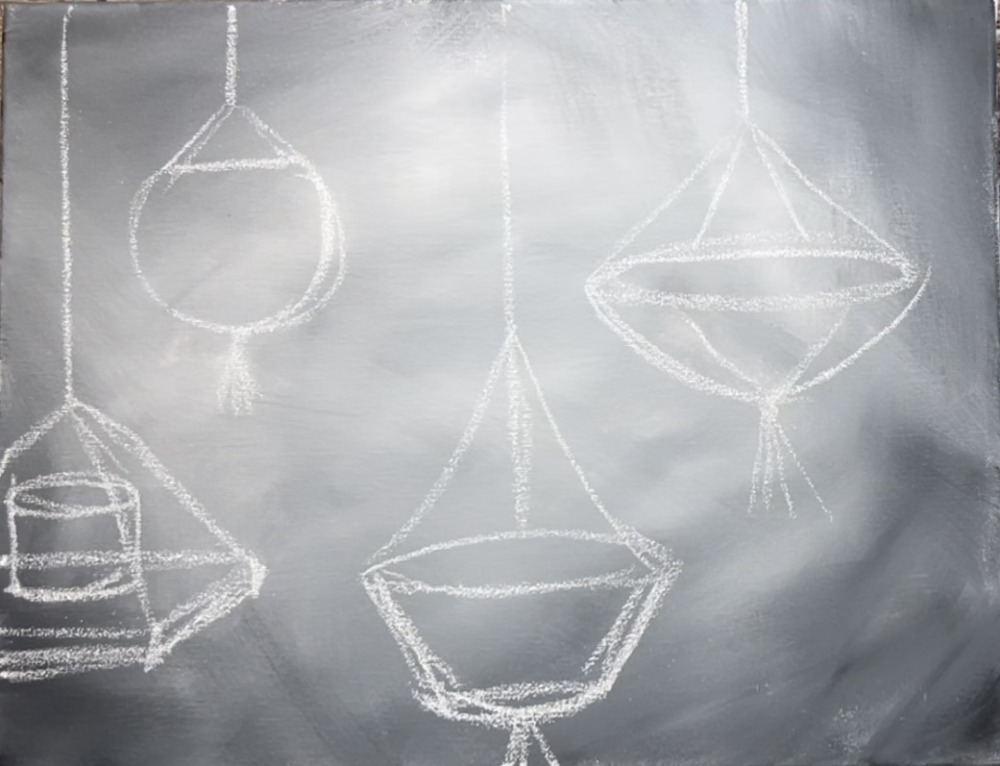
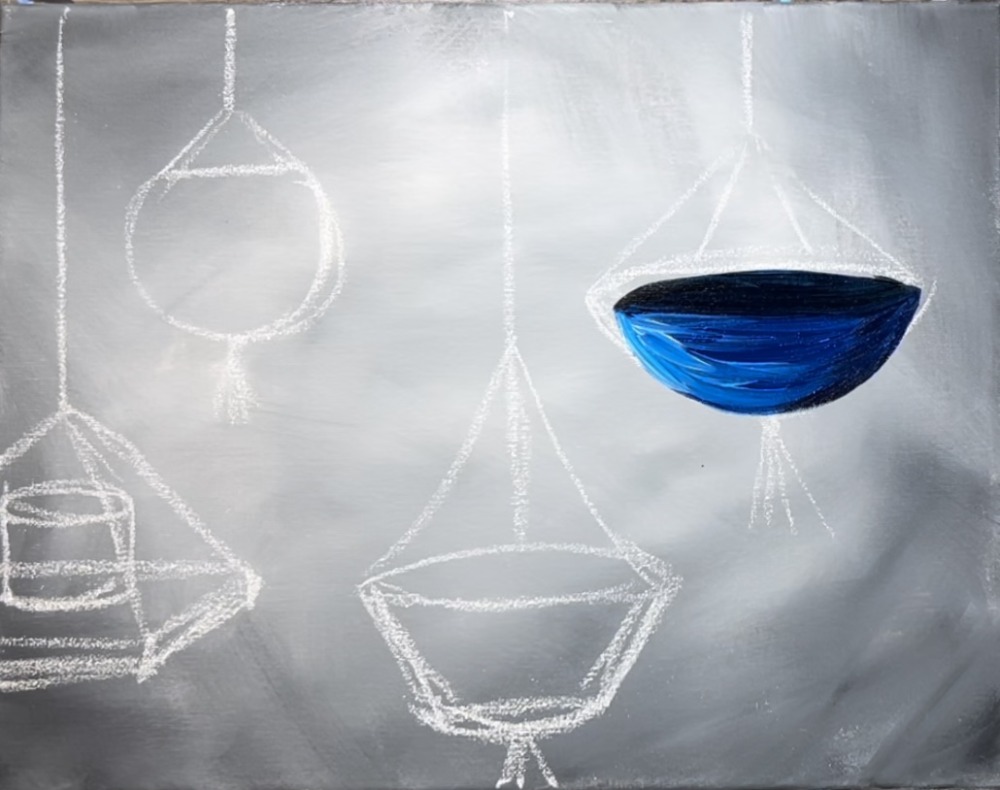
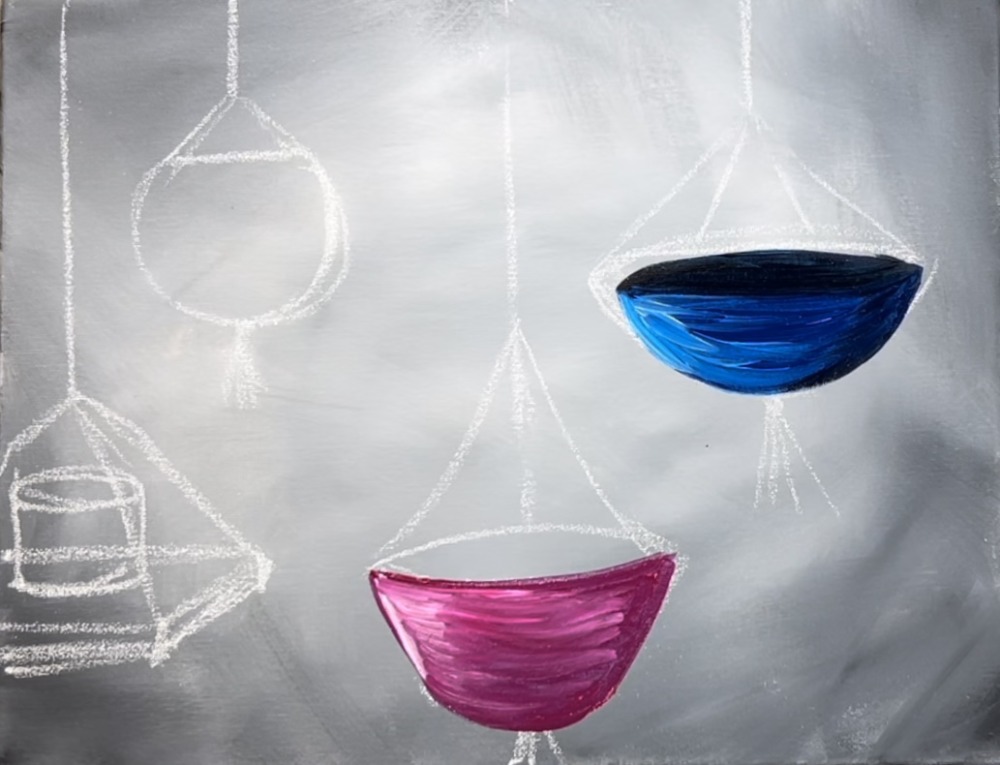
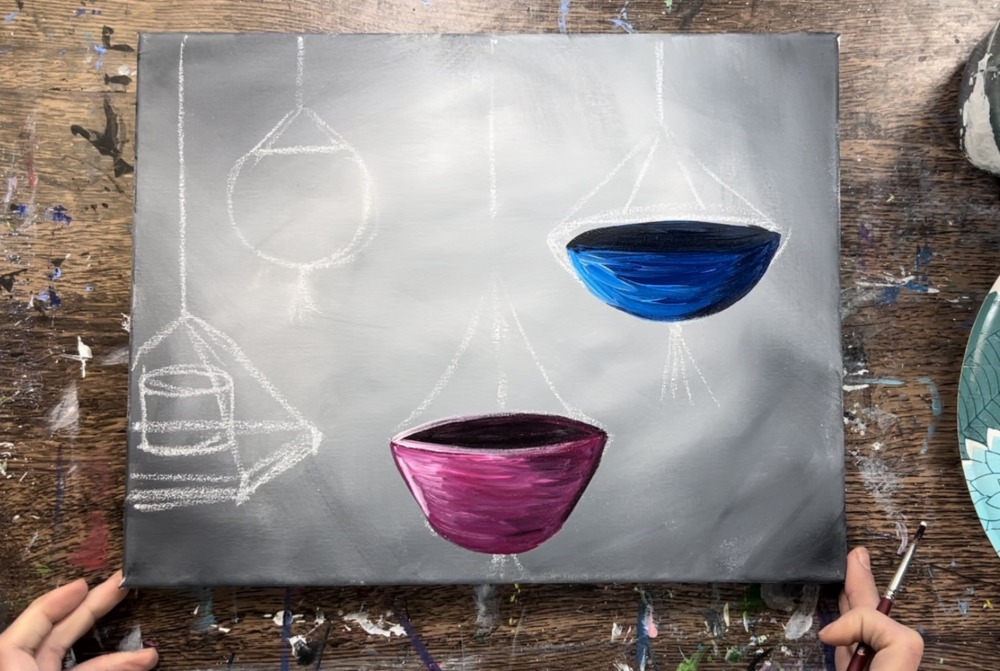
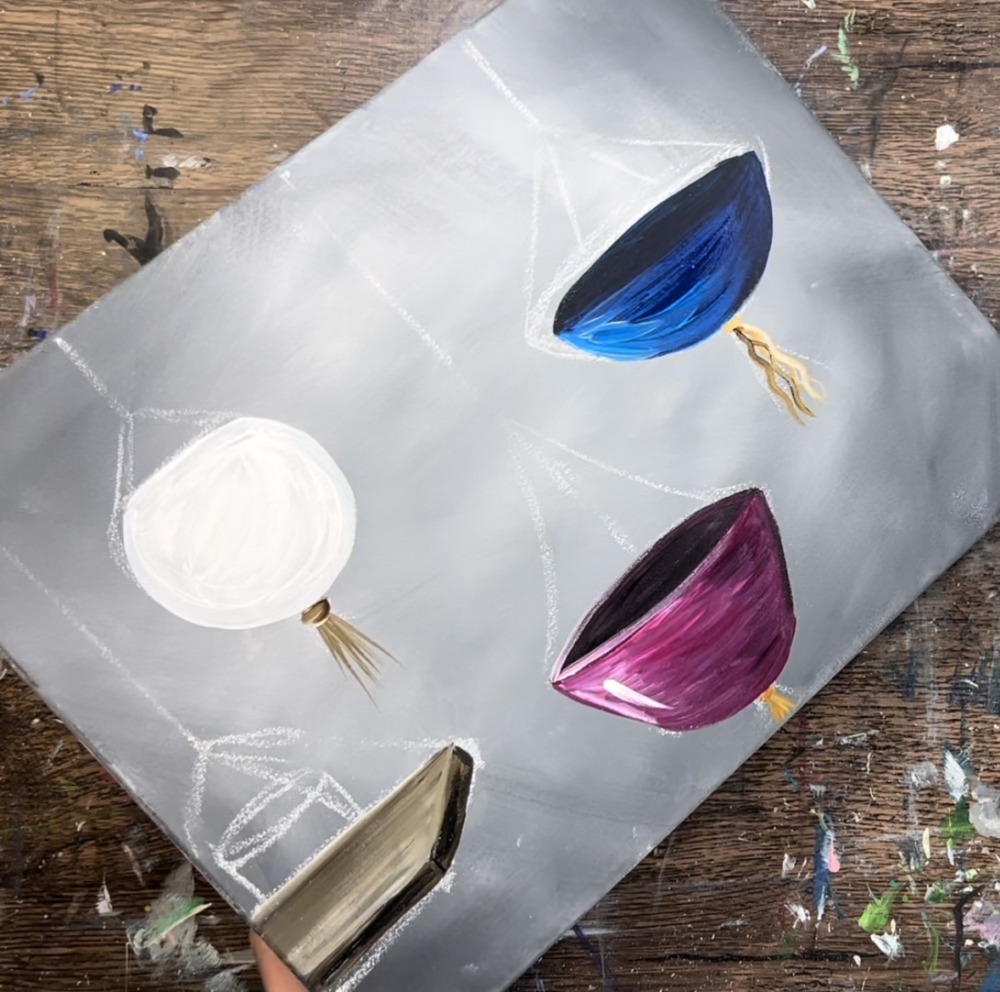
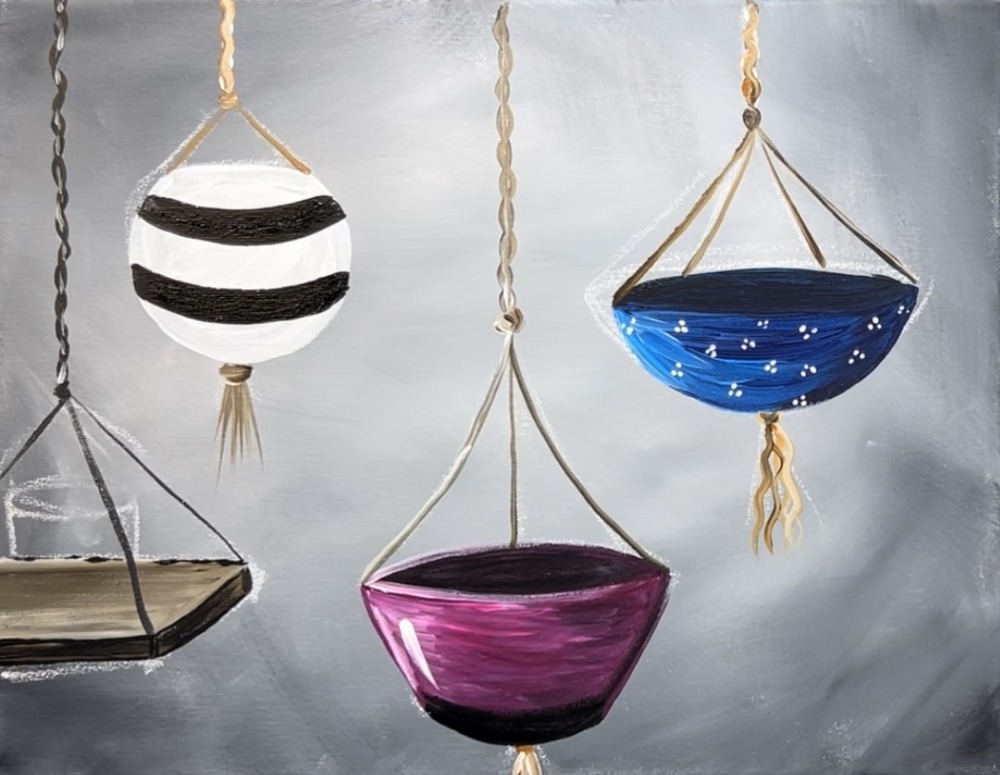
2. Draw Pots & Cords
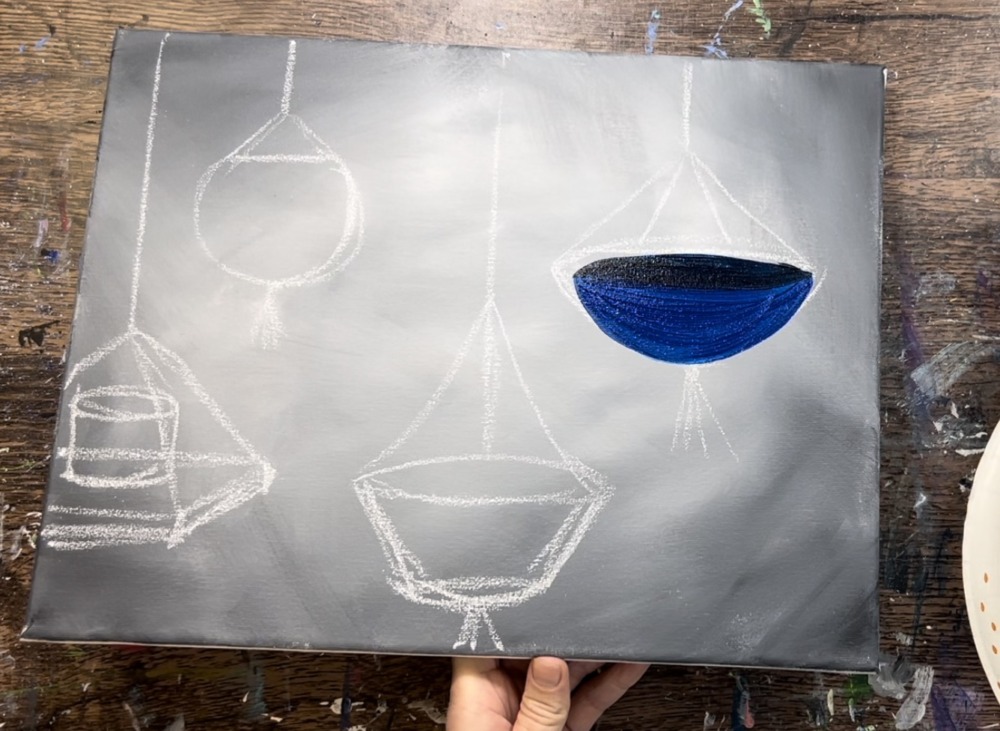
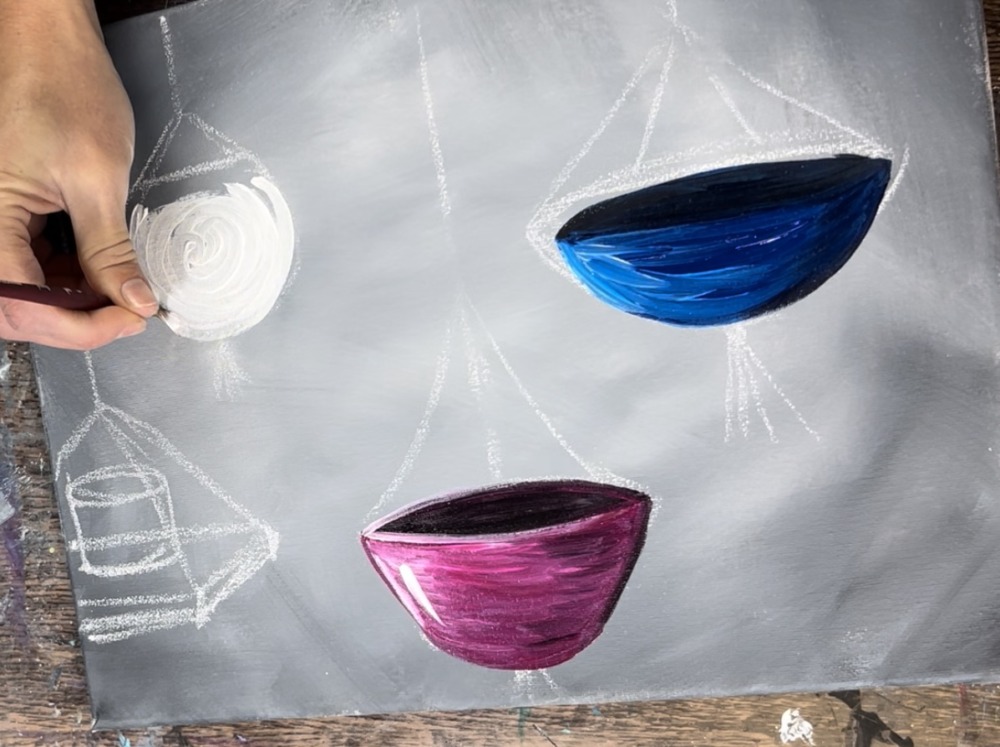
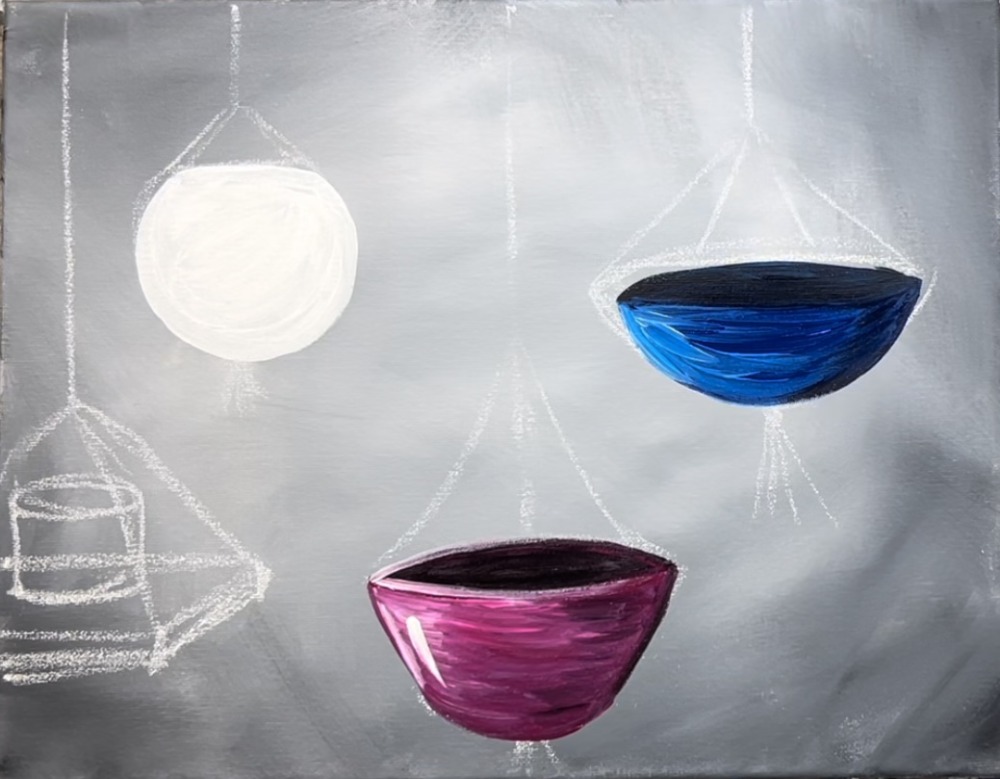
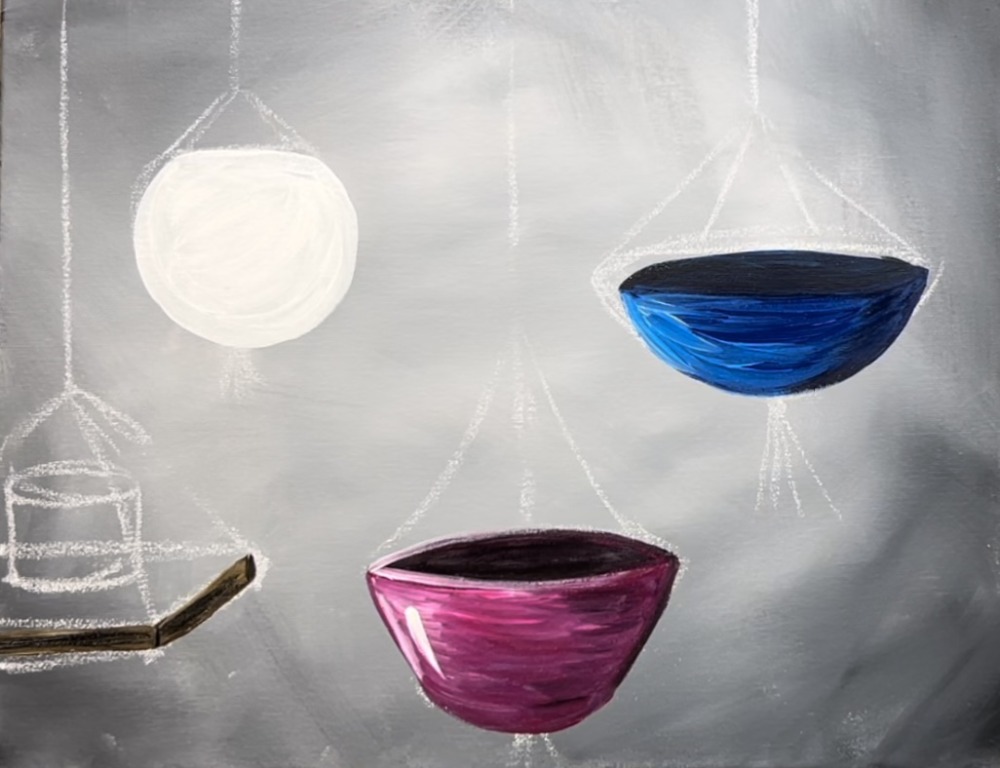
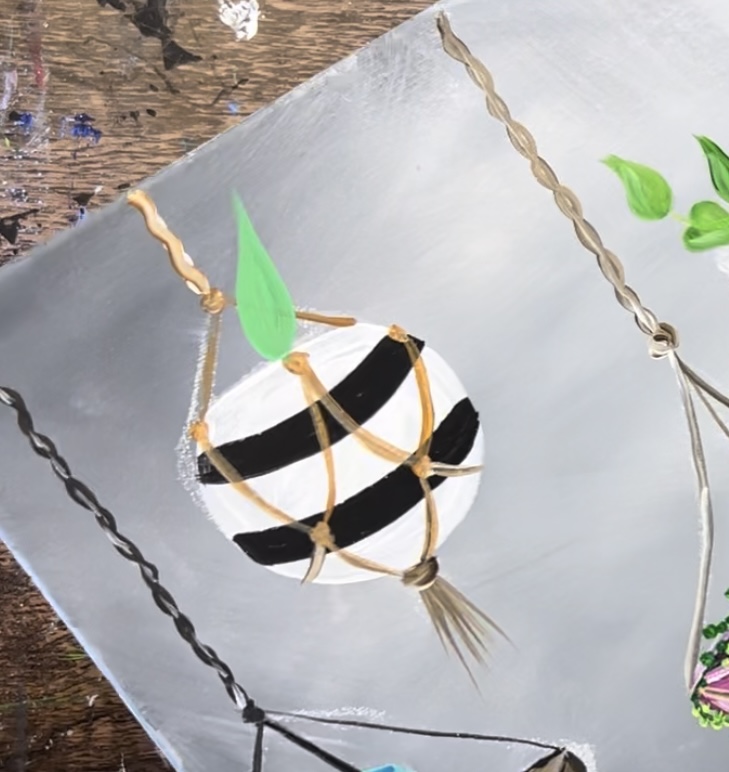
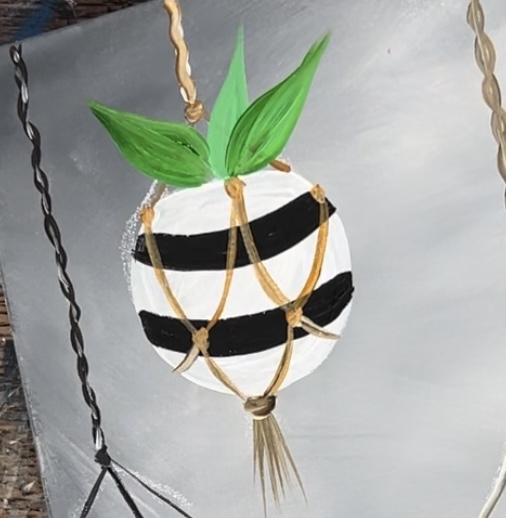
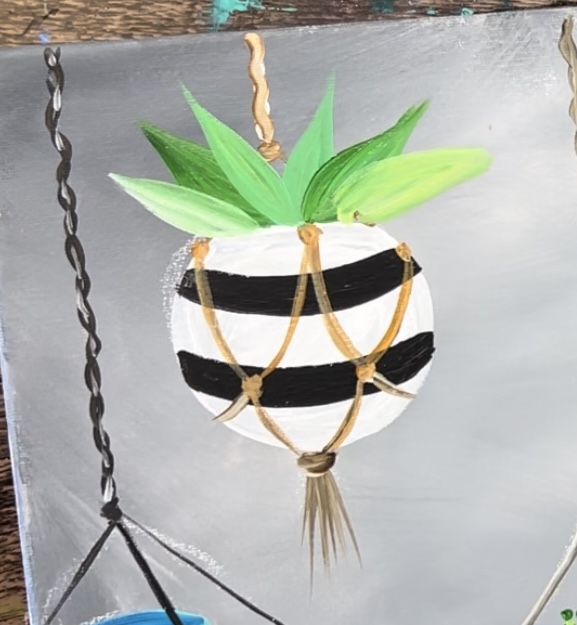
Use a regular white piece of chalk to draw each of the pots. Start in the upper right area of the canvas and draw a semi-circle, upside down dome shape.
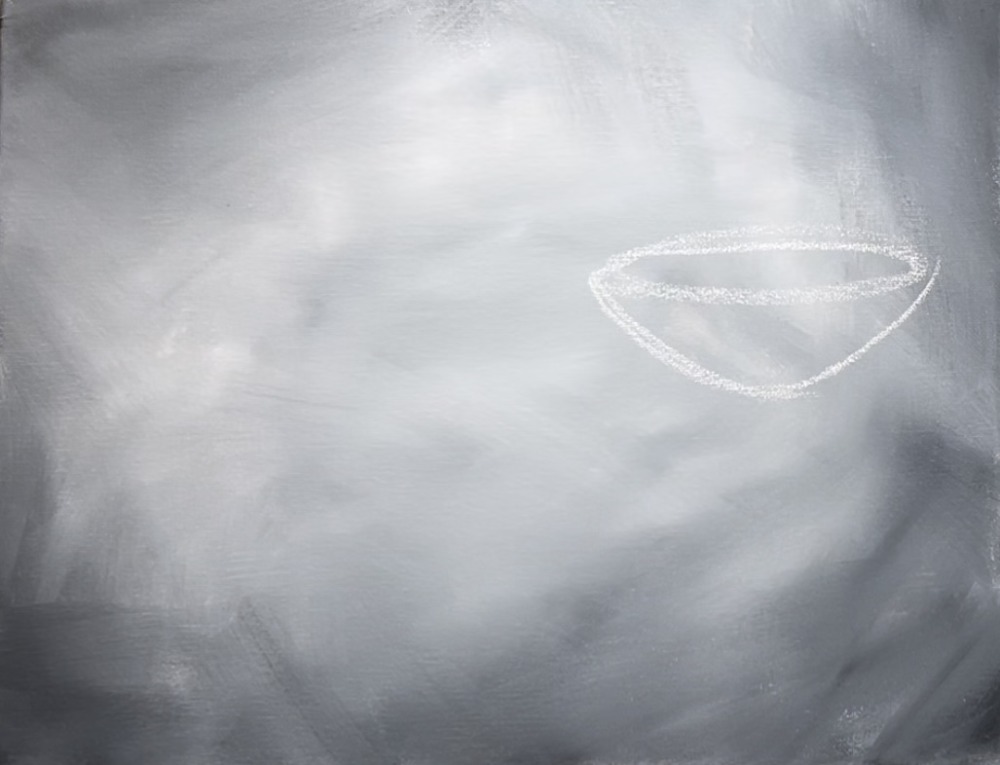
Then draw diagonal lines and a vertical line for the cord. Also draw a small dot for the knot and hanging pieces.
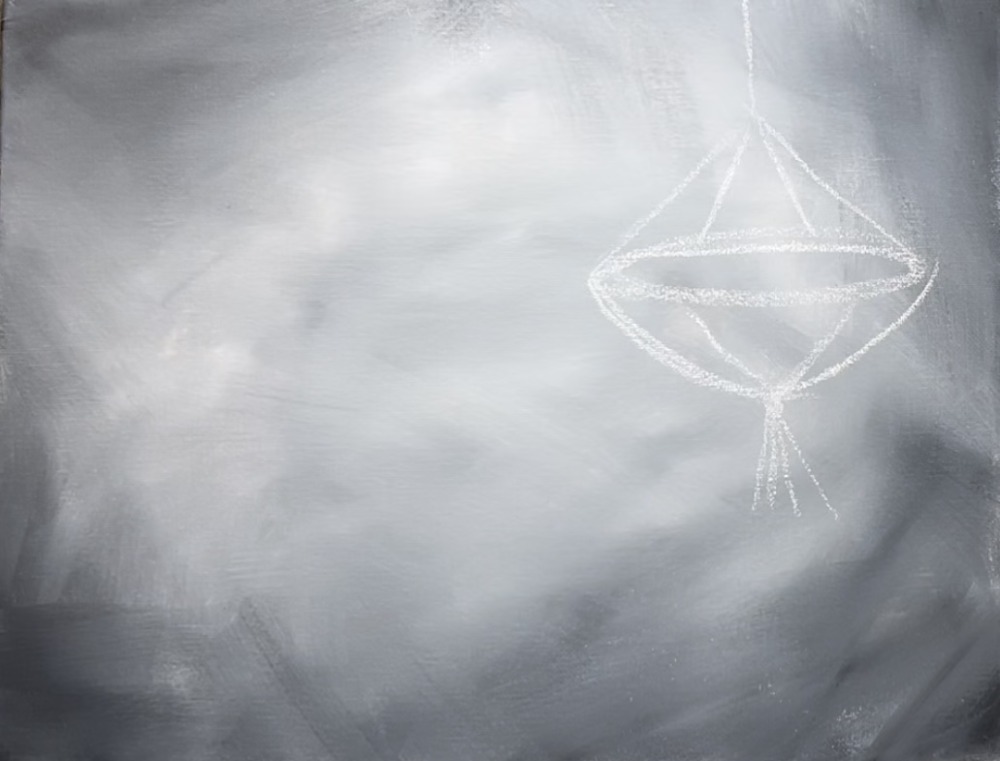
Then draw a second pot that is more of a trapezoid shape. Draw a narrow oval for the opening.
Then draw a vertical line and two diagonal lines for the cord.
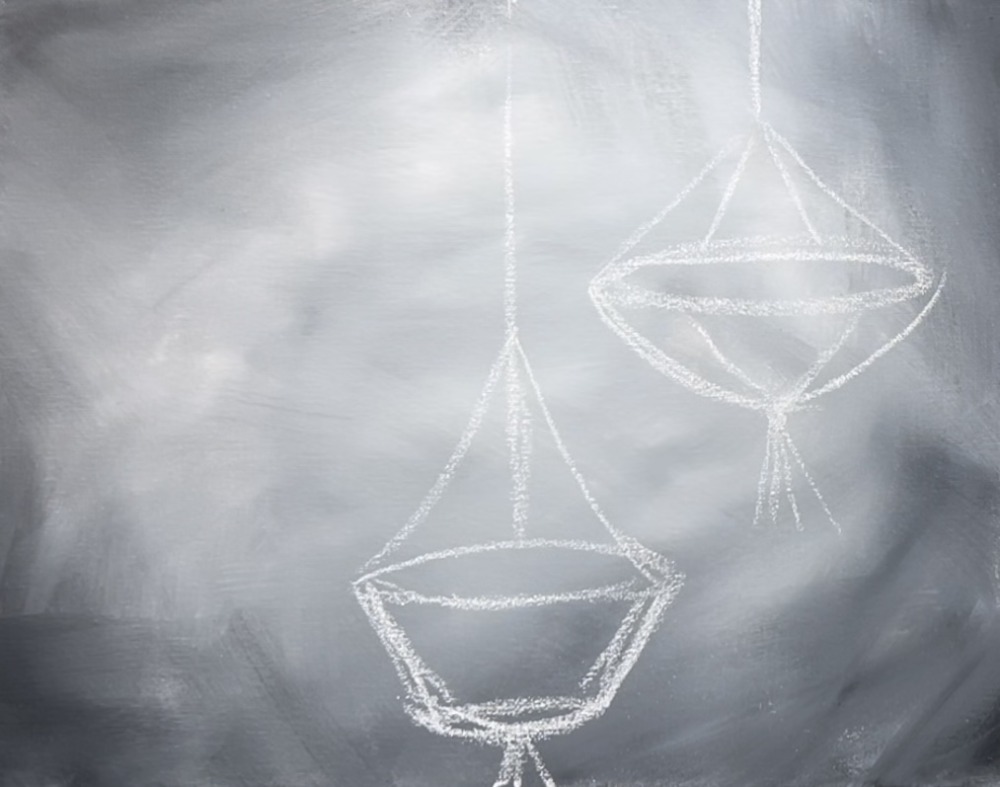
Draw a circle shape pot on the upper left area of the canvas. Then draw a vertical line and two diagonal lines for the cords. Draw a small dot for the knot and small diagonal lines hanging down.
Next, draw a rectangular ledge going off the side of the canvas.
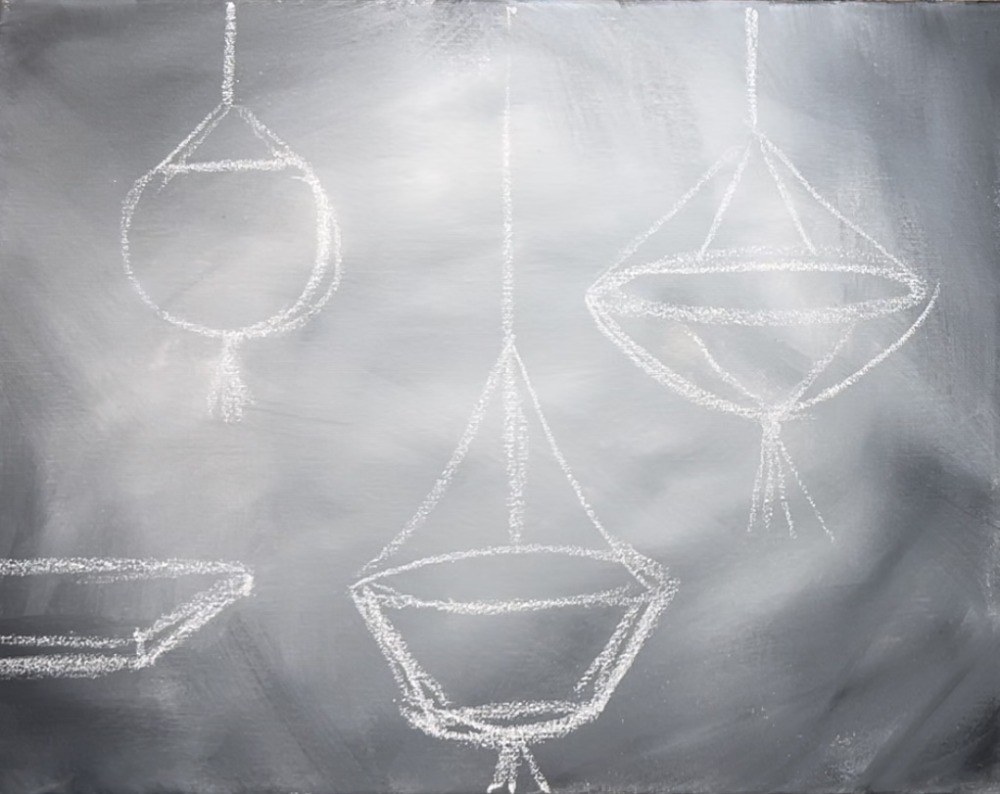
Then draw a cylinder shaped pot on top of the ledge.
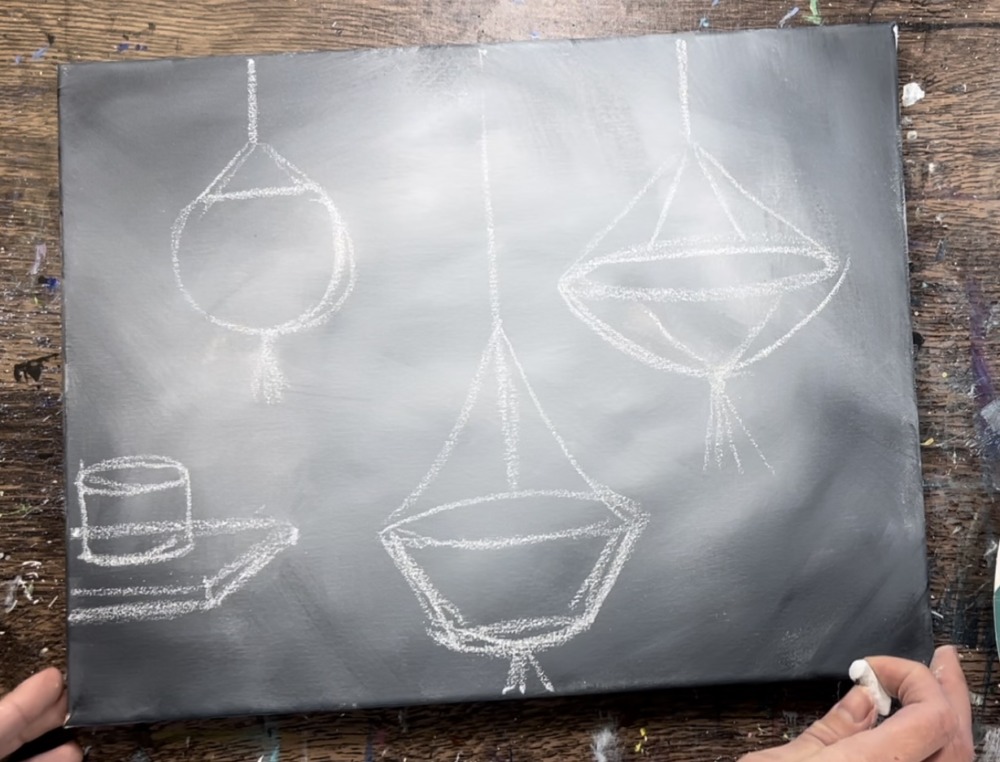
Draw the cord lines going diagonally up from the corners of the ledge and then going vertically.
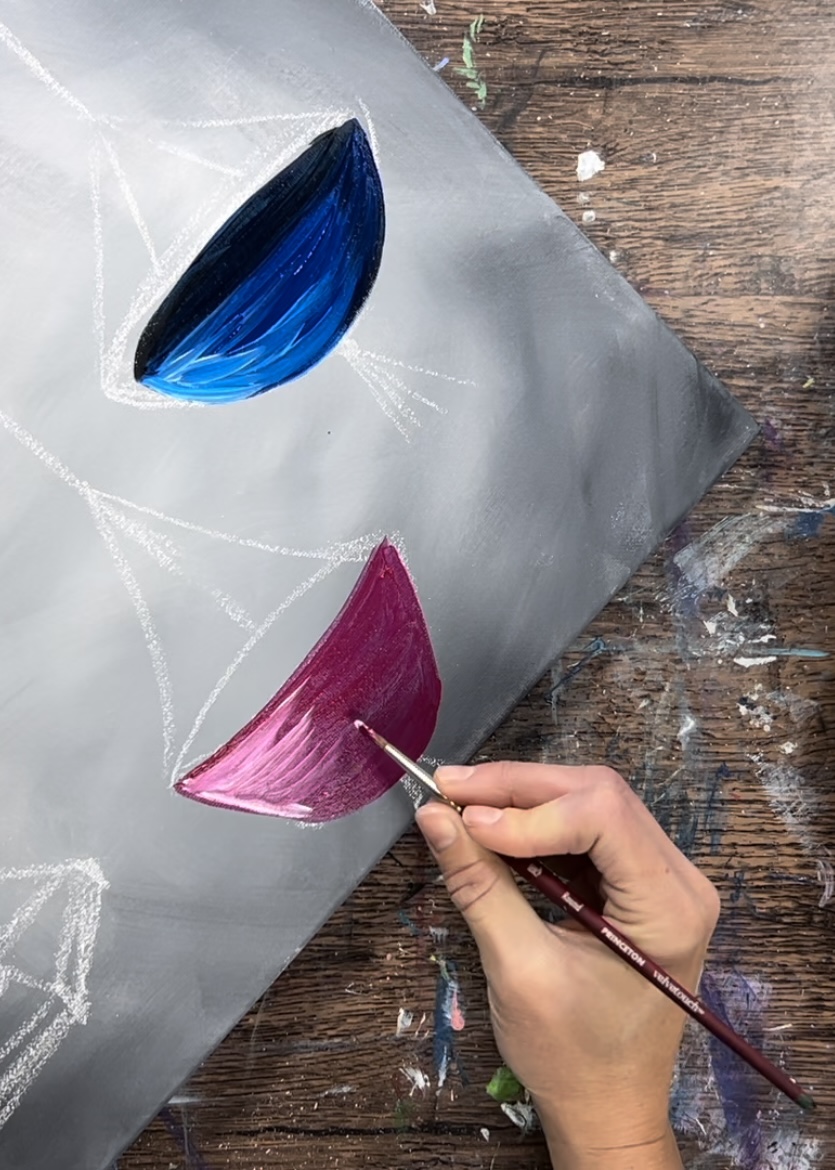
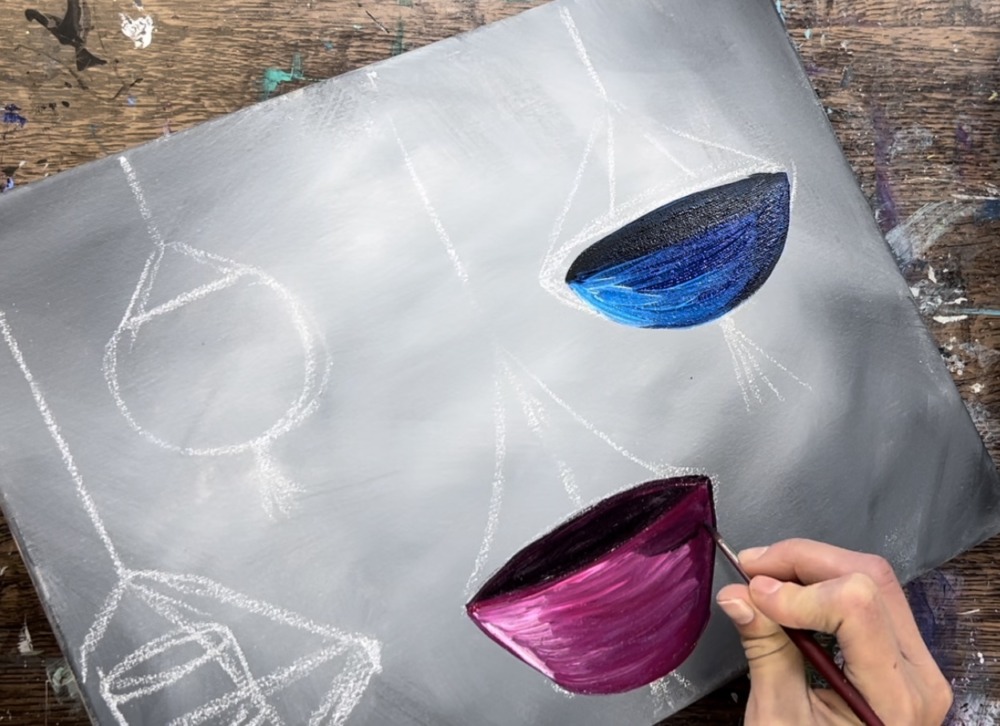
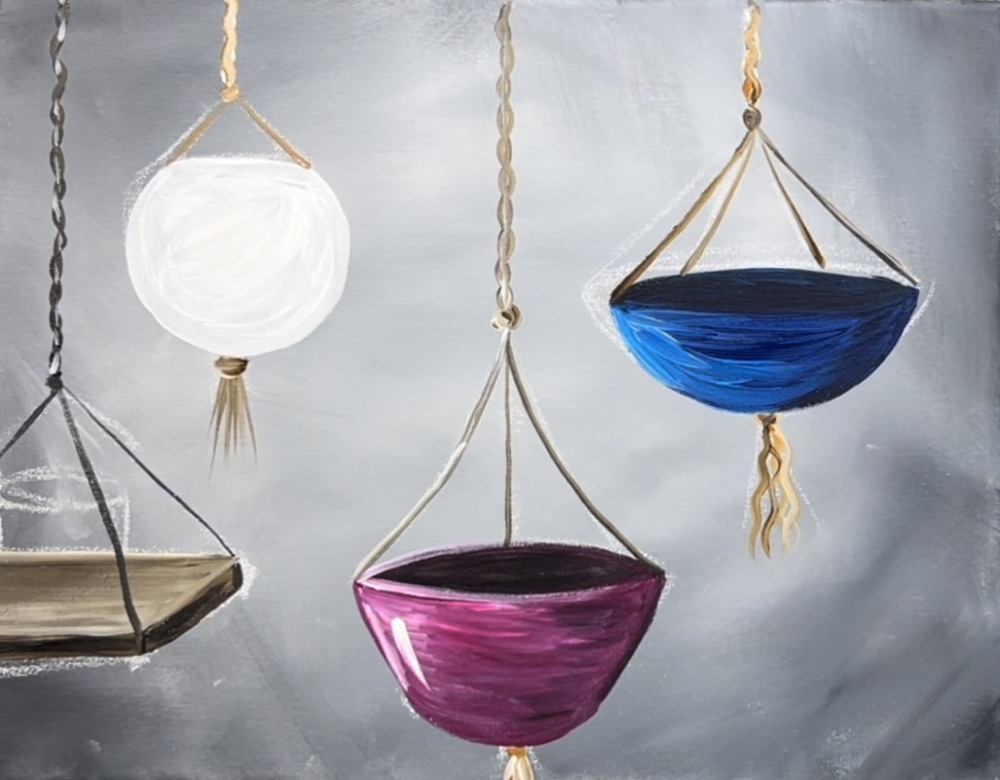
3. Paint Pots
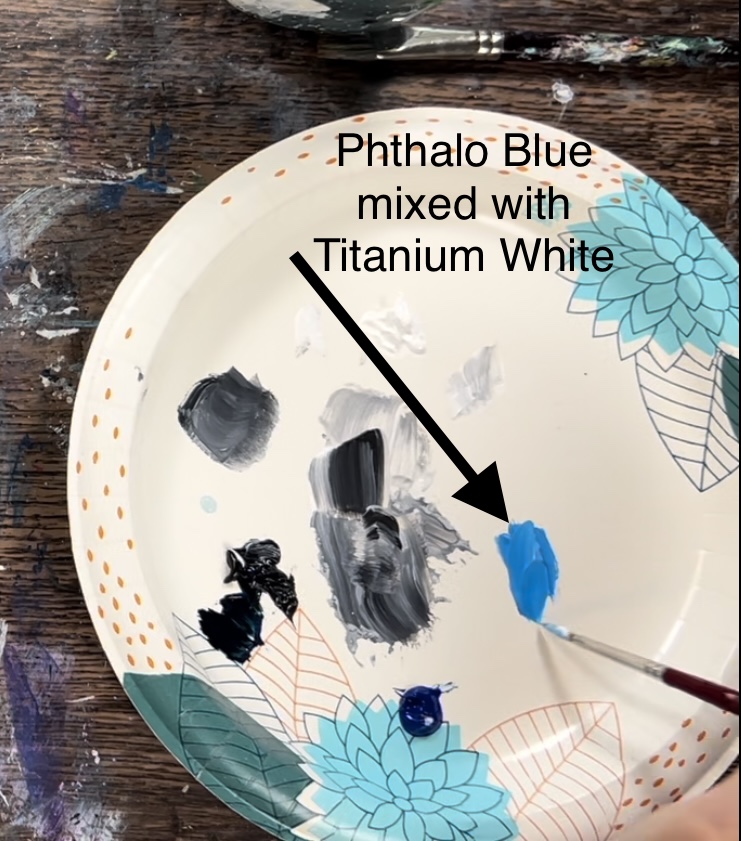
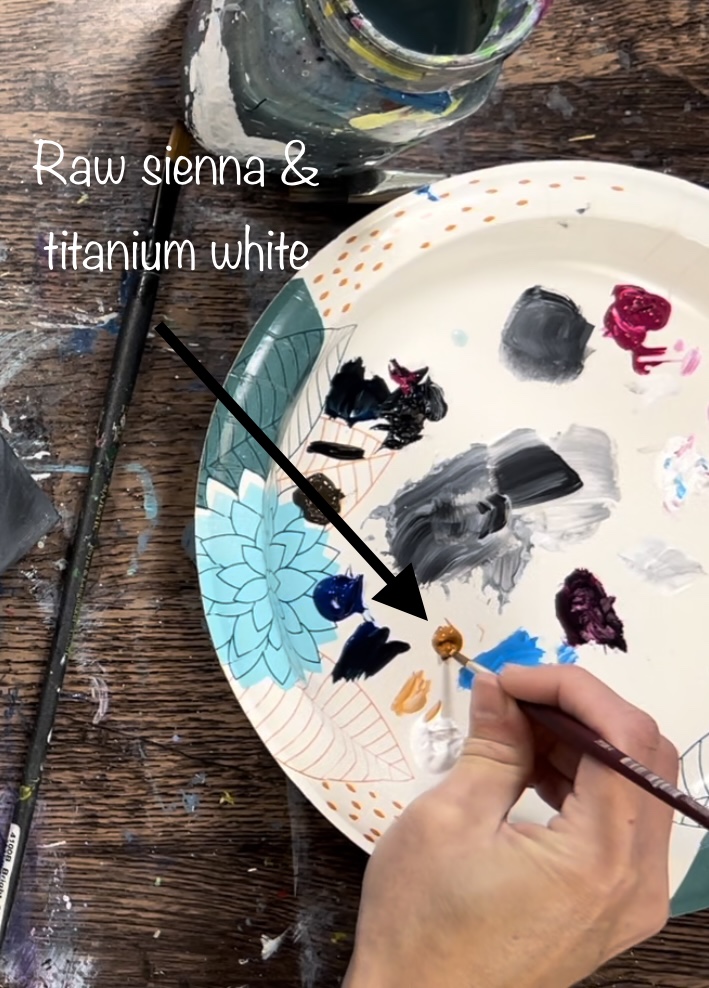
Load your palette with the colors: phthalo blue, titanium white, mars black, quinacridone magenta, burnt umber and raw Sienna.
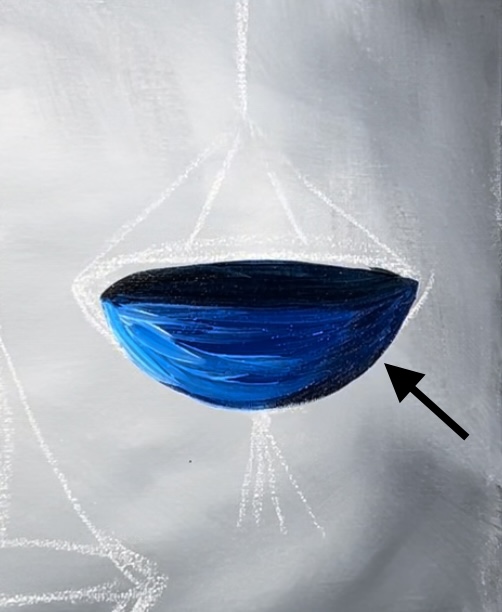
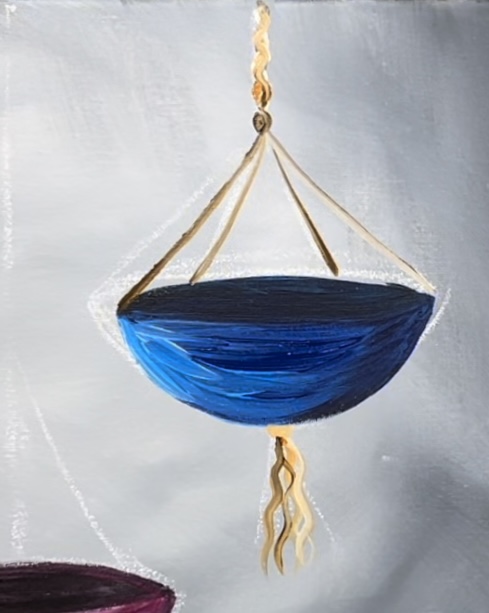
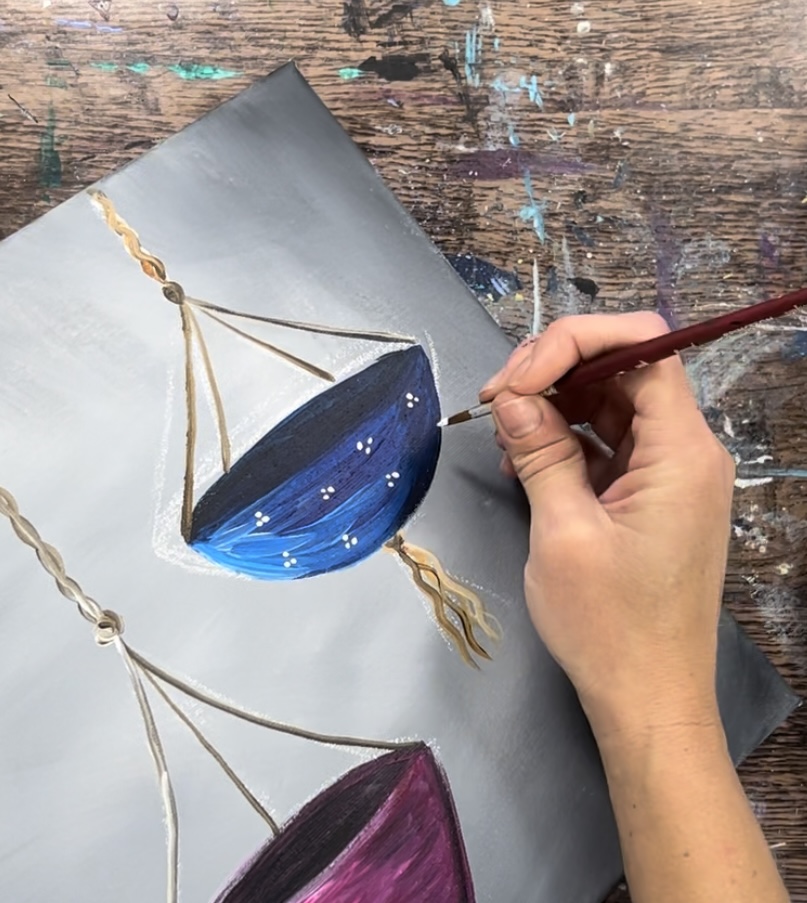
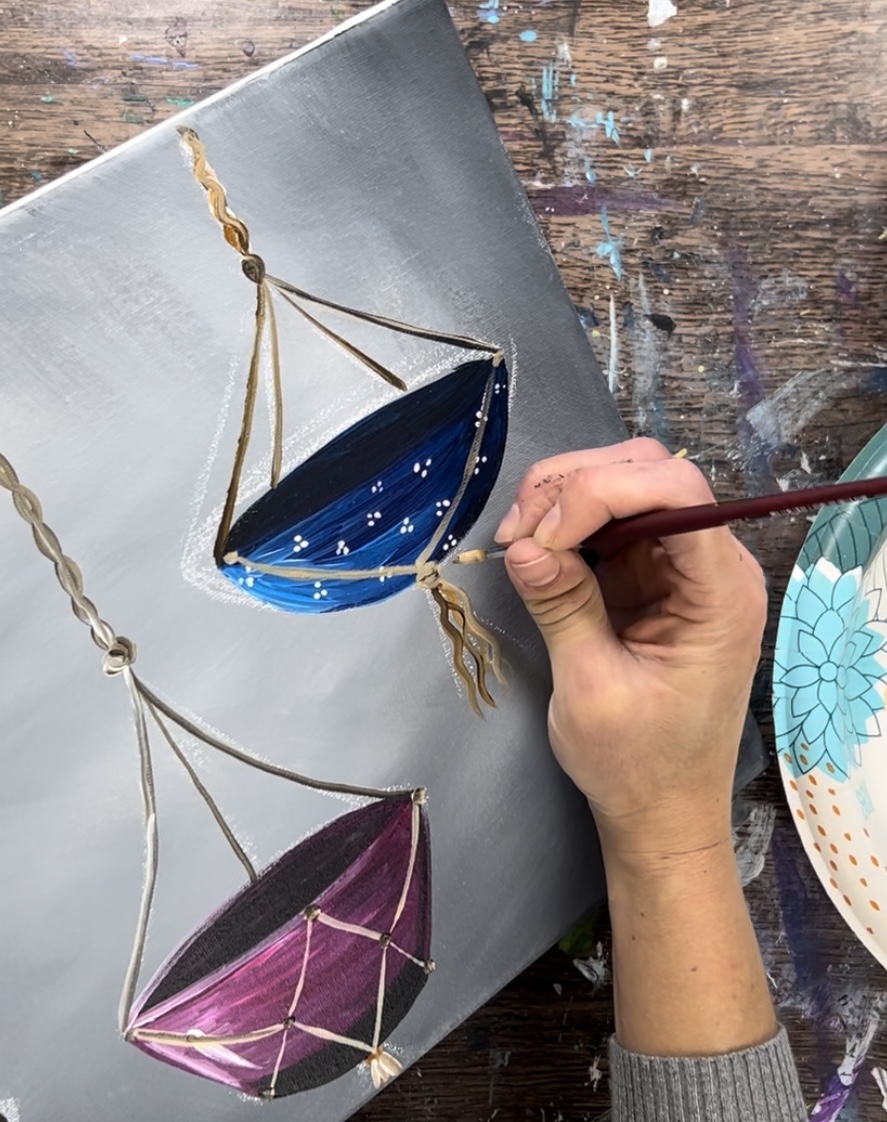
Start with the dome shaped pot on the right. Use your #4 round brush to paint the pot a solid coat of phthalo blue. Paint with long, curved strokes to give your pot form.
Then paint the opening of the pot “mars black” mixed with a small amount of phthalo blue.
Next, mix white with phthalo blue on your palette to make a lighter blue. Use the light blue to “highlight” the pot by adding the light color just on the left side.
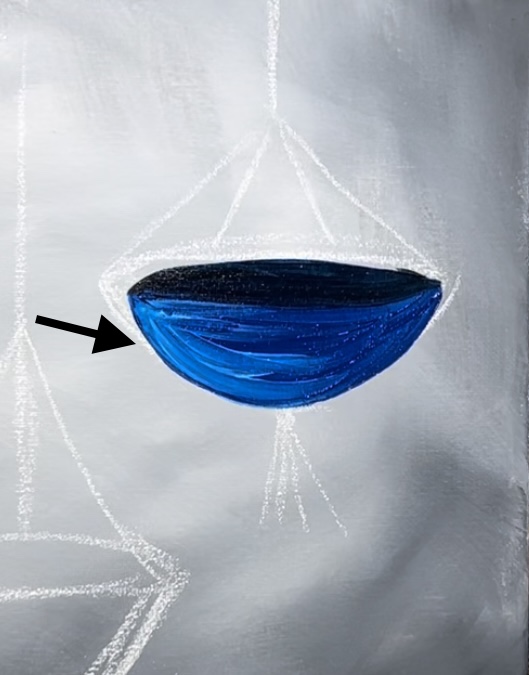
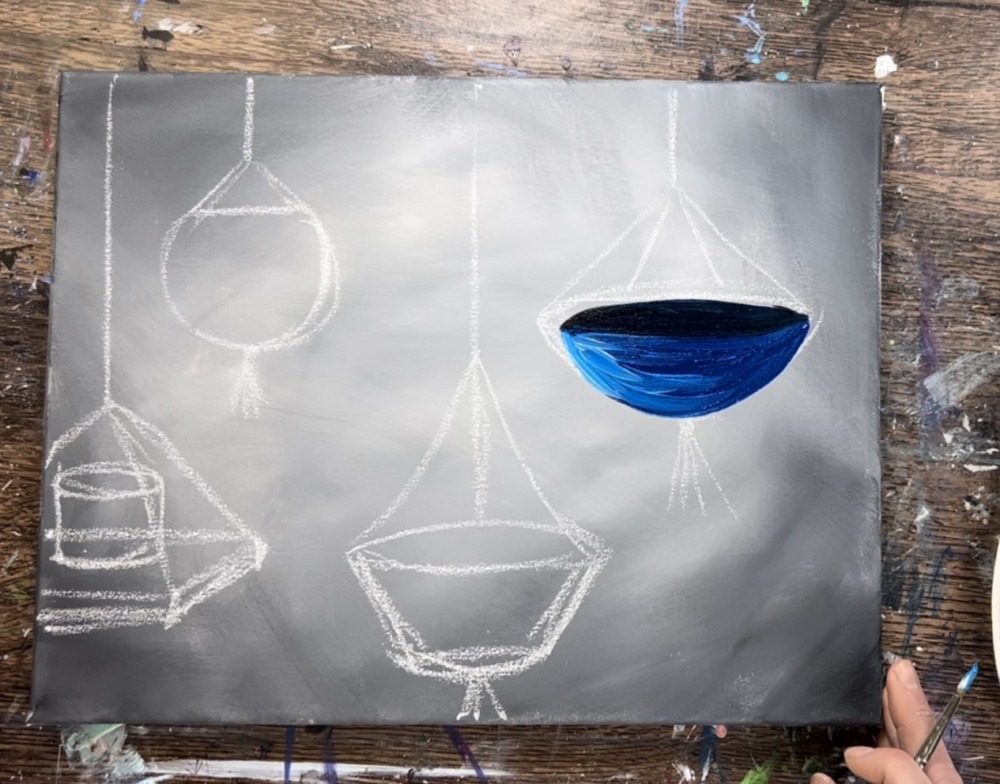
Rinse the brush. Then use mars black mixed with phthalo blue to paint the right side of the pot a darker color for the shading/ shadowing.
Next, paint the magenta pot. Use a clean, dry #4 round brush. Paint the pot a solid coat of quinacridone magenta. Do this with curved strokes to give the pot form.
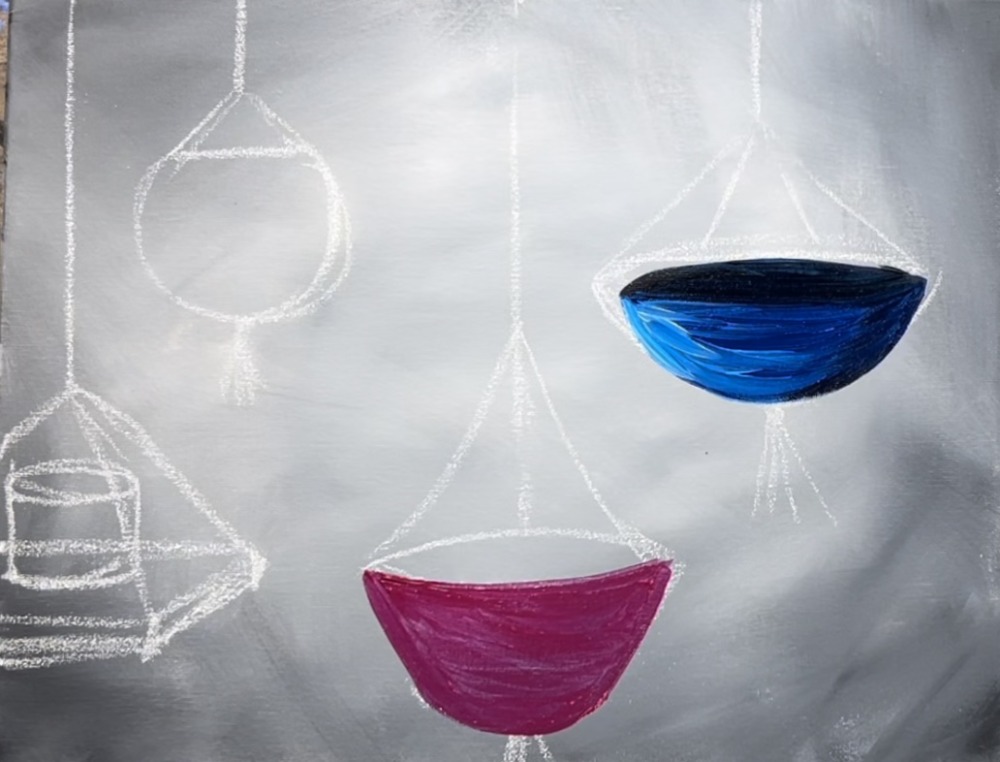
Then, add white on the left side of the pot for the highlight and blend it in.
Then add a small amount of black into the magenta. Blend the darker color on the right side of the pot and blend it into the rest of the magenta.
Next, paint the rounded pot in the upper left part of the canvas. Do this with titanium white and the #4 round brush. Paint this a solid coat and don’t worry about the shading or highlighting.
Next, paint the wood ledge. Load your palette with raw umber. Use a #4 round brush to first paint the sides of the ledge.
Then use a #12 bright brush to paint the flat top part of the ledge. Load your brush in equal parts titanium white and raw umber. Then use the full width of the brush to paint the entire board. Drag the brush with full width strokes across the board. The color of the brown should be lighter than the darker sides of the board.
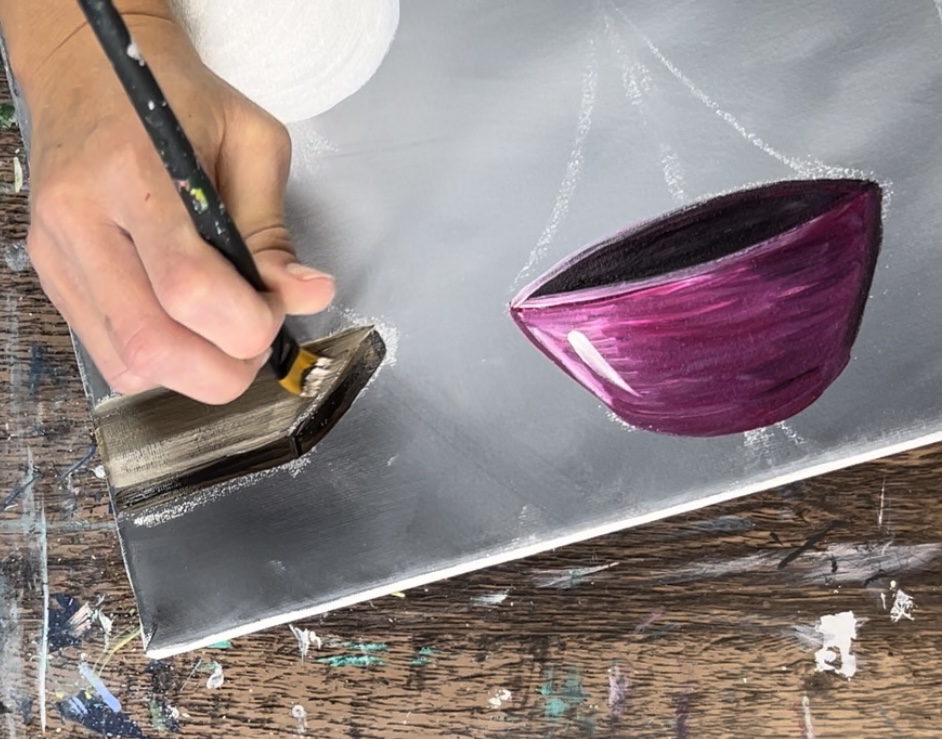
Try not to mix the brown all the way. When left “un-blended”, it gives the wood a faux wood look.
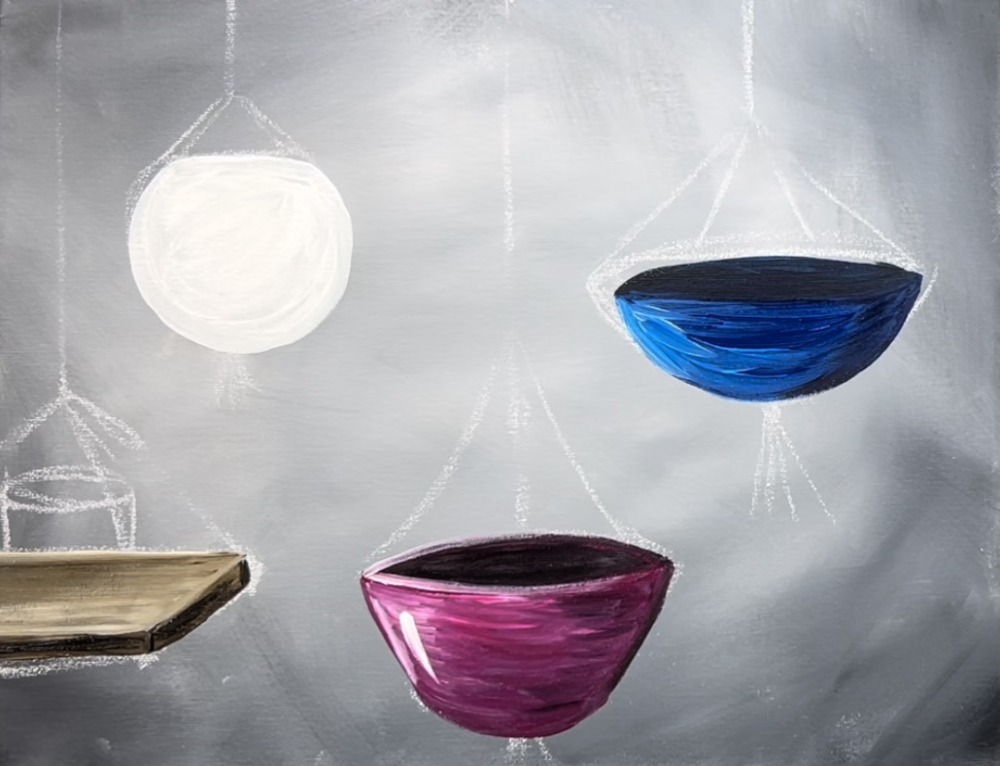
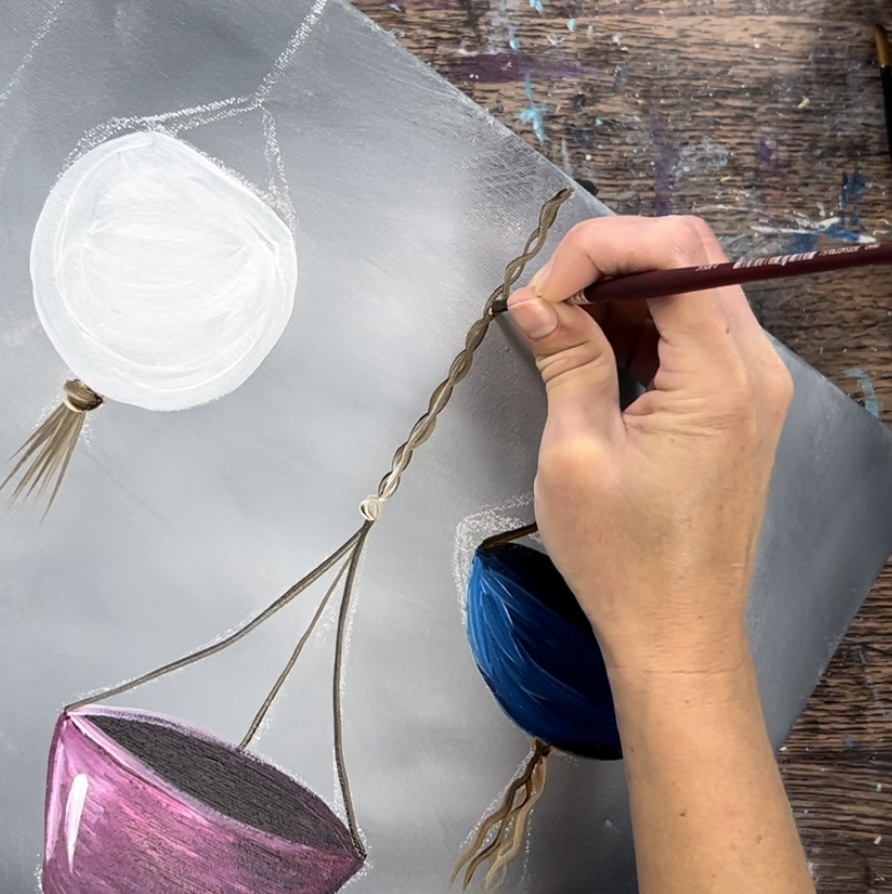
4. Paint Cords
Use a #4 round brush and the colors: raw umber, titanium white and raw Sienna to paint the cords.
Start by loading your #4 round brush into raw Sienna and titanium white.
Start by painting a small dot for the knot. Then paint loose, wavy lines going down from the knot.
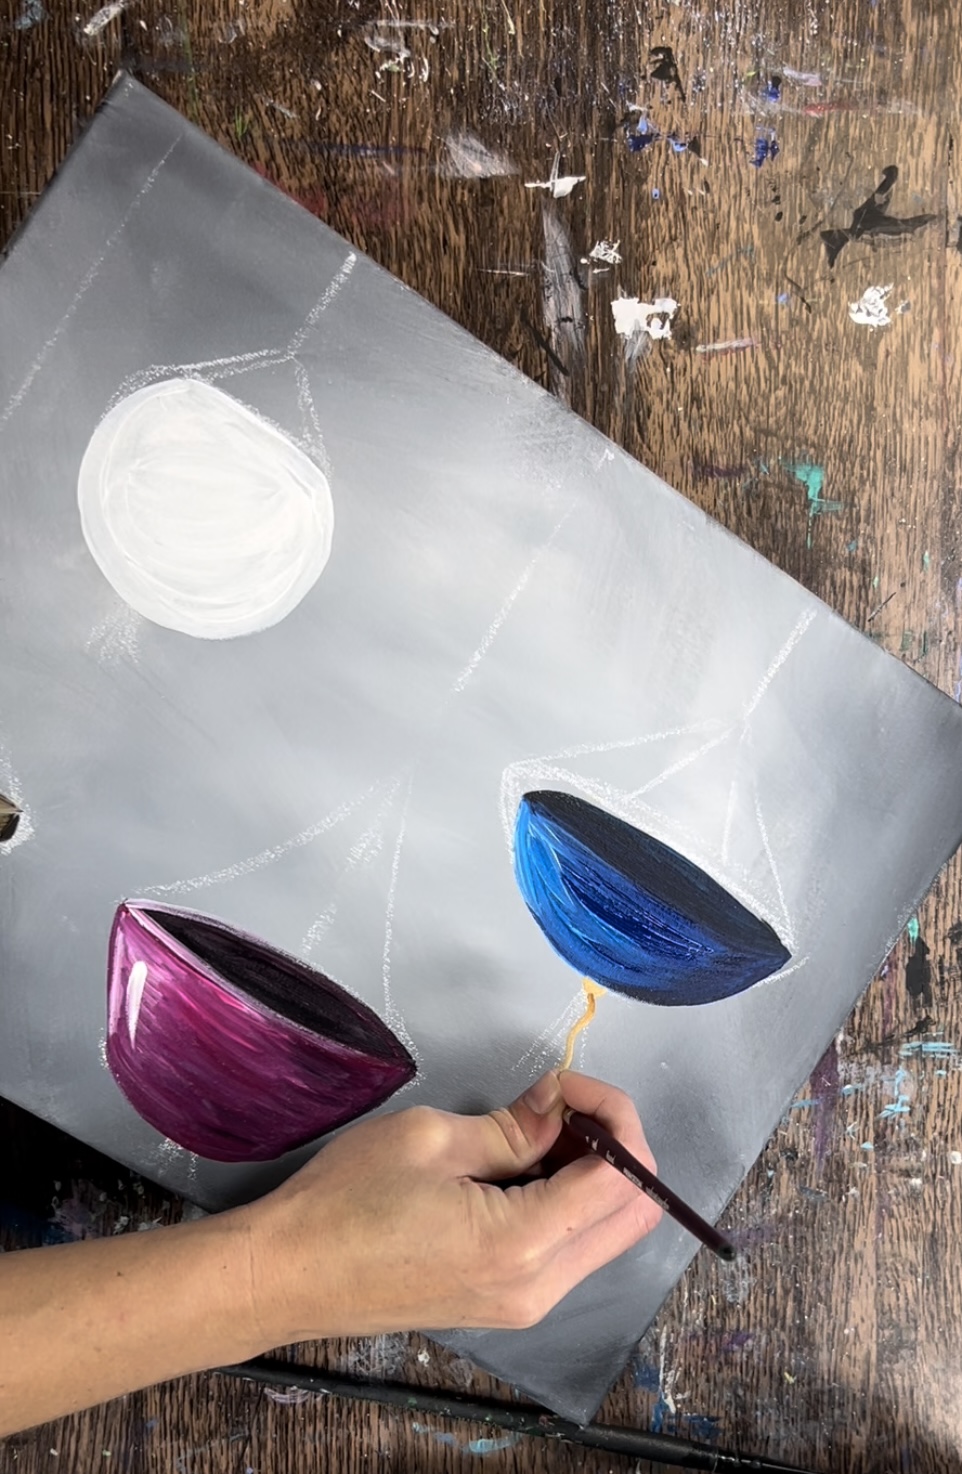
Load your brush in varying amounts of raw Sienna and titanium white so that each of the wavy lines is a slightly different brown. You can also use the darker brown (raw umber).

Then paint the knot and cord pieces on the white vase. For this one, I did straighten pieces hanging down from the knot and slightly more of the darker brown.
Then repeat this for the magenta pat. There isn’t much room below this pot so you only see a little bit of the knot and cord.
Next, paint the hanging cord pieces. Paint two diagonal lines that attach to the knot in the middle. Then paint a braided style cord going vertically up from the knot to the edge of the canvas.
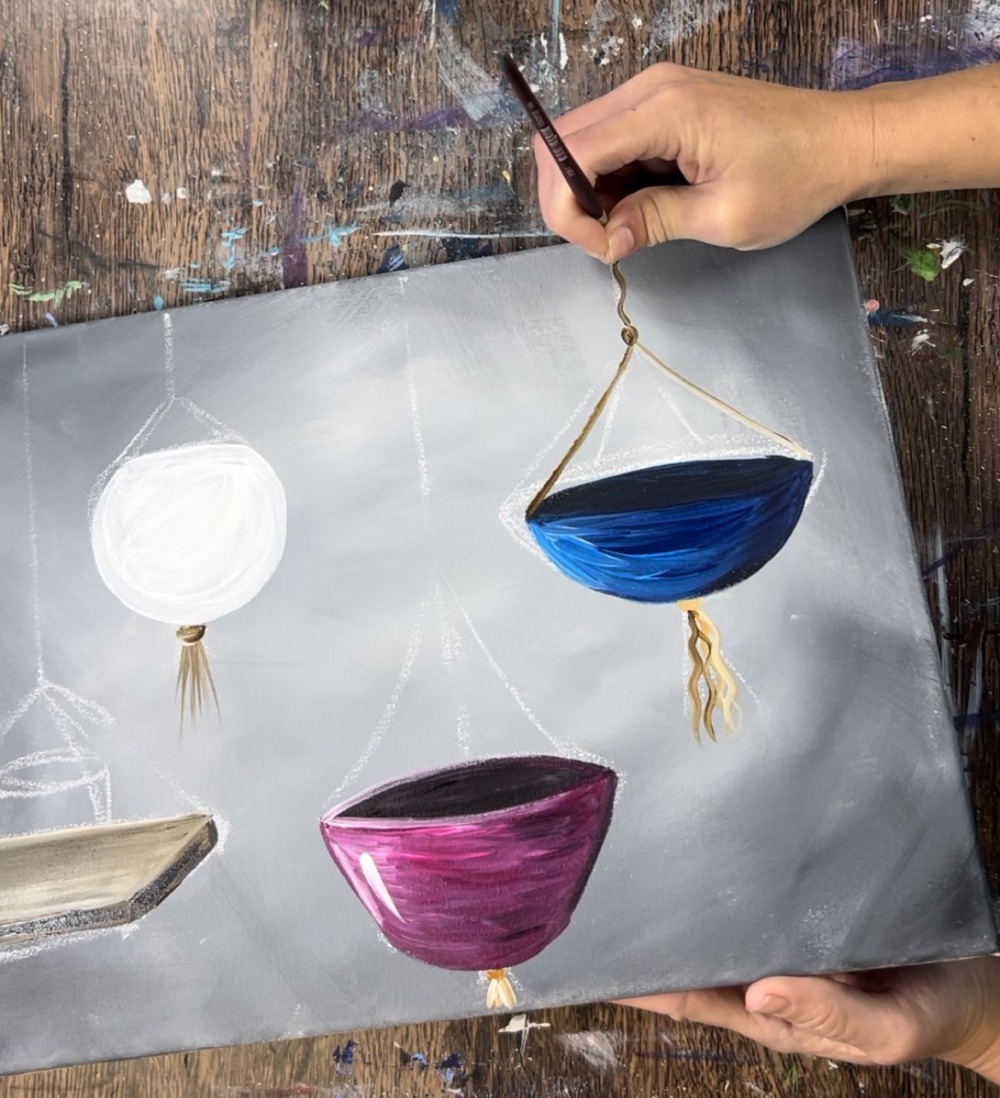
To give it that braided effect, paint one wavy line with one color then paint a second wavy line going the opposite direction with a different shade or tint of brown.
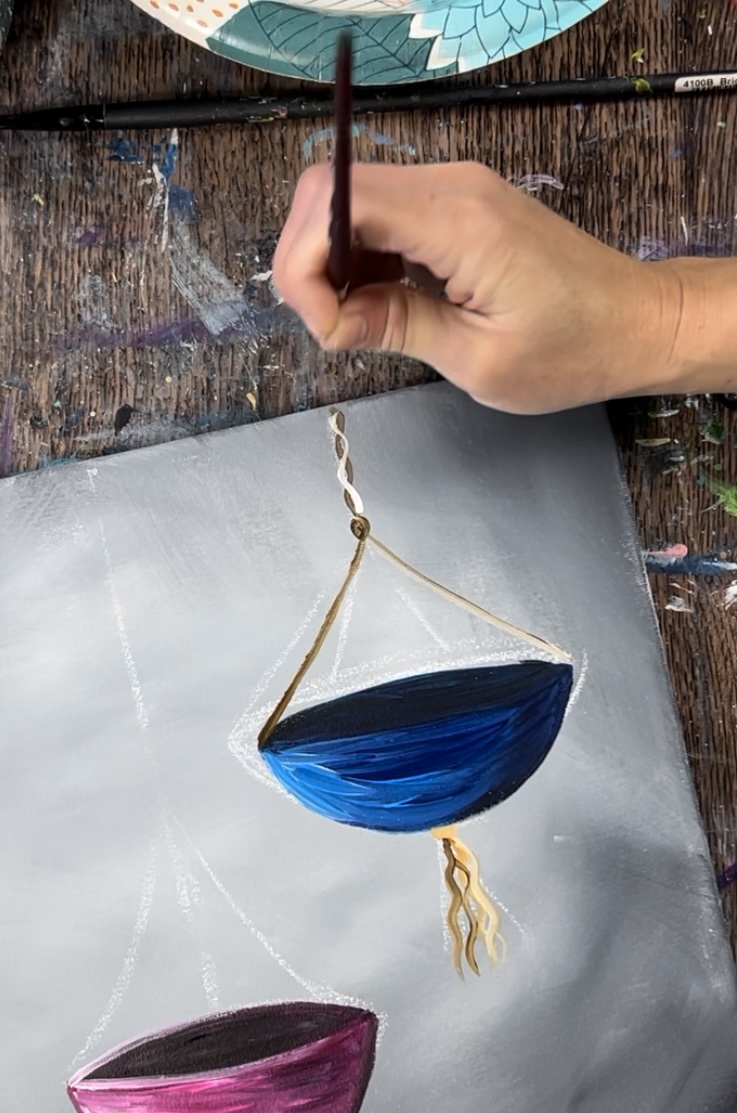
Then paint a second set of cords going diagonally and attaching to the back of the pot. Add a small amount of titanium white into raw umber and add a bit of raw Sienna into the brown. This brown combination does not have to be exact, just try to vary your browns so the color is slightly different on each of the cord lines.
Then paint the cord lines for the magenta pot.

Paint a braided cord going vertically up from the knot to the edge of the canvas.
Paint the rest of the cord lines using this same technique but vary the darkness and lightness of each of the cords.
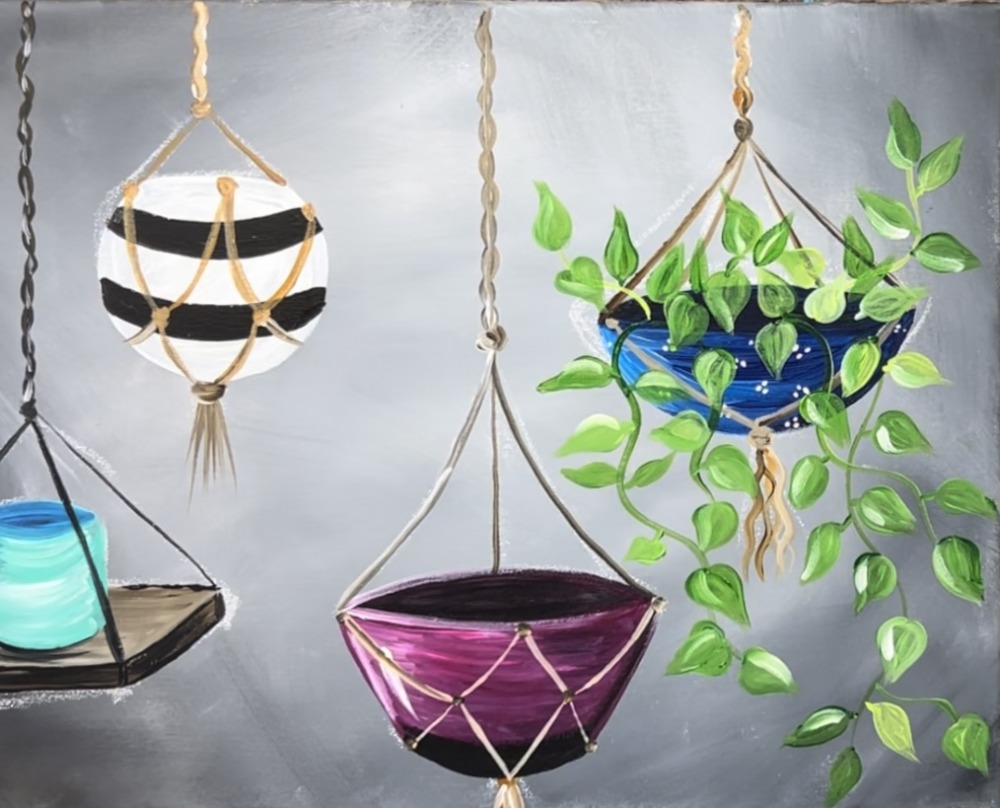
5. Paint Patterns On Pots
These patterns can be customized and changed!
Paint two black stripes on the rounded pot using mars black and the #4 round brush.
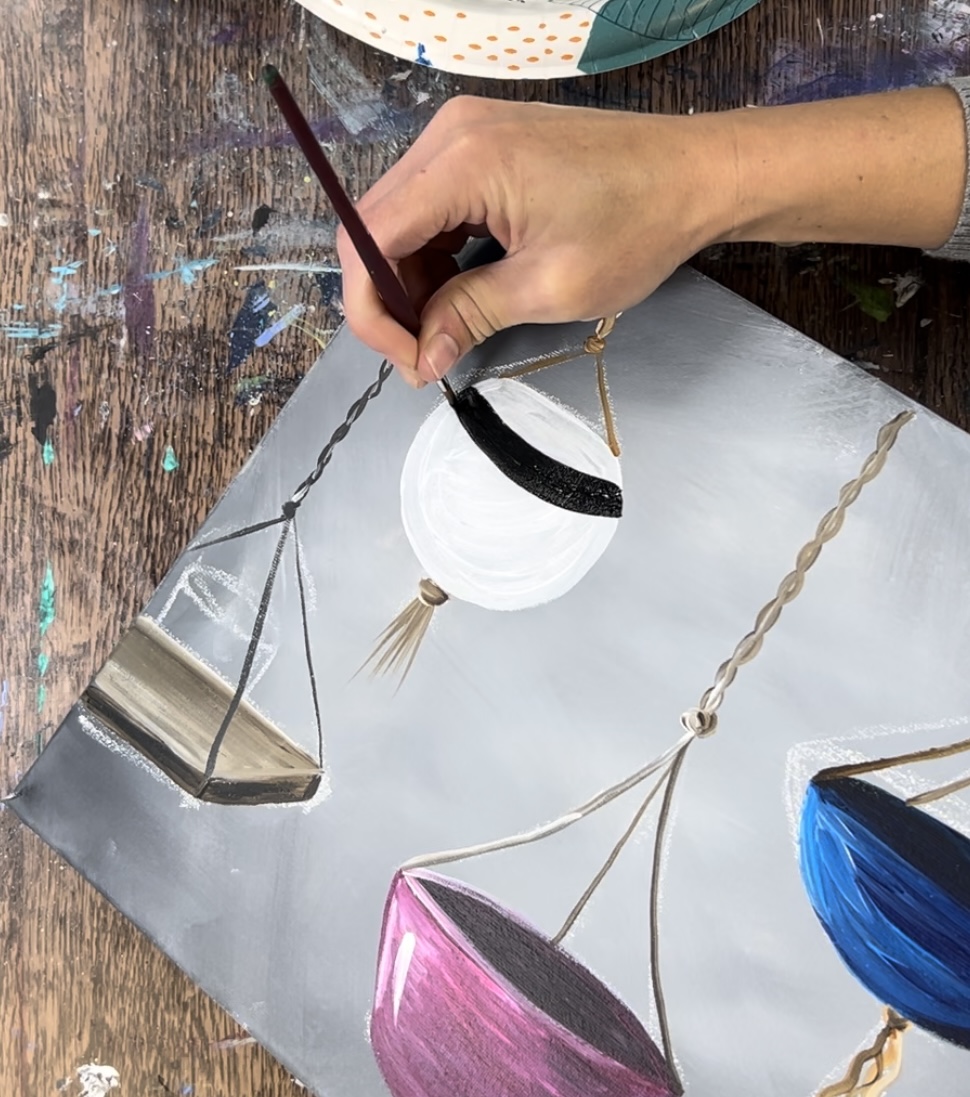
Then paint sets of three pin dots on the blue pot.
For the magenta pot, paint a black stripe on the bottom edge of the pot.
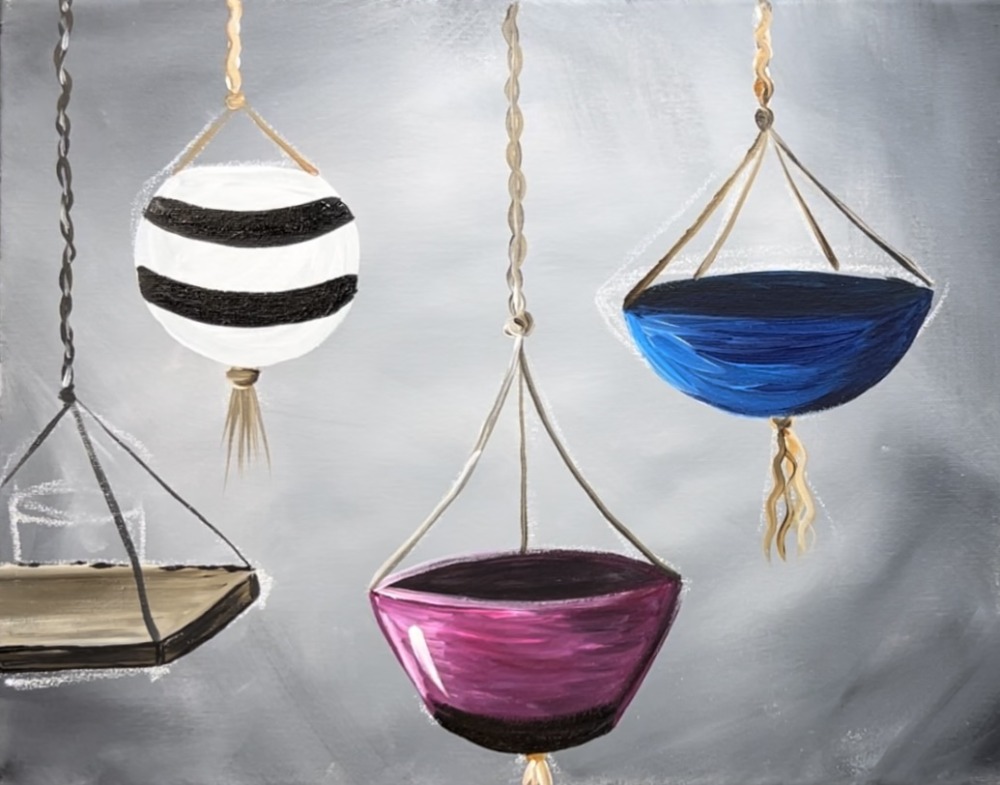
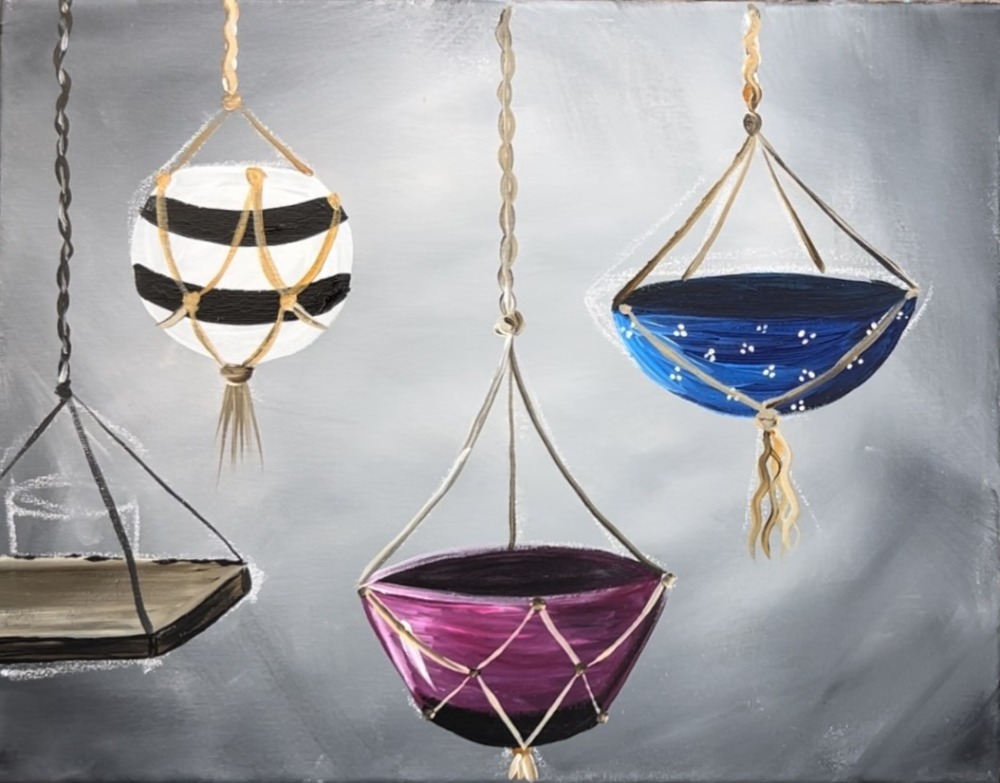
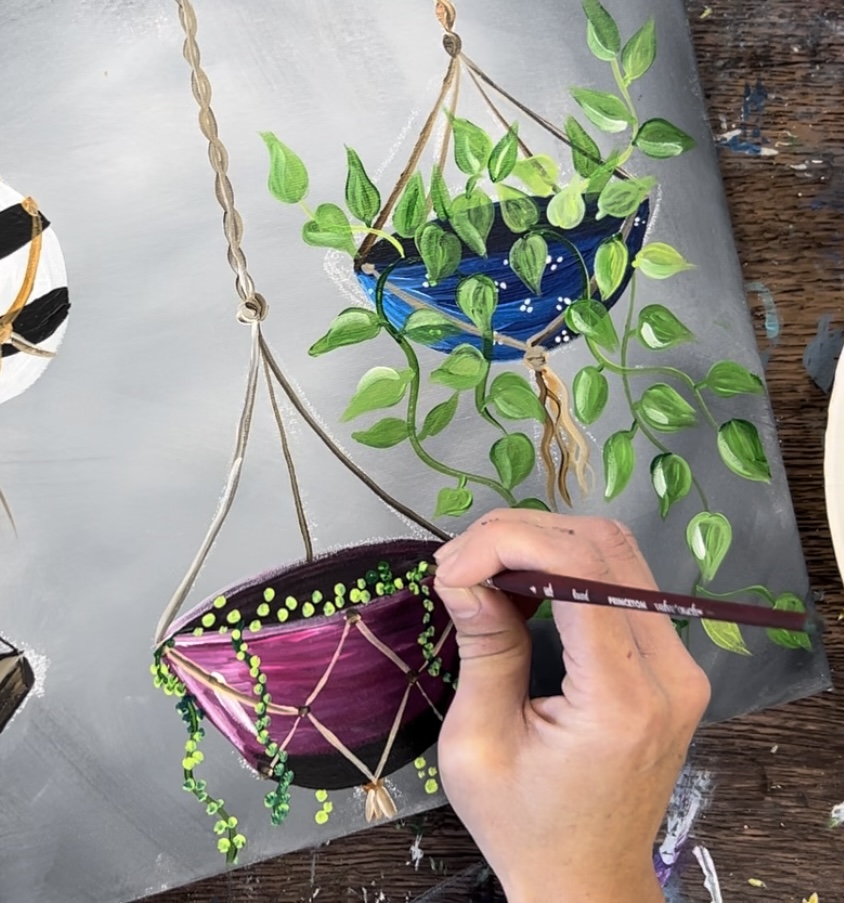
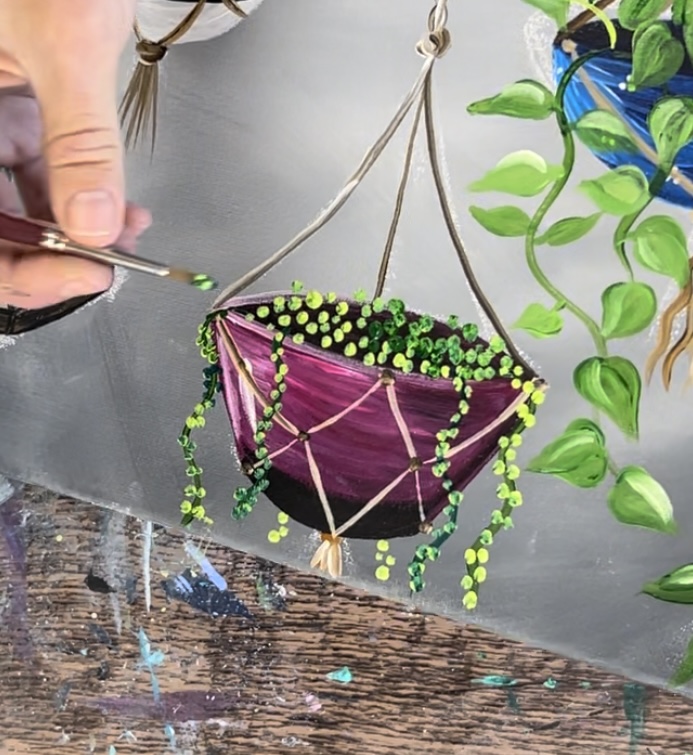
6. Paint Cords That Wrap Around Pots
When the pots dry, paint the cords that are wrapped in patterns around the pots.
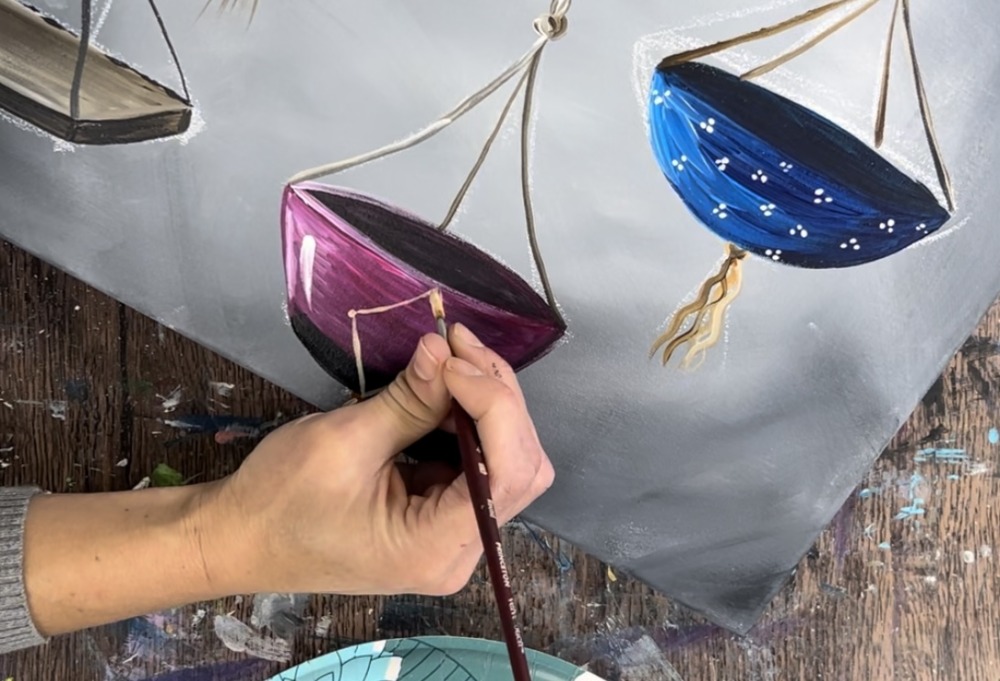
Paint a diamond shapes cord with small dot knots on the tips. Then paint a set of diagonal lines going to the left and right edge of the pot.
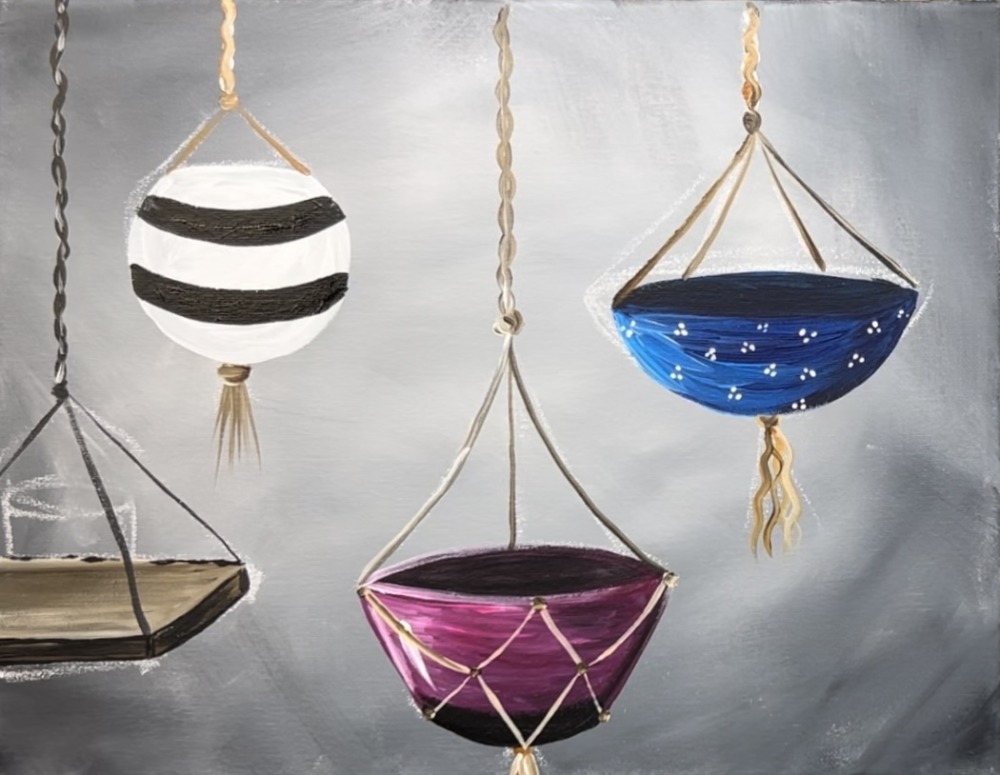
Then paint two diagonal curved lines meeting in the middle where the knot is.
Then paint a set of cords woven around the round, striped pot. Paint two triangular pieces starting from the bottom.
Then paint them so they form two “x’s” similar to the magenta pot. Paint a dot on each of the points for the knots.
7. Paint Aqua Pot On Wood Ledge
Use the color bright aqua green to paint a cylinder shaped pot on the ledge.
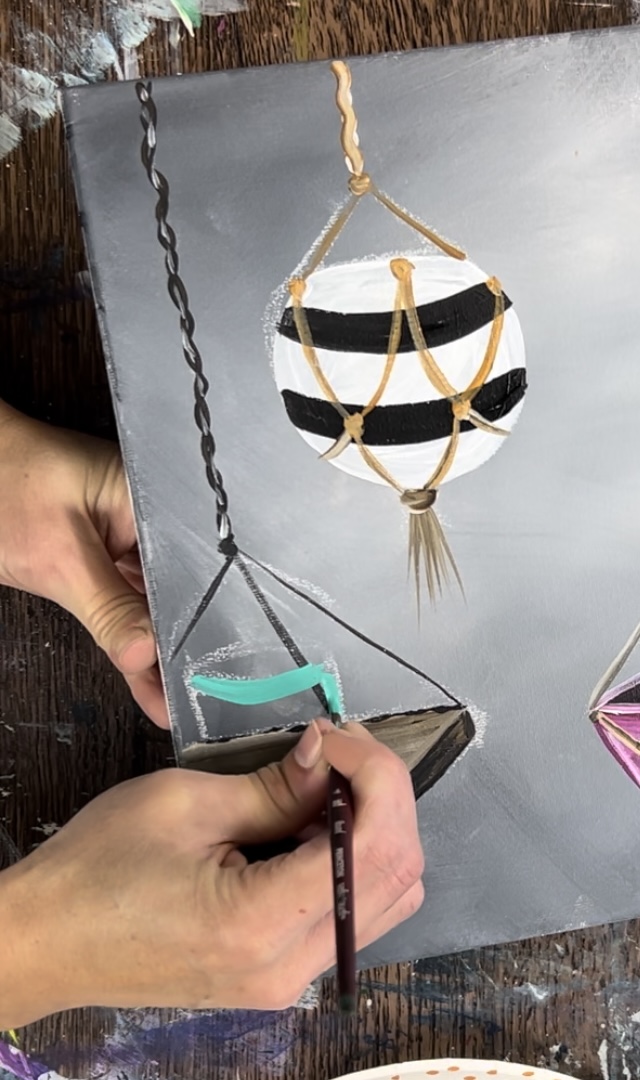
Add titanium white to the middle area of the pot and paint in a curved direction to give the pot some form. Then paint phthalo blue on the inside opening of the pot so that area is darker.
Use mars black to paint a small amount of shadow under the aqua vase.
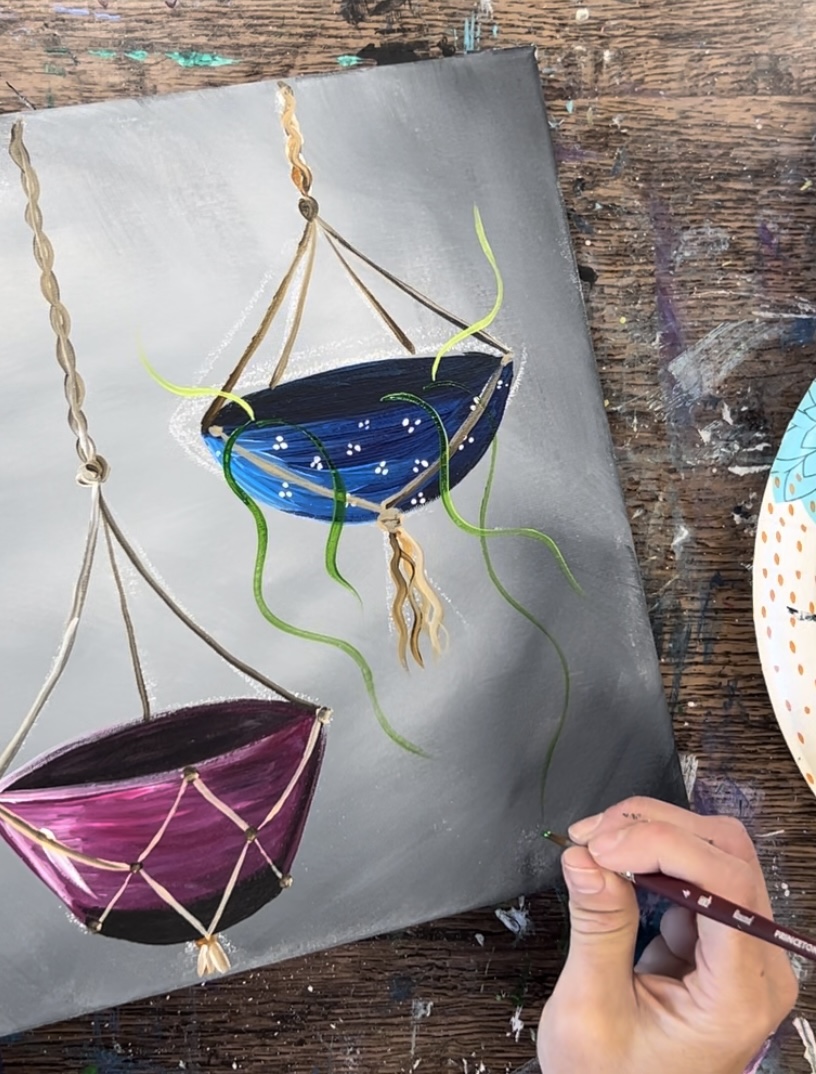
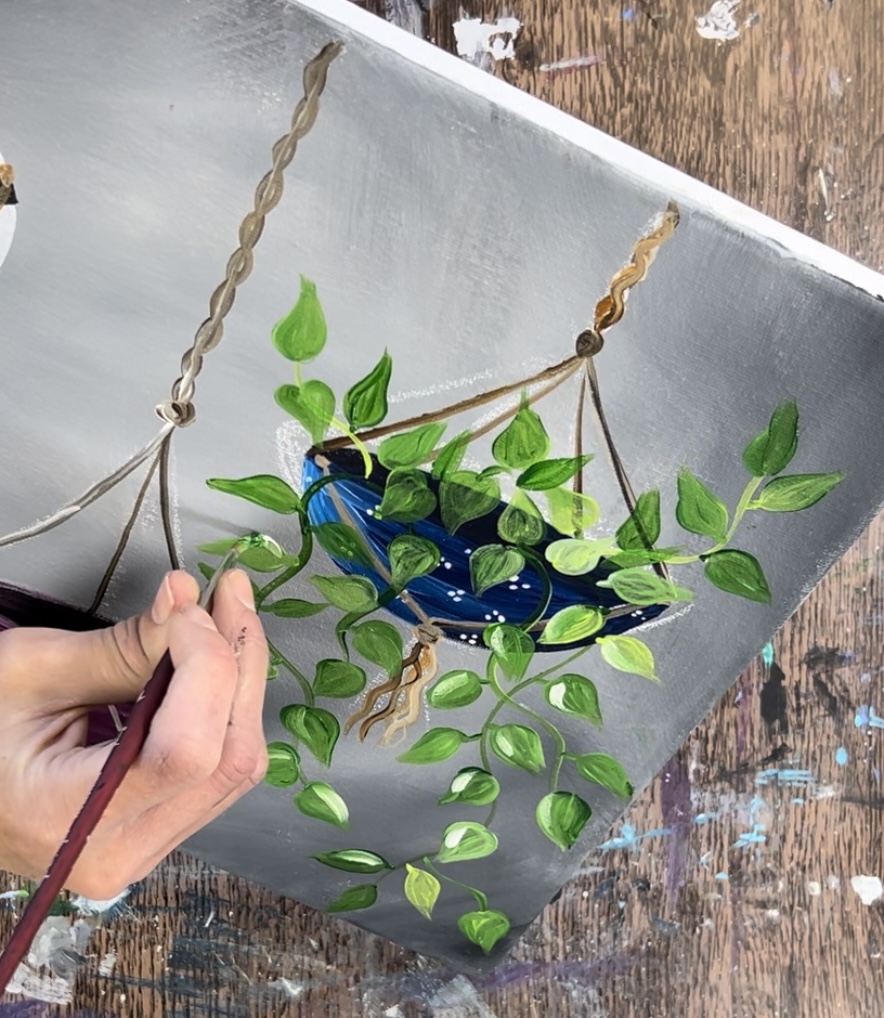
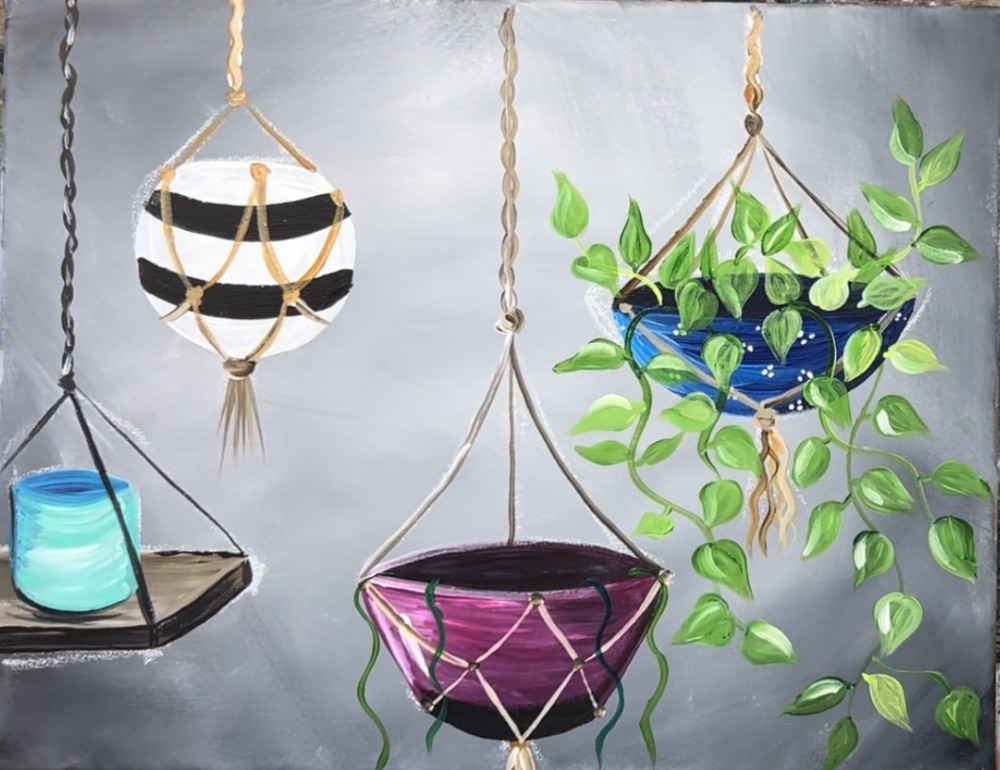
8. Paint Pathos Plant
Use a #4 round brush and the colors: hooker’s green hue and brilliant yellow green. Start by loading any of the two greens on the tip of your brush. Paint long, wavy stems going down and out of the pot. Some of the stems can be going upwards. Some are much longer and some are shorter.
Then paint the pathos leaves. Use a variation of the two greens on your palette to paint rounded leaves that are pointed on the tips.
Continue to paint multiple leaves along the vine lines. Have them go in different directions or even overlapping the lines. Vary the green so that some leaves are darker and some are lighter.
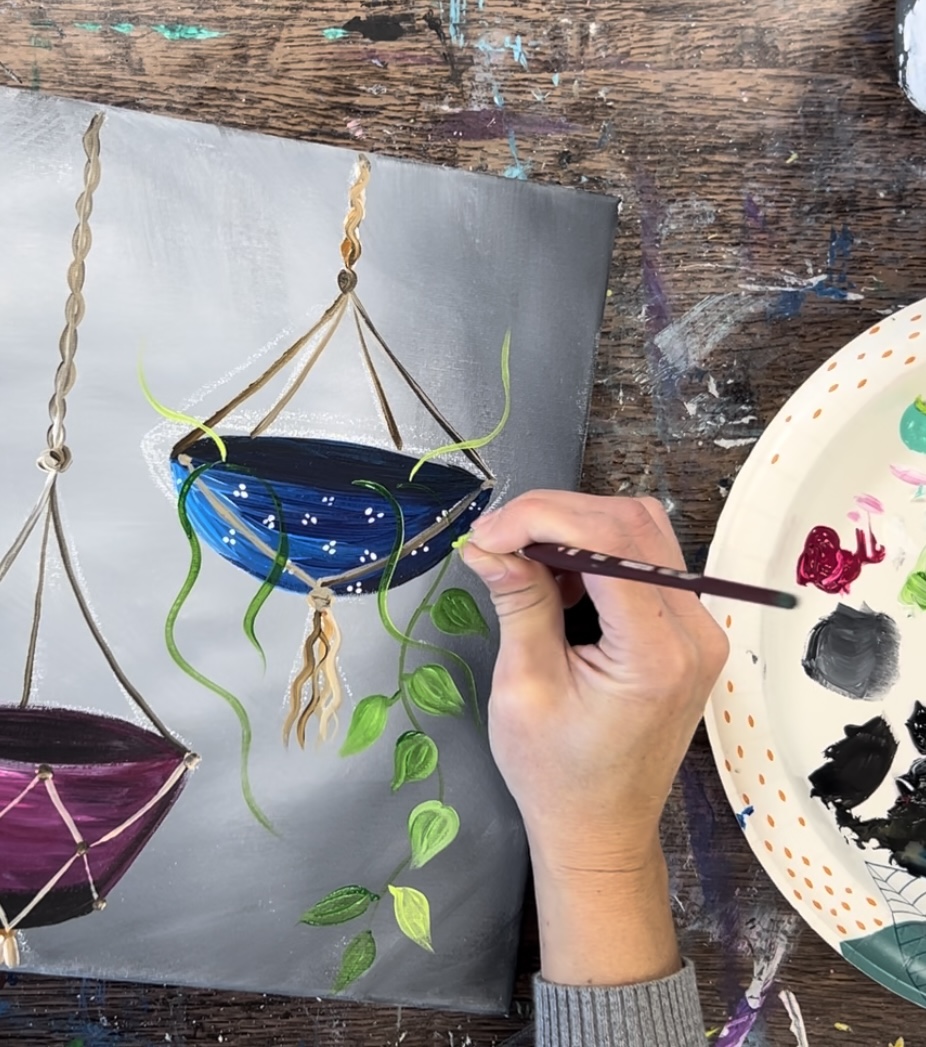
Paint individual leaves showing inside the pot but you don’t have to paint the vine those leaves are attached to.

Continue to fill all the vines with leaves! You can also paint more vines if needed. I made sure the lower right part of the canvas had many hanging leaves because there was a lot of empty space in that area.
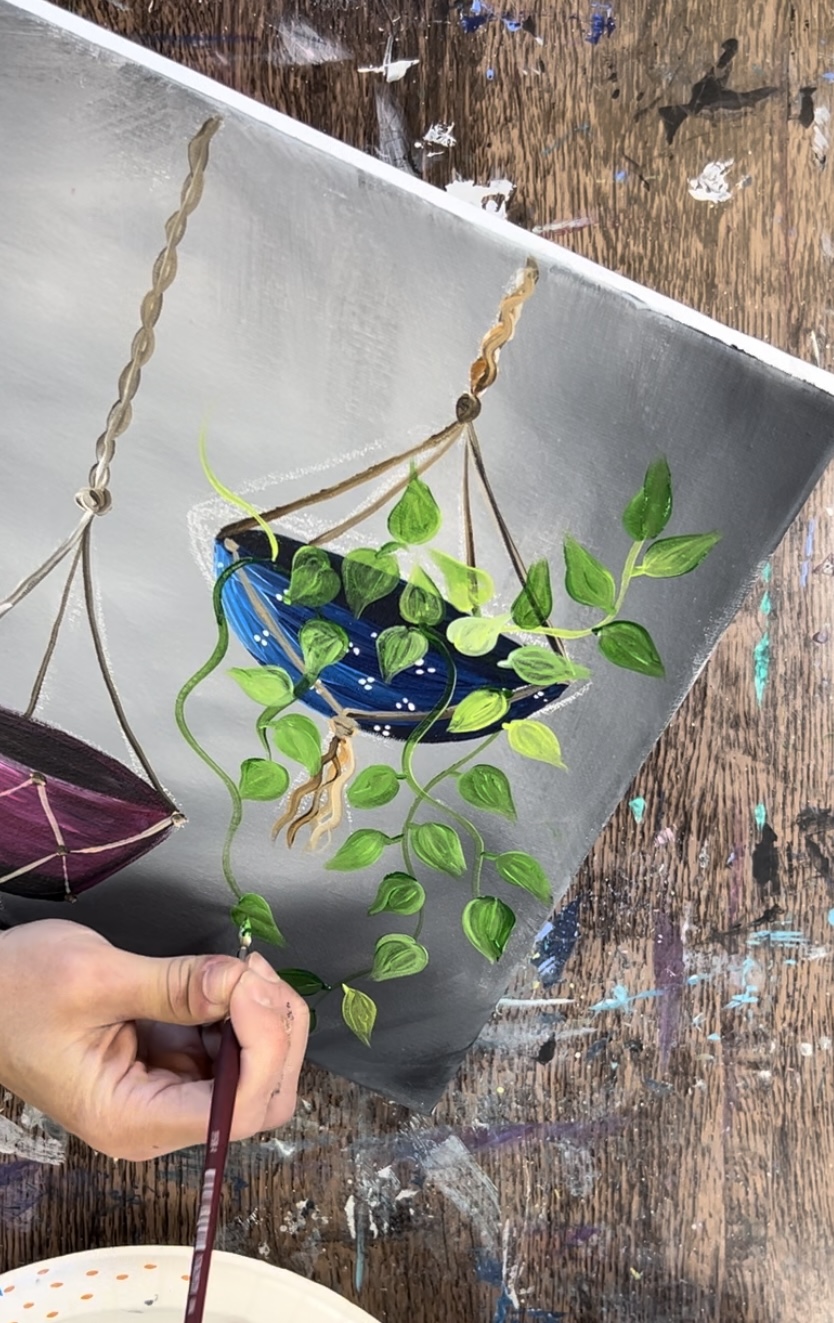
Optional: you can highlight some of the leaves. Do this with green mixed with a higher proportion of white (so it is brighter). Paint a curved line just on the left side of the a lot of the leaves. You don’t need to highlight every leaf.
9. Paint String Of Pearl Plant
The first step of the string of pearl plant is similar to the pathos plant. You want to start by painting wavy lines hanging out of the edge of the pot but not as many. I did four wavy lines. Also, I made this center stem line slightly darker by mixing some phthalo blue into the hooker’s green hue permanent.
Then use the brilliant yellow green and the #4 round brush to paint the dots/ pearls along the middle wavy line.
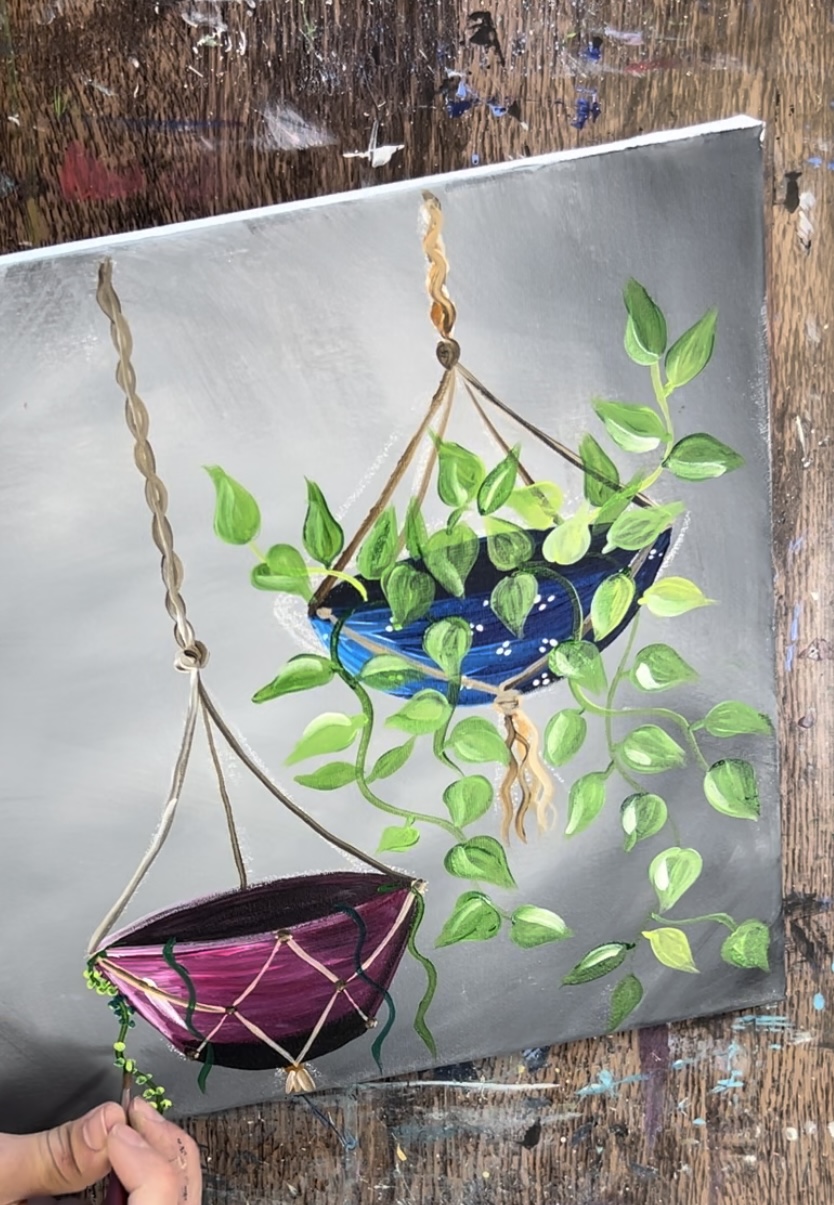
Paint these bright green dots on each side of the line and some overlapping the line.
On the inside of the pot, paint more dots of varying sizes but these do not have the center vine visible.

You don’t have to paint each of the pearls with the brilliant yellow green, you can add some of the darker green in it as well to create some variation in the colors.
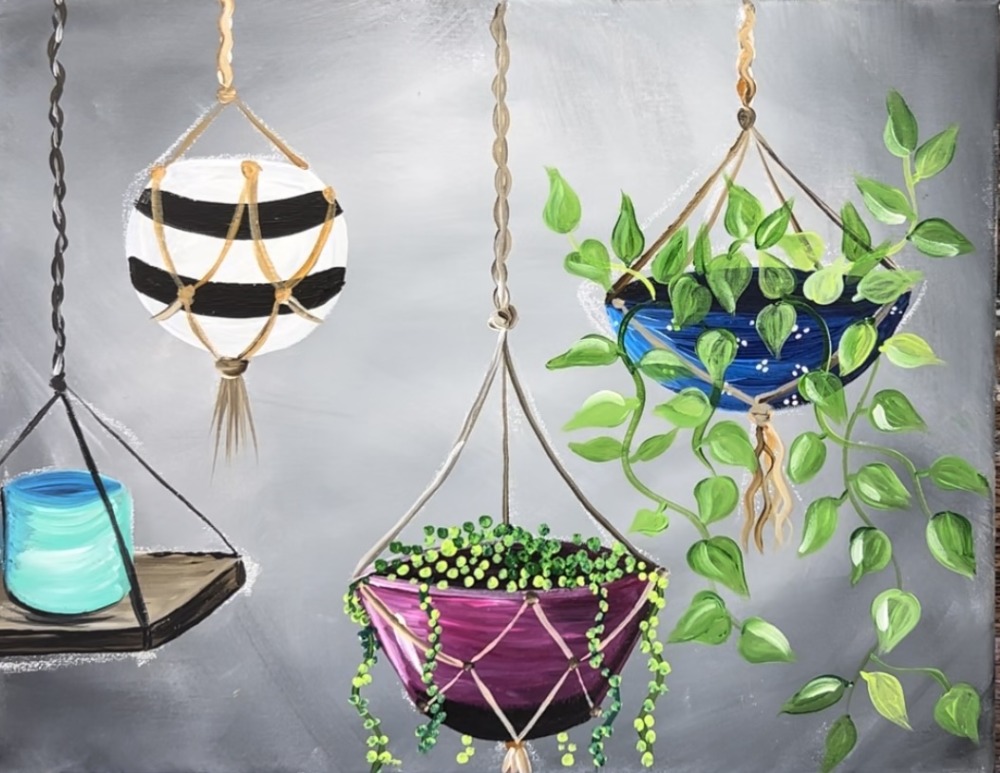
10. Paint Agave Plant
Use the #4 round brush to paint the agave leaves. Add a little bit of bright aqua green into the hooker’s green hue to make the green a little more blueish. Paint very pointed leaves that each overlap each other going in an array on the top of the pot.

With each leaf, you’ll want to vary the color of each of the leaves so they stand out from each other. To do this, add different amounts of the lighter green, the darker green and even some of the white into each of the greens. You can mix the colors on your palette or right onto the canvas.
If you need to paint some of the leaves over the cords, that is fine. You can always re-paint the cords later.
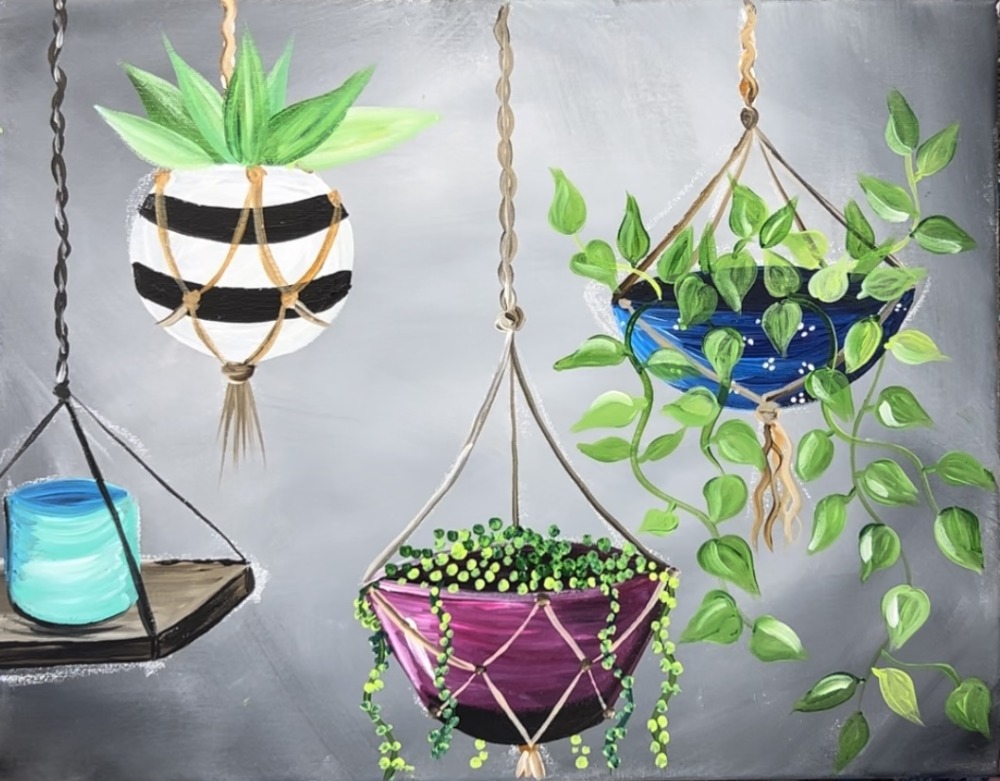
11. Paint Cactus Plant
Use mostly the hooker’s green hue for the cactus plant but you can also use the other greens for color variation. Paint a small barrel shape using the #4 round brush. Then paint two smaller barrel shapes on each side.
Then paint white dots on the cactus using the #4 round brush.

If you want to add flowers to the cactus, mix a small amount of white into the magenta. Then paint the little blossoms on the tips of each of the barrel pieces.
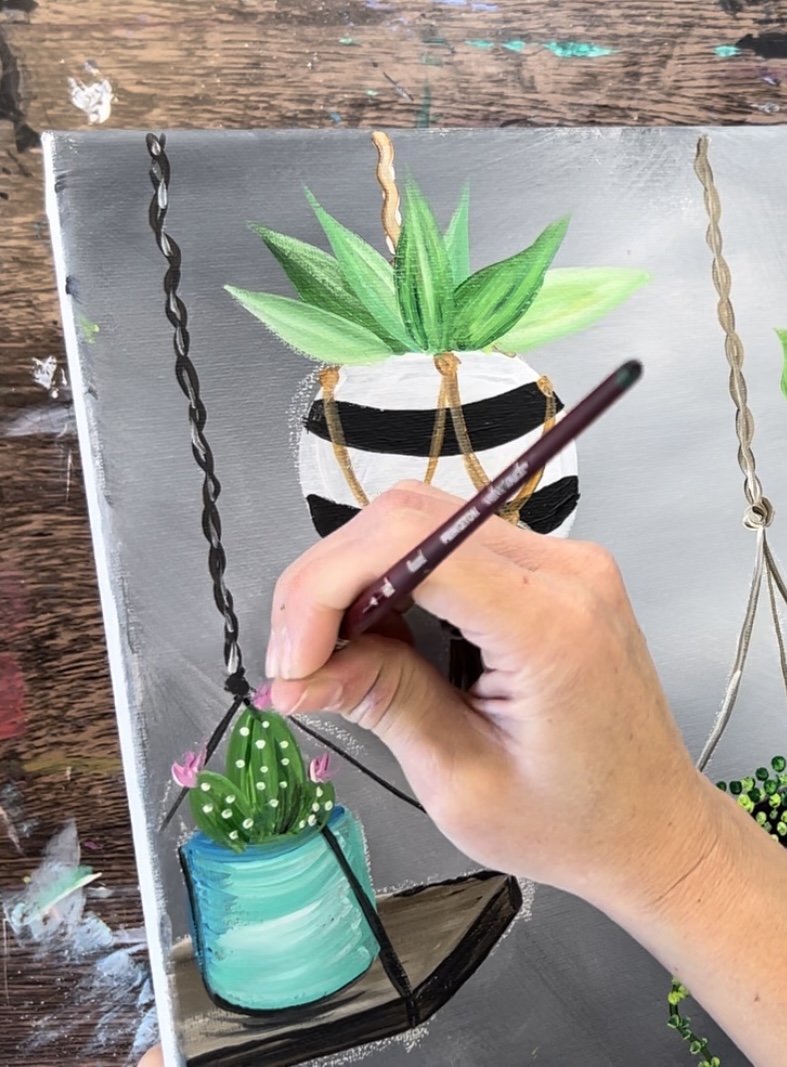
12. Touch Ups
Some touch ups you can do include: painting the cords so they overlap parts of the plants, adding a pattern on the turquoise pot (I painted small black triangles), adding a white highlight on the left side of the striped pot.
Finished!