

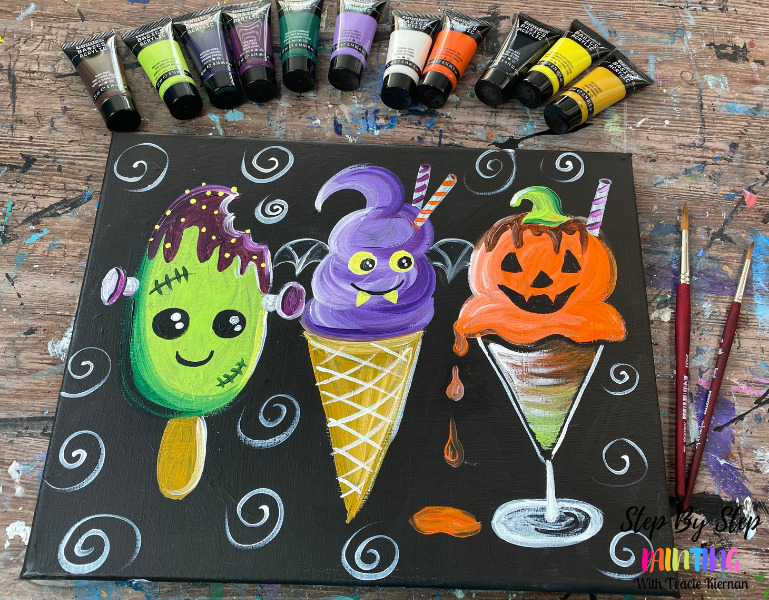
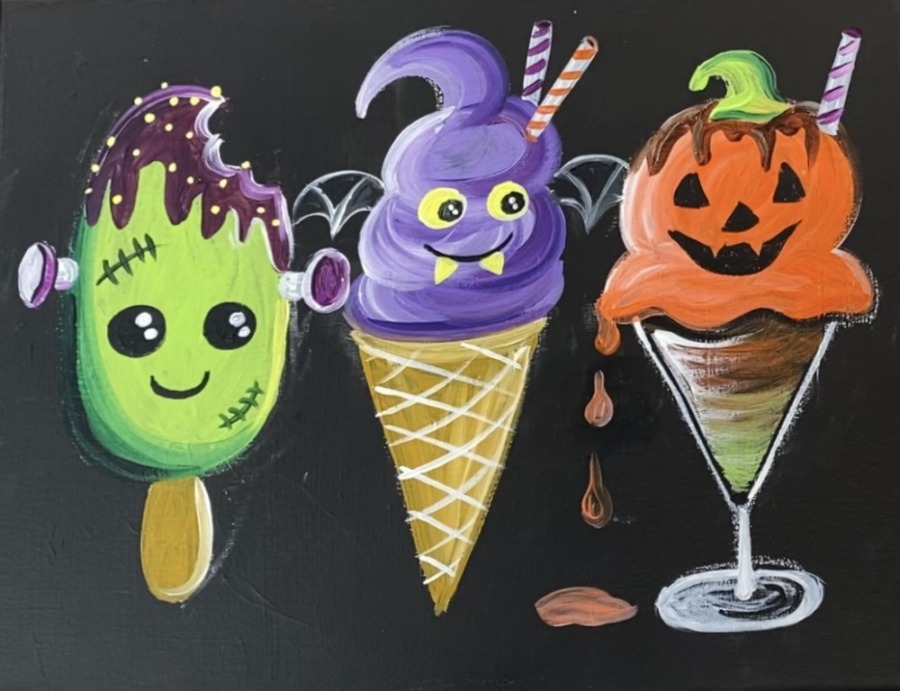
“Halloween Treats” is a fun and absolutely adorable acrylic painting tutorial you can do for Halloween! This is a great painting you can do with the kids and it is set at the very beginner level!

Would you like to save this?
In the tutorial I will show you how to draw the basic shapes of the “treats”. I will be making a traceable for this that you can download and print to trace onto your canvas!
Enjoy and happy painting!
Materials
Halloween Treats Acrylic Painting Tutorial
Learn how to paint an adorable set of "halloween treats" on an 11 x 14 black canvas. This is a very easy beginner painting tutorial that is also kid friendly!
Materials
- 11 x 14 Canvas
- Acrylic Paint
- Paint Brushes
- Chalk
- Optional Traceable
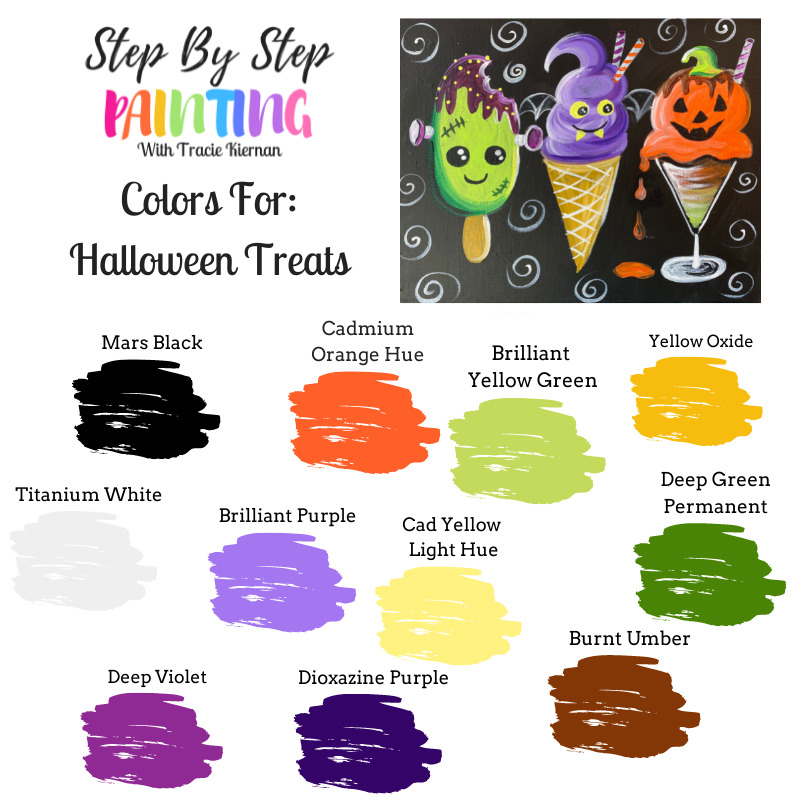
Colors
- Mars Black
- Titanium White
- Cadmium Orange Hue
- Cadmium Yellow Light Hue
- Brilliant Yellow Green
- Yellow Oxide
- Deep Green Permanent
- Brilliant Purple
- Dioxazine Purple
- Deep Violet
- Burnt Umber
Brushes
- #8 Round
- #4 Round
Instructions
See tutorial on www.stepbysteppainting.net for instructions!
Color Palette
There are a lot of colors in this one! I would suggest getting a variety pack of colors such as the Liquitex 48 piece set or a variety set of craft paints (craft paints converted below). You can also simplify this color palette! Colors can be customized as well.
Using Craft Paints?
If you are using craft paints such as the Apple Barrel Craft Paints, I would suggest substituting with these colors:
- White
- Black
- Jack O Lantern
- New Shamrock mixed with a little white
- Holly Branch
- Purple Iris
- Fuchsia
- Nutmeg Brown
- Yellow Flame
- Nutmeg Brown mixed with a little white
Traceable

Directions At A Glance
Video
Step By Step Directions
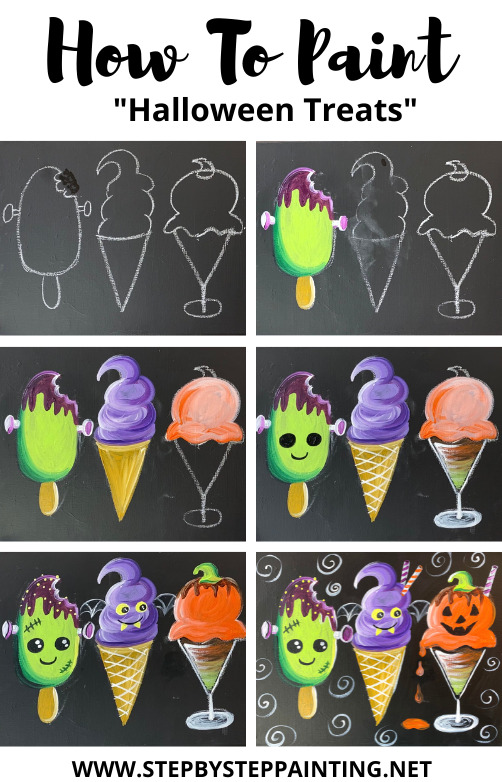
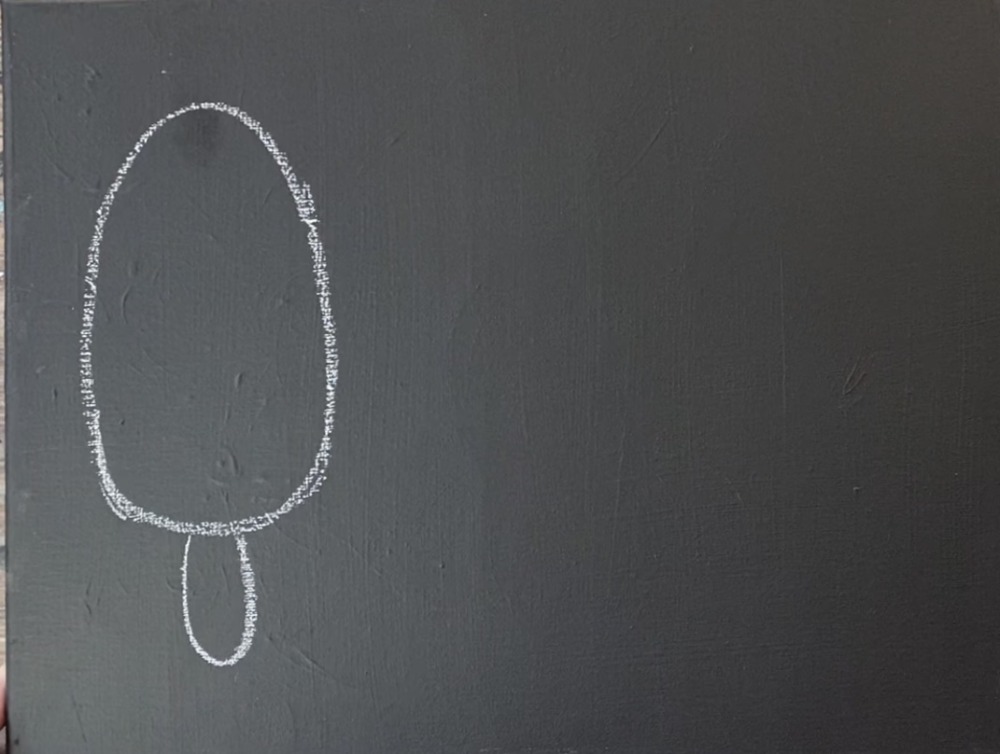
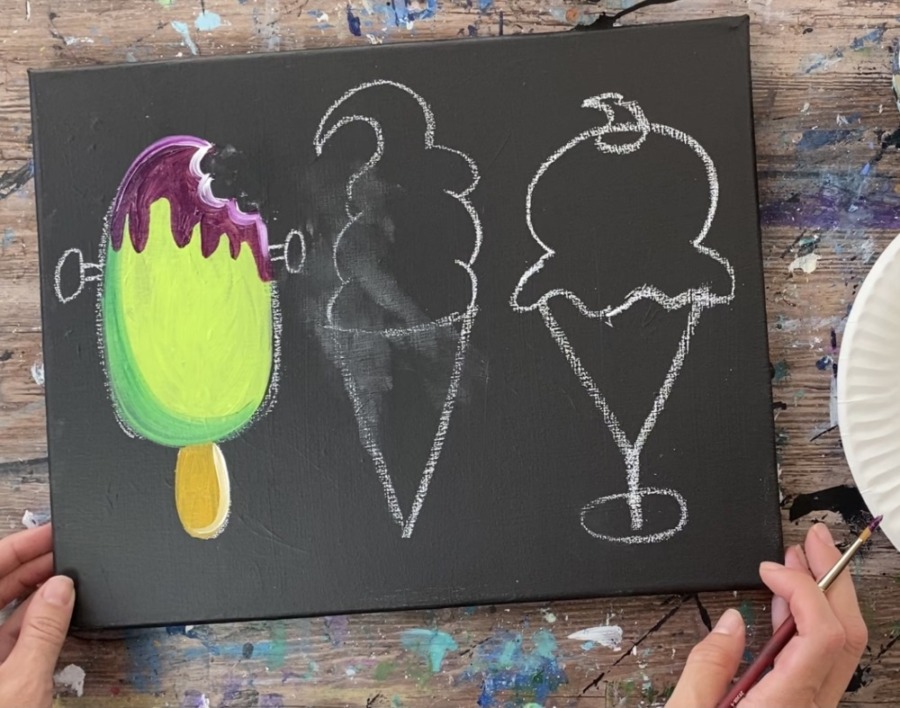
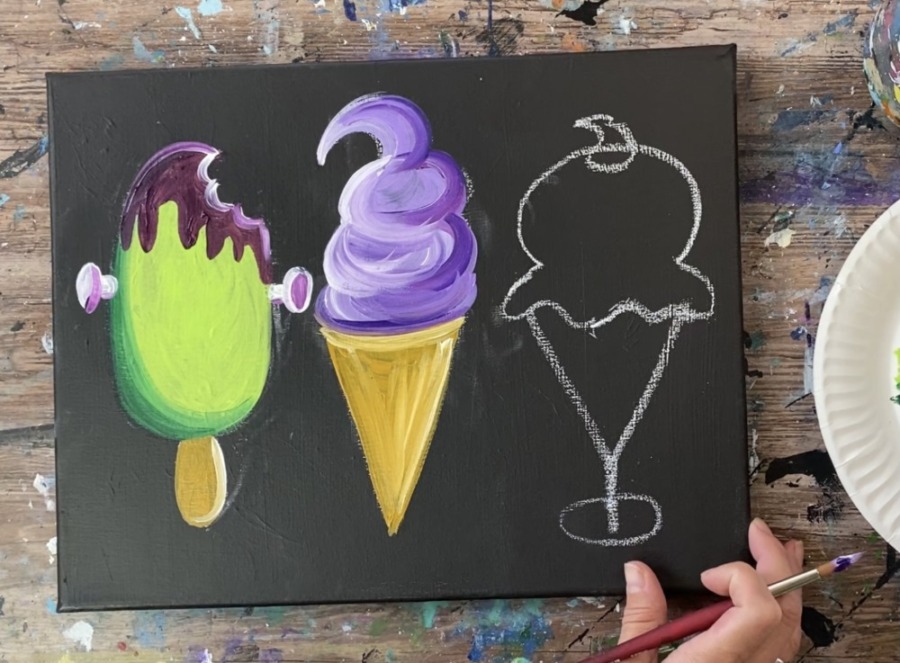
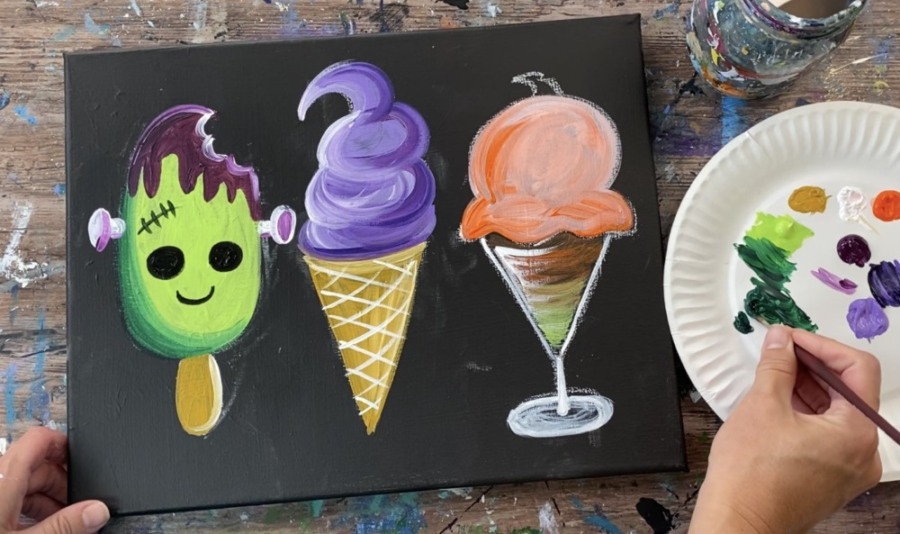
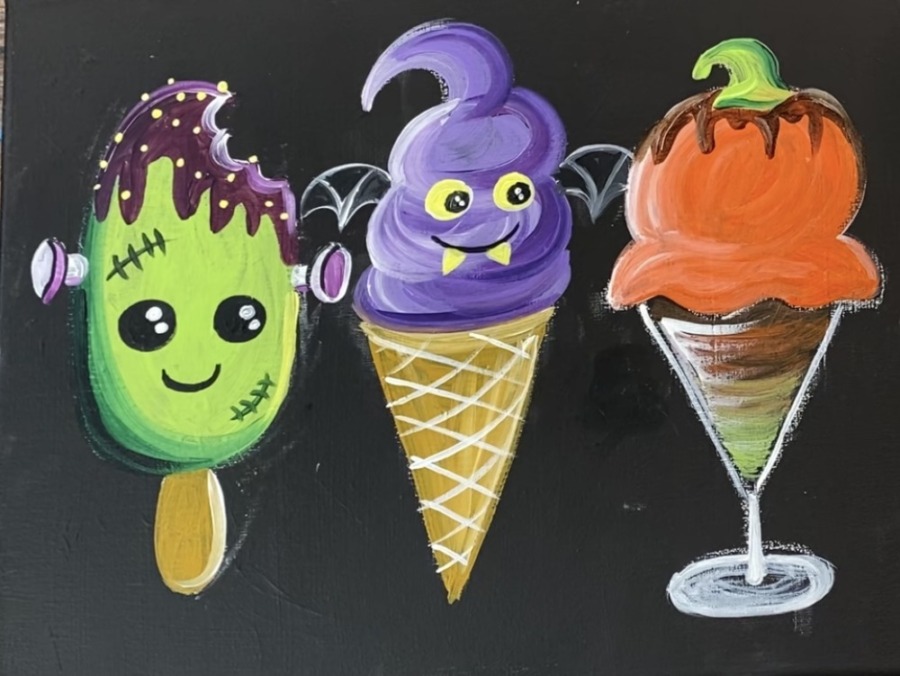
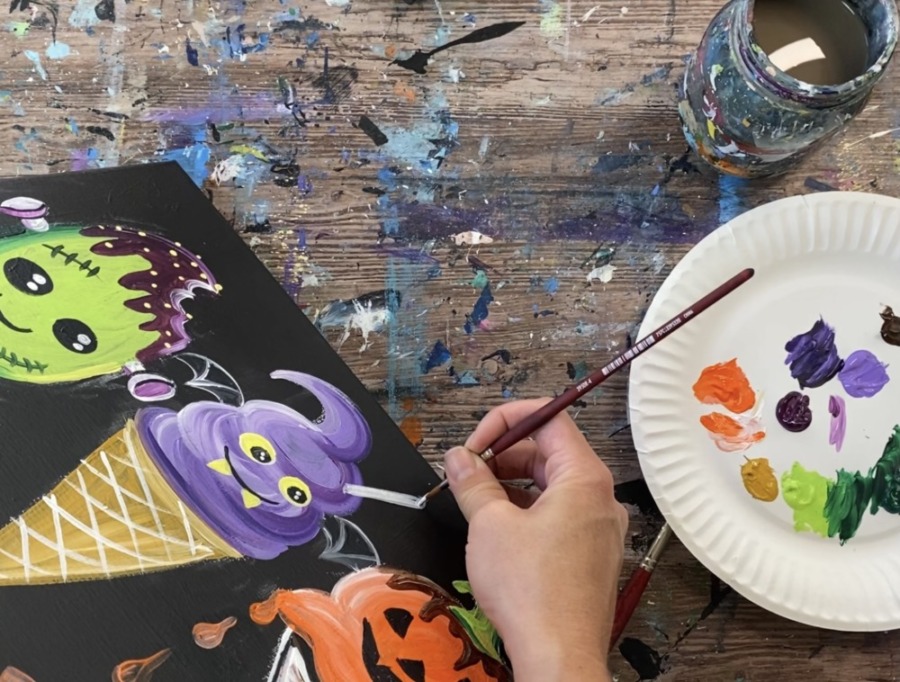
1. Paint Canvas Black & Draw The Treats With Chalk
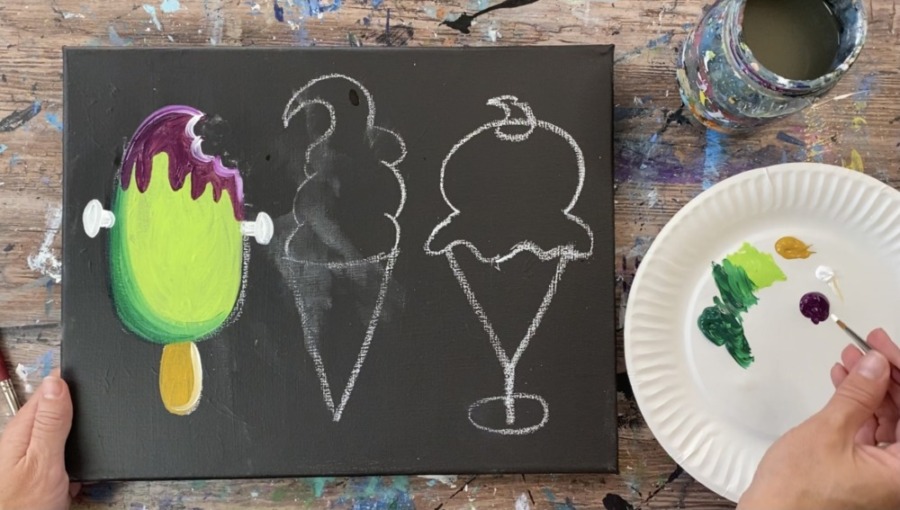
Paint an 11 x 14 canvas black. I typically paint over a “mess up painting” when I do paintings with a black background. Wait for the black to dry.
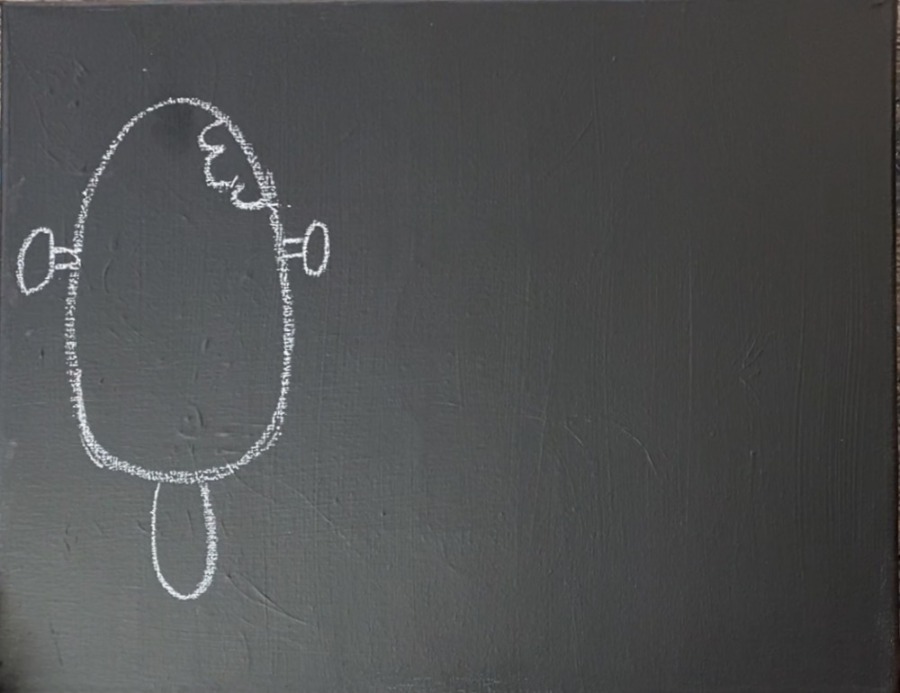
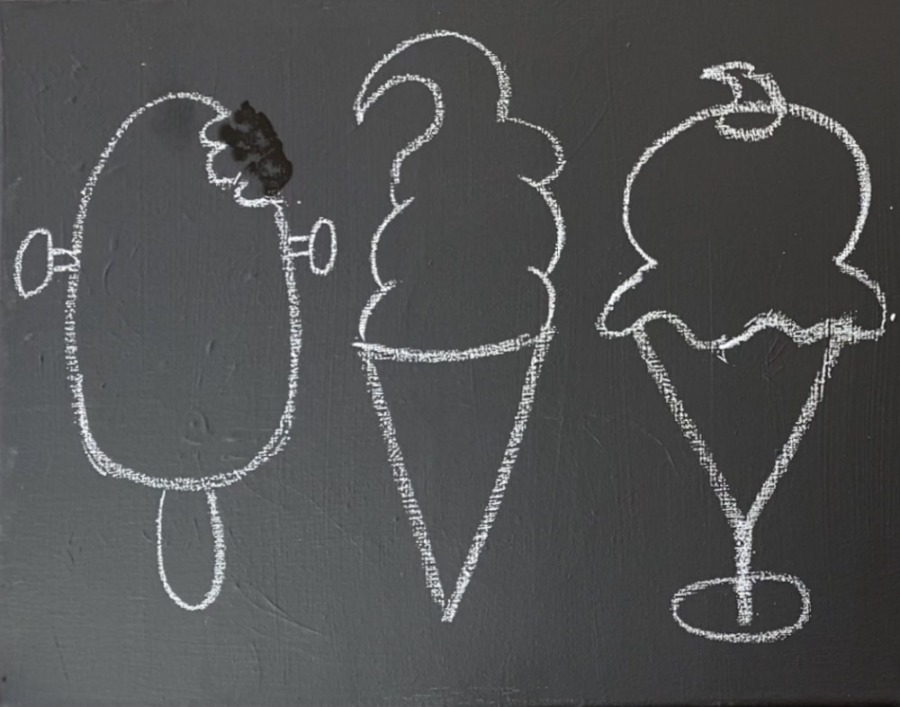
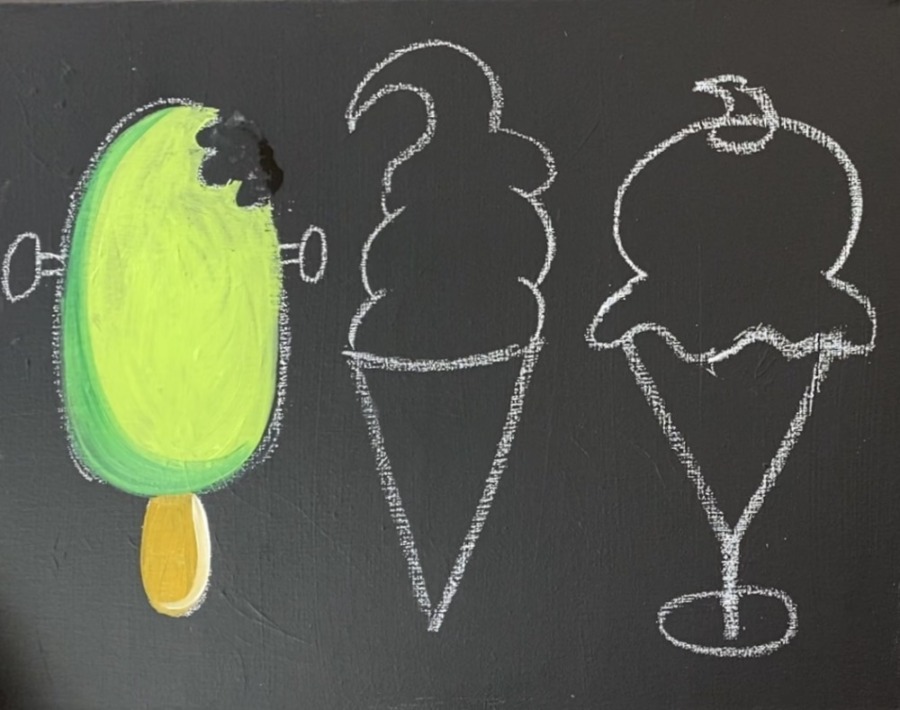
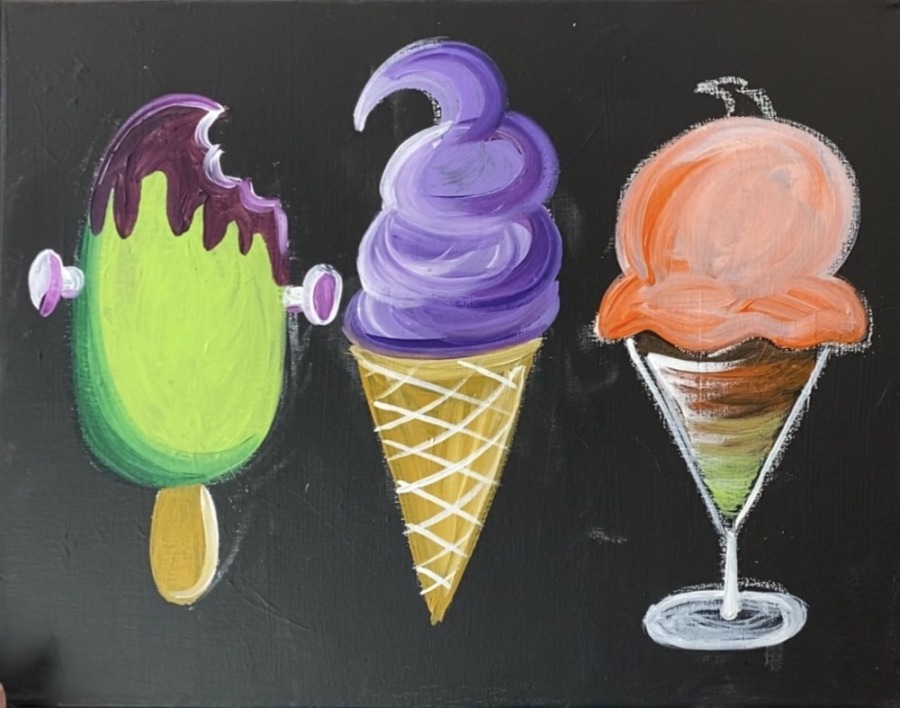
Use a piece of chalk, chalk pencil or regular drawing pencil to draw the shapes of the ice cream. Starting with the ice cream on the left, draw an elongated oval shape that is slightly more narrow at the top. Then draw the popsicle stick.
To make a bight mark, draw bumpy lines on the upper right. Then draw the screws for “Frankenstein”.
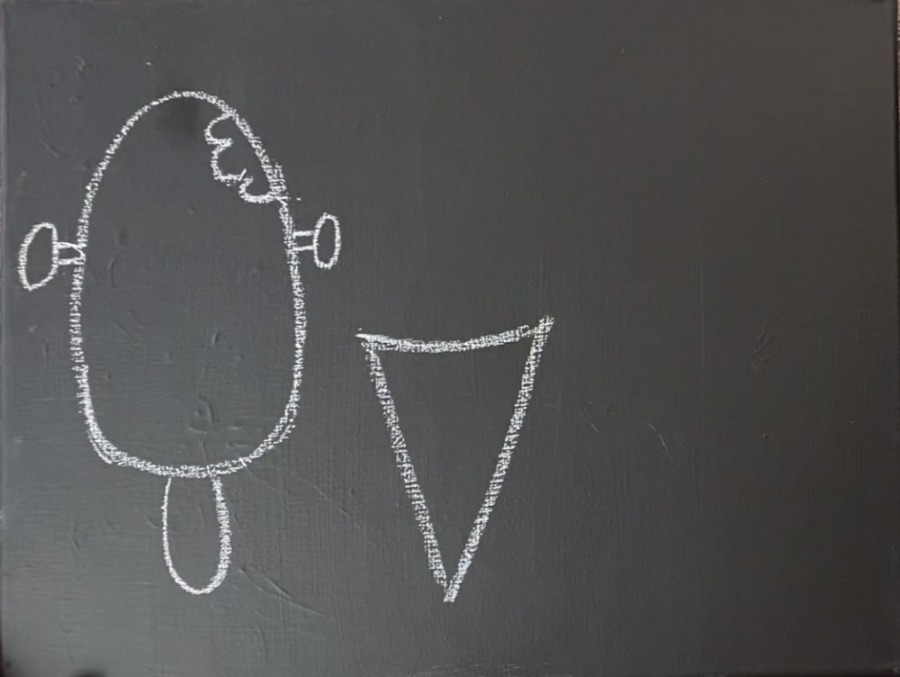
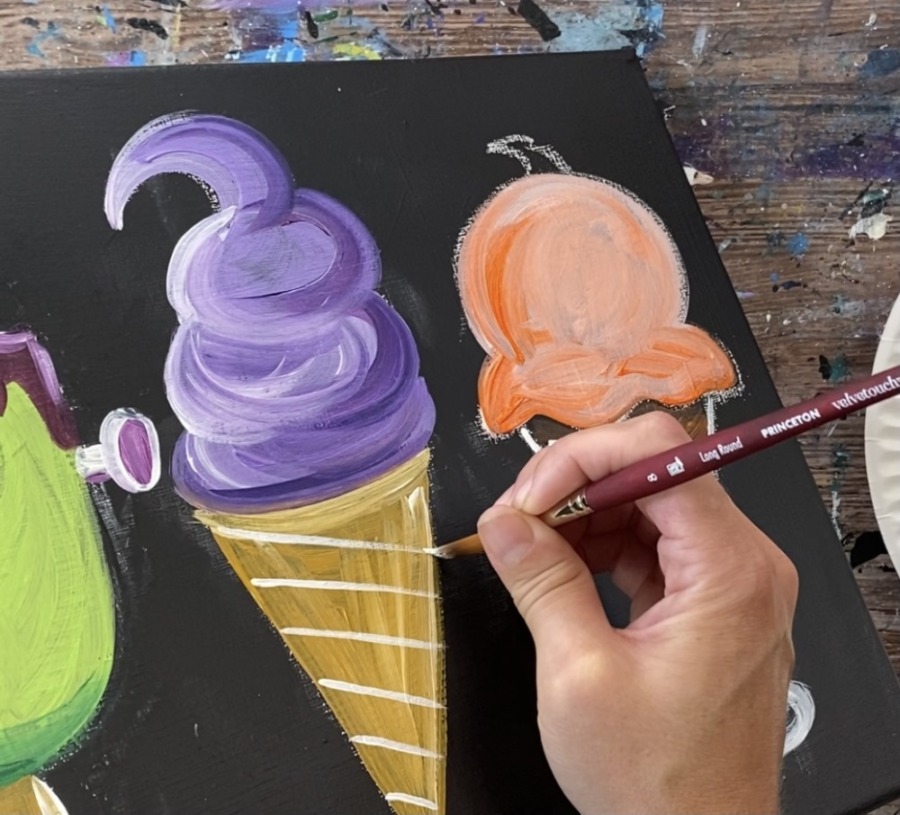
Next draw the triangle for the middle ice cream.
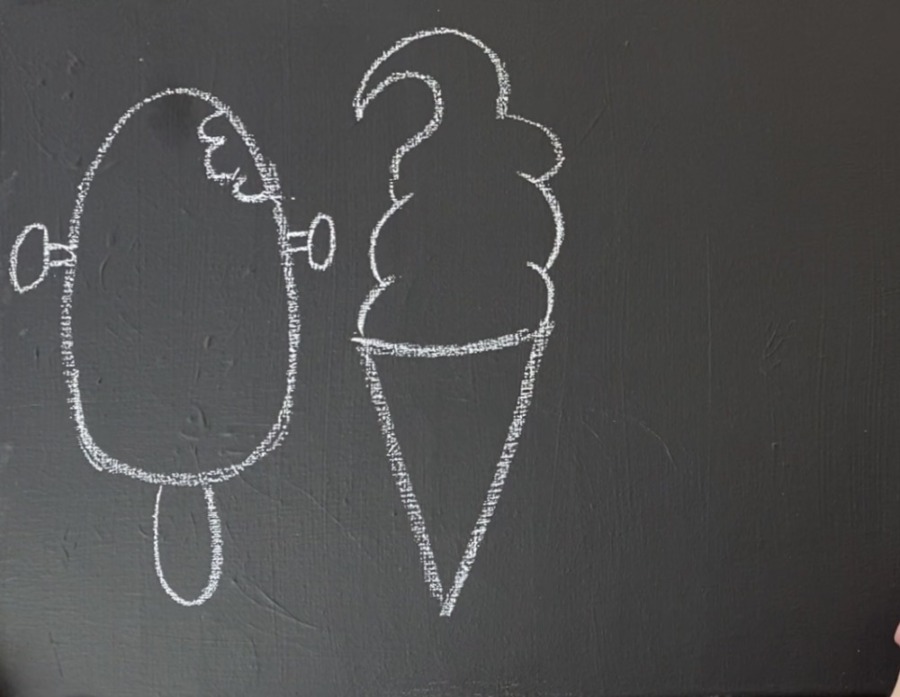
Draw swirly ice cream on top of the cone.
Draw the ice cream on the right. This one is in a triangular glass cup. Draw an oval for the base and a “Y” for the stem and bowl. Then draw a bumpy line for the bottom of the ice cream scoop.
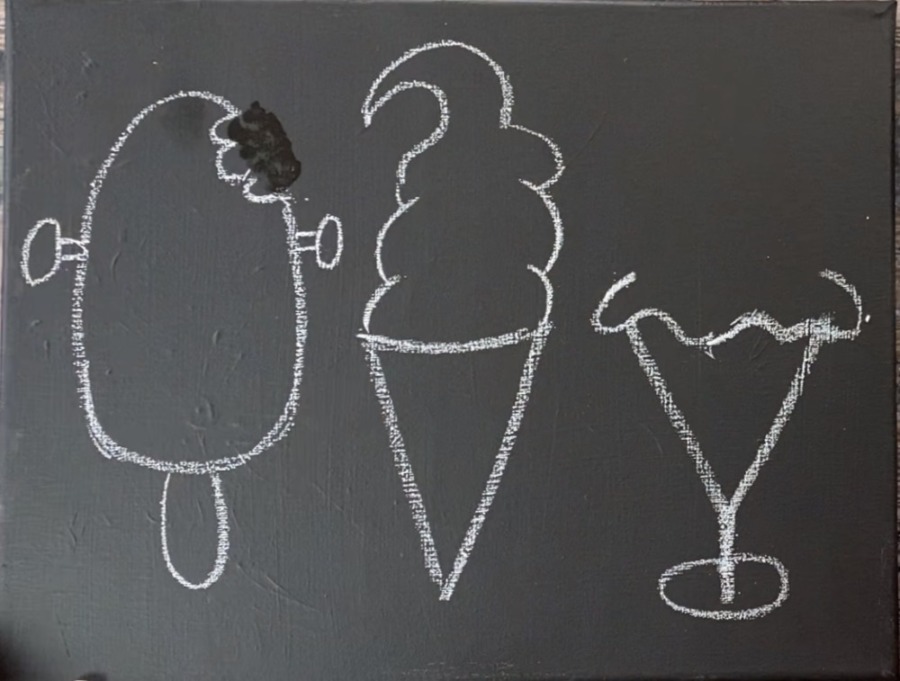
Draw the top of the pumpkin ice cream scoop and stem.
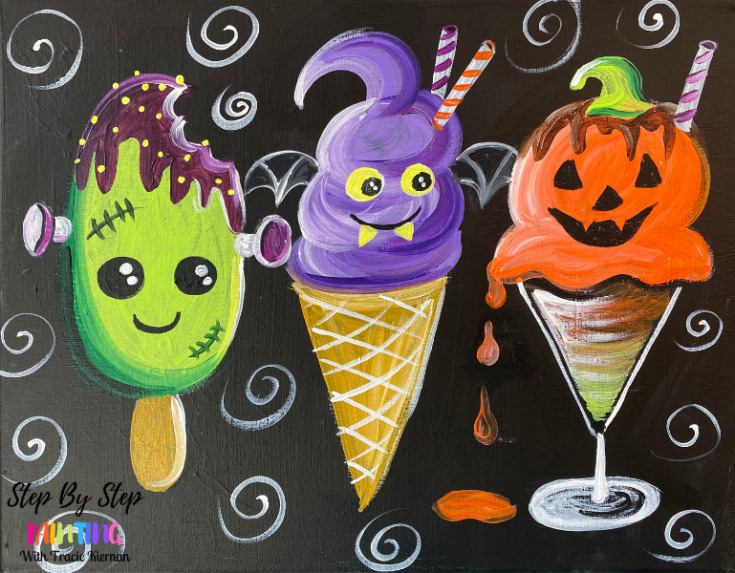
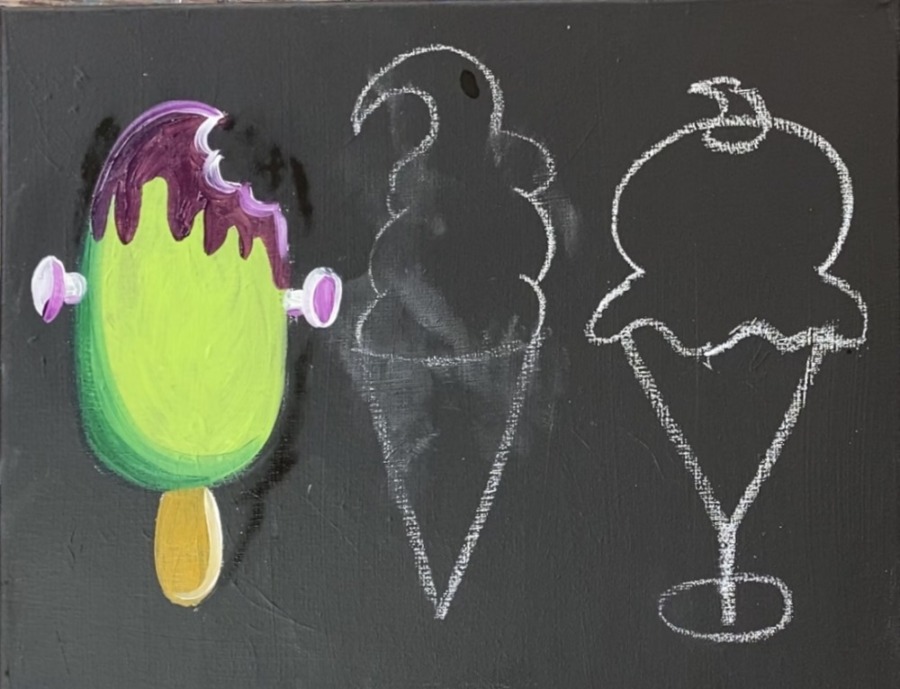
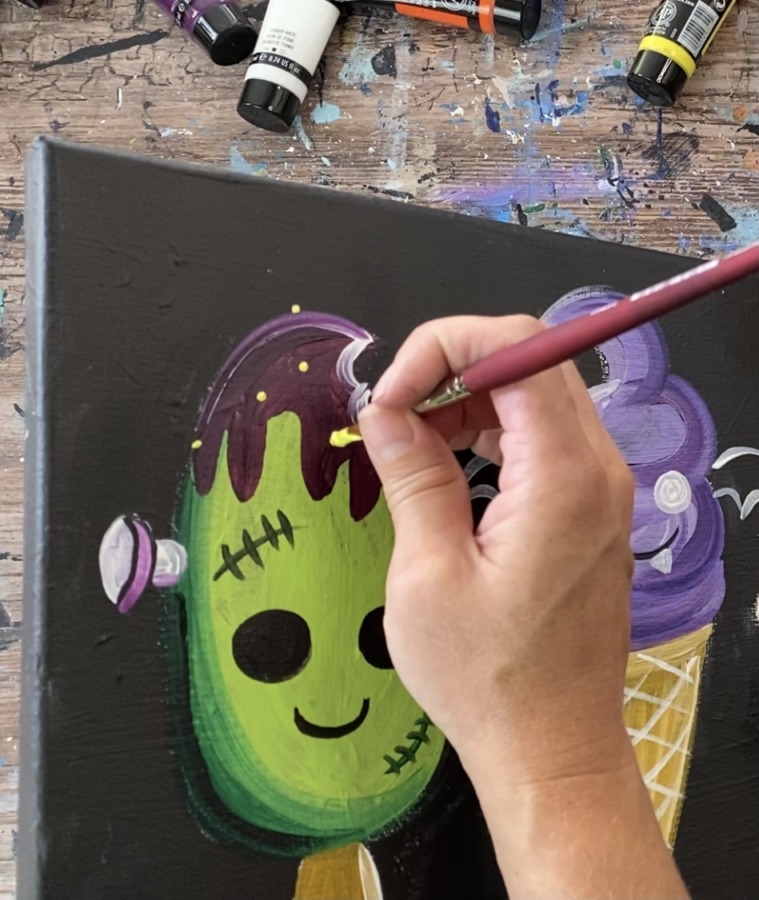
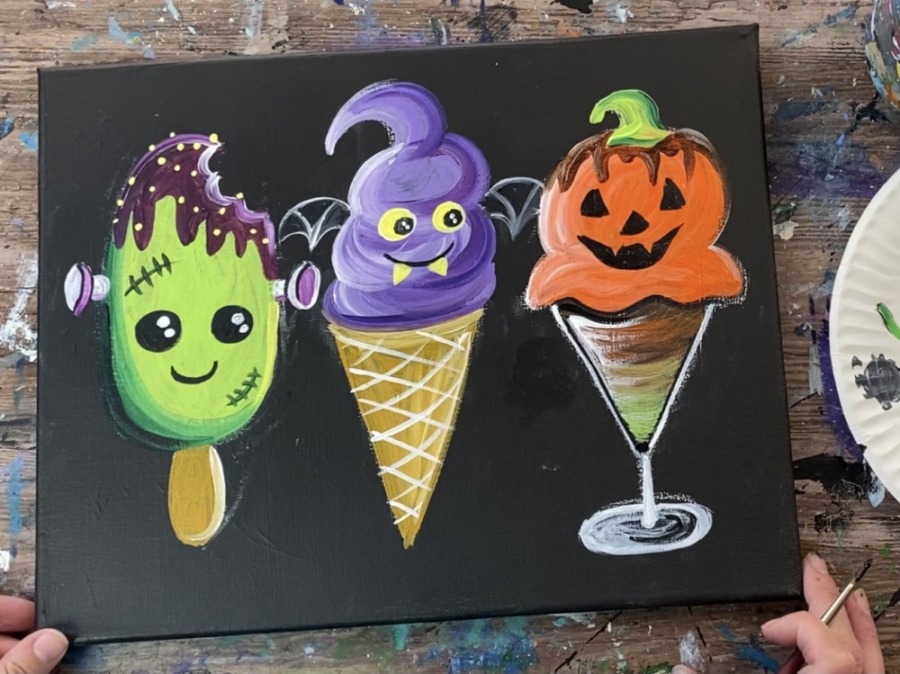
2. Paint Frankenstein Popsicle
Paint each of the ice cream shapes next! You can follow these colors or customize your colors.
Use a #8 round brush and start by painting Frankenstein ice cream on the left. Paint the shape with “brilliant yellow green”.
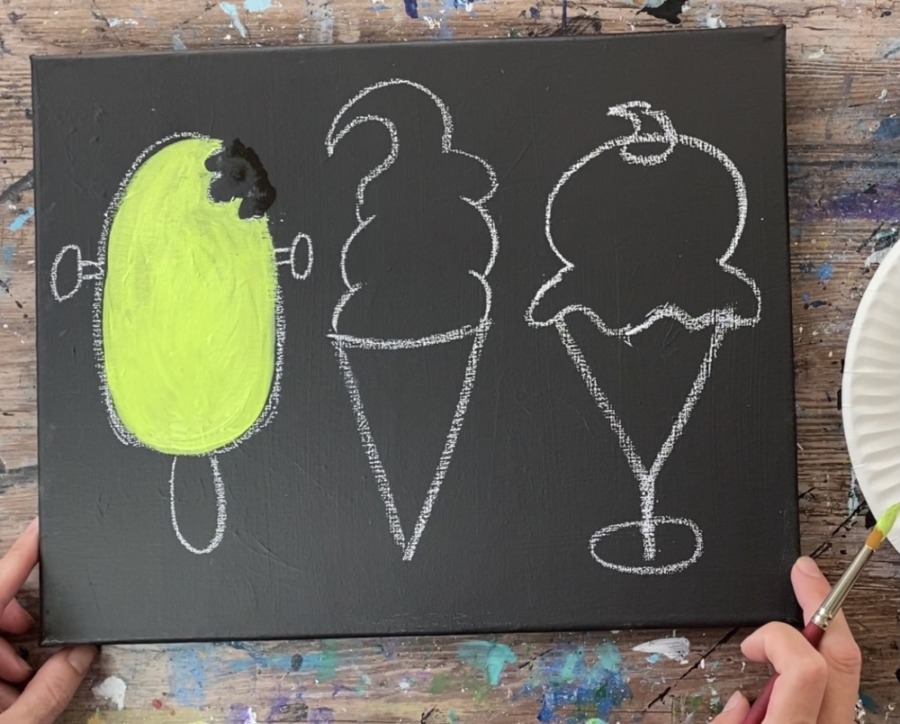
Then load your brush with a little bit of deep green permanent. Paint a semi thick line on the bottom of the ice cream and allow it to go thin as you go up to the top left of the ice cream shape.

Then paint the popsicle stick with yellow oxide. Paint the right side of the stick with some titanium white.
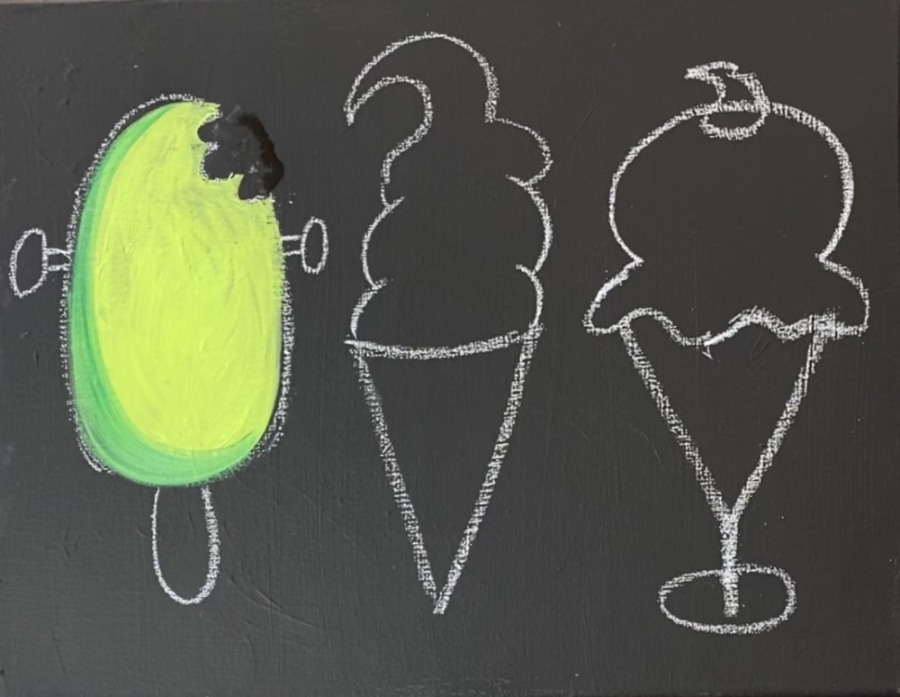
Use a #4 round brush and the color “deep violet” to paint the top part of Frankenstein’s head. Paint a dripping shape just at the top of the ice cream.
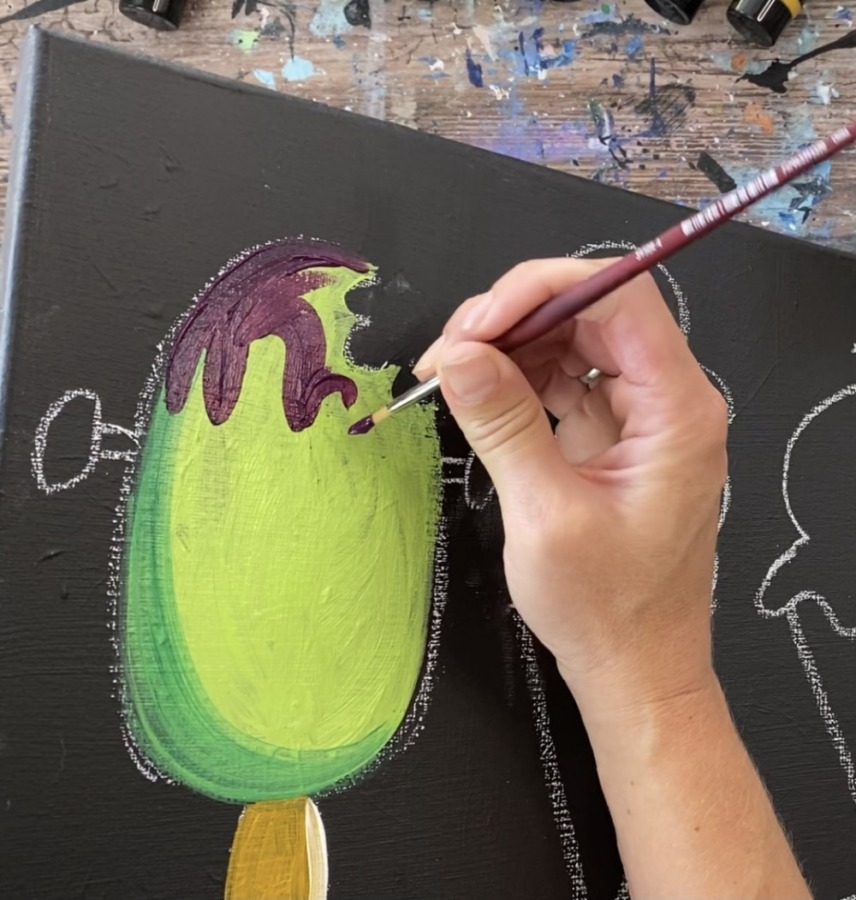
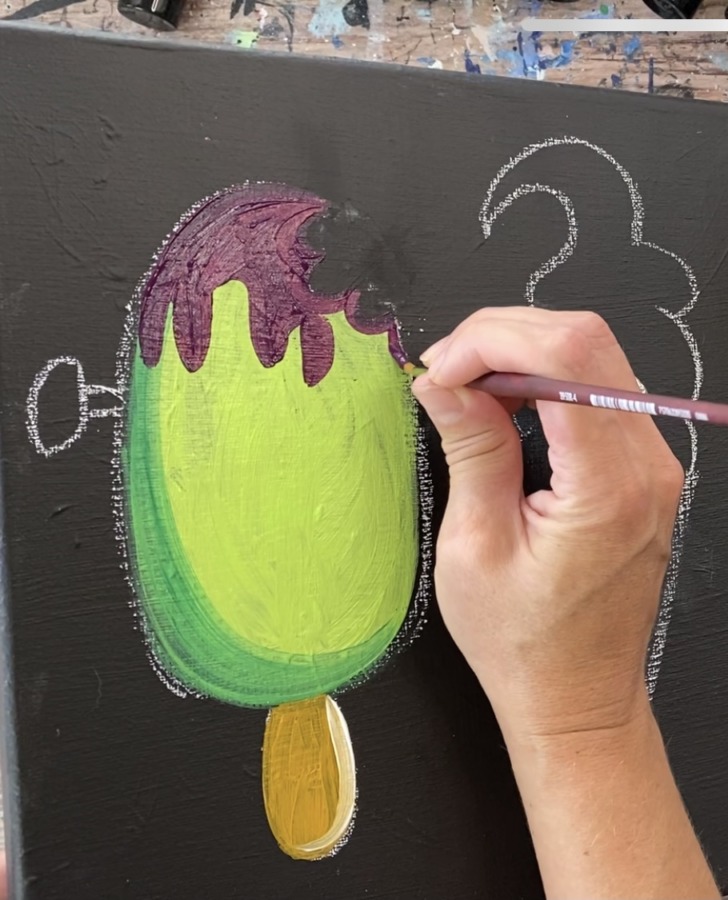
Load your round brush with titanium white and loosely outline the top and the bite mark line.
Then paint the screws titanium white.
Add some purple to the screws.
3. Paint Middle Bat Ice Cream
Paint the ice cream cone in the middle with yellow oxide and a #8 round brush. Add a small amount of titanium white to the left part of the cone and gently blend it in with the yellow oxide. Paint some of the white on the top curve opening of the ice cream cone and allow it to blend gently with the yellow oxide.
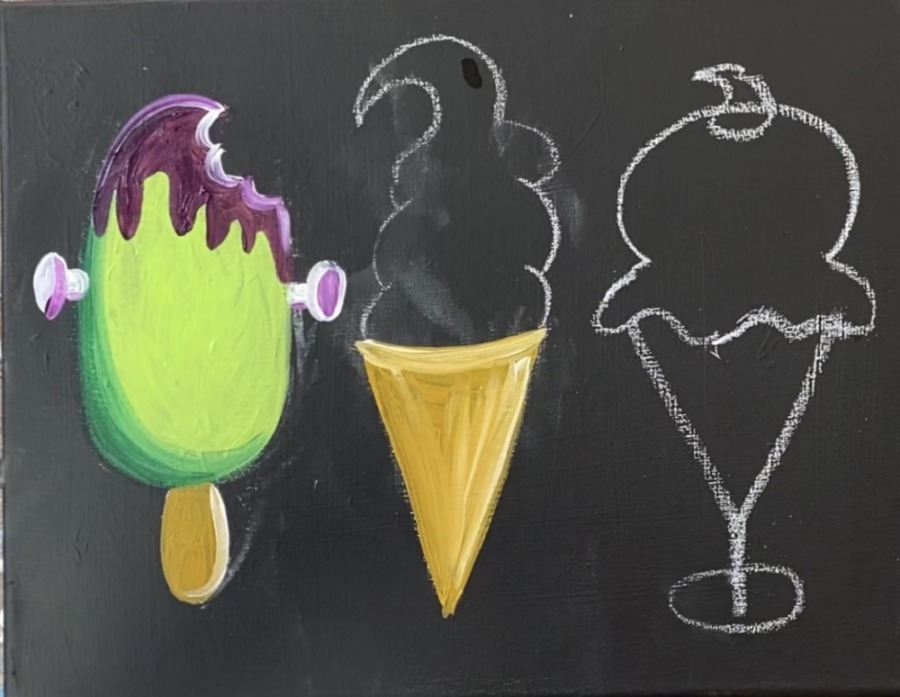
Use your #8 round brush to paint the purple ice cream. Use brilliant purple and a small amount of titanium white. Paint in a swirled direction allowing the purple and white to blend but not all the way. Try to add a little more white on the left side of the cone and let it blend with the purple.
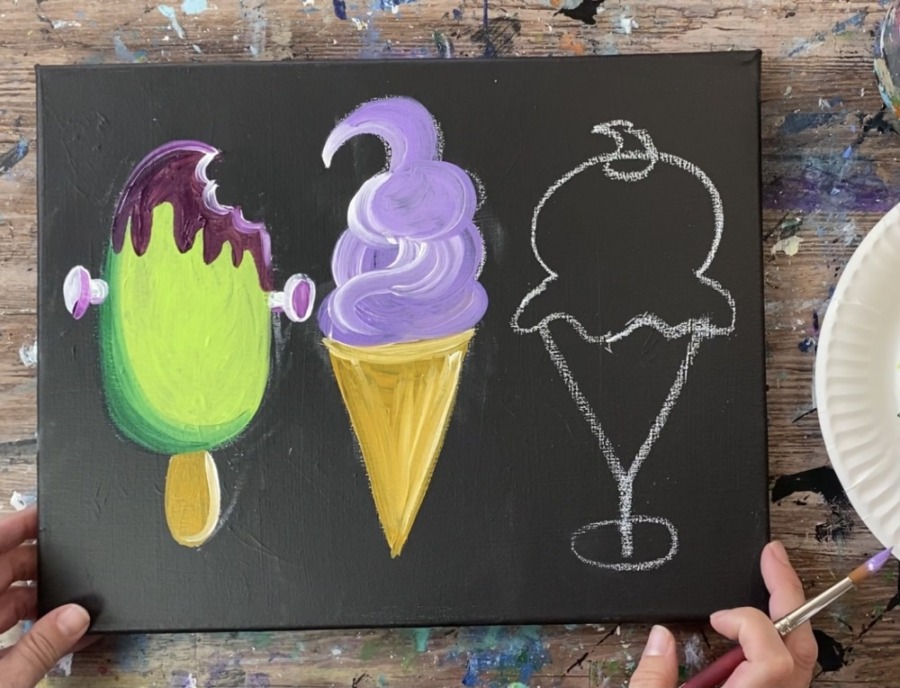
Add a small amount of dioxazine purple to the right side of the ice cream swirls and let it gently blend with the brilliant purple.
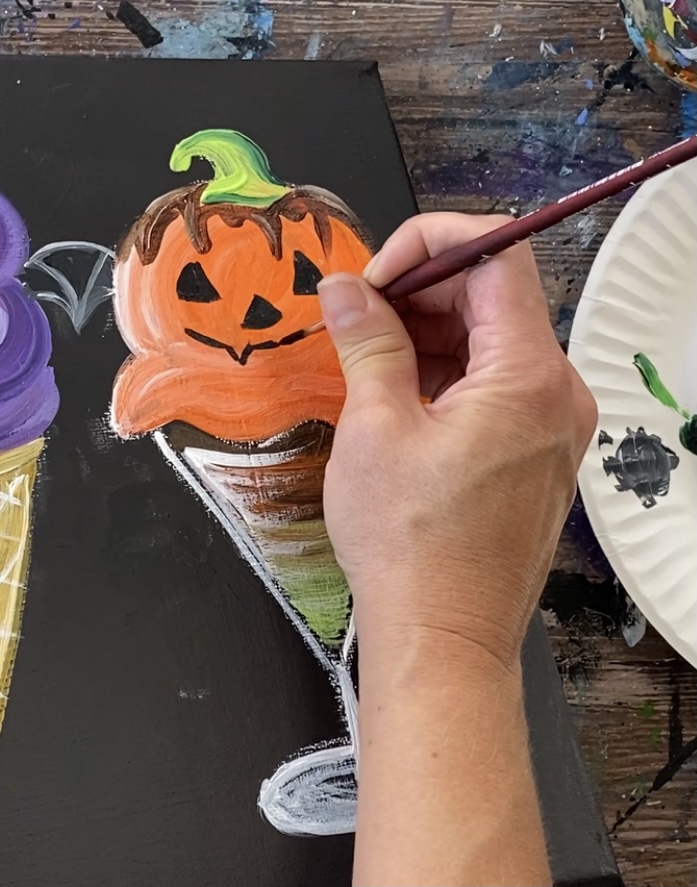
4. Paint Orange Pumpkin Ice Cream
Double load your brush in titanium white and cadmium orange hue. The titanium white helps the orange to have coverage over the black background.
Paint this first layer on the ice cream. It will be a light orange. You will be able to paint a second coat over this with just the orange after it dries.
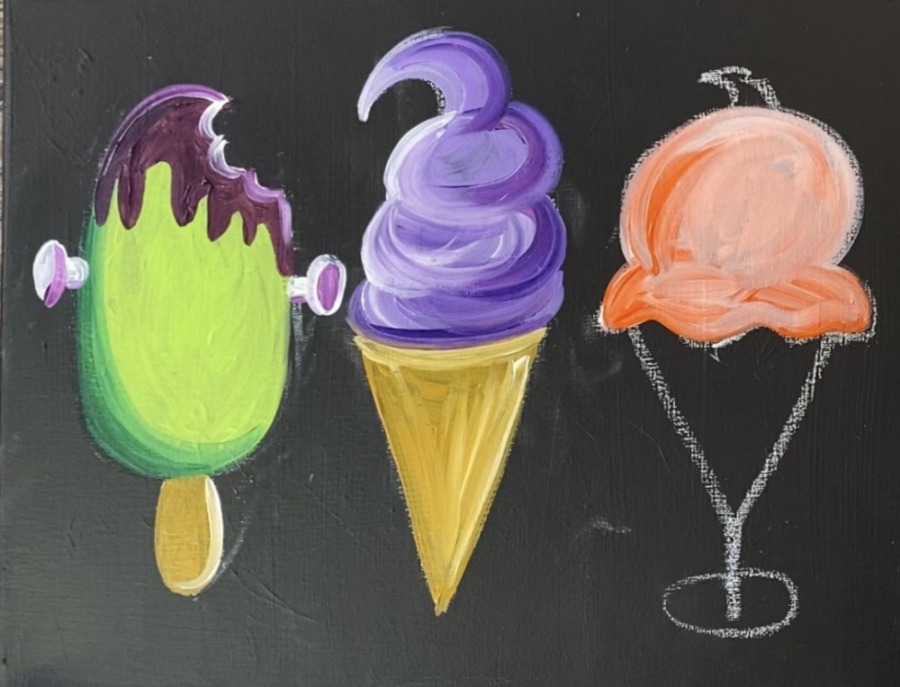
Paint the inside of the glass with cadmium orange hue (not mixed with white). Paint curved strokes. You do not have to completely cover the black background.
Then add a small amount of brilliant yellow green on the bottom inside of the glass ice cream bowl. Let it gently blend with the orange.
Then, outline the shape of the glass. Paint the two diagonal lines, the stem and the oval on the bottom.
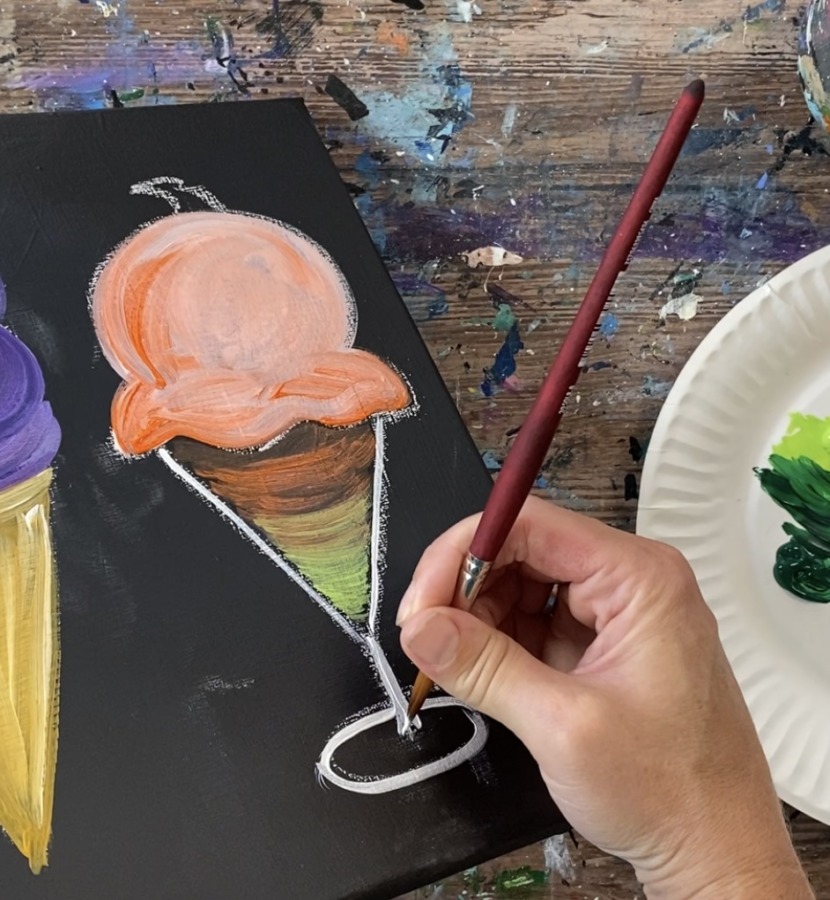
Dry brush the bottom part of the oval. That means only load a small amount of white on the round brush and wipe it off. Paint a small amount of white on the bottom oval base and allow a lot of the black background to show through.
Then paint a highlight on the left part of the glass. Dry brush some more white lines going in a curved direction on the left.

5. Paint All The Decorative Details!
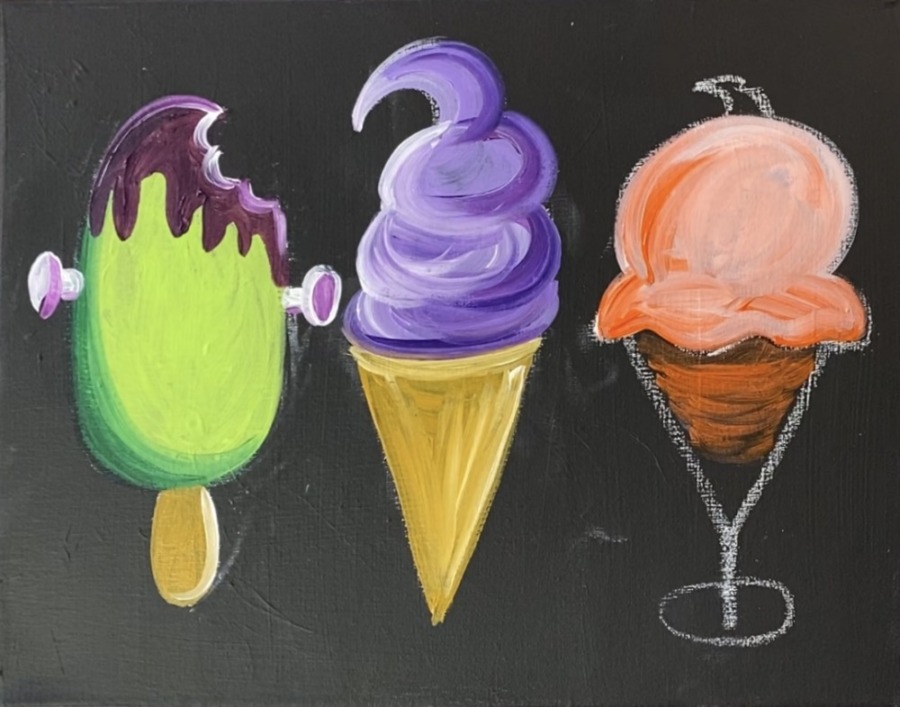
Paint the texture on the ice cream cone. Paint diagonal lines going in one direction and then paint diagonal lines going in the other direction.
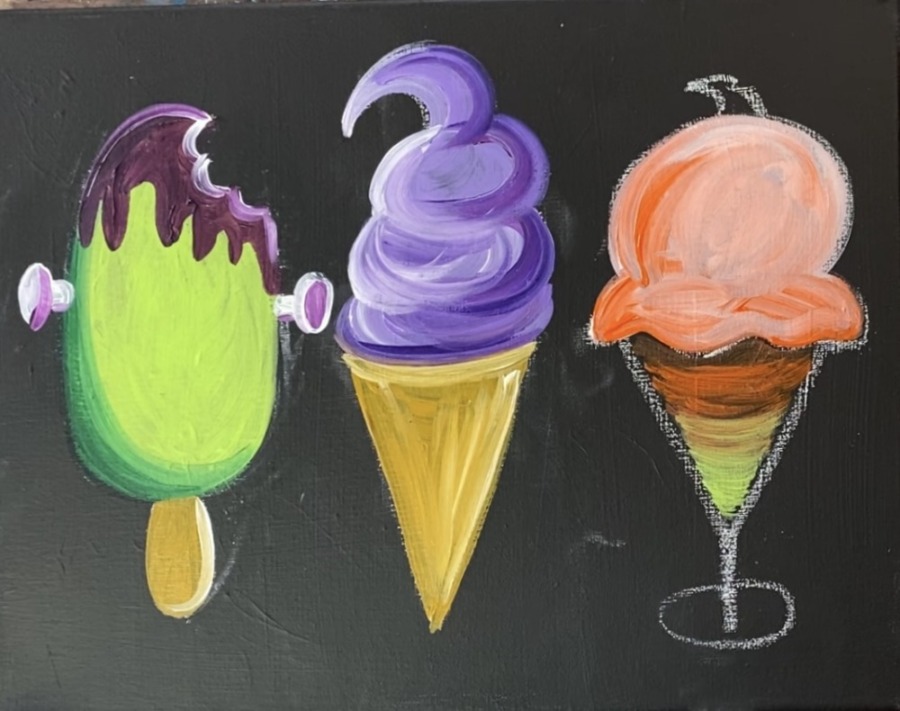
Use the #4 round brush and mars black to paint two eyes and a mouth on Frankenstein ice cream.
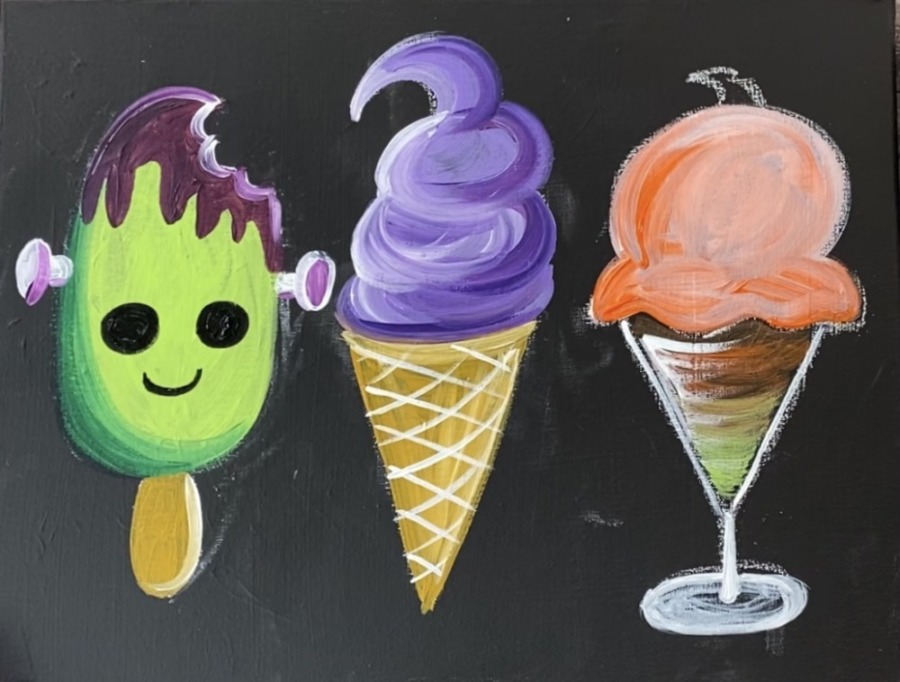
Paint stitches using deep green permanent.
Paint the face and wings on the bat ice cream. Use titanium white for the wing shapes, eyes and teeth. Use mars black for the mouth.
Paint the stem of the pumpkins with brilliant yellow green and deep green permanent. Paint a second coat on the ice cream with cadmium orange hue.

Paint sprinkle details on the Frankenstein with cadmium yellow light hue mixed with titanium white. Paint small dots on the top area of Frankenstein.
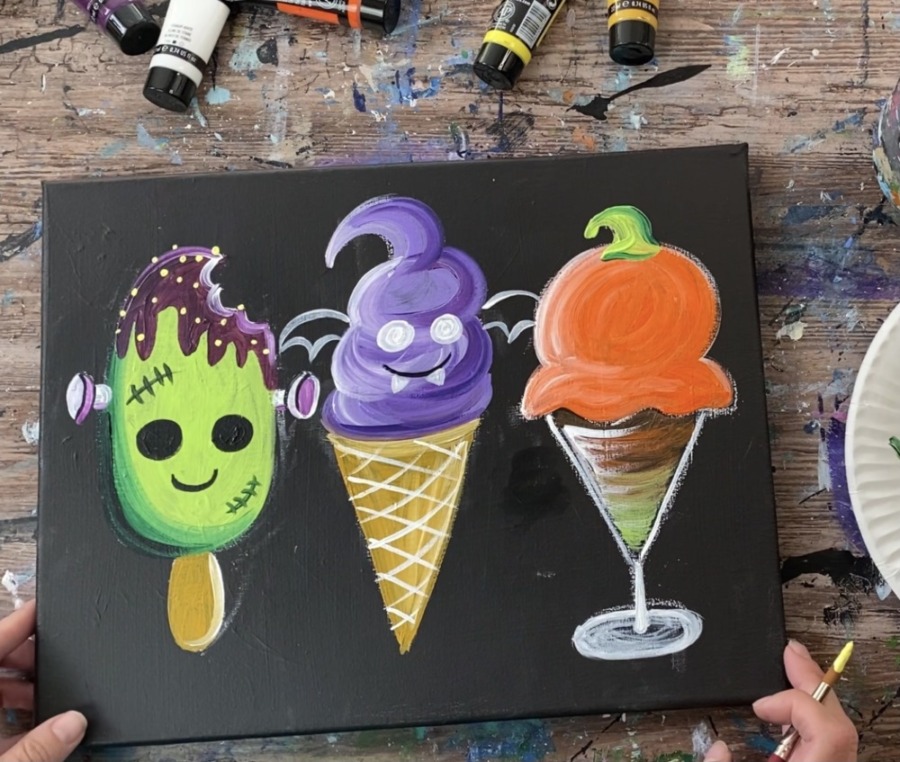
Paint black circles on the eyes of the bat. Paint two curved white lines on the inside of the bat wings.
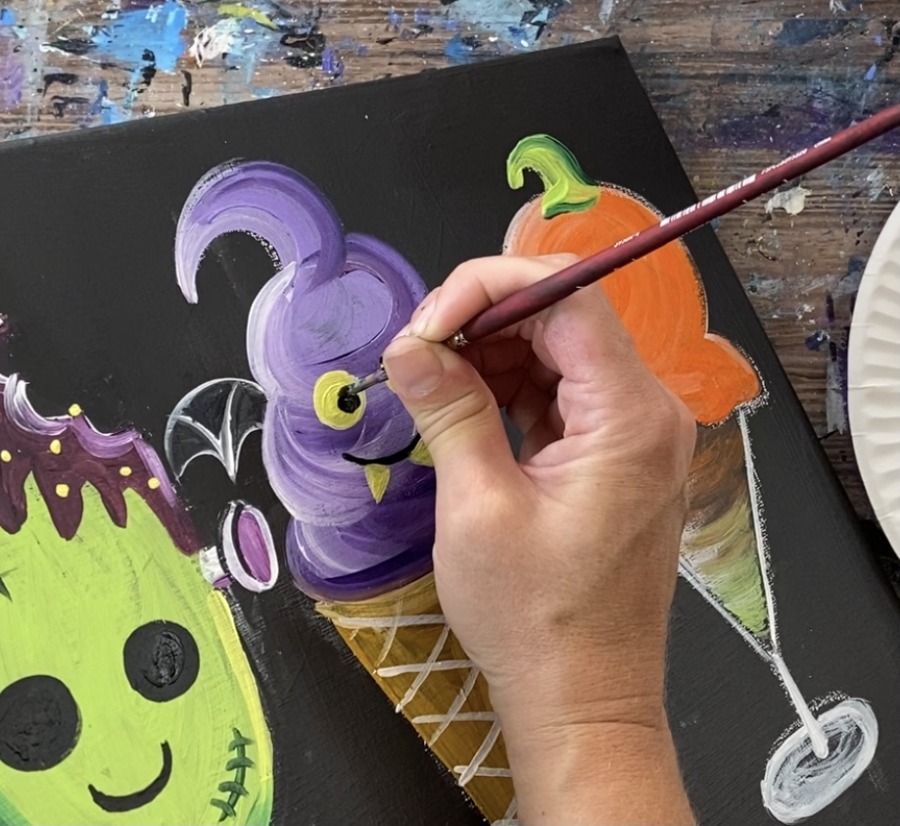
Paint two sets of white dots on the inside of both sets of eyes.

Paint burnt umber on the top part of the pumpkin. Paint dripping chocolate syrup.

Paint the Jack O’ Lantern face with mars black.
Outline the inside of the glass between the white outline and the ice cream.
Paint drips on the left side of the pumpkin ice cream.
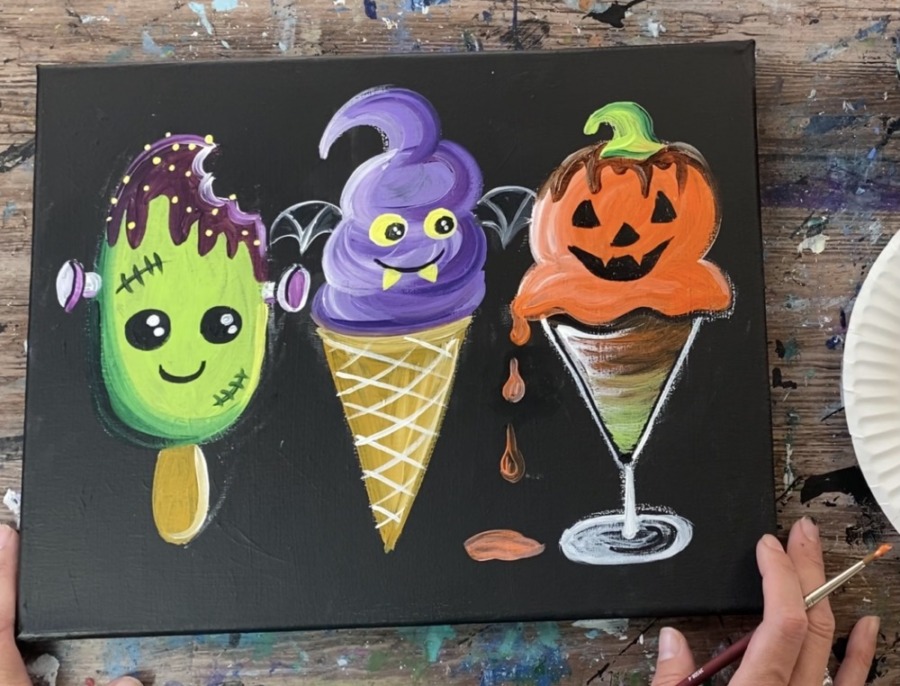
Paint small straws on the bat and pumpkin ice cream. Paint two diagonal lines and an oval at the top. Paint the straw shape titanium white.

When the white dries, paint diagonal stripes up the straw. I used deep violet and cadmium orange hue to do the stripes.
6. Add Patterns In Background
Paint white spiral lines in the background around the ice creams.
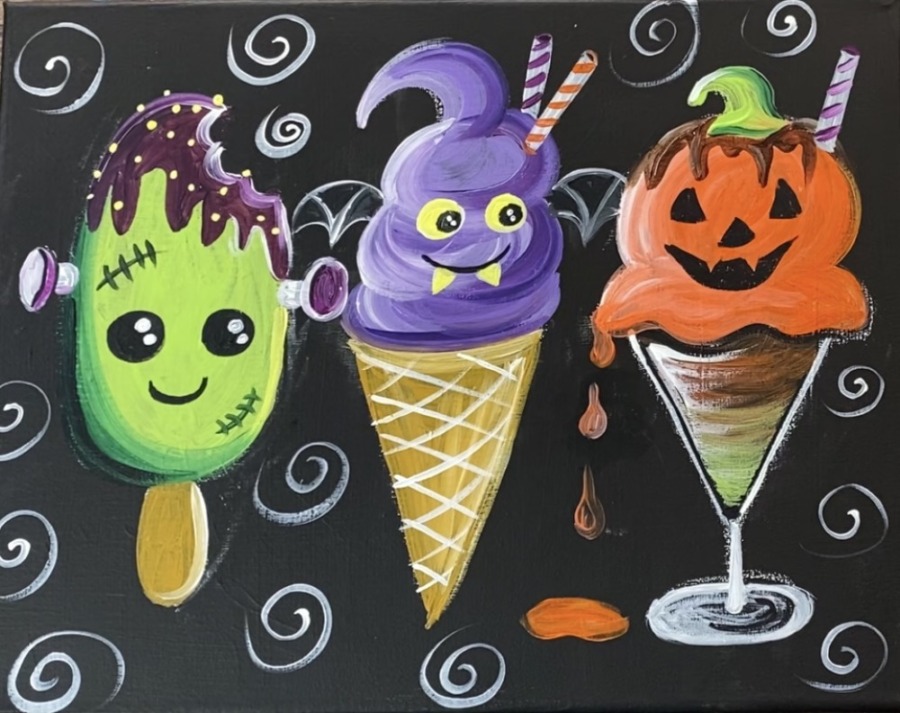

Finished

Share your art here!


This painting is soooooo stinkin’ cuuuuuute!!!
Thanks Debbie!!!
Where is the traceable?
Hey Rosilynn! I added the traceable to this post so it should be in there now. Thanks!