
Would you like to save this?
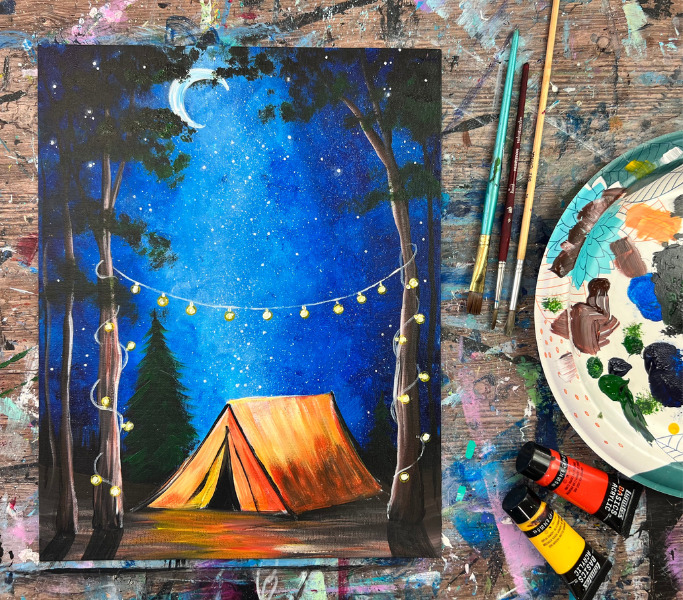
This acrylic painting tutorial will demonstrate how to paint a camping theme painting on canvas!
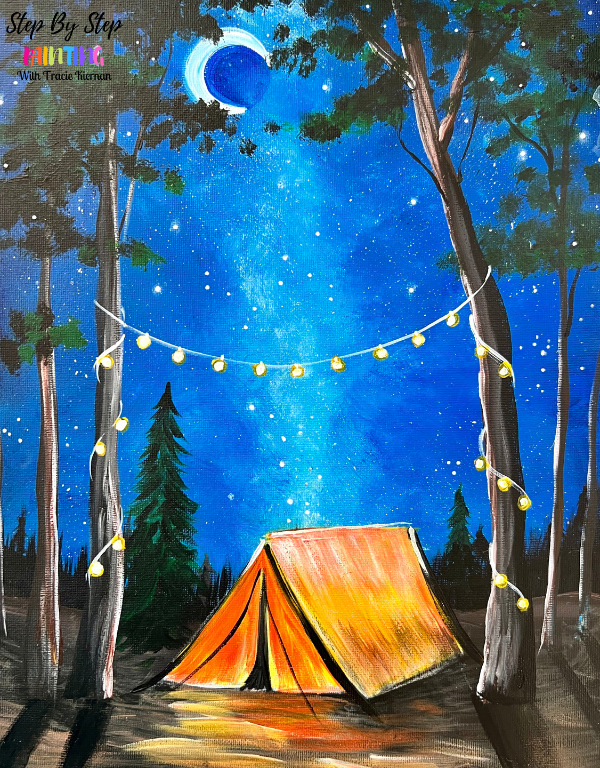
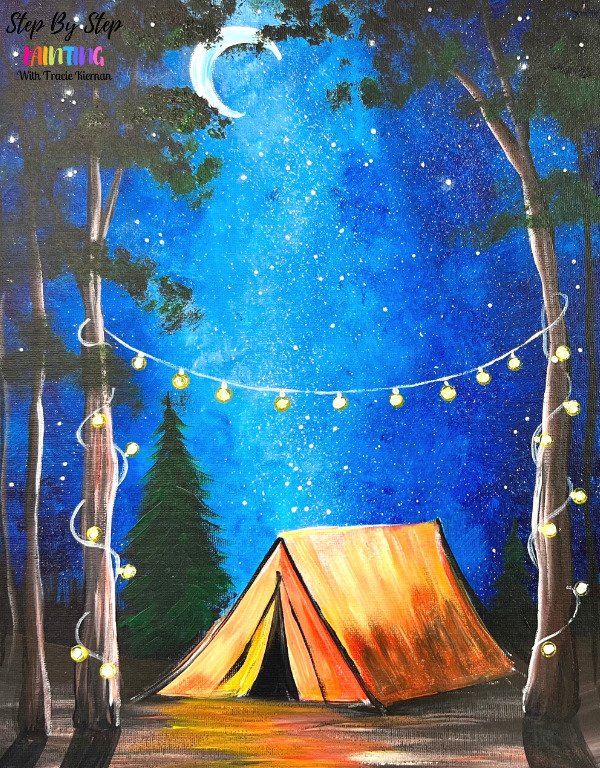
I just love the glowing stars through the trees and the string lights in this “glamping” scene! The contrast of the dark galaxy sky with the bright tent bring that warm fuzzy feeling to anyone that loves to camp!
This tutorial has a lot of steps to it because of all the details in the trees, lights and tent! I would suggest breaking it down into at least two sessions if you are used to painting in one session.
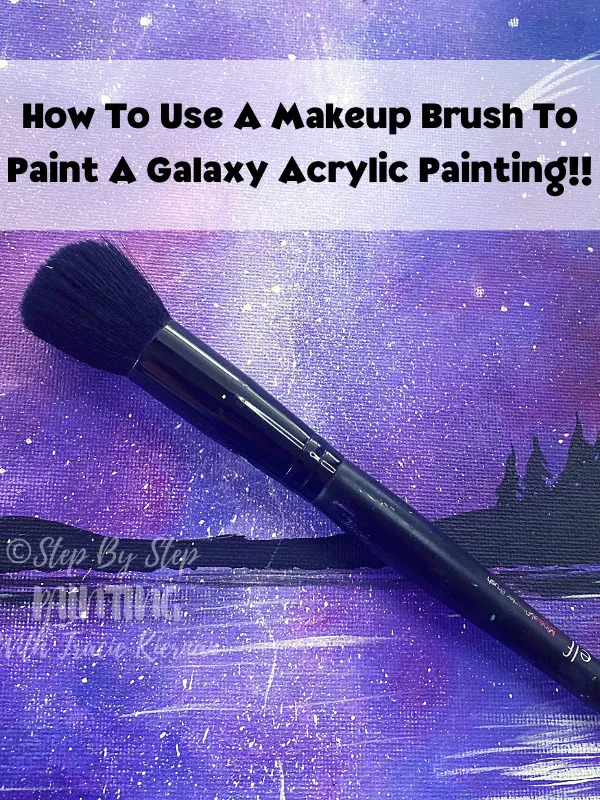
For the galaxy sky, I used a round makeup brush and sponge to achieve the Milky Way impression in the sky. I highly recommend using both of those tools for this technique.
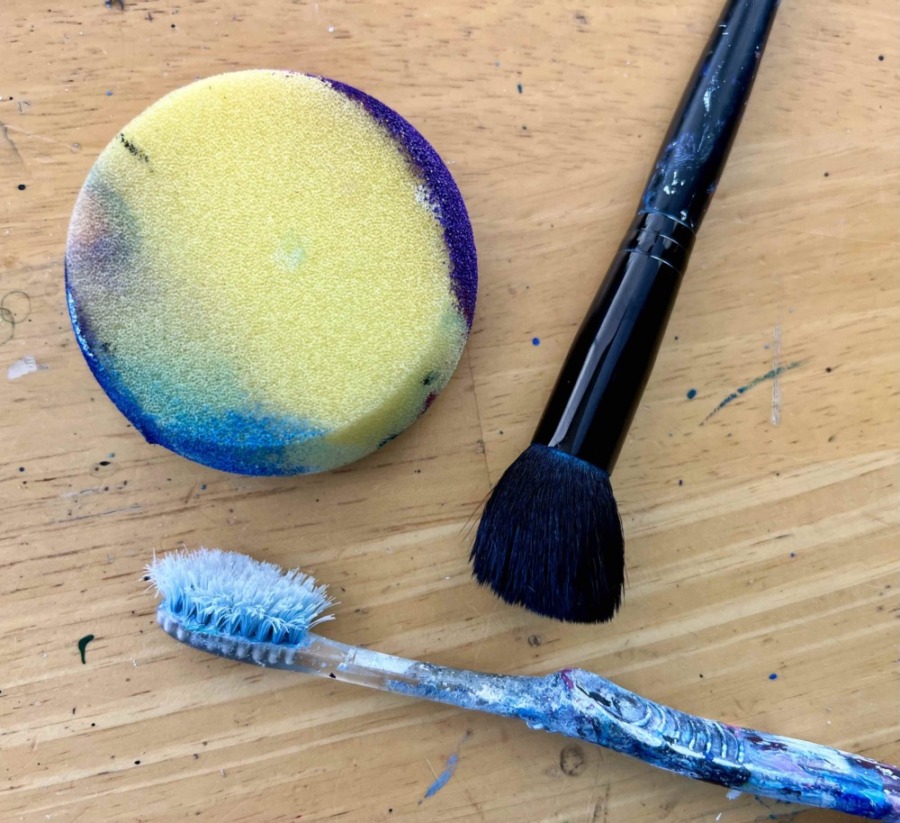
It’s been awhile since I’ve done a galaxy sky painting but you can see other versions of this technique in this Camping Painting, This Desert Scene and my How To Paint A Galaxy tutorial!
Enjoy and happy painting!
Skill Level: Medium
Duration: 2+ hours
Materials Needed:
"Let's Go Camping!" Acrylic Painting Tutorial

Paint a magical "Glamping" acrylic painting on canvas! This tutorial demonstrates how to paint a starry night, trees and a glowing tent.
Materials
- 11 x 14 Canvas
- Acrylic Paint
- White Chalk Pencil
- White Paint Pen
- Pencil
- Sponge
- Acrylic Paint Brushes
- Round Mop Brush or Makeup Brush
- Water Cup
- Paint Palette
Colors
- Cadmium Red Light Hue
- Cadmium Yellow Medium Hue
- Hooker's Green Hue Permanent
- Phthalo Blue
- Prussian Blue (optional/ can be omitted)
- Mars Black
- Burnt Umber
- Titanium White
Brushes
Color Palette
I used Liquitex BASICS acrylic paints for this tutorial. You can use whatever paints you have on hand! Use the color chart below to try to match your colors.

Using Craft Paints?
If you are using craft paints such as the Apple Barrel Paints, I would suggest substituting to these colors:
- White
- Black
- Too Blue
- Bright Blue
- Bright Yellow
- Jack-O-Lantern
- Nutmeg Brown
- New Shamrock
Directions At A Glance

Video
Step By Step Directions
1. Paint The Galaxy Sky
Load your palette with Prussian Blue, Phthalo Blue and Titanium White. Load your round mop brush into the water and squeeze the bristles so most of the water drips out and the brush remains damp.

Start with the Prussian Blue. Apply this dark blue using the round mop brush in small circular strokes. Apply it just on the outer right and left edges of the painting and go up to the top edge of the canvas. Leave a large white area blank in the middle of the canvas from top to bottom.

Next add phthalo blue to your brush without rinsing the Prussian Blue off. Blend the phthalo blue in with the Prussian and go further in with this dark blue color. Leave a blank white space in the middle. Note: phthalo blue is very similar to Prussian Blue and is only slightly lighter.

Next, wipe your brush but don’t rinse it. Load it into titanium white. Paint small circular strokes with this white and gently blend the white with the blue. You will want the center part of the canvas (Milky Way) to be brightest/lightest.

Fill the entire center with this light blue color (the white that mixed with the phthalo blue).

Next, use the sponge to blend your sky better. Press and turn and/or dab your sponge all over the canvas but concentrate on the areas where the colors transition and need to blend.

Next, apply white to your sponge. Dab the white up into the Milky Way area and blend it with the blues. Create more layers of white, concentrating on the center part of the canvas where it should be bright and light blue. You can also add more darker colors to your sponge and add more dark colored texture to the outer parts of the sky.

Use a toothbrush to splatter white speckled dots all over the canvas. Load the toothbrush in a small amount of water. Then load it into titanium white paint. Flick the brush all over the canvas. Concentrate in the center of the canvas to create very bright and dense stars for the “Milky Way”.


2. Paint Ground
Use a 3/4″ flat wash brush and mars black to paint the ground. Paint a ground line that goes in an inverted curve in the middle. On the left and right, the ground goes up about 3″ from the bottom of the canvas.

3. Paint Tree-line
Next, use the tip of your flat brush to paint small vertical tree marks along the horizon line. These brush strokes are supposed to represent trees that are way in the distance. It is helpful to only load a small amount of paint on the brush. Paint the strokes fast and vary the strokes (some small, some large).

Do this all the way across the “horizon line”. Tip: if your 3/4″ flat wash brush is painting too thick of strokes, you can try doing this with a smaller flat brush (such as the 12 bright) or even a round brush.


4. Paint brown on land under the trees
Next, load burnt umber onto your palette. Paint brown on the lower part of the ground all the way up to the “horizon line” under the trees.

Wait for this to dry before going onto the next step.
5. Draw Tent
Draw the tent using a chalk pencil. The measurements for the tent are approximately: 6.5″ wide by 3″ high. Additionally, the tent is 1.25″ from the bottom of the canvas.

Start by marking where the bottom of the tent will be. This is about 1.25″ from the bottom of the canvas (if you are using an 11 x 14 canvas). Draw a horizontal line that is about 6.5″ wide and centered. This will be the bottom line of the tent (the tent’s width). Then make a second mark about 3″ from that bottom line. This will be the height of the tent.

Then use your white chalk pencil to lightly sketch the tent. Draw a triangular shape for the front of the tent. Then draw a line that is slightly slanted upwards for the side of the tent.

Draw your far right edge of the tent. This is a line that is slightly inner curved.

Draw the bottom side line so that it is parallel to the top side line (both go slightly in a diagonal direction). Then draw an isosceles triangle shape on the front part of the tent for the door.


6. Paint Tent
Use titanium white, cadmium yellow medium and cadmium red light hue and a #12 bright brush to paint the tent.

Load your brush in titanium white. Paint the right side of the tent white. This will ensure your orange/yellow colors of the tent will show up bright against the dark background.

Use the tip of your brush to outline the front shape of the tent. Leave a little bit of a gap from the front part of the tent to the side part.

Paint the front part of the tent white. Leave the door unpainted. Also, leave a small gap from the front of the tent to the side of the tent (the line that divides those two parts).

Wipe your 12 bright brush off. Then load it into the cadmium red light hue (orange). Paint diagonal strokes starting at the top of the tent.

Then wipe your brush off. Load it into cadmium yellow medium and blend the yellow with the orange.

Then add more cad red light hue on the bottom. Add more yellow if desired for a brighter side of the tent but add it just in the middle part.
Then paint the front part of the tent using the orange and yellow. To create contrast, paint orange on the far right of the front part of the tent and paint more yellow on the left.

You can add strokes of titanium white onto the tent to brighten it up. The trick with this tent is to try not to over blend the colors. Let the colors blend on the canvas but try not to over blend them so the tent doesn’t turn solid the same color.

Optional: add some darker and more shadowy strokes on the right bottom part of the tent. Lightly blend some black going in a diagonal direction up the side of the tent. Do this with only a small amount of black and blend it in with the orange.

Then use a #4 round brush and mars black to loosely outline the shape of the tent. Add black to the edges of the door of the tent to define the shape of the door. Loosely outline the front triangle piece and the far right diagonal line.


7. Paint Ground Reflection
There is reflection on the ground from the glowing tents and lights. To create this effect, use your 12 bright brush (or 3/4″ wash brush) to apply light paint colors below your tent. Load your palette with: burnt umber, titanium white and use the colors that you used in your tent (the cadmium yellow medium and cadmium red light).
Triple load your brush in titanium white, burnt umber and yellow. Paint left and right short choppy strokes below your tent.

Add the orange color into it as well. Let the colors blend gently on the canvas but don’t over blend them. There should be a variation of light brown and orange in the ground. Add more color just below the tent so that it is brightest on the ground in that area. Add a small amount of color on the far left and right but keep that area generally dark.

There should be a gentle glow on the ground below the tent. The tent, however, should still be brighter than the ground.
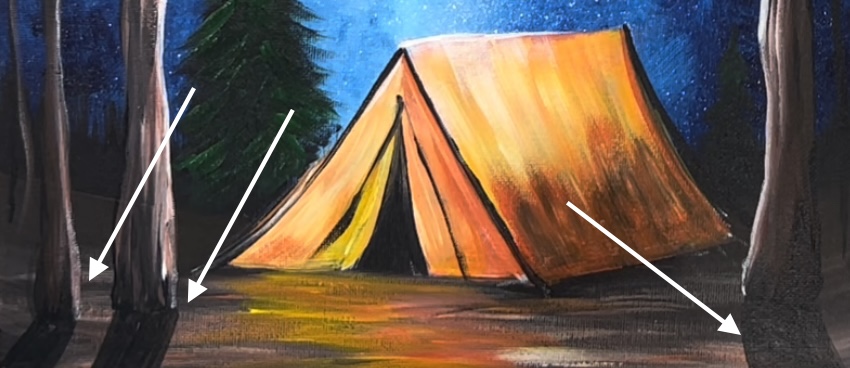
8. Paint Trees
Use mars black and your 12 bright brush to paint the base color and shape of the trees. Start with the tree on the left. Paint a trunk that is about 3/4″ thick and then goes very thin by the time you reach the top of the canvas. To get that thinner line, turn your brush on it’s side. This tree goes all the way to the top edge of the canvas. Then create thinner branches that stem out from the top area of this tree.

Paint a second tree on the right of the tent. This tree slightly bends inwards. Paint another thin tree to the right of that one.

To add color to the tree, go back over your black with a layer of burnt umber. This will show up as a dark brown that slightly blends with the black.

To add highlight to your tree, paint just the far edge of the tree with white mixed with burnt umber (about 3 parts white and 1 part brown). Use just the tip of your 12 bright brush. Paint the far right edge of the tree on the tree on the left of the tent (where the light would be hitting it).

Do the same for the right tree but highlight the left side of it. To create some texture in the tree, paint up and down strokes with the light brown on the middle part of the tree. Add more brown to this so it appears darker. The brightest/lightest part of the tree should be the edges where the light is hitting it.


Then do the pine needles/leaves on the trees at the very top. To do this, I used a round bristle brush. A “stencil brush” also works very well for this step! You just need a brush that has the natural bristles in a rounded shape.

Load your palette with mars black and hooker’s green hue permanent.
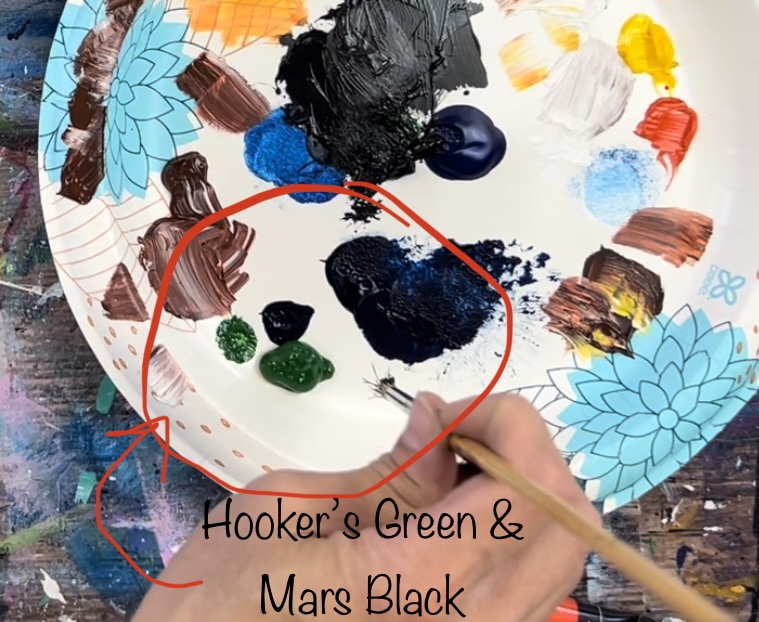
Use your round bristle brush to “dab” the black and green in horizontal clusters high up in the trees.

You can vary the color a bit by adding more pure green in some areas and more pure black in others. However, all the “foliage” should be very dark, almost a complete silhouette. Leave a lot of the sky still showing through.

Paint all these in clustered areas staggered up the trees. Leave a lot of sky still showing and also leave a blank area for the string lights.

9. Paint Pine Tree (optional detail)
If you want, you can paint medium sized pine tree/ Christmas style trees in the background!
I did on on the left of the tent. Use a round brush and mars black to form the top tip of the tree. Stroke each branch stroke going downwards to form a conical shaped tree.

This tree is higher than the tent and behind the tent in the background. Go back with a layer of hooker’s green hue permanent to add green color to the black silhouette.

10. Paint Tree Shadows On Ground
Use a #12 bright brush. Water down mars black to a watercolor consistency. Then paint the shadow below the tree trunks. These shadows angle oppositely on each side and go down in a diagonal direction.
11. Paint String Lights
For the string lights, I recommend drawing with a chalk pencil where you want your wire to hang. I did a curved line that attached to two trees and then on each tree, I drew the wire so it wrapped around the trunks of the trees.

Then use titanium white and a #4 round brush to paint over that drawing of the string light wire. Do this with a very loose, thin line. You can also do this with a white paint pen.

Then use cadmium yellow medium to paint the individual string light circles. You can do this with a round brush or you can do this by stamping the back of an eraser on a pencil. The eraser will create individual circle stamps. Position the lights so they are about 1 finger width apart and a small slither of a gap below the string.

Then you can paint the sockets of the lights by using your round brush and titanium white to paint a small square stroke that attaches each light to the string.

To make the lights look bright, use your round brush and titanium white to paint a small white circle in the center of each of the lights. This will make it look like the lights are glowing bright. Don’t cover all of the yellow with the white, just paint a small white circle inside the yellow circle.

12. Paint Moon (optional)
If you want to do a crescent moon (or full moon) in the sky, I recommend tracing a circle with a compass or anything that has the size circle shape you want! I used the lid of a liquitex BASICS acrylic paint bottle. Trace the circle with the white chalk pencil.

Then on the inside of the circle, draw the crescent shape.
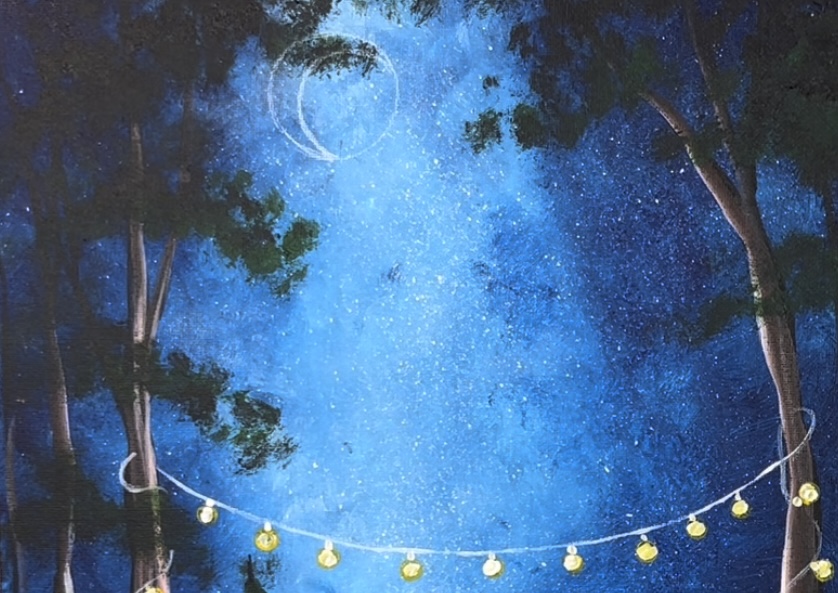
Next, use your #4 round brush and titanium white to paint the crescent.

As an added detail, you can mix a tiny bit of blue in the moon.

Then, if necessary, repaint some of the foliage on the top of the trees to make it look like they are overlapping parts of the moon.
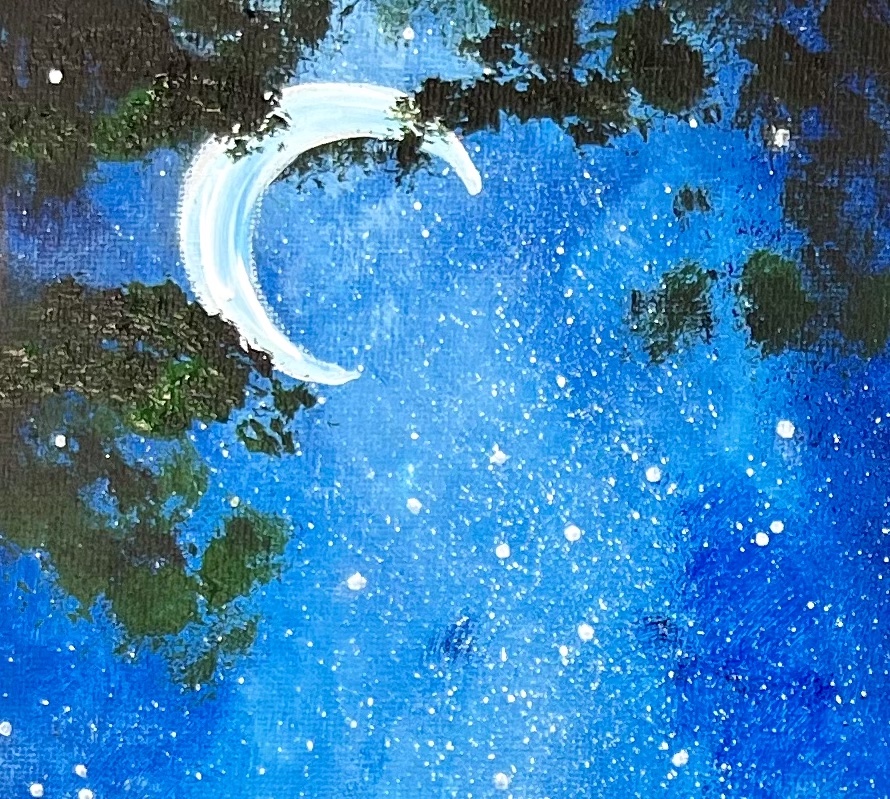

13. Paint more stars with paint pen (optional detail)
Another optional detail you can do is paint more stars! These could also be fireflies. Use the white POSCA paint pain to paint little clusters of bright white dots. You can do constellations! You can also make some stars look like they are shining through the trees.

To make some of theme look blurry, you can use your finger to smear the little dot before the paint dries.


Do touchups wherever you feel is needed!
Finished!
Share Your Art Here


