
Would you like to save this?
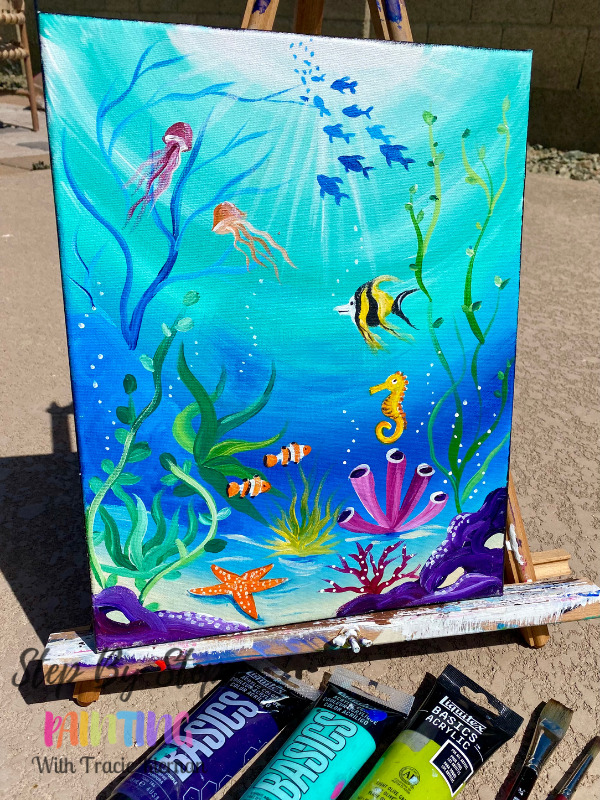
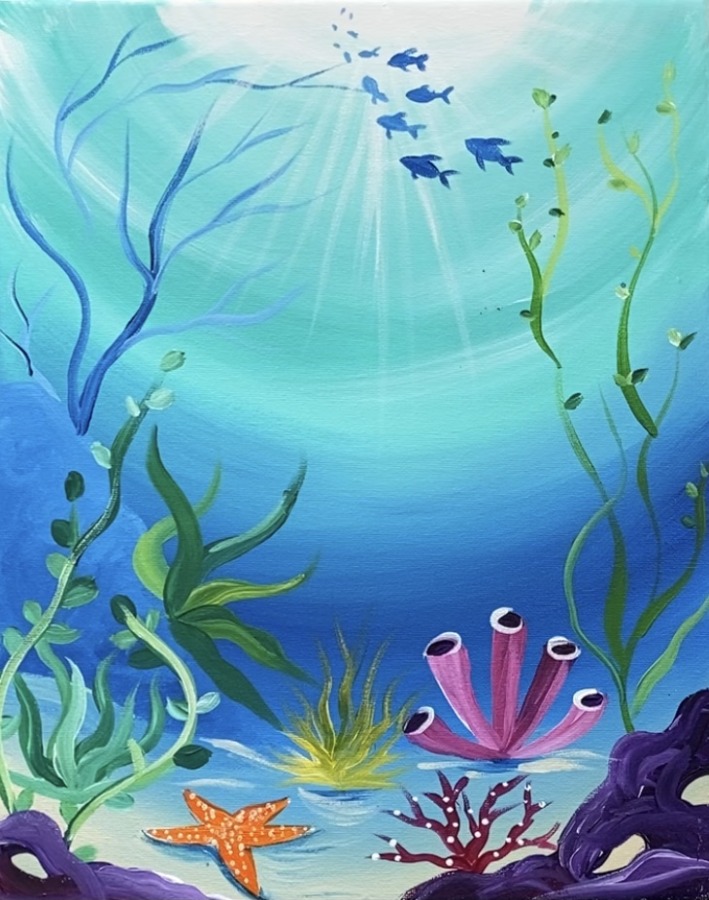
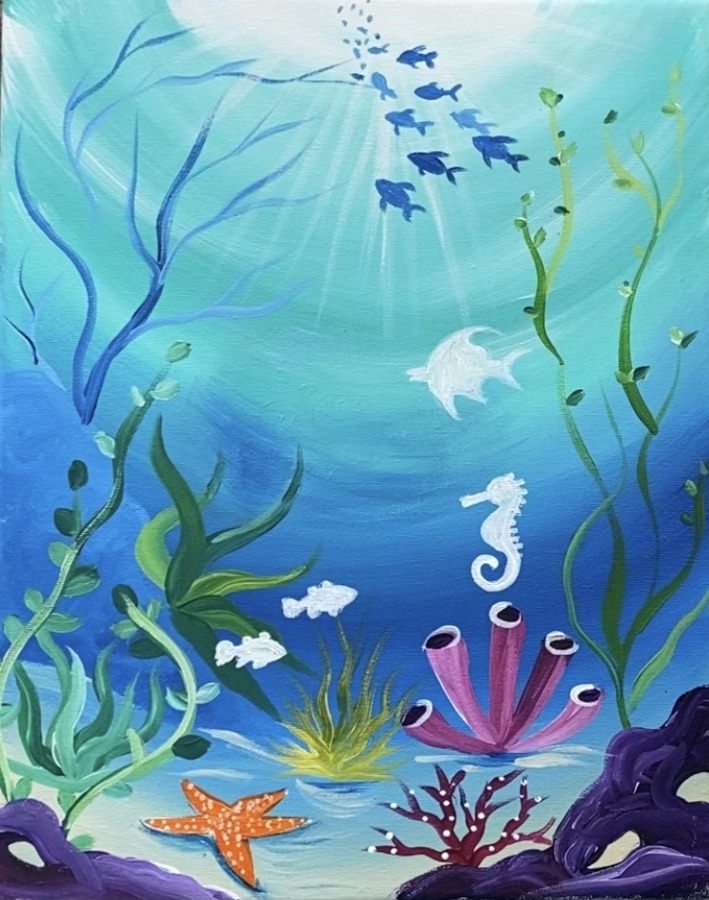
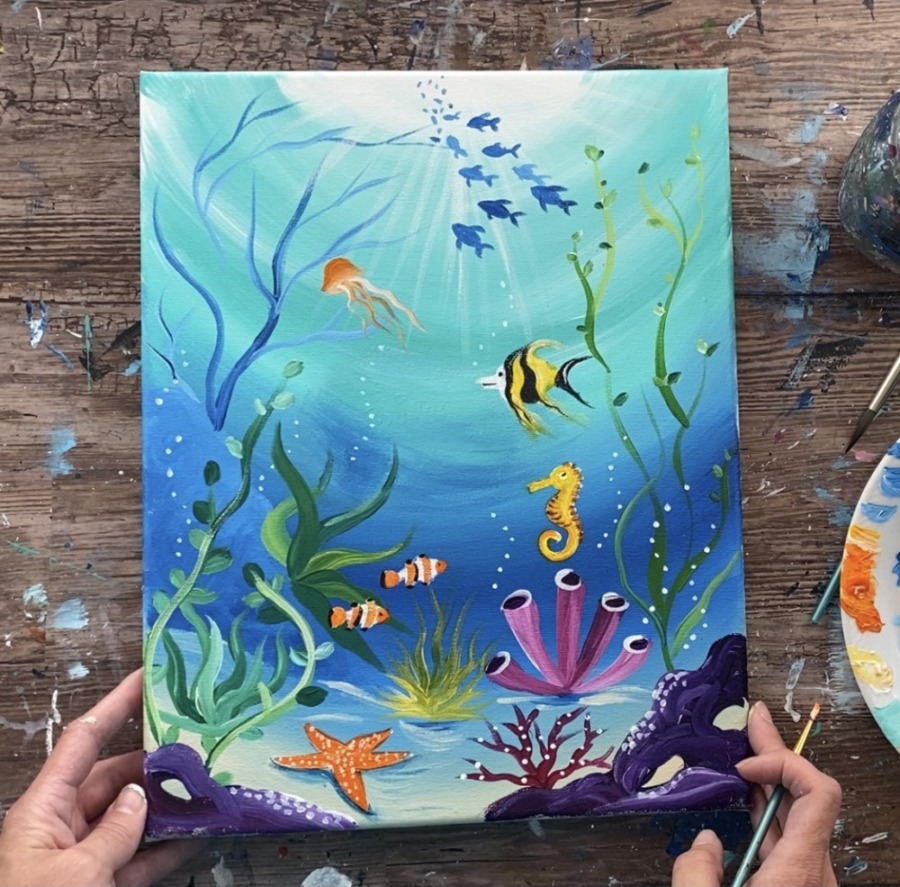
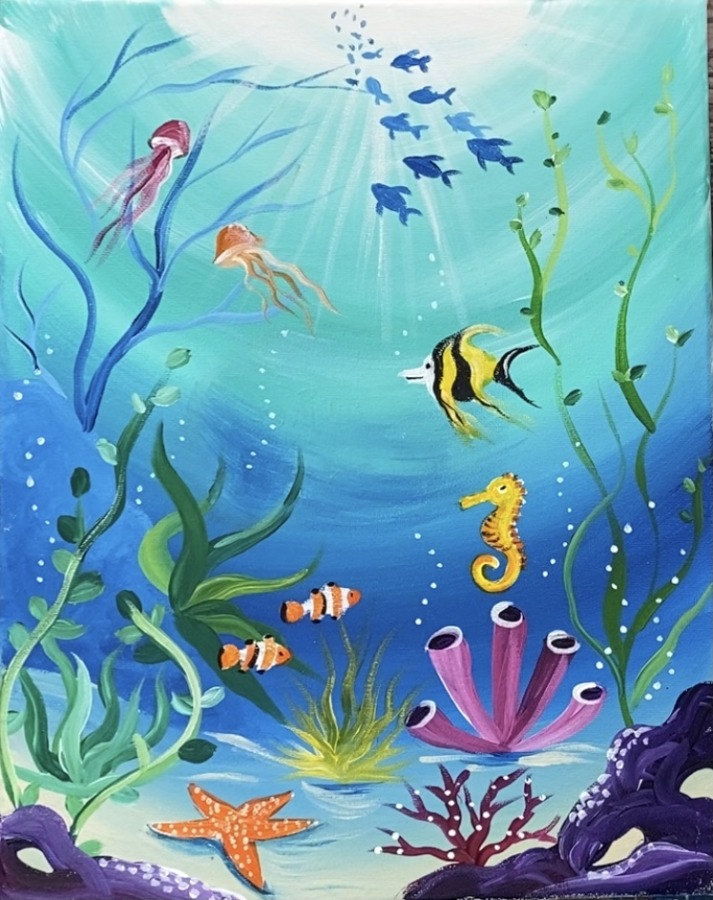
Learn how to paint an under the sea ocean painting with acrylics on an 11″ x 14″ canvas. This design can also work on any size canvas.
You will be guided through the steps on how to create the pretty turquoise and deep blue water background with the sand sea floor.
Then add seaweed and coral or even customize the types of coral reef plant life you would like to add. You can also customize the types of fish in this painting.
Enjoy and happy painting!
Looking for more under the sea paintings?
Check out Angelfish Under The Sea Painting & the Jellyfish Painting!
Materials
Under The Sea Painting Tutorial

Learn how to paint an beautiful underwater ocean scene step by step with acrylics on canvas. This is a beginner friendly painting tutorial.
Materials
- Acrylic Paint
- 11 x 14 Canvas
- Brushes
- White Chalk Pencil
Brush Sizes
- 1" Flat Wash Brush
- #8 Round Brush
- #2 Round Brush
Colors
- Titanium White
- Mars Black
- Quinacridone Magenta
- Cadmium Orange Hue
- Cadmium Yellow Medium Hue
- Hooker's Green Hue Permanent
- Light Olive Green
- Unbleached Titanium
- Dioxazine Purple
Instructions
- See full tutorial on www.stepbysteppainting.net for instructions!
Color Palette
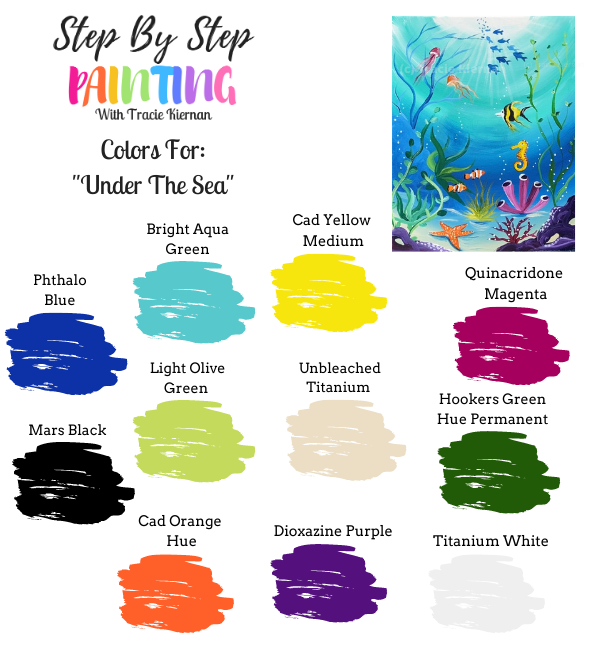
Using Craft Paints?
Try substituting these colors:
- Black
- White
- Antique Parchment (any sand color or mix brown with white)
- Yellow Flame
- Fuchsia
- Jack O Lantern
- Purple Iris
- Bimini Blue
- New Shamrock
- Holly Branch
- Too Blue
Directions At A Glance:

Video
Step By Step Directions
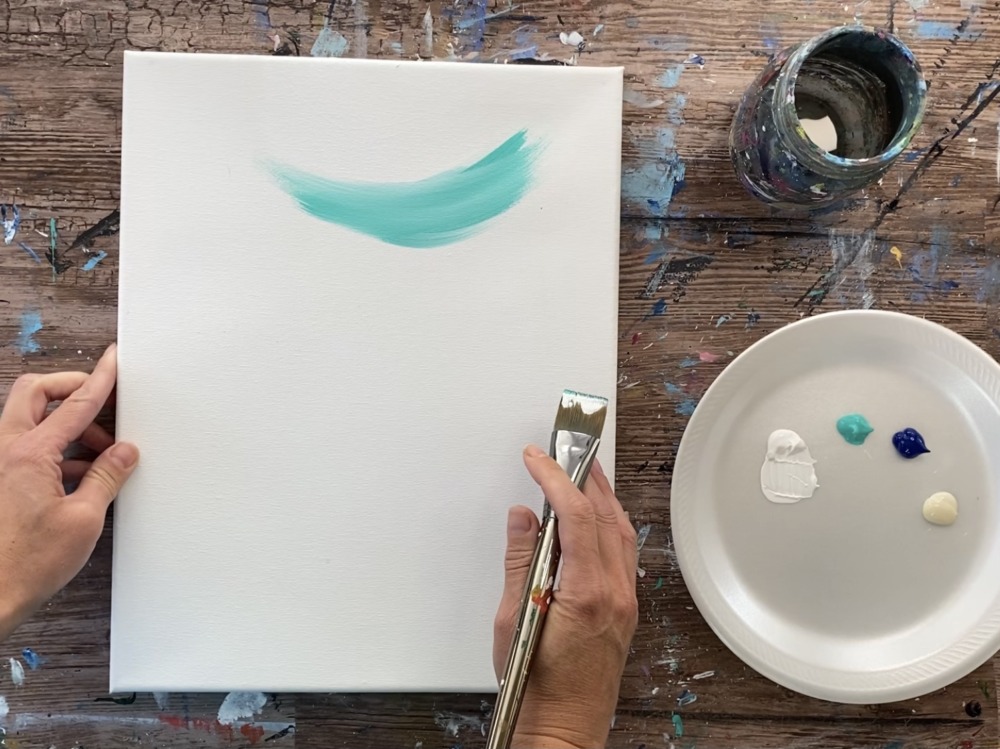
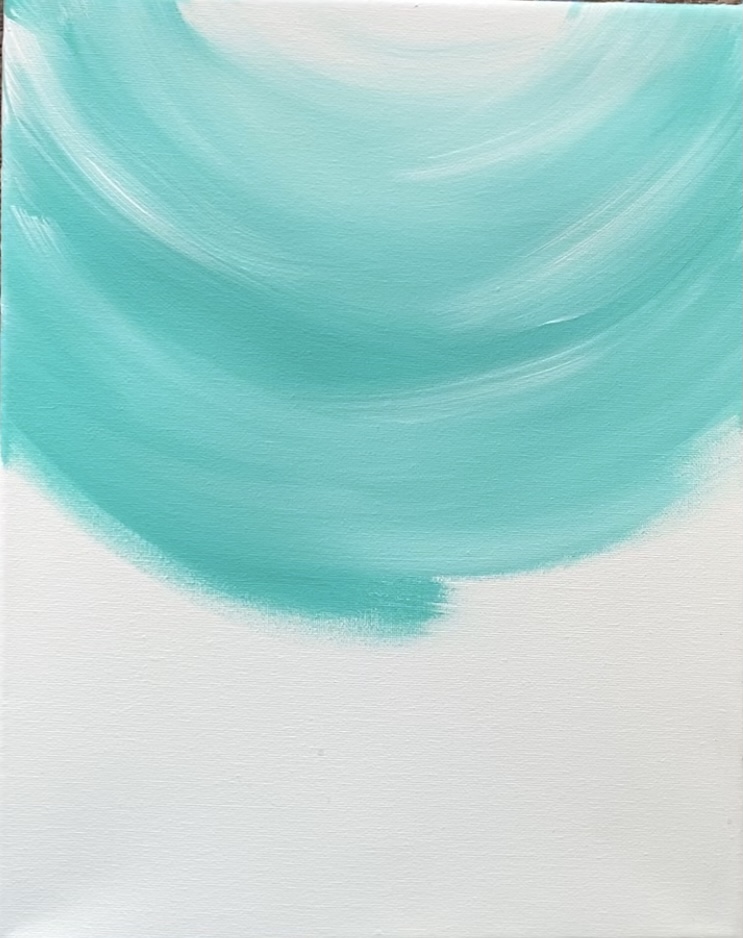
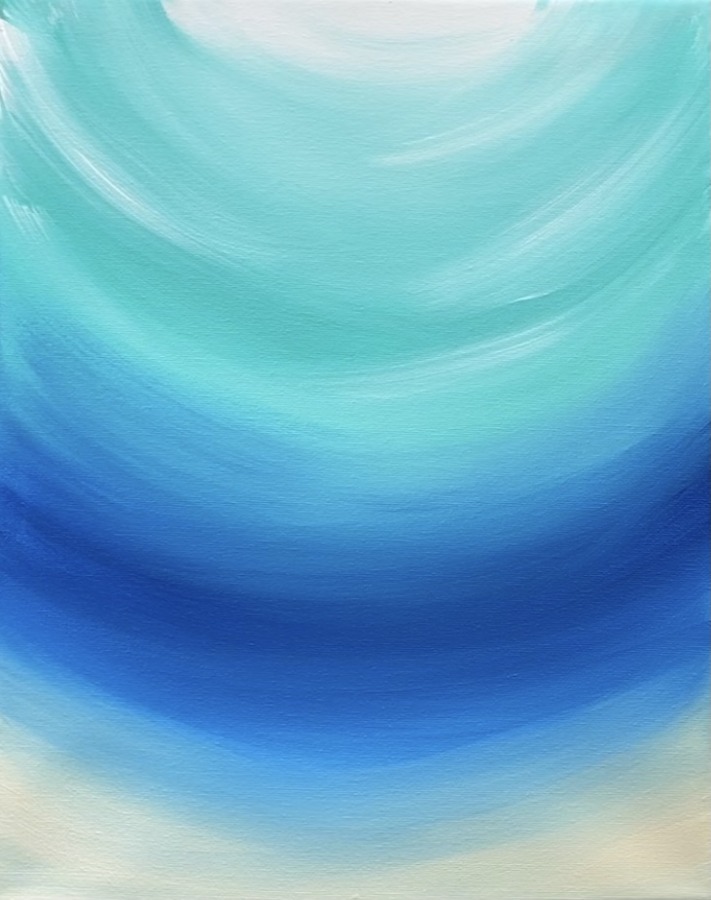
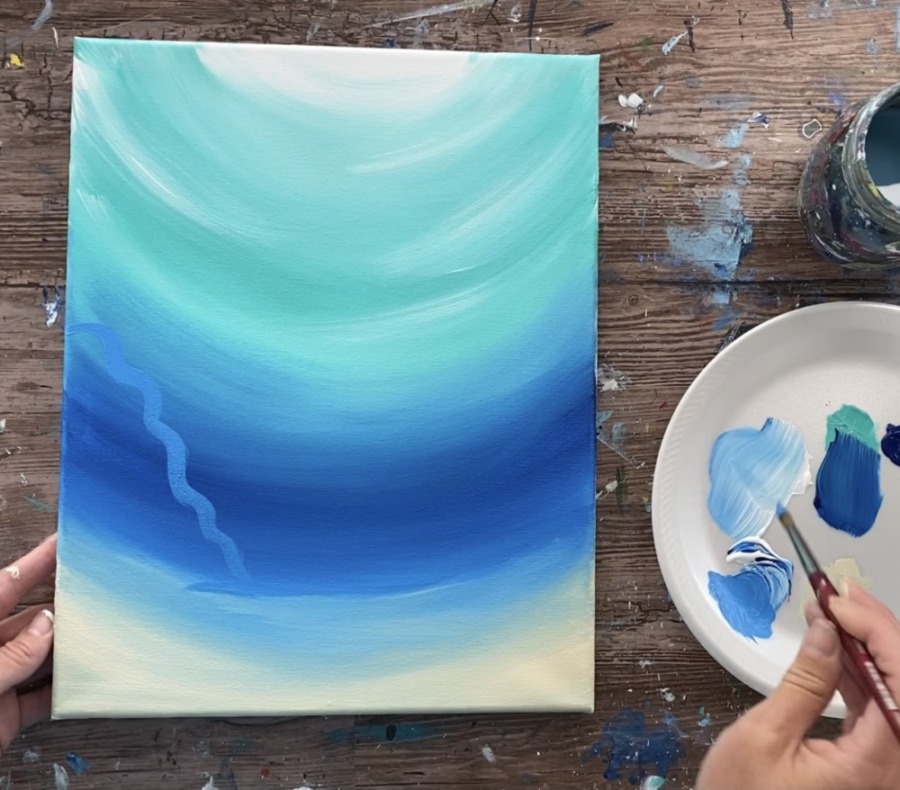
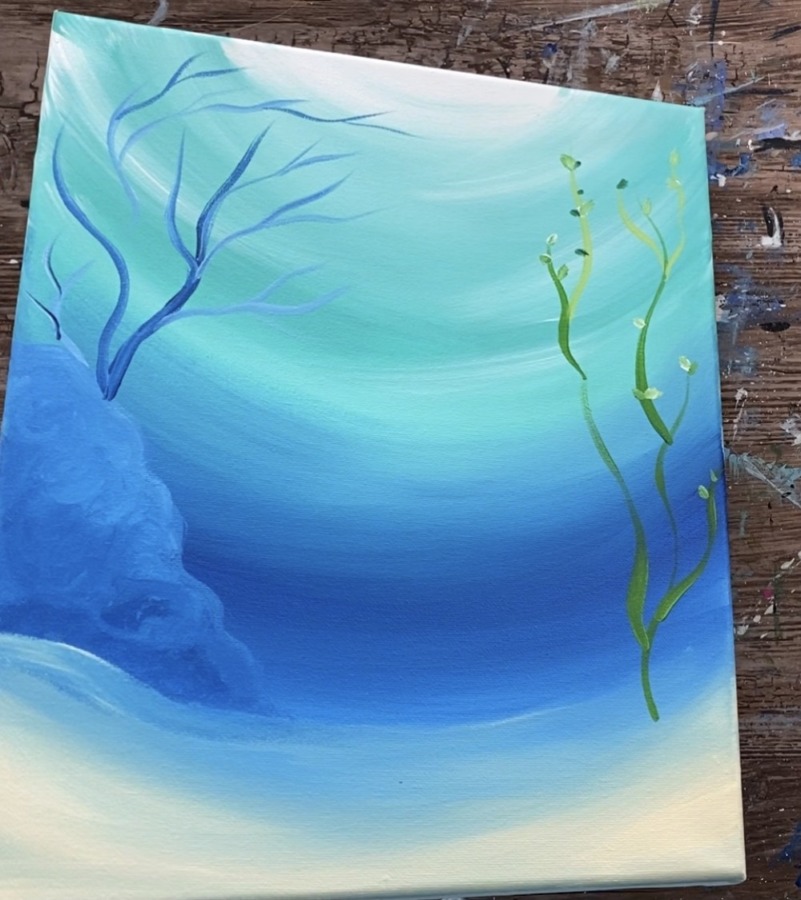
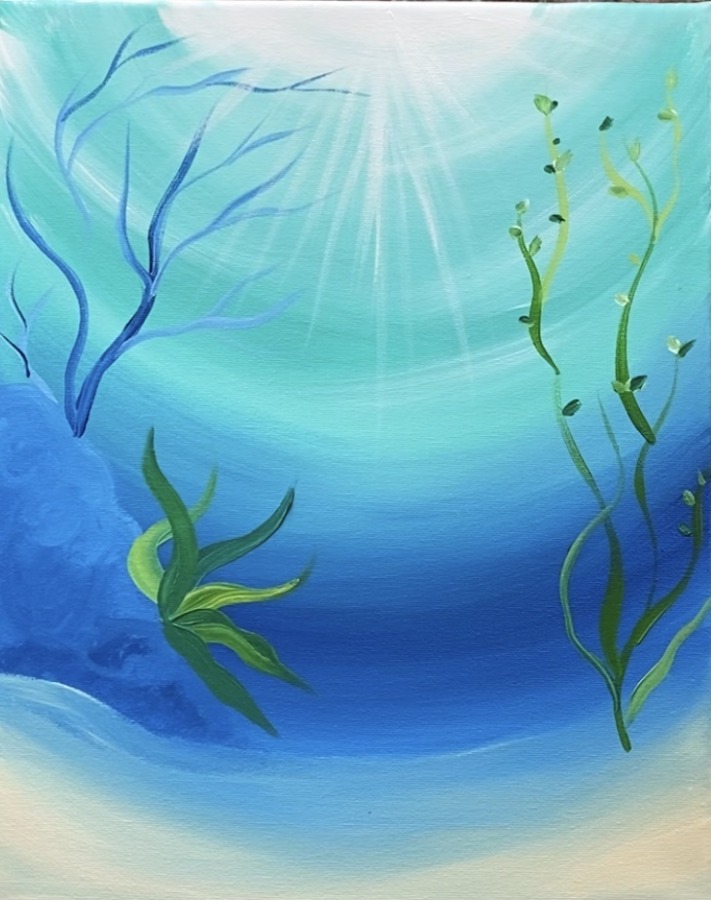
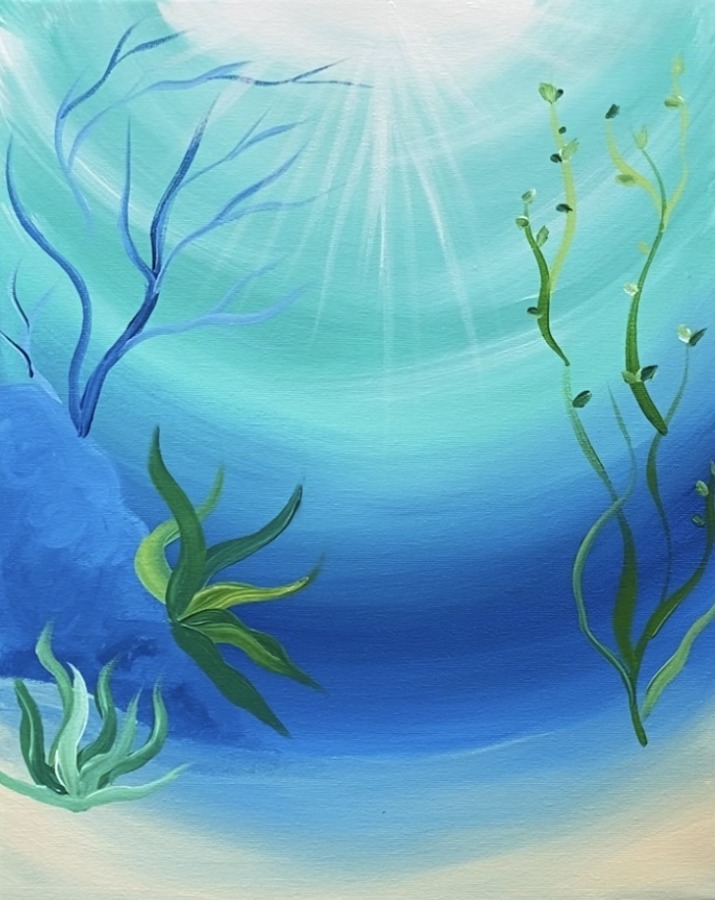
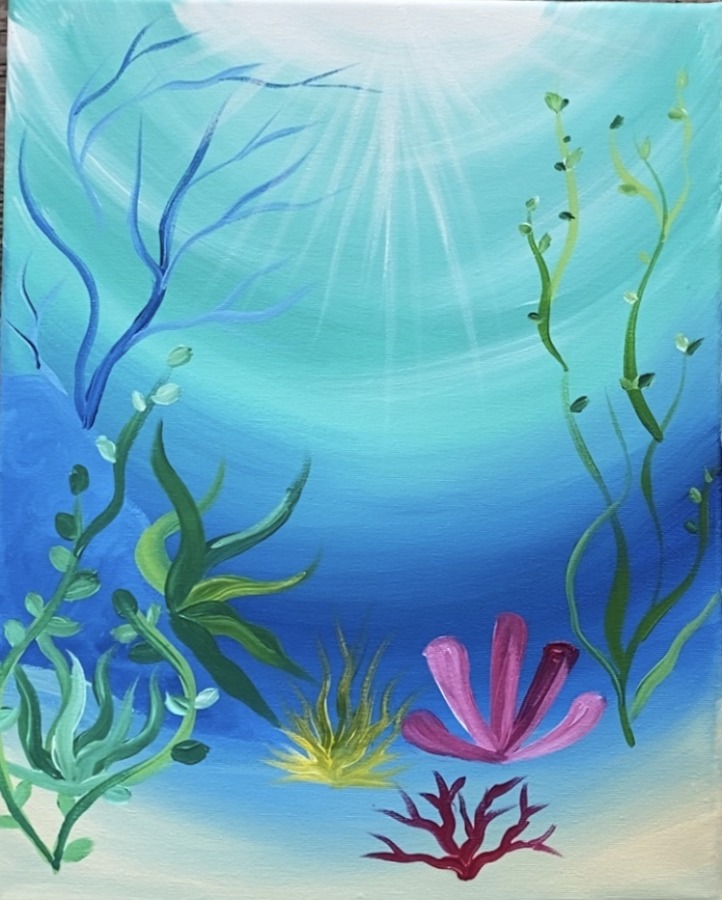
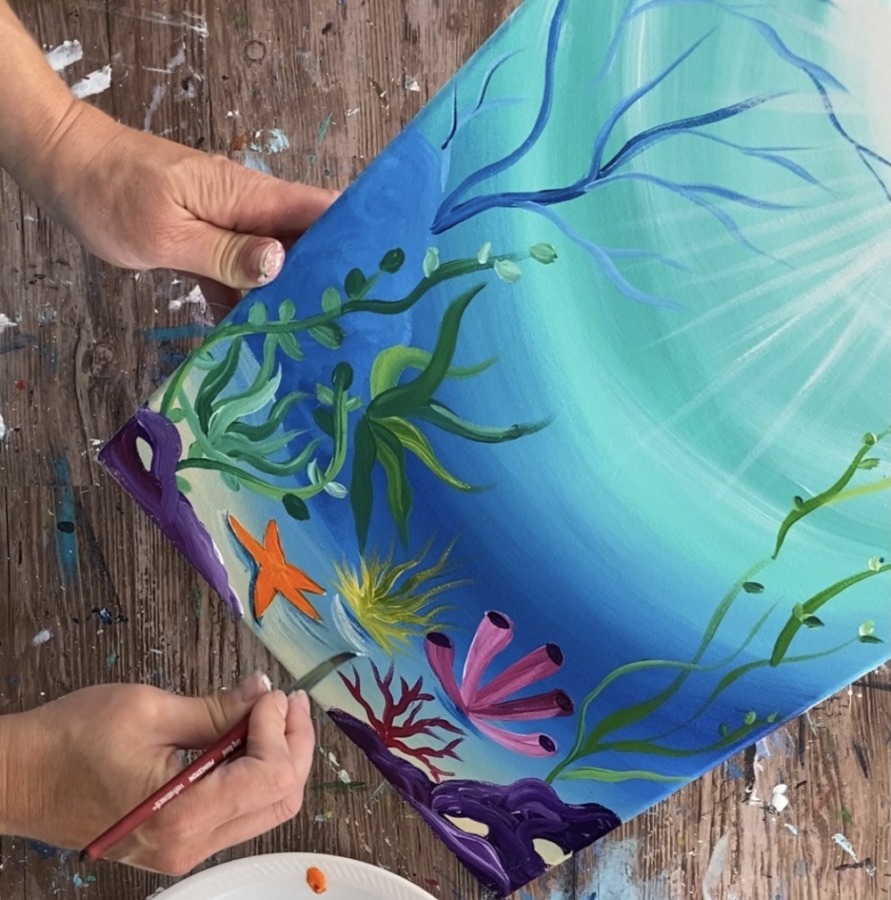
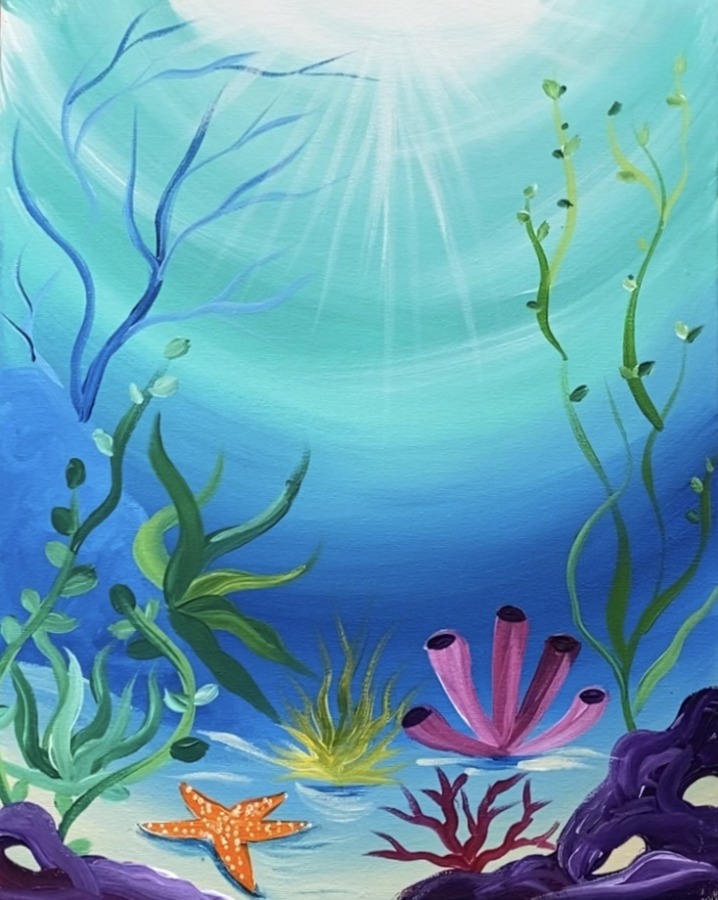
1. Paint the ocean background colors & sand floor
Load your palette with titanium white, bright aqua green, phthalo blue and unbleached titanium.
Start at the top of the canvas with titanium white. Paint a half circle area at the top middle and go down about 3-4 inches.
Then load your brush in a little bit of bright aqua green and gently blend it into the white. Paint in curved strokes down the canvas.
Continue to blend the bright aqua green into the titanium white. Continue to paint in all curved strokes down the canvas. Gradually add more bright aqua green and less titanium white as your work your way down.
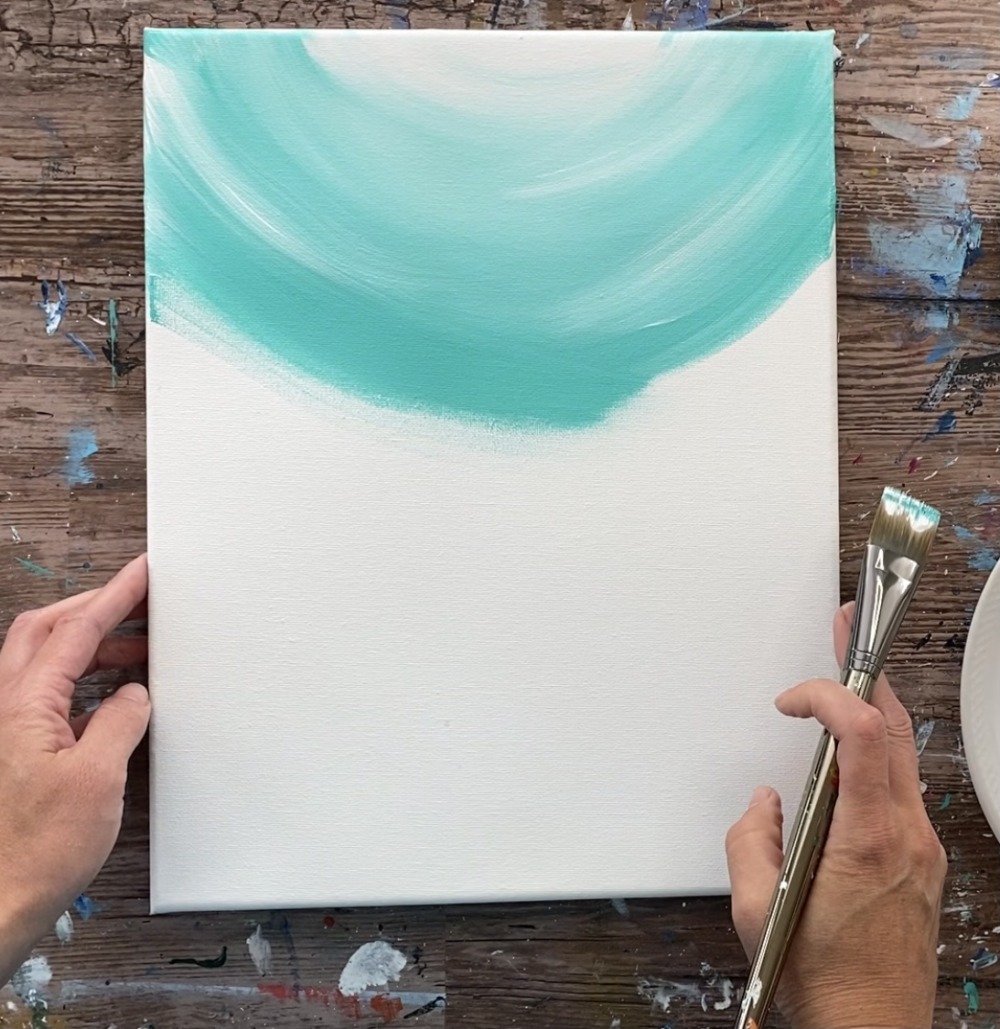
Go a little past the half way point with the aqua.
Then add a little phthlao blue on your brush. Mix it with a little aqua on your palette. Then blend that phthalo blue & aqua to create a deep blue area of the ocean. Make sure your strokes are still going in a curved direction.
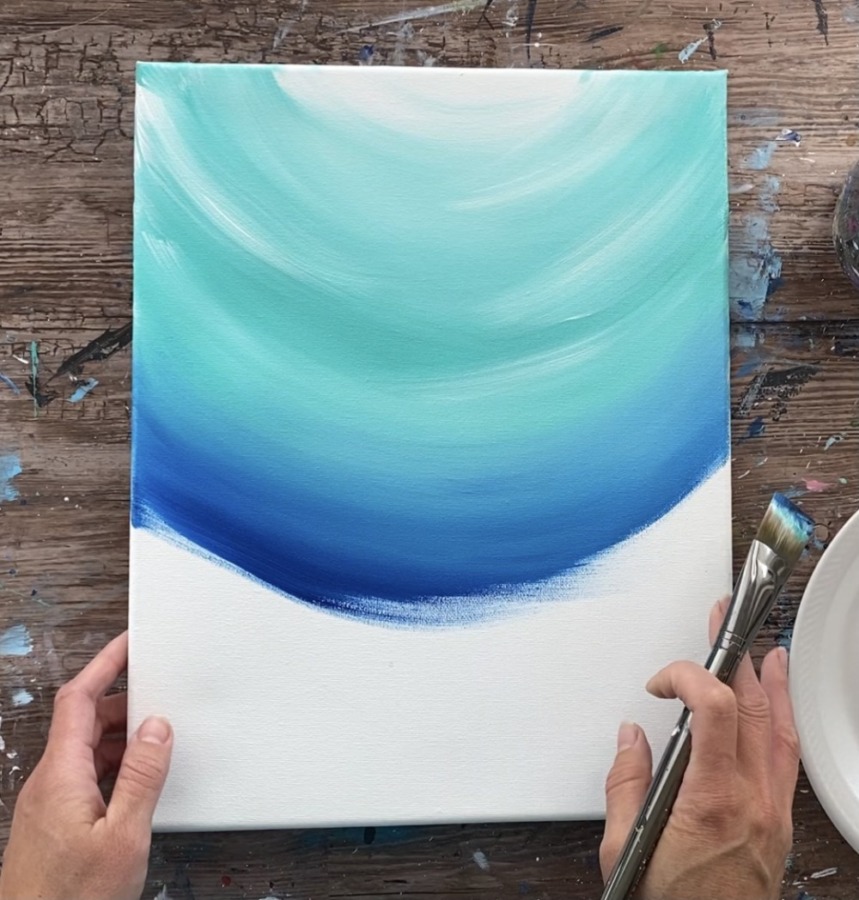
Continue adding more phthalo blue until you get almost all the way down the canvas. Then wipe off your brush. Add a little titanium white to your brush and blend the titanium white into the blue so that it gets slightly lighter on the bottom. (This will help with the blending of the sand color in the next step)
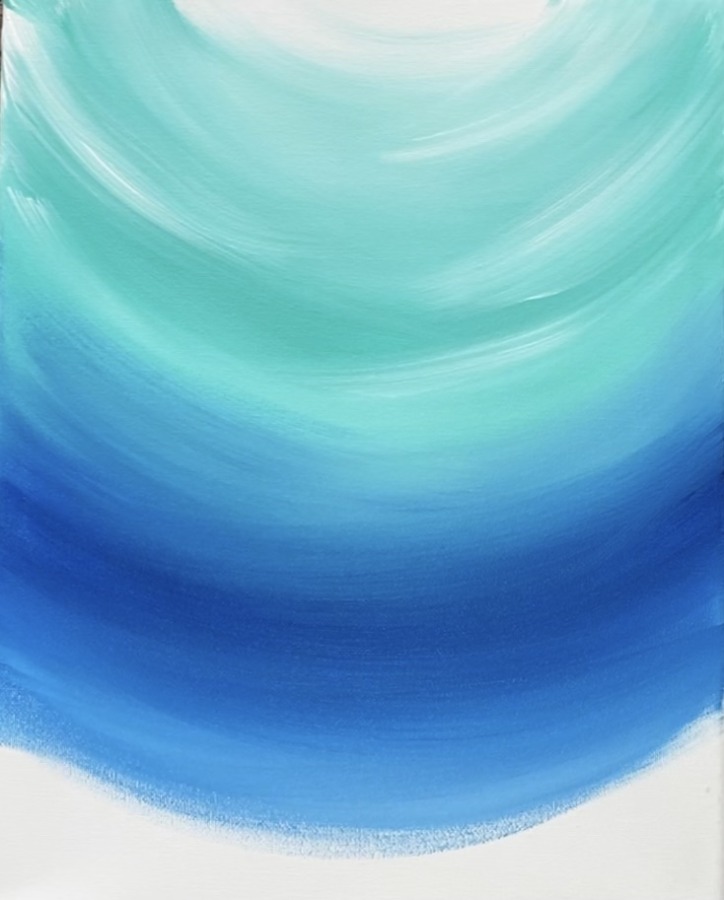
Then add a small amount of unbleached titanium to the bottom and blend it back up into the white/ phthalo blue. This sand color is for the bottom of the ocean floor.
Tip: unbleached titanium is such a strong color, a little goes a long way. Blend this in gently. It is also okay if some blue gets mixed into the sand color on the ocean floor areas.
2. Paint a distant coral piece
Use a #8 round brush for this step. Mix a little white into phthalo blue so that it becomes a lighter blue. Paint a coral piece in the distance on the left.
Then fill it in solid using circular strokes. Use both the pthhalo blue and the titanium white and have the two colors mix together to create different variations of that color. Make the top part of that coral slightly lighter and the bottom part slightly darker.
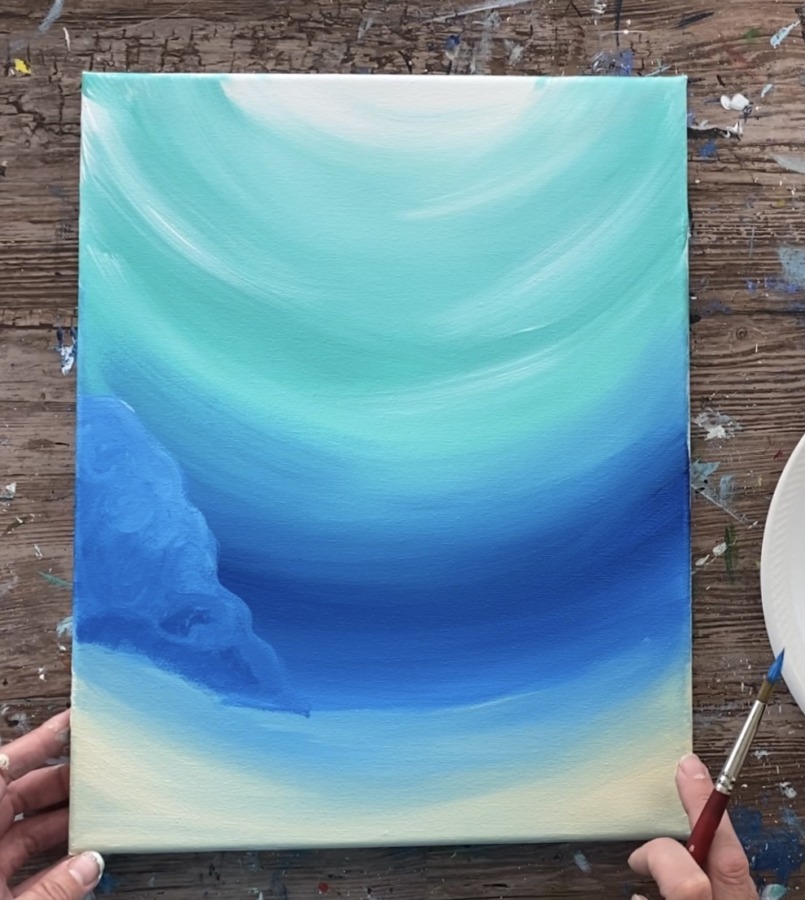
Define the bottom of the ocean floor with the unbleached titanium mixed with a little bit of the blue/white. Paint a sort of flat line in the middle that goes upwards on the left and right.
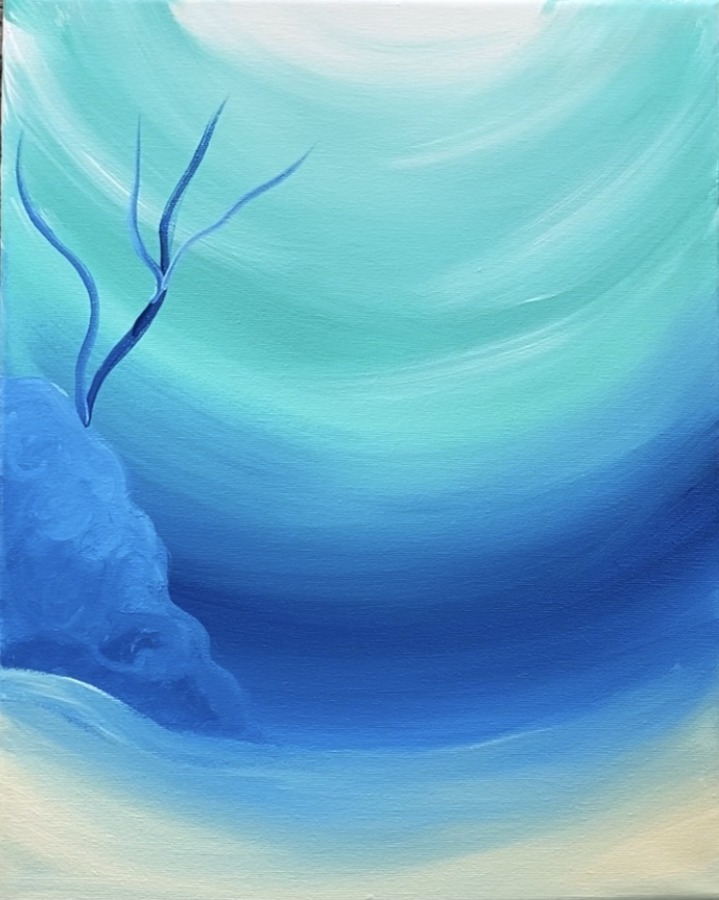
3. Paint blue & green seaweed
Use the #8 round brush and the phthalo blue and titanium white. Mix the two together and slightly water it down. Paint blue seaweed that branches up on the coral piece. Make different variations of that white and blue.
Then paint some green seaweed. Load your palette with hookers green hue permanent and light olive green. Use your #8 round brush to load in both of the colors.
Paint the seaweed on the lower left area. Use the round brush to paint wavy lines with variations in thickness. Also vary the light and dark green so the seaweed shows up with different colors of greens.
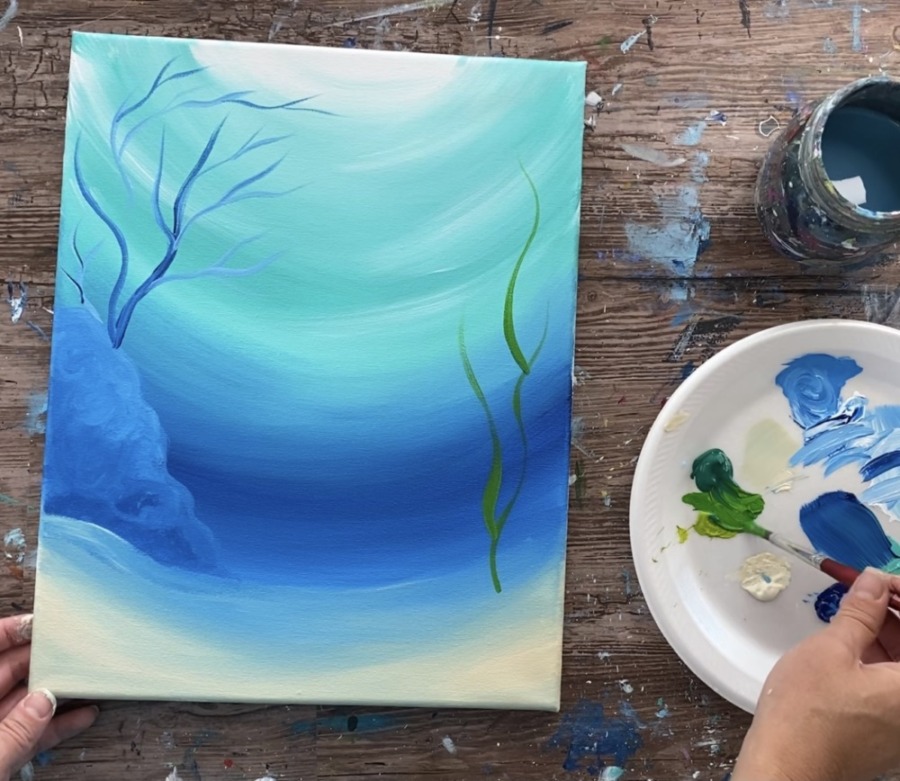
Add small little rounded leaves on the seaweed using the same round brush and the same greens. You can also add a little titanium white into the greens to lighten them up a bit.
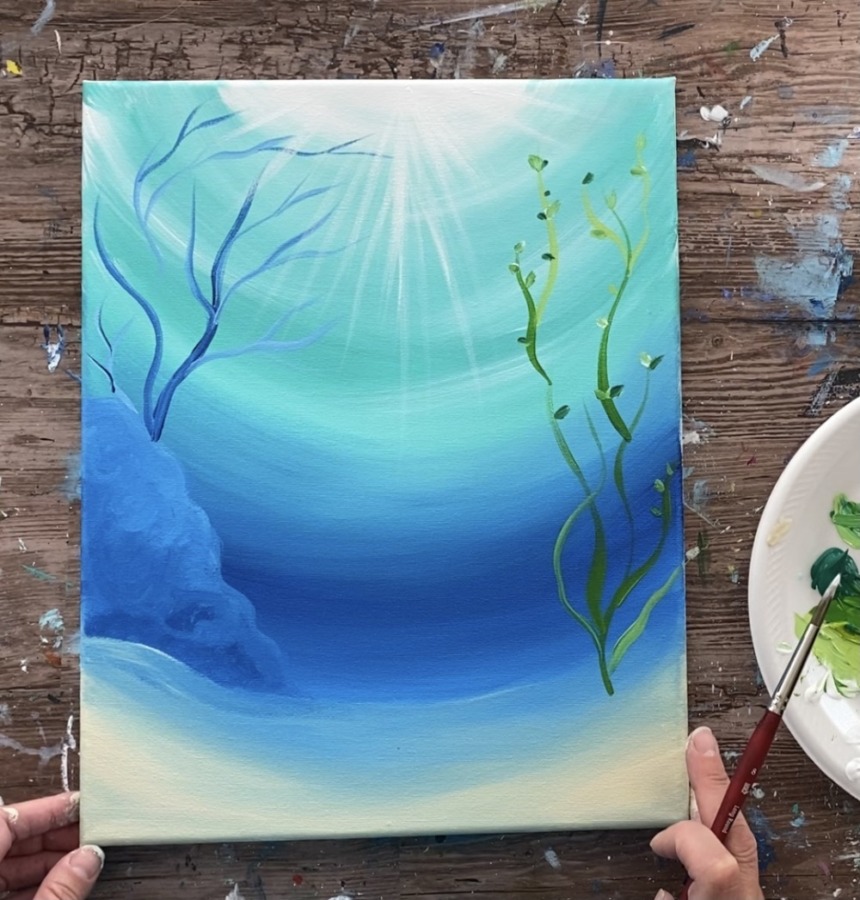
4. Paint light rays
Next paint the light rays that are going down at angles at the brightest top part of th painting.
Load the tip of your #8 round brush with a small amount of titanium white. Then stroke quickly down to create rays of light at different angles.
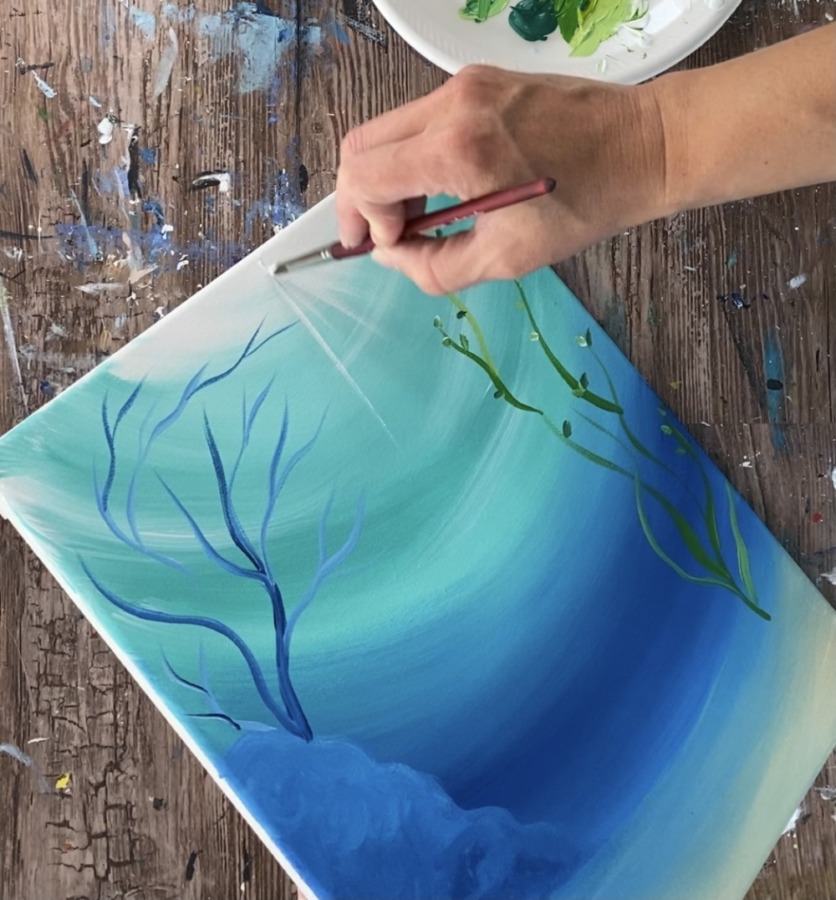
Tip: make sure only a small amount of paint is on your brush. These light rays should be very thin and kind of translucent. To create that effect, it is almost as if you are “dry brushing” the strokes of paint.
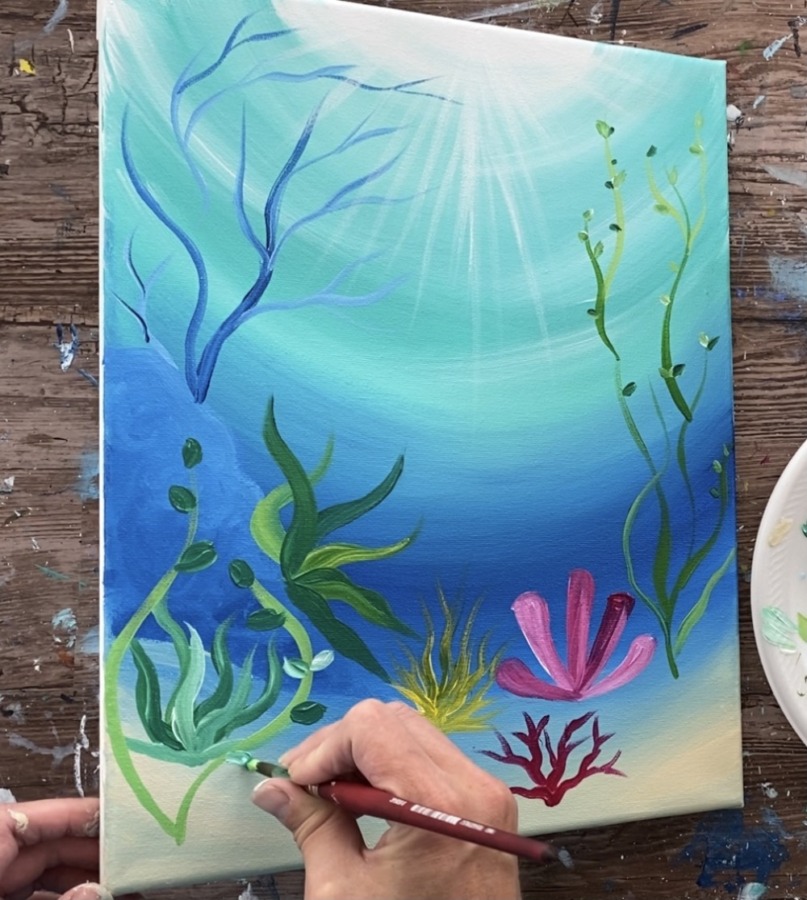
5. Paint more seaweed & coral pieces
Use the #8 round brush to paint leaf shape/ pointed seaweed on the side of the coral. Use different variations of the greens to create this kind of seaweed.
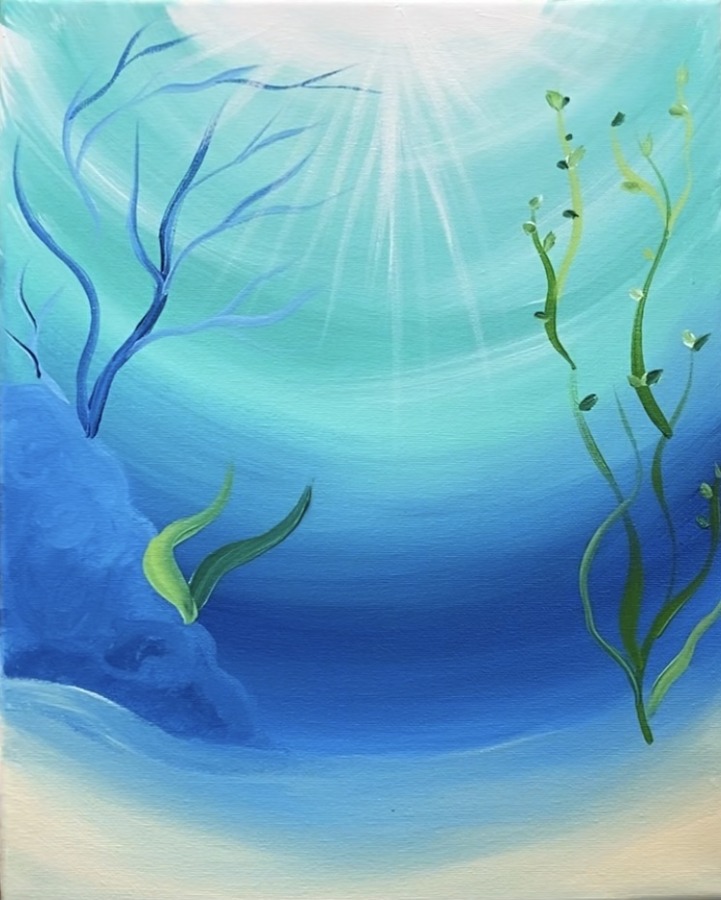
Paint the leaves so they are flowing in different directions towards the right.
Paint another seaweed plant on the bottom of the ocean floor.
Load your palette with cadmium yellow hue and titanium white. Paint another type of seaweed with that yellow. (Tip: adding white into the yellow helps it to be more opaque).
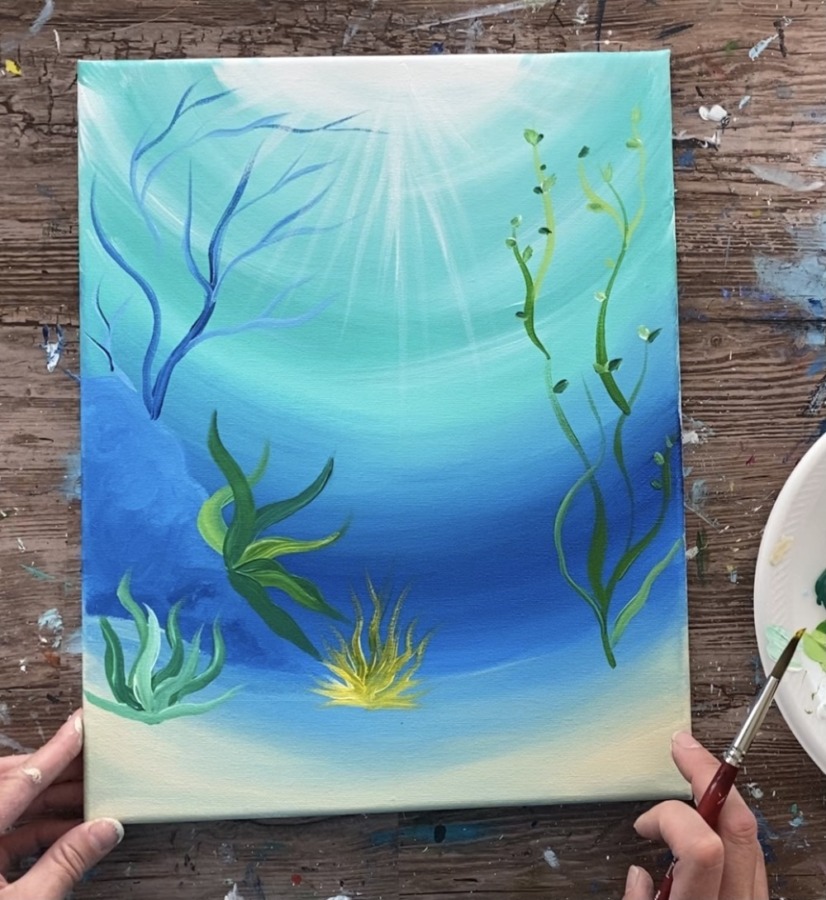
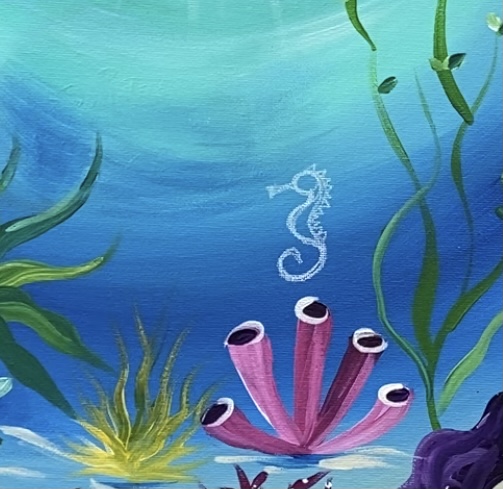
Then paint a column coral piece on the bottom. Load your palette with quinacridone magenta and a little bit of titanium white. Paint cylinder pieces using the #8 round brush and the two colors (magenta and white).
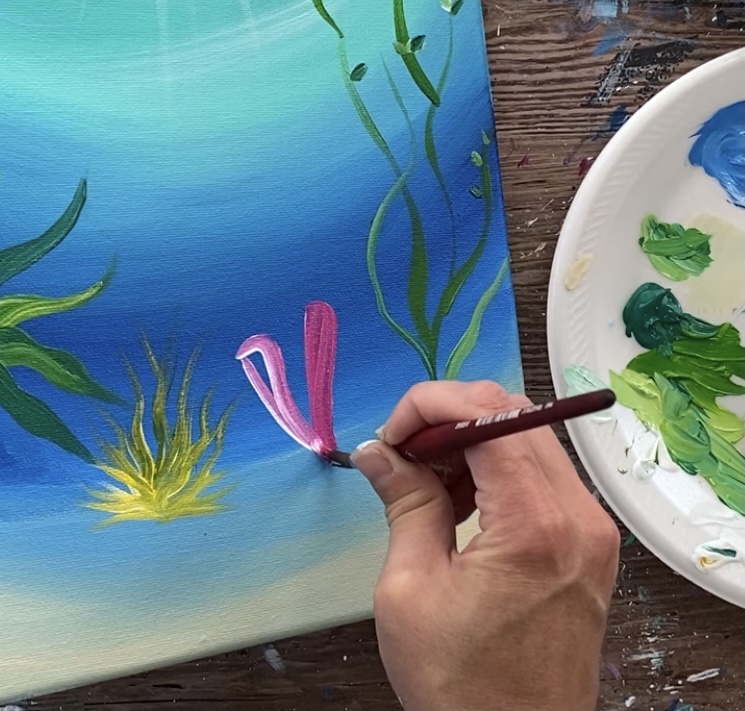
Let the white and magenta blend together to create different variations of the two colors.
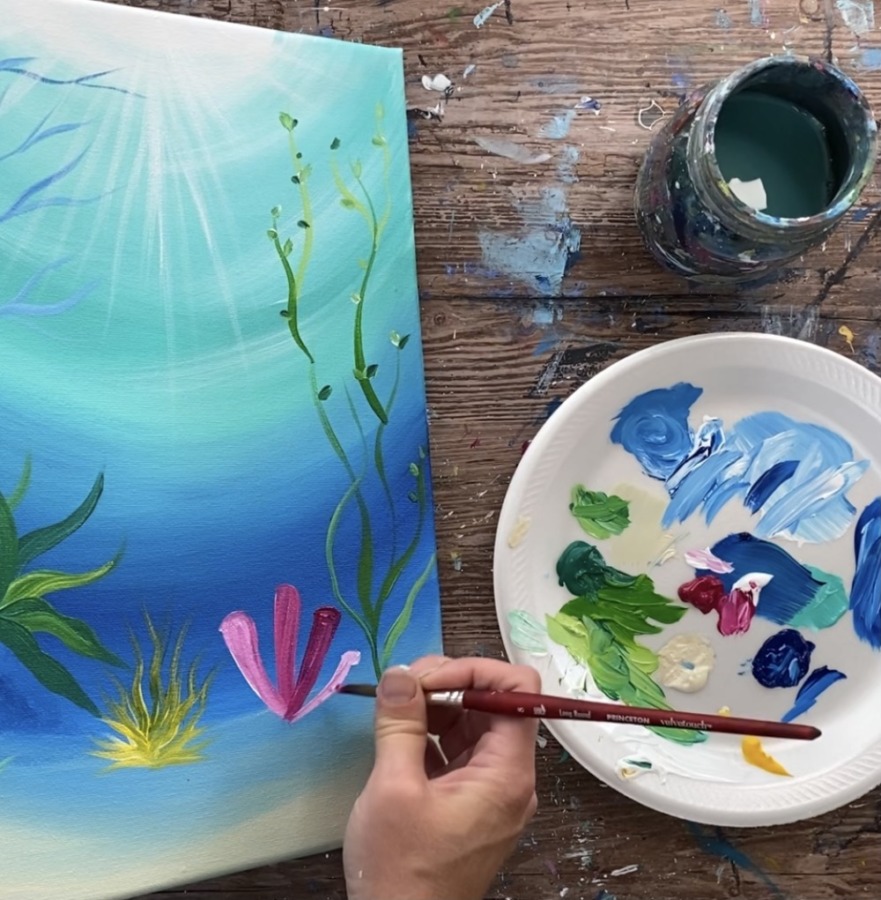
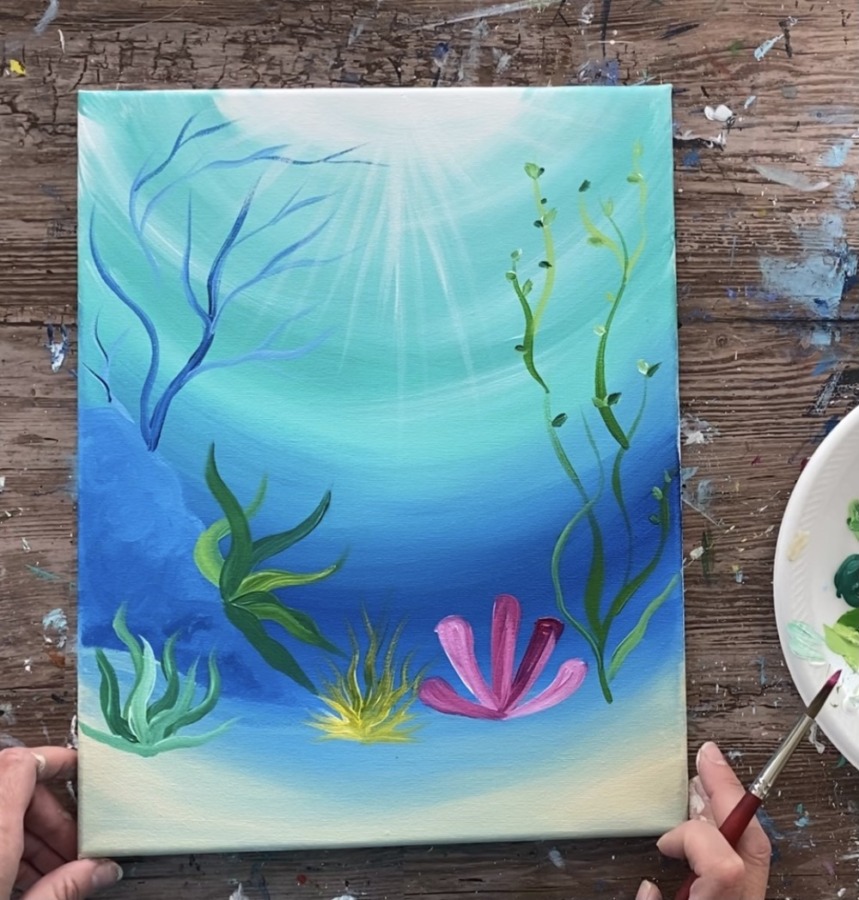
Next paint a branched coral piece on the bottom using just the quinacridone magenta.
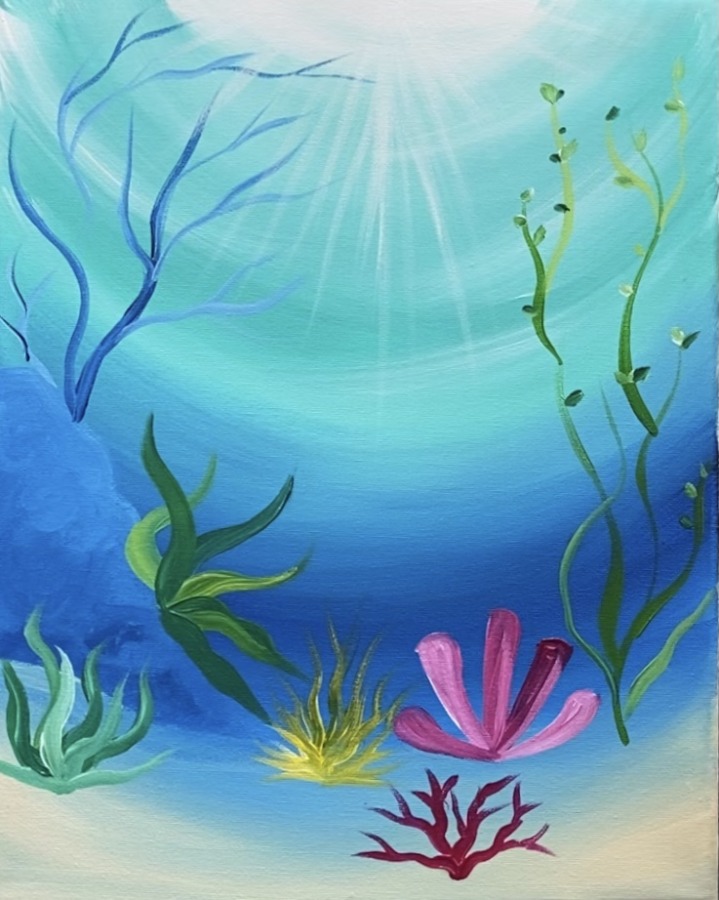
Paint more long and flowing seaweed on the bottom left. I did this similar to the other seaweed piece on the left. I did long flowing lines with rounded leaves.
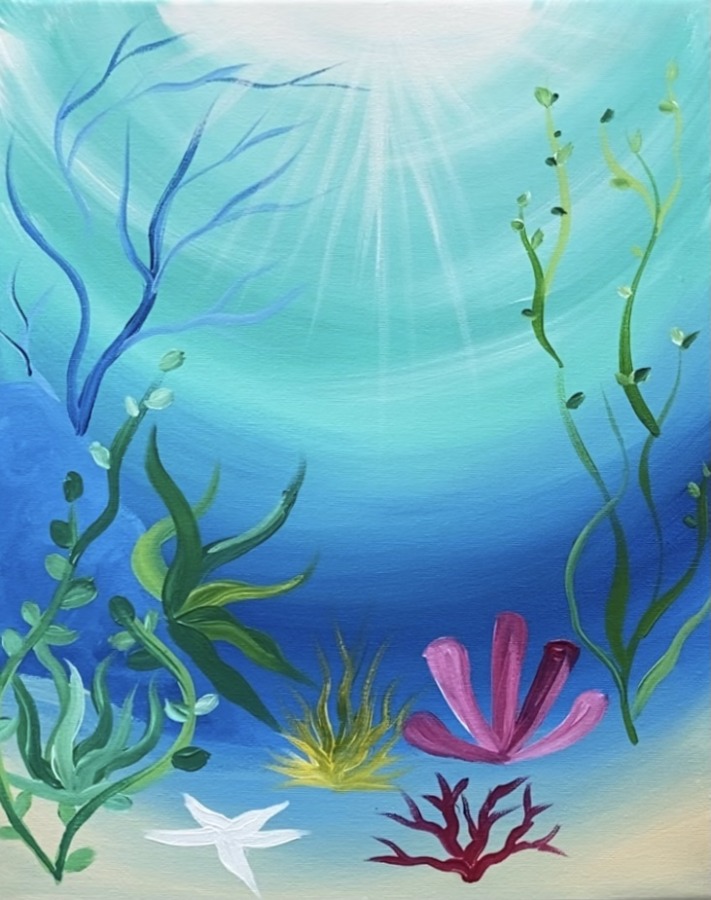
6. Paint starfish white
Next use a #2 round brush to paint a starfish. It may also be helpful to draw it out first with a chalk pencil. Paint it in solid white. You will need to wait for this to dry before you can paint it orange.
7. Paint dark coral on bottom left and right
Use a #8 round brush and dioxazine purple. Paint/ draw out the coral on the bottom left and bottom right of the painting. Paint openings in the coral as well.
Also paint a small purple ovals on the top of the magenta cylinder pieces.
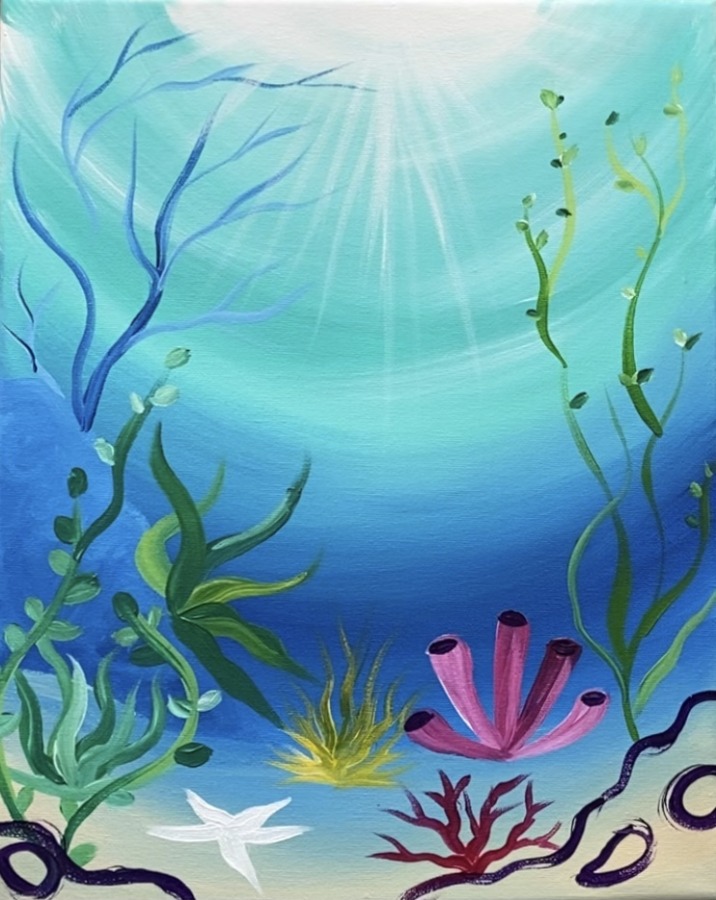
Paint it solid with the purple and a little bit of titanium white. Let different variations of the purple create texture/ highlighting on the coral.
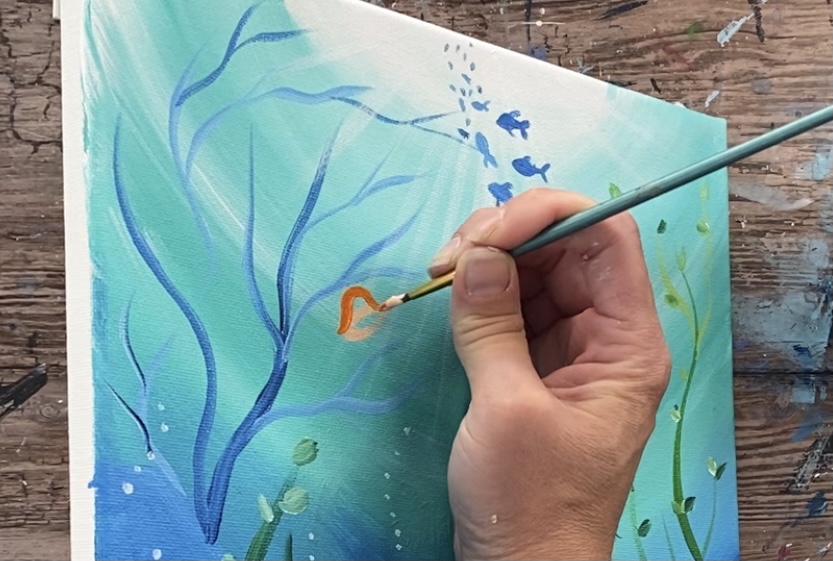
8. Paint starfish orange (or other color)
When the white of the starfish is dry, paint it another color. I did mine with cadmium orange hue.
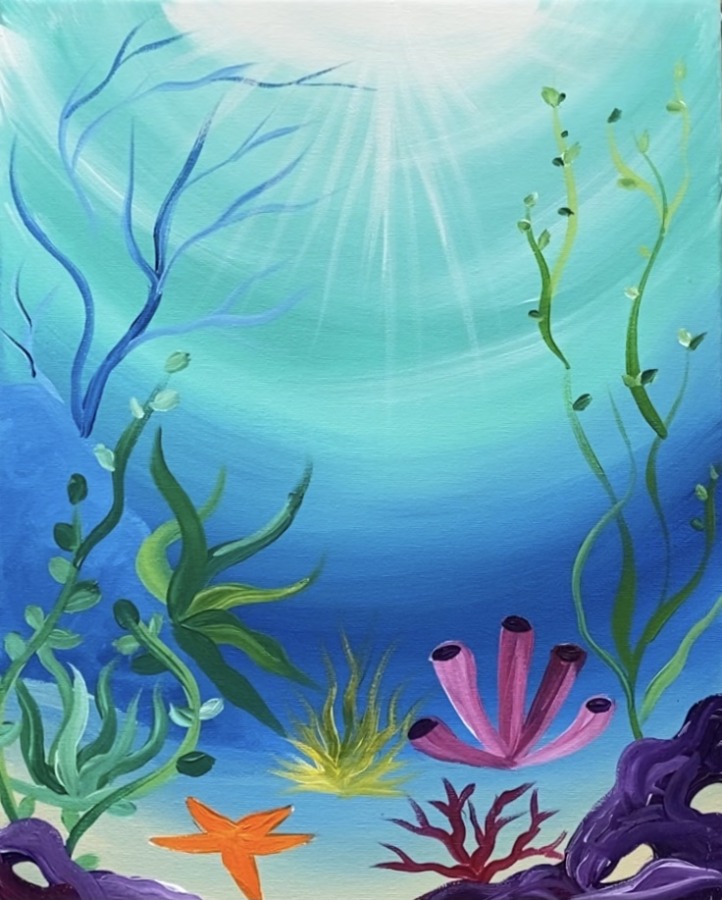
9. Paint shadow and texture on ocean floor under starfish and coral
Use a combination of unbleached titanium and a little bit of phthalo blue. Water it down to a very thin consistency. Paint a very thin shadowy area under the starfish and some of the coral.
Use unbleached titanium and a #2 round brush to paint small dotted texture on the starfish.
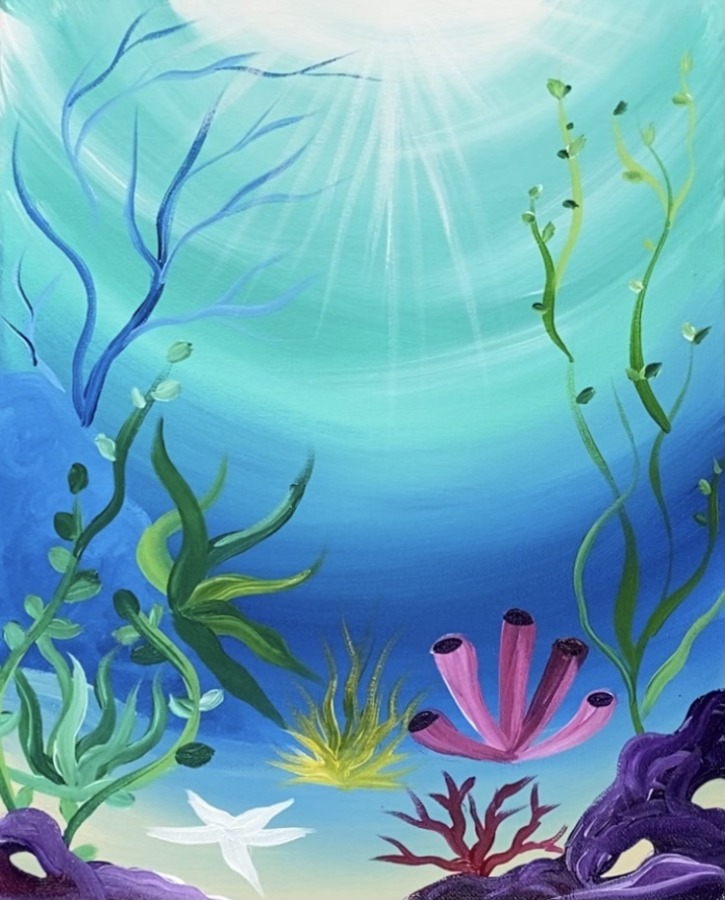
10. Paint school of fish
Use a #2 round brush to paint small fish up towards the top of the ocean. Use phthalo blue mixed with a little white. Paint small fish with different variations of that blue and white.
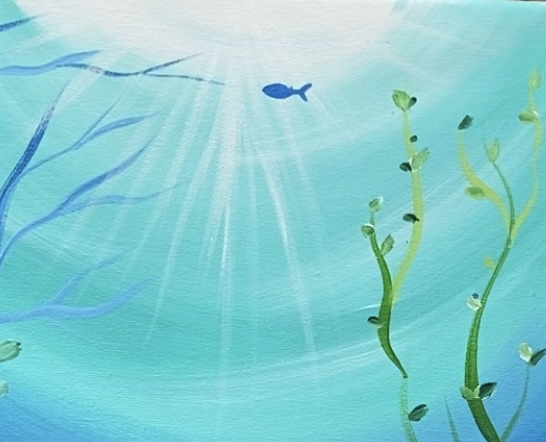
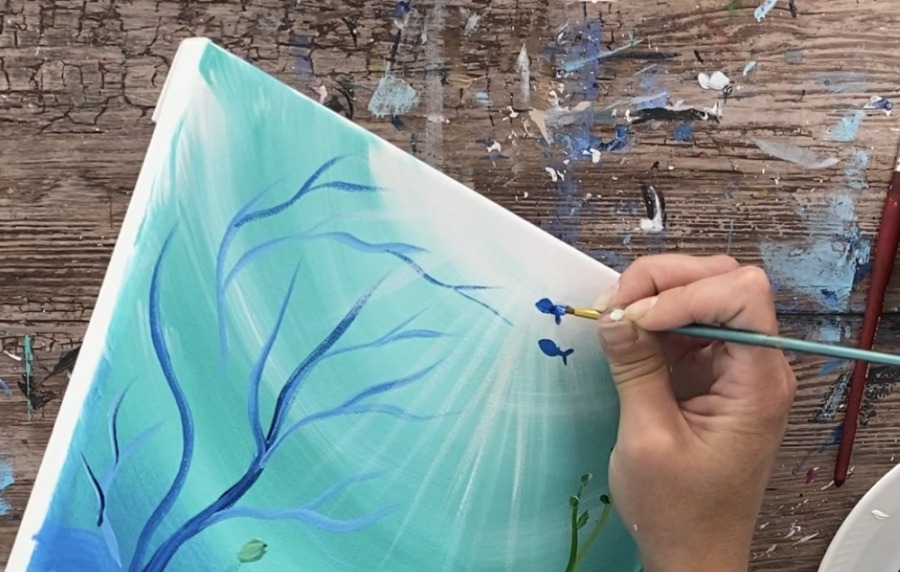
To create depth, paint smaller fish that are going in different directions. The closer to the top, the smaller the fish. Some of the fish are little tiny dots with no details because they are so far away.
Some more details… Use a #2 round brush to paint small dots on the branched coral. Also loosely outline the top oval piece on the branched coral.
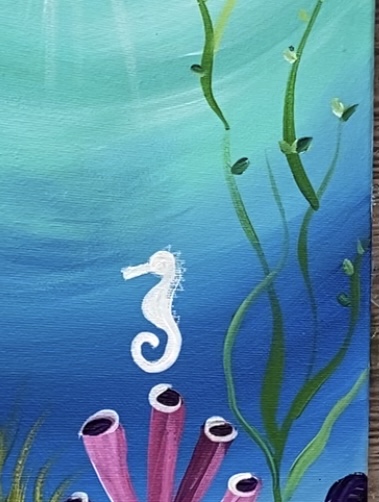
11. Draw seahorse, angelfish & clownfish. Paint them in white.
I highly recommend using a pencil or white chalk pencil to draw all your sea creatures. Art Projects For Kids Blog has a lot of great tutorials for drawing different sea creatures such as this “How To Draw A Seahorse” tutorial.
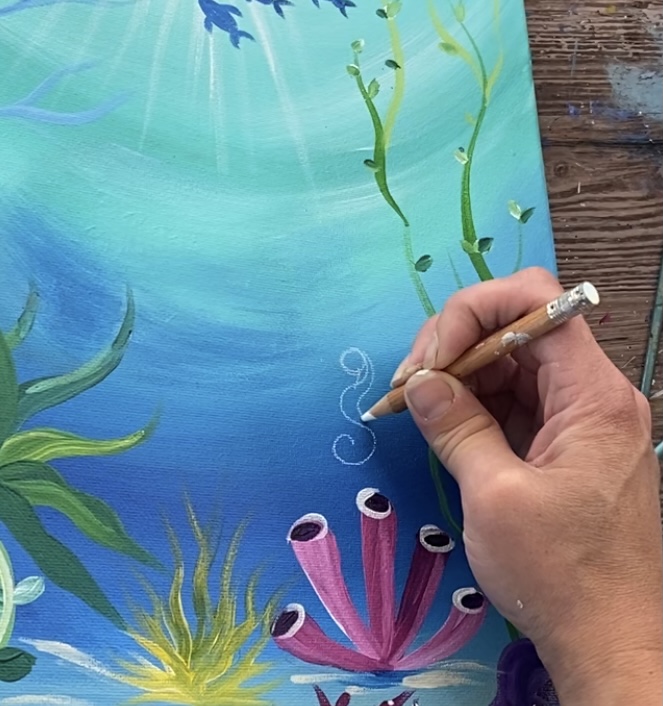
Draw the seahorse with a piece of chalk and then fill it in solid with titanium white. Use a #2 round brush to do this step.
Then draw a small angelfish. This is the same angelfish design that I did in my Under The Sea Angelfish tutorial.
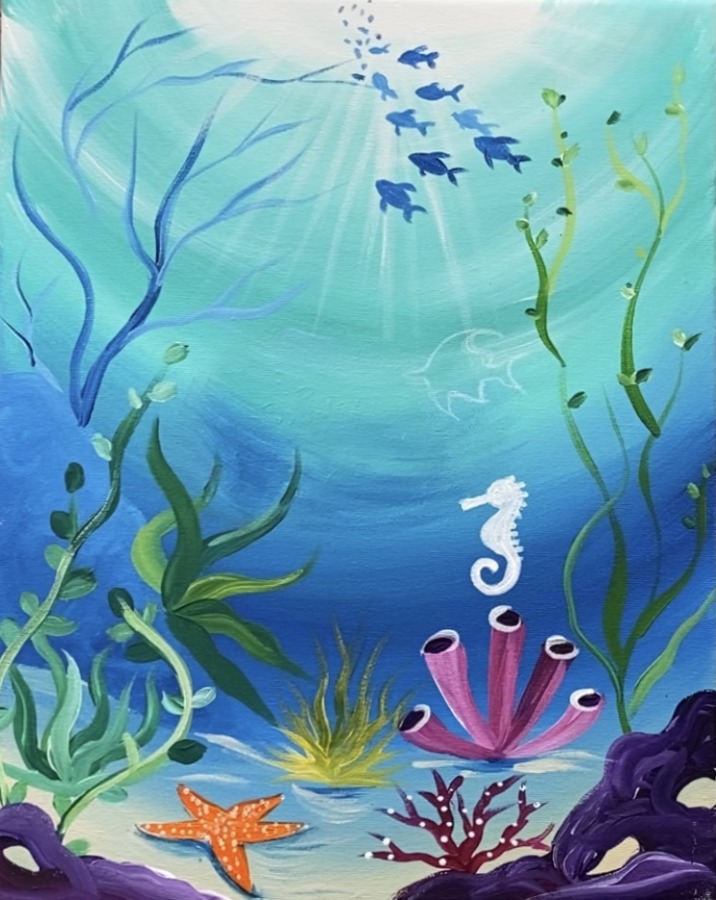
Then paint it in solid with titanium white.

Draw the clownfish.
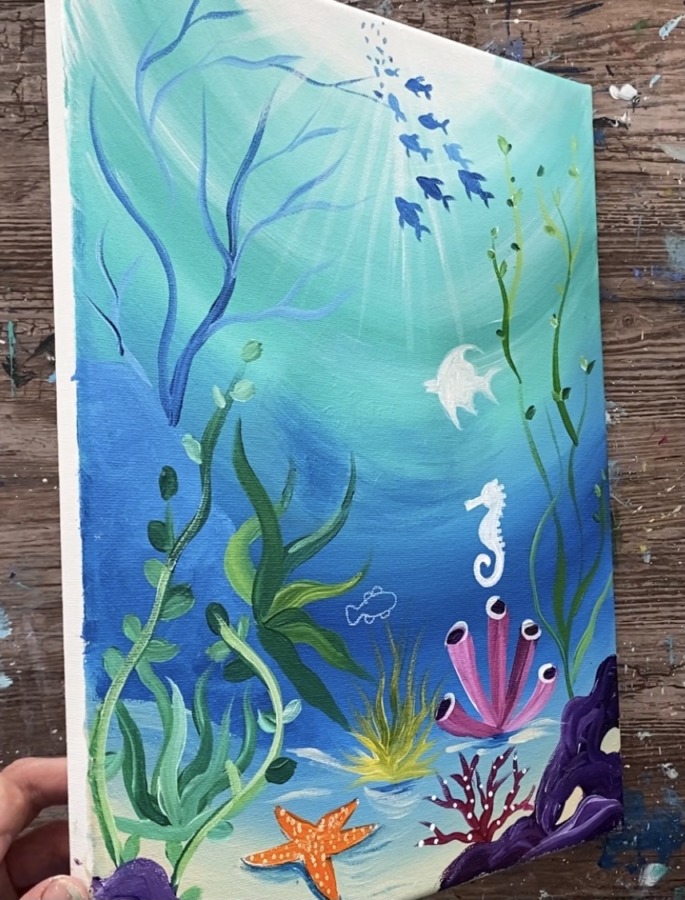
Then paint the clownfish titanium white.
12. Paint angelfish, sea horse and clownfish.
After the white from your sea creatures have dried, paint the colors in. For the angelfish, I used cadmium yellow medium hue to paint stripes on the fish.
Paint the seahorse yellow with a little bit of orange mixed into it to make a golden orange color. (You can also change the colors of any of these sea creatures if you want!)
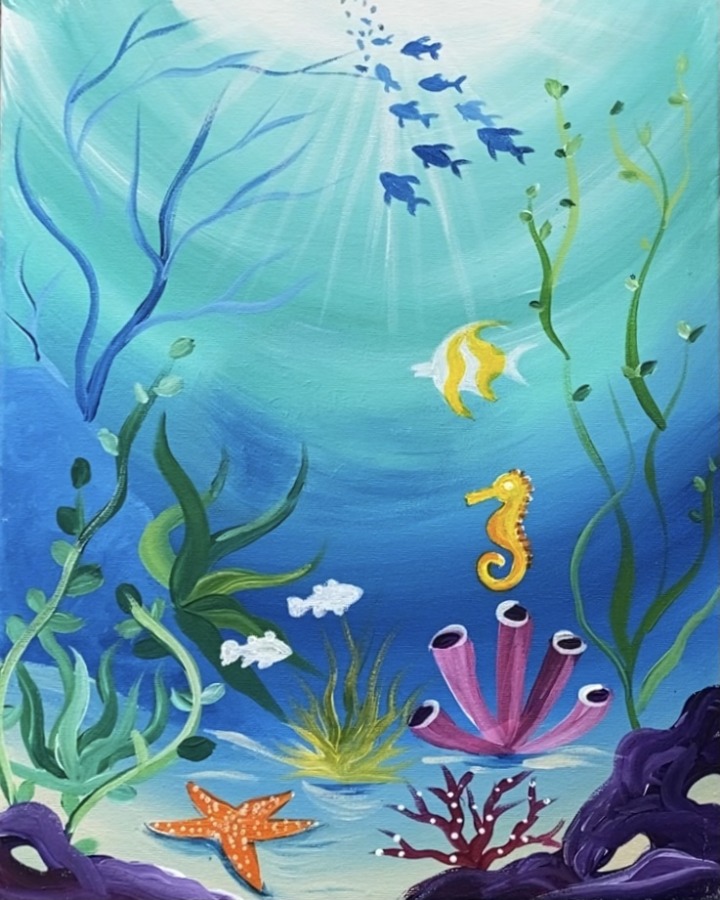
Paint the little spikes on the seahorse with just the orange. Also paint a white dot for the eye of the seahorse.
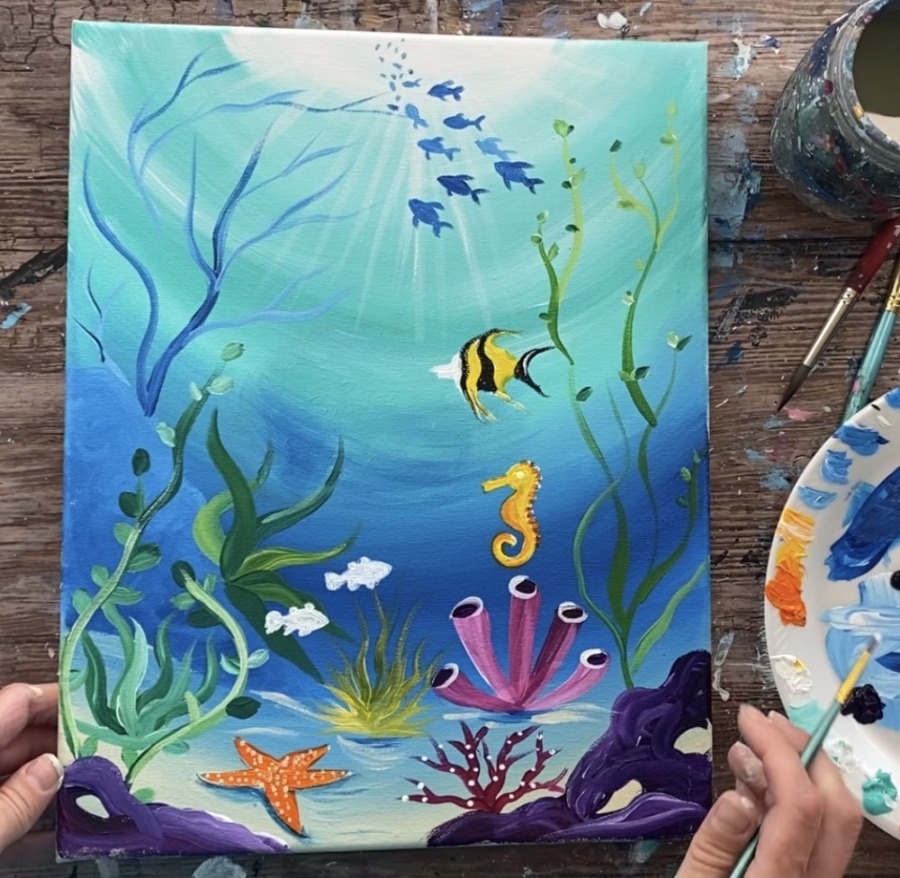
Then paint the black stripes on the angelfish. Paint the back tail fin with mars black.

Paint an eye and mouth on the angelfish.
Then paint the orange stripes on the clownfish.
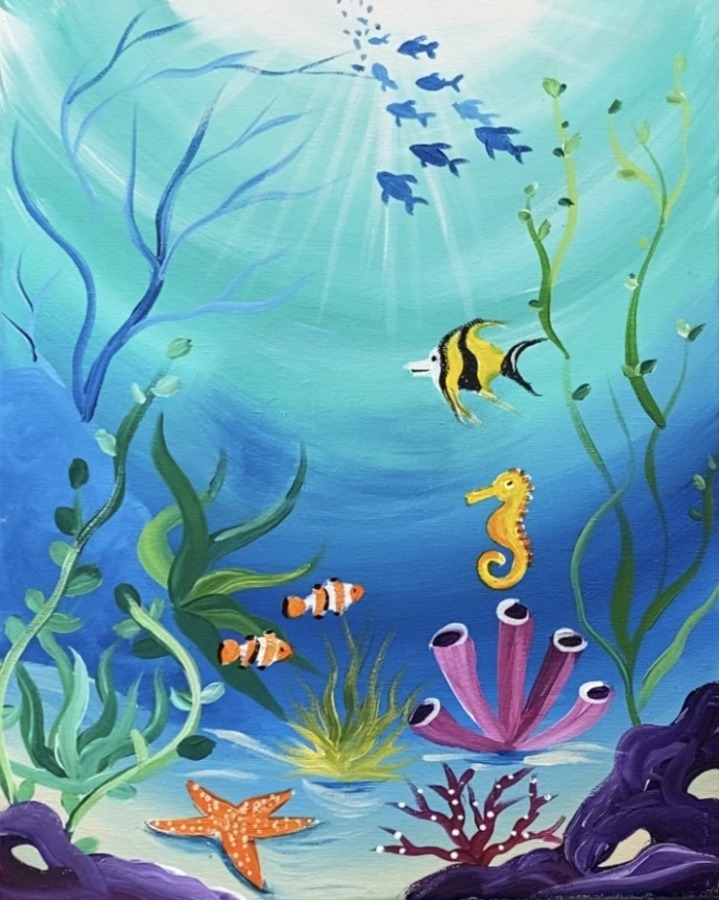
Paint the black marks on the clownfish tips of the fins and a black dot for the eye.
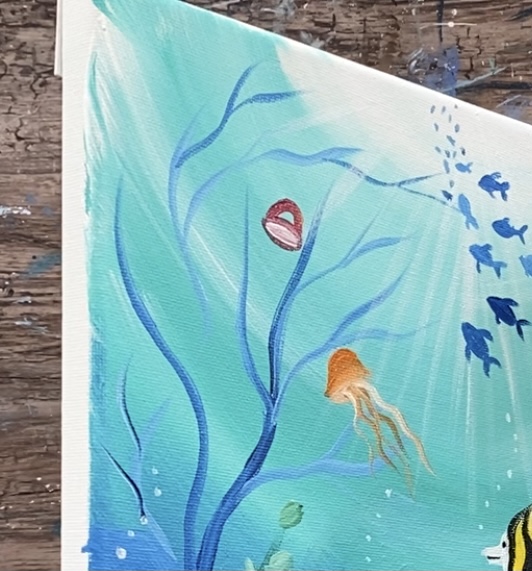
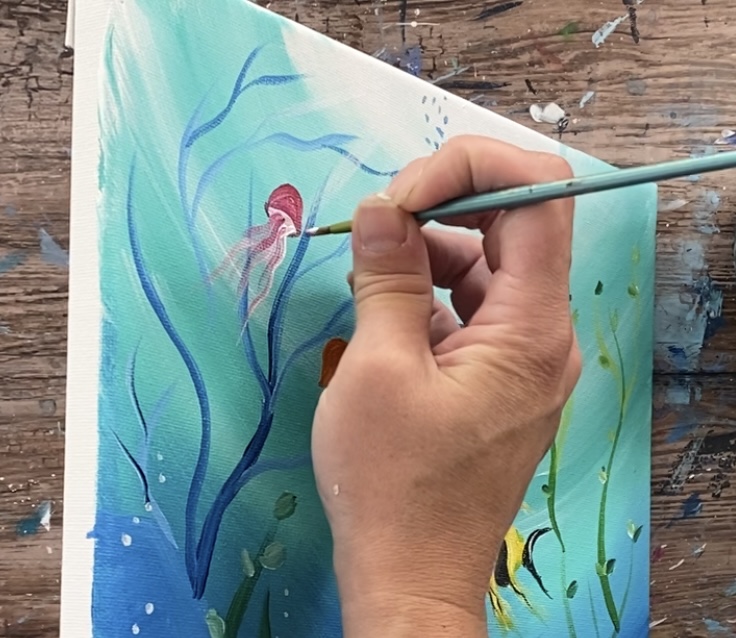
13. Paint jellyfish
Use your #2 round brush and cadmium orange hue mixed with a little titanium white. Paint a bell shape for the top of the jellyfish piece.
Then loosely paint the tentacles. Do this with very little paint on the tip of the brush. Let the white and the orange blend together to create different variations of the orange and the white.
Then paint a similar jellyfish using quinacridone magenta mixed with a little titanium white.
You can keep adding more details and sea creatures! That is it for this tutorial, hope you enjoyed! Sign your name and show it off!
Share Your Art Here!


This painting looks so realistic! Great job once again.
Thanks Lisa!
Gosh…thank you so much for including reference for colors used with Craft Paints! that extra mile you go. will create and post on FB group once completed.
You’re welcome Abby! Can’t wait to see yours in the group!!