
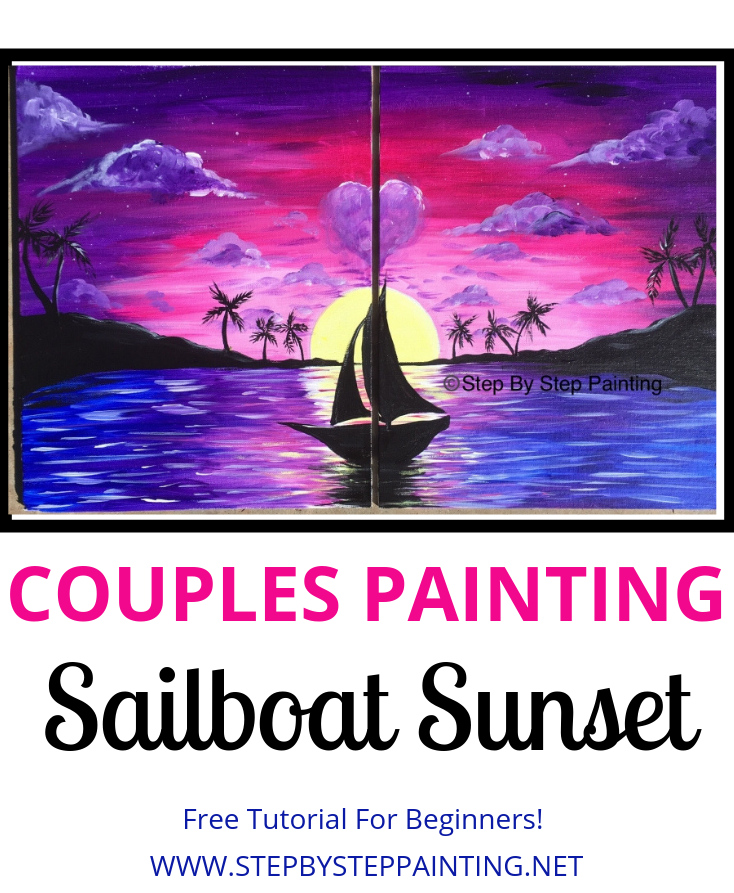
How To Paint “Couples Tropical Sunset”
Would you like to save this?
Intro
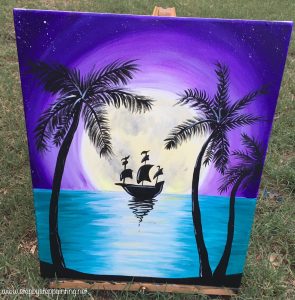
Have a painting date night at home! Learn how to paint a beautiful tropical sunset over a lagoon with a sailboat sailing on a romantic lagoon. This acrylic canvas tutorial is intended to be a “couples” painting where you and your partner can paint side by side and, in the end, fit your two paintings together. I will guide you through each step with pictures, directions and a video!
It can also be an option to leave the painting without the sailboat silhouette! Simply just omit it and enjoy the beauty of the sunset and waters. I think my favorite part of the whole painting is that heart shaped cloud right above the sun!
Also, if you don’t want to do this as a couple’s painting, it can work as a stand alone single painting. Simply use a 16″ x 20″ canvas and paint the entire design on it.
Enjoy and happy painting!
Similar Paintings

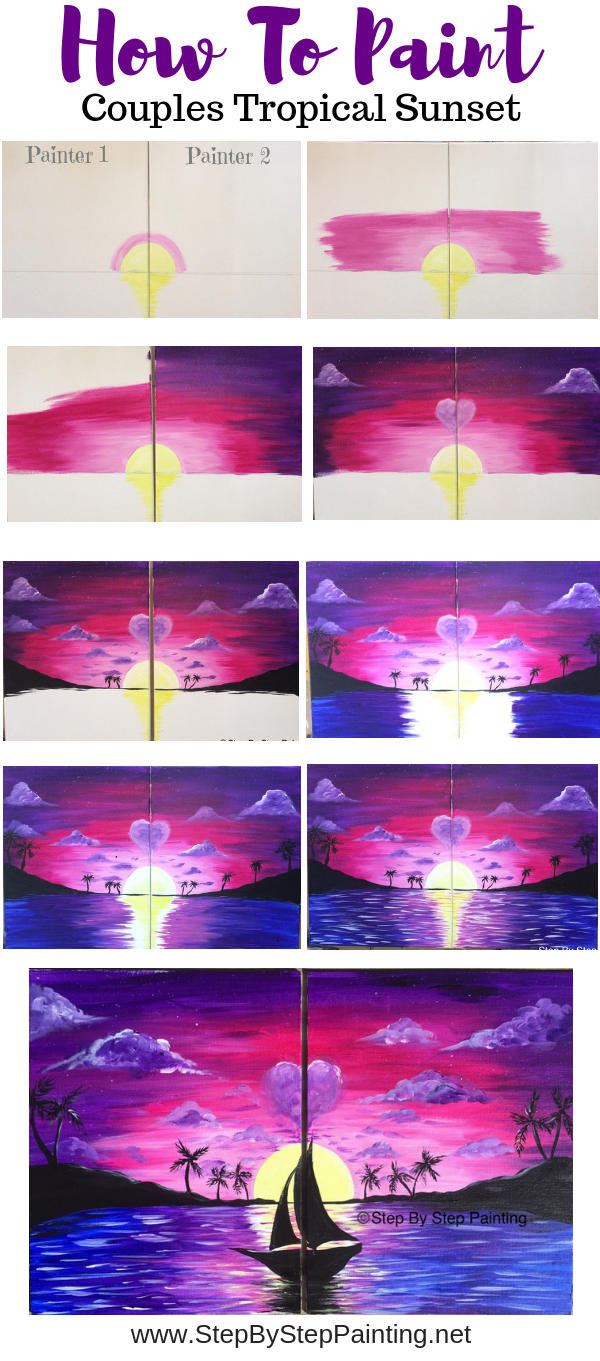
How To Paint "Couple's Tropical Sunset"

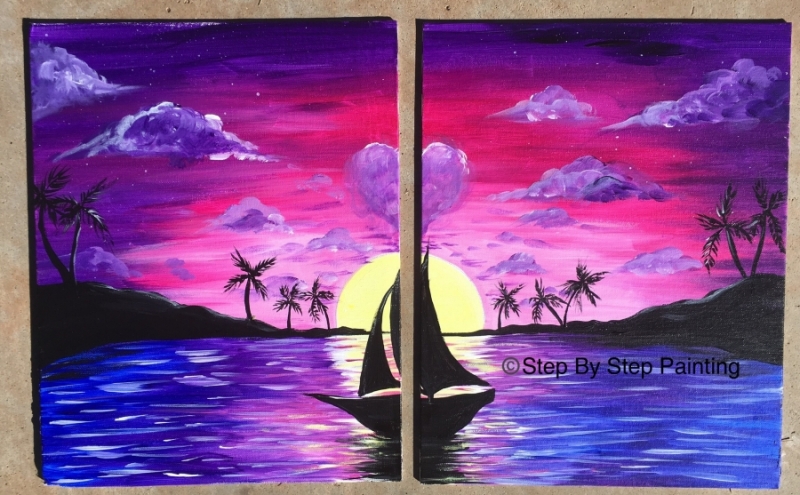
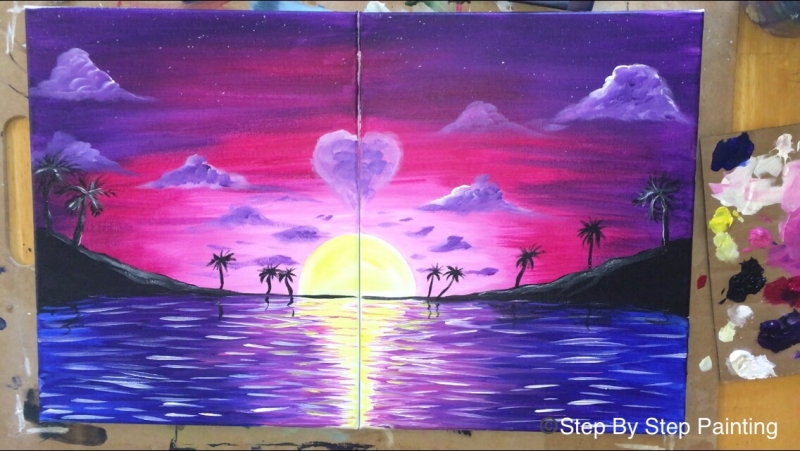
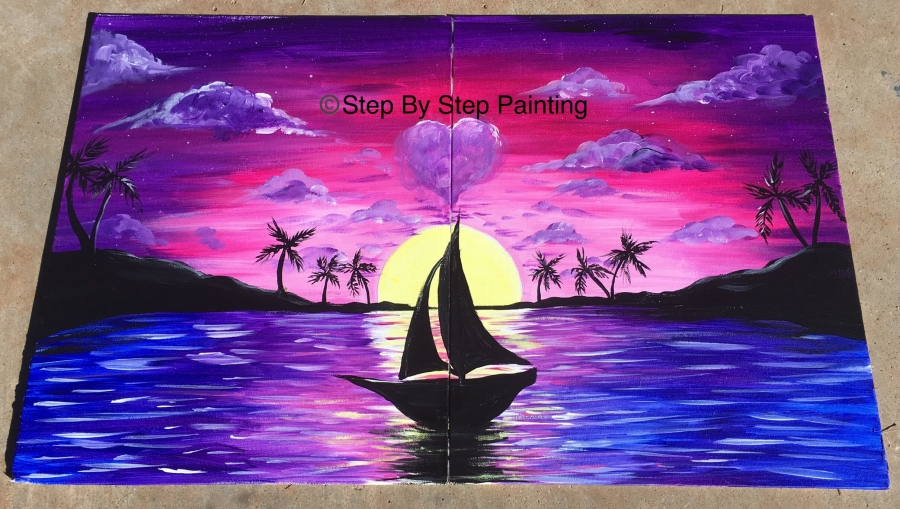
This tropical sunset painting was done on two 11" x 14" canvases and put together to form a whole. In this tutorial, you and your partner will learn how to paint step by step.
Materials
Basic Materials
- Two 11" x 14" Canvas
- Acrylic Paint
- Paint Brushes
- T-Square Ruler (for drawing horizon line)
- Solo Cup (for tracing sun)
Colors
- Titanium White
- Mars Black
- Quinacridone Magenta
- Medium Magenta
- Dioxazine Purple
- Cadmium Yellow Light Hue
- Ultramarine Blue
Brush Sizes
Instructions
- Scroll down for complete tutorial with pictures and step by step directions.
Recommended Products
As an Amazon Associate, Michaels Affiliate and a member of other affiliate programs, I earn from qualifying purchases.
Color Palette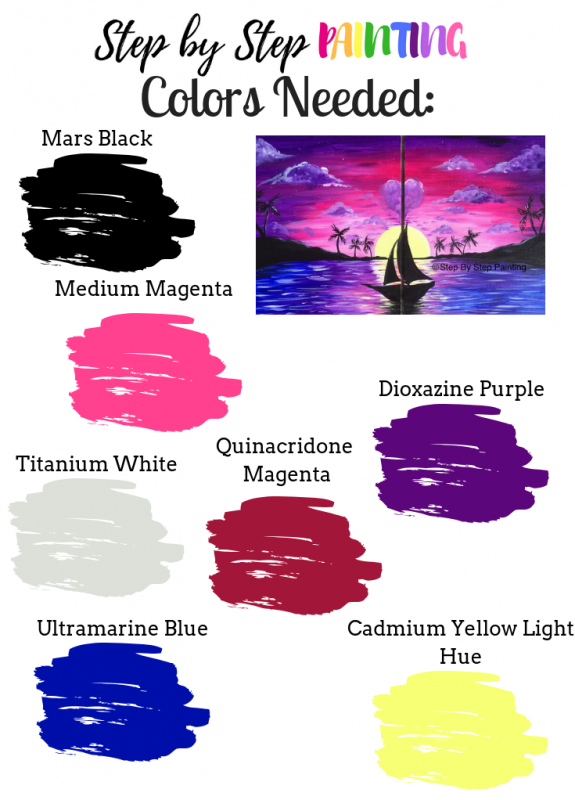

Brushes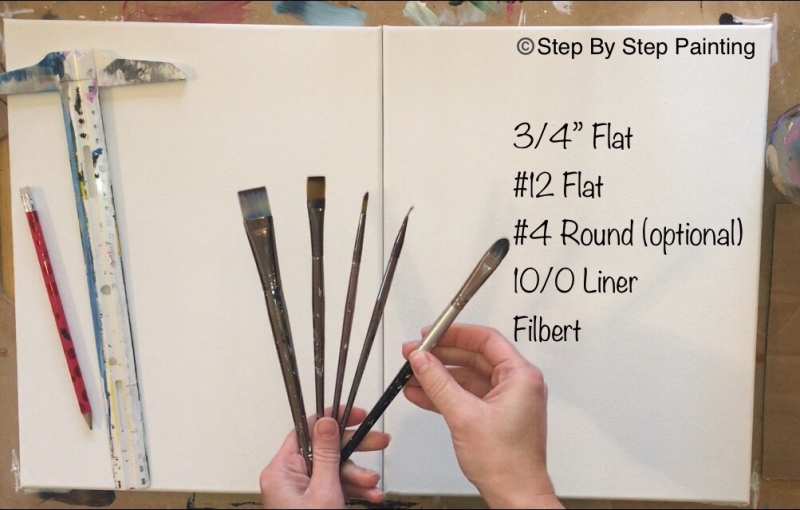

Directions At A Glance

Video
Directions
1. Get your supplies ready! Position the canvases so they are going vertical.
I recommend that you paint side by side as close as possible because this painting matches side by side. You can try painting flat on the table, on two separate easels or on one large easel. Both of you will need to mirror each other and paint in unison. 
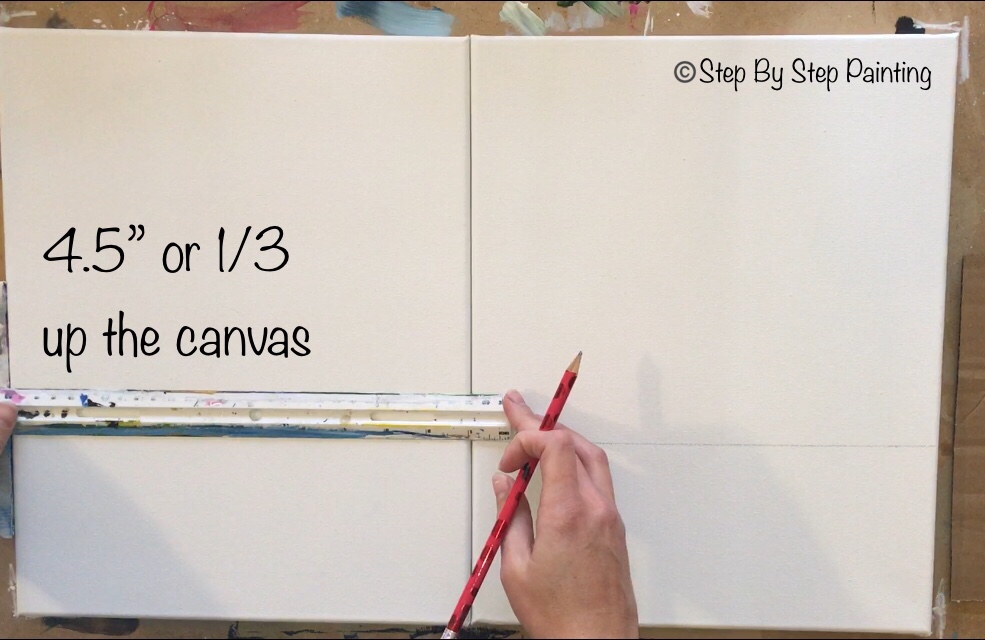
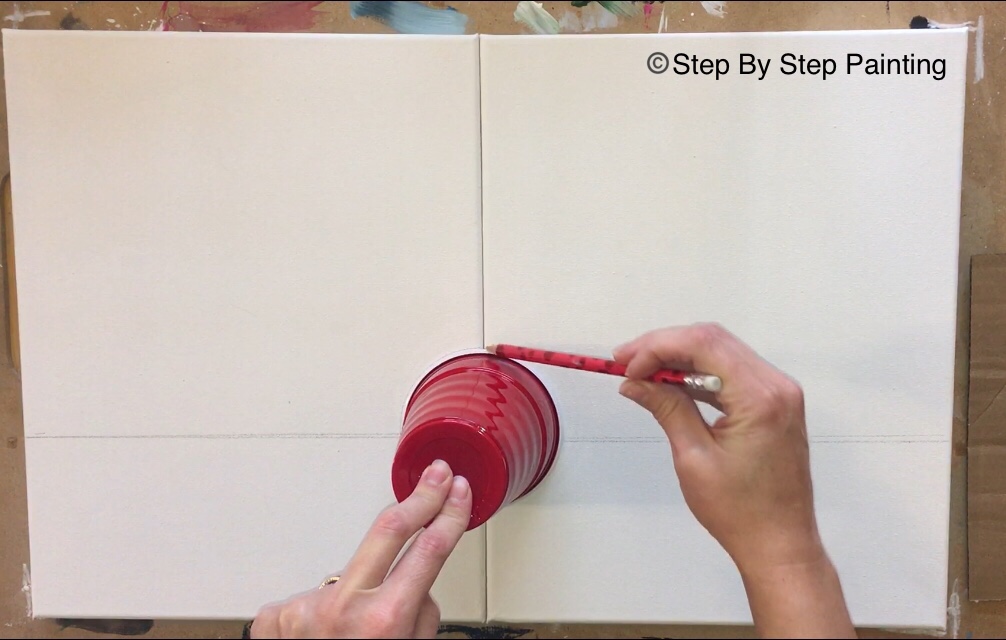
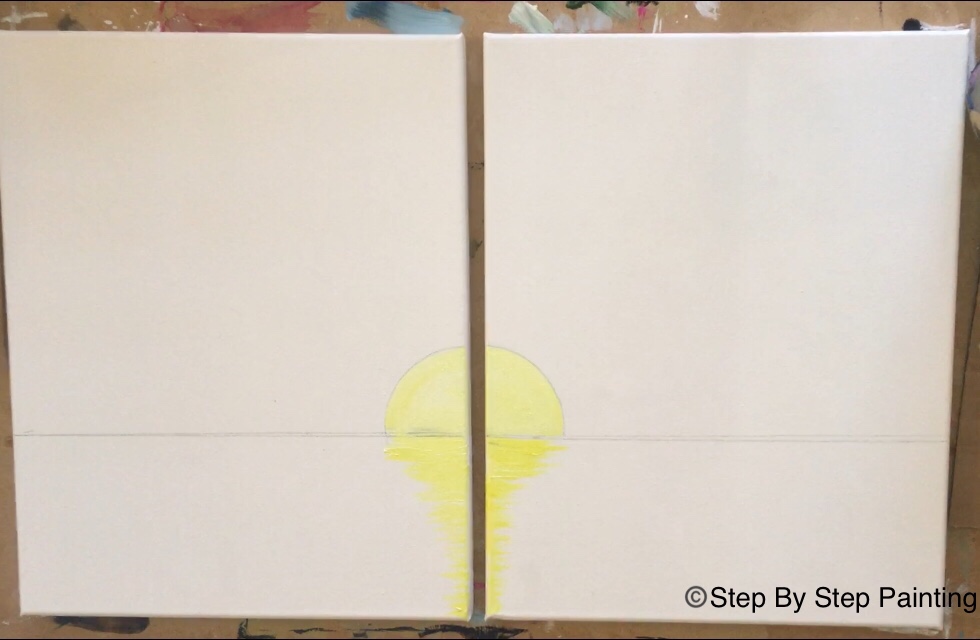
2.Draw the horizon line and the sun.
Use a T-Square ruler to draw the horizon line about 1/3 up the canvas. Then use a Solo cup to trace the sun so that half is on one canvas and the other half is on the other canvas. Note: the T-Square really helps to get the horizon line to be parallel and match up with both paintings.

3. Paint the sun with a #12 Bright and Cadmium Yellow Light + Titanium White
Basically dip your brush in both colors (about equal parts) and paint the sun inside the shape that you drew on the canvas. 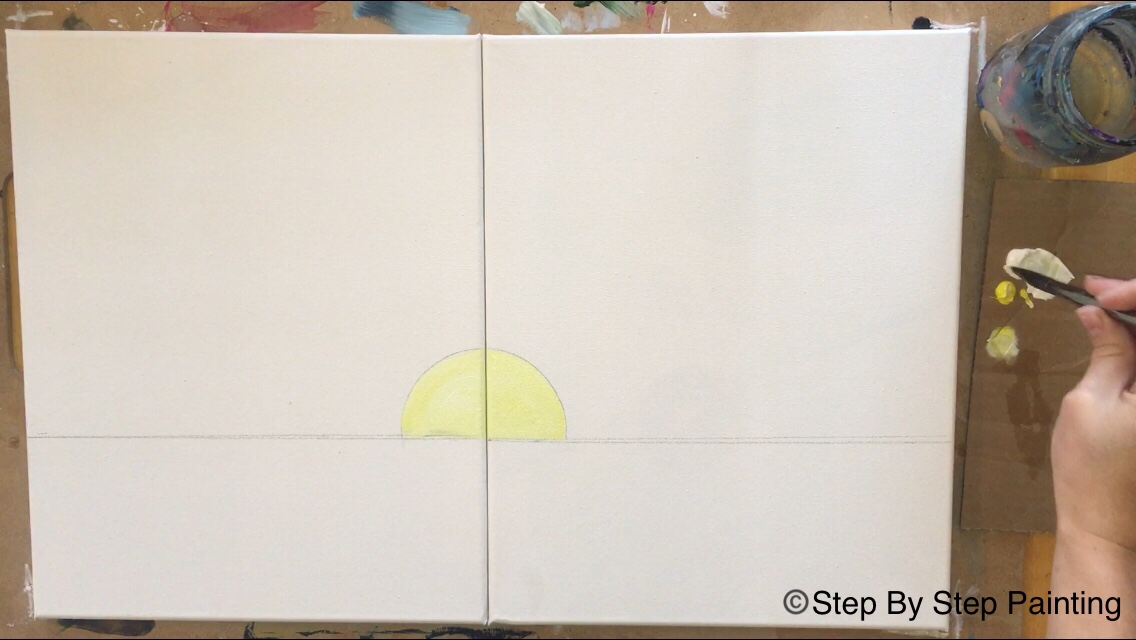
4. Paint the reflection under the sun
The reflection goes from thick to thin like an upside down triangle. Paint left and right strokes starting from the sun and then going to the bottom of the canvas. We will do the rest of the water later!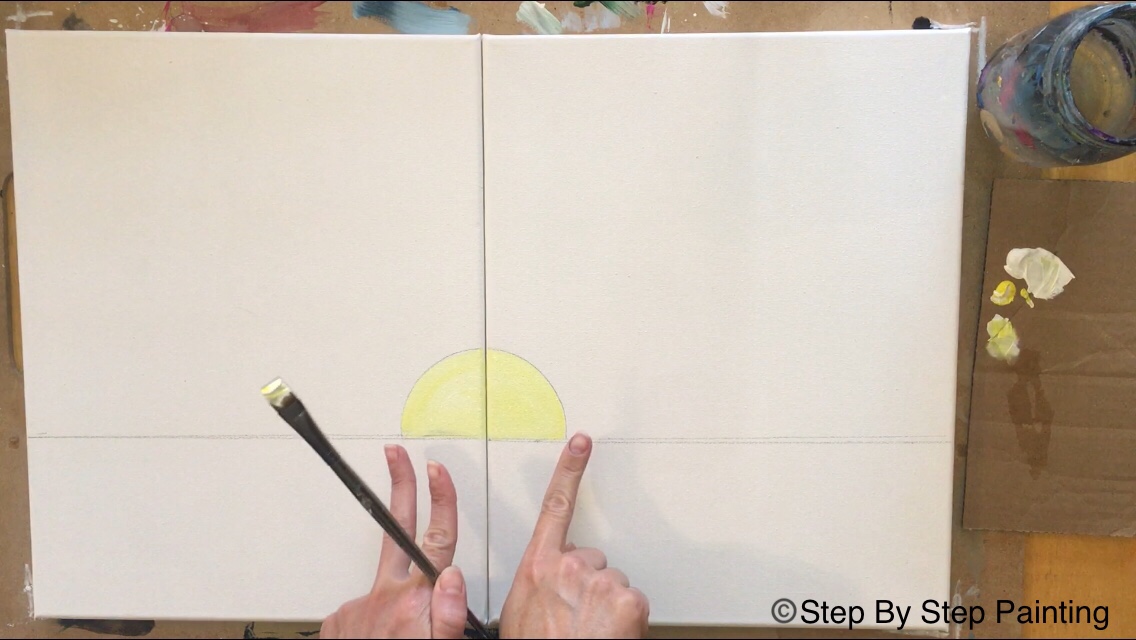
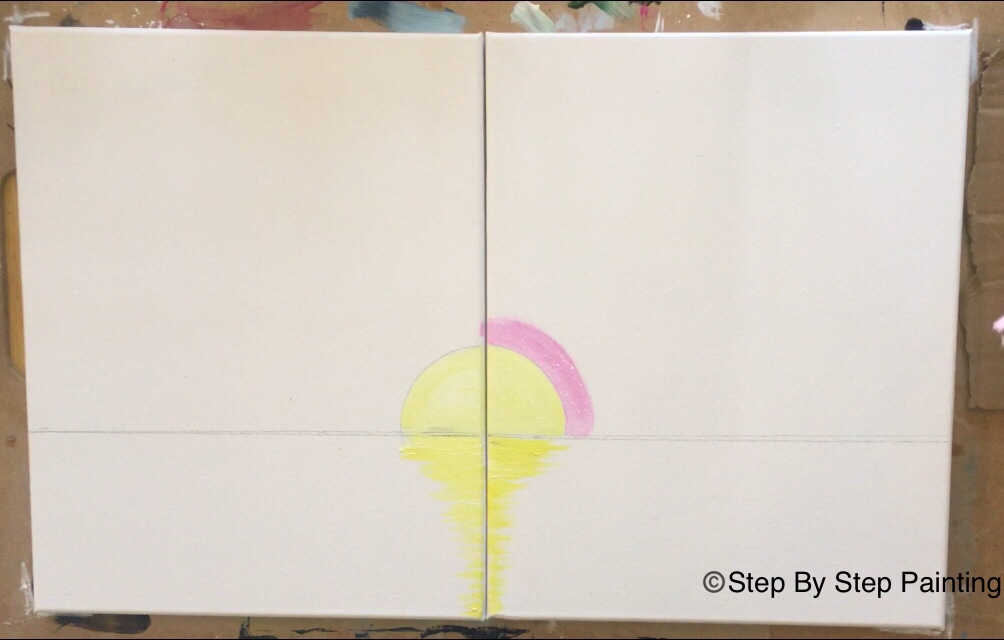
5. Use medium magenta + titanium white to paint a “ring” around the sun (above the horizon line).
Next you and your partner will paint a very light pink ring around the sun. This is only to “cut in” on the sun. The rest of the sky will be left and right horizontal strokes. Basically dip your #12 bright in both white and medium magenta then let the colors blend on the canvas painting a ring the size of the width of the brush. 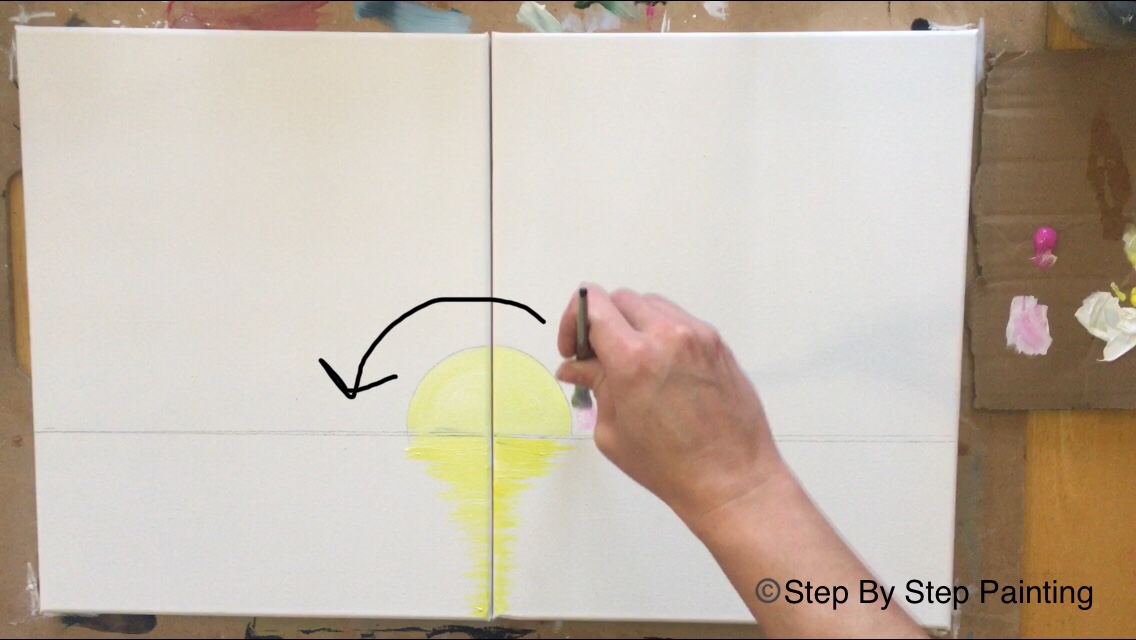
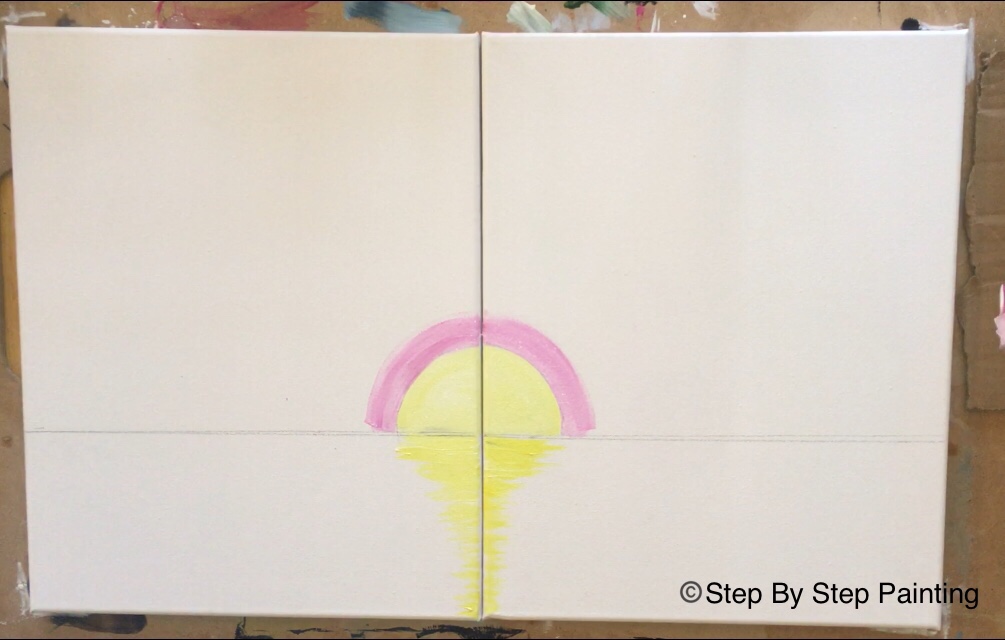
6. Paint left and right strokes with medium magenta + titanium white & your #12 brush.
Next continue with that same color combo (medium magenta + titanium white) and paint horizontal strokes. Try to disguise that initial “ring” around the sun. Basically the sky is going to be lightest around this sun and it is going to gradually get darker as you work your way to the left and right and upwards. Keep in mind that painting a sunset is not an exact science! Your colors may not do the same thing as my colors did. Go at this with an open mind, relax and embrace the way your colors blossom! 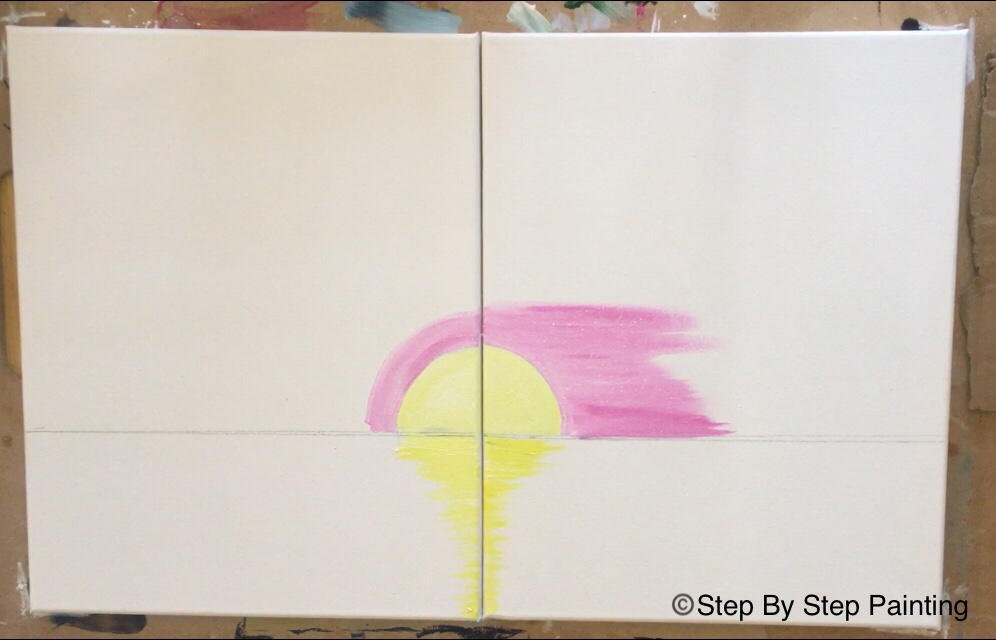
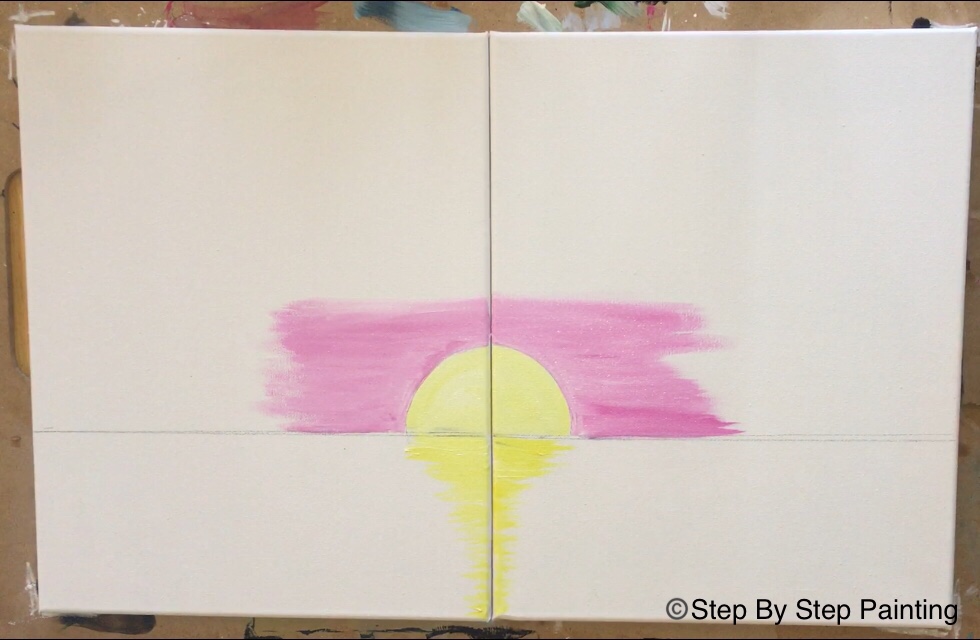
7. Switch to a 3/4″ flat – Add medium magenta (without titanium white).
Switch to a 3/4″ flat because there’s a lot of sky to paint and that #12 won’t do the trick here. Continue to paint left and right strokes but this time with just medium magenta (no white). Let it blend with the lighter pink already on the canvas (wet on wet blending) by painting over the lighter area slightly. Your sky should be slightly darker as it is further from the sun.
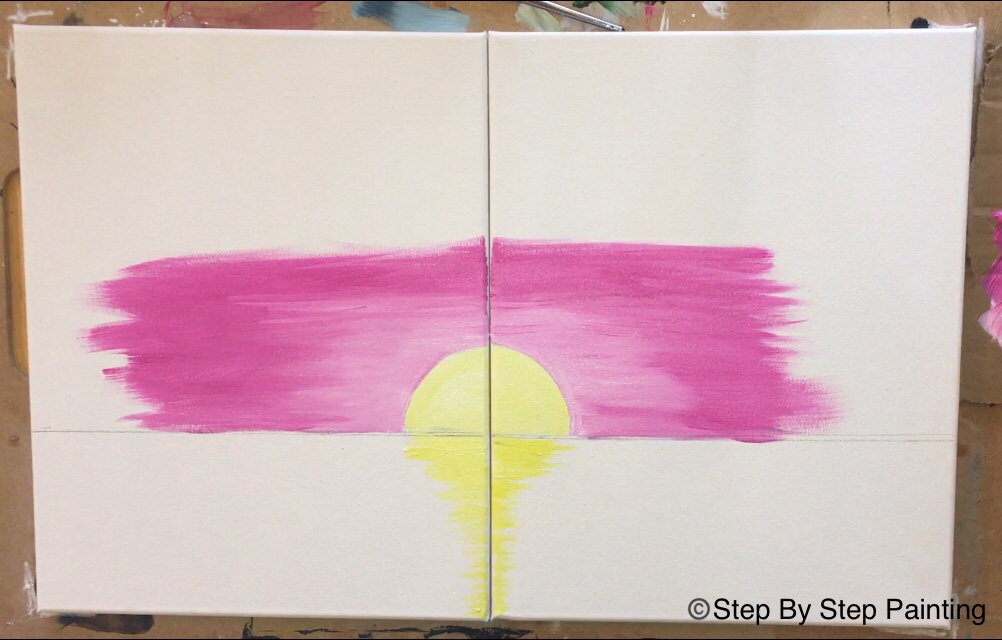
8. Add Quinacridone magenta into the sky
You may chose to rinse your brush or simply just add quinacridone magenta to it. Basically continue on with the left and right horizontal strokes in the sky. Blend that quinacridone magenta in with the medium magenta by doing “wet on wet” blending. Go all the way to left and right edges of the canvas.
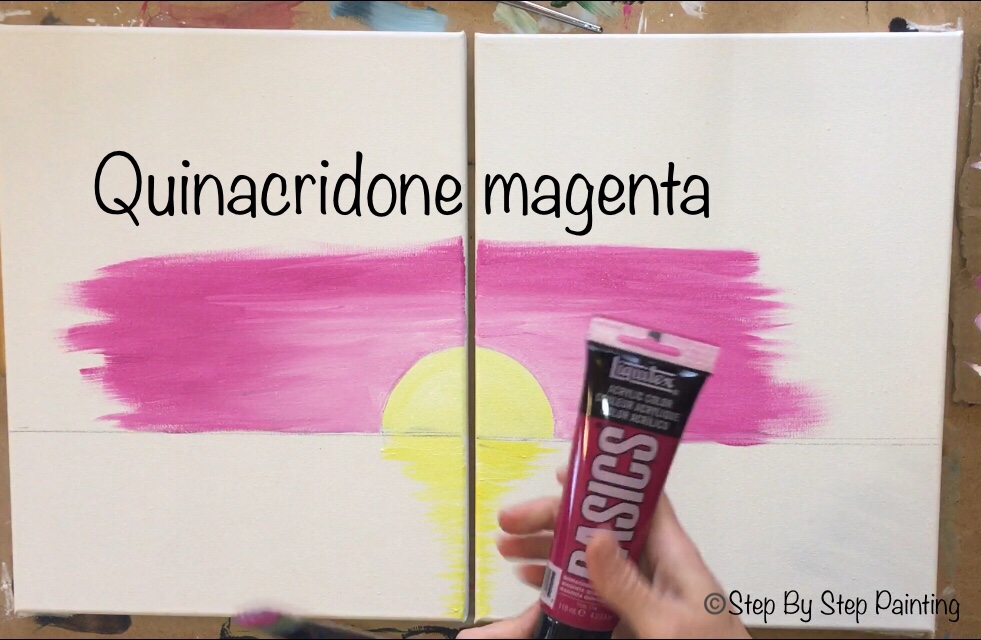
Quinacridone magenta is dark and spreads fast. Avoid the middle of the painting where the sun is because we want that area to stay light and bright. 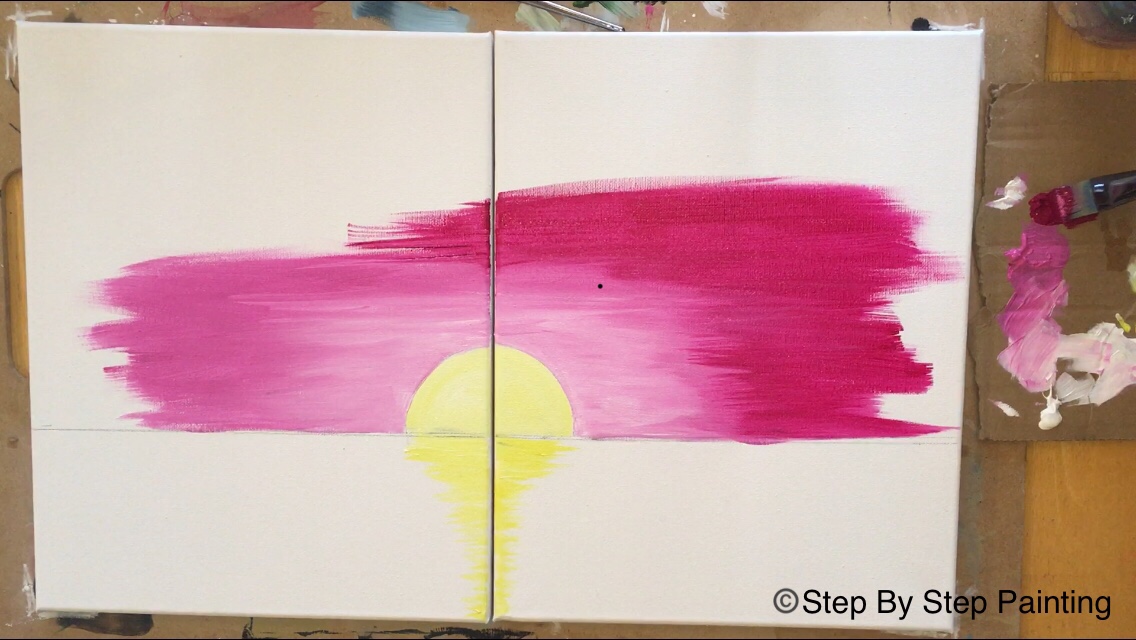
If you need to, add more medium magenta to your quinacridone magenta to help it blend. The sky is not a perfect smooth blend of colors – remember painting a sunset is not an exact science! 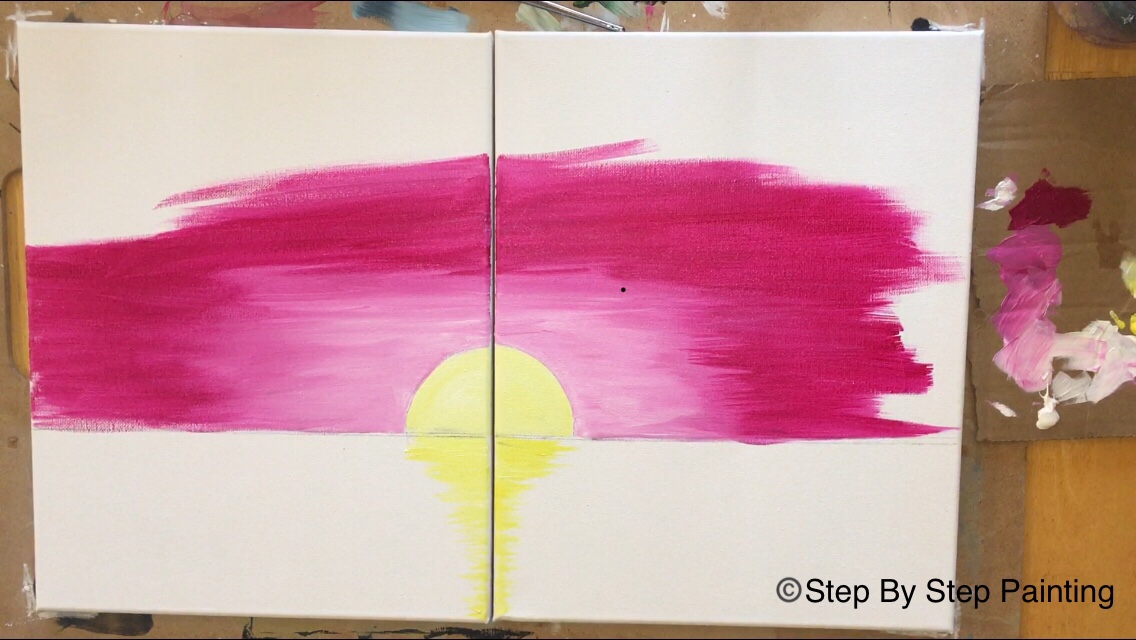
9. Add dioxazine purple into the sky
Word of caution: dioxazine purple is dark and it spreads fast! Paint this carefully and slowly. If you need to – add medium magenta on your brush to help your purple not be so dark. Paint all the way to the far right and left edges. Also paint all the way to the top of the canvas so the very top of the sky is this dark purple. Go back and add more colors if needed to help with the blending. 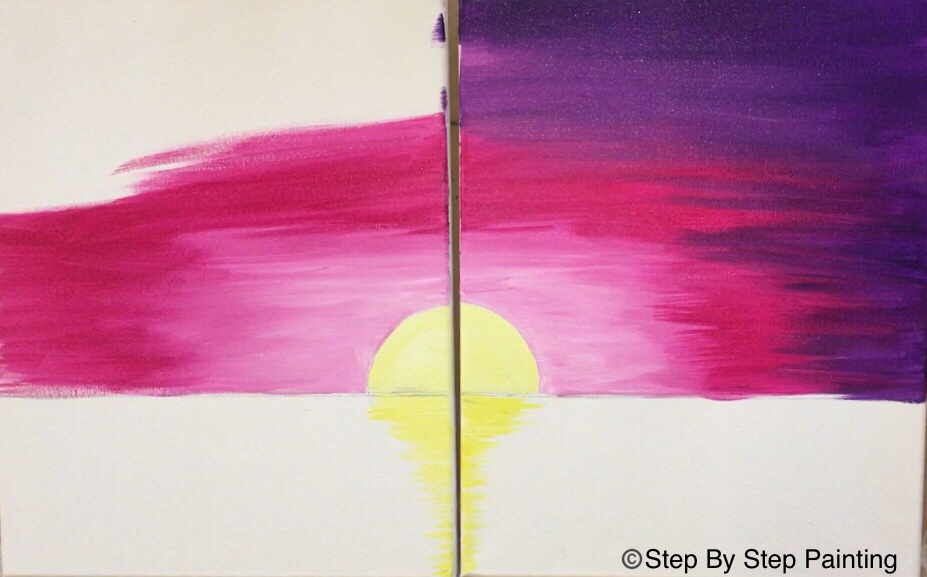
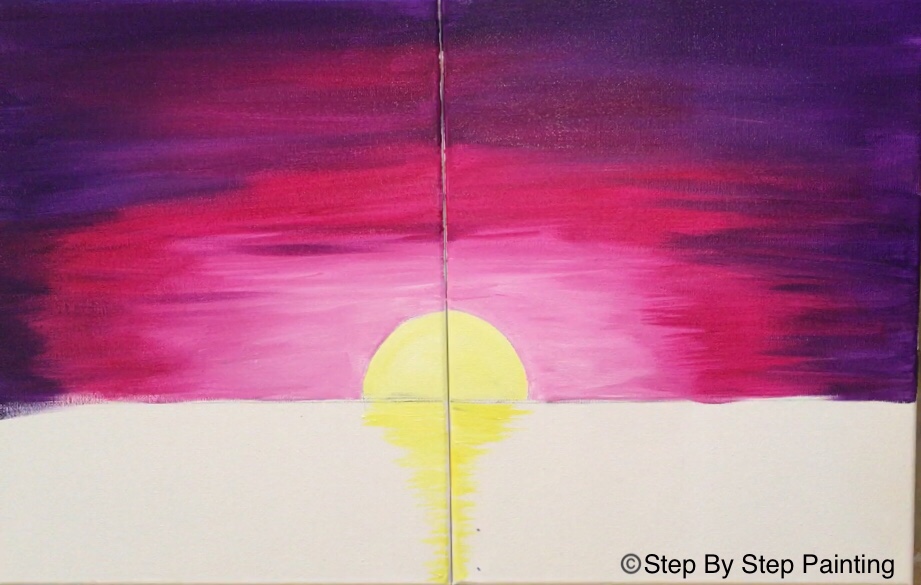
10. Optional: splatter a few stars way at the top of the sky
I always like to splatter stars in my paintings with dark skies. I think adding the stars gives this a nice touch to the dark area of the sky. Basically use an old tooth brush dipped in a little bit of water and titanium white. Then flick the brush to make the little white stars.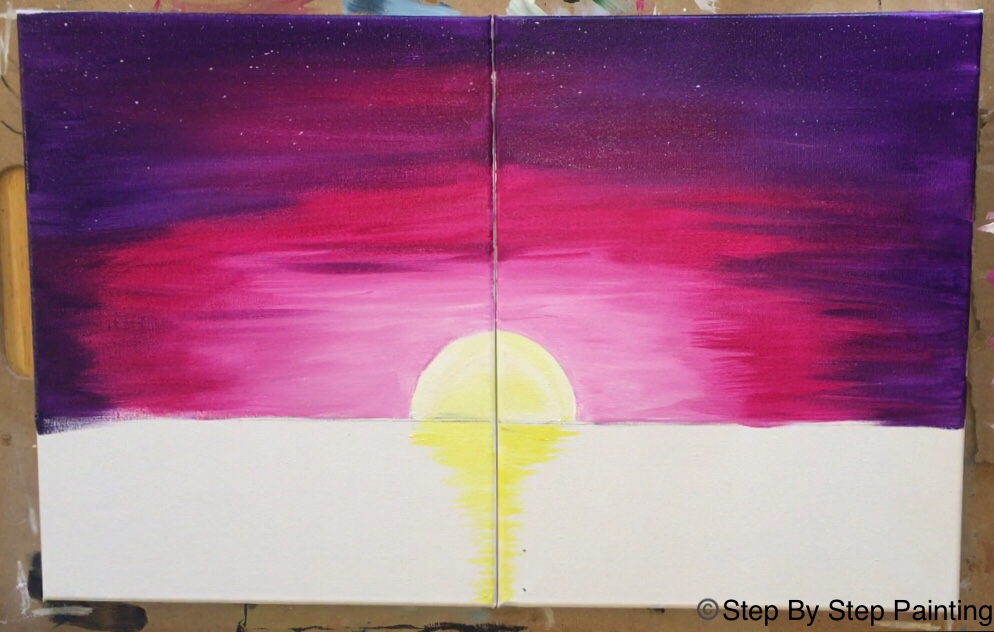
11. Paint the clouds
I like to use a filbert brush for clouds. I find this brush easy for clouds because the tip is rounded. 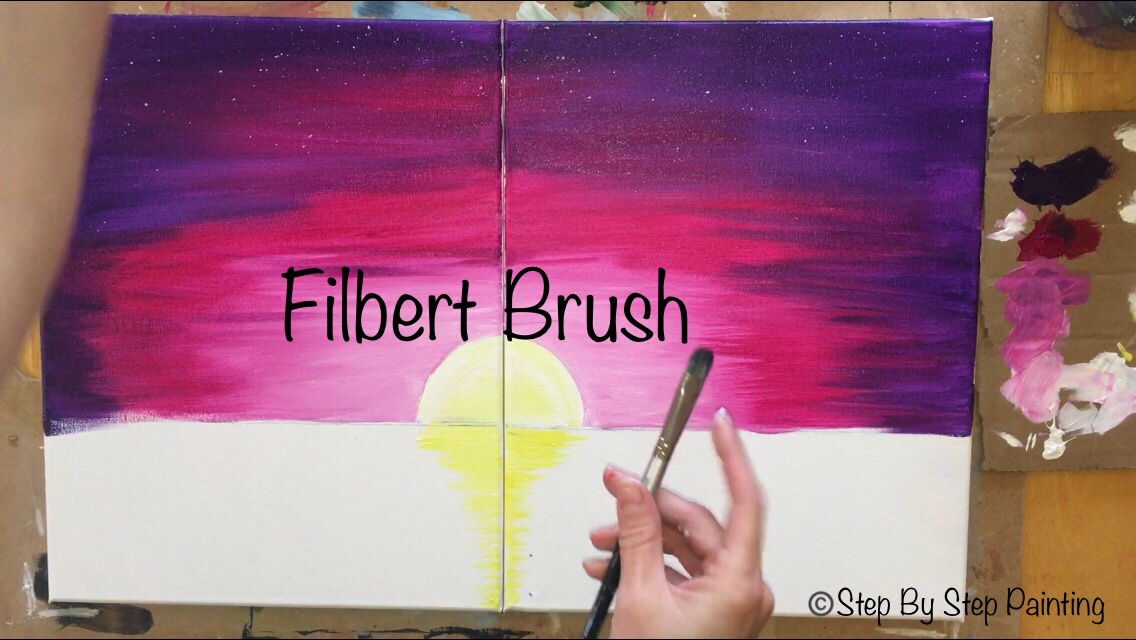
Start by painting a heart shape that connects your two canvases together. Use titanium white to paint this cloud. 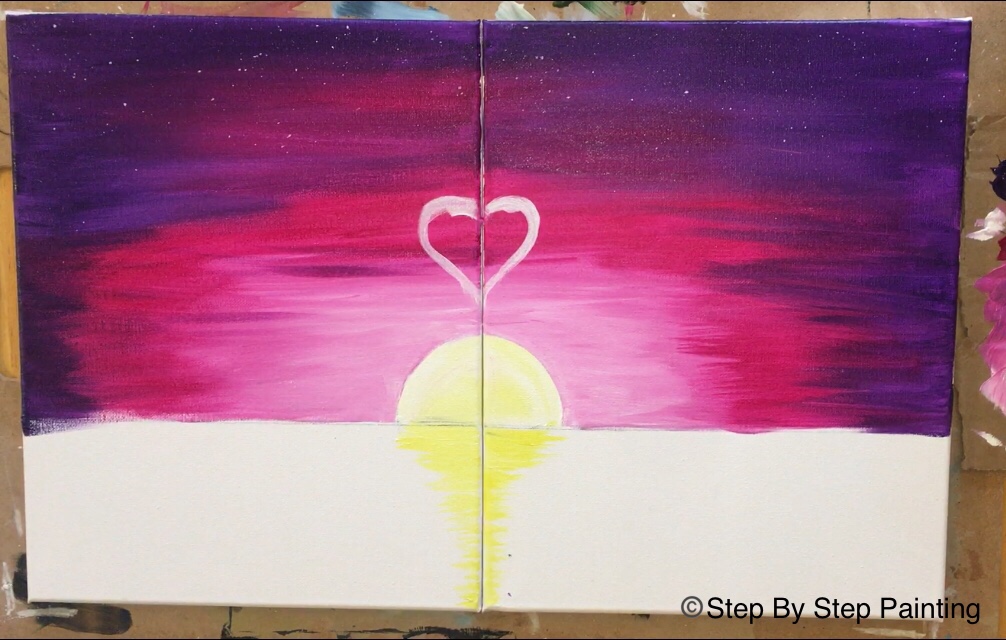
Then wipe your brush off so there’s only a little bit of white paint left on your brush. Paint in “circles” to fill in that heart shape. The white should be a transluscent “subtle” white that blends in with the colors below. See the picture below: it is not a bright solid white cloud – it’s “see through”. 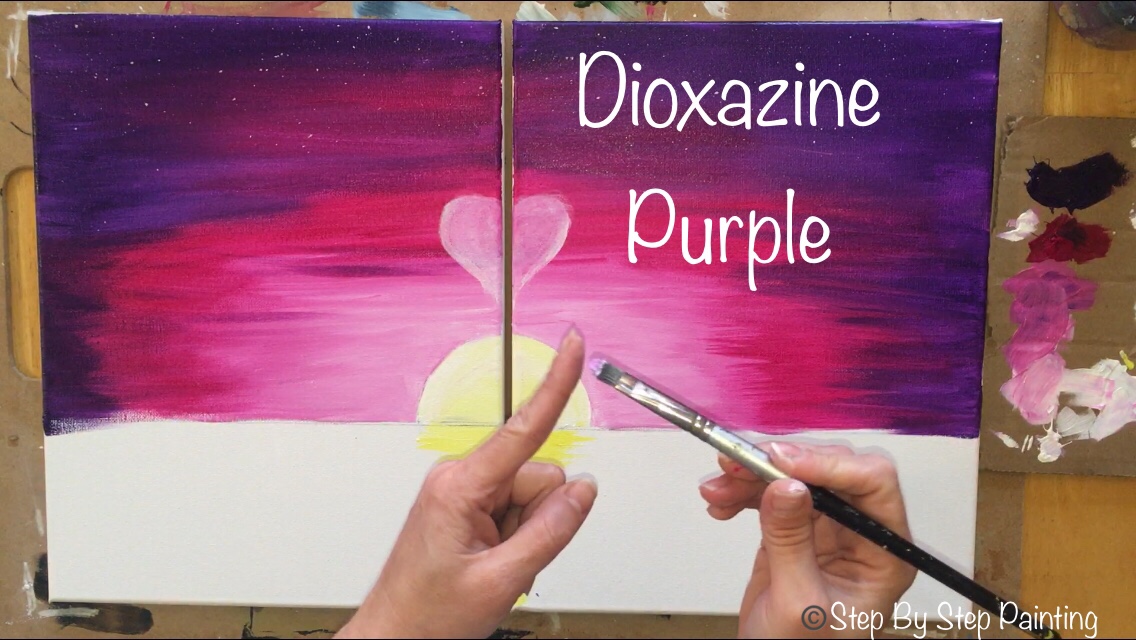
Next add dioxazine purple to the tip of your filbert brush (just a little bit). Add the dioxazine purple to the cloud by painting in in circles letting that purple blend with the white to make the heart a “fluffy” cloud. 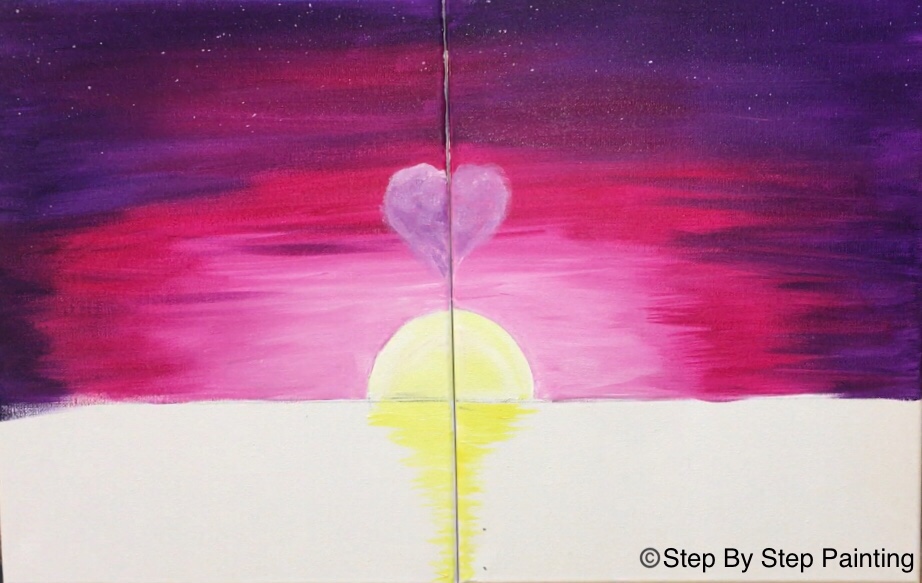
Then paint more clouds in the sky. There’s no need to rinse the brush for the next cloud. When I do clouds, I start with titanium white and paint the top “fluffy” part forming the shape. Then I paint in circles working my way to the bottom of the cloud. As you paint little circles, the colors blend on the canvas to make a transluscent color as the color of your brush runs dry. 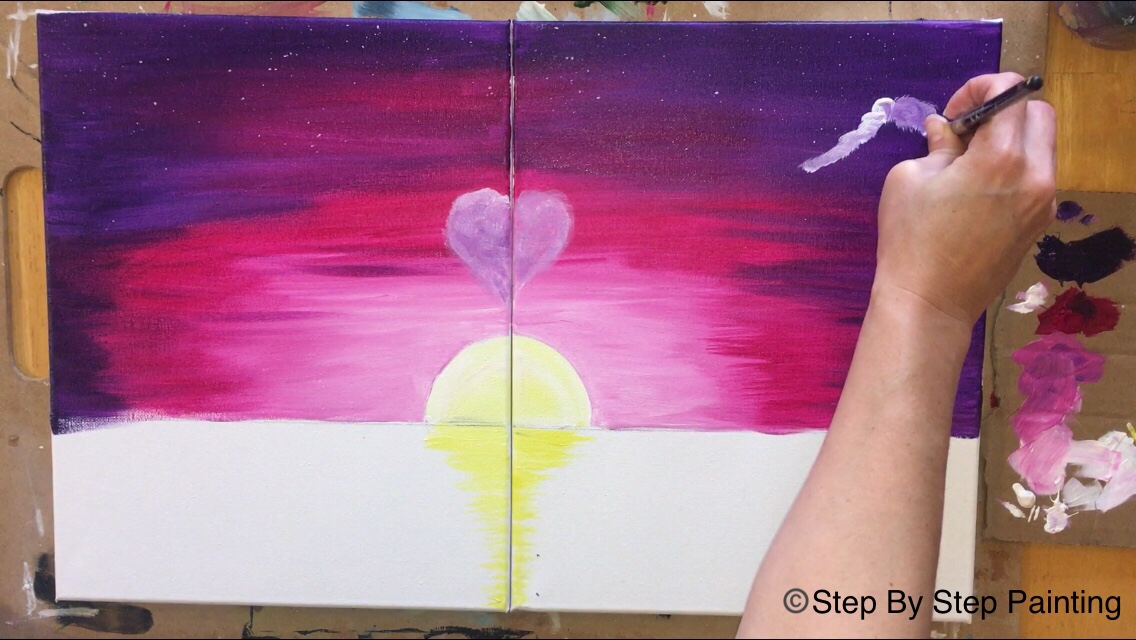
Then I add the darker color to my brush and paint more little circle strokes on the cloud to give it dimension. This darker color that I added was “dioxazine purple”. You only need a tiny but on your brush! Just paint little circle strokes letting it blend with the white. 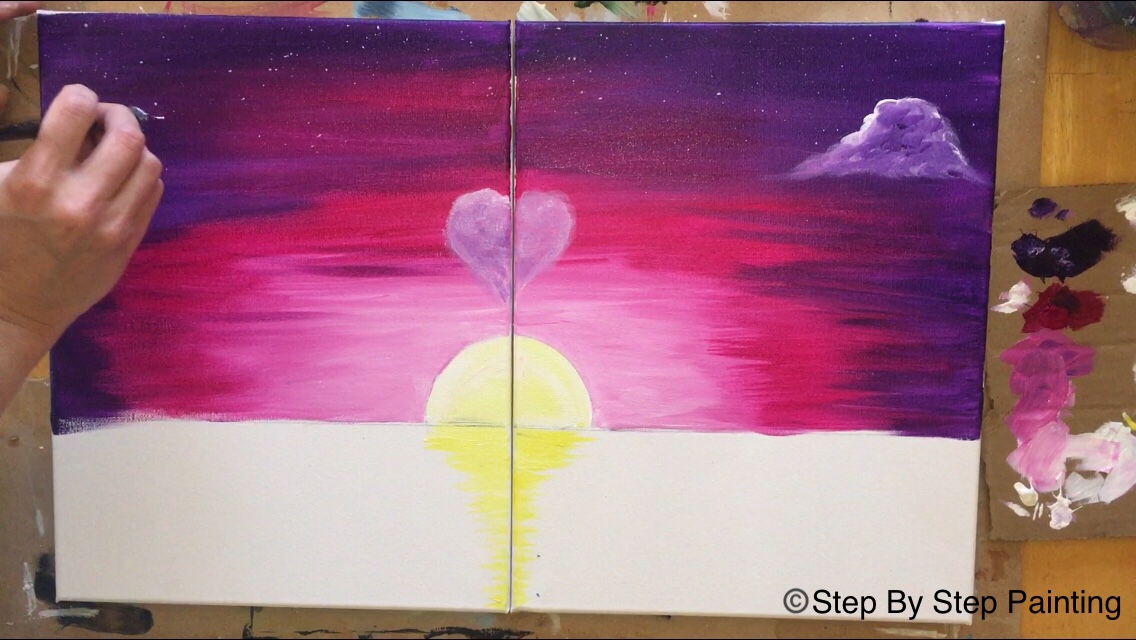
As you paint your clouds, keep in mind that the closer they are to the sun, the smaller they should be. The larger ones are high up in the sky. This gives the sky and the overall painting “dimension”. You can also paint short little “tick marks” of clouds by the sun. Remember: The only two colors I am using for the clouds are: titanium white and dioxazine purple. I start with white and then add the dioxazine purple on top. 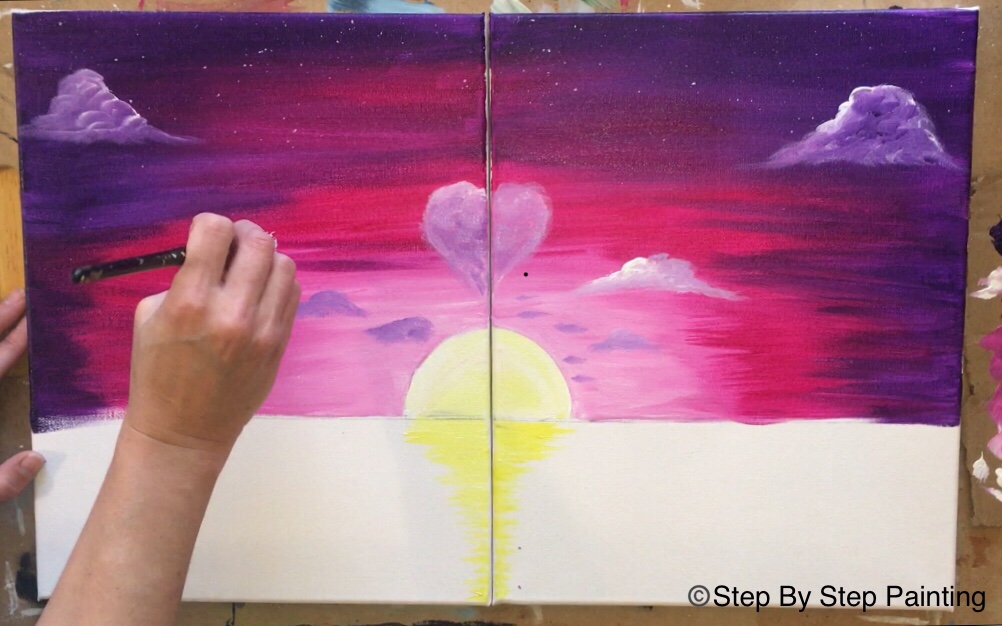
Just like with sunsets, there’s not an exact science to painting clouds. Embrace the way the colors blend! Yours may not do the same thing that mine did and that is okay. Also, you and your significant other may have a different style of cloud and that is what will make this painting so unique to both of you!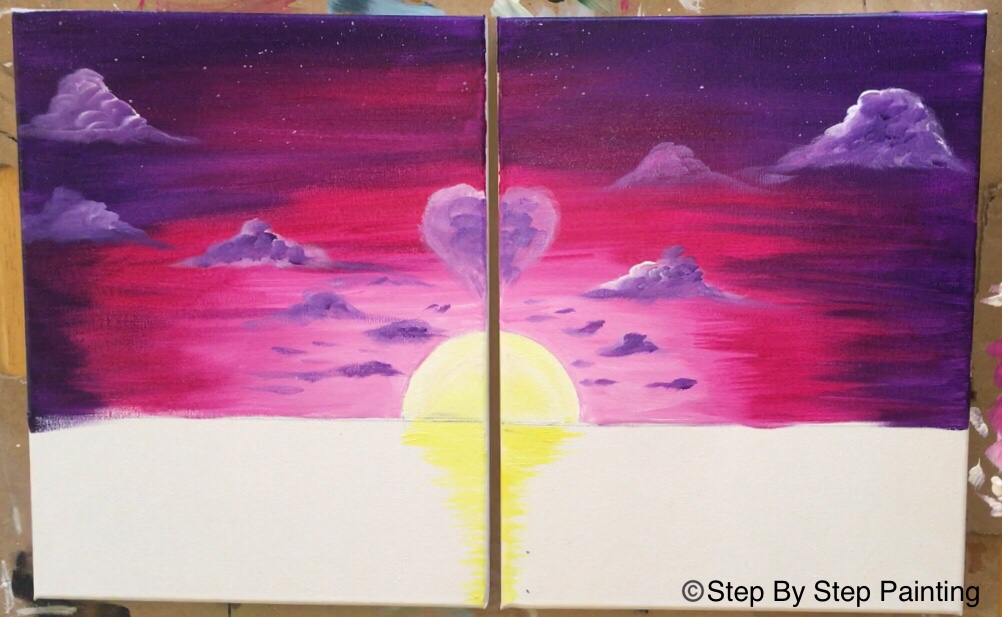
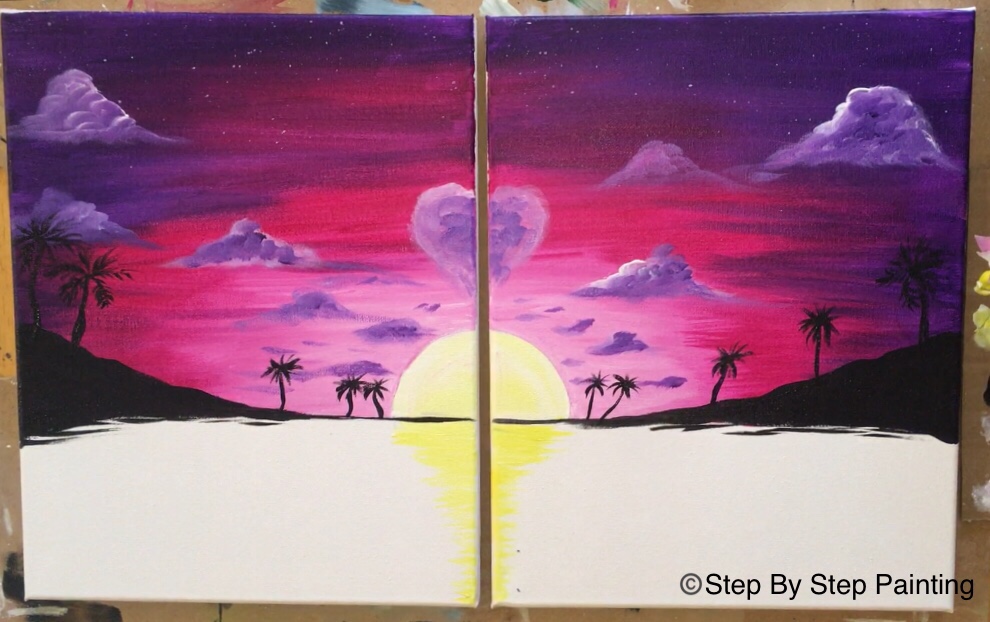
12. Paint the land with mars black and a #12 brush.
Use your #12 brush (completely cleaned, rinsed off and dried). Dip it in mars black and paint the land above the horizon line. Start at the right of the canvas (or left depending on which painting you are doing). Paint a diagonal/ lumpy line that slants down all the way to just a “slither” under the sun. Then paint the land on the right going slightly under the horizon line at a curve. Note: the height of the highest part of the land is about four fingers above the horizon none. 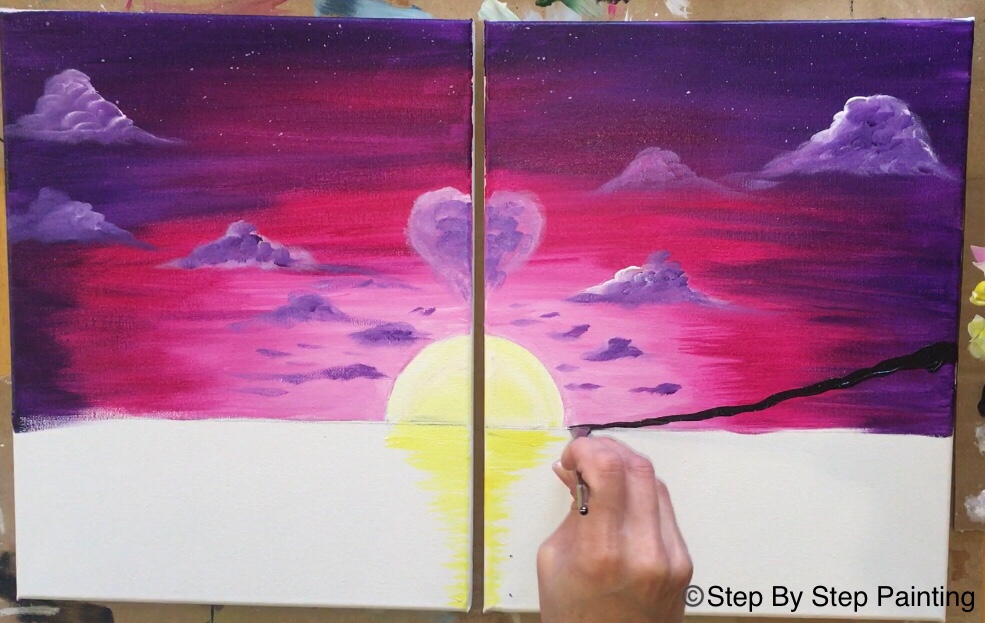
Also note, the bottom of the land slightly curves under the horizon line. See picture below. 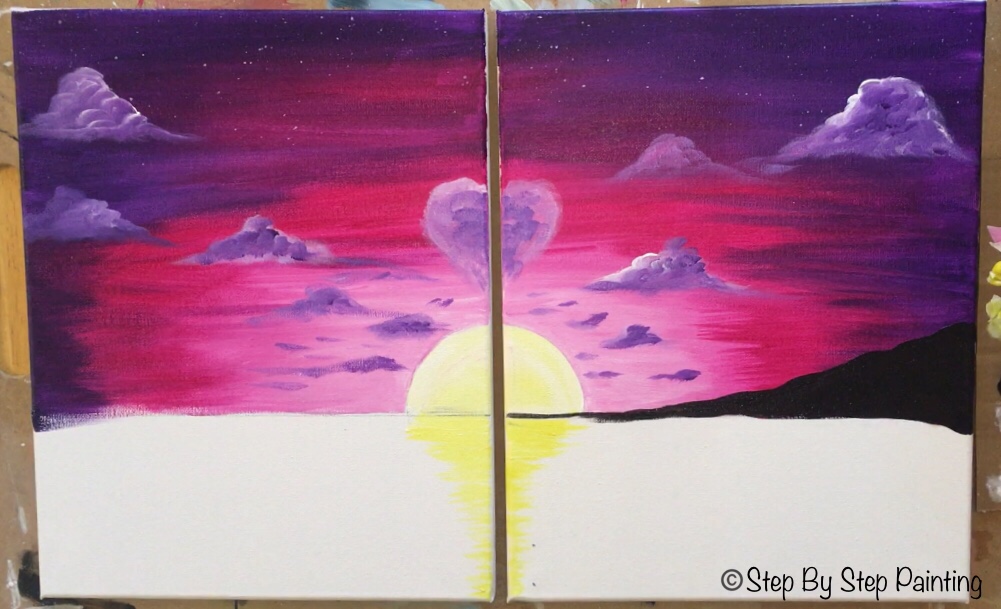
You can also paint a few reflection horizontal lines with the mars black just under the land. 
13. Paint the palm trees with a 10/0 liner
Get your really tiny brush ready and paint some palm tree silhouettes. The smaller palm trees are in the middle closer to the sun and they get slightly bigger on the left and right where the land gets higher. Start by painting the trunks first. Then paint one little strokes for the palm leaves. 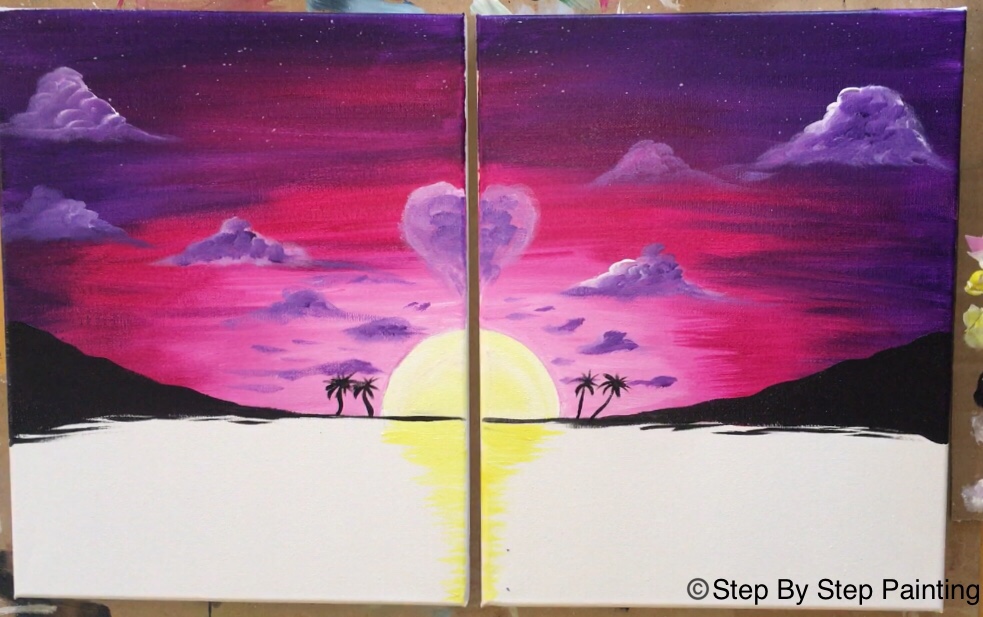
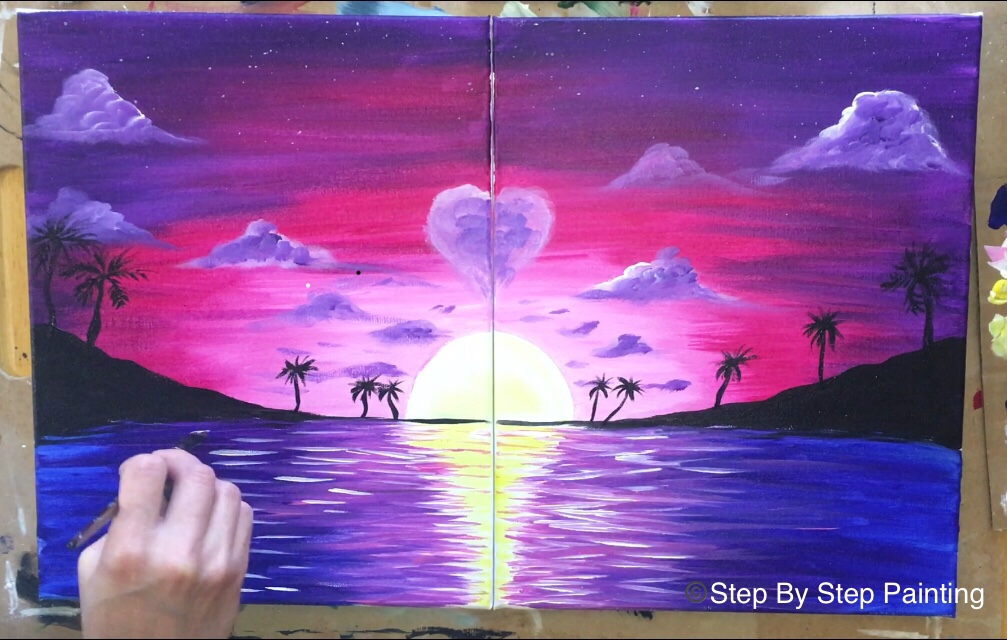
14. Paint the water.
Start with the color “ultramarine blue”. Use your #12 flat brush to paint horizontal strokes starting at the far left and right edges (depending on what canvas you are doing). This water will start out “ultramarine blue” then it will turn to “dioxazine purple” and then “medium magenta”. 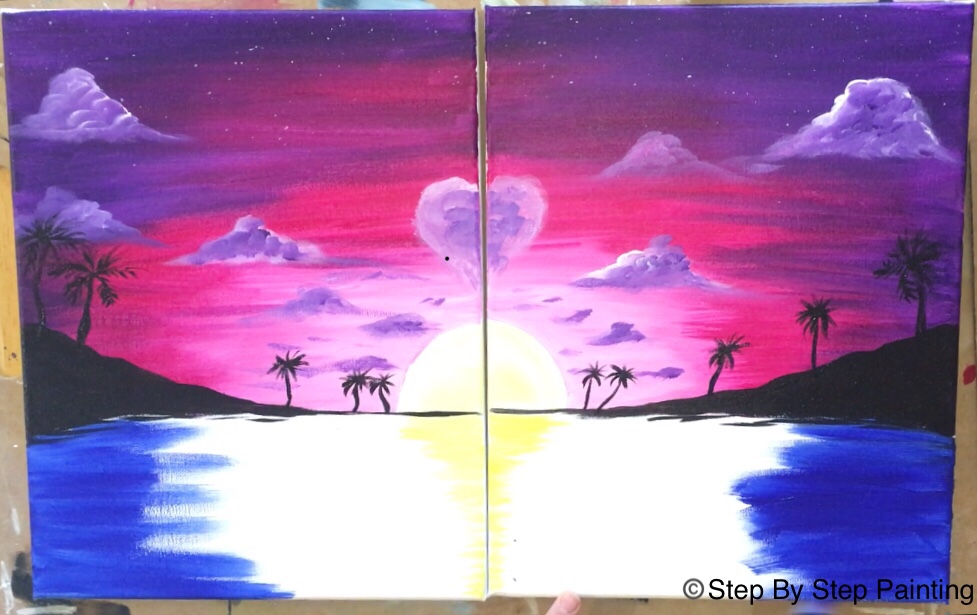
Add “dioxazine purple” to your brush without rinsing it off. Continue painting left and right horizontal strokes letting it blend with the blue. Note: my photo lighting got kind of “off” in these few pics. 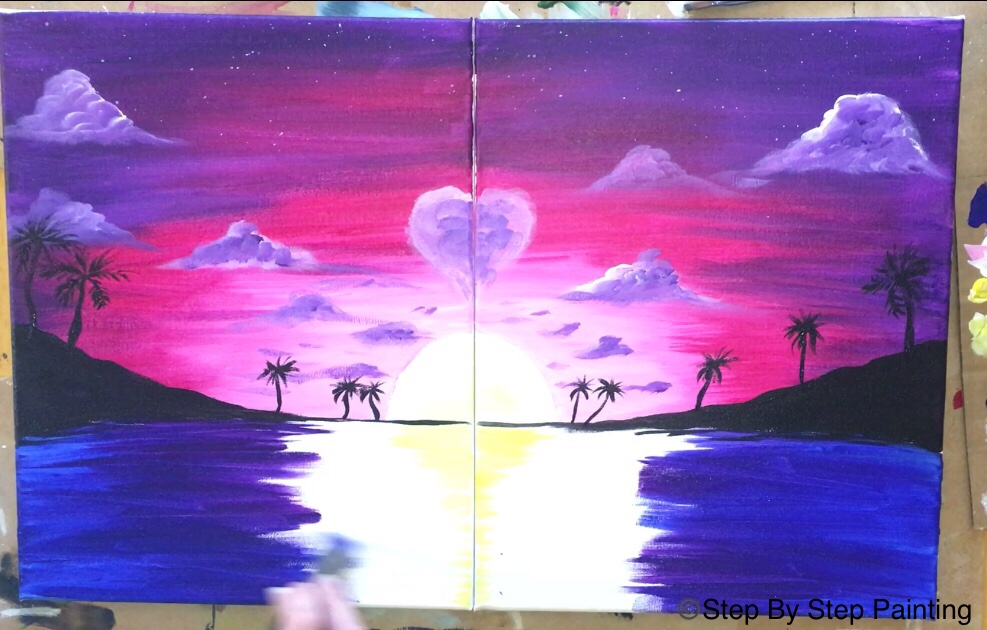
Add in medium magenta without rinsing your brush. Continue to paint left and right horizontal strokes but avoid the yellow area. Get as close to the yellow area as possible. 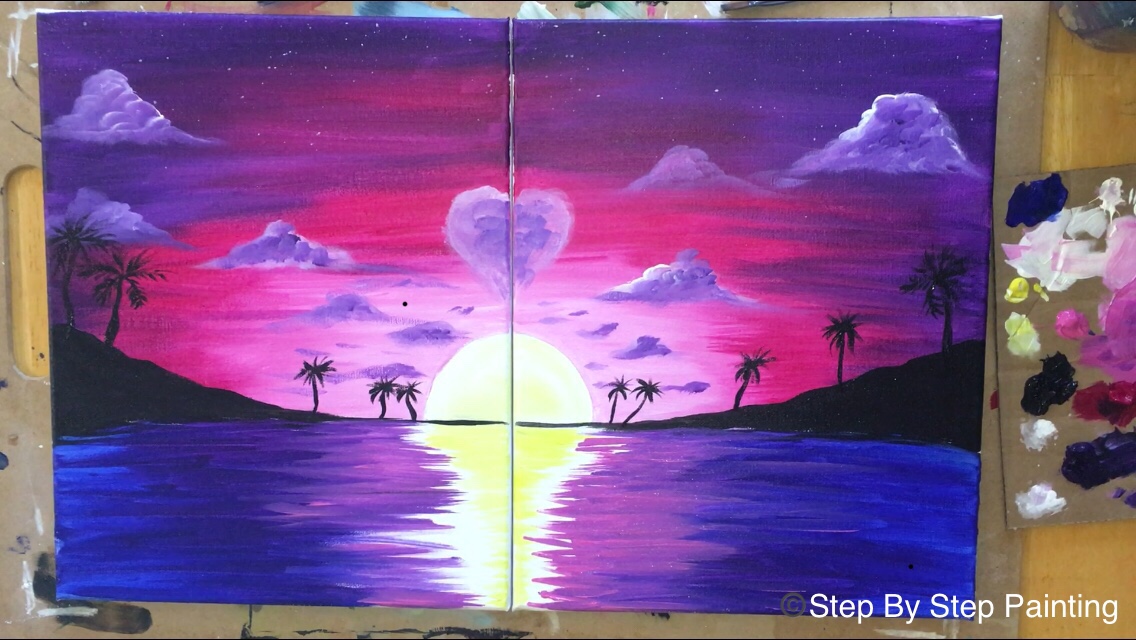
Then use the tip of your #12 brush on its side to make the thin strokes. Lightly paint some medium magenta lines over the yellow area. Only do this in a few strokes, you don’t want to cover that yellow area with too much pink! Remember that the yellow reflection area should be the shape of an upside down triangle. 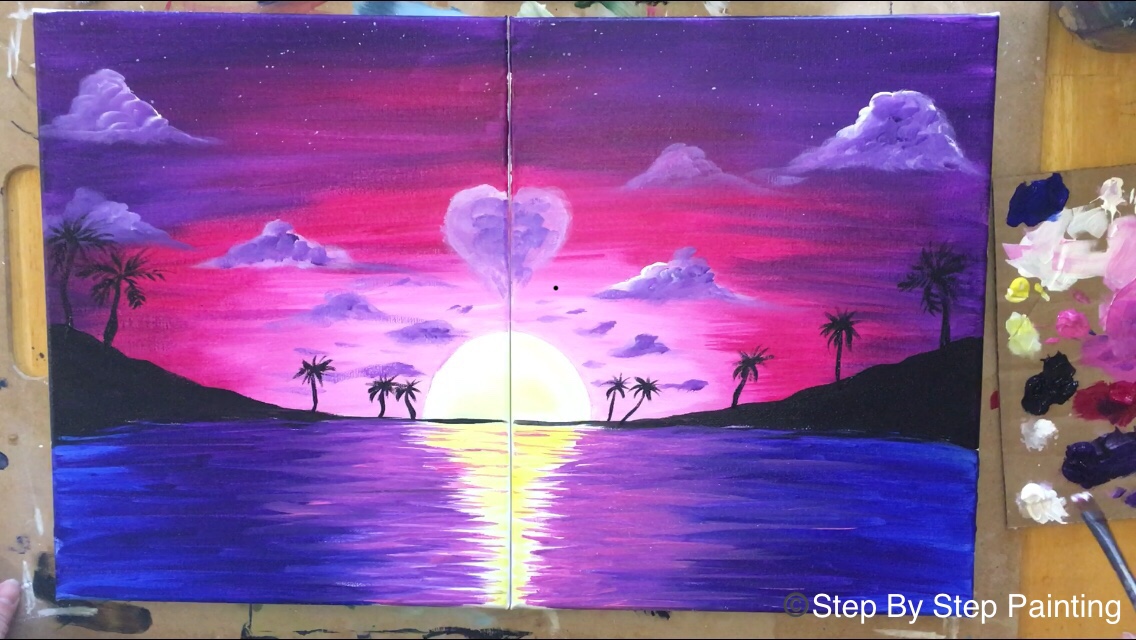
15. Paint the white reflection lines on the water
This is the part that makes the water look like it is “glistening”. Simply use a rinsed off and clean #12 brush. Dip it in titanium white and paint little white horizontal strokes on the water. Do this all throughout all areas of the water starting in the middle where the reflection of the sun is and working your way all throughout. Just be careful not to do too much white! All these strokes are relatively the same size.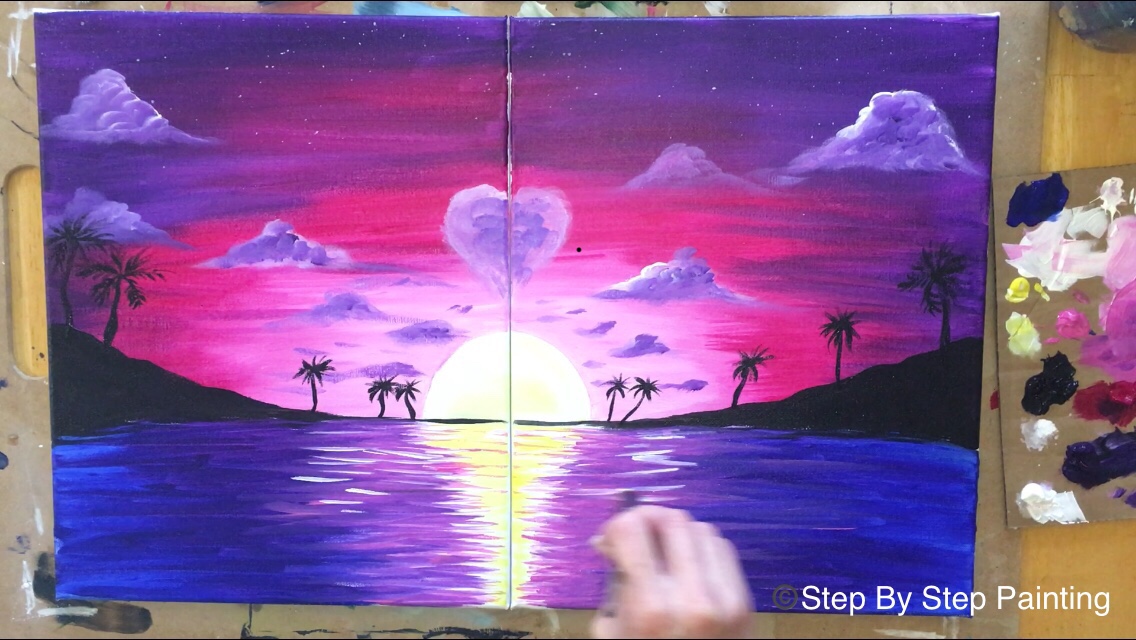
I did add a little bit of yellow into some of the lines in the center close to the yellow sun reflection area. 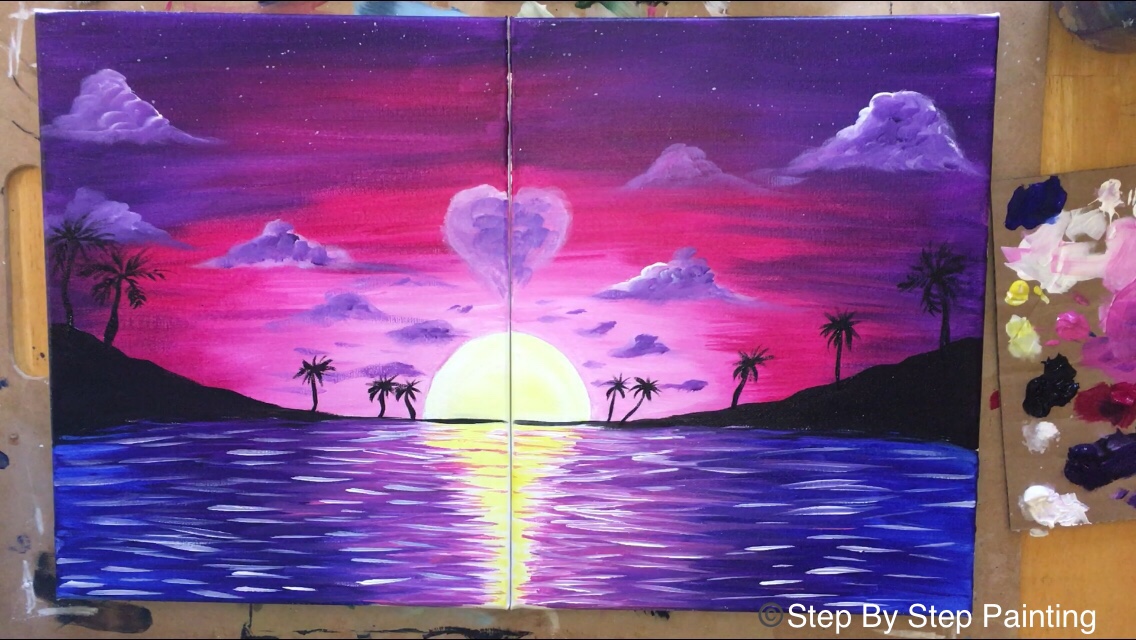
16. Optional: add a little bit of white in the land and palm tree shadows.
I did this with a #4 round brush and titanium white. Basically paint a little bit of white on one side of all the shadowy areas. This gives the trees and land a little bit of depth. 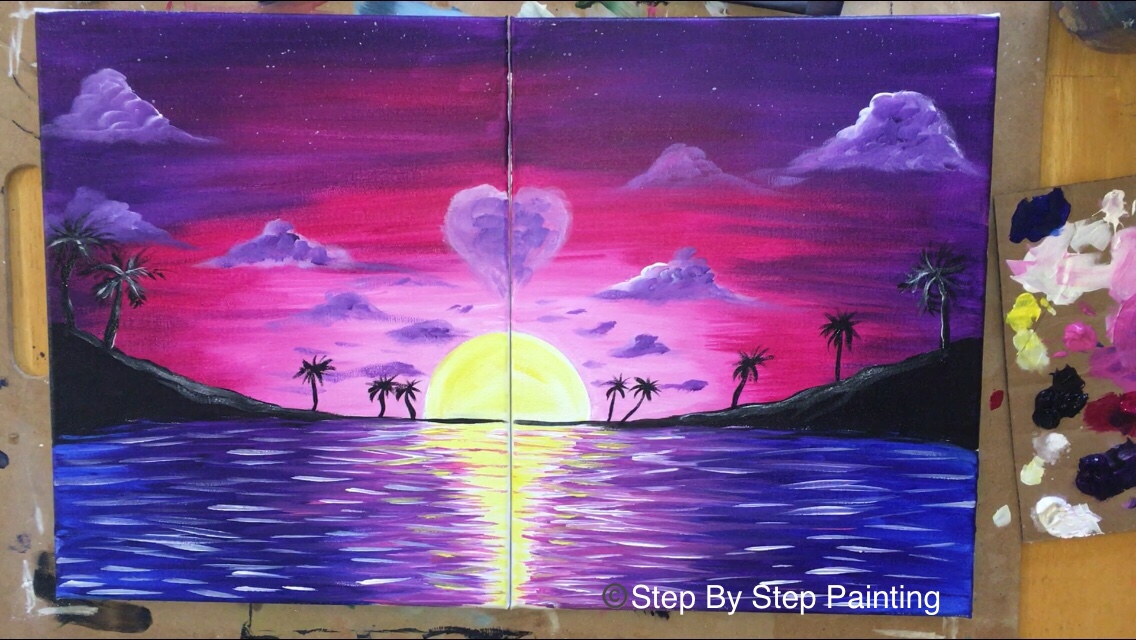
17. Paint the sailboat
This is also optional if you like the sailboat! I did mine right in the middle so that each canvas has half of the sailboat. While I do not have a traceable for this, you can easily find a silhouette of a sailboat to print out by searching for one on pixabay.com or google. Then just trace it onto the canvas. You can also sketch it out with pencil or chalk and fill it in. I was feeling confident so I just went at it free handed with a #4 round brush. 
Start by painting the bottom of the boat. Then the large sail on the right. 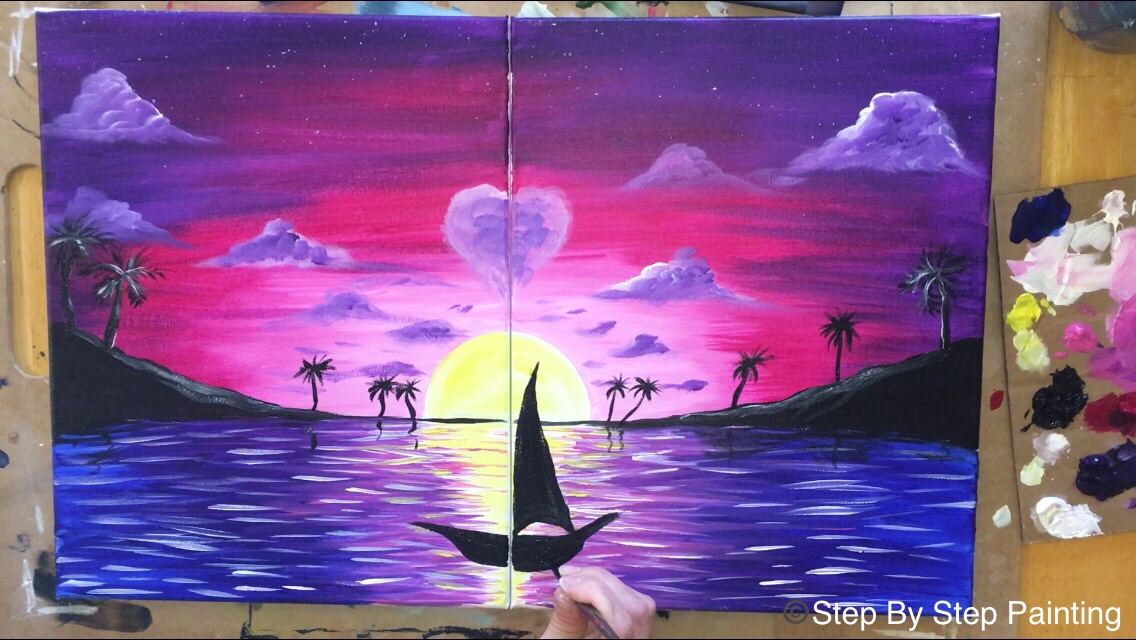
Then paint the smaller sail on the left. 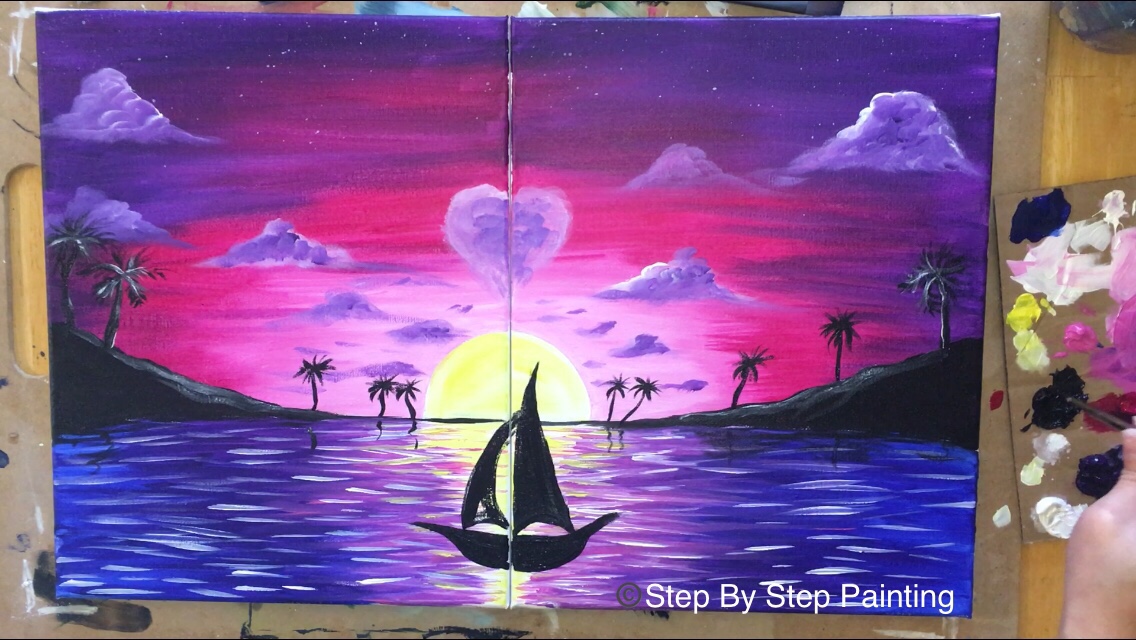
Finally, paint a few horizontal reflection lines with the mars black under the sailboat. 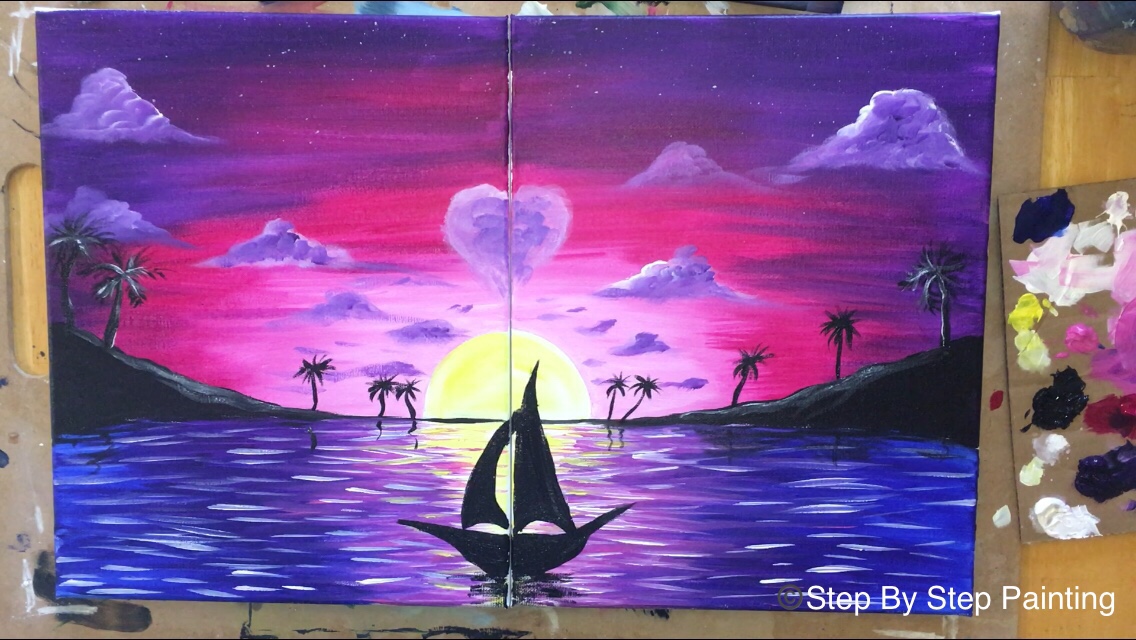
Finished
I hope you and your partner truly enjoyed painting together! I love seeing couple paintings because two different personalities tend to show through the work and then put together to form a whole masterpiece! Don’t forget to sign your work, show it off on social media and find a special place to hang it.
Share Your Art


What colors would be best to use if using Apple Barrel? We just finished your other couples’ painting and would love to do another!