
How To Paint Love Birds On A Branch

Would you like to save this?
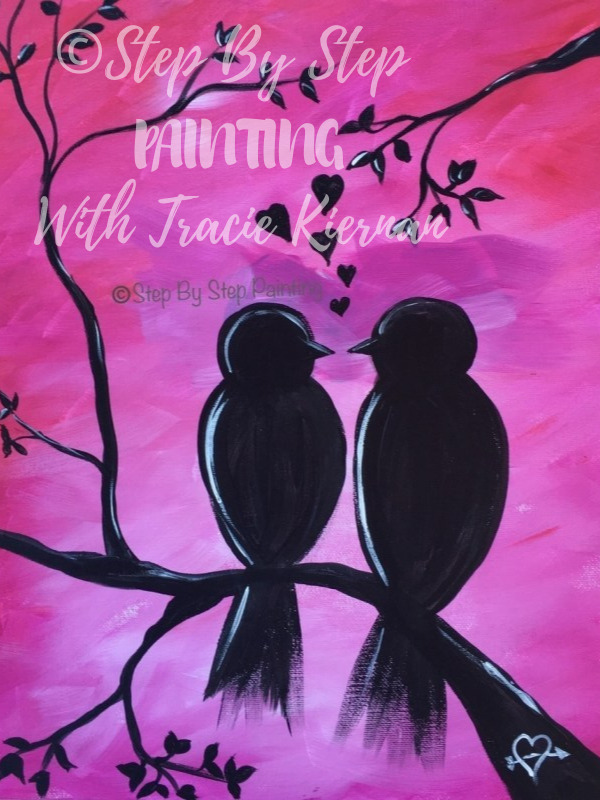
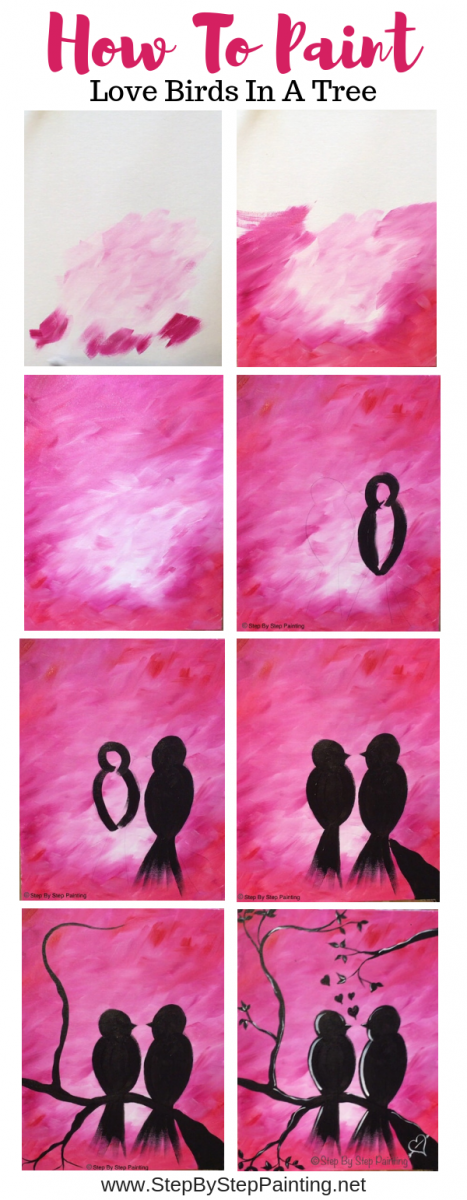
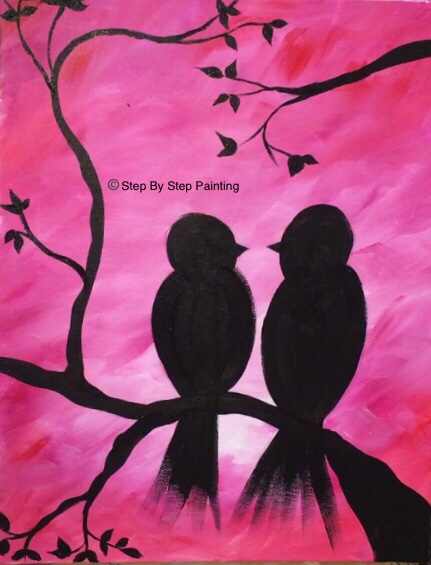
Learn how to paint this VERY easy, simple canvas painting of two love bird silhouettes on a branch. This step by step canvas painting tutorial will guide you through the steps. It makes a lovely Valentine’s Day theme painting and a great first painting if you’ve never painted with acrylics on canvas before. It’s also quite possible to divide this in half and make it a couple’s painting.
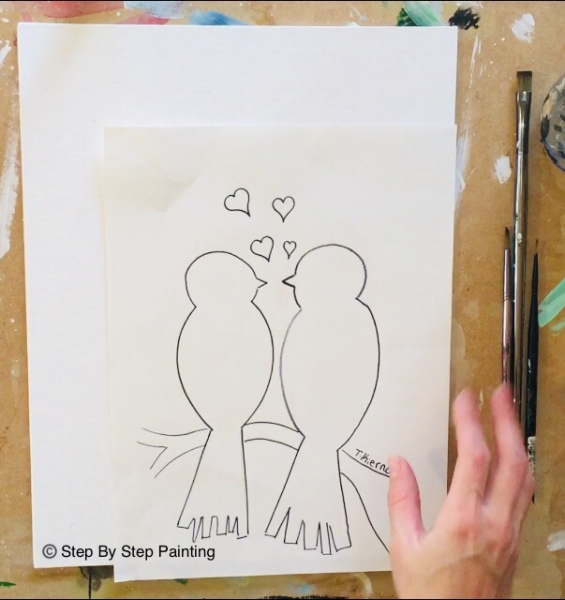
Also within this tutorial is a free traceable of the bird silhouette that you can just trace onto the canvas! No drawing skills (and no prior painting skills for that matter) are required to do this painting. Simply print and use graphite paper or another method of tracing it onto the canvas.
Play music while painting this!!!
For this painting, I highly recommend that you paint the background while listening to music. Turn on something that gives you “the feels”. The background is very expressive and when I listen to music, I tend to paint more expressively and freely! Try it, it’s very therapeutic! 
Hope you enjoy this easy painting! Do share your results on Facebook or on a Pinterest Pin! Happy painting!
How To Paint Love Birds On Branch

Materials
Basic Supplies
- Canvas 11" x 14"
- Acrylic Paint
- Brushes
- Traceable
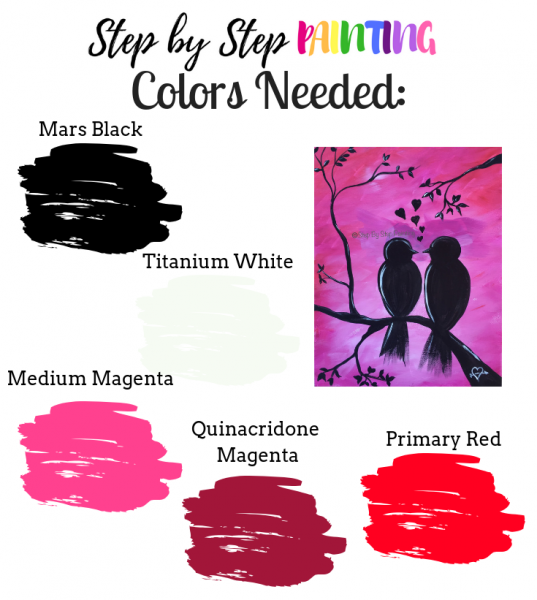
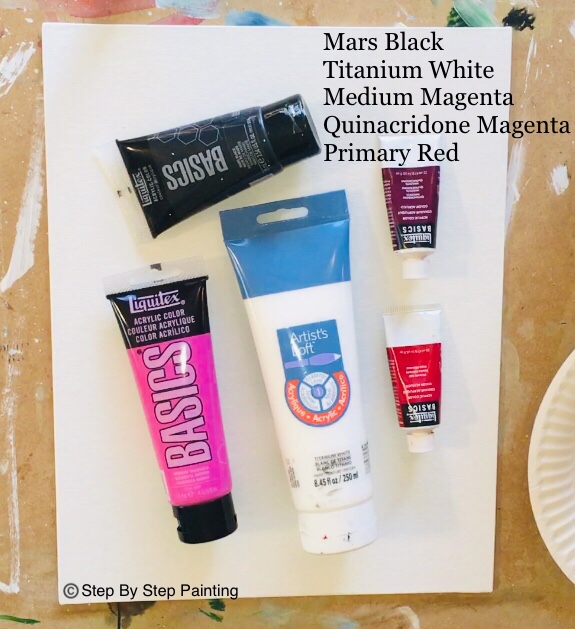
Colors
- Titanium White
- Mars Black
- Medium Magenta
- Quinacridone Magenta
- Primary Red
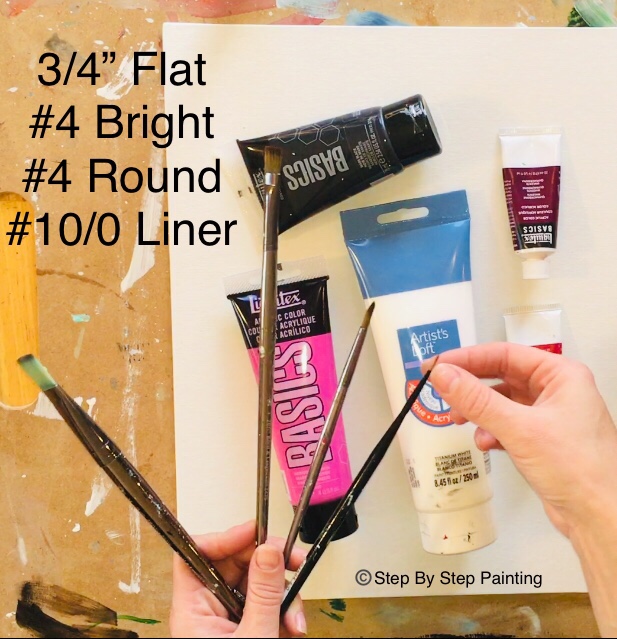
Brush Sizes
Instructions
- Paint the background with a combination of titanium white, medium magenta, quinacridone magenta and primary red
- Let the background dry
- Transfer or free draw the bird silhouettes
- Paint the bird silhouettes in with mars black
- Paint the tree branches
- Paint the leaves with a 10/0 liner
- Paint hearts with a liner
- Add white highlights to the silhouettes
Recommended Products
As an Amazon Associate, Michaels Affiliate and a member of other affiliate programs, I earn from qualifying purchases.
Brushes:
Traceable:
Go to Traceable Library for the PDF download.

Directions At A Glance:

Video:
Directions:
1. Paint the background
Let’s talk about the background for a second because this is an important part of this painting! I call this an expressive background. It has two different magentas, white and a red in it. It starts out light in the lower middle (behind where the bird silhouettes will be) and it gets slightly darker along the top and sides of the canvas. If you look at the strokes, they are going in angles and they are NOT blended all the way to one color. I HIGHLY recommend that you listen to music when painting this. Music helps us feel and paint more expressively. 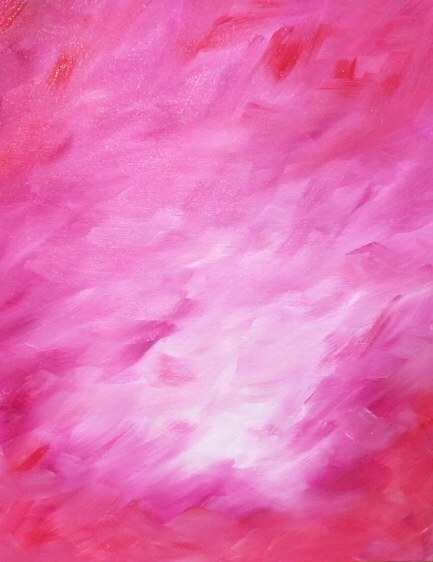
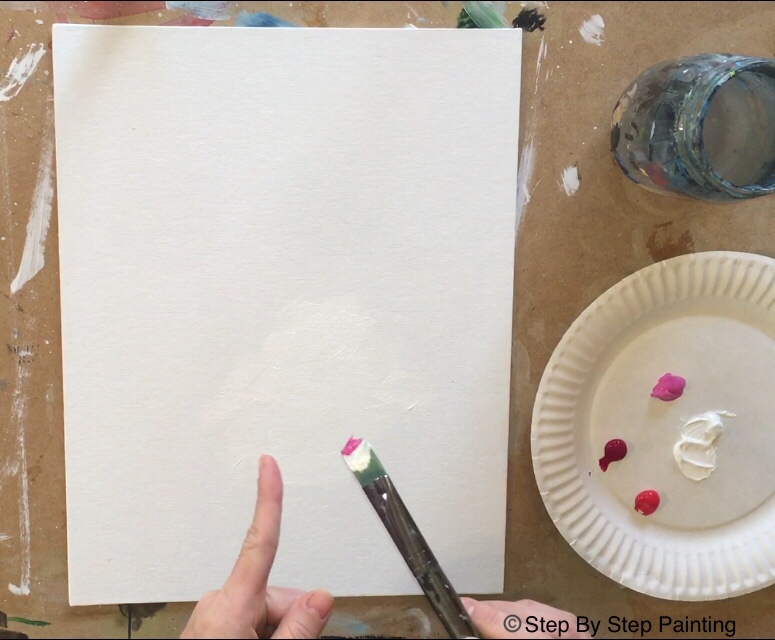
Get your colors ready on your palette (all except mars black). You’ll also need a 3/4″ flat brush dipped in water and patted dry. 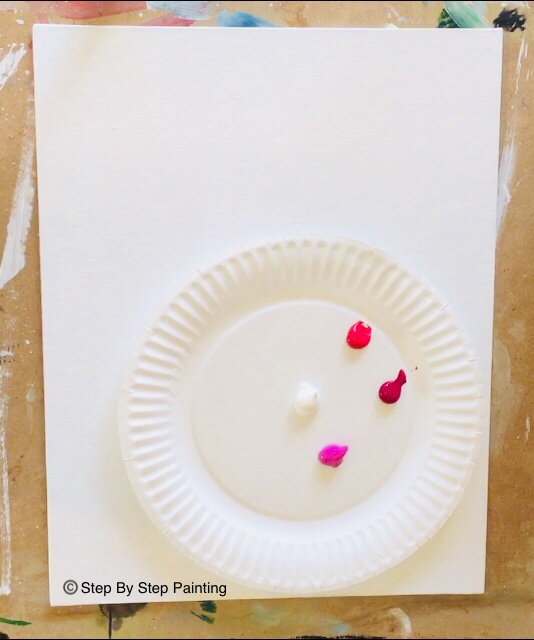
Dip your 3/4″ flat brush in the white and start painting in the lower middle area of the canvas. Note: the background is purposely brighter in the area where the birds will be drawn/painted. Paint “X strokes” in this lower middle area. Basically, “X strokes” are when you “flip flop” the brush to apply expressive strokes to the canvas (much like painting a bunch of thick X’s everywhere). 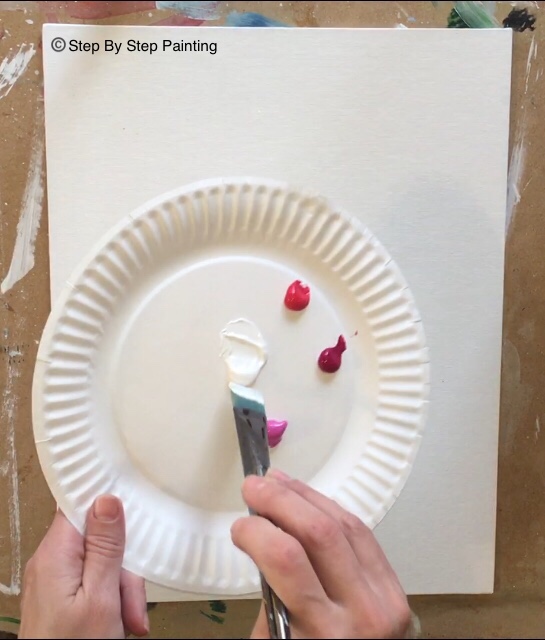
See below where my “blob” of white is. Leave this area wet and don’t let it dry!
Don’t rinse your brush! Dip it in the medium magenta and start painting.
As you apply the paint, let the magenta blend with the white. Again, “flip flop” the brush on the canvas to get these colors to blend but don’t blend it all the way. If it seems too dark, you may wish to add more titanium white to your brush. 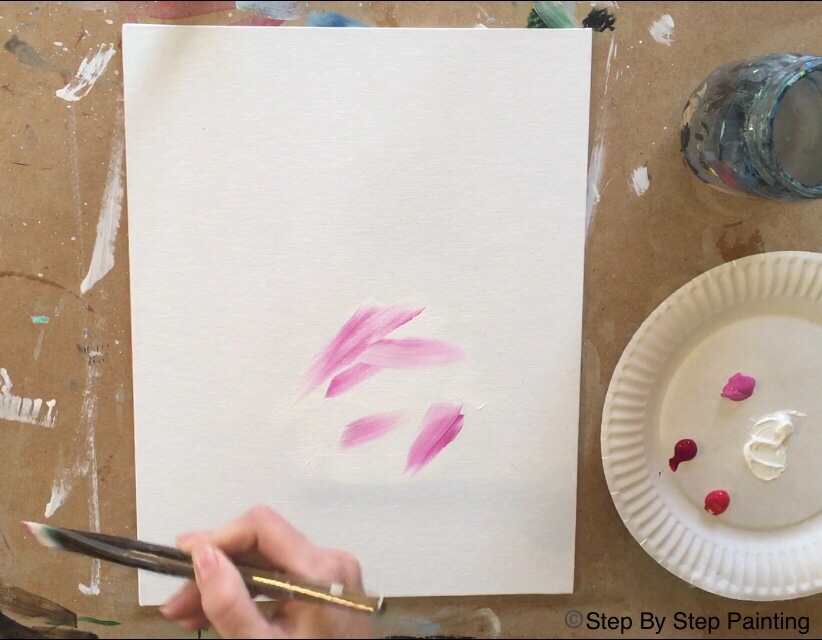
This “blob” should turn a light pink. Remember, we’re not trying to blend it all the way. We are being expressive and we want to see those strokes!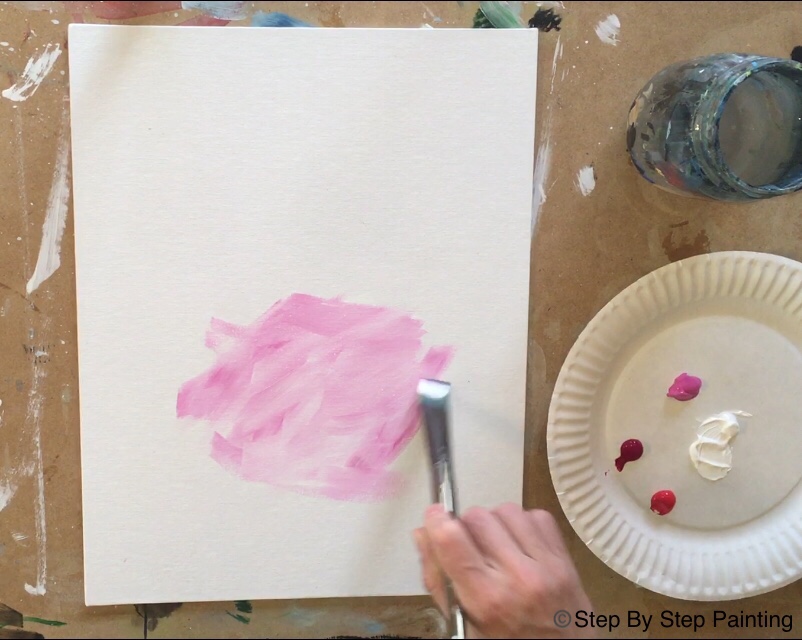
As you work your way out from the middle, this pink background will need to get gradually darker. Dip your brush in quinacridone magenta (without rinsing it) and apply it to the canvas (same style x strokes). Let that quinacridone magenta blend with the medium magenta/titanium white combo that is on the canvas. If you need to add more medium magenta to get the quinacridone magenta to blend, then you may do that. 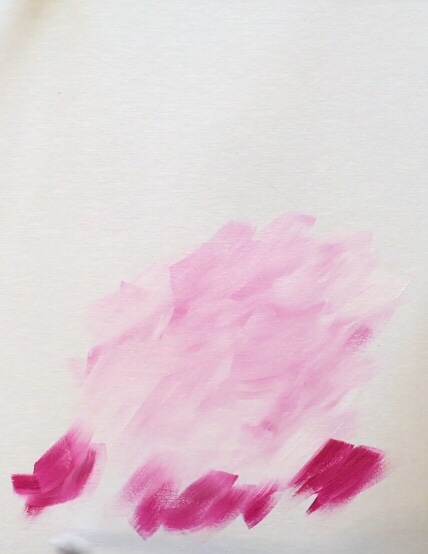
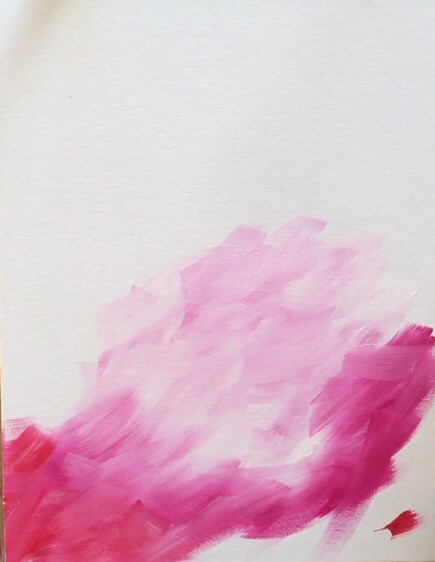
On the far edges and corners of this painting, I used “primary red”. To apply the primary red, dip your brush into that color (no rinsing) and apply the red using the same style strokes. Remember, express yourself with this background! Don’t worry about messing it up or perfection! Feel the painting, don’t think too hard!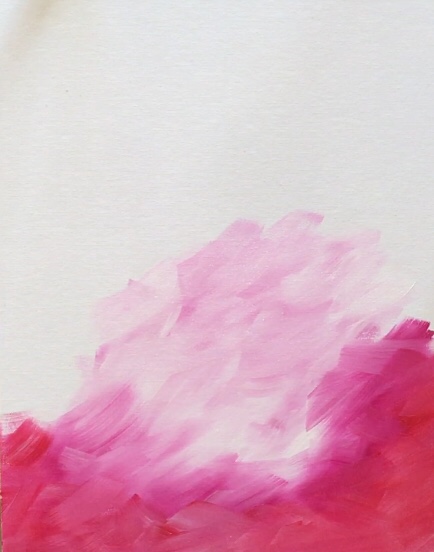
Keep applying this technique all the way up the canvas. Remember, light in the middle and darker on the sides. You may re-load your brush in medium magenta and quinacridone magenta. You can also add more white if you feel the painting needs more white in some places. 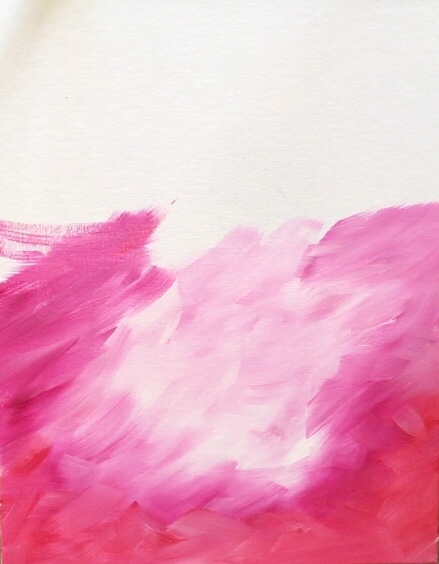
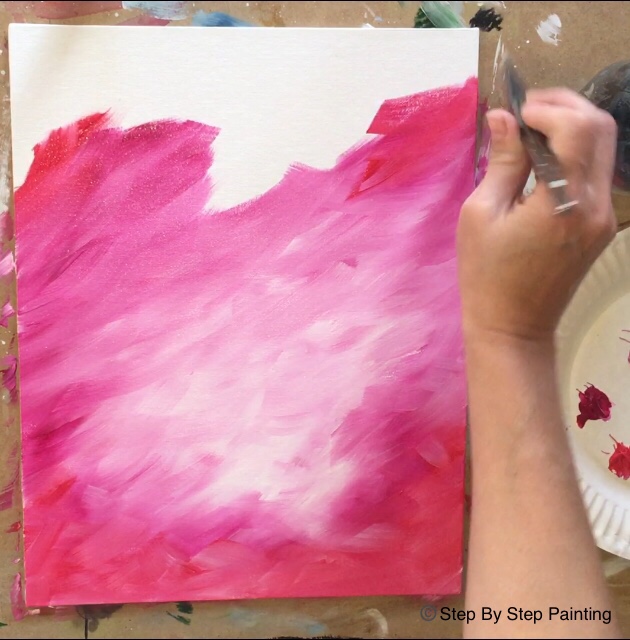
As you fill up the canvas, take a step back and look at your background. If you feel like adding more of a certain color, you can do that while the painting is still wet. Just be careful not to over blend the colors! 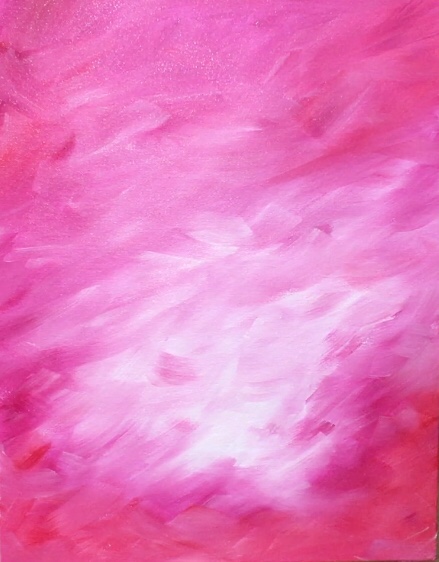
2. Wait for the canvas to completely dry!
Now is a time to take a break. You will need to allow everything to dry (for me it took about 20 minutes) before you can continue on with the bird silhouette.
3. Draw or trace the bird onto the canvas.
While this is a fairly easy drawing, you are welcome to use my traceable! Simply go to my traceable library and print out the PDF (or jpeg version). The design was traced on the lower right hand corner of the canvas. Place a sheet of graphite paper underneath the traceable or scribble with pencil on the back and then trace over the lines. 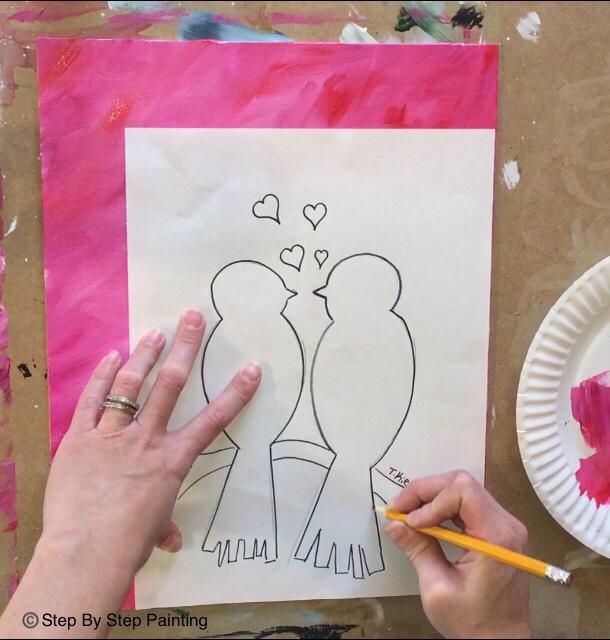
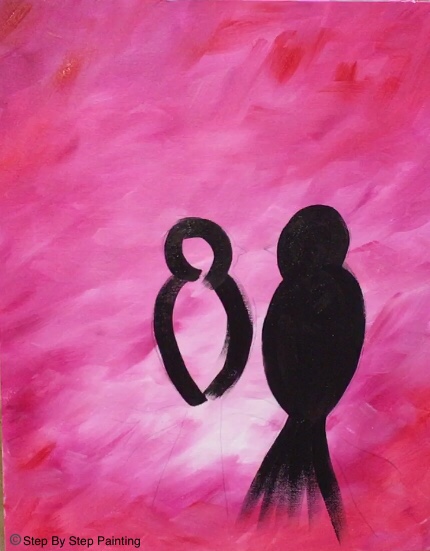
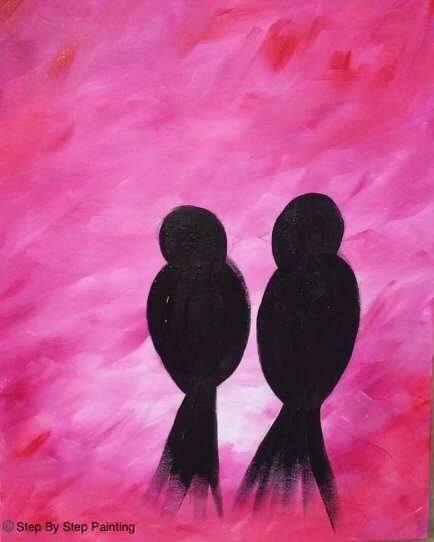
4. Paint the birds first
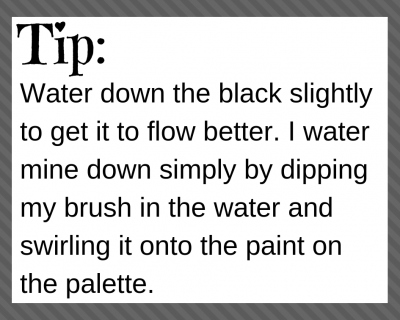
I found it easiest to paint the birds first and then the tree. Use a #4 flat brush and mars black (slightly watered down with a few drops of water). When you slightly water down black paint if flows better for painting silhouettes in! 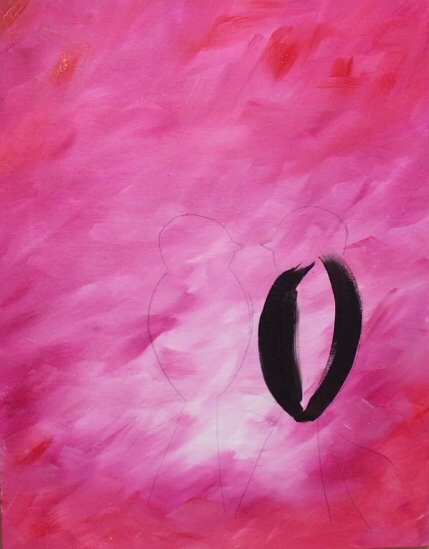
To get the “dry bursh style” of the bird tails, let your brush be slightly dry. Try wiping off some excess paint. Drag your brush with one long stroke and let it dry out at the end. This creates a “translucent” look on the tips of the bird tails. 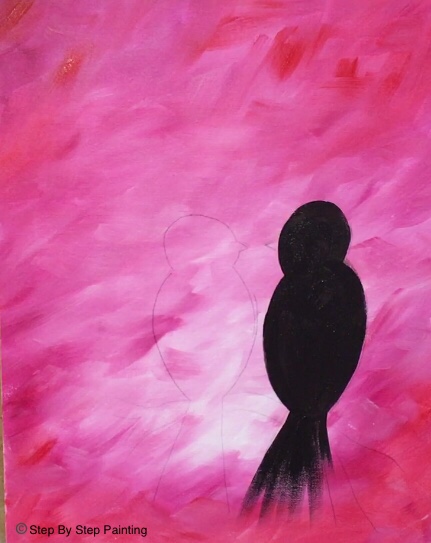
For the bird beaks, I used my 10/0 liner because it is a smaller area to paint in. 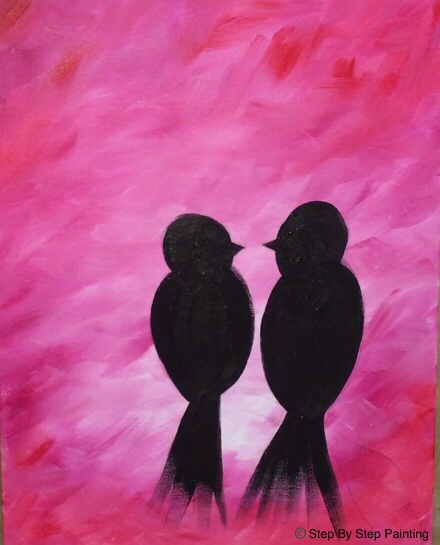
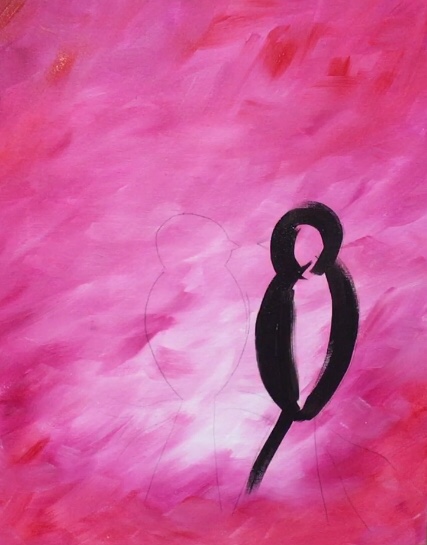
5. Paint the branches of the tree.
Use Mars Black and a #4 Bright brush. Start on the lower right corner and paint a thick black, branch going in a triangular shape. Towards the bottom of the bird on the right. 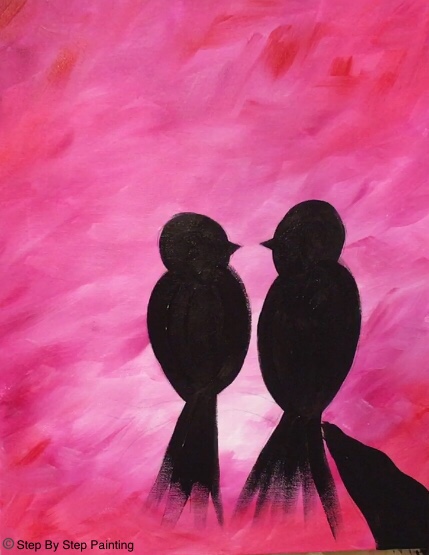
The branch gets thinner as it goes horizontally. Note: the traceable has parts of the branches already drawn for you and you can use that as a guide to paint the branches. Allow the branch to go under the birds so it looks like they are perched. 
Then paint some thinner branches stemming off towards the bottom of the canvas. I recommend that you switch to the 10/0 liner for the really thin branches. 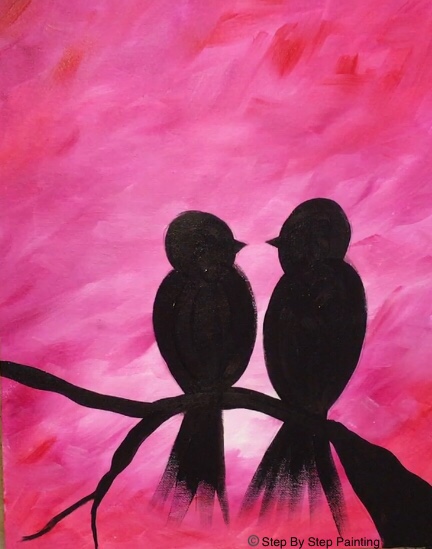
Next paint a branch that goes up to almost the top of the canvas. I used my #4 bright for this and then twisted it to it’s side to make the line get thinner. You can also switch to the #4 round or 10/0 liner to get the branch to become thinner. 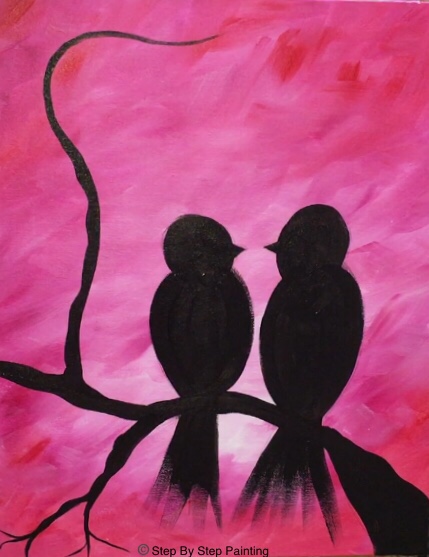
Next I painted a branch coming from the right side of the painting. I used my #4 bright for this and the 10/0 liner to get the branches to be thinner. 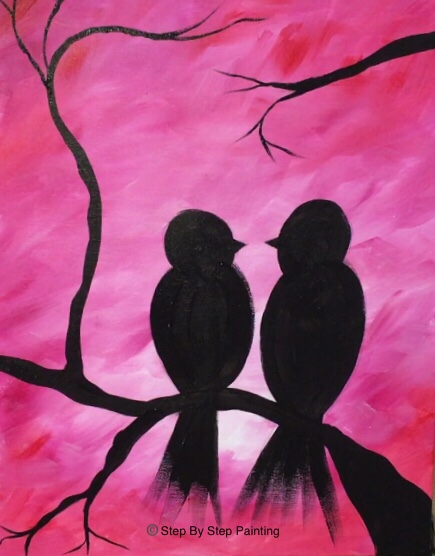
6. Paint the leaves
Use a 10/0 liner for this (or the smallest round brush you have). Paint the leaves on the tips of the branches simply by drawing the little leaf with your brush and then filling it in with black.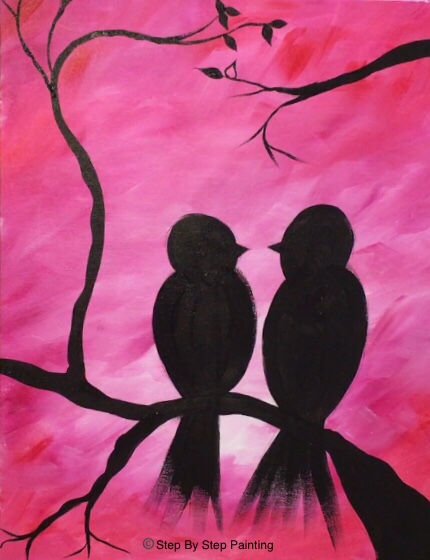
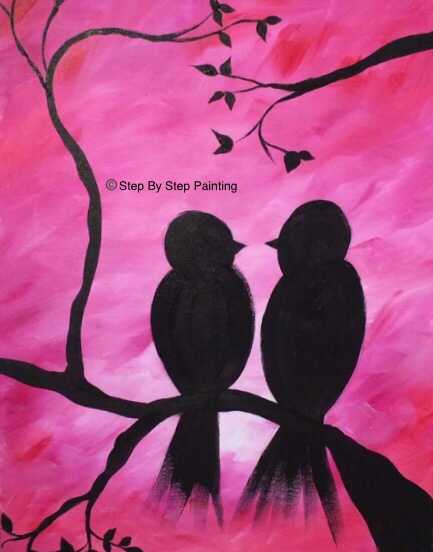
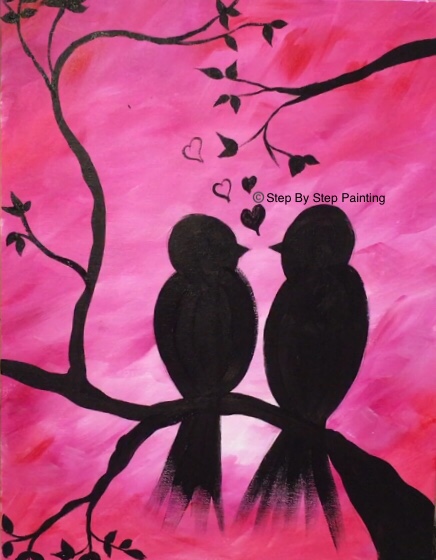
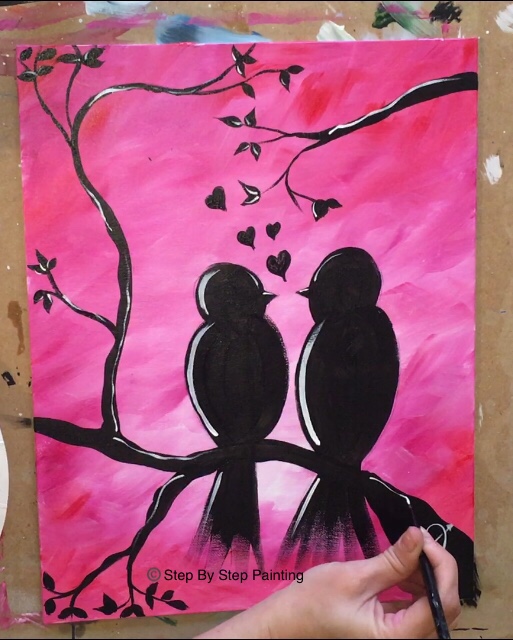
7. Paint hearts
Next use your 10/0 liner to paint little hearts above the love birds.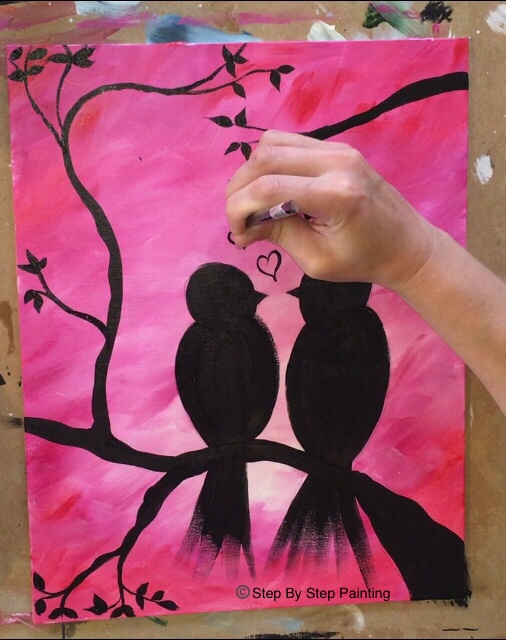
8. Optional: add white highlight effect to the silhouette
I like doing this to my silhouettes. I think it adds more character and interest to a silhouette painting. You can certainly leave out the white. Basically, I used my #4 round and the color titanium white. I added white lines to some of the edges of the birds and branches. Make sure that black is dry before doing this! For the leaves, I used my 10/0 liner to make smaller lines on the edges. 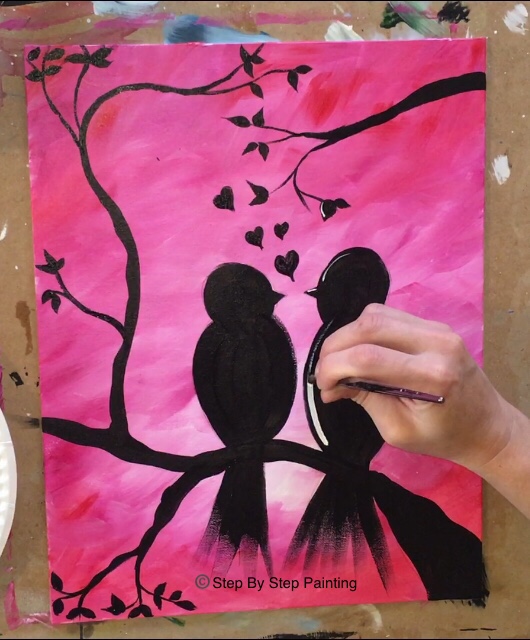
For the white heart on the tree trunk in the lower right, I used a 10/0 liner. 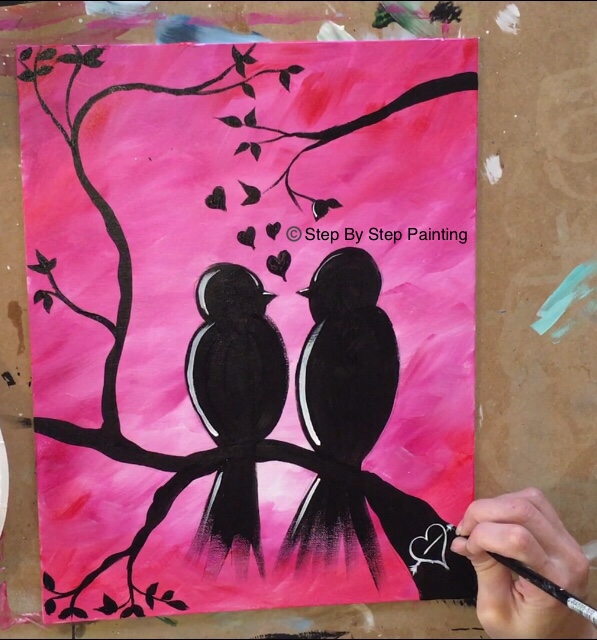
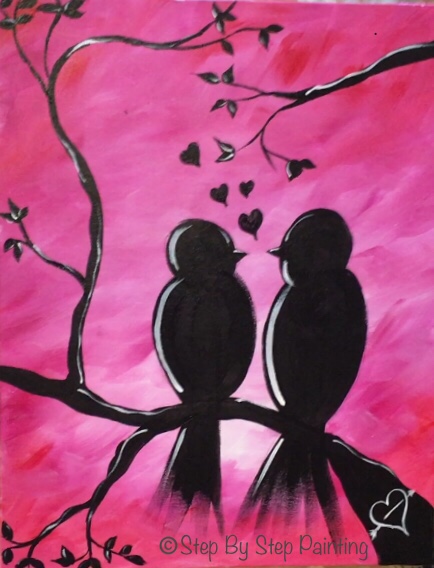
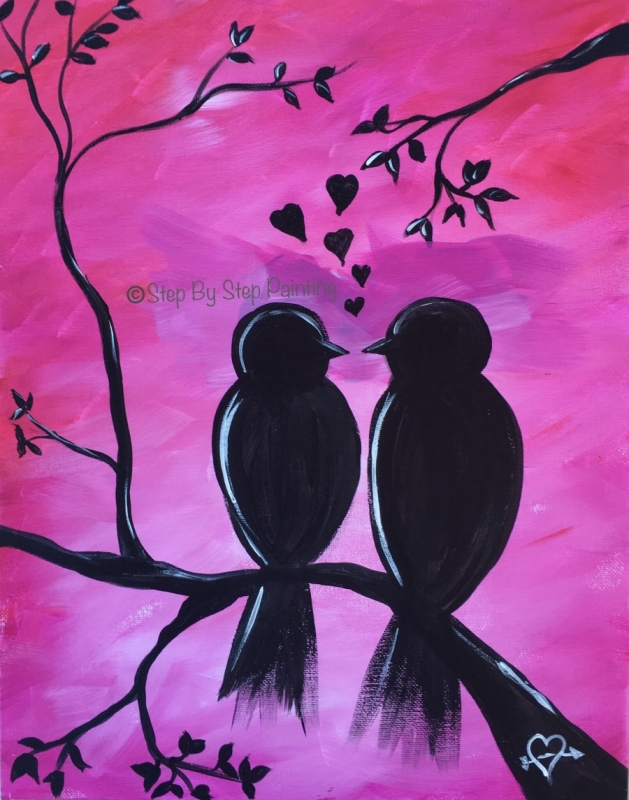
Finished!
I love doing simple canvas paintings with silhouettes! I love the pink glowing background and I can’t wait to hang this up for Valentine’s day! Don’t forget to sign your name and show it off! Share it on the Facebook Page!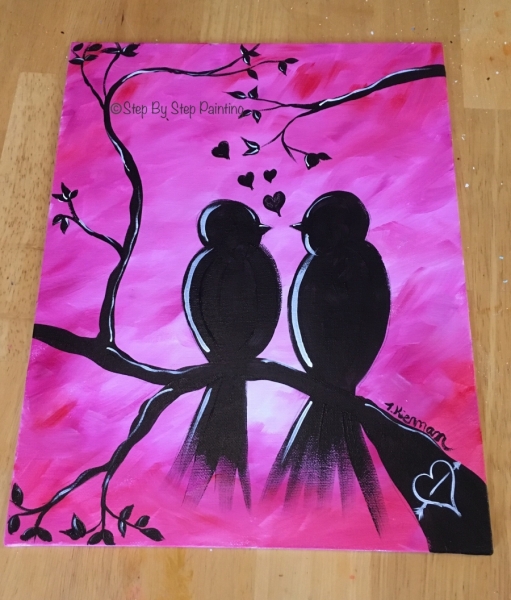


Hi there! Thank you so much for your wonderful Blog! I am so excited to get started with the family on some of these! I have a question on a painting I thought I saw last month. My daughter is a huge Frozen fan and there was n Olaf painting that looked easy that I don’t see on your list anymore. Would you mind sharing? Unless of course I am just imagining things! LOL
Hi Jeannette! Thank you! Unfortunately I do not have an Olaf Frozen Painting and did not do one in the past either ☹️ I’m sorry.
Ok, no worries! Thank you for the quick response!
You’re welcome!
i really enjoy all your painting thank you so much, your videos and detailed steps are so helpful and awesome! ??
Thanks Kristina!
First, I want to thank you so very much for this site!!! It is getting me back in touch with my creative side and I’m really learning my different brushes!
I use Apple Barrel, mostly because it’s 50 cents a bottle. However, I’ve tried to figure out what shade compares to the quinacridone magenta and just can’t figure it out! HELP! I would greatly appreciate it because I’m painting this as an anniversary present to my husband and I have way too much red!
Hi Sunshine! You’re welcome ?. Quinacridone Magenta is a dark magenta. I am judging based on the picture of the colors on the Apple Barrel website and not actually having the color in person but…these colors are what I would recommend: “cranberry” or “plum kiss”.
Thank you so much! Cranberry seems a little more red than magenta, so I will have to find plum kiss!
Hope plum kiss works out!!
Thank you so much! This has been so much fun.
You’re welcome Wendy!
Hi Tracie! I was wondering if I could paint this just with reds for the background instead of red and pink? Or would it turn pink when I blend the white in the middle? Thanks!
You can do this with reds! It will turn to light right if you used a red and not so much pink.
Okay, thanks!
Hi Tracie,
Thank you so much for this site. I am really learning a lot from you and I appreciate your detailing .
You are amazing teacher, regards from Roamania!
Valeria
You’re welcome Valeria!
Thank you for this wonderful step by step! I was wondering how could I divide this to make t into a couple’s painting? Like would I use the same size 11 x 14 Canvas to divide in half?