

Galaxy Painting
 Learn how to create your very own galaxy painting with acrylics!
This step by step painting tutorial will guide you through the process and techniques of rendering the entire galaxy on any size canvas or surface!
There are two parts to this tutorial. Part one is how to paint the galaxy background.

Part two is how to paint the planets after you have done the galaxy painting.
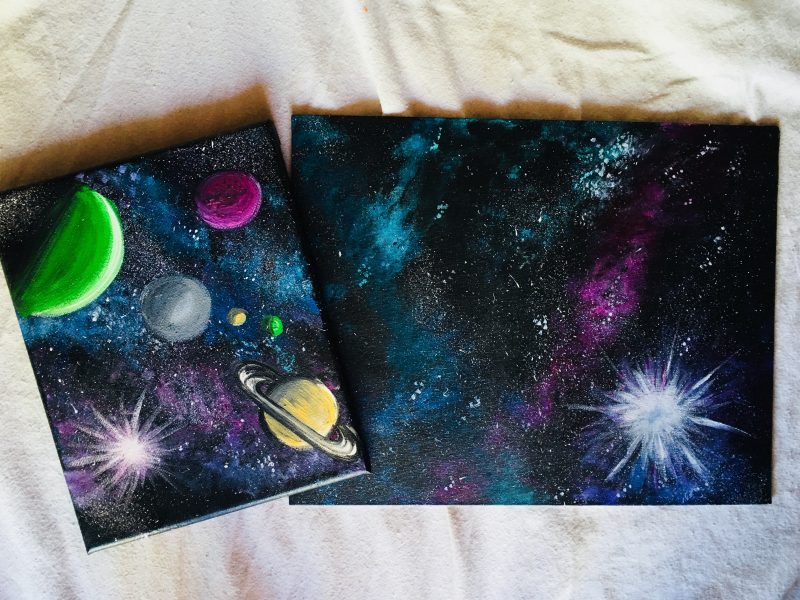
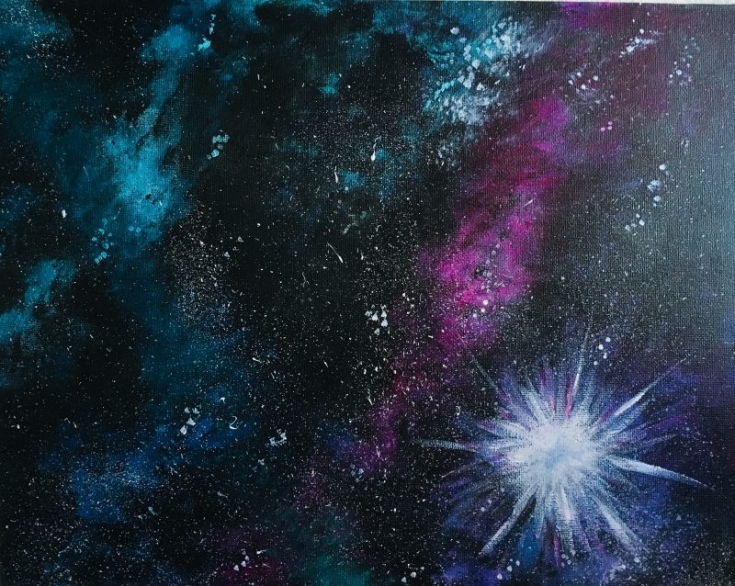
I used a sponge for 80% of this galaxy painting. The sponge helps to create the blurred effect you see with the colored paint.

![]()
I also did this on an 11 x 14 canvas and an 8 x 10 canvas. As stated above, you can do this on any size.
Enjoy this tutorial! Happy painting artists!
My Other Galaxy Painting Tutorials:
Materials:
How To Paint Galaxy Space With Acrylics
This tutorial will show you how to do the sponge painting technique to render an acrylic galaxy painting.
Materials
Colors
- Quinacridone Magenta
- Deep Violet
- Bright Aqua Green
- Turquoise
- Cerulean Blue
- Titanium White
- Mars Black
Brushes
- 3/4" Flat or any large brush to paint your surface solid black
- #0 Round or the smallest round brush you have
- Any synthetic or natural sponge
Instructions
- Paint your surface black using a large flat brush.
- Load your sponge in both magenta and white. Use only a tiny bit of paint on the sponge.
- Paint a diagonal strip across the canvas.
- Wipe off excess paint off the sponge.
- Blur the paint by sponging over the colors applied to the canvas.
- Load your sponge (different area) in deep violet and white.
- Repeat the sponging and blurring technique in a different area of the canvas.
- Repeat the sponging technique for cerulean blue and white and sponge a different area of the canvas.
- Repeat the technique for bright aqua green.
- To dim the colors, load you sponge in a tiny bit of mars black (only a little is needed as less is more).
- Paint the black over areas of the canvas to allow the colors to dim.
- Repeat with more colors of the sponging technique after you have dimmed the first layer of color.
- Use a toothbrush to splatter white stars over the colors.
- Use a tiny round brush to paint brighter stars.
- Paint a starburst (if desired)
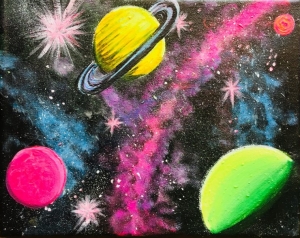
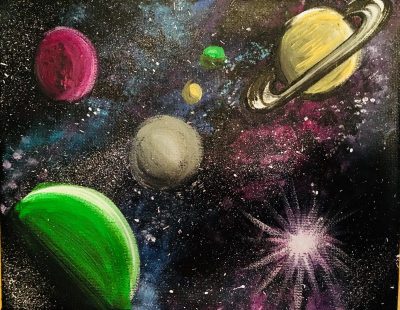
- Paint planets (if desired)
Galaxy Painting Colors
When painting a galaxy, you’ll need to choose colors other than just black and white.
I chose shades of pink, blue and purple.
Below are suggestions, however, you can chose similar shades or omit a few of the colors depending on what color preferences you have for your galaxy painting.
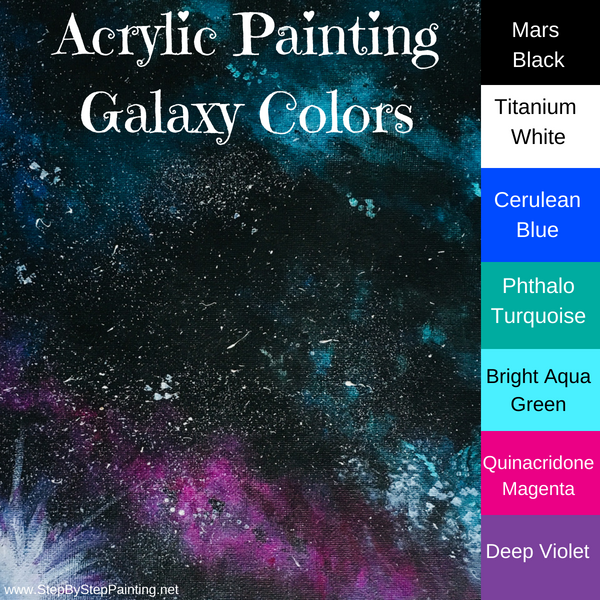
I do recommend that you limit your palette as much as possible so it doesn’t end up looking like a rainbow.
I selected three colors in the “blues” category: cerulean blue, turquoise and bright aqua green.
And I selected two colors in the “purples” category: quinacridone magenta & deep violet.
Black and white are essential (for obvious reasons).
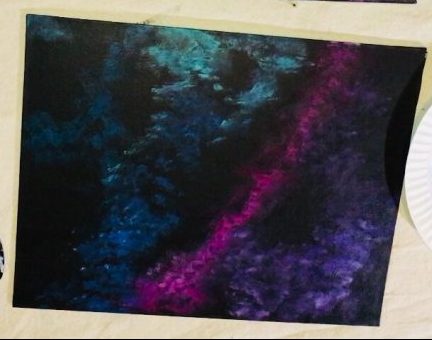
Tools For Your Galaxy Painting
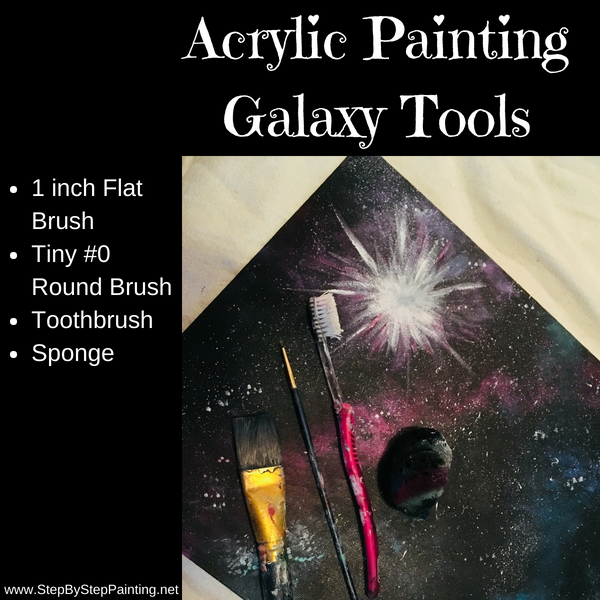
You really don’t need anything special to paint a galaxy! I think the most essential tool you’ll need for this technique is a sponge.
It can be any sponge. I’ve even cut up a dollar store bath sponge before and used that!
I also used two different size brushes. One was a 1 inch flat brush (or 3/4″ flat) and the other was a tiny #0 round brush.
The large brush was just to paint the entire canvas black. The small brush was to make bigger looking stars.
Finally I used an old toothbrush! This is to splatter those very fine white dots that resemble stars.
If you don’t want to use a toothbrush, you can also use any thick shaped brush to splatter paint or get a special splatter paint brush especially designed for this technique.

![]()
Directions At A Glance:
Galaxy Painting Video:
Step By Step Directions:
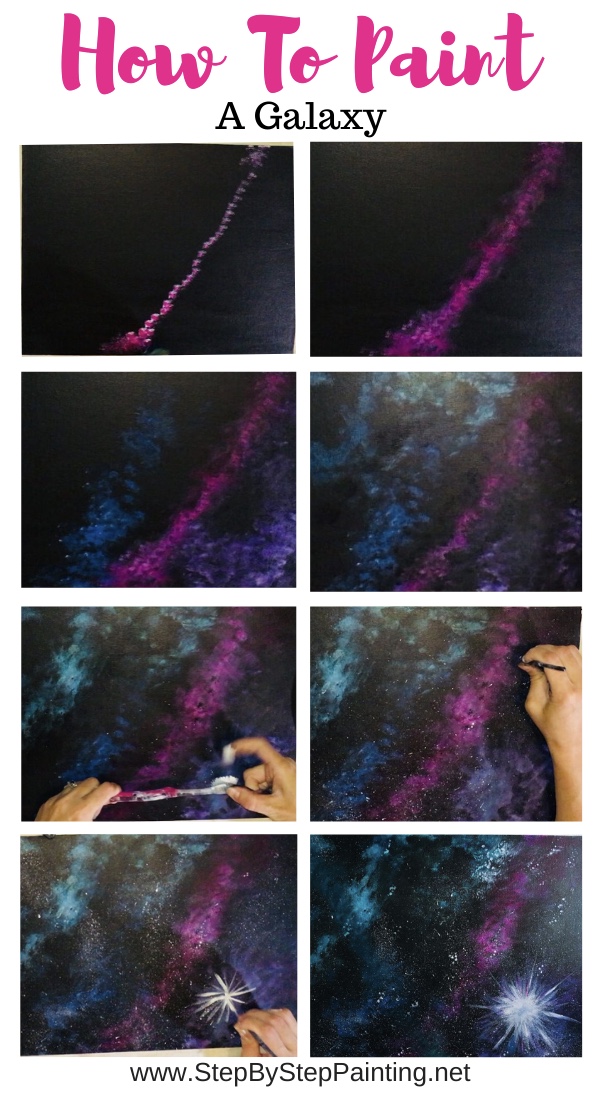
1. Paint your canvas or surface area black.
Use any large brush to do this step. I used mars black in this demonstrations, however, you can use any shade of black to fill your canvas.
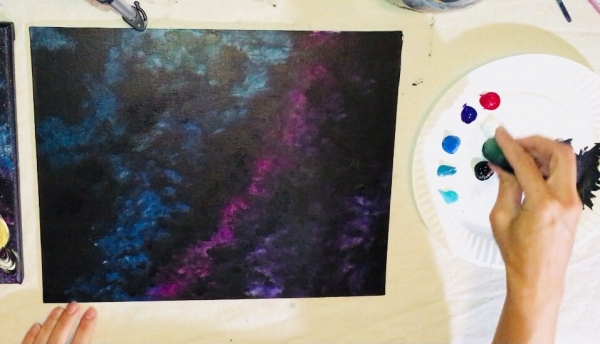
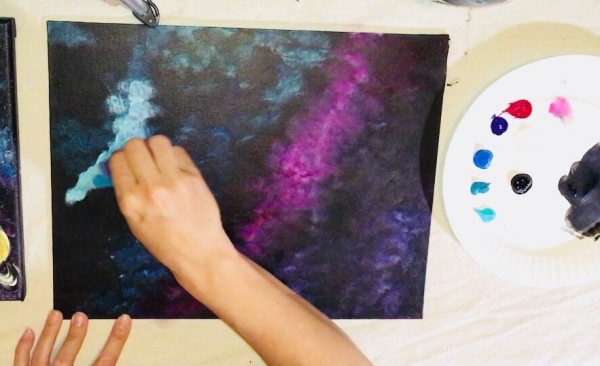
2. Use a sponge to paint magenta and white.
Dip your sponge in quinacridone magenta and a little bit of white.
With this technique, less is more. Don’t overload your brush. You can also try loading and then dabbing it elsewhere to unload some paint off the sponge.
Paint a diagonal line.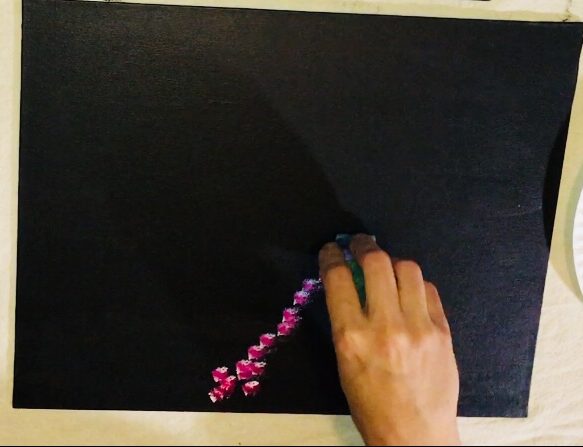
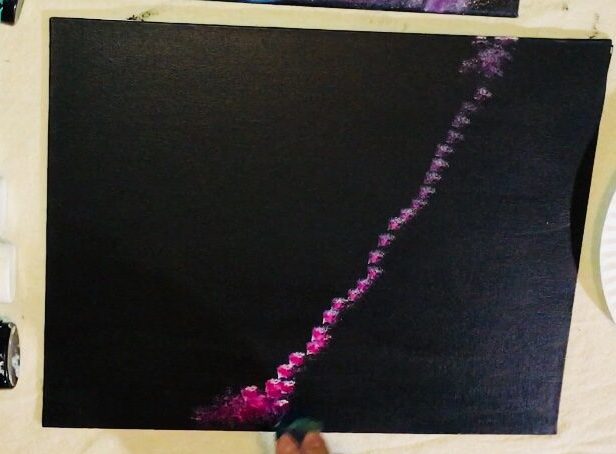
3. Dim/ blend the paint back into the black background
Use a dry area of the sponge (no paint) and paint over the area you had already painted. This helps to “dim” the color.
It should look blurry and darker.
Tip: it helps to press and twist the sponge.
It’s almost like you’re wiping off the color with the dry part of the sponge to get it to be dimmer.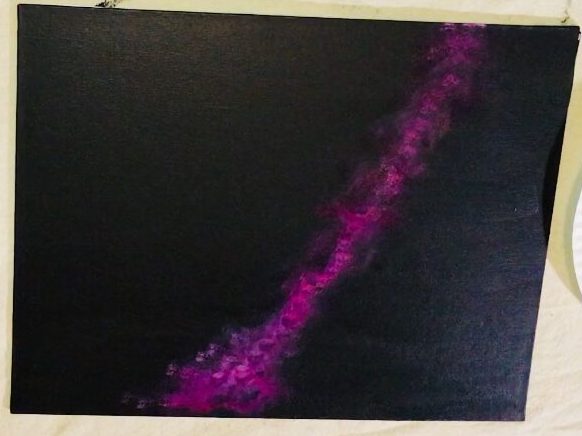
4. Use the sponge to paint deep violet and white.
Now sponge an area in the lower right corner with deep violet and a little bit of white.
Repeat the dimming technique by sponging it over with a dry part of your sponge. 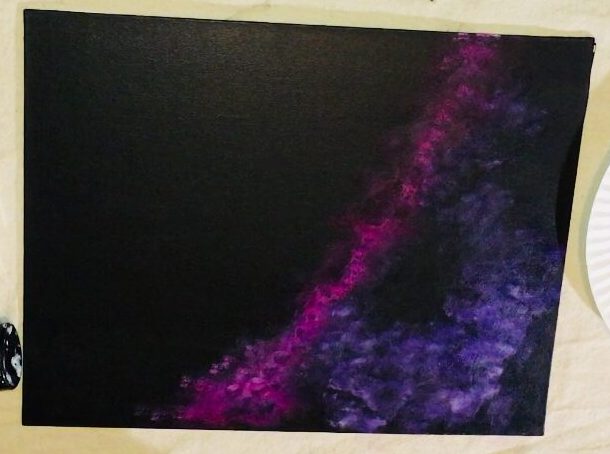
5. Use the sponge to paint cerulean blue hue, and white.
Repeat the same technique to sponge another area of cerulean blue and white.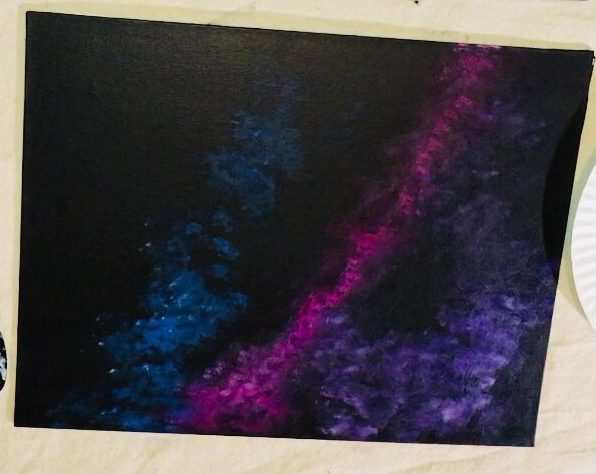
6. Sponge an area of bright aqua green.
Repeat the same technique. Notice the clusters of color look almost like clouds.
They all have the same technique but their shapes, sizes and intensity of color vary.
7. Sponge black lightly over all your colors!
This is the part that will make the colors blend more into the background.
You CAN essentially skip this step and fast forward to the star part but I like to do this technique to create more depth in the sky.
Basically I sponged black over the colors in clusters.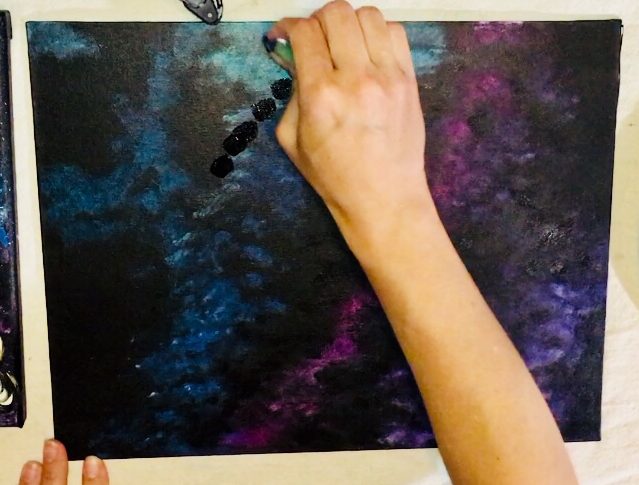
Load your brush in a TINY bit of black. Less is more because black easily can take over if you load too much.
You don’t want to cover all the colors. Just sponge enough to dim the colors.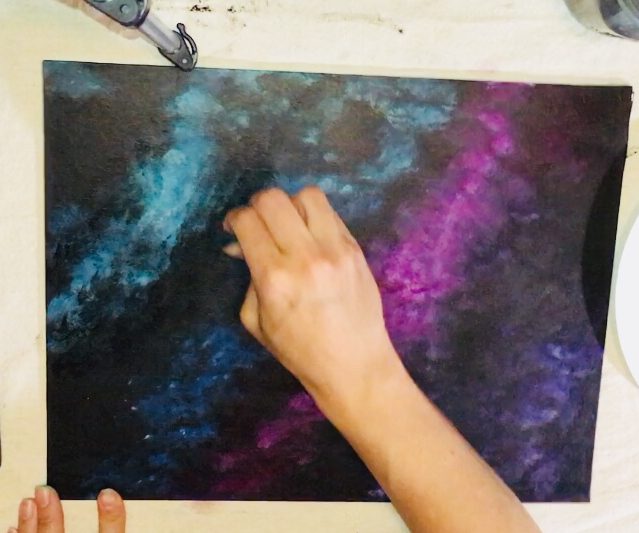
Be careful & dab lightly.
Tip: wait for your painting to dry a bit before proceeding.
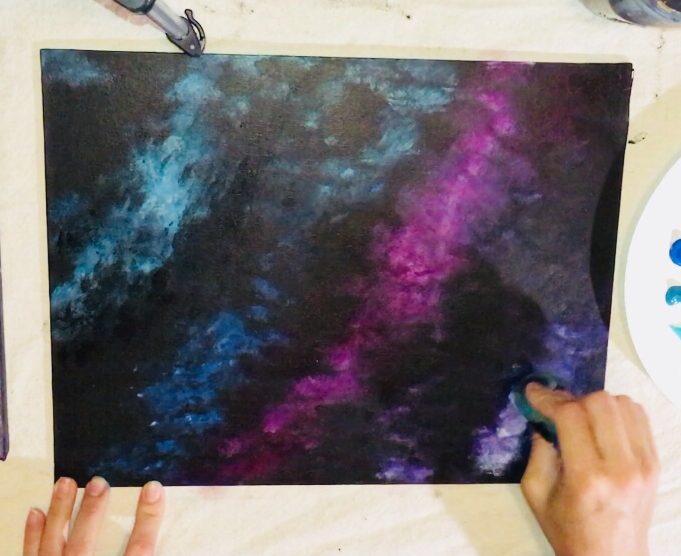
8. Apply more layers of color!
Huh? So we dimmed the colors now we are adding more on top? I’m not crazy!
The reason why I did this is because this painting has dimension!
Galaxies have a lot of dimension! In order for colors to be in the distance, they have to be dim so we applied black over that!
Now we are adding brighter colors on top! Basically, add white to the quinacridone and apply more paint and then blur with the sponge.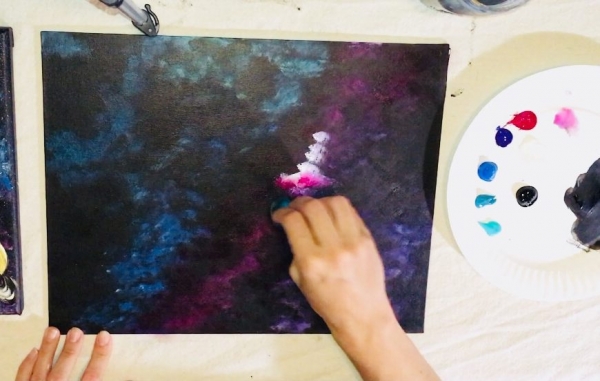
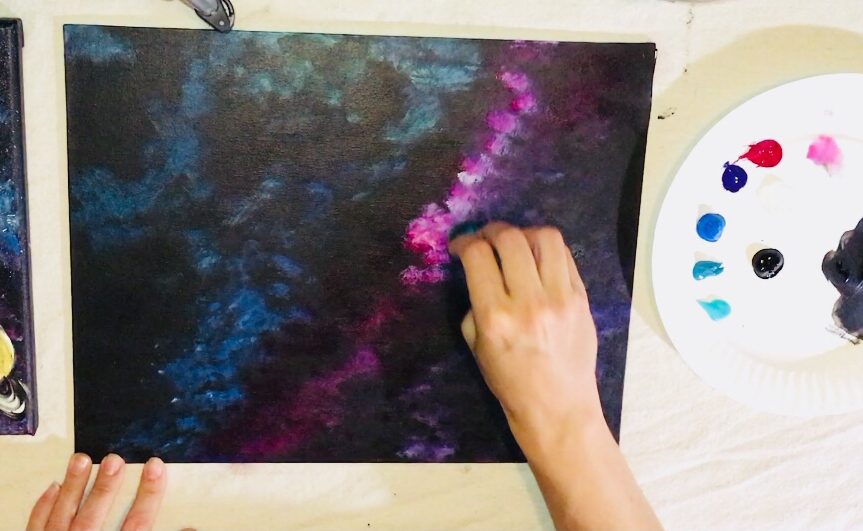
9. Apply a brighter layer of violet and blues too!
Continue on and add more brighter layers to all the colors specifically in the middle of those diagonal lines!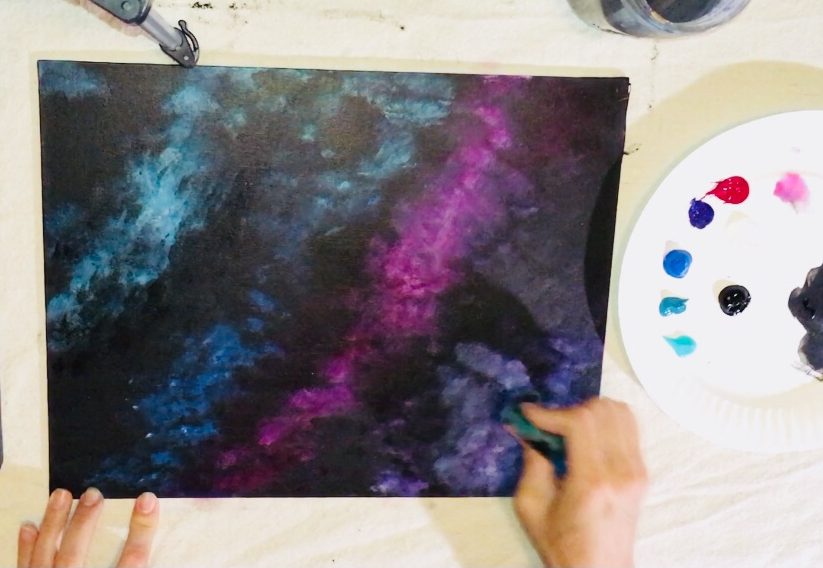
10. Optional: Dim the colors again with black!
So the “gist” of this is, more layers means more dimension. You can stop if you’d like!
But I didn’t. I dimmed the colors again with black.
Then I added more color on top!
Emphasize the middle of all those diagonal sponged on lines being brighter with more white! 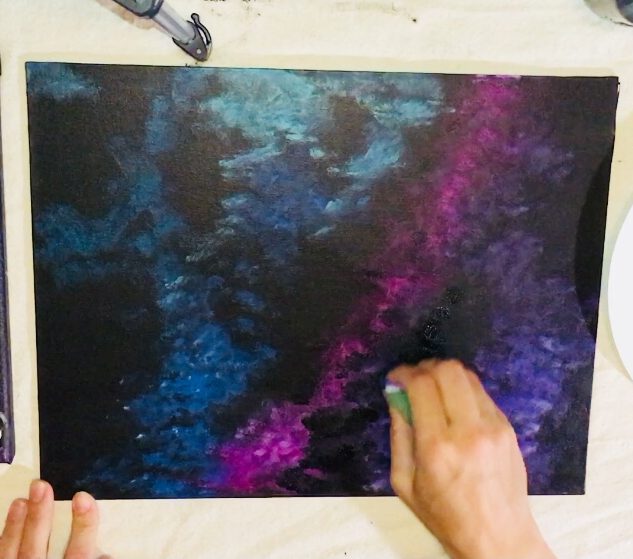
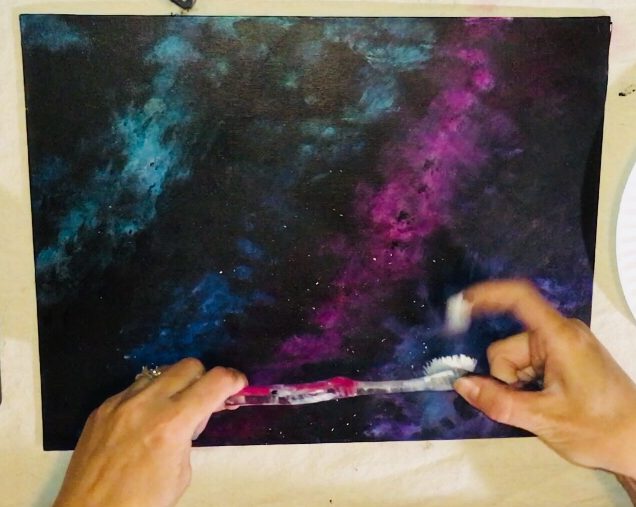
11. Splatter paint stars with a toothbrush.
This is that magic moment in galaxy painting! Dip the toothbrush in white paint and flick it with your finger.
Experiment with it! When you splatter really close to the canvas, you get dense stars versus if you splatter far away.
When you angle the brush you might get a line of stars.
Also, try adding a TINY TINY bit of water to the brush. You will get more stars than if your brush is completely dry.
12. Use a tiny round brush to paint brighter stars.
To get a variety of stars, I used a tiny round brush and titanium white to paint some cluster areas of bright larger stars.
Think “clusters”!
When you look at the sky at night, the stars really aren’t in a uniform distant apart from each other.
Some are close together, some are far, some are dim, bright or even different colors!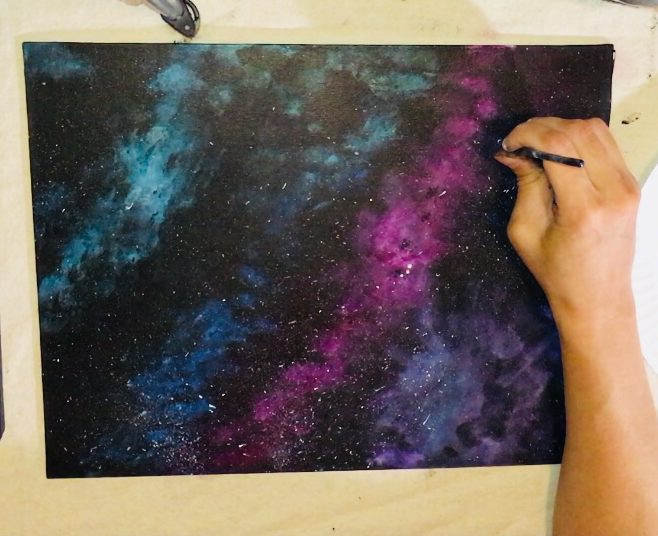
13. Paint a starburst If desired.
I used that small round brush to paint a star burst.
Basically paint an asterisk.
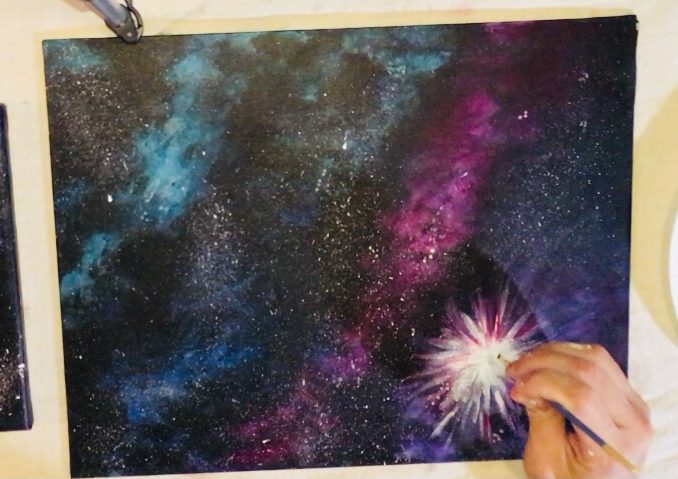
Drag each stroke from the center out. Apply more white in the middle to make the middle super bright.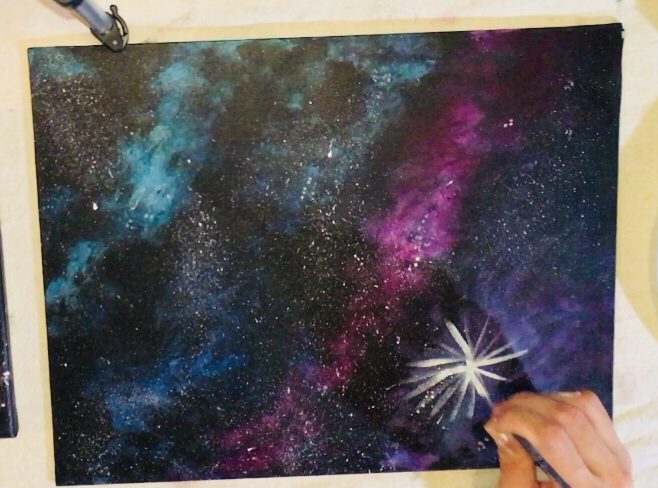
As the white dries, apply more white until it is pure white and super bright.
Basically, the more you layer the white directly in the middle of that starburst, the brighter it will get!
You can even add a dab of purple or magenta to the tips of the starburst.
14. More stars!
You’ll see in the video that I went in and did more sponging over the stars.
This allowed the stars to be different colors.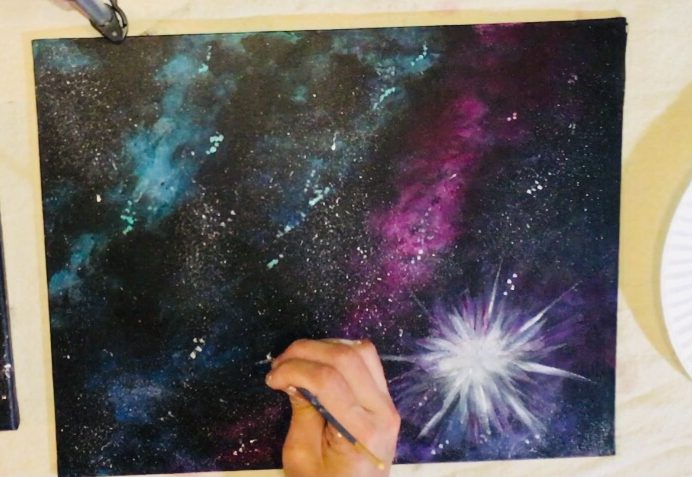
Then I did more of the round brush stars in clusters. Just keep going with it and have fun!
Also notice there is a new diagonal line of “turquoise” going the opposite direction. 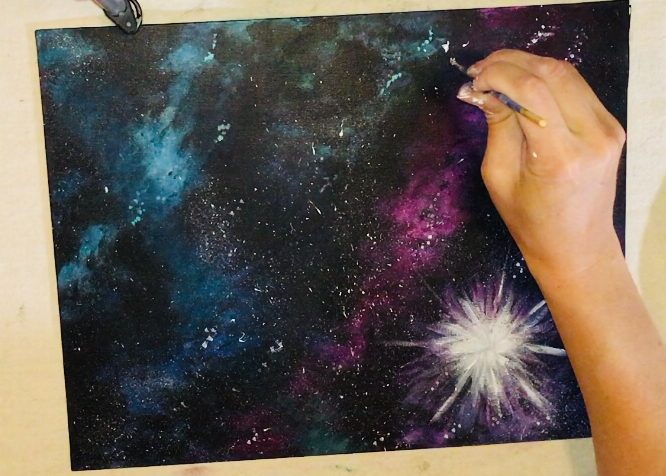
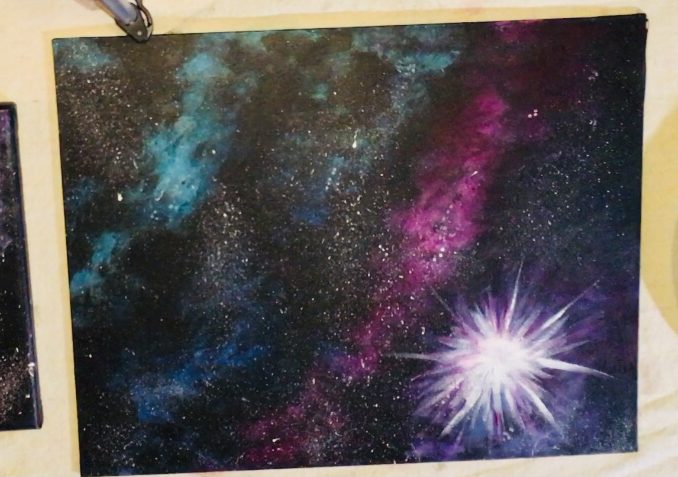
15. Keep going with those layers, stars, sponging, splattering, etc. until you are content with your galaxy!
This is beautiful the way it is! But if you are here for the planets…continue on to part two!
Go To Part 2 “Planets”
That’s it! If you’re ready to paint planets on your galaxy background, go to part two of this tutorial.
Hi Tracie,
I love your website and your videos! I saw above that it said video, but it doesn’t seem one is available for the galaxy painting yet. Do you plan on uploading one?
Hi Elisabeth! There is a Galaxy video! If it’s not showing up, try looking here in the video library at the bottom of this link: https://stepbysteppainting.net/videos-2/
Thank you for letting me know, and so quickly!
This step by step tips on galaxy painting is really amazing.
Hi Tracey
I have tried all ways to see your video about galaxy painting, the link above takes me to a glow in the dark version which isn’t what I want.
I’ve watched it and its just what a need are there any other options to accessing this video
Look at the very bottom of this page: https://stepbysteppainting.net/videos-2/
There are two galaxy painting videos there.
This is my favorite tutorial from you. Thanks for showing me how. Would love to see some whimsical or more galaxy /space type videos with moons etc. Thank you.
Thanks Michael!
Hey! When you say blur out the colors, am I rubbing the sponge back over it or dabbing it or what? I’m not artistic but want to try this. Thanks!
Hi Christie! I meant dabbing it over with the black gently because it will blur out the other colors. ?
Thanks Brittany!! I think that is so awesome your kids are into painting especially the three year old! You can share it on social media if you have Facebook or Instagram. You can also email me tracieannekiernan @ gmail.com
Hi Tracie, I am looking for the video for the galaxy painting and it seems to be gone, I have looked at it a couple of times but now the link or something seems to be broken. Is it still available?
I’ll see what’s going on with the video… Thanks!
Thank you, I have a group coming over and this is the one we were going to do.
It looks like a lot of videos are down right now on my site.
I’m not sure why…but I am going to have to troubleshoot this further. Hopefully I can get it working for you soon! Is your event today?
Yes, it is. It’s in an hour so I understand if you are not able to get it up in time.
Okay I’ll do my best to get it going for you!
Do you have an email address I can reach you at?
In the meantime I recommend using the video for the Galaxy Falls. The sky part of the video is the exact same technique I used in the galaxy painting. https://youtu.be/rq_gQoaSZd8
It should be working now!
Thanks so much for helping me out. We all had fun!
No problem! Sorry about the glitches today but I’m so glad you had fun!!
i used this technique on my 10 year old’s dresser and it looks amazing, I never thought I’d be actually able to make something myself that looked this cool, lol. thanks so much!
You’re welcome Gracie! What a fun idea to paint a galaxy on a dresser!