
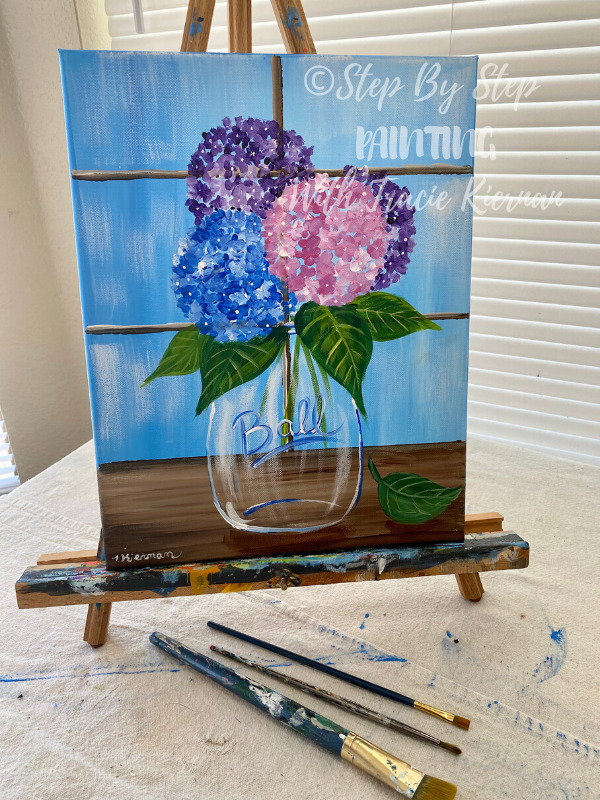
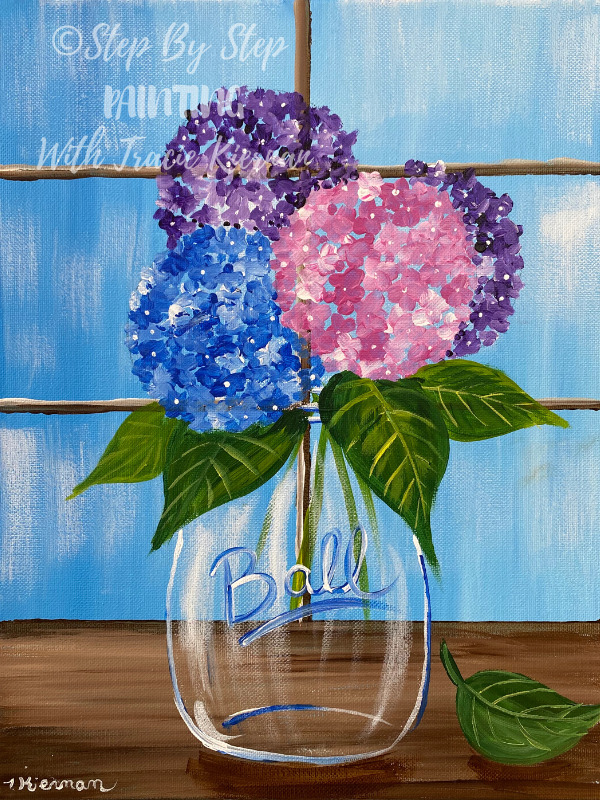
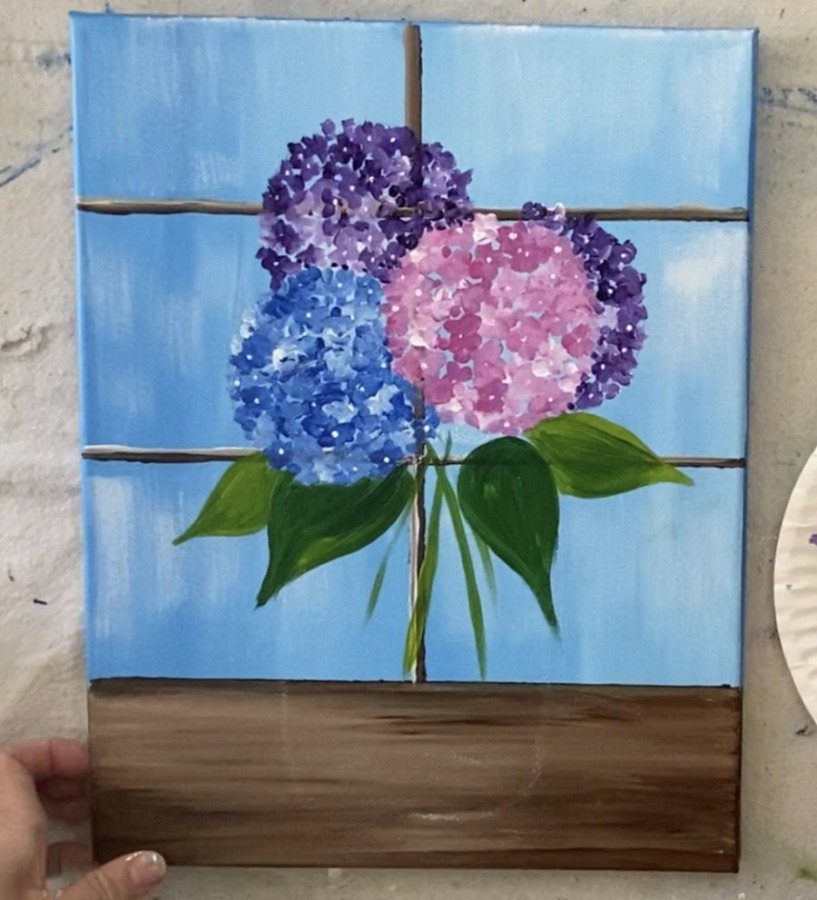
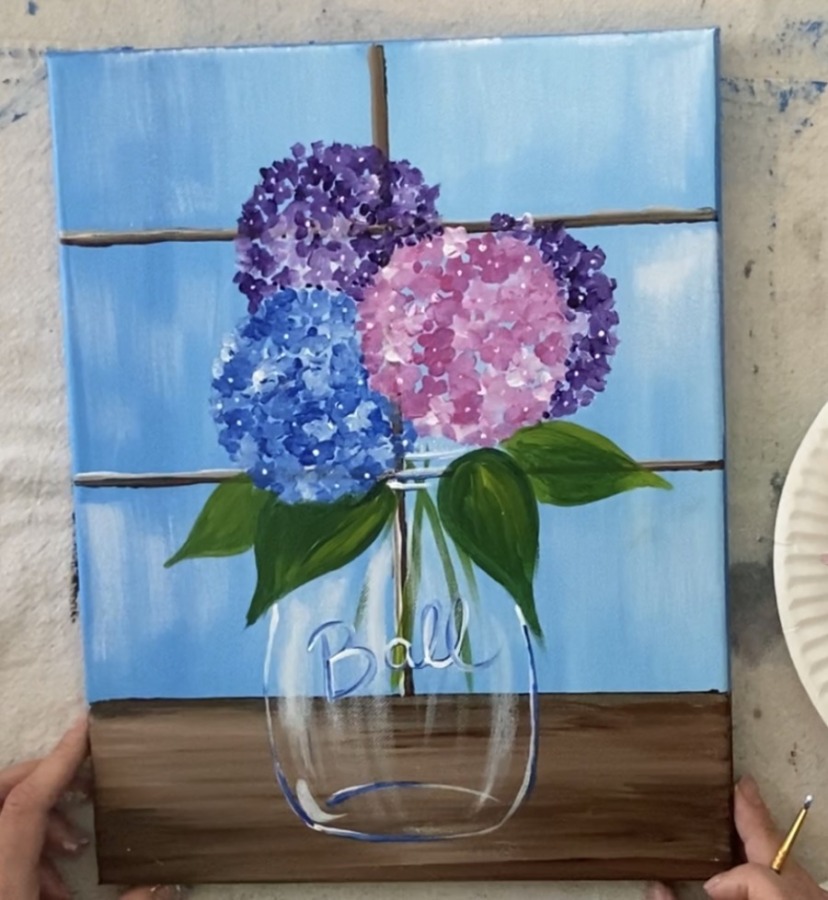
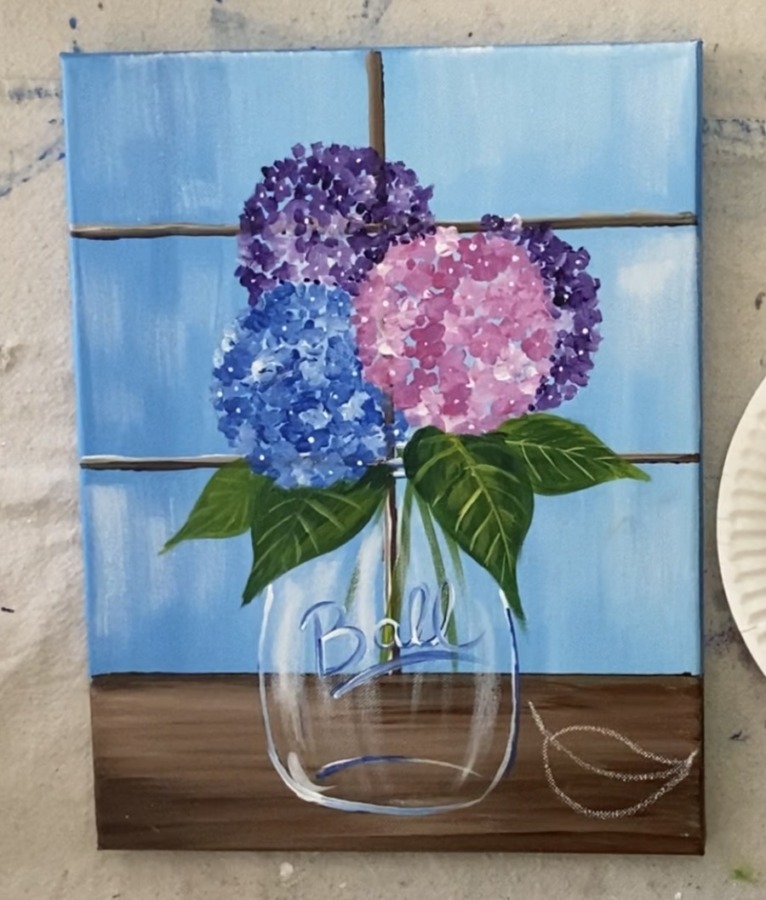
How To Paint “Hydrangea Window”
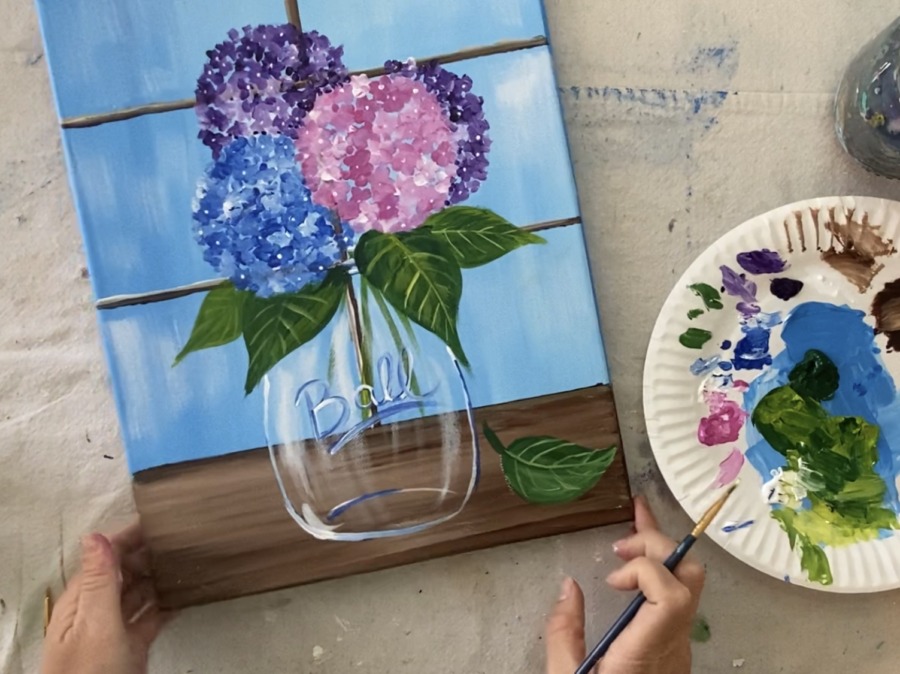
Learn how to paint hydrangeas in a mason jar in front of a window! I love the combination of the glass jar in front of the glass window! It gives off a bright and cheerful feeling.
I have been itching to paint hydrangeas for awhile now and thought they would be too hard for a tutorial. However, they are actually REALLY simple once you break the steps down.
Would you like to save this?
I love Pamela Groppe’s hydrangea painting tutorial and was definitely inspired by it! She breaks the technique of how to paint the hydrangeas down into simple easy steps.
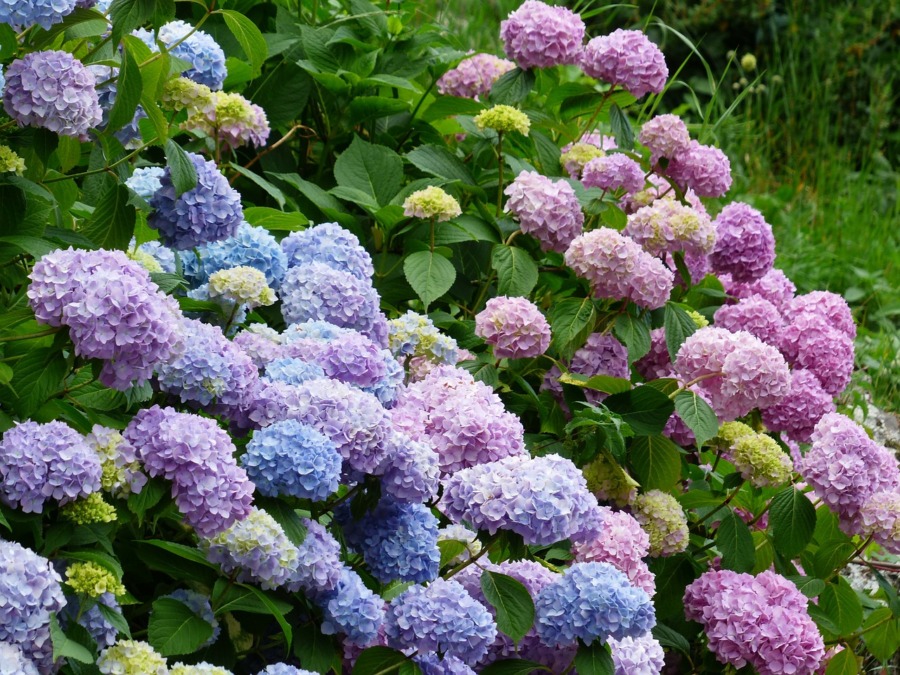
Hydrangeas are basically a big balls filled with little flowers. Therefore, the main shape of these flowers is a circle! Then inside of the circle, you paint little 4-5 petal flowers and vary your colors with white.
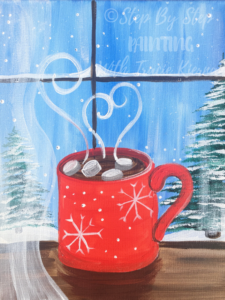
The window in this painting reminds me of the hot cocoa window painting I did last December! Perhaps it is the same window, although we cannot see any trees outside.
To keep things simple, we only see a glare on the window in this window painting and nothing outside. However, you can choose to paint some trees or something outside if you want to go a little more advanced!
The mason jar glass is super simple as well! I did that using a dry brush technique. I love painting mason jars because they are so pretty! You can check out two other mason jar painting tutorials I created using this similar technique.

Hope you enjoy this tutorial! Happy painting!
This post contains affiliate links.
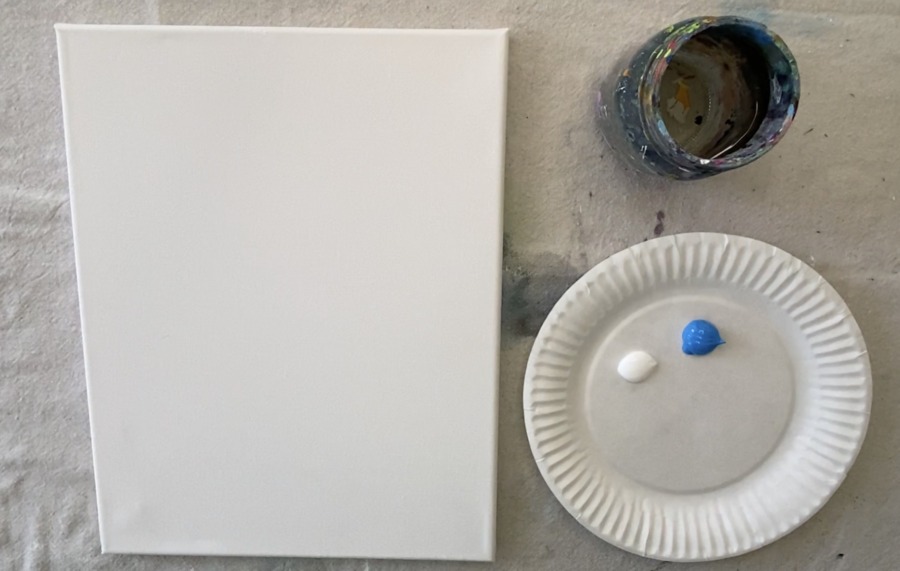
Materials
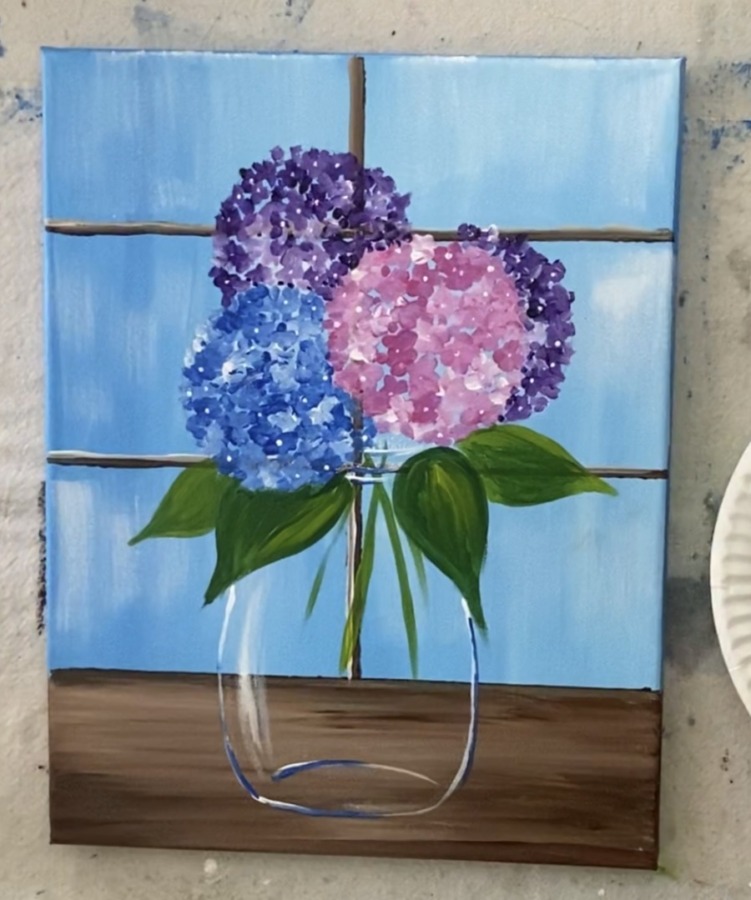
Hydrangea Window
Hydrangeas are a very easy flower to paint! In this tutorial I will show you step by step how to set up your window painting with a bundle of hydrangea in a mason jar.
Materials
- 11 x 14 Canvas
- Acrylic Paint
- White Chalk For Drawing Mason Jar
- Brushes
- T-Square Ruler
- Pencil
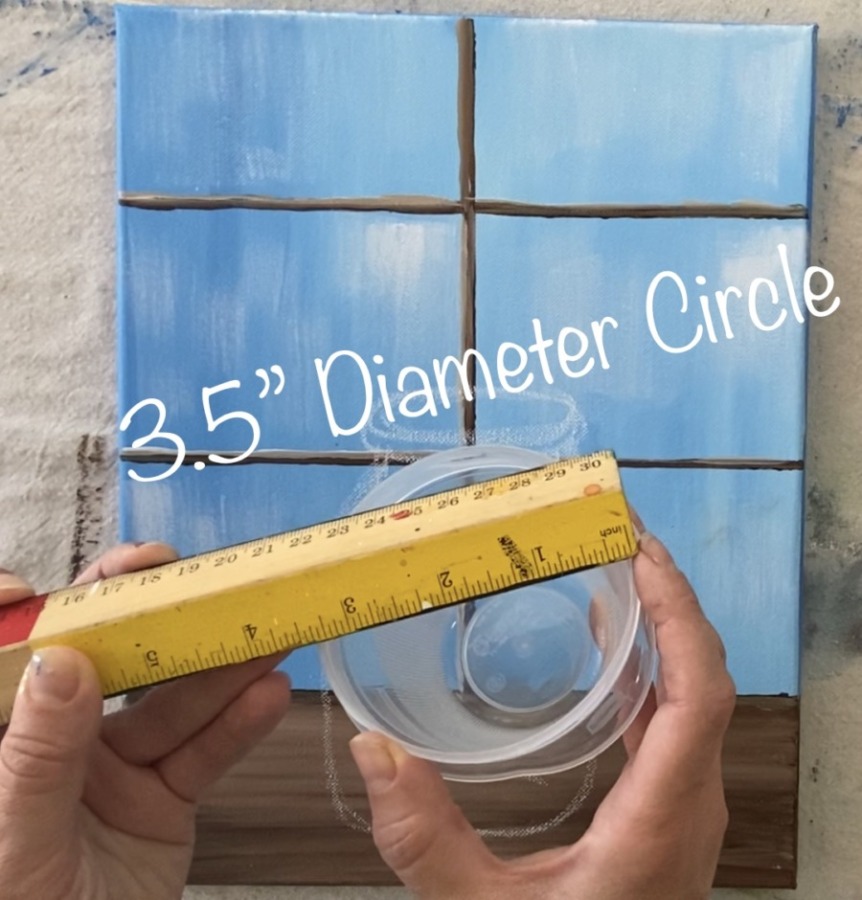
- Circles to trace (about 3.5” diameter) I used a Tupperware container.
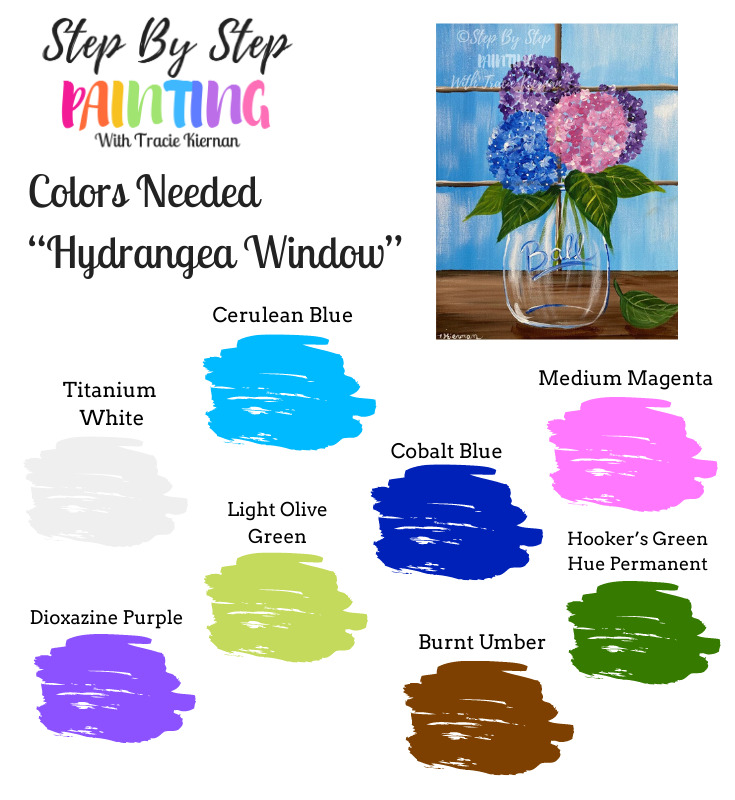
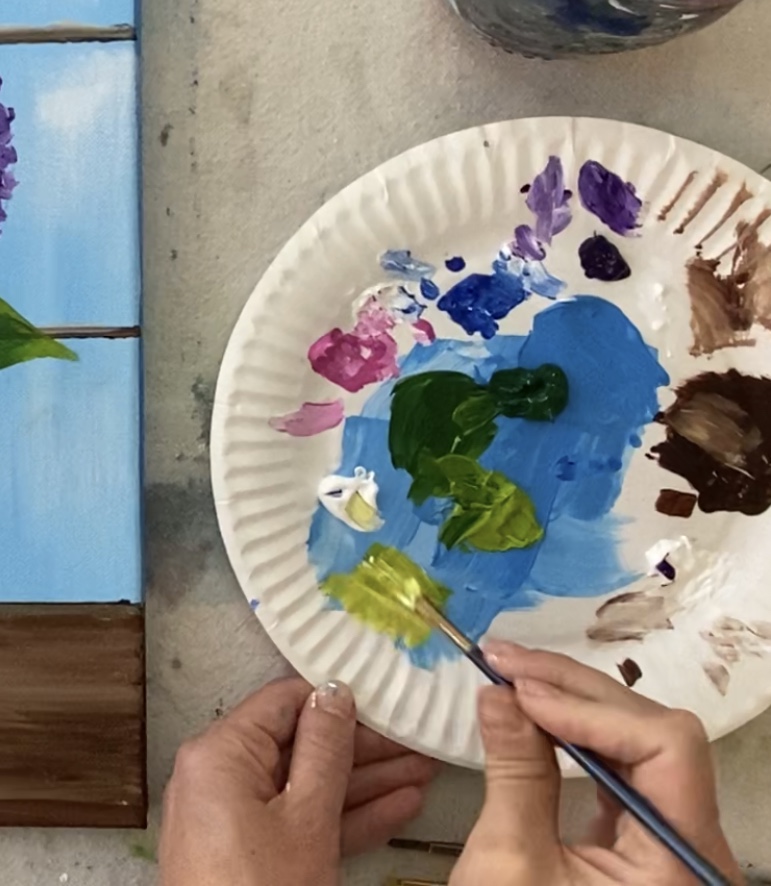
Colors
- Titanium White
- Burnt Umber
- Medium Magenta
- Dioxazine Purple
- Cobalt Blue
- Cerulean Blue
- Hookers Green Hue Permanent
- Light Olive Green
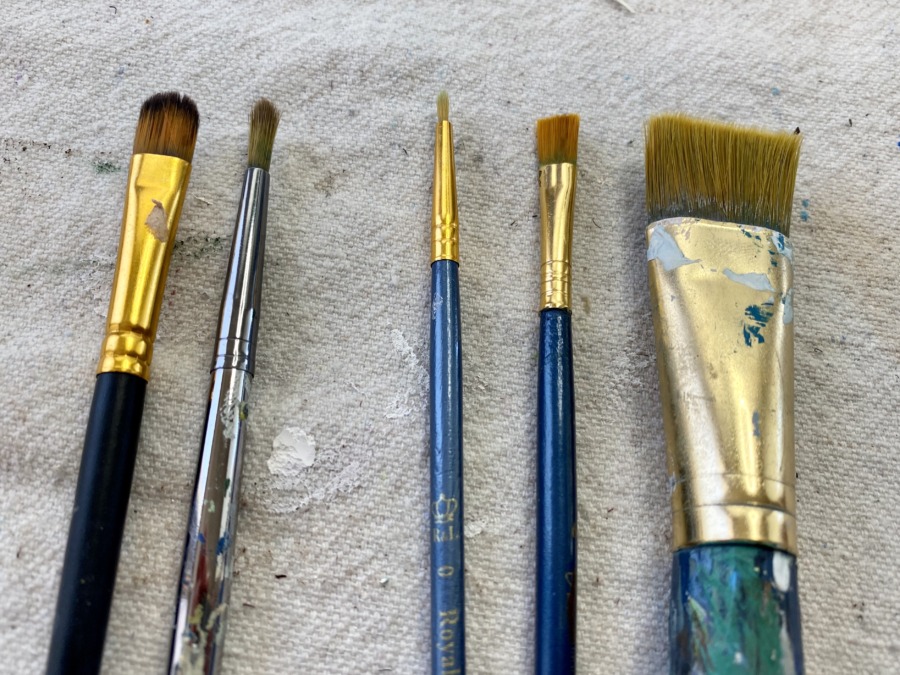
Brushes
- 3/4” Flat Wash Brush
- #6 Shader (or any small flat brush like a 4 bright will work)
- #0 Round Brush (or any small spotter brush)
- 4 Round Brush
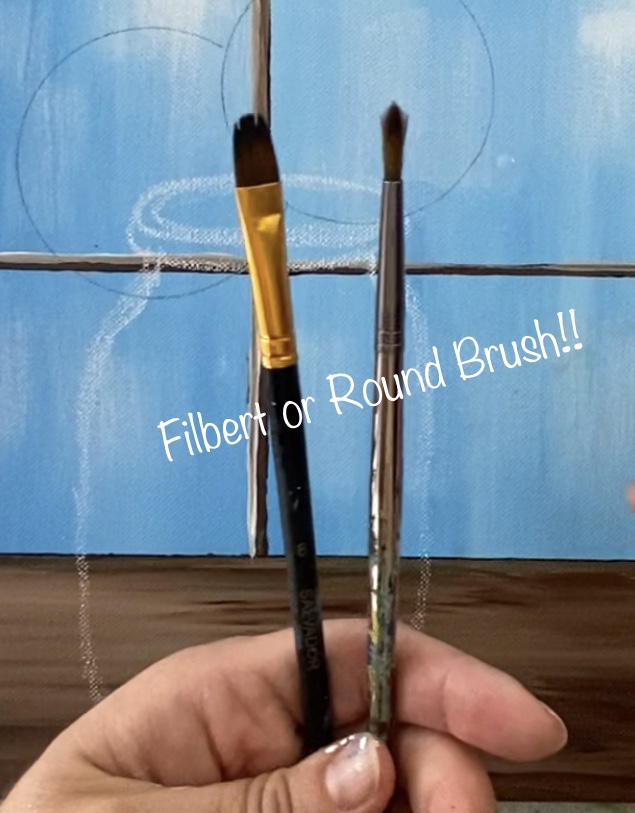
- Optional: #8 Filbert brush
Color Palette
Brushes
I always say this about brushes but you can achieve the same or very similar techniques using different brushes.
I used a 3/4 Wash brush, a #6 shader (can also use a 4 bright), a 0 Round, a 4 round and a #6 filbert (optional).
When I demo the hydrangea technique, you can decide if you like the filbert or the round for the petals of the hydrangeas.
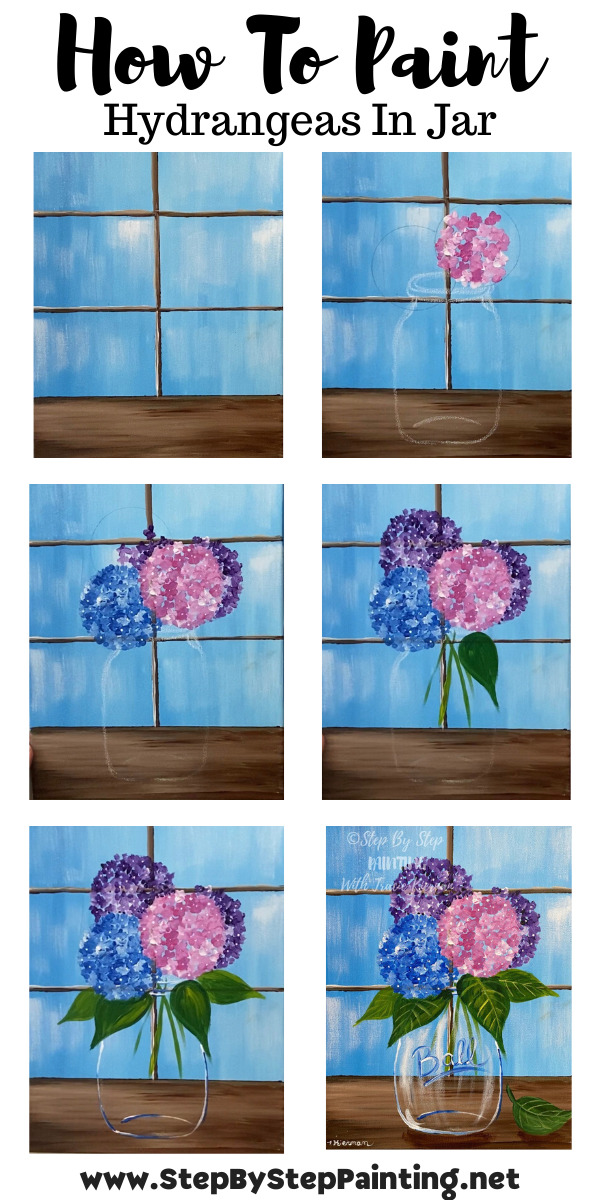
Directions At A Glance
Traceable
This painting can be done absolutely with no traceable! Yay! However, if you need extra guidance with the mason jar, you are welcome to use the mason jar traceable that I used in my Daisies and Fireflies paintings! You can also download this in my traceable library.

Video
Step By Step Directions
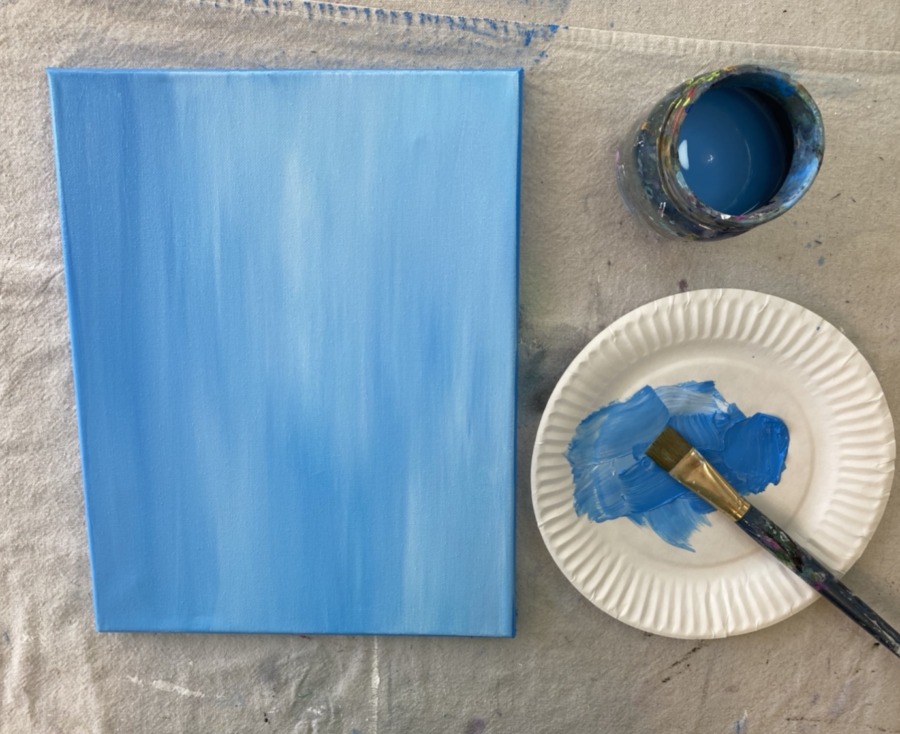
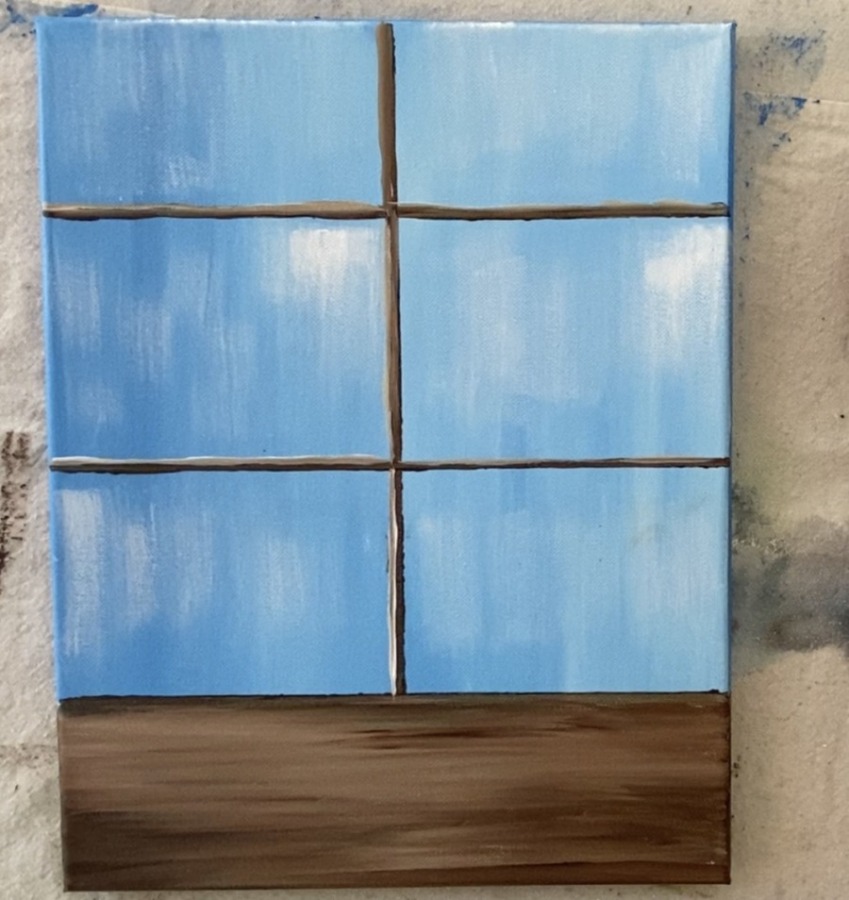
1. Paint The First Layer Of Paint On The Entire Canvas
Load your palette with cerulean blue and titanium white. Use your 3/4” Wash brush and double load it into both of the colors.
This should be a thin layer of paint. Add a bit of water to the brush to help thin it down a bit. Paint all up and down strokes with the blue and the white so the two colors blend together.
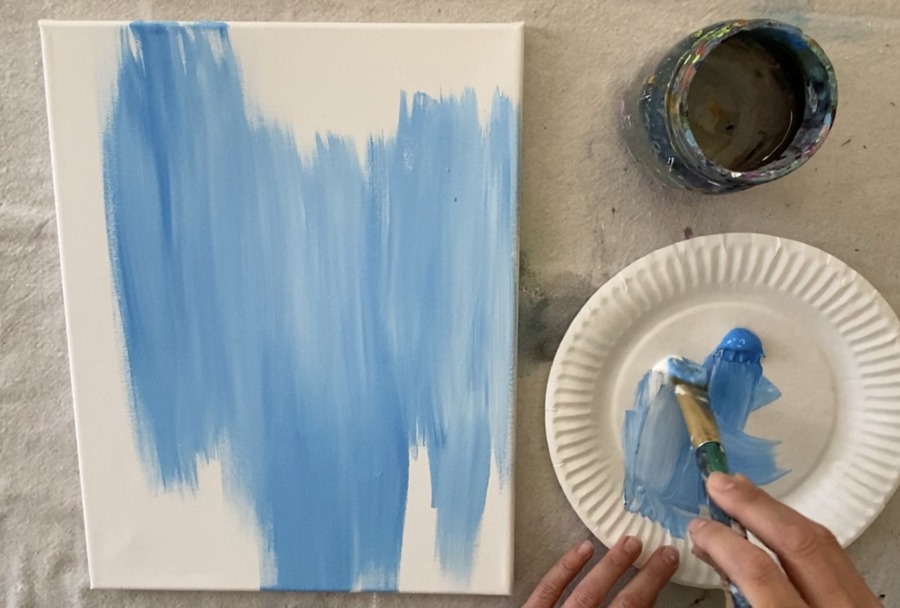
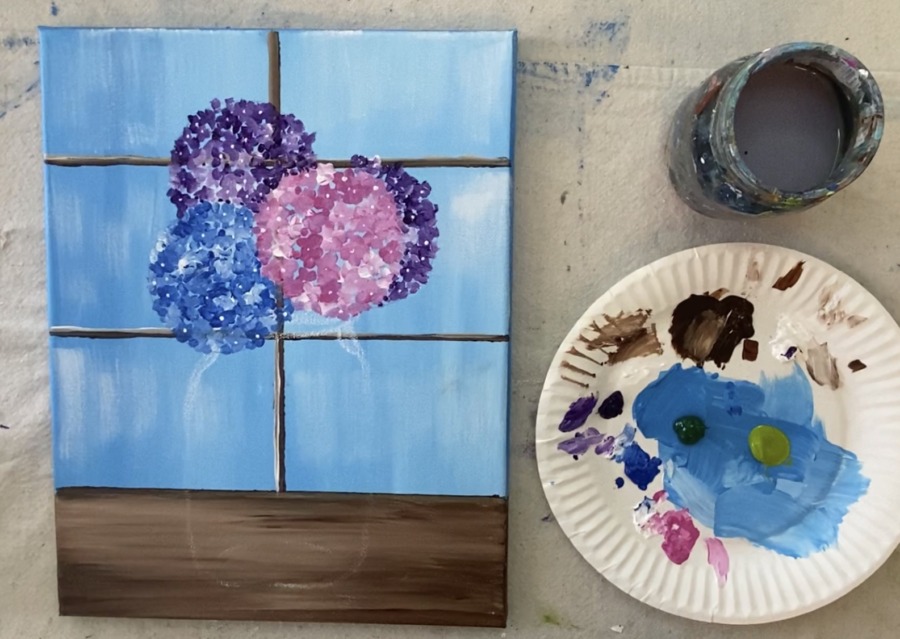
Fill your entire canvas with this blue and white combination. Wait for this to dry before proceeding to the next step.
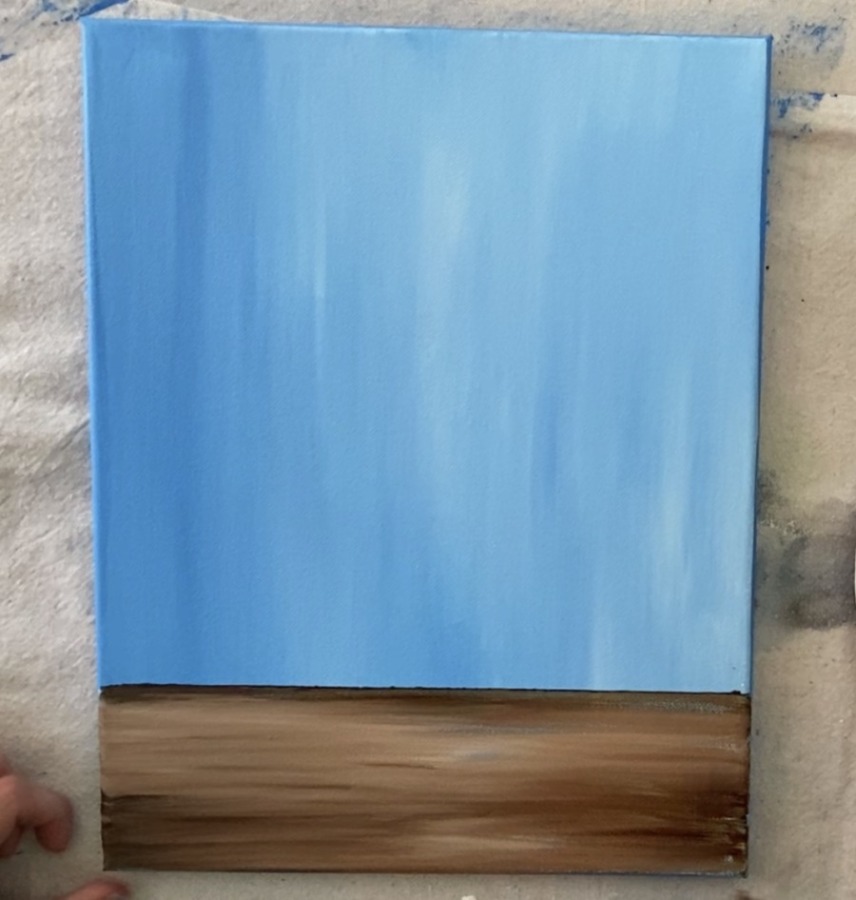
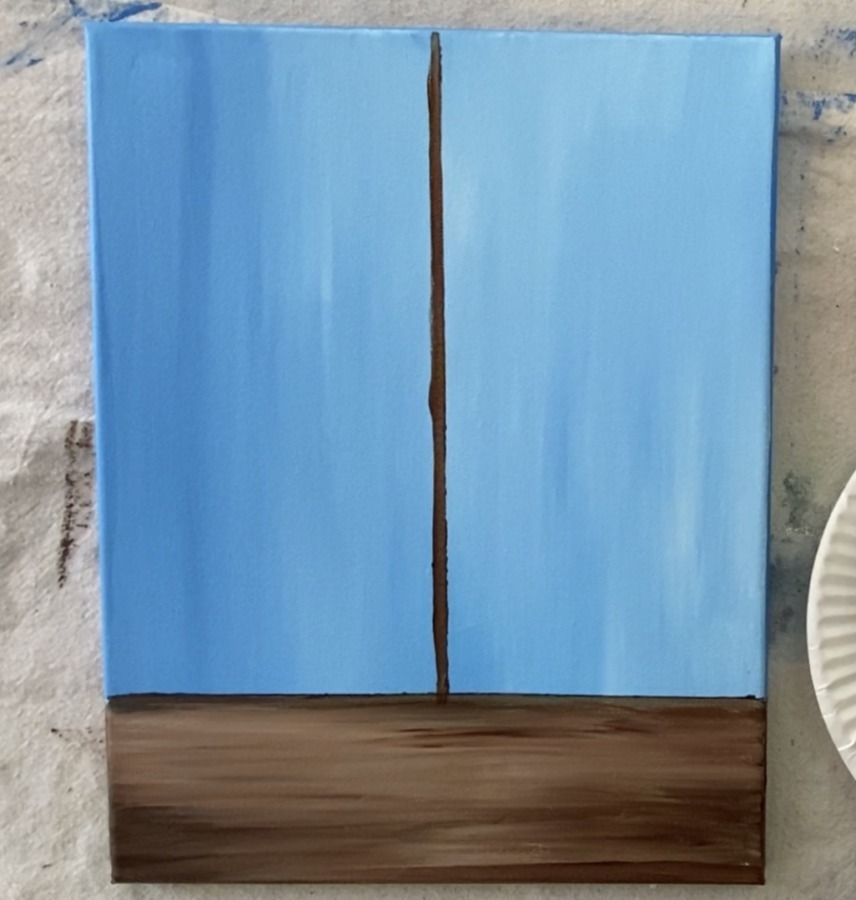
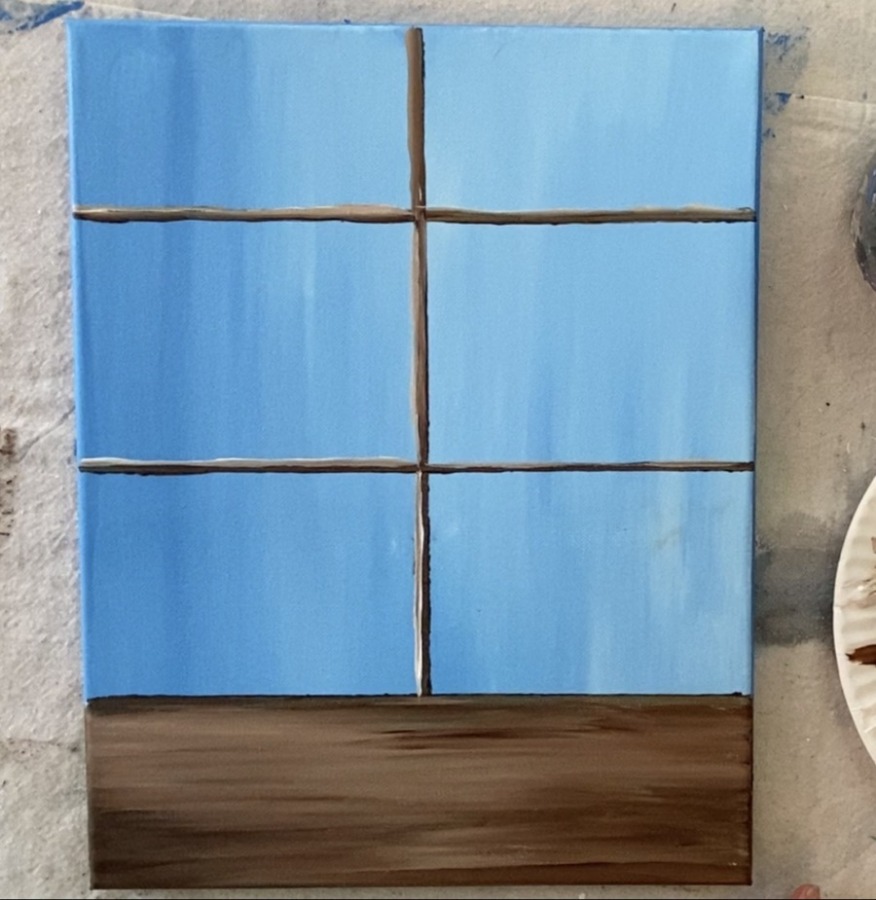
2. Draw Your Table Line & Paint The Window Sill
Use a T-Square ruler or straight edge to measure about 3” from the bottom of the canvas (you can estimate this especially if you are working on a larger canvas).
Then paint a horizontal line with burnt umber and a 3/4 wash brush.
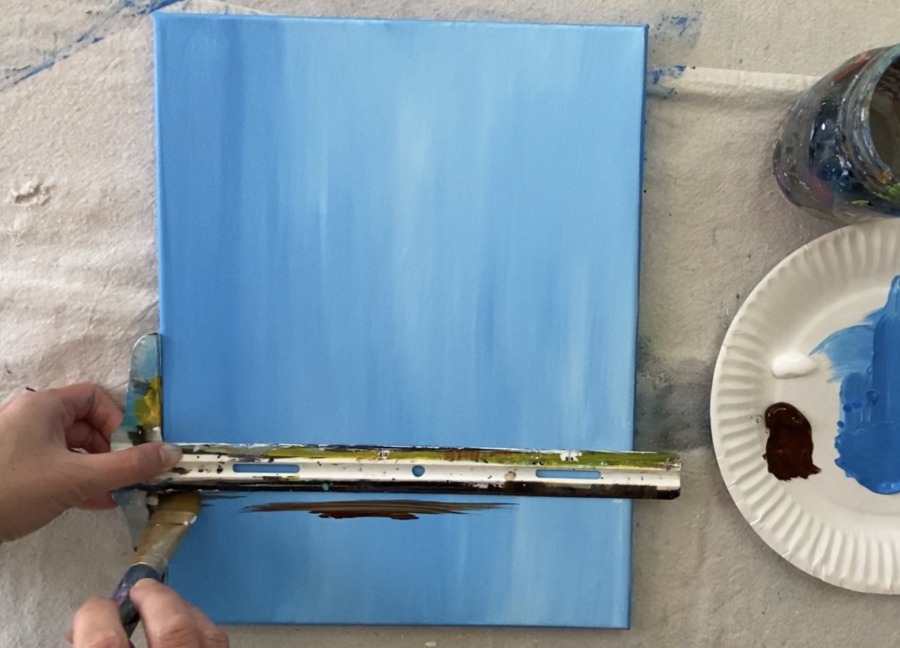
After defining that line, fill the rest of the area with a combination of burnt umber and titanium white. We will be doing somewhat of a faux wood technique.
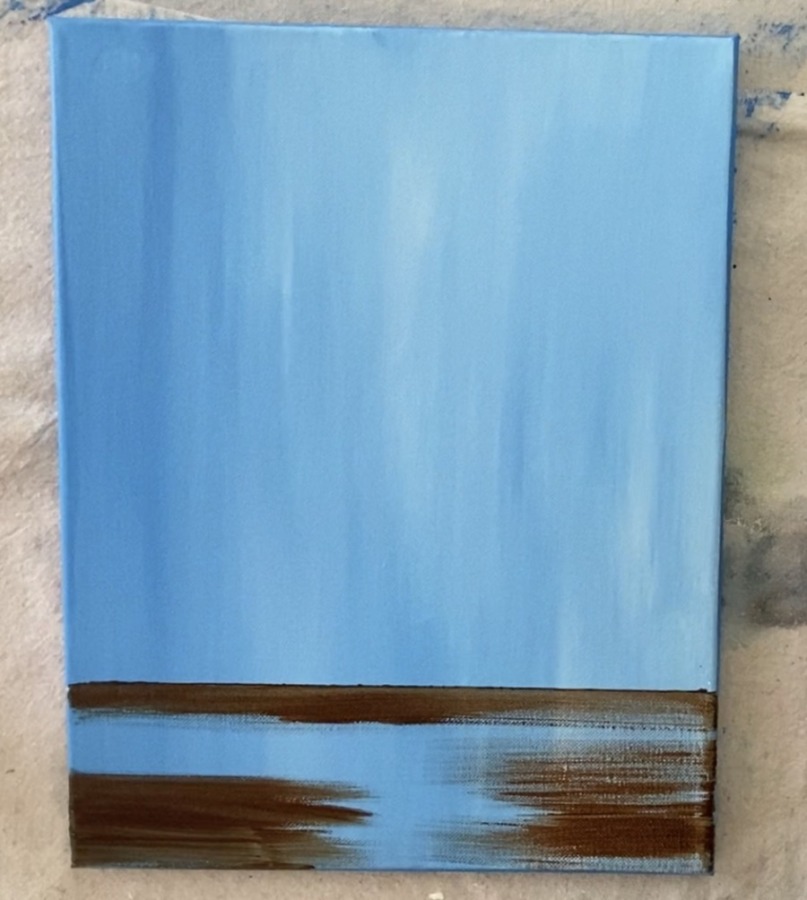
Double loud your brush in brown and white and have those colors blend together. This will create the impression of a faux wood grain.
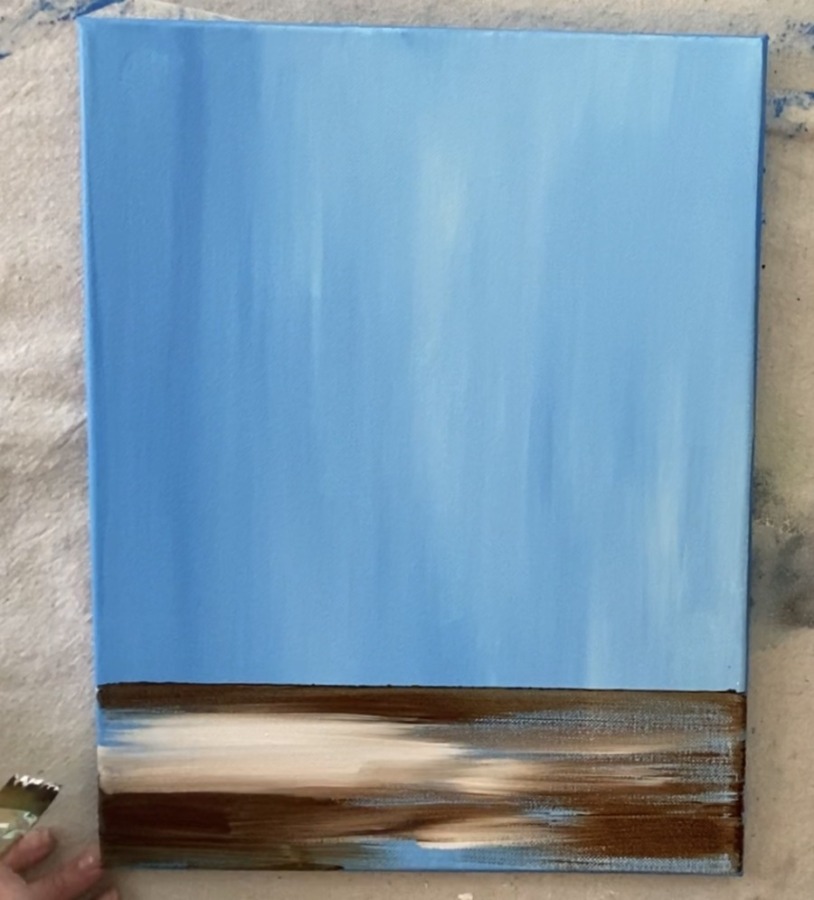
The faux wood impression is created simply by the brown and white blending together (but not all the way) so you get that streaky look!
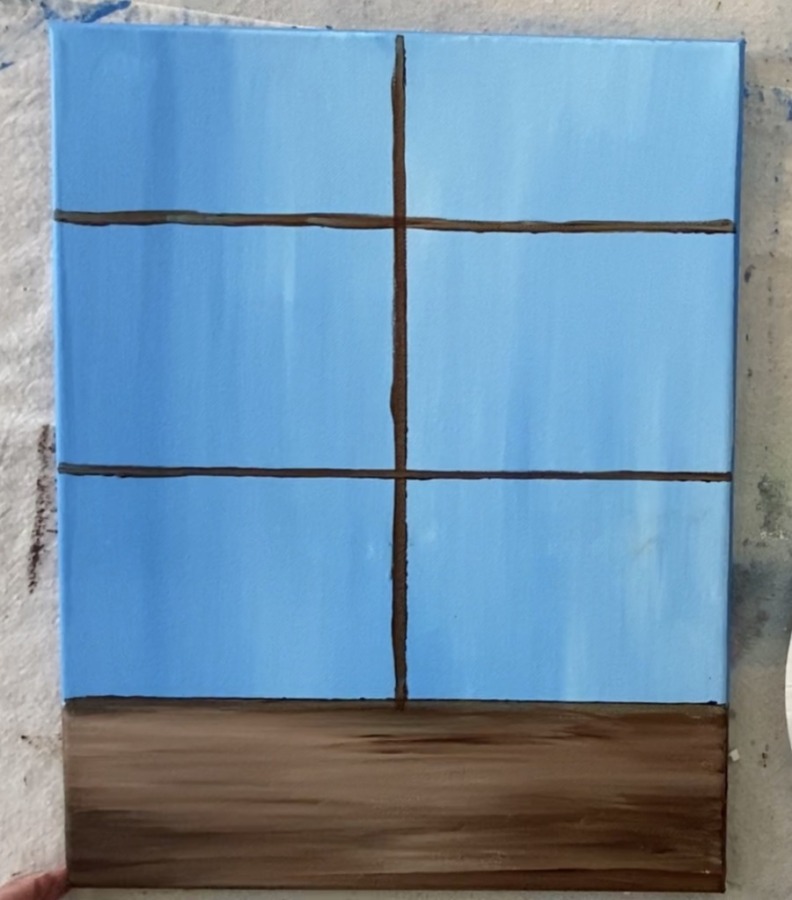
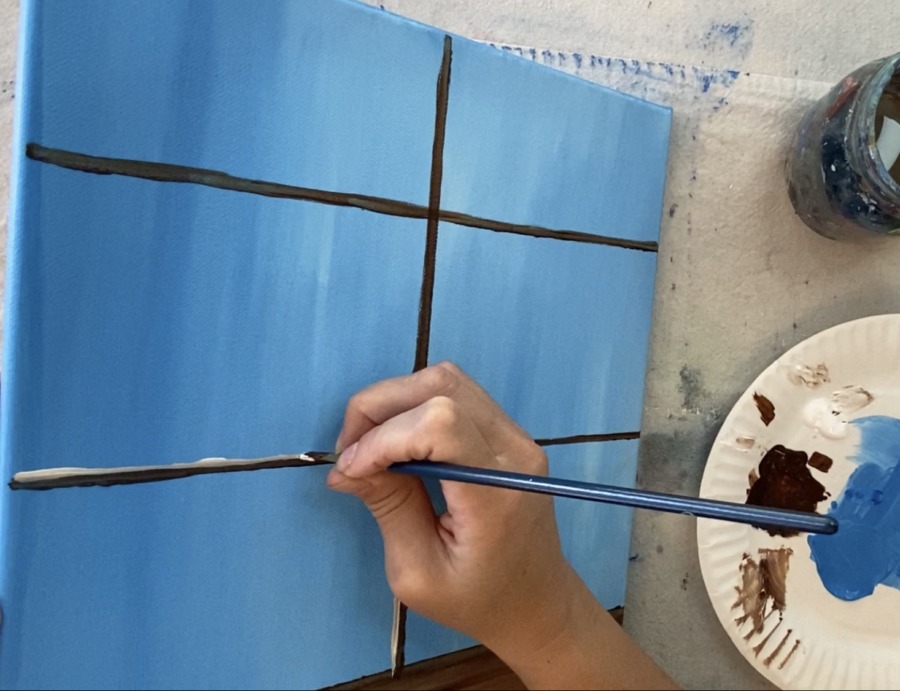
3. Paint the Window Pane Lines
Next use the t-square to define the window pane lines. I estimated where the middle of my canvas is and used a *#6 shader brush to paint that line burnt umber.
*If you do not have a #6 shader brush, you can do this with any brush! Any small flat brush will work best for this step, however, a round brush can work too!
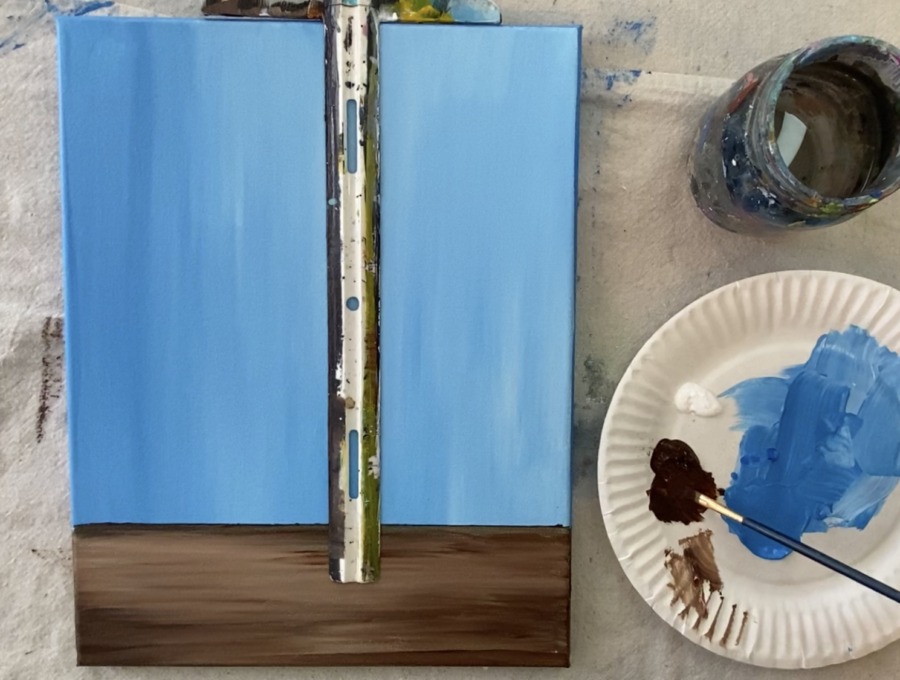
My line came out kind of wobbly but that is okay! Remember, this is part of the background and the focus of this painting will be the hydrangea jar. You won’t notice minor flaws with your window pane lines.
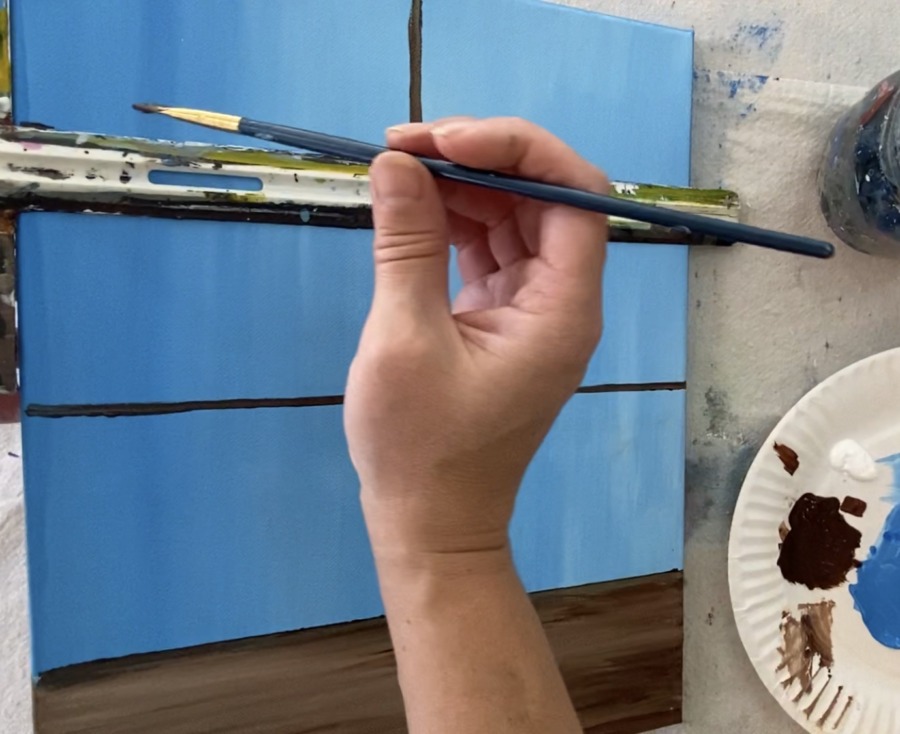
Then I estimated the horizontal lines and painted them at the 1/3 marks. I used my t-square ruler for this step as well.
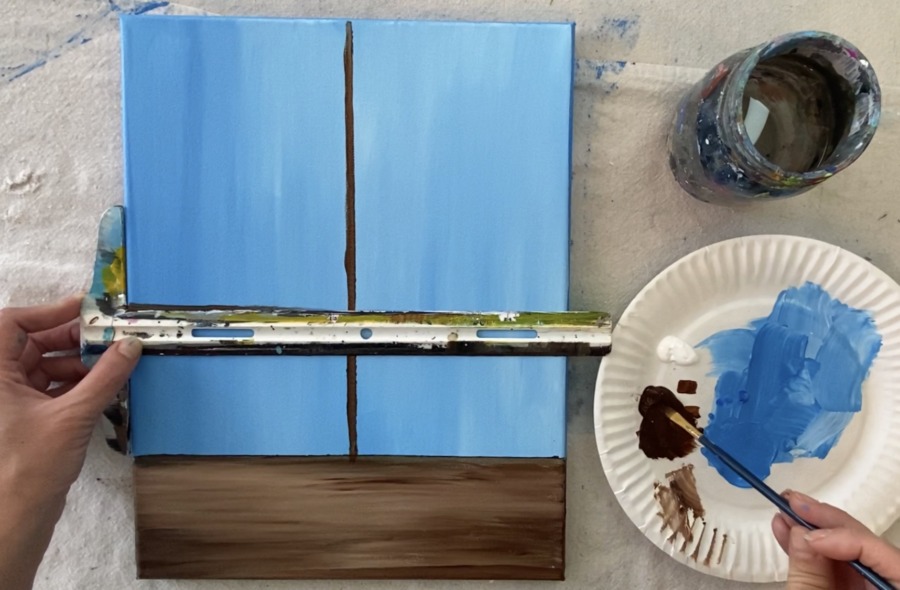

Make sure to wipe off paint that gets on the ruler so that you don’t make accidental marks when you paint your next lines again.
Now we have window pane lines horizontal and vertical!
4. Highlight The Window Pane Lines
To do the highlights on the window pane lines, I used that #6 shader brush and titanium white. I made my white line markers on the top edge of the horizontal lines. Slightly paint over the brown so it overlaps. If it blends with the brown, that’s even better!
Then add more white on the left side of the vertical lines. If you want the lines to be not as white, blend in some brown into the white so it dims a bit.
5. Paint The Window Glare
Next is painting the glare on the glass of the window! I did this using the dry brush technique.
Dip your 3/4 Wash Brush in titanium white paint and wipe the brush off with a paper towel. The point is to make sure only a small amount of paint is on your brush.
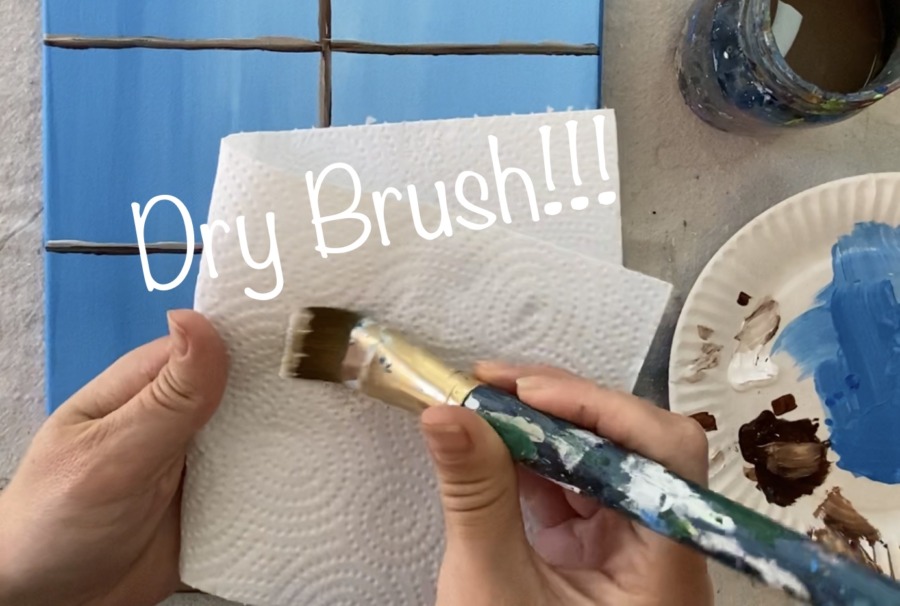
Test it out to make sure that your stroke is see through and not opaque. It should look very dry and scratchy.
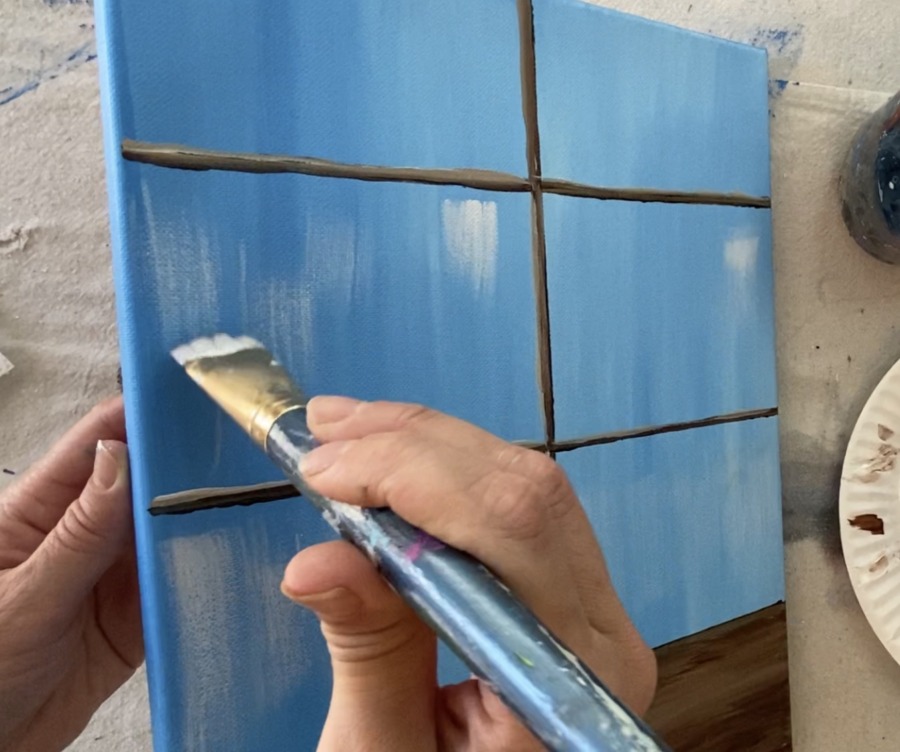
Make vertical strokes with this dry brush technique over all your window panels. Make sure you are not covering all the blue up. Some strokes may be brighter and some much lighter! This gives it great variety.
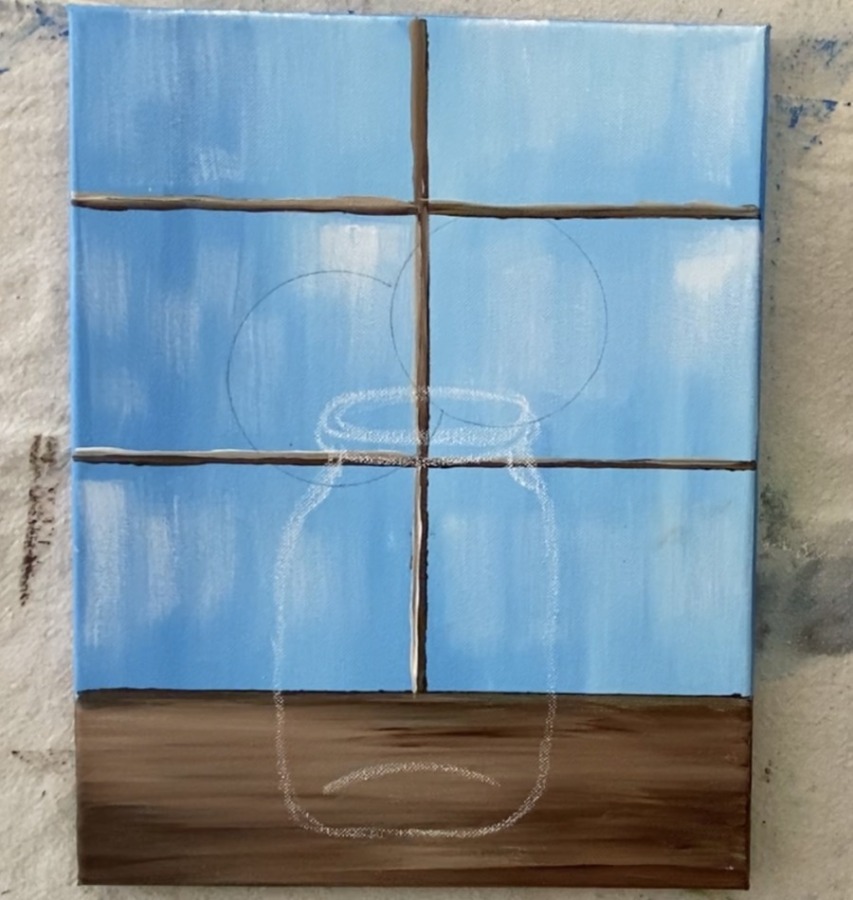
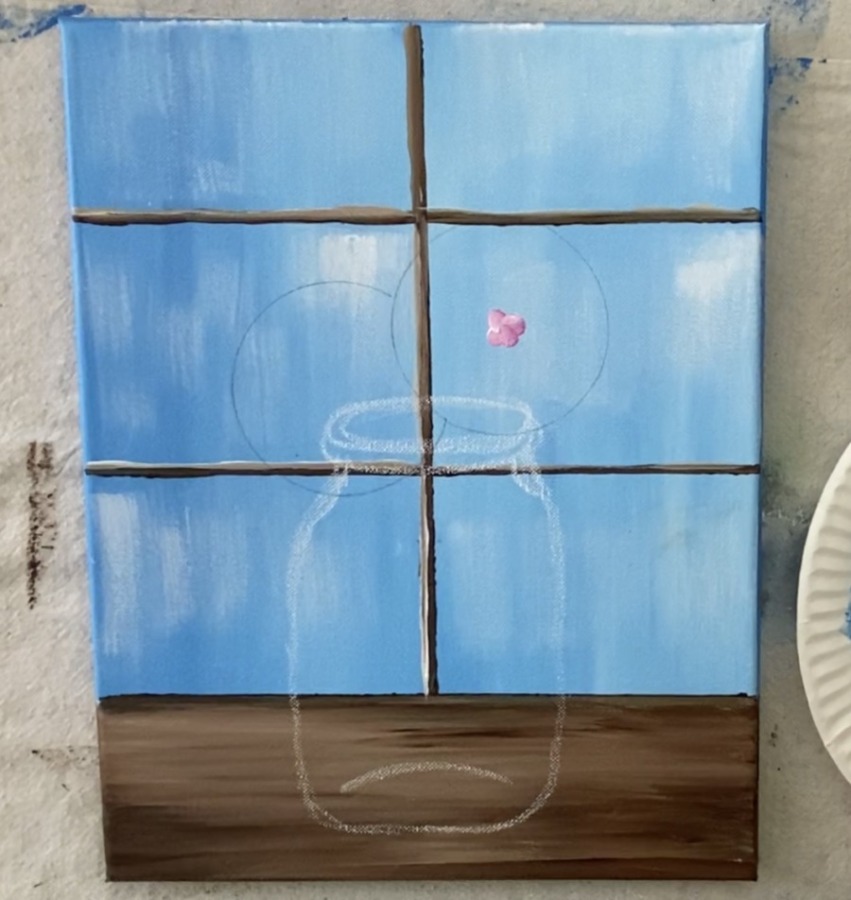
6. Draw The Mason Jar with Chalk
Drawing a mason jar is fairly simple! The nice thing about this painting is that most of the top of the jar will be covered with flowers and leaves. You can use my mason jar traceable if you need to:
I used a piece of chalk to sketch it out on the canvas. Start with an oval for the opening of the jar.
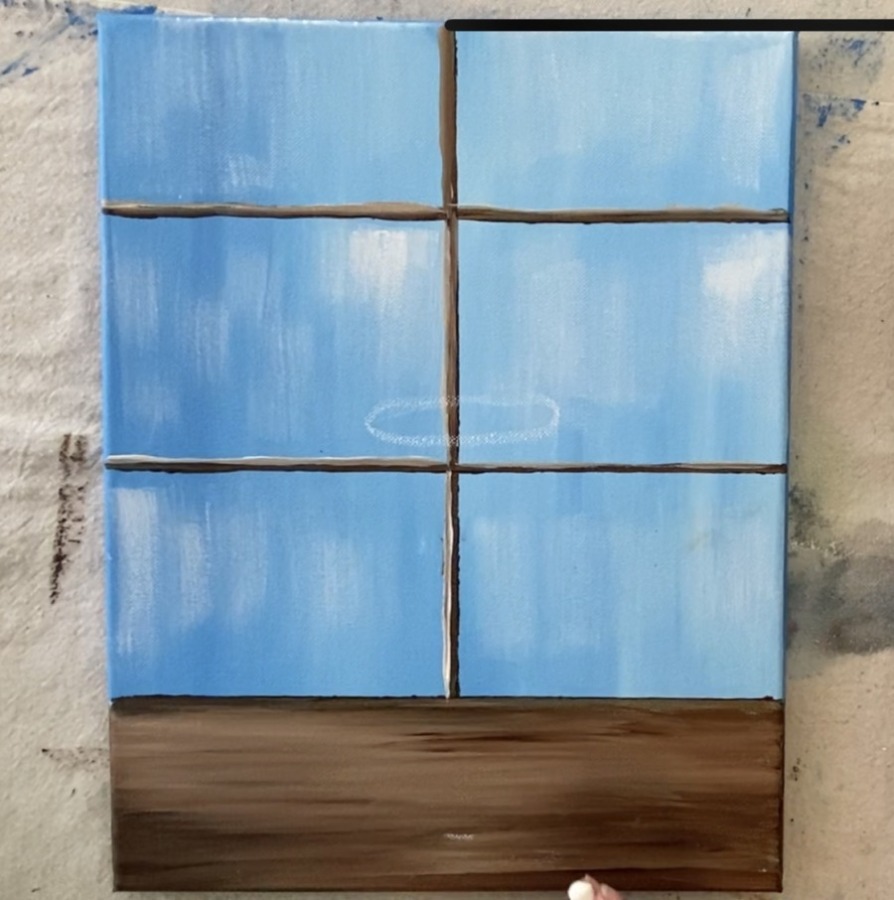
Then draw the rim and the outer two edges of the jar.
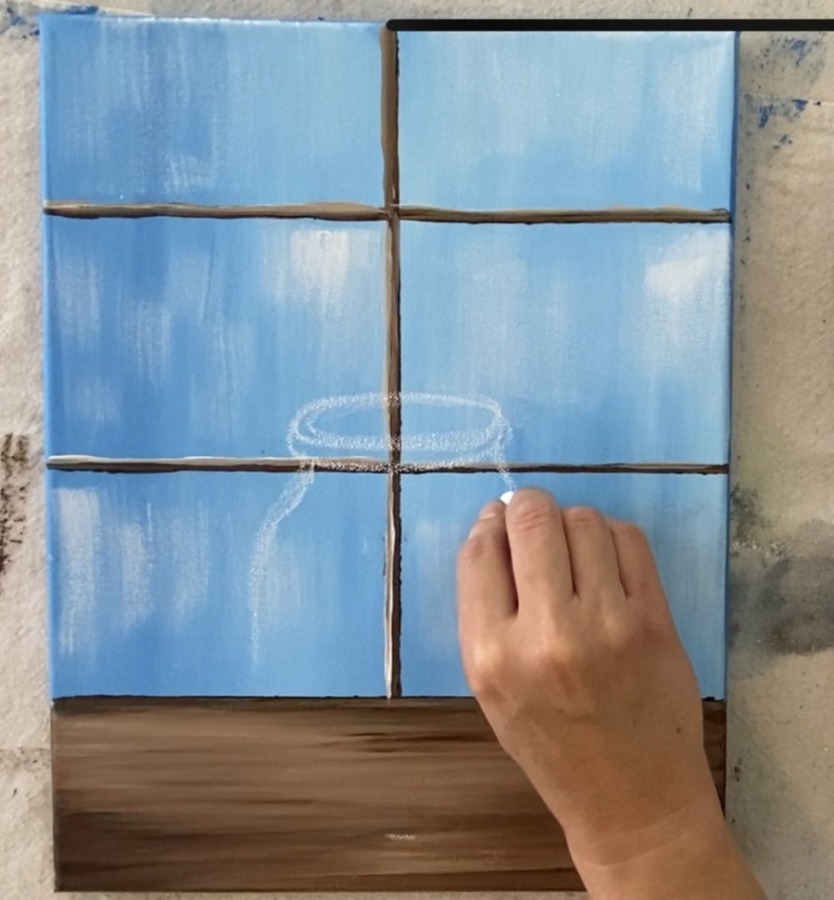
Draw the inside bottom curve. If you need to adjust your chalk drawing, you can use a wet paint brush to erase.
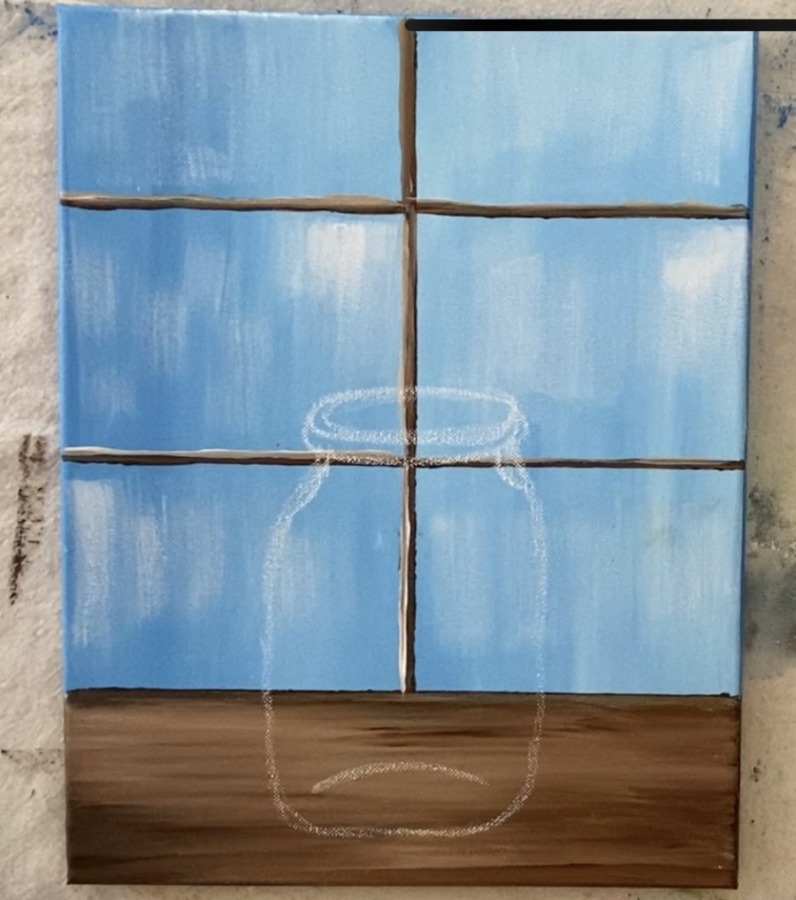
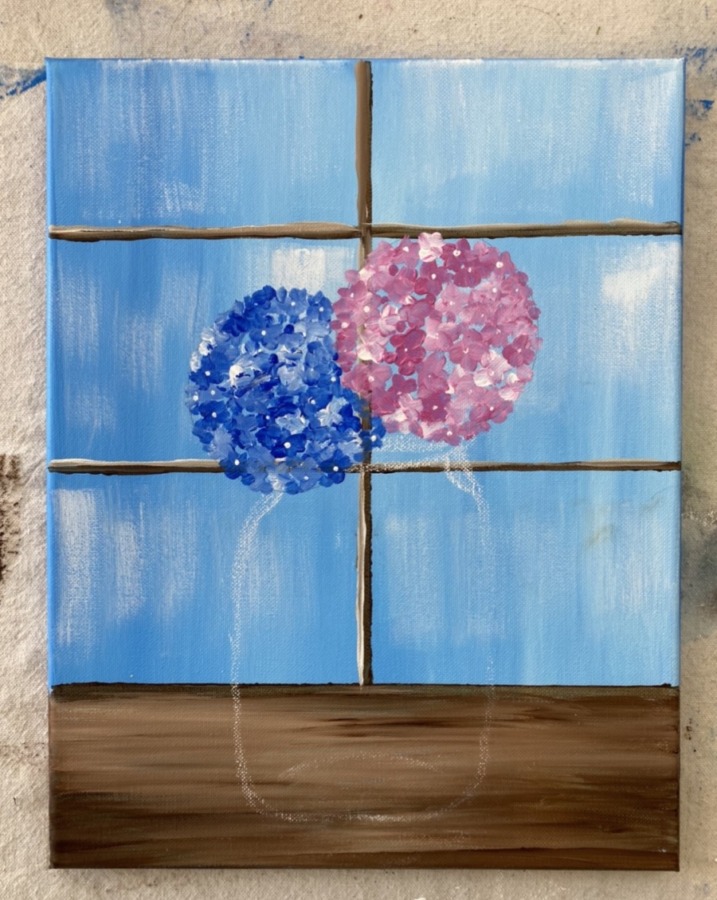
7. Draw Two Overlapping Circles
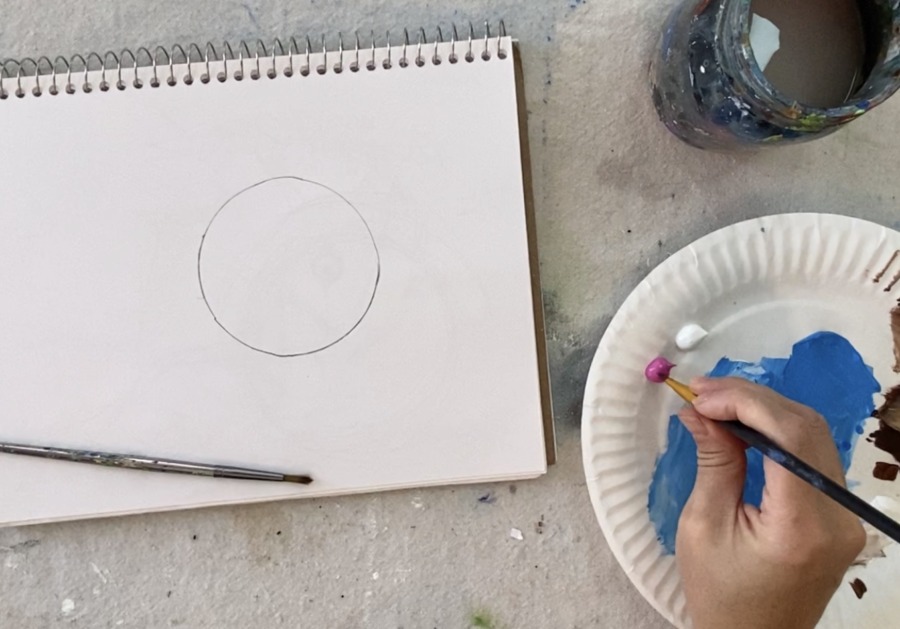
Hydrangeas are big balls of flowers which means the main shape is a circle! I decided to find a circle to trace. This is a Tupperware container and the diameter is about 3.5”. You can find something similar in size.
Then I traced two circles. These circles are overlapping the top rim part of the mason jar. Also, one circle is overlapping the other.
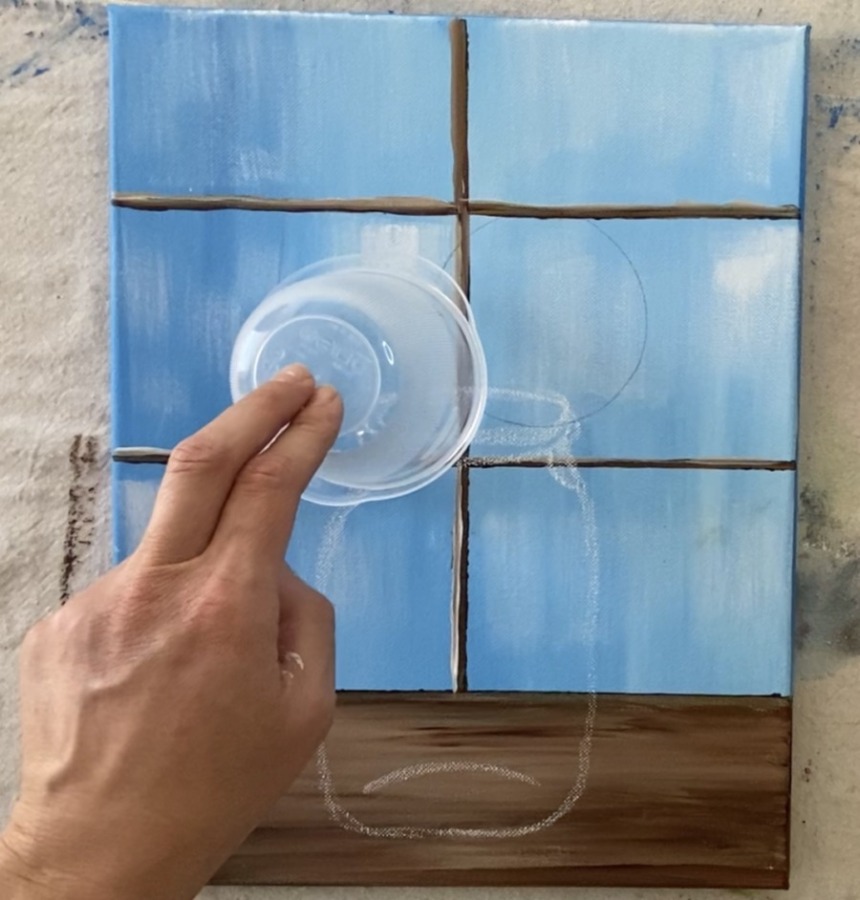
I decided not to draw the other circles just yet so it wouldn’t look overwhelming!
8. Practice those hydrangeas (they are easy I promise!)
Next get a sheet of paper (or practice on the back of your canvas). When I practiced my hydrangeas, I tried them with either a round brush or a filbert brush. Both brushes gave similar but slightly different styles in the hydrangeas and I will demonstrate that below.
Load your palette with medium magenta and titanium white. Draw a circle on your practice paper.
With that filbert brush, simply paint a small four or five petal flower. The nice thing about the filbert brush is that it gives the edges of those petals a curved look.
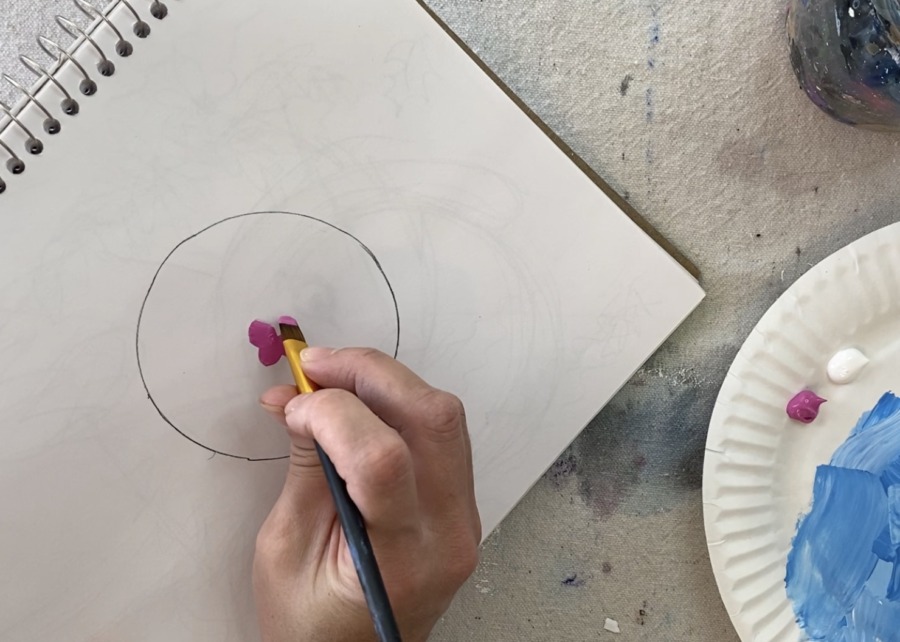
Then do another small flower. This time I decided to load a little bit of white onto my brush. So now my brush is loaded with both pink and white.
This next mini flower overlapped the first one slightly.
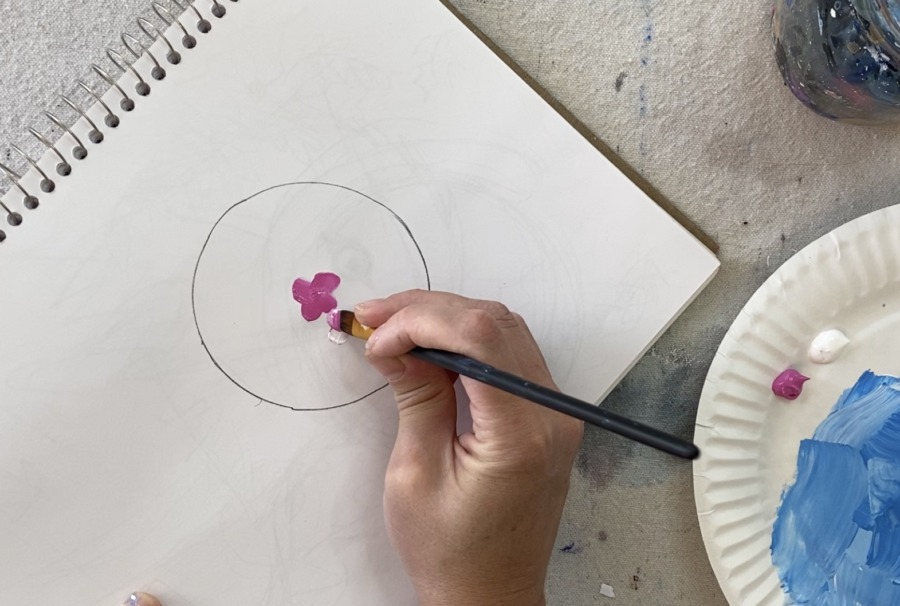
Then just keep going! The hydrangea is full of little flowers that have different variations of the pink and white.
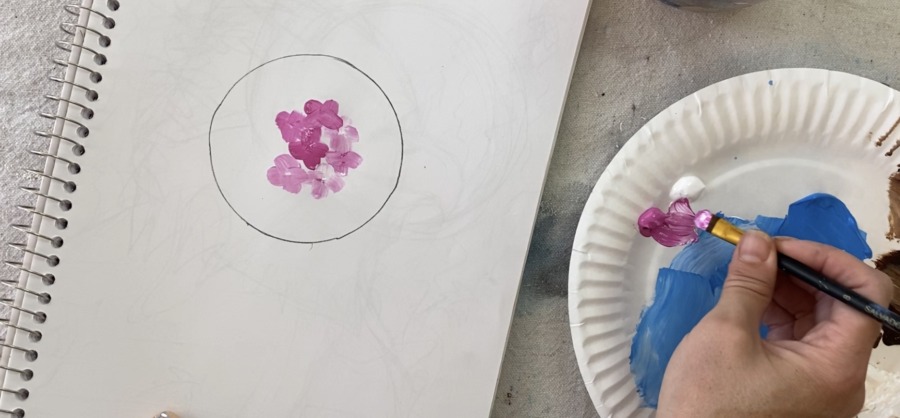
In some areas, I just painted dots to fill in the space and give the impression that maybe the flower is facing a different direction.
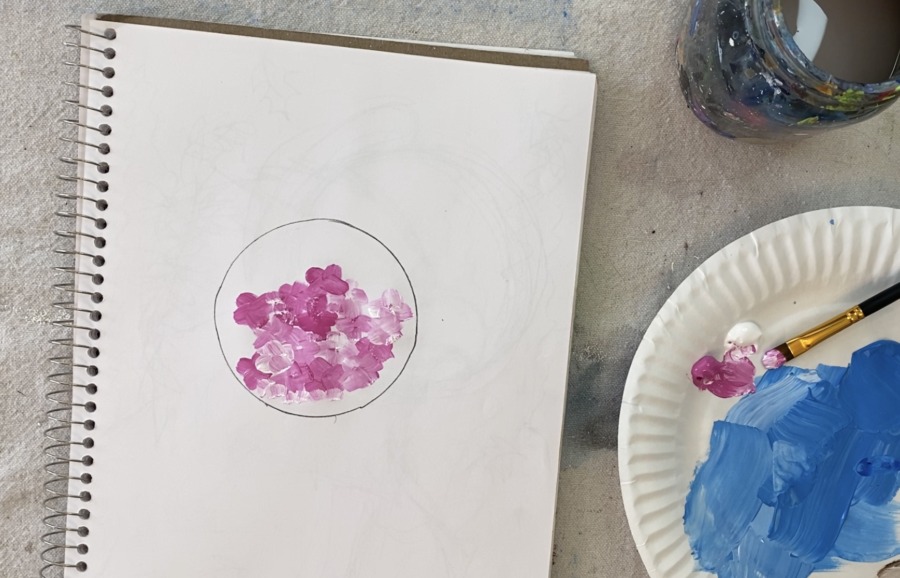
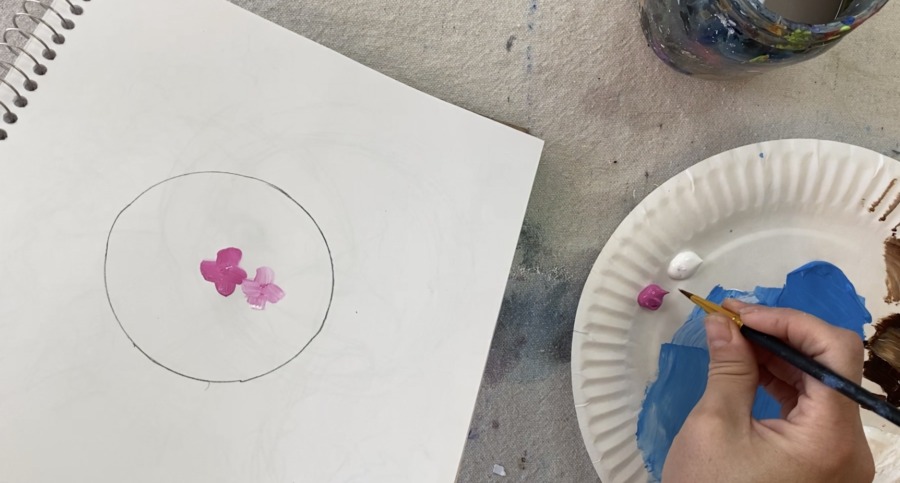
Fill up the entire circle. Then have some petals of flowers overlap the circle you drew so as to cover that pencil line. Also, if you want your hydrangea to look less like a circle, you can have even more petals going outside of the circle.

Then paint a small dot in the center of many of the flowers. I did the dot with a #0 round brush. You can use white or pink or both for the dots.
For the blue flower, I decided to practice the technique with my round brush. I loaded my palette with cobalt blue.
The round brush gave the flower more of a loose style. With this blue, I still did the same technique of loading in both blue and white to create different variations of colors in the little flowers. Sort of press on your brush to create the stroke of the petal.

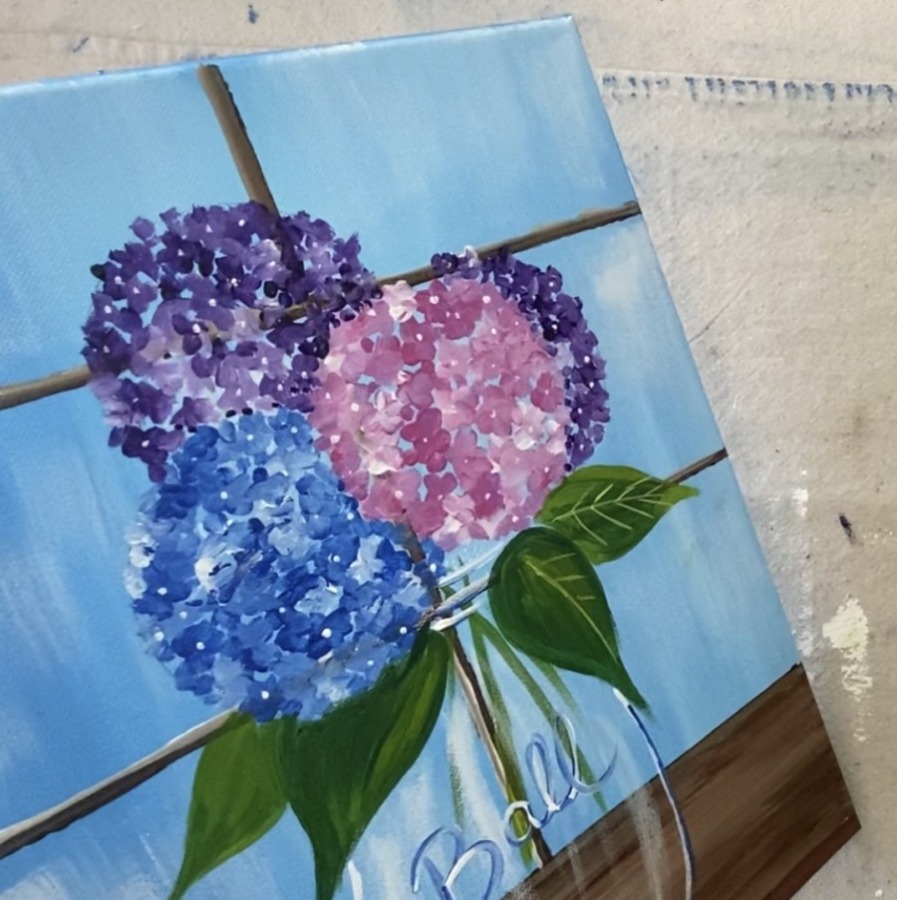
9. Apply that technique to your circles on your canvas!
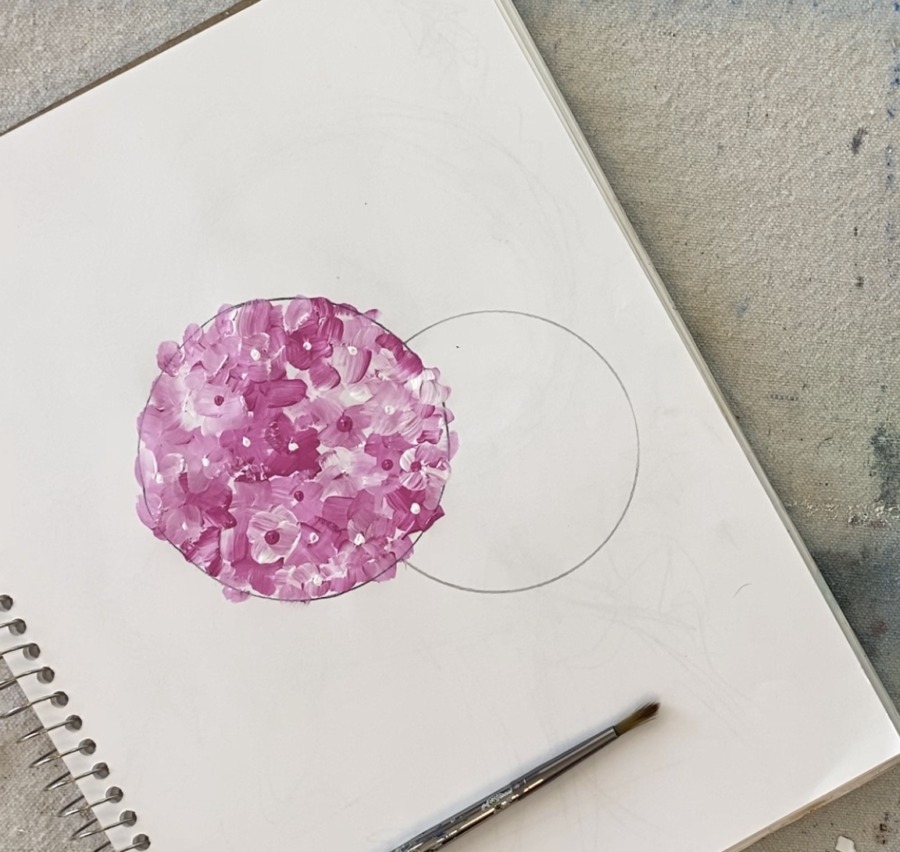
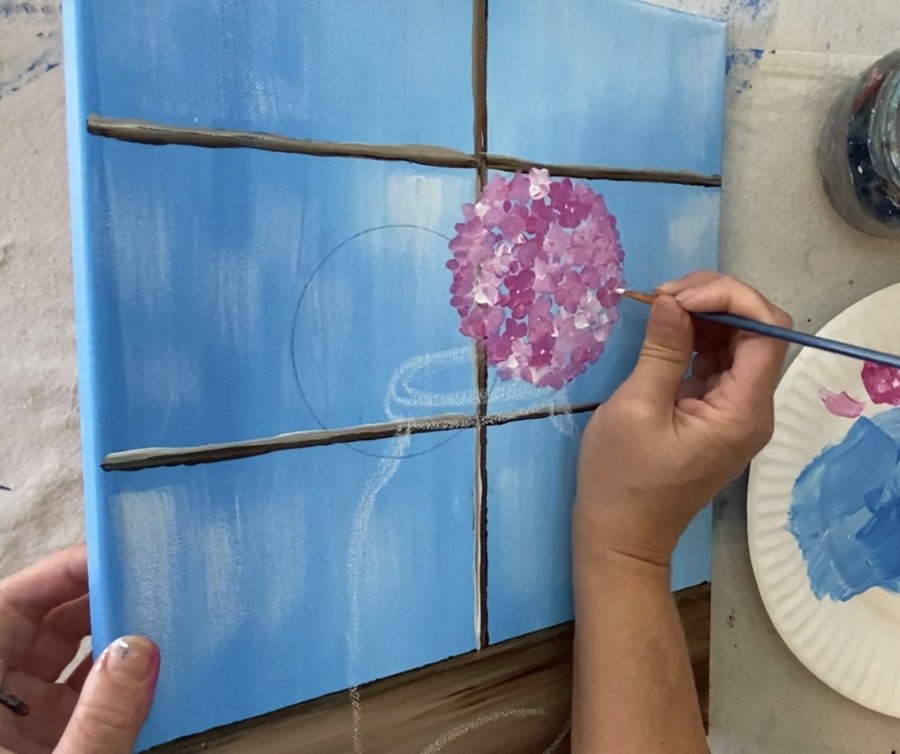
Now that you have practiced your hydrangeas, it is time to apply this technique to the canvas! I decided to use the round brush for all my little flowers. The first circle was painted with medium magenta and white. Simply fill it up with little flowers and some dots.
Remember to cover up your pencil line and go out slide of the line slightly. Also if you want your hydrangea to not look like a perfect circle, you can go outside of the lines even more!
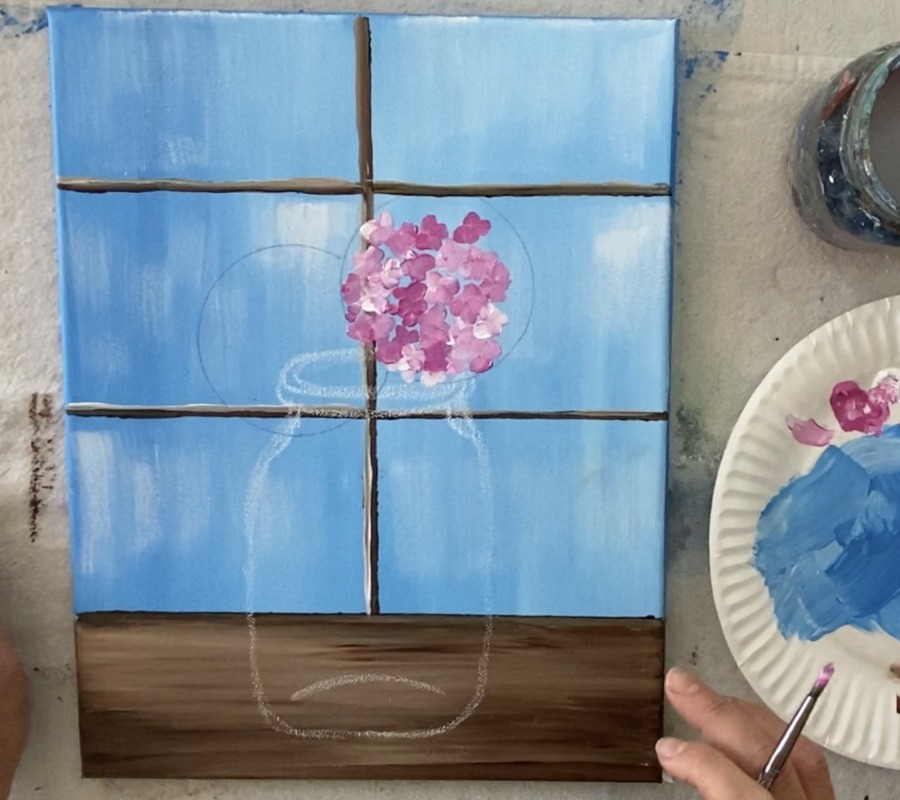
And for the middle dot, I used my #0 round brush and titanium white.
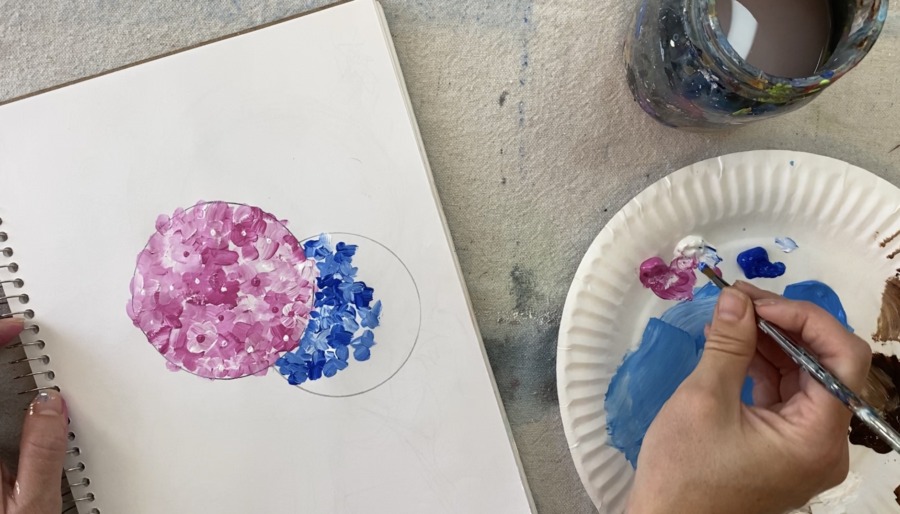
Then I did my cobalt blue flower using the exact same technique!
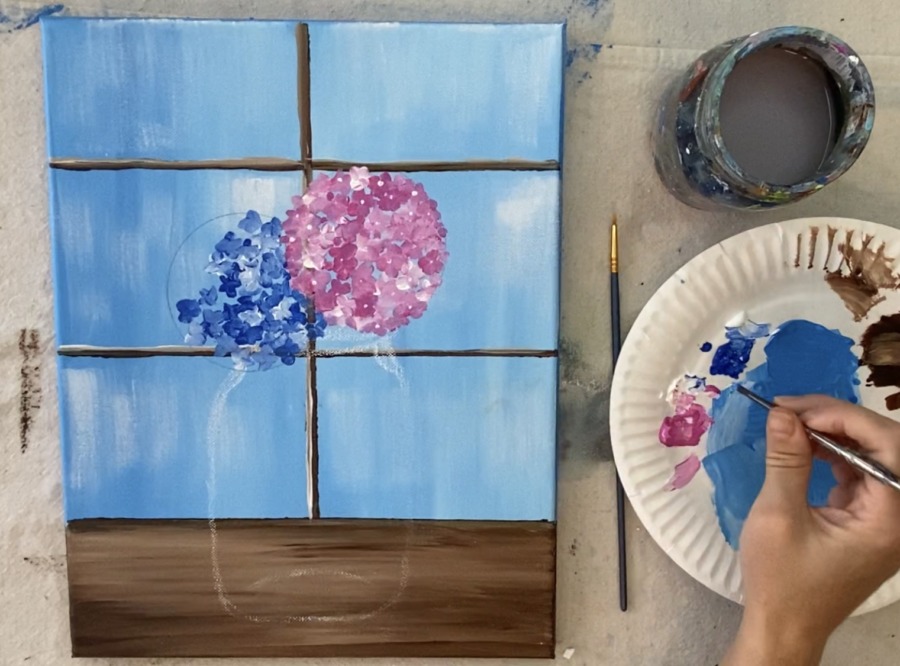
Next I traced two more circles with the same Tupperware container! Both of these will be purple hydrangeas! They are going behind the two already painted flowers.
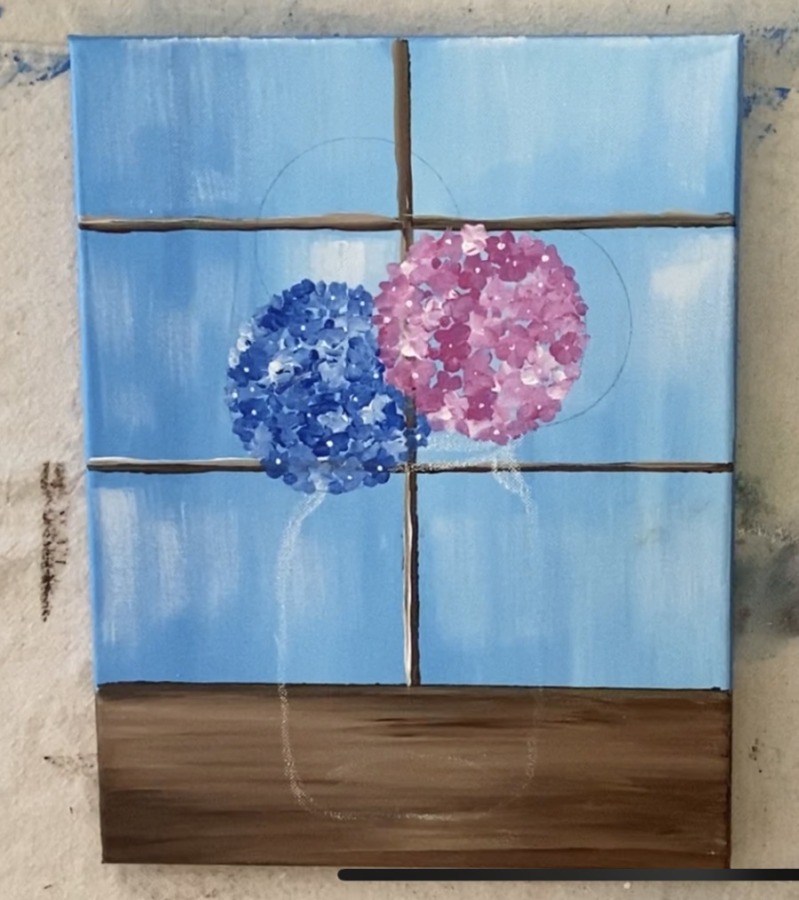
To paint the purple hydrangeas, I used dioxazine purple and titanium white as well as the same technique!
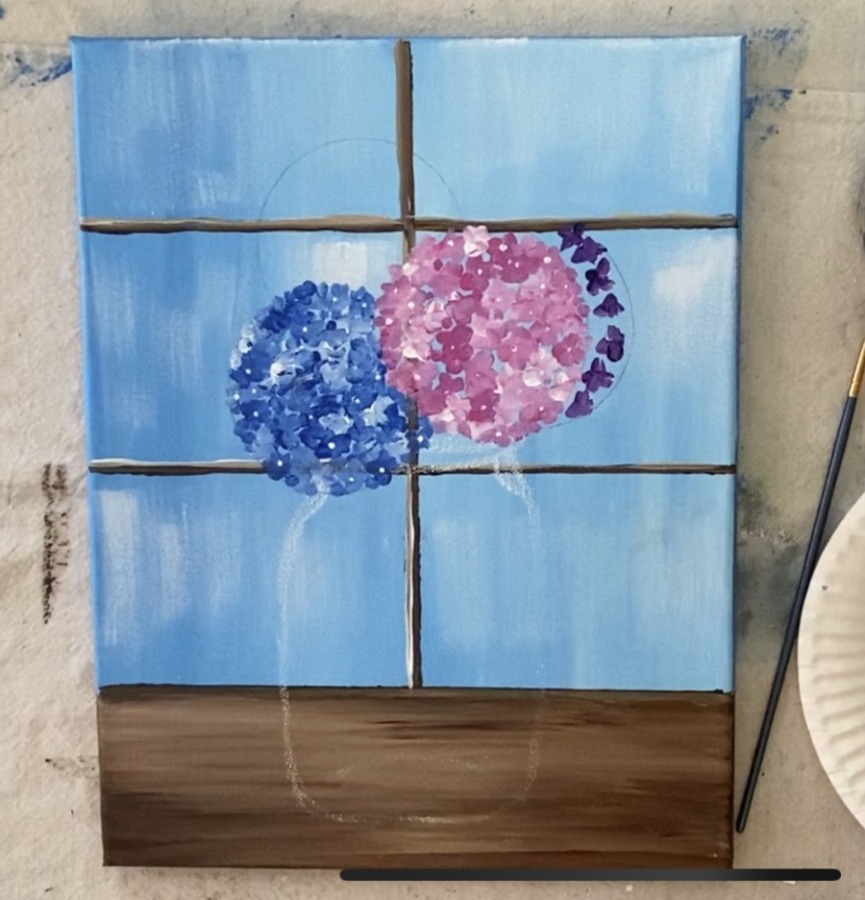
Tip: when painting the area where the hydrangeas meet, make sure you really define that edge! I did this by painting little dots instead of actual flowers.
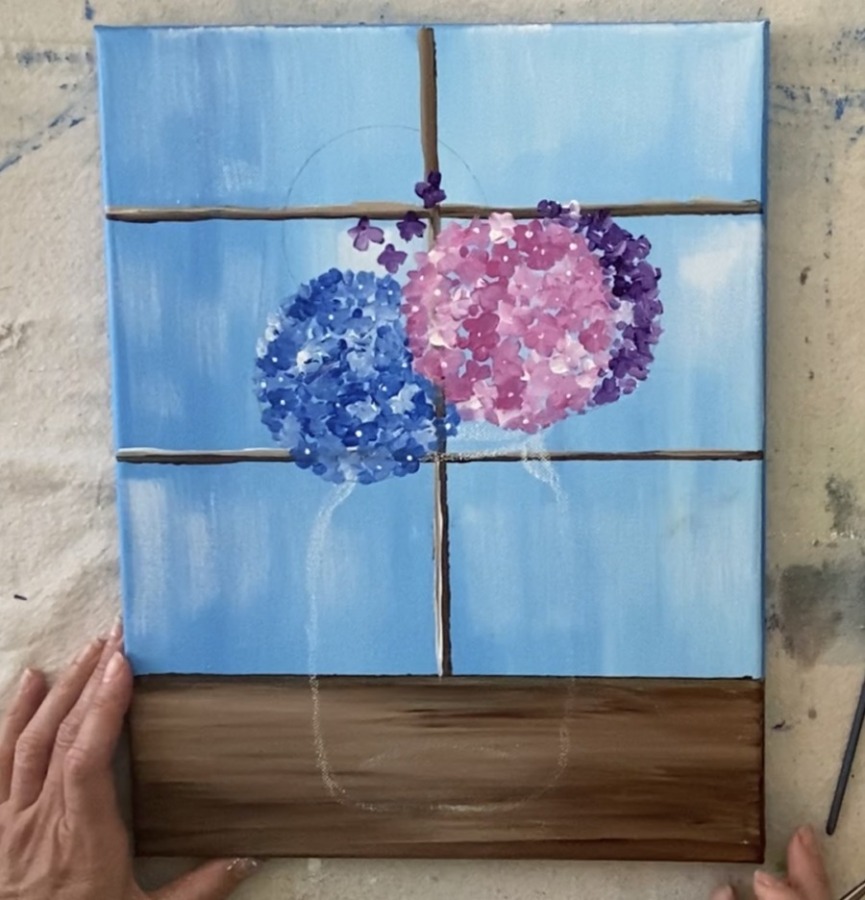
And then the little white dots in the center! I did not choose to do dots for every single flower but for most of them!
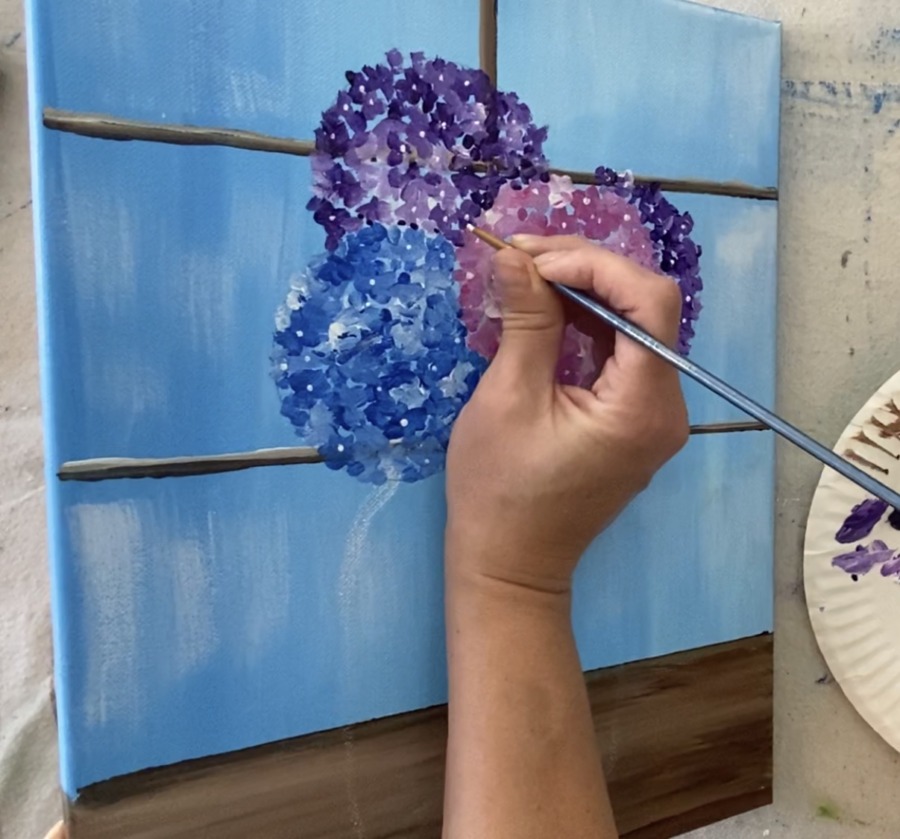
Also notice you can still see some blue through the flowers! If you want, you can cover all the background 100%, however, I choose to have some areas still showing through.
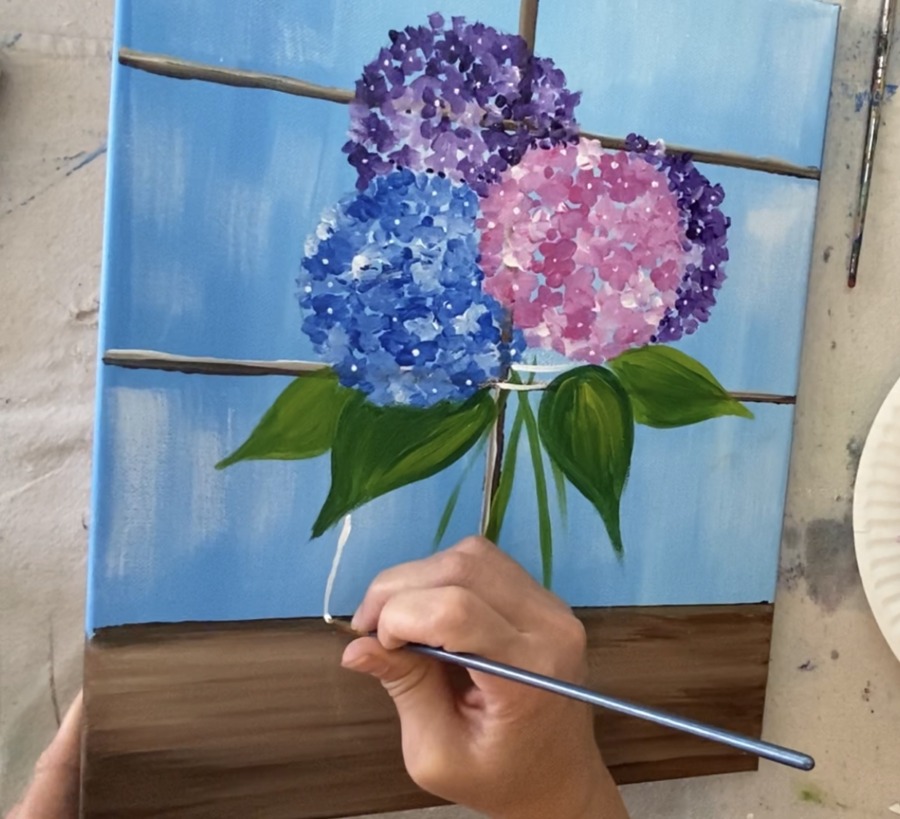
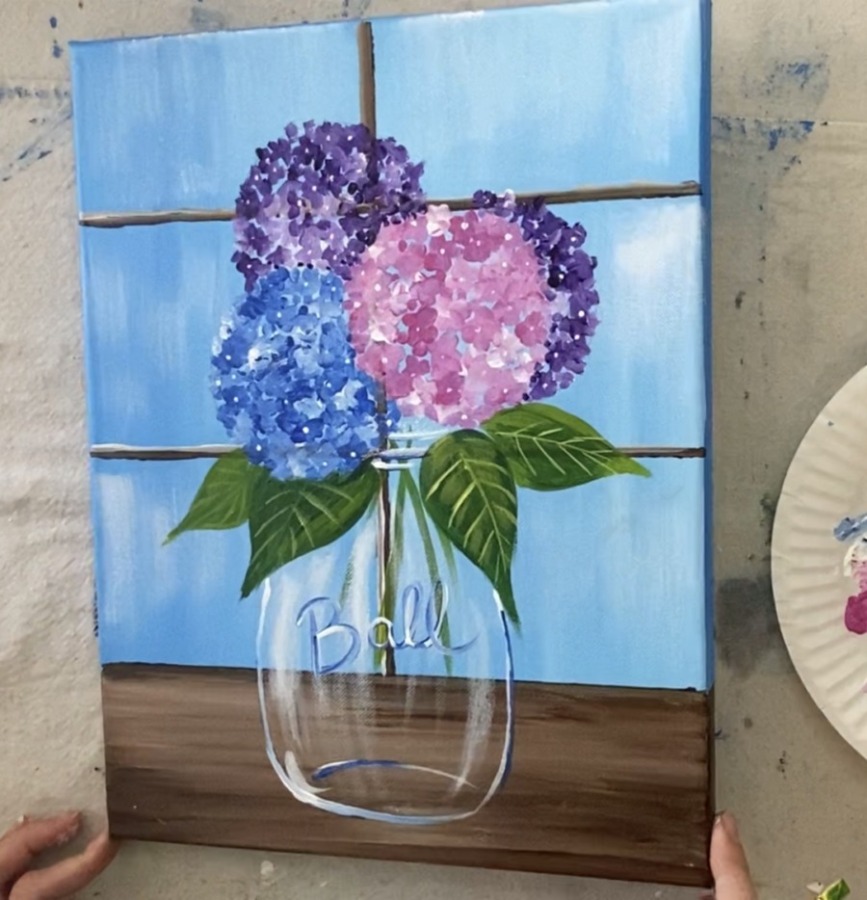
10. Paint The Stems
For the stem, I used a #4 round brush and the colors hookers green and light olive green. I like to use a variation of greens when I do stems and leaves!
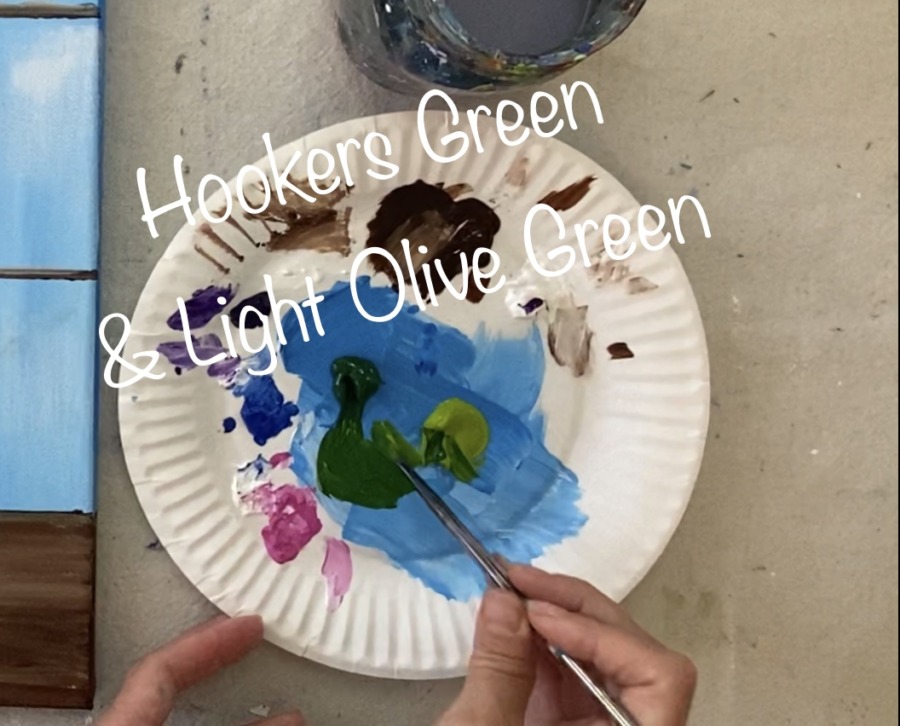
For the stems, I double loaded my #4 round brush in both the dark and the light green.
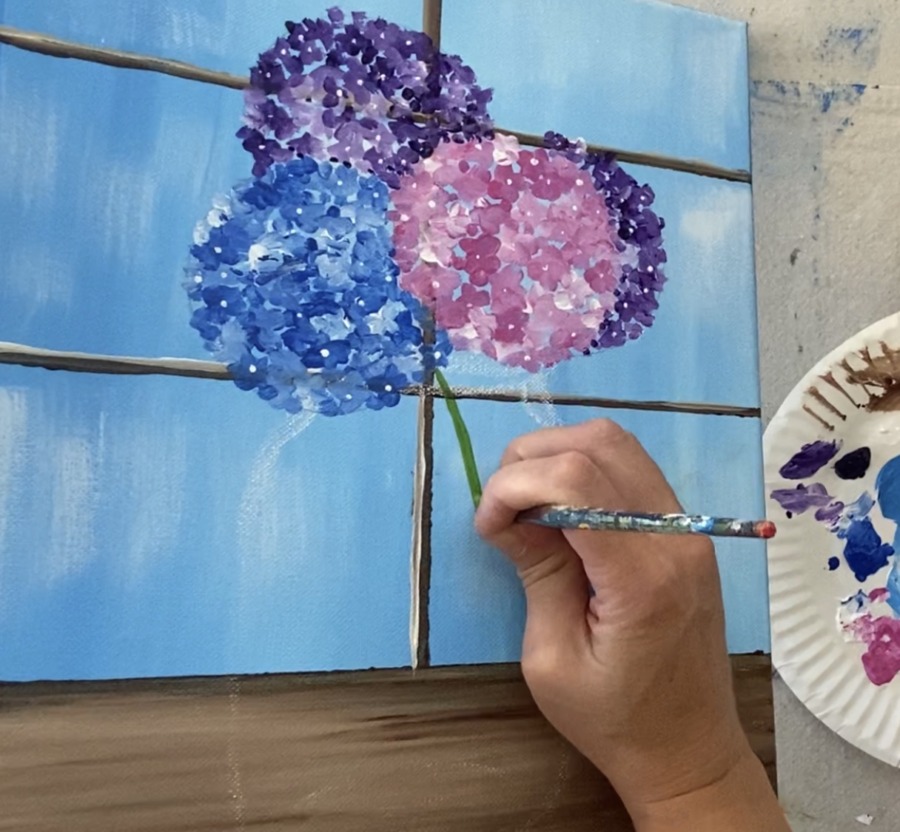
And I painted the stems! Paint simple vertical, diagonal and slightly curvedlines going down from the flowers inside the jar.
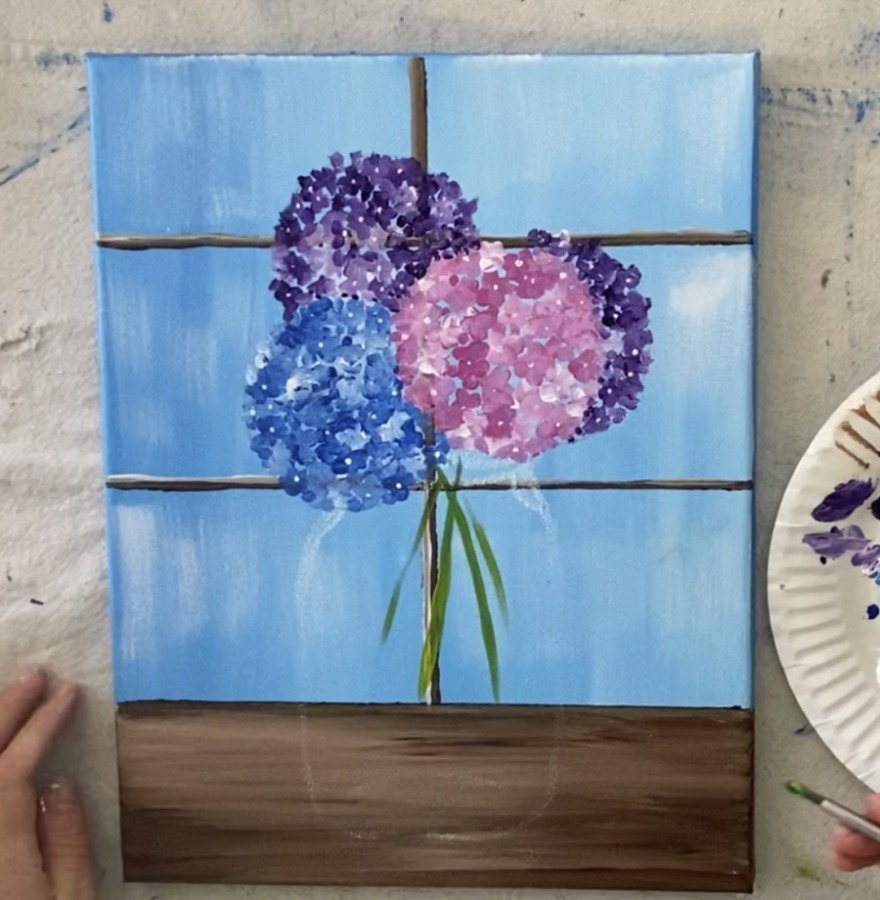
You don’t have to put much detail into these stems! Much of this will be covered with our glass glare that we will paint later.
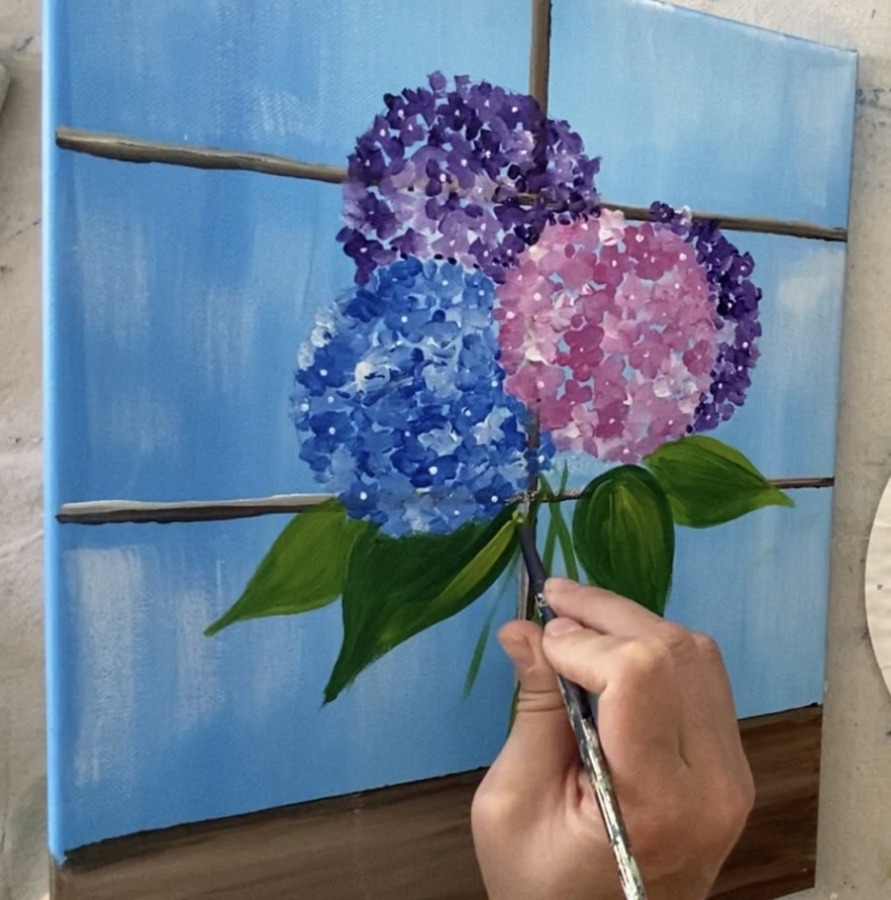
11. Paint The Leaves
I used the hookers green to paint the shape and base color of the leaves. The hydrangea leaves are a basic leaf shape.

Paint your leaf outline first and then fill it in solid.
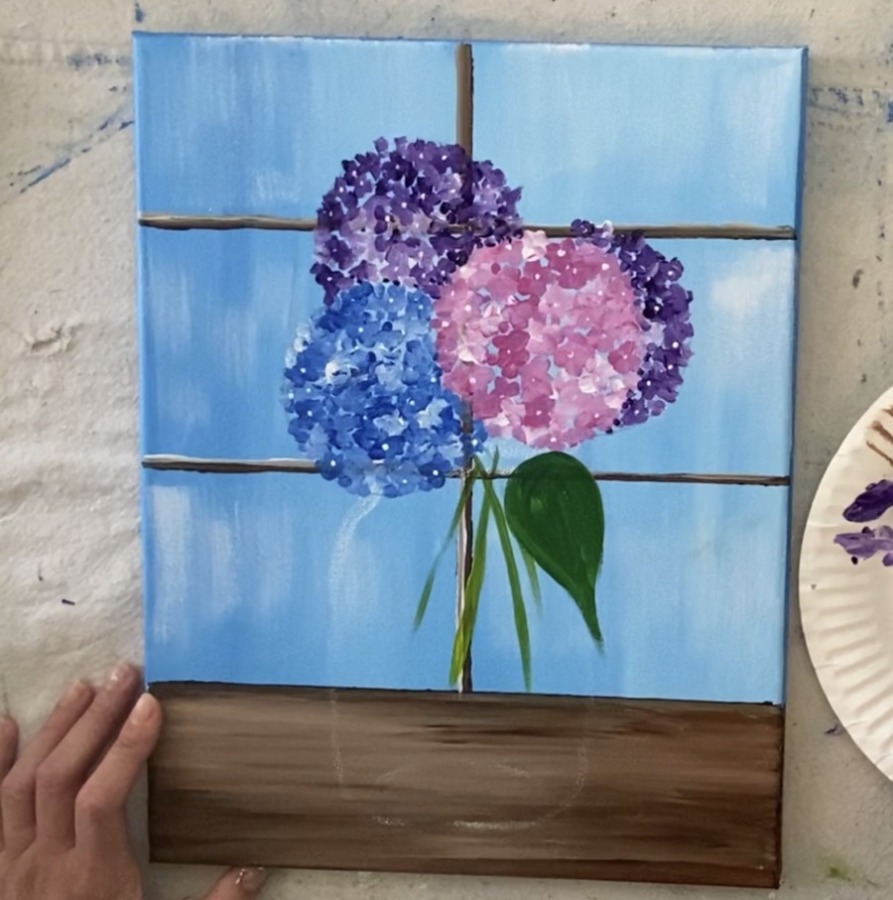
For the next leaf, I did one that was under the first one and lighter (more light olive green on the brush).
Then paint a third leaf.
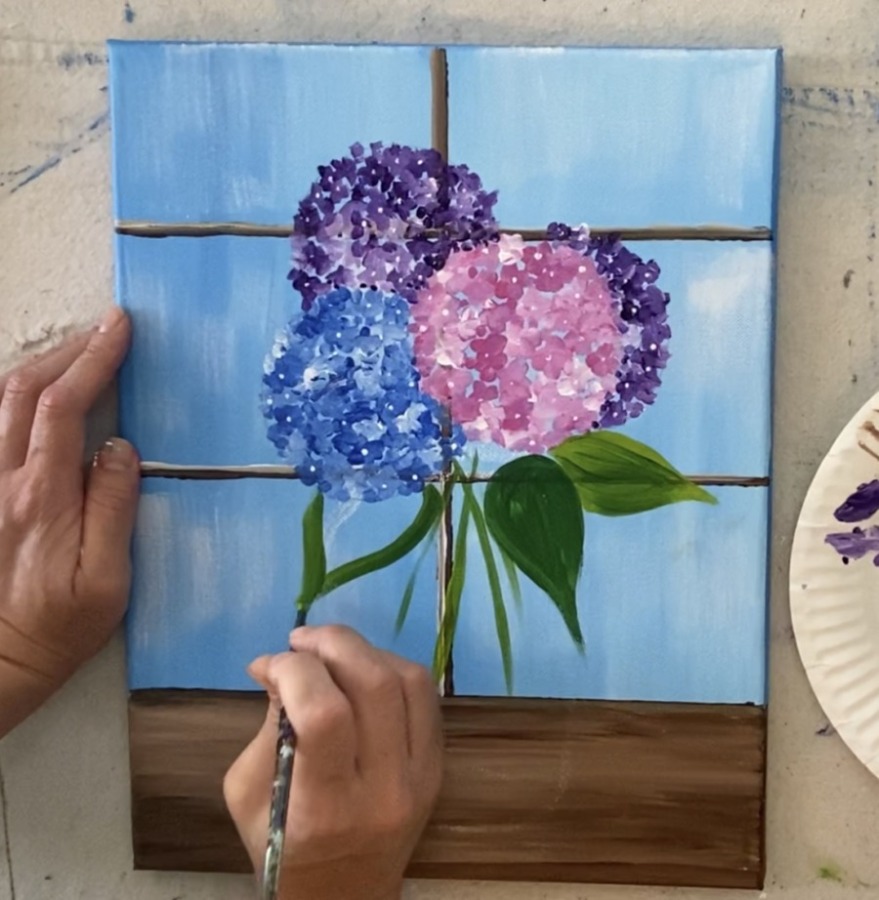
I did a total of four leaves.
Then I went in and added a second coat to my leaves with the light olive green. This gave the leaves some color variation.
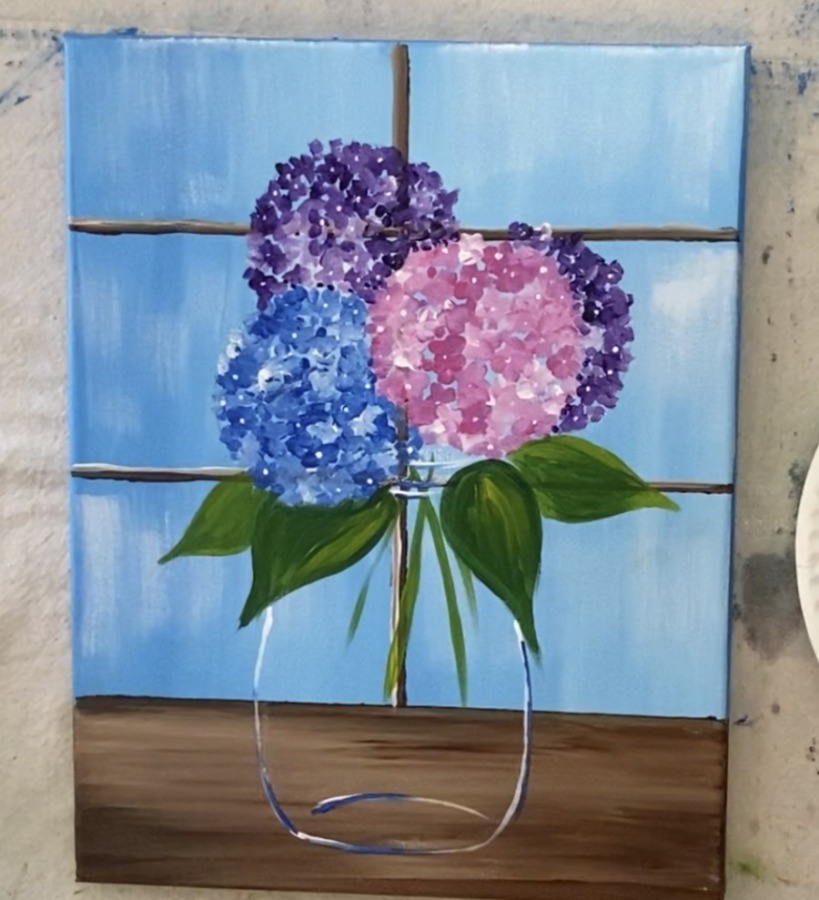
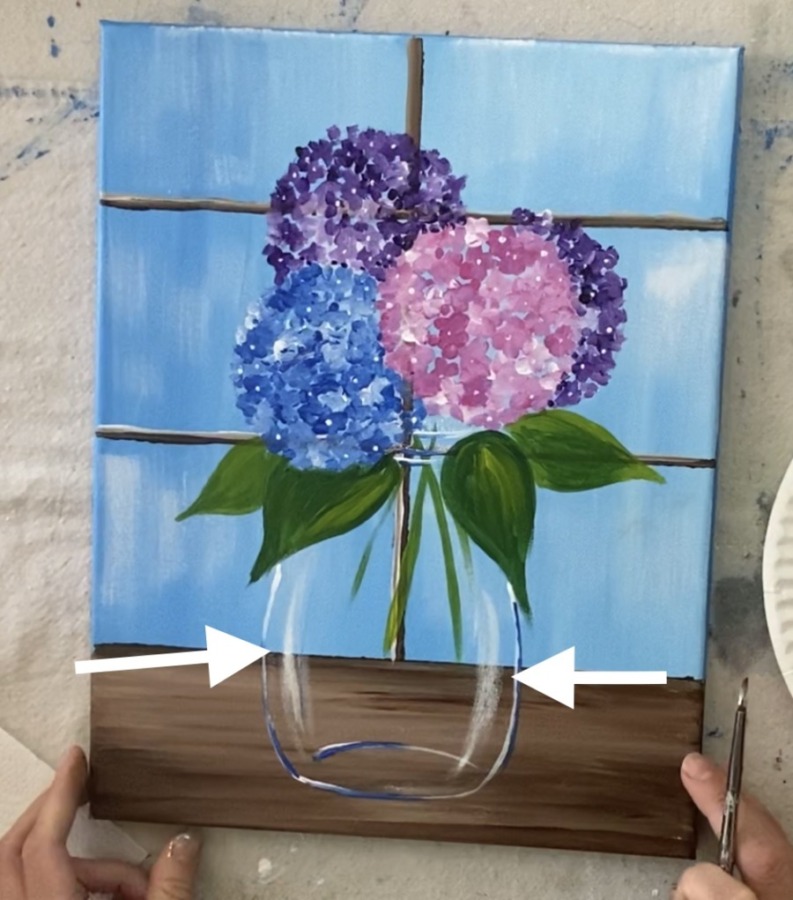
12. Paint The Mason Jar
Next use your #2 round brush and titanium white to outline your jar drawing. Outline the rim (if it is still showing through) and the sides and base of the jar.
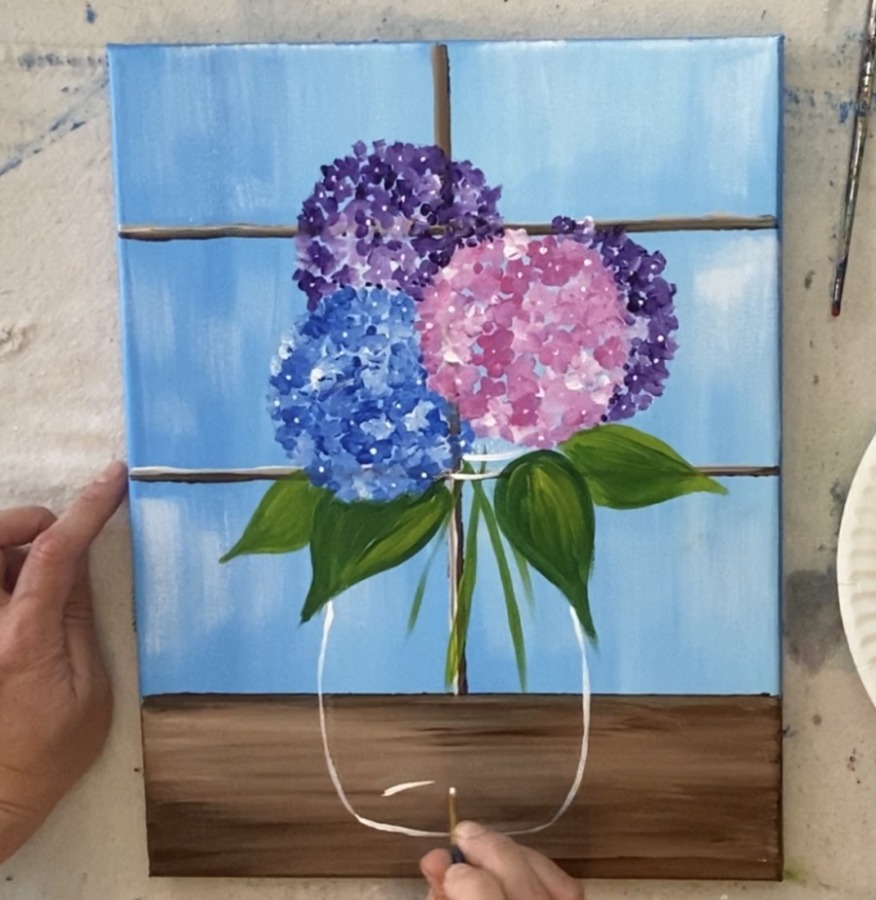
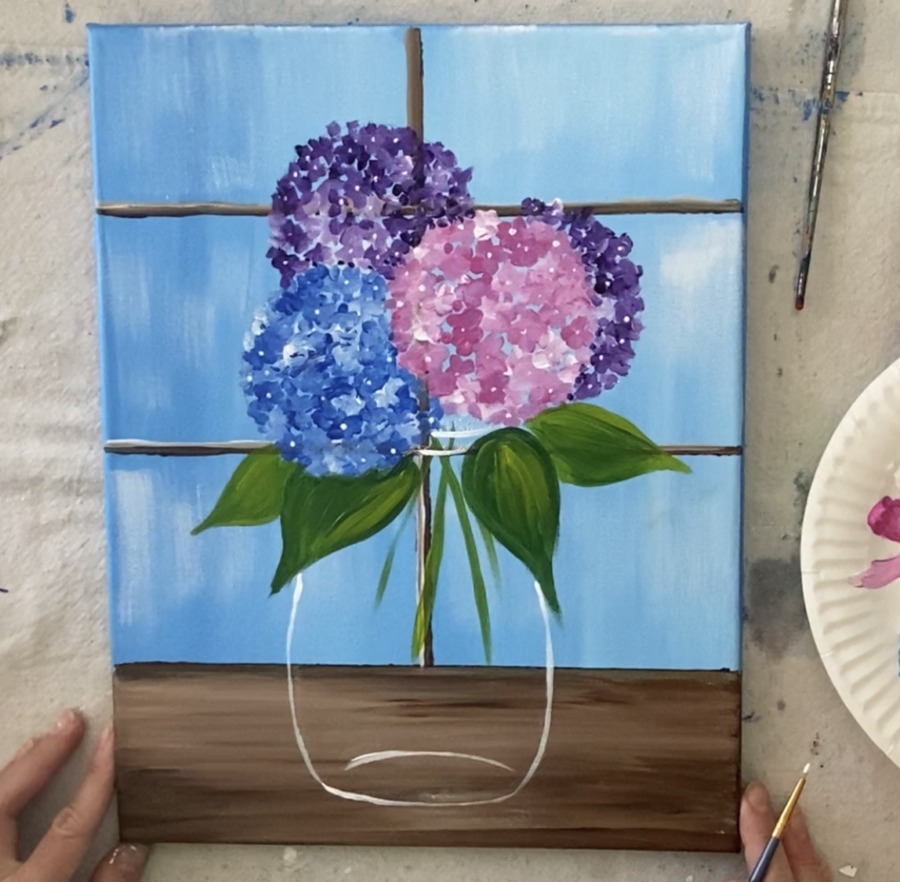
Then go in with some cobalt blue on your brush and loosely outline some parts of the jar with the blue.
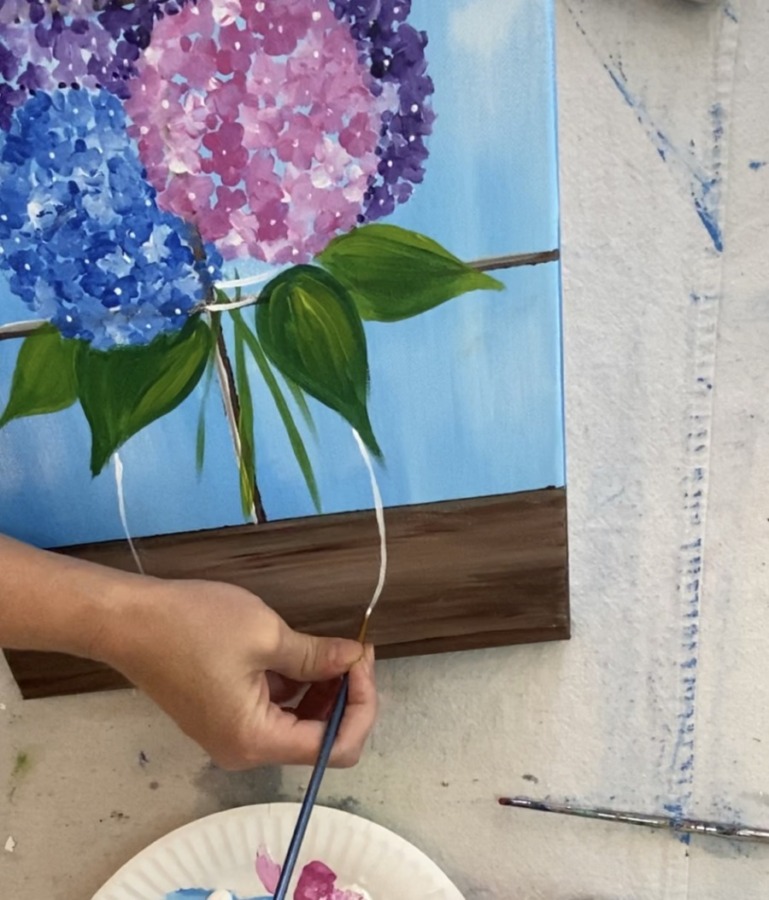
13. Paint The Glare On The Jar
The glare will give your jar that glass look! Load your #4 round brush in titanium white and wipe it off with a paper towel.
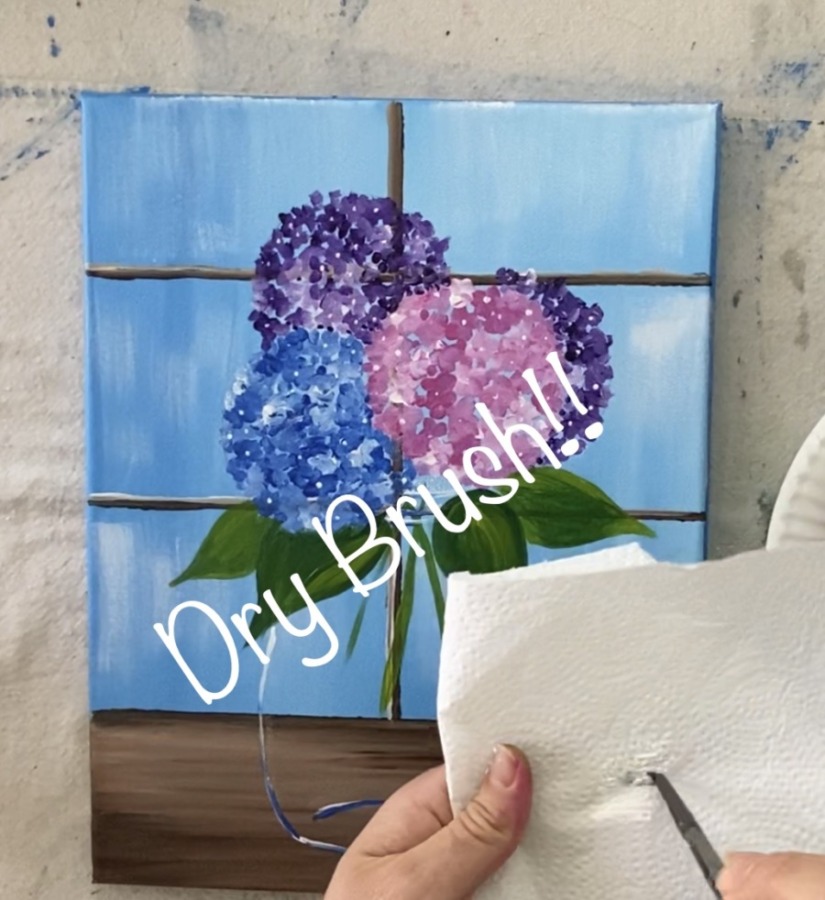
Start off by painting a dry brush stroke vertically (but slightly curved) on the left side of the jar.
Then do the same thing on the right.
Add some more glare in the middle. If you overlap your stems, that will give it more of a realistic effect!
Then go in and add some brighter glare! I did one on the bottom left corner of the jar.
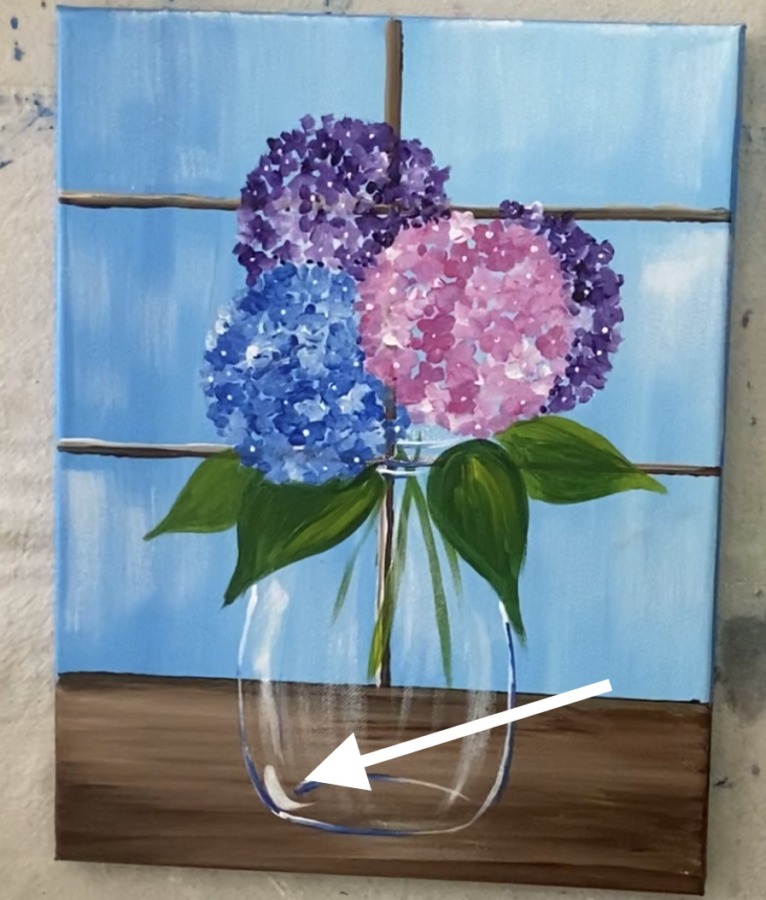
And then I made the left side of my glare brighter by giving it a second coat.
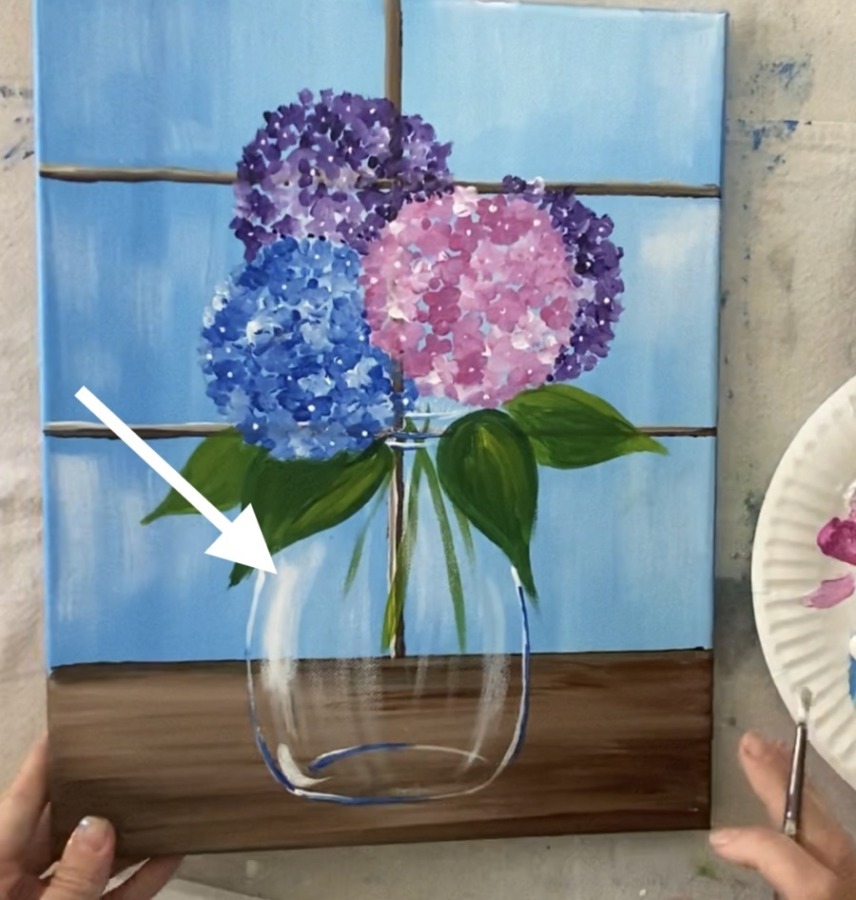
And a few more brighter glares in the middle.
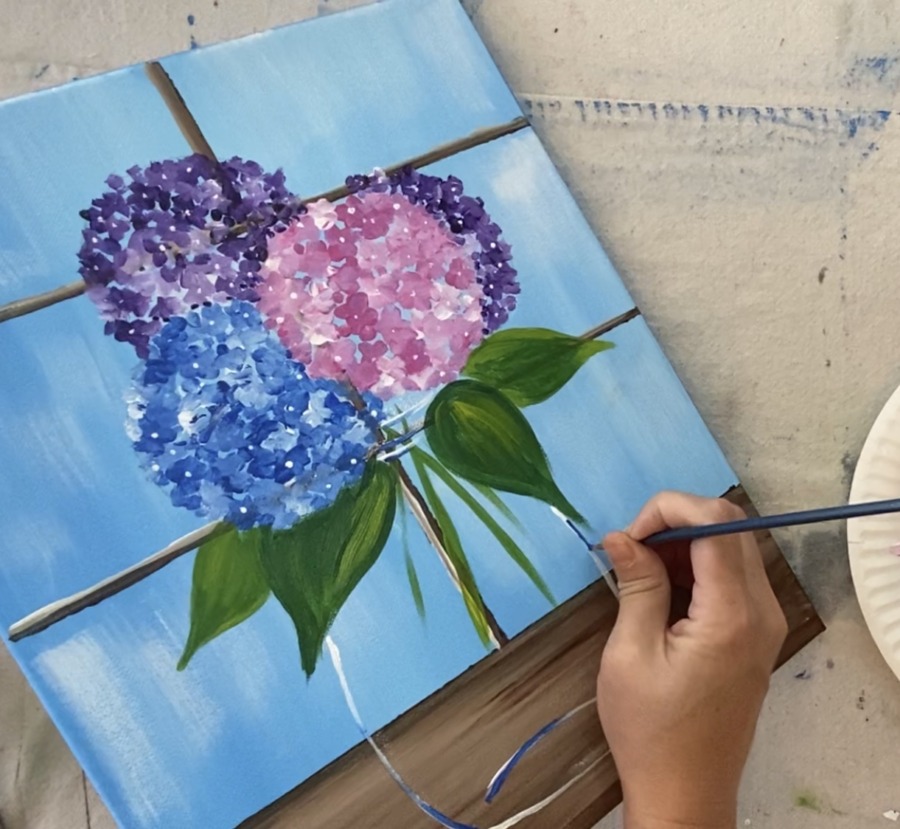
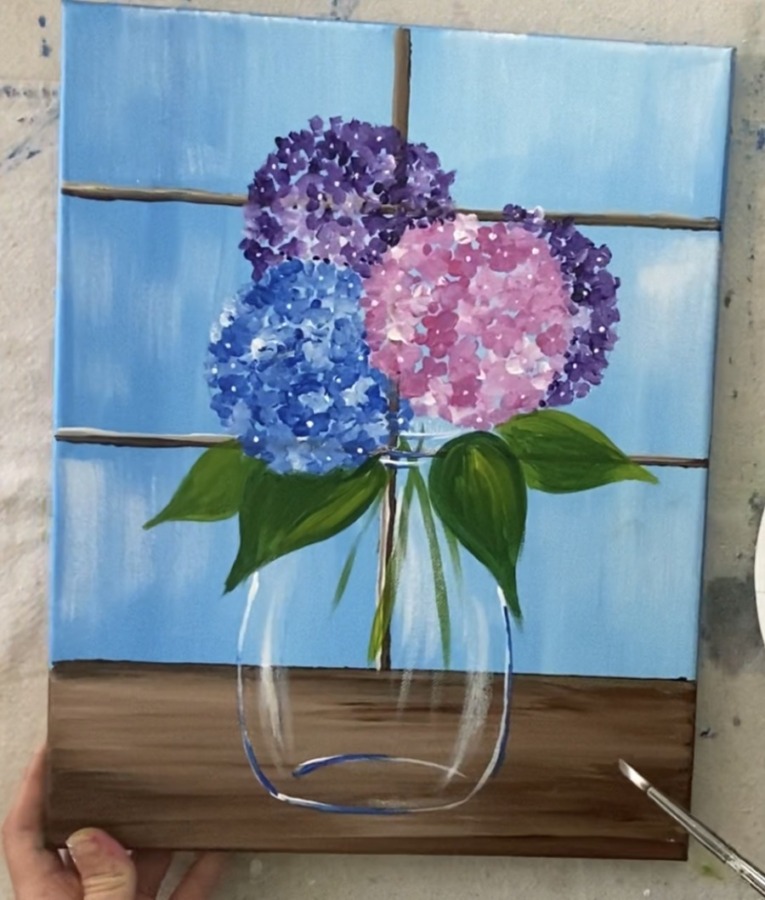
14. Write The Word On The Jar
I pretty much free handed these letter. If you need to, you can use a pencil or chalk to lightly sketch it out first. You can also customize this word!
I used my #2 round brush for this step! Start with cobalt and a little bit of white on your brush.
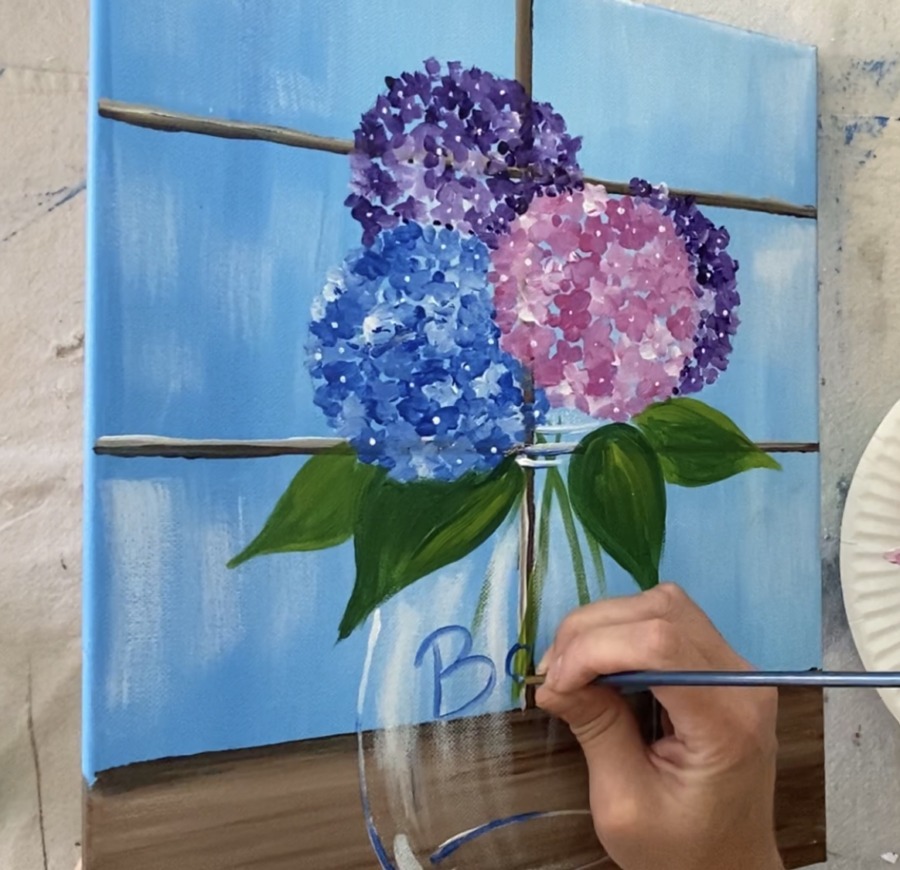

Then I went back over the letters with a little bit of white.
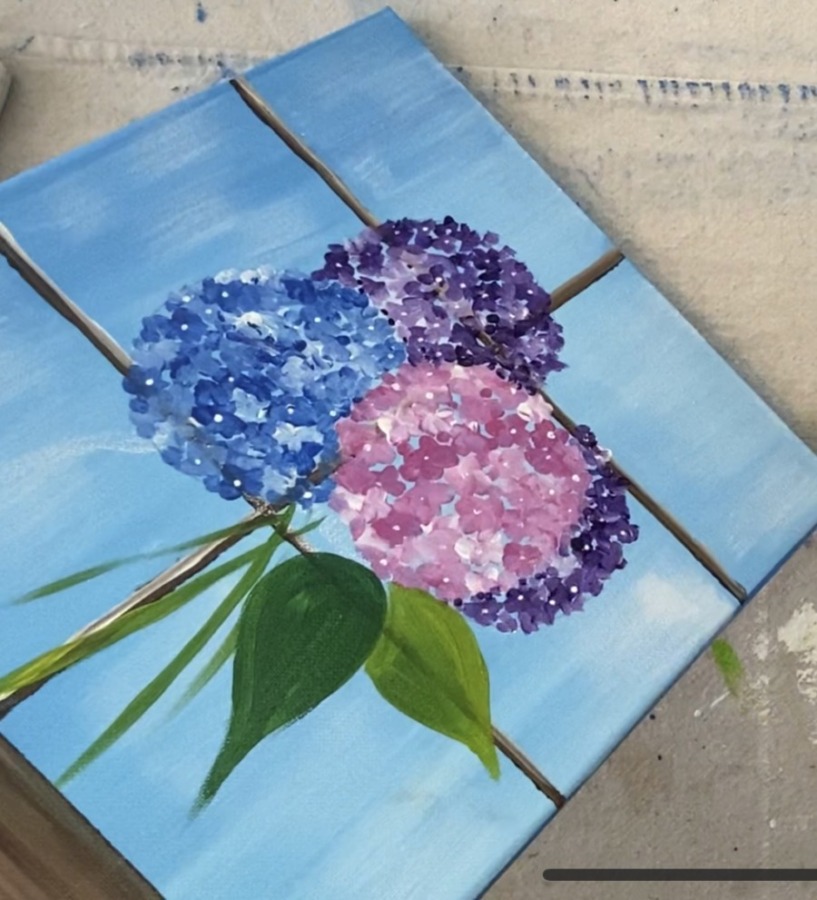
15. Paint the lines on the leaves
For the leaf lines I used the #6 shader brush (the edge of the tip). You can also do this with the #2 round brush.
I mixed some titanium white into the olive green on my palette to get a lighter shade of green.
And I painted the lines! Start with the middle line and then do diagonal lines going outwards.
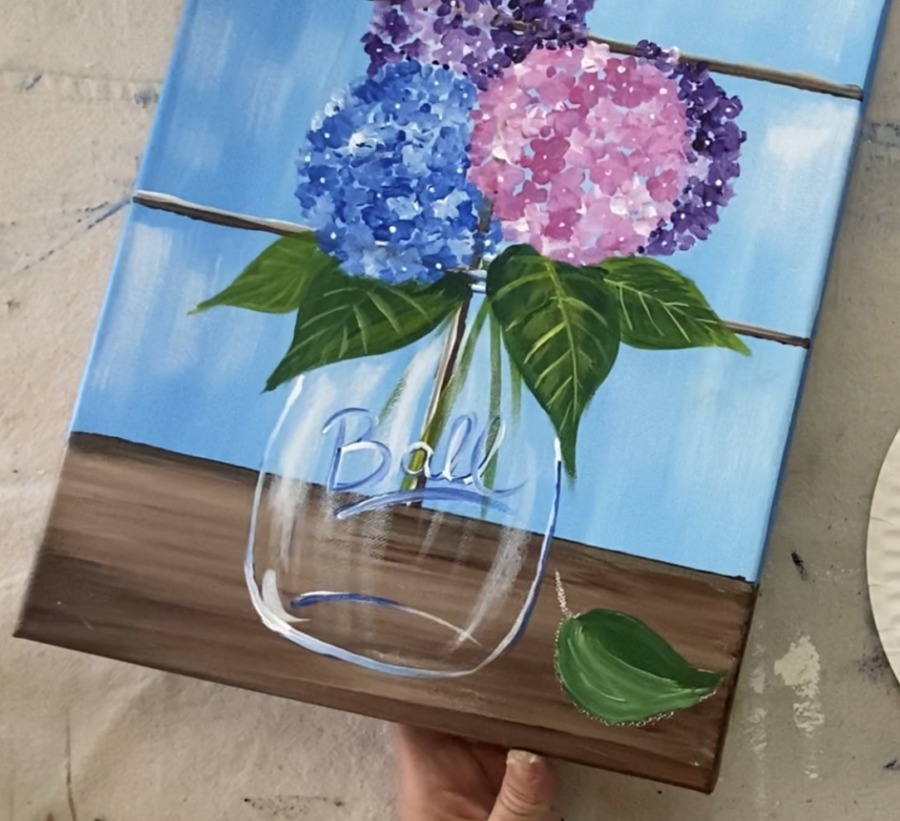
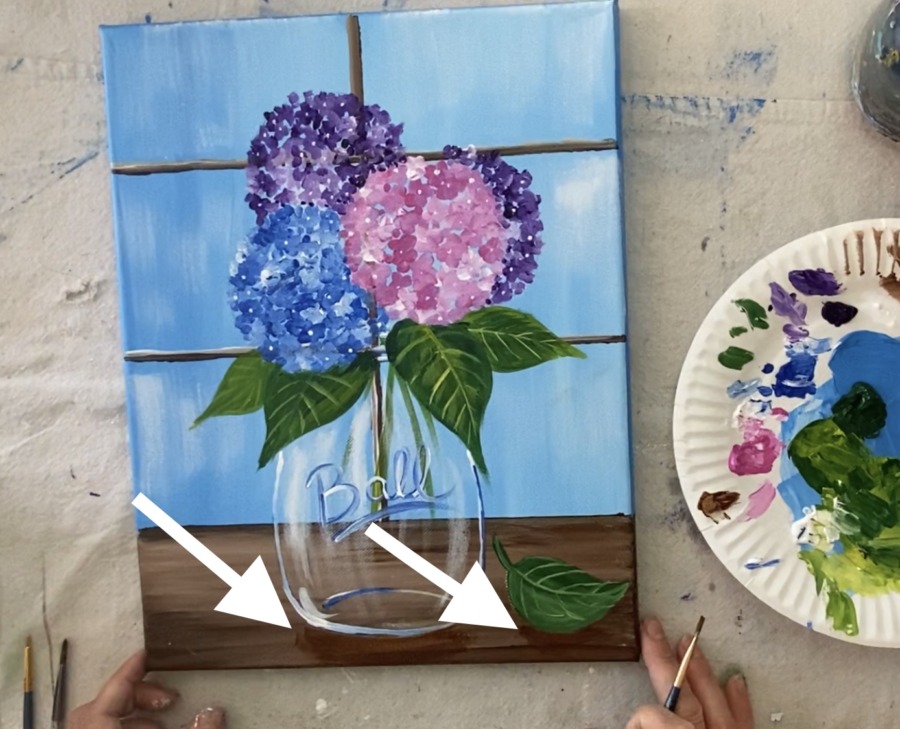
16. One final touch! Paint a leaf on the ledge/ table
This painting was way too symmetrical so I decided to add one more thing! I drew a leaf on the ledge/table with a piece of chalk and painted it in.
I did the leaf using hookers green.
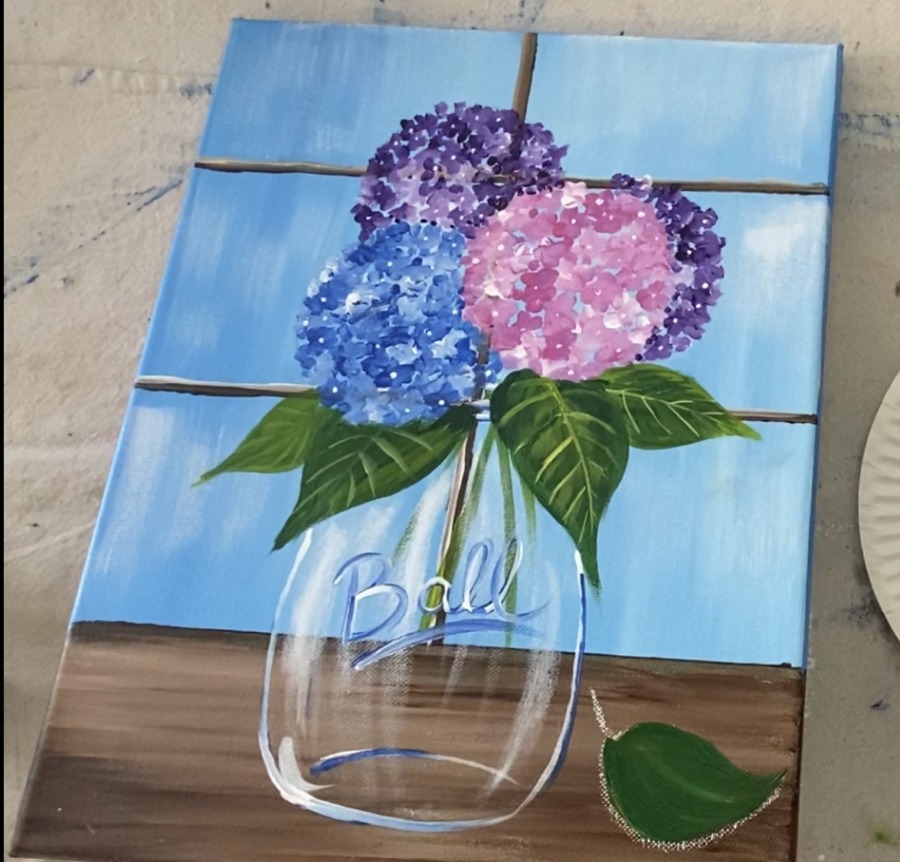
On the bottom half of the leaf, I added a bit of white and then blended it into the green so the leaf looks lighter on the bottom and darker on top.
Then I did the lines.
As one final step, I painted a little bit of a shadow under the jar and leaf. To do this, I watered down some burnt umber and used my #6 shader brush.
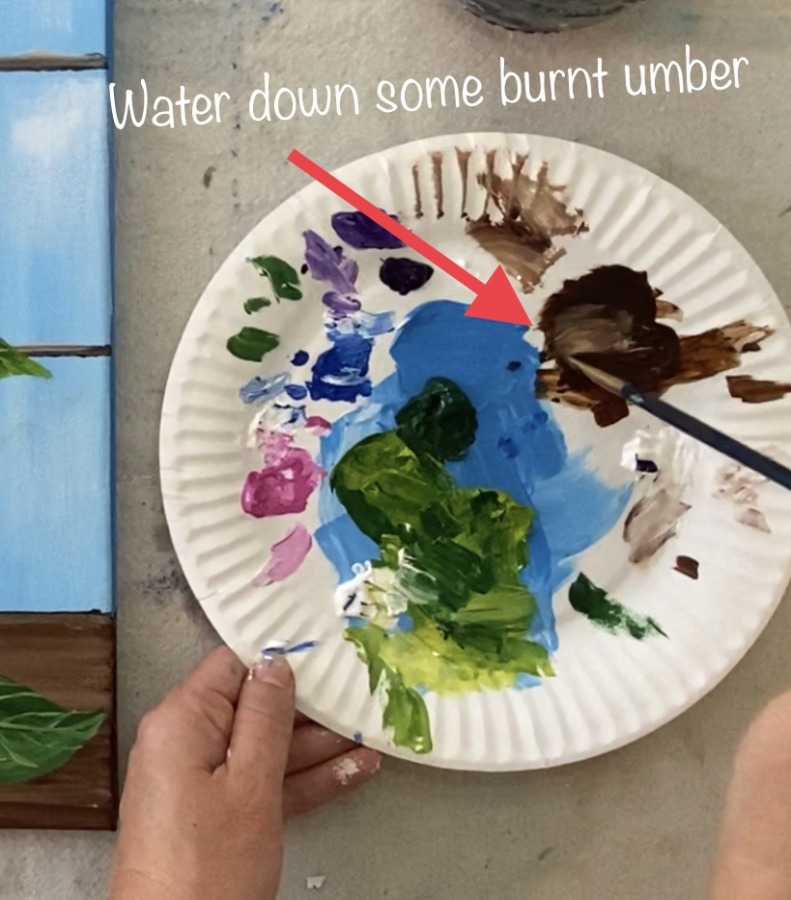
Paint that thinned out burnt umber just below the leaf and the jar to create their shadows.
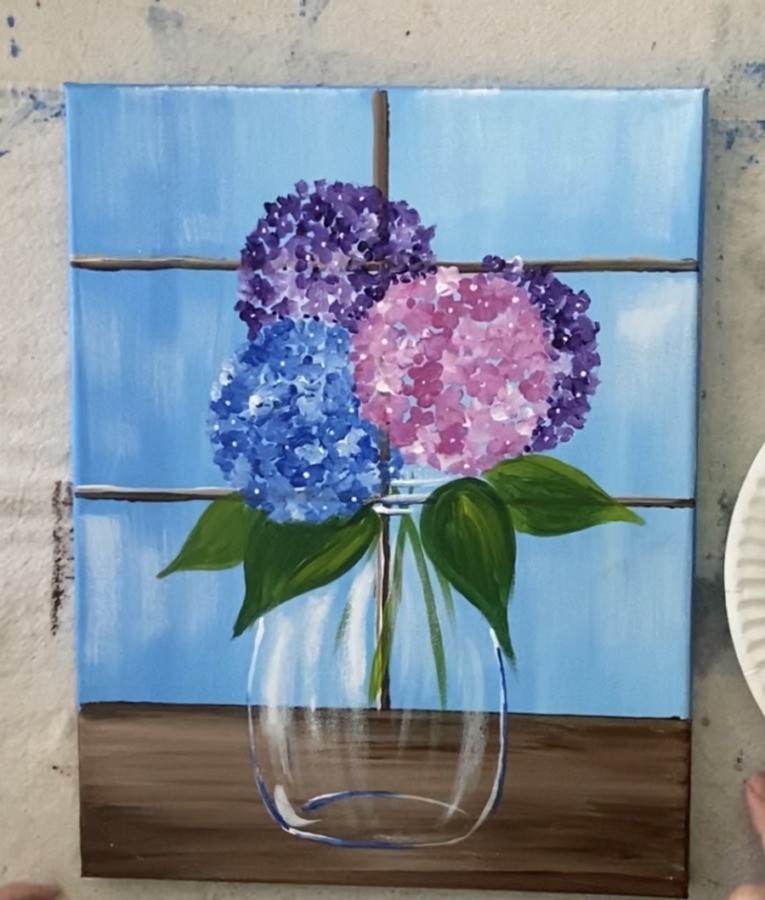
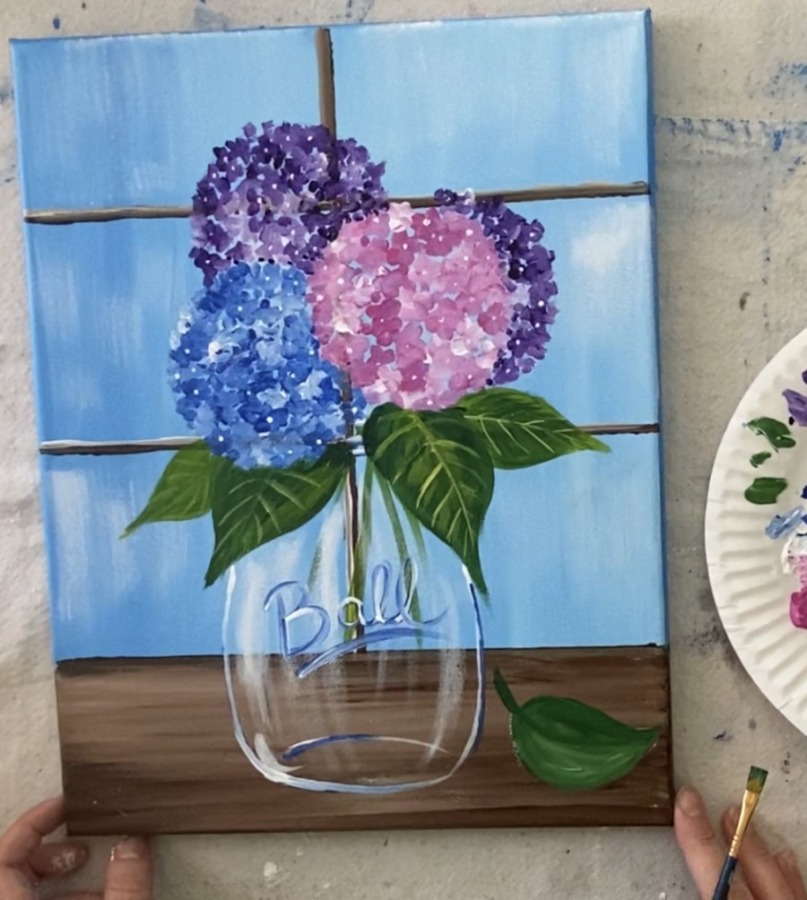
Finished!!
Sign your name and show it off!!

Share This Post!
Absolutely love all your paintings but these flowers / gardens / nature painting are my favs. As always beautiful and so excited to paint this !
Thanks Veronica! So glad you’re excited to paint this!
Love this! I’ll work on that soon. Thanks a lot.
Thanks Natty! I can’t wait to see it when you’re done!! ❤️❤️❤️
Thanks for the link to my Hydrangeas and love your rendition. I really enjoy viewing your lessons, they are so fun. I am working on some hydrangeas in a jar too but using my pallet wood board for the surface.
You’re welcome! Ohh I saw that one on your Instagram! I love it and can’t wait for that tutorial! I’ve been wanting to do a palett board painting. Love all your floral tutorials!
I love following your videos. I have done two that helped me to find a zen in my life. Than you added more I was so happy. I went to the craft store and bought all the paint colors I will need and canvas. I got set up and was ready for a zen day of painting but when I started the video my anxiety started your video was on speed. I tried to follow but I couldn’t. So I had to give up on the picture. I hope that you go back to the step by step videos a regular speed. Until than I will just see if I can fin a new zen time.
I have a long version video Lameya. It is on YouTube and on this blog post. Sorry you did not see that.
I love this painting! It’s so cute. I love flowers, and this painting is a favorite. Thanks. God loves you! John 3:16
Thank you Hahna
You are amazing young lady thank you