

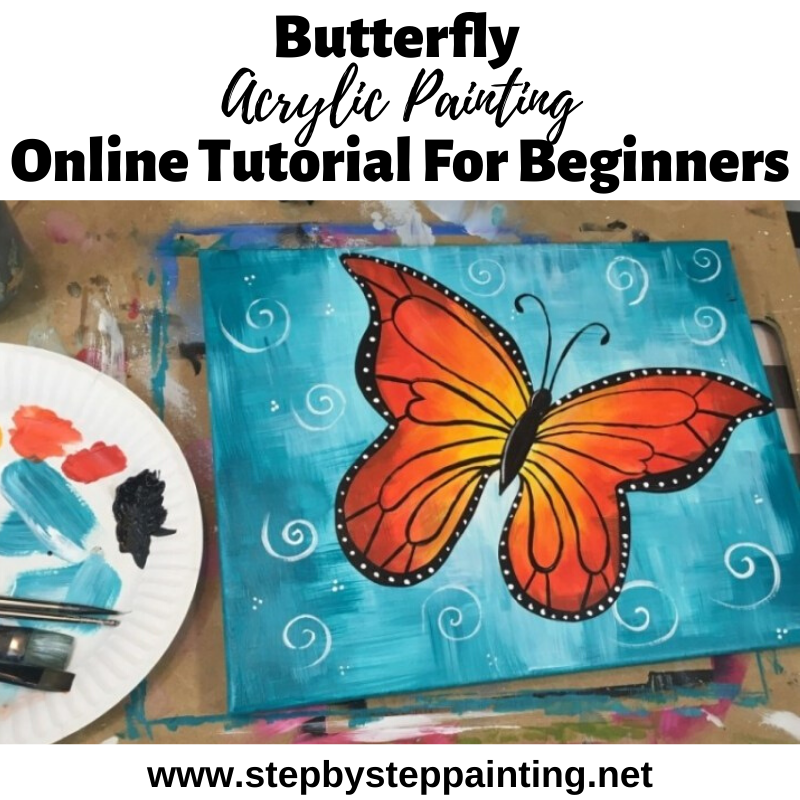
Butterfly Painting Tutorial

Create your own butterfly painting with acrylics on a stretched canvas!
This step by step canvas tutorial will guide you through the steps of how to paint a monarch butterfly.
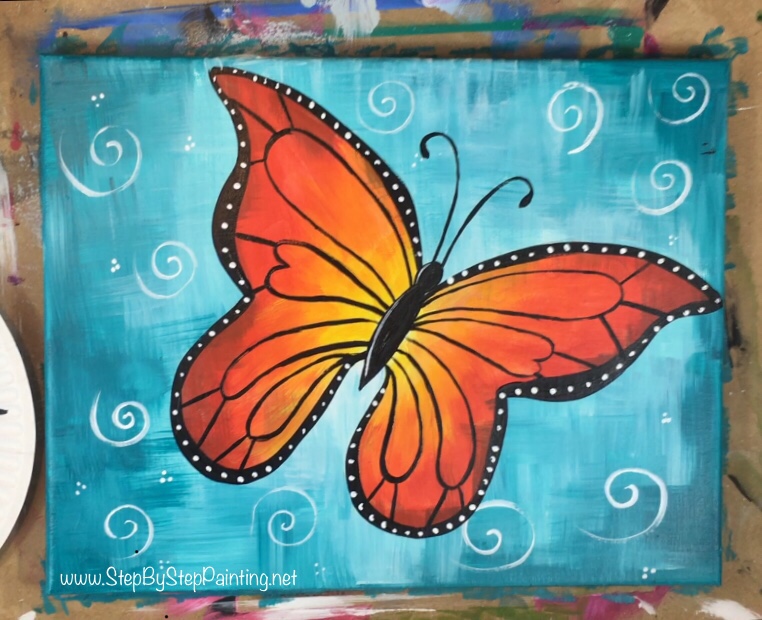
I just LOVE the combo of the teal and orange in this butterfly painting! Those colors pop so cheerfully together.
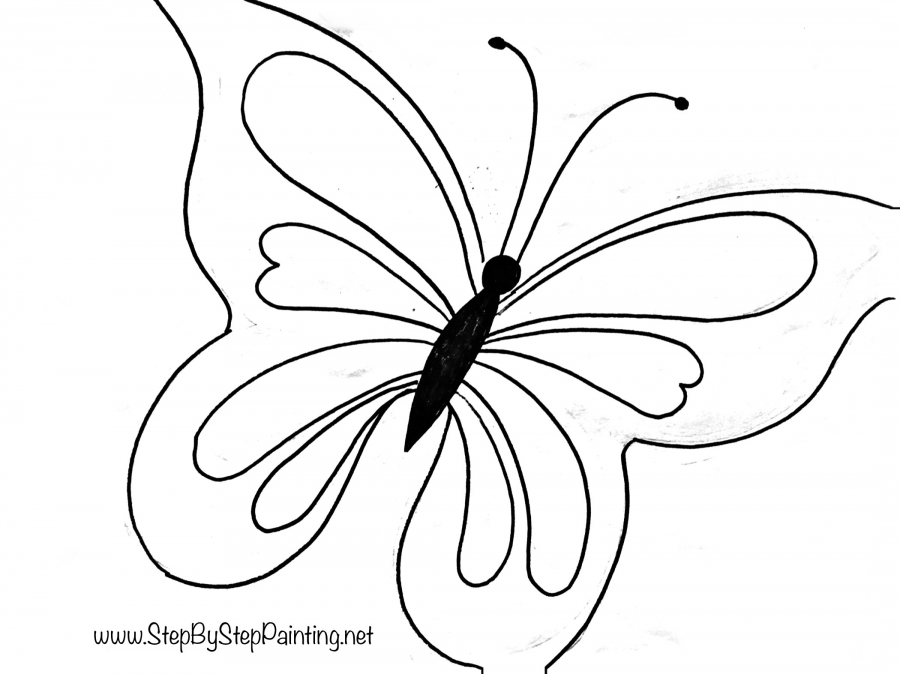
This tutorial includes a free printable that you are welcome to use and trace onto the canvas.
Enjoy and happy painting artists!
See Also:
Materials Needed For Butterfly Painting:
How To Paint A Butterfly
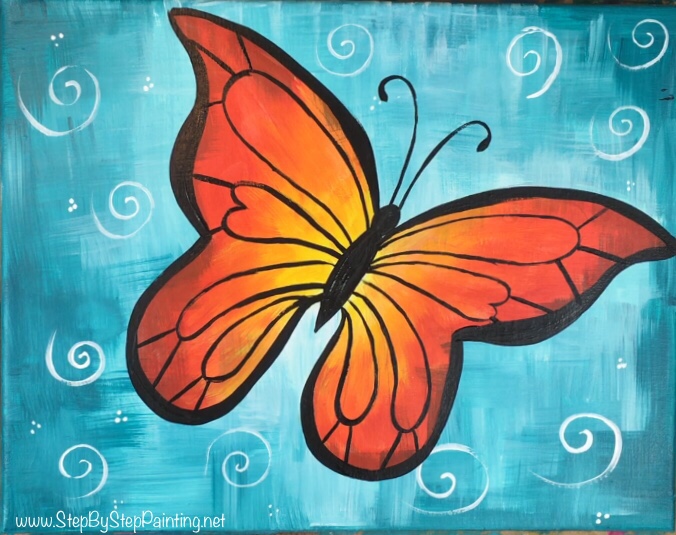
Beginners can learn how to paint a bright, cheerful monarch butterfly with a stunning teal background.
Materials
Basic Materials
- 11" x 14" canvas (or any size)
- Traceable (unless you are free drawing the butterfly)
- Acrylic Paint
- Brushes
- Graphite Transfer Paper
Colors
- Mars Black
- Titanium White
- Cadmium Red Medium
- Cadmium Orange Hue
- Cadmium Yellow Deep Hue
- Cobalt Teal Hue (DecoArt)
Brush Sizes
- 3/4" Flat
- #12 Bright
- 10/0 Liner
- #4 Round
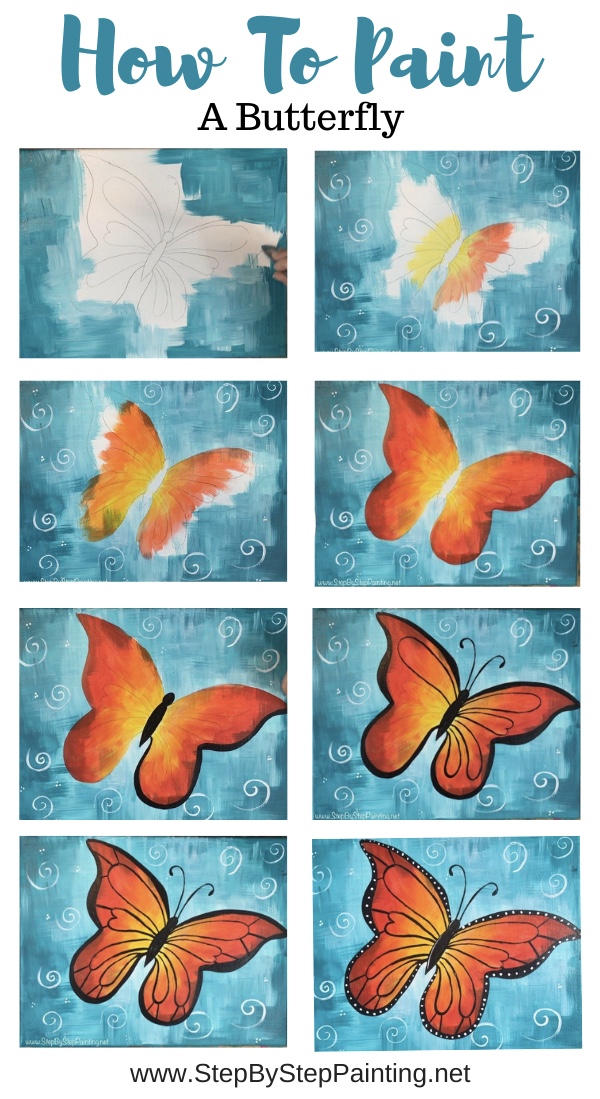
Instructions
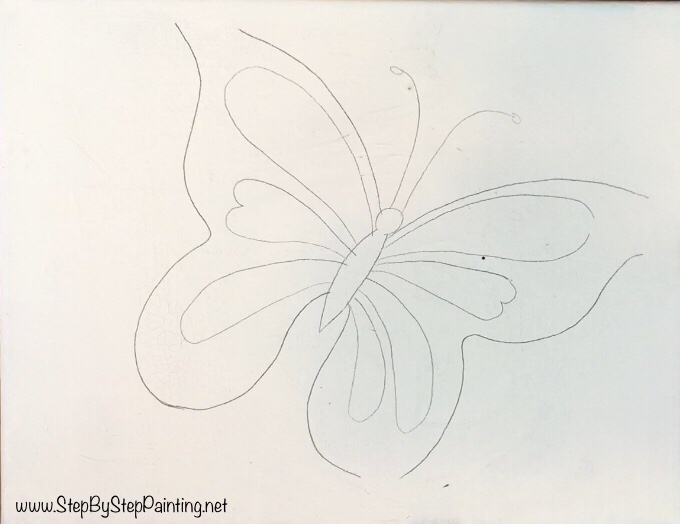
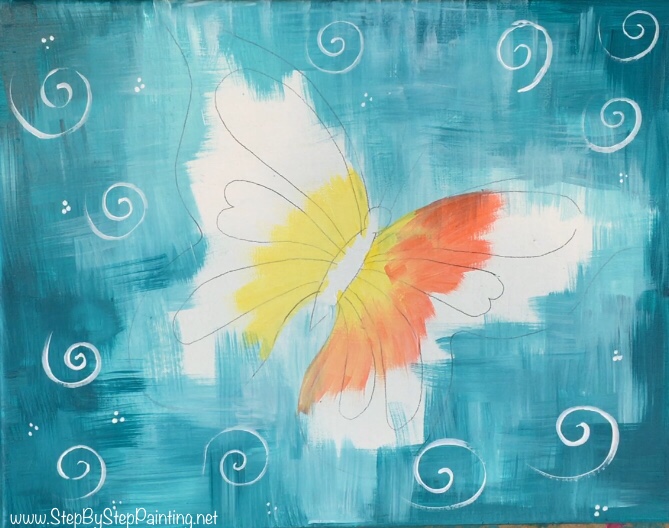
- Trace or draw the butterfly onto the canvas with a pencil. If you’re using the traceable, lay a sheet of graphite transfer paper under the butterfly.
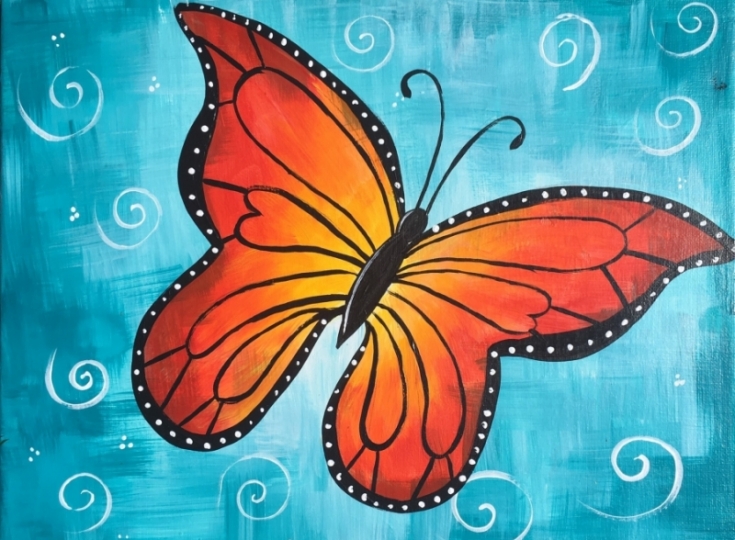
- Paint the background using a 3/4” flat brush and a combo of cobalt turquoise and titanium white.
- When you paint, use short vertical and horizontal strokes. Try to make the colors blend from dark to light with the lightest tints just around the butterfly. Do you bet to go around the edges of the butterfly drawing.
- Wait for the background to dry then use your 4 round brush to paint spirals as a design elements in the background.
- Paint the wings of the butterfly starting from the center with yellow and blending outwards to the edges of the wings with cadmium orange hue and cadmium red medium.
- Paint the body of the butterfly with mars black and outline the wings.
- Paint the antennae and the black designs on the wings that resemble that of a monarch.
- Slightly outline the body of the butterfly with titanium white and then paint white dots over the black outline on the wings.
Recommended Products
As an Amazon Associate, Michaels Affiliate and a member of other affiliate programs, I earn from qualifying purchases.
Color Palette:
*Note: “Cobalt Teal Hue” I used is DecoArt Americana brand. The other colors I used were Liquitex BASICS.
You can also change the colors for your butterfly painting to resemble other kinds of butterflies. 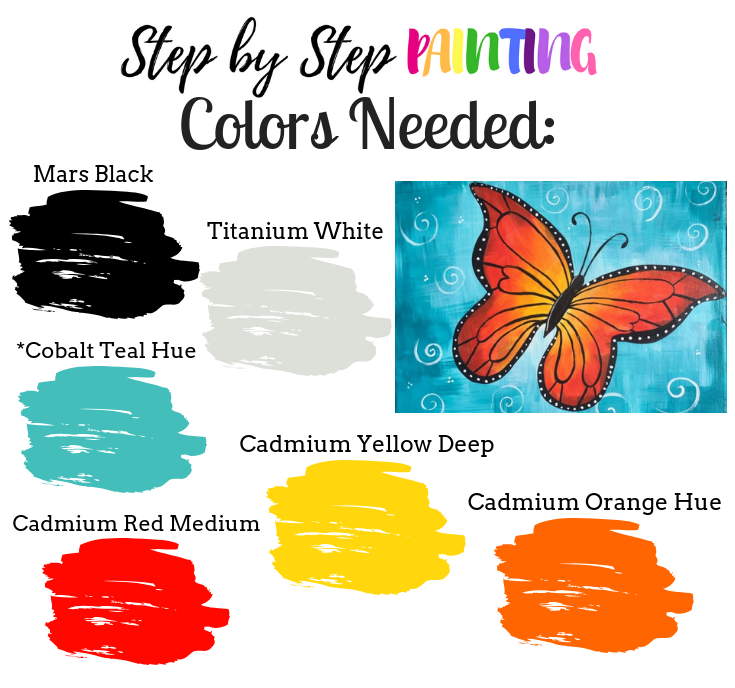
Craft Paints:
If you want to do this with the Apple Barrel Craft paints, below is a suggested list of what to substitute with.
Note that these are not an exact match to the original painting but will allow you to still create a beautiful render. These Apple Barrels are great for DIY paint parties!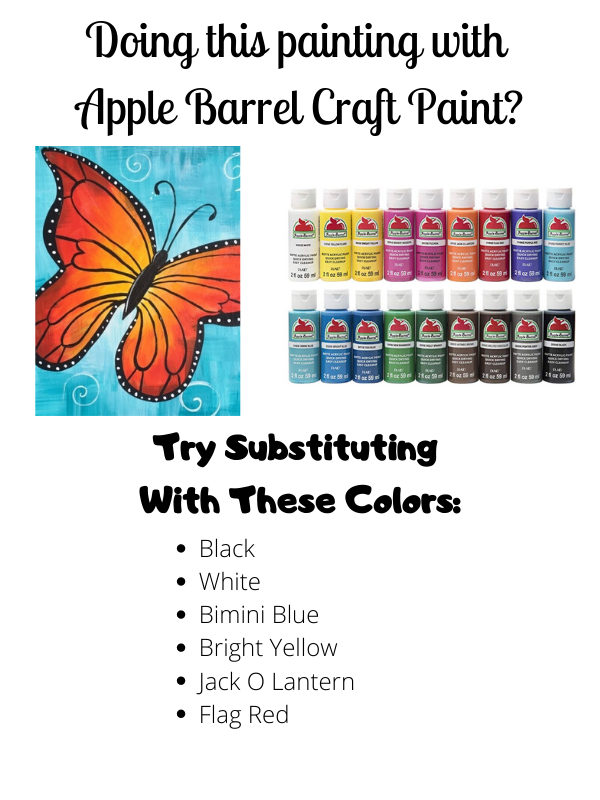
Traceable:
Directions: Trace onto the blank white canvas prior to painting.
You may need to free draw in parts of the wings that are cut off (real simple).
How To Draw A Butterfly:
You can see a step by step drawing tutorial for how to draw a butterfly. Draw this directly on your canvas or draw on paper first and transfer to your canvas. 
Directions At A Glance:

How To Paint A Butterfly Video:
Step By Step Directions:
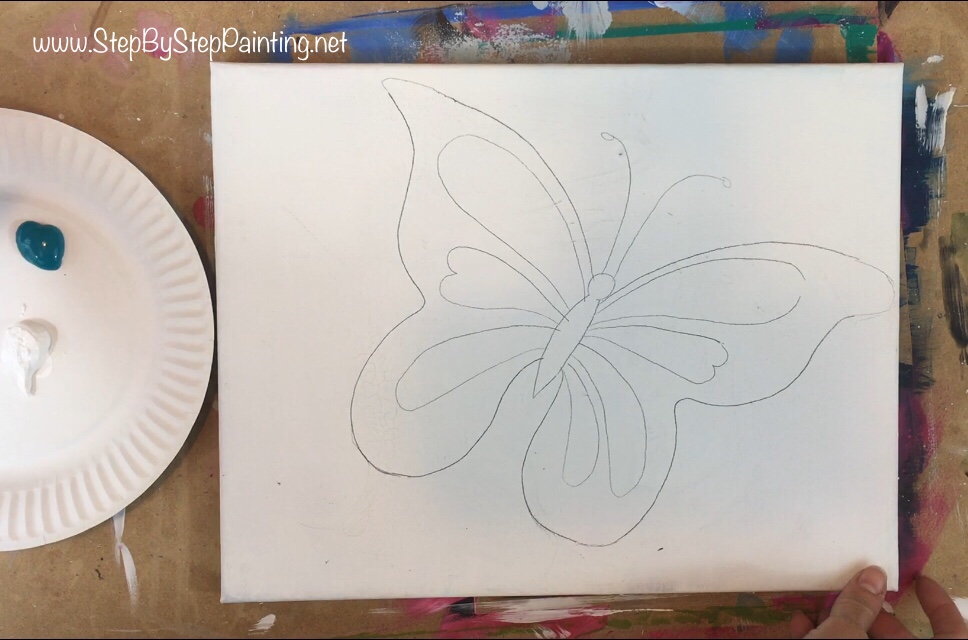
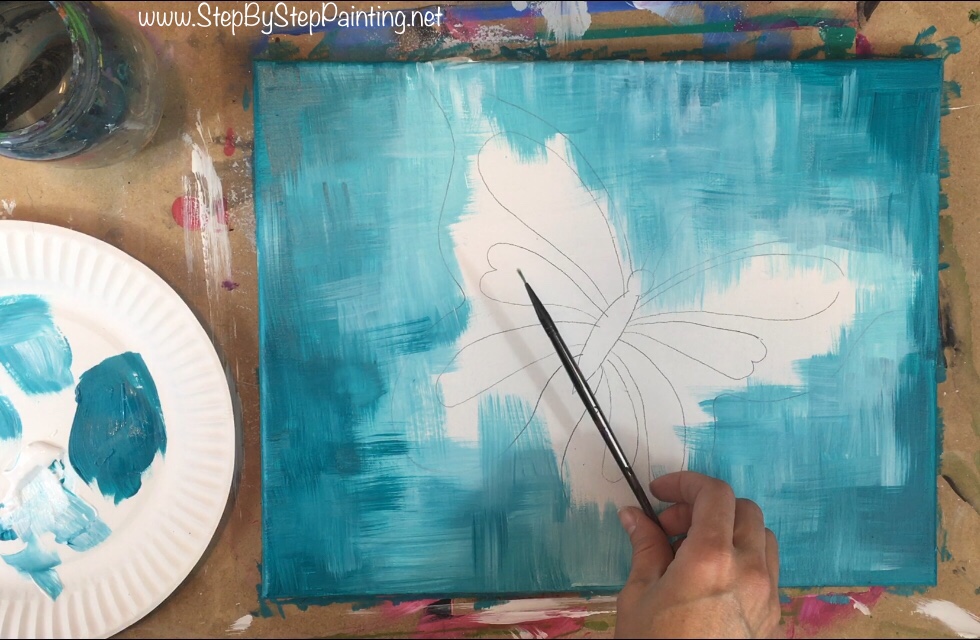
1. Trace or draw the butterfly on the canvas
Use the provided traceable and a sheet of graphite paper to transfer the butterfly to the canvas. You can also draw this directly on your canvas. See a tutorial for how to draw this here.
I am using a 11″ x 14″ canvas in horizontal/landscape mode. Position the butterfly so that it is going slightly diagonal.
You may wish to extend the wings a bit by free handed drawing them on the canvas.
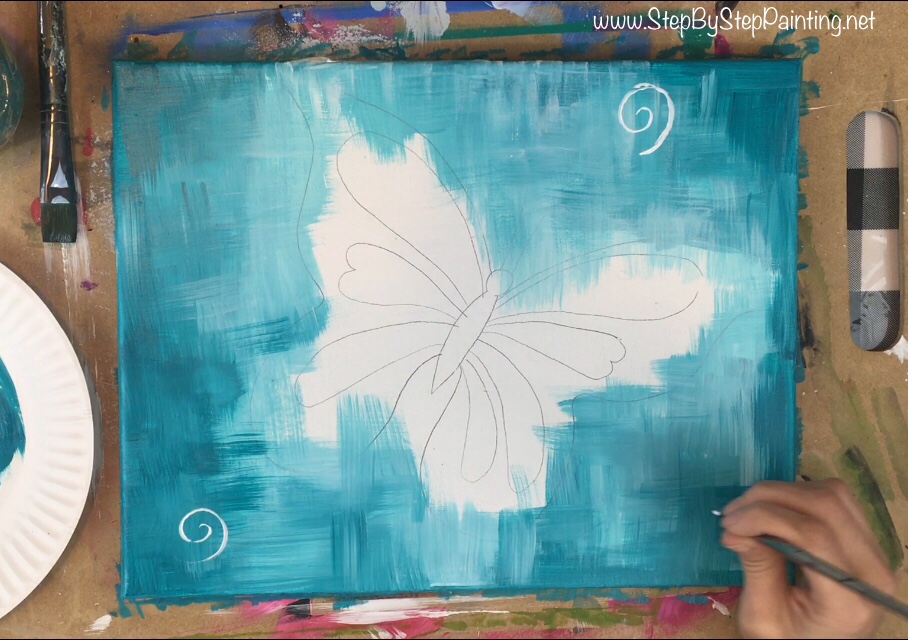
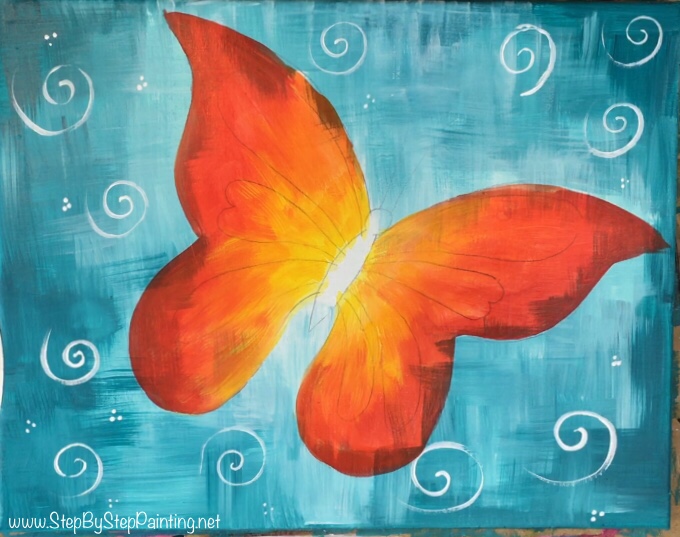
2. Paint the background
Use a 3/4″ flat and the colors cobalt turquoise hue and titanium white.
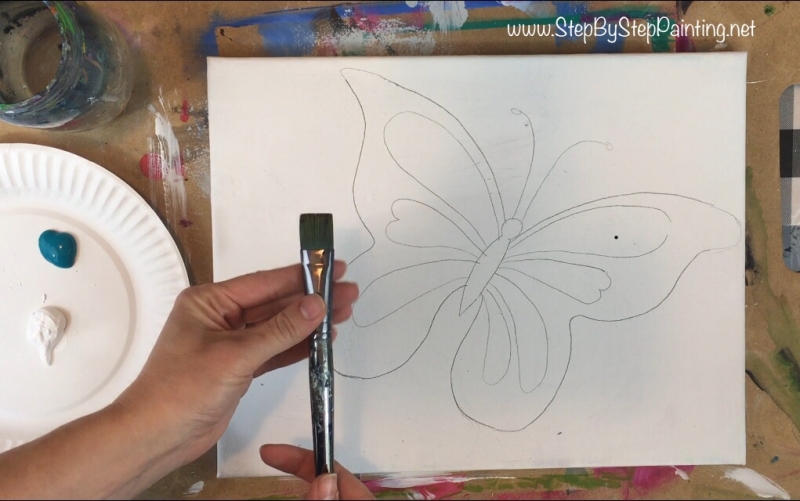
Start off by painting just cobalt turquoise hue on the edges of the canvas.
This background is a progressive gradient of pure cobalt turquoise hue on the edges that blend with white and eventually a light turquoise color in the middle around the butterfly (so dark to light).
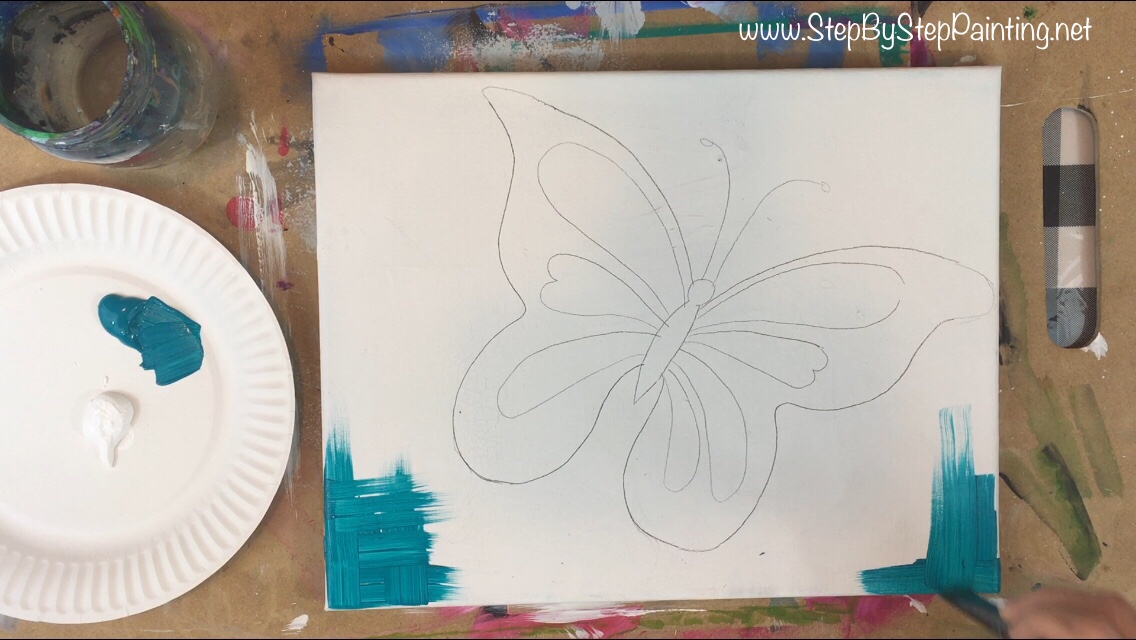
When you paint these stroke, use “cross-hatching” strokes that almost look like a woven basket.
Paint short vertical lines and then paint short horizontal lines that overlap the vertical lines (and criss cross them).
This is very similar to how I do some of my backgrounds with “X strokes” only this time they are going vertical and horizontal instead of diagonal.
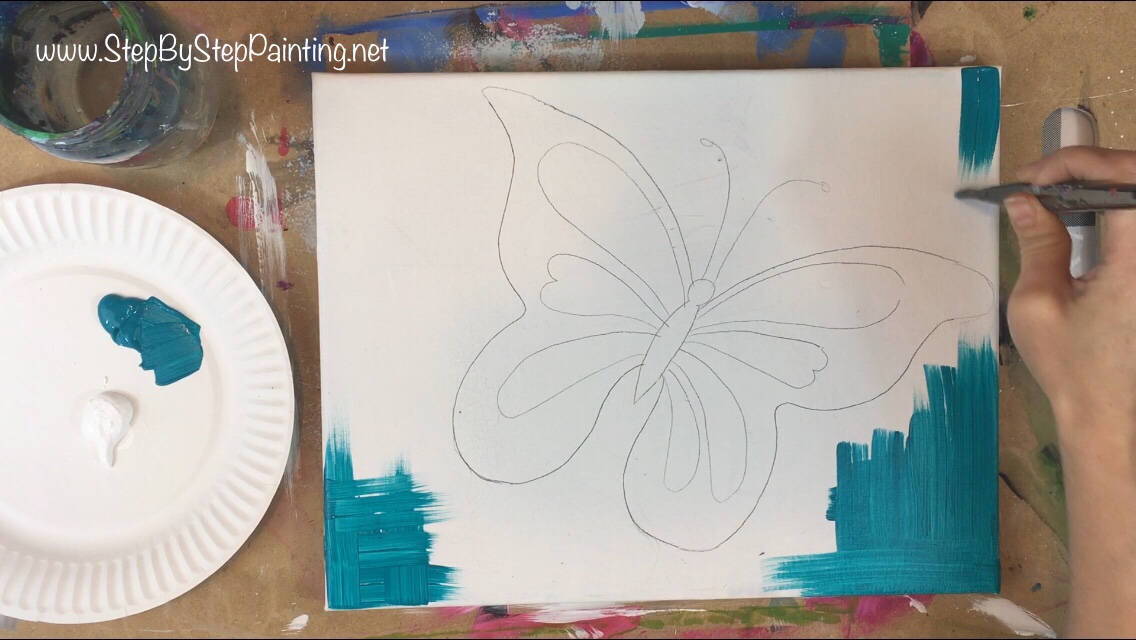
As you approach the middle of the canvas (area around the butterfly), dip your brush in a little titanium white and continue the same style of strokes.
As you paint, let the titanium white blend in with the cobalt turquoise hue as a smooth transition.
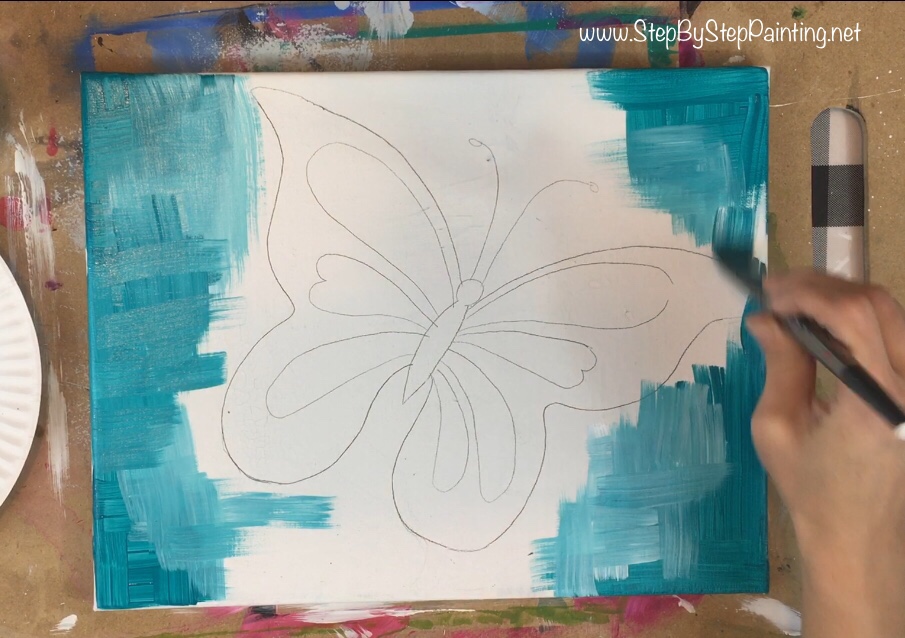
It’s okay if the strokes look “choppy”. The background is “expressive” and not a perfectly smooth gradient.
At the same time, do you best to try to blend the cobalt with the turquoise so you get several different tints of light turquoise, dark turquoise, etc.
The ultimate goal is to make the background look darker on the edges and brighter behind the butterfly.
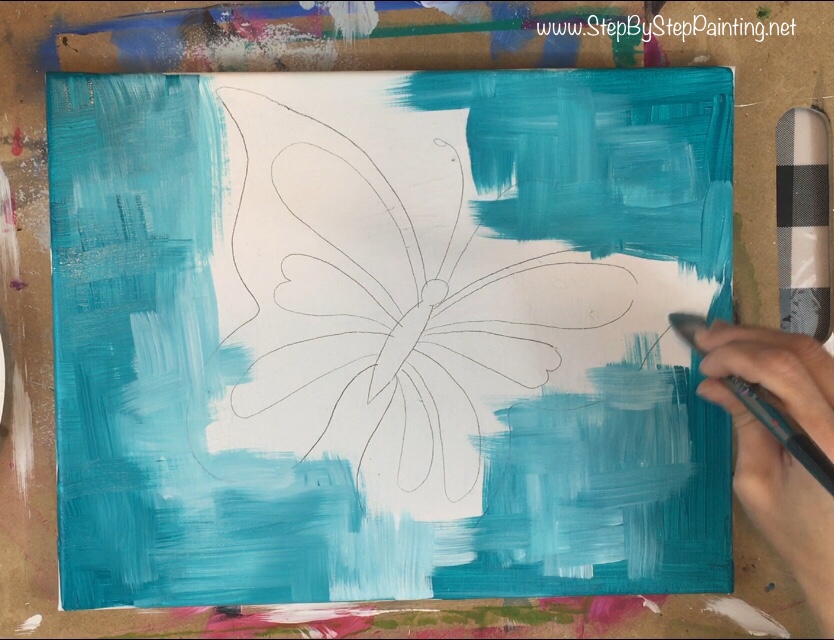
I painted over some of the edges of the butterfly but I did not completely paint over it.
You want to leave the butterfly as blank as possible.
Next switch to a 10/0 liner round brush.
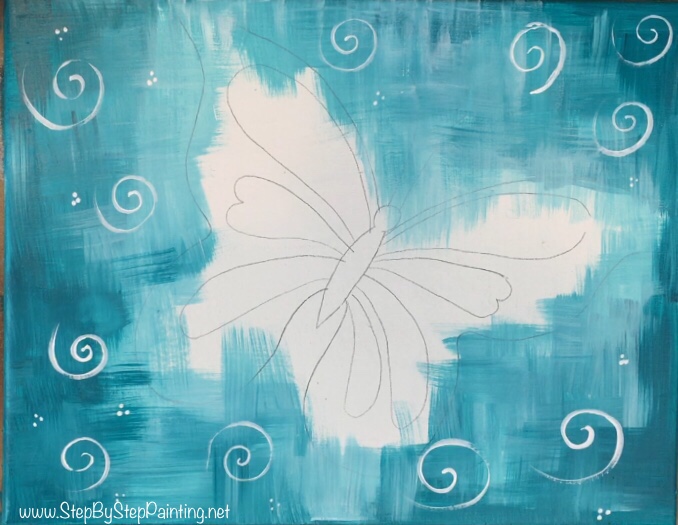
You will paint pure titanium white spirals and little clusters of three dots in the background.
This step is optional but I thought it added a fun design to a sort of plain background.
3. Paint the butterfly wings
For this next step I used a #12 flat and the colors titanium white, cadmium yellow deep, cadmium orange hue and cadmium red medium.
Load your #12 flat in both titanium white and cadmium yellow deep.
Start in the middle and paint outwards using the full width of the brush.
Basically, we are painting these wings so that the bright yellow is in the middle and it slowly transitions to the red on the tip of the wings.

Do the same on the other wing. Go out about half way with this yellow/white combo.
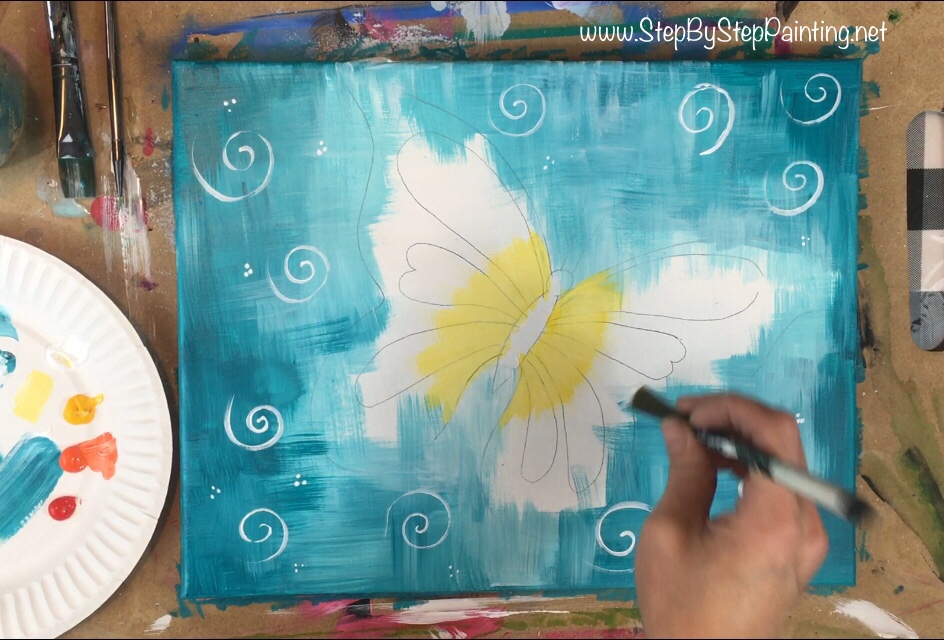
Next load your brush in cadmium orange medium. You will need to blend this carefully with the yellow because that orange is so strong.
It might help to load both the yellow and orange in the brush to get it to blend.
Basically continue to paint outwards towards the edges of the wings blending that orange with the yellow.
Tip: if you still have a lot of white on your brush, completely rinse it and then load again.
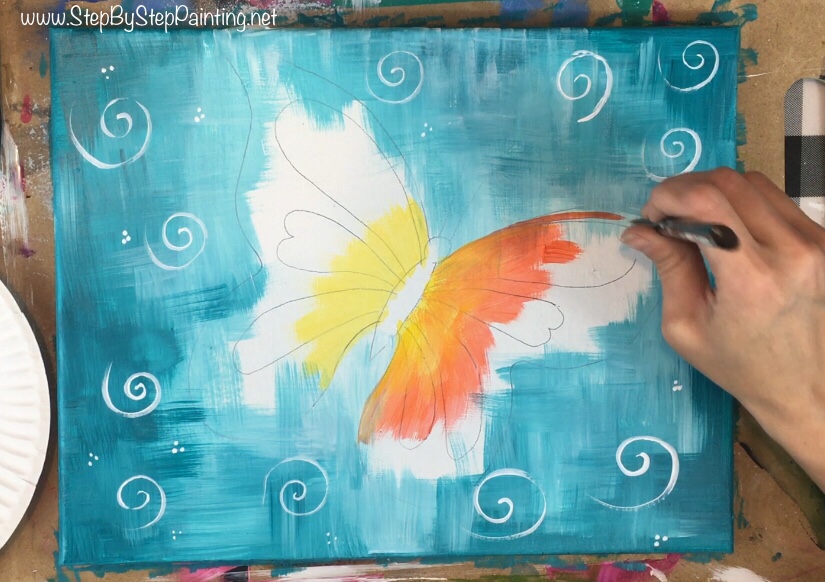
Do this on both the wings. I went almost all the way to the edges with this orange.
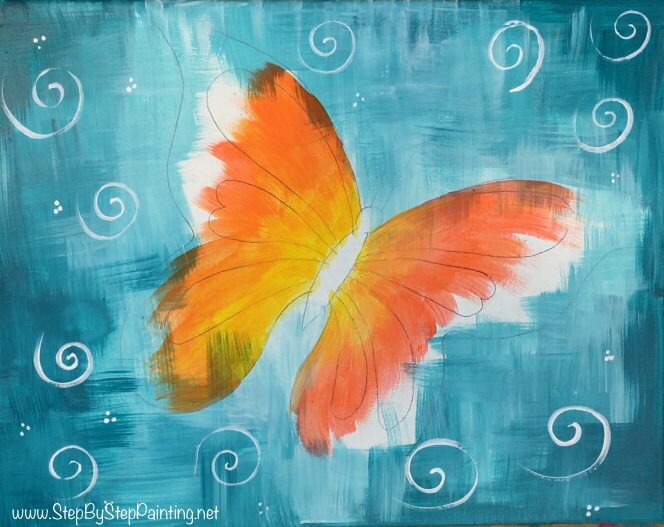
Next load your brush in cadmium red medium and carefully blend it with the orange by painting over it slightly and adding more orange to your brush to allow the two colors to mesh and blend on the canvas.
Use the side of the brush to kind of outline the wings so you can really define the butterfly at this point.
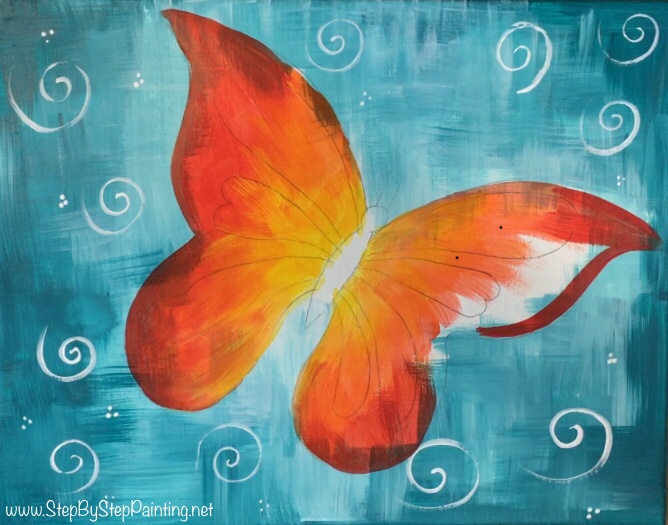
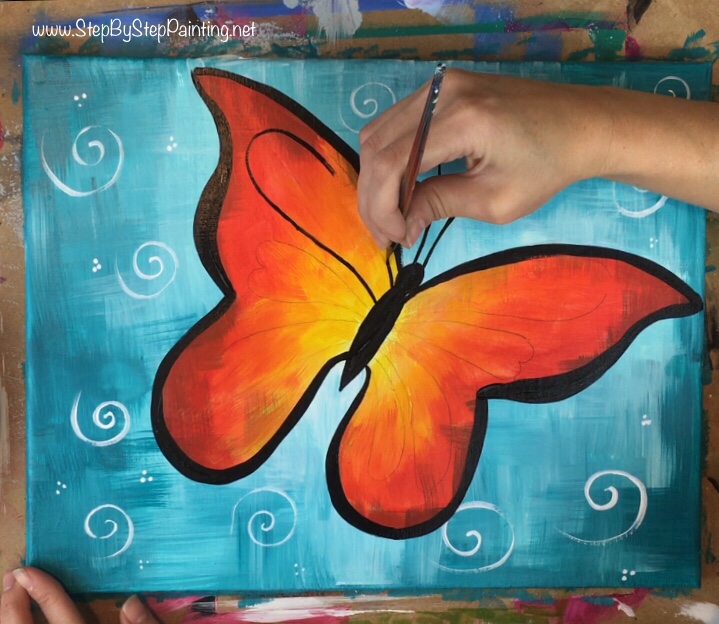
4. Paint the butterfly body and outline the wings
I used a #4 round brush and mars black to paint the body of the butterfly.
Tip: water down the black slightly by swirling your brush in the water and then on the palette. This helps the black paint to flow better.
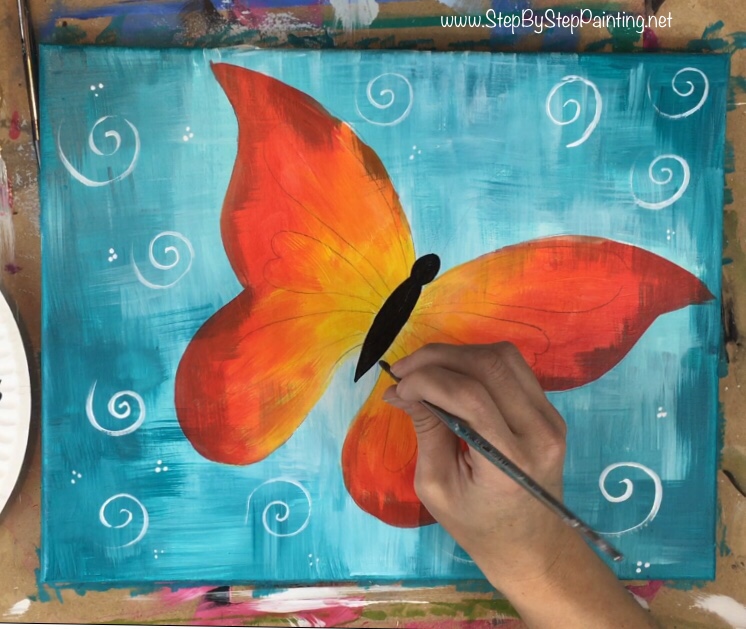
Then with the same brush and the black, outline the far edges of the wings.
When you outline, allow your line to be very thick in some areas and not so thick in other areas.
To increase the thickness put more pressure on the brush and the decrease thickness, put less pressure on the brush.
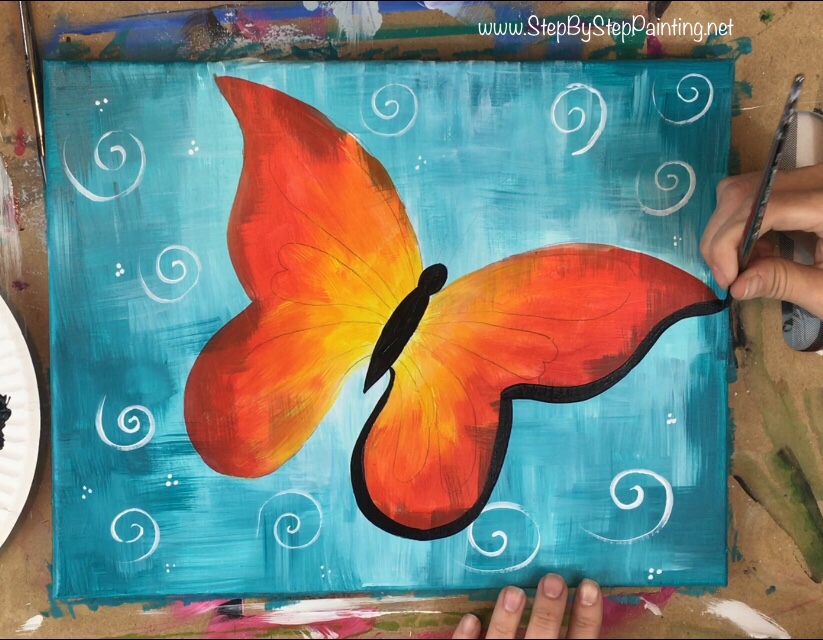
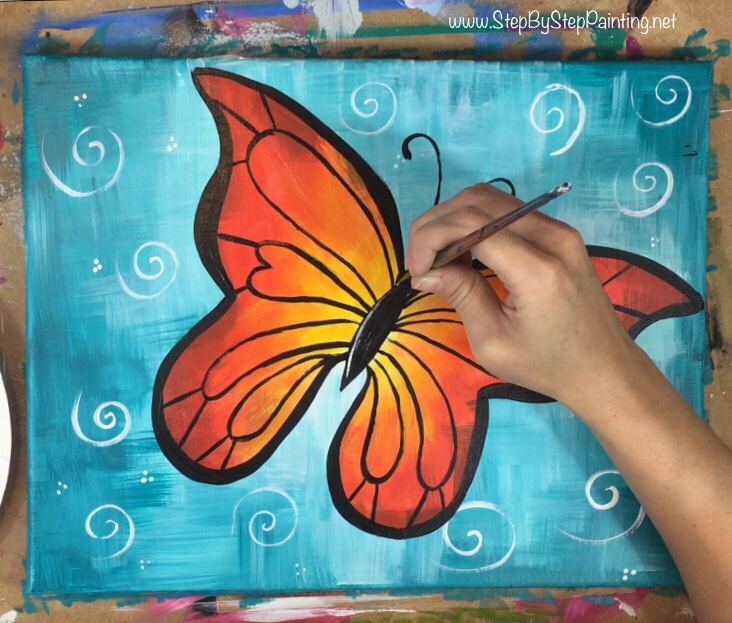
For the butterfly antennae, I used a 10/0 liner because this is a much thinner line.
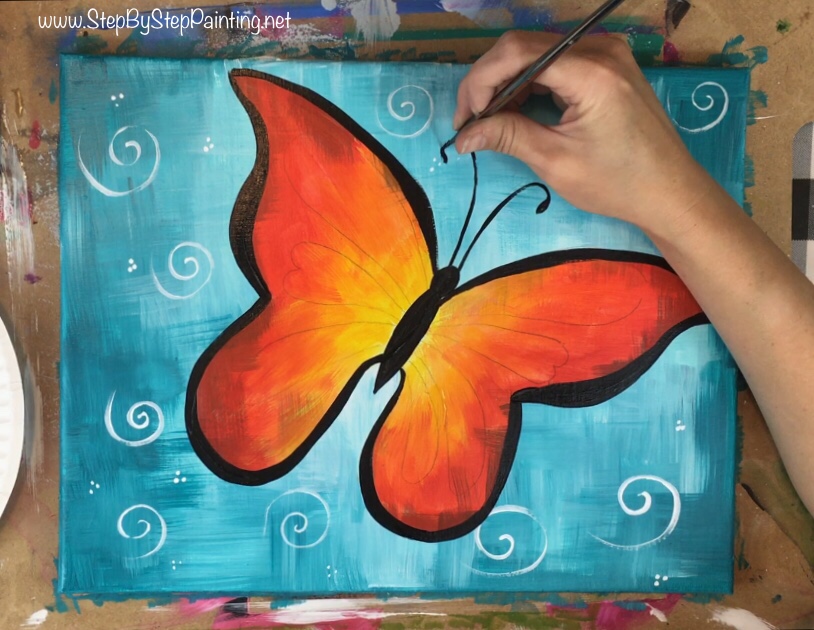
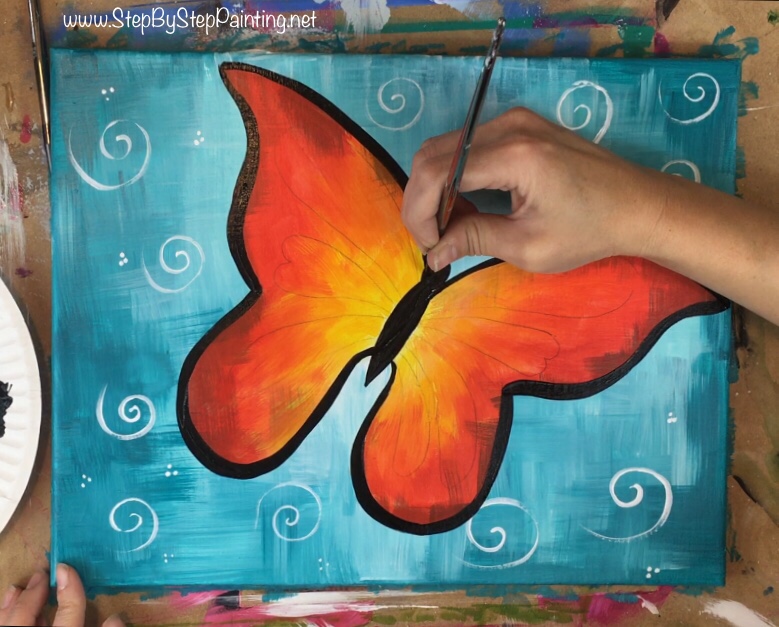
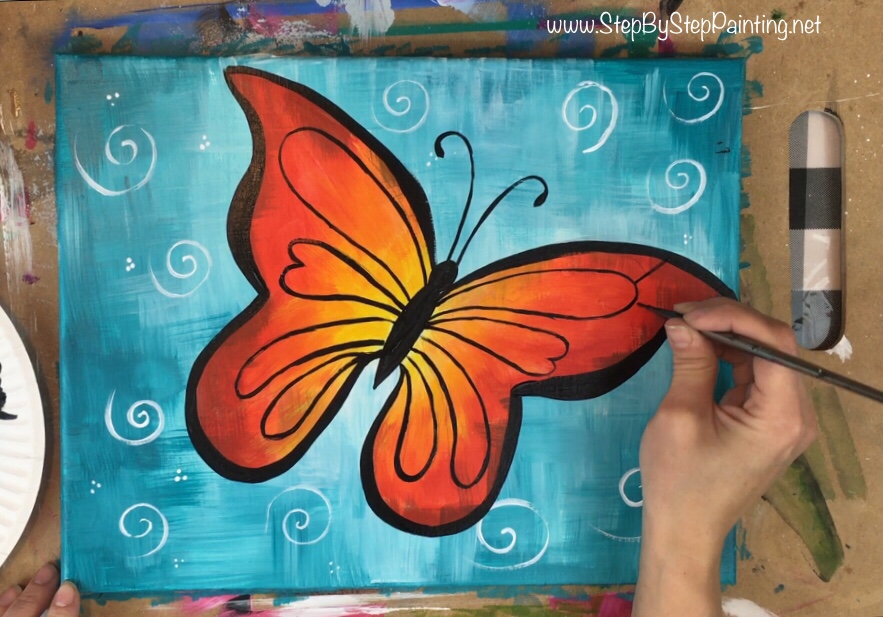
5. Paint the black line details on the wings
Next, you should still be able to see those lines that you traced in the beginning. Use a 10/0 liner to paint those lines.
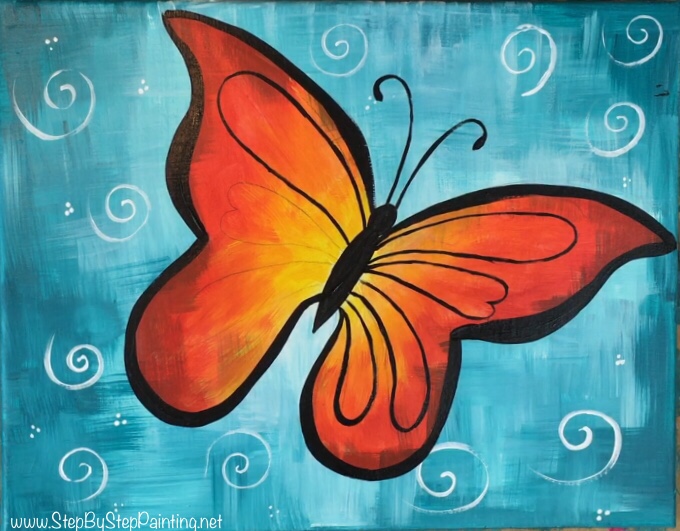
Then paint some new lines extending from the “loop lines” to the edges of the wings. See pictures below:
Use the 10/0 liner and titanium white to paint one highlight line on the body and the head.
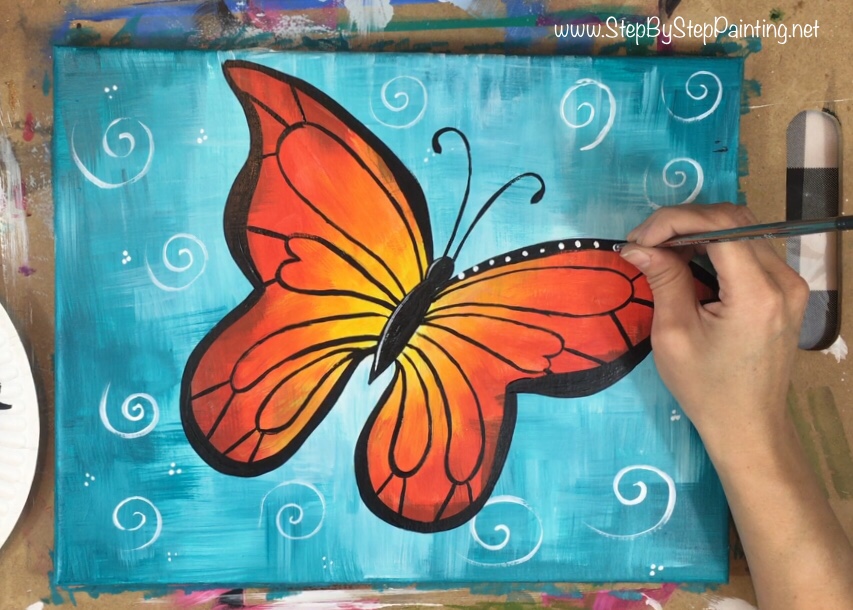
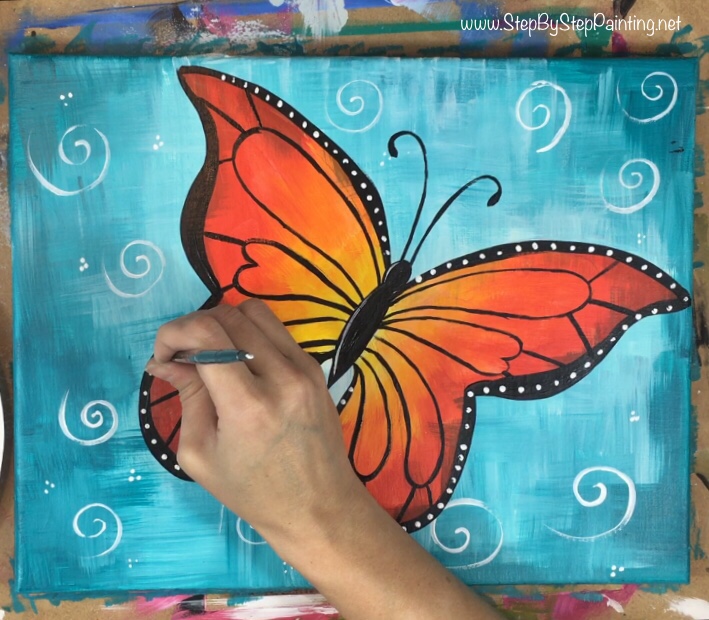
6. Paint white dots after the black outline has dried
Wait for the black outlines to dry completely and then use the back of a paint brush handle and titanium white to paint little white dots all along the border of the butterfly.
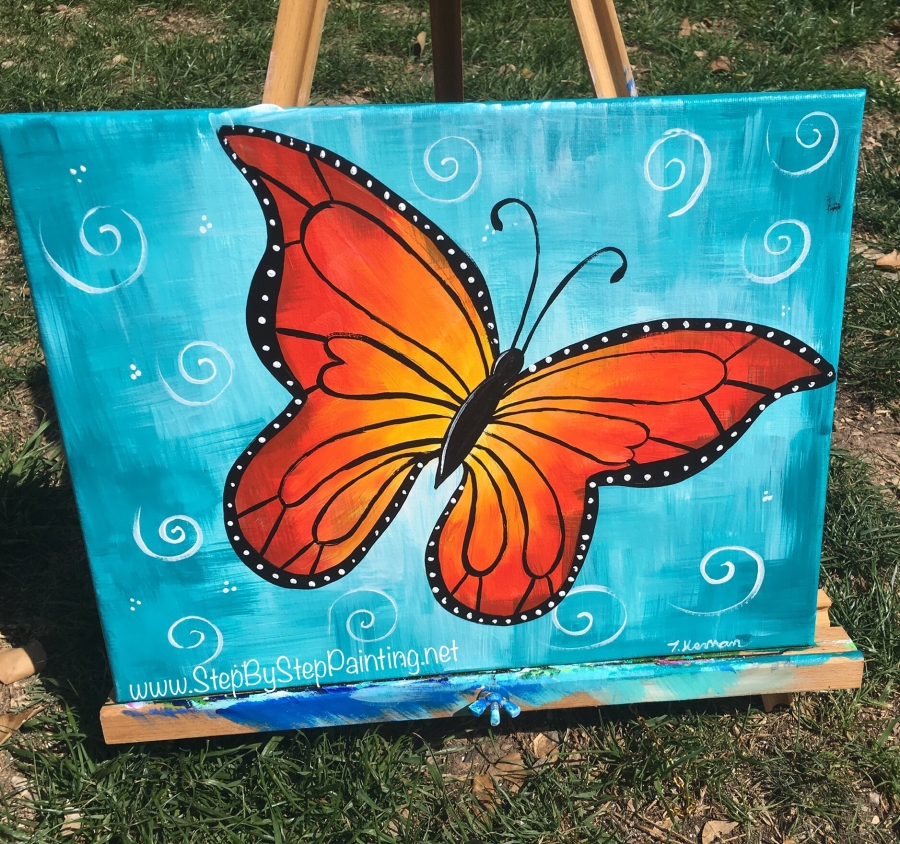
Finished!
See Also:
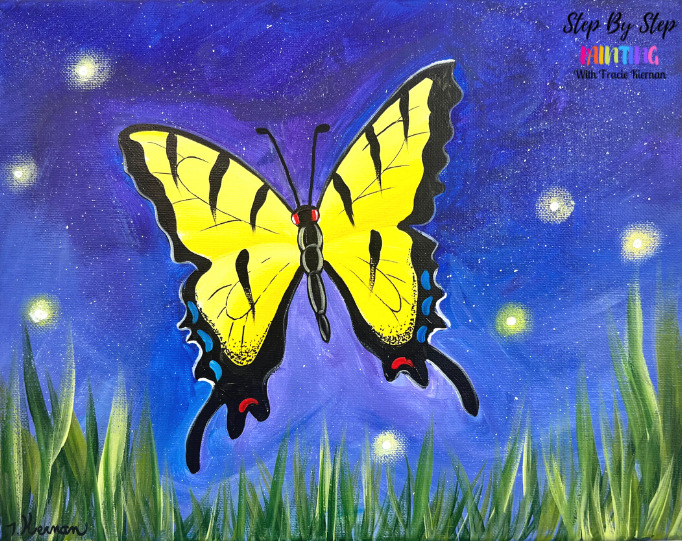
How To Draw A Swallowtail Butterfly
This was very well written and produced in a way even the most amateur (like me) could understand! Keep up the good work!
Thanks Linda!!
This butterfly was super fun! Thank you for providing a printable. I was nervous about the shading but after painting all the lines it looked great!
Sounds great Celeste! Thank you!
Tracy ,
Your tutorials have helped me so much during this virus to stay sane as I both work in mental health and struggle with my own mental health issues . I look forward to painting with you more in the future !