
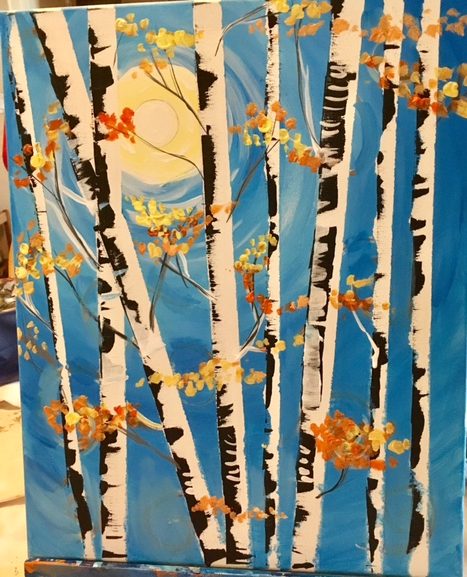
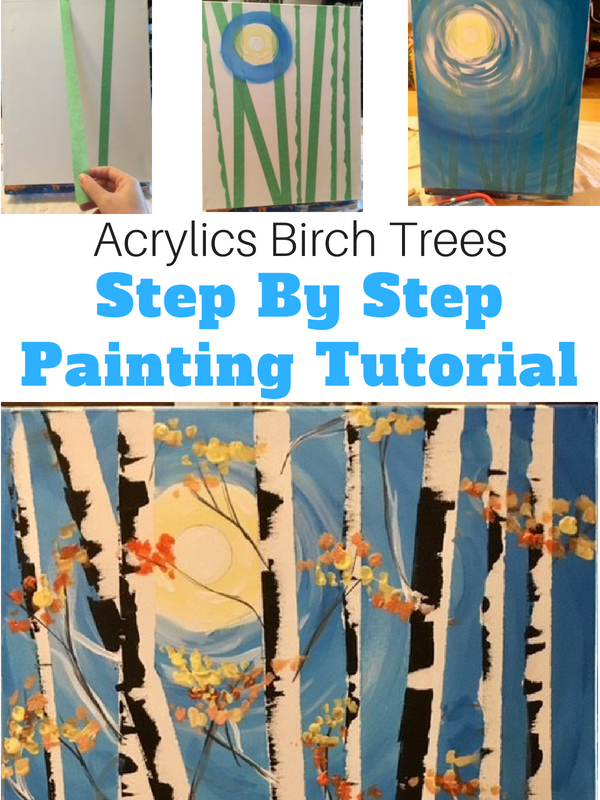
How To Paint Birch Trees

Learn how to paint simple birch trees on canvas using painters tape! You will learn how to create your own birch tree canvas wall art! This design can be used as a year round painting (not just a fall painting). You can paint green leaves instead of orange! You can also omit the leaves.
Use painters tape to block out the trees on the canvas, creating a resist. Then paint over the painters tape and peel it off when finished! Add the black markings with a credit card, paint on branches and dab on some beautiful fall foliage and you have your own original artwork!
You will be amazed at how simple this painting really is. Feel free to let your creativity run free and add your own artistic ideas to it.
Since this is one of my earlier tutorials, there is no video with it. However, I think (and I hope) the picture directions are so simple enough for you to follow!
Thanks and enjoy!
This Post Contains Affiliate Links to Amazon.com
Materials:
- Acrylic Paint (I recommend the Liquitex Basics brand or Apple Barrel Craft Paint)
- Cadmium Red Medium
- Cadmium Orange Hue
- Primary Yellow
- Cerulean Blue
- Titanium White
- Mars Black Black
- 16″ x 20″ Canvas
- Various Brush Sizes.
- 1/2″ flat
- 1/4″ flat
- #3 Round Brush
- Small bottle cap to trace the sun (or you can just free draw the circle!)
- Palette or paper plate for palette
- Covered work space
- Painters Tape (I used the one that was about 1″ wide)
- Old Visa Card for scraping the black marks
Directions At A Glance
Step By Step Pictures
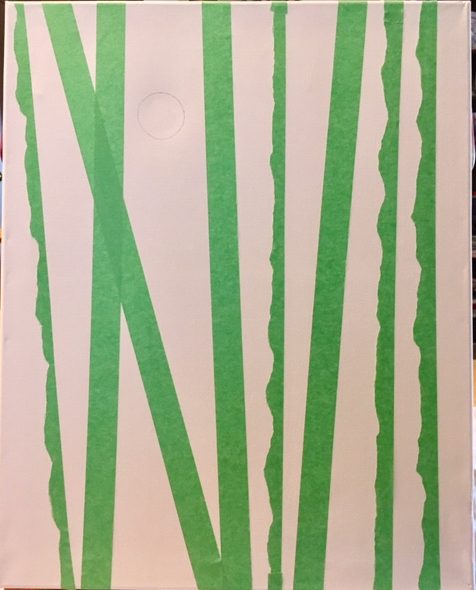
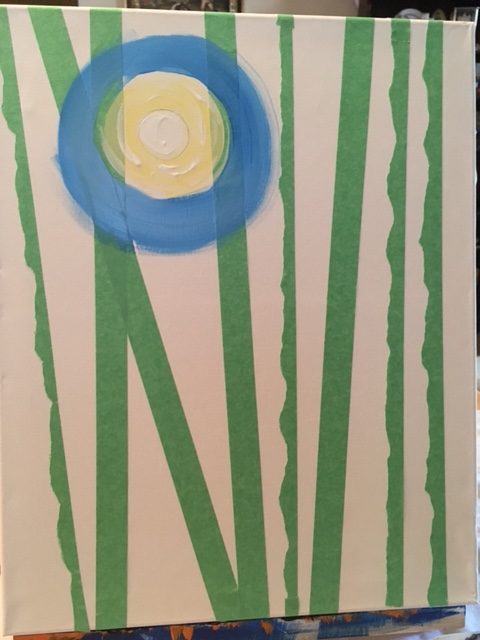
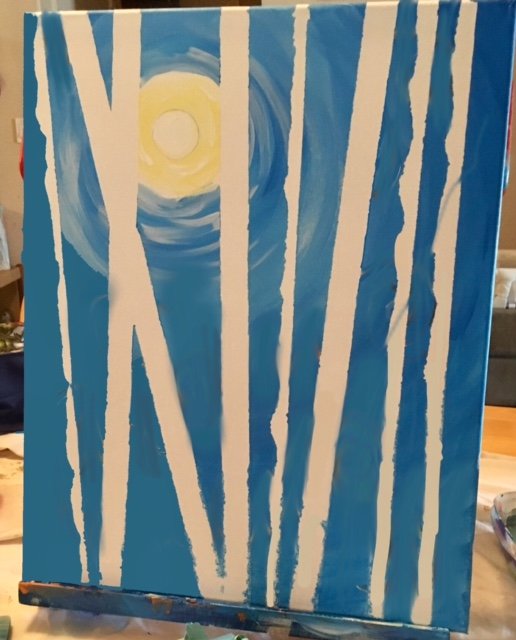
1. Apply The Painters Tape
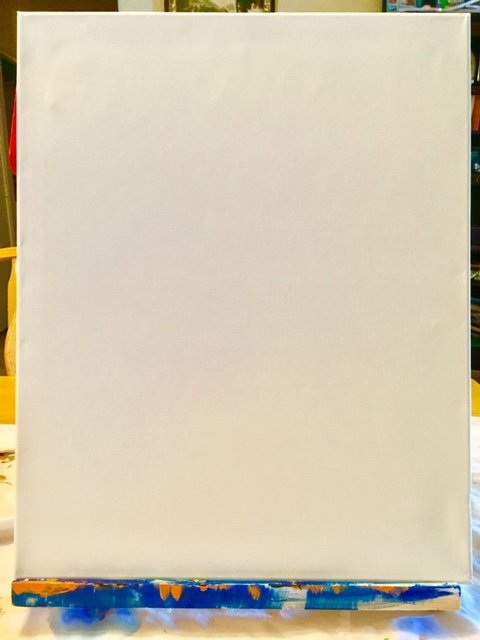
First, turn your blank canvas to a portrait (vertical) position.
Apply painters tape all the way from the top to the bottom. Note that the tape line is slightly slanted, don’t worry about keeping any of the tape lines perfectly vertical.

Fold the excess painters tape on the sides of the canvas.

You may overlap some of the painters tape lines if you wish.
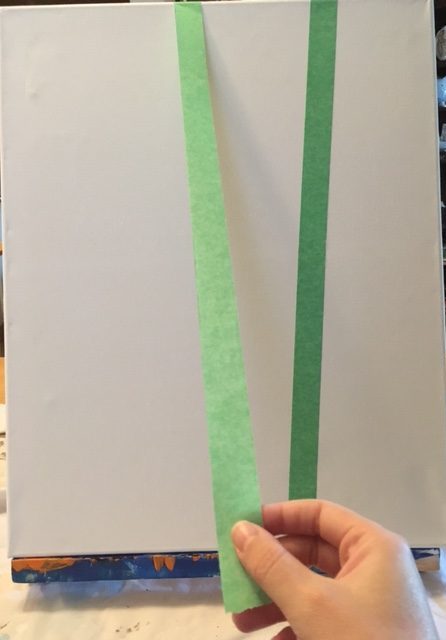
To add some dimension and texture, I put on skinnier pieces of painters tape. To do this, I ripped the painters tape all the way down the middle. Don’t worry about it being “rugged” on the ends.


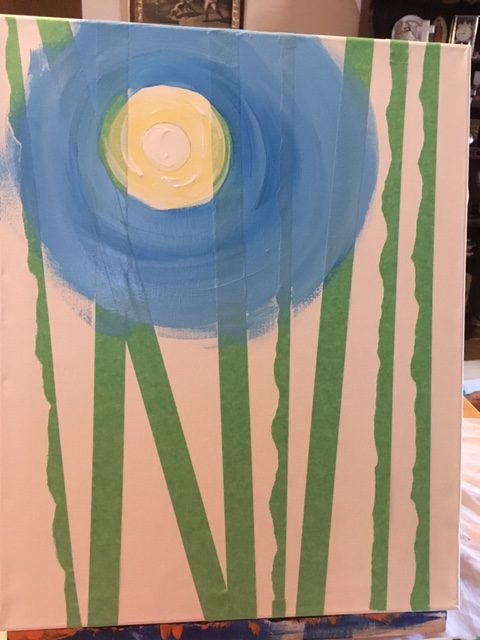
2. Draw & Paint The Sun
Next, I took a plastic milk cap and placed it somewhere on my canvas. I traced the circle lightly with a pencil.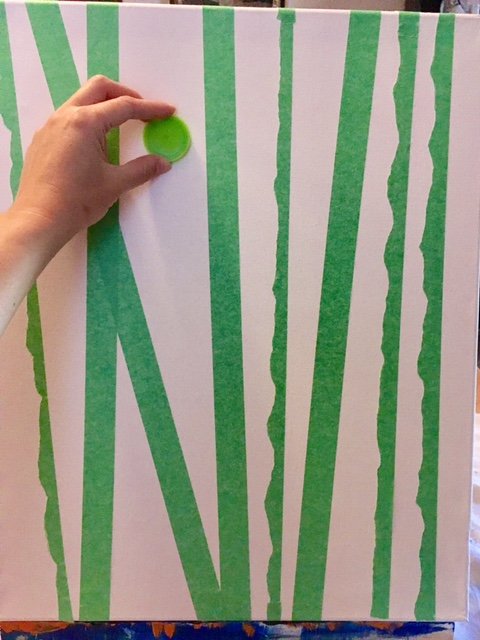

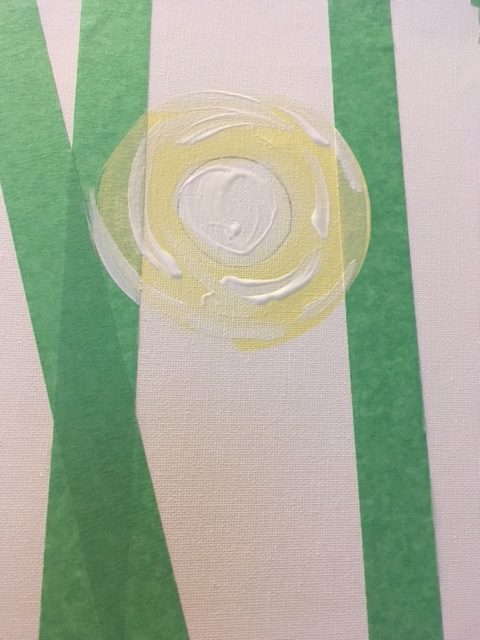
Then I mixed equal amounts of yellow and white together on my palette. With the 1/2″ flat brush, paint a 1/2″ ring around the circle.
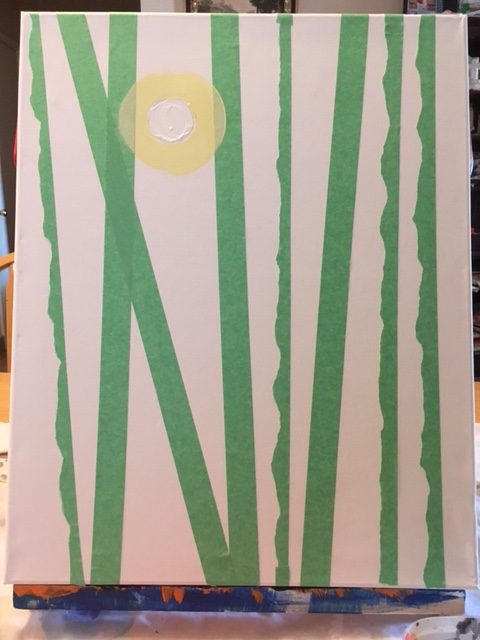
Clean off your brush and load it with white. Paint the circle solid white. Then add curved lines around the sun.

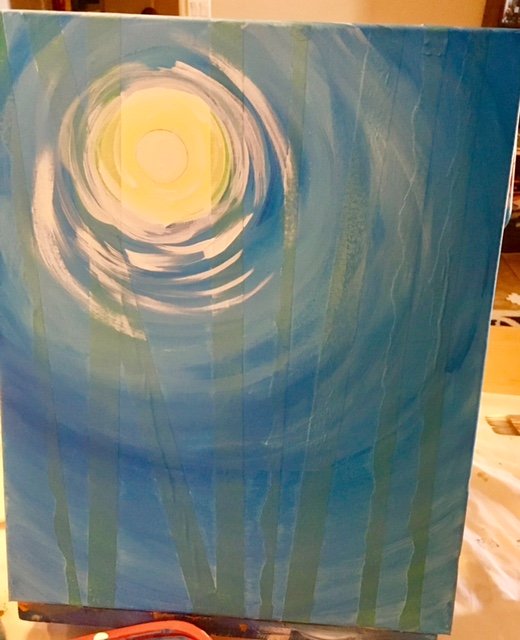
3. Paint The Sky
Next mix a large amount of white and a small amount of cerulean blue on your palette. Do not mix the color completely. It should look kind of “swirly” on the palette.
With your 1/2″ flat brush, paint a ring next to the yellow ring. You don’t want to try to blend the yellow and blue colors together because it will turn green.
Keep painting in a circle. You will get variations of blue because your paint on the palette is not completely mixed. If you run out of paint on your palette, mix some again and don’t worry about making it the exact same shade of blue again. Add more white to make it lighter in some areas.
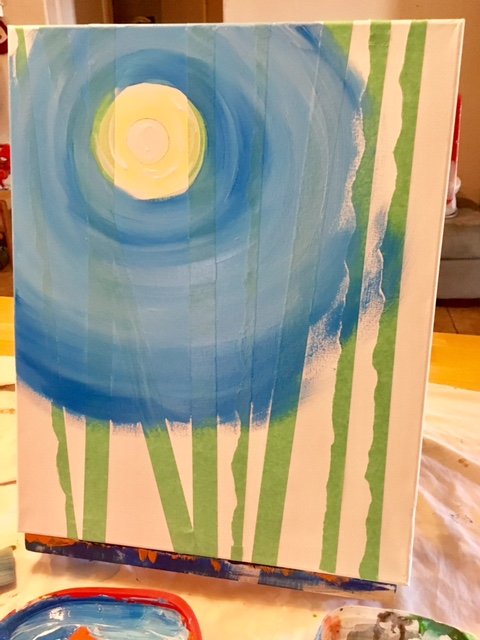
4. Add Some White In The Sky
Keep painting in that circle motion until you reach the end of the canvas. See how the shades of blue and white vary? That is because the paint on the palette was kept “swirled”. If you need to add more white on top of the blue, you may choose to do so.

Next, I added some more solid white swirls without mixing in any blue. I did this with a rinsed off 1/2″ flat brush.
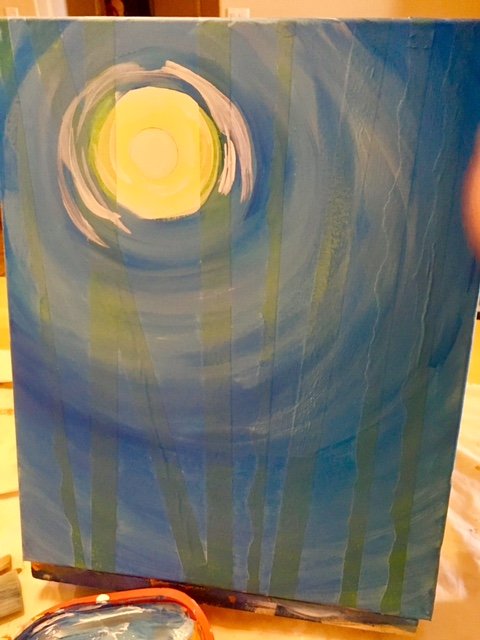

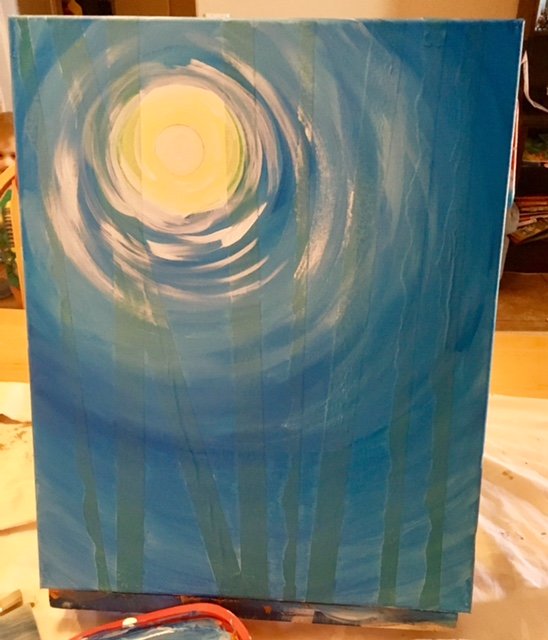
5. Peel Off The Tape
Next slowly pull off the painters tape. I recommend waiting until the paint is dry to do this! I did not wait and got blue on some of the white areas. If this happens, it’s okay! You can always touch it up later with white.
6. Scrape The Trees
Then I got an old visa gift card and dipped the side of it into some black paint. I did not water this paint down.
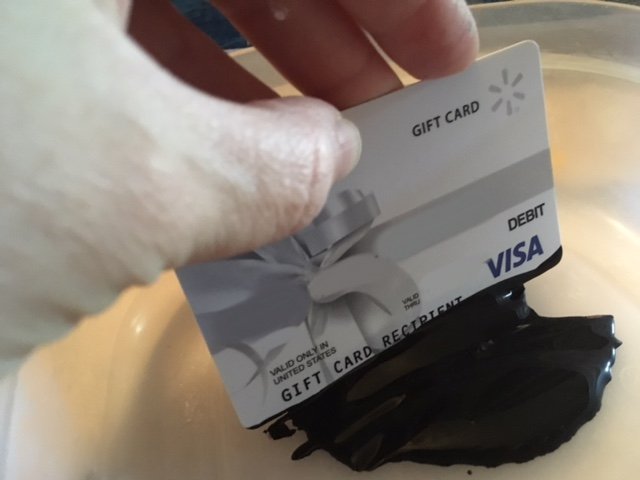
Scrape the paint from left to right. Make sure you stay consistent with each tree and scrape from left to right.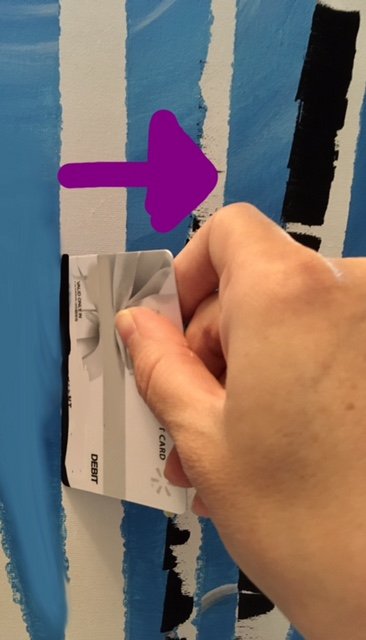


You will get multiple variations of black as you’re scraping and that is okay. Also, make sure you pay attention to the overlapping trees! I made the overlapping trees look like they were going through each other like an optical illusion (by accident)!

7. Paint The Branches
Next, use the side of that flat brush to paint some branches. You can also use a tiny round brush to do this step. The branches are very thin! I painted some branches black and some white and some were painted black with white on top to get a gray. 

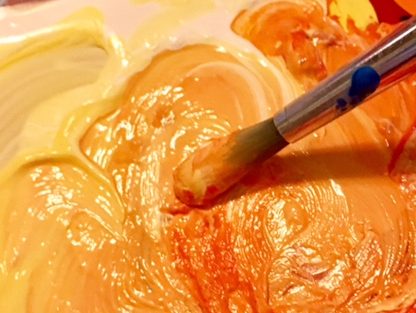
8. Paint Leaves
Next, on your palette, mix equal parts of yellow and orange and keep the paint “swirled”. Don’t mix the colors all the way. Take your #3 round brush and paint dots everywhere. Paint the dots in clusters and close to the branches. If you want, you can also add red dots to the trees too! Also, you can use different size round brushes to create different size dots.

Finished!
If you liked this tutorial, please share!

Share your art!


See Also:
great !
I tried this and add Cardinal on a branch,turned out really nice! Thank you for your help.
That’s great Marry! You’re welcome ?
This looks like a really fun one to try!
Thanks Lisa! It’s super fun!
this is my favorite kind of tree to paint, it goes with all seasons.
Yes! It certainly does!!
Loved pictures of step by step paintings of Birch trees.
It looked fun. Will try in few days.
Tracy, I will be trying this tonight. On a side note, for the last 5 months, at least 2 people a day save my pins of your painting tutorials. I like them because you give detailed instructions.?
Thanks Bonnie! That is so great to hear!!!
Thank you so much .?
Oh! Its really really fannnntastic its really a boon to be on this web site and its so honestly and perfectly mentioned with all the minute details i really enjoyed and loved the presentation. Lots of hugs and respect to Tracie. Millions and tons of thanks. Tracie you are doing a great job.
I love these tutorials so much! Great instructions and amazing artwork!
Is there a video tutorial for these birch trees? If not, can you create one? Would love to do this for my daughter’s birthday party! Thanks.
Hi Merrilee! There’s no video for this one. It’s one of my older tutorials but I’ve been thinking about doing a newer version of the birch trees with video ?.
Tracy, you saved my sanity through lockdown! Have shared with my family across the pond (in the UK) so that we can do it together, whilst staying at home. Thank you for the wonderfully simple step-by-step instructions.
You’re welcome Mona!