

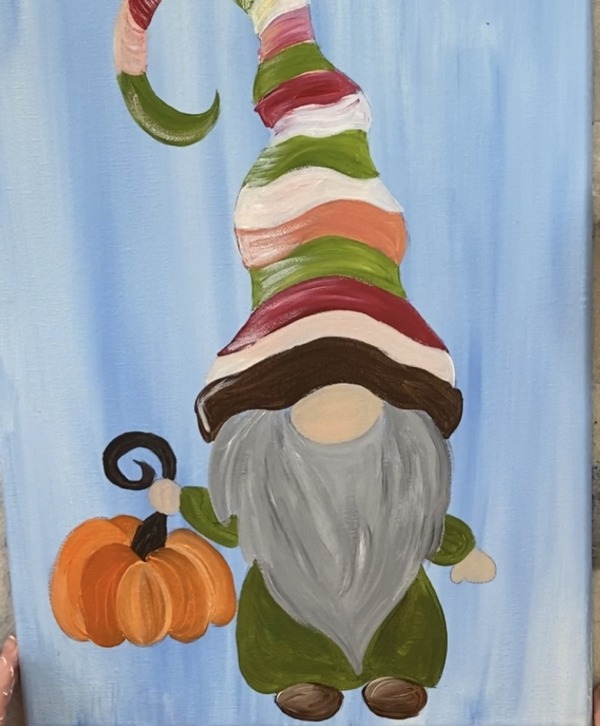
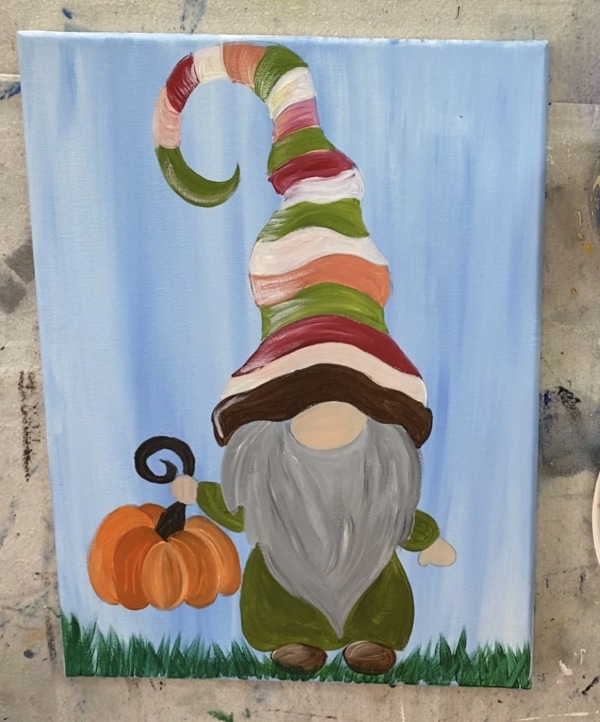
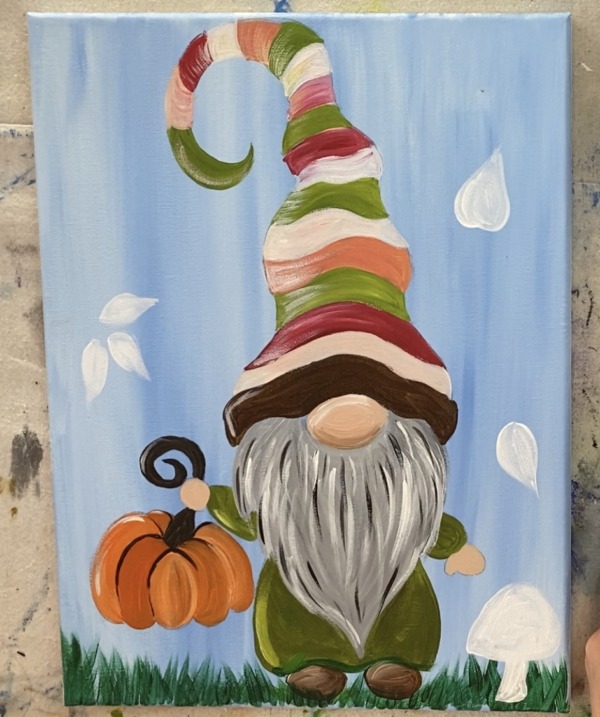
Learn how to paint a fall gnome!
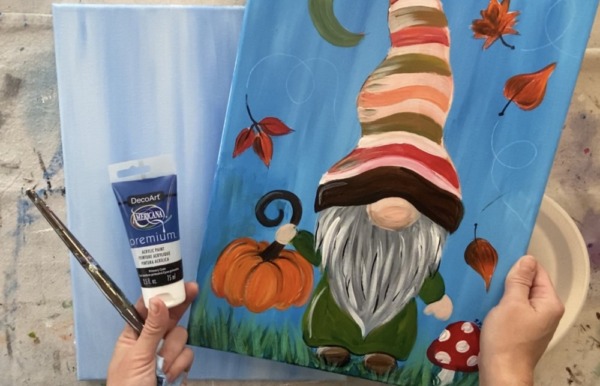
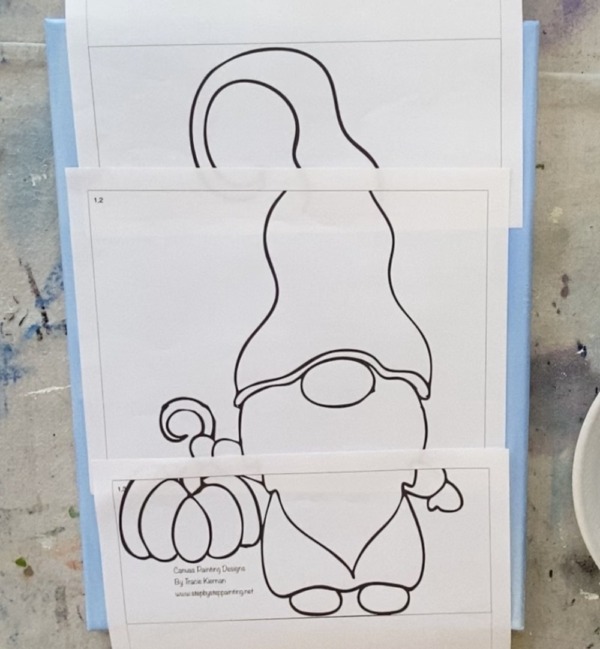
This beginner painting tutorial is of an adorable Fall gnome! I made a traceable for this so you do not have to draw him. This traceable is for a 12 x 16 canvas size, however, I do have other gnome canvas traceable sizes in my free traceable library! Or you can sketch him out lightly after you paint the background, whatever you prefer!
You can also customize him to your liking with your own colors and designs on his hat.
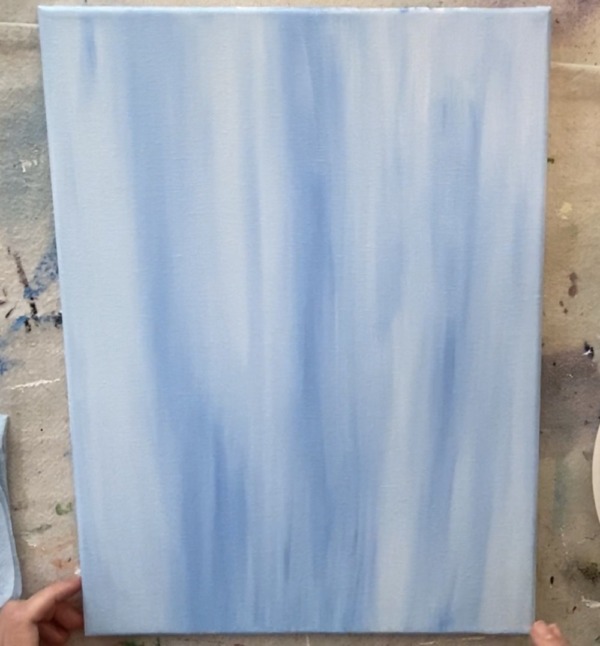
I did this painting twice as I do a lot of my paintings. The first time around was with a darker blue background and the second time around with the lighter blue. I like the lighter blue background better because it allows for more contrast in the painting but you can also decide for yourself!
The darker blue is “Primary Cyan” from DecoArt Americana. The lighter blue background is cobalt blue by Liquitex BASICS.
Enjoy and happy painting!
Materials
How To Paint A Fall Gnome
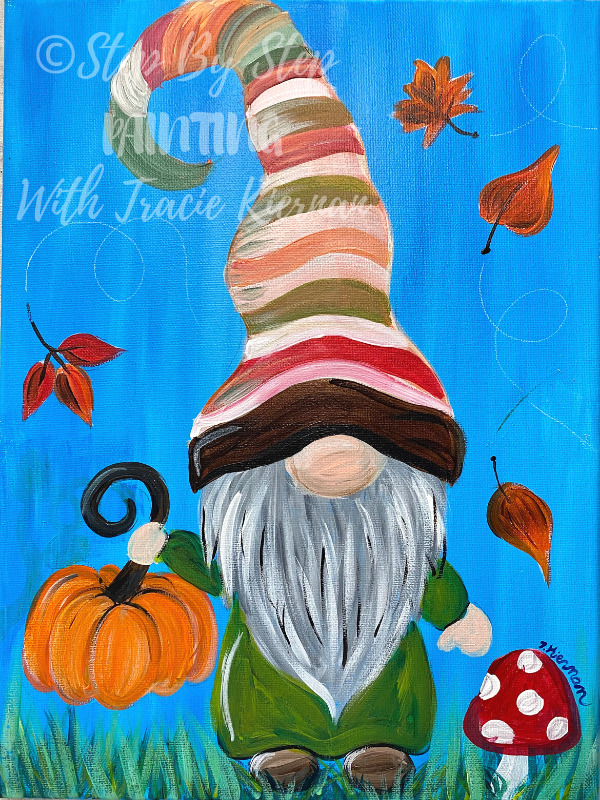
Learn to paint an adorable fall gnome step by step with acrylics! This is a super easy painting tutorial that comes with a free traceable for the gnome!
Materials
- 12 x 16 Canvas
- Acrylic Paints
- Paint Brushes
- Traceable
- Graphite Transfer Paper
- Pencil or Pen For Tracing
Paint Colors
- Cobalt Blue
- Titanium White
- Mars Black
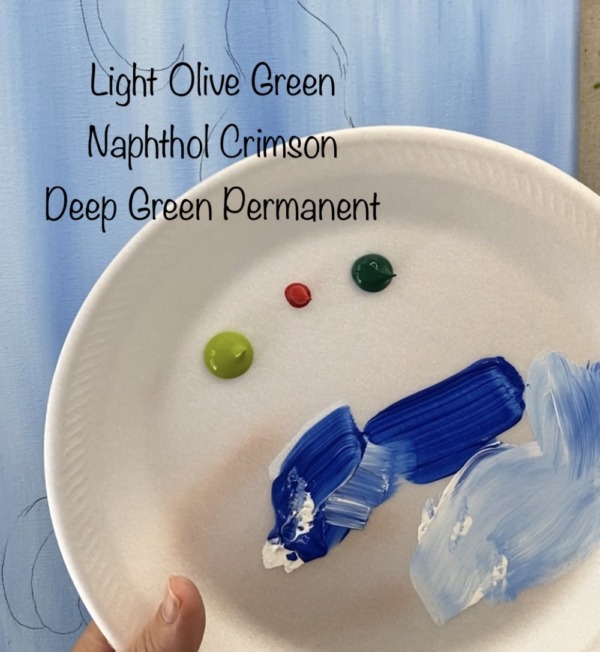
- Naphthol Crimson
- Cadmium Orange Hue
- Light Olive Green
- Deep Green Permanent
- Burnt Umber
- Light Portrait Pink
- Unbleached Titanium
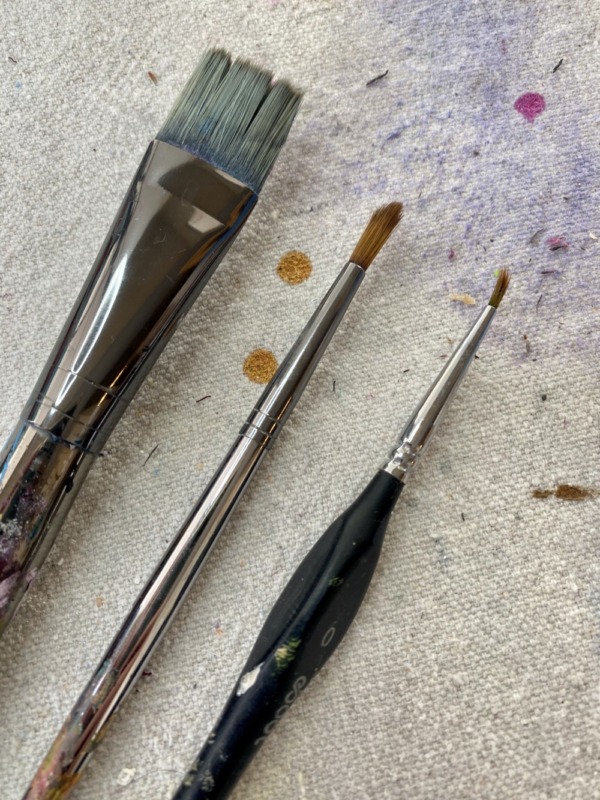
Paint Brushes
- 3/4" Wash
- #4 Round
- #0 Round
Instructions
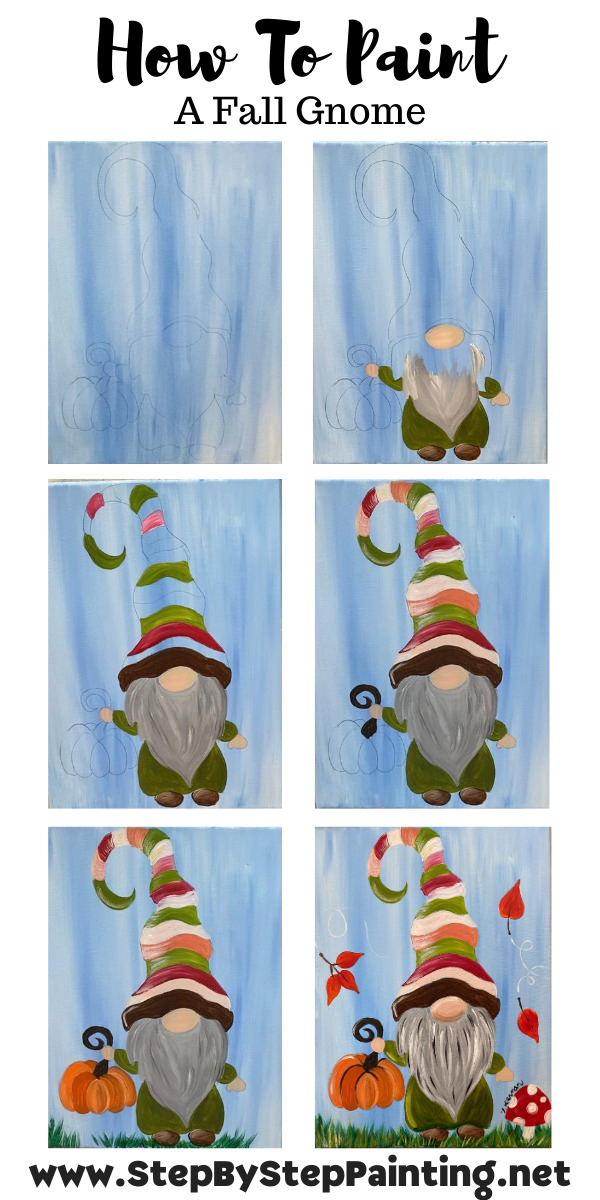
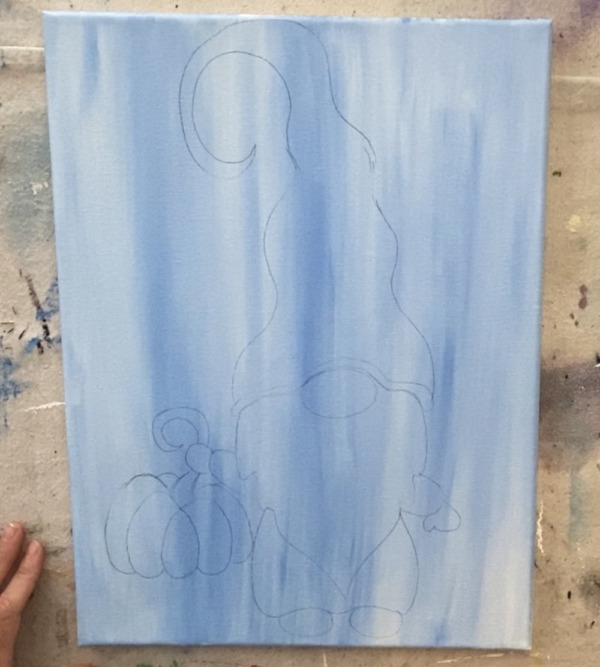
- Paint the background and let dry.
- Trace or draw the gnome onto the canvas.
- Paint the gnome in starting with the green robe then doing the shoes, the nose, the hands and the beard.
- Draw stripes on the hat then paint the striped hat in.
- Paint the pumpkin.
- Paint the grass.
- Add texture in the beard.
- Paint the mushroom.
- Paint the leaves.
- Paint second layer of texture in the grass.
- Touchup wherever needed!
- Sign your name and show it off!
Color Palette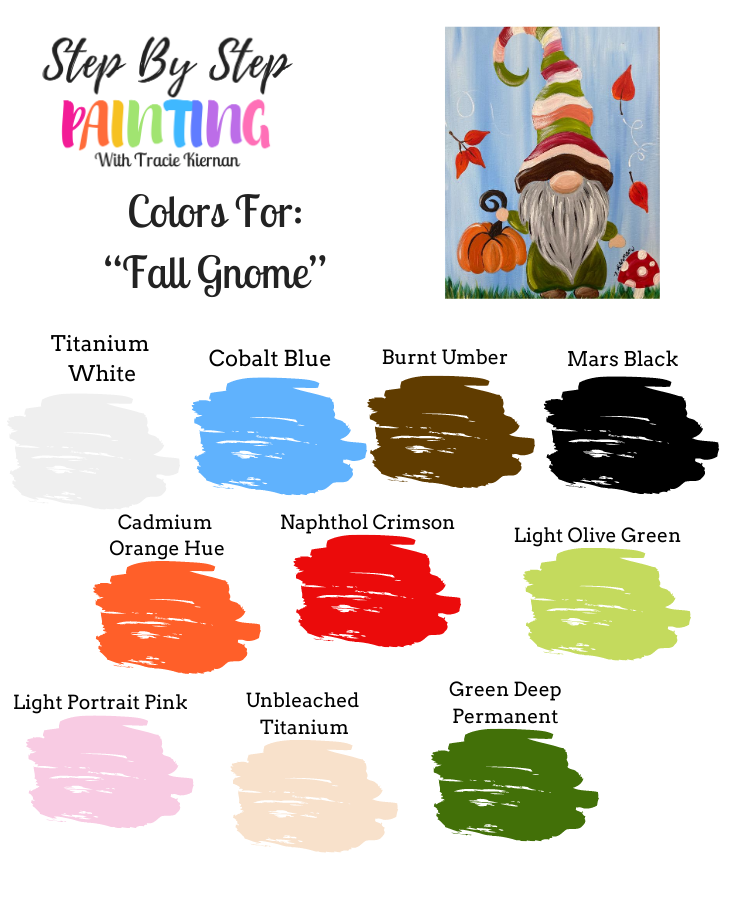

Craft Paint Suggestions
If using craft paints for this, try to take the above swatch and match colors or select colors from the below suggestions:
- White
- Black
- Any Light Sky Blue
- Any Dark Brown
- Orange
- Red
- A deep olive green color or dark green
- Any skin color
Brushes
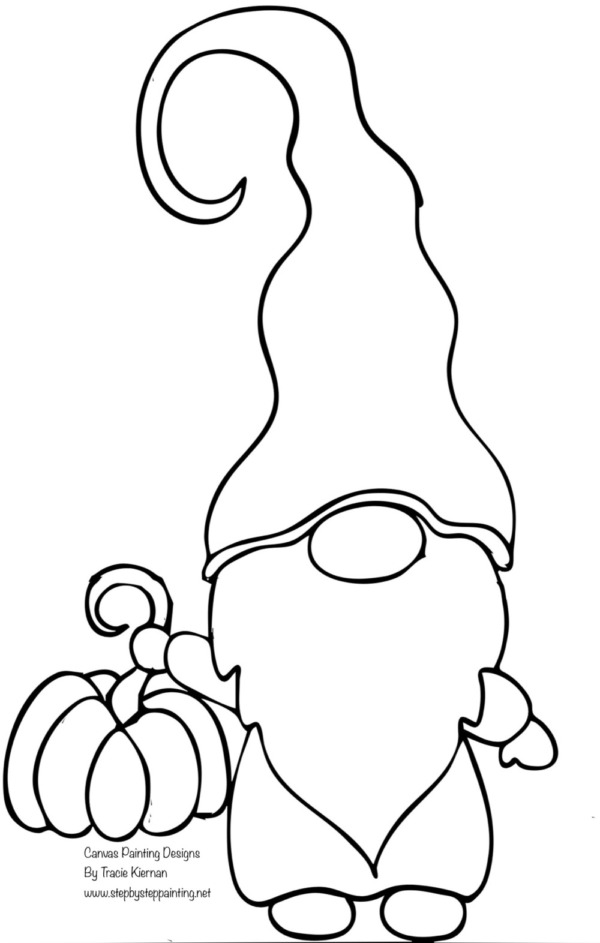
Traceable
This traceable is to be printed on three sheets and taped together. Go to my traceable library to get the PDF download.
I did this painting on a 12 x 16 canvas. If you are doing a different size canvas, I recommend downloading the image below and scaling it to whatever size canvas you are using. A great software for scaling Traceables is the Rapid Resizer Online Software! That is my affiliate link and I use and love that software for resizing Traceables!
Directions At A Glance
YouTube Video
Step By Step Directions
1. Paint The Background On The Entire Canvas
Load cobalt blue and titanium white on your palette and use your 3/4″ wash brush. Load your brush into the water and pat dry and then load both cobalt and white onto your brush.
Paint up and down strokes so the white and blue blend together to make an unblended streaky look.

To get the background to be light, make sure you are using more white than blue.
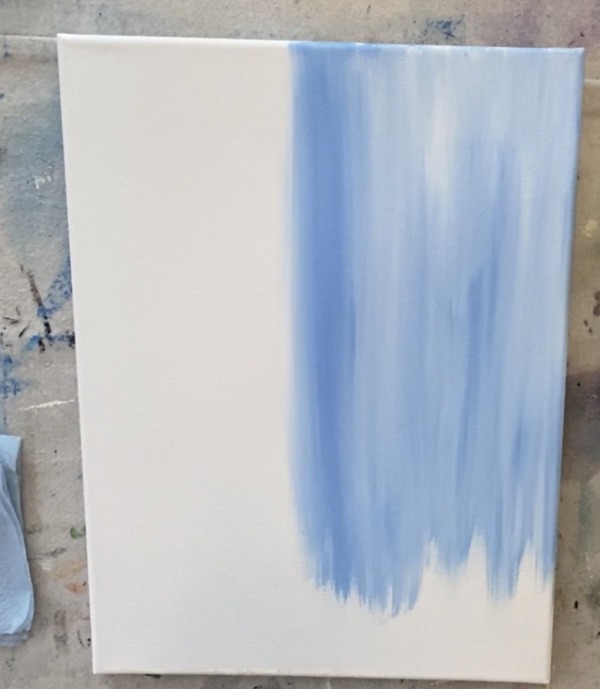
Fill the entire canvas. You can paint the sides too! To get your paint to flow a little better, you can add a bit more water to the brush and swirl it in the paint. This helps to flow of the paint to increase.
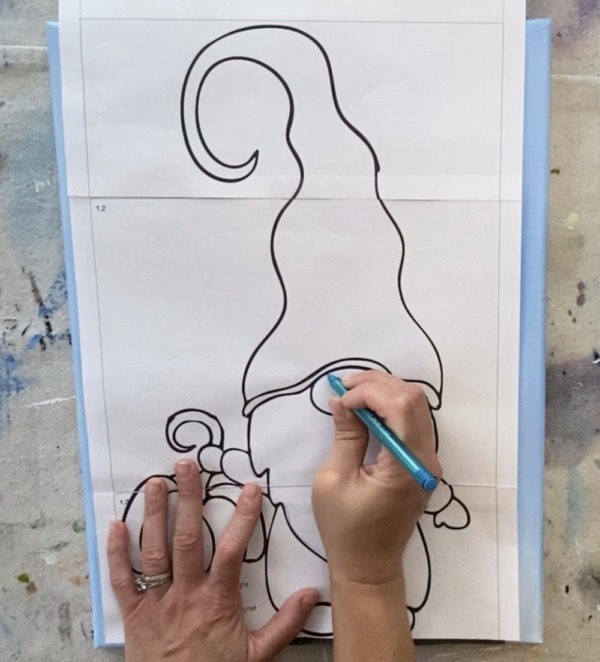
2. Wait for painting to dry and then trace the gnome traceable (or draw him)
Go to my printable library and print out the gnome. It will print on three sheets. Then you cut on the dotted lines and tape together.
Note: you do not have to cut on all the dotted lines, just on the bottom where the gnome is taped together. Place a sheet of graphite paper under the printable and then use any writing tool to trace the design.
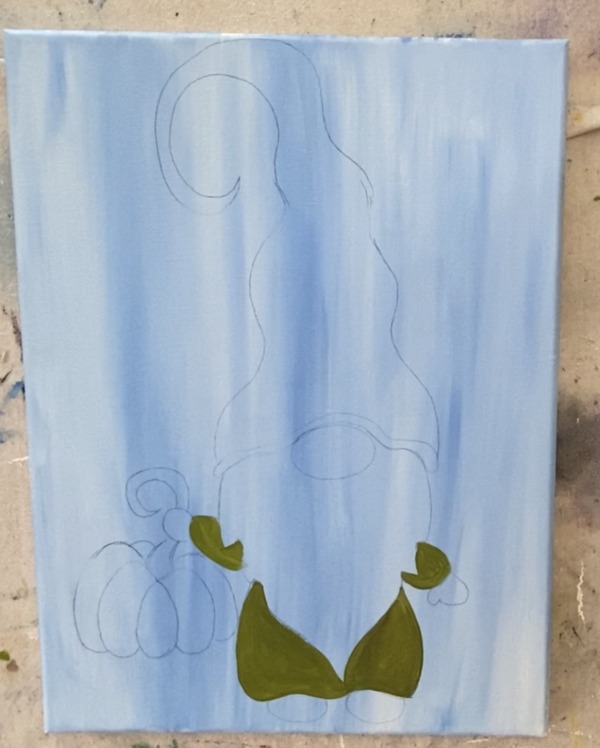
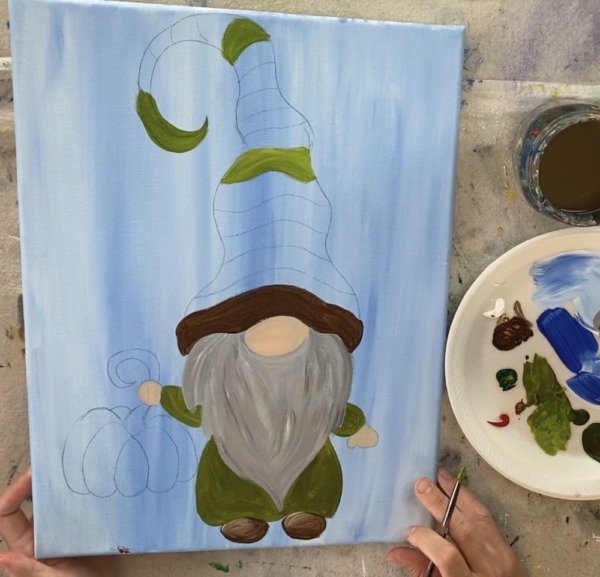
3. Paint The Robe and the Shoes
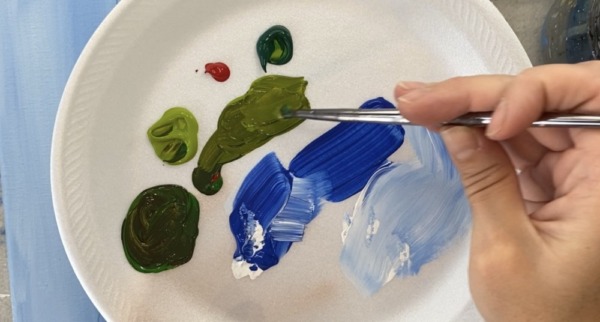
Next paint the robe! To make that really awesome dark olive green color, I actually mixed light olive green with deep green permanent and a little bit of naphthol crimson. The proportion is about 4 parts olive green, 1 part red and 2 parts dark green but you may need to play around with it a bit to get the desired green.
Paint the entire robe using a #4 round brush.
Then rinse your brush and paint the shoes burnt umber!
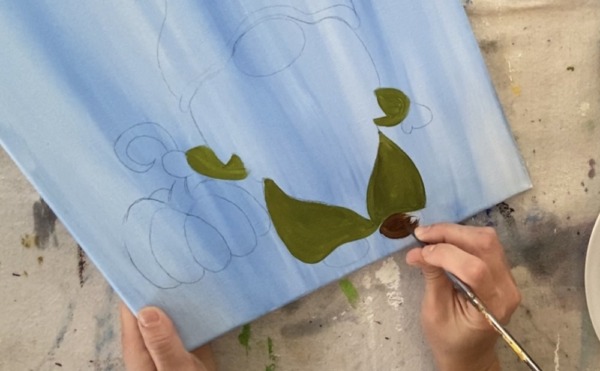
To get that highlight on the shoe, wipe the brown off your brush and load a little bit of white (or mix a very light brown on your palette). Paint the upper right part of the circle of his shoes and curve/blend it into the brown.
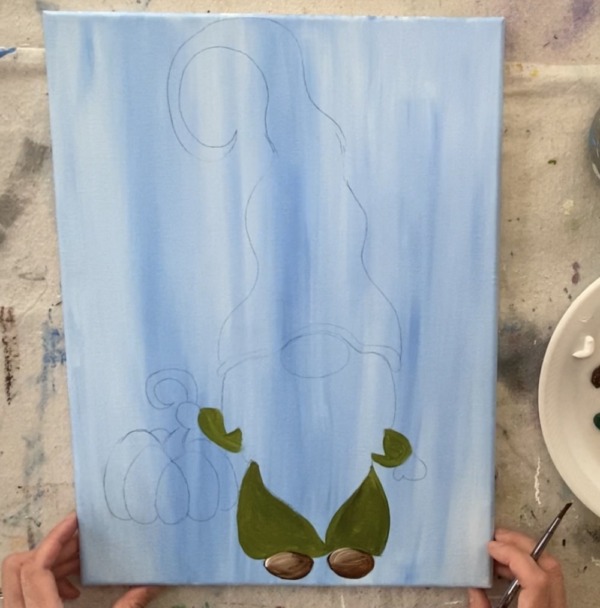
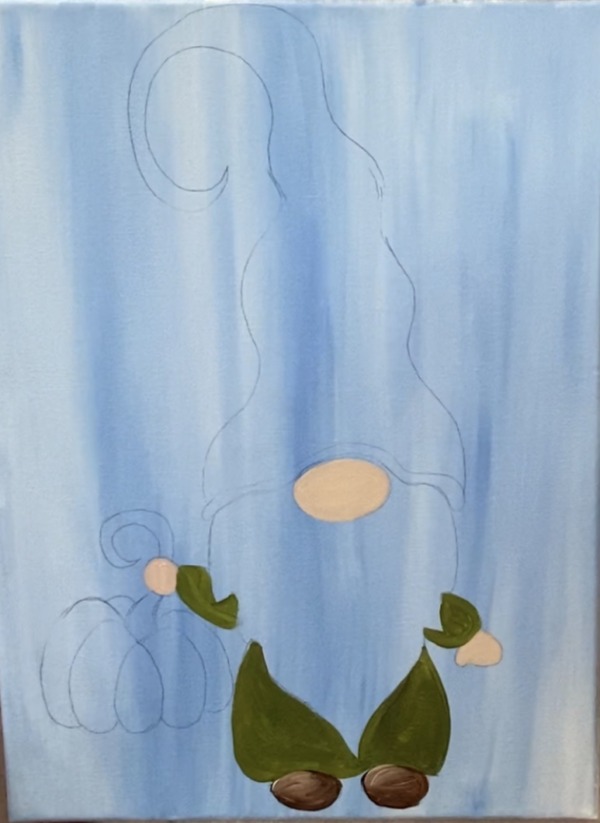
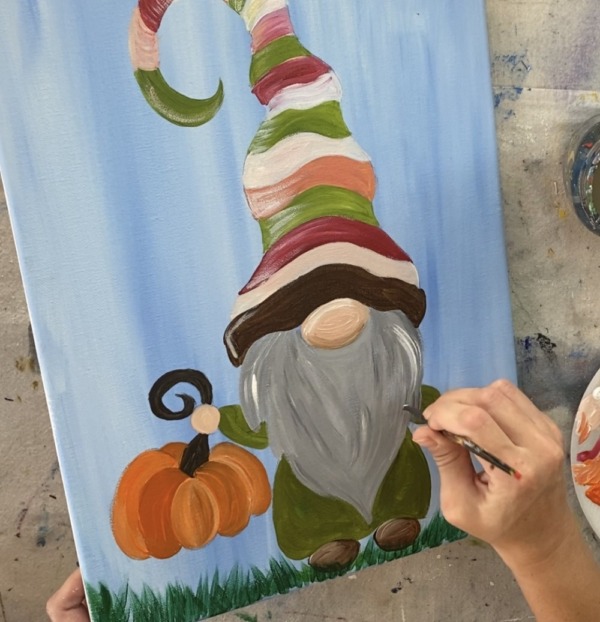
3. Paint the nose, hands and beard
Next I painted the nose and hands! I made a light tan color by mixing about equal amounts of unbleached titanium and light portrait pink. Use the #4 brush and paint his nose and hands.
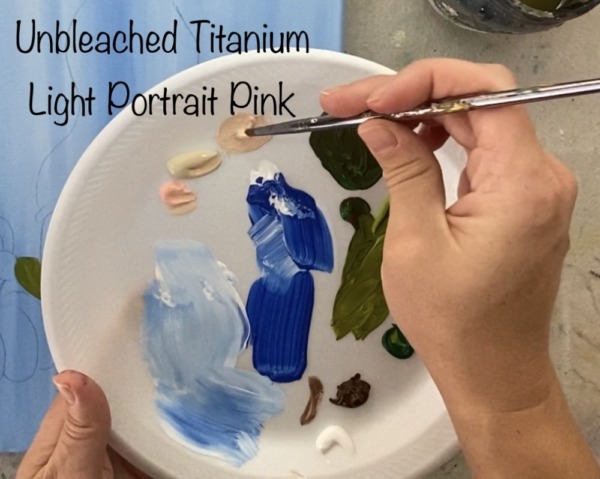
Next I painted his beard! On your palette load mars black and titanium white. Then swirl the two together (about 4 parts white and 1 part black).
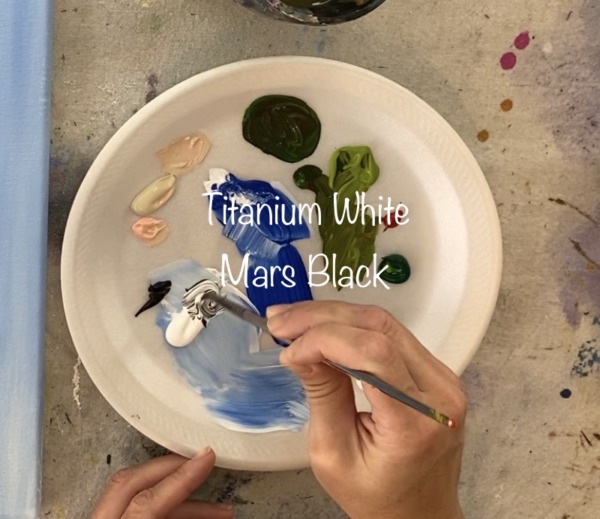
Use your #4 brush to paint the beard. Note that your gray should be a light to medium gray and since you did not mix the colors all the way on the palette, you will get different variations of the gray as your paint.
The direction of your strokes should flow and go in the direction of the beard. Don’t worry about the texture just yet because you will add another layer of texture layer! Just get the beard to be completely filled in. Note that the different variations of gray were from loading my brush in the white and black combo so some areas turned out lighter gray and some darker.
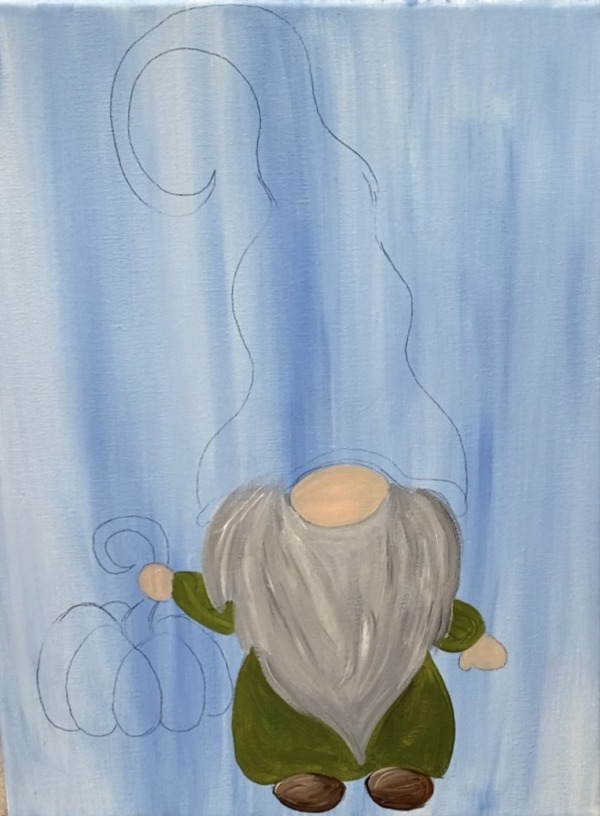
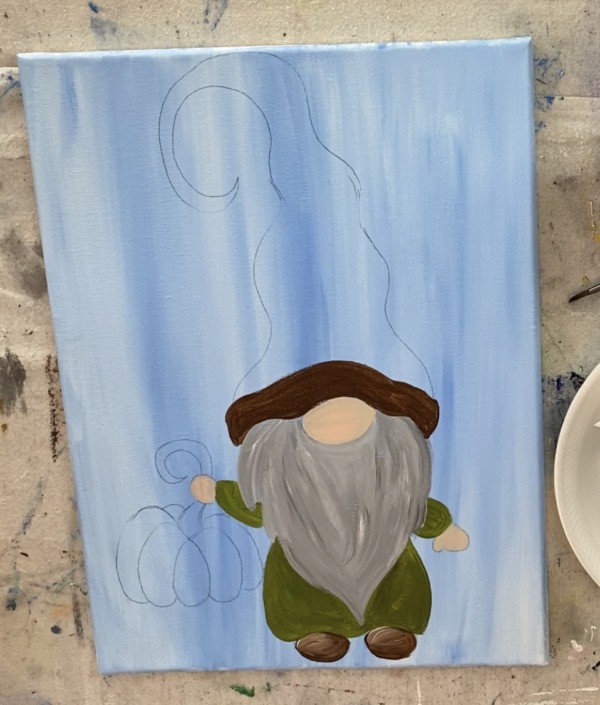
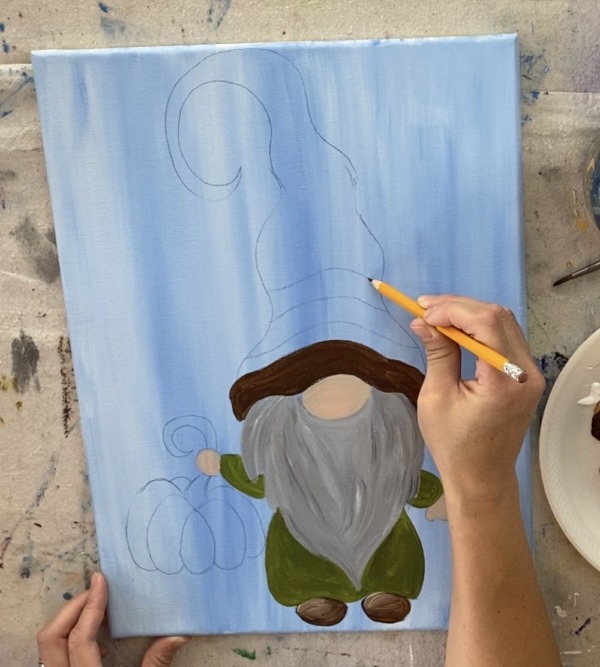
4. Paint The Hat
The had is painted a solid coat of burnt umber. Rinse your #4 round brush and paint the hat. I made this bottom part about an inch high.
Then I drew stripes on the hat with a pencil. The spacing of the lines were about an inch or 3/4″ apart. Make them curved and flow with the hat.
Then fill the stripes in! For this step, I started with that same color green I made in his robe. Use your #4 round brush for it and add a tiny bit of titanium white. When you add that white and blend it in, it will give it some color variation.
Then I painted naphthol crimson red stripes. Again, if you mix a little white with the red, it will give it color variation.
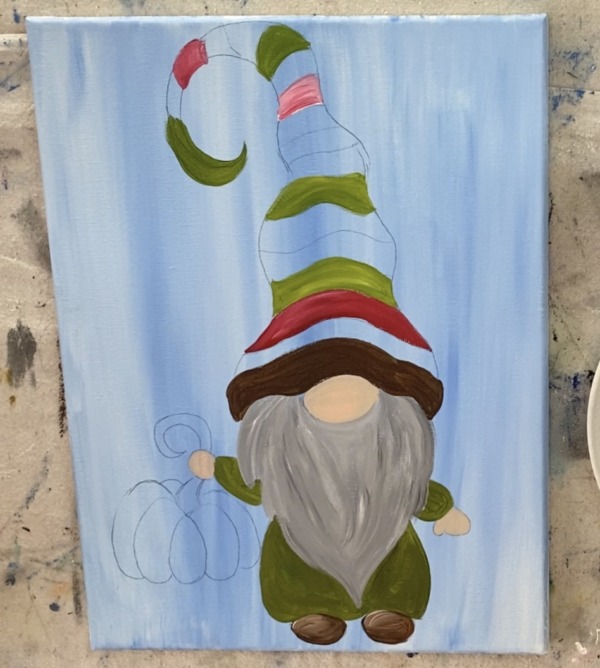
Mix a little white into the orange to make a light orange color and paint some of the stripes orange. Note: you can customize these colors!
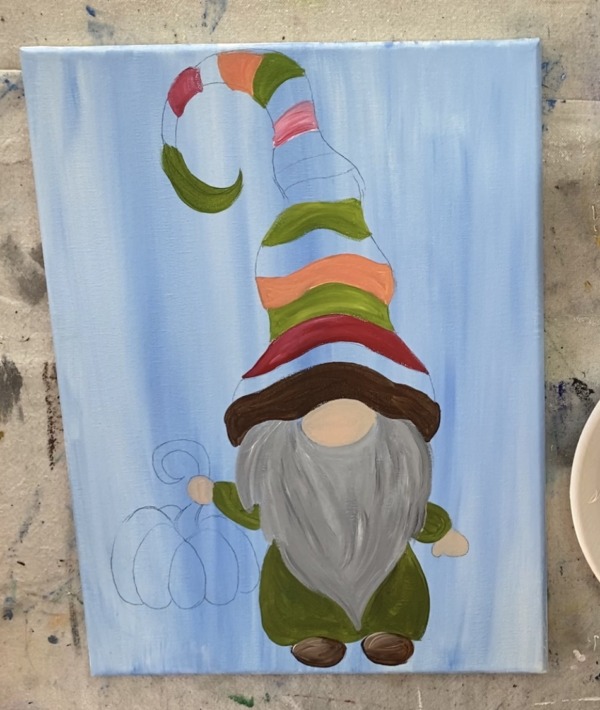
Then I did white stripes and mixed a tine bit of orange into it to make it an off white color.
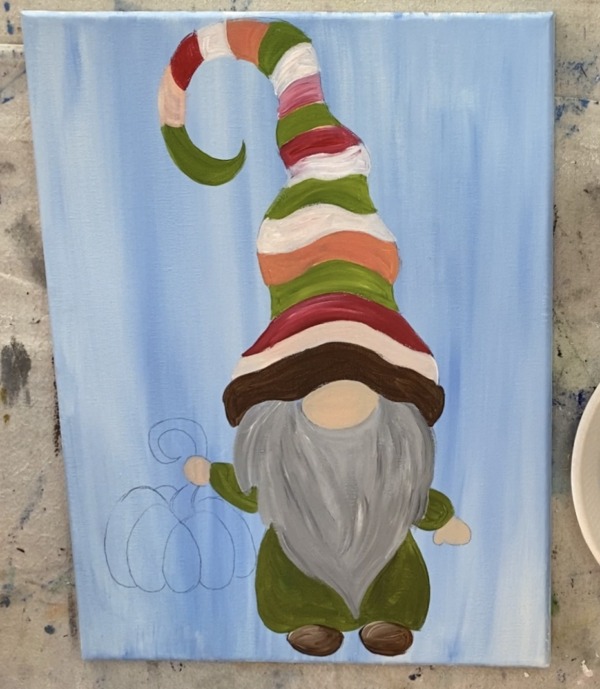
Let your stripes dry and then add “highlight” to the left part of the hat. To do this, load your brush in white and wipe it off. Dry brush lines on the left side of the hat to give it highlight. When you dry brush, there is very little paint on your brush and it comes off dry, feathery and see through.
Notice also the dry brush highlight on the brown part of the hat and on the green pointed tip.
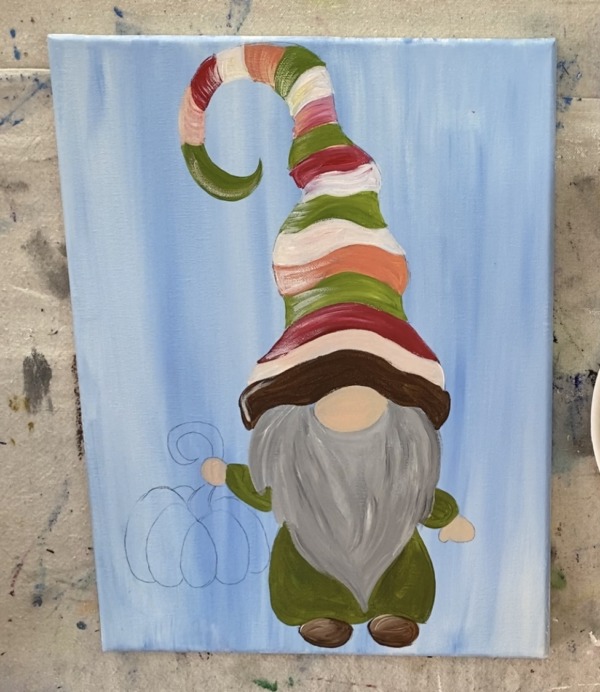
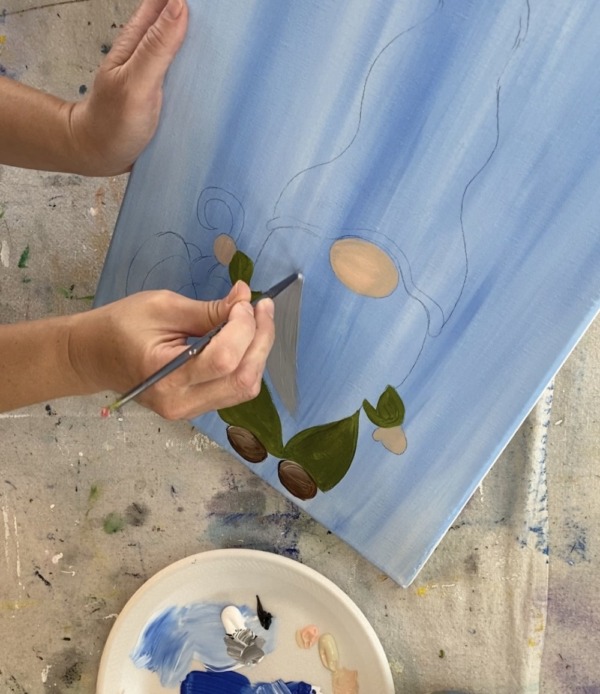
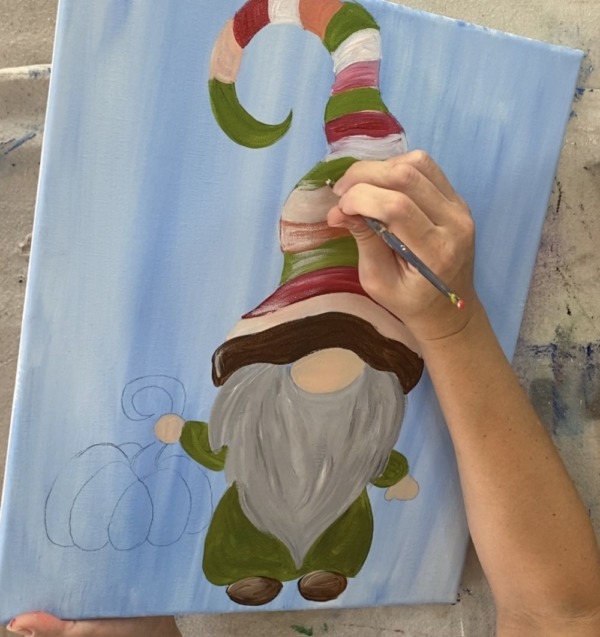
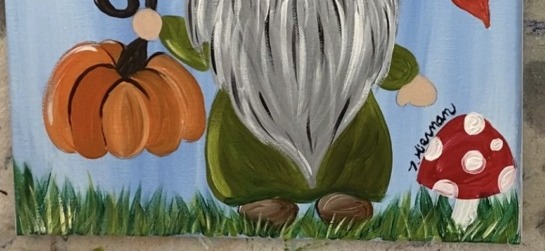
5. Paint The Pumpkin
To do the stem of the pumpkin, mix brown and black together to make a very dark brown. I did about 1 part black and 3 parts brown. Use your #4 round brush.
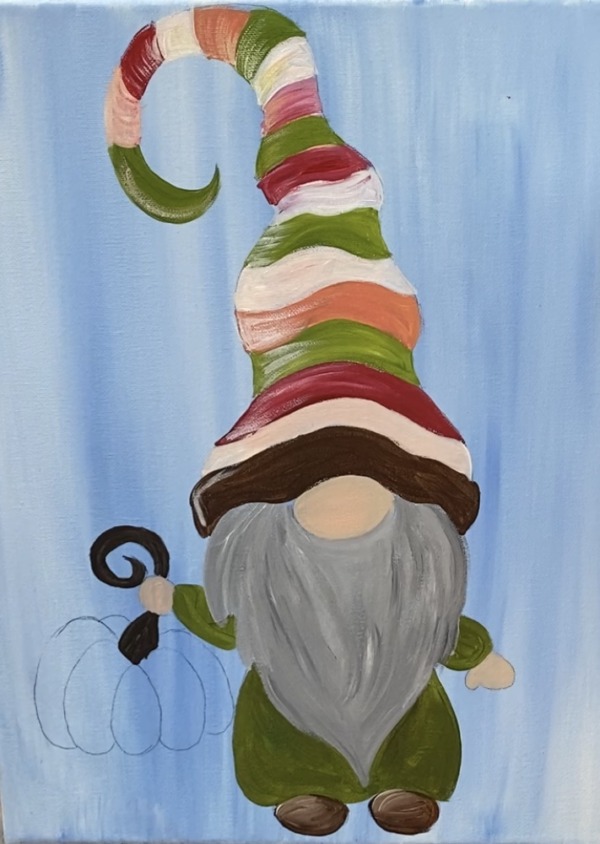
Then load cadmium orange hue onto your palette. Use your #4 round brush to paint the pumpkin. Start with one of the pumpkin bumps and paint it cadmium orange hue. Start at the top of the bump and paint down making your stroke go in the direction of the shape.
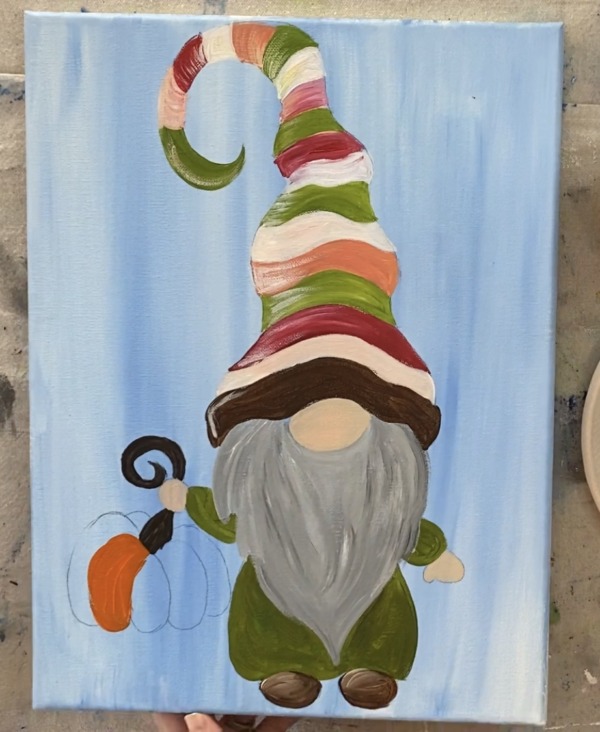
Then mix a little white into your orange to create a different tint of orange. Paint the next bump. Then paint each bump using a different variation of orange mixed with a little white. When you vary the tint of the orange, you are allowing the bumps of the pumpkin to stand out!
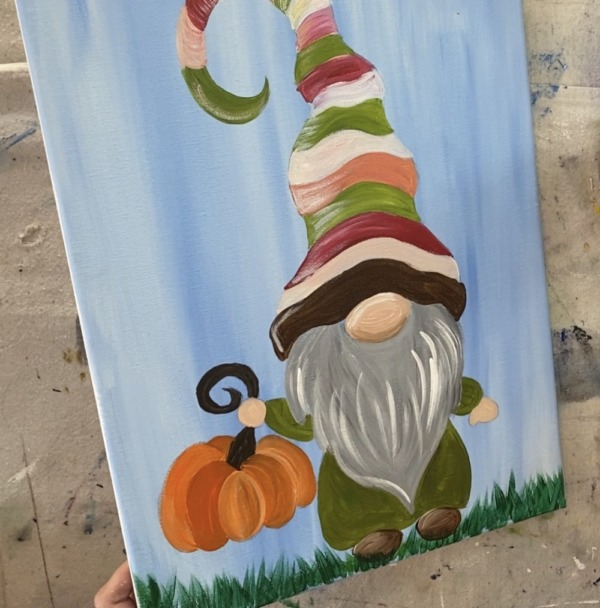
6. Paint The Grass (first layer)
To do the grass, I used the #4 round brush and deep green permanent. Slightly water down the green so it will flow. When you paint the grass, start at the base and stroke up. Release the pressure of your brush as you stroke up allowing the blade of the grass to go to a point.
The grass under the gnome’s feet is a little more flat and is going at an angle.
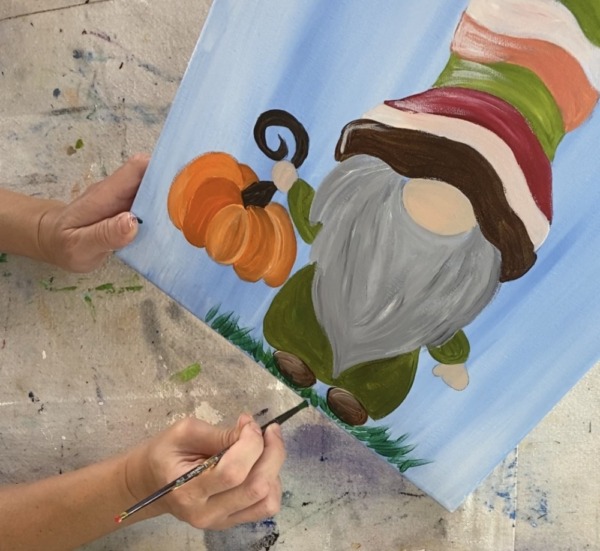
Then paint more grass. Make sure each blade starts at the bottom and strokes upwards or diagonally. Make the grass blades slightly higher on the left and right of the shoes and go all the way across the bottom.
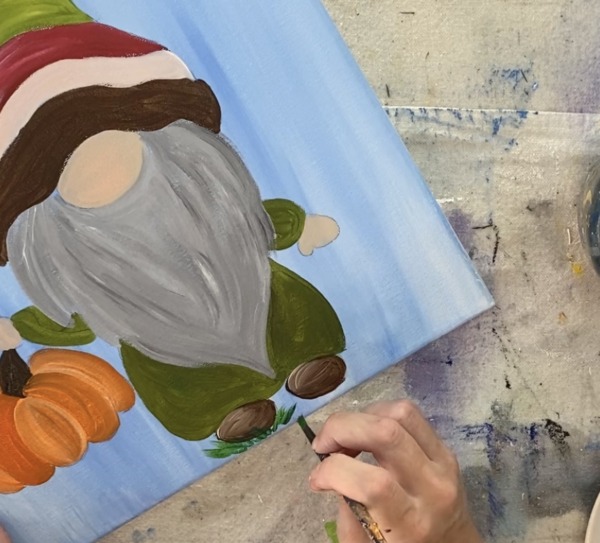
7. Add texture on the beard and some shadowing and highlight in the nose
Load your #4 round brush in titanium white. Then add some texture onto the beard. Make very fast strokes that curve and go in the direction of the bead.
These strokes are fast and curve! This white adds a layer of texture to the beard.
Next use your #0 round brush and mars black. Make more texture stroke marks in the beard.
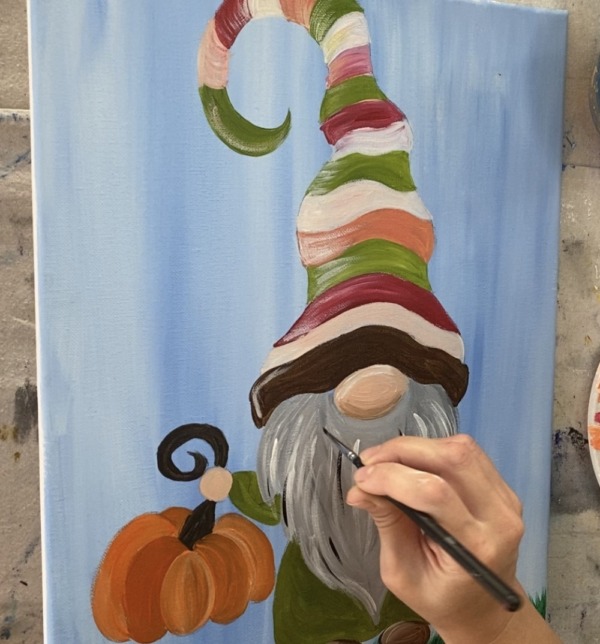
The black strokes should curve and counter in the direction of the shape of the beard.

To do the shadow and highlight in the nose, paint a second layer of that light portrait pink and unbleached titanium combo. Then add a white stroke of paint at the top of the nose and a brown stroke of paint at the bottom. Blend the brown slightly into the nose color so it isn’t so dark (or make a light brown on your palette).
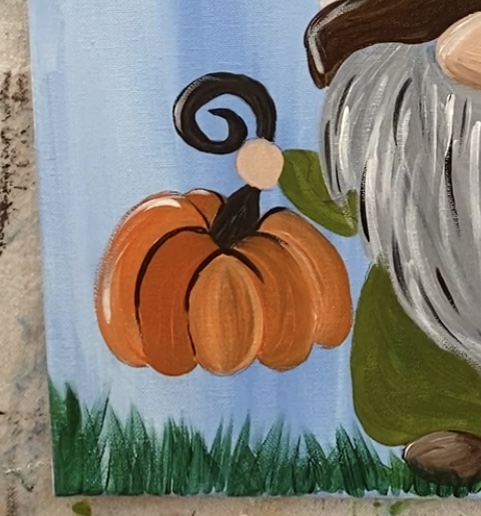
8. Add detail in the pumpkin
I used a #0 round brush and mars black to make the dark lines. Start at the top and stroke downwards but do not outline the entire bump. I also added a white highlight on the left bump of the pumpkin as well as the stem.
9. Paint the leaves and mushroom and add some more texture in grass
To do the leaves, use your #4 round brush and titanium white to paint the shape of the leaves. Paint the shape of the mushroom as well.
Then paint the leaves in! I used a combination of the naphthol red and cadmium orange hue. Mix the two together to get a reddish orange. Paint the top of your mushroom Naphtol crimson.

Then use your #4 round brush to paint another layer of grass the same way you did the first layer. This time use just light olive green. When you do this layer, it will show up slightly lighter over that darker green area. Notice also that I took the light olive green and made a highlight on the left side of the gnome’s robe.
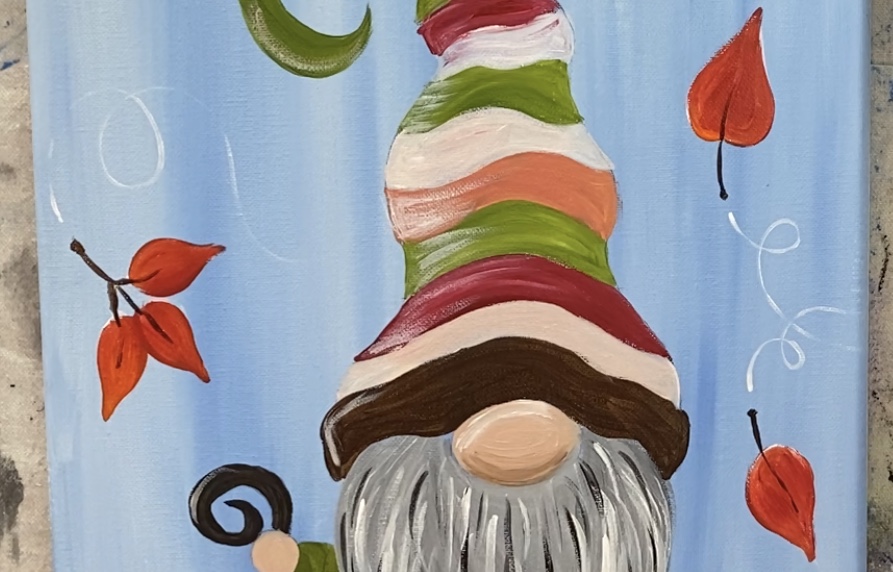
Then use your #0 round brush and brown/black to paint the stems of the leaves. Make the base of each stem sort of rounded. To get the swirls by the leaves, use your #0 round brush and titanium white. Very lightly paint the spirals of where the leaves are flying. You can also use a white paint pen for this step!
Then add another layer to the grass. Mix light olive green with a little bit of white to make a bright green. Use your #0 round brush to paint fine textured grass that overlaps the other layers of grass. Again, make the blades go in different directions.
Lastly, paint white dots on the mushroom.
Finished!
Sign your name and show it off!
I LOVE this fall gnome! I can’t wait to paint it. Will you have a Christmas one? That would be wonderful!
Thank you so much for making these great tutorials available! You are a great teacher and a talented artist!
Thanks Monica! And most likely yes I’ll be doing a Christmas one too!
This was the perfect way to spend a rainy Saturday! Thank you so much even my significant other liked how this one turned out. THANK YOU. Oh! and please bring a winter version, I really like that idea.
Glad you like the fall gnome painting! And yes definitely I will consider doing a winter one! I’m already sketching out ideas ?
I have always been fascinated by gnomes, an now even more. Thanks for sharing your amazing talent. Makes me want to try and paint one. Your instructions are very detailed and well explained. Beautiful gnome.
Just checking in on when you plan to post a Christmas gnome. I know it’s only October but I’m ready to start preparing ??
I’ll be doing one soon!! Lol ?
I loved making this gnome this fall. It was so easy to follow and turned out great. Will you be making a Spring gnome this year?
Thanks Jacqueline! It’s a possibility!
Tracie I love painting with your videos. I started painting a year ago. You make it so easy to follow. I’ve done the Fall pumpkin wagon, gnome and barn. Not sure how to post my results but thank you so much. I adapt the paintings to 8×10. I now have my own “wall of fame ” lol.
Josie