
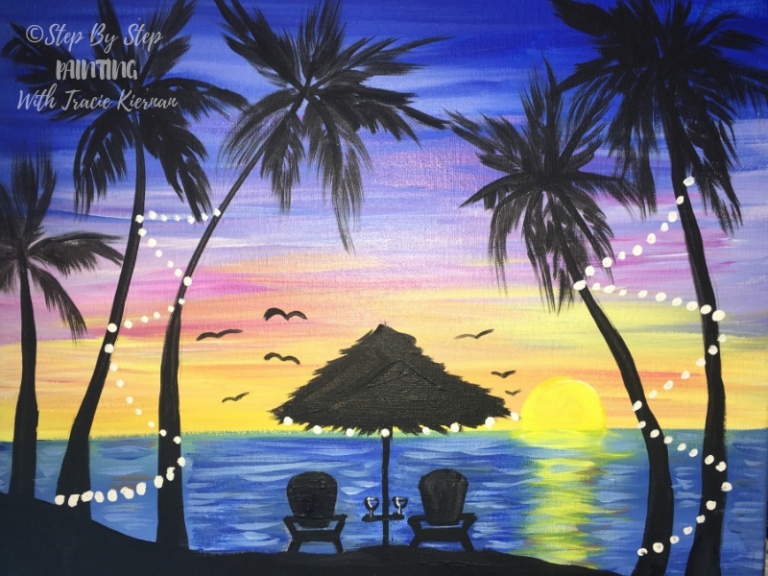
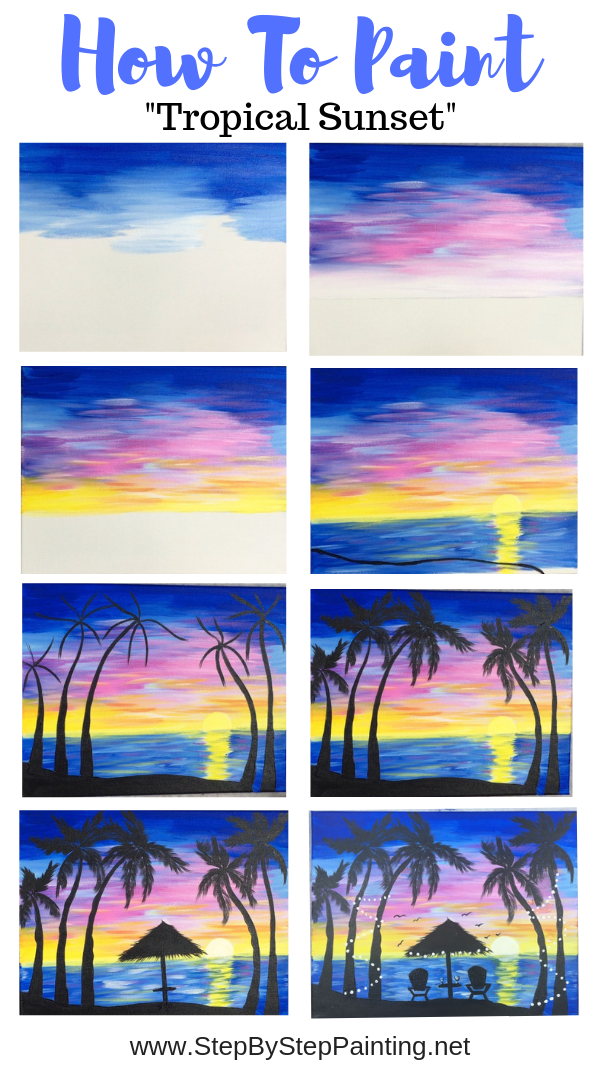
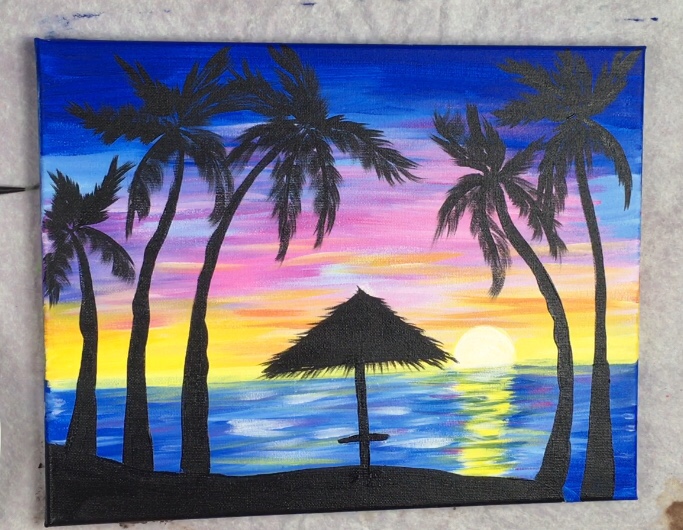
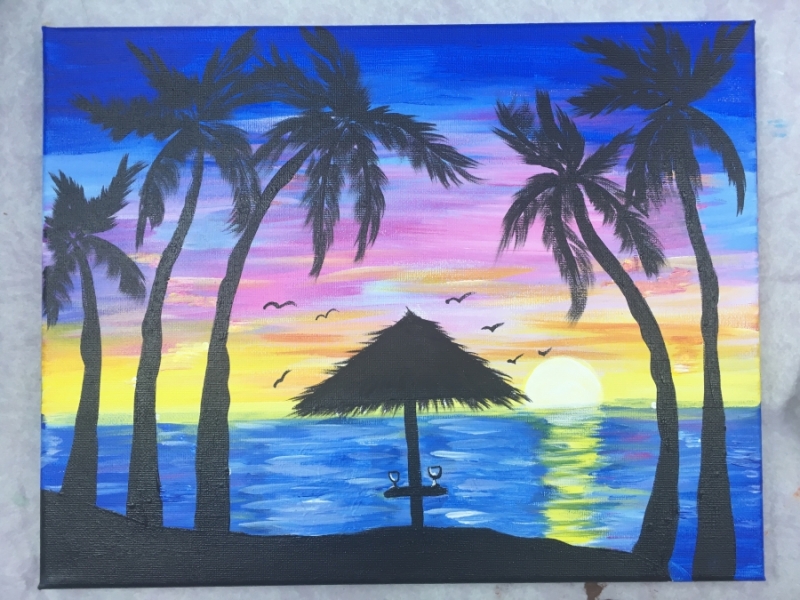
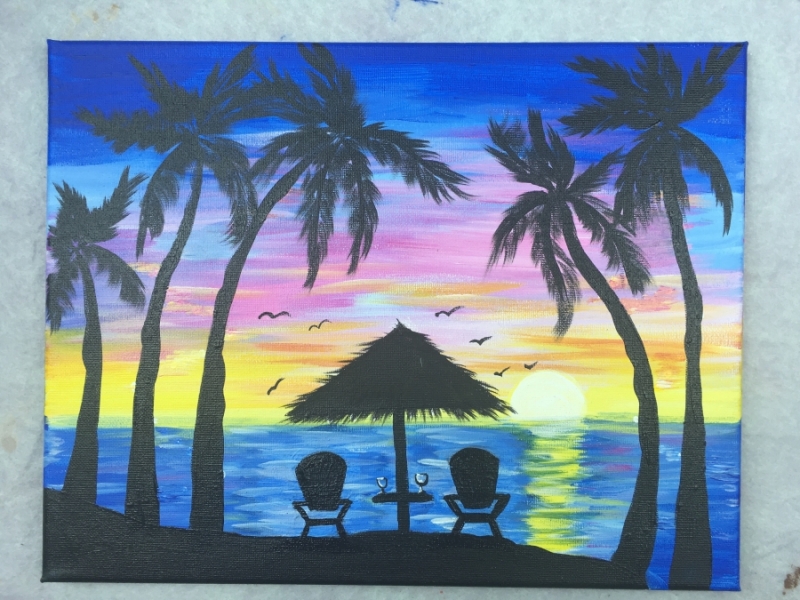
How To Paint A Palm Tree Sunset
This beginners acrylic painting tutorial will guide you through the steps on how to paint a palm tree sunset with a full pink, orange and blue sky.
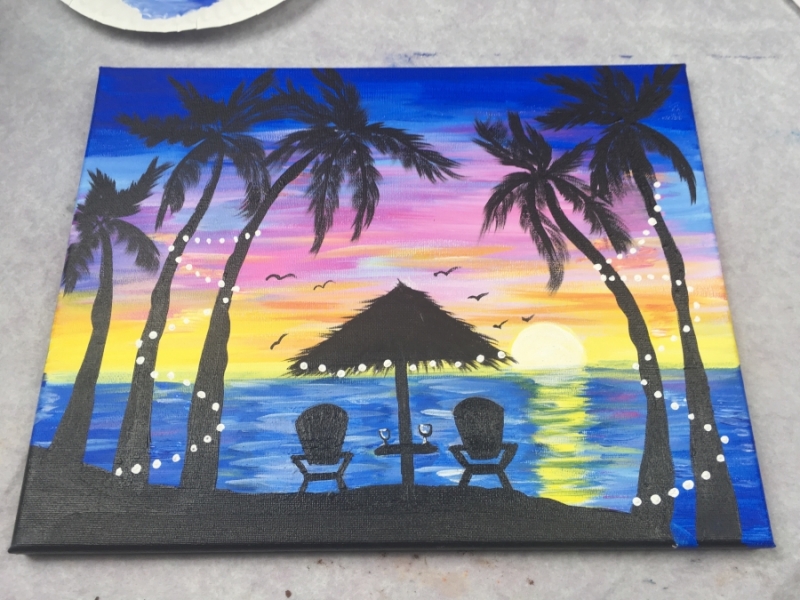
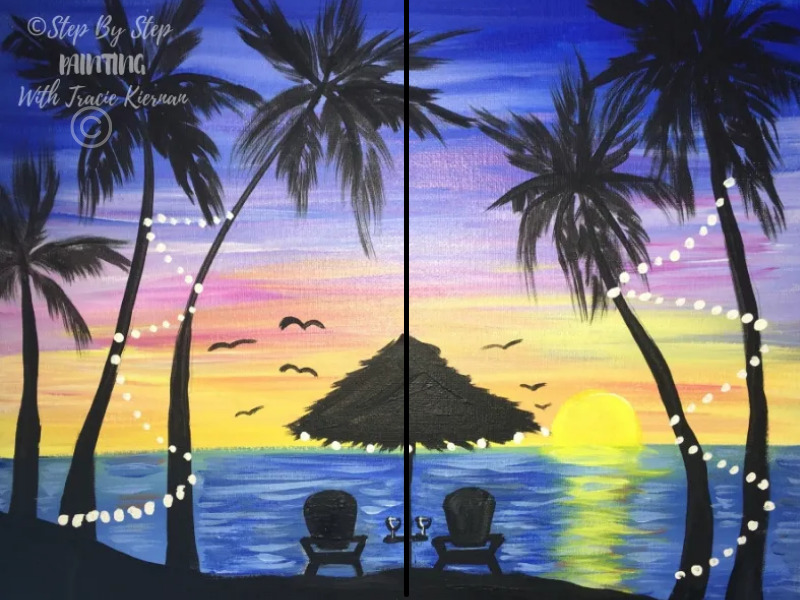
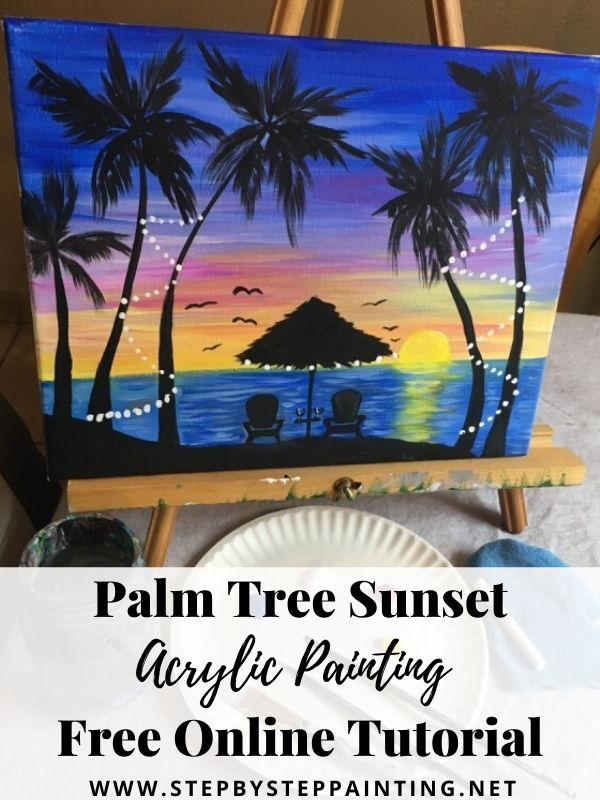
In the foreground there are silhouettes of swaying palm trees with string lights and an umbrella with two beach chairs.
Would you like to save this?
This one works as a couples painting!
Simply divide the painting design in half. Do this on two 11 x 14 Canvases positioned vertically (or two 8 x 10s). Have your partner do one side and you do the other!
Enjoy And Happy Painting!
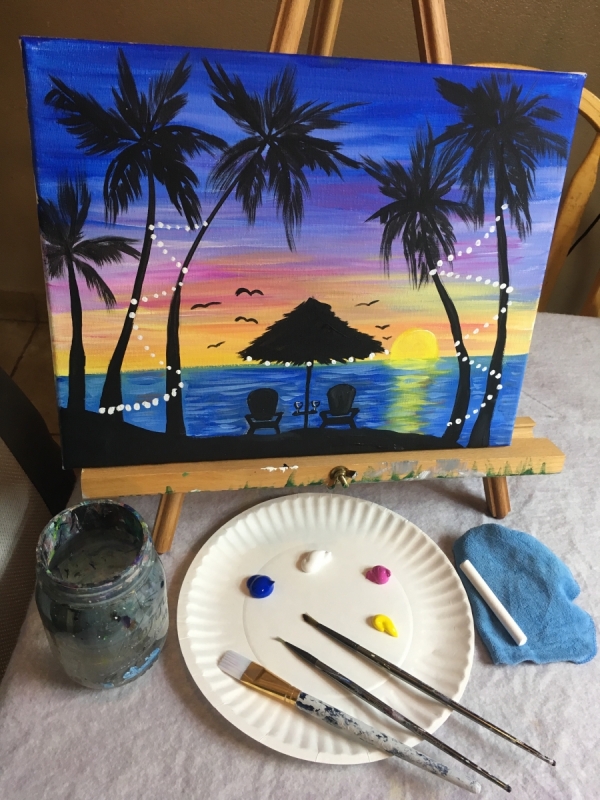
Materials:
How To Paint A Tropical Sunset

You'll want to sit in one of those chairs next to your person and enjoy the tropical sunset. In this beginner acrylic painting tutorial, you will learn step by step how to paint a sunset with silhouettes of swaying palm trees.
Materials
Basic Supplies
- Acrylic Paint
- Brushes
- Canvas (I used 11 x 14 but this design works on a larger scale too)
- White Chalk (Optional to help with silhouette drawing)
- Large Pouncer (Optional)
Colors
Brushes
Instructions
- For more detailed instructions please scroll down through the entire tutorial below.
- Paint the sunset starting from the top of the canvas and "cobalt blue". Continue down the canvas adding: "titanium white", "medium magenta" and "primary yellow".
- Use a circle foam pouncer to paint the sun.
- Paint the reflection under the sun using "primary yellow"
- Paint the ocean with "cobalt blue" and a little bit of "titanium white" and other colors in the sunset.
- Paint the silhouette of the land on the bottom of the canvas
- Paint the silhouettes of the palm trees using a #4 bright brush and "mars black".
- Paint the silhouettes of the umbrella and chairs
- Paint the silhouettes of the birds.
- Use the back of your paint brush to stamp "titanium white" dots to represent the string lights.
Color Palette: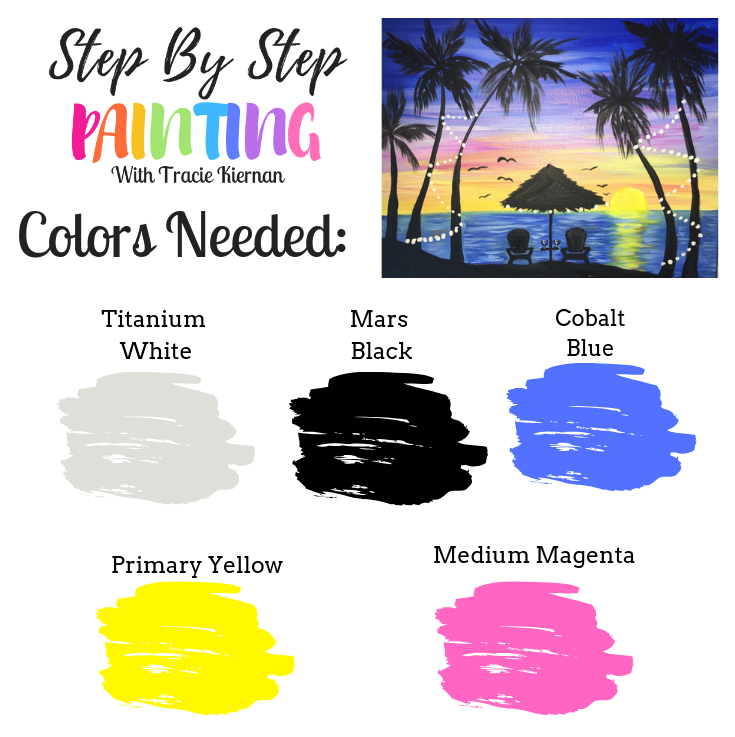

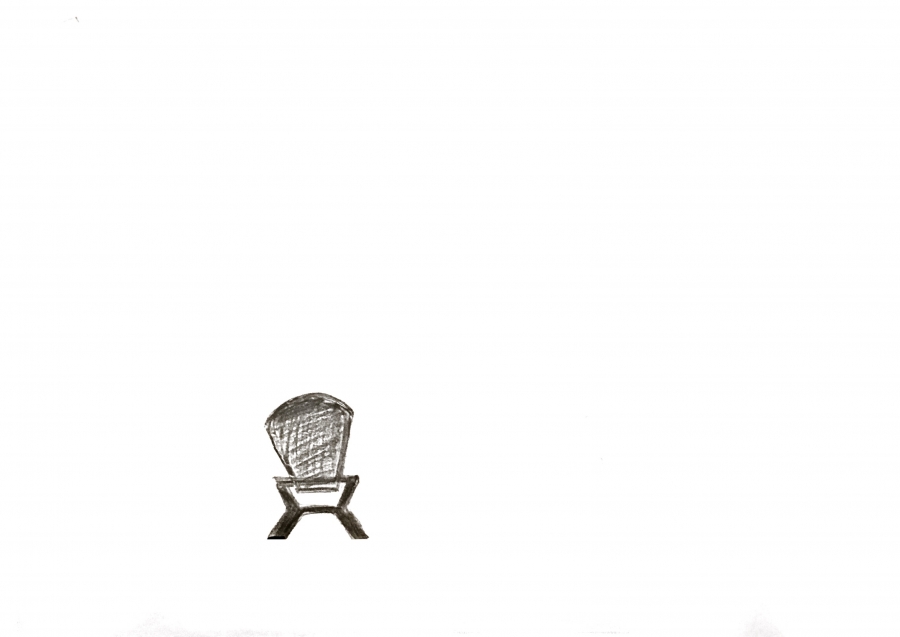
Traceable:
This is a copy of the chair I drew for the chair silhouettes in this painting. Print it out on standard size computer paper.
Directions at a glance:

Video:
Step By Step Directions:
1. Get your supplies ready!
You’ll need a 3/4″ flat brush, cobalt blue, titanium white, medium magenta and primary yellow. You’ll also need a cup of water! 
2. Paint cobalt blue at the top of the sky
Using your 3/4″ flat brush and colbalt blue, start at the top. Paint long solid left and right strokes across the canvas. (Tip: dip your brush in the water first and slightly wipe it dry to allow the paint to flow)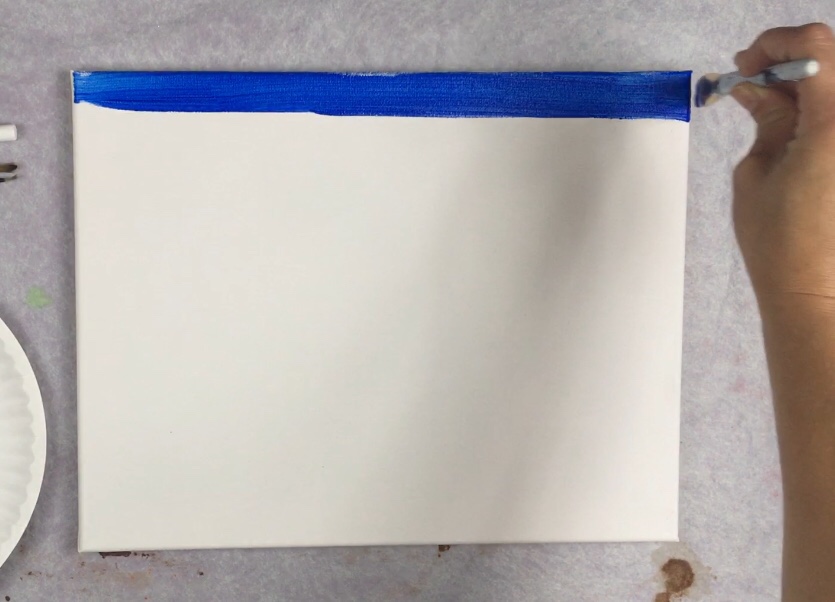
Continue to paint left and right strokes but as you work your way down, leave a lot of open areas. 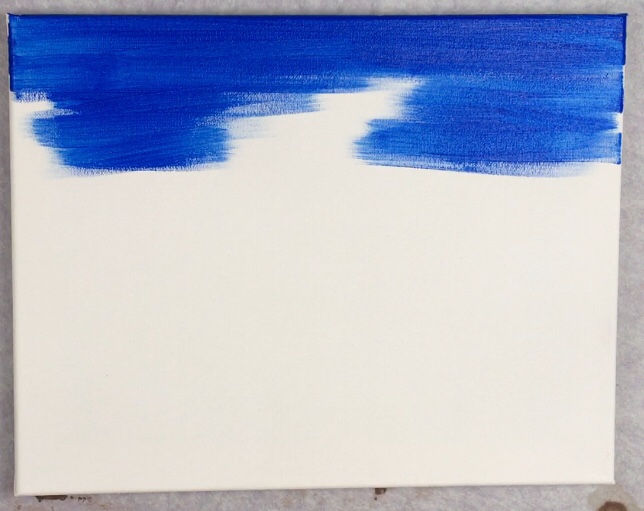
3. Add titanium white into the sky
Don’t rinse the cobalt off your brush. Load it into titanium white.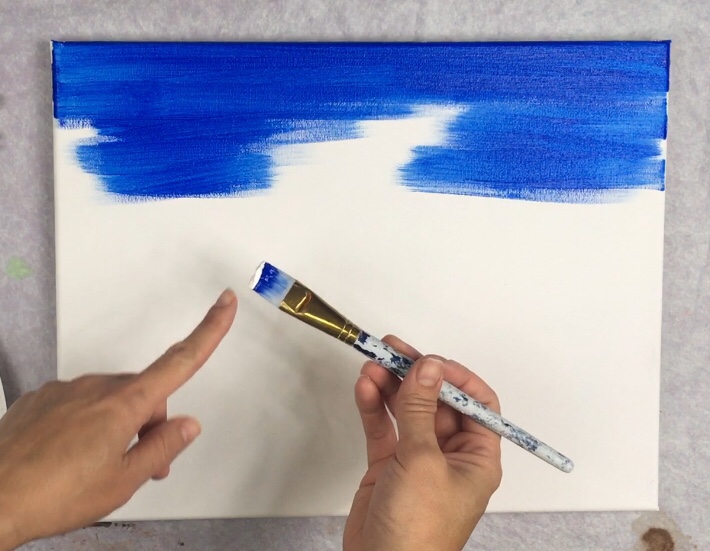
Paint left and right strokes with that titanium white but not all the way across the canvas. Fill in the blank areas. That white will blend with the blue. Leave some more open areas as you work your way down. 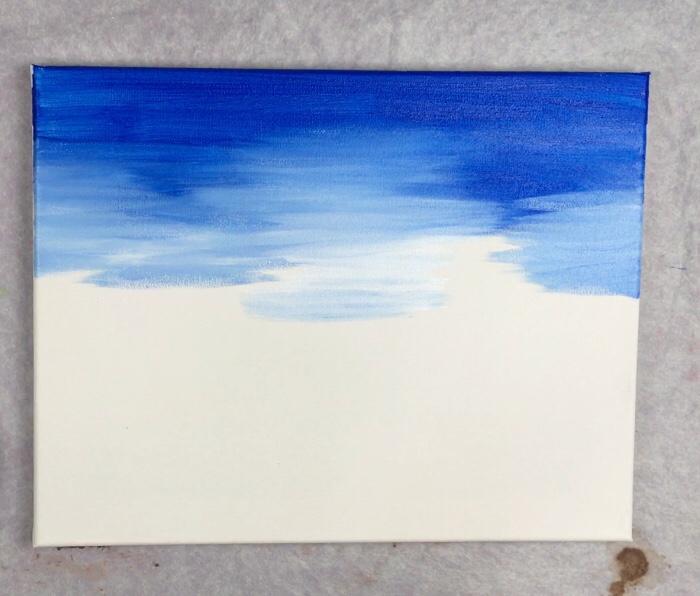
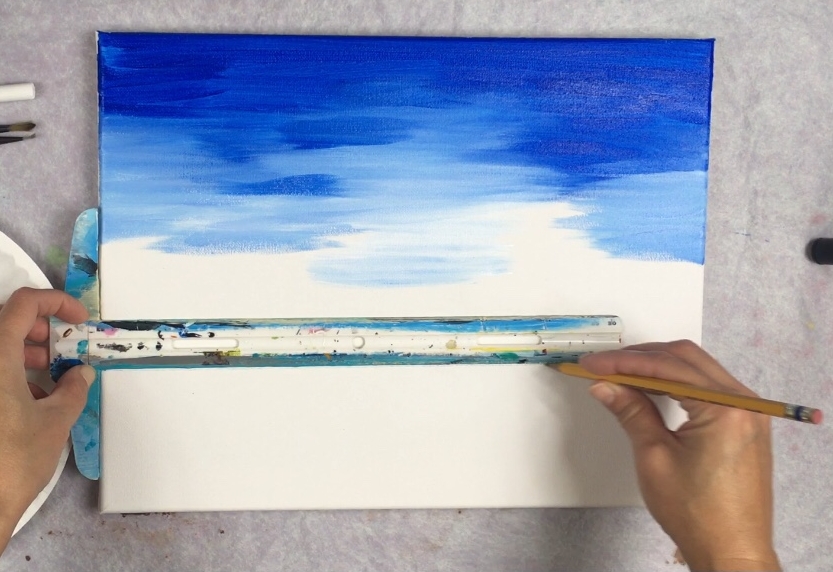
4. Define your horizon line
Before you go any further, you’ll need to define your horizon line so you know where the water will start. Use a t-square ruler and a pencil. Draw the line about five fingers from the bottom of the canvas. 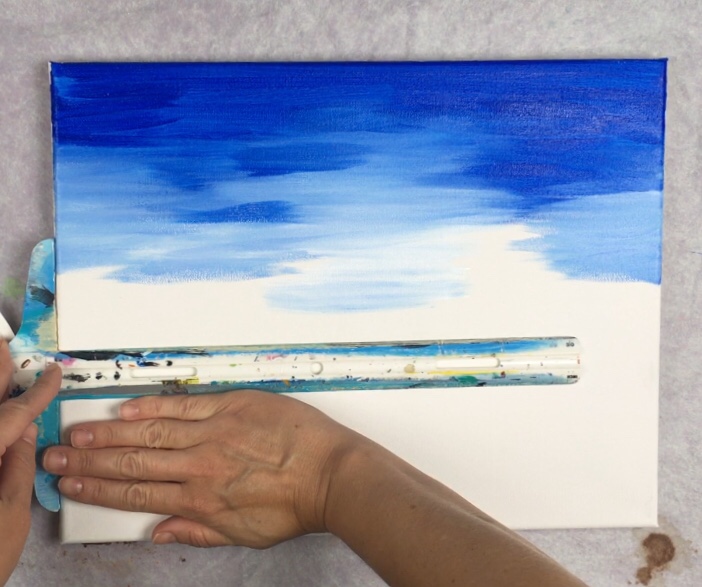
5. Add magenta into the sky
Next rinse your brush off of all the blue and white. Then load the brush with medium magenta and titanium white (about equal amounts). Paint left and right strokes filling in the blank areas and overlapping some of the other areas. 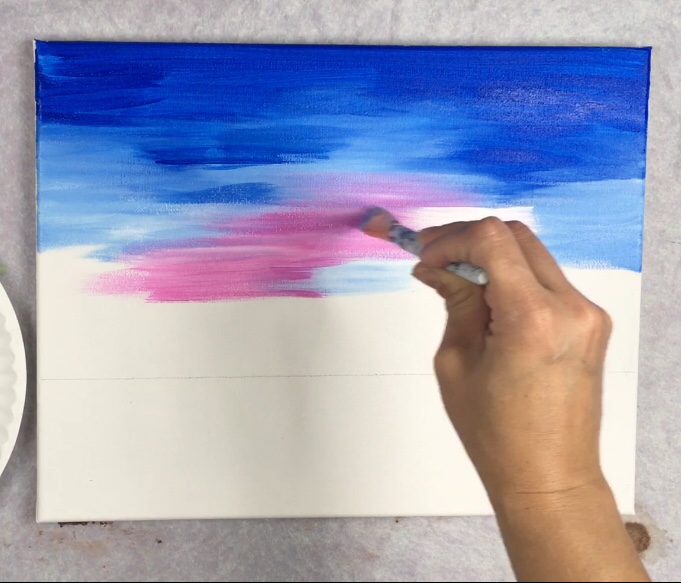
Add this medium magenta/ titanium white combo all throughout the sky. Blend it with the blue by painting over the blue. Apply different amounts of medium magenta in some areas and different amounts of titanium white in other areas. Go almost all the way to the horizon line.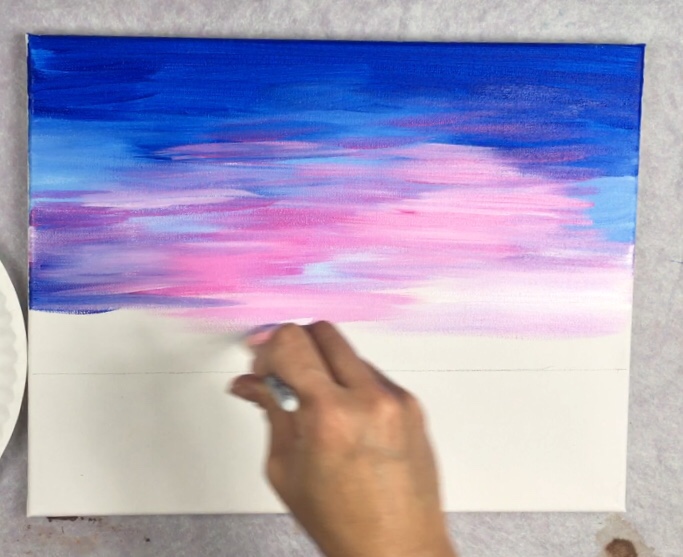
Add more white closer to the horizon line because this area is brighter. Then add mostly white along the horizon line. You can also add a few more strokes of white higher in the sky. 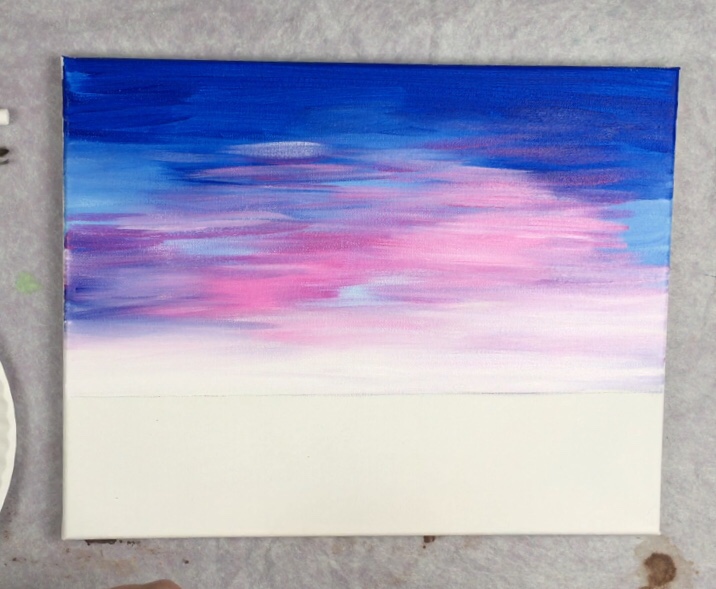
6. Add yellow into the sky
Next load your 3/4″ flat brush in the yellow and add it into the sky in the area closest to the horizon line. It should blend with the titanium white that is already in that area. To get the orange tones in the sky, blend the medium magenta with the yellow and those two colors will turn orange. 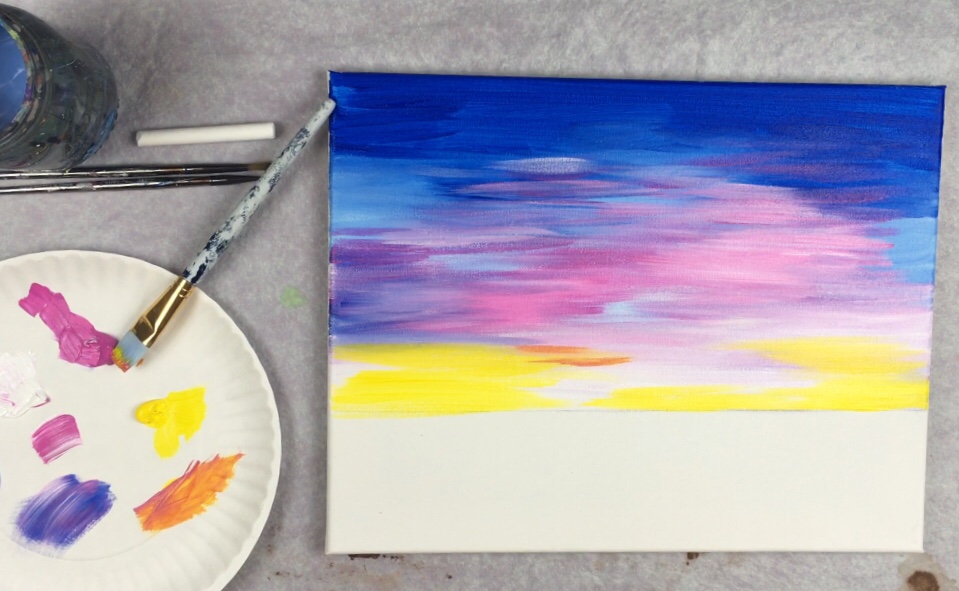
Tip: if your yellow is too strong, add more titanium white to it.
Keep painting left and right strokes with this yellow mostly in the bottom area of the sky. Then paint some thinner strokes in the medium magenta area. (To do the thinner strokes, use the tip of your brush instead of the full width.)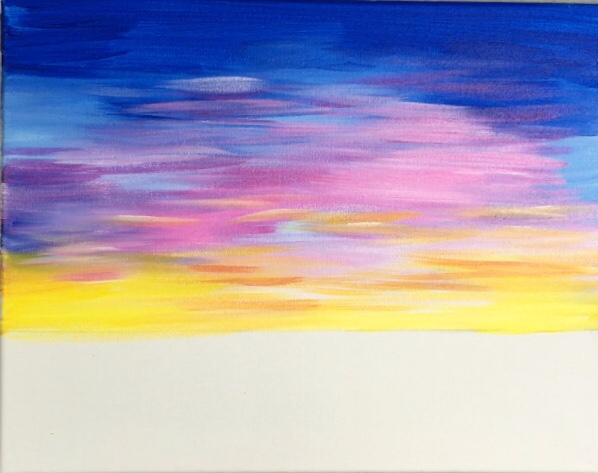
7. Paint the sun
For the sun I used the large pouncer in this set. I used my finger to apply titanium white to the sponge. 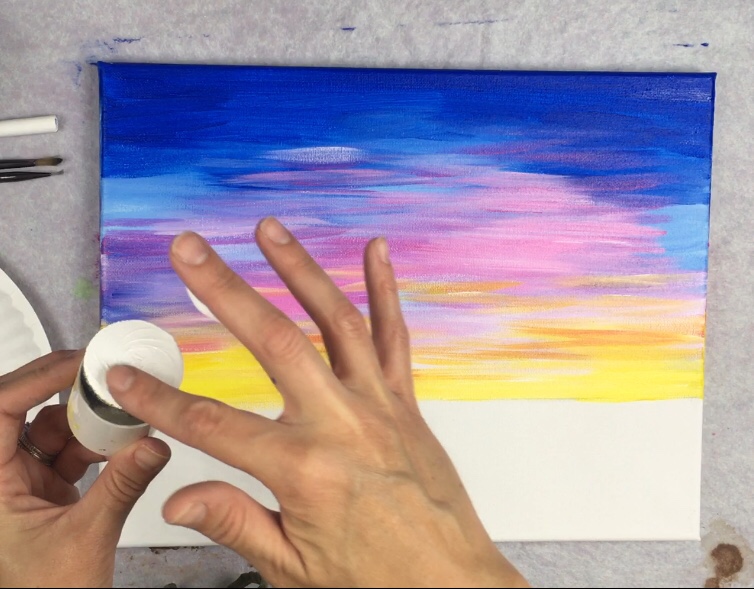
Stamp your sun half way above the horizon line offset to the right of the painting. 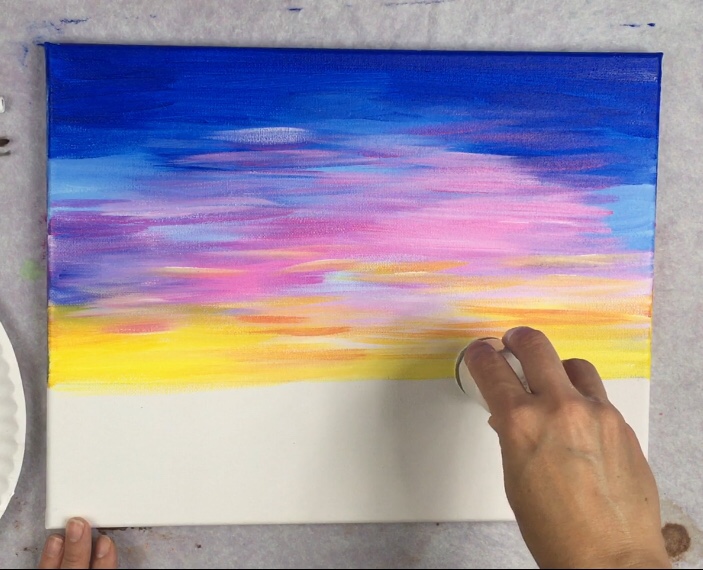

If you want your sun to be yellow, then add the primary yellow to the sponge and stamp it on the circle again. (Note: in one painting I did a yellow sun. In another painting of this design I ended up doing the sun white. It kind of depends if there’s enough orange tones around the sun for the yellow to stand out)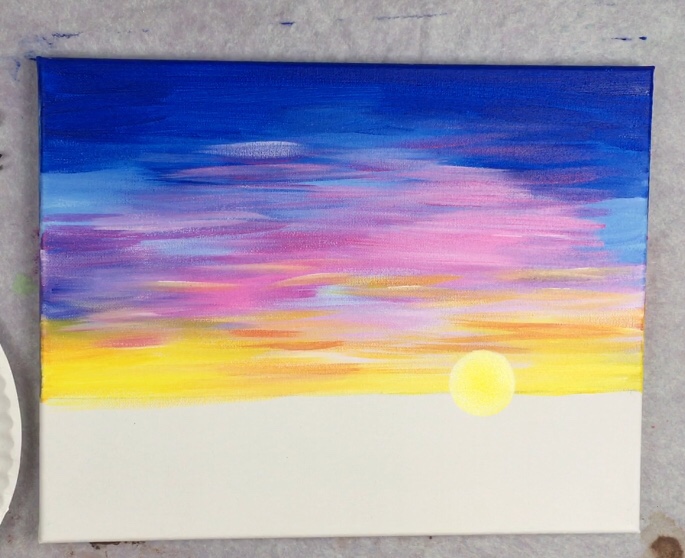
8. Paint the yellow reflection under the sun
Use a 3/4″ flat brush and primary yellow. Paint short horizontal strokes in a rectangular shape under the sun going all the way to the bottom of the canvas. 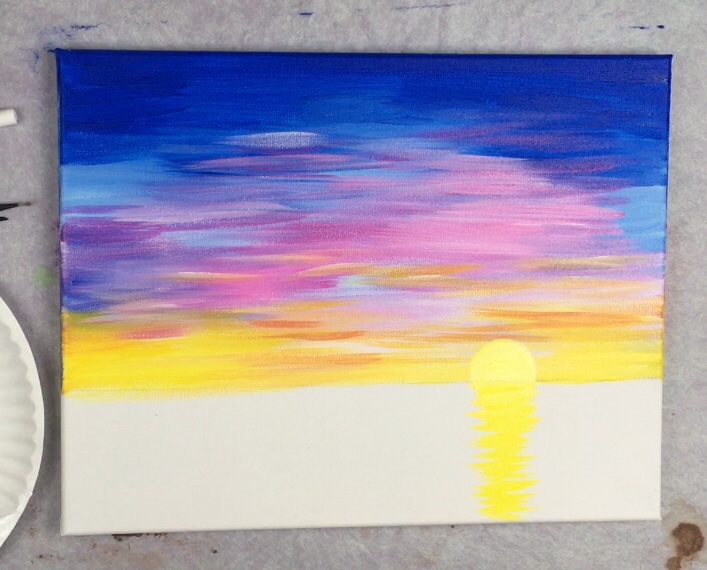
9. Paint the water
Rinse all the yellow off your brush. Load your 3/4″ flat brush in cobalt blue and a bit of titanium white. Fill in the entire ocean area with these two paint colors. Be sure to do long horizontal strokes.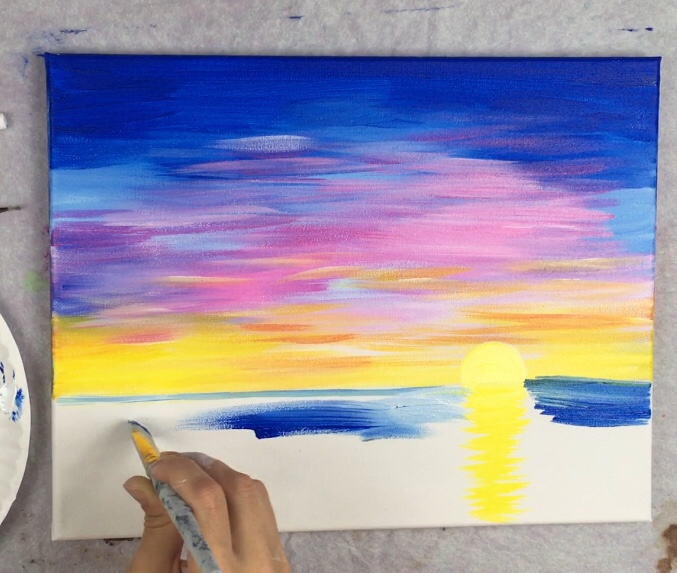
Go almost all the way to the bottom of the canvas but leave a small area blank on the bottom. Do not paint over the yellow reflection area. 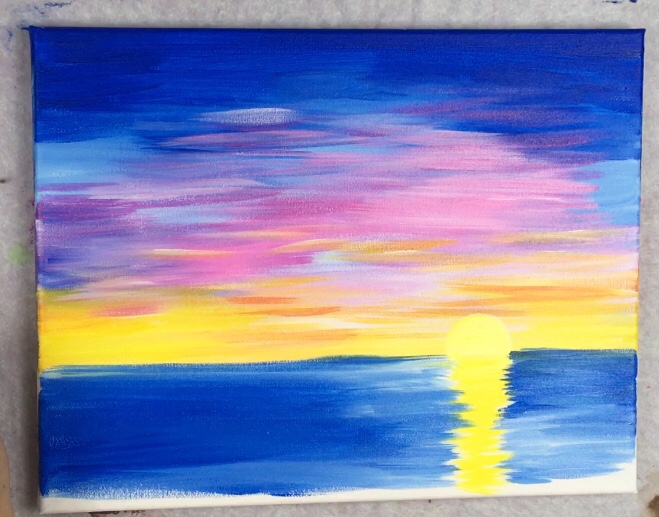
Don’t rinse the blue off your brush. Add some more white on your brush and paint horizontal water lines everywhere. Then lightly paint over the yellow reflection area with the blue/white that is on your brush. This gives some water texture in the yellow reflection area. 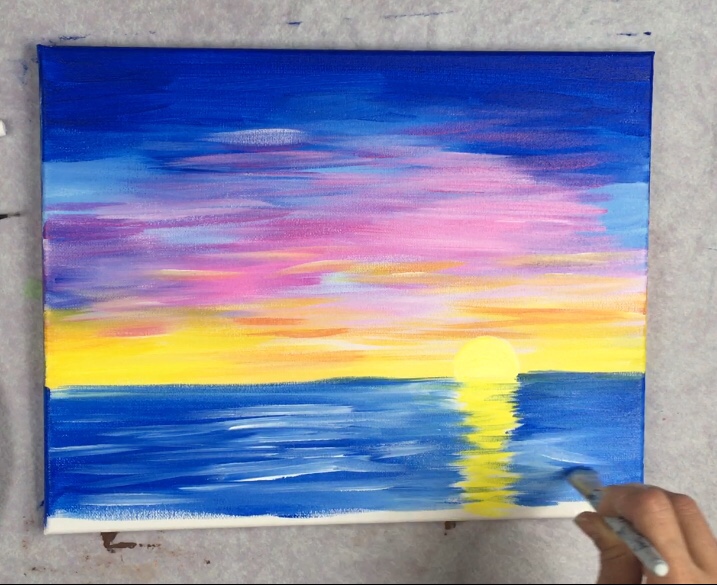
Optional: add a tiny bit of medium magenta (rinsed brush) on your brush and gently paint some medium magenta water lines. Do the same with the yellow. These lines are very light and feathery, almost a dry brush stroke. 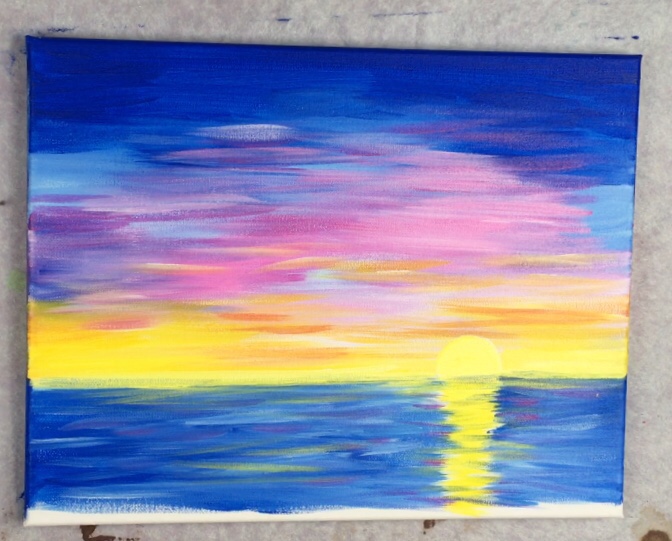
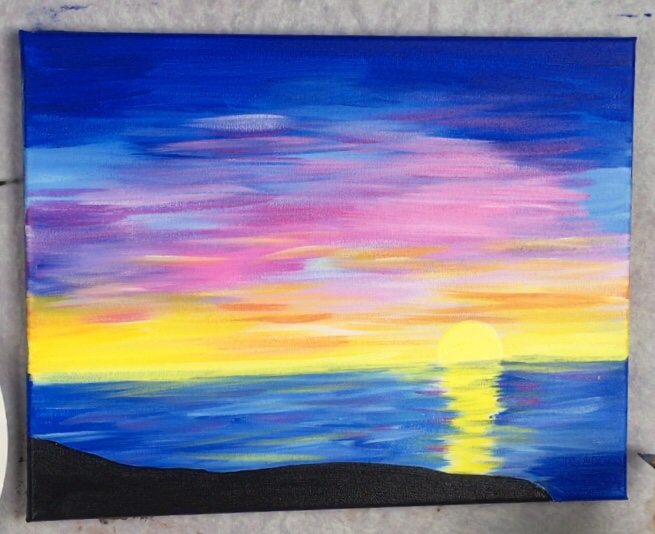
10. Paint the land silhouette
Use your 3/4″ flat brush and mars black to paint a line starting on the left of the canvas. Paint a long wavy line that starts out high but then dips down. There is on open space on the far right.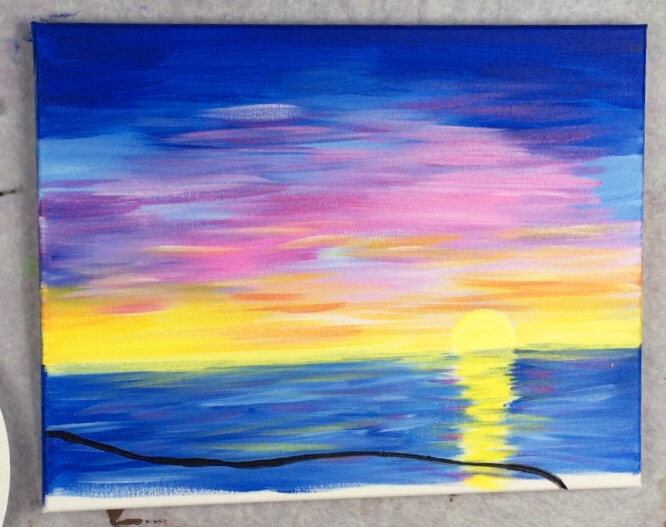
Then paint the entire land area solid black. Also, fill any blank white areas in the water cobalt blue (specifically on the bottom right).
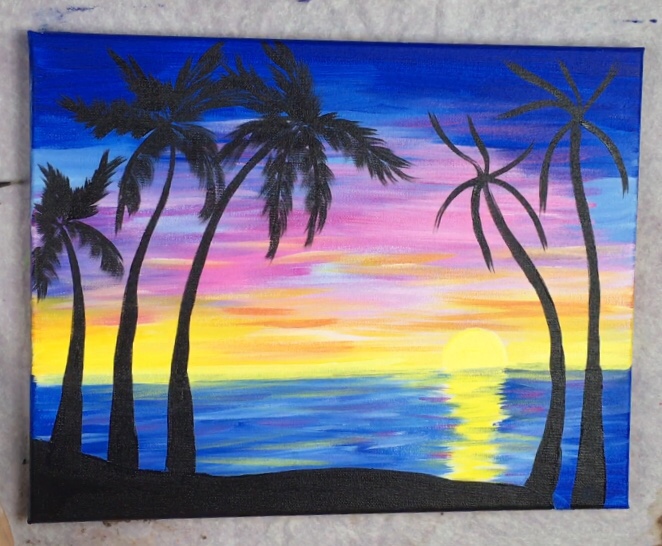
11. Paint the palm trees
Use a #4 bright brush for this step. Start by painting the trunks of the trees. Palm tree trunks are thicker on the bottom and get thinner at the top. To achieve this effect, use the full width of the brush on the bottom. Then when you paint up, twist your brush on its side to achieve the thinner line.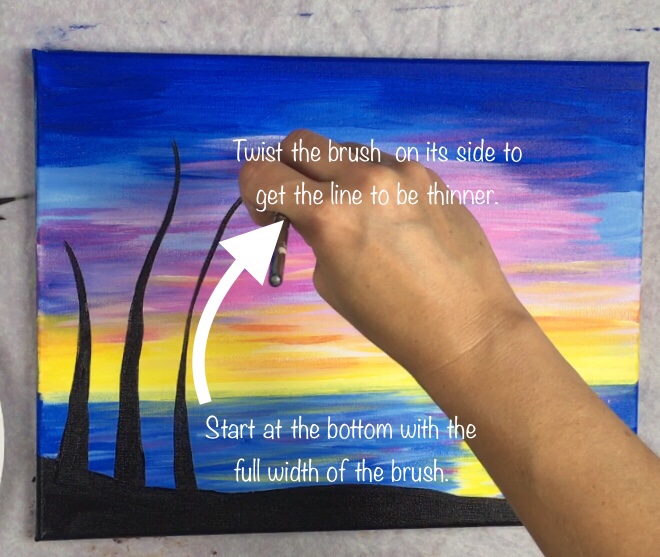
I did three palm trees on the left and two on the right. There is a shorter palm tree on the far left. Also the two middle palm trees are curving opposite from each other. 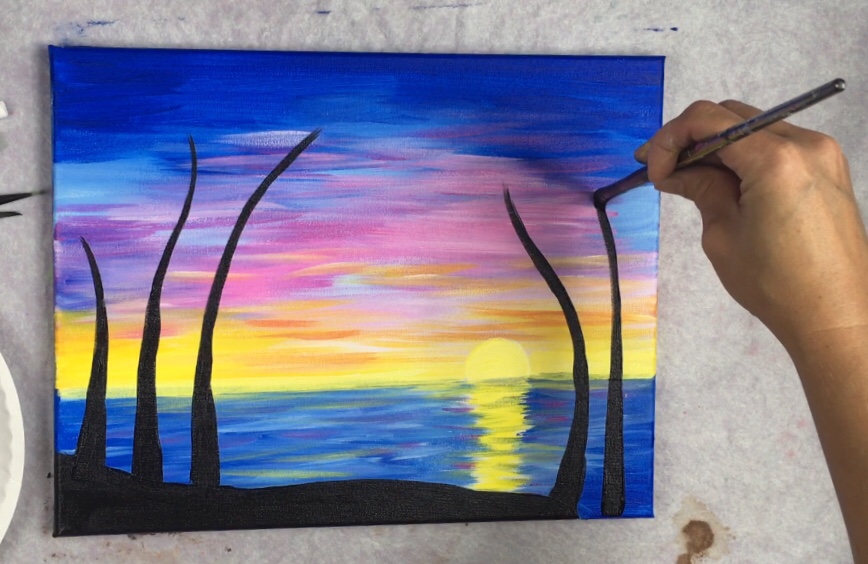
Next paint the middle spine part of the palm leaves. To do this, use your #4 flat brush and the very tip of it to paint think lines. Paint 5-6 lines radiating from the top of the trunk. Some are hanging down, some are swaying upwards, etc.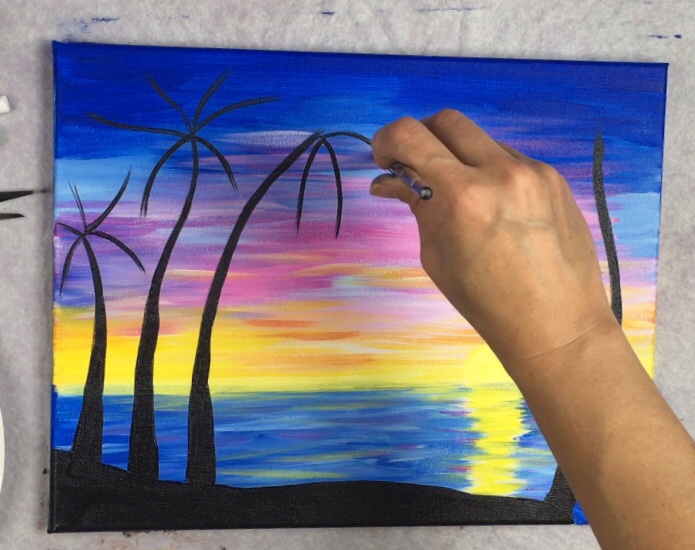
To paint the leaflets, use your #4 flat brush but use the full width of the brush. Start at the spine and drag the brush down forming the leaflets. (Tip keep the paint on the brush kind of dry to get the stroke to be “whispy” or “feathery”)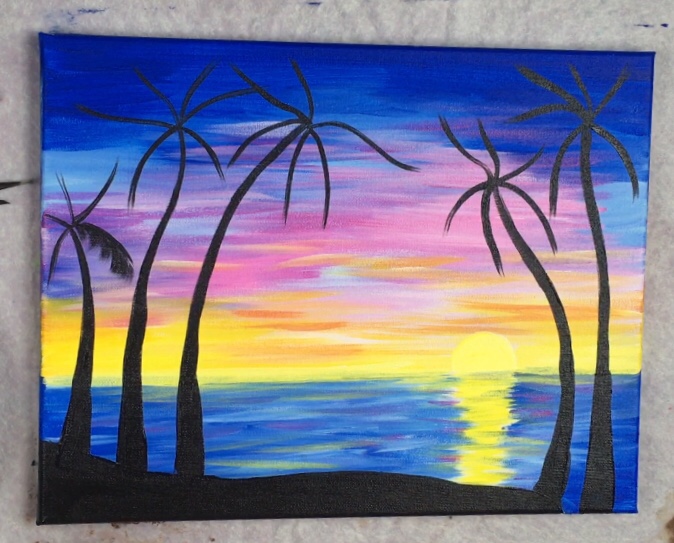
Use the full width of the #4 brush for all the spines and keep dragging each chunk of leaflet from the spine out. On some of the leaves I did this on both sides of the spine and on others I did it only on one side. 
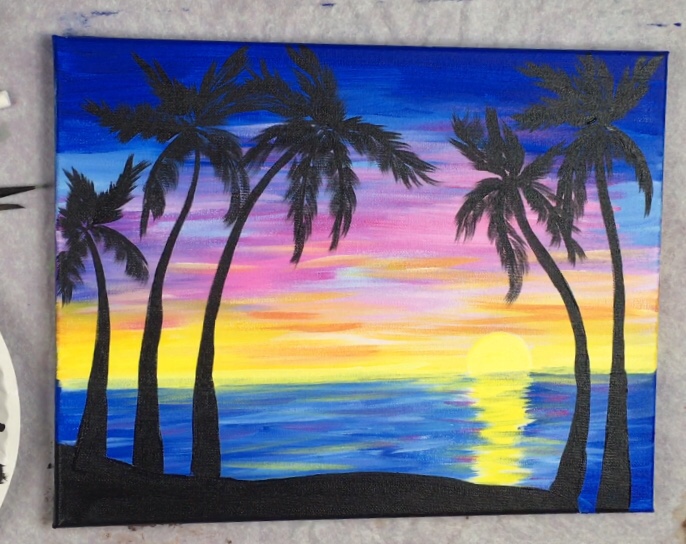
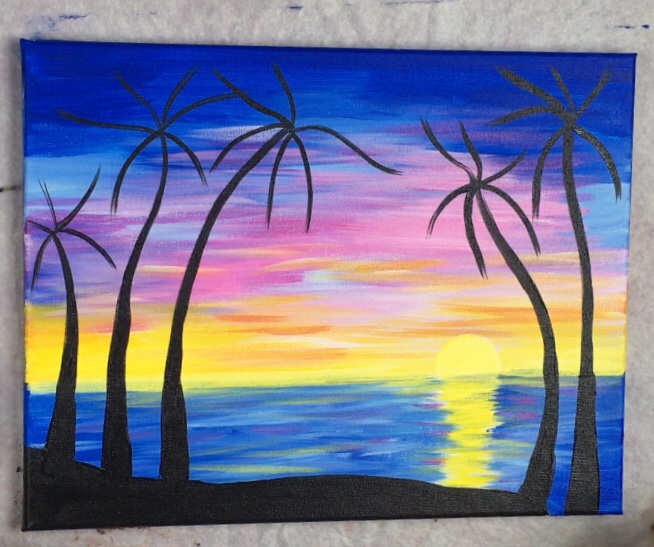
Looking back at this painting, I actually really like it with just the palm trees. Nice and simple! In the next steps I will show you how I did the umbrella & chair details.
12. Paint the umbrella.
To do the umbrella, use a piece of chalk to draw a triangle. The bottom of this triangle pretty much lines up with the horizon line. The top point is about 3″ high. (Note I’ll be doing a traceable for this!)
Then paint the triangle with mars black and paint a center line in the middle. 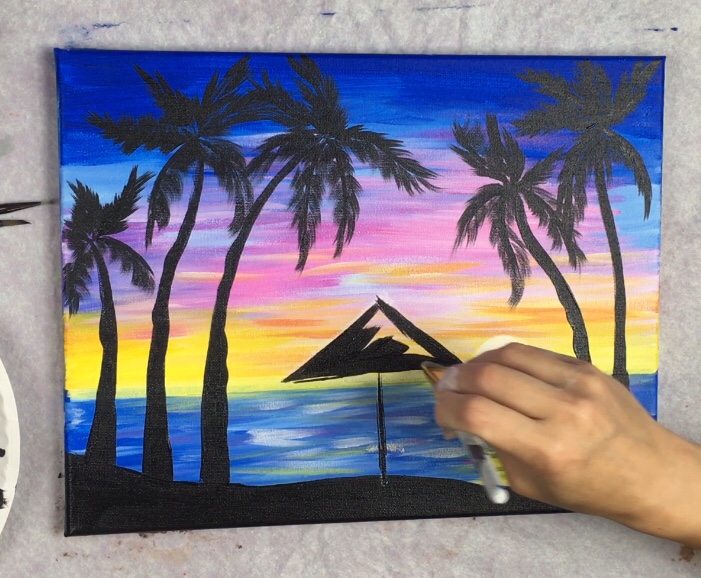
I used my #4 round brush for this step. Use the tip of your brush to add some texture on the umbrella edges. Also paint a small horizontal line to represent an attached little drink table. 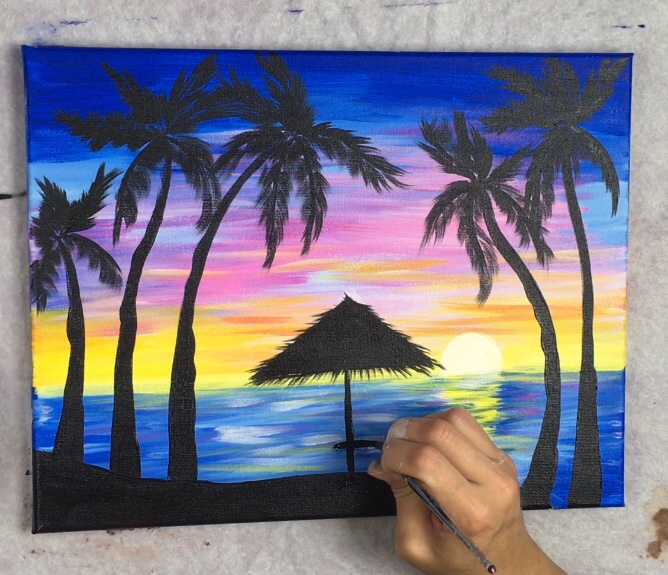
13. Paint the birds and little wine glasses
Use a 10/0 liner brush and mars black to paint the birds. 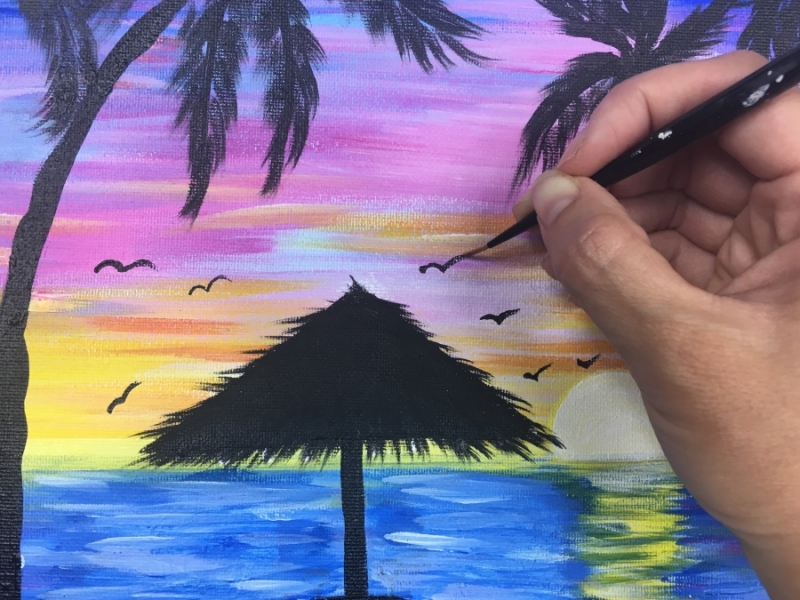

Then use the 10/0 liner to paint the little wine glasses on the umbrella table. 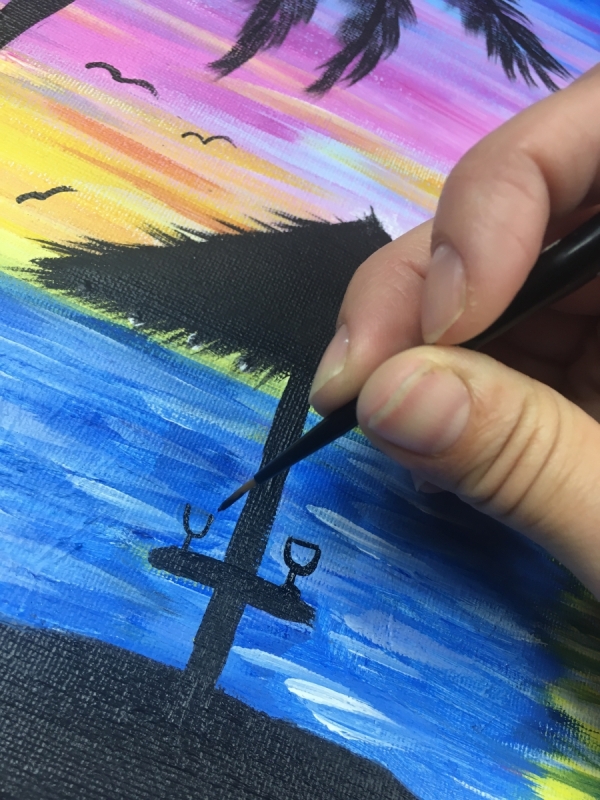
To do the highlights, rinse the black off the brush and add white on the left sides of the wine glass shape. 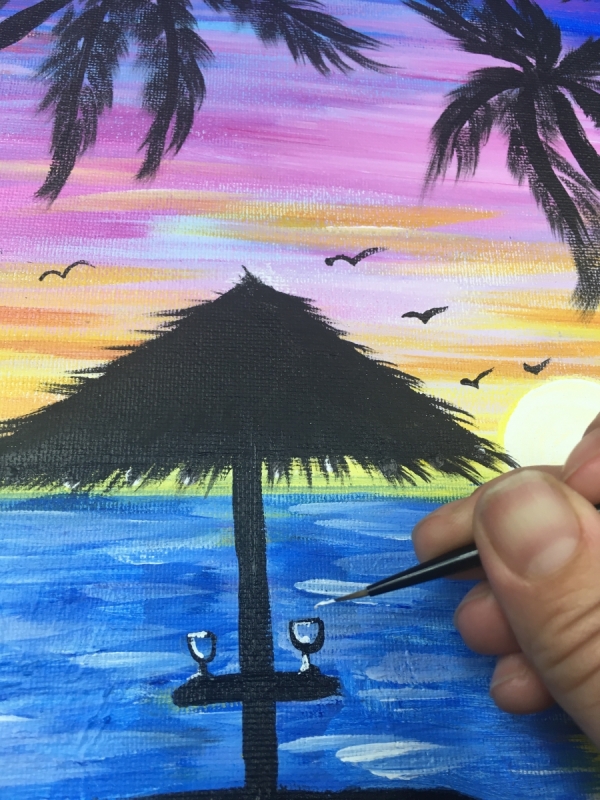
14. Paint the chairs
I had some MAJOR issues with these chairs! :p They look simple but I messed up quite a few times trying to free hand this silhouette with the paint brush. I found it easiest to draw the chair on a sketch paper first and then transfer it with graphite paper. I’ll get this traceable up for you soon! 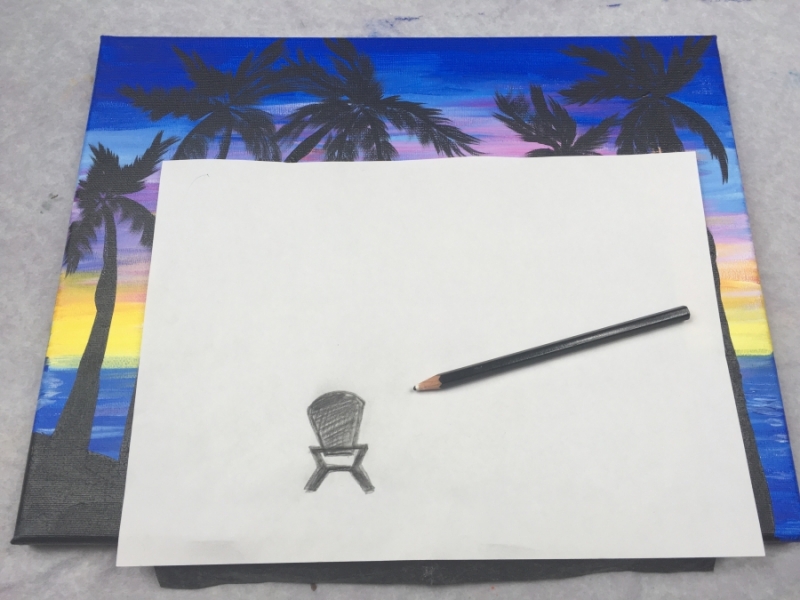
With the sheet of graphite paper under the chair drawing, I transferred it to the canvas. 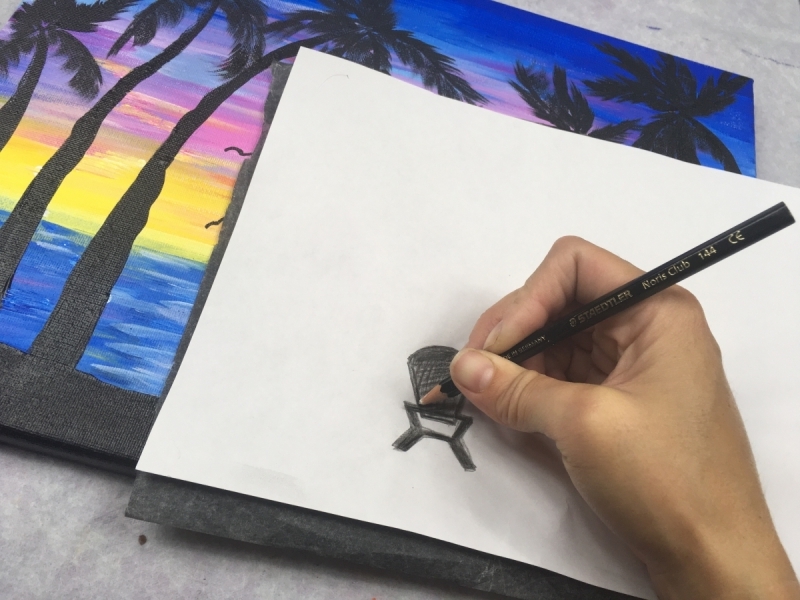
Note: the top of the chair is about one finger width below the horizon line. 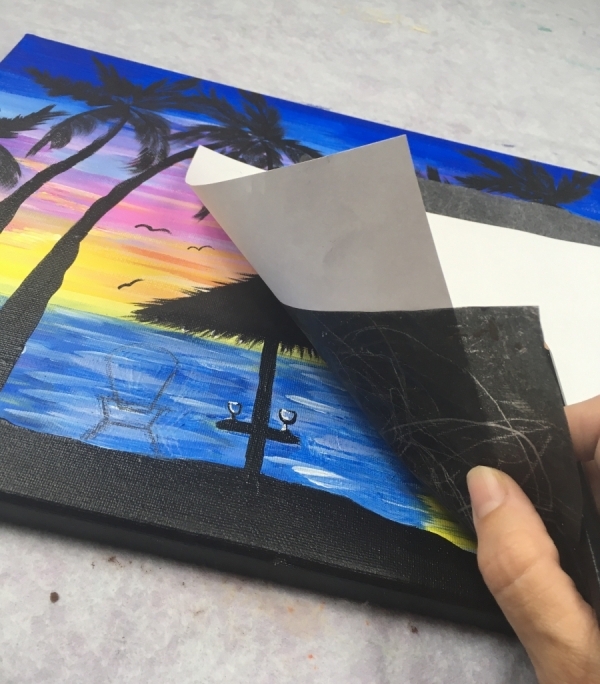
Once transferred, I drew over the chairs again to make the shapes and lines more visible. 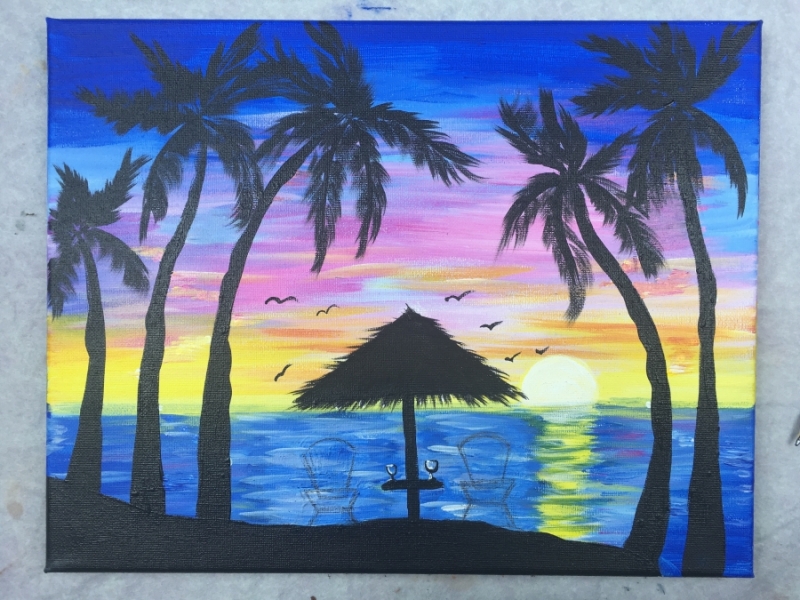
Then paint them in with any of your round brushes. I used my #4 round brush to paint them in. 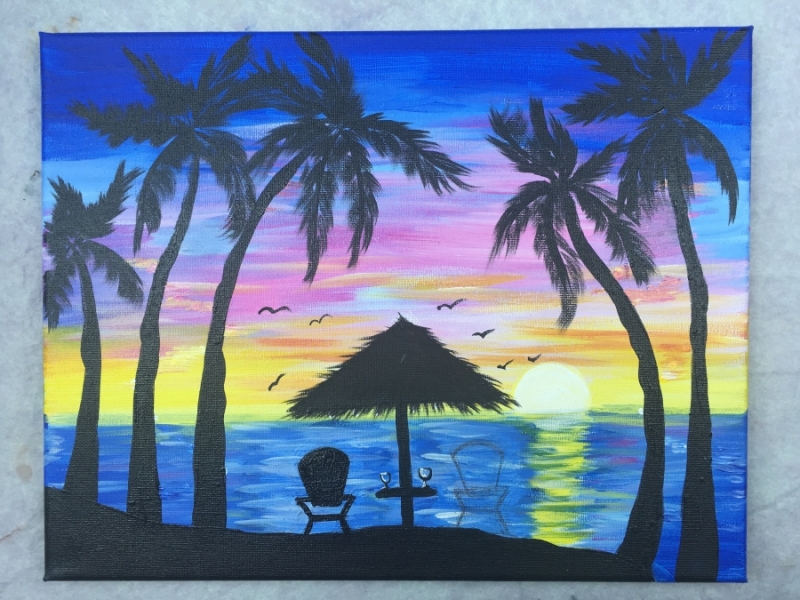
15. Paint The Lights
I used the back of a paint brush and titanium white to stamp the string lights up the palm trees. 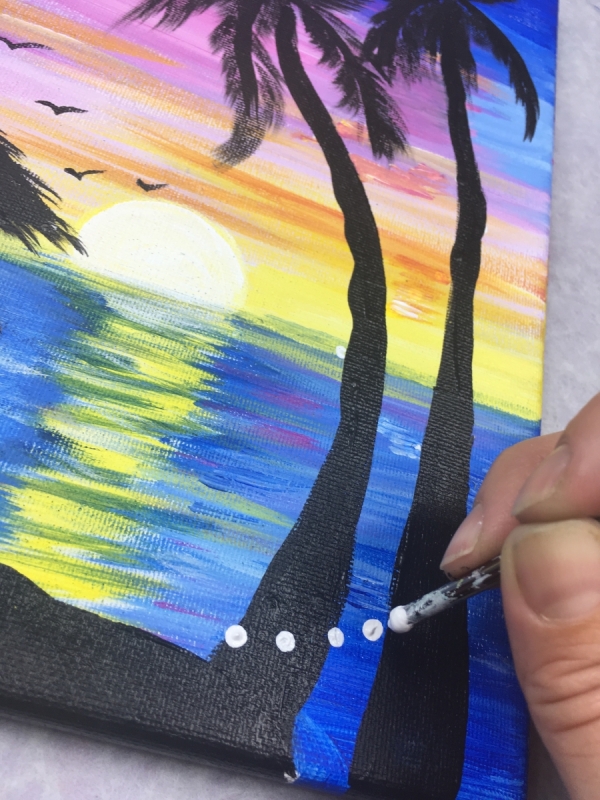
Paint the dots in a zig-zag motion around two of the trunks. 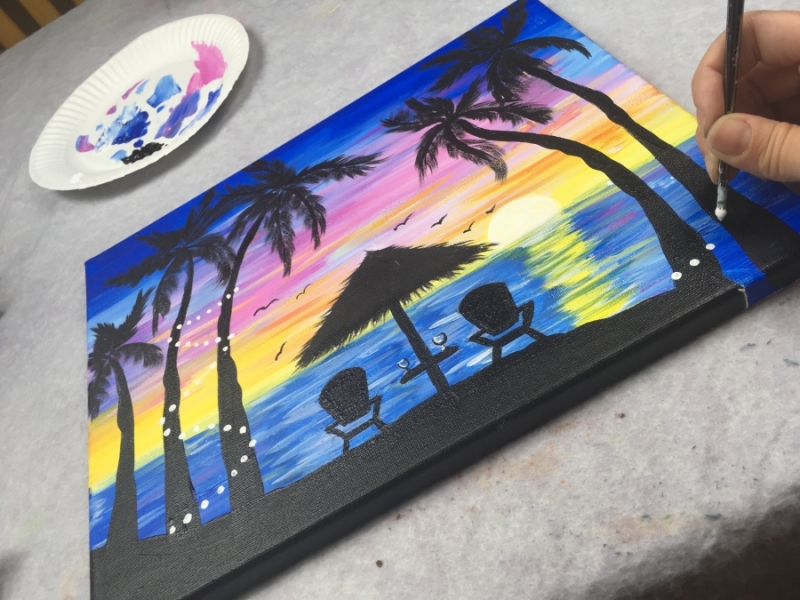
There are lights under the umbrella too!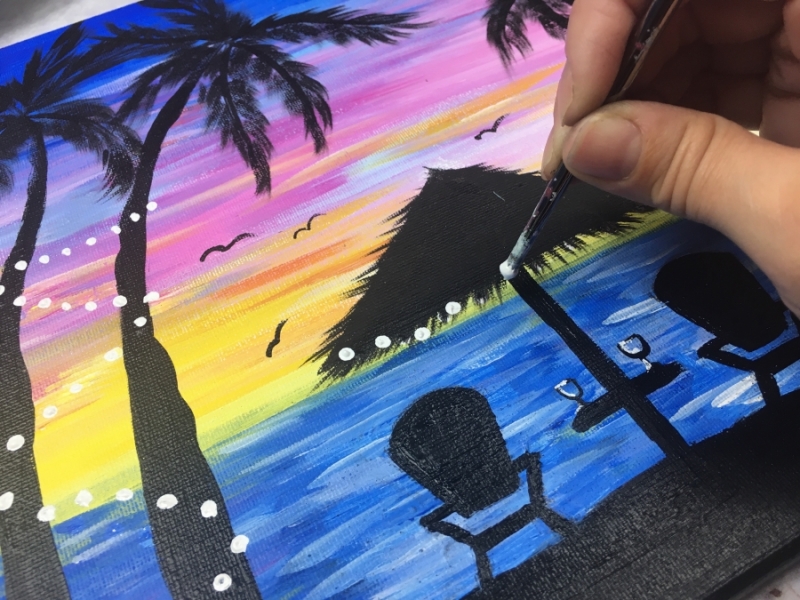
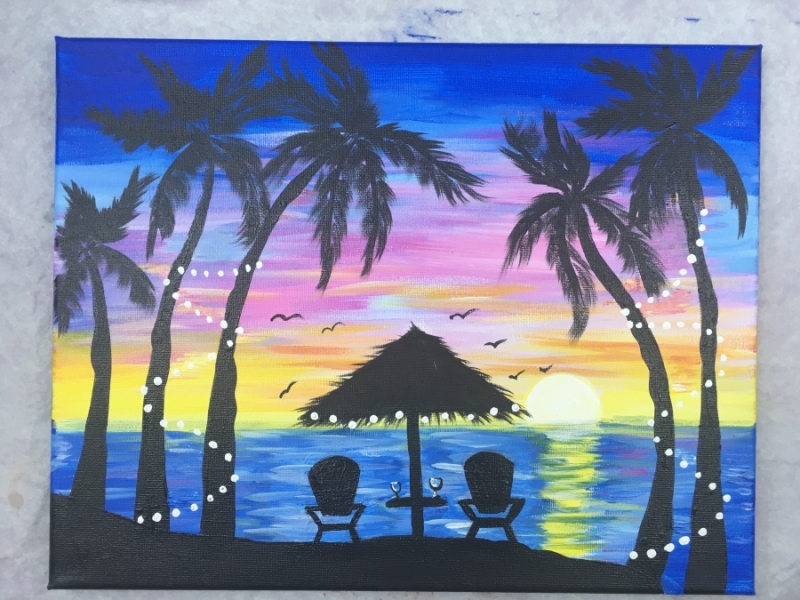
Finished!
Sign your name and show it off!
Share Your Art


I love your work.you break it down so wonderfully. I have favored watercolors since college. I’m now in my 60s;and you make it so easy to try acrylics. I’ve always been afraid to make mistakes, but with art, a tiny flaw is known only to the artist. Thank you for showing me how to do the silhouette. I never would think to use graphite paper to transfer,on canvas. I’m so excited to try and do this. I have been doing little 8in canvas items. Thanks so much. I’m excited to learn new techniques and new art. God blessed you and I thank you for sharing your love of painting.
Thank you Donna! ❤️❤️❤️❤️
Also, I’ve been itching to venture into watercolors! I haven’t done them in so long but you’re comment has inspired me try them out again. I’ve always favored acrylics.
You know- I’m pretty sure there are many people (like me) who would love to know how to use Watercolor Pencils and use Watercolor brushes in their artwork. Do you wet the paper first? Do you add color in the Agua brushes- or do you color on dry- then use the Watercolor brushes and blend it in – wet on dry? When should the “hot pressed” vs
“cold pressed” paper be used? Just some suggestions- but I know you could open a 2nd series – and maybe alternate projects- or possibly make it a ” summer” series. It would be great to see how this Island silhouette, (or any of your previous work) – translated into a watercolors painting-in your talented hands- that would be Impressive..I am a woman of faith- and I believe God has blessed our paths for a good reason 🙂
I have already checked out your step by step and several videos..I will definitely upload and share with you when I have made your acrylics. xx Donna
Thank you! You’ve definitely given me some new ideas to work with! I’d love to see your work so definitely share!
I totally agree with Donna! I painted when I was younger, but got frustrated so easily! You make it simple enough for me to perfect my brush strokes and learn what each one does! My husband tells me with each painting I do how much better I’m getting! Eventually, I’ll be confident enough to paint my own designs. Also, my friends and family love getting these paintings as gifts!
Side note: Is a bright brush the same as a shader? Some of my R&L brushes from Walmart are called this and I think they look similar.
Thank you so much for this blog!
Thanks Sunshine! I think that’s wonderful you are improving with each new painting and excited about designing your own! To answer your question, a bright has shorter bristles for ease of control. A shader typically has slightly longer bristles and might be a little more narrower.
Hi again. I am looking for the chair traceable, did not find it in your resources or traceable items. I did find the flip flop. But also needing to print the chair. I have made a card with a chair silhouette on the beach and this painting would match nicely. I’m looking to introduce paint day in my Church. Going to hobby lobby now
Easels are 50% off today!
Hi Donna! The Flip Flop is here: https://stepbysteppainting.net/2018/03/08/printables/
The chair still needs to be uploaded! I will get that up sometime today ?
Hello! I found some of your 5 step pictures on pinterest before, and now I am so glad I found your website! I absolutely love your explanations and slow introductions to new techniques! For now I am doing tutorials, but hope to become creative enough to paint my own. I will be doing several!! Thank you so much for these.
You’re welcome!!
Hi , I am 9 and my mum and I love your paintings!You inspired me to open my mind to new things.We did your palm tree sunset painting and it was great!
Thank you ? Mila