

Would you like to save this?
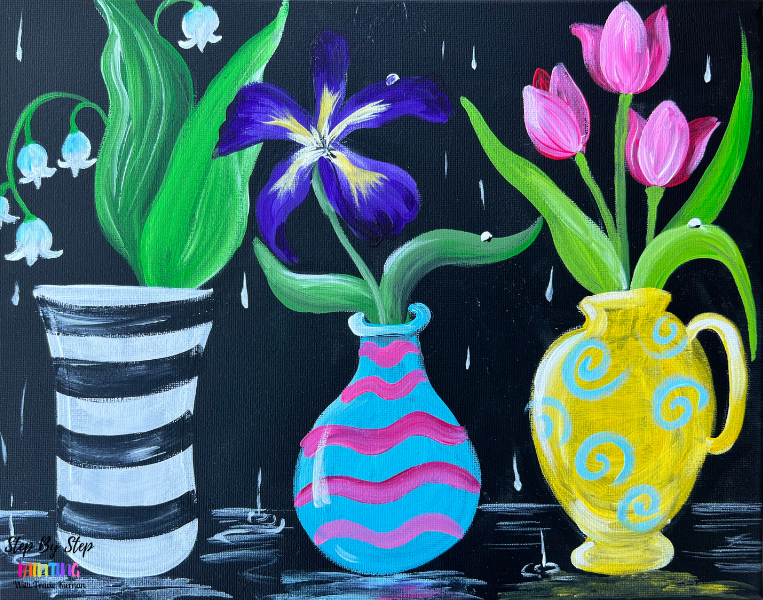
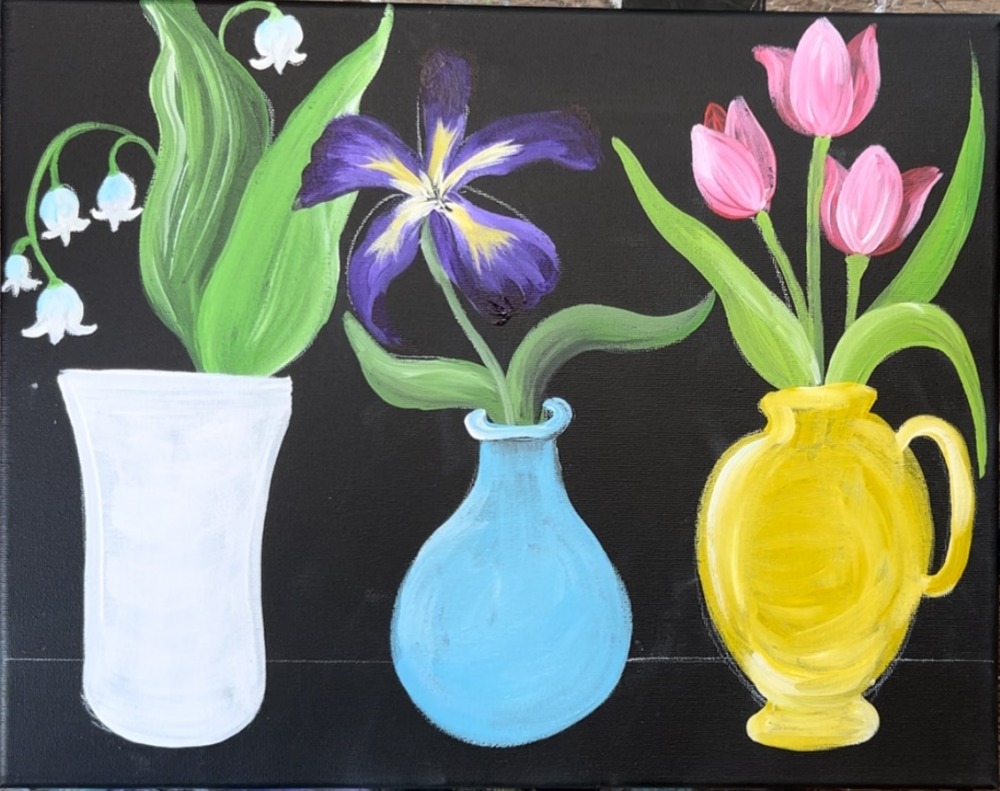
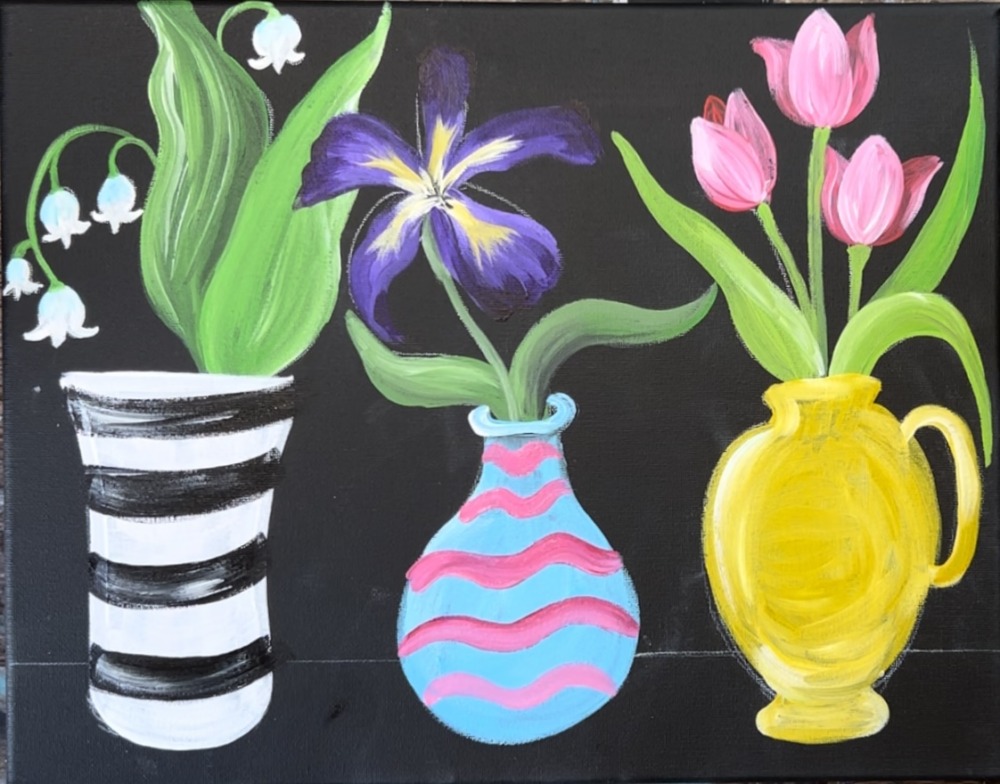
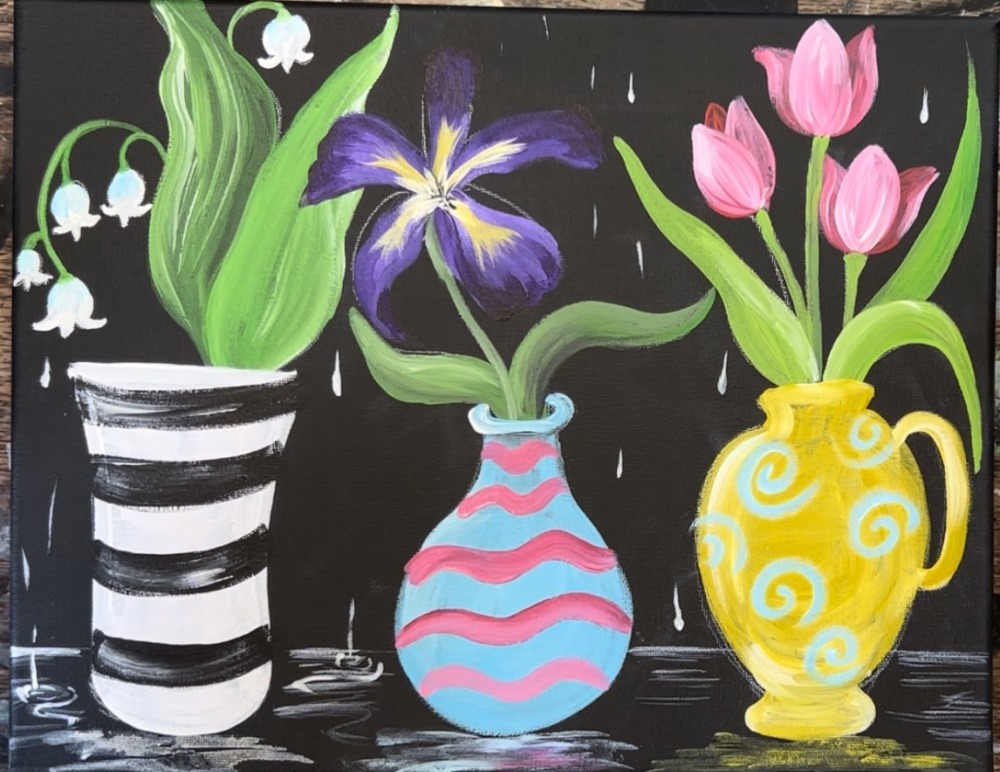
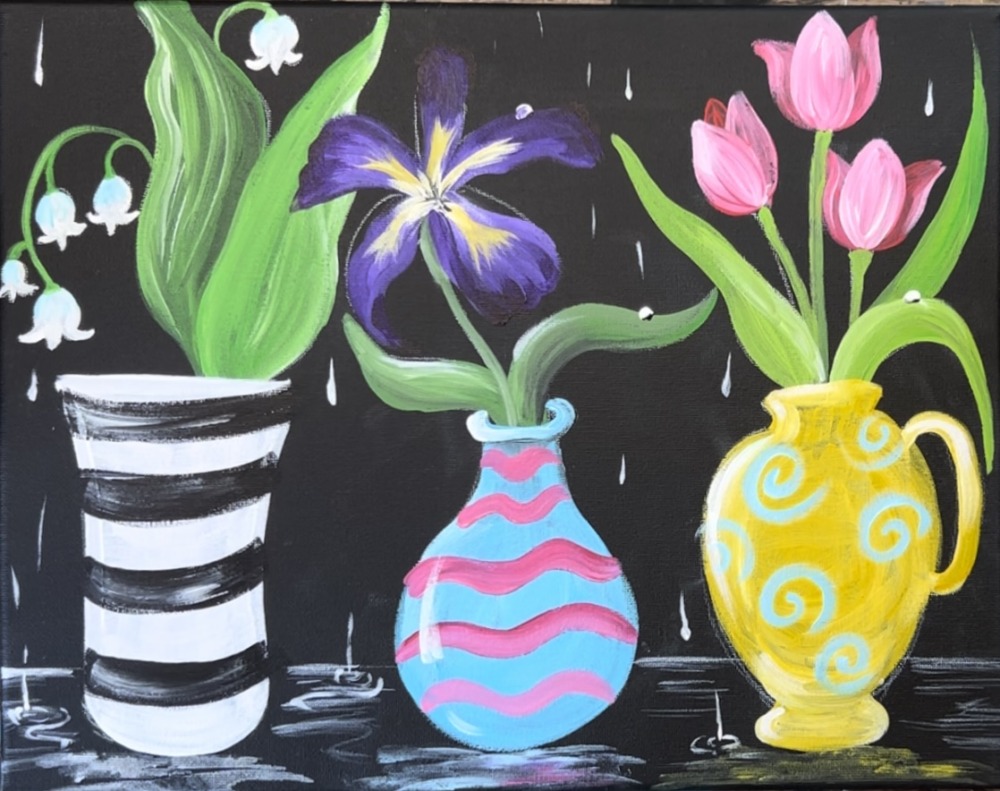
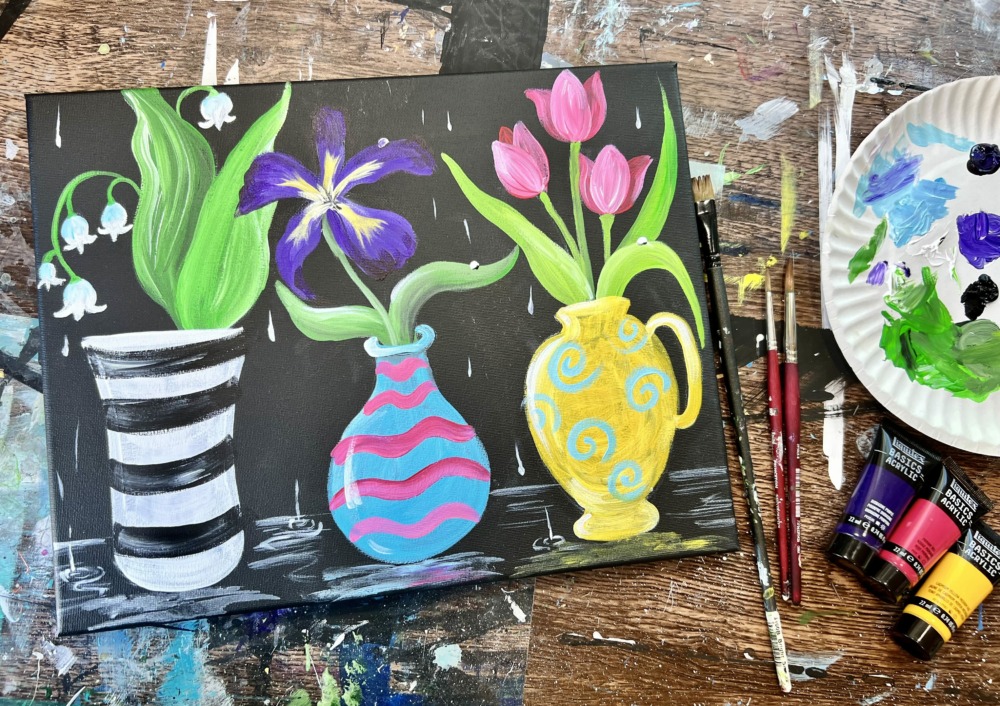
“Spring Blooms” is painted on an 11 x 14 black canvas with acrylics. You can purchase a black canvas or you can paint over a canvas with one coat of black paint. For this painting, I used Liquitex BASICS Mars Black paint to cover my canvas.
We will be painting a lily of the valley, iris and tulips.

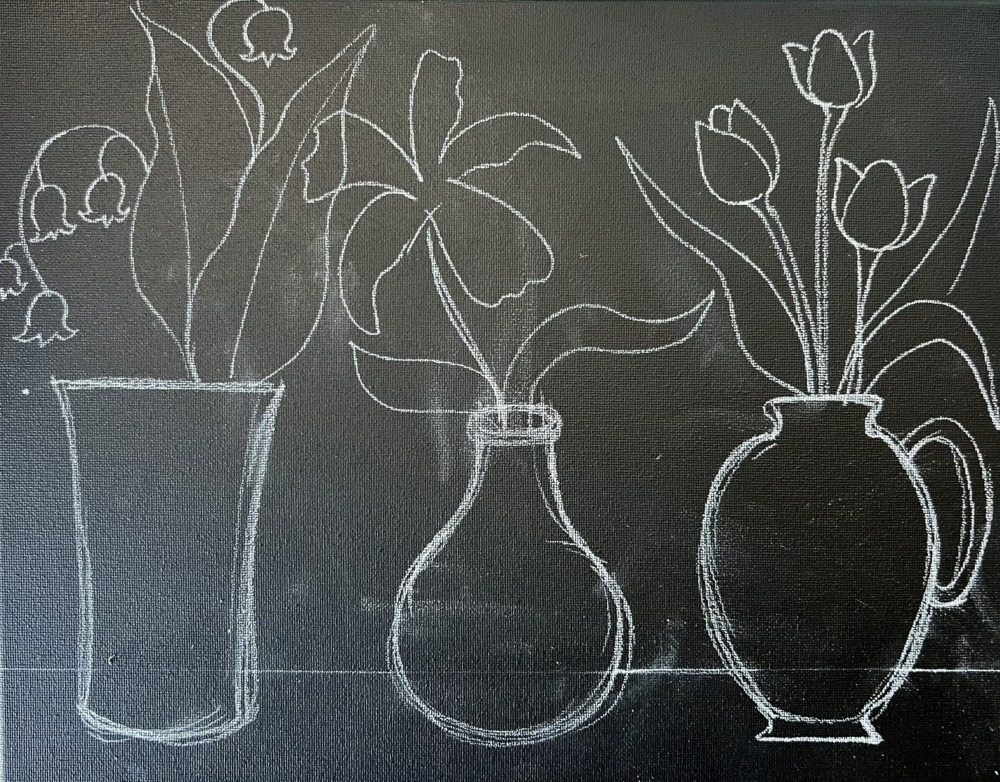
We will be drawing the vases and flower composition first with a white chalk pencil. I love these White Chalk Pencils by General Pencil. If you don’t have a white chalk pencil, you can also draw this with a piece of chalk, however, the lines may be a little thicker than needed as it is a sort of detailed drawing. You can also draw this with a white colored pencil or regular graphite pencil.
Enjoy and happy painting!
Materials
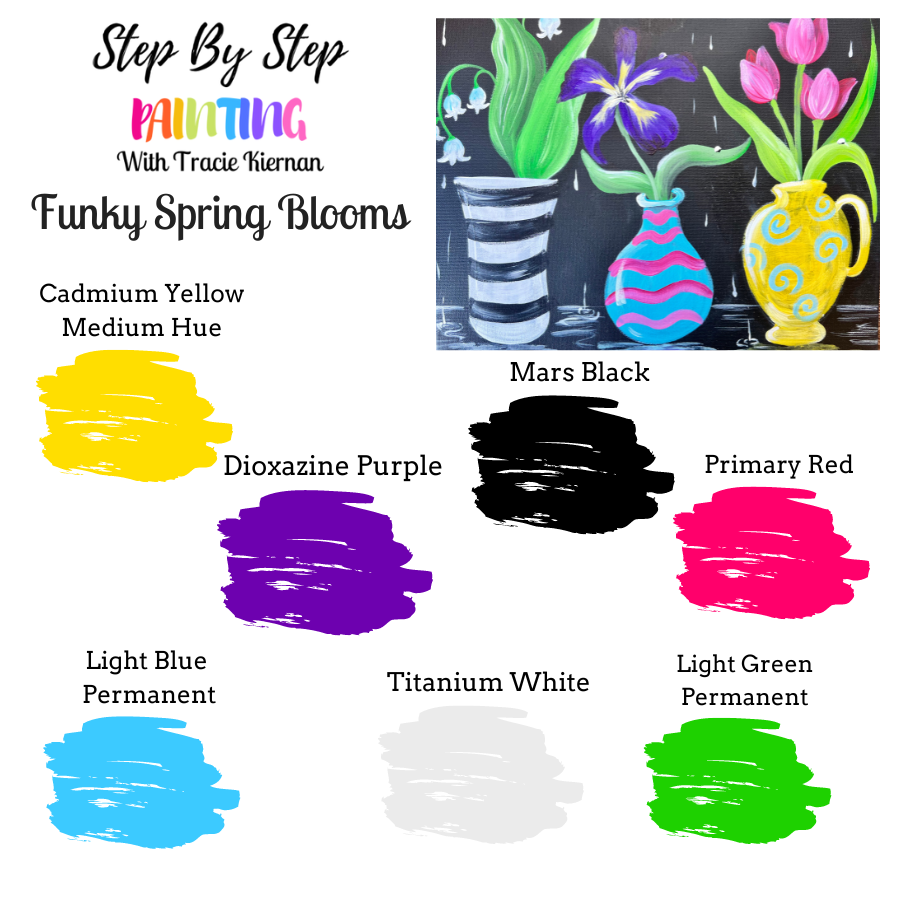
Funky Spring Blooms

Materials
- 11 x 14 Canvas Painted Black
- Acrylic Paint
- Brushes
- White Chalk Pencil
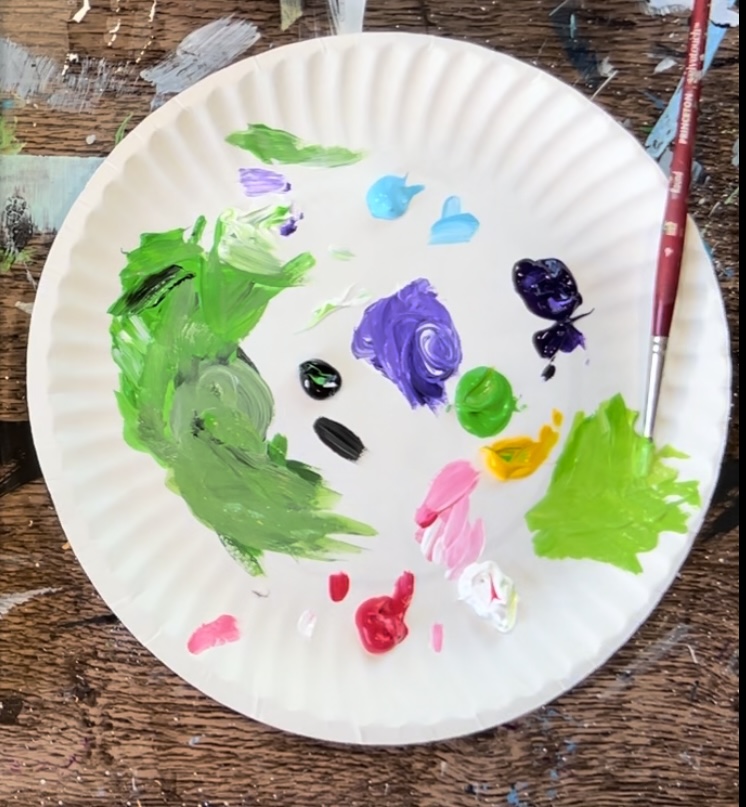
Colors
- Titanium White
- Mars Black
- Primary Red
- Cadmium Yellow Medium Hue
- Light Green Permanent
- Light Blue Permanent
- Dioxazine Purple
Brushes
- 12 Bright
- 8 Round
- 4 Round
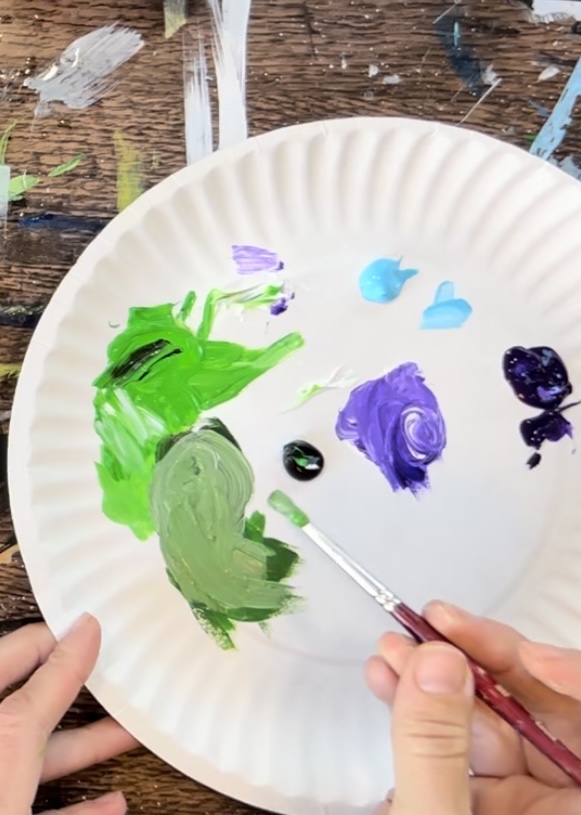
Color Palette
Directions At A Glance
Video
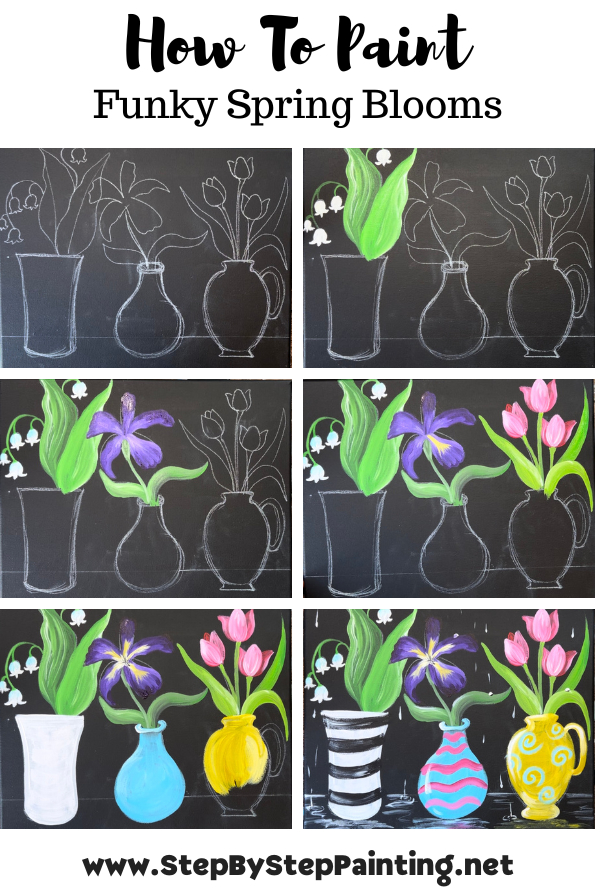
Step By Step Directions
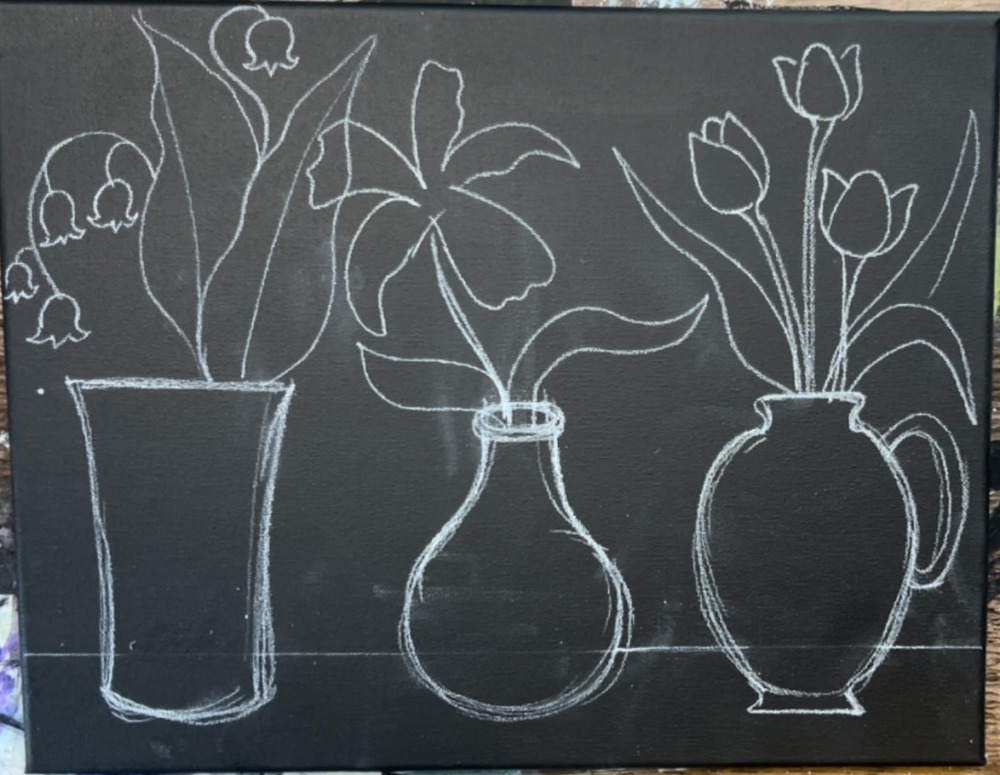
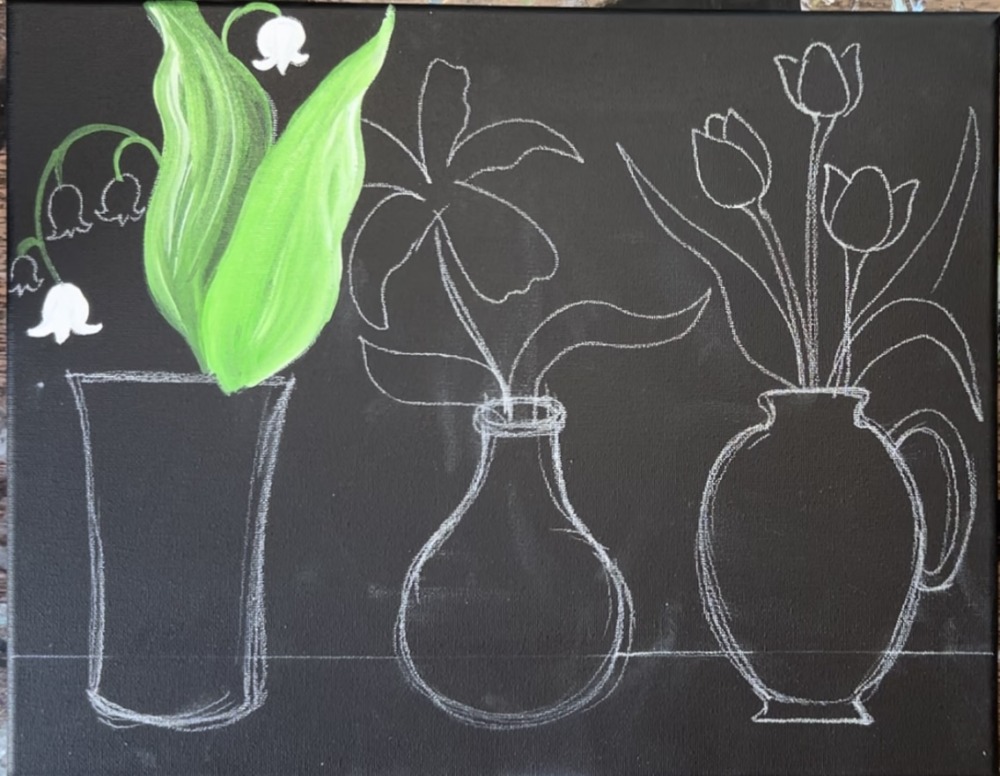
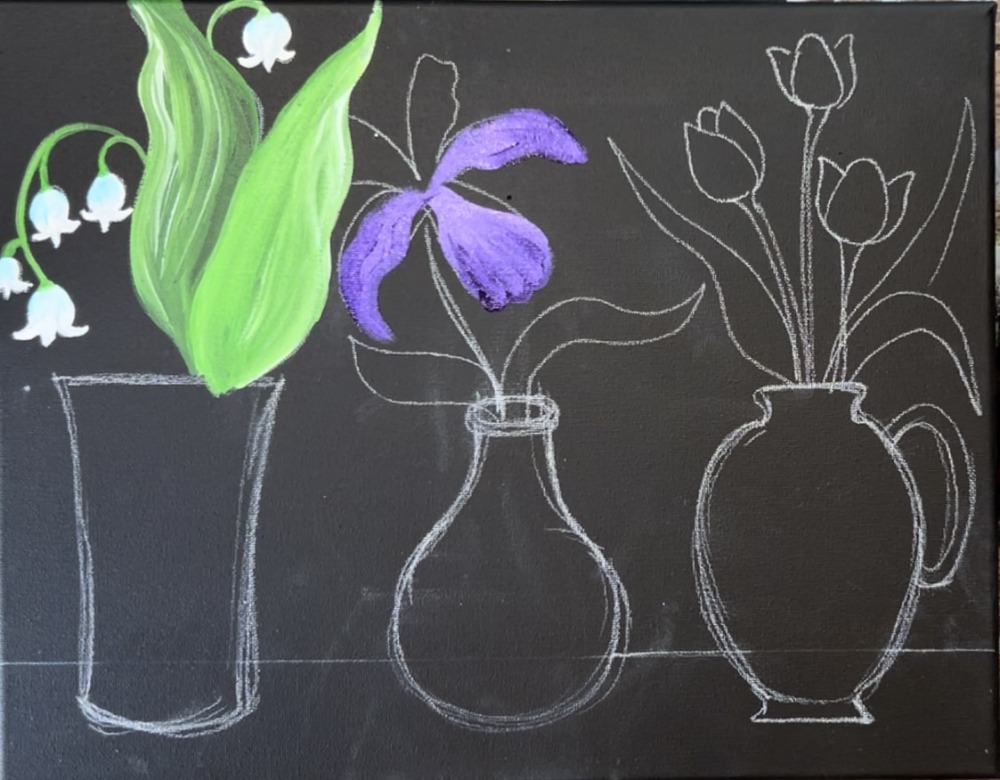
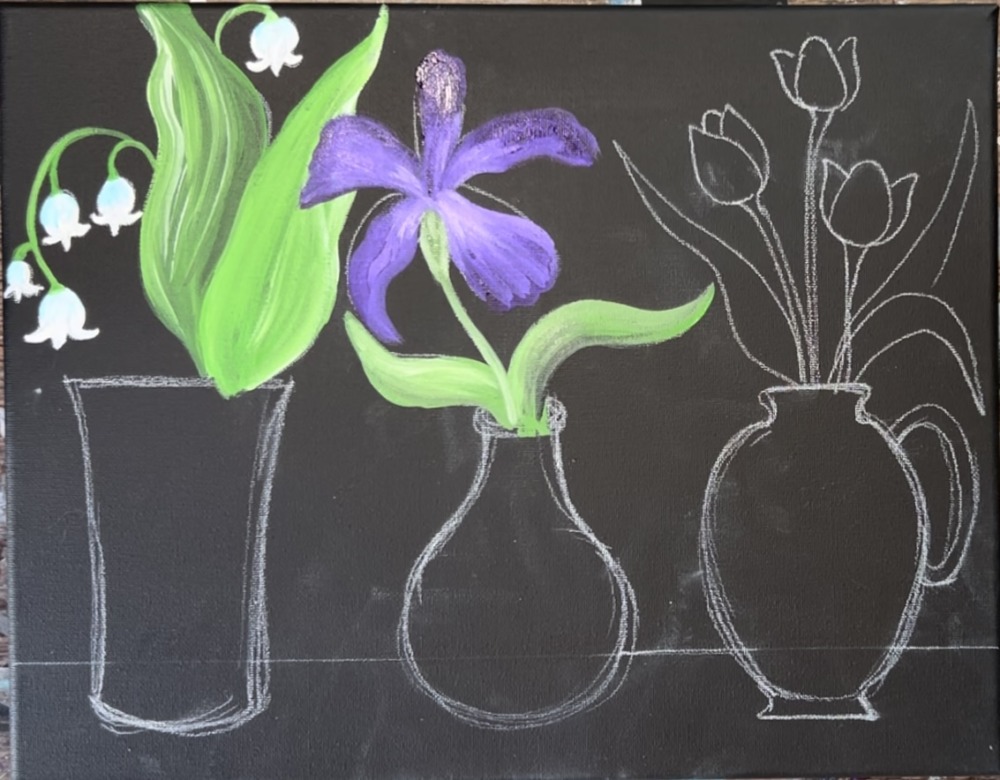
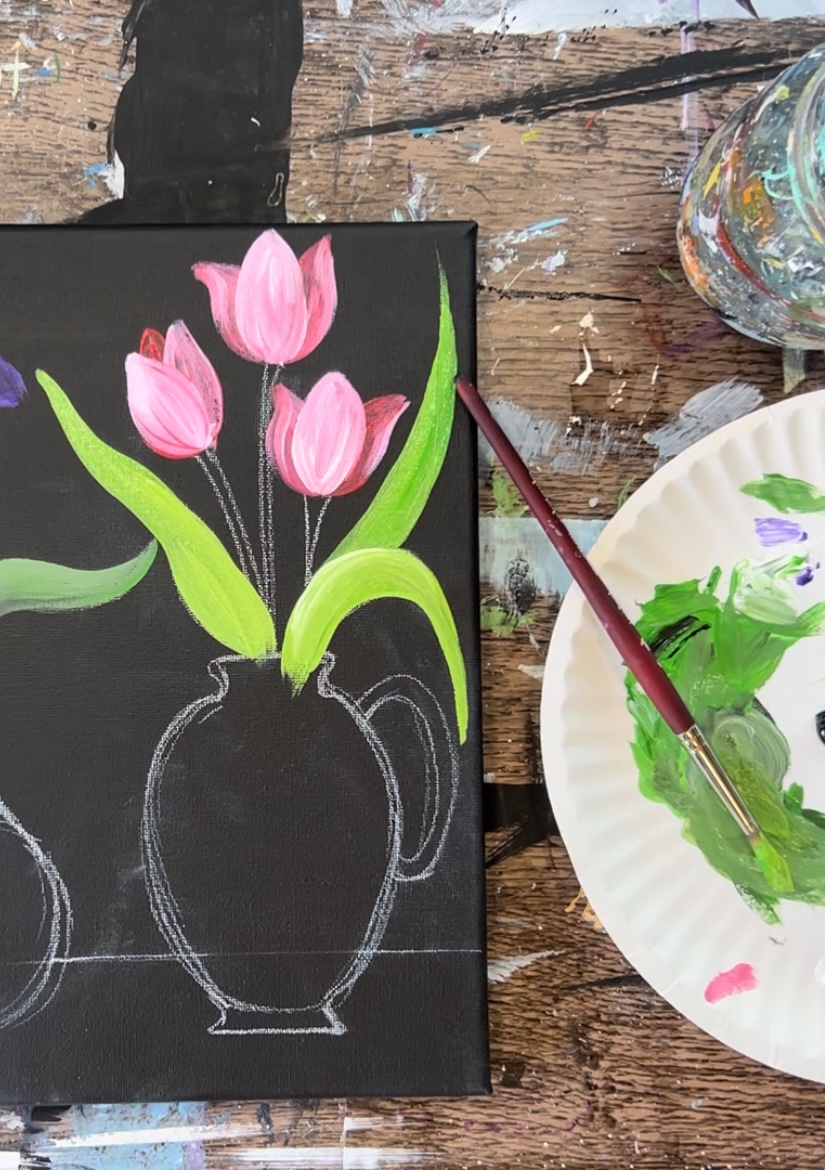
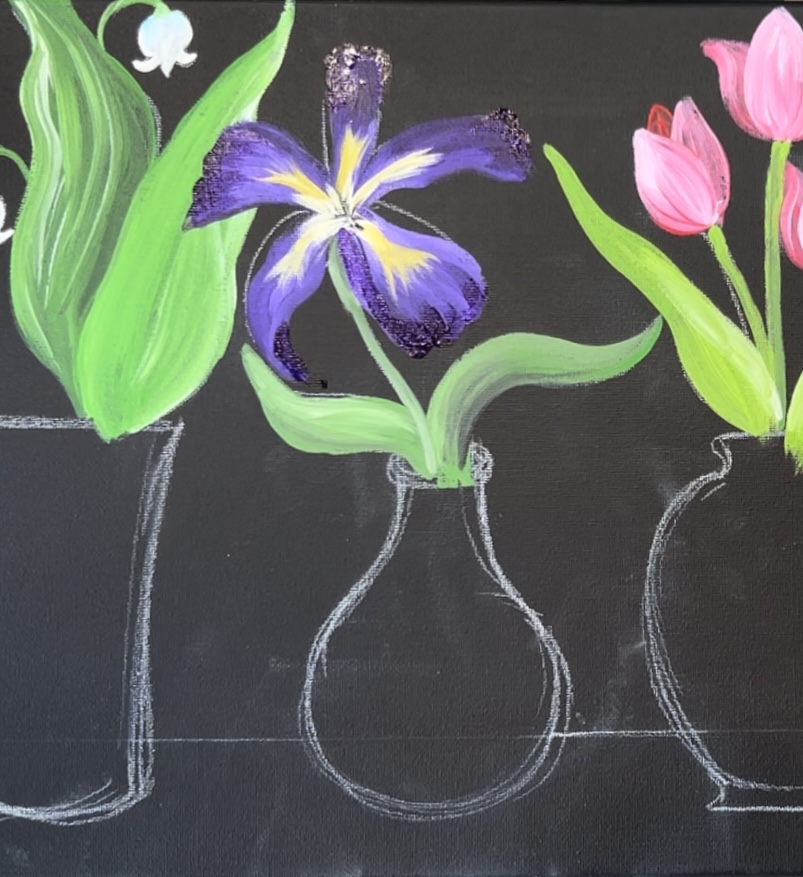
1. Draw Vases & Flowers
Either use a canvas that is already painted black or pre-paint a canvas with one coat of black paint. I used “mars black” Liquitex BASICS paint to paint this canvas.
Then wait for it to dry.
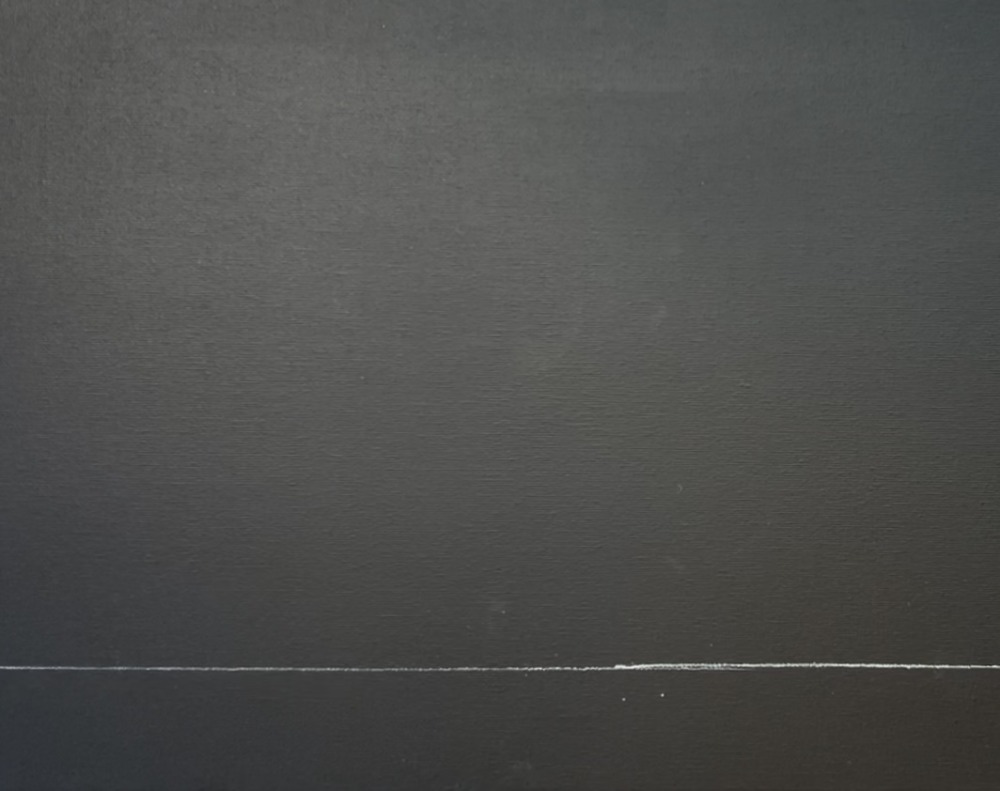
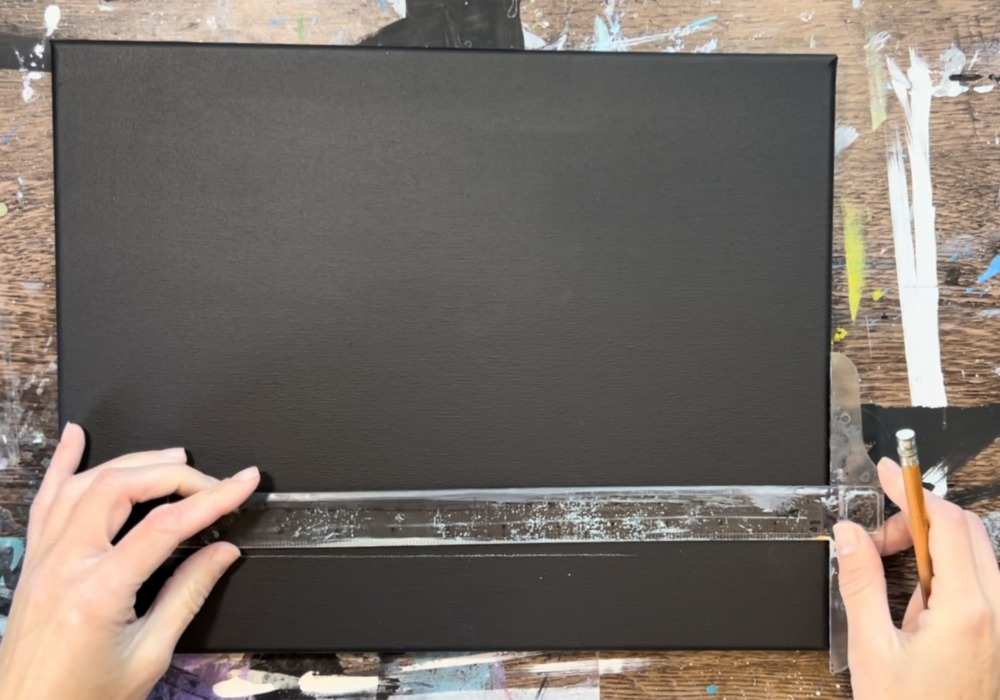
Use a ruler to measure 2″ from the bottom of the canvas and draw a horizontal line across the canvas. You can do this with a white chalk pencil or regular pencil. I used a white chalk pencil.
Then measure the center of the canvas. I made a mark at 5.5″. This mark will help you with the heights of the vases. None of them should be higher than that mark because you want to leave enough room for the flowers.
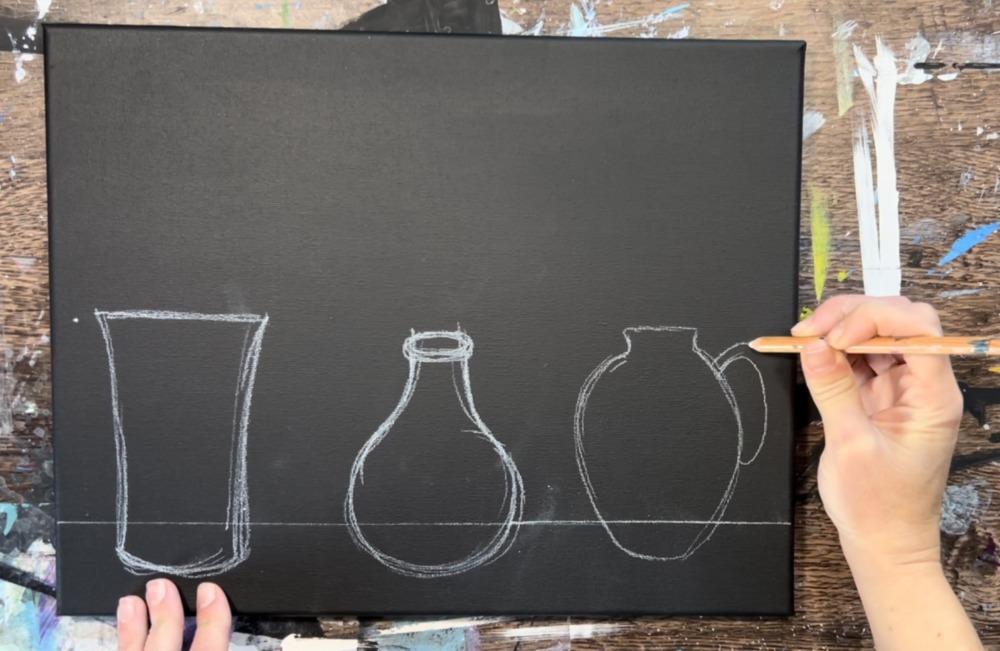
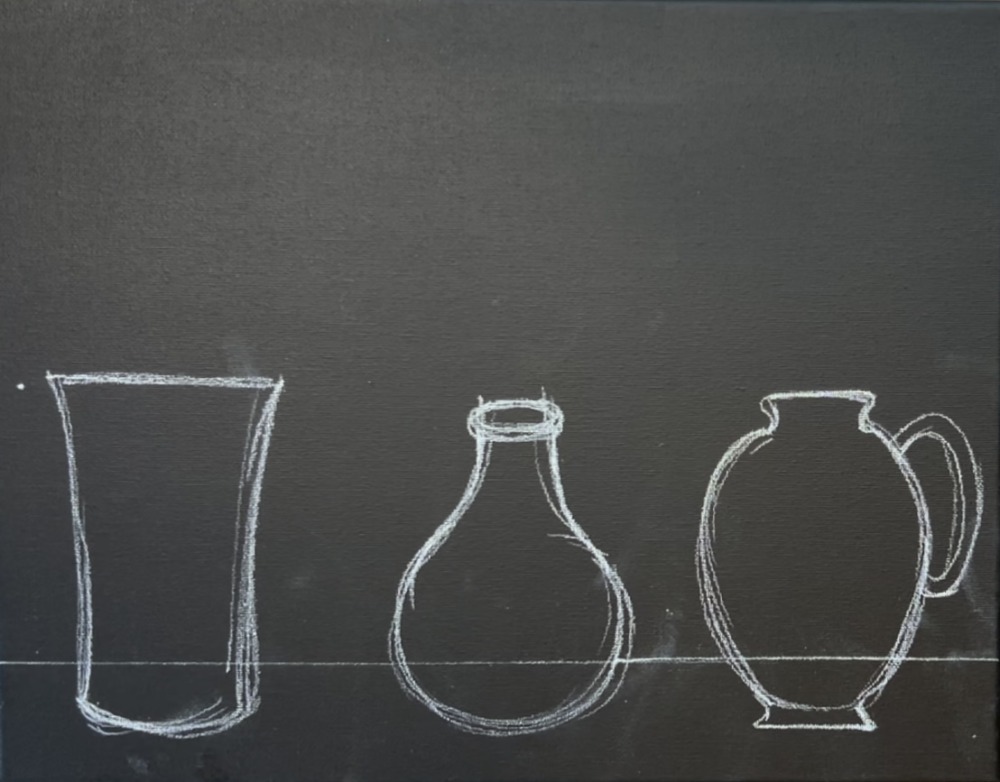
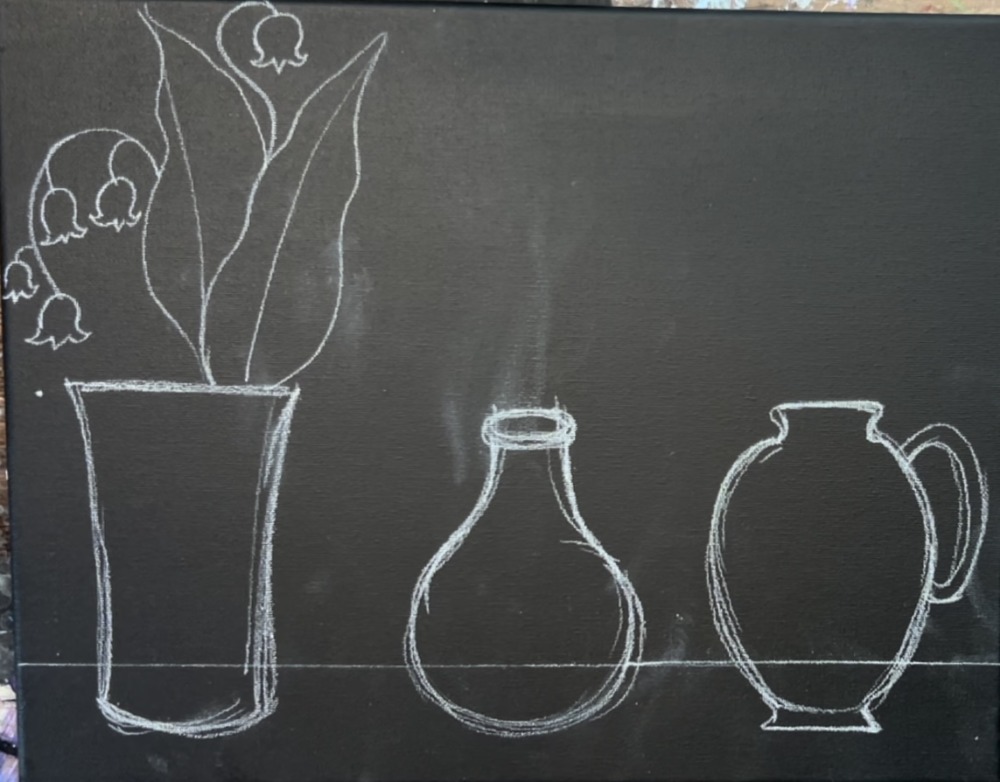
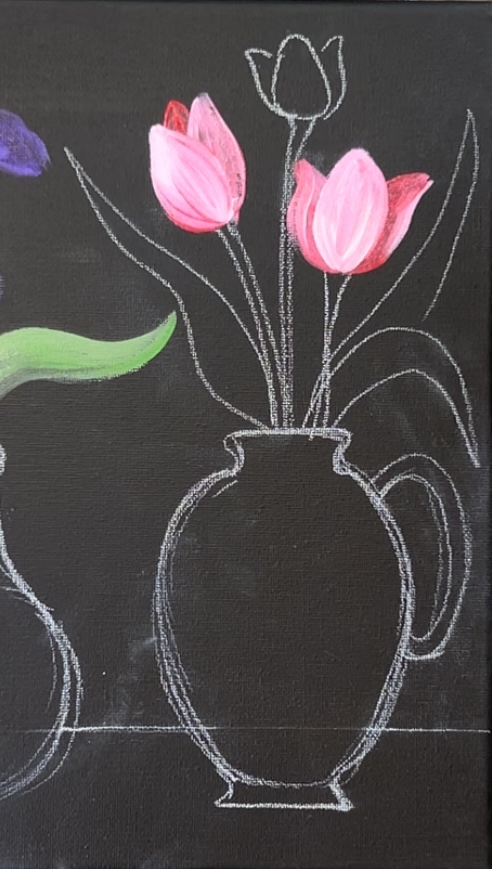
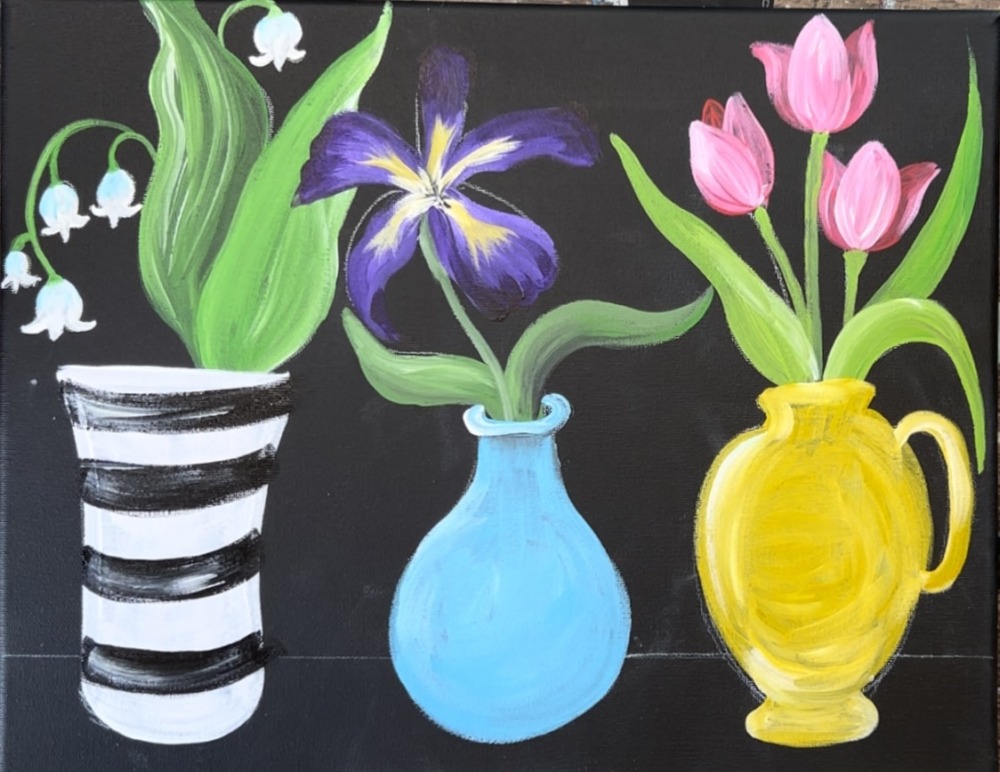
Then draw the first vase on the left.
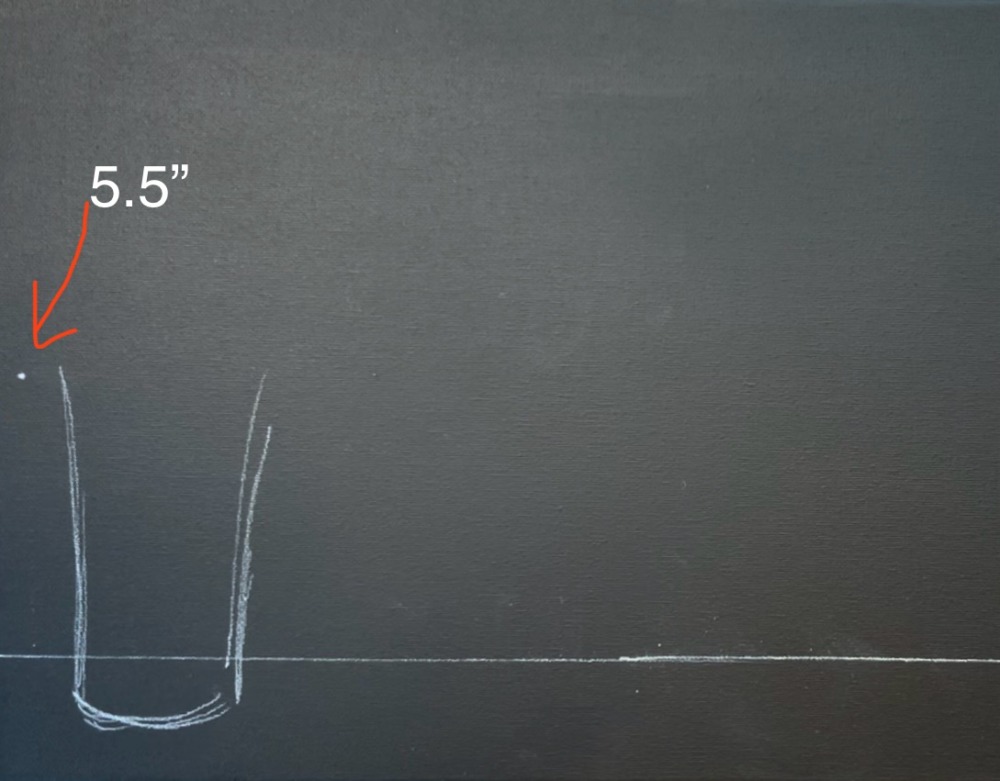
This vase has a wide opening and curved bottom. The height of this vase goes to that 5.5″ mark.
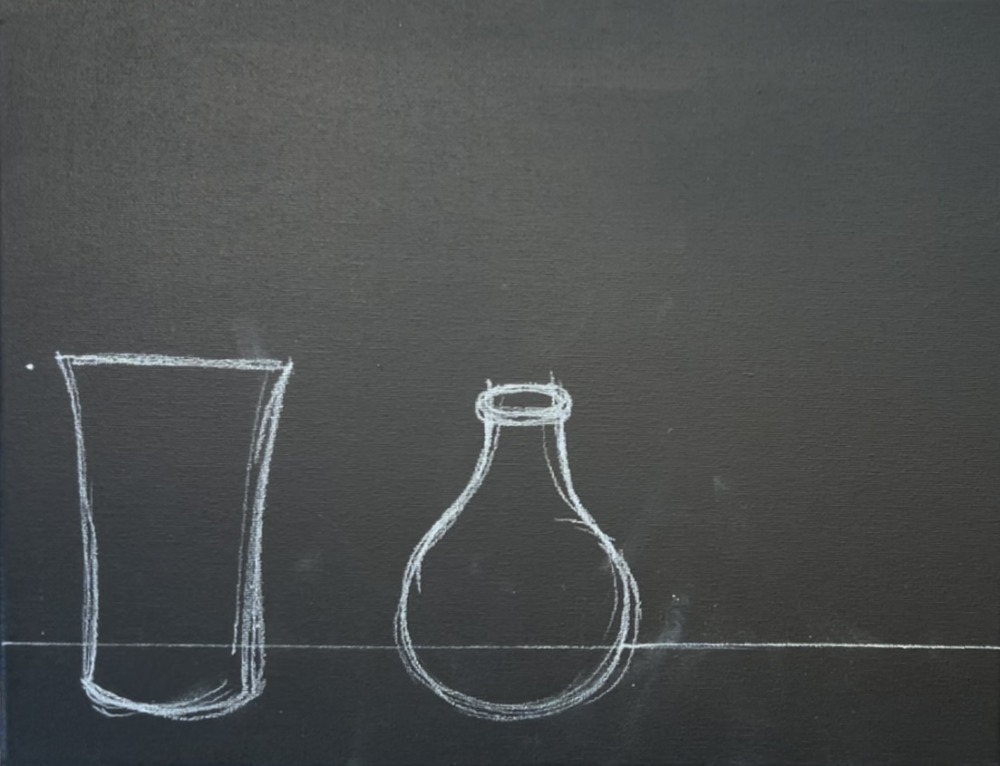
Then draw the middle vase. This one is a rounded vase with a narrow neck and opening. Start by drawing a medium size circle with the bottom lined up to the bottom of the vase on the left.
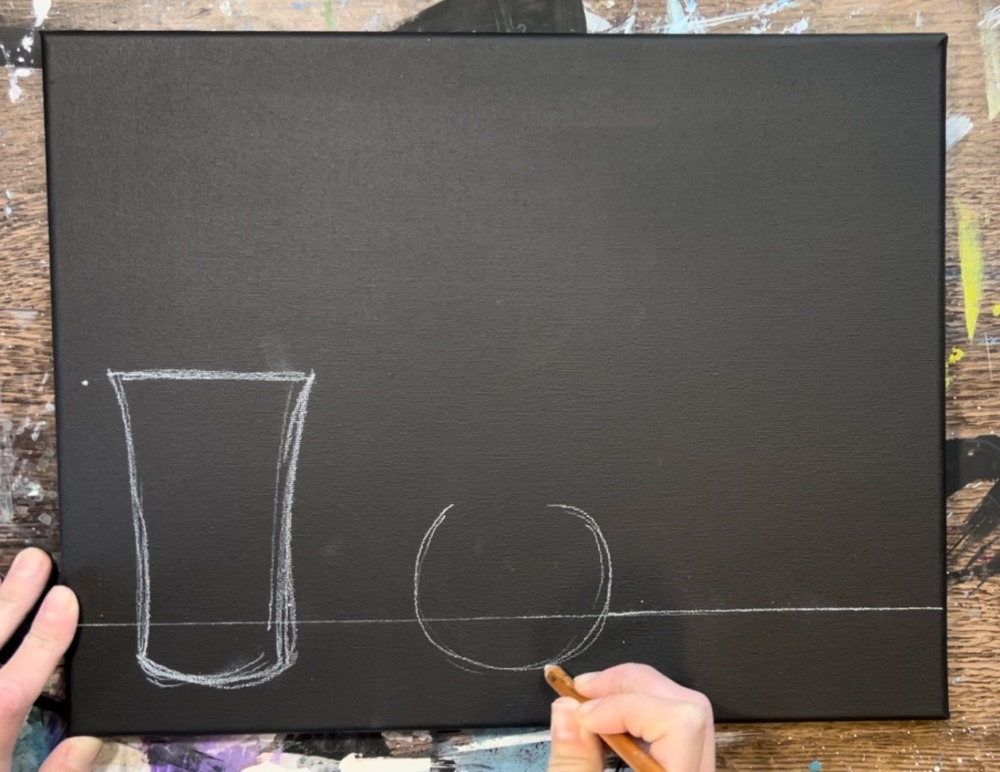
Then sketch the neck of the vase and an oval for the opening.
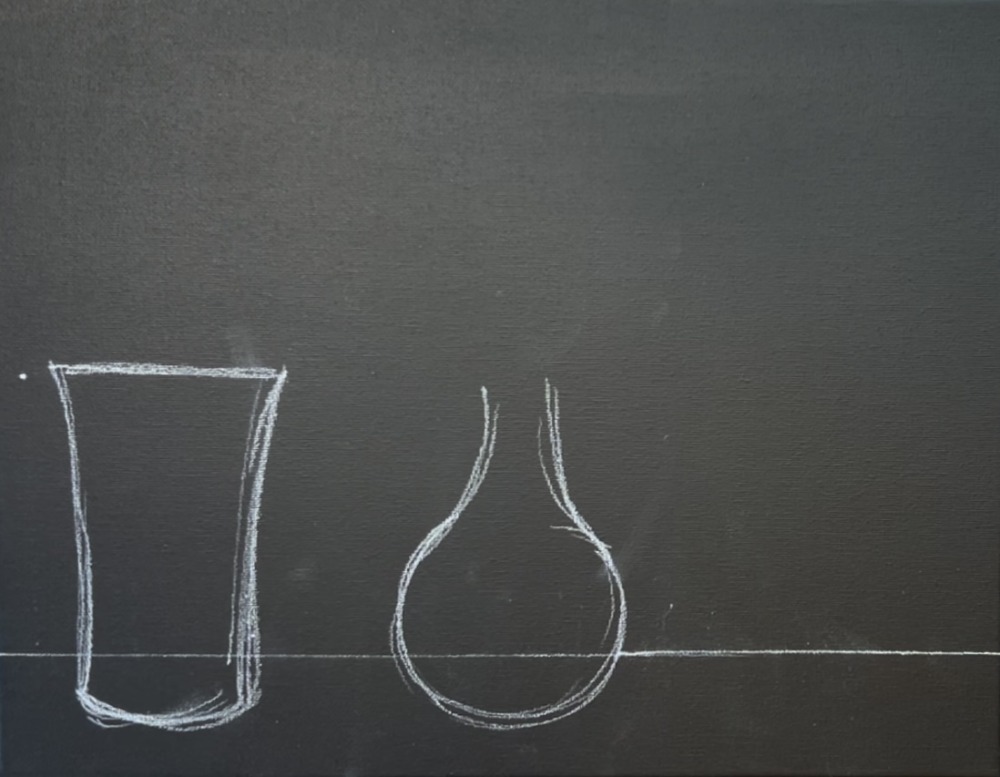
The height of this vase is almost the same height as the vase on the left.
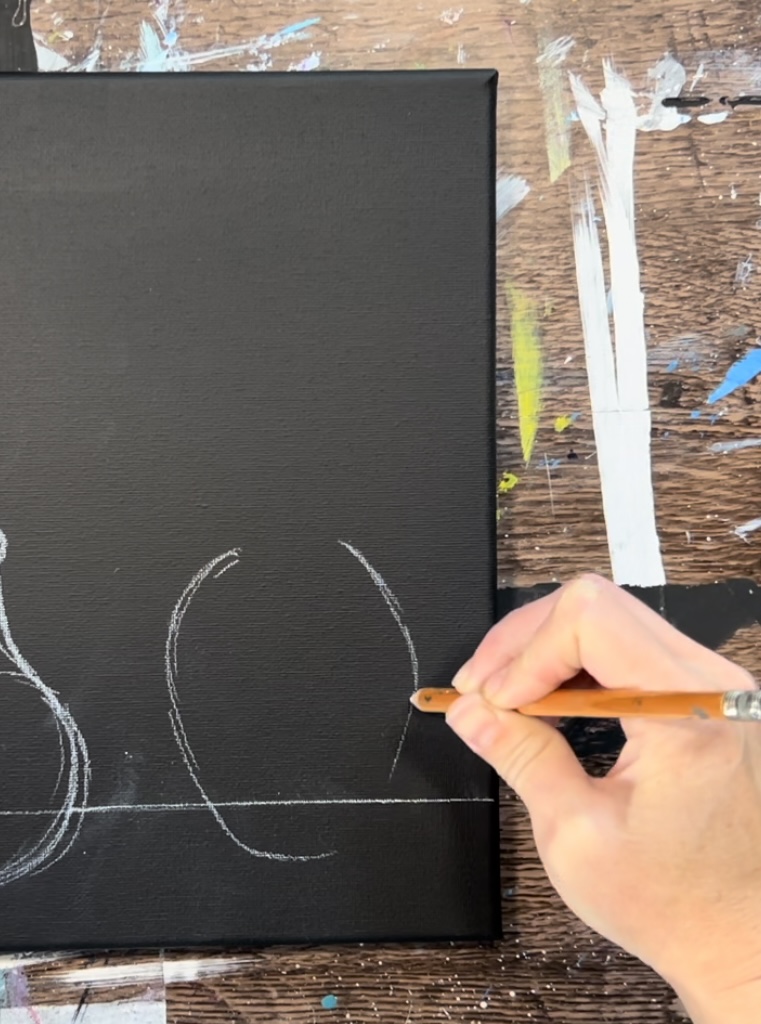
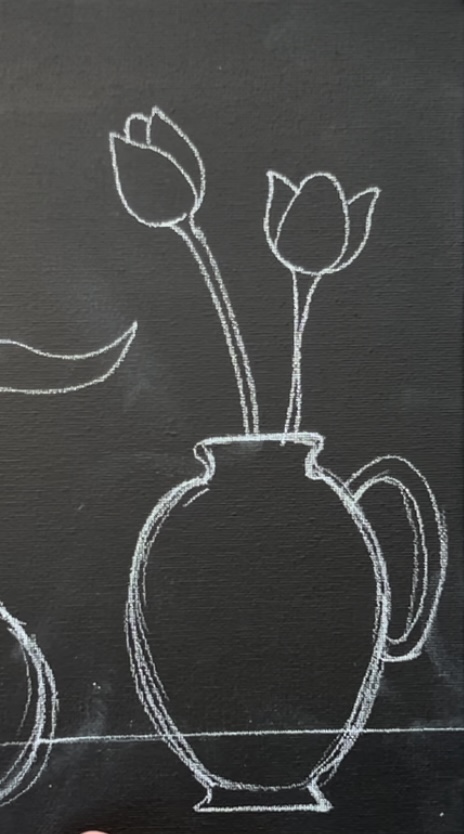
Then draw the third vase on the right. Draw an egg shaped vase with a flat bottom. Draw a handle on the right side of the vase with a flat opening on the top.
Then draw the leaves of the lily of the valley flower. Draw to narrow pointed leaves coming out from the top edge of the vase. The edges of these leaves are slightly wavy.
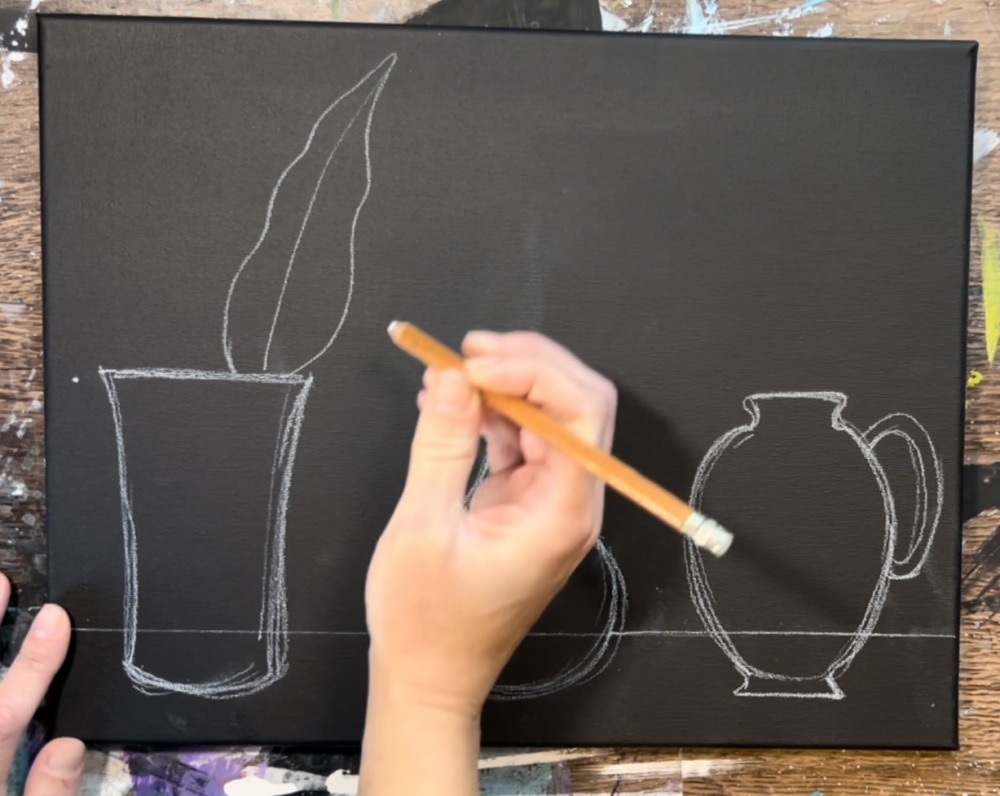
Draw a second leaf next to it so that it looks like it is going behind the leaf on the right.
Then draw the lilies. Draw a curved line that points downwards at the top of this line (like a letter S). Then draw a little “squid shape” flower. The lily of the valley flowers are all facing downwards.
Draw another curved stem line with another flower.
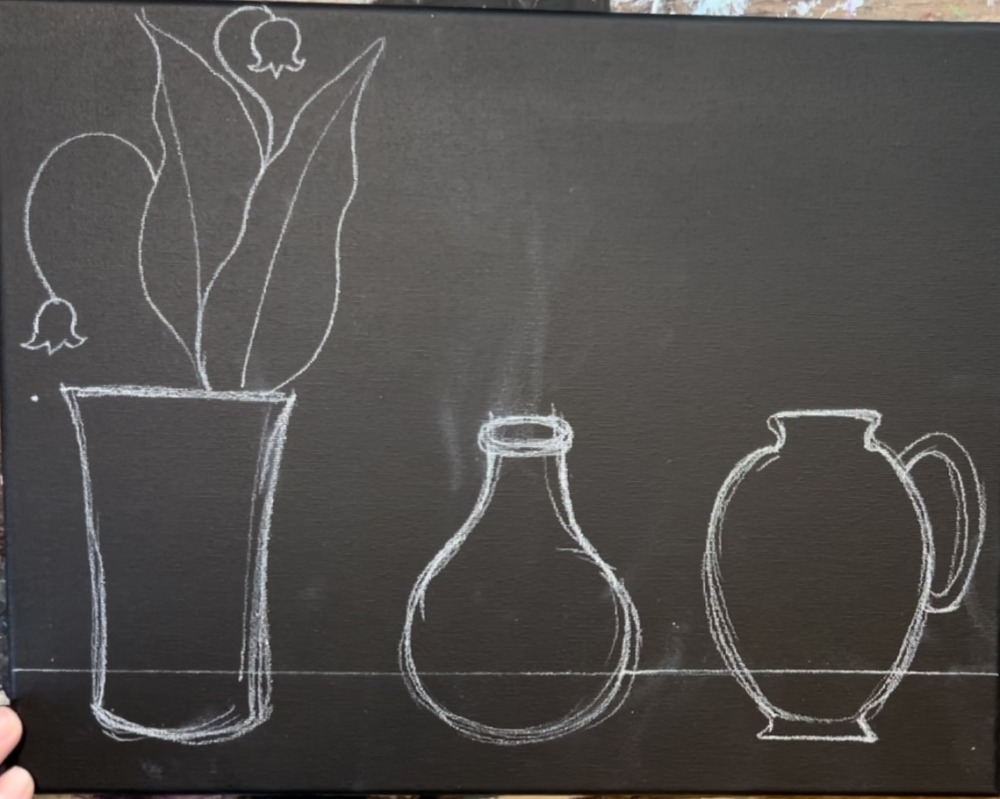
Then draw three more curved lines attached to the main line and three more upside down lily flowers.
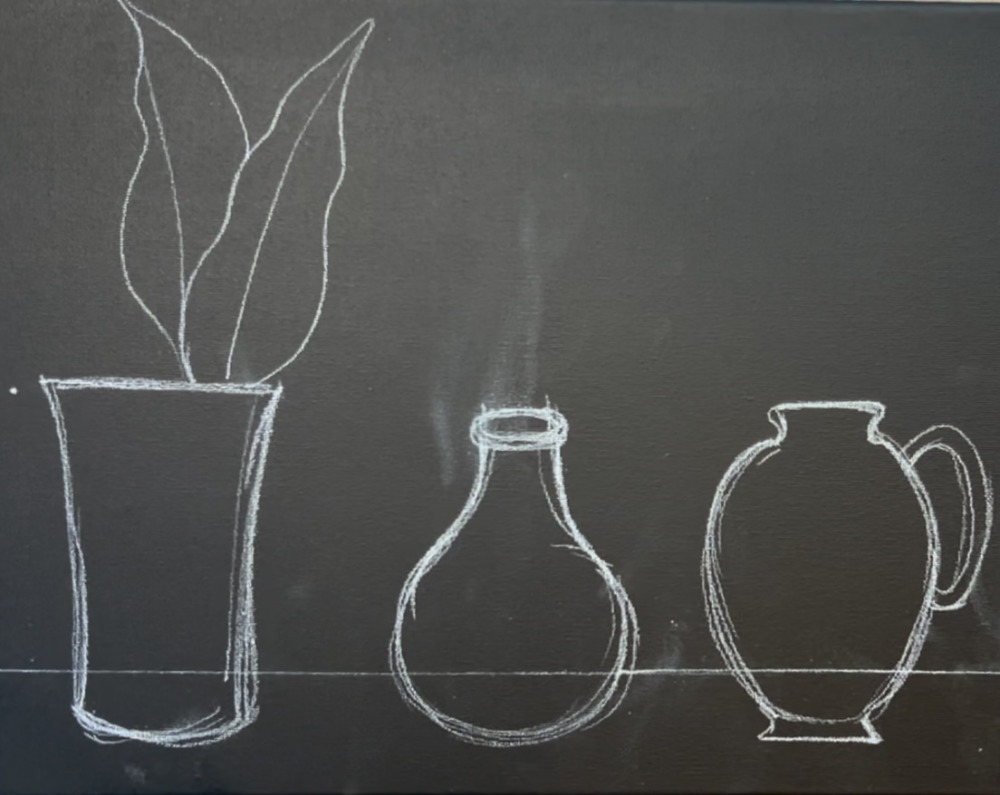
Next, draw the iris. Draw narrow petals that go wider on the edge and also have a wavy line on the edge.

I did three of the petals more narrow and two of the petals wider. You can change the style of this iris if you want. I did one petal that is overlapping part of the lily of the valley leaf.
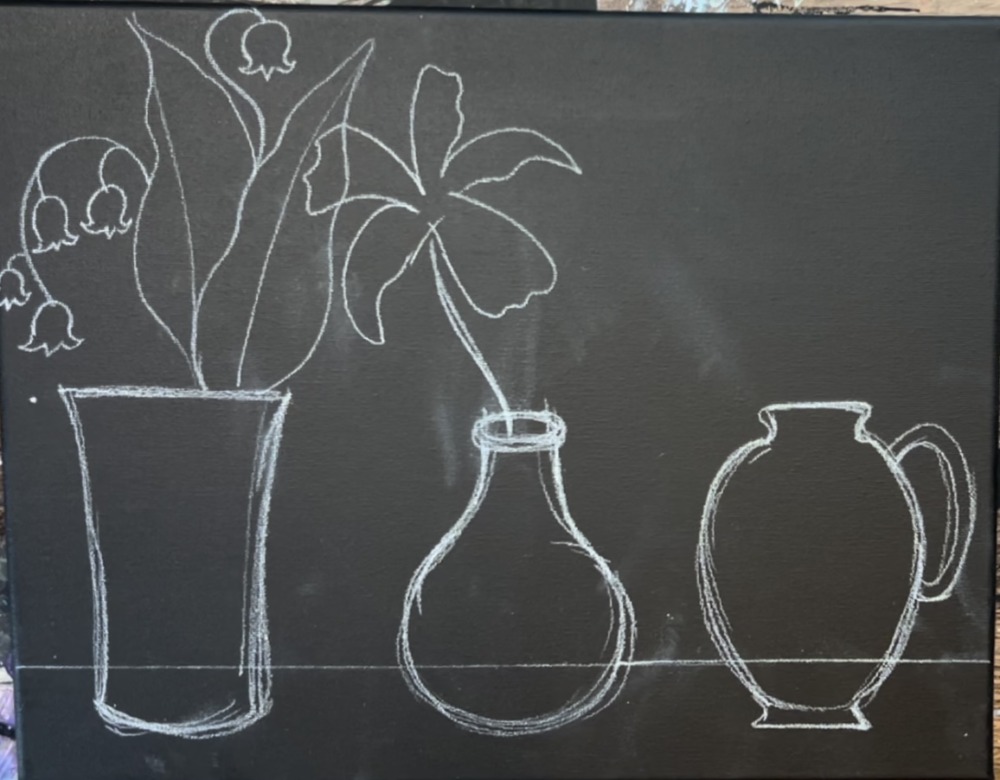
Then draw two narrow and pointed leaves going out from the vase.
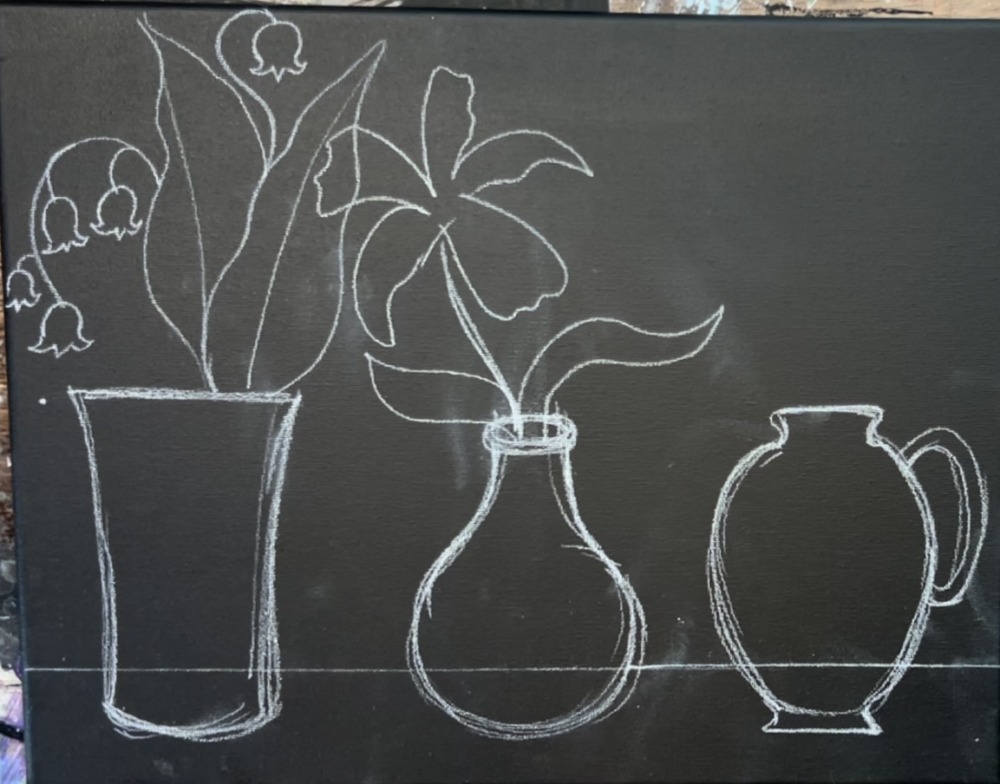
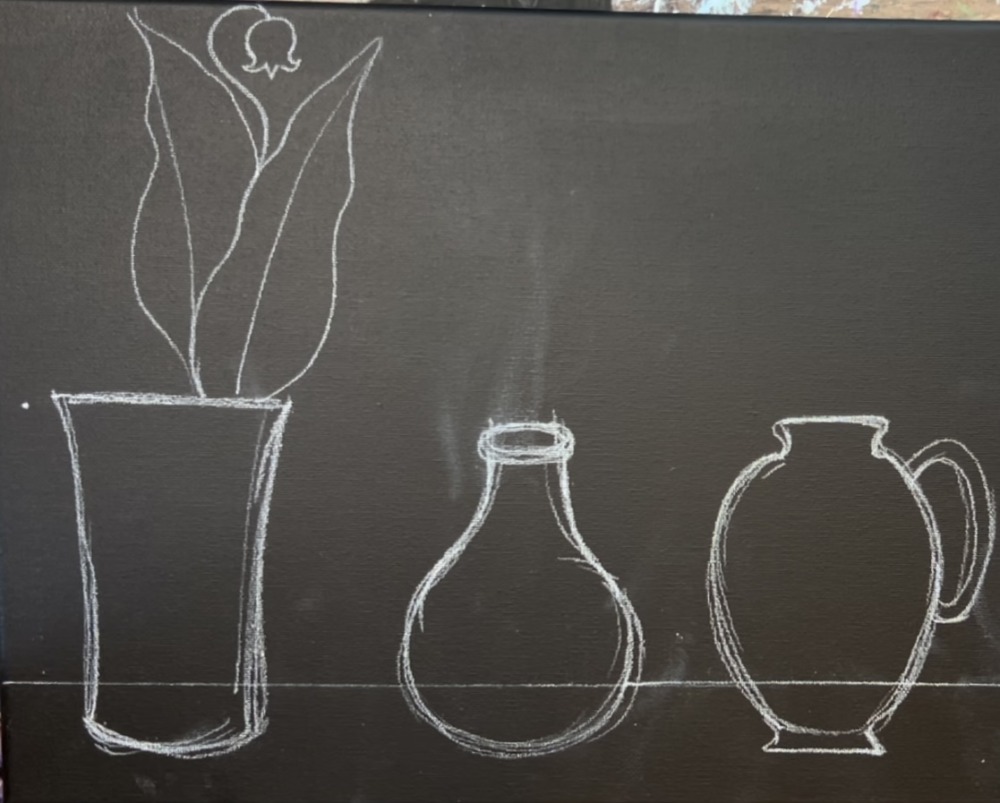
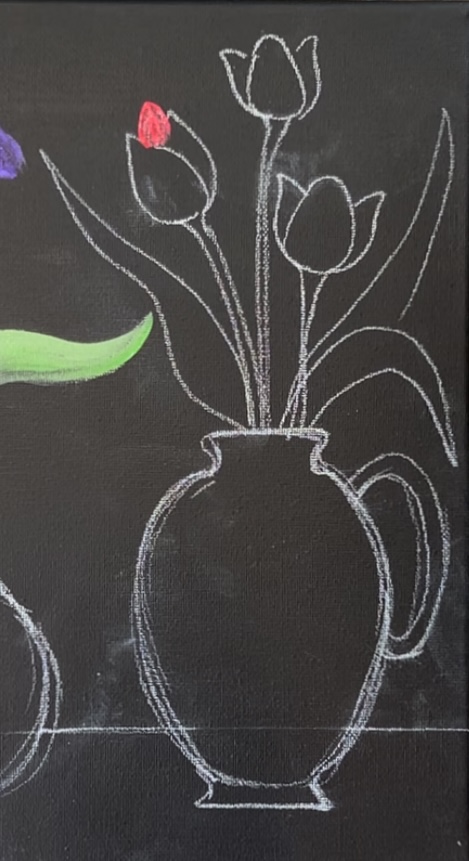
Next, draw the tulips. Draw a teardrop shape.
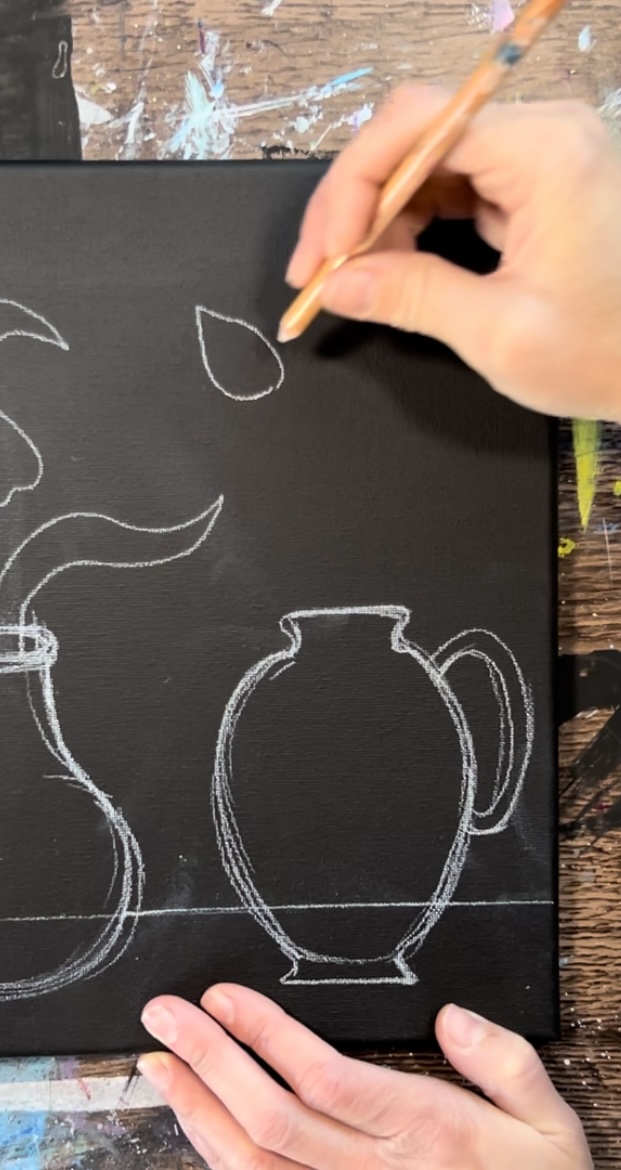
Then draw a second teardrop shape on the right that is behind the first shape. Then draw a little curved notch in the center that is behind both petals.

Draw a stem that is attached to the tulip.
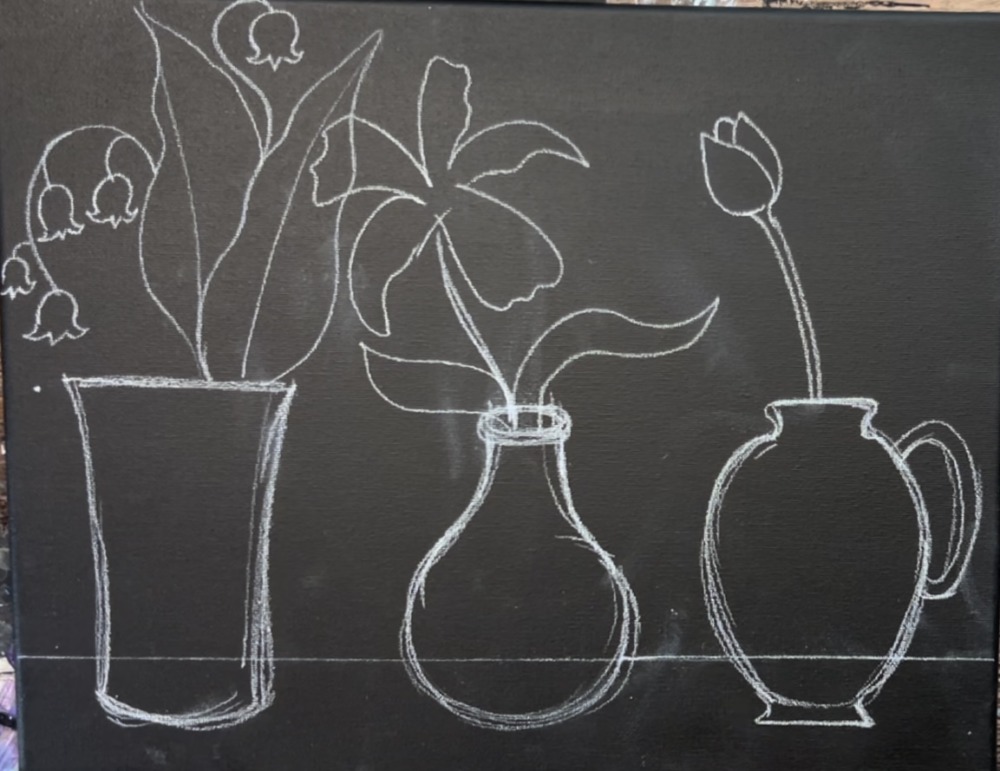
Draw two more tulips. This time, I did a different style. Draw an “egg shape” in the center. Then draw to more teardrop shapes that are behind the egg shape.
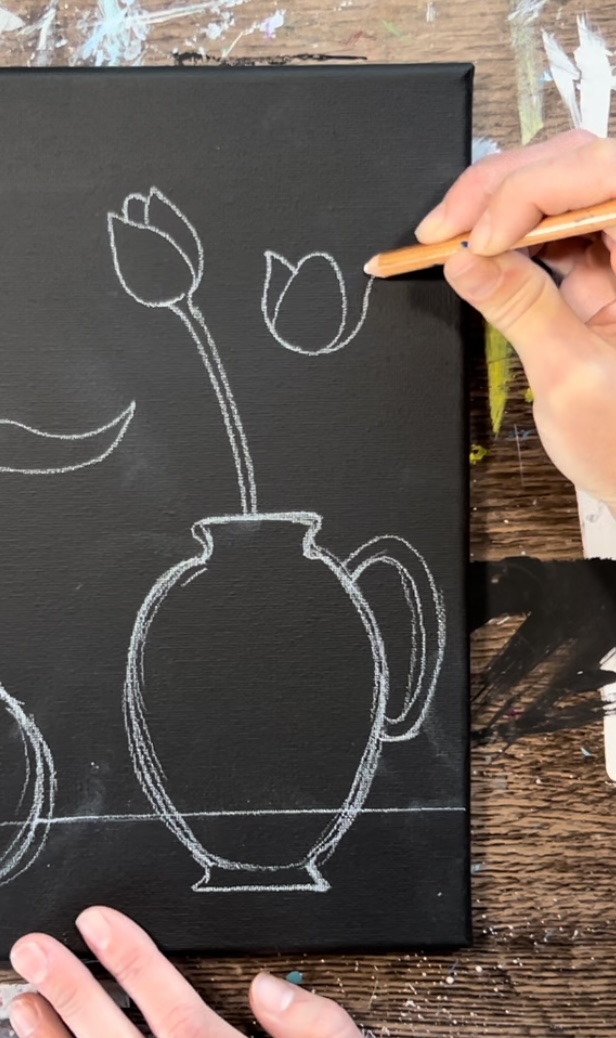
Draw the stem for this tulip.
Draw the third tulip using the same steps.
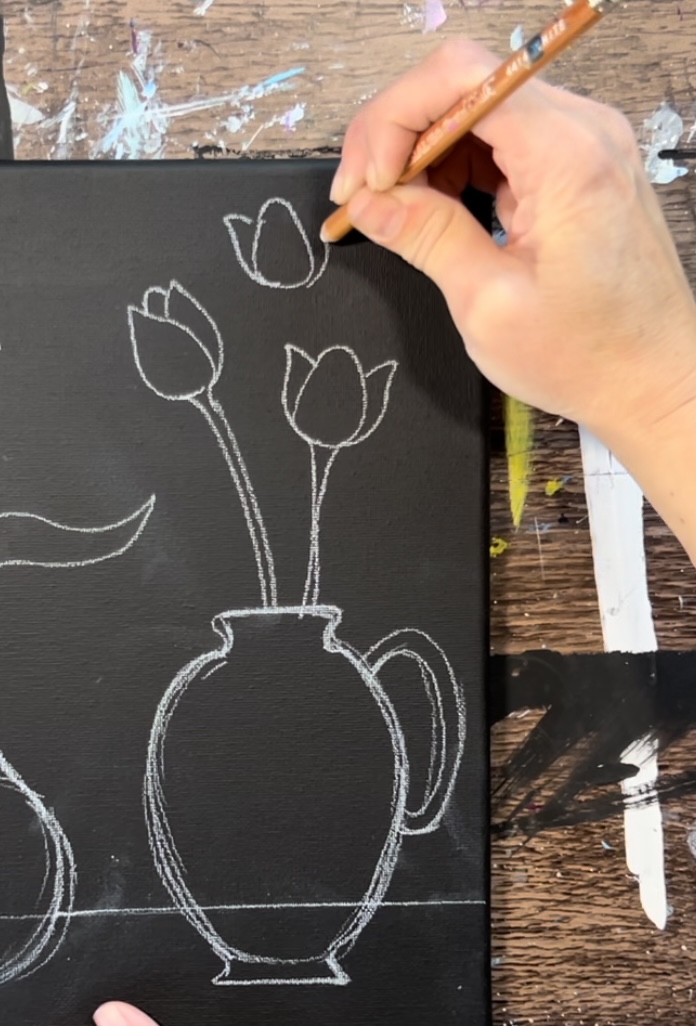
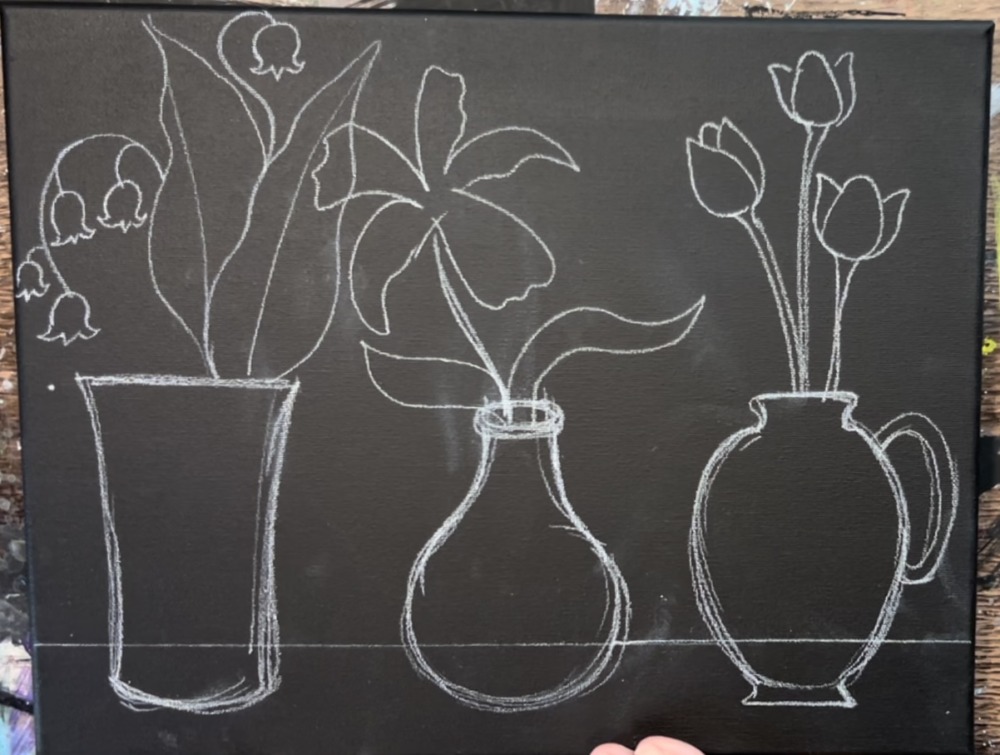
Draw tulip leaves. These are long, narrow pointed leaves. I drew one leaf going straight up and another leaf in front of it that is curving down.
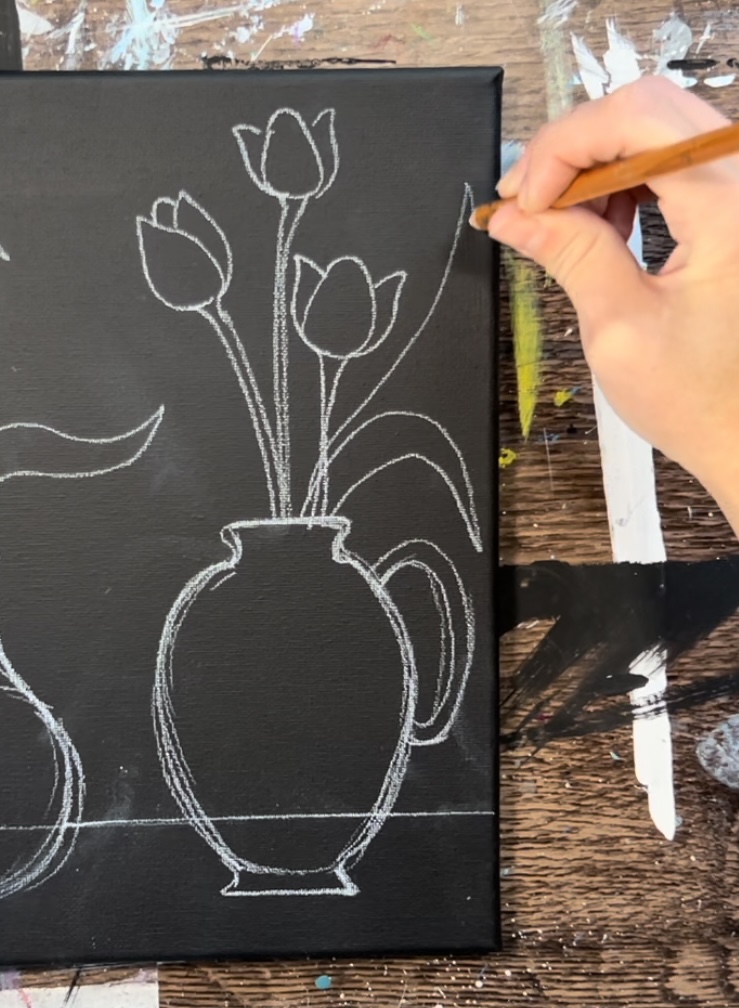
Then draw I drew a third leaf that is pointing diagonally towards the iris.
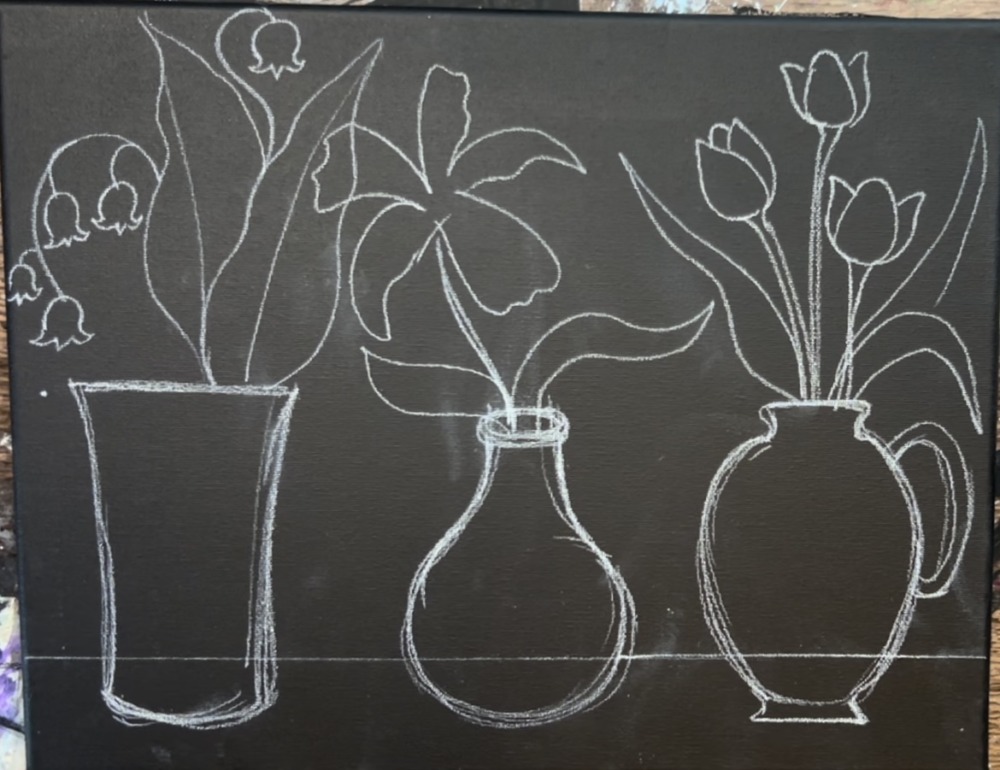
If needed, erase the line that overlaps the vases.
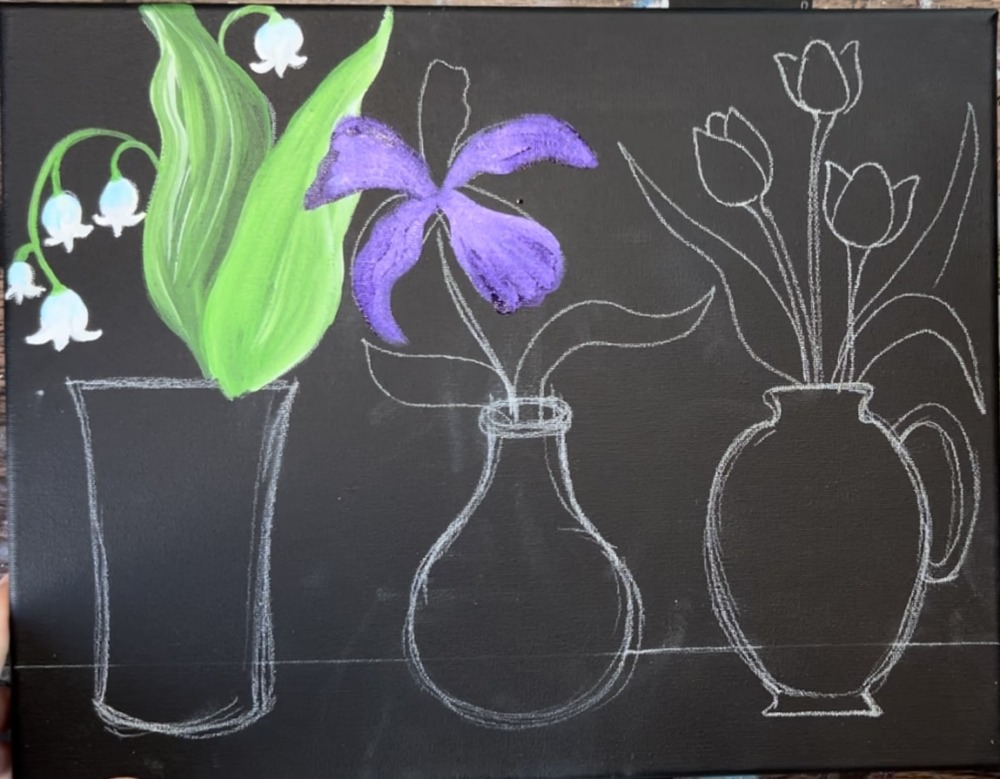
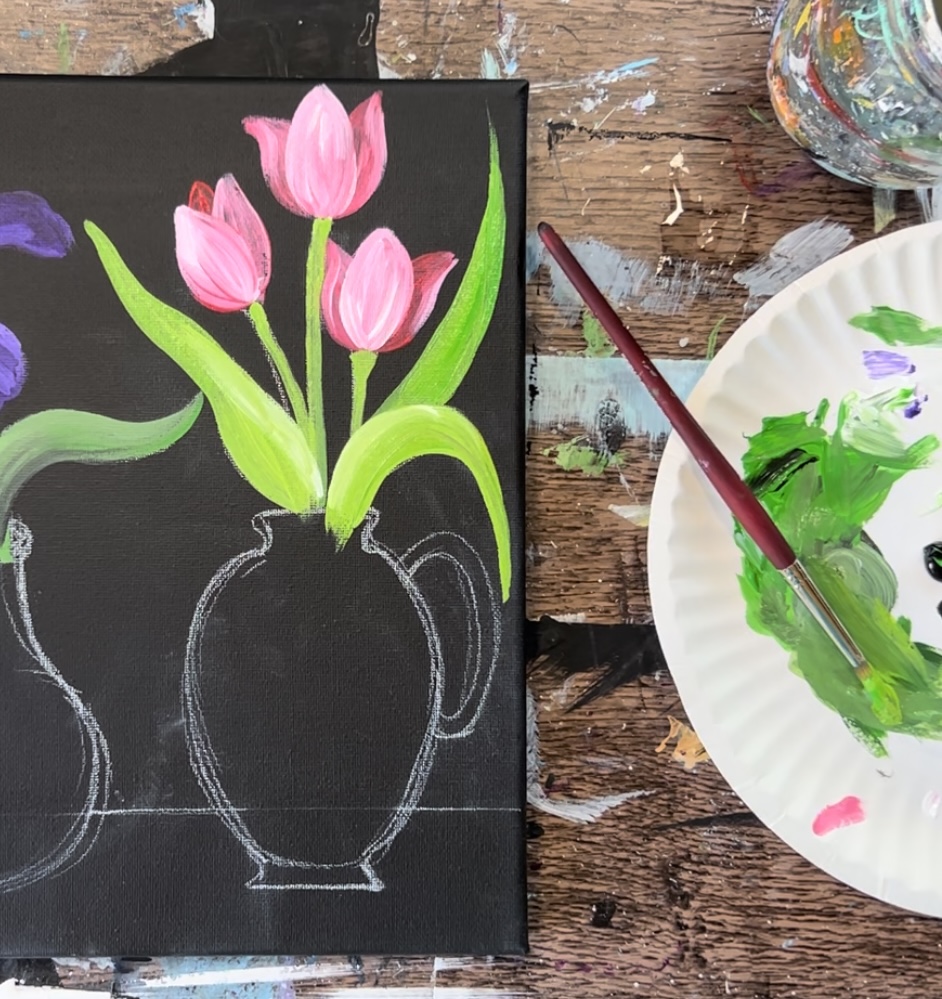
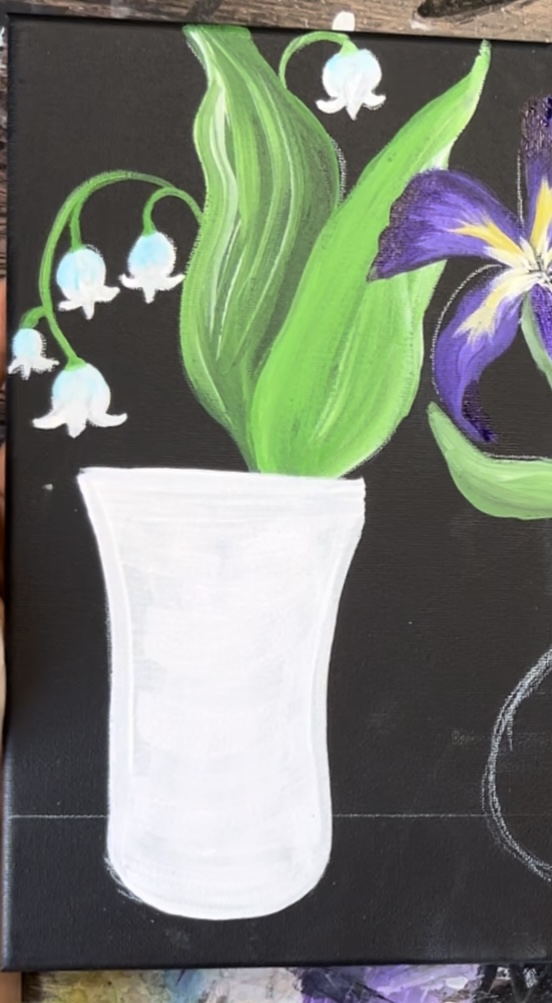
2. Paint Lily Of The Valley
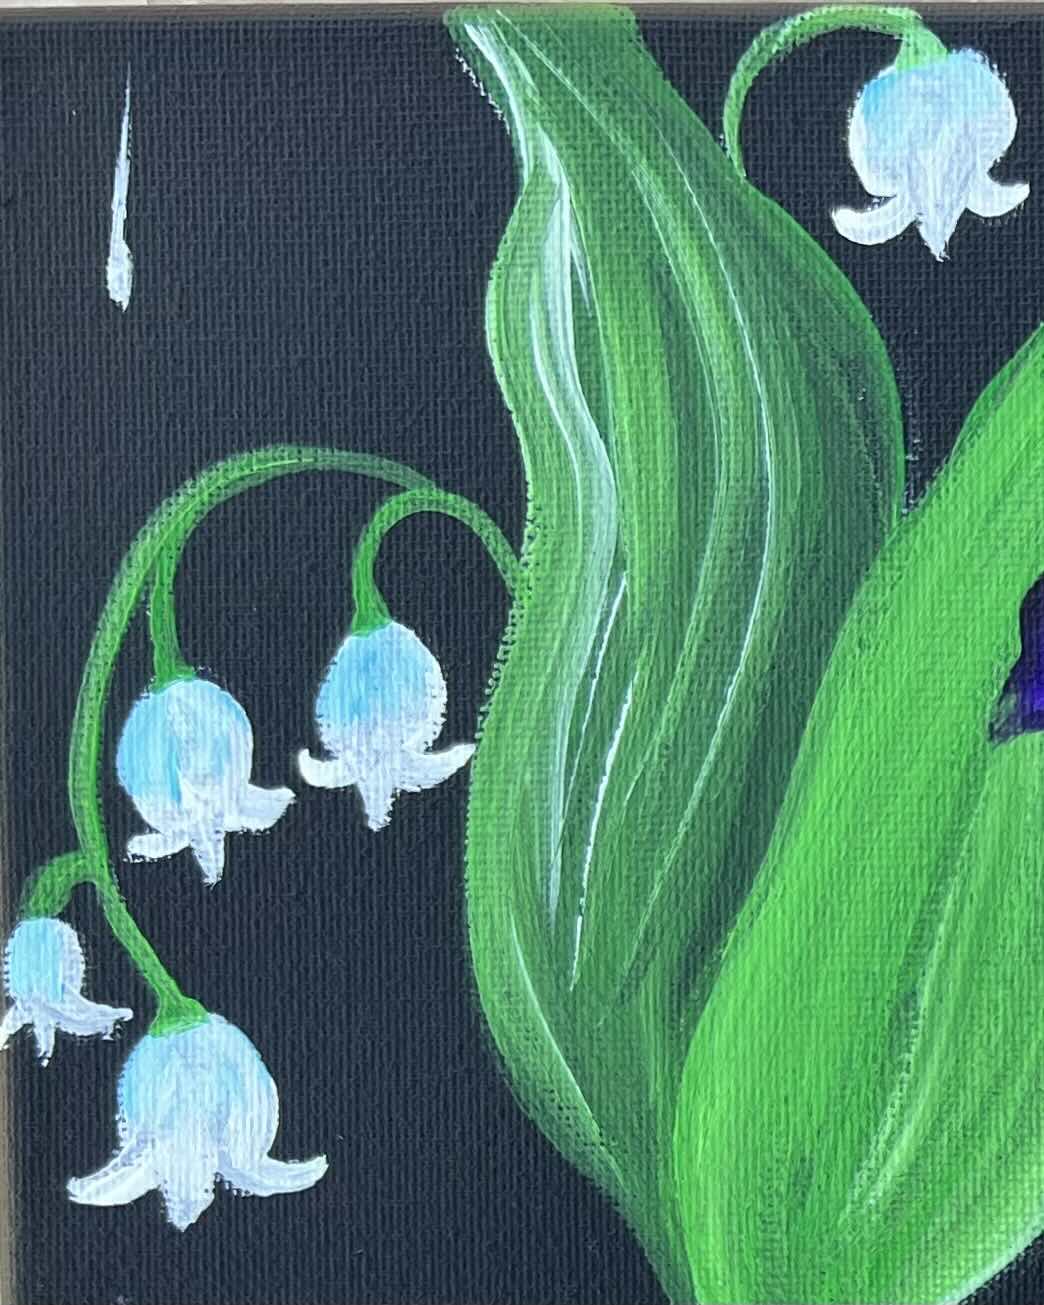
Load your paint palette with the two colors: light green permanent and titanium white. Use the #8 round brush to mix equal amounts of those two colors together. Then paint the leaf. Pay special attention to the edges of the leaf. The edge is slightly wavy.

Add a little bit more white to the right side of the leaf and blend it in so that it is lighter on the right side.
Next, mix a darker green on your palette. Without rinsing the brush, add a small amount of “mars black” into the “light green permanent” green color. This will make a dark green.
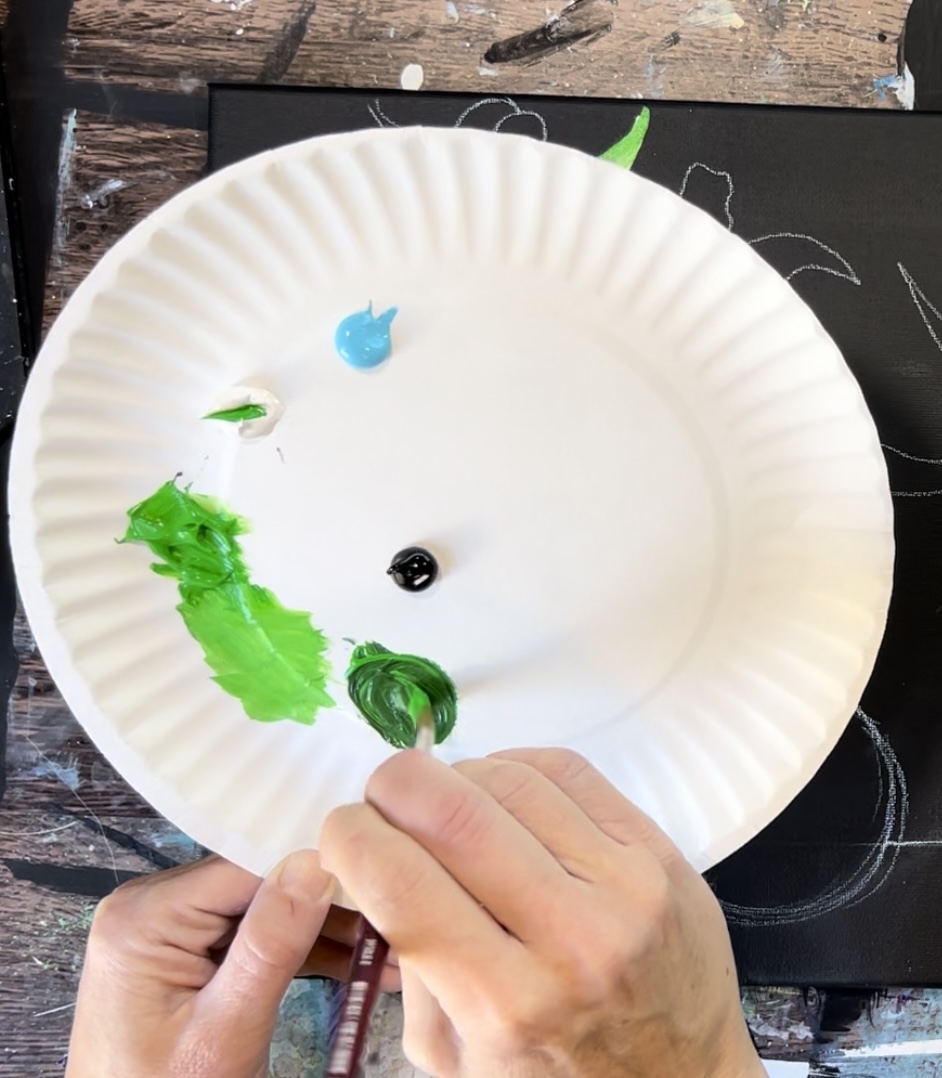
Paint the leaf on the left with this darker green. This will stand out from the leaf on the right because it is darker.
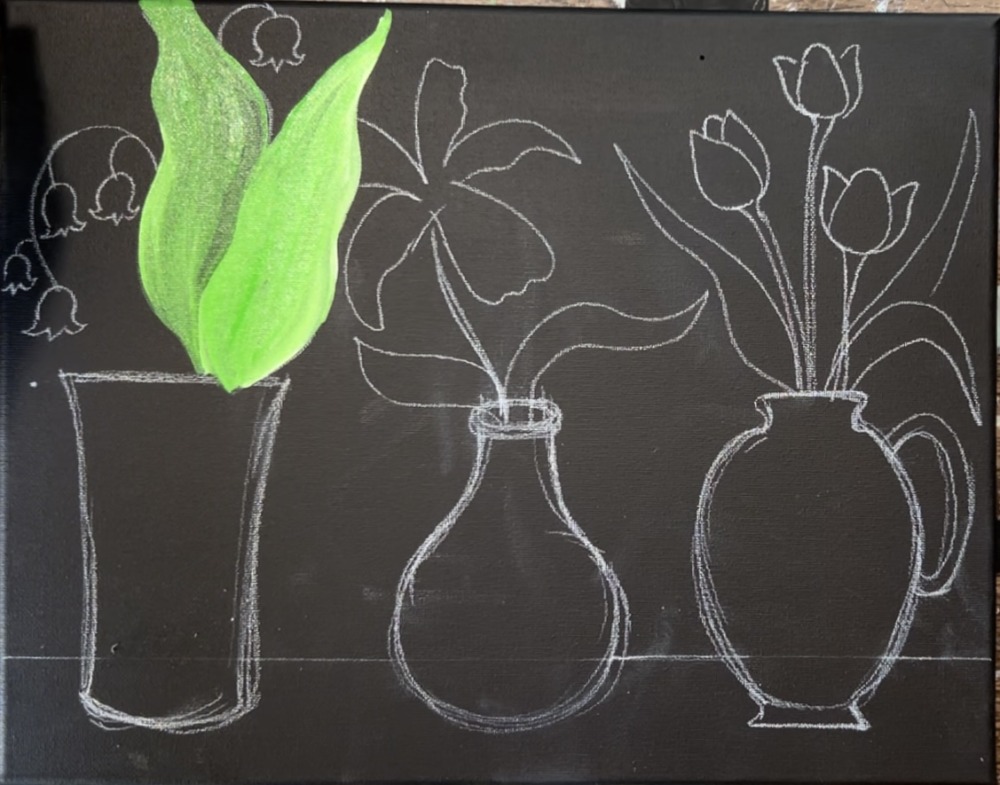
Then blend lighter green on the left side of the leaf. Keep the far right of it shadowy.
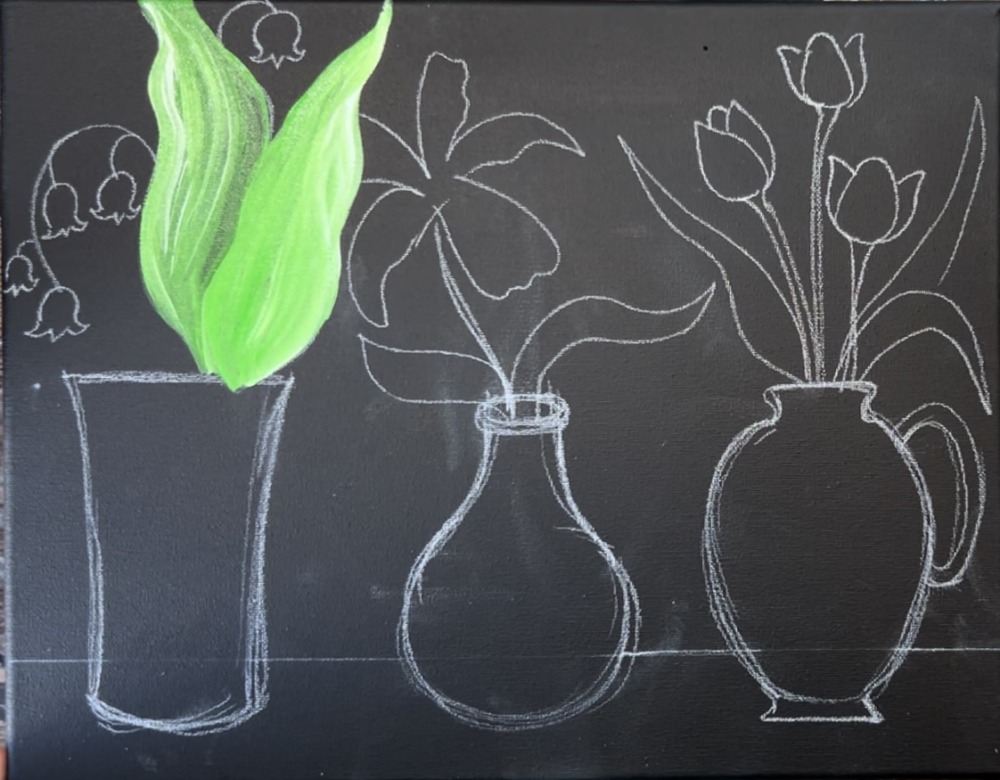
Paint the lily of the valley flowers using titanium white and the #4 round brush. Tip: use the tip of the #8 round brush to paint the pointed ends of the lily flowers. Use either of the round brushes to paint the stems of the flowers.
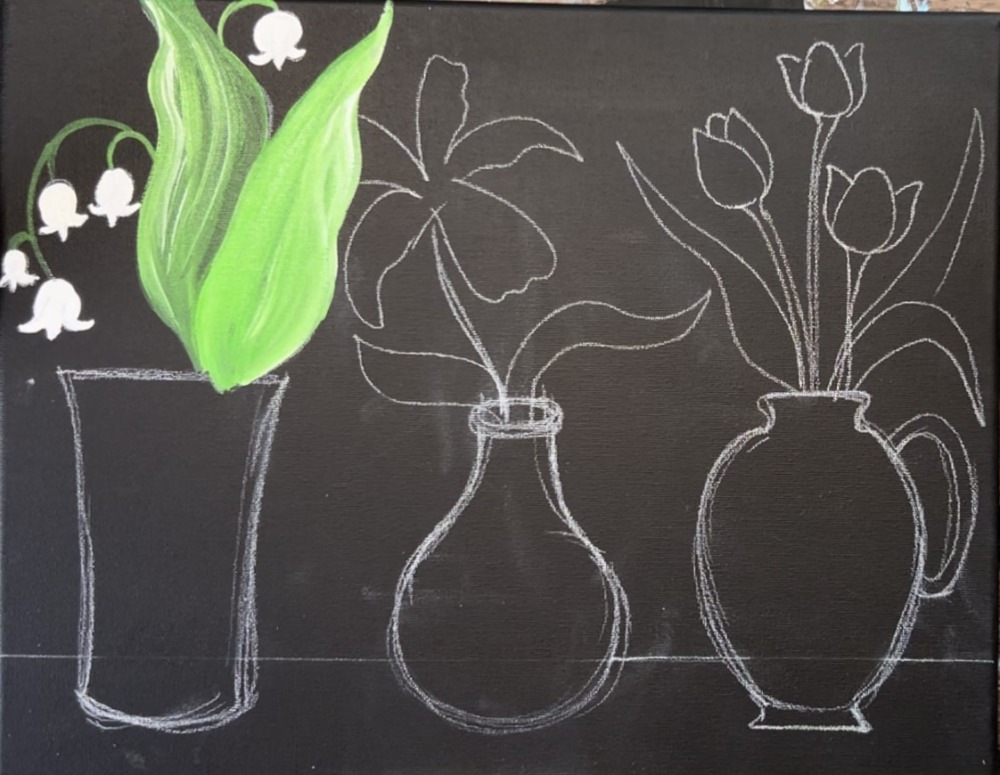
Next, add a small amount of “light blue permanent” to your #4 round brush. Add a small amount of blue to the tops of the lilies and blend it in with the white. This gives it a little bit of shading at the top.

Note: leftover chalk lines can be erased with a regular pencil eraser after the painting is dry.
3. Paint Iris
Load your paint palette with the colors “dioxazine purple” and “titanium white”. Mix equal amounts of purple and white together. This will lighten the purple but also allow it to show up bright on the black background. Paint the first petal with the light purple. Then add darker purple on the far edge of the petal.
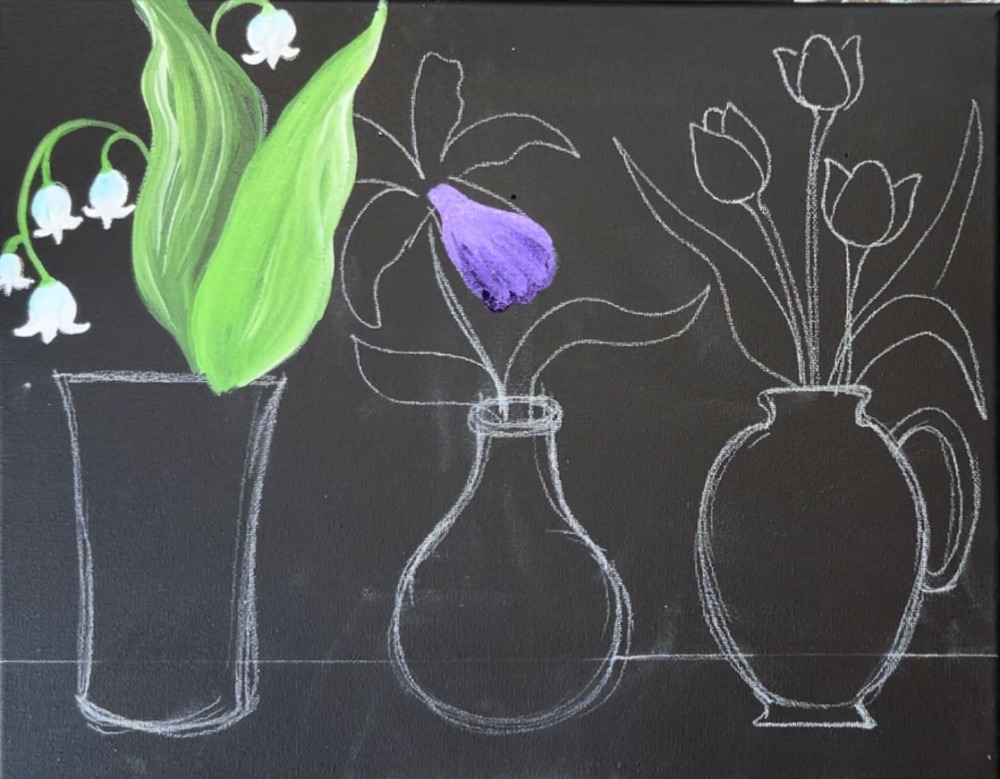
Paint each petal so that the center part is higher and edges are darker. Make the edges of the petals slightly wavy.
The petal on the left overlaps the part of the lily of the valley leaf.
Then go back in the center of the flower (base of each of the petals) and add just a little more light purple and drag it outwards to blend with the rest of the petal. This makes the center of the flower brighter.
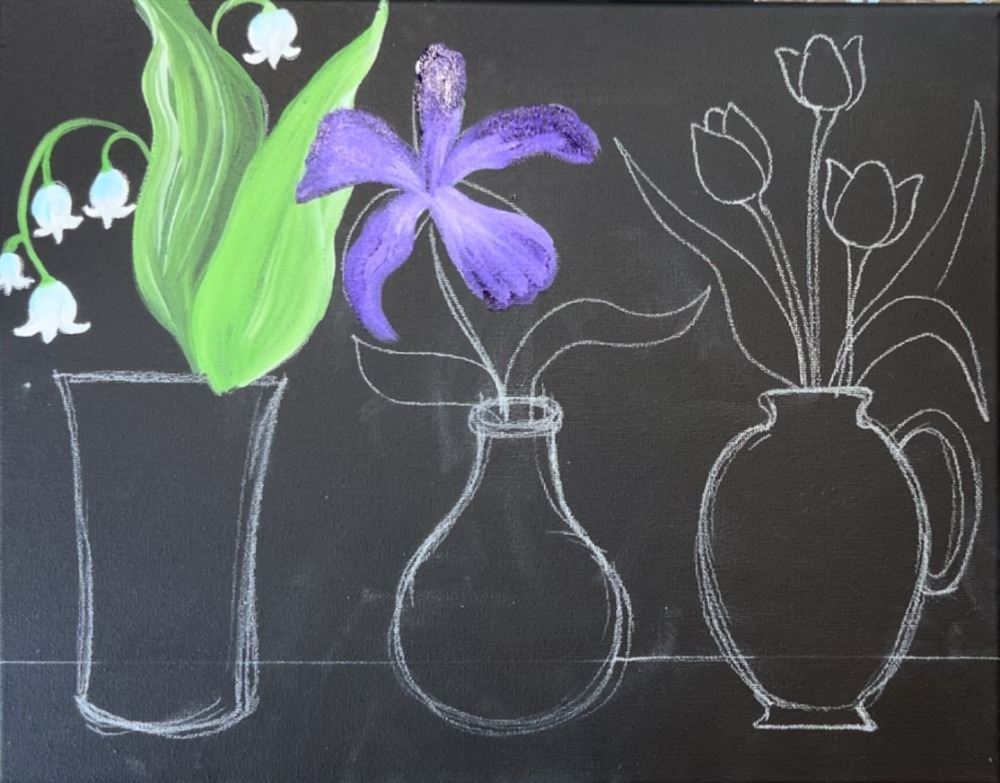
Paint the stem and leaves. On your palette, mix a green that is slightly different than the green from the lily of the valley leaves. Add a little black and white into the green to make it more of a gray-green color.
Then use the #4 round brush to paint the leaves and stem of the iris. I made the top part that attaches to the petals slightly wider.
4. Paint Tulips
Load your paint palette with the color “primary red”. This color can be made into pink by adding white into it.
Start by using your #4 round brush and just the “primary red” to paint the little petal in the back. With each of these tulips, you want to paint the back petals first and the front petal (the one that is on top in the drawing) last.
Then mix titanium white into the red. It will turn pink. Paint the teardrop petal shape on the right. Then add a bit more white to your brush. Paint another teardrop shape on the left. It will stand out and overlap all the petals. Don’t over blend.
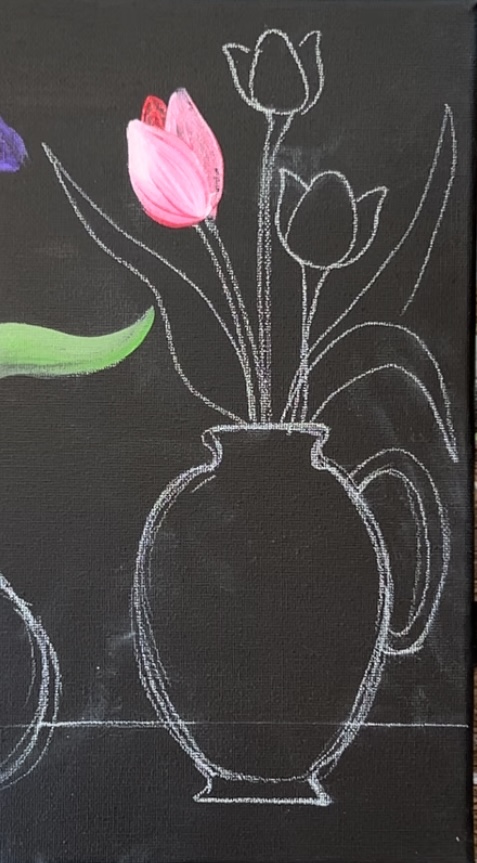
Repeat this for the other two tulips. I started by painting the back petals with “primary red” so they would appear darker. Then paint the middle petal with white mixed with primary red so that it appears in front of the back petals.
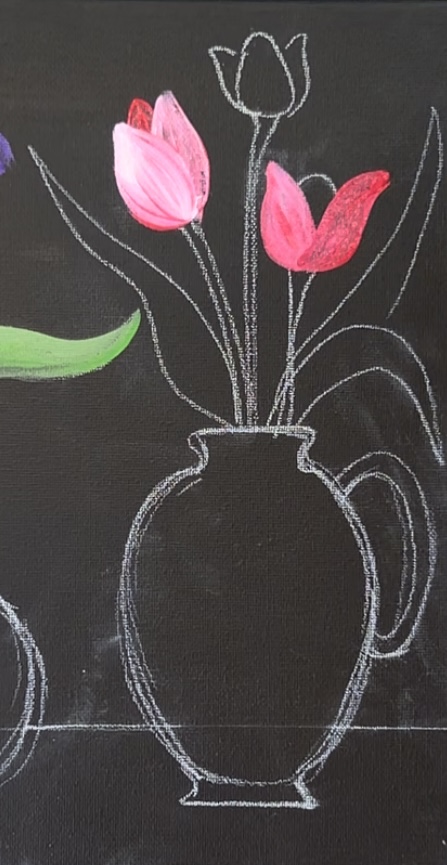
You can blend a little bit of lighter color into the back darker petals but don’t make it as light as the front petal.
Paint the third tulip using the same technique.
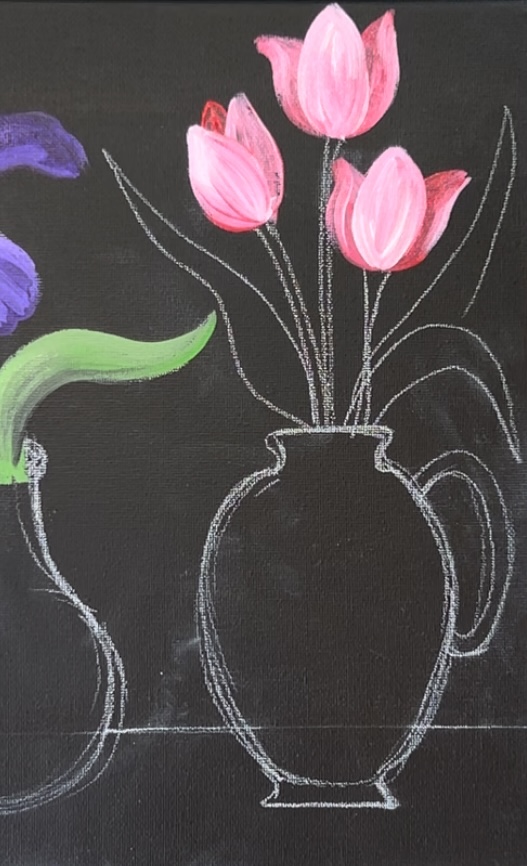
Paint the tulip leaves. On your palette, mix a light spring bring color by mixing equal amounts of “light green permanent” with “cadmium yellow medium hue” and a small amount of “titanium white”.
Then use the #8 round brush to paint each of the leaves. Start at the end of the leaf and use just the point of the bristles. Then stroke downwards with the brush and press firmly to make the leaf thicker on the bottom.
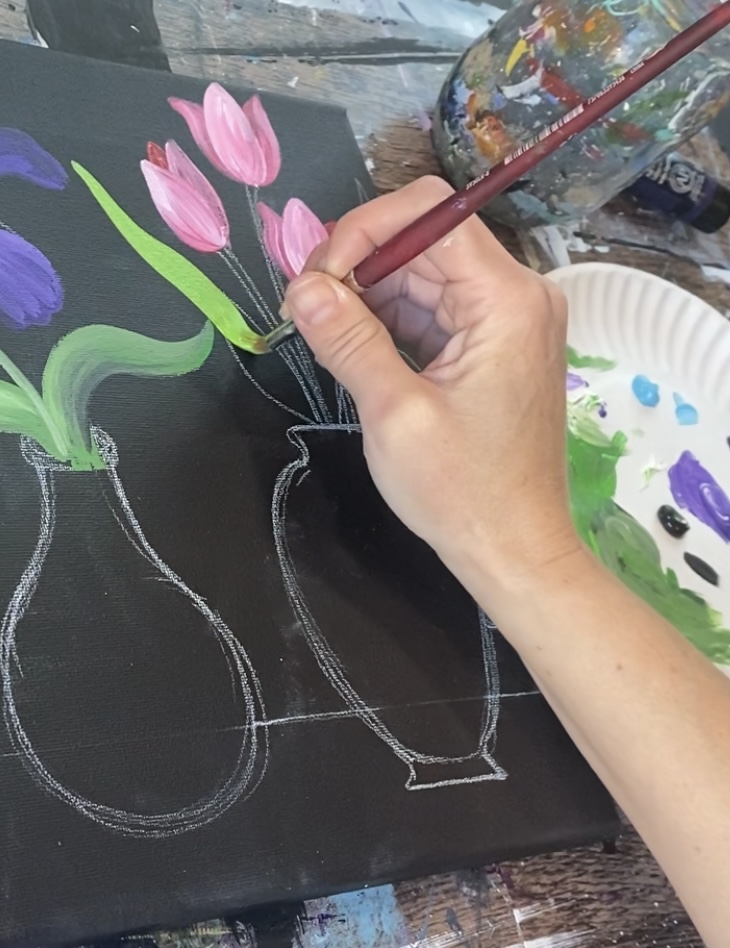
Repeat this technique for each of the leaves. Make the leaf that is in front/ overlapping the back leaf slightly lighter by adding more white to it. This will help it stand out.
Then use the #4 round brush to paint the stems of the tulips. Use the same green as the tulip leaves.
5. Paint Yellow On Iris
If the purple on the iris is dry, paint the yellow part in the center. you can do this on all the petals or just a few of them.
Use the #4 round brush and mix cadmium yellow medium hue with titanium white. Then paint a narrow area starting from the center of the petal and drag it outwards. Allow the end of this to sort of “dry brush outwards” or branch out a bit and fade out.
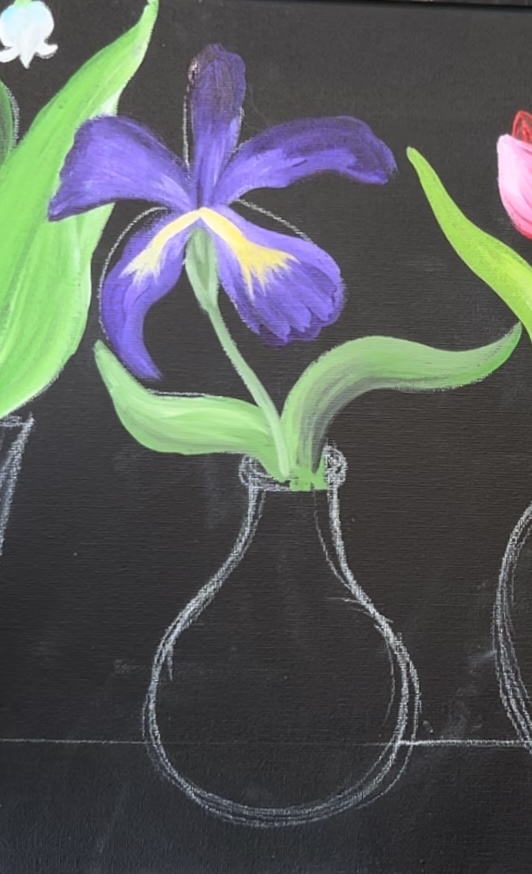
I did this on each of the petals. Then in the center of the iris, add a bit more titanium white to make the center extra bright.
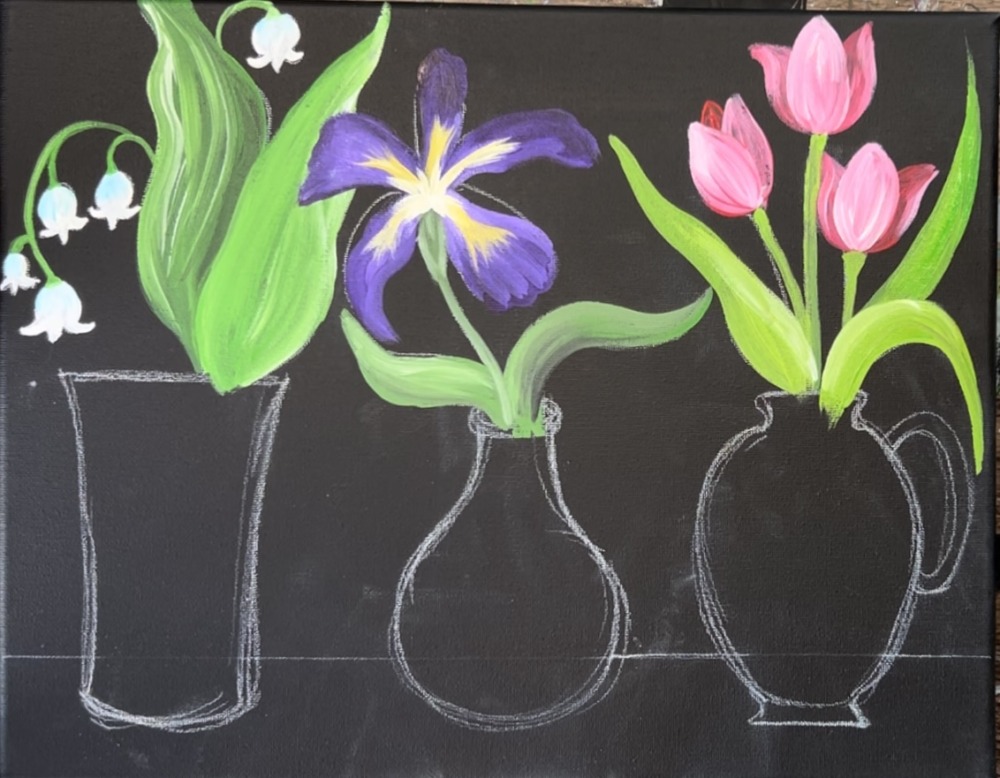
Add a little bit more “dioxazine purple” to the ends of the petals to make the ends extra dark. Then use the tip of the #8 round brush and “mars black” to paint a few little black lines radiating from the center of the iris.
6. Paint Vases
Use the #12 bright brush and titanium white to paint the vase on the far left. It helps to outline the shape of the vase first and then fill it in.
Use the #12 bright brush and “light blue permanent” to paint the middle vase.
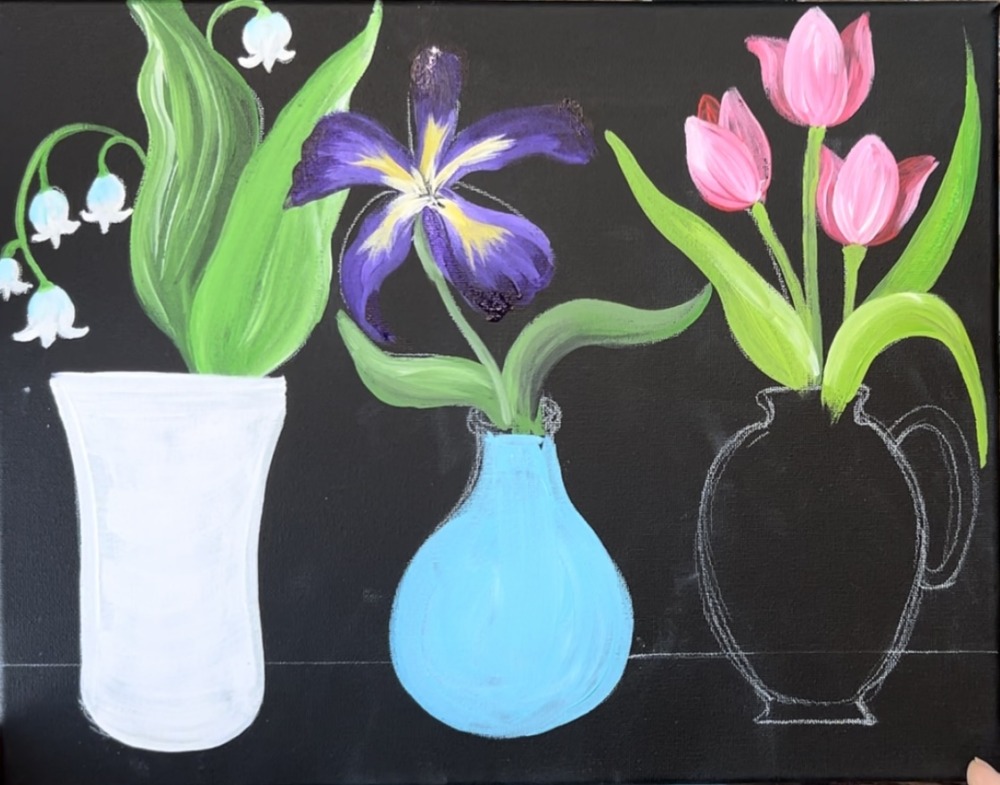
Use the #4 round brush to paint the opening of the vase and add a little bit of black below it for shadow and blend it into the light blue.
I used the #4 round brush to paint the yellow vase on the right because it was more “curvy”. Mix “cadmium yellow medium hue” with “titanium white” to make a light yellow. Then paint this vase a solid yellow color.
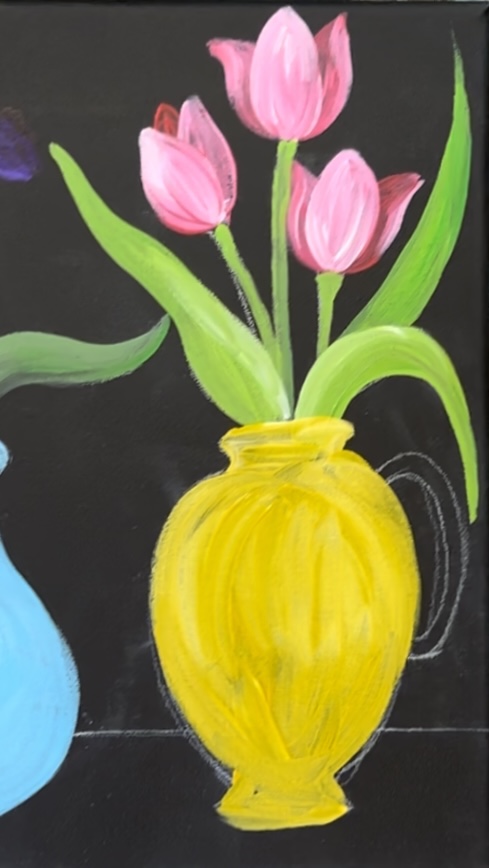
Load more “titanium white” onto the “#4 round brush” and paint highlights on the vase specifically on the left edge, bottom left and on the left side of the handle.
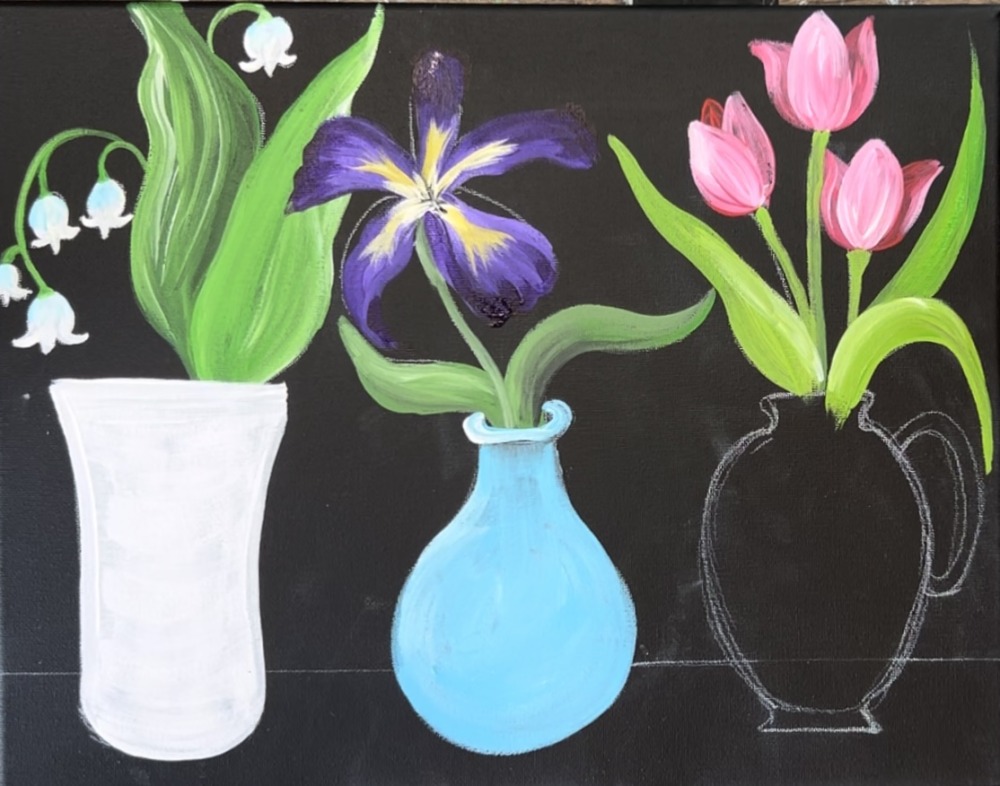
When the white vase dries, use the “#12 bright brush” and “mars black” to paint stripes. Use the full width of the brush and paint stripes that slightly curve downwards. This will make the vase look like it is a little more three dimensional.
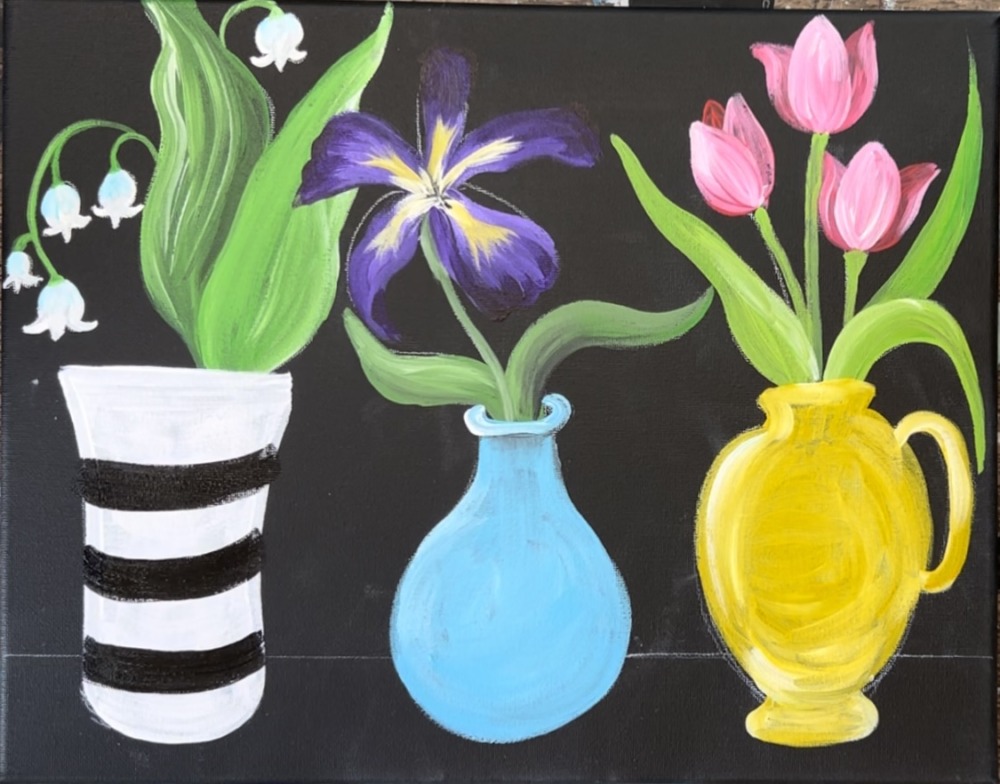
Then add a small amount of “titanium white” to the brush. “Dry brush” a little bit of this white over the stripes to give them a shiny/ highlight effect.
Then, use the #4 round brush to paint wavy lines on the center vase. Mix the “primary red” and “titanium white” together to create the shade of pink.
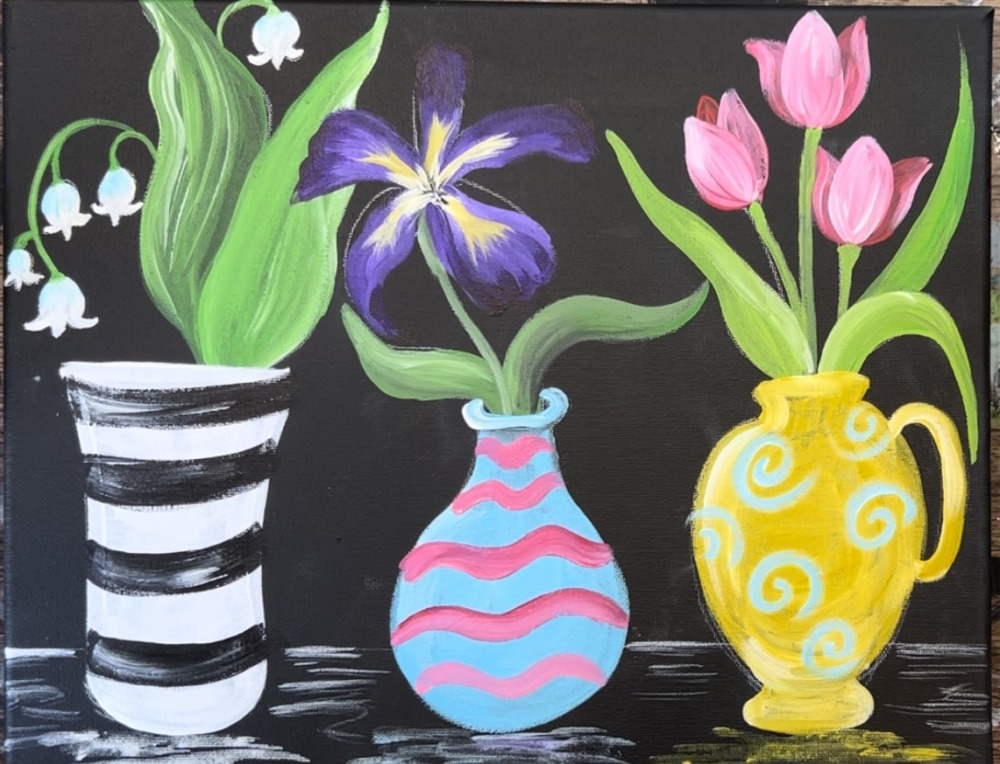
Use the #4 round brush and “light blue permanent” to paint spiral patterns on the vase on the far right.

7. Paint Reflection Under Vases (optional)
The rain and reflection in this painting is an optional detail.
Use the #4 round brush to paint reflections under the vase. Water down each of the colors for the vases to a water color consistency. Paint left and right loose lines under each of the vases. This should show up very thin and translucent.

Additionally, loosely outline the line that is behind the vases (what was drawn with the white chalk pencil earlier).
8. Paint Raindrops (optional)
This is also an optional step! I decided to paint rain and little droplets.
Use the #4 round brush to paint little rain drops falling around the vases.
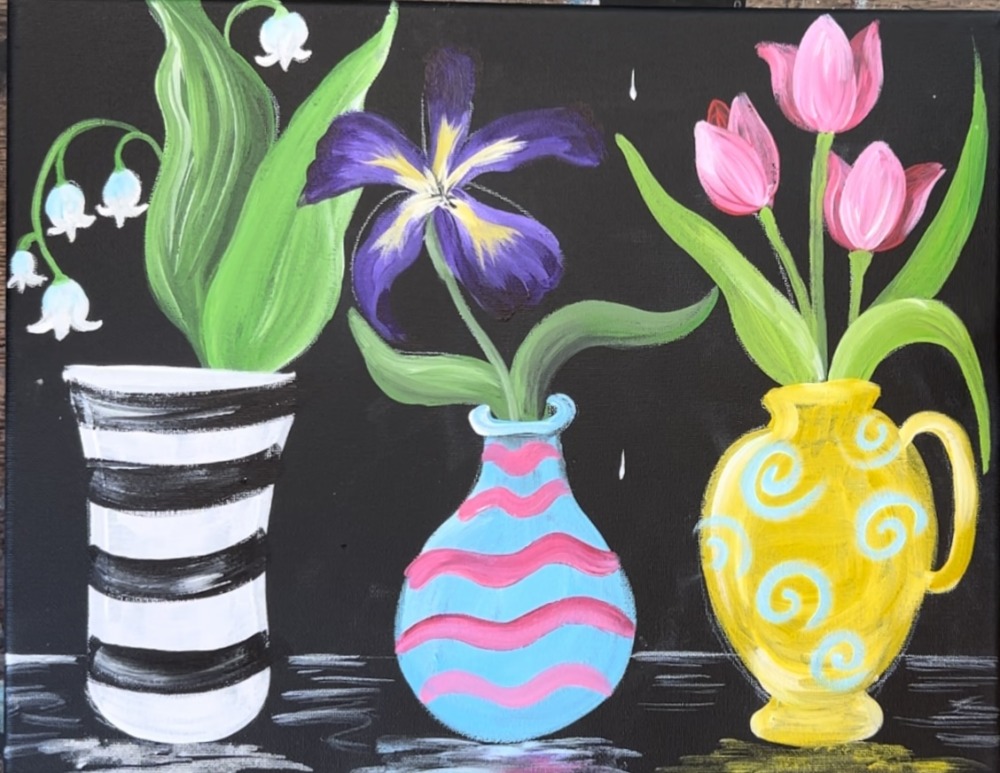
Paint little raindrops falling on the ground as well with ripples.
You can also paint little drops on some of the leaves. Paint a semi-circle shape using solid titanium white.
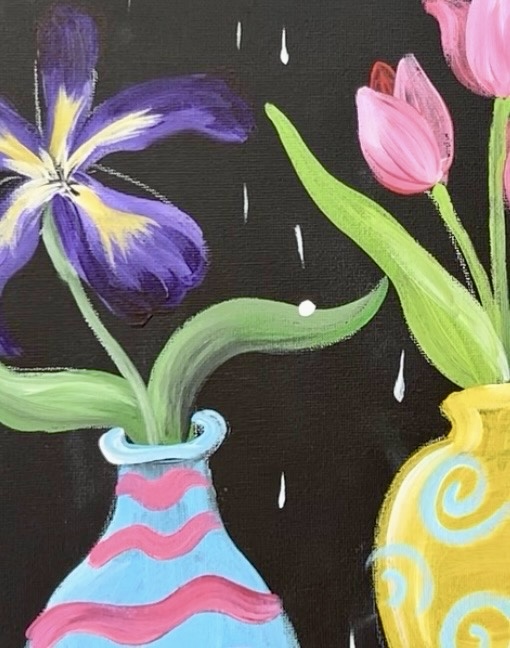
Then use mars black to paint a little line on the bottom of each drop. You can also add a tiny bit of color inside of the rain drop but leave it mostly white.

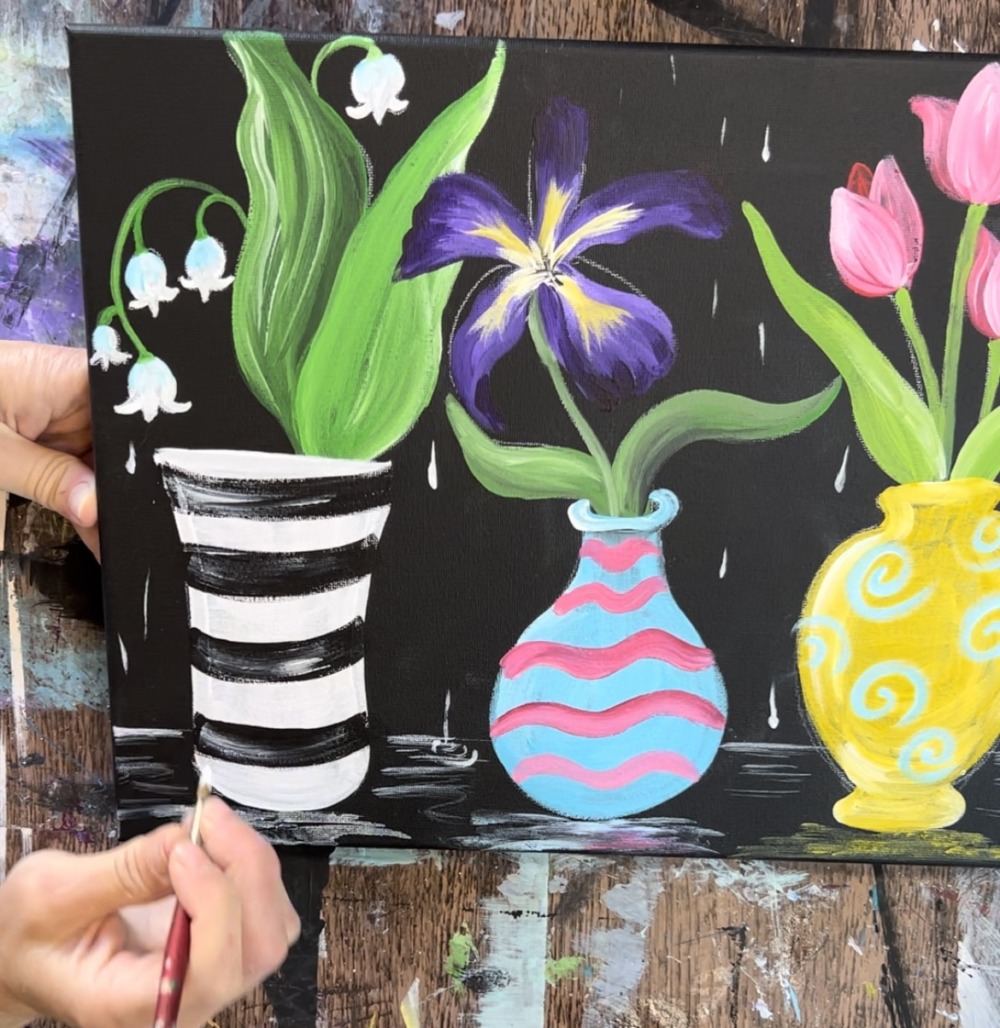
After your painting dries, you can erase any remaining chalk lines with a regular pencil eraser.
Finished!
Awesome! Just finished mine. Yes regular chalk is a “no go” for this one also it’s messy.
The spacing from the leaves of the first one sets the whole picture. I erased ALOT! lol! I loved this 100%! Beautiful in the end! Thank you x1000!