

Would you like to save this?
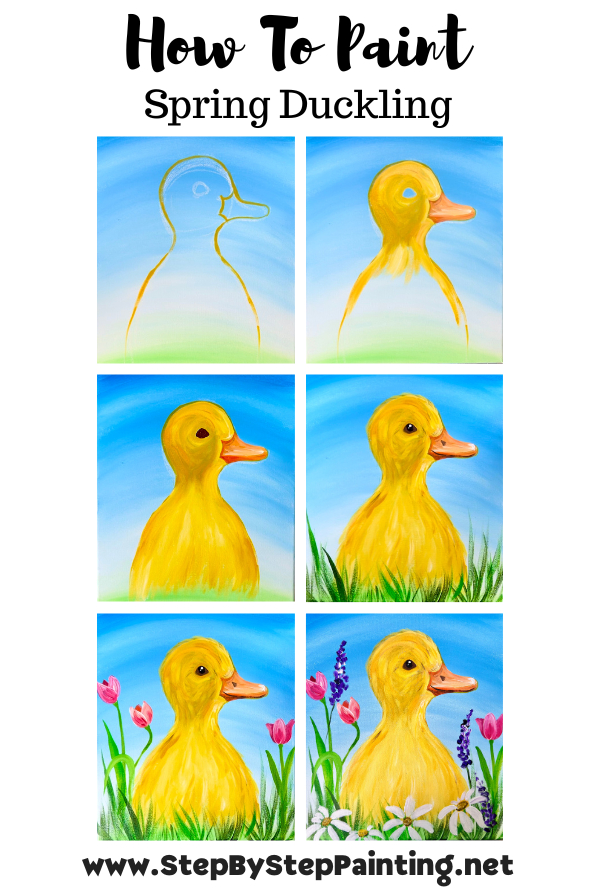
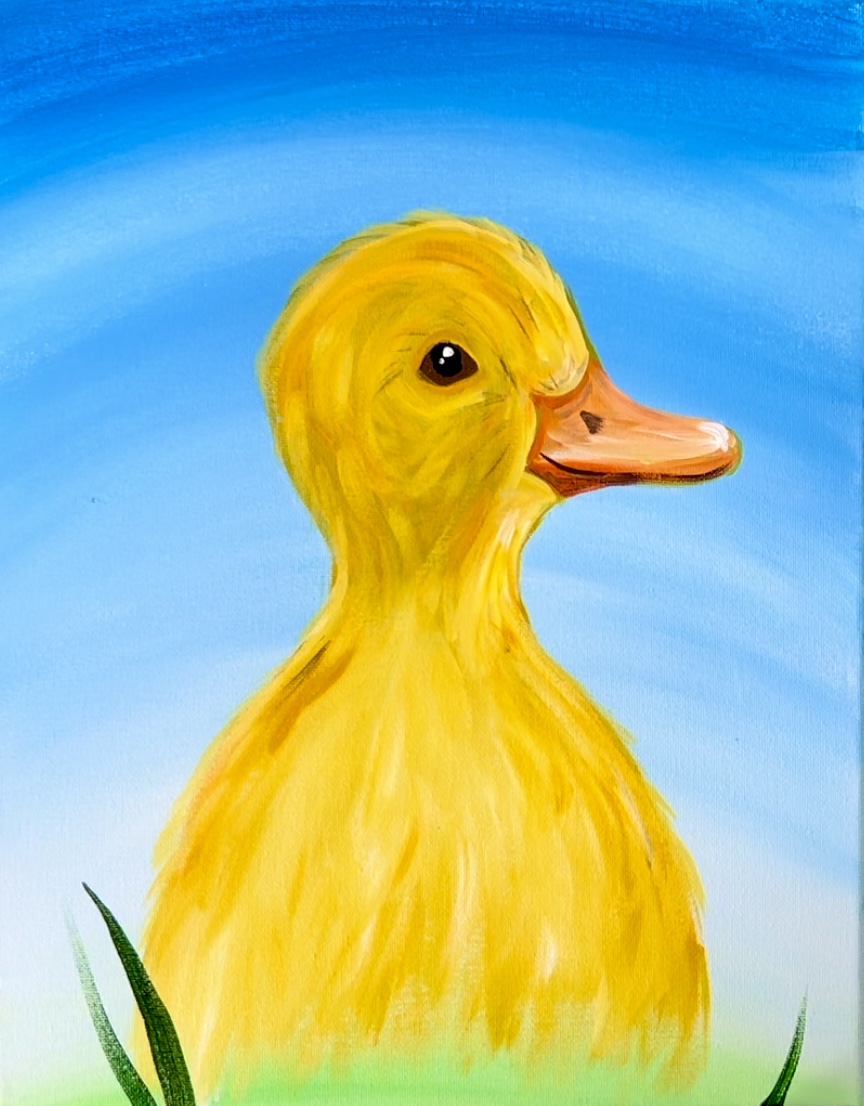
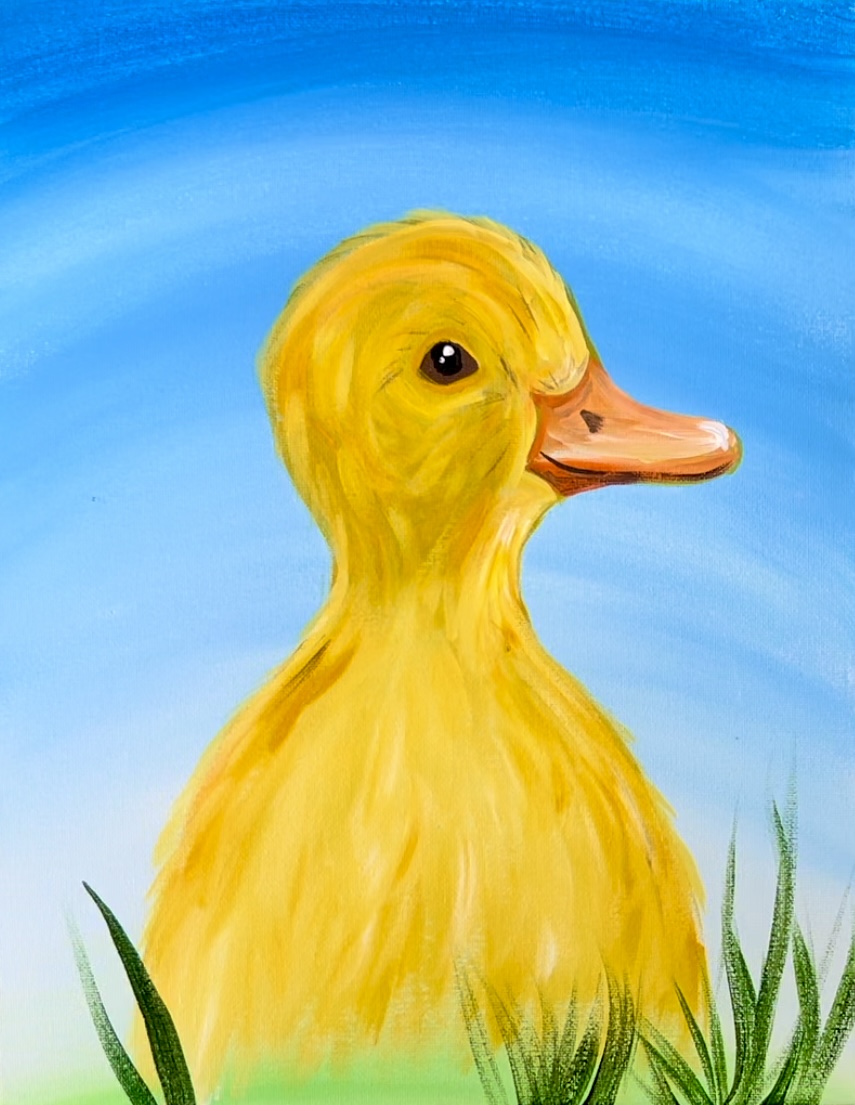
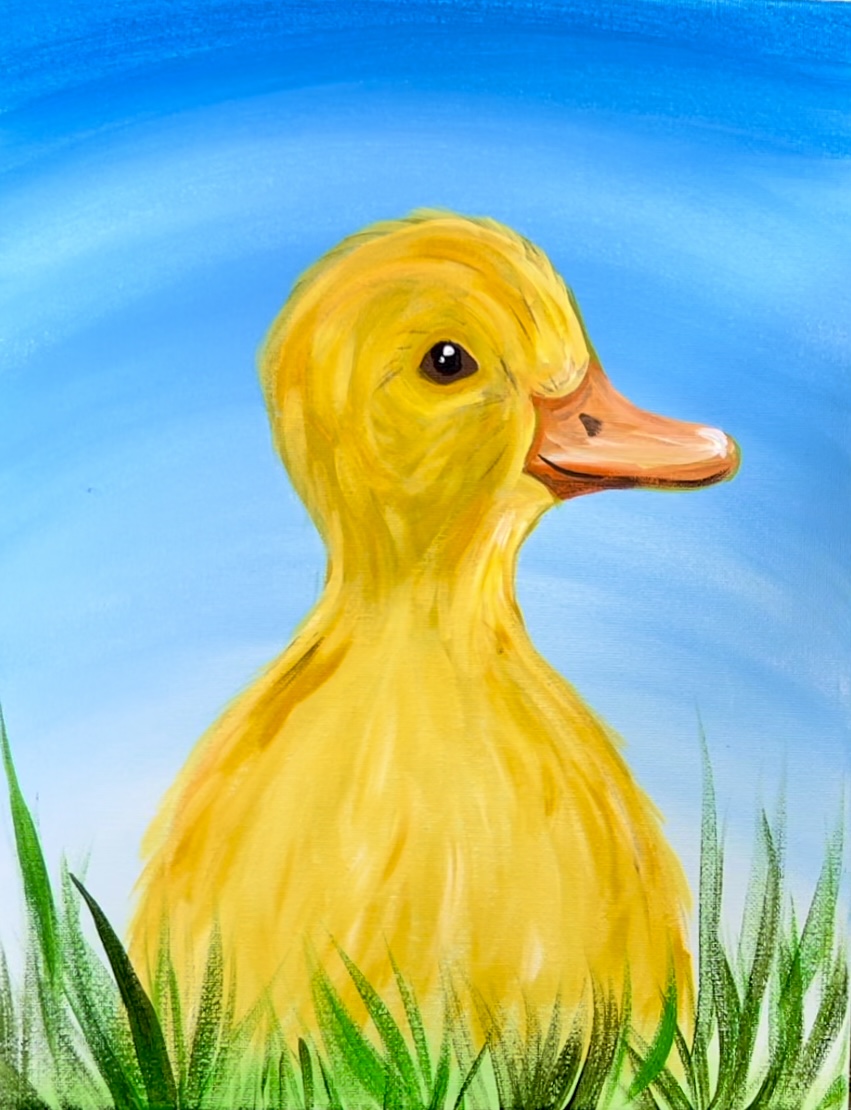
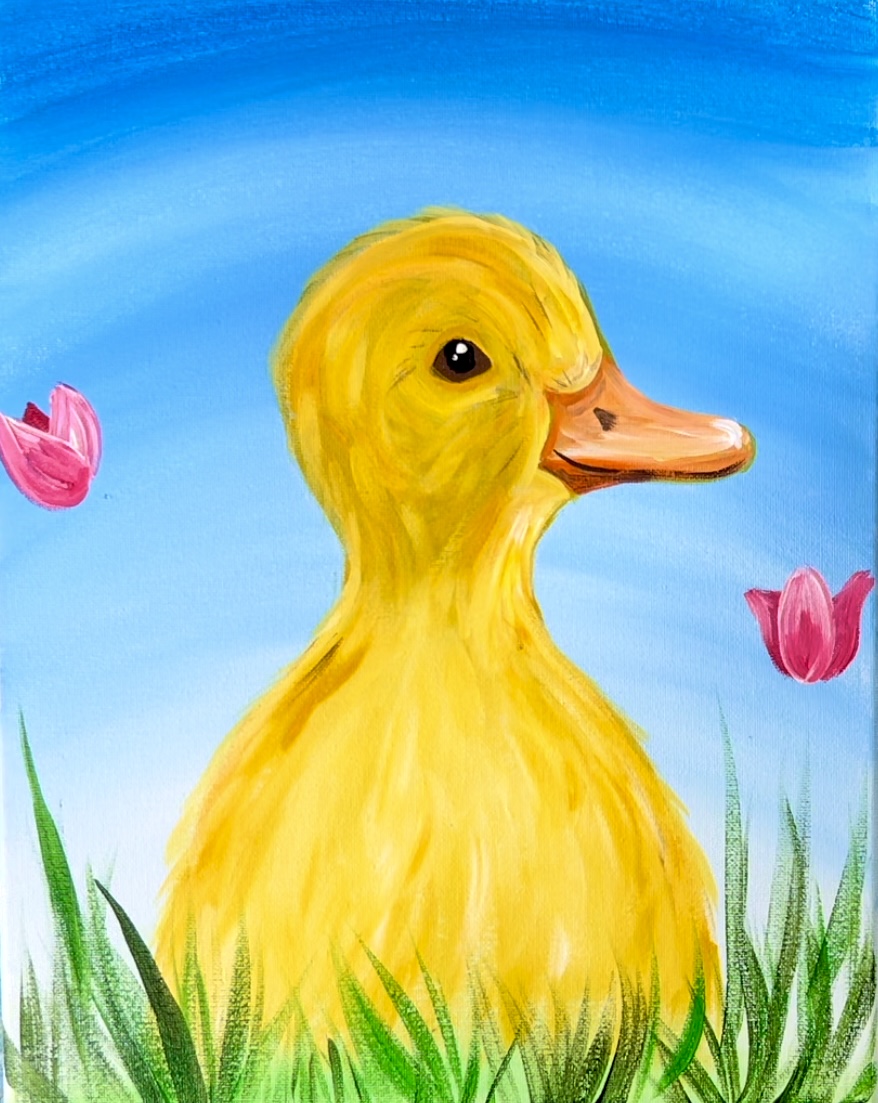
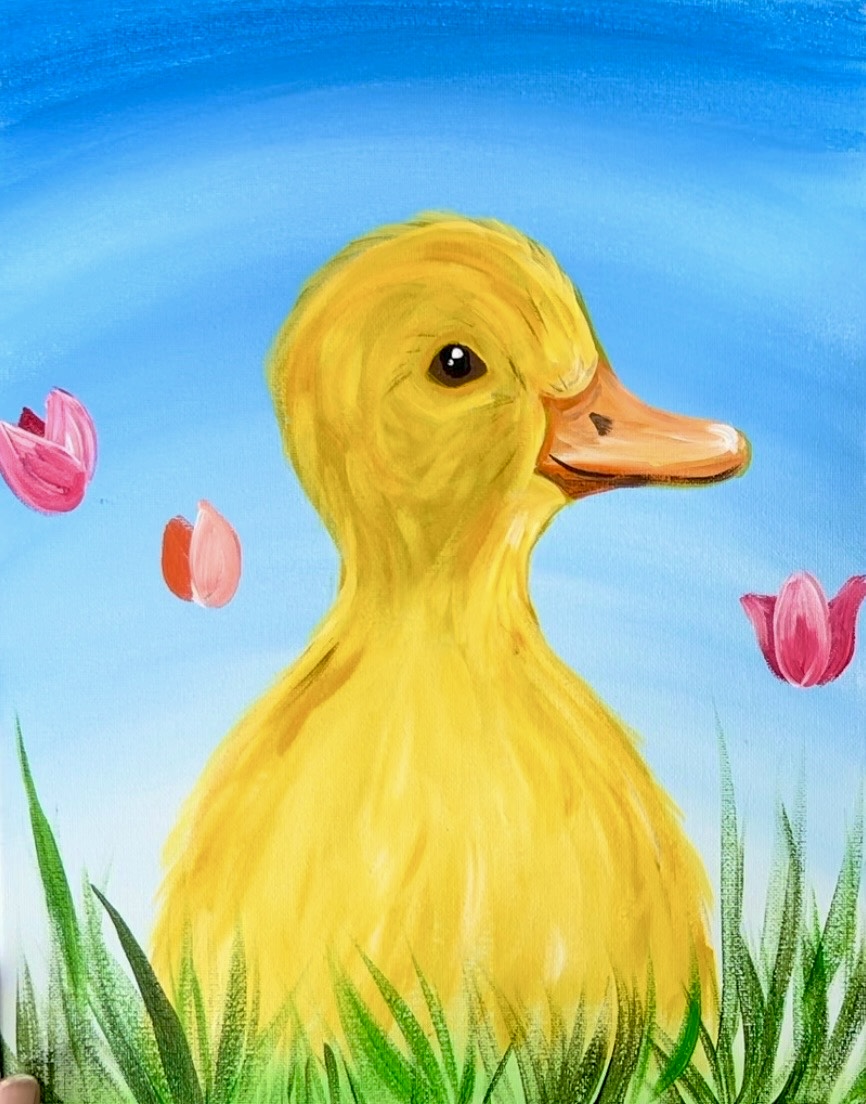
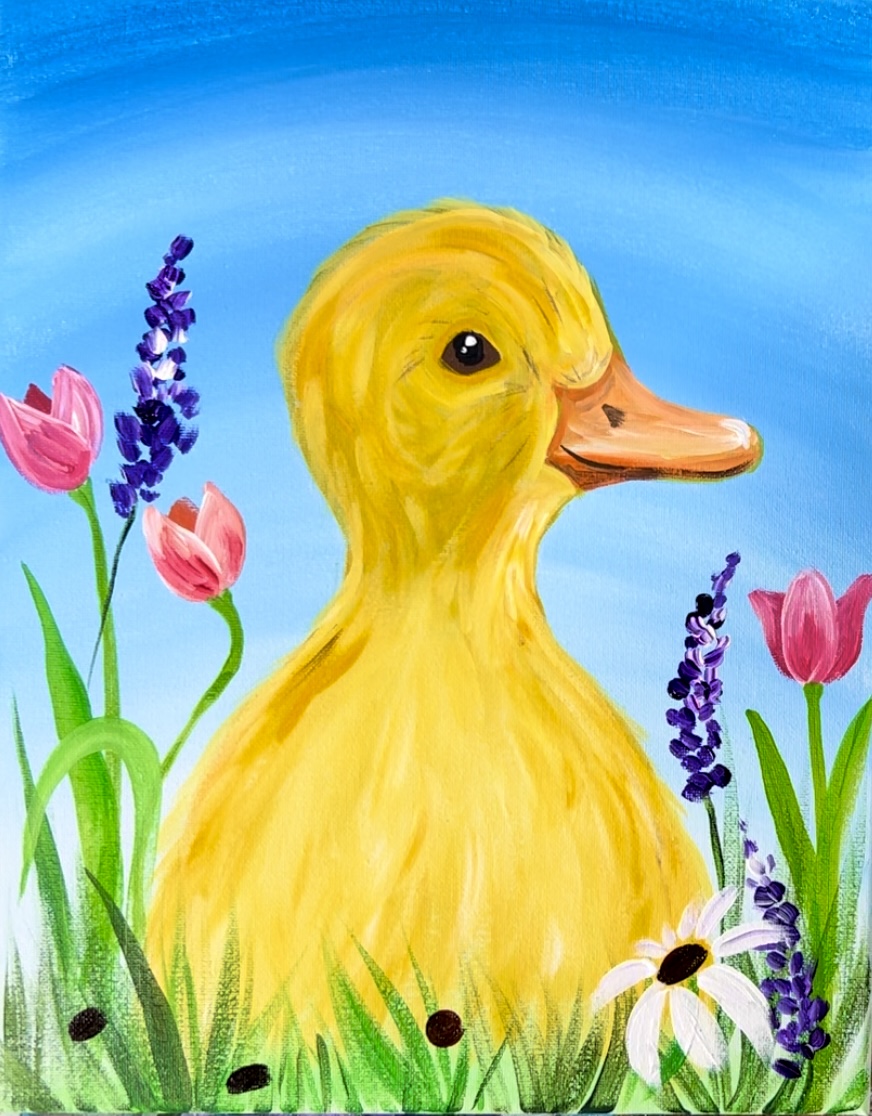
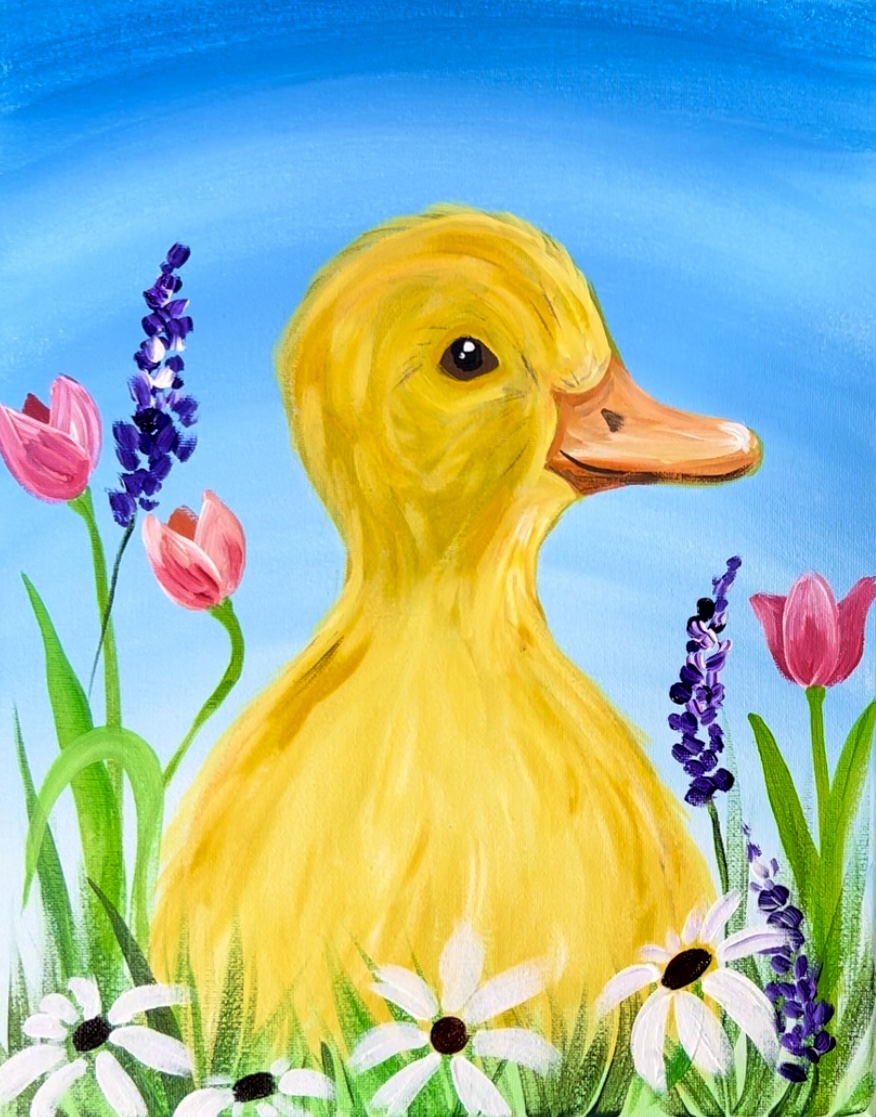
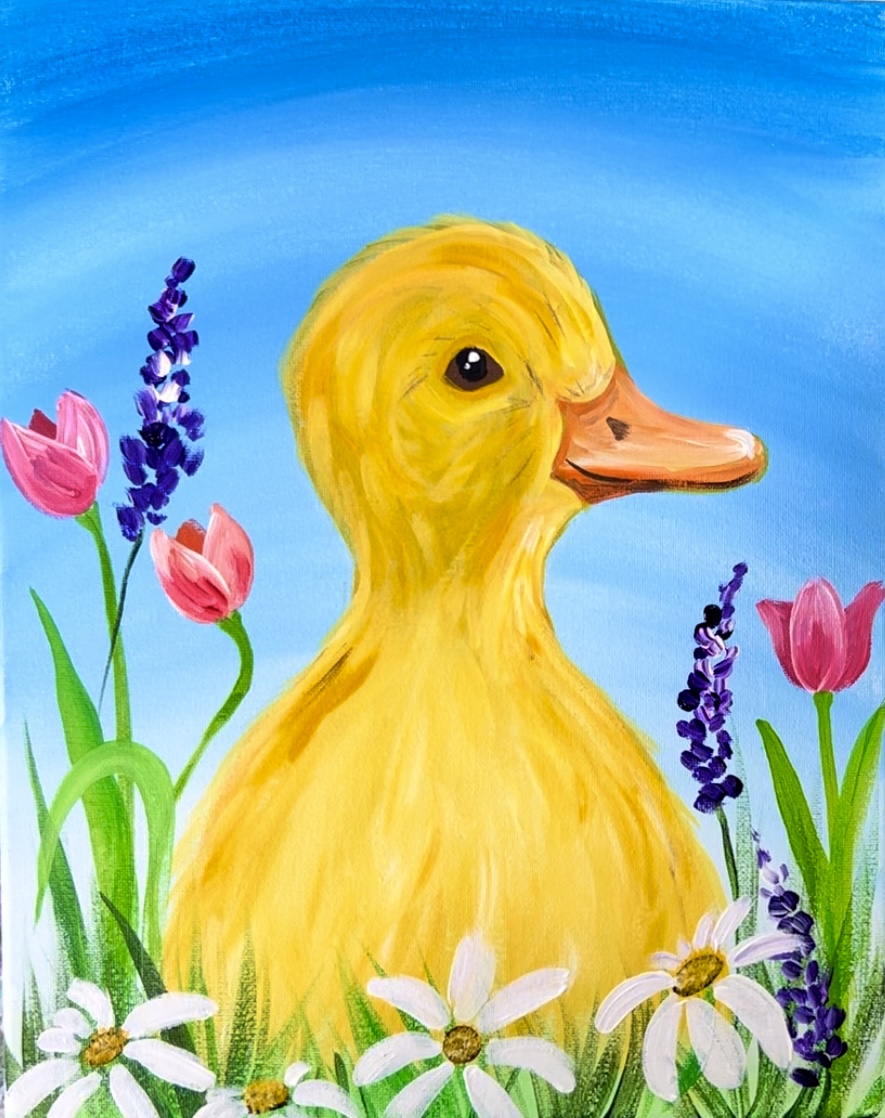
Let’s paint a super cute duckling in a field of Spring flowers! This tutorial will show you how to paint a pretty blue sky background with bright yellow baby duck.
We will also be painting simple flowers around the duckling.
Enjoy and happy painting!
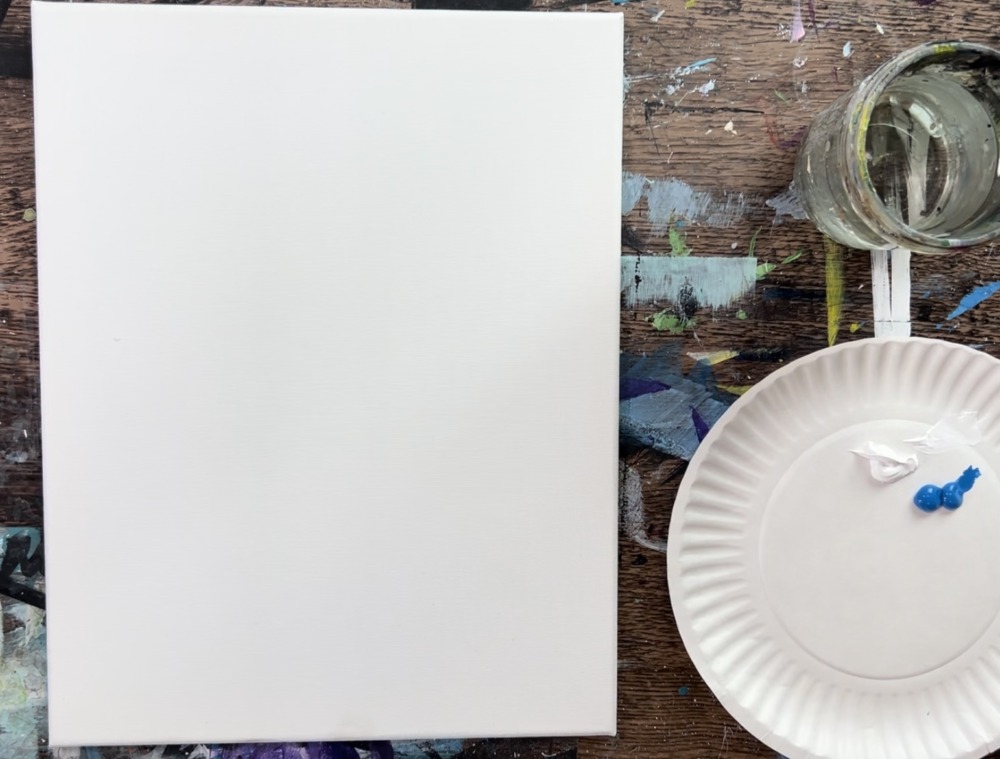
Materials
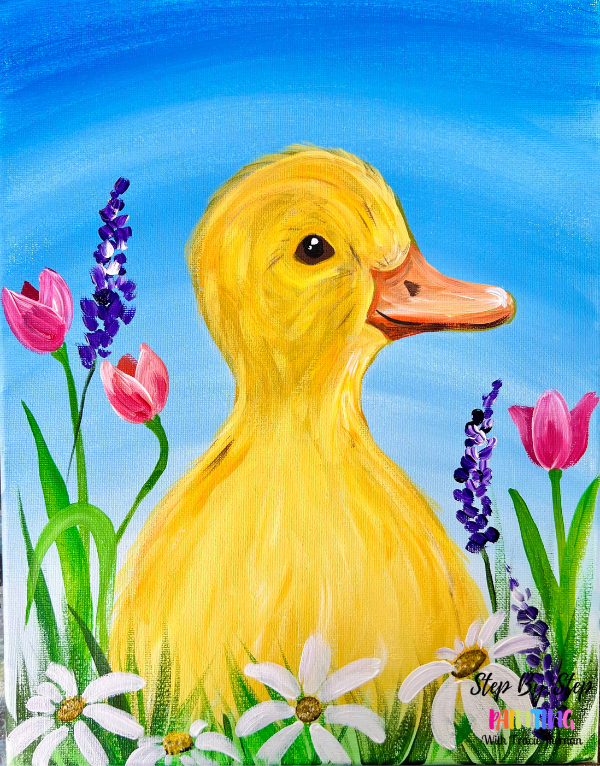
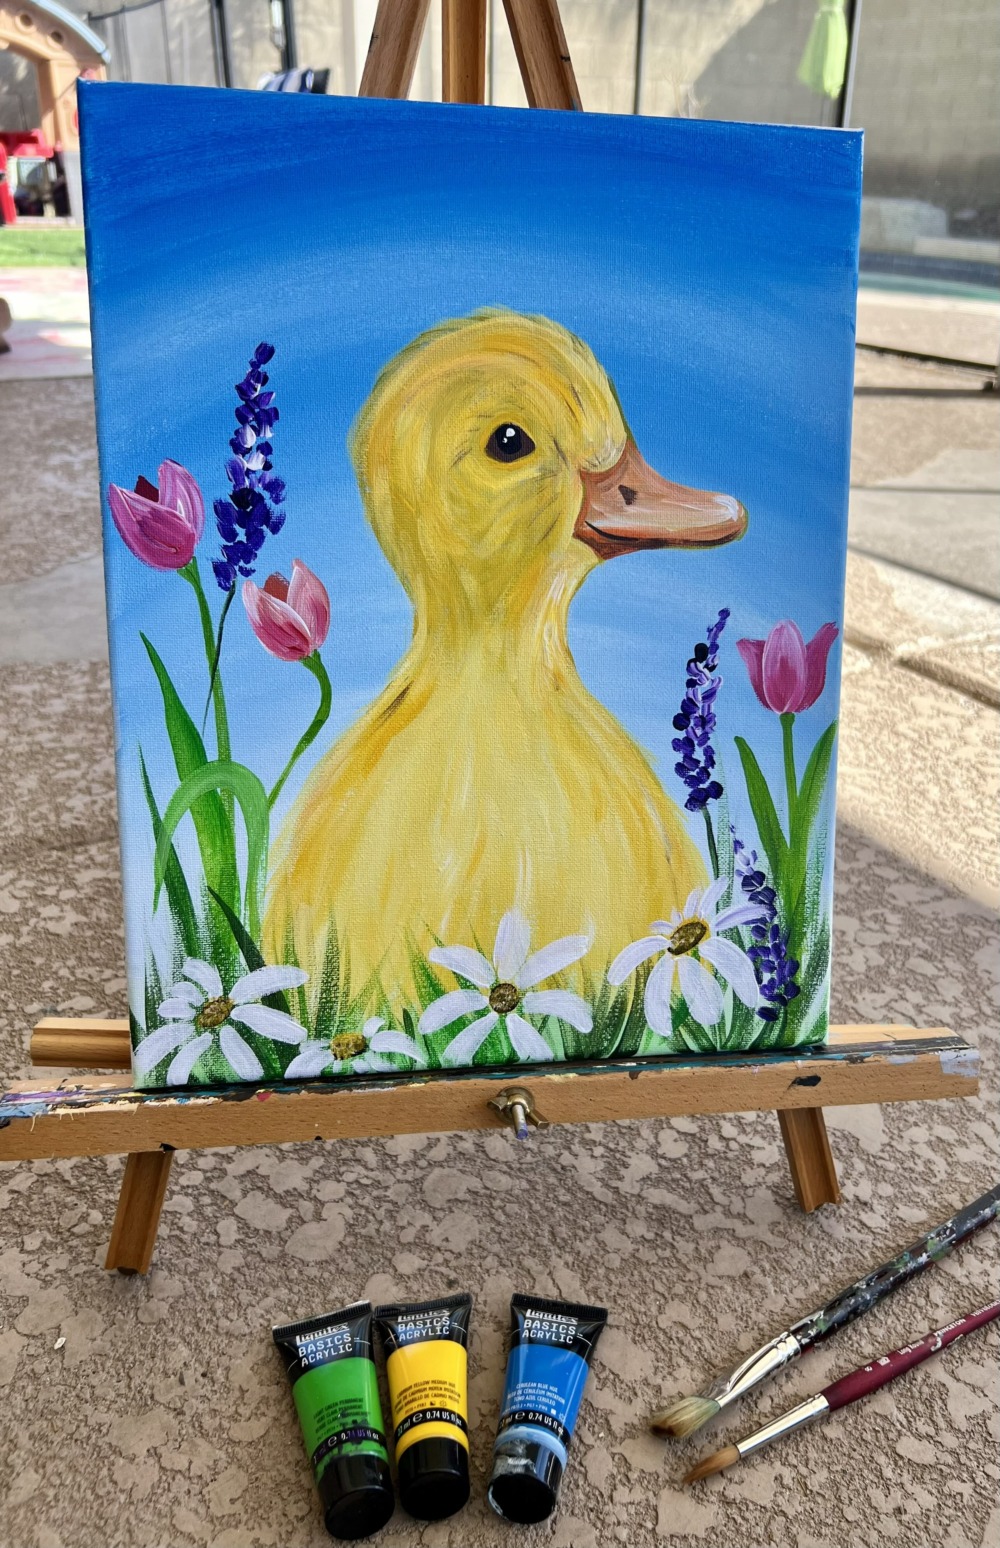
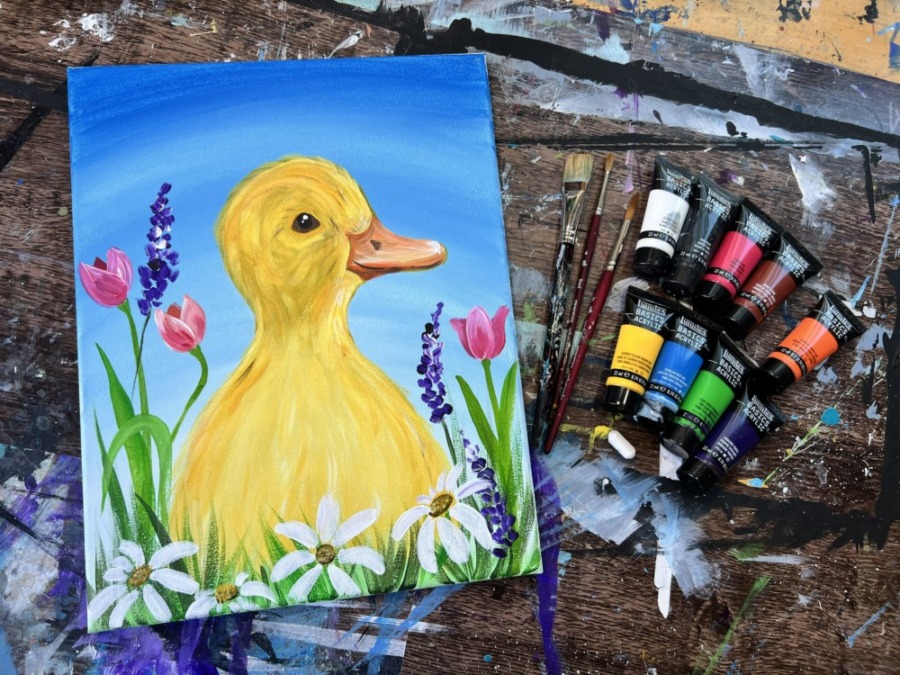
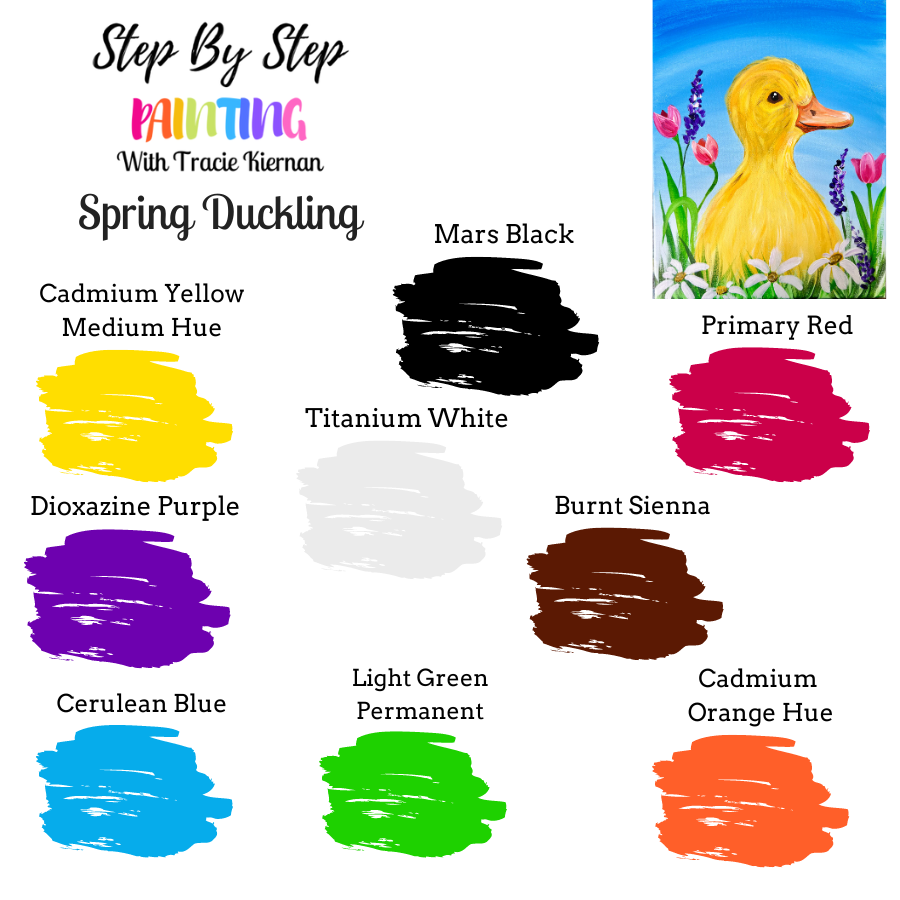
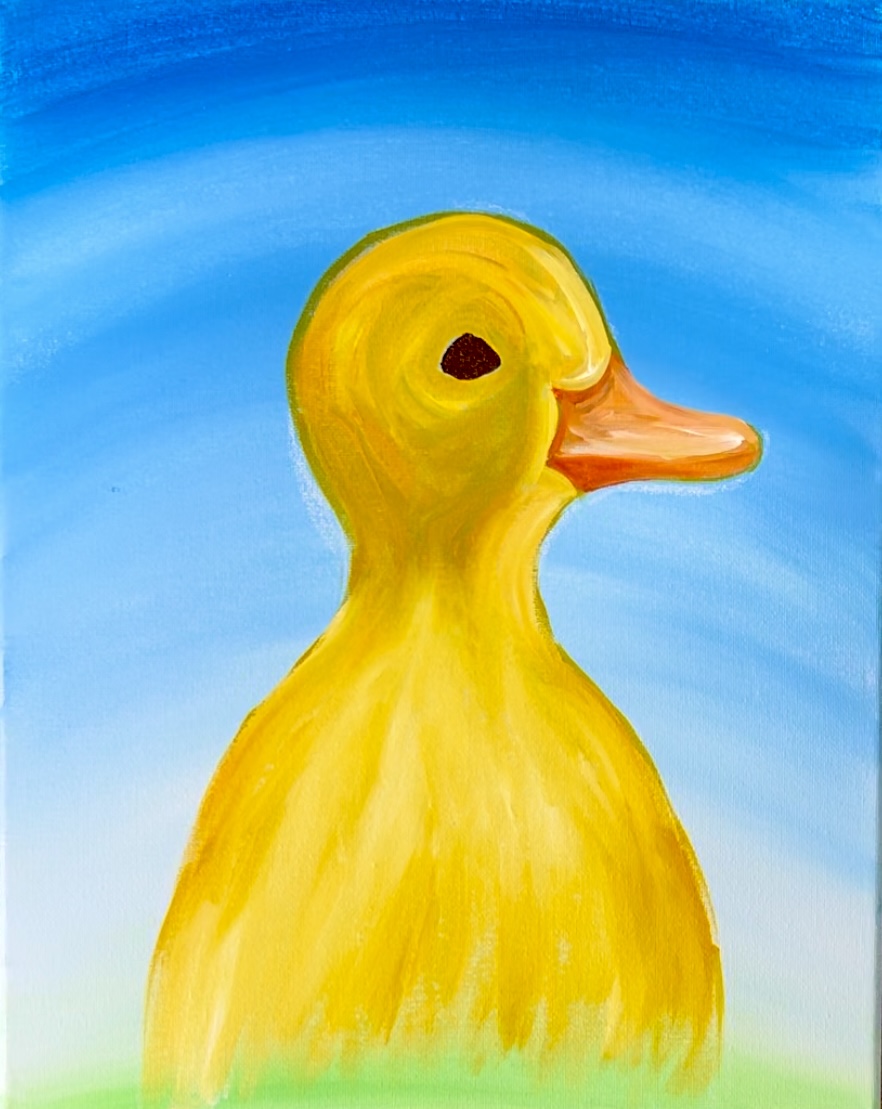
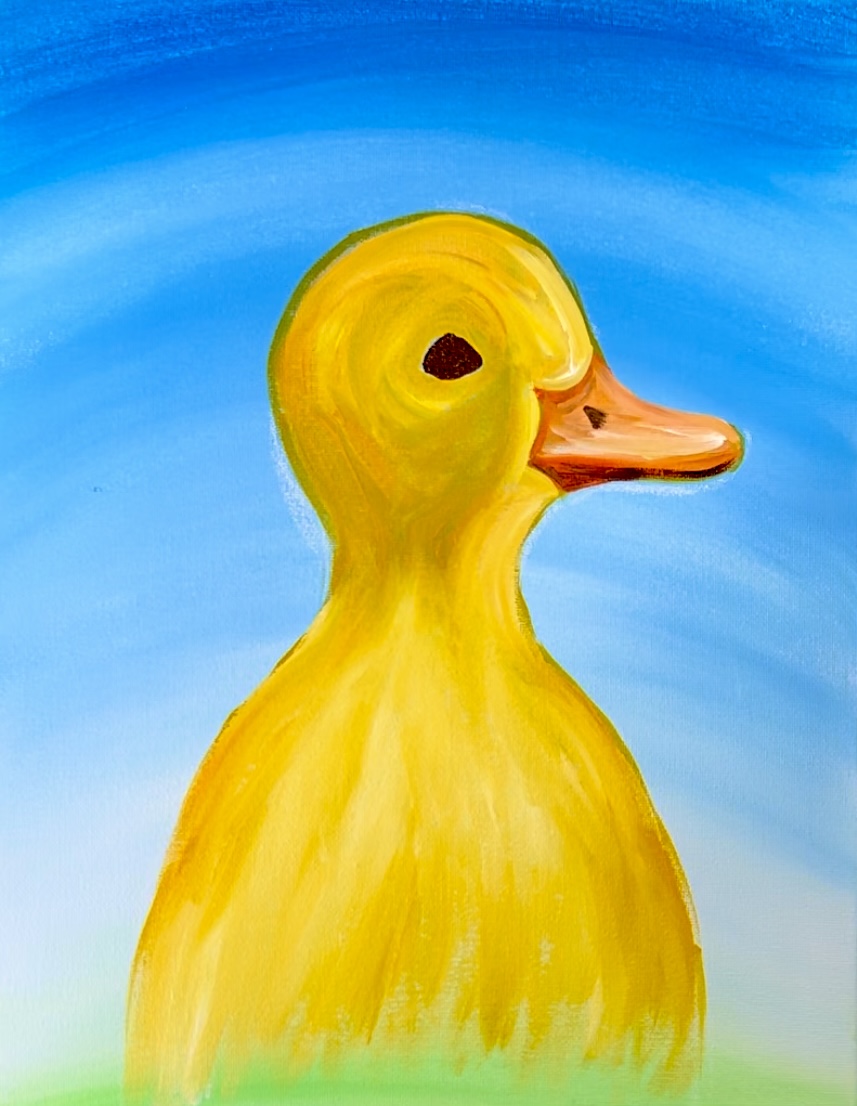
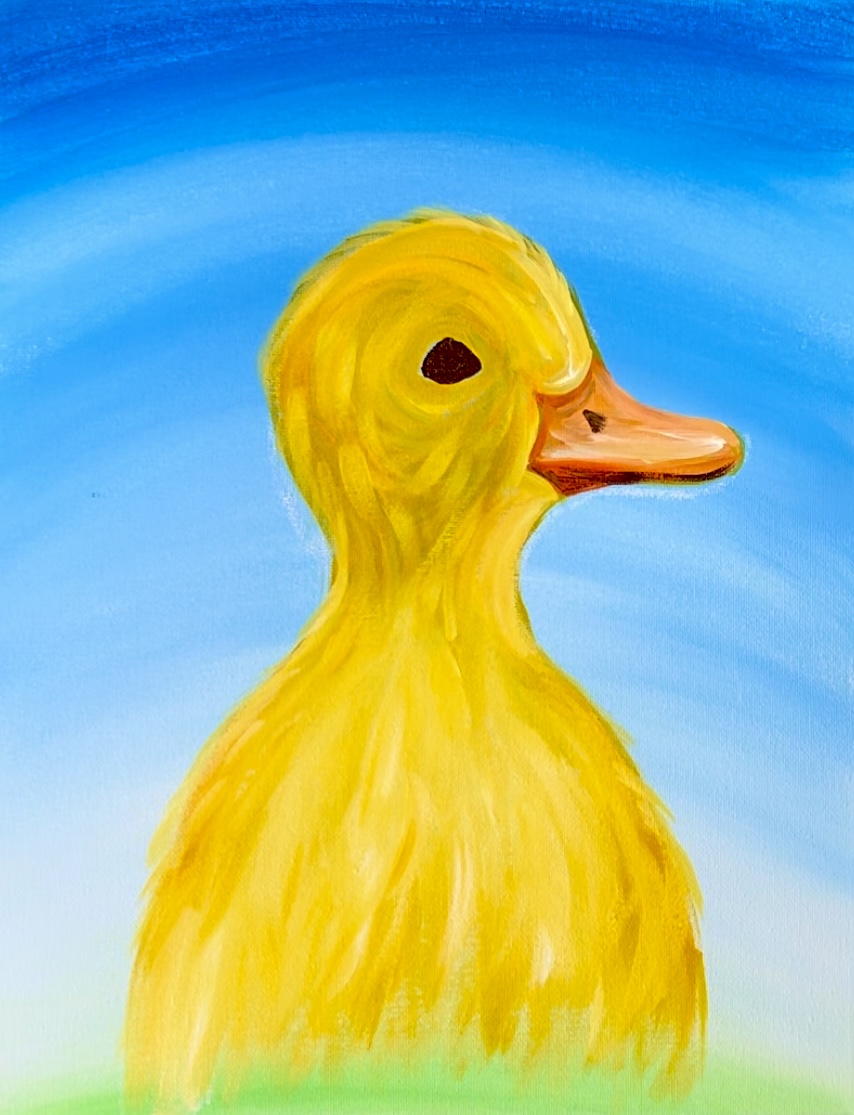
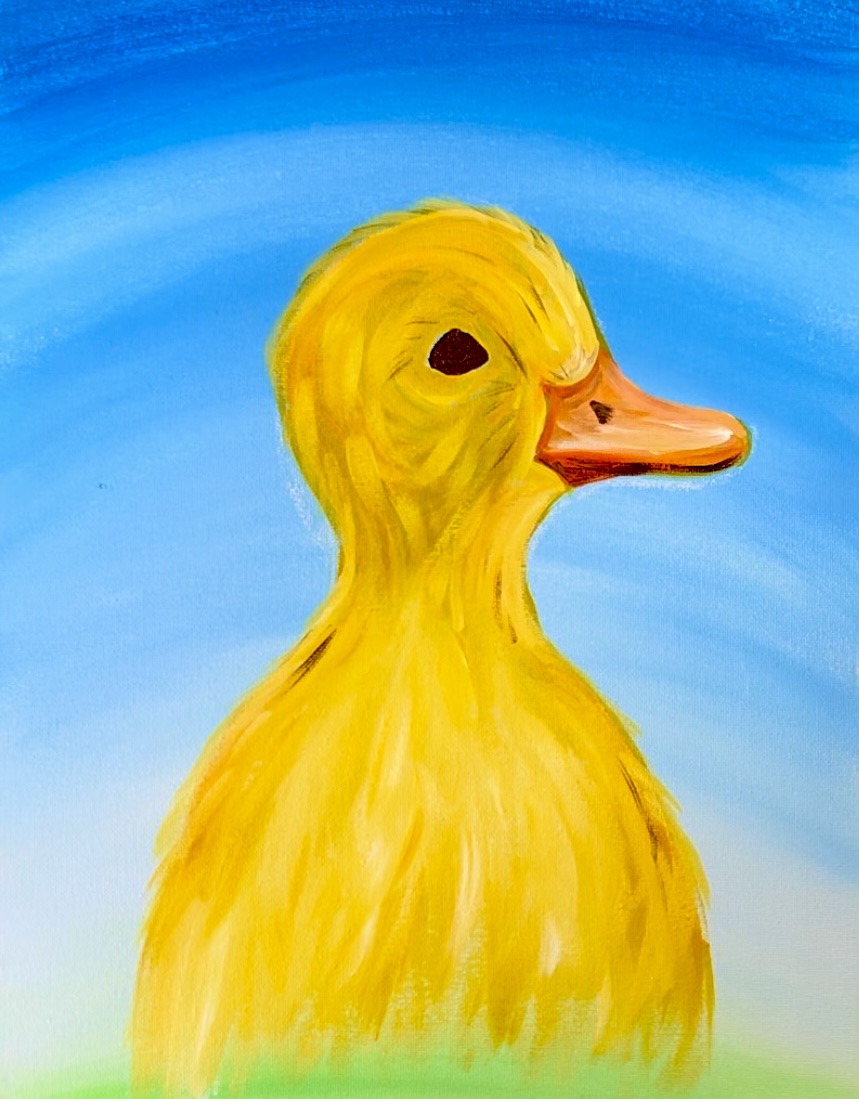
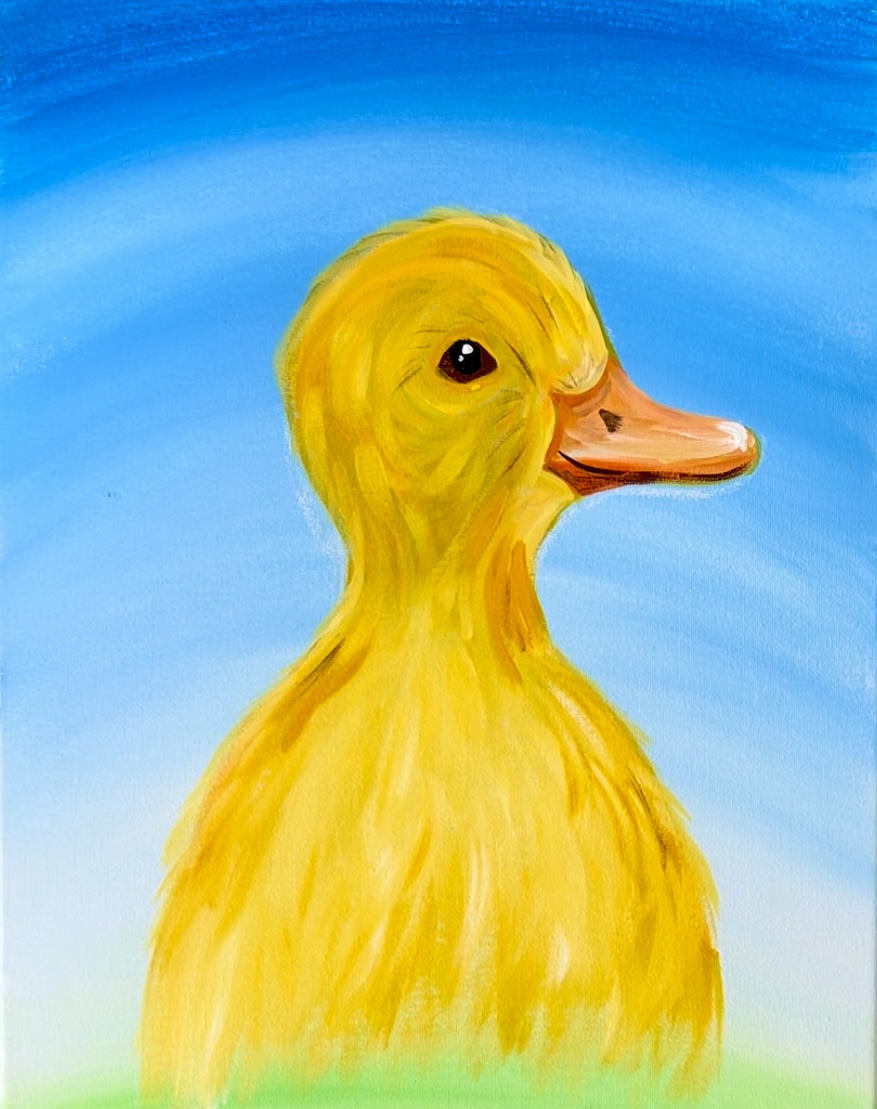
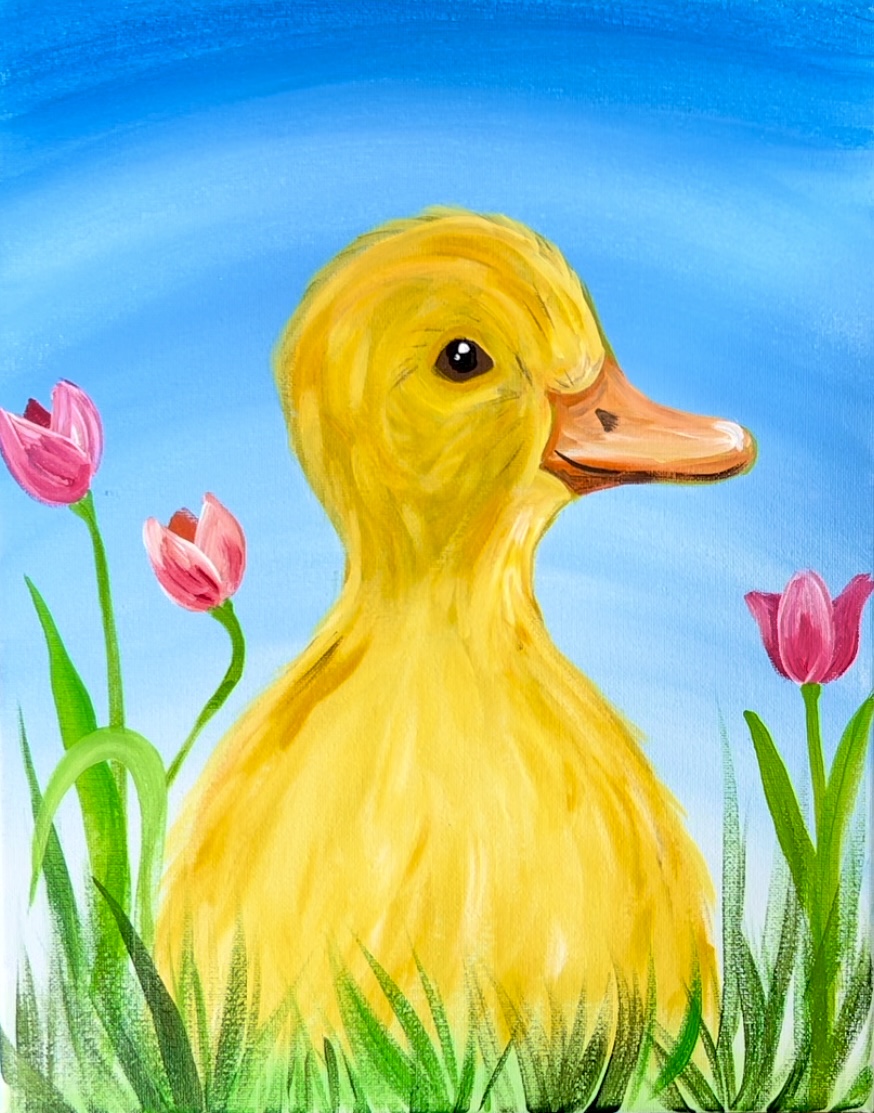
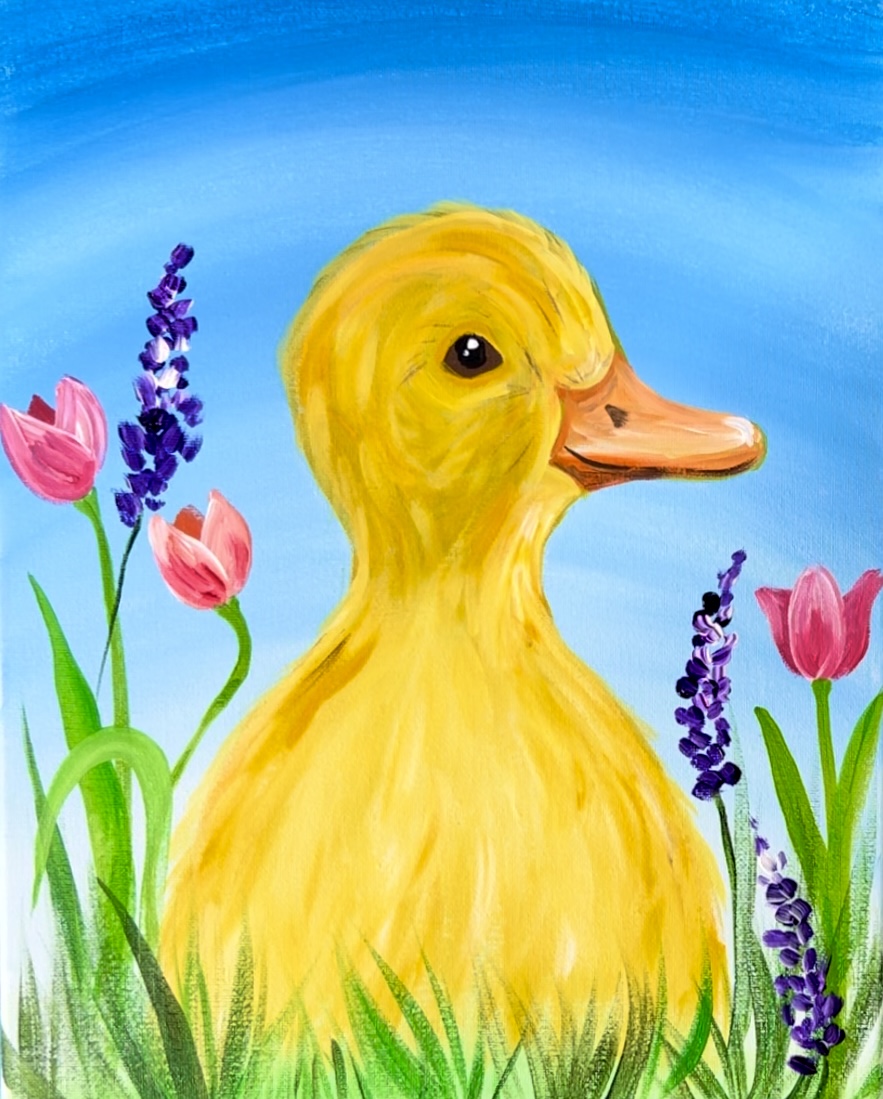
Spring Duckling
Learn to paint a cute yellow duckling surrounded by flowers.
Materials
- 11 x 14 Canvas
- Brushes
- Acrylic Paint
- White Chalk
Colors
- Titanium White
- Mars Black
- Cerulean Blue
- Dioxazine Purple
- Primary Red
- Light Green Permanent
- Burnt Sienna
- Cadmium Orange Hue
- Cadmium Yellow Hue
Brushes
- #8 Round Brush
- #4 Round Brush
- 3/4" Flat Wash Brush
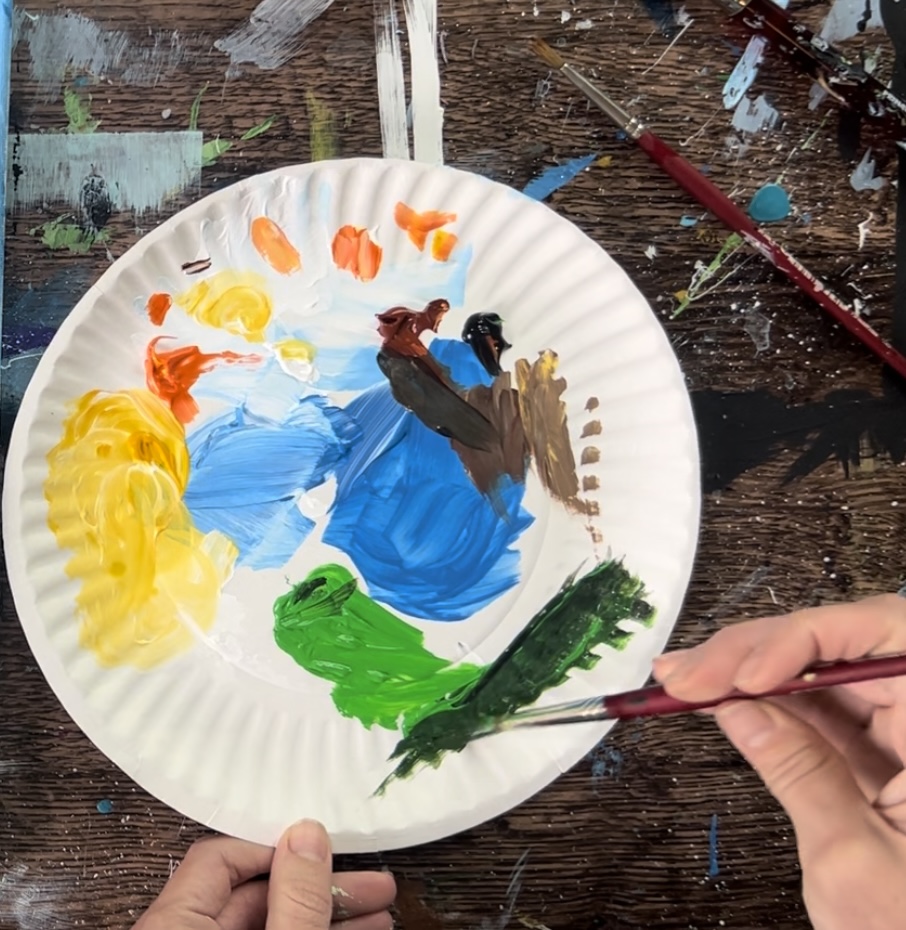
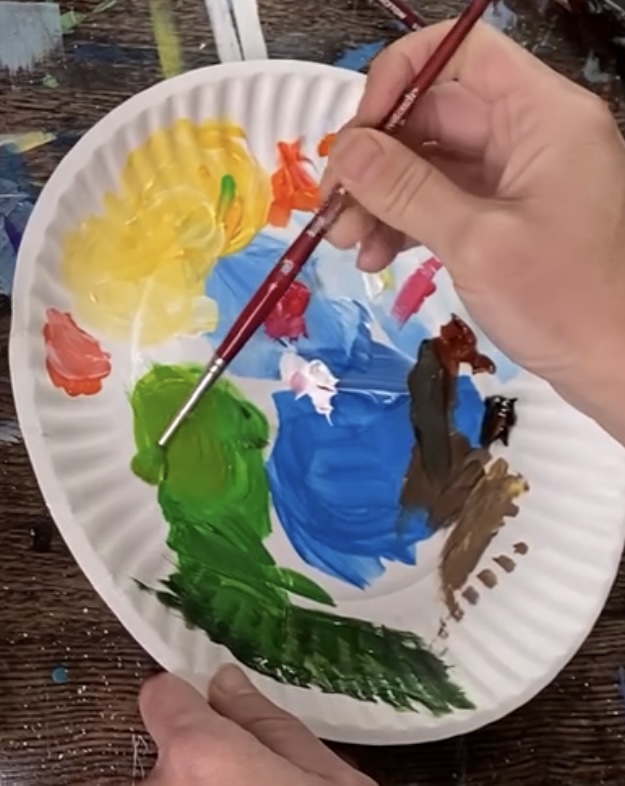
Color Palette
Using craft paints?
If you are using craft paints such as Apple Barrel Craft Paints, I would recommend subbing to:
- Snow White
- Jet Black
- Yellow
- Candy Pink
- Brown Oxide
- Grape Jam
- Parakeet
- Regency Blue
- Harvest Orange
Directions At A Glance
Video
Step By Step Instructions
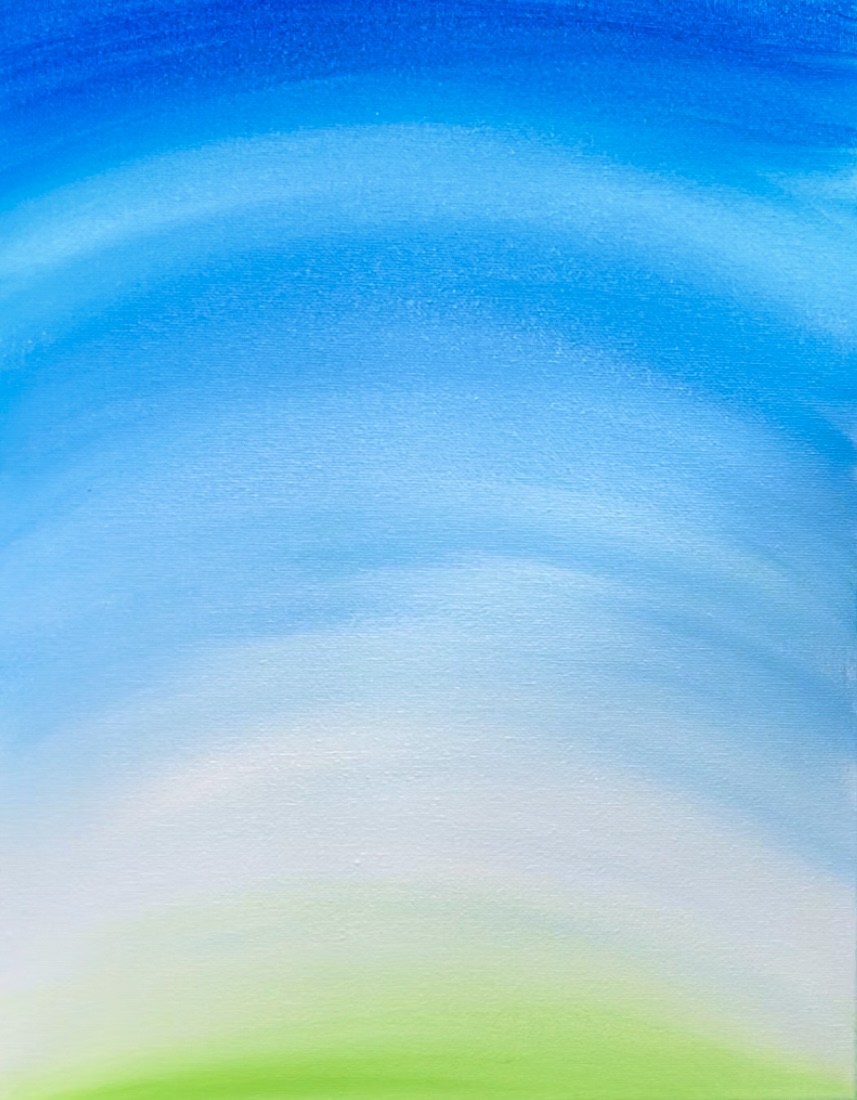
1. Paint the background
Load your paint palette with the two colors: titanium white and cerulean blue.
Load your “3/4″ flat brush” into the cerulean blue. Start at the top of the canvas (your canvas in vertical mode) and paint left and right paint strokes that go in an arch from one side of the canvas to the next.

Go down about 3″. Then load your brush into “titanium white” without rinsing the brush. Start below the blue and blend the white into the blue to create a lighter blue. The goal with this background is to create a subtle gradient of darker blue at the top to light/ almost white on the bottom.
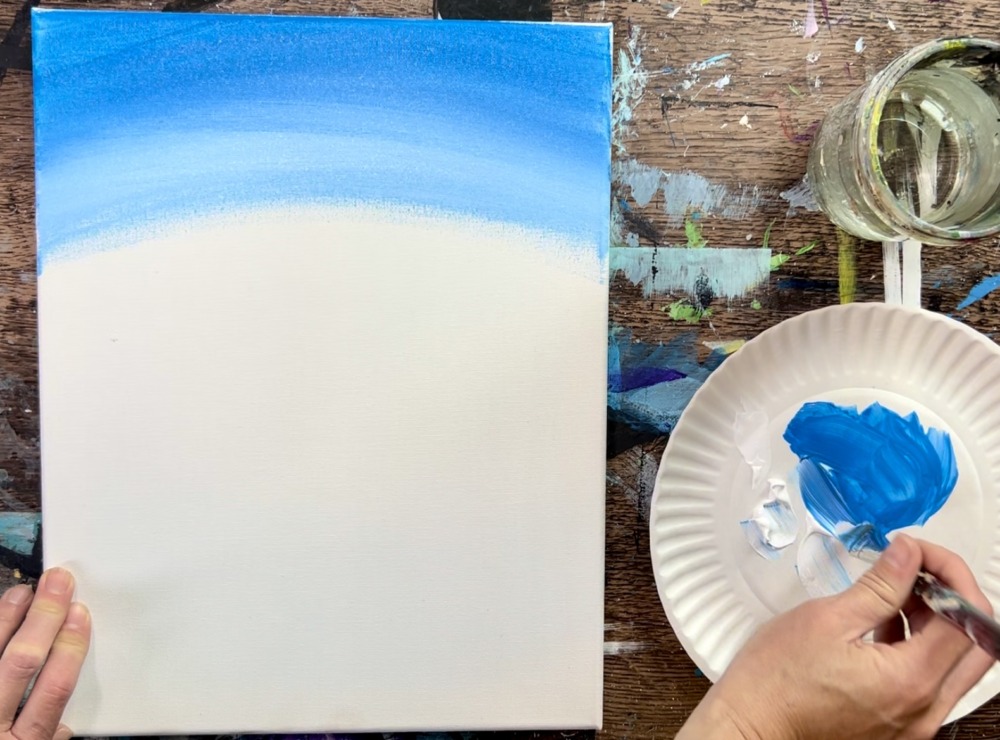
Continue to blend more white and paint in an arch direction al the way to the bottom of the canvas.
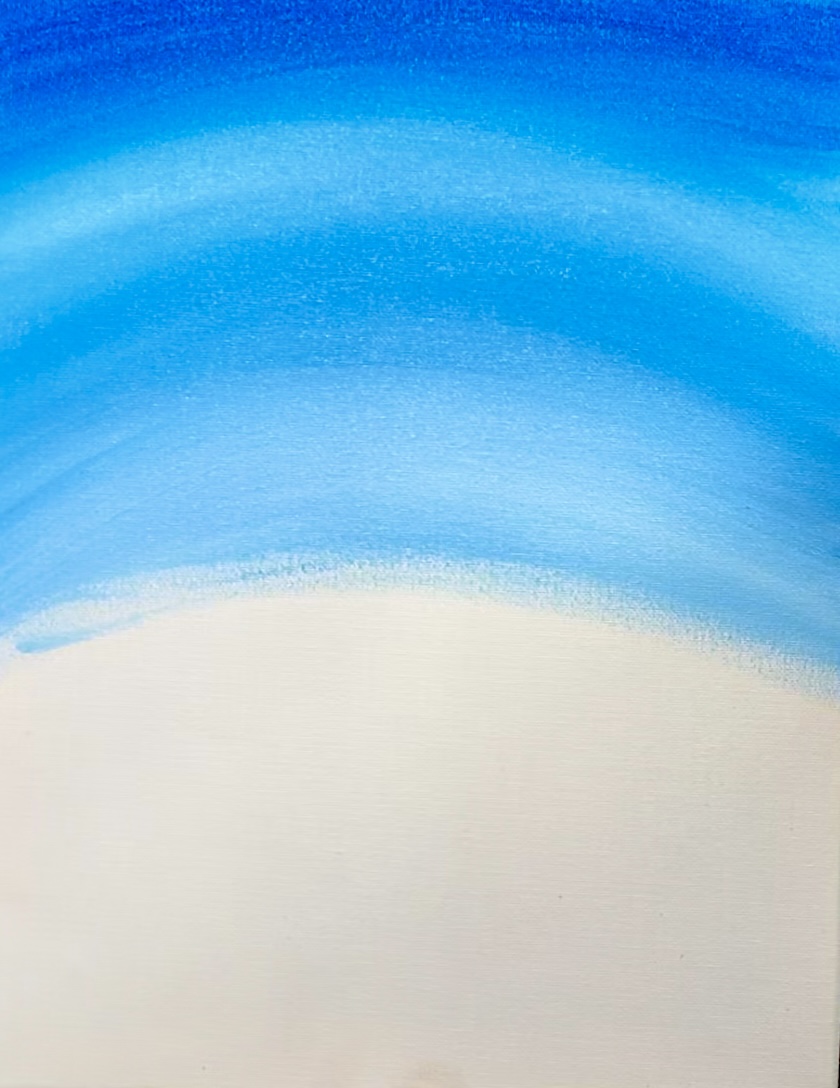
Keep adding more white to the brush. If the paint seems thick and not spreading well, you can add a little water to your brush.
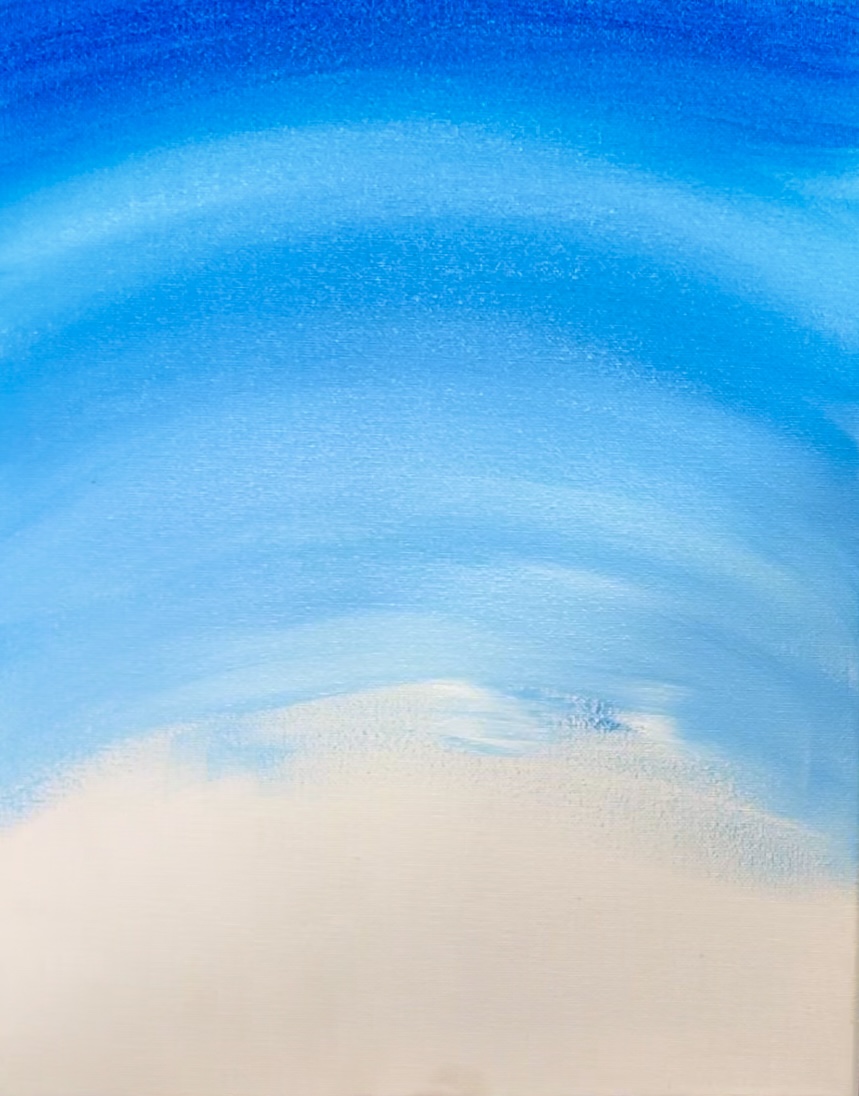
As you get to the bottom of the canvas, allow the paint to become almost a pure white.
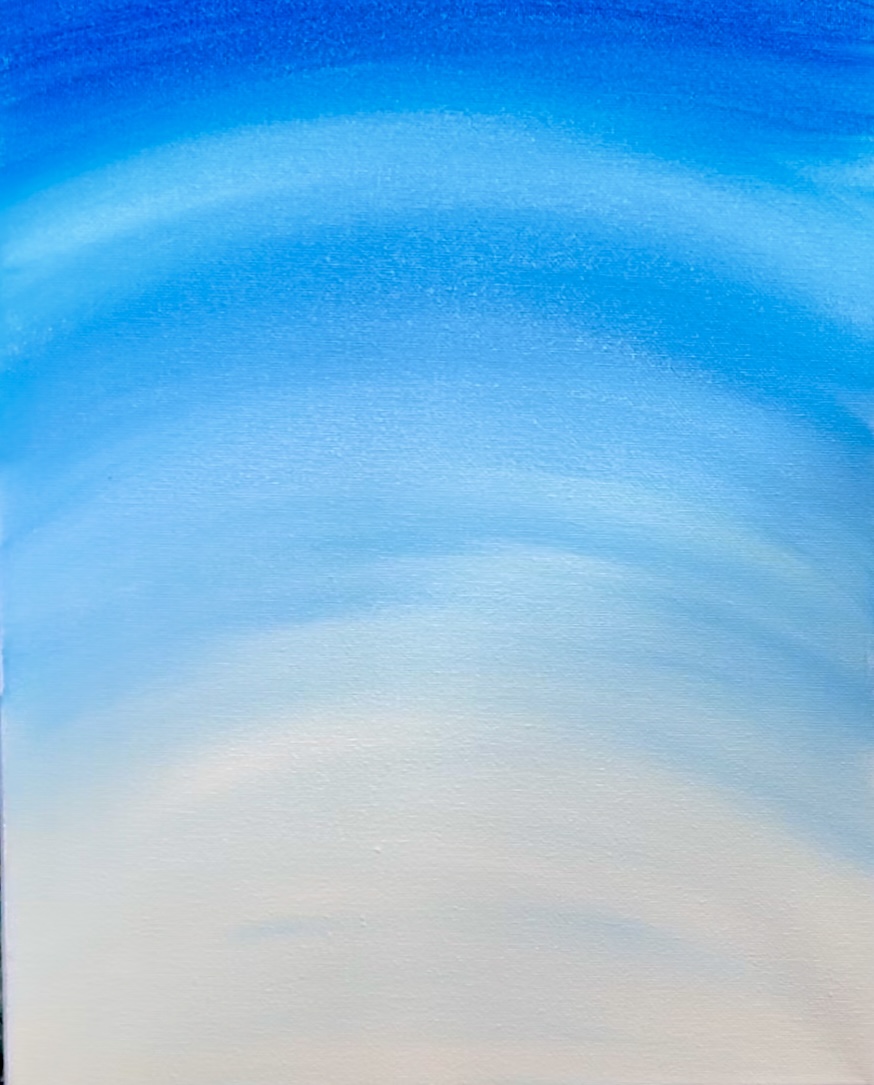
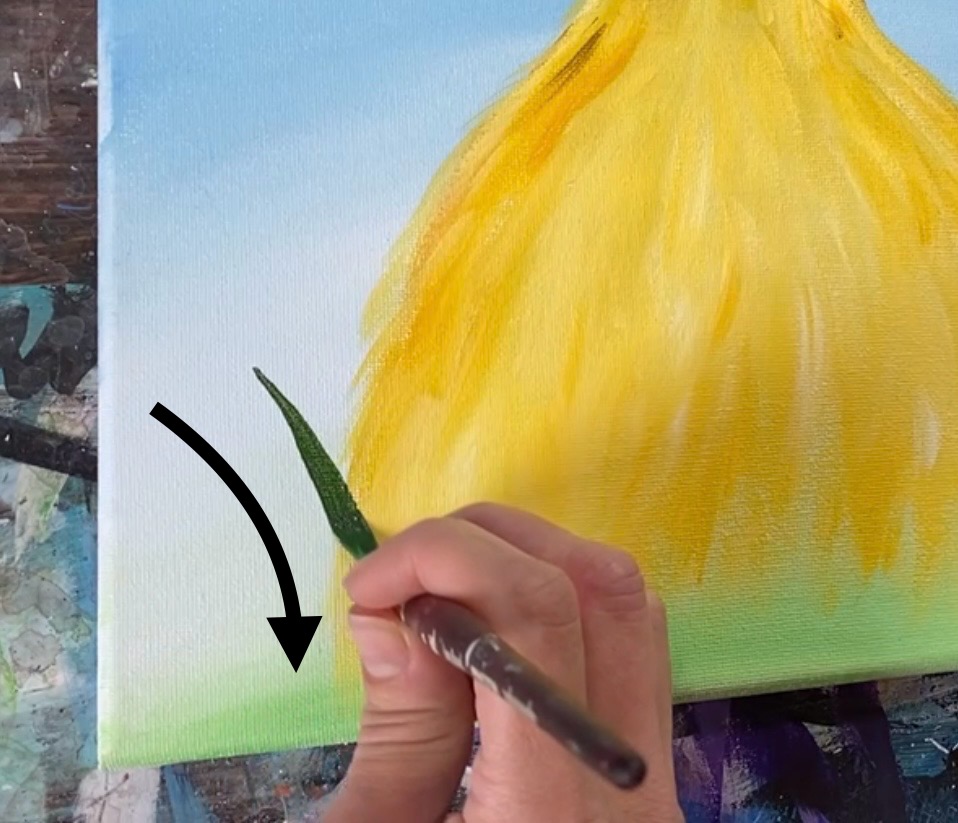
Then either rinse or wipe the blue/ white off of your brush. Then load your paint palette with the color “light green permanent”. Gently blend a little bit of this green on the bottom of the canvas and blend it up. This little bit of green at the bottom will be the base for the grass area around the duckling.
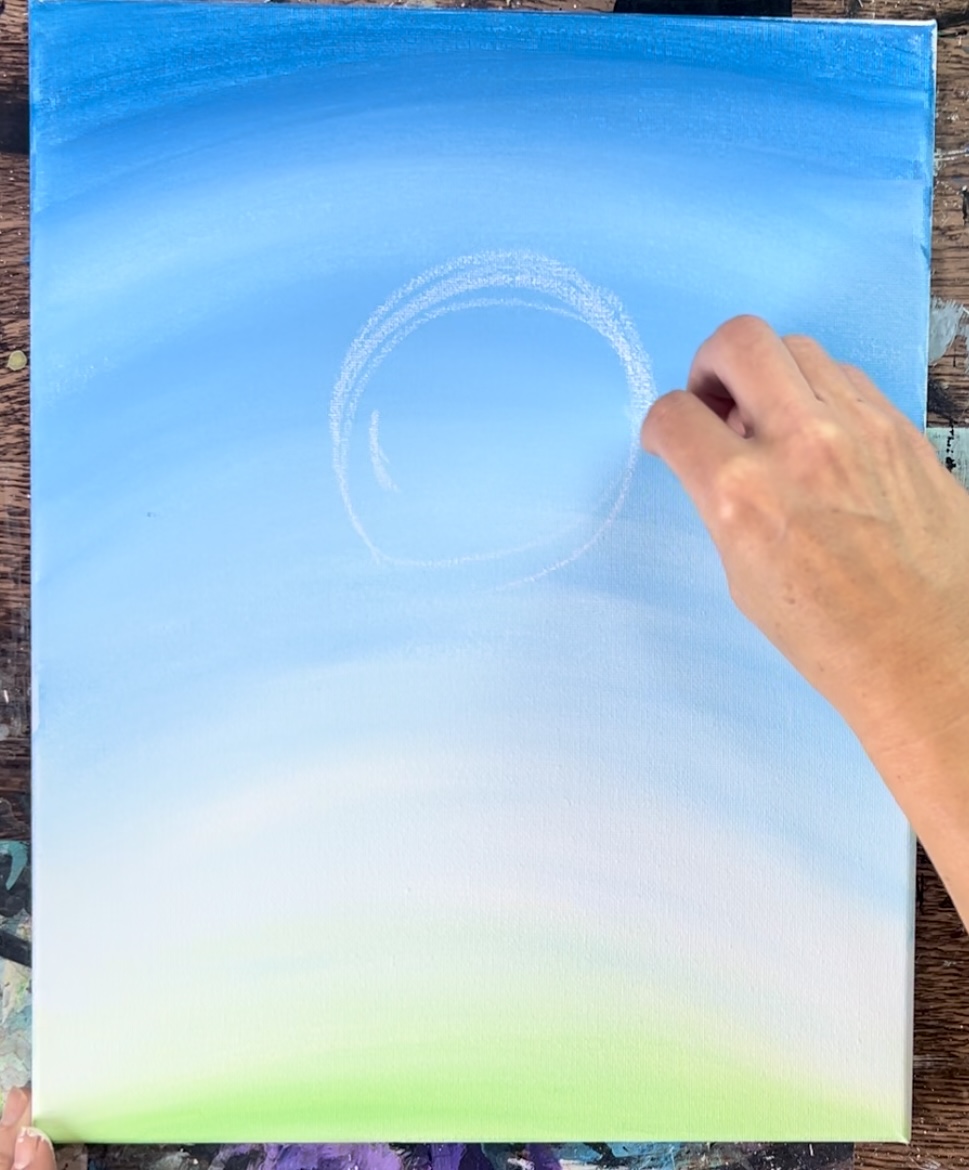
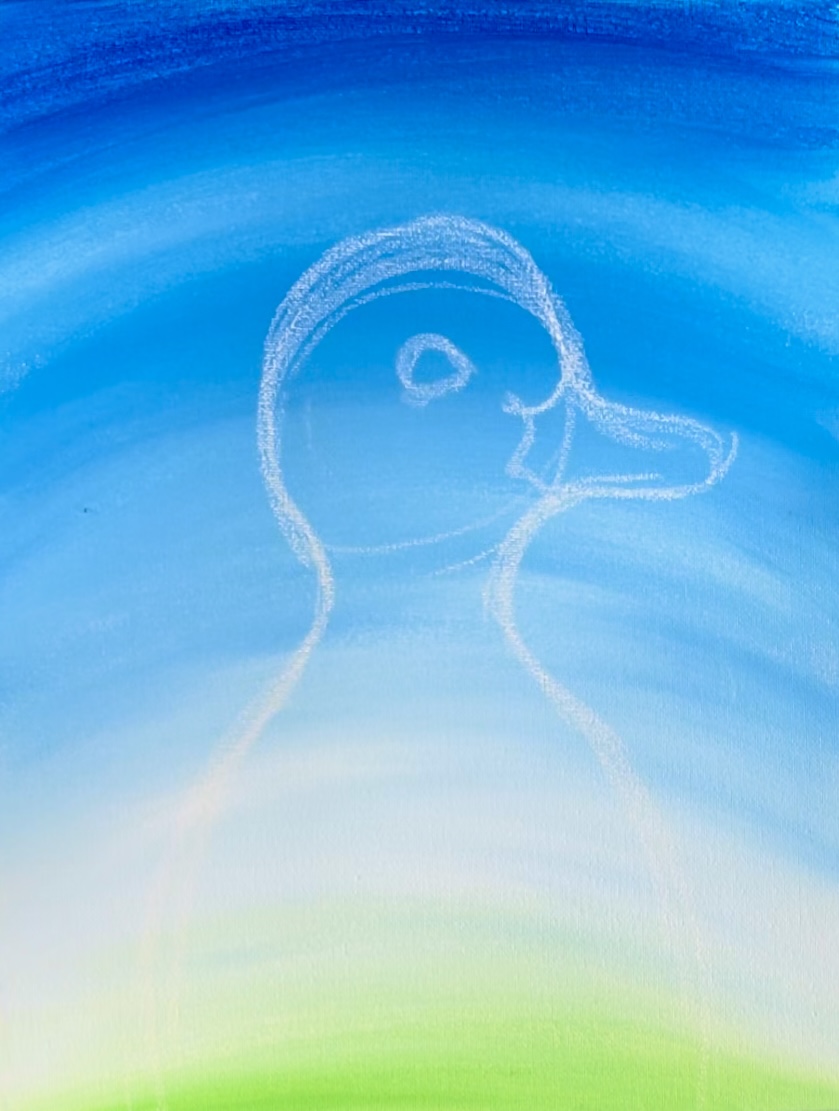
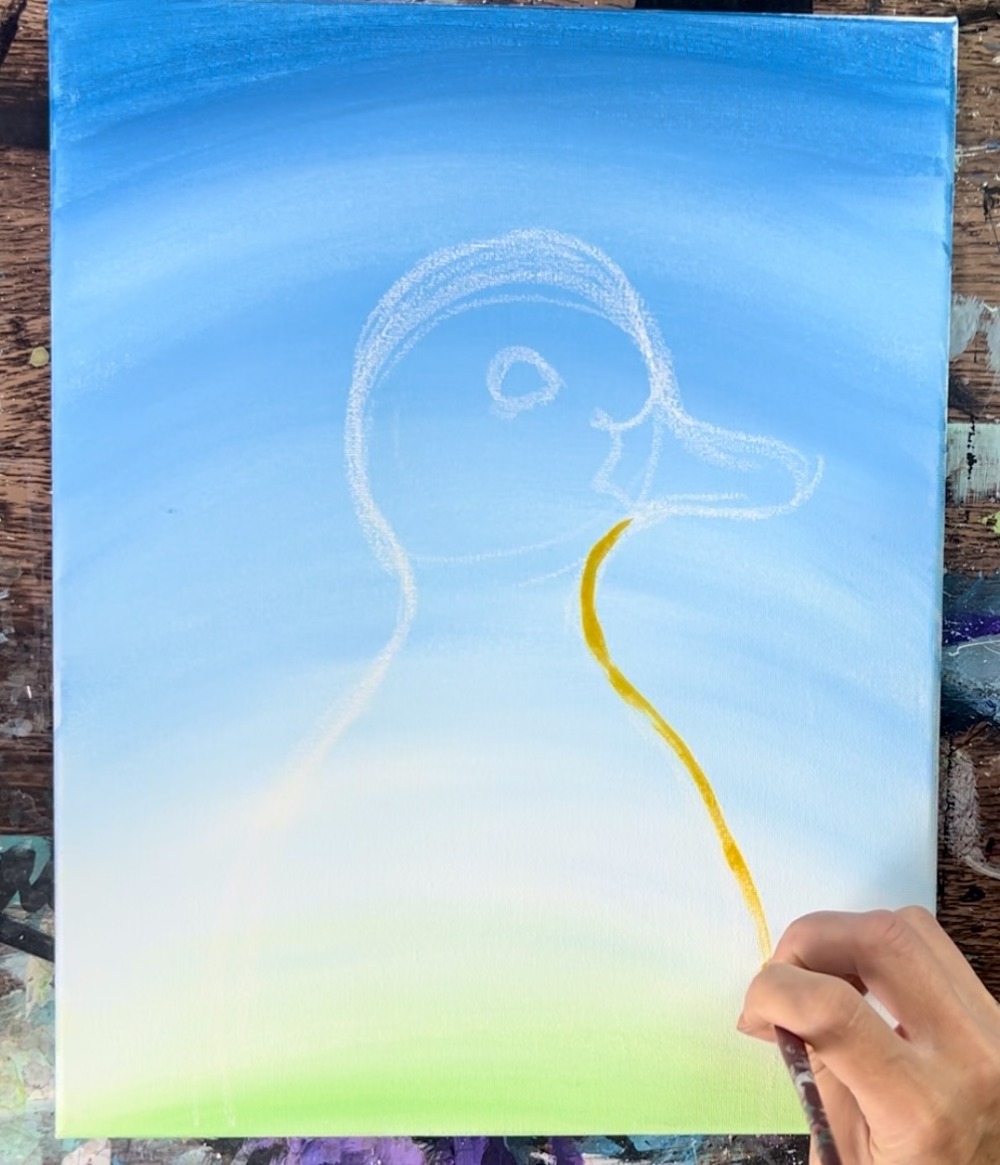
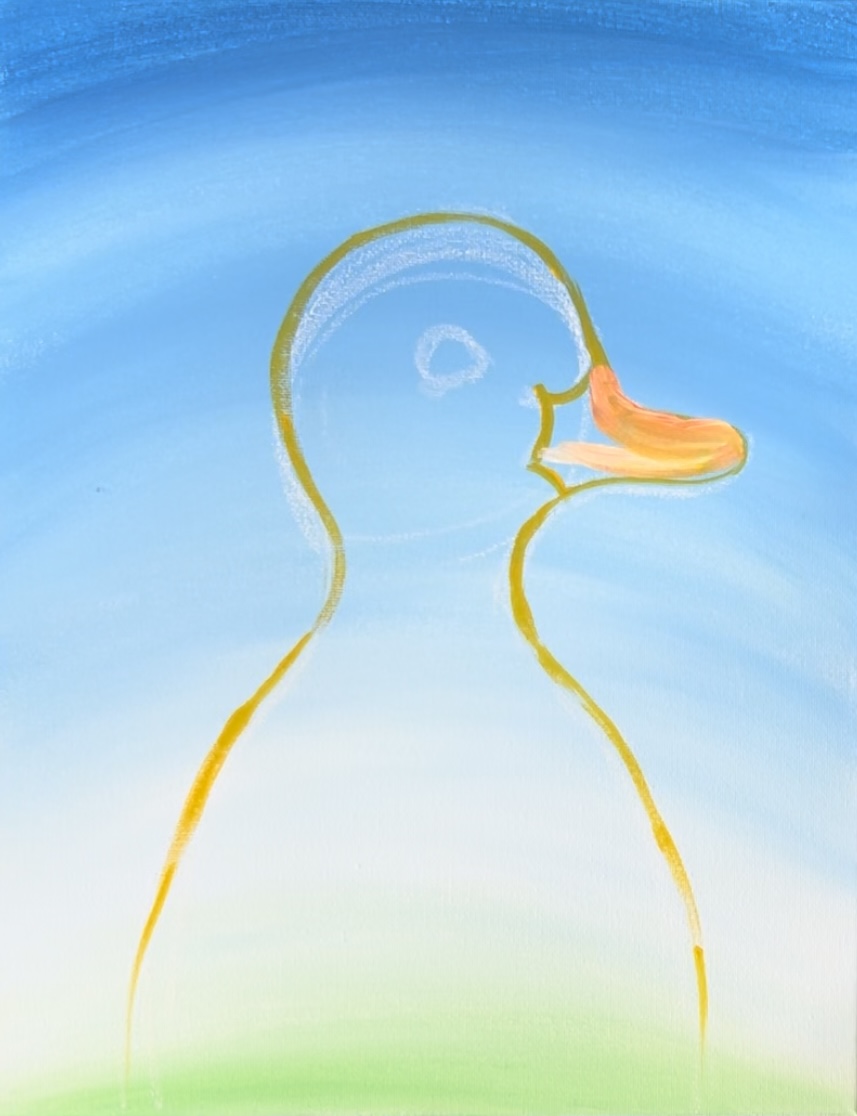
2. Draw the duck
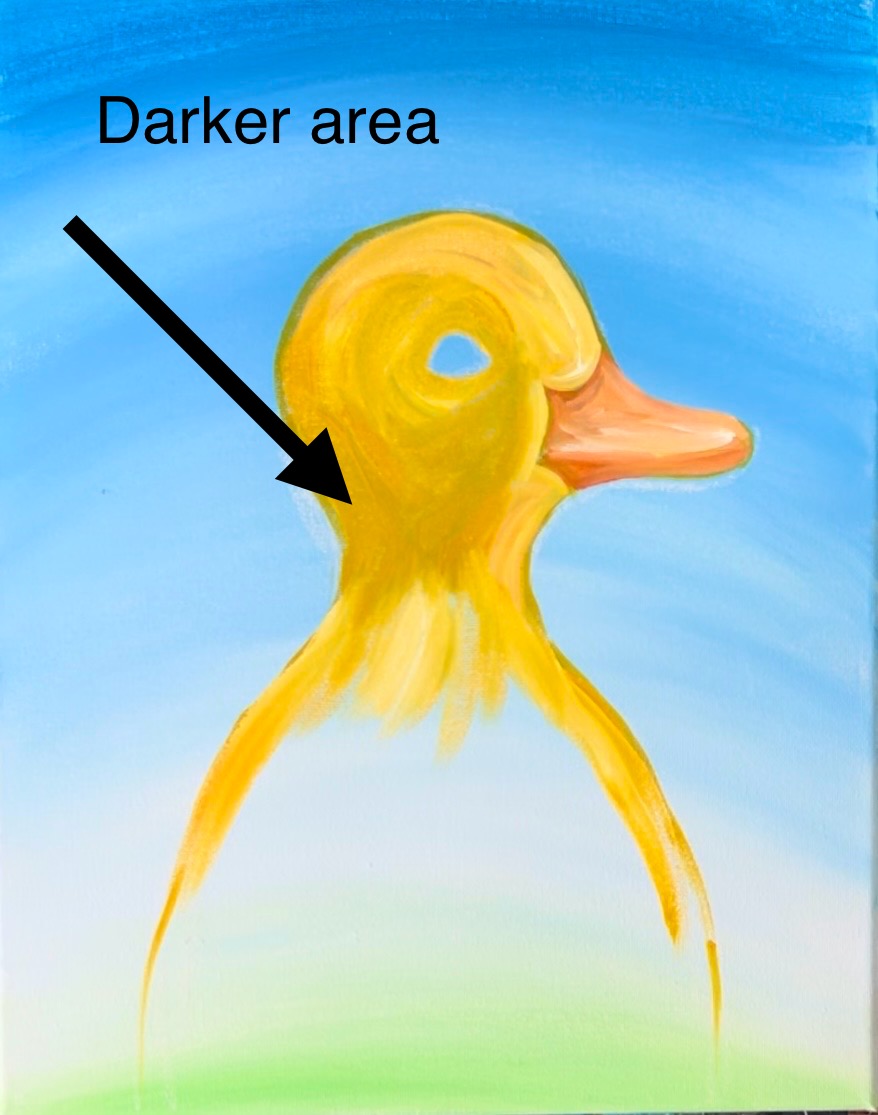
Wait for your canvas to dry. Then use a piece of white chalk to draw the duck on your canvas. You can use the graphic below to help guide your drawing.
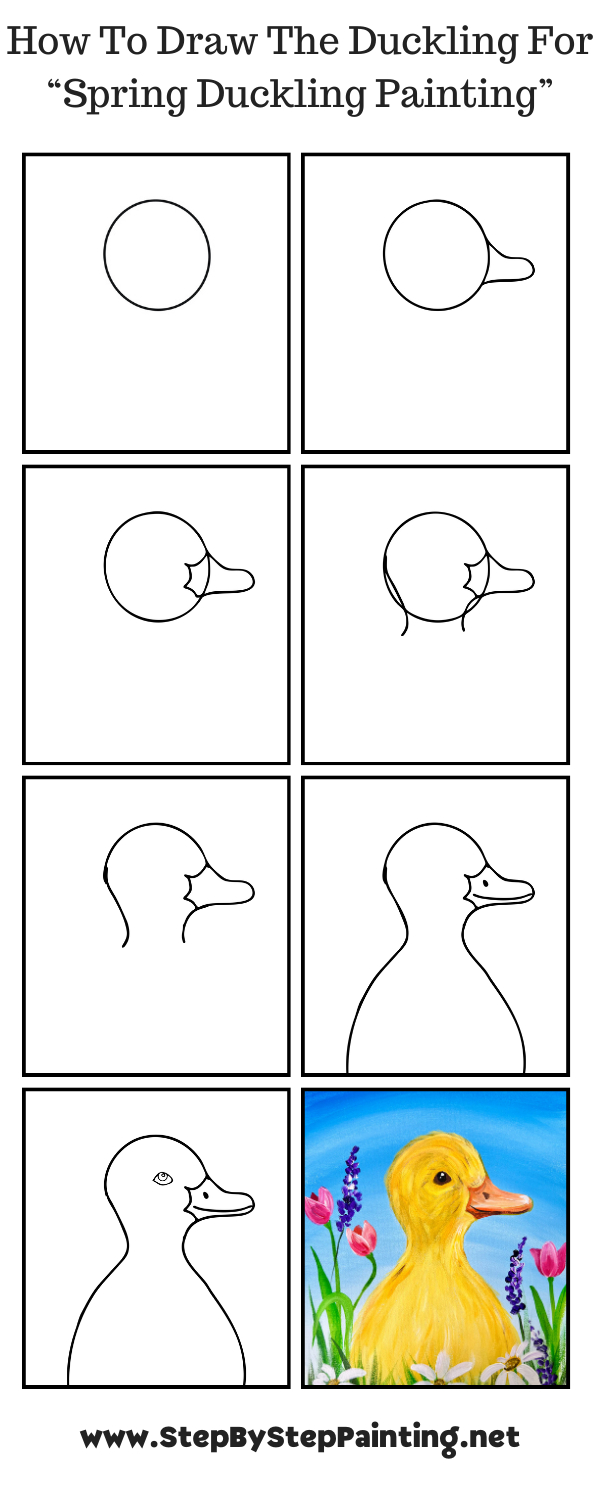
Start by drawing the head. The top of the head is at about the 11″ mark up from the bottom of the canvas. The head is about 3″ in diameter. These dimensions do not, however, need to be exact.
Then draw the beak on the right side of the circle. The beak curves into the circle and slightly slopes downwards. It is also curved on the edge of the beak. The bottom line of the beak curves into the bottom of the circle and starts to form the neck.
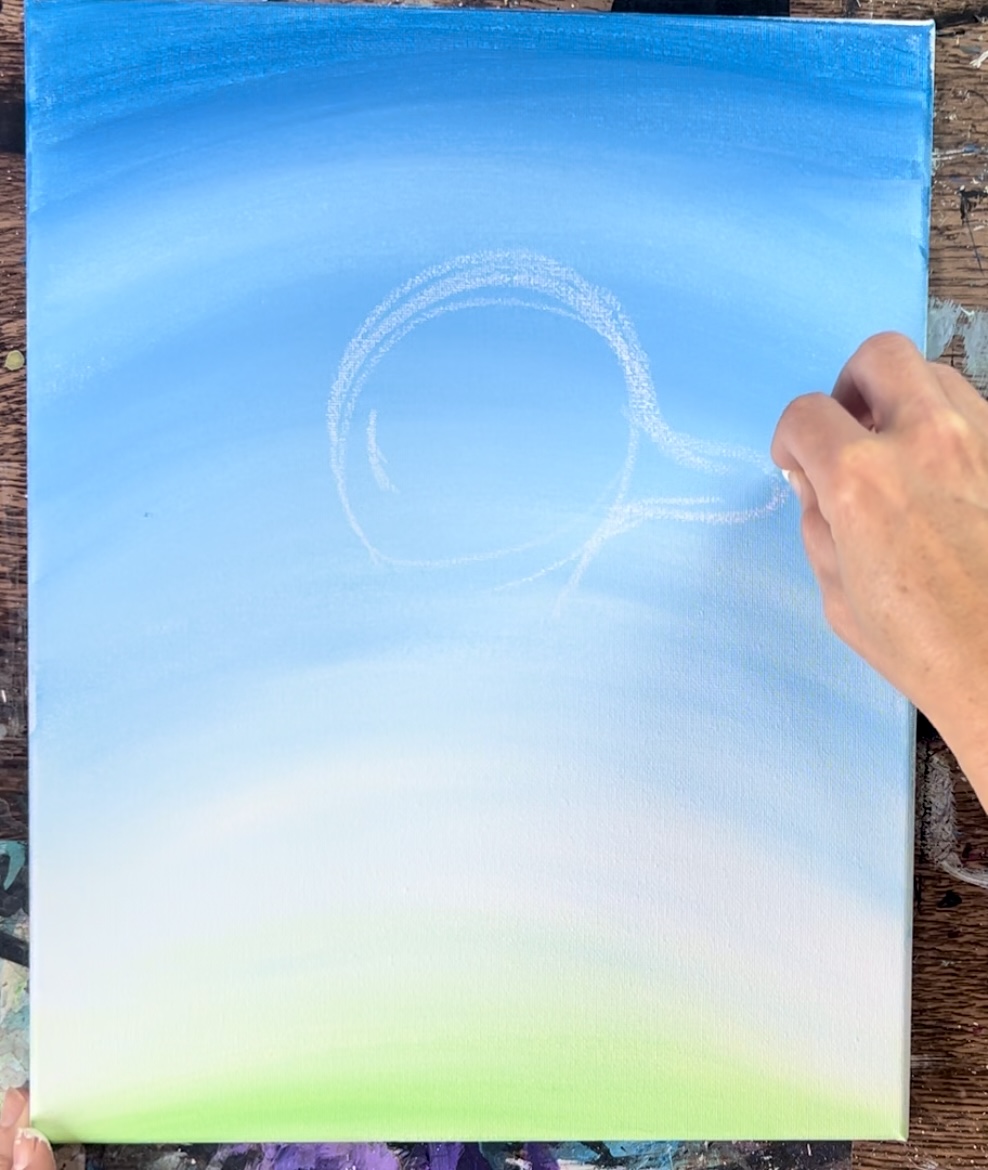
Sketch the neck so that it goes inwards on your original circle and then draw the body so the line goes about as wide as the end of the beak.

Repeat this line on the other side for the left side of the neck and body. You can draw the lines for the body all the way down to the bottom edge of the canvas.
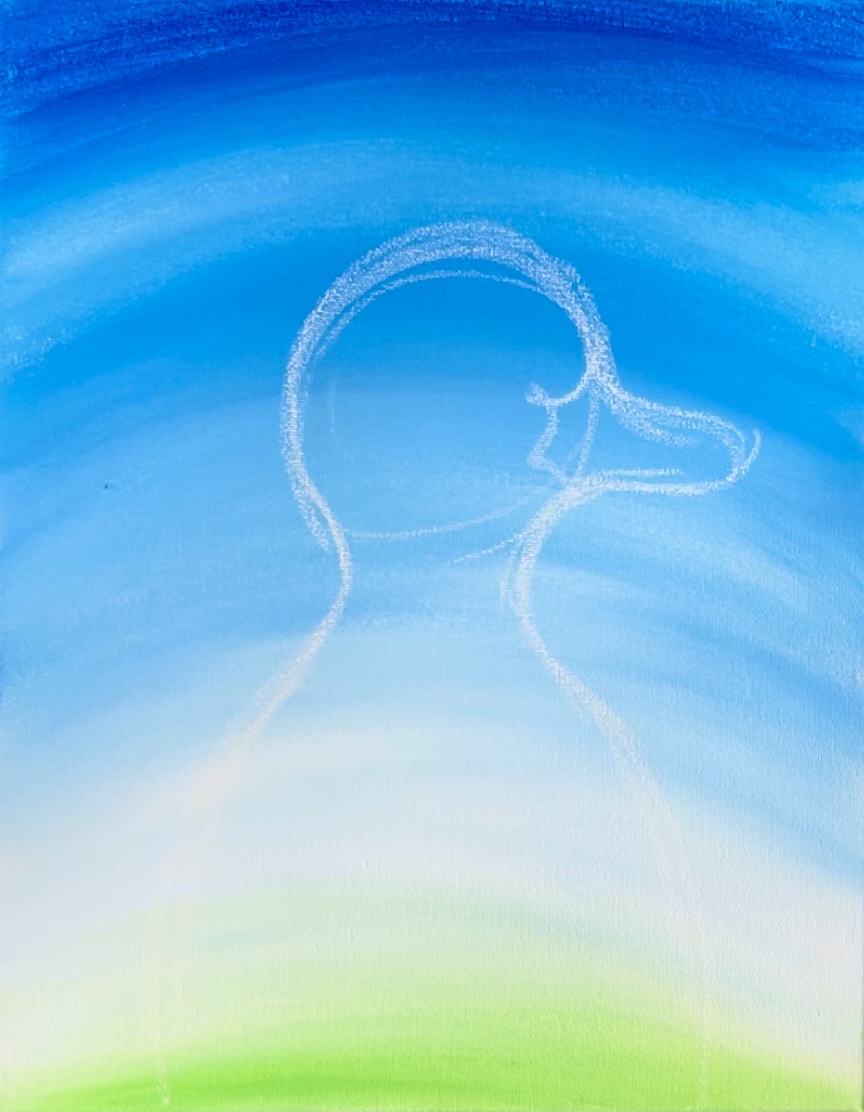
Then draw a walnut shape for the eye. The top edge of this lines up with the top point of the beak. This eye is not exactly in the center of the circle. It is slightly upwards. Notice where it lines up with the top half of the beak.
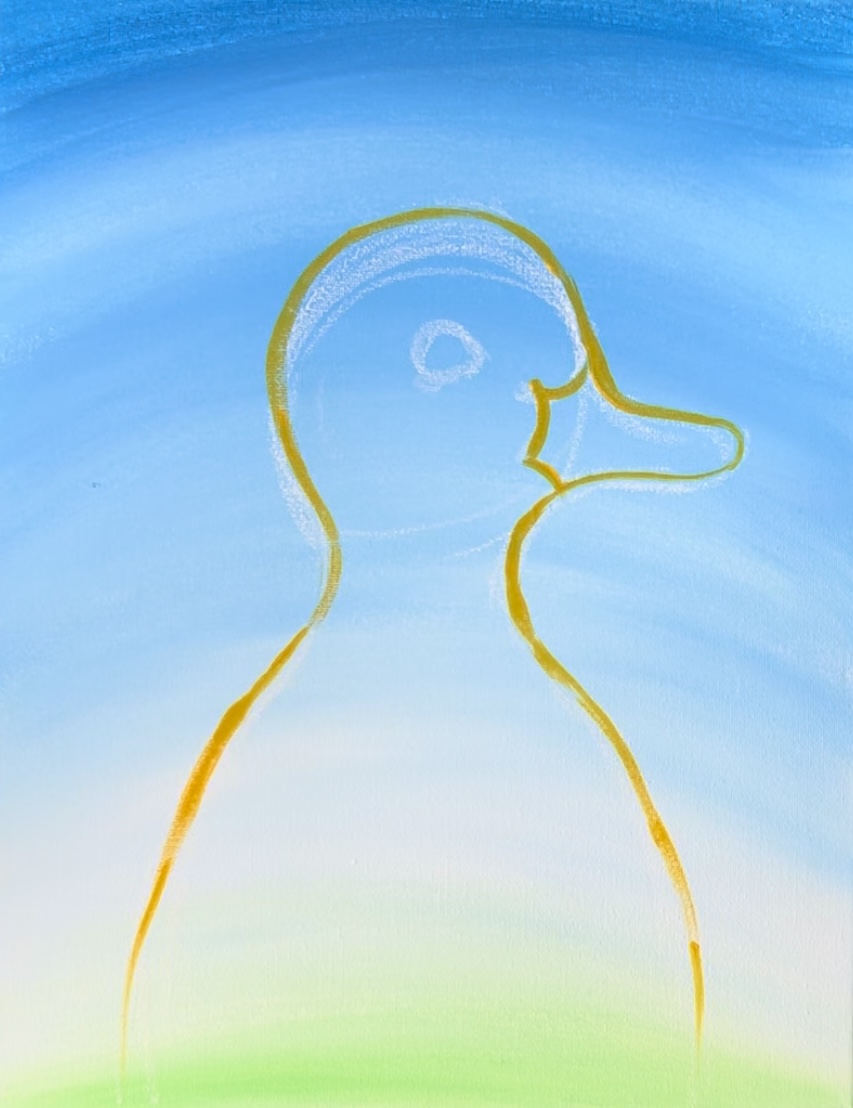
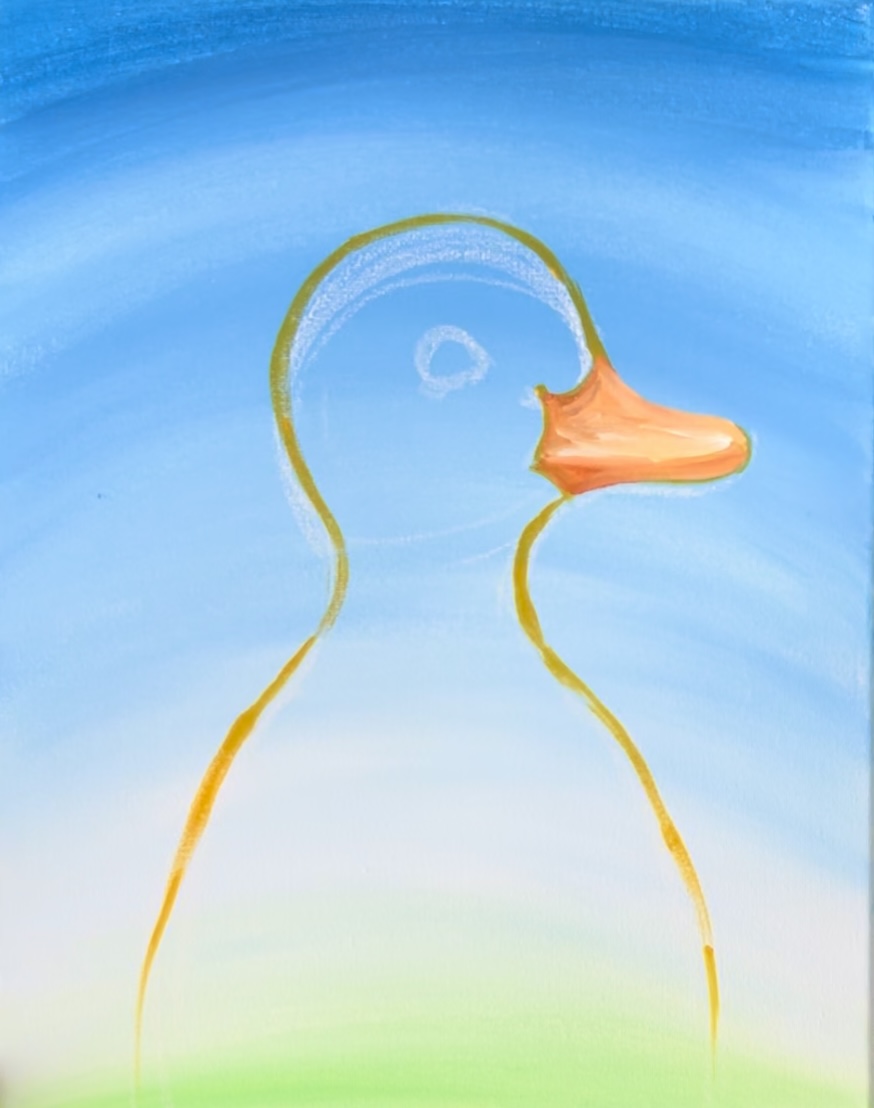
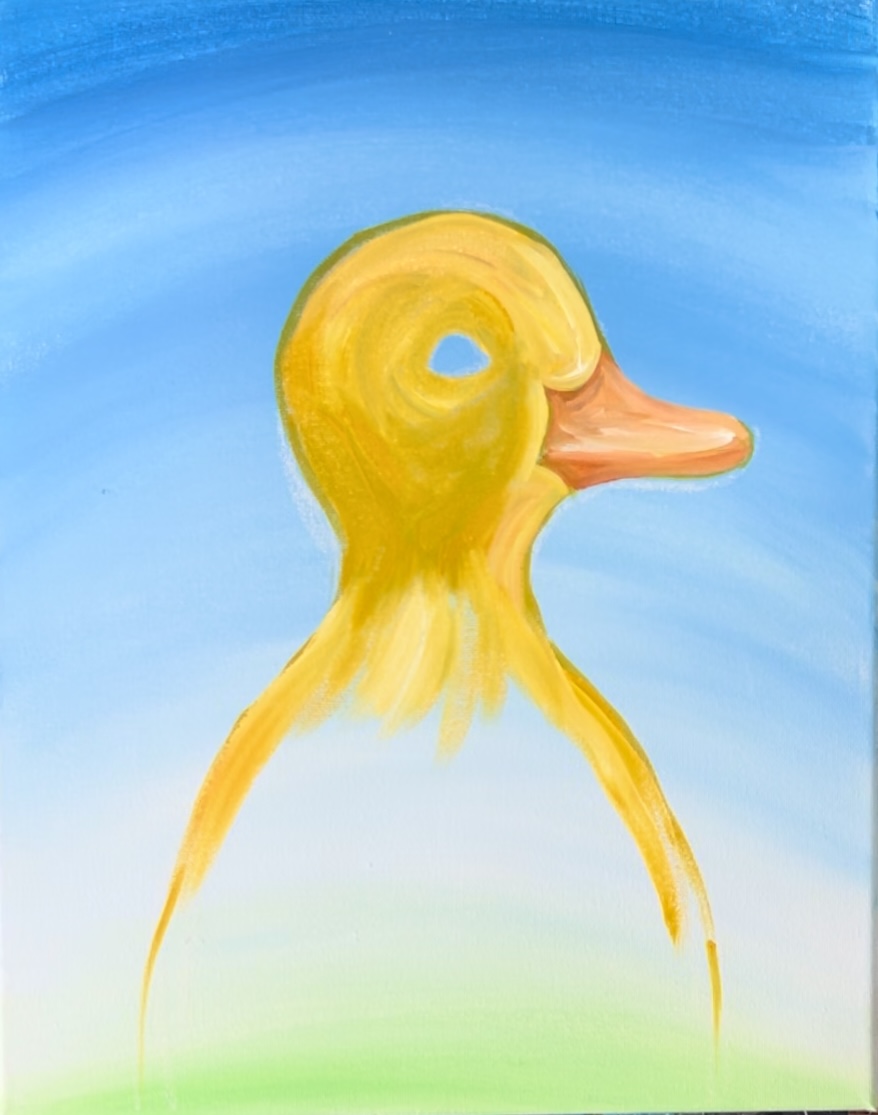
3. Outline the duck
After drawing this duck with chalk, outline it with a #4 round brush and the color “cadmium yellow medium hue”. Loosely outline your chalk drawing with a thin paint line.
This will define your duck drawing.
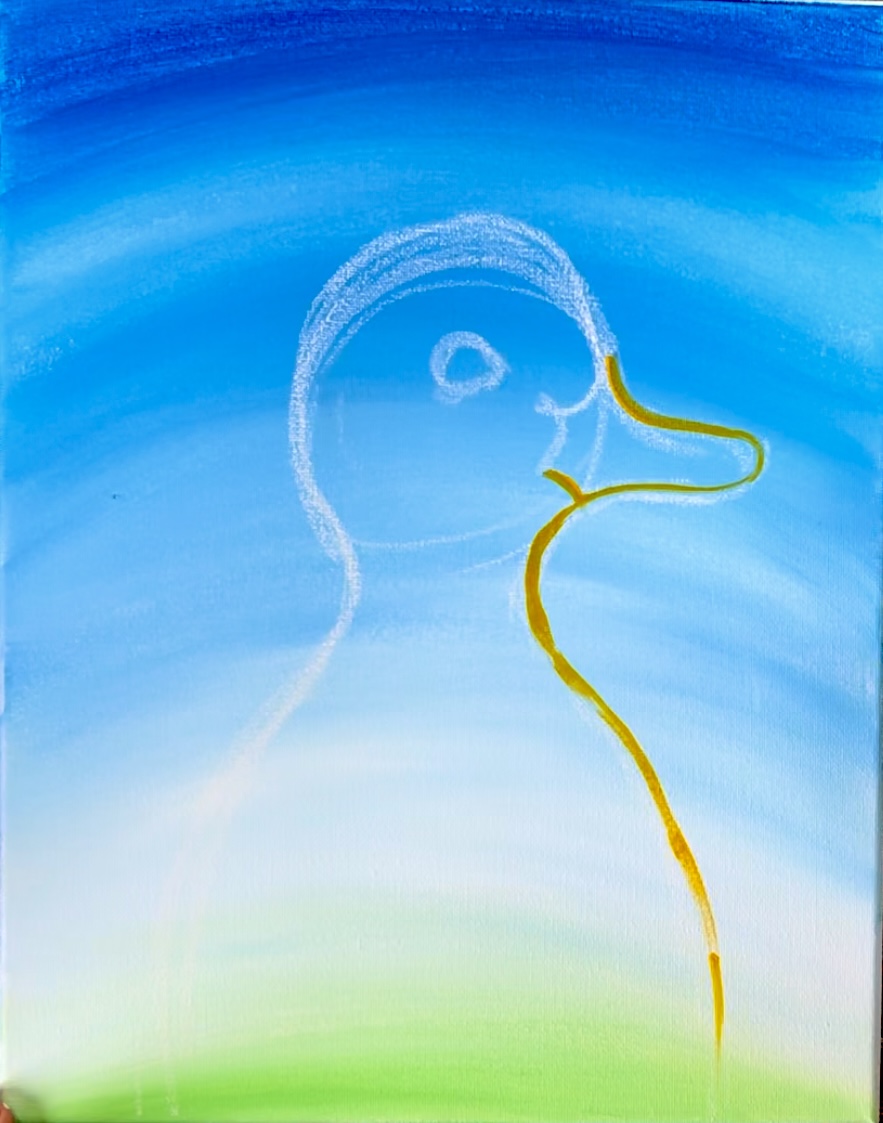
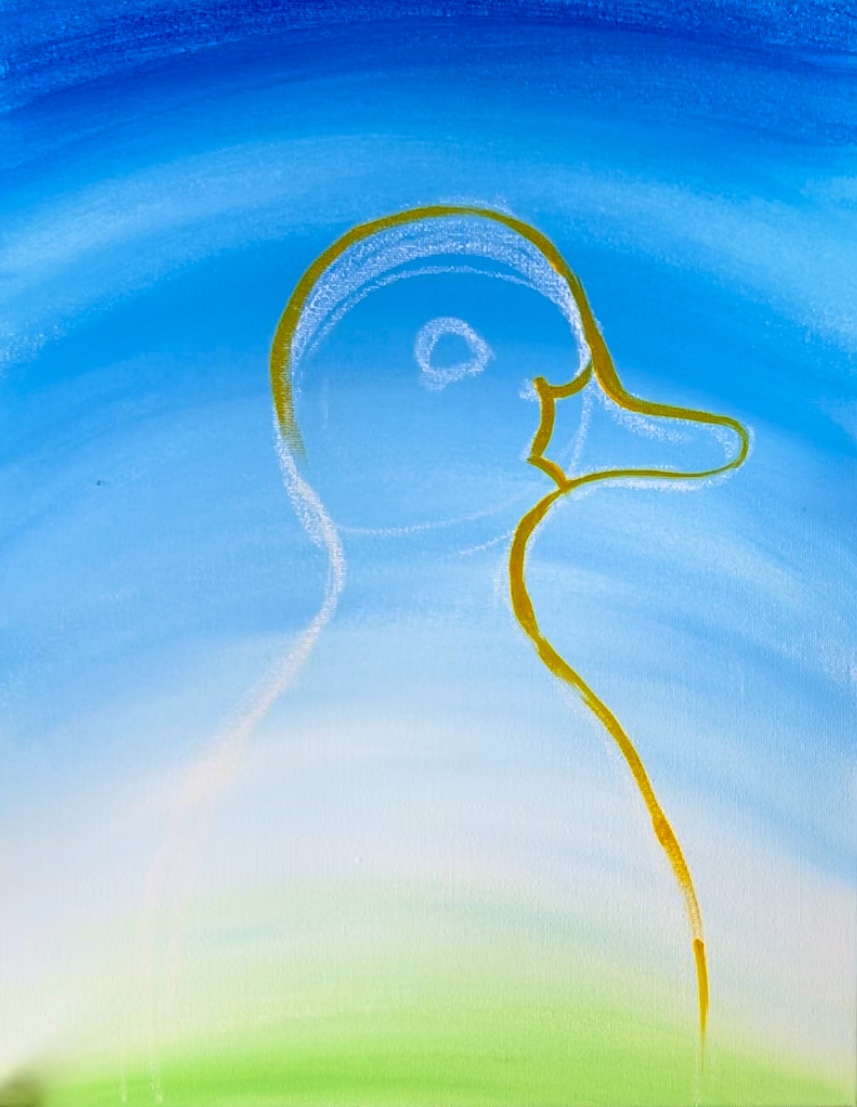
I did not outline the eye.
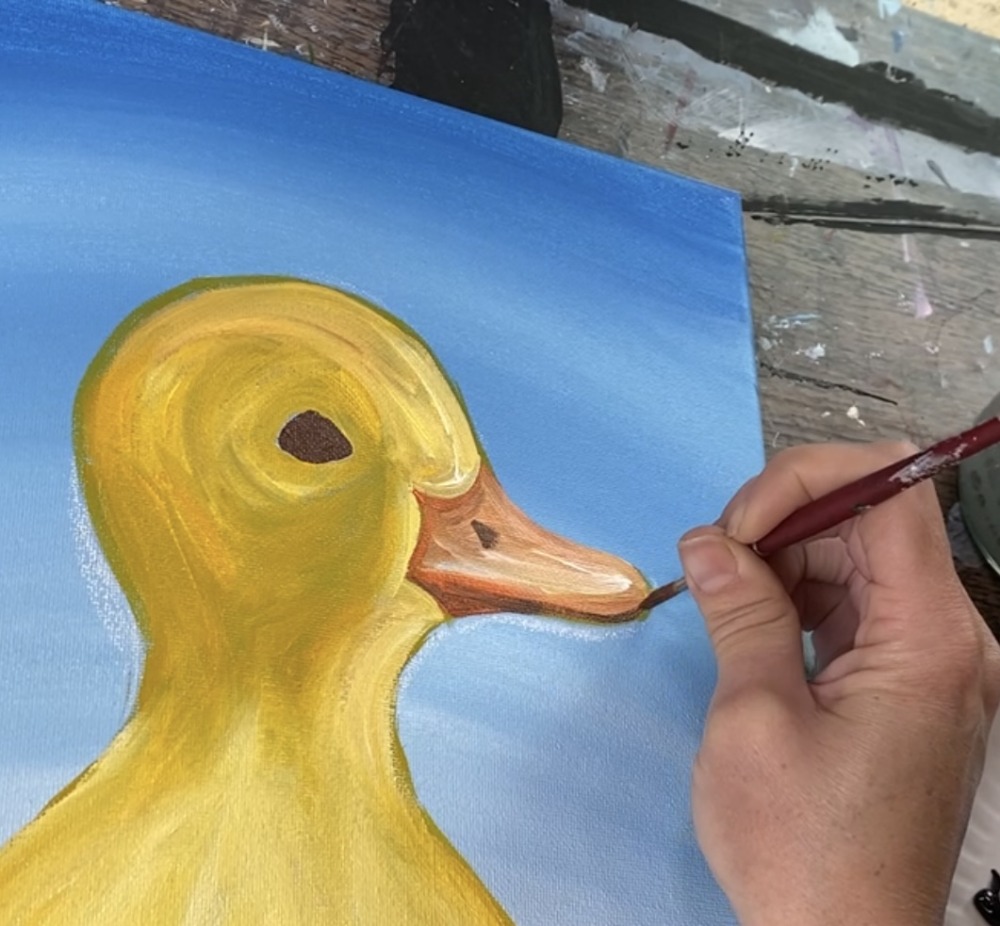
4. Paint the beak
Load your paint palette with the colors: cadmium orange hue, titanium white and cadmium yellow medium hue. Use the #4 round brush to mix equal parts: orange, white and yellow together. Paint the top half of the beak with this “light yellow-orange color”.
Then paint the bottom half of the beak with just orange. You don’t need to rinse your brush off to paint the darker part, just wipe the brush and load it into orange. There will be a natural line that divides the top of the beak from the bottom (the line where the beak opens).
5. Paint Duck Head/ Body
Load your paint palette with the two colors: “cadmium yellow medium hue” and “titanium white”. Use the #4 round brush and “double load” it into both the yellow and the white. Start painting the duck. Start from the outer edges and paint in a curved direction and let the yellow and white gently blend together. Go in the direction of the shape of the head.
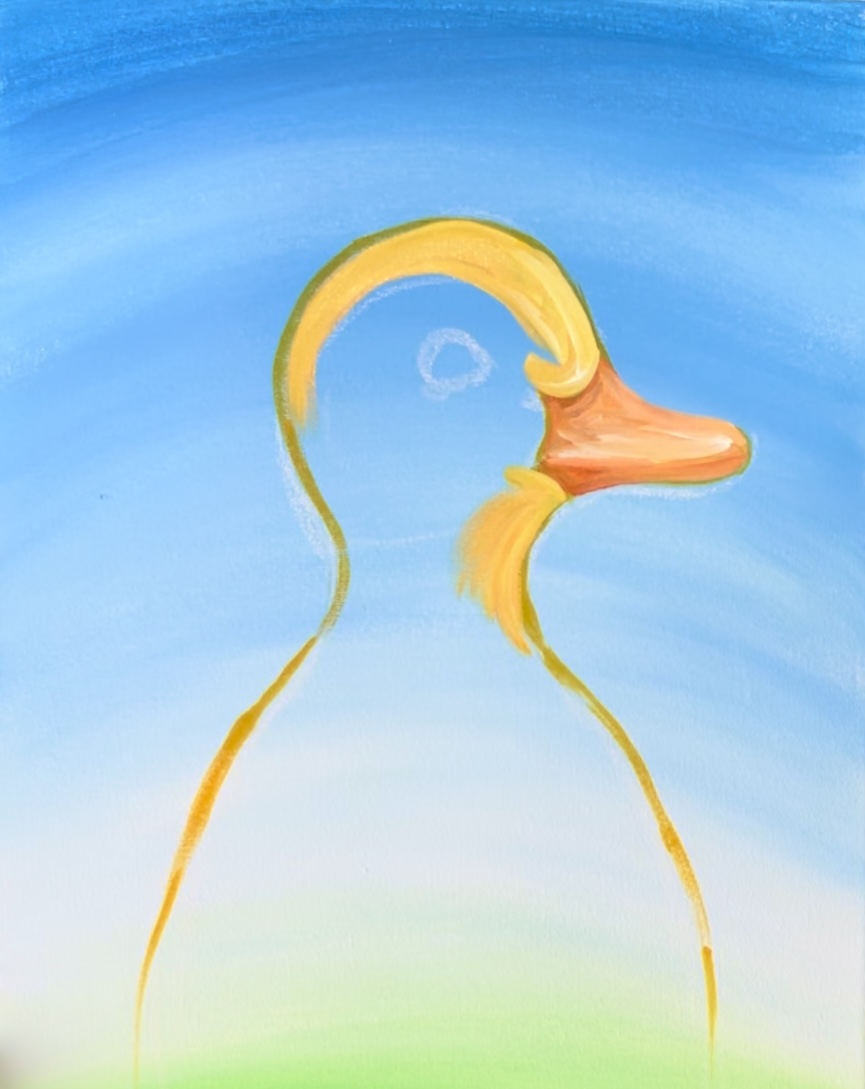
Paint around the eye and continue to make your paint strokes go in “contouring directions”. Add more yellow to your brush and less white under the eye and to the left of the beak. This area is a little more dark and shadowy.
As you approach painting the body area of the duckling, paint with long paint strokes, dragging the brush downwards. Blend white and yellow together. You can create some “feathery texture” simply by letting your yellow and white blend together to create different tints of that yellow.
Paint long, slightly curved expressive paint strokes in the body area. Curve your strokes slightly in the direction of the shape. Example: on the left side of the body, the paint strokes are curving slightly to the left. The opposite is on the right side of the body.
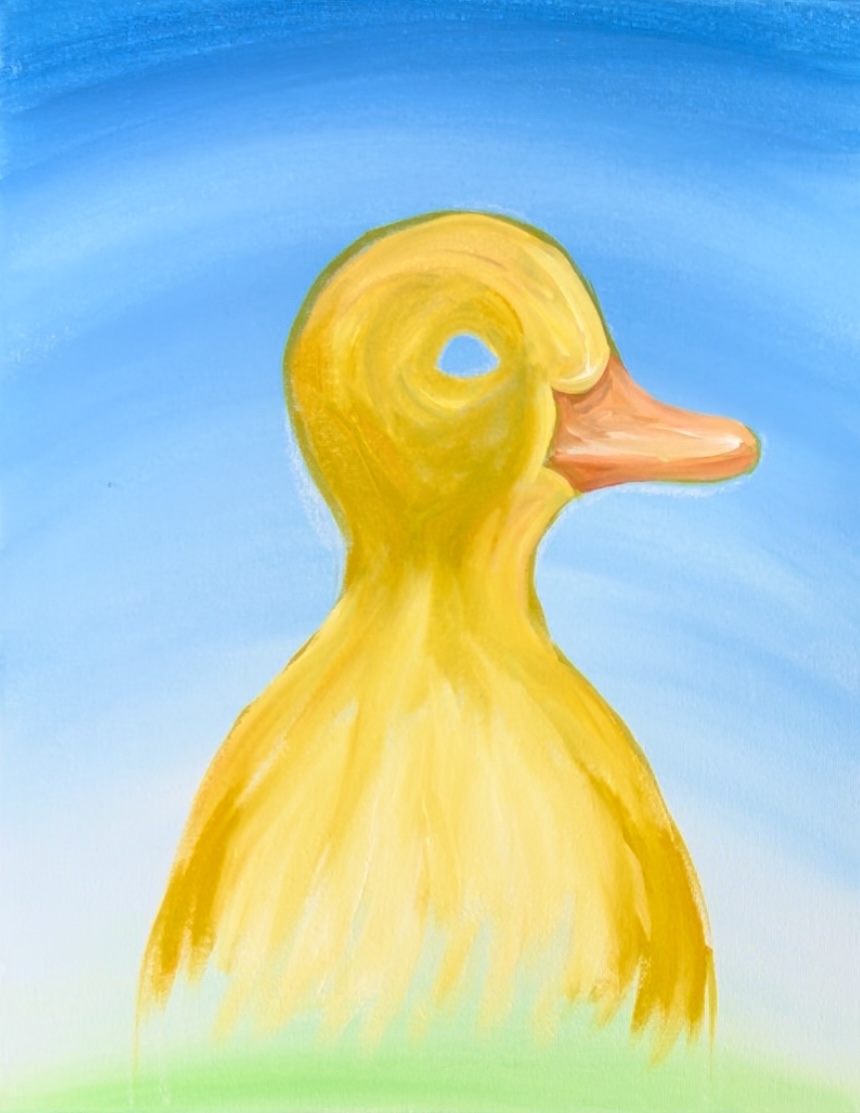
You don’t need to paint this all the way to the bottom edge of the canvas because the grass will be covering up part of the duckling on the bottom. Let the yellow sort of fade away as you approach the green area.
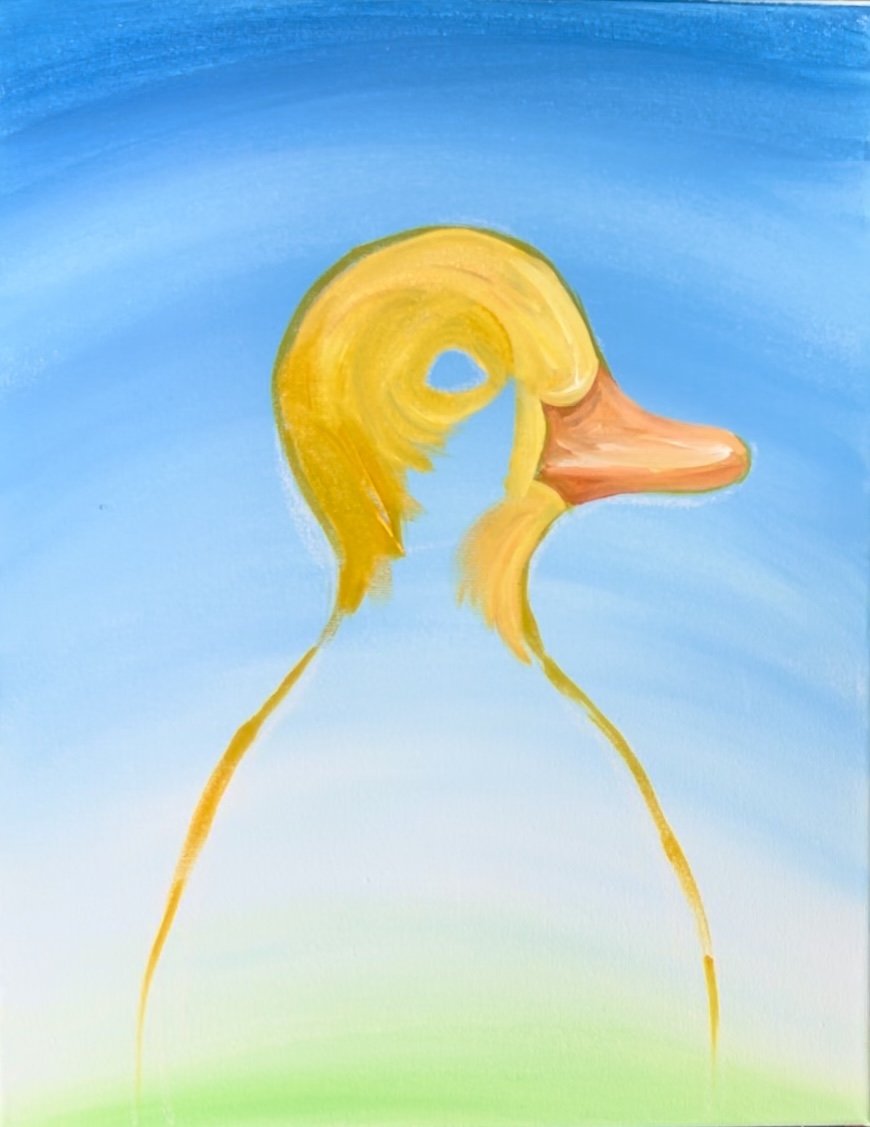
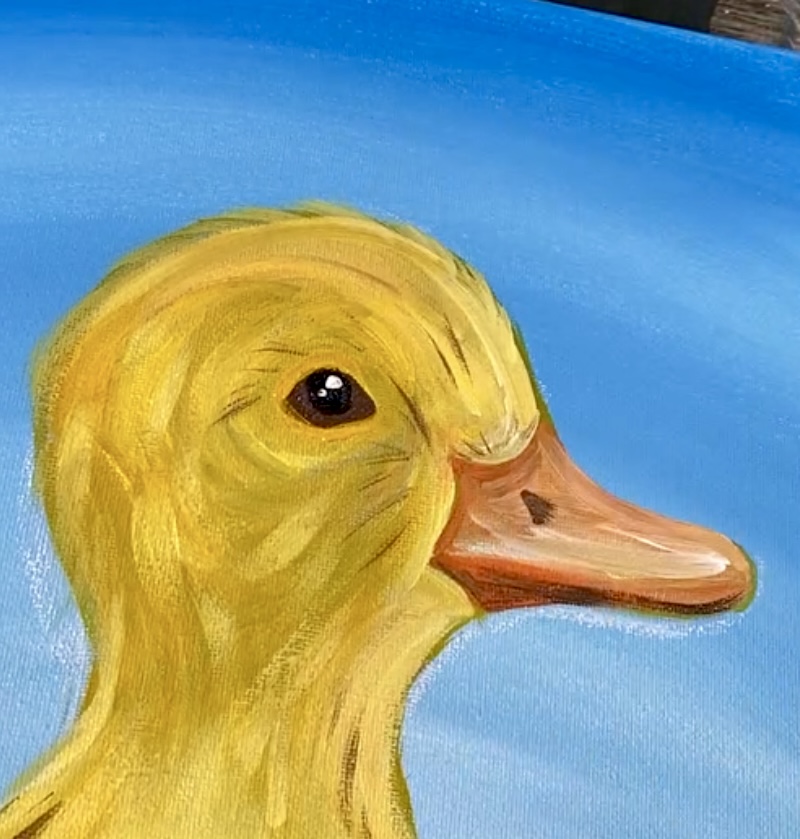
6. Paint Eye & Nostril
On your palette, mix a dark brown color. Mix about 2 parts “burnt Sienna”, 1 part “titanium white” and 1 part “mars black”.
Paint the “walnut shape” eye a solid coat of this dark brown.
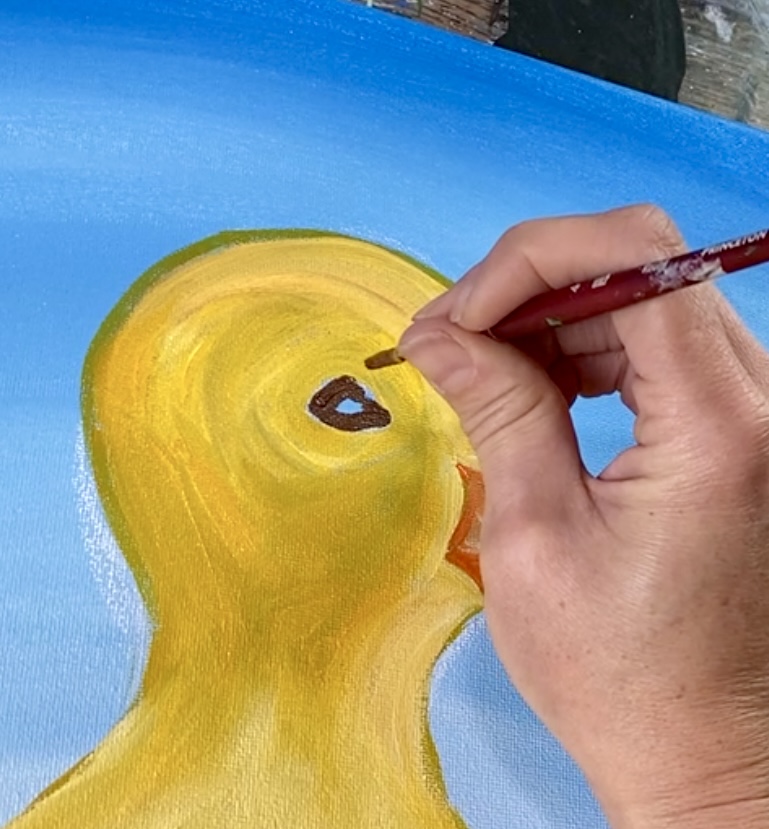
Wait for this to dry before painting the black circle and yellow highlight in the eye. While this is drying, paint the little nostril on the top left part of the duck’s beak. This is a little triangle shape and it is the same brown color you used for the eye. You can use the #4 round brush or even a smaller derail brush for this. Also, add a little bit of brown on the very bottom edge of the duck’s beak to give that area more shadow.
7. Paint Duck Feather Texture (optional)
This is an optional step. You do not have to go into detail with the duck feathers if you wish to keep the painting more simplified.
Use a #4 round brush and yellow mixed with white (make it slightly lighter so that it shows up). Paint little feather strokes along the top of the duck’s head but make the strokes all go in the direction of the curves of the outline of the duck. Let these little lines slightly go outside the lines.


Do this all along the edge of the duckling. Then go around the eye and around the head.
Then you can add a few darker feather strokes on the duck. This is also optional. I used the brown that was used in the eye to paint a few very thin brown feather strokes around the eye and a few along the neck area.
8. Paint Detail In Eye
Make sure the brown eye layer is dry. Then use the #4 round brush to paint a black circle on the very top center of the eye.

Let this black dry just a bit. Then rinse the brush. Load it into “titanium white”. Paint a white dot at the very top of this black circle.

Then paint a second, smaller white dot going diagonally below the larger white dot.
9. Paint Grass
Mix a dark green color on your paint palette by mixing about 3 parts “light green permanent” with 1 part “mars black”.
Use the #8 round brush to paint grass blades of various heights and thickness. You can paint the grass blades starting from the top point and stroking the brush down making the blade thicker on the bottom.
Or, you can paint the grass blades from the bottom up starting with more pressure on the brush and quickly release the pressure. I do a combination of both types of paint strokes with this round brush.
Create longer grass blades on the left and right areas of the duck and shorter grass blades in the middle.
Also, add some lighter green to your grass color to create some variations of shades of green.
10. Paint Tulips
Load your paint palette with the colors “primary red” and “titanium white”. Use the #4 round brush to paint a little “teardrop shape”.
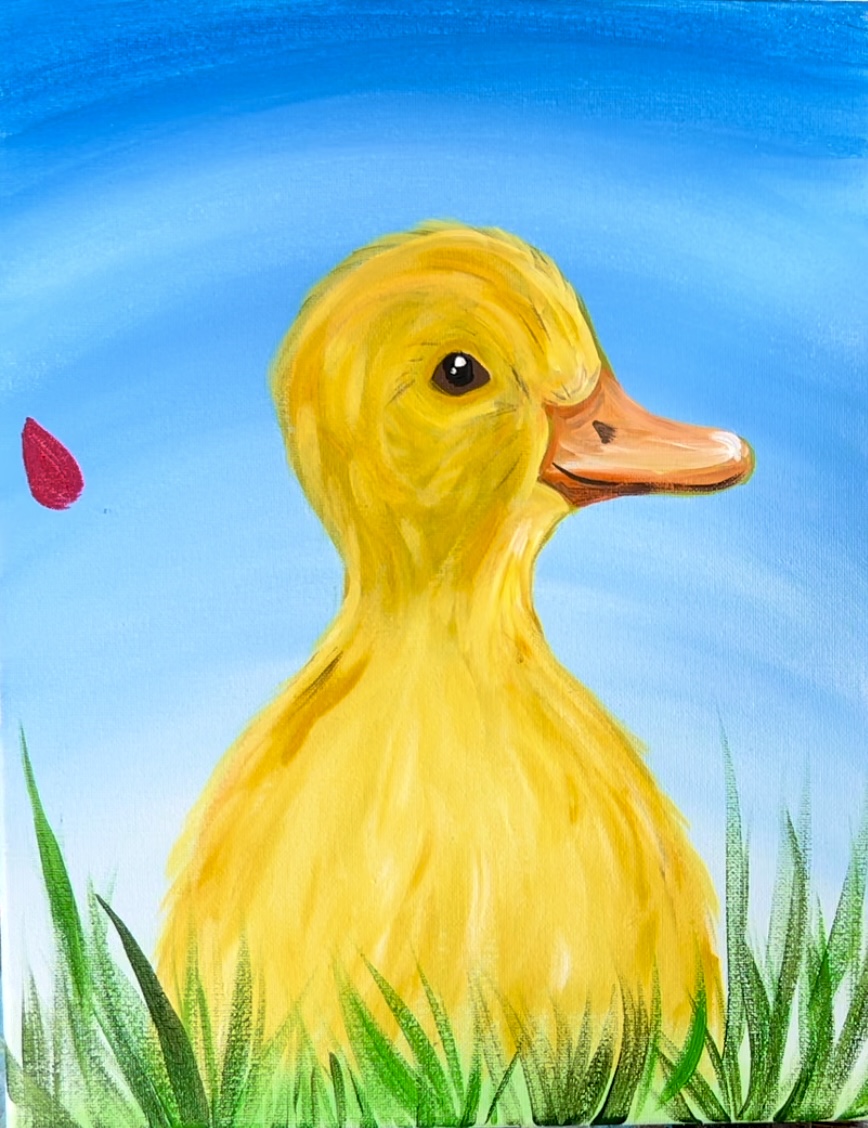
Then load your #4 round brush with titanium white (without rinsing the brush). Let the red & white blend together to a medium pink color. Paint two more teardrop shapes that each overlap each other. This will form a tulip shape when you paint three overlapping teardrop shapes.
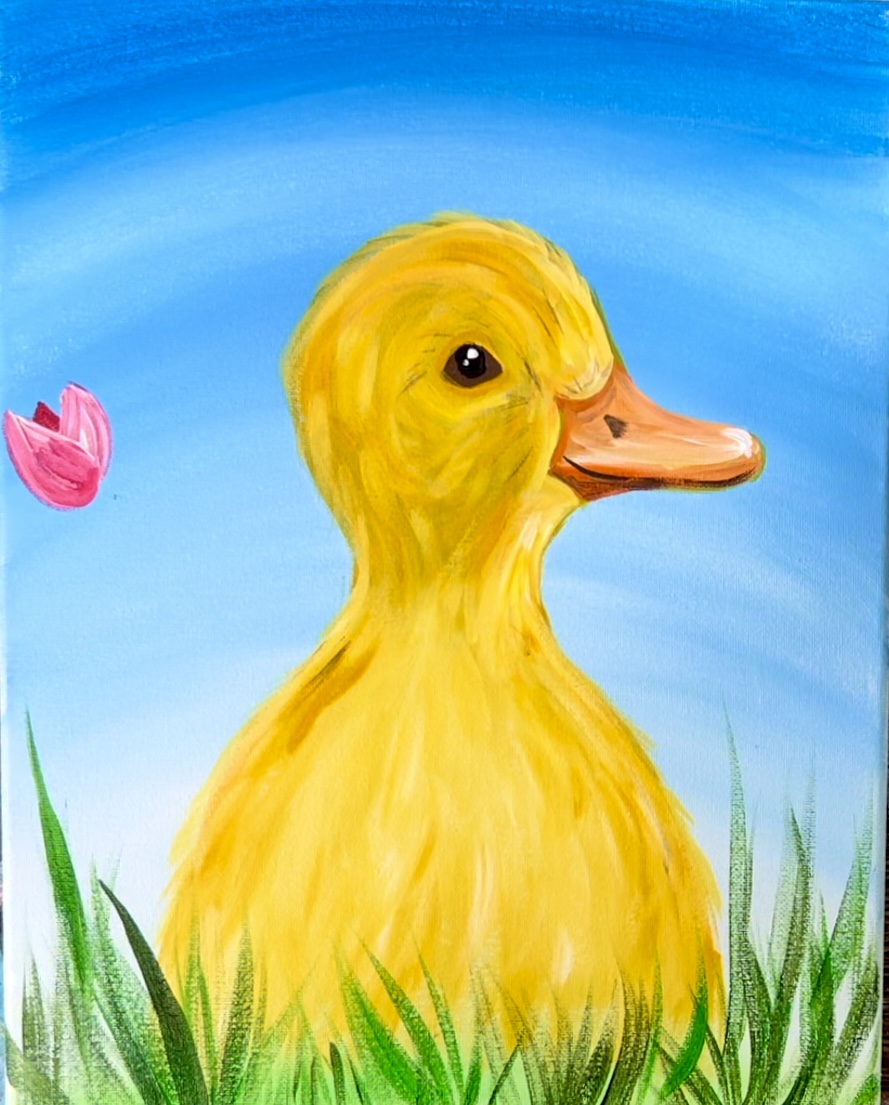
Repeat this for the other tulip. Paint two primary red teardrop shapes. This time I made the tips slightly curve outwards.
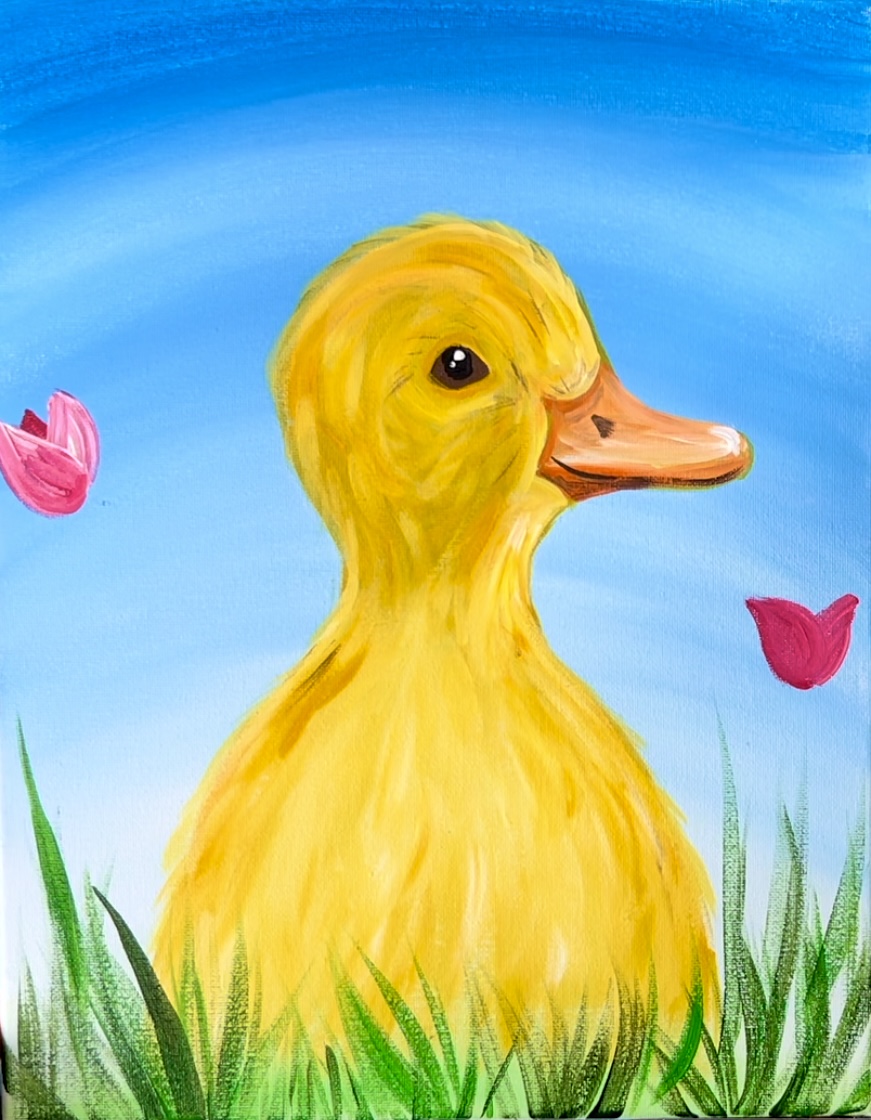
Then paint a third teardrop shape in the center and make sure to add white to your brush to make it lighter and stand out against the other petal shapes.
Paint a third tulip. This time, I added a little orange to my brush to make it a slightly different color. The technique is the same. Paint a dark back petal first and then two light overlapping petals.

Then paint the stem and leaves. Mix a yellow-green color on your paint palette by mixing equal parts yellow and green together.
Paint the stem of the tulip as a consistent semi-thick line. Let it sort of “flute open” at the very top of the stem where it attaches to the flower. Paint the leaves of the tulips so they are thick on the bottom and thin and pointed on the edge. You can do this with your #8 round brush (similar to how you painted the grass blades).
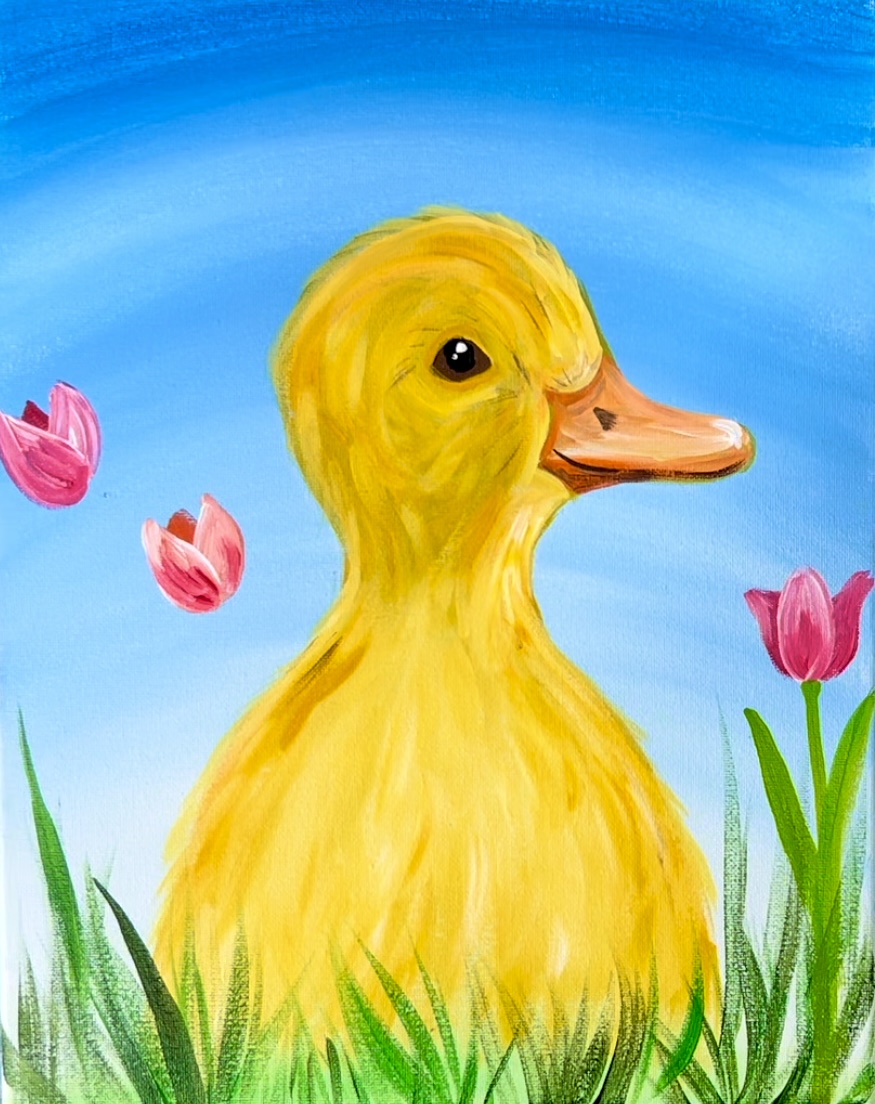
Paint stems and leaves for each of the tulip flowers.
11. Paint Hyacinths
Load your paint palette with the colors “dioxazine purple” and “titanium white”. Use a #4 round brush. Double load the brush in both the purple and the white. Paint a purple column of little dotted paint strokes with purple and white gently blending together. This “column” is slightly more narrow at the top and wider on the bottom.
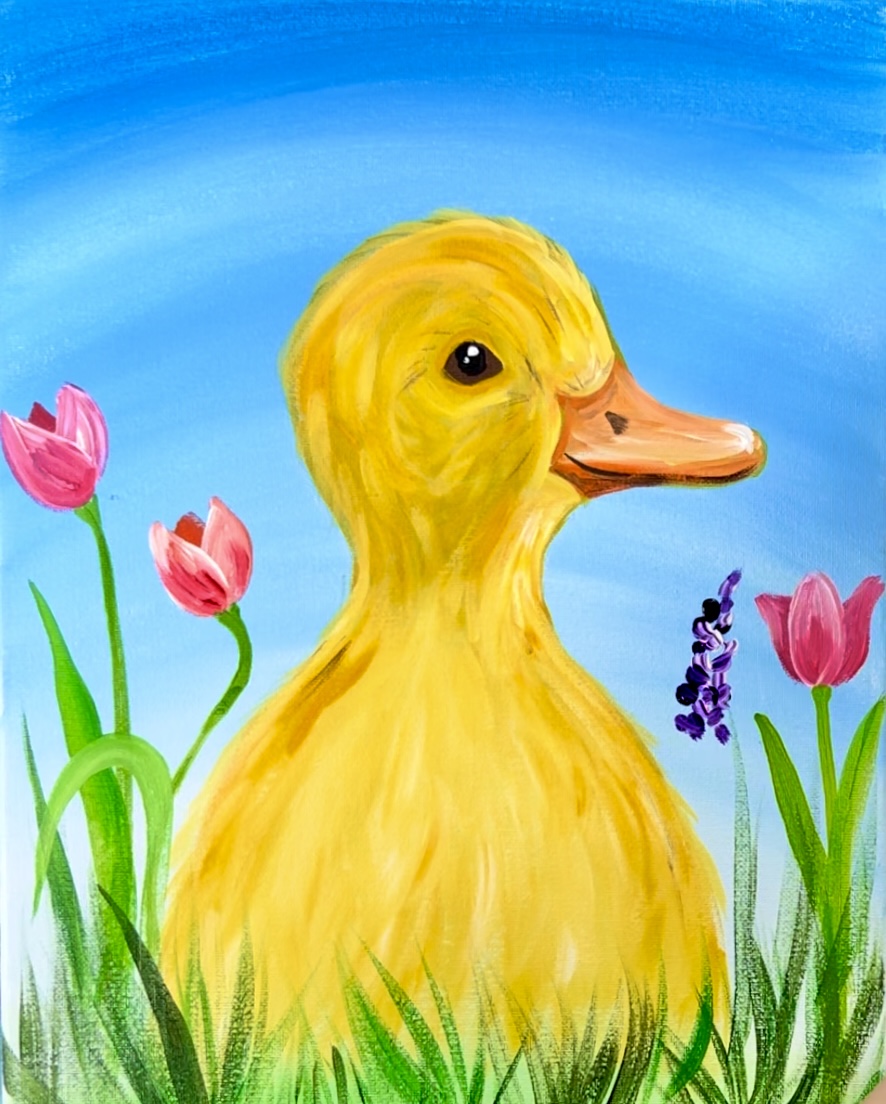
Then paint stems with the dark green paint color that attach to the hyacinth flower down into the grassy area.
12. Paint Daisies
Start by painting the centers of the daisies. Use a dark brown color (same as the eye color) to paint both a combination of circles and ovals. The ovals will be the daisies painted on their sides and the circles will be the daisies painted as a front view.
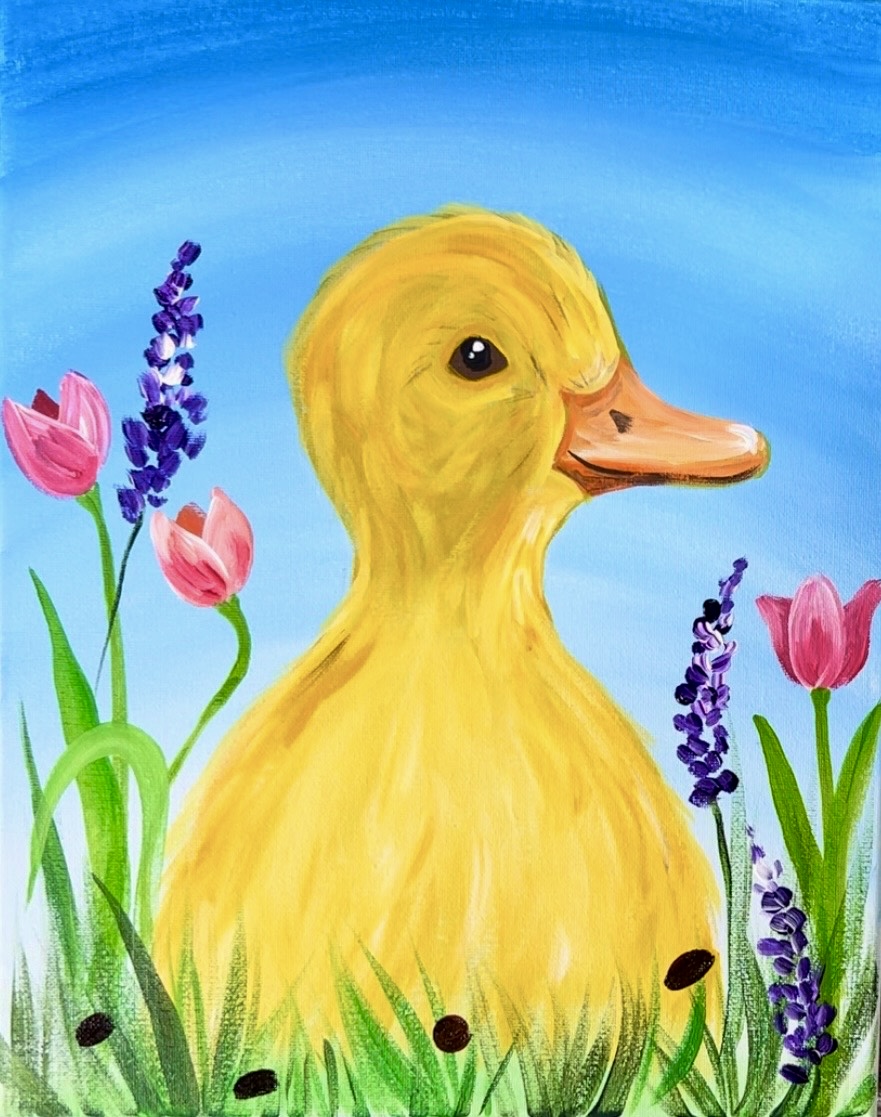
Then paint the petals of the daisies. Use titanium white and the #4 round brush. If you are painting a daisy on its side, paint the petals so they are longer on the bottom of the oval and shorter, more angled backwards on the top part of the oval.
If you are painting a daisy as a front view, paint all the petals going around the circle and each petal is about the same length and size.
Then, use cadmium yellow medium and the #4 round brush to “stipple” little yellow dots over the dark centers of the daisy. Don’t cover all of the brown. This yellow “stipple” will give the centers of the daisies more texture.
If needed, go back over the petals with a second coat of white paint.