
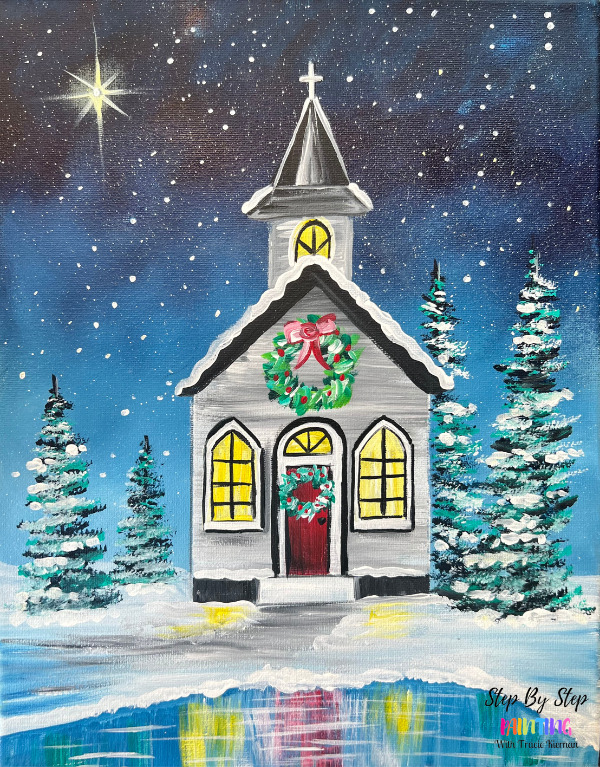
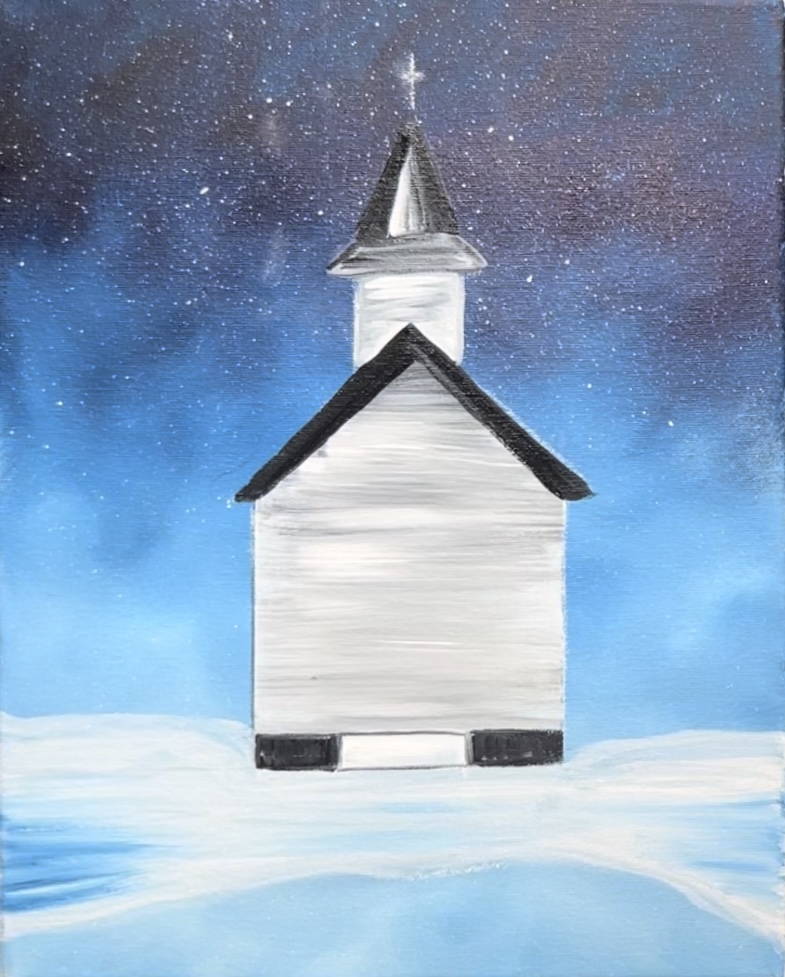
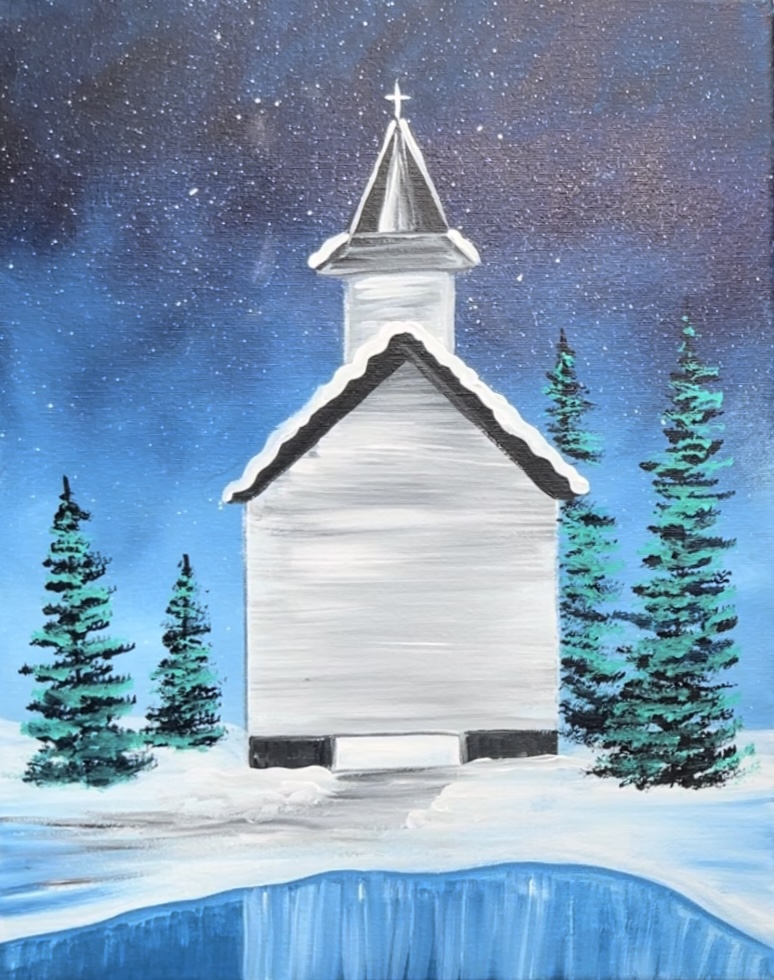
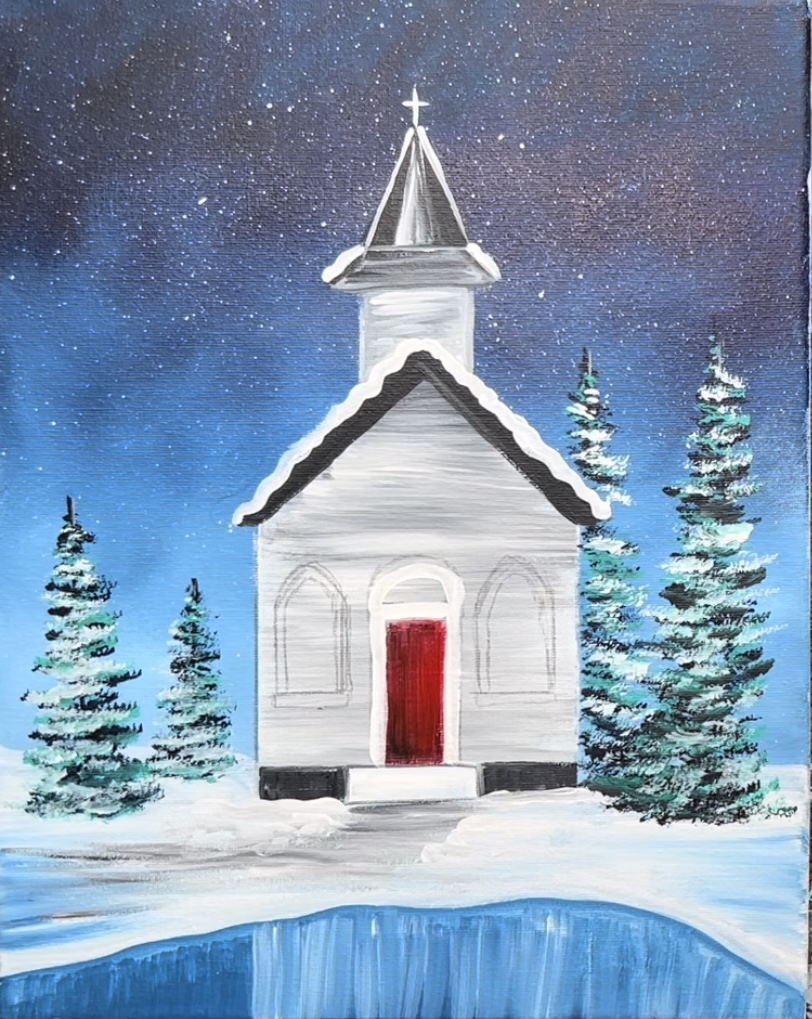
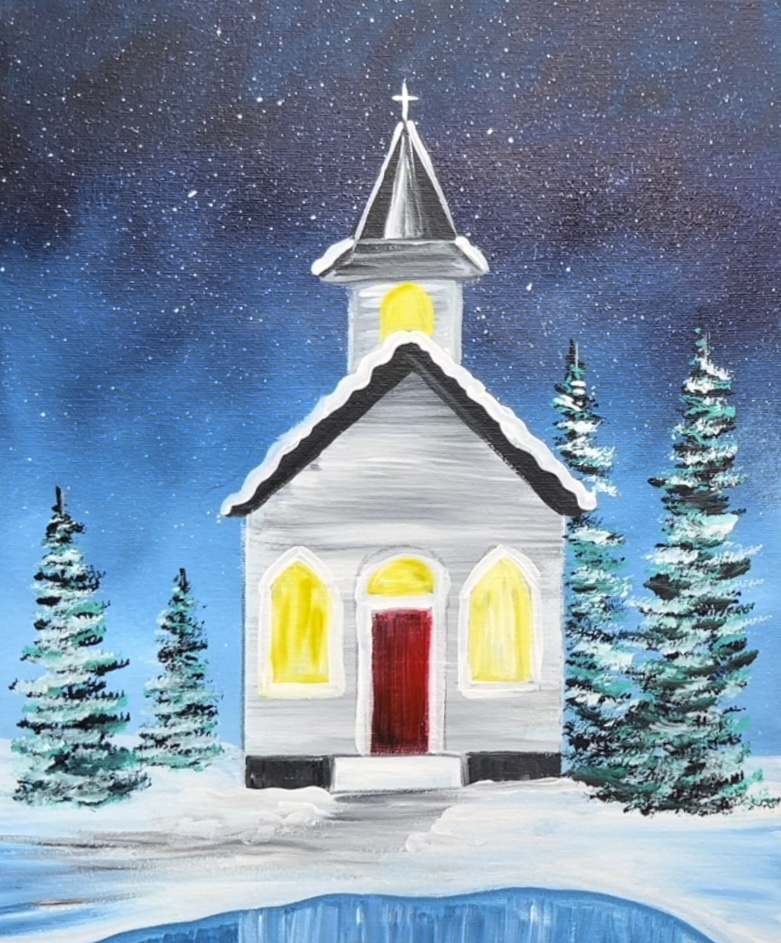
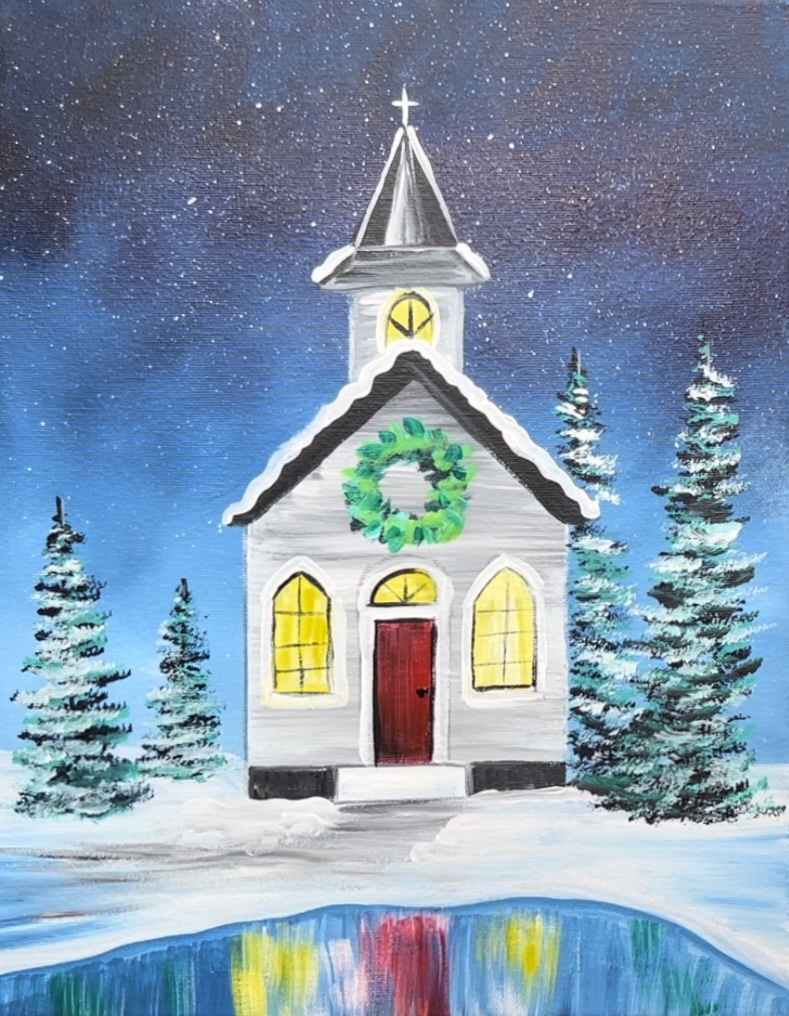
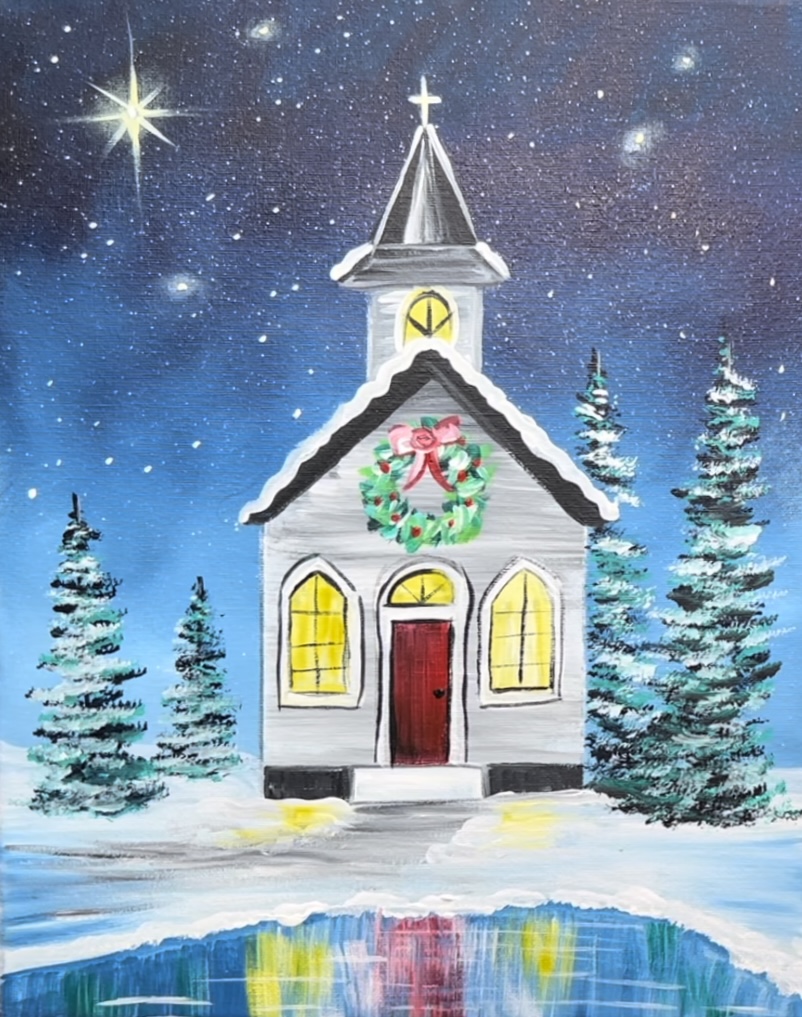
Learn how to paint a colorful Christmas chapel reflecting on a frozen pond with a wintery winter background and Christmas star!

Would you like to save this?

Materials
- 11 x 14 Canvas
- Acrylic Paint
- Brushes
- Ruler
- Traceable
- Graphite Paper (preferably white but you can still use dark for this)
- Pencil
- Chalk (optional if you are drawing church building on your own)
- Painters Tape
Brushes
- 12 Bright
- 3/4″ flat
- #4 round
- Blender Brush (optional: I use this brush)
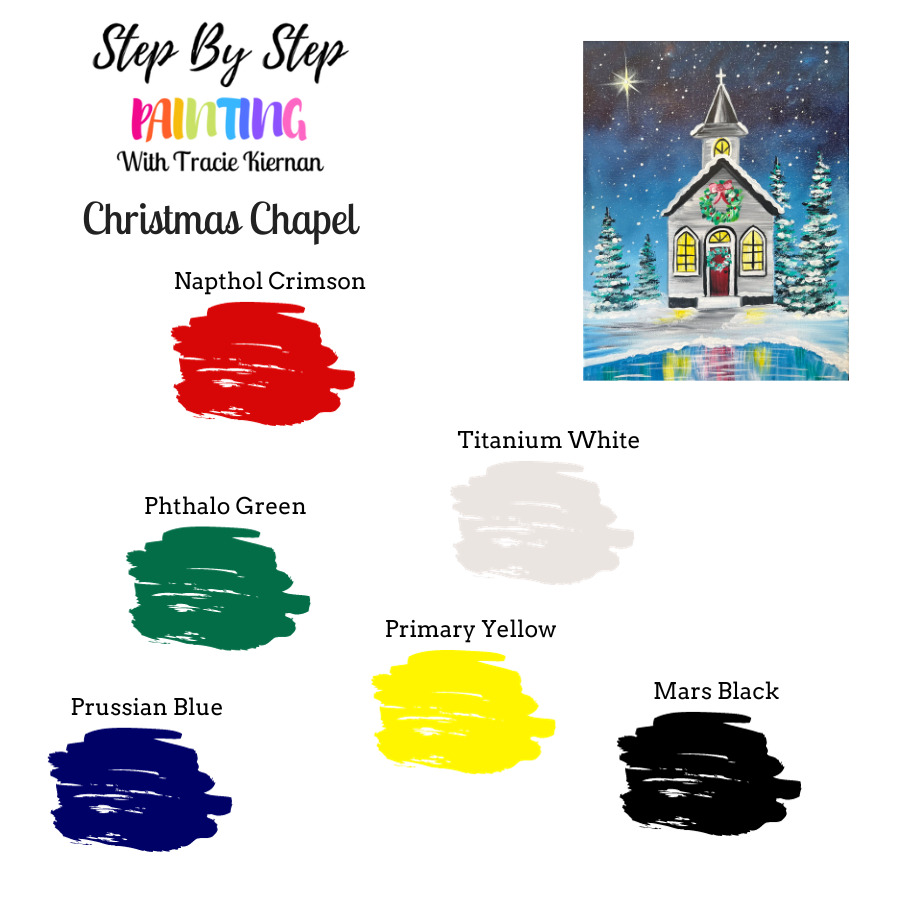
Colors
- Titanium White
- Mars Black
- Prussian Blue (sub Phthalo blue if you don’t have this)
- Napthol Crimson (sup any red if you don’t have this)
- Primary Yellow
- Phthalo Green (sub any green if you don’t have this)

Color Palette
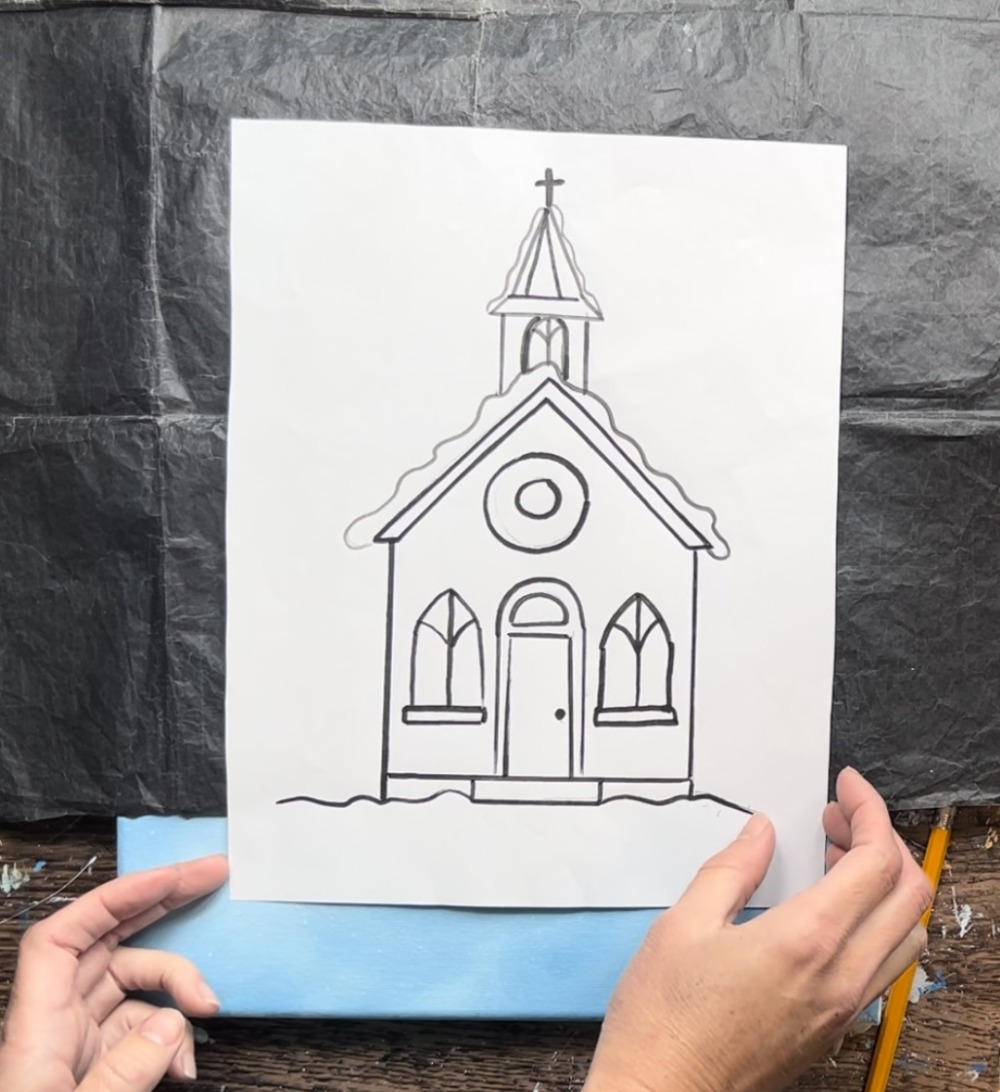
Traceable
The traceable is used in the demonstration of this tutorial. Print it onto one sheet of paper for use on a 11 x 14 canvas.

Directions At A Glance
Video
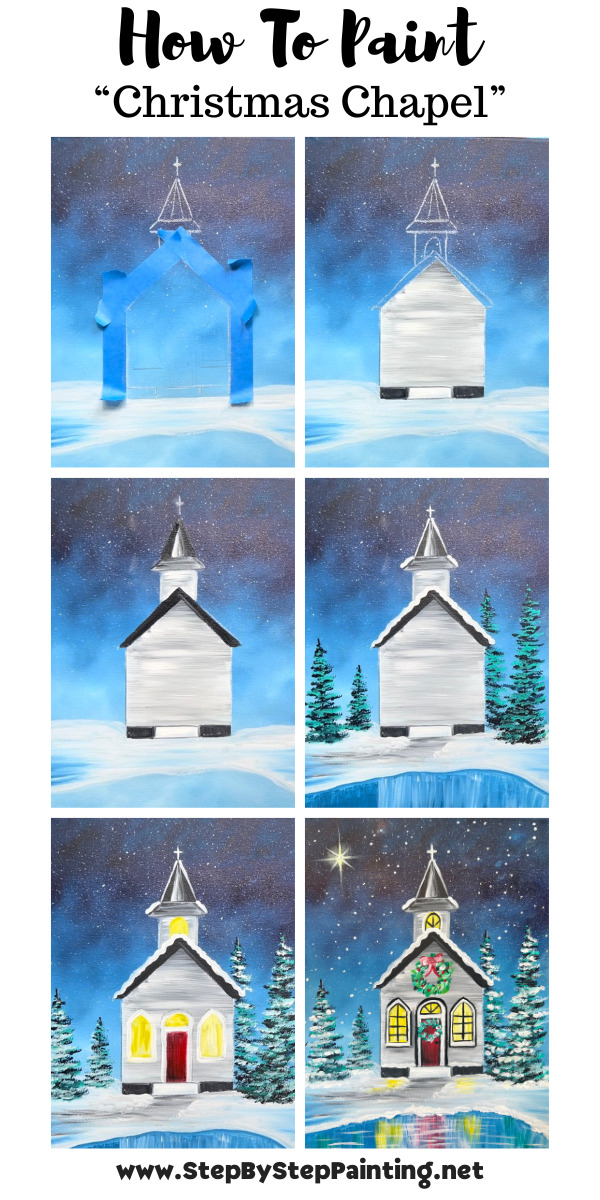
Step By Step Instructions
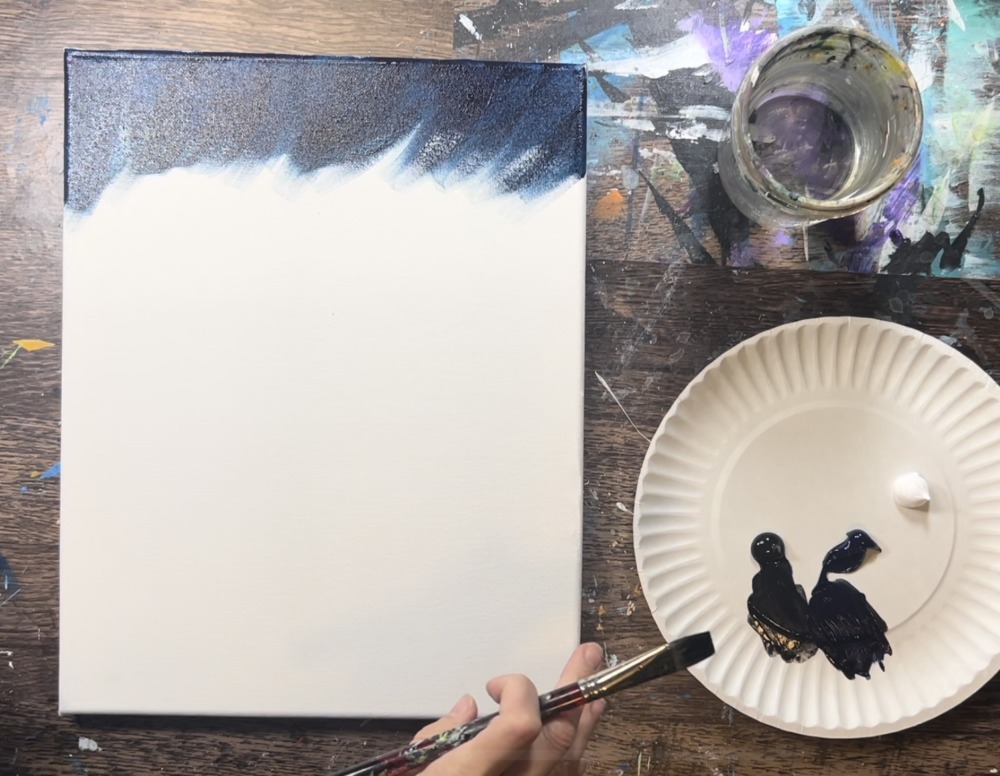
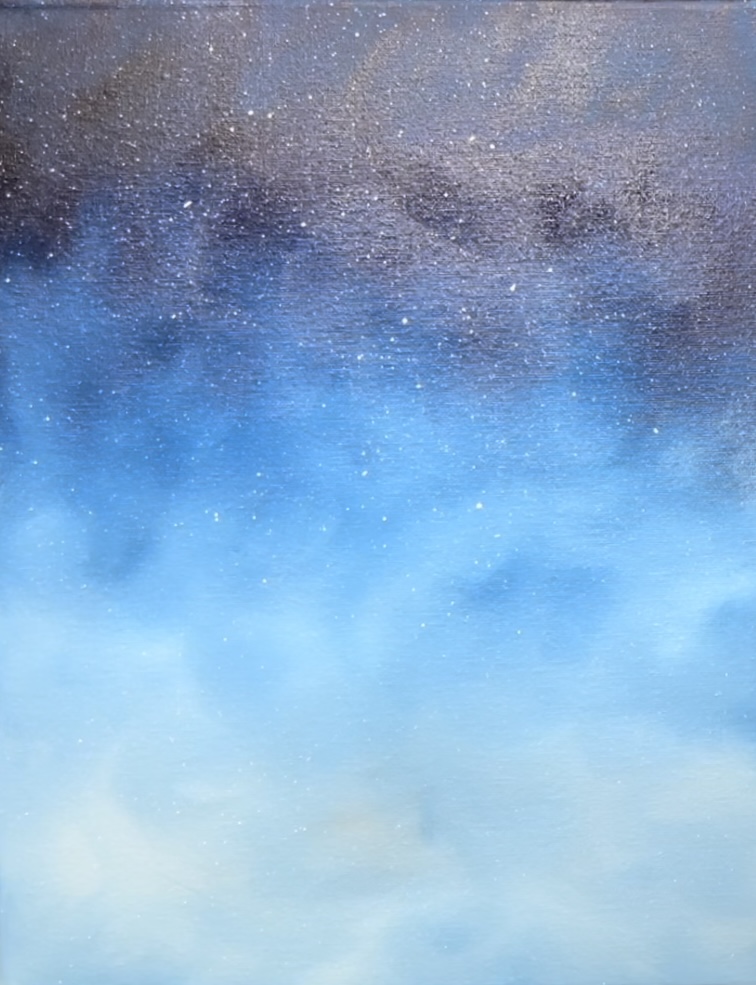
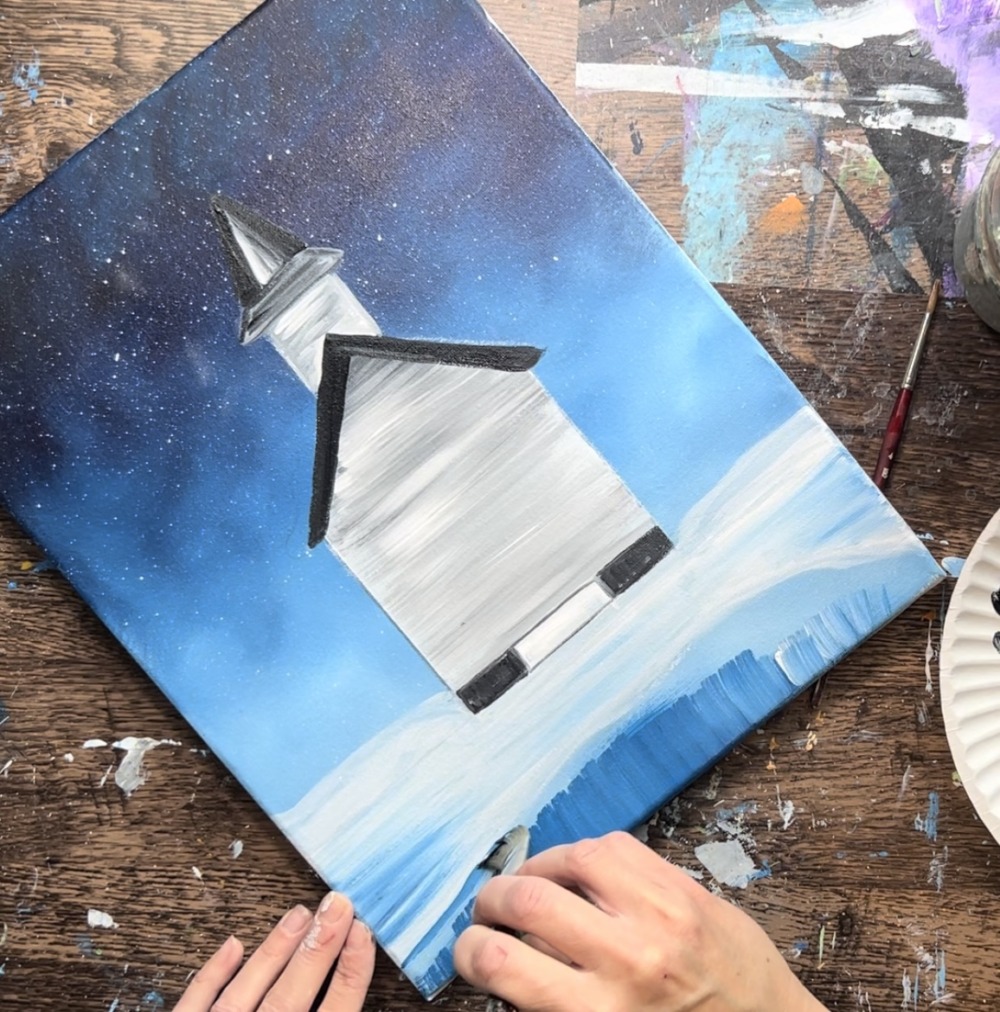
1. Paint the background sky
This background is painted using two brushes: the 3/4 flat and a blender brush. The 3/4 flat is used to apply the paint and the blender brush is used to “dry blend” the color into soft strokes. The sky in this background will be very dark at the top and become lighter as it goes to the bottom edge of the canvas.
Load your palette with Prussian blue, mars black and titanium white. Mix about equal parts black and blue together to make a very dark blue. Load your 3/4 flat brush into the dark blue and paint about a fifth of the way down the canvas with angle/ cross-hatching paint strokes.
Next, reload your brush into just the Prussian blue. Continue to paint until you are about a third of the way down the canvas.
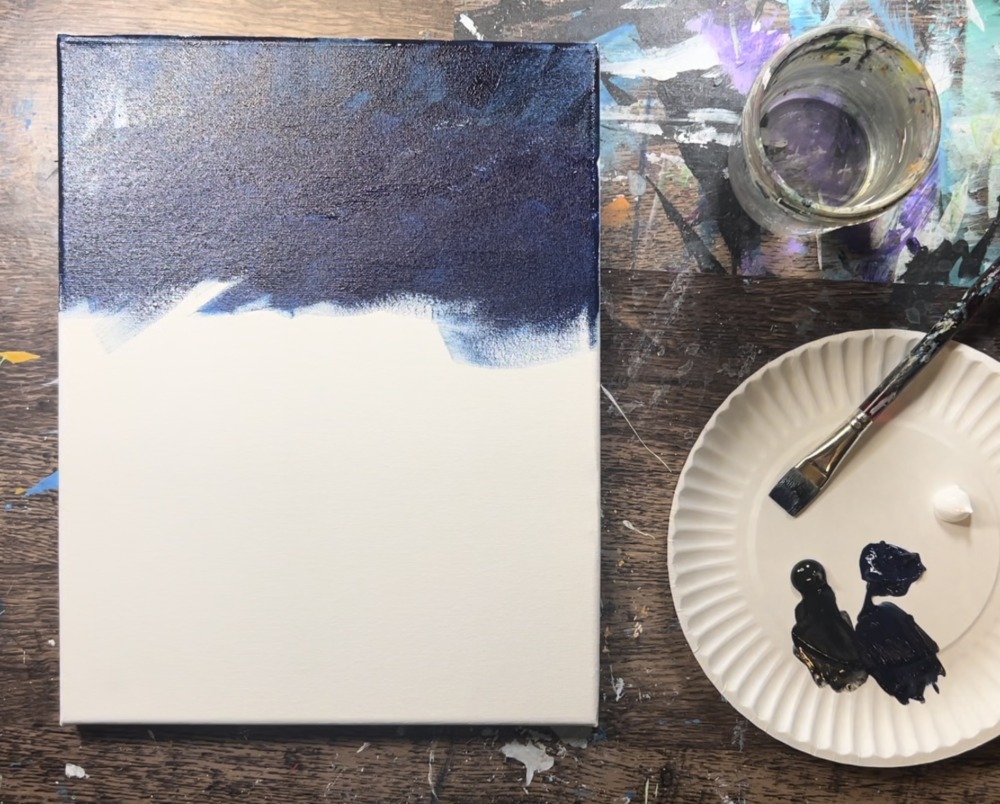
Next, get your blender brush before this first layer of paint dries. Do not load it into any paint or water. Smooth out your paint strokes on the canvas by lightly using the tip of the bristles to paint in circular strokes.
Next, go back to your 3/4 flat brush. Do not rinse it and load it into titanium white.
Paint short angle strokes. This will look like a medium blue. If needed, add a little more blue to your bush. It shouldn’t be too light of a blue yet.
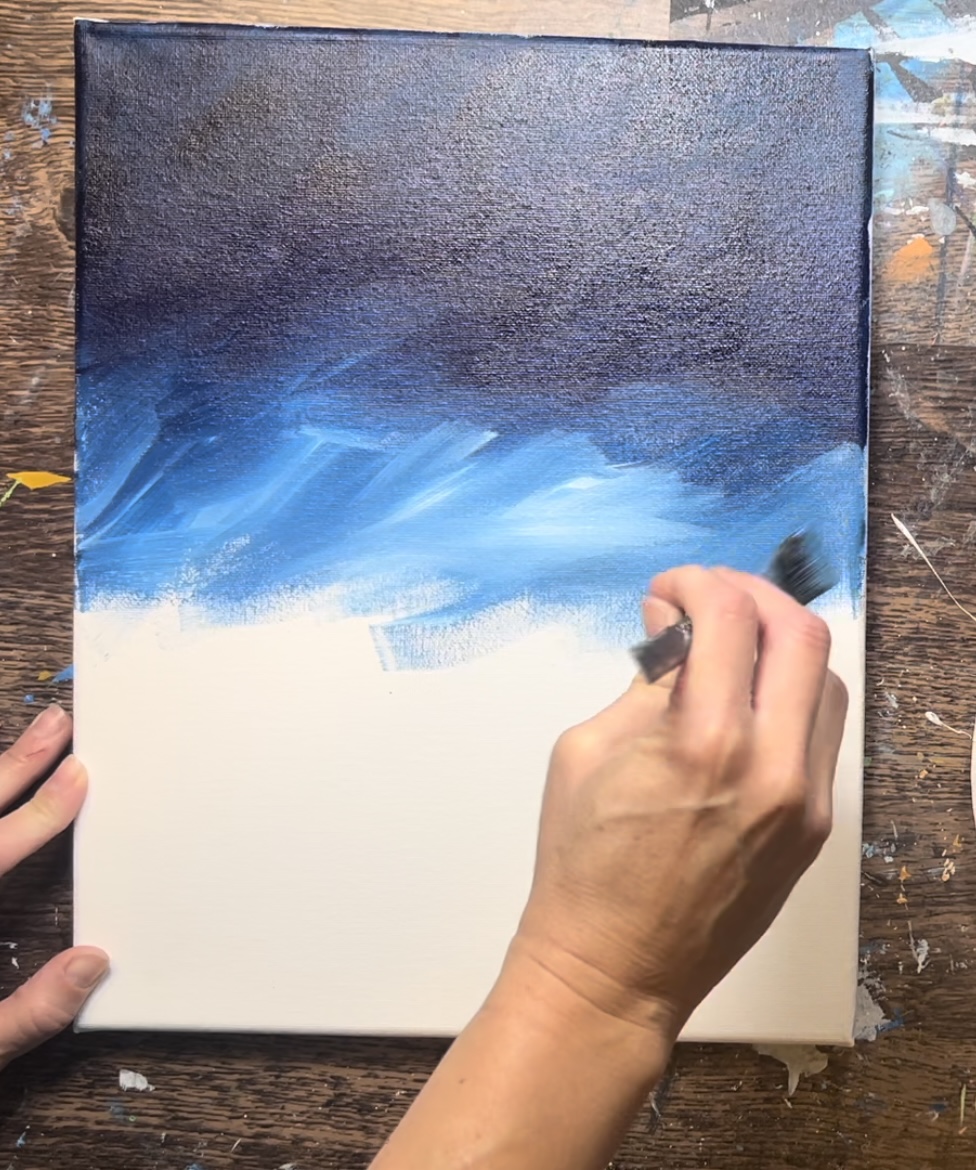
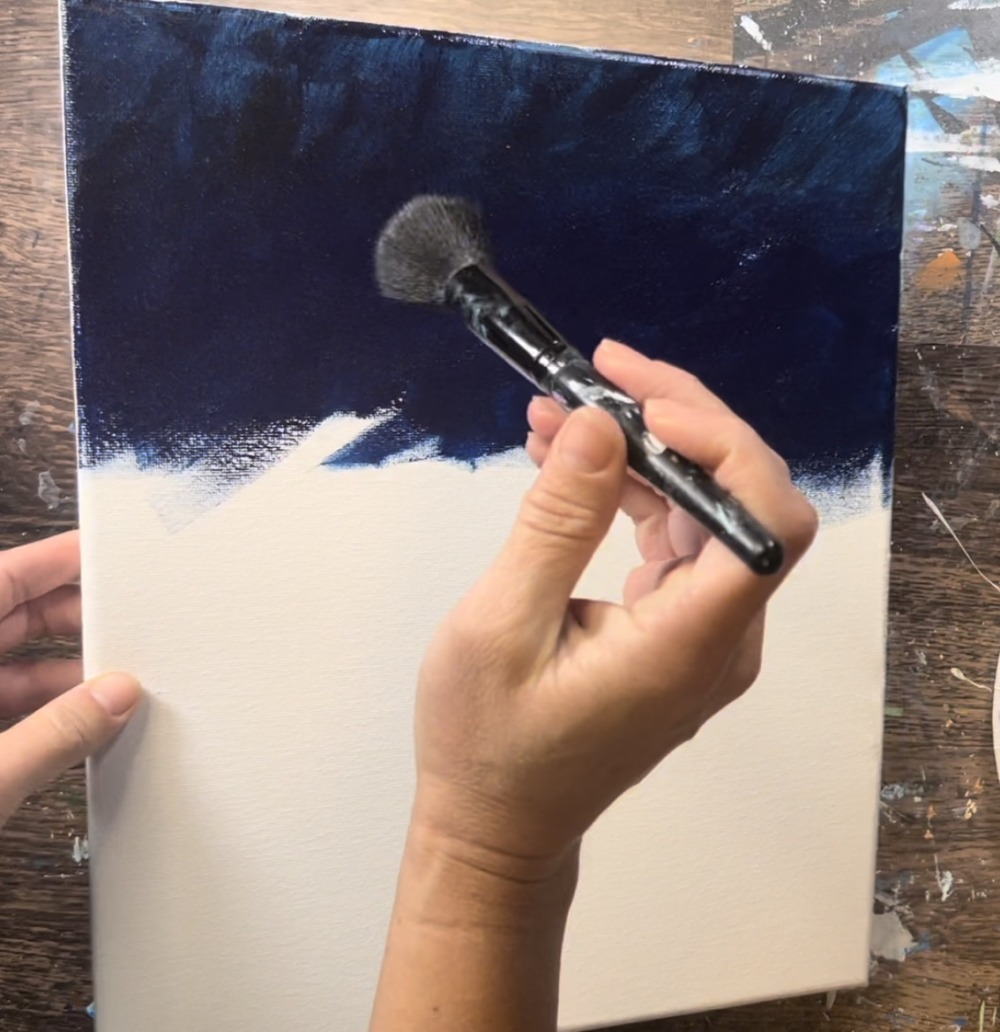
Then use the blender brush to blend the medium blue up into the darker blue. IT will look soft and cloud-like.
Then load your brush into more titanium white. Paint another row of white angle strokes that blend with the medium blue. Then use the blender brush to blend this color.
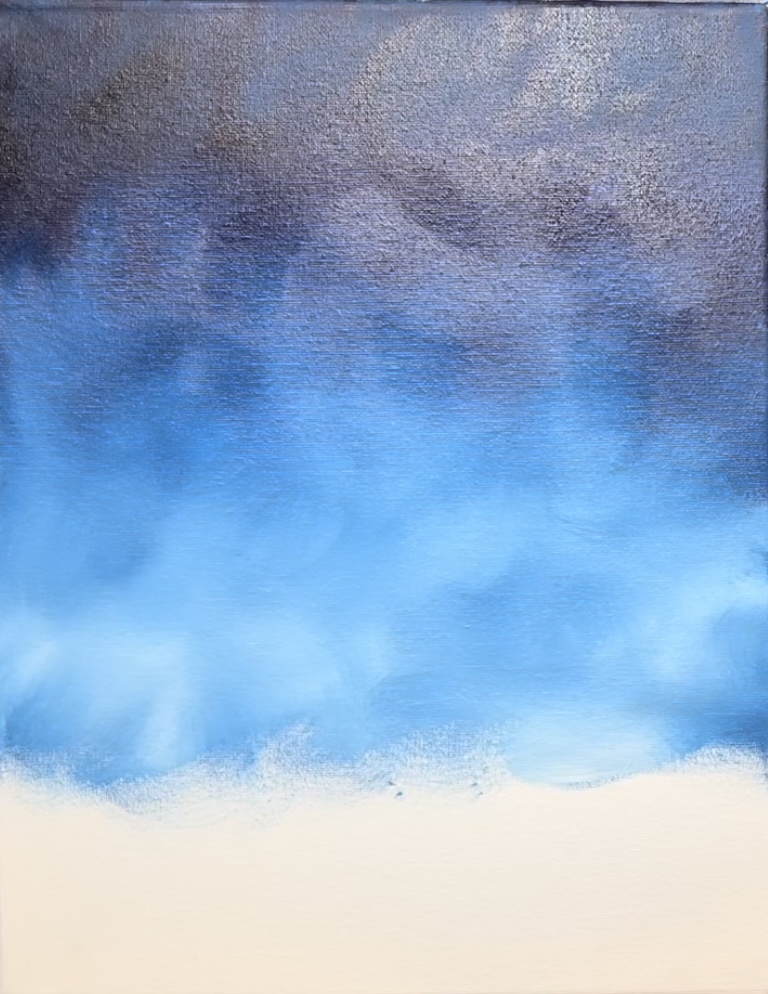
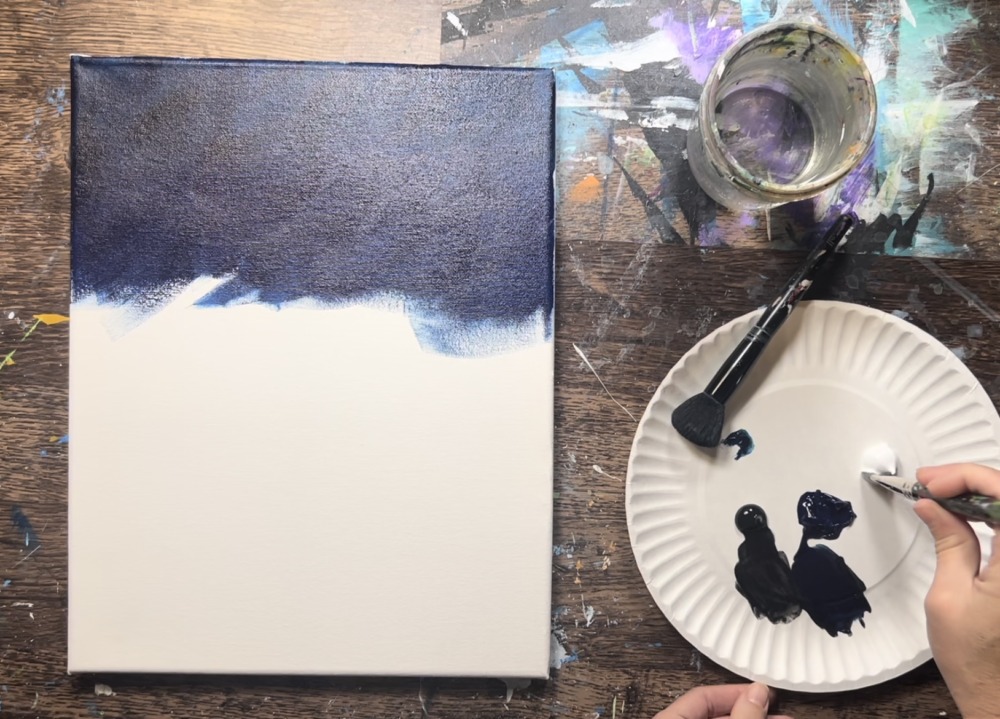
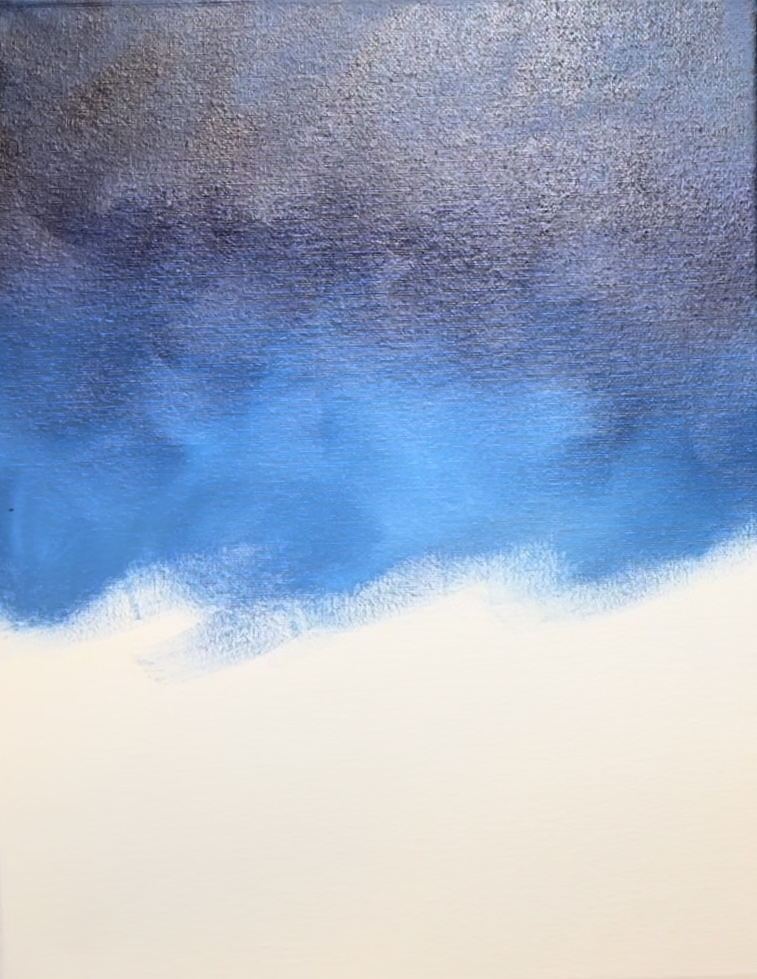
Paint the rest of the canvas all the way to the bottom using this same technique and make sure the bottom is much lighter.
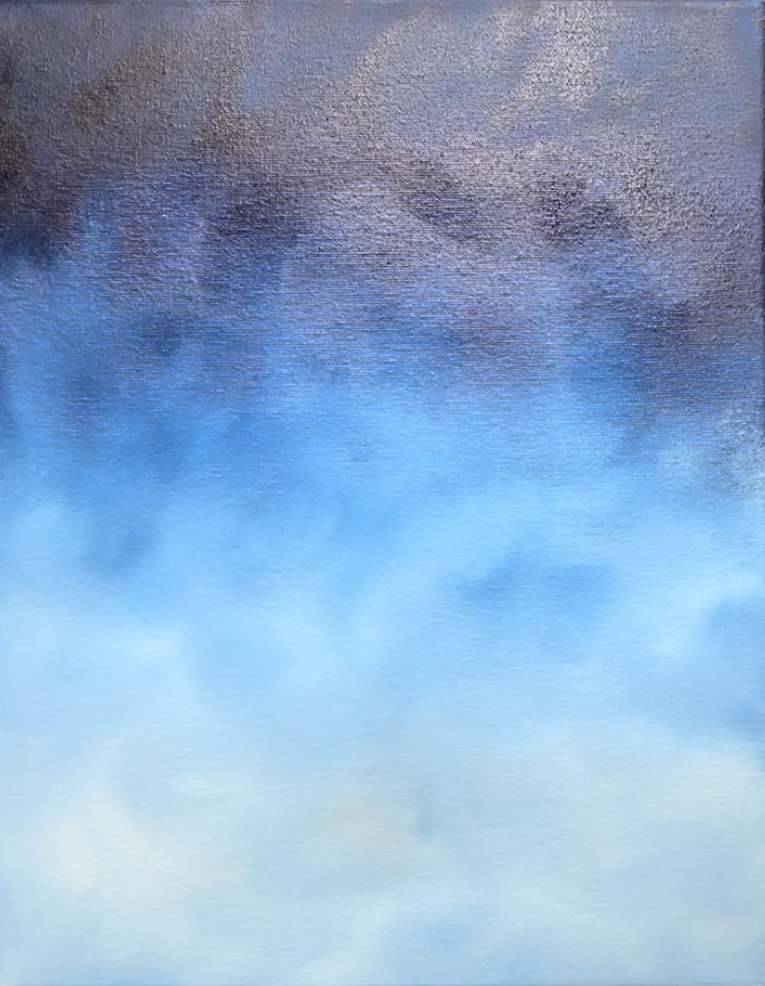
Next, use a “splatter paint toothbrush” and dip it into a small amount of water. Add titanium white paint to the brush and test it out on a different surface. Make sure the splatter is not too watery and not too thick. Then splatter little white specks all over the canvas. It will show up nicely against the dark areas of the sky.
Wait for this to dry before going onto the next step.
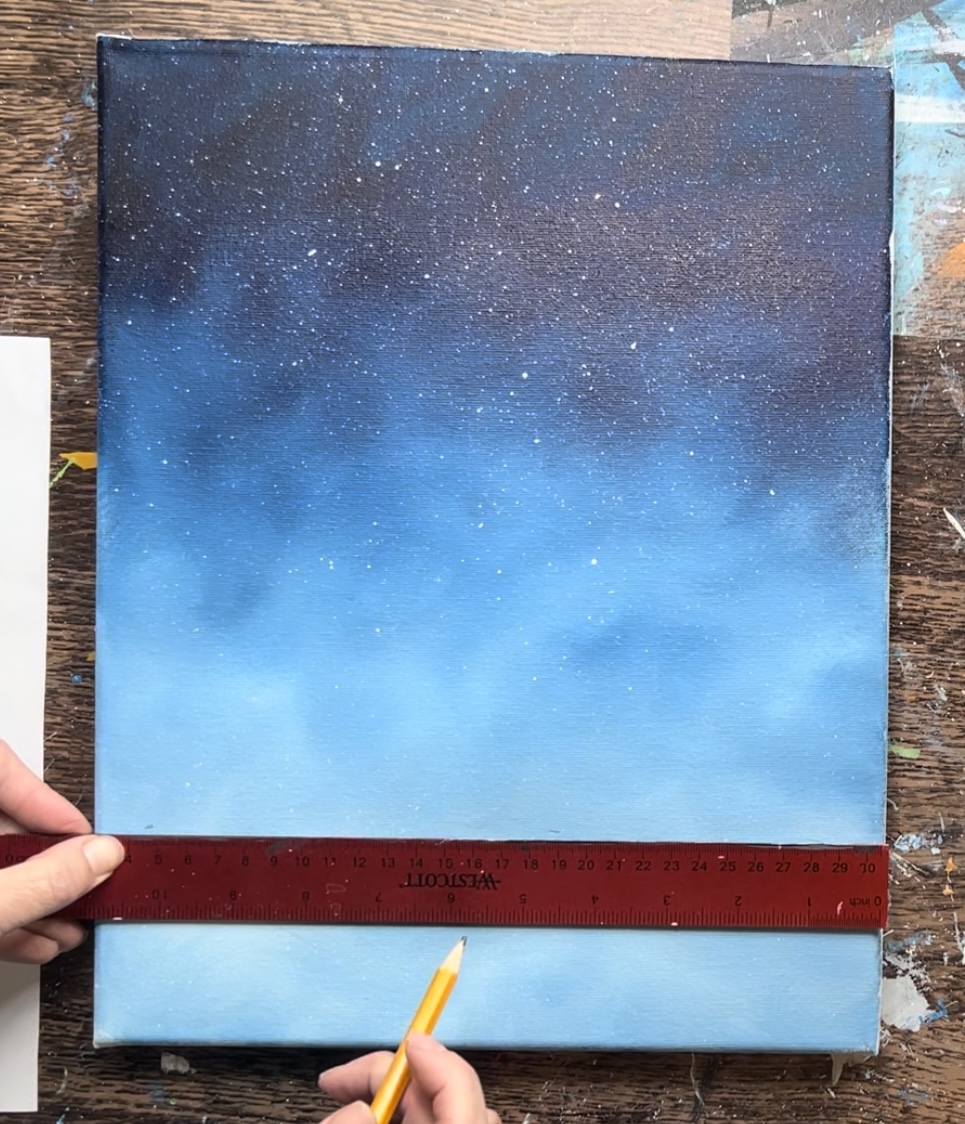
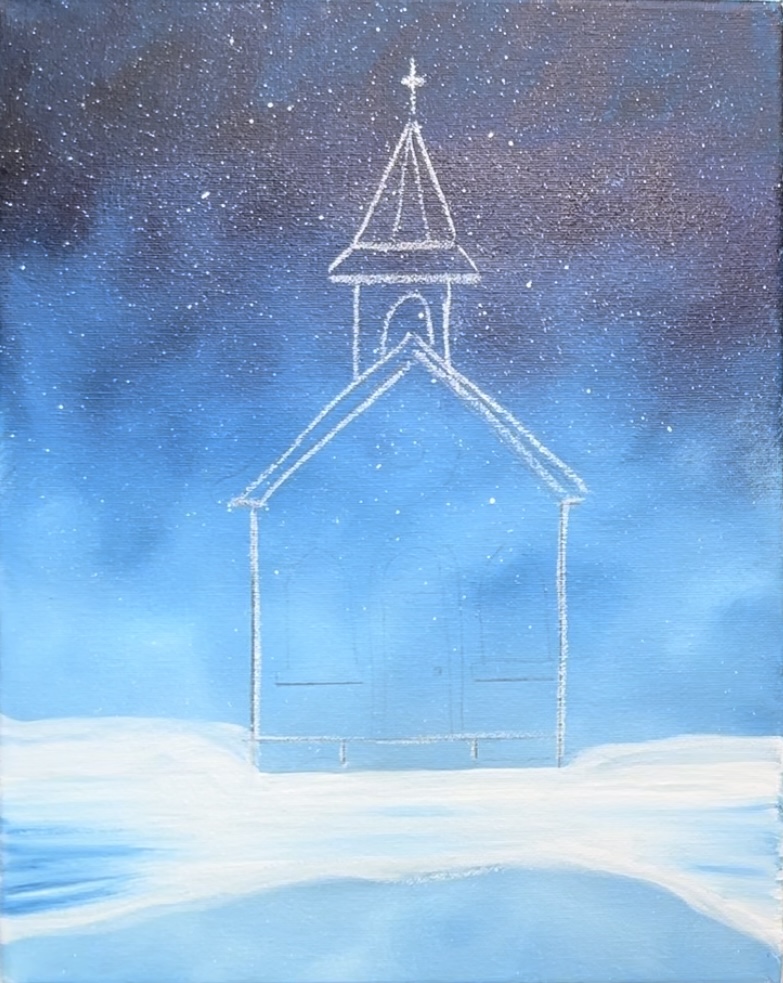
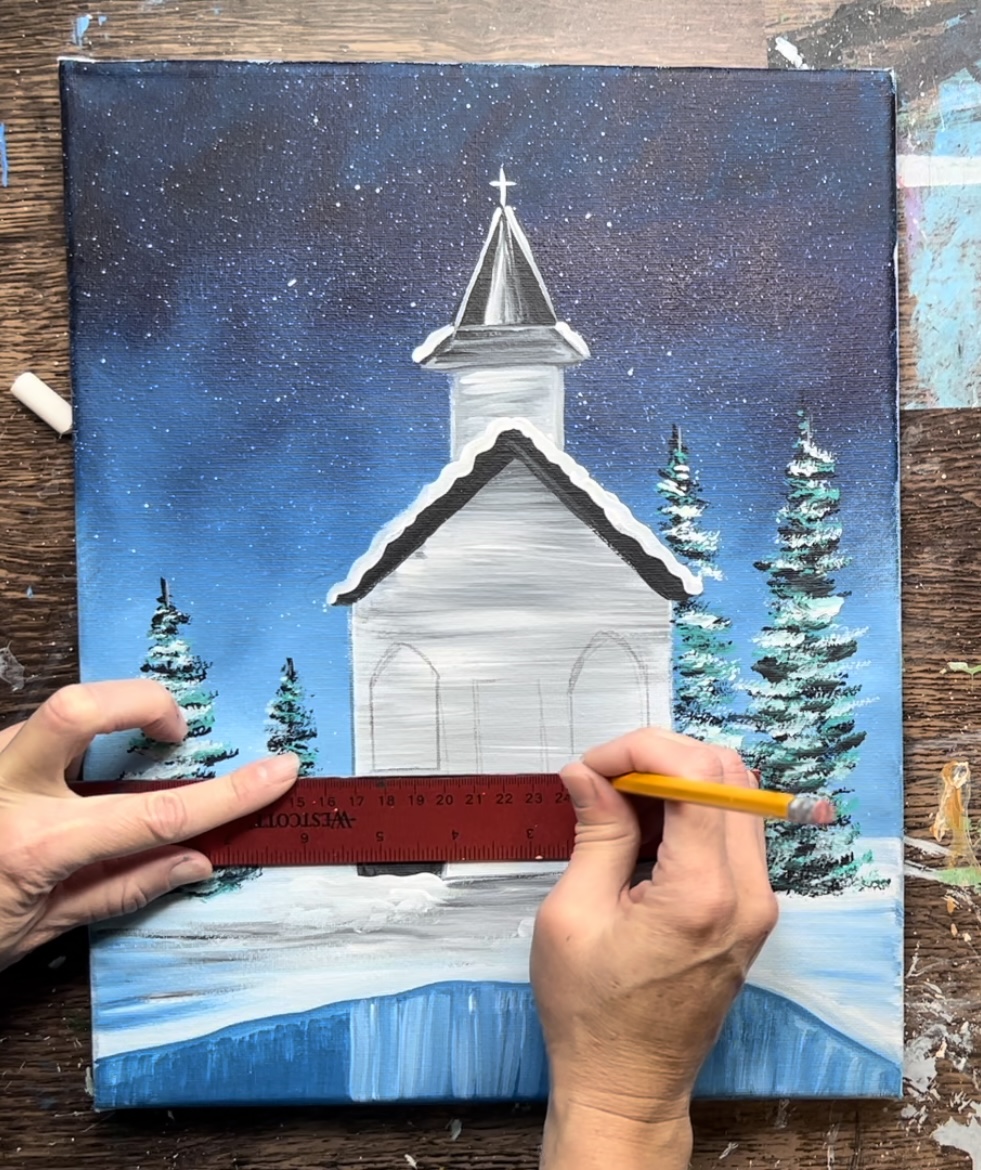
2. Draw horizon line
Use a ruler to draw a horizontal line at about 3″ from the bottom edge of the canvas.
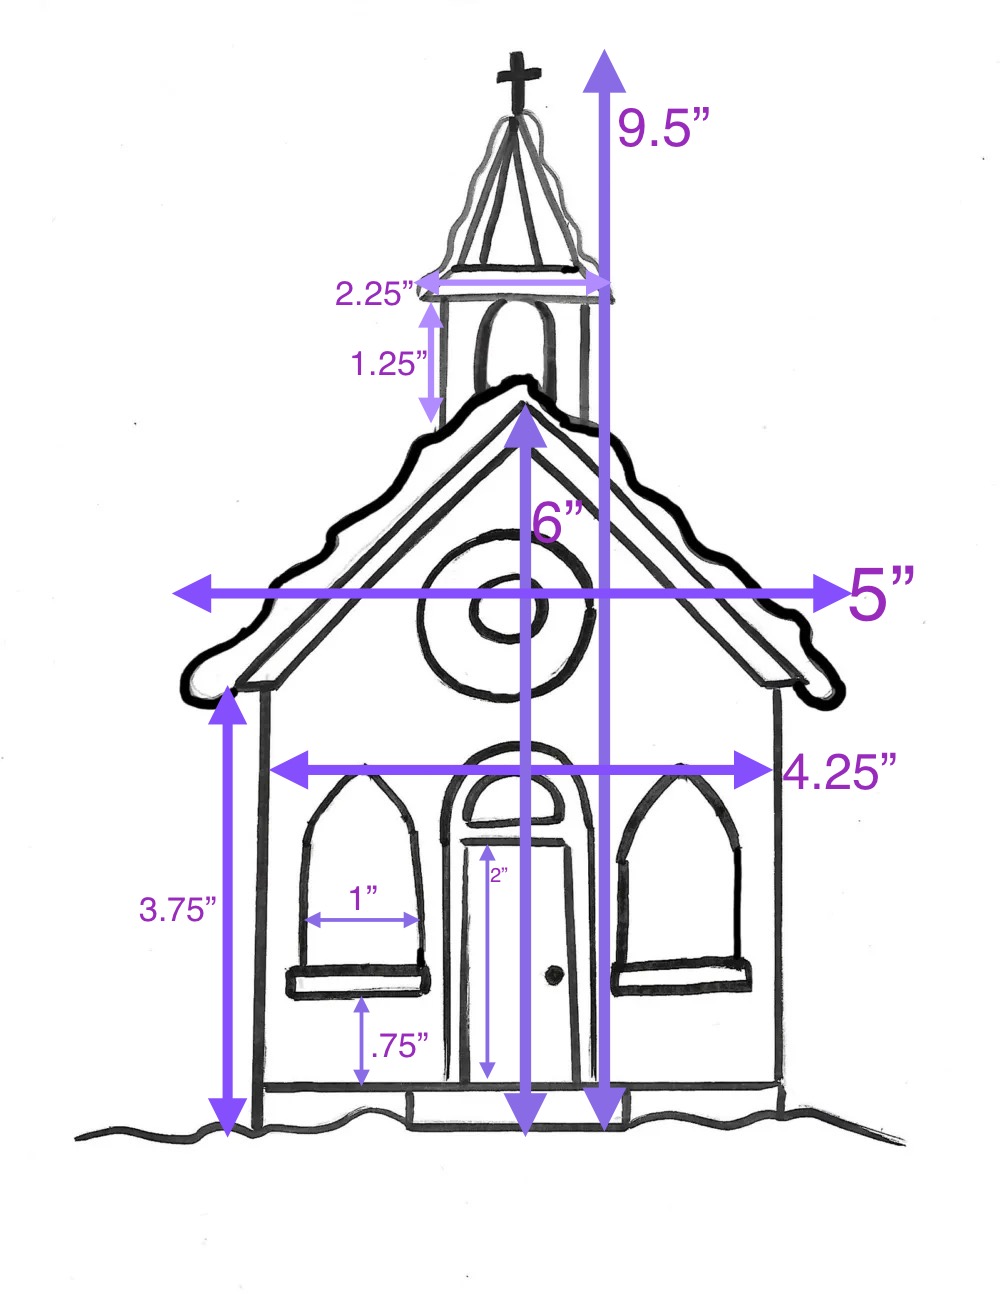
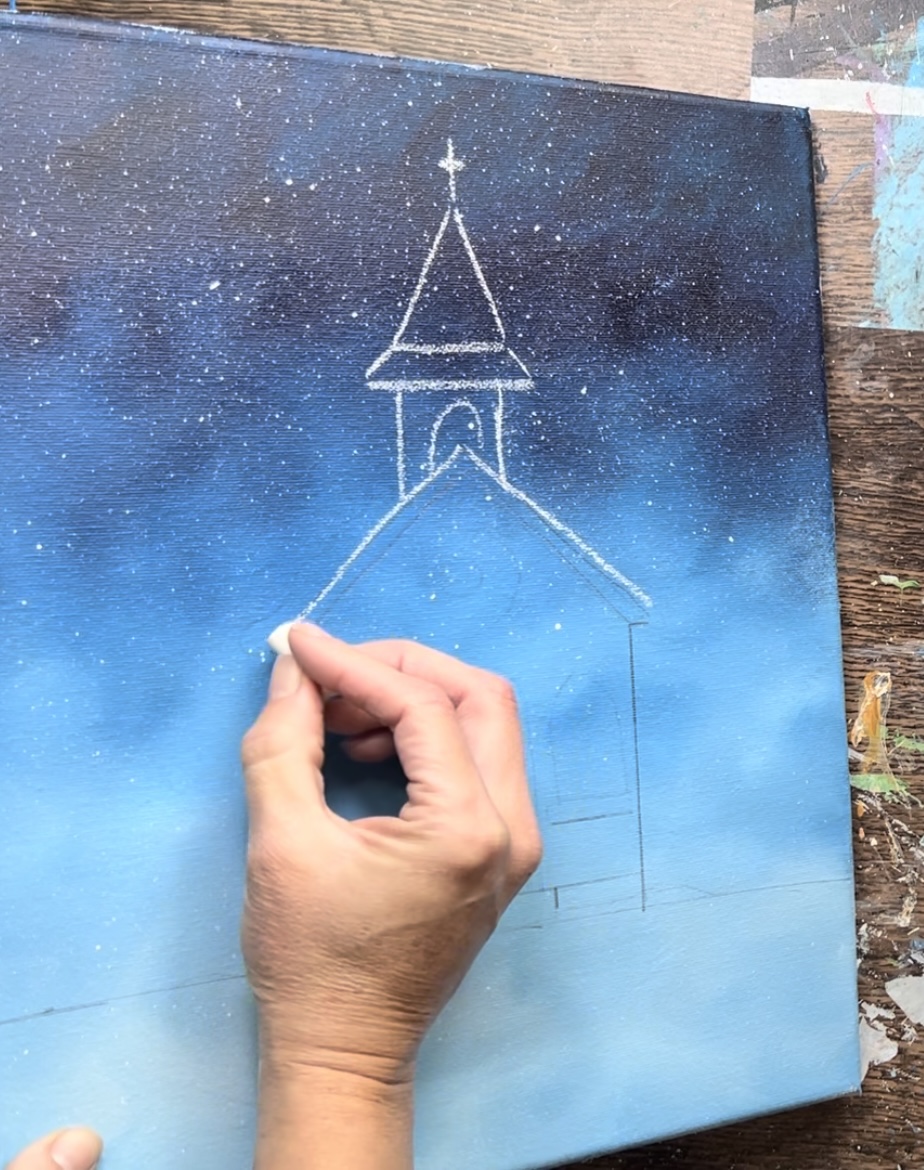
3. Transfer chapel traceable template
Print the chapel template on an 11 x 14 canvas. Place it over a sheet of graphite paper (shiny side down). The bottom of the chapel (where the snow line is) lines up with the 3″ horizontal line you drew on the canvas.
Press very firmly to trace the design onto the canvas.
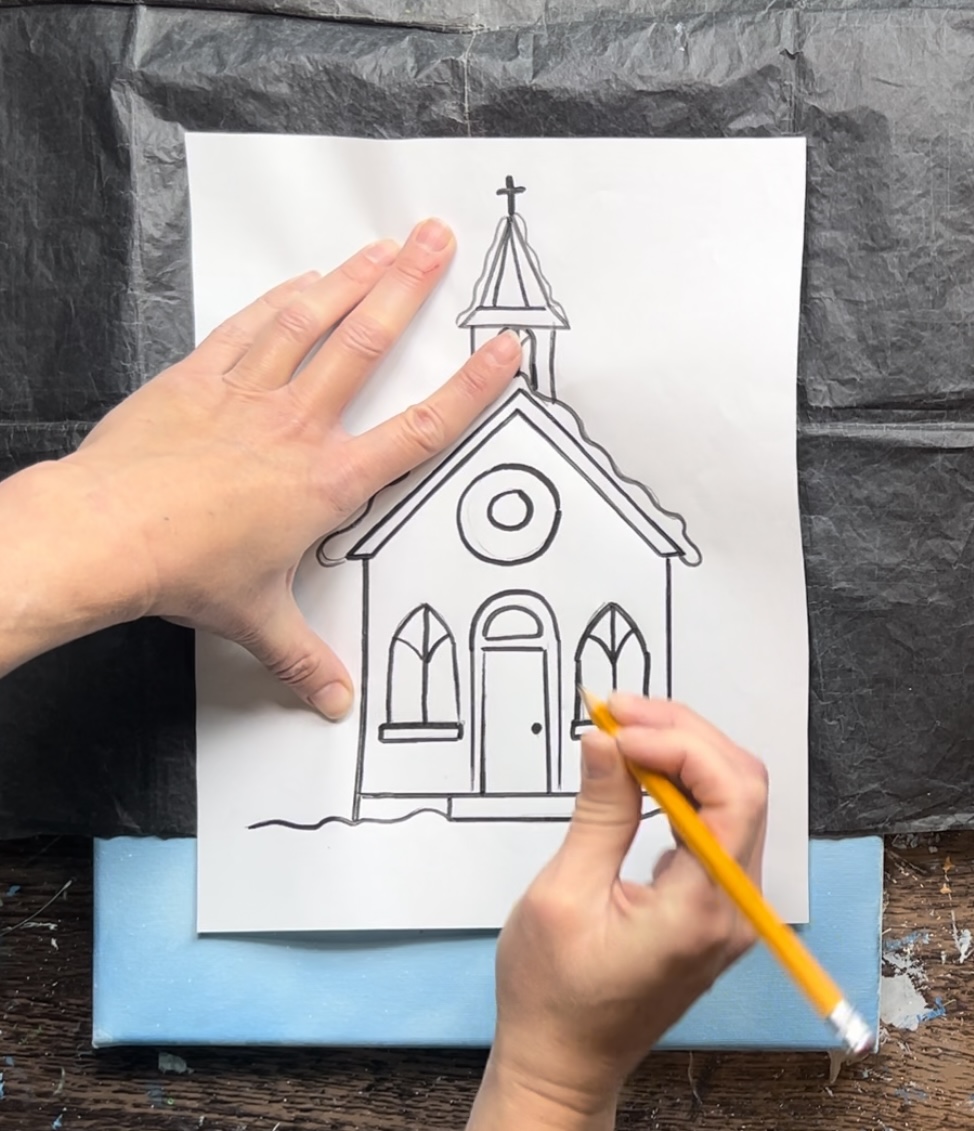
After removing the tracer, you may notice the lines are not as visible in the darker areas. I used a piece of chalk to draw over those lines so that I can see them. If you used white graphite paper, you likely would not need to draw over your lines because they would be visible.
4. Draw lake area
With a piece of chalk or pencil, draw the area of the lake. This is a long, wavy line that curves upwards about 1.5″ from the bottom of the canvas and dips down at each of the corners.
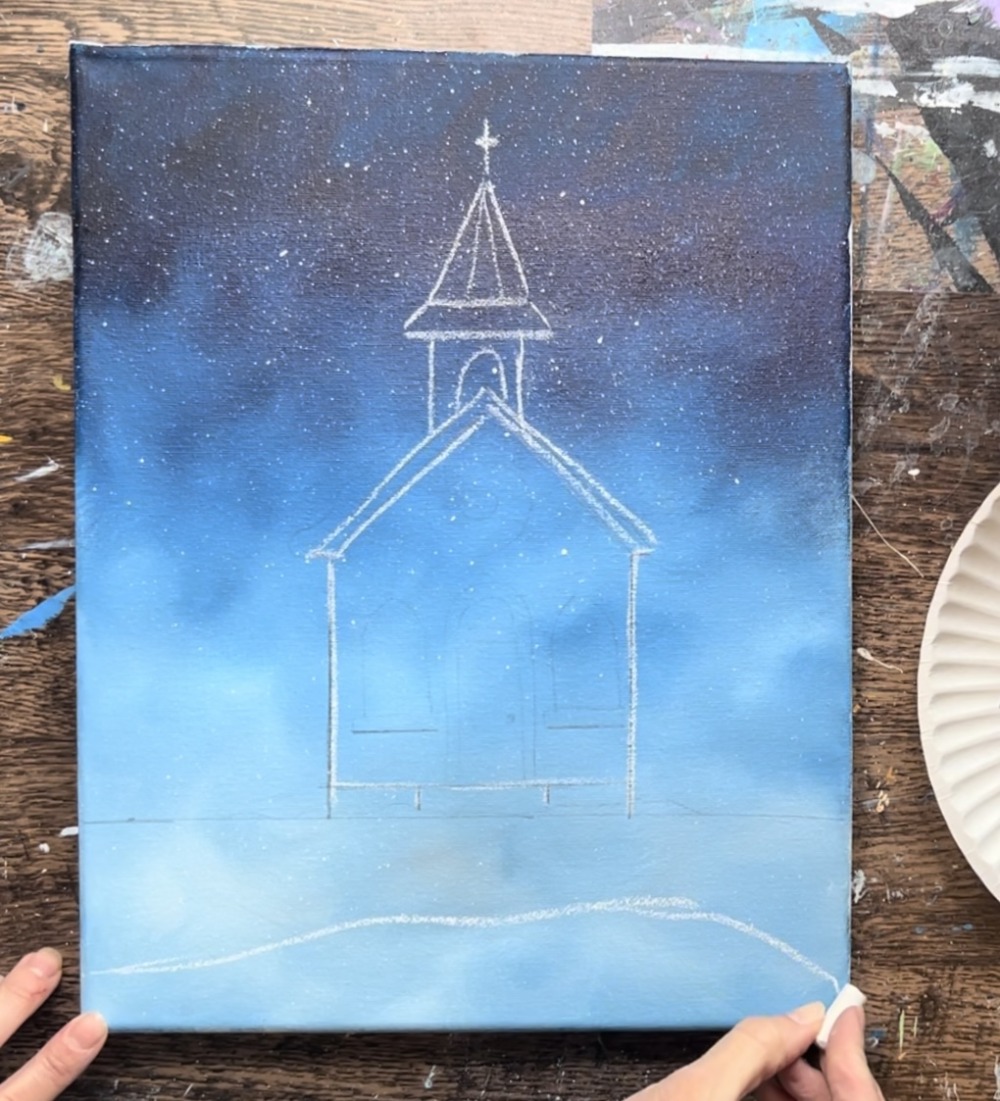
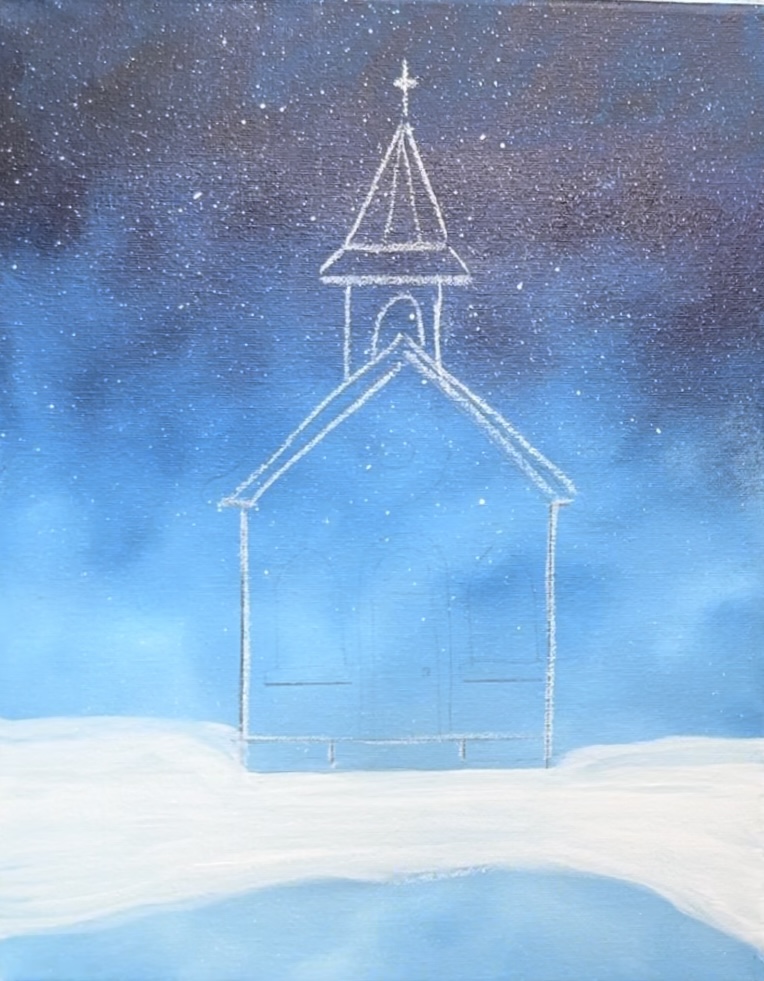
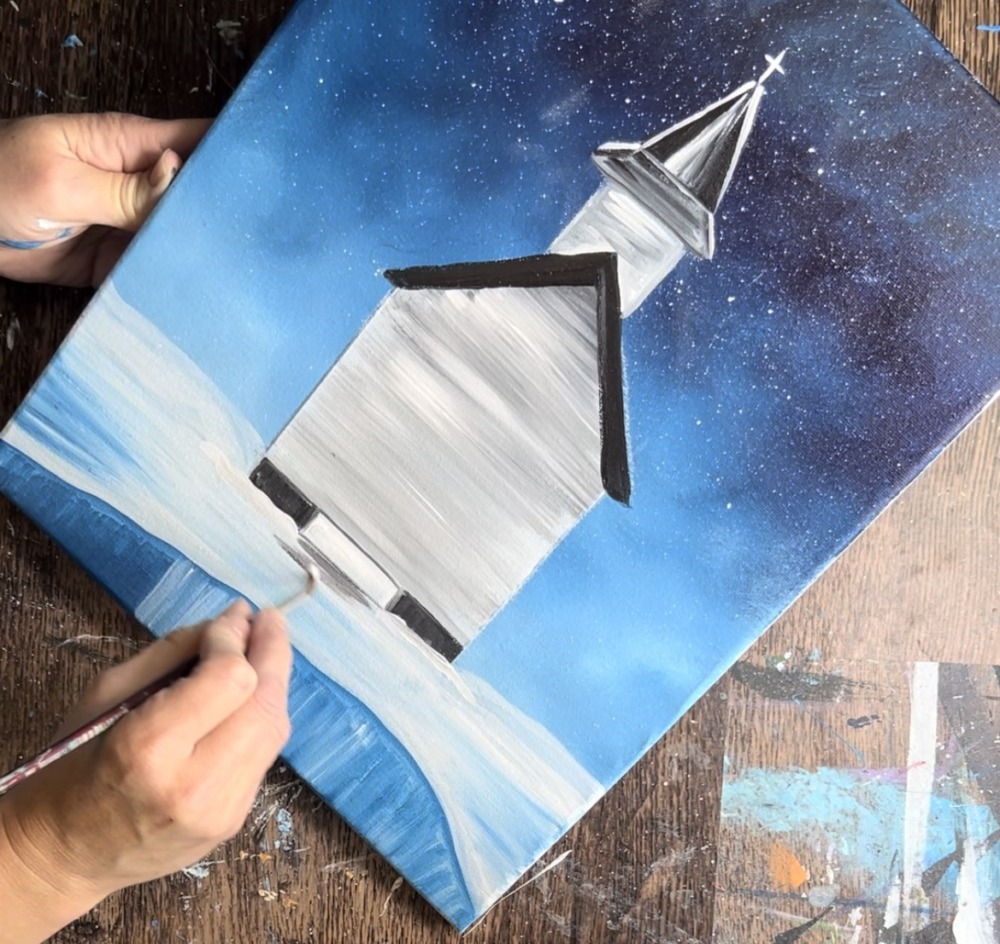
5. Paint snow on ground
Load your palette with fresh titanium white. Use a 3/4 flat brush to paint the snow. This is everything below the chapel, a little bit above the chapel and all around the lake. Do not paint the lake area white.
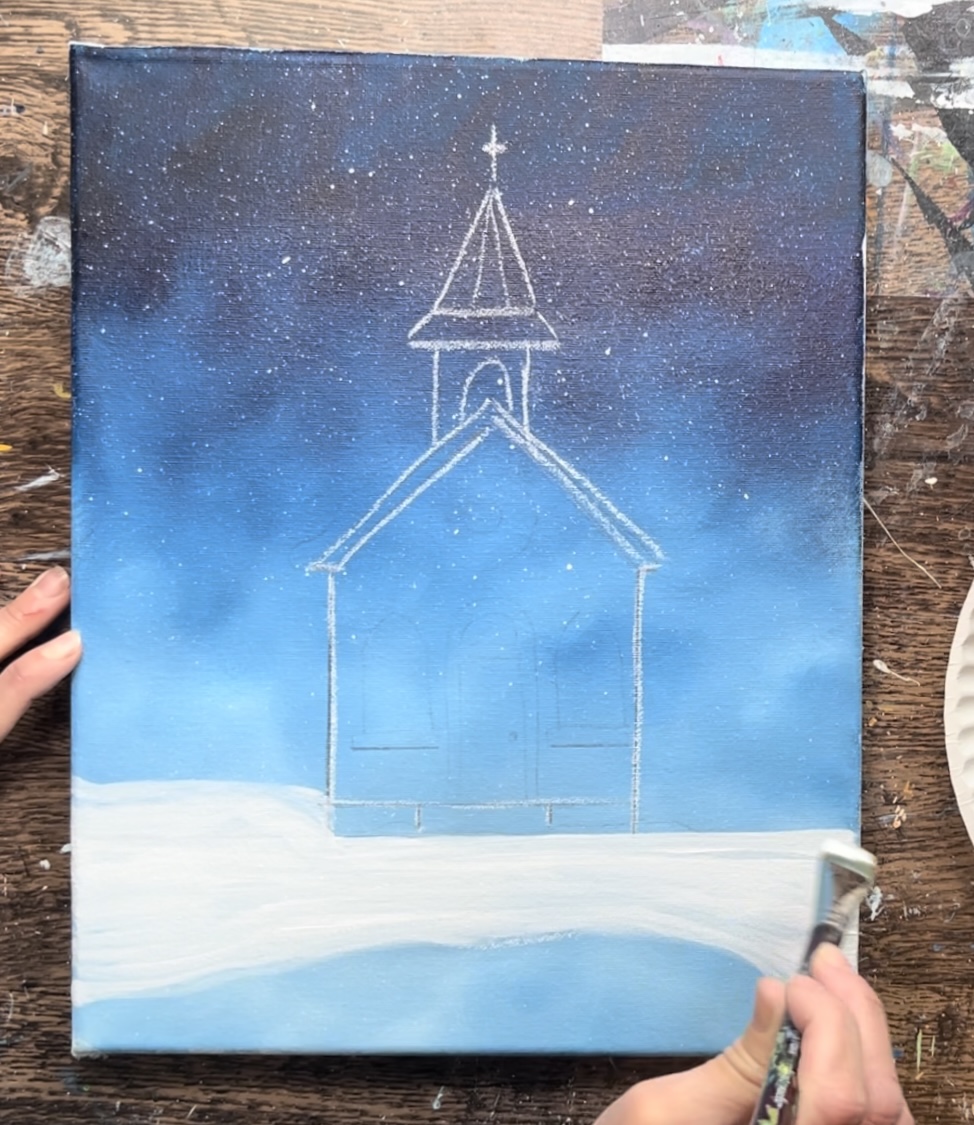
Paint left and right strokes. You only need to do one layer, it does not need to be a bright, solid white. In other words, it is okay if the background color is showing through a little.
Next, add a small amount of Prussian blue to the brush. Paint a little bit of blue on the bottom part of the white snow area and blend it up. This gives your snow area a little bit of shadow.
6. Apply painters tape
Place painters tape along the edges of the front part of the chapel (the house shape).
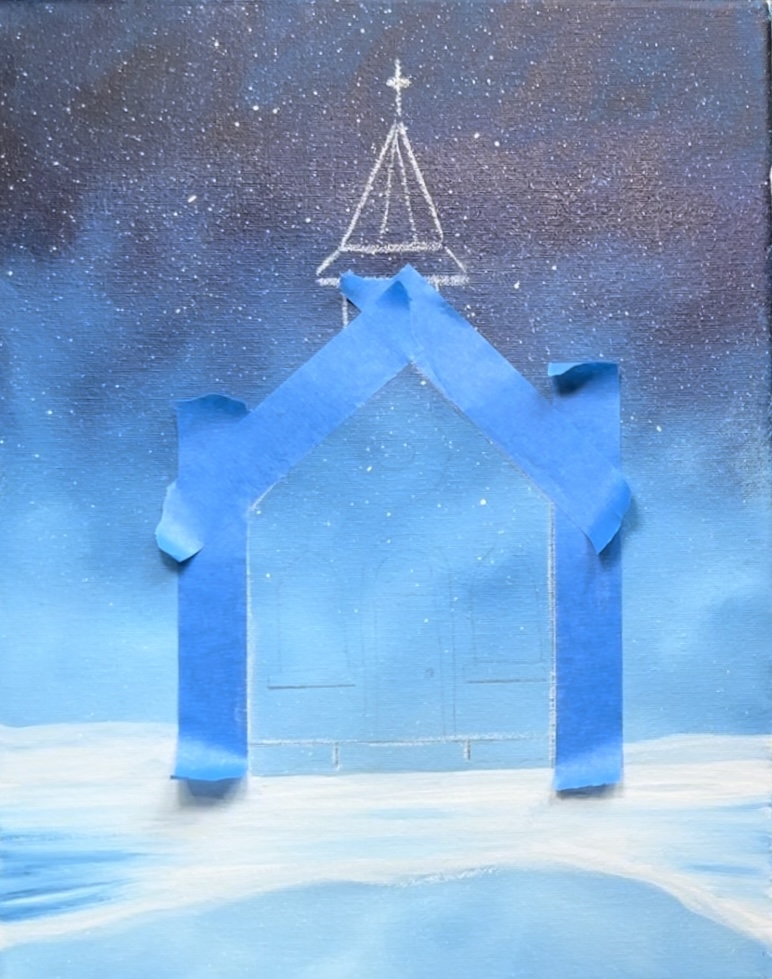
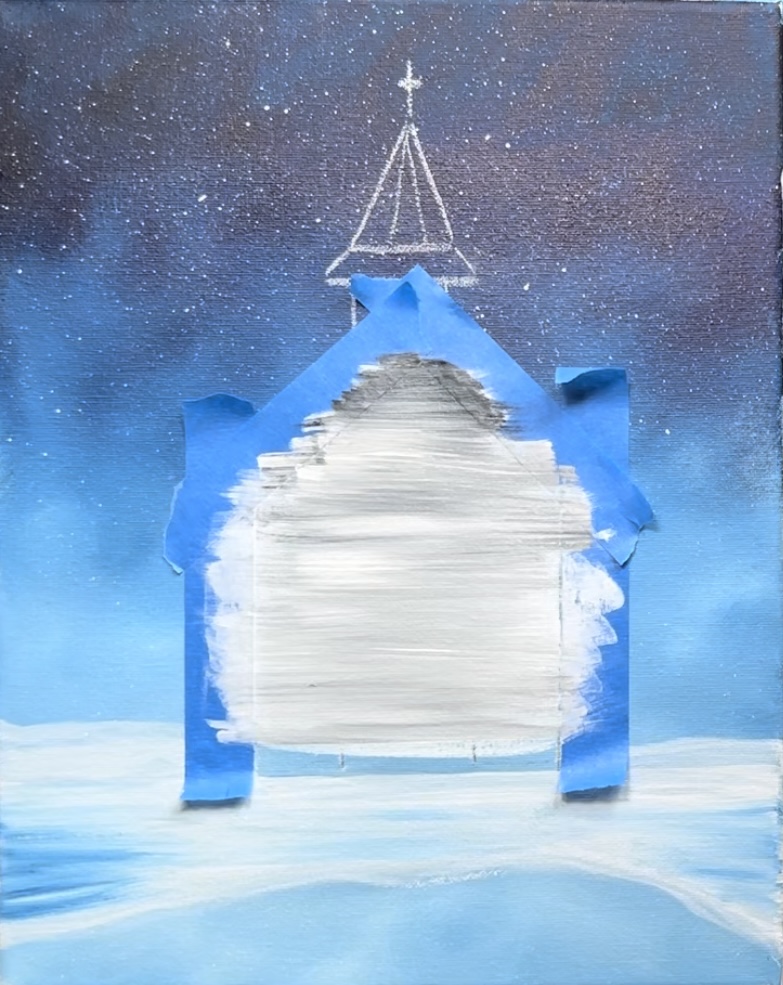
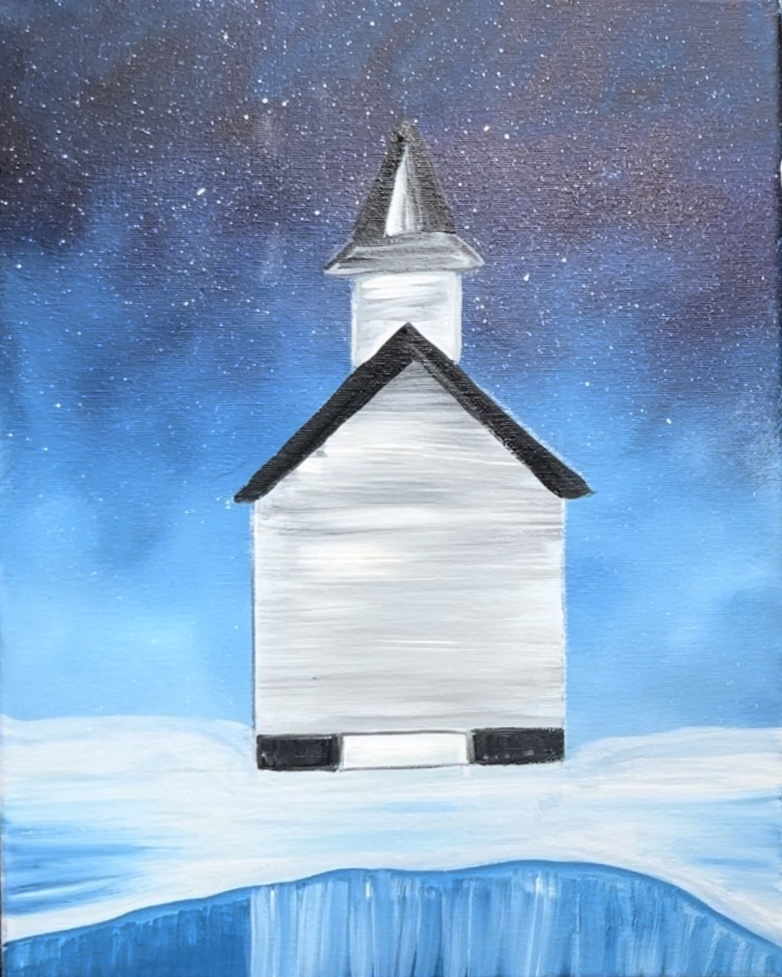
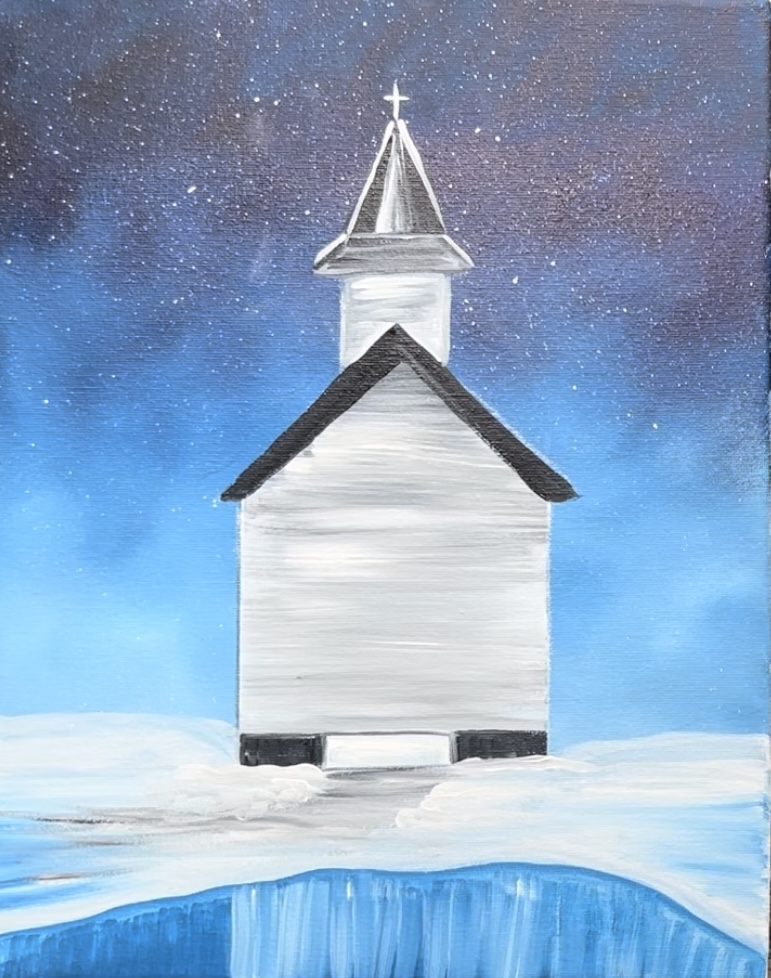
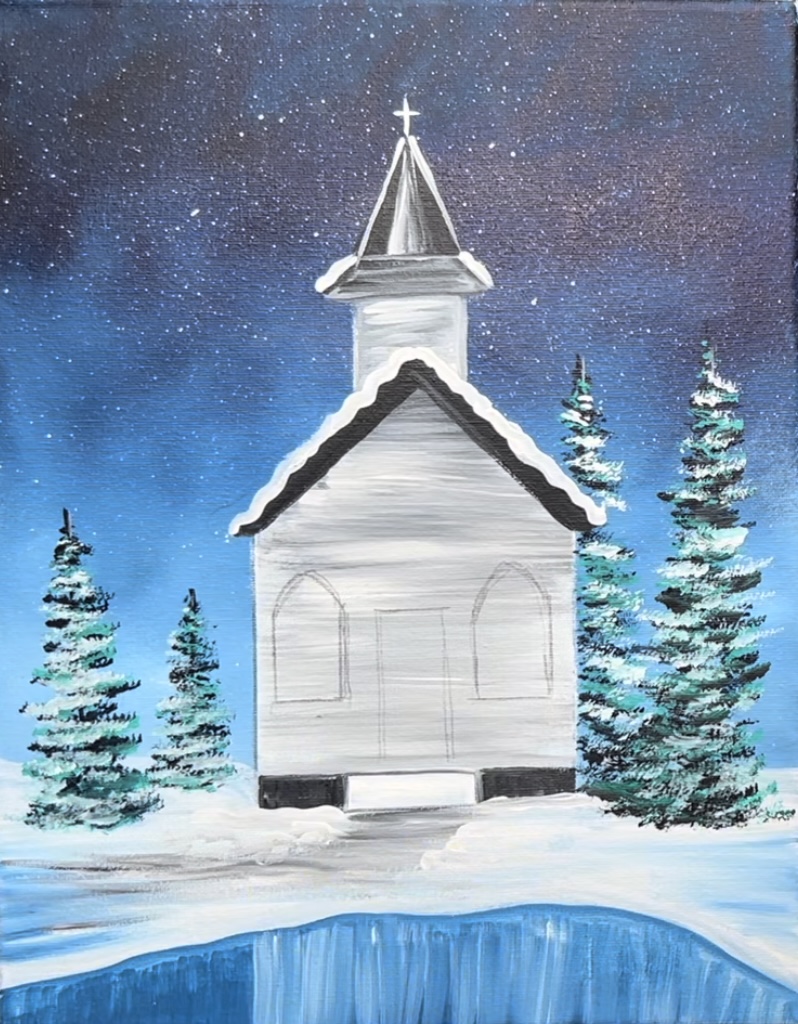
7. Paint chapel front building
Load your palette with titanium white and a small amount of mars black. Use the 3/4 flat brush to paint the first layer of the building (inside the painters tape) a layer of titanium white paint. Make sure to paint with left and right paint strokes.
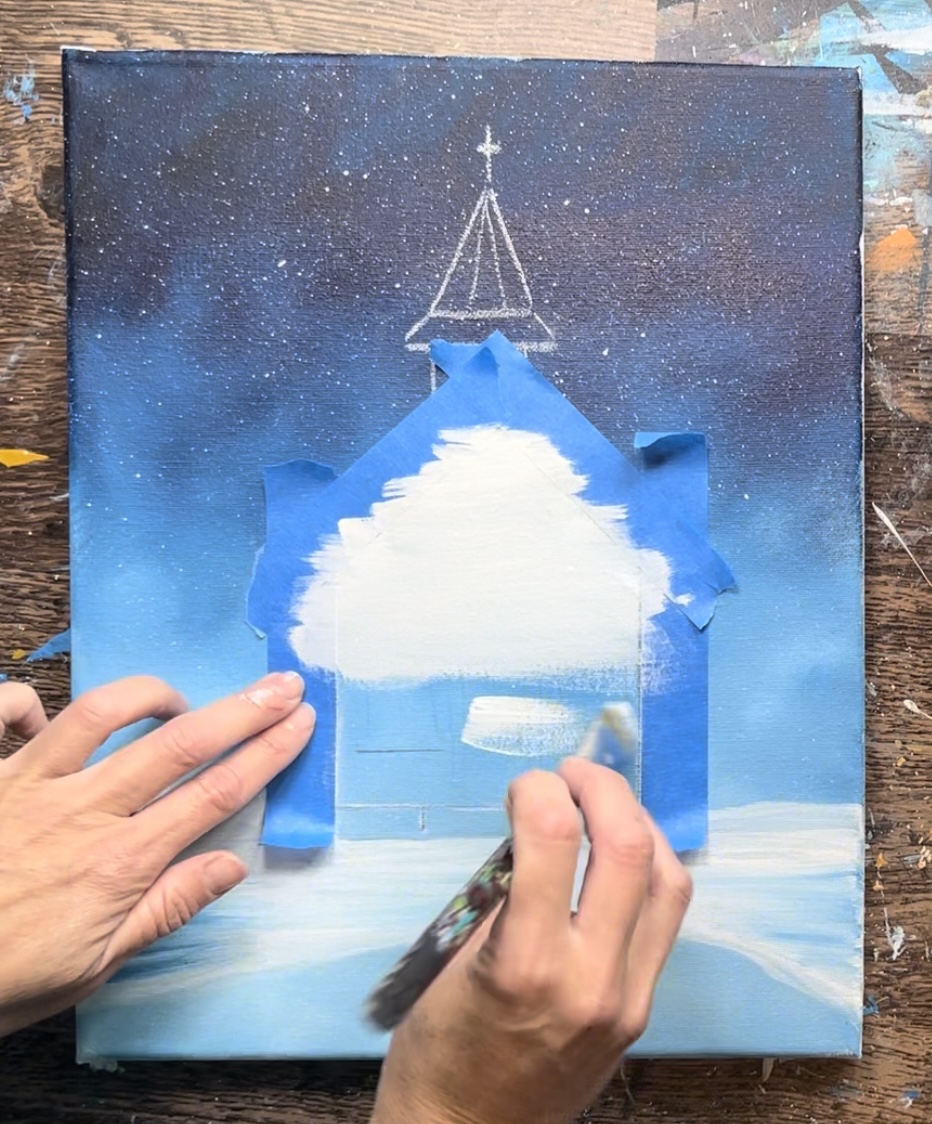
Next, add a small amount of mars black onto your brush. Gently blend the black into the white so that you achieve horizontal gray strokes on the building. Try not to overland the colors. This is to create the texture on the front of the building.
8. Paint step & foundation
Use a #4 round brush to paint the step white. This is the rectangle below where the door will be.

Then paint the foundation mars black. These are the two rectangles on each side of the white rectangle.
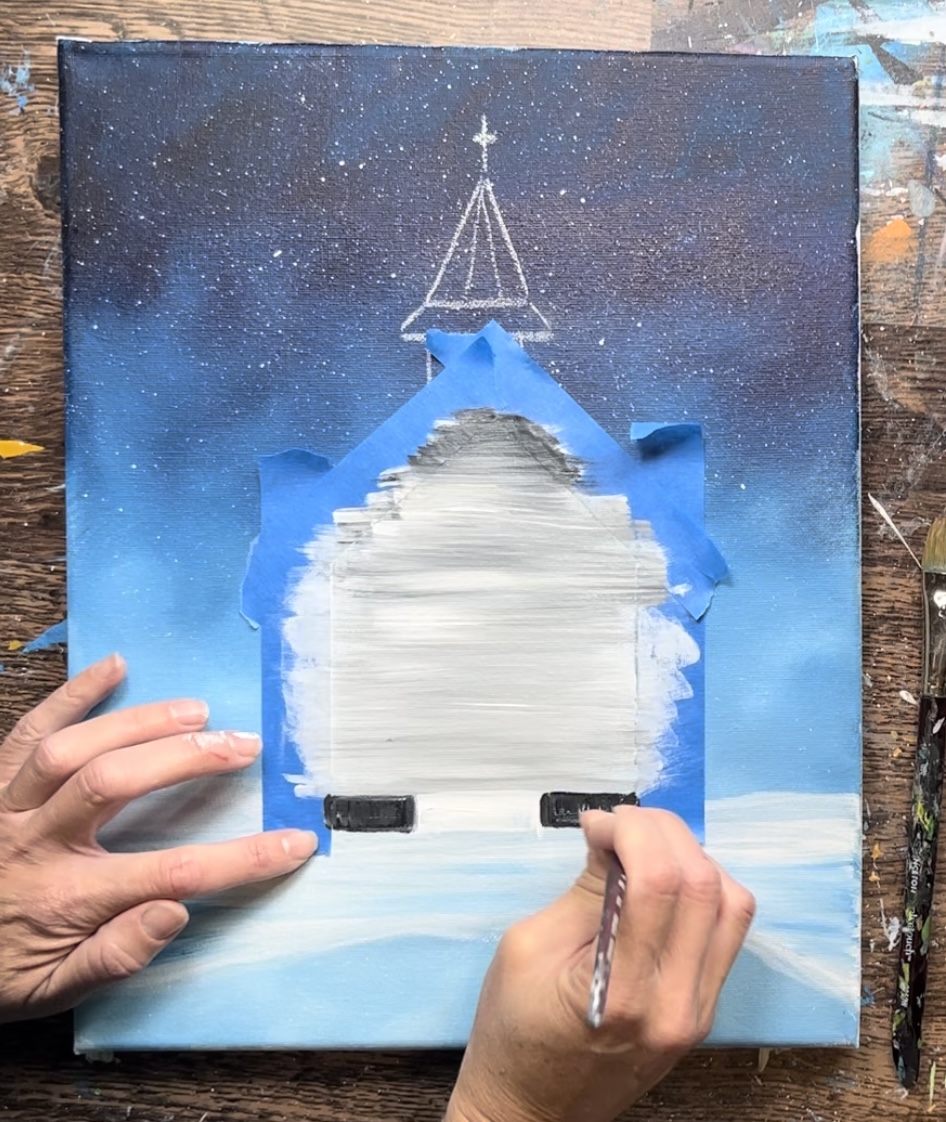
Outline the step with black paint.
Then gently remove the painters tape.

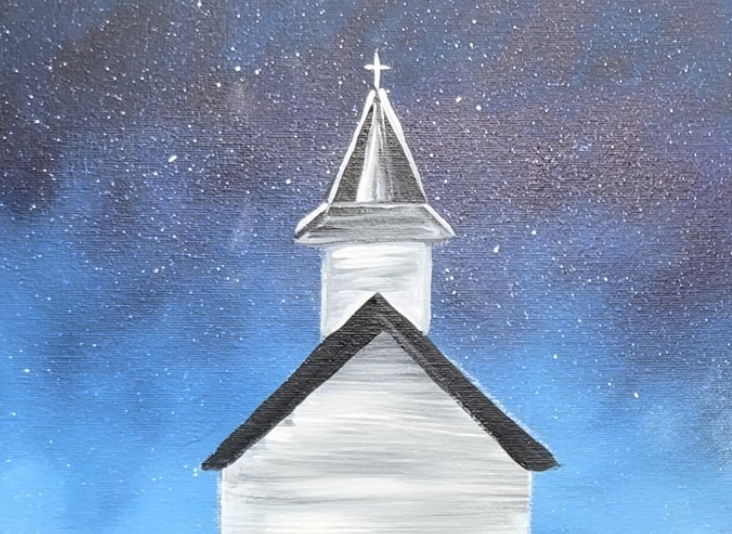
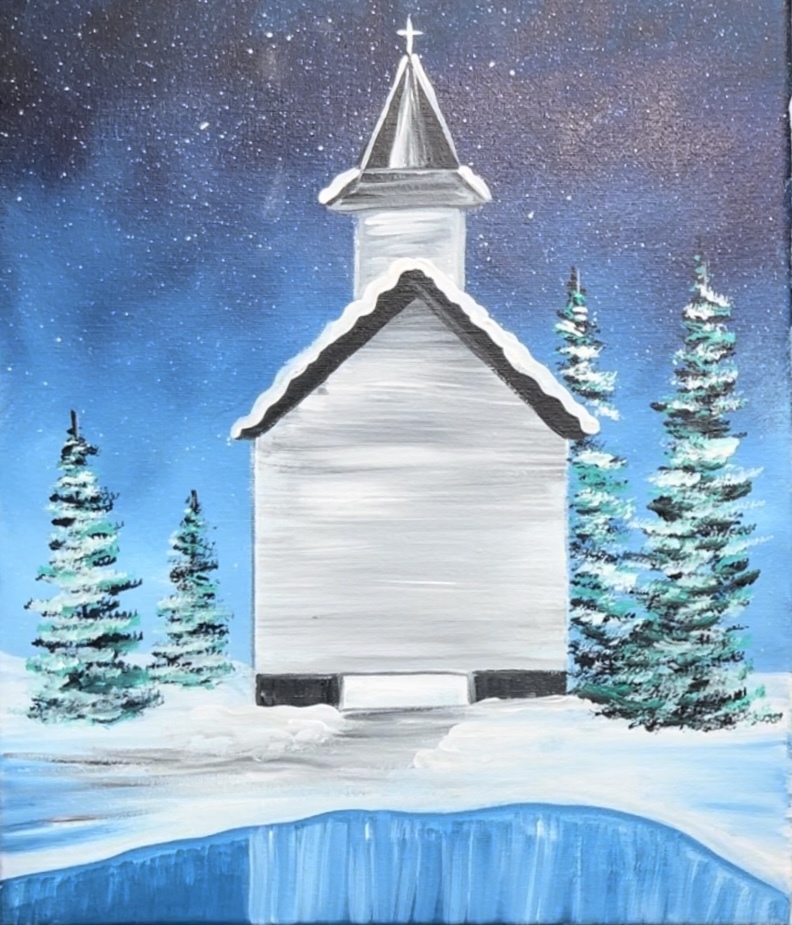
9. Paint roof
Use a #4 round brush to paint the roof solid mars black.
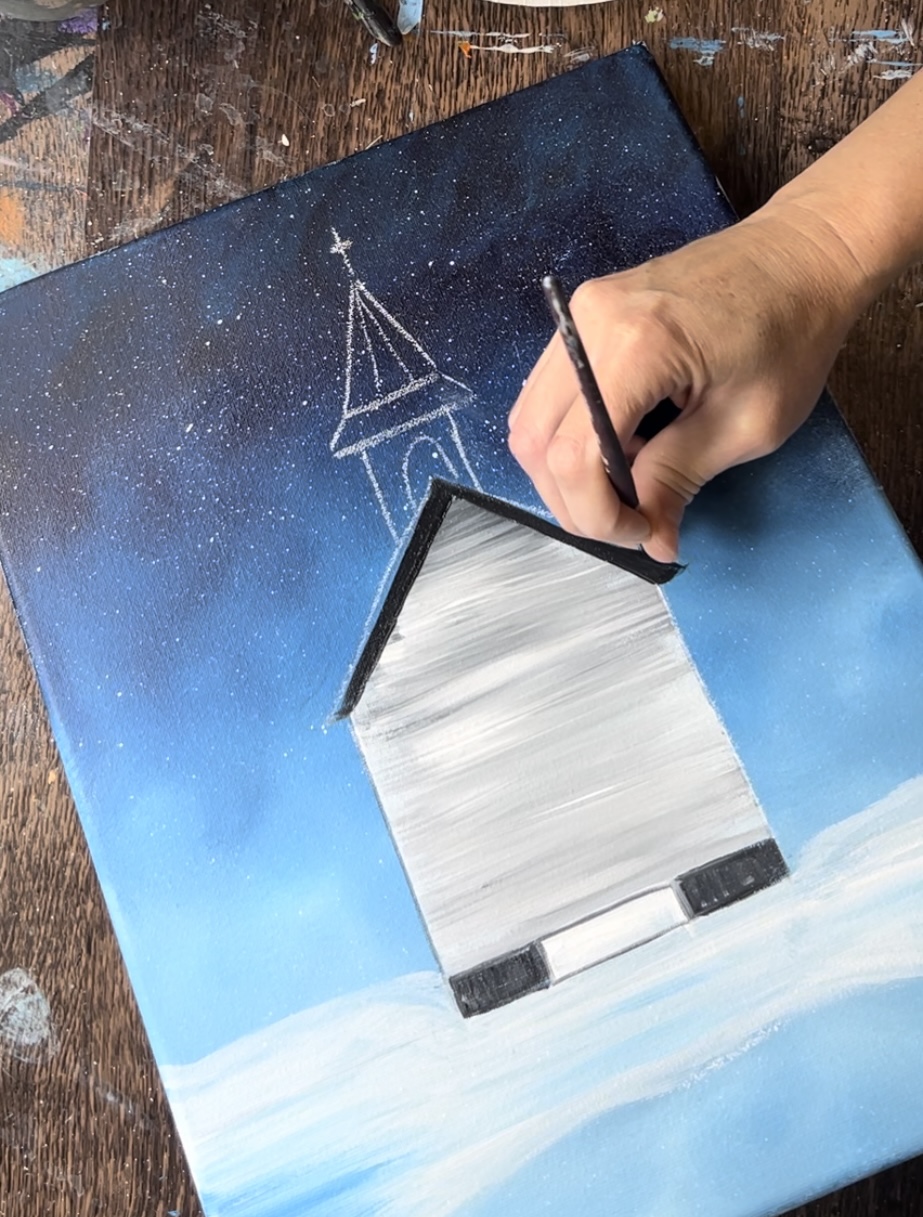
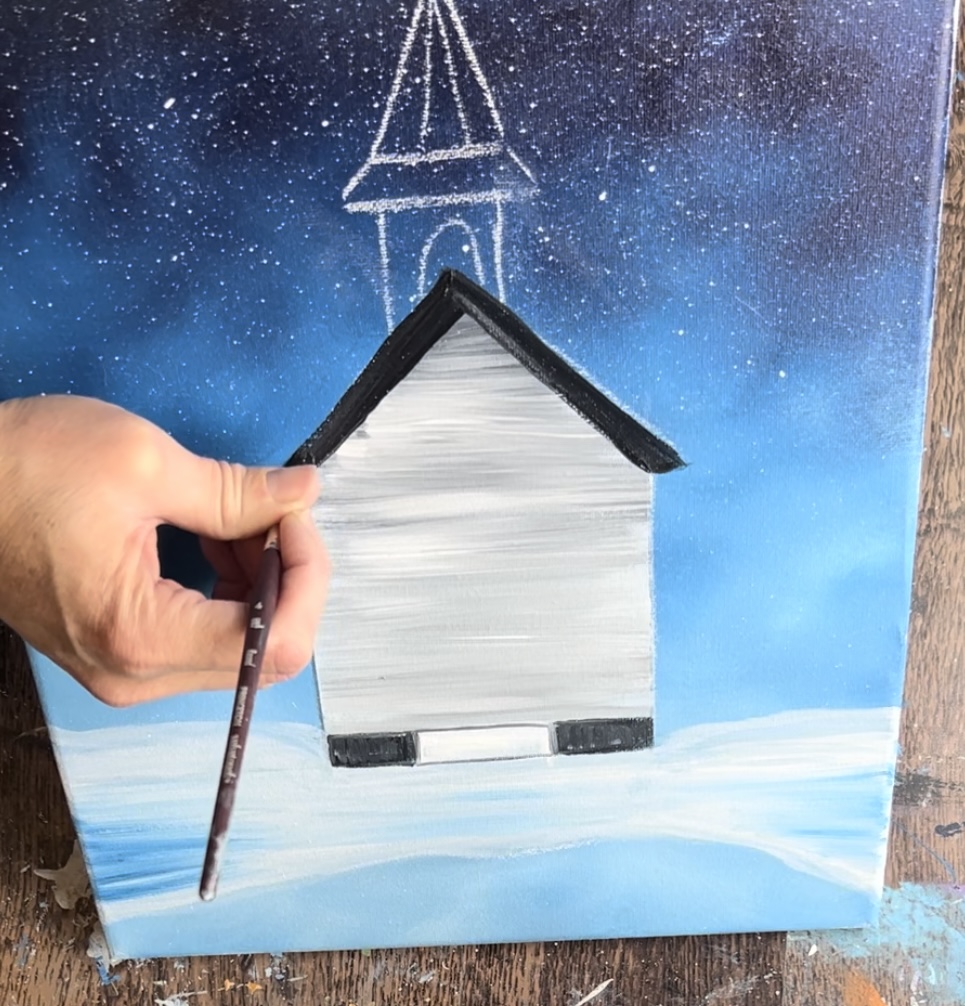
10. Paint tower
Then use the #4 round brush to paint the tower titanium white. Do this with horizontal strokes and add a small amount of black into it to create horizontal light gray stokes.
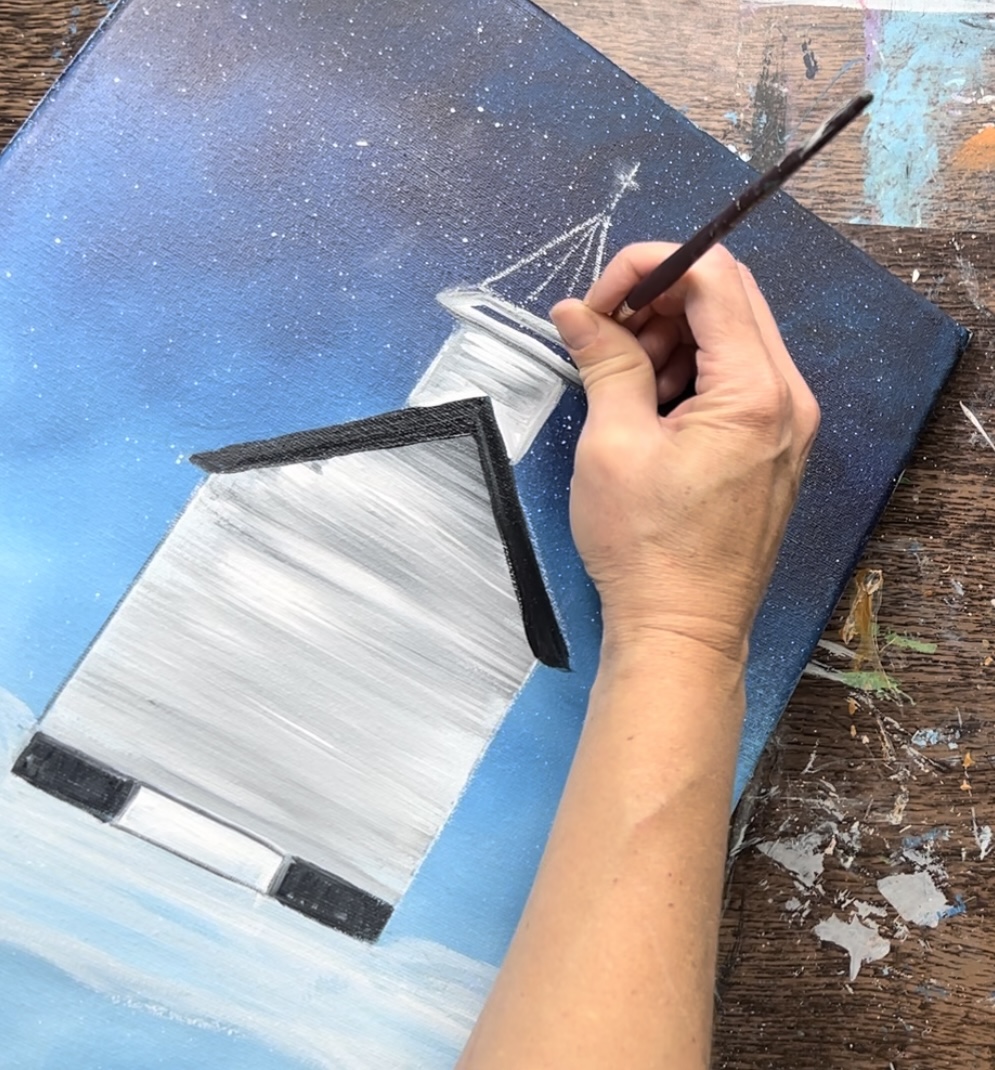
Paint the tower roof using mars black and the titanium white. There are three triangles on the top of the roof and I did the two outer ones black with the center one a light gray. The trapezoid shape below that was done with a medium gray. Mix the black and white on your palette to create this gray.
11. Paint pond
Use a 3/4 flat brush to paint the pond with vertical paint strokes. Do this with Prussian blue mixed with titanium white (about equal parts).
Add a little bit of white in the center of the pond and use your brush to stroke down. This is to represent the reflection of the light colored chapel over the water.
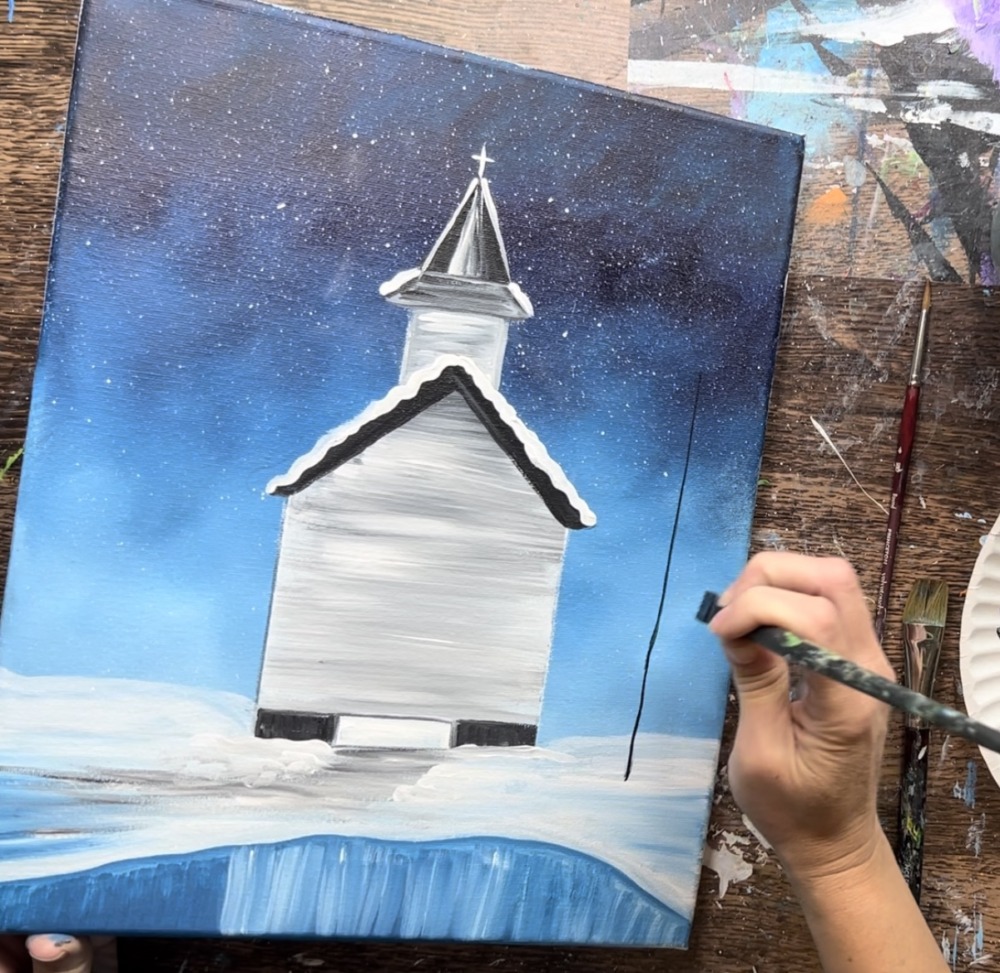
12. Paint cross
Use a #4 round brush and titanium white to paint the cross on the top of the tower.
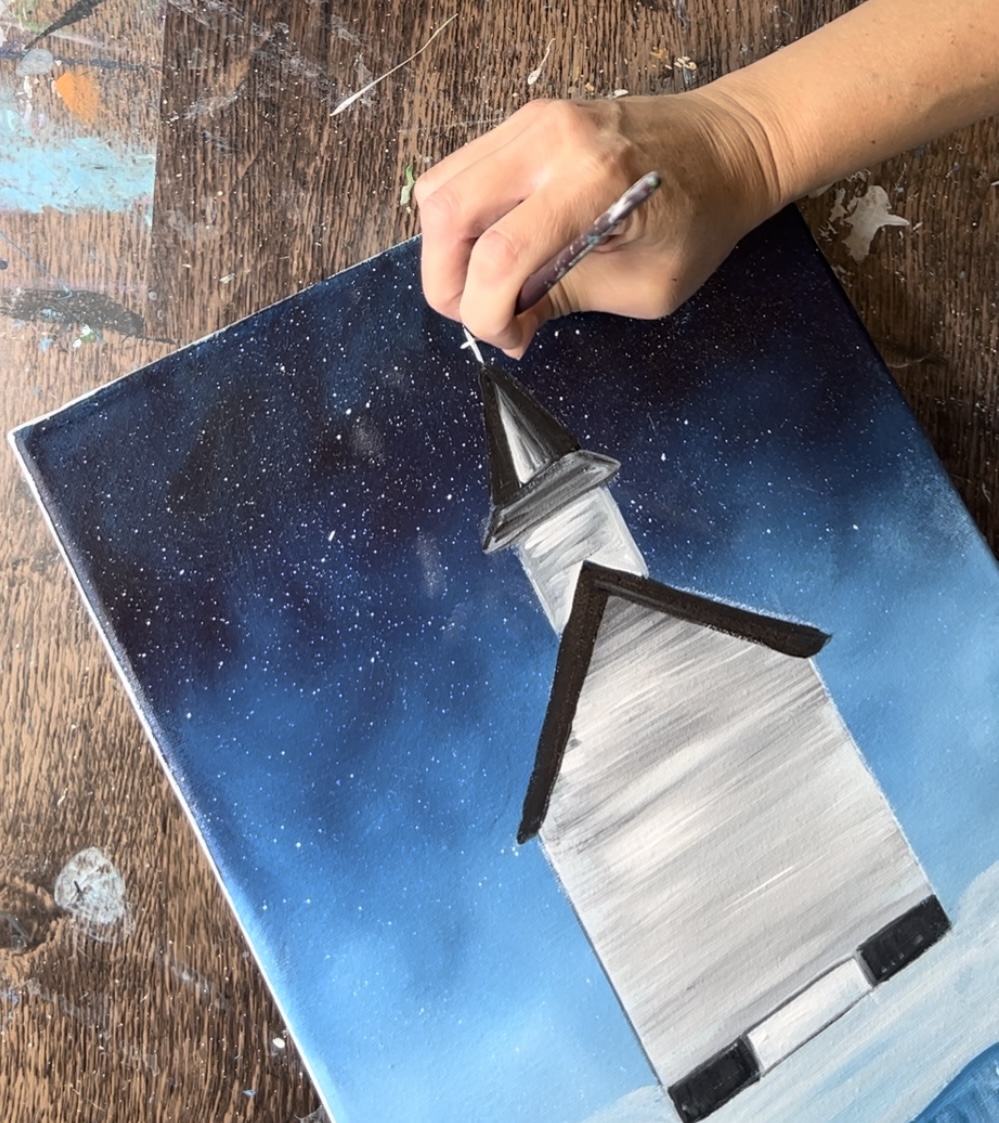
Then loosely paint a white line on the edges of the triangular part of the tower. This will help give contrast in that area.
13. Paint path
Use a #4 round brush and gray paint (white and black mixed together) to paint left and right strokes under the step and do left and right strokes down to the pond and then sharply to the left.
You can do this path very loosely. It doesn’t need to be too dark. Then use the #4 round brush and just the titanium white to paint little piles of snow on each side of the path.
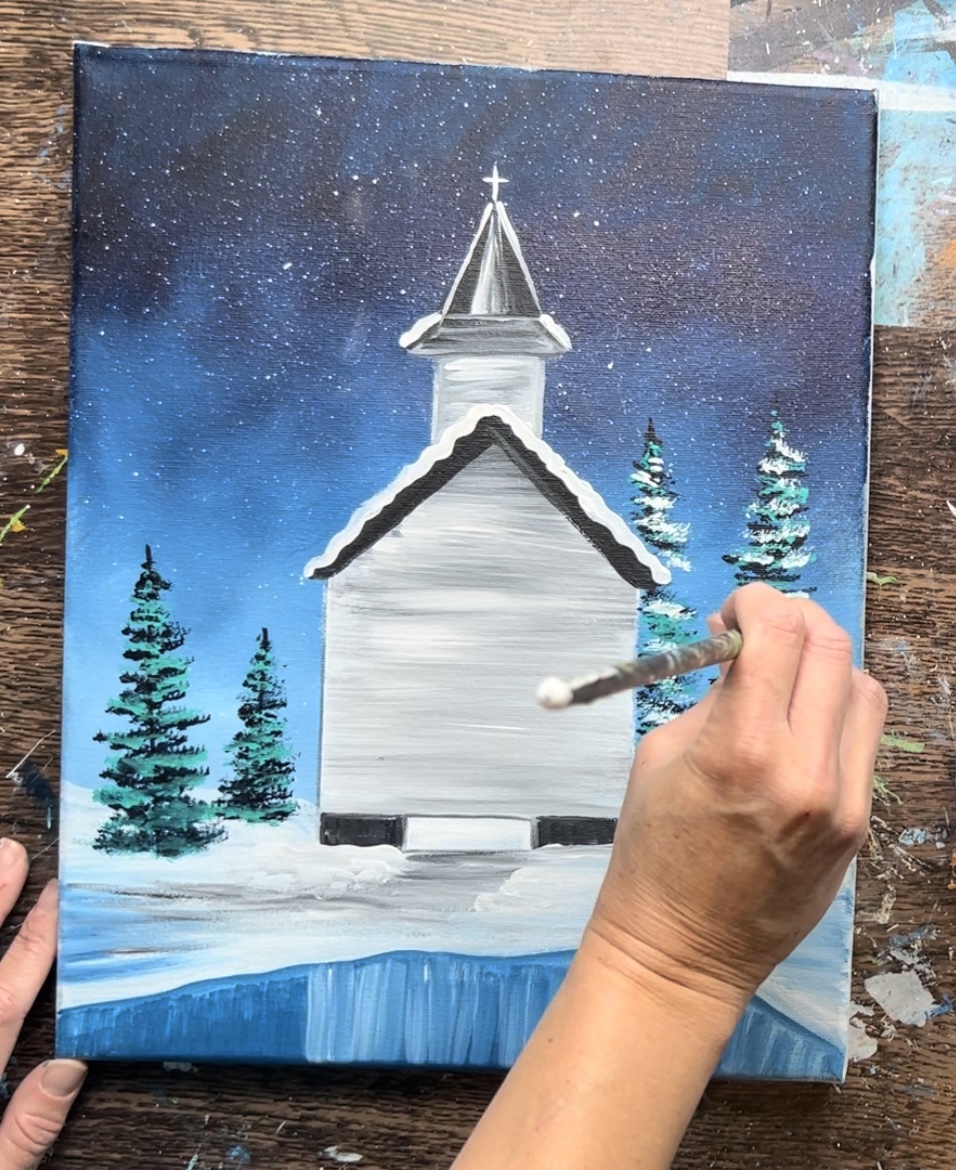
14. Paint snow on roof
Use a #4 round brush and titanium white to paint snow on the roof of the chapel.

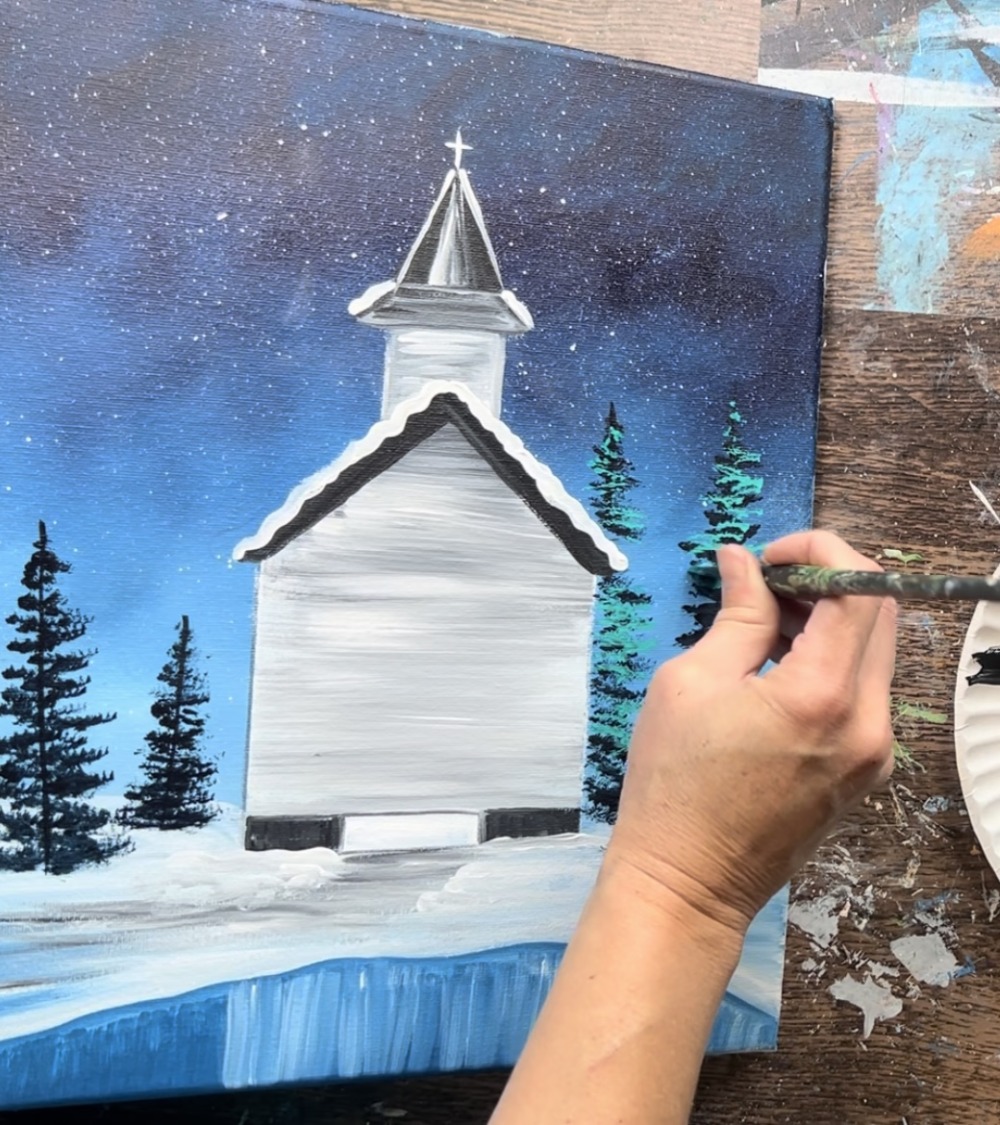
15. Paint trees
Use a #12 bright brush to paint these trees. Start by mixing equal parts Prussian blue and mars black onto your paint palette. Use the tip of the brush to paint the center line of the tree. My first tree is on the right and starts just below the bottom of the chapel and extends about as high as the peak of the chapel roof.
Then paint the branches. Use the tip of your brush to “stamp” branches. Start at the top of the line and paint a very thin narrow column of branches at first (you might need to use just the corner of the brush). Then stamp the brush left and right going in a zig-zag formation. As you work your way down, allow the branches to get thicker and wider. You may need to press harder on the brush as you approach the bottom of the tree.
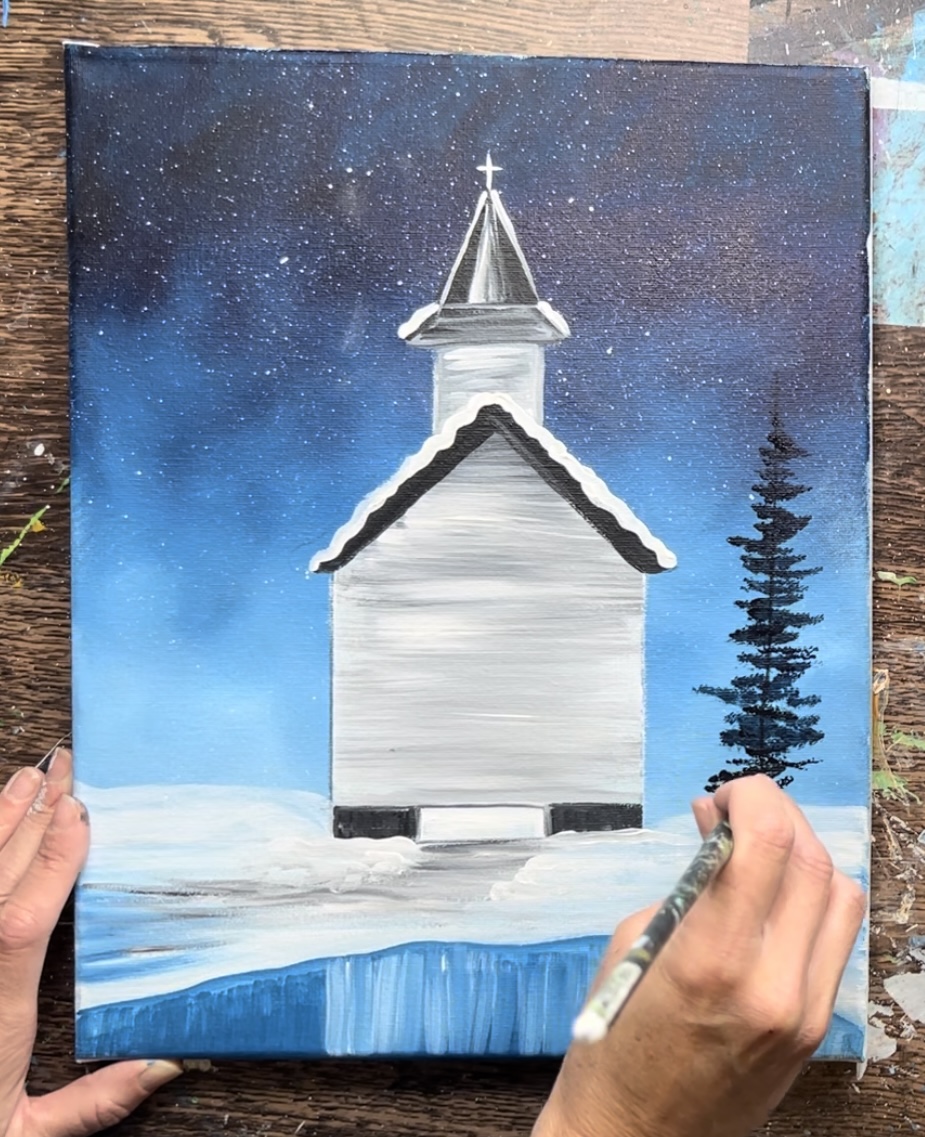
Paint a second tree behind the chapel using the same technique but do not paint the branches over the building.
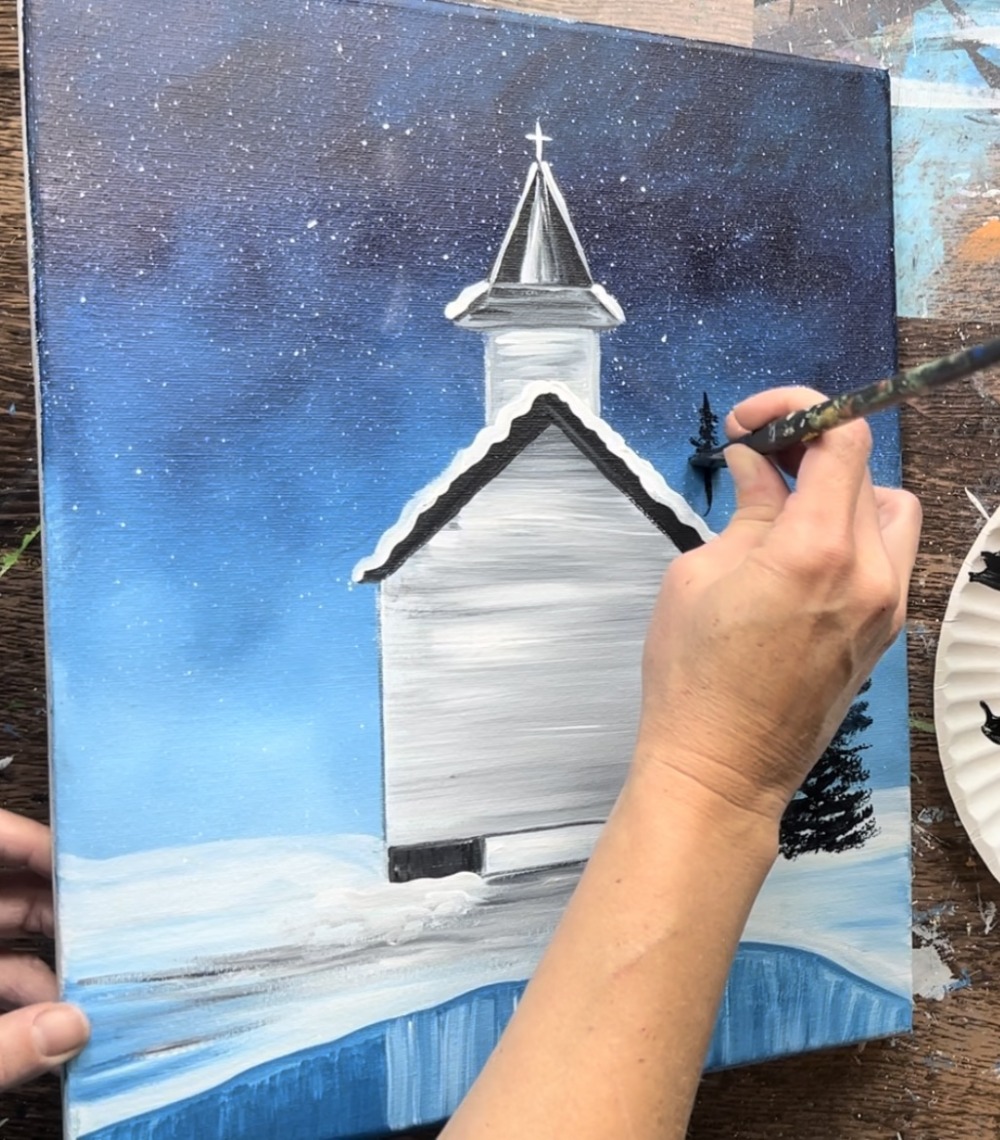
Then paint two more trees on the right of varying heights. You can paint more trees if you want!
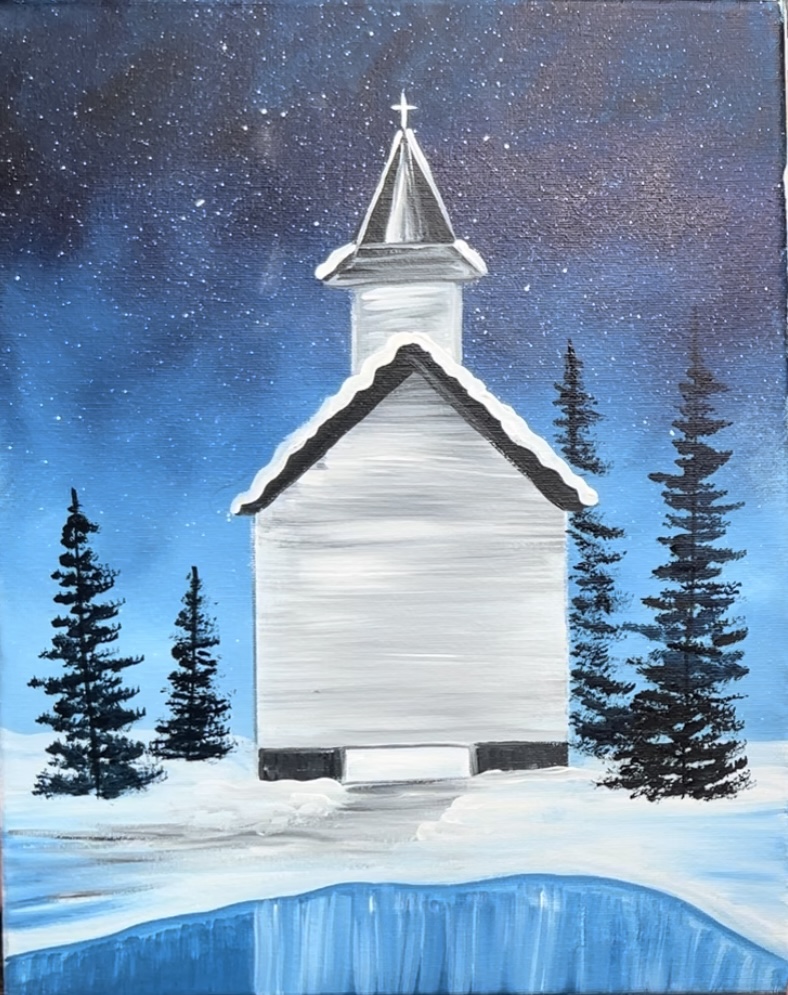
To add color to your trees, load your palette with phthalo green and titanium white. Mix the two colors together to get a lighter green. Then paint another layer of branches using the same technique. This time, leave a lot of the dark still showing through as the shadowy layer on the tree.
Do this to each of the trees.
Next, load your brush in just titanium white. Paint the snow layer on the trees using the same technique. Do not cover all of the green and dark layer.
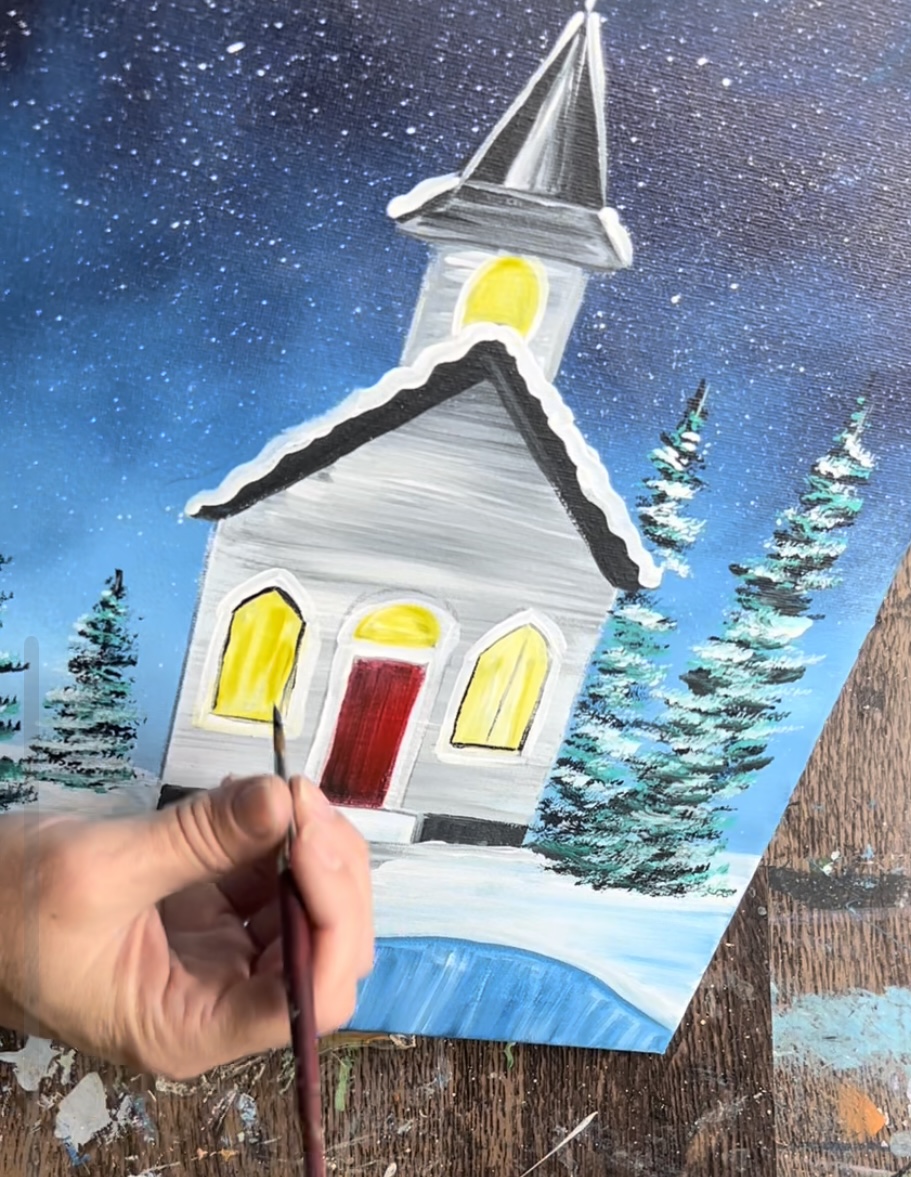
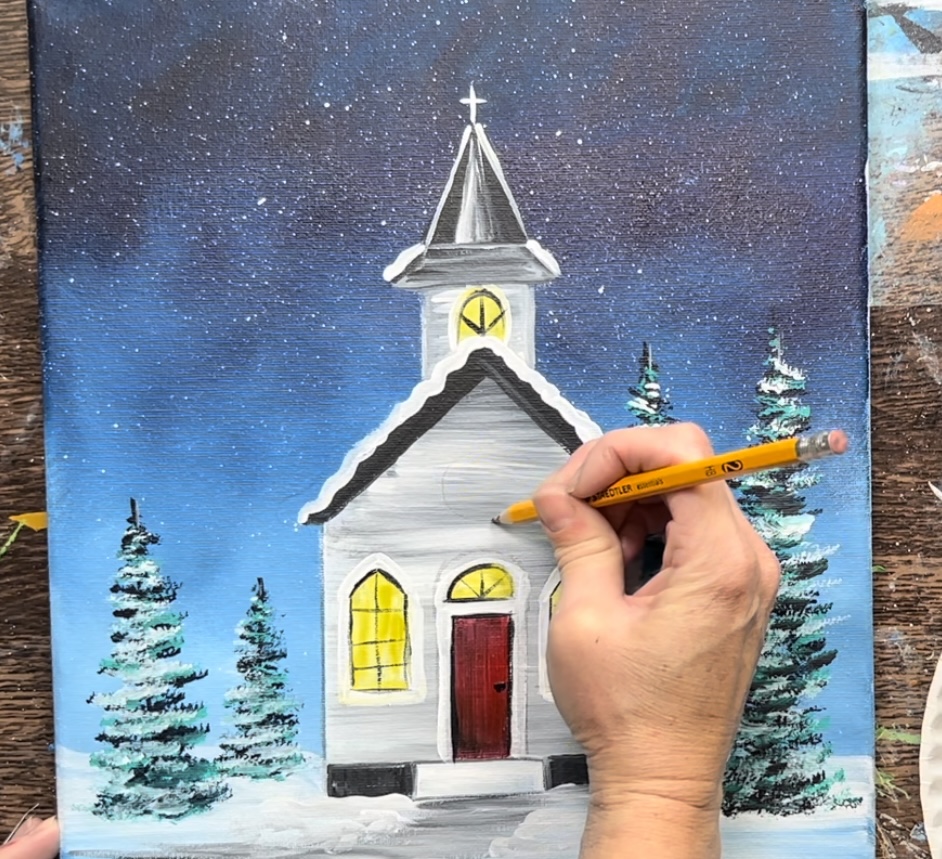
16. Re-draw door & windows
Use a pencil to draw the door and windows. You can also use the traceable again to re-trace the door and windows.
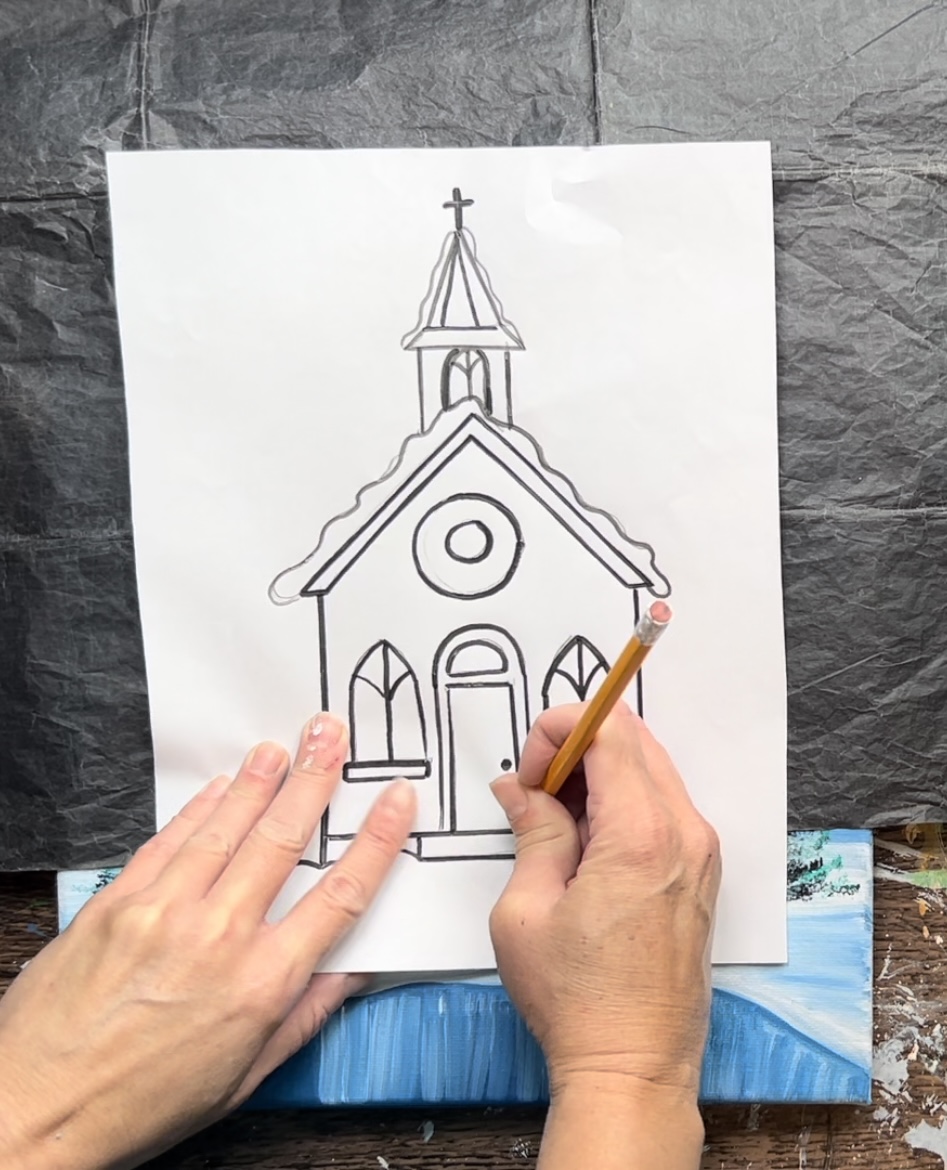
Tip: use a ruler to make sure your windows and door are straight and lined up.
17. Paint door and windows
Use a 12 bright brush to paint the door “naphthol crimson”.
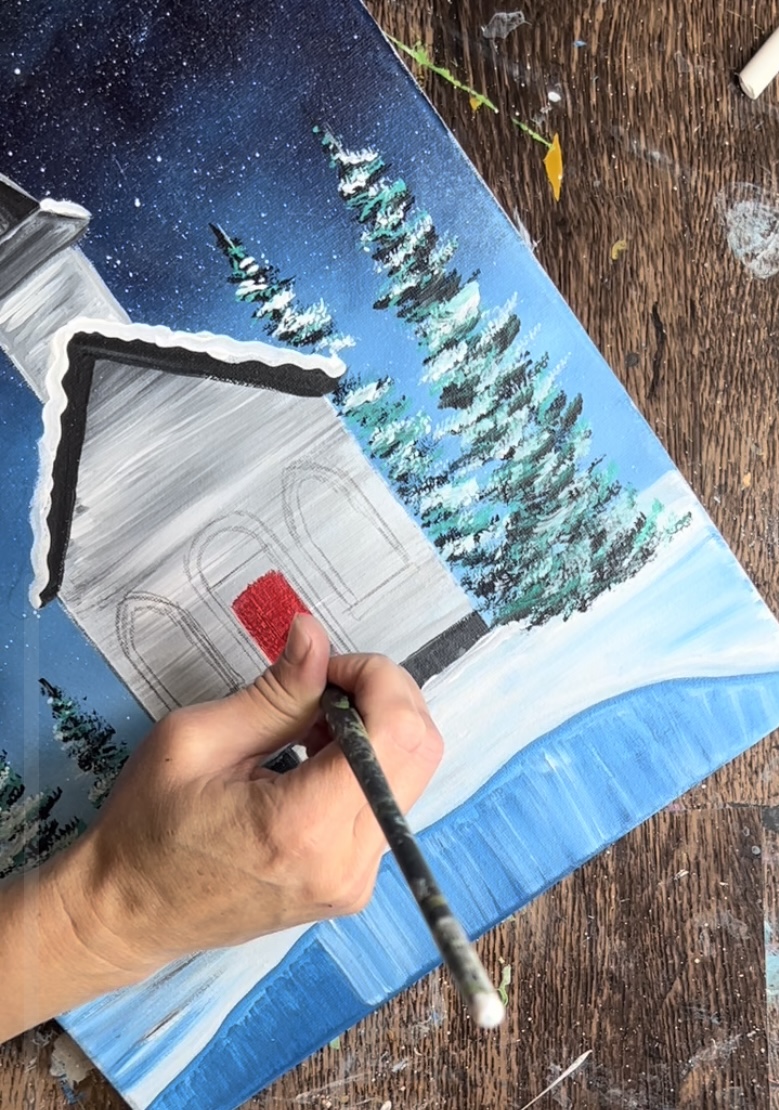
Add a little bit of black on the very bottom of the red door and blend it up into the red.
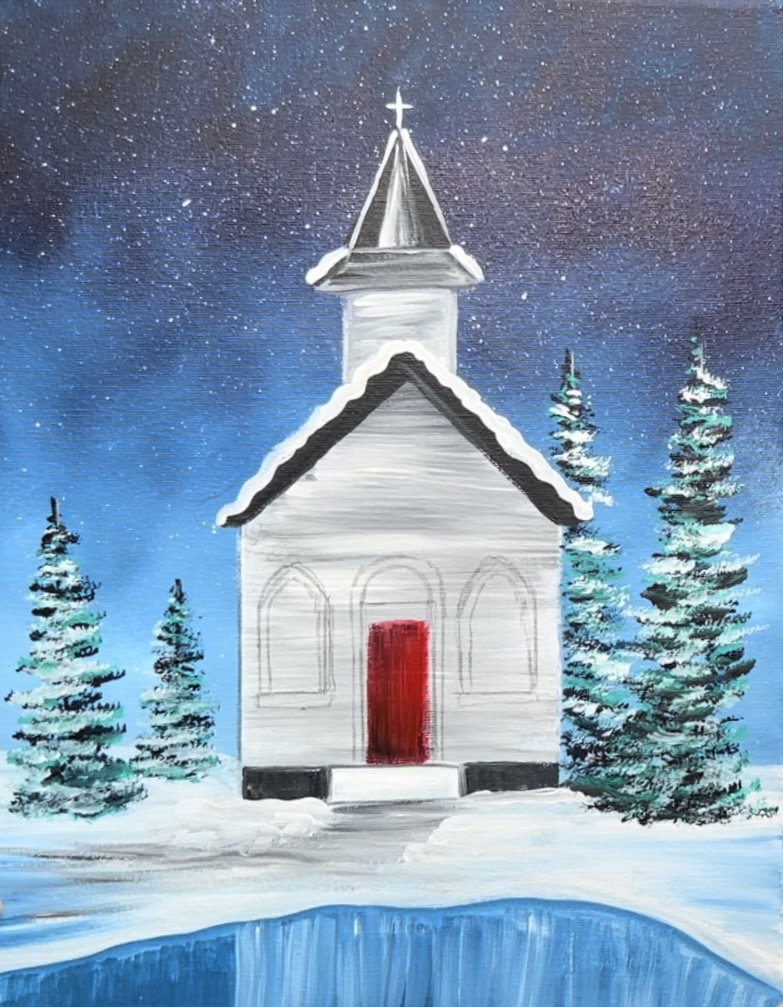
Then use the #4 round brush and titanium white to paint the outline of the door including the semi-circle.
Load your palette with primary yellow. Mix a little white into the yellow to brighten it. Then paint the inside of each of the windows with this yellow-white combination. Use the #4 round brush for this. Paint these with up and down vertical strokes.
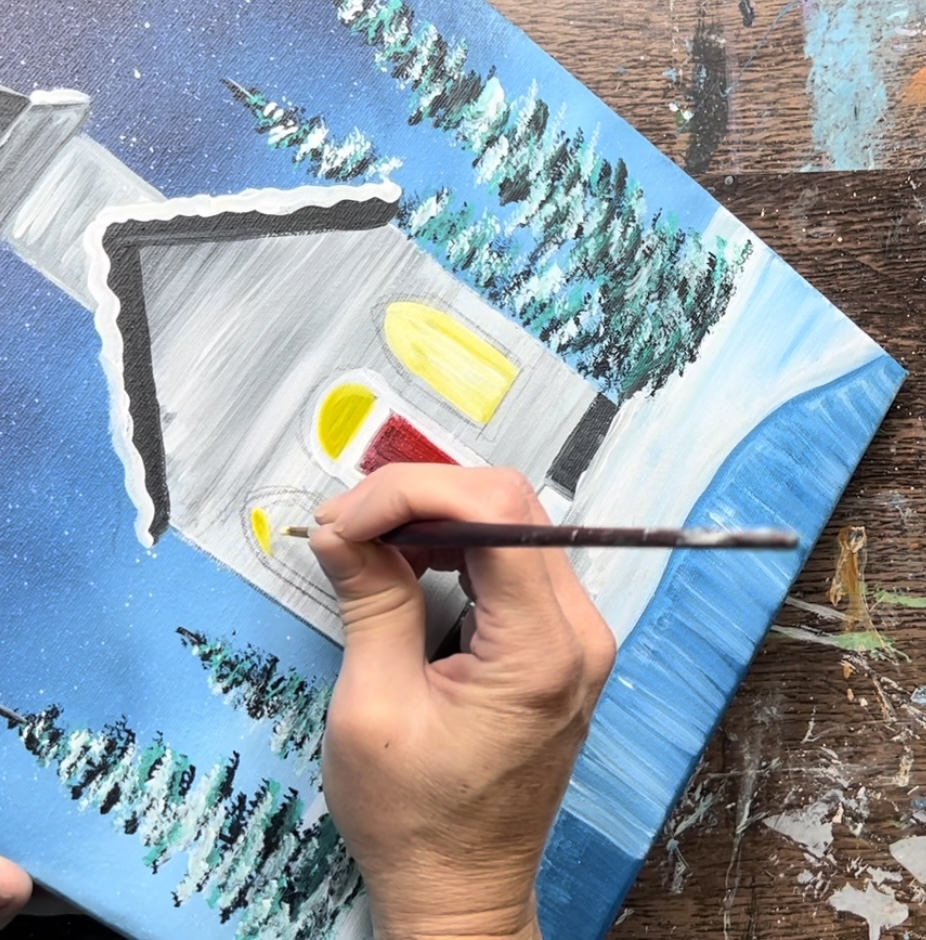
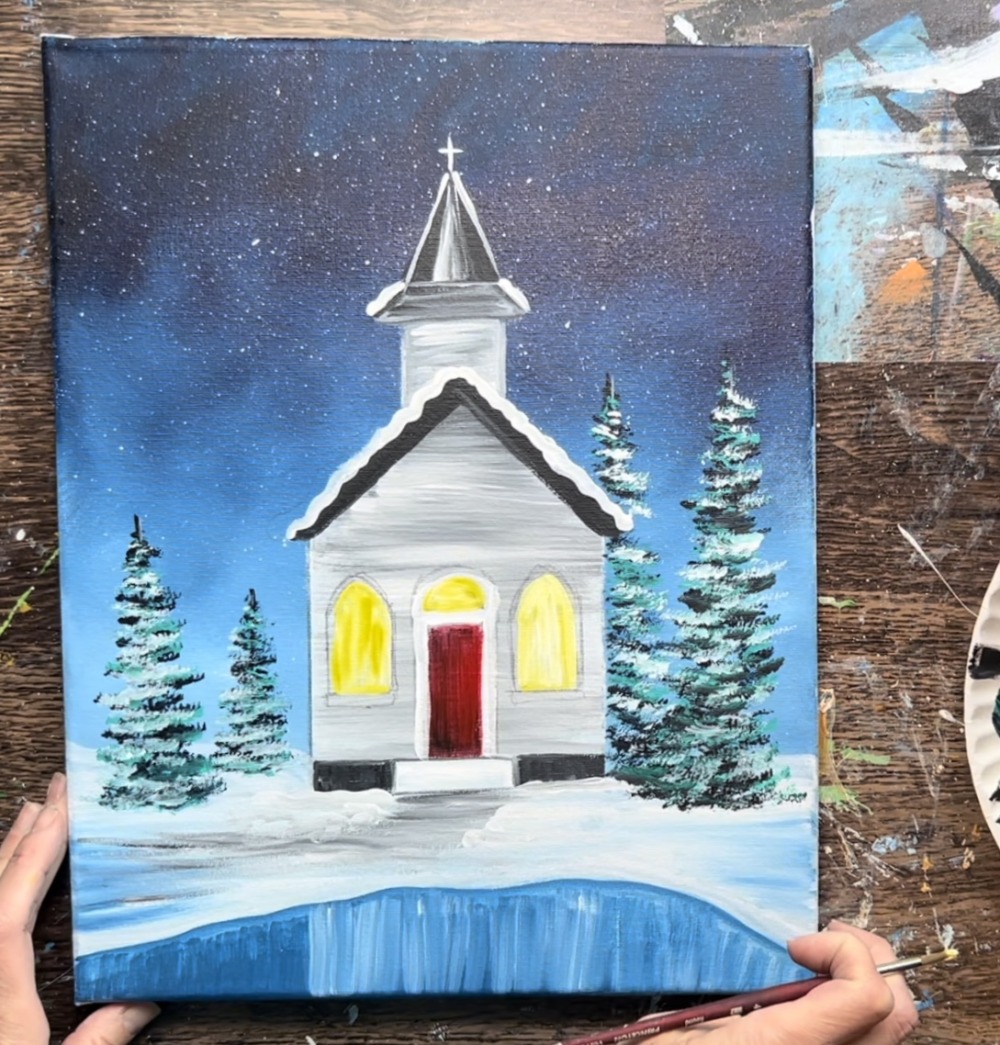
Use the #4 round brush to paint the border of the windows with titanium white.
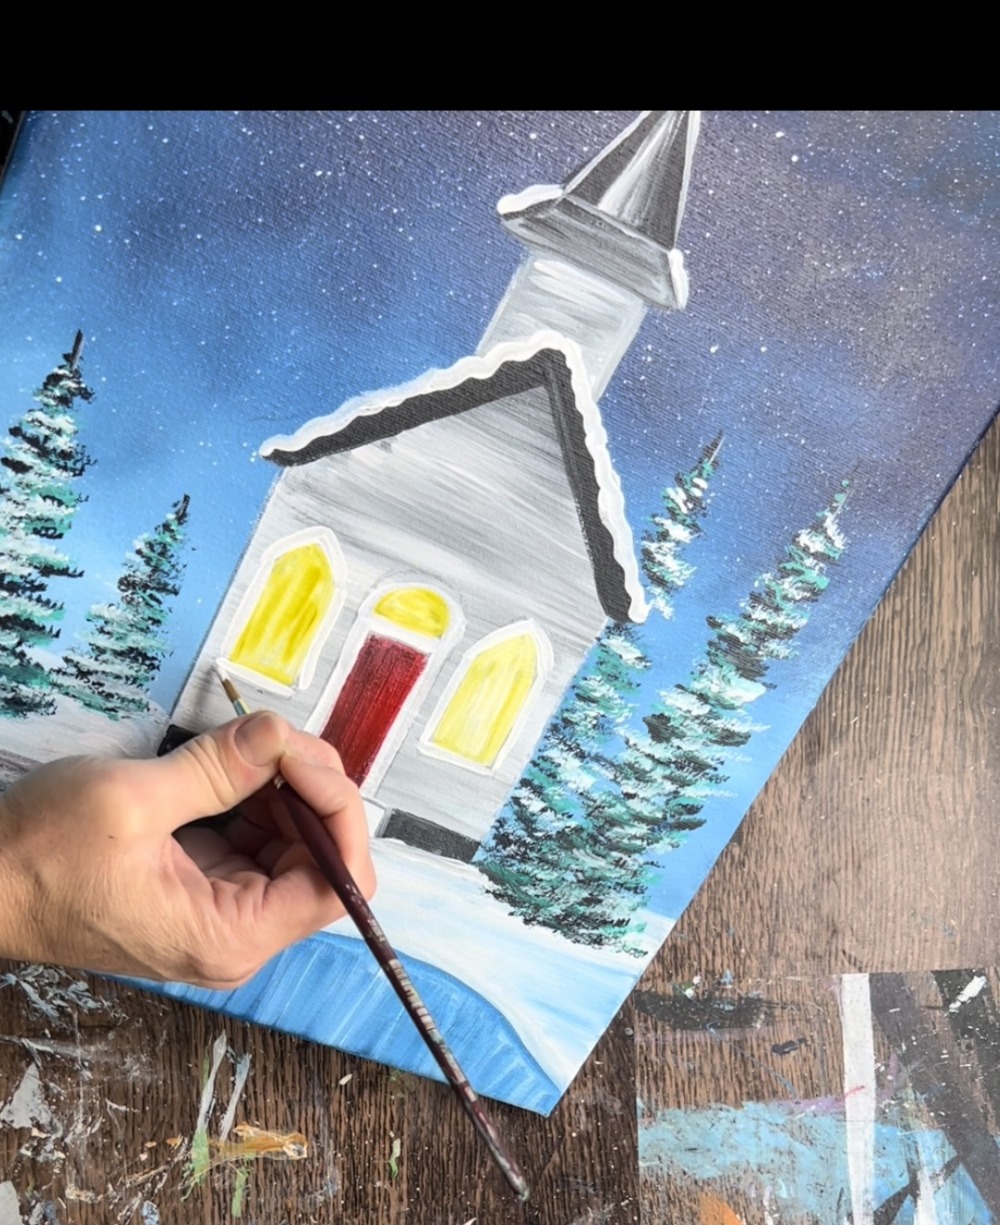
Paint a half circle window on the tower.
Tip: use a black paint pen for the outlining of the windows and window panes. You will have better control of your lines.
I used a #4 round brush and mars black to paint the window pane line and outlined the inner part of the window frame.
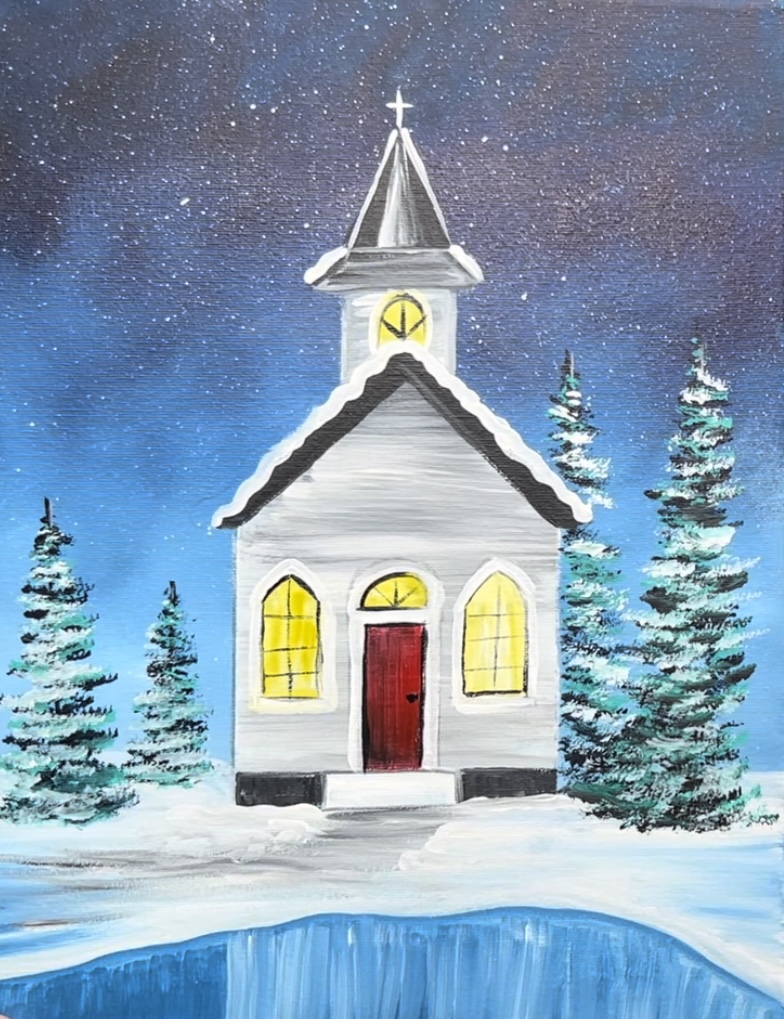
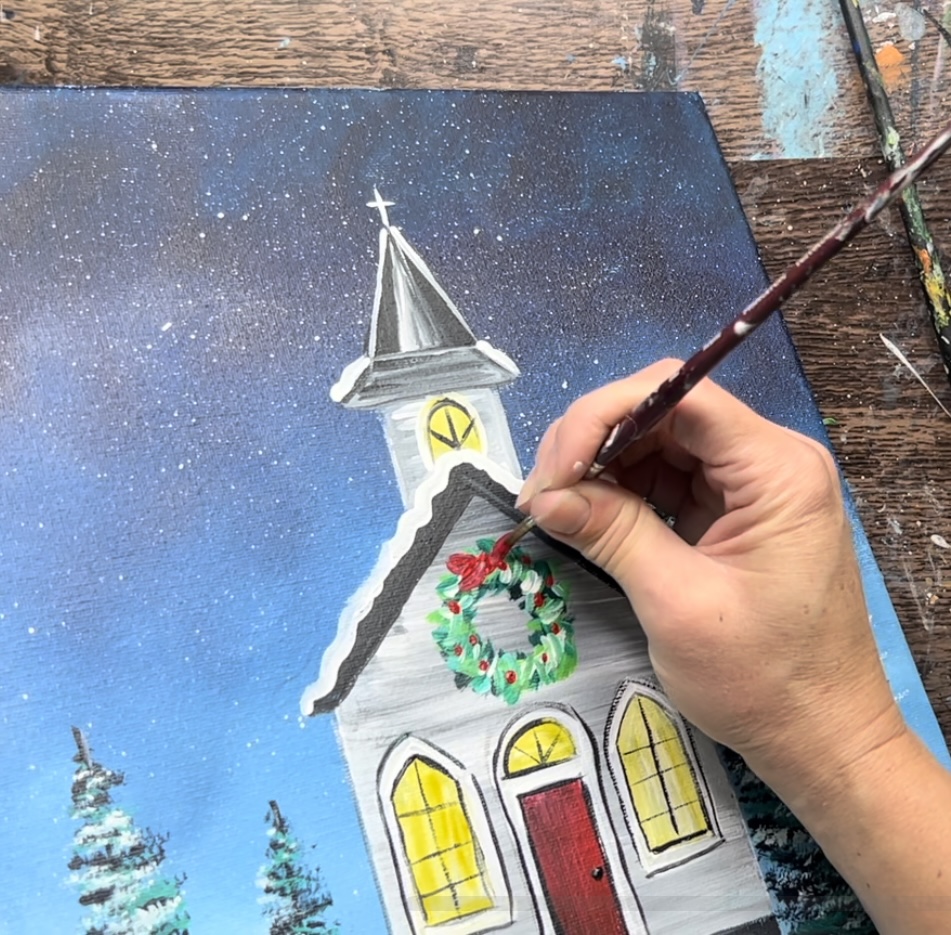
18. Paint wreath (first layer)
Use a pencil to draw a circle above the semicircle window.
Then use a #4 round brush to paint the wreath. Paint small “x” marks using phthalo green and mars black. When you paint small “x” marks, you create the texture of this wreath. Go around this on the circle.
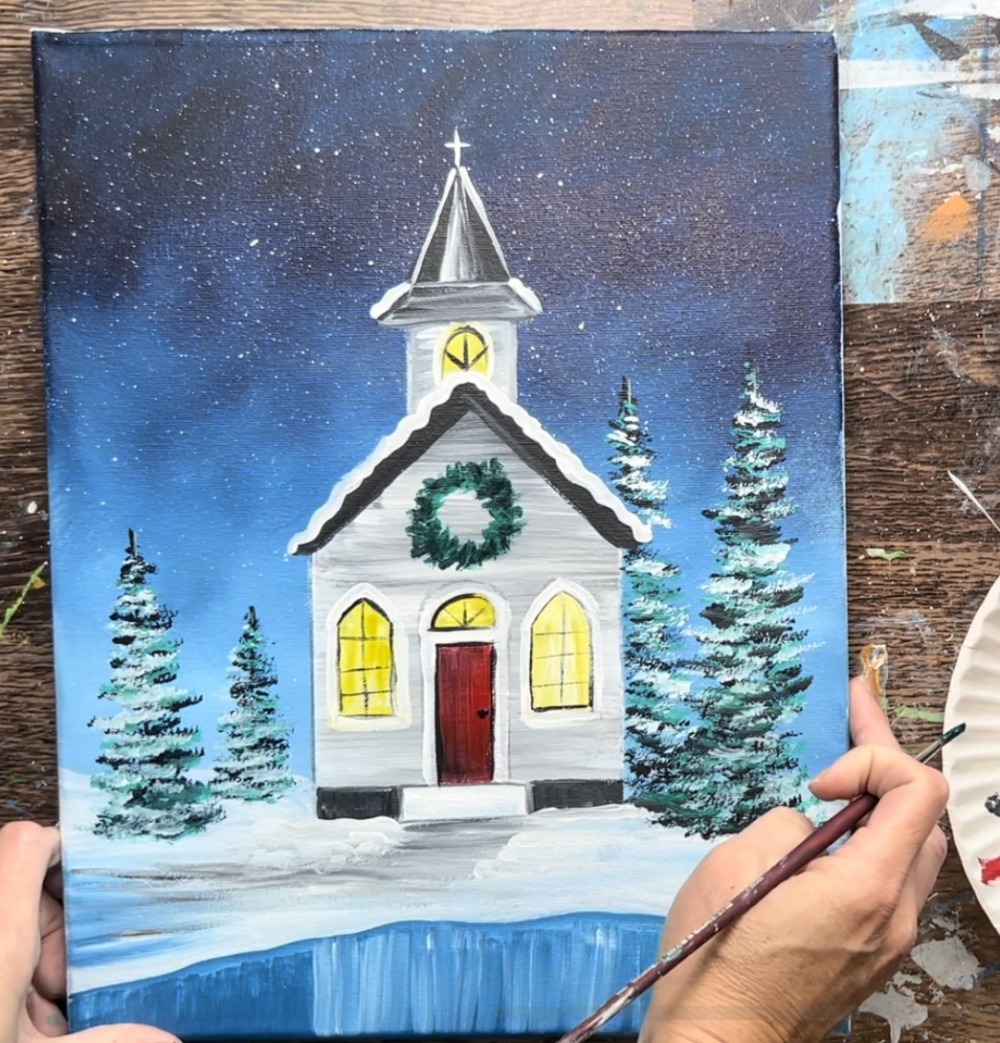
19. Paint reflection in water
Use a #12 bright brush to paint reflection of color from the chapel on the pond. Do this “dry brush style”. This means you are loading only a small amount of paint on the brush and stroking downwards in a vertical direction. Leave a lot of the color of the pond still showing through.
For the yellow reflection, double load the brush in titanium white and primary yellow. Paint a vertical mark under the window area. Leave a lot of water still showing.
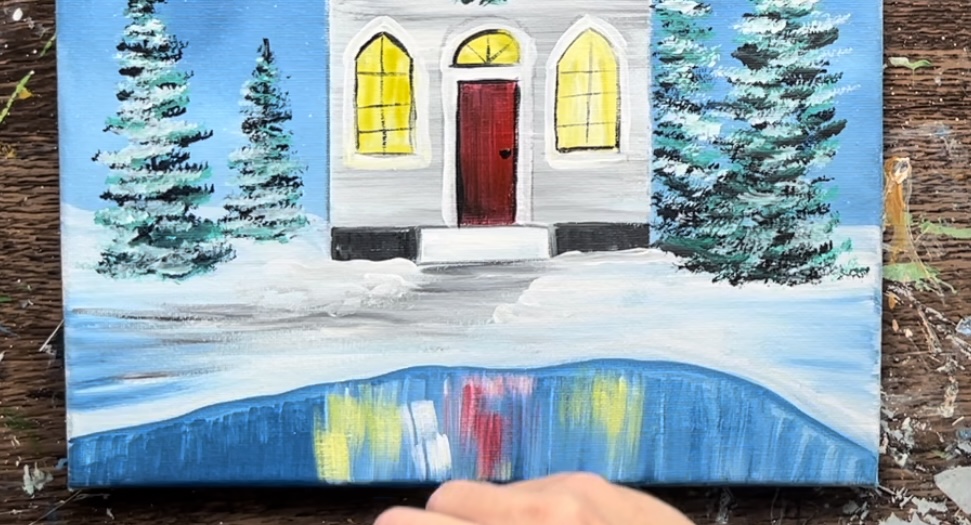
Do the same for the red reflection and add some more white reflection in between the red and yellow.
20. Paint second layer on wreath
Add a second, brighter layer to the wreath. Mix the green with some titanium white and yellow to make a lighter yellow-green color. Paint this second layer using the #4 round brush and leave a lot of the dark first layer still showing through.
21. Paint horizontal lines on pond
Use either the 12 bright or #4 round to paint thin white lines going in a horizontal direction on the pond over the reflection layer.
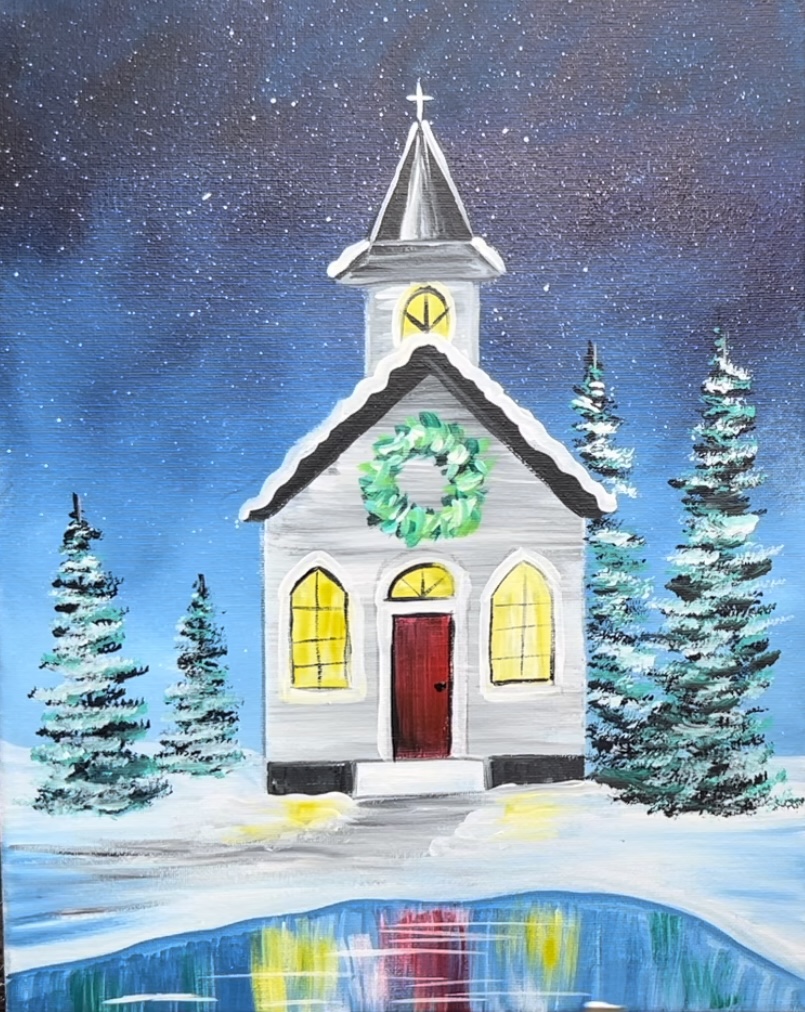
22. Paint bow & berries on wreath
Use a #4 round brush and naphthol crimson to paint little berries and a bow on the wreath.
23. Paint the Christmas star
To do the Christmas star in the sky, start by painting a light yellow “blurry dot” in the upper left (or upper right) area of the sky. Use the #4 round brush to paint a thick dot.
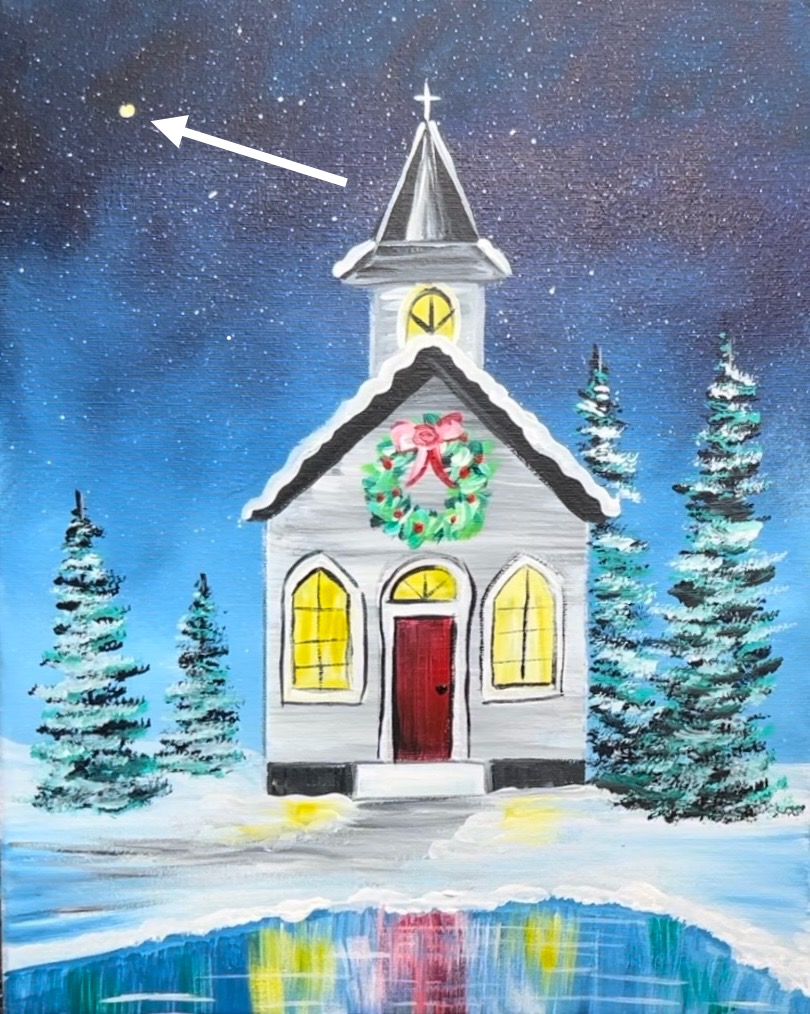
Use your finger to “smear” the dot.
This will create a blurry dot in the sky. This layer is important because it will make your Christmas star look like it is glowing.
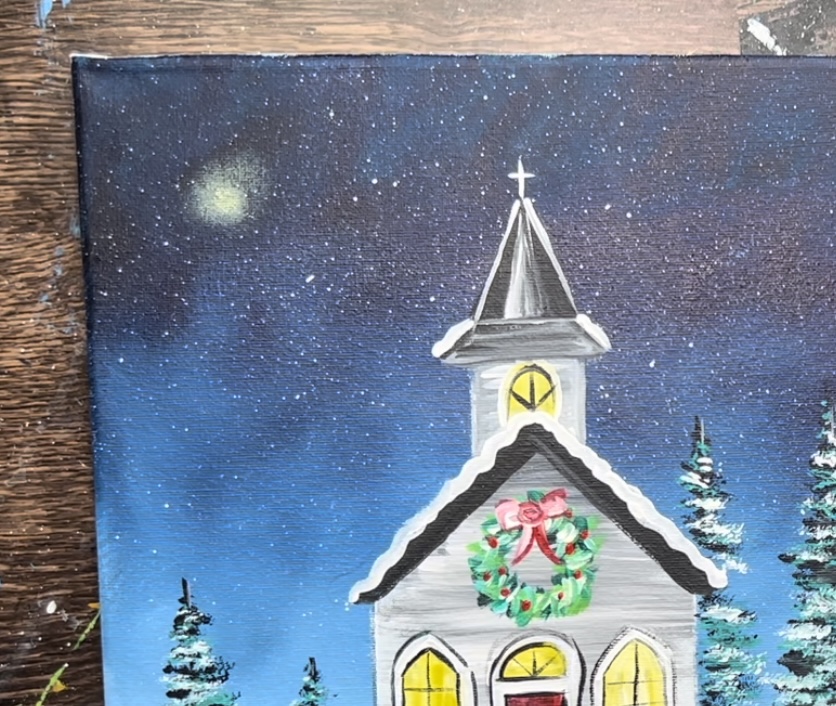
Then paint another dot using the same yellow-white. That will be the center of the star. Paint two vertical lines coming out from the dot. Tip: it may be helpful to use a much smaller brush for this or pinch the bristles of the #4 round to make sure you can paint tiny lines. You also don’t need to load a lot of paint on your brush.
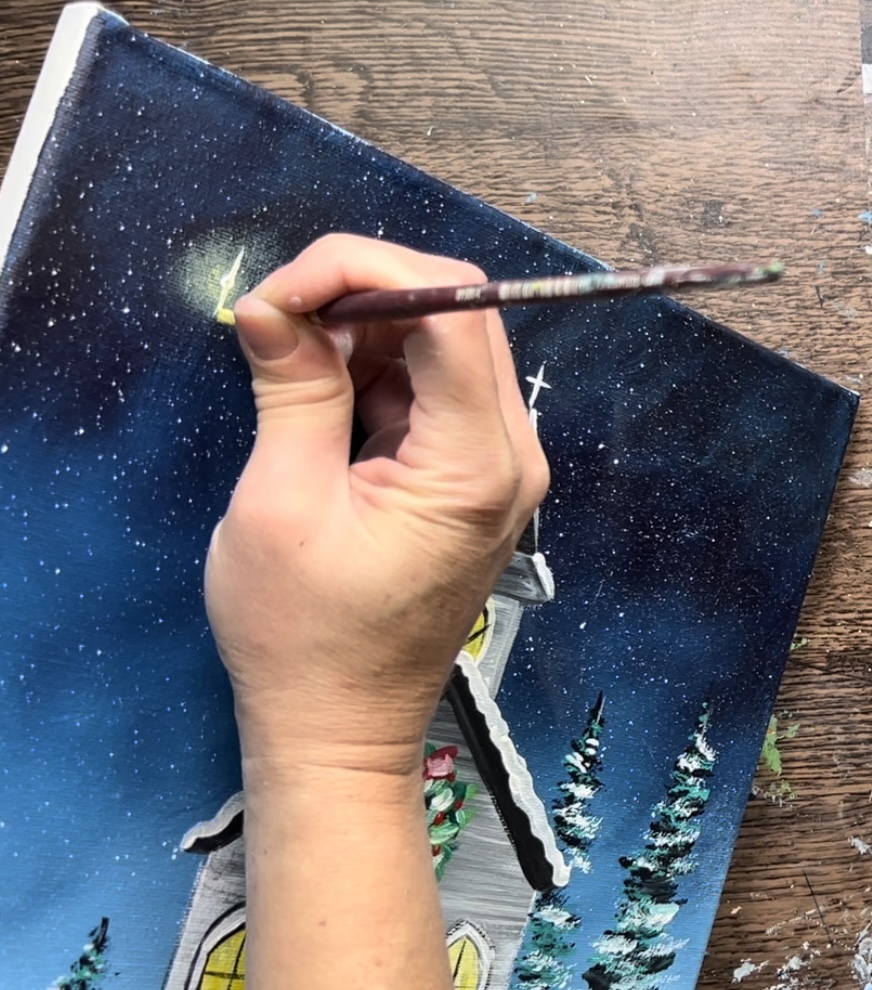
Paint a set of horizontal lines. Try to get the lines to go to a point.
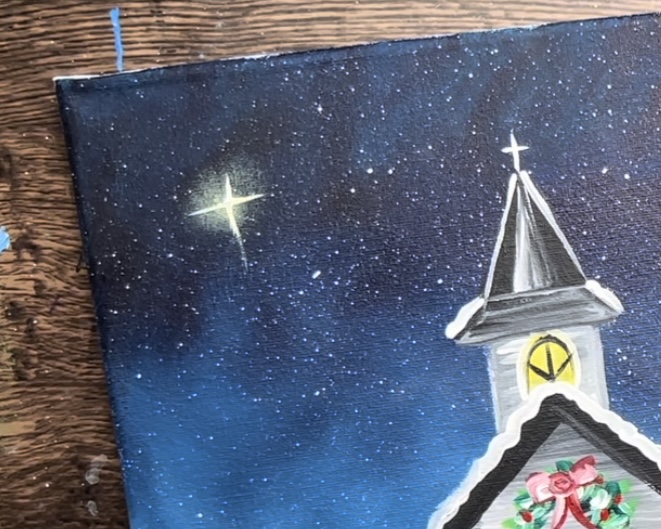
Then paint a set of diagonal lines.
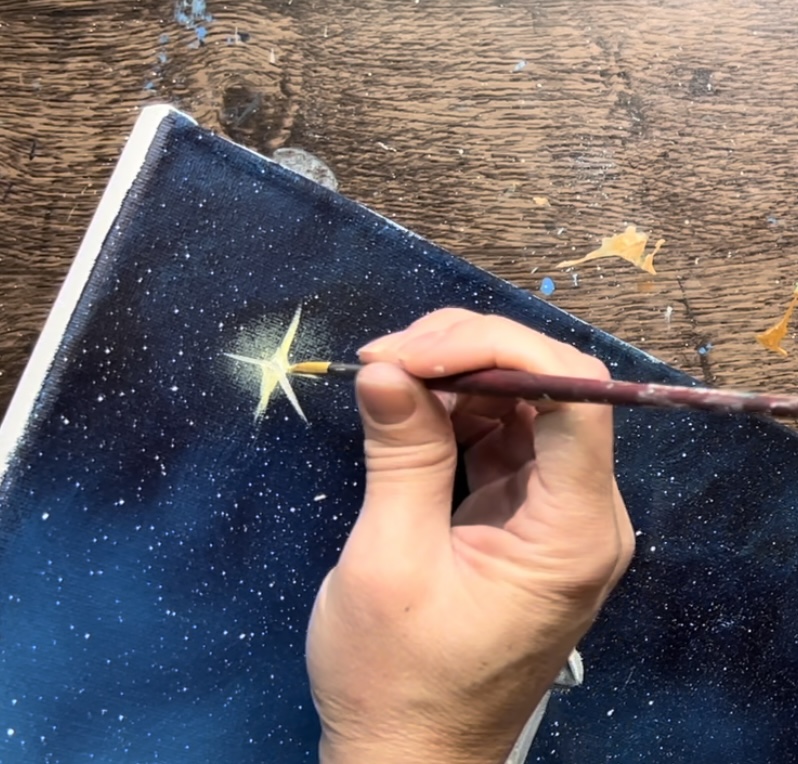
Make the vertical and horizontal lines go a little longer than the diagonal lines. Only small amounts of paint for this! You can also try not loading anymore paint on your brush and “dry brushing” the paint that is already on the canvas to extend those lines.
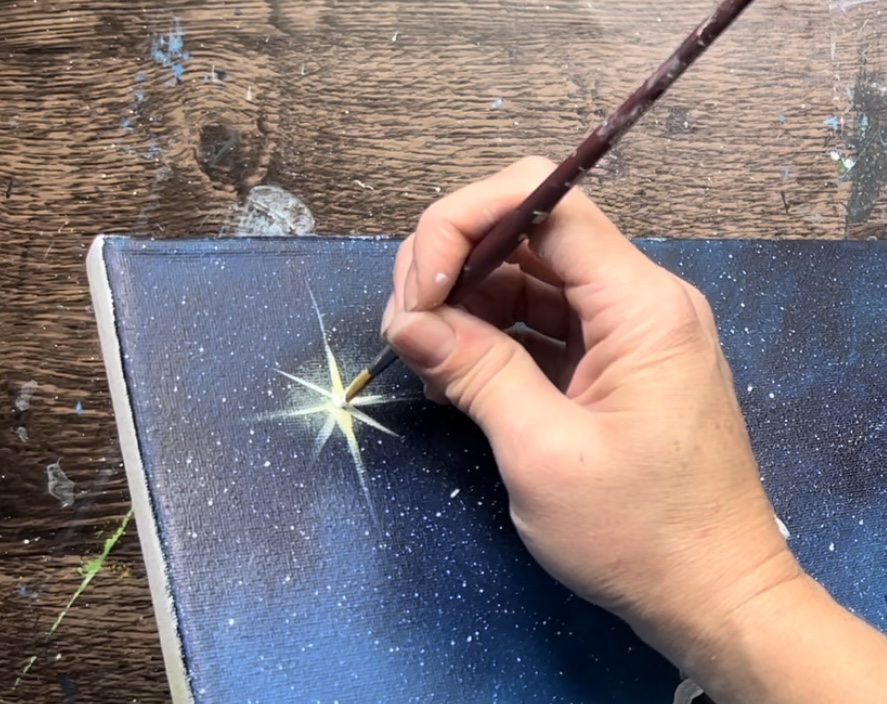
Paint one final dot in the center of that star!
Then paint little snow dots/ stars all over the sky.
24. Paint wreath on door
As a final touch, you can paint a small wreath on the door using the same technique you used to paint the large wreath.
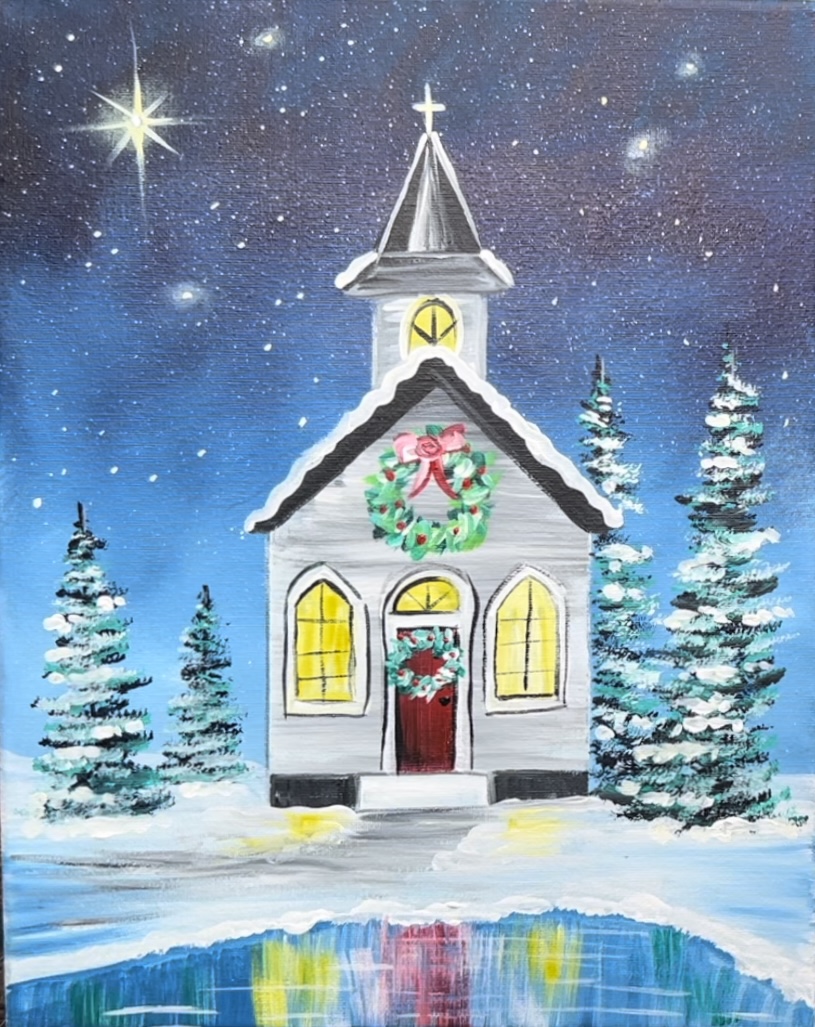
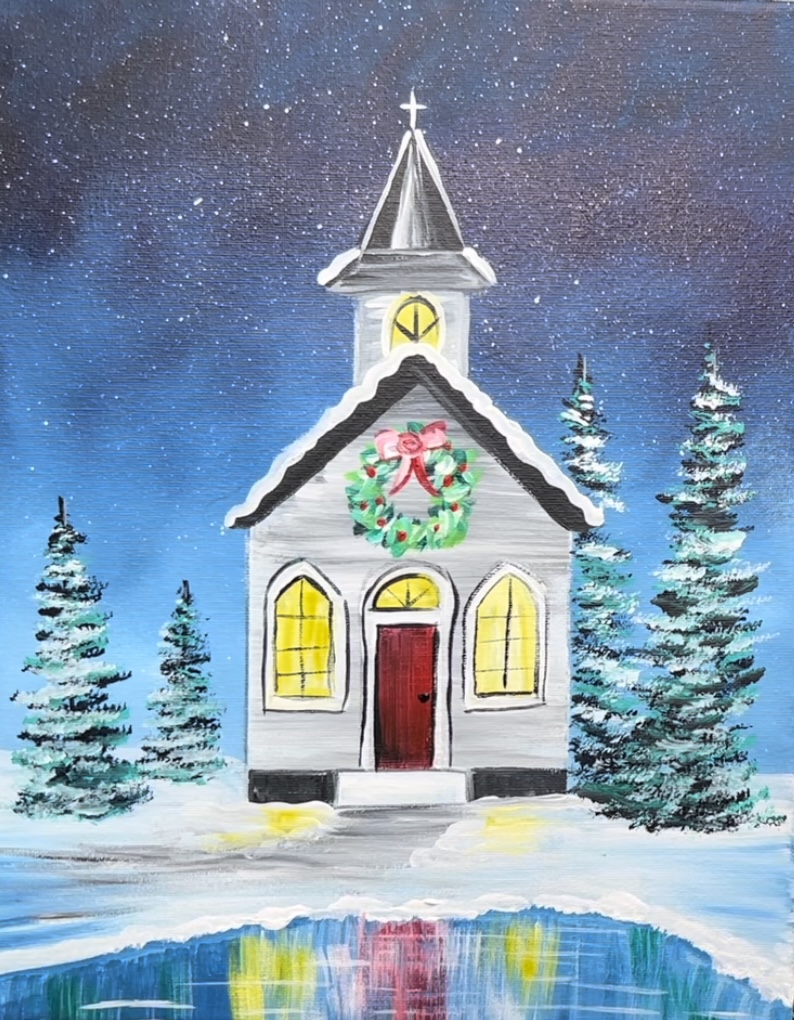
Finished!
Sign your name and show it off!
I cant wait until
You upload the video! I have just started painting and have painted two of your tutorials! Can’t afford to subscribe bit totally appreciate all of the hard work and hours you have put into your tutorials and gallery! Thank you for allowing me to find my joy in painting!!💜🫶✌🏼