
Would you like to save this?
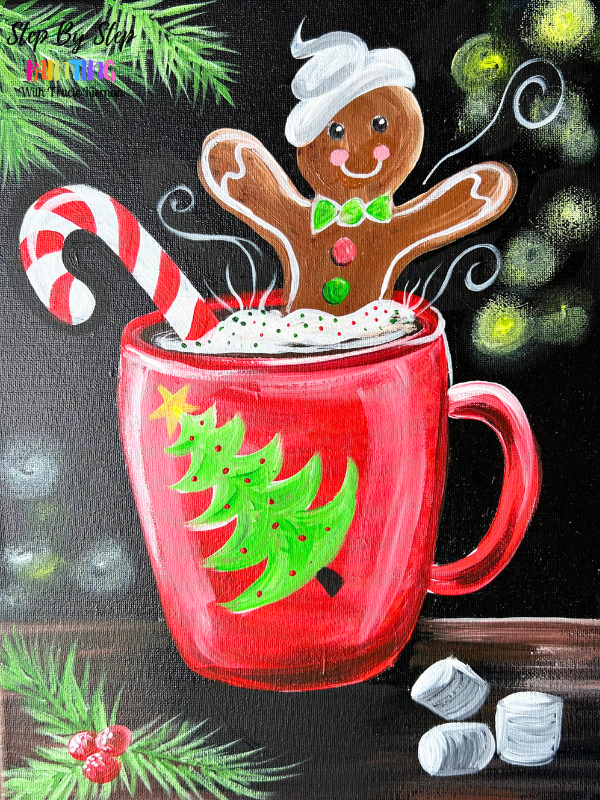
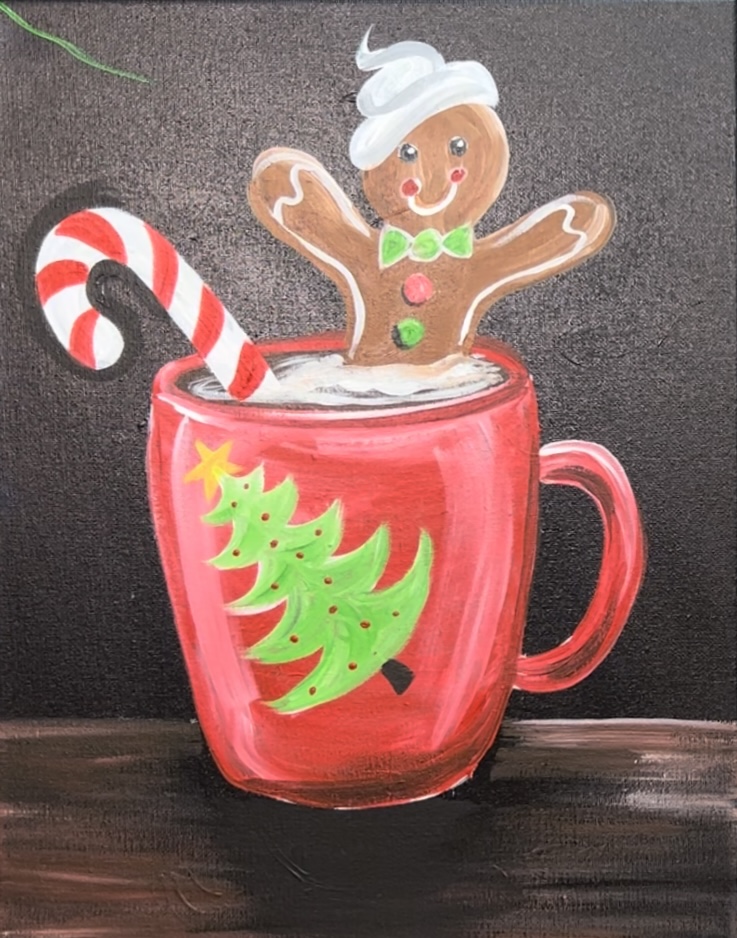
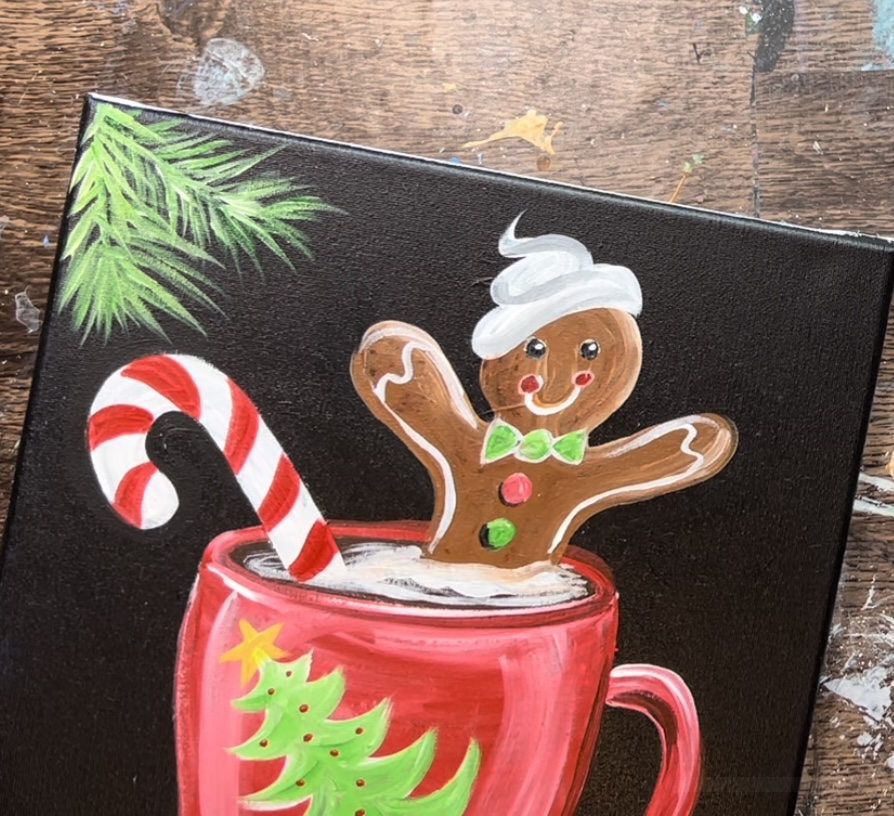
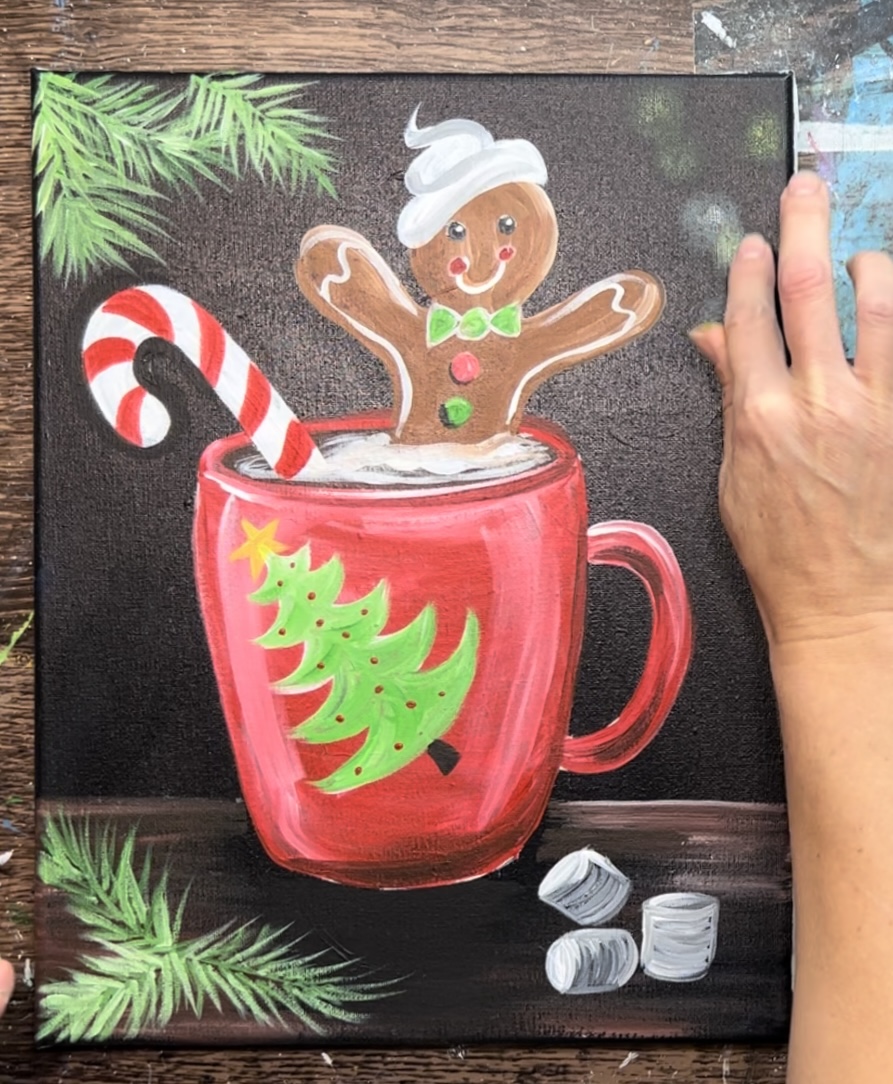
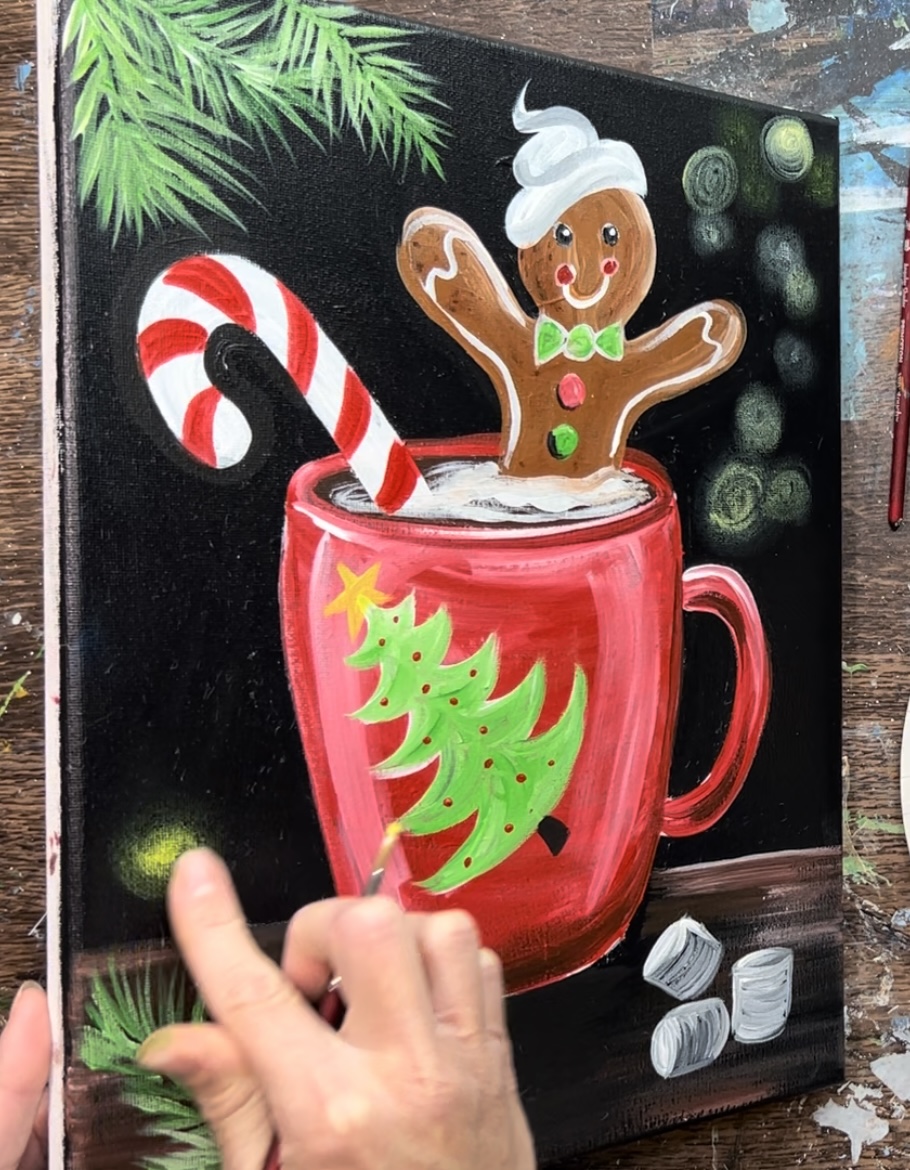
Paint a hot cocoa Christmas themed cup with a gingerbread man and candy cane. Add bokeh lights in the background and pine needle accents.
This painting is done on a black canvas background. You can purchase a canvas that is already primed with black or paint over a white canvas with one coat of black paint.
Enjoy and happy painting!
Materials
- 11 x 14 Canvas Painted Black
- Acrylic Paint
- Brushes
- Traceable
- Chalk
- Pencil
- Ruler
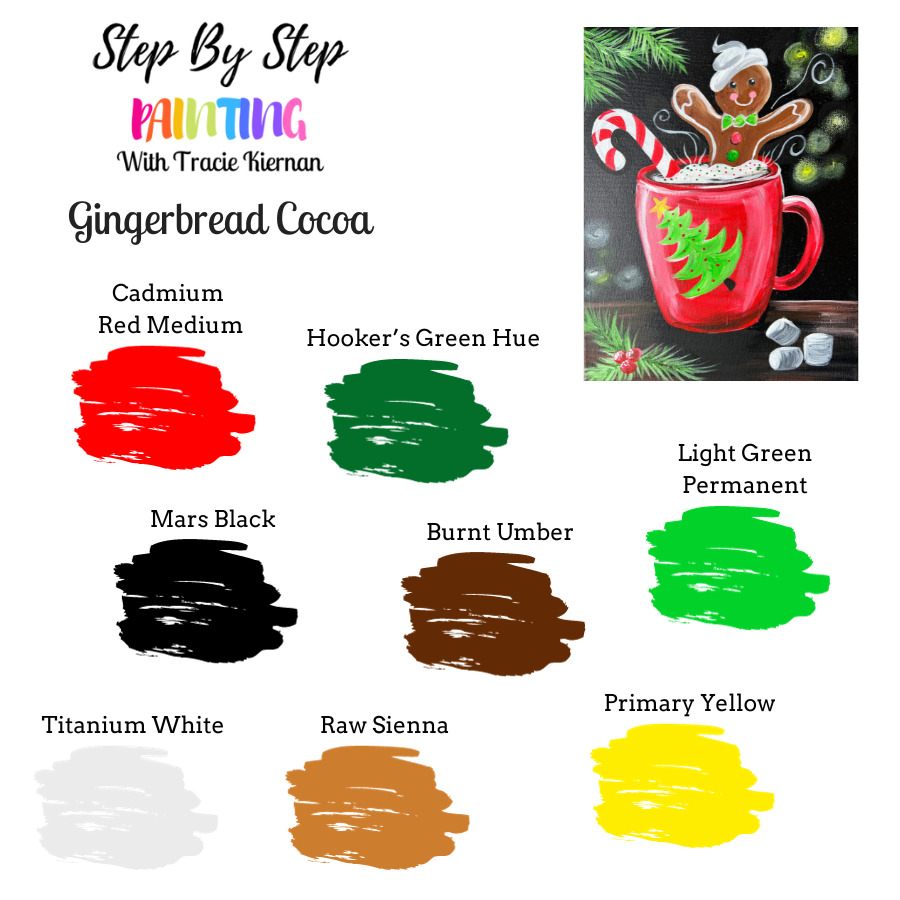
Color Palette
- Titanium White
- Mars Black
- Cadmium Red Medium Hue
- Primary Yellow
- Hooker’s Green Hue
- Light Green permanent
- Burnt Umber
- Raw Sienna
Brushes
- #4 Round Brush
- 3/4″ Wash Brush
- #12 Bright Brush
- 1″ Flat Brush (for painting canvas black)
Color Palette
Traceable Template Cup
This traceable is just for the mug and it is sized to fit on an 11 x 14 canvas.

Directions At A Glance
Video
Step By Step Instructions
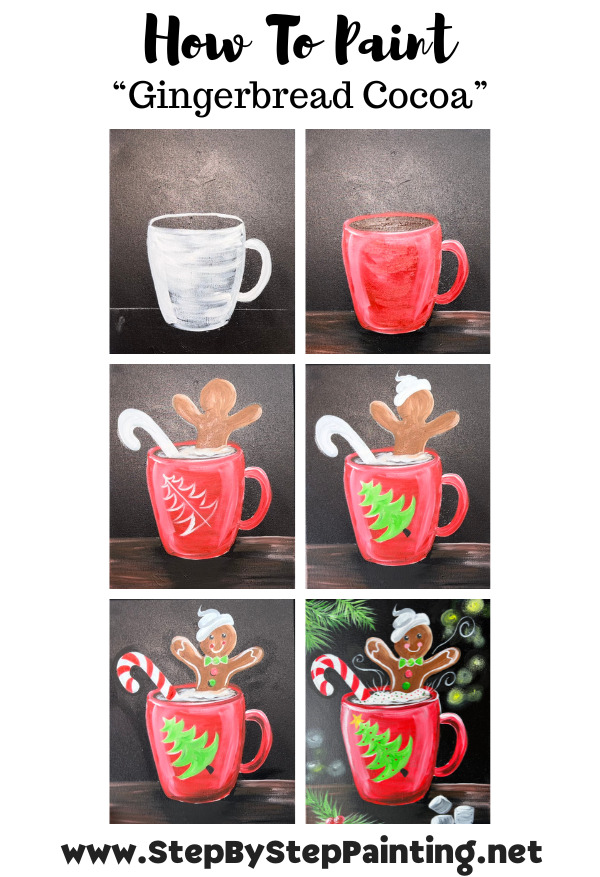
1. Paint Canvas Black
You can use a blank white canvas and paint a layer of black paint on it. You can also paint over a “mess up painting” or purchase a canvas that is already primed with black.
2. Apply Chalk On Back Of Template
Next, print out the cup template. This will be on one sheet of paper for the 11 x 14 canvas. Turn the template over and apply white chalk to the back where all the lines of the cup are.
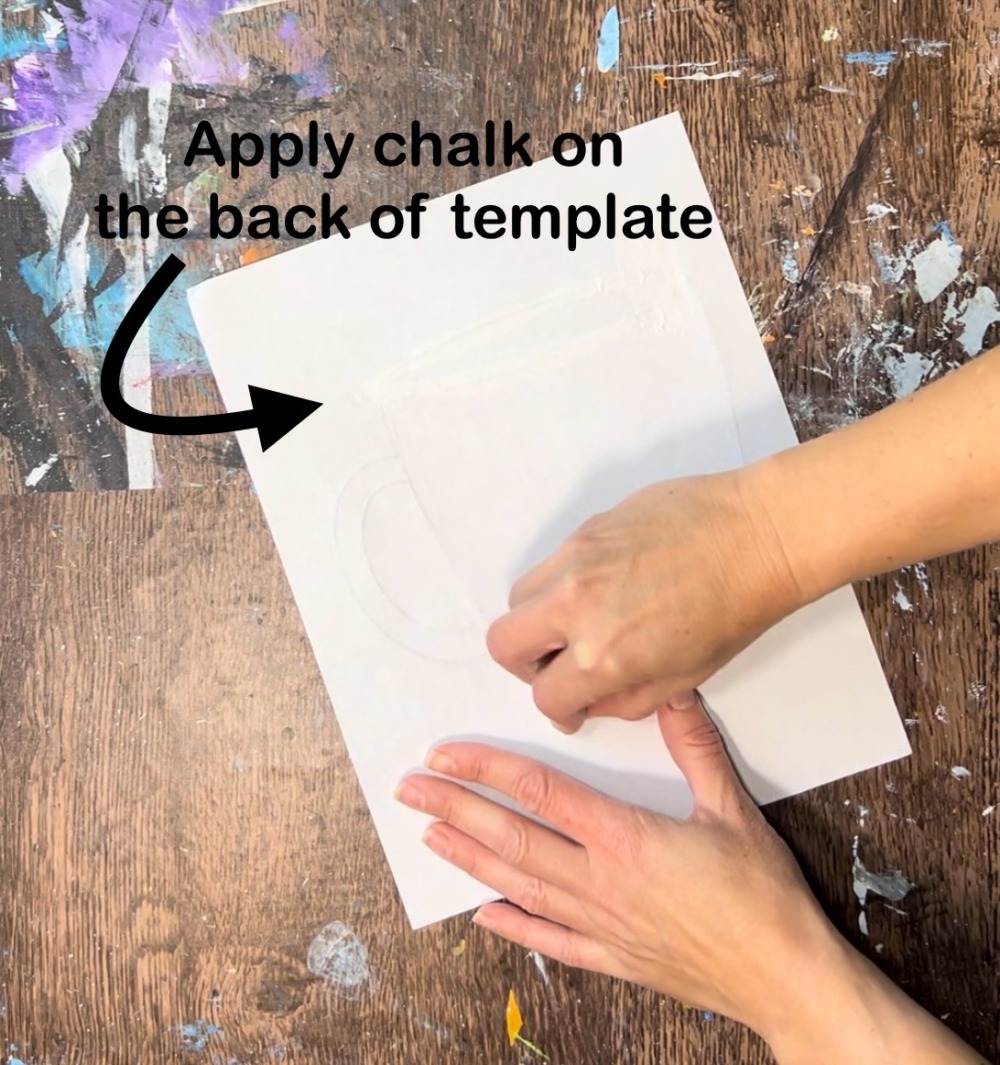
Alternatively, you can use “white graphite paper” for this.
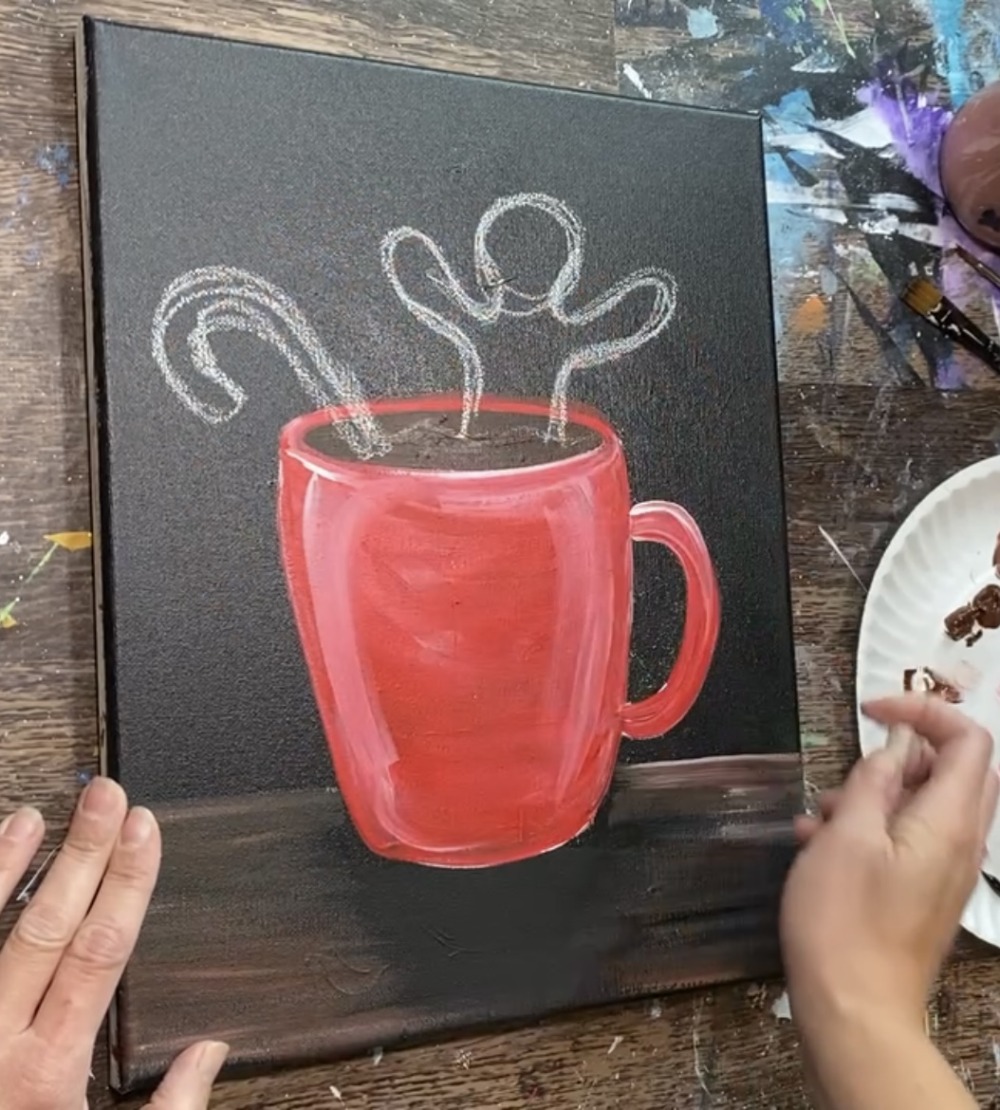
3. Transfer Cup Template To Canvas
Then turn the cup over. Position the template so the bottom edge of the paper lines up to the bottom edge of the canvas but leave about a half inch of space on the right edge of the paper to the right edge of the canvas. Note: you just want to make sure there is extra space on the left side of the cup because of the candy cane and leave plenty of space above the cup for the gingerbread man.
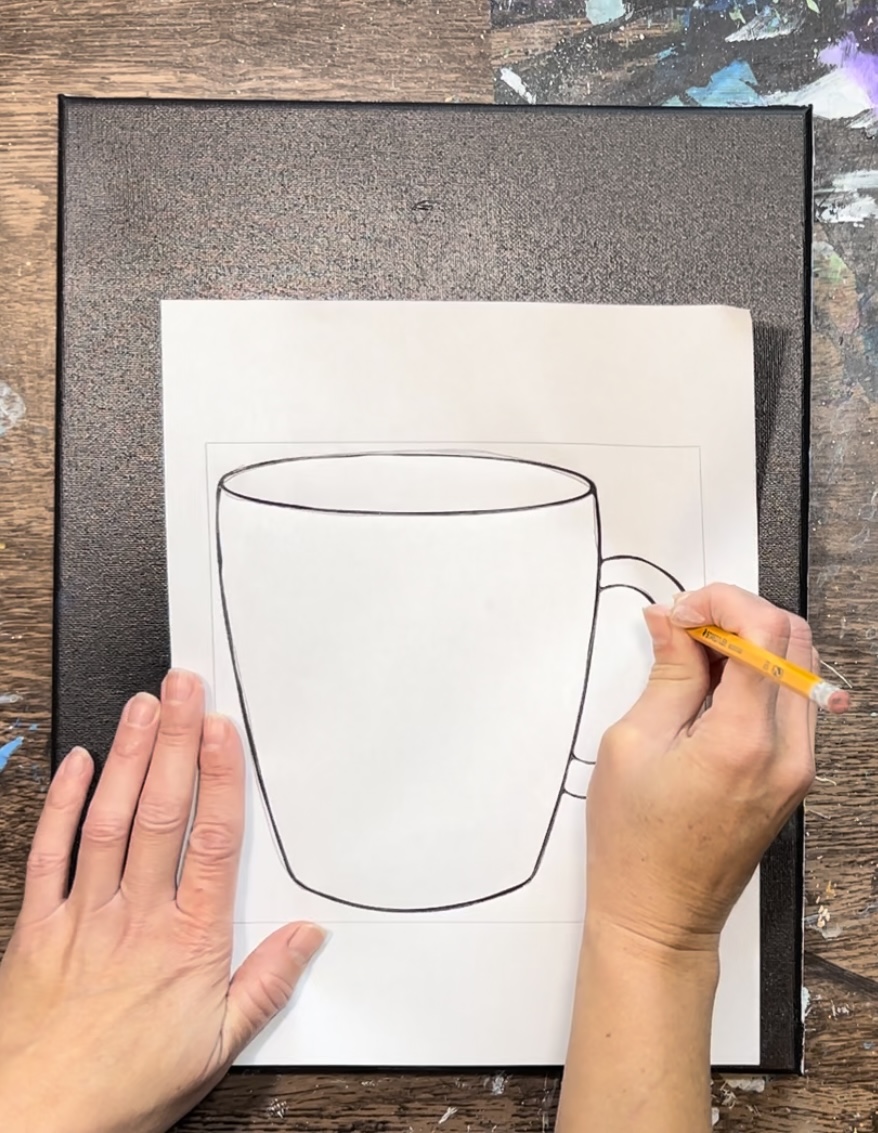
Use a pencil to press firmly on the lines and this will transfer the design to the canvas. Then use a ruler to draw a “table line” behind the cup. This line is about 3.5″ from the bottom edge of the canvas.

4. Paint Cup White
Use a #12 bright brush and titanium white to paint the cup a layer of white. This is to ensure the color of the cup will show up nice and bright against the black background. You do not need the white to have 100% coverage.
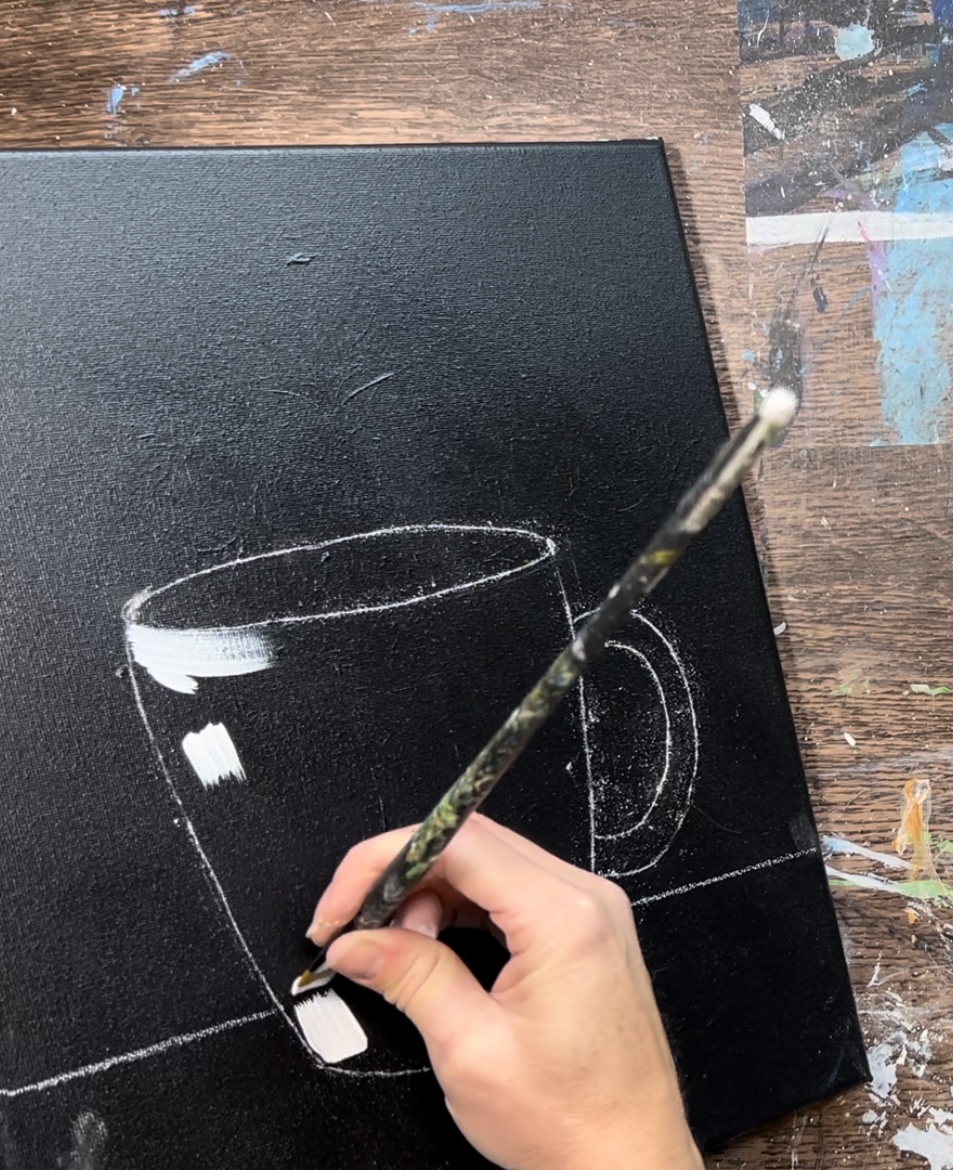
Use the tip of the brush to paint the edges of the cup drawing and use the full width of the brush to paint curved strokes to create the shape of the cup. This helps give it form.

Use the #4 round brush to paint the handle of the cup.
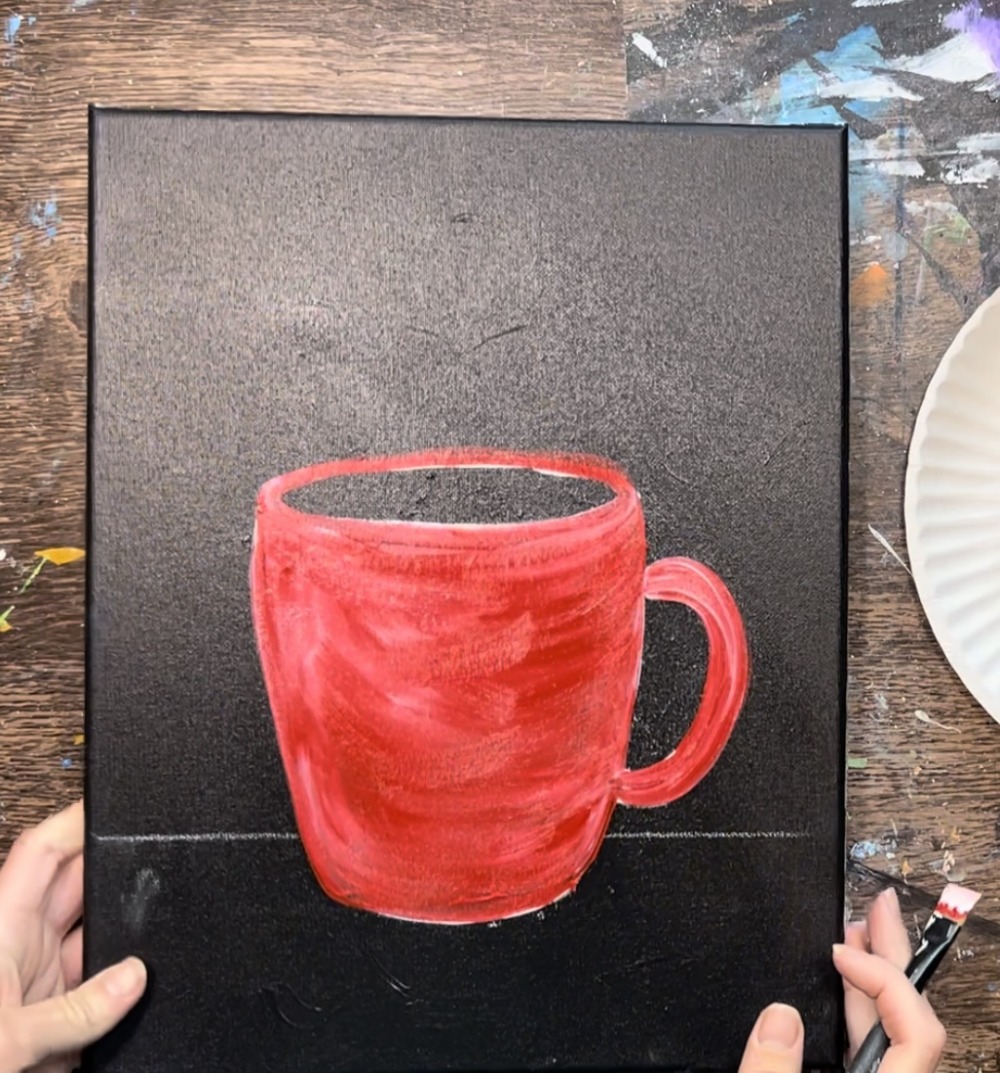
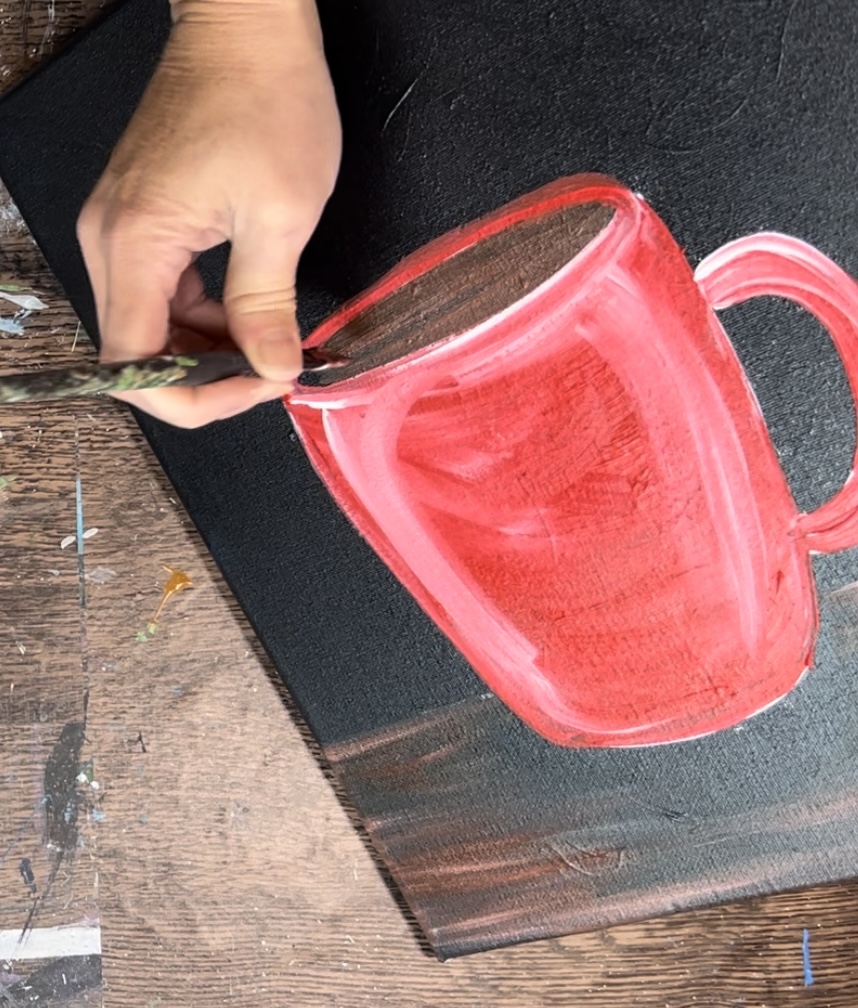
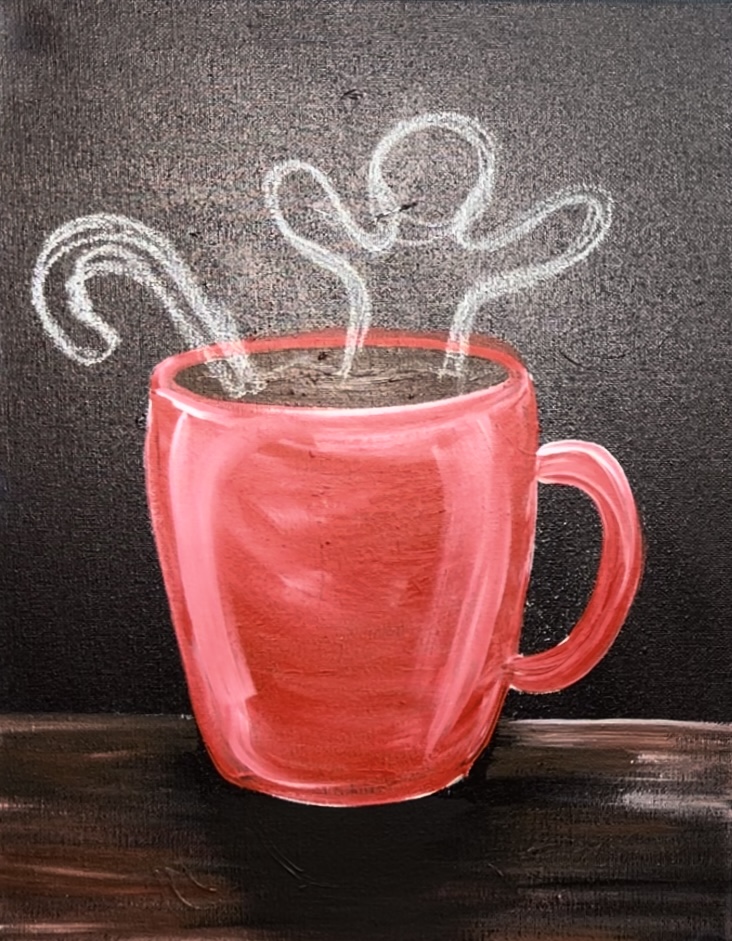
5. Paint Cup Red (or other color)
Wait a little bit for the cup to dry. Then use cadmium red medium hue (or your chosen cup color) to paint the cup. Make sure you make your strokes go in a curved direction for the middle of the cup area and then use the tip of the brush to outline the edges.
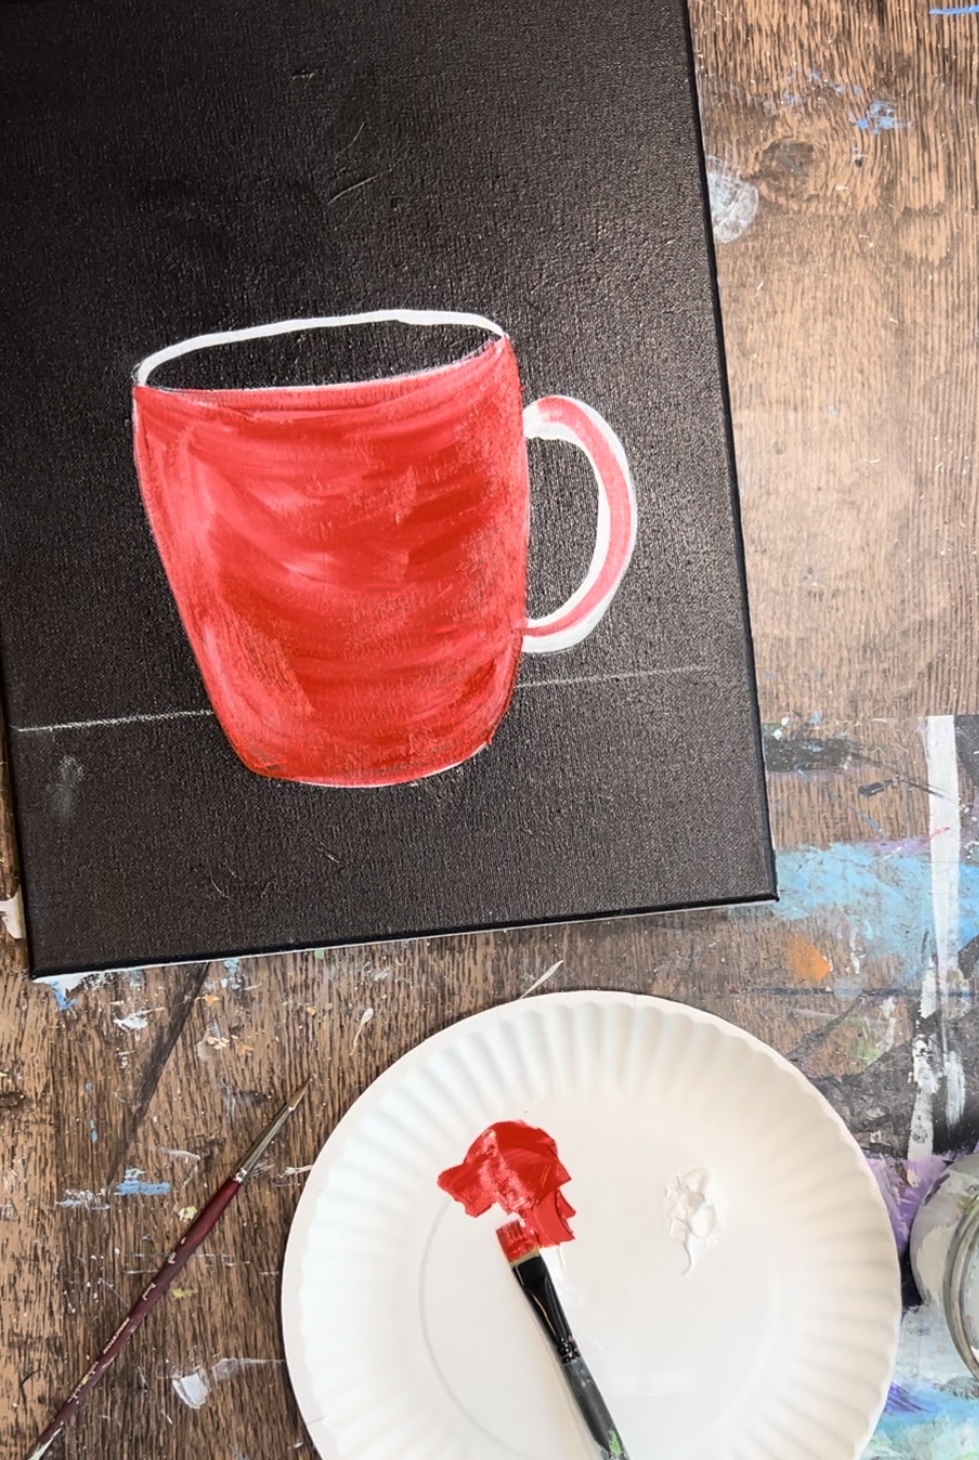
Use the #4 round brush to paint the rim and the handle.
Next, paint highlights on the cup. On your palette, mix titanium white and cadmium red medium (about equal amounts) together. This will create a light red.
Use the #12 bright brush to paint two vertical/ slightly curved lines on both sides of the cup. Make this line area slightly wider on the top and thinner on the bottom. This will make a lighter area on the cup to help create that “shiny look”.
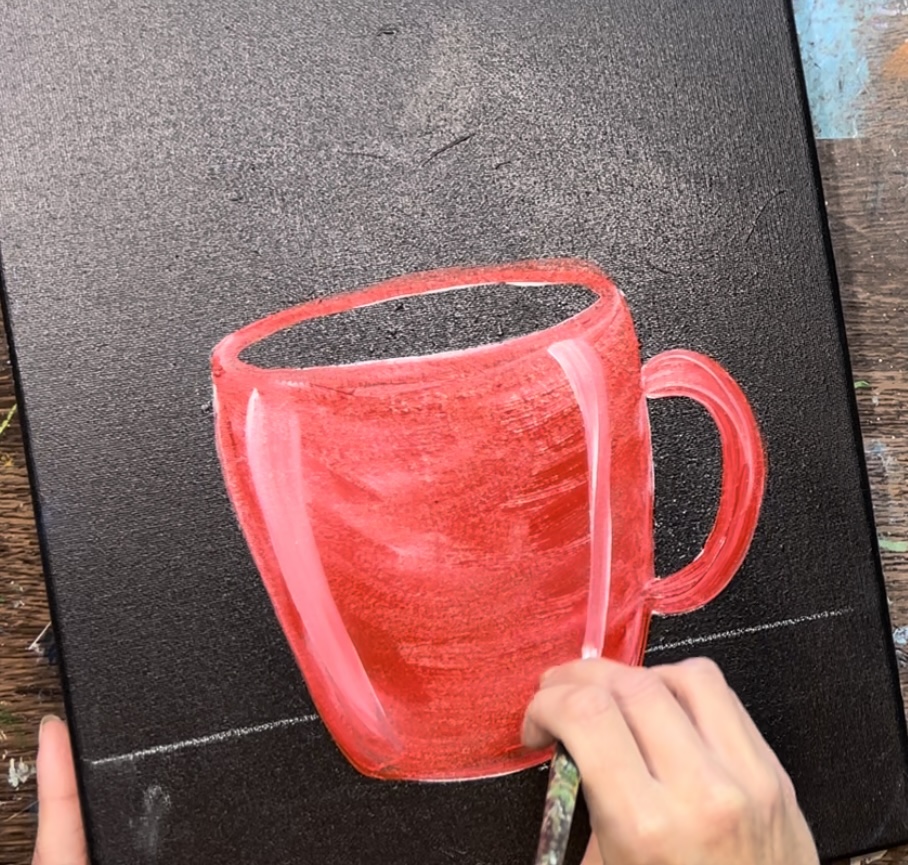
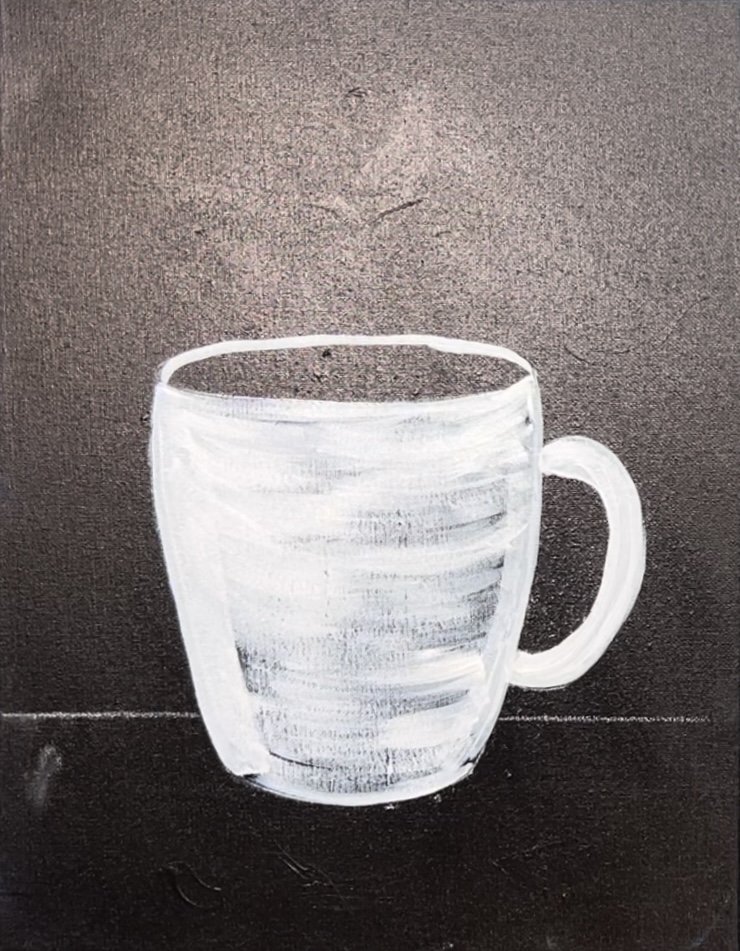
Use the round brush to paint a highlight on the rim of the cup, the top of the handle and on the curve on the bottom edge of the cup. If needed, use the red to help blend the highlight in a bit. Note: picture below shows highlights. Table color will be painted in a later step.

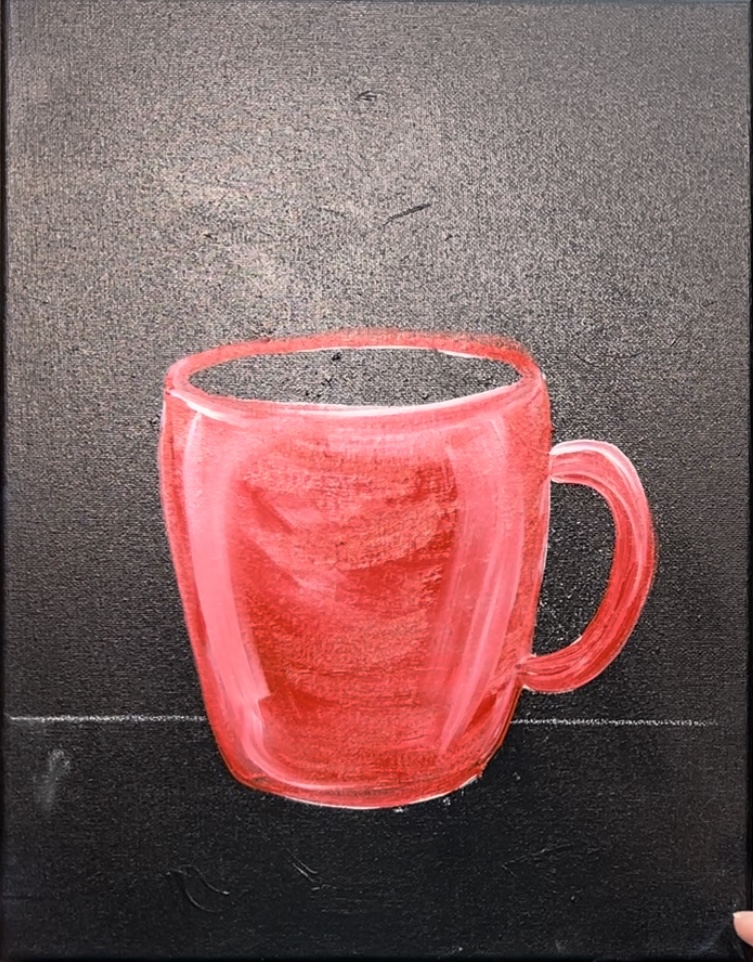
Next, use the burnt umber to paint the inside of the coffee cup. You can use any brush for this and it is just a solid coat of brown on the inside of that oval shape.
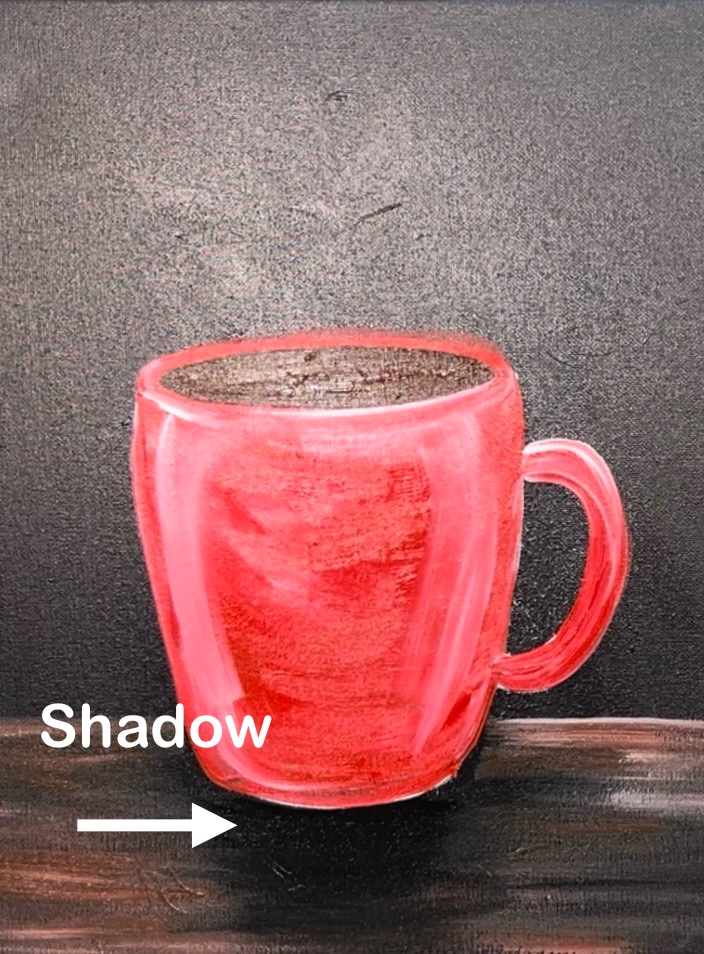
6. Paint Table
Use the #12 bright brush to paint the table area. Mix a small amount of titanium white into the burnt umber. Then paint loose, left and right paint strokes going in a horizontal direction on the table area. Leave a lot of the black form the background still showing through.

Add small amounts of white in the brown and let it gently blend with the brown so that some of the areas of the table are lighter brown. Again, leave a lot of the black still there to help create the texture of the wood. Leave the area below the cup without much lighter brown because this area will have shadow.

Then rinse the brush and use mars black to paint a shadowy area under the cup. Use the 12 bright brush and the black to paint loose, left and right paint strokes.
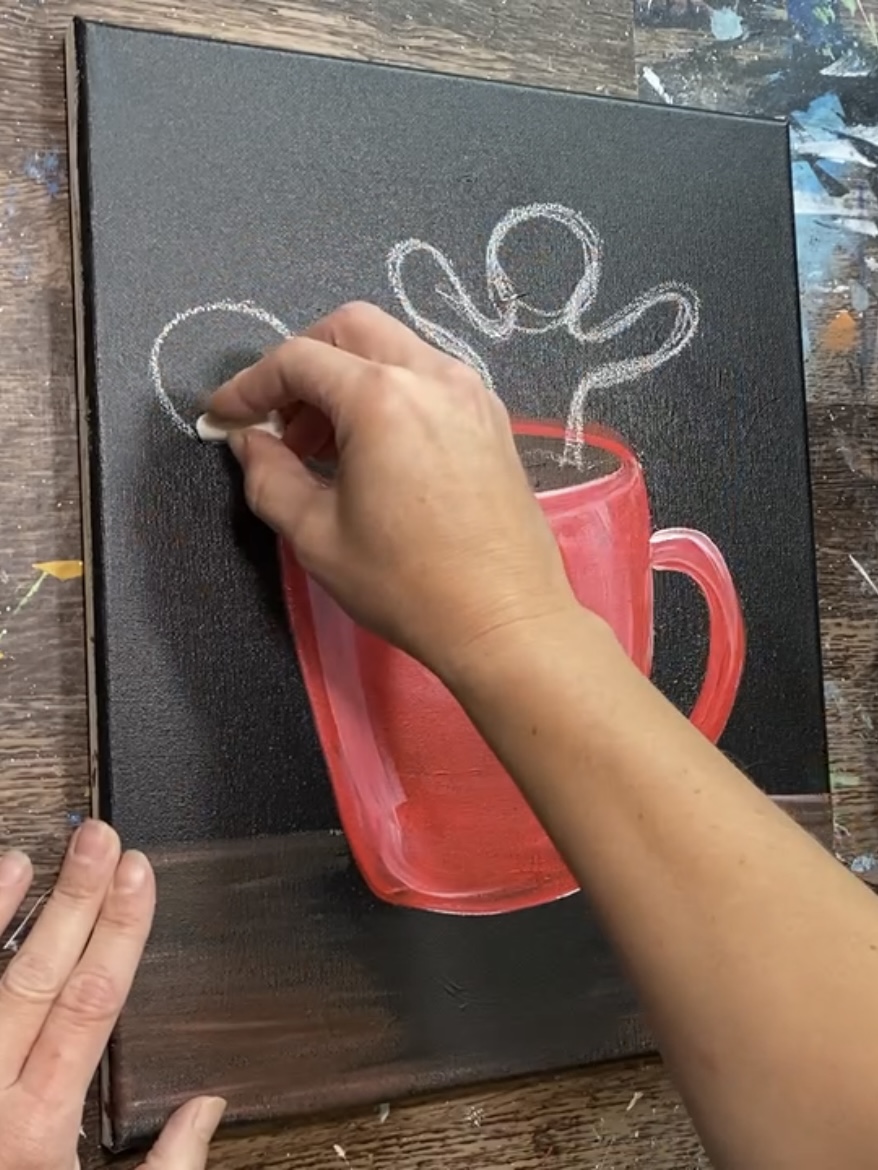
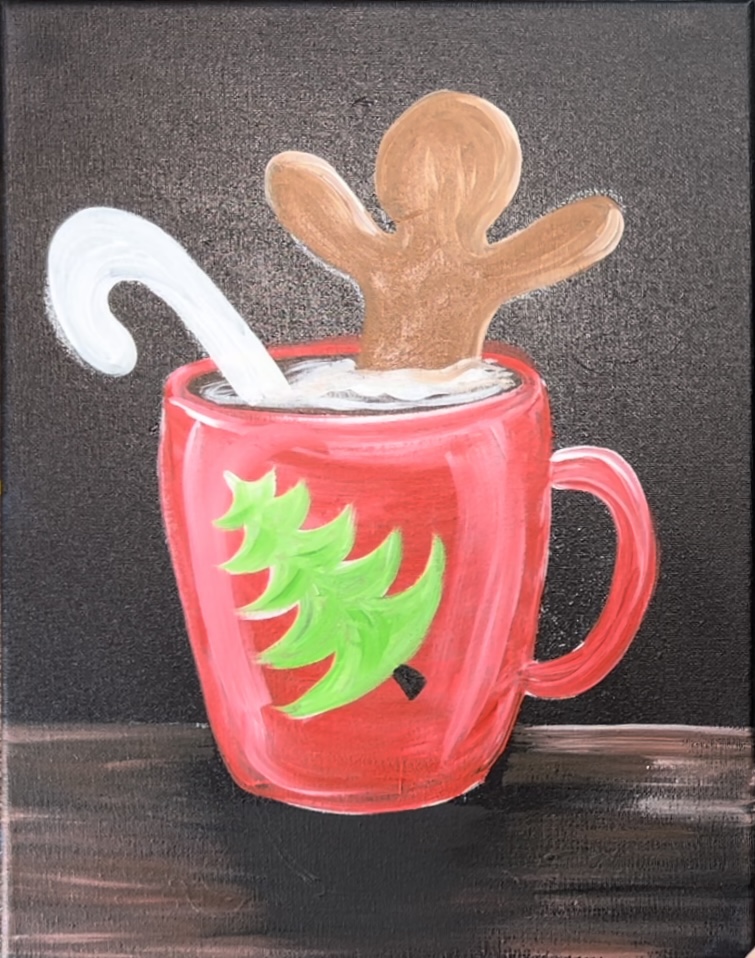
7. Draw Gingerbread Man & Candy Cane
Use a piece of white chalk to sketch the shape of the gingerbread man. Draw the gingerbread mean so you see the upper half of him (his head, arms and upper torso) with the bottom half inside of the cup.

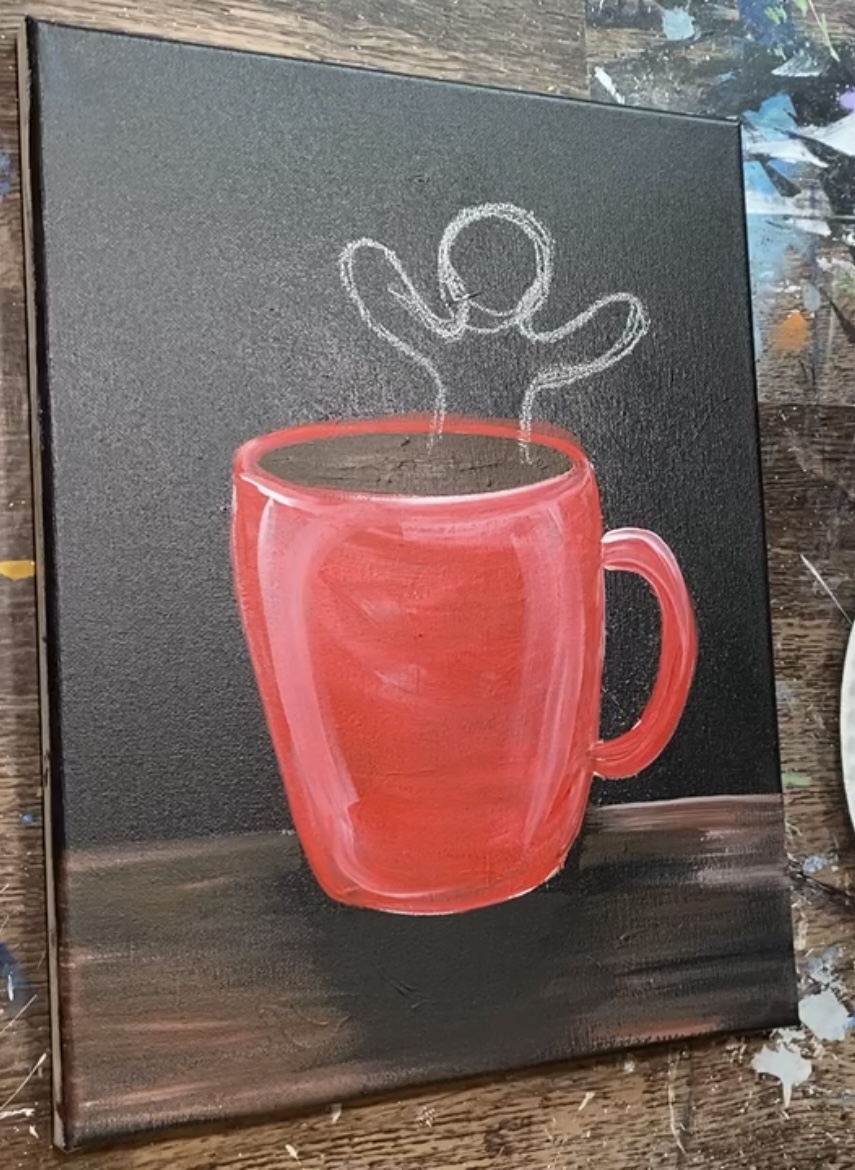
Then draw the candy cane so the top half of the candy cane is visible and the bottom half is in the hot chocolate.
8. Paint Gingerbread Man & Candy Cane (first layer)
Use a #4 round brush and the color “raw Sienna” to paint the gingerbread man.

Outline the shape of the gingerbread man and then fill it in solid with the raw Sienna.

Next, mix a little bit of white into the raw Sienna. Blend this lighter brown on the right sides of the gingerbread man so that it highlights it. Do this on the right side of the head, arms and torso.

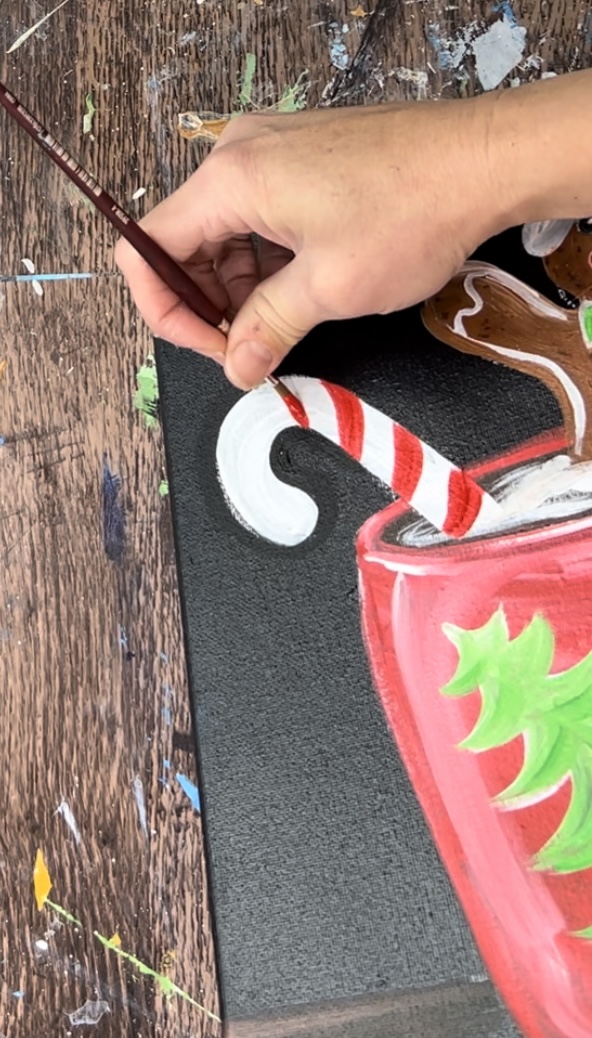
Then use the #4 round brush and titanium white to paint the candy cane.

Loosely paint the whipped cream around the candy cane and gingerbread man in the opening of the cup.

9. Paint Christmas Tree (or other design) on Mug
Use a #4 round brush and titanium white to paint the tree. Paint a diagonal line then outline the shape of the branches to create the shape of the tree. This is a whimsical style Christmas tree with branches that curve and slightly point upwards. You can also change the pattern/ design on the cup.
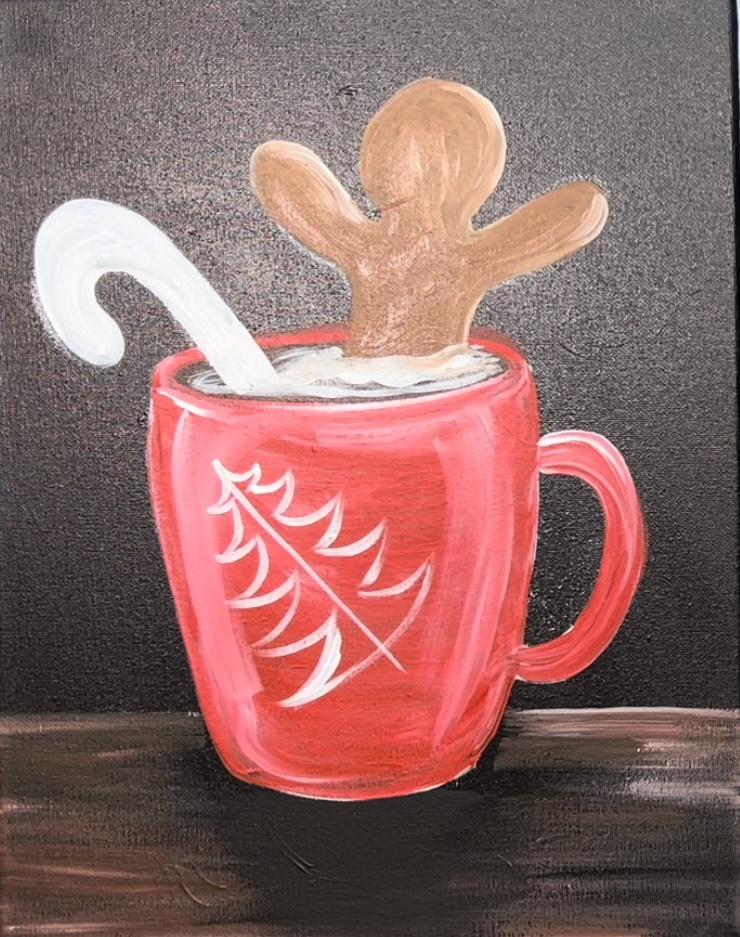
Mix light green permanent and titanium white together on your paint palette. Then use the #4 round brush to paint the tree a solid coat of this green.
Use mars black to pain the base of the Christmas tree trunk. Wait for this to dry before doing red ornaments and star on the tree.
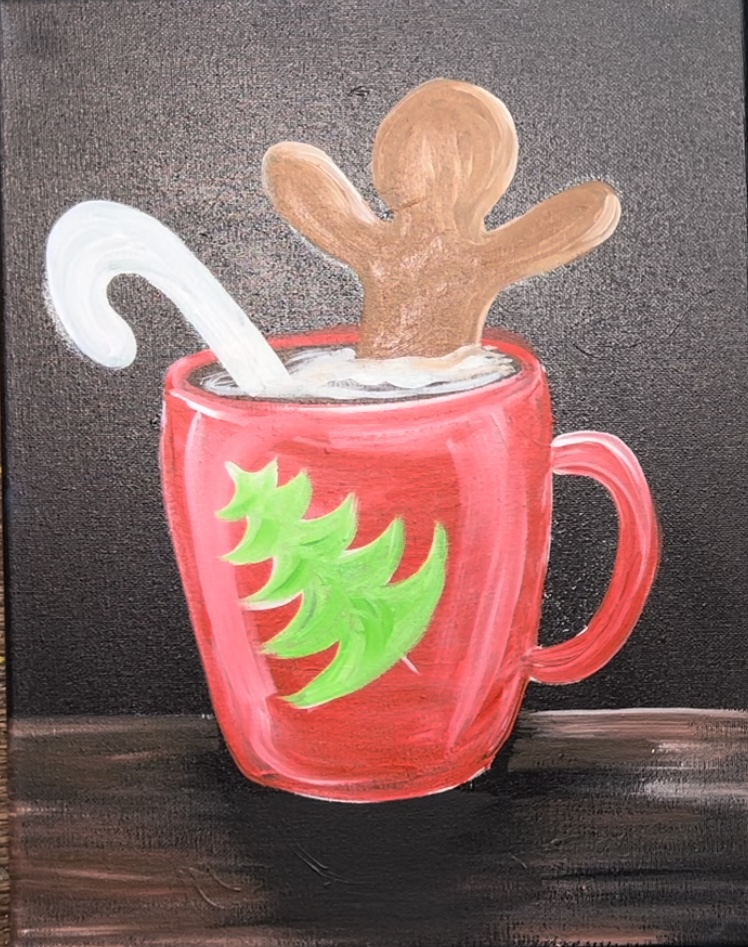
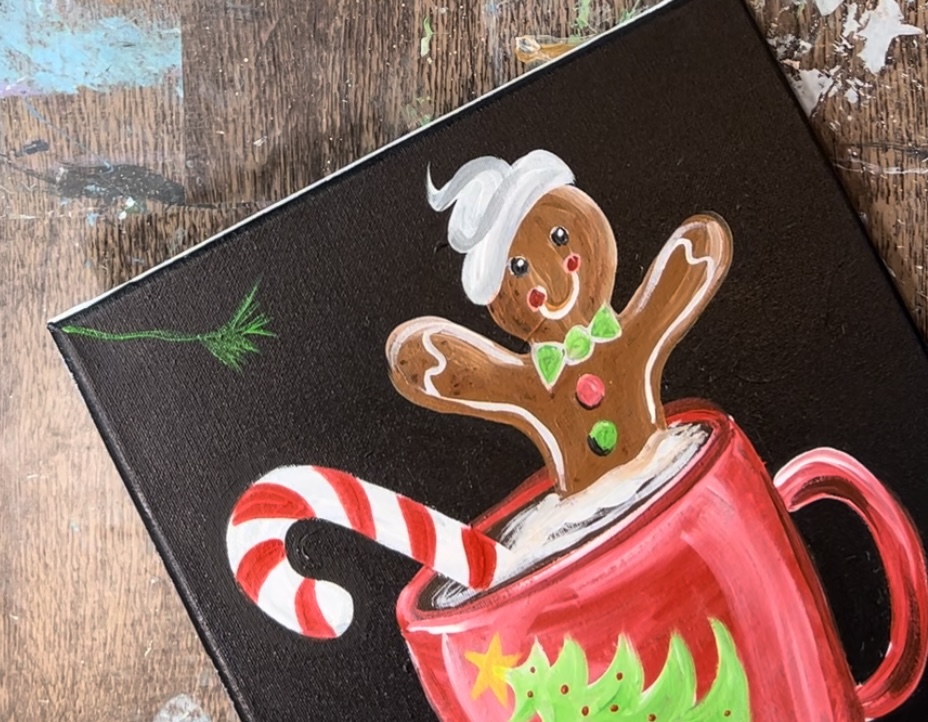
10. Paint Face & Other Details On Gingerbread Man
Use a #4 round brush and titanium white to paint whipped cream on the gingerbread man’s head.
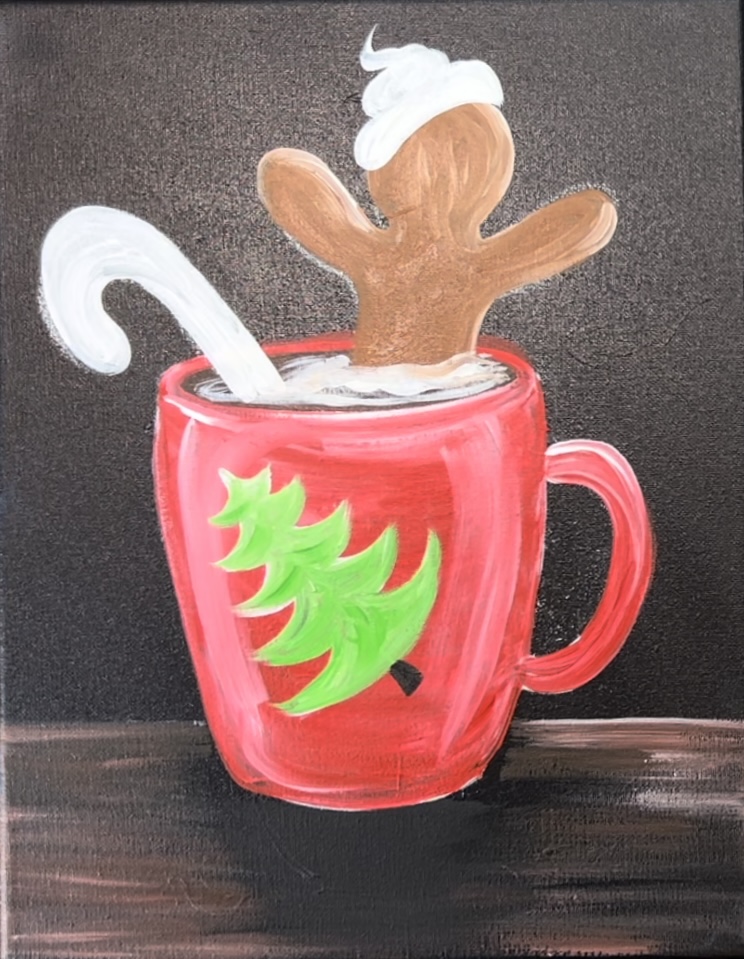
Then blend a little bit of gray (mix black and white to make gray) on one side of the whipped cream and blend it into the white.

Paint the details on the gingerbread man. Paint the eyes, mouth and icing on the arms with the #4 round brush and titanium white. Paint the “gumdrop buttons” with red and green.
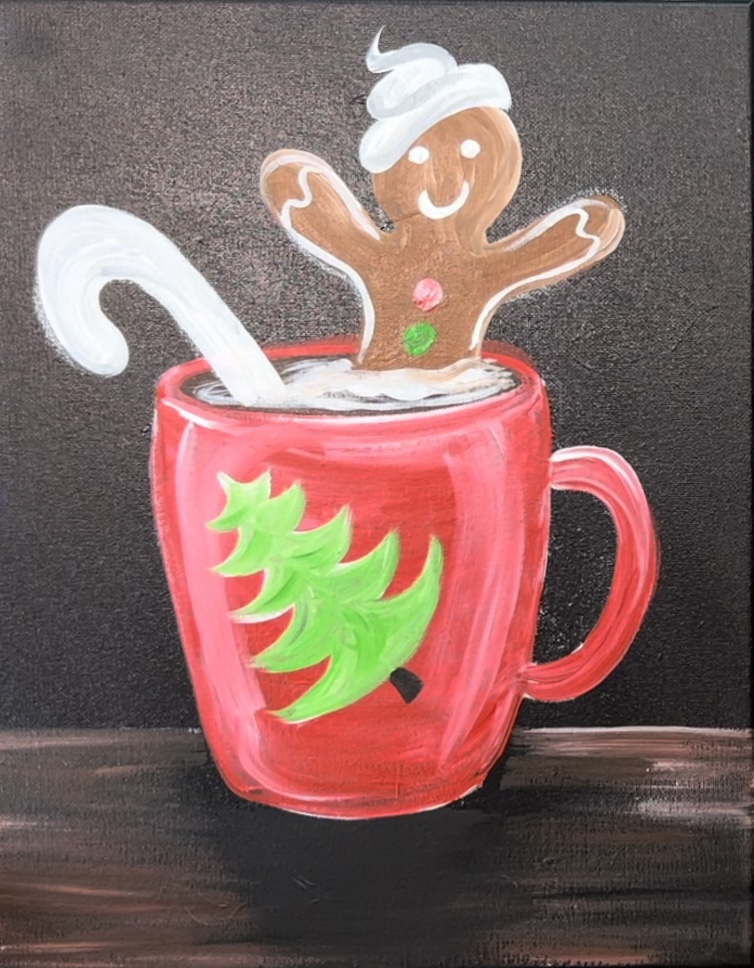
Paint the bowtie with green and outline it with white.
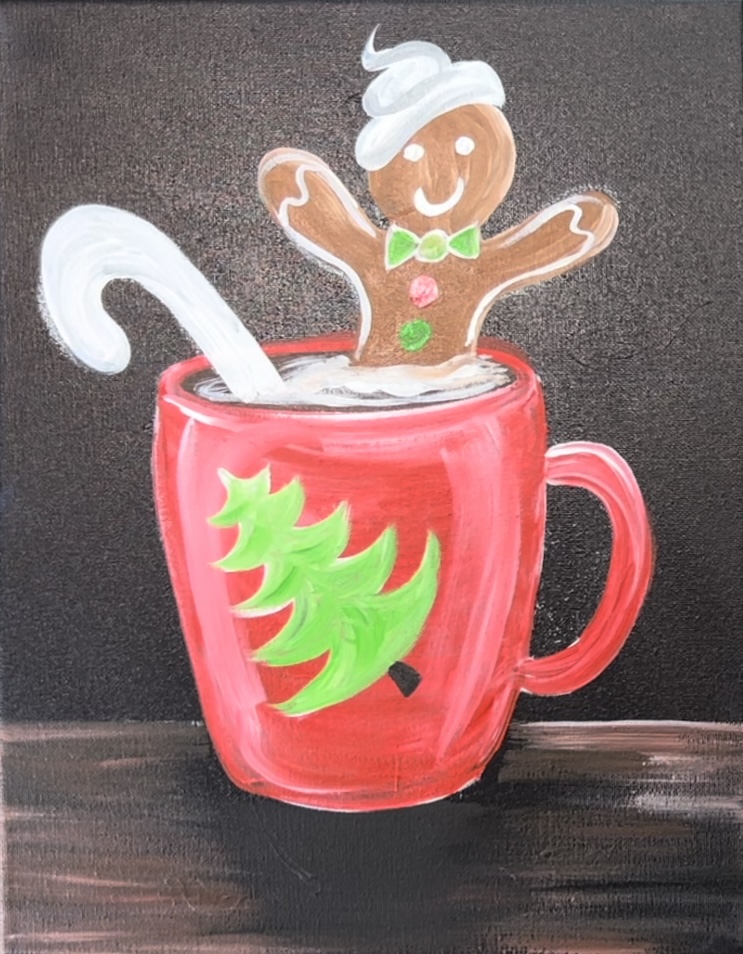
Paint the red stripes on the candy cane.
Some other details on the gingerbread man include painting the eyes black and adding a white dot highlight to them. Also paint pink “cheeks” on each side of the mouth line.

Add more details on the tree on the mug. Paint a yellow star using titanium white and cadmium yellow medium. Then paint little red dots on the tree.
11. Paint Pine Needle Branches
Use a 3/8″ angle brush to paint the pine needles. Mix white with any of the greens on your palette (I used hooker’s green hue & light green permanent mixed with white). Start by painting a line for the middle of the branch.
Then use the tip of the angle brush to paint the pine needles. Use a combination of both of the greens on your palette plus a little bit of titanium white. Start at the end of the branch and paint the pine needles going from the right to the left.
When you add little bits of titanium white into the green, it will help the pine needles look brighter against the dark background.
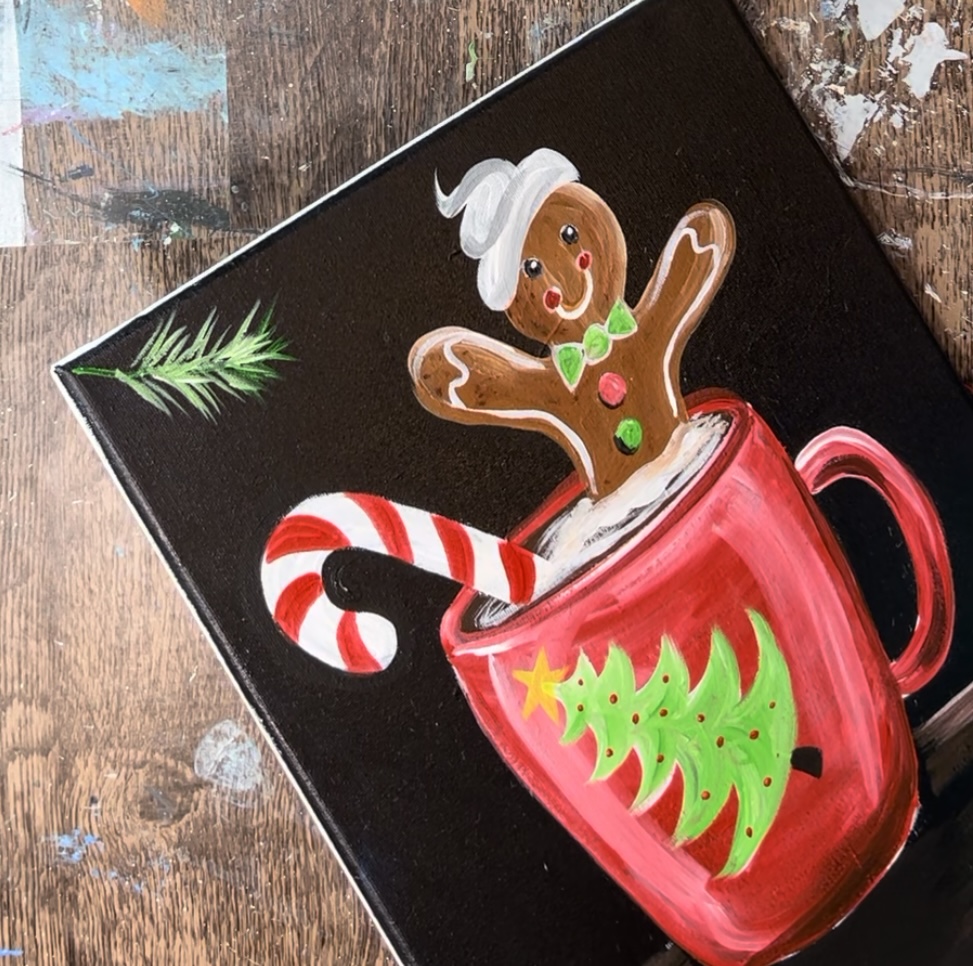
Paint multiple branches in the upper left corner area of the background.
Then repeat this step for the bottom left area of the table. Paint three pine needle branches lying on the table.
12. Paint Marshmallows
Use a #4 round brush and titanium white to paint marshmallows. Paint an oval (the end of the marshmallow) either white or gray. Then paint the side of the marshmallow the opposite color.

I did three marshmallows on the table.

13. Bokeh Lights
Bokeh lights are soft, out of focus lights in the background. To create this effect, use a small amount of yellow, yellow mixed with white and pure white. Use the #4 round brush to paint a very small dot. Then use your finger to smear the dot into a blurry circle. Use different combinations of the white and yellow to create more blurry circles. Some of these circles can overlap each other.
Some of the circles are larger, some smaller. Some are brighter (add slightly more paint to make it brighter) and some are dimmer.
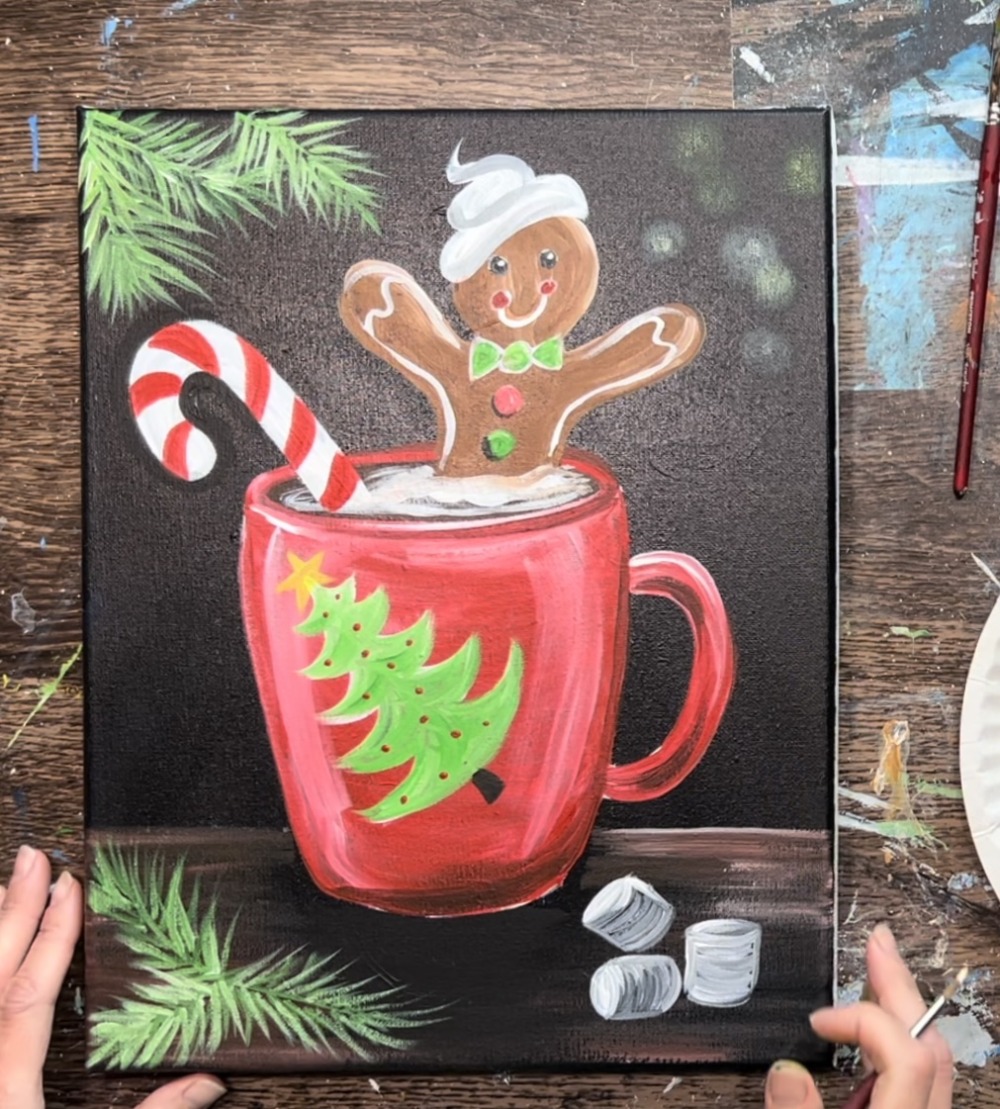
You can also use your round brush to paint these blurry circles. Load only a small amount of paint on your brush to paint these circles in a dry brush style. These circles should still have the background black color showing through because they are translucent and not opaque.

Paint more bokeh in the lower left area of the background.
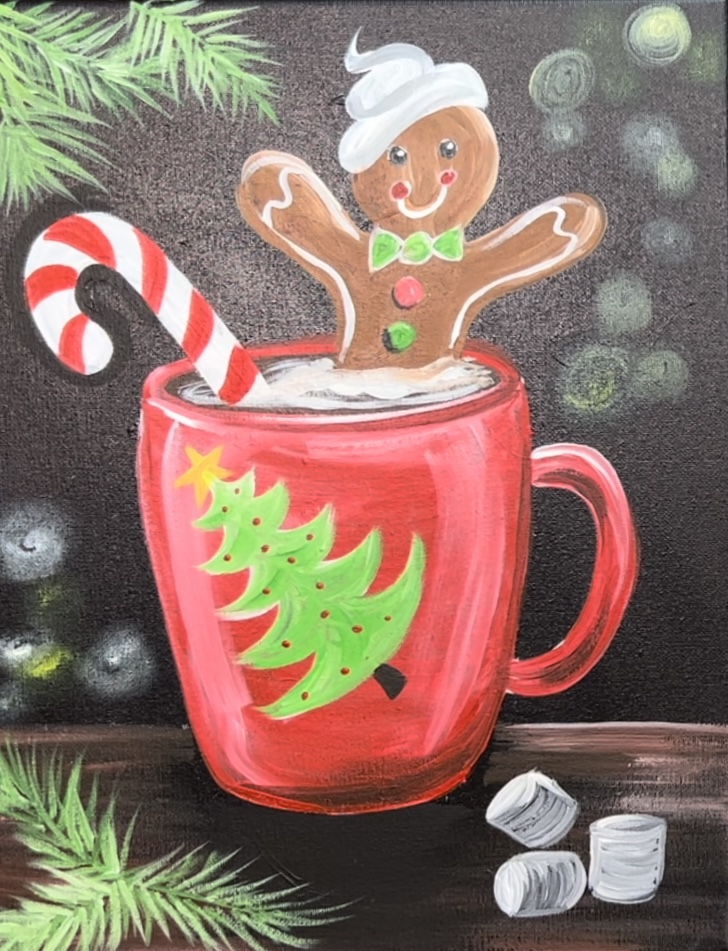
14. Paint Stem & Final Touchups
Use a #4 round brush and titanium tie to paint little steam spirals coming out from the hot chocolate mug.

Then paint berries on the pine needle bunch using the #4 round brush and the red paint. Add a little bit of white on the left side of the berries for highlight.

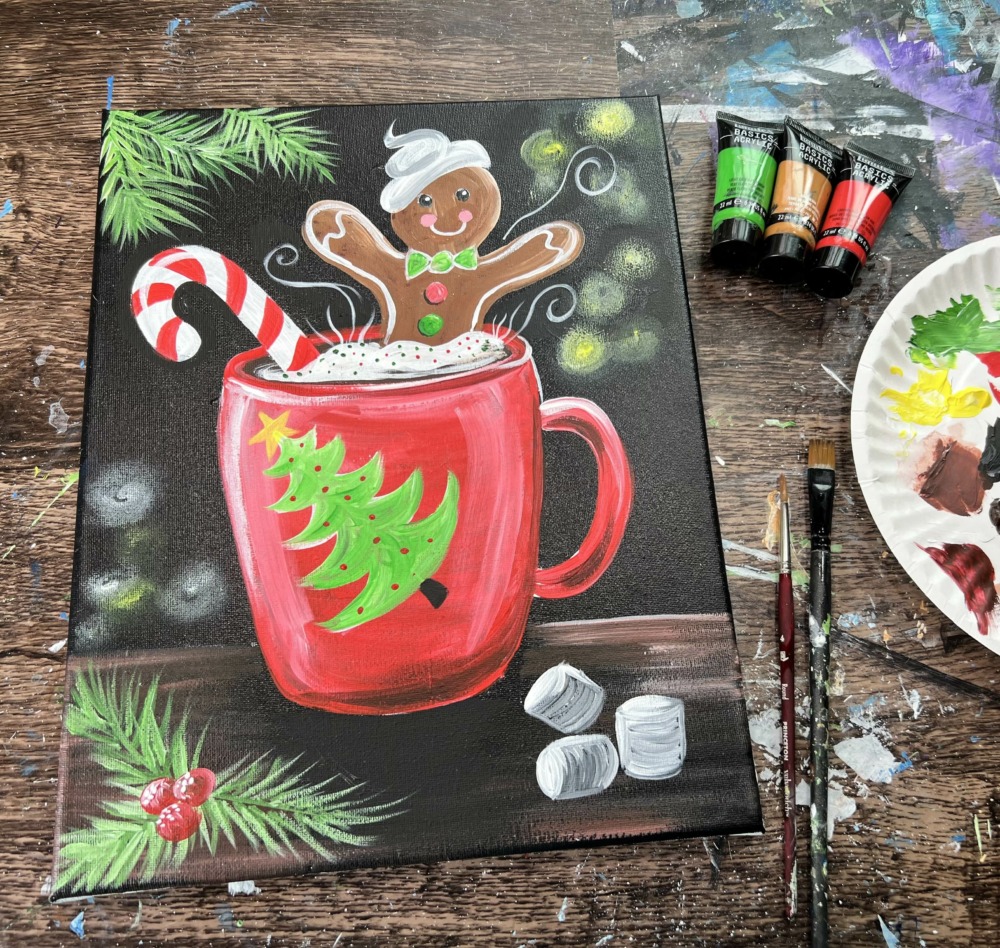
Finished!