Would you like to save this?
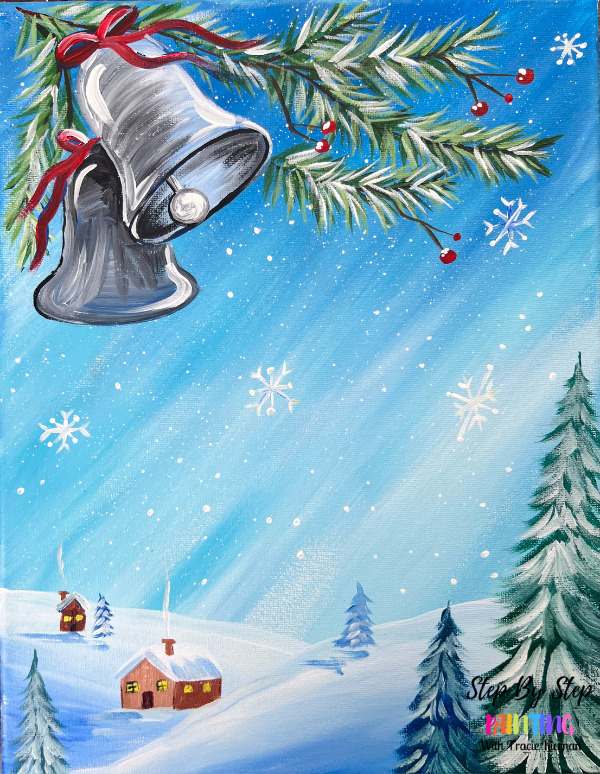
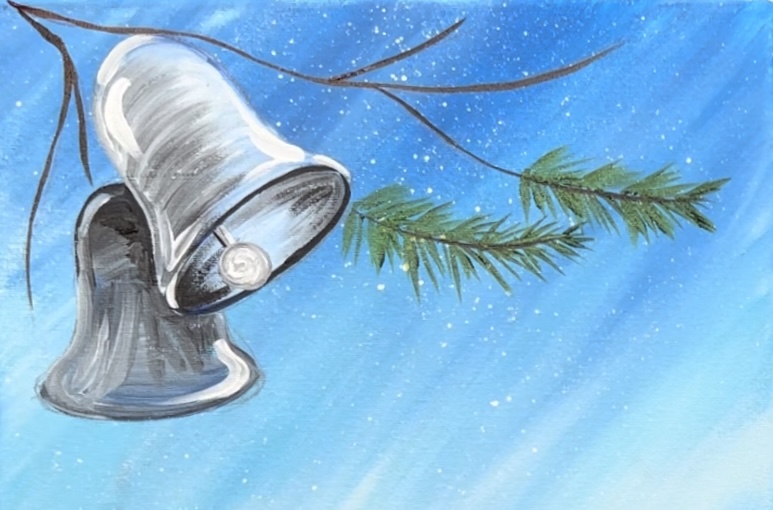
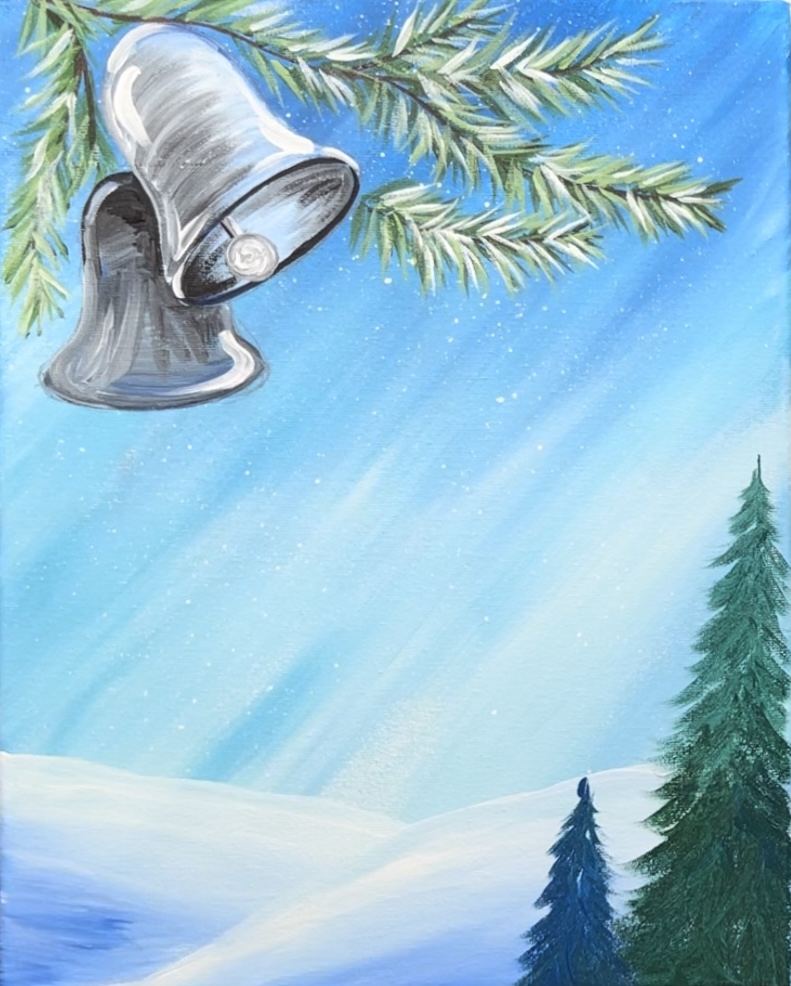
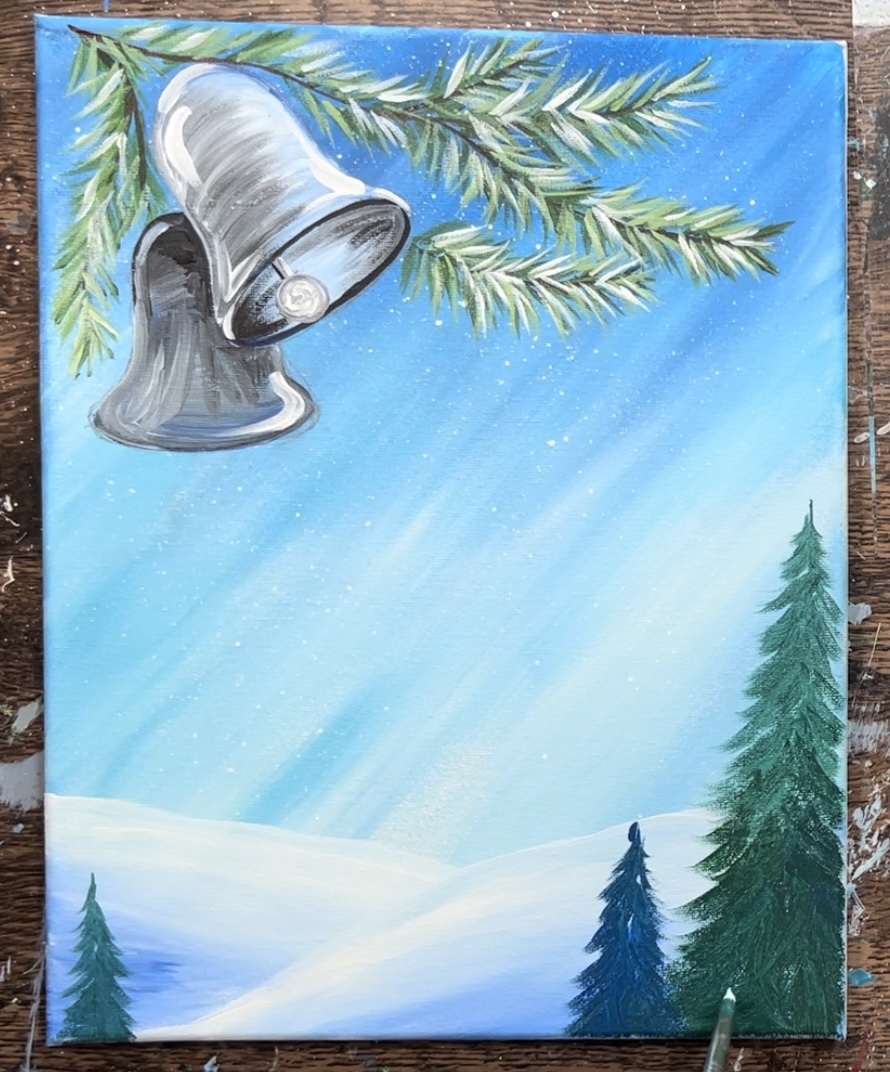
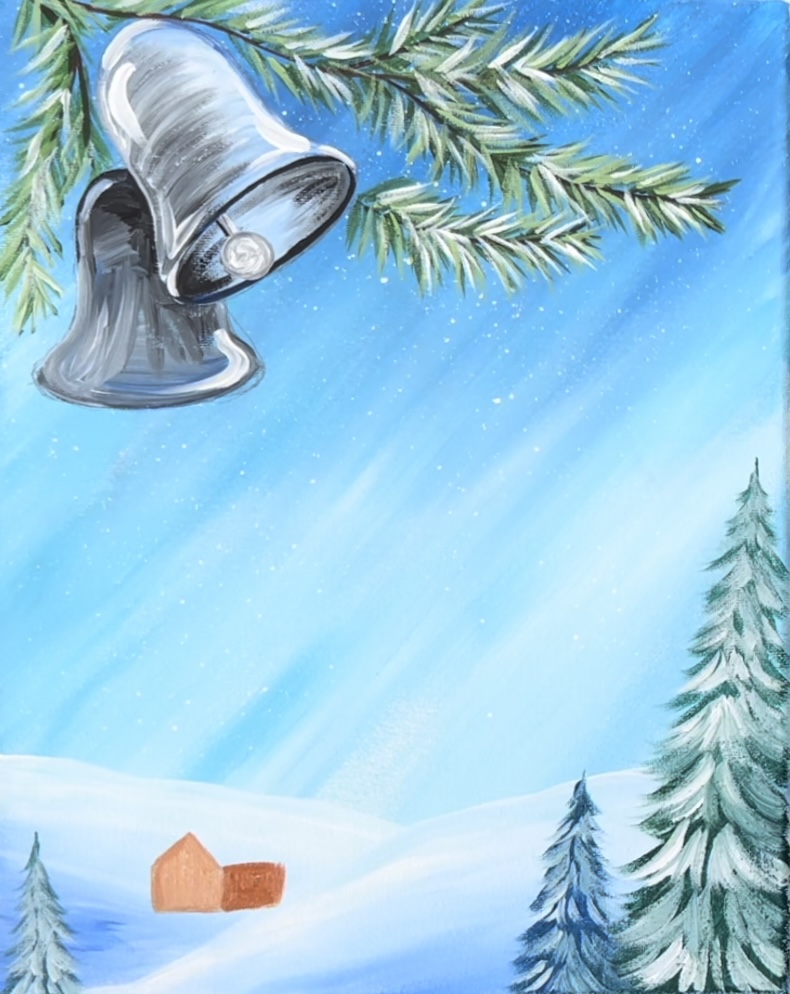
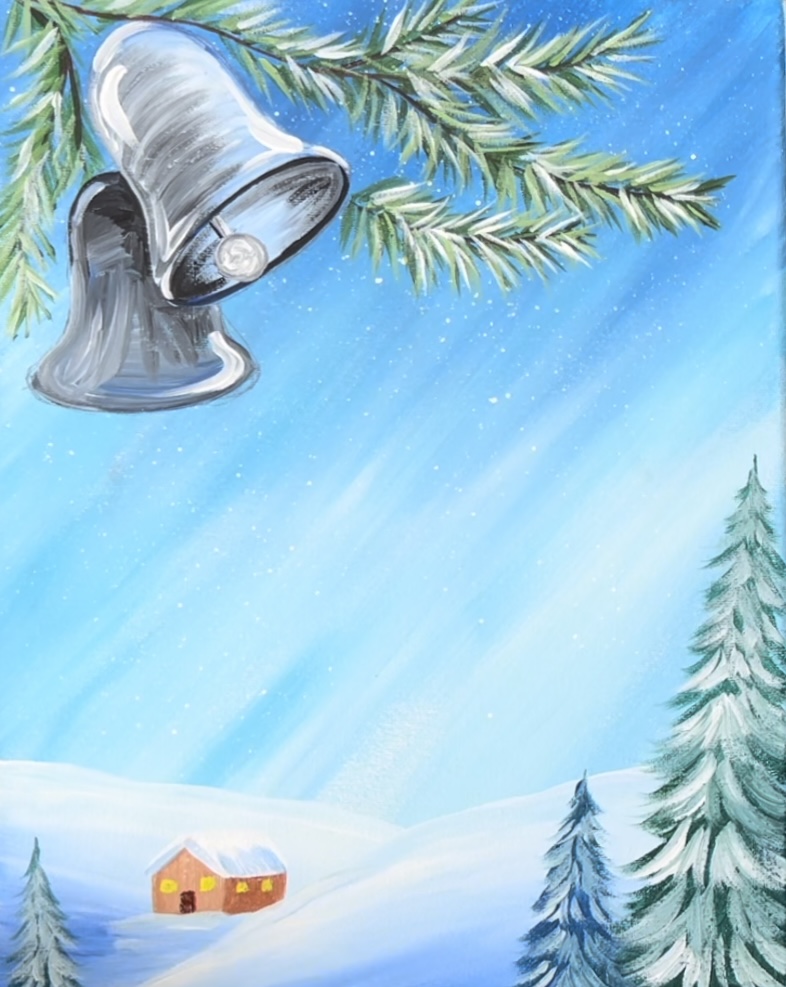
We have sort of a challenge painting this week! I will be showing you how to paint this gorgeous “Silver Bells Winter Landscape”.
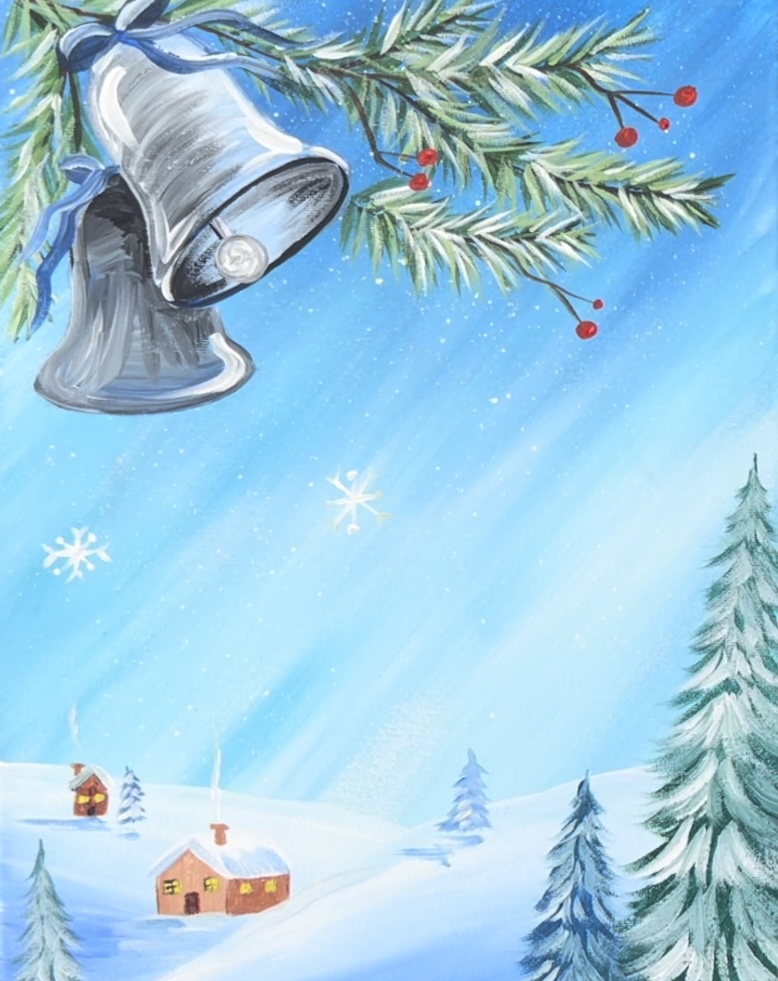
This painting has a unique perspective with the large bells up high in the foreground and little homes and trees in the distance.
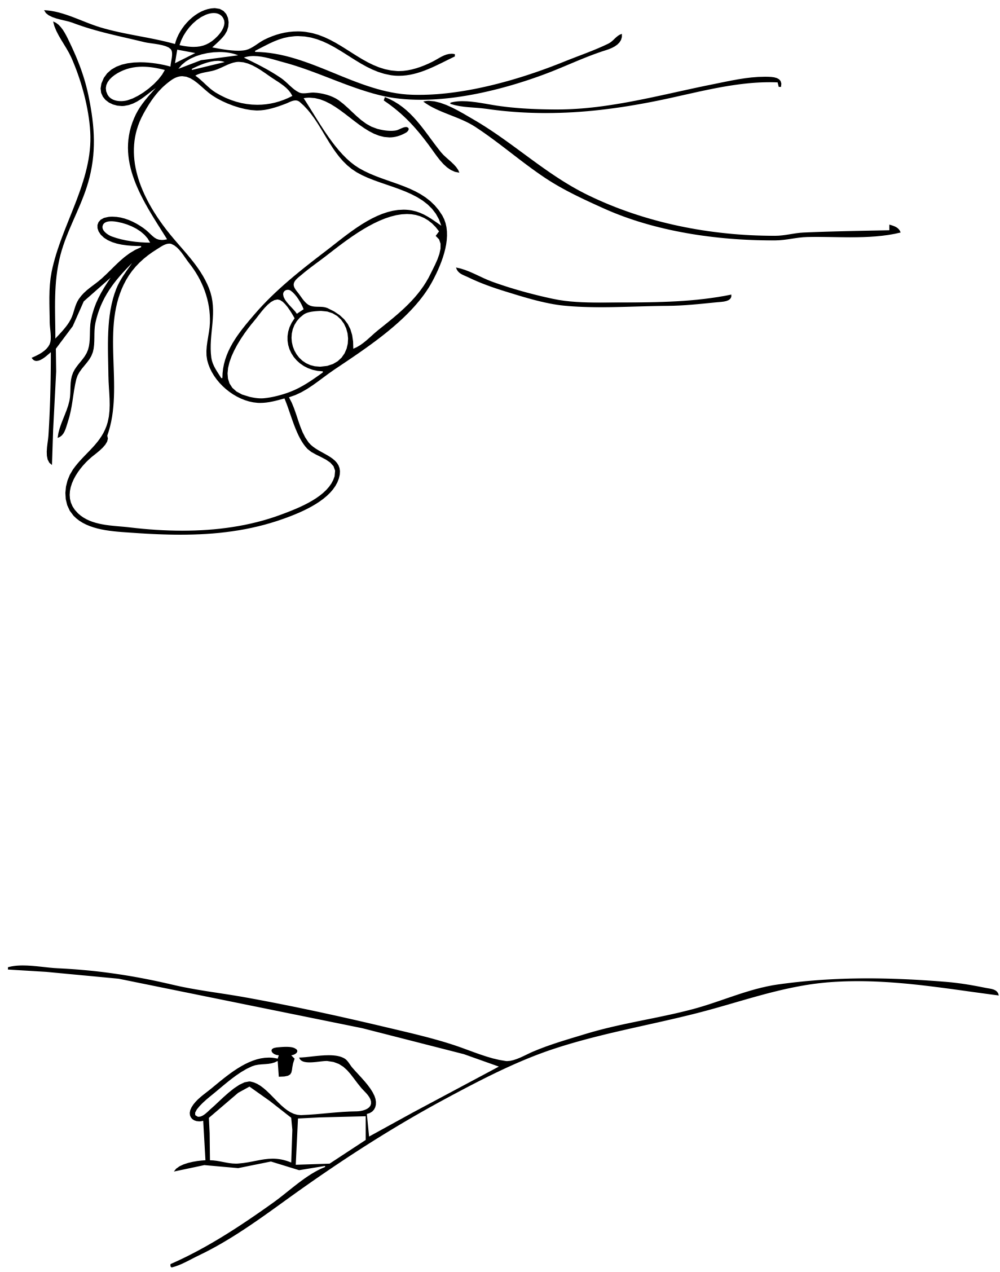
There is an optional template for this! I will be showing you how to draw the bells and overall composition of the painting. However, you are welcome to use the template to help with the drawing portion.
Materials Needed
How To Paint "Silver Bells" - Acrylic Winter Landscape Tutorial
Learn how to paint a wintery landscape with silver bells adorning frosted pine branches.
Materials
- Acrylic Paint (Liquitex BASICS)
- 11 x 14 Canvas
- Brushes (Princeton Velvetouch)
- Paint Palette (I use paper plates)
- Water Cup (I use a glass mason jar)
- Drawing Pencil & Eraser
Brushes
- 3/4" Flat
- #8 Round
- #4 Round
- 3/0 Tiny Detail Brush
- 3/8" Angle Brush
- Toothbrush for snow specks (optional)
Colors
- Titanium White
- Mars Black
- Cobalt Blue
- Light Blue Permanent
- Cerulean Blue
- Burnt Sienna
- Hooker's Green Hue
- Cadmium Red Medium Hue
- Cadmium Yellow Light Hue
Color Palette
I used Liquitex BASICS acrylics for this painting. If you are using a different brand, I would recommend looking at the color chart below to help you match colors. If you want to simplify this color palette, you can omit one of the darker blues and omit the yellow.

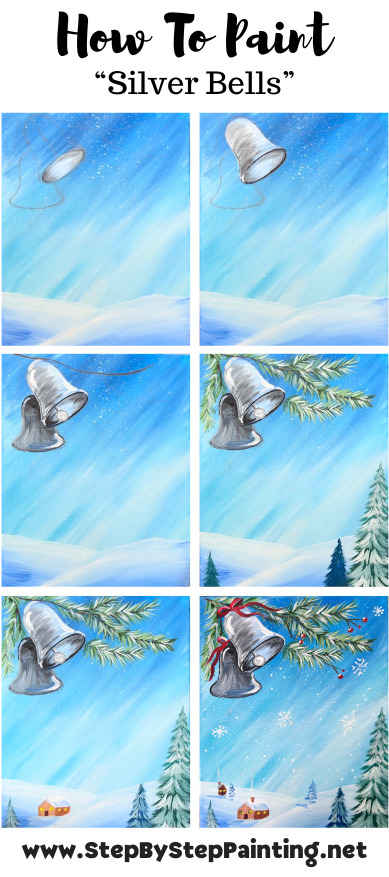
Directions At A Glance
Optional Traceable
Video
Step By Step Instructions
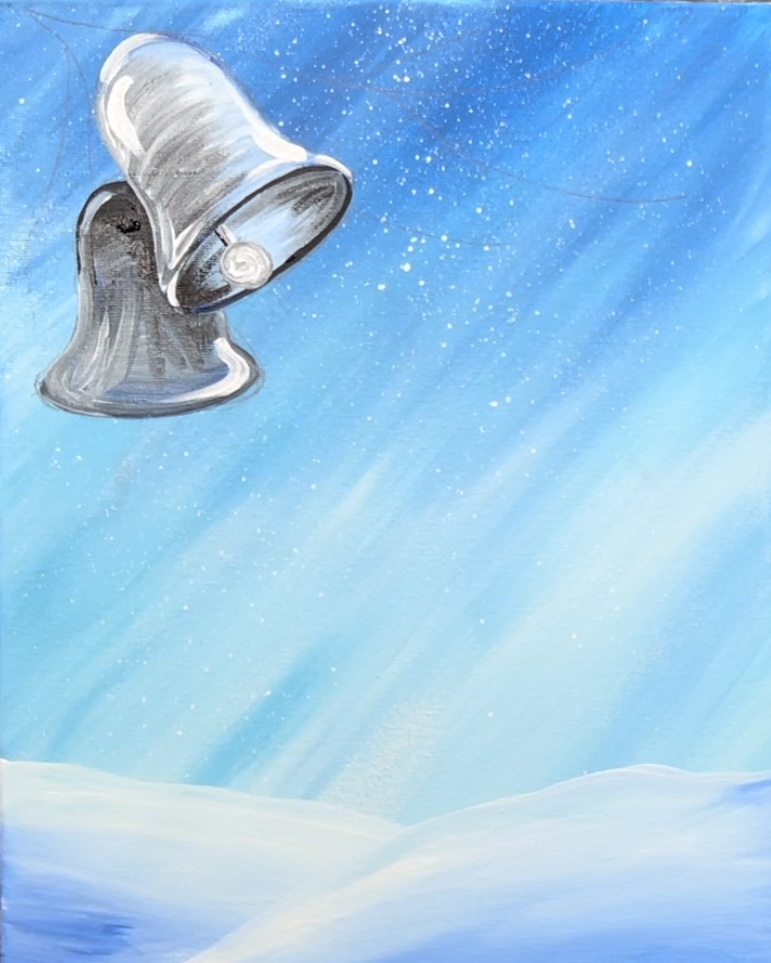
1. Paint background
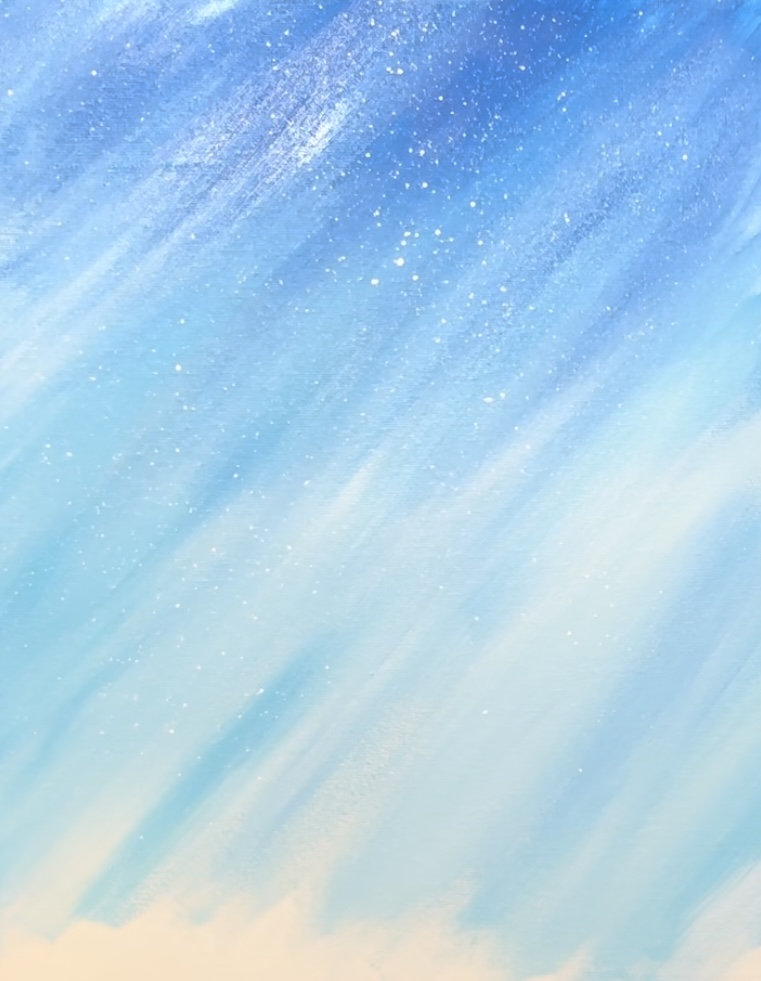
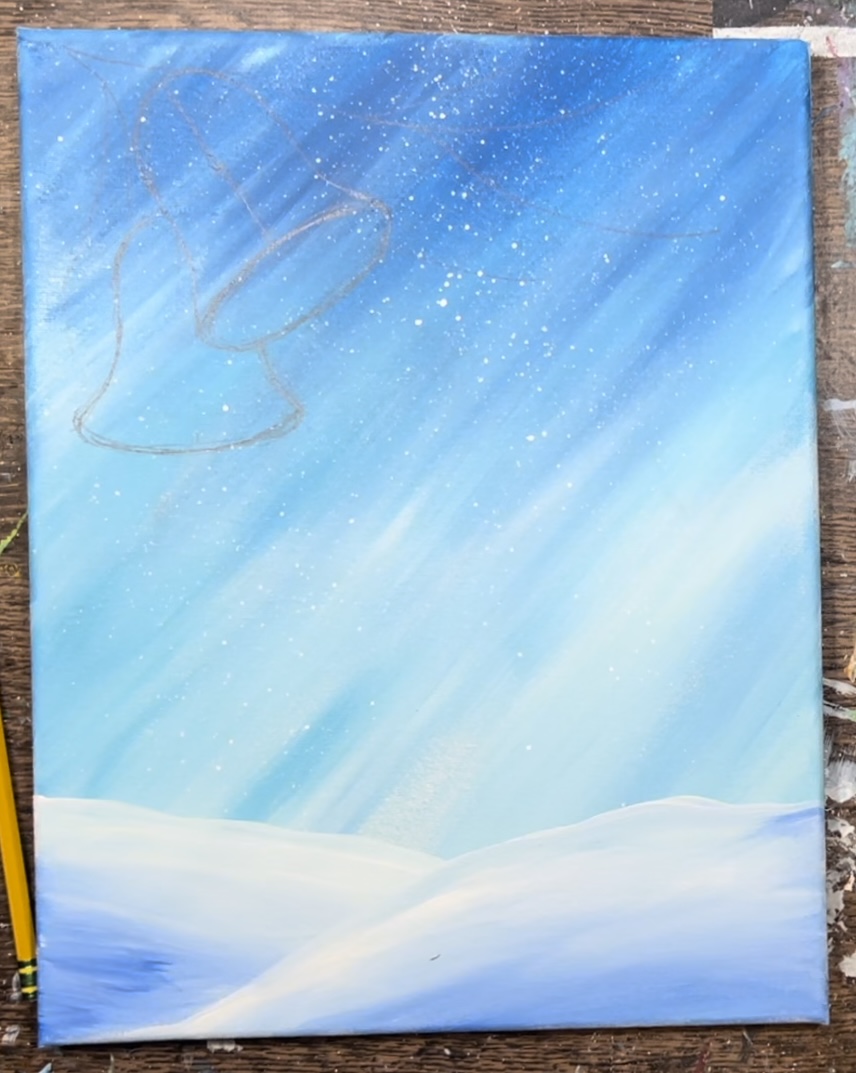
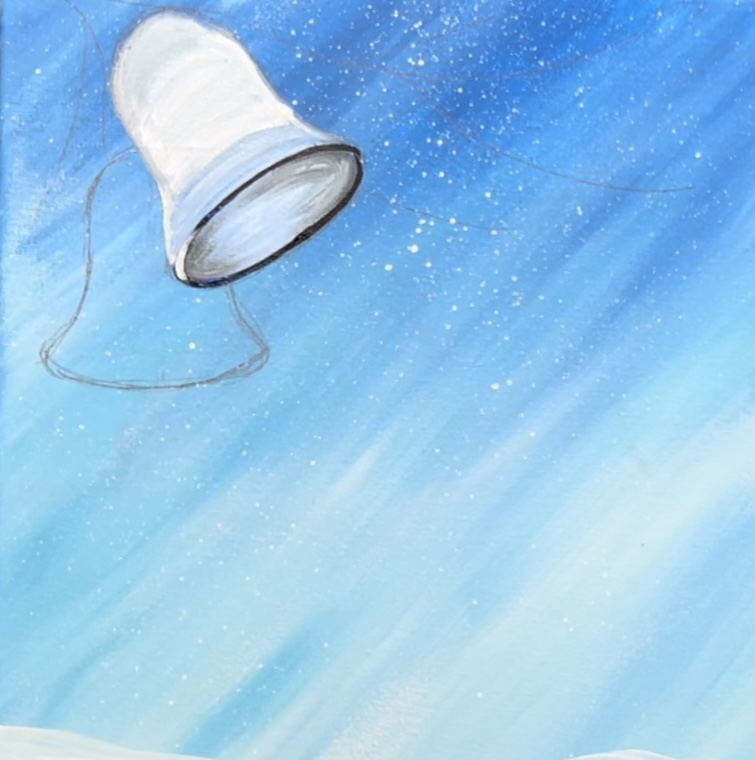
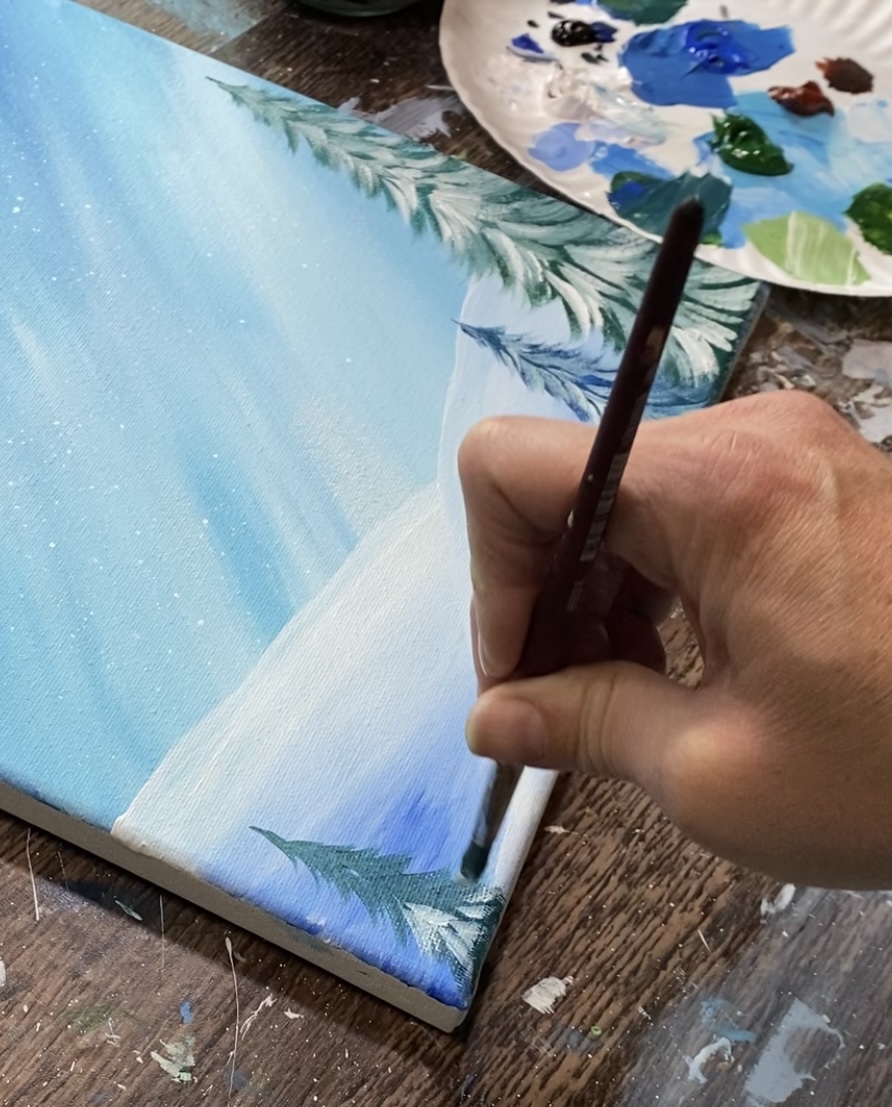
Load your palette with the colors: cerulean blue, light blue permanent and titanium white. We will be painting our background with a 3/4″ flat brush going in diagonal strokes. This sky will be blended so that it is darker on the top and lighter towards the bottom (horizon line).
Start by loading your 3/4″ wash brush in water and tap the excess water off of the brush. Load it into the cerulean blue (this is the darker blue). Paint diagonal paint strokes starting at the top edge of the canvas. Go down about 1/3 of the canvas with these diagonal strokes.

Then load your brush in light blue permanent (without rinsing the brush). Blend light blue permanent in the same diagonal direction. This will be a lighter blue and it will allow the sky to start getting lighter.

Go down about half way. Then wipe or rinse the brush off. Load it into just titanium white and blend diagonal strokes of white into the blues. Try not to over blend the white into the blues. You want to create an “icy scene” with the sky having two different blues that gently blend together plus the white creating different tints of the blues.
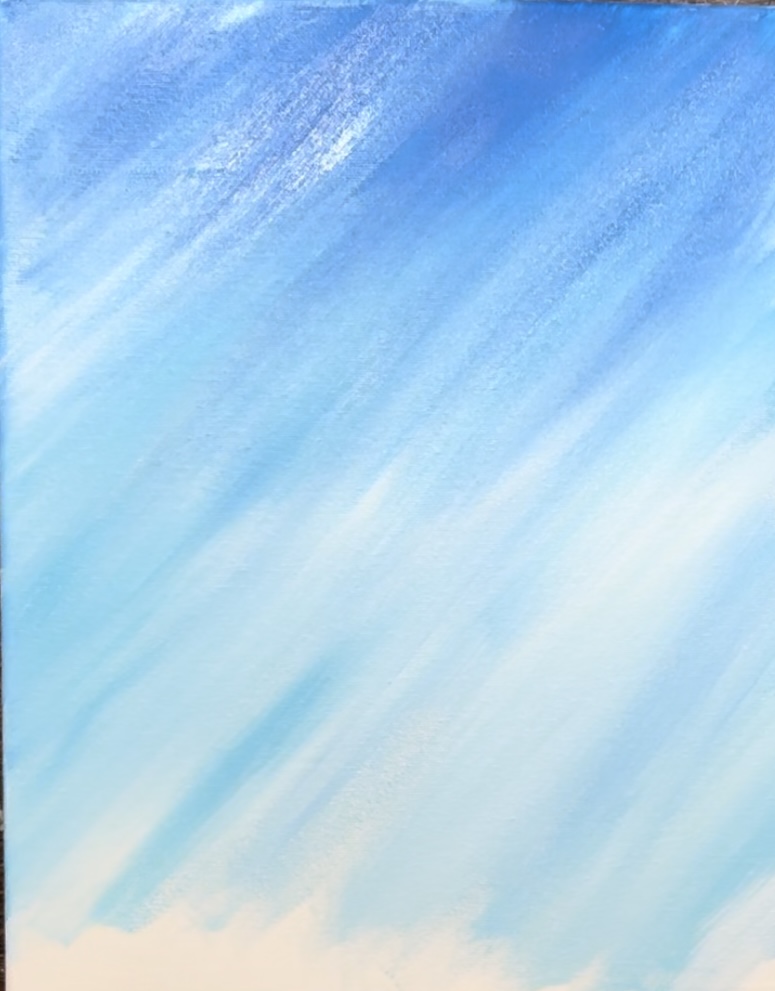
Go to almost the bottom of the canvas and leave about an inch of space on the bottom of the canvas.
Then, splatter paint little white snow specks all over the canvas. To do this, use a toothbrush (or flick your 3/4 flat brush). Lightly water down titanium white paint. Test the brush on a different surface to make sure the consistency is just right. Then splatter the snow dots all over the canvas by flicking the toothbrush.
2. Paint Snow Ground
Use a 3/4″ flat brush to paint the snowy ground area. Start with a clean brush and load it into just titanium white. Paint a hill line about 3″ on the right edge of the canvas. Use just the tip of the brush to paint the outline of the hill and have it dip down to the lower left corner of the canvas.
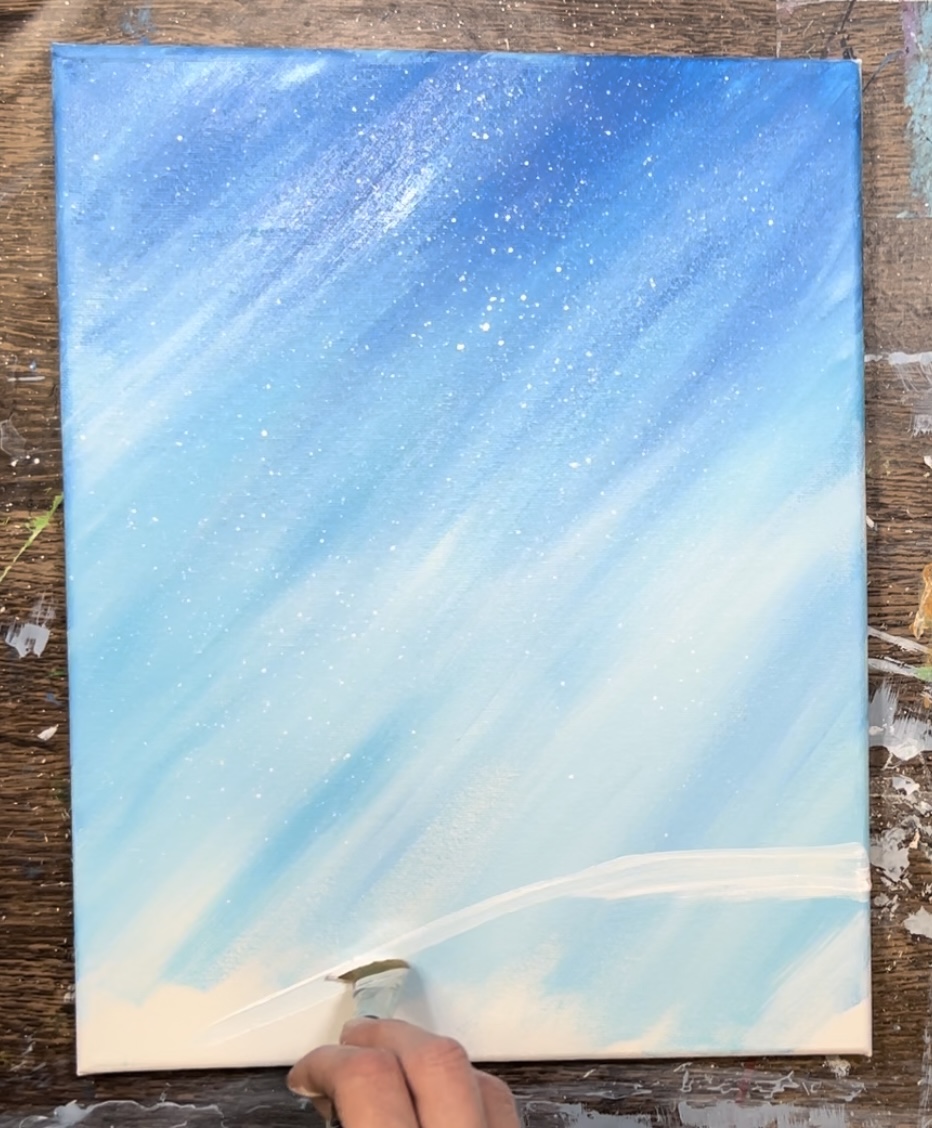
Then paint a second hill line on the left at about the same height and have it go behind the first hill.
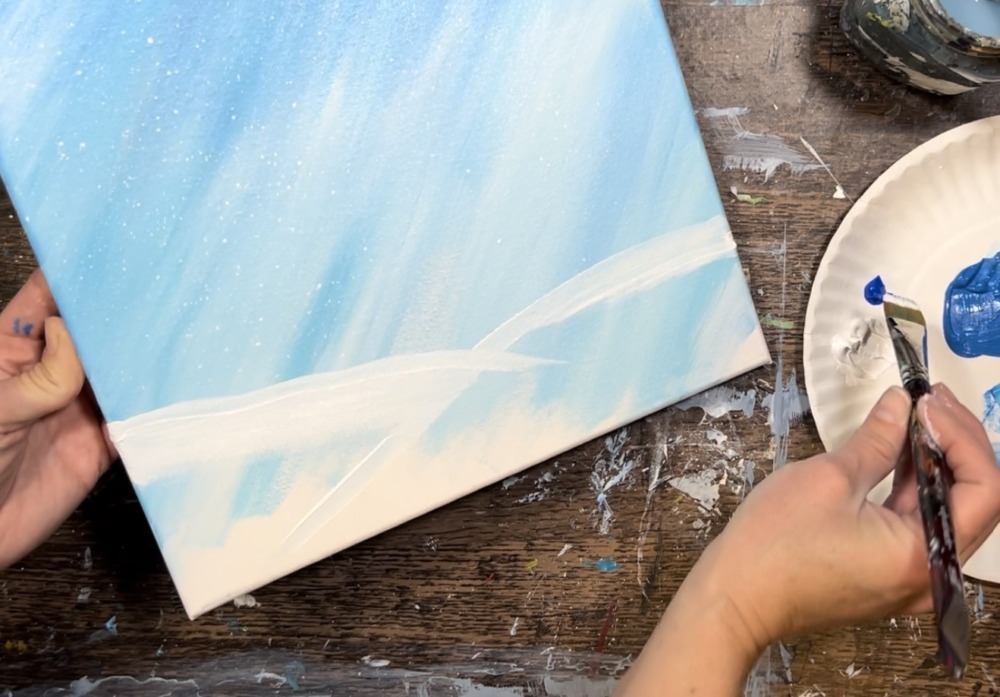
Next you want to use the “cobalt blue” to blend a shadowy area on the bottom of each of the hills. Load a very small amount of this blue on your brush and blend it up into the rest of the white.

Add more white onto the brush if needed and blend it into the blue. The hills should be bright white at the top and blend to the light cobalt blue color on the bottom.

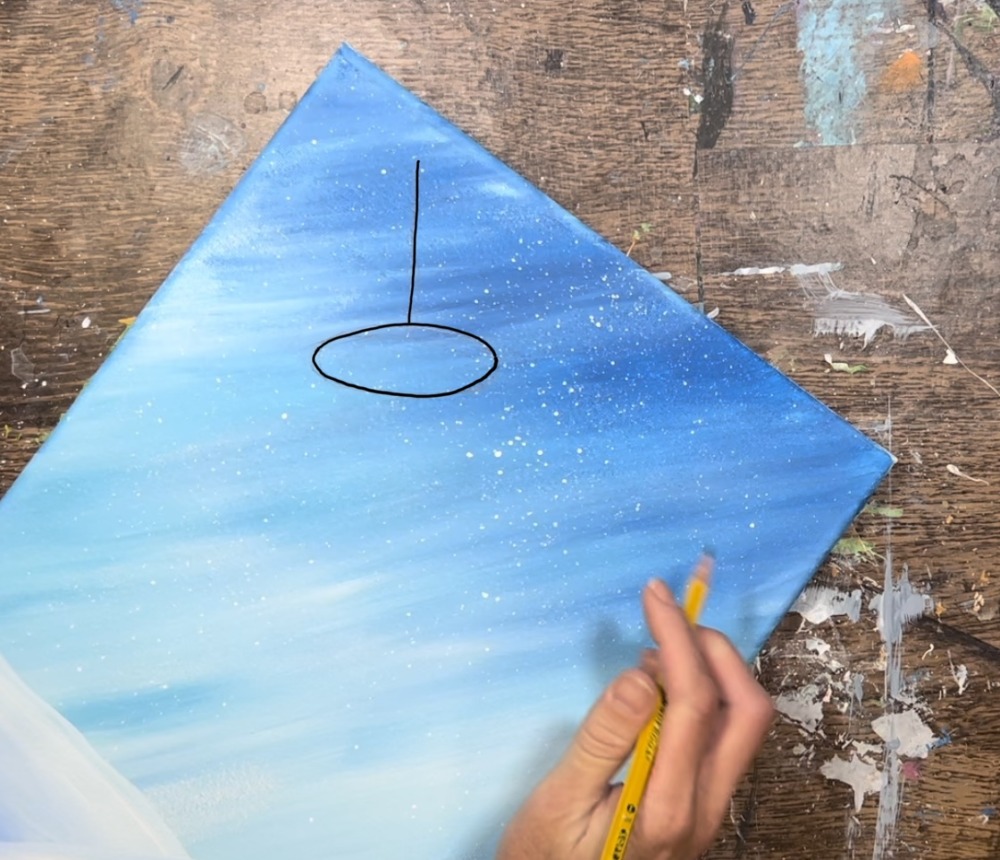
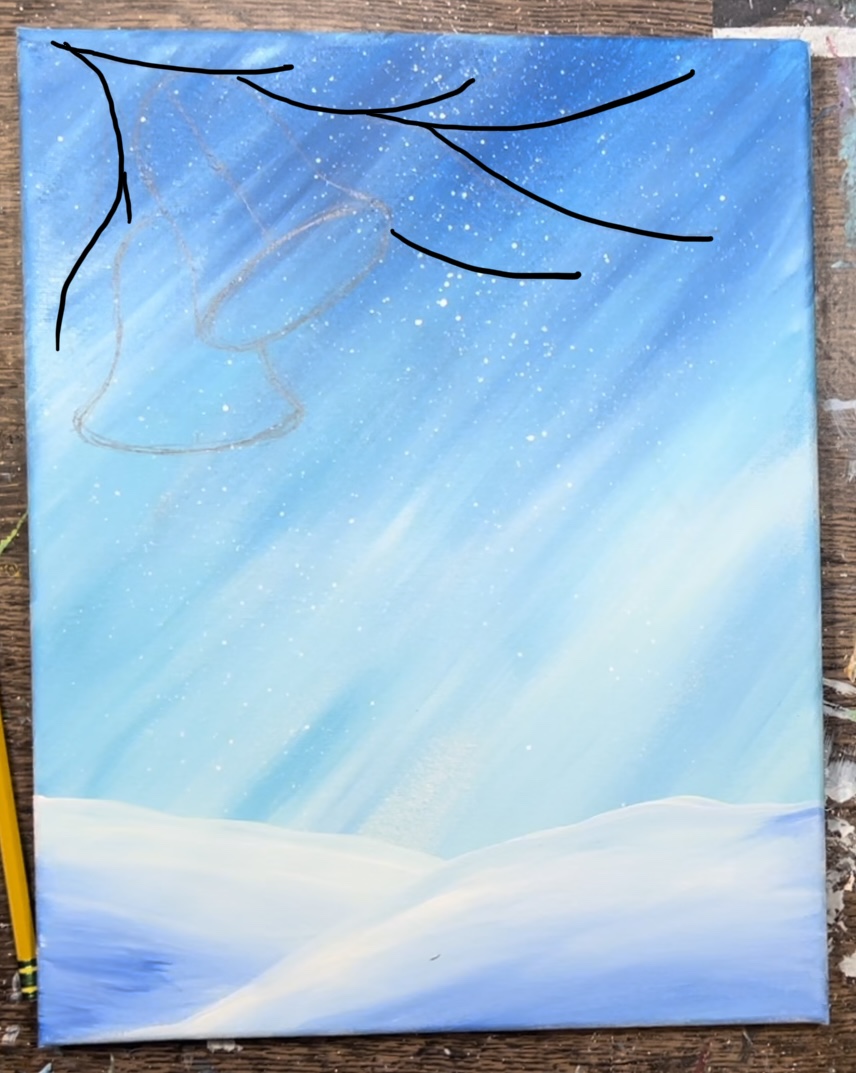
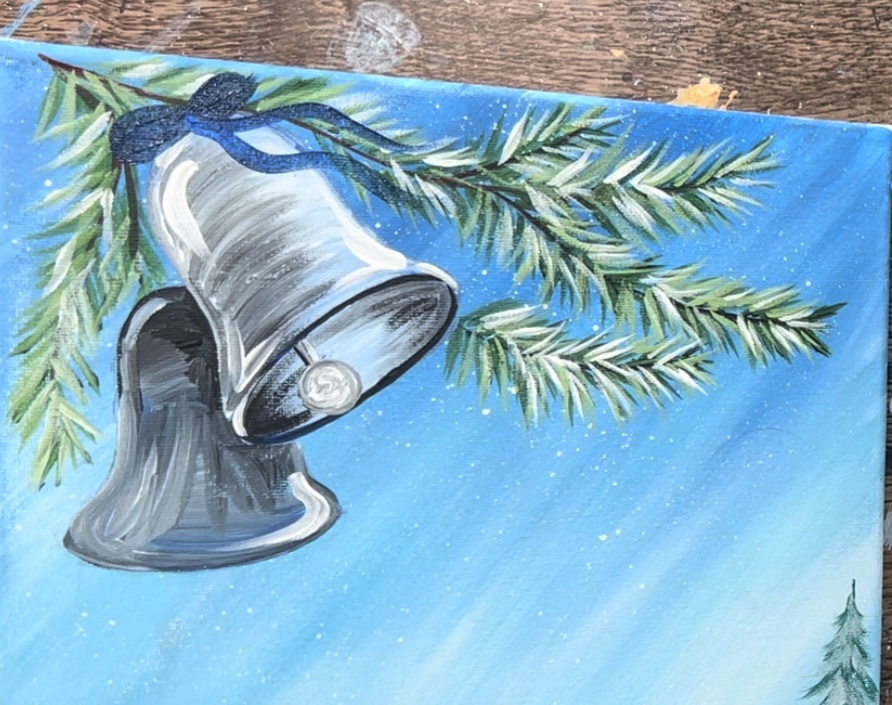
3. Draw Bells
Make sure your canvas is dry before going onto the next step. If you are using the template, transfer it to your canvas using a sheet of dark graphite paper.
If you are drawing, use a pencil to lightly draw both of the bells. My drawings below are darkened to help you see the steps. Start by drawing an oval (the bottom opening of the bell). This is going diagonally in the upper left area of the canvas.
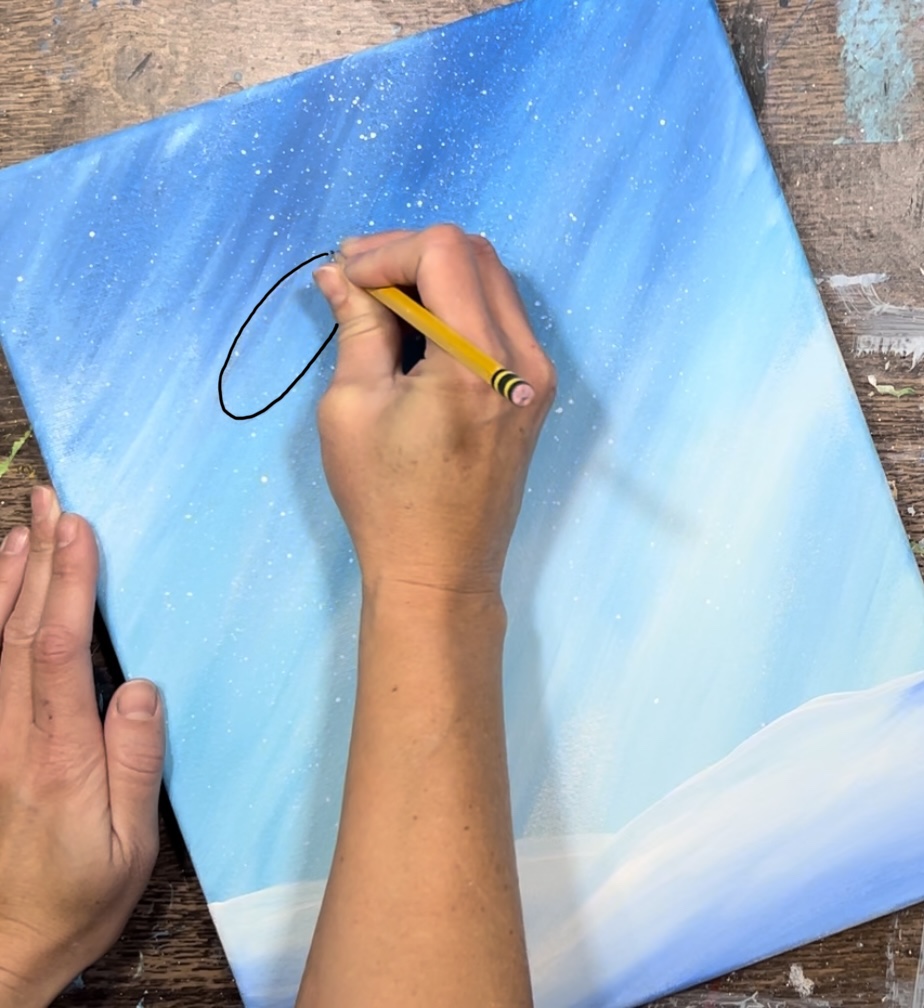
To help your bell be symmetrical, draw a vertical line in the middle of the oval, going up about 2.5″.
Draw the top half of the bell as a half circle. If it helps, you can draw the horizontal line on the bottom of the half circle and erase that line later.
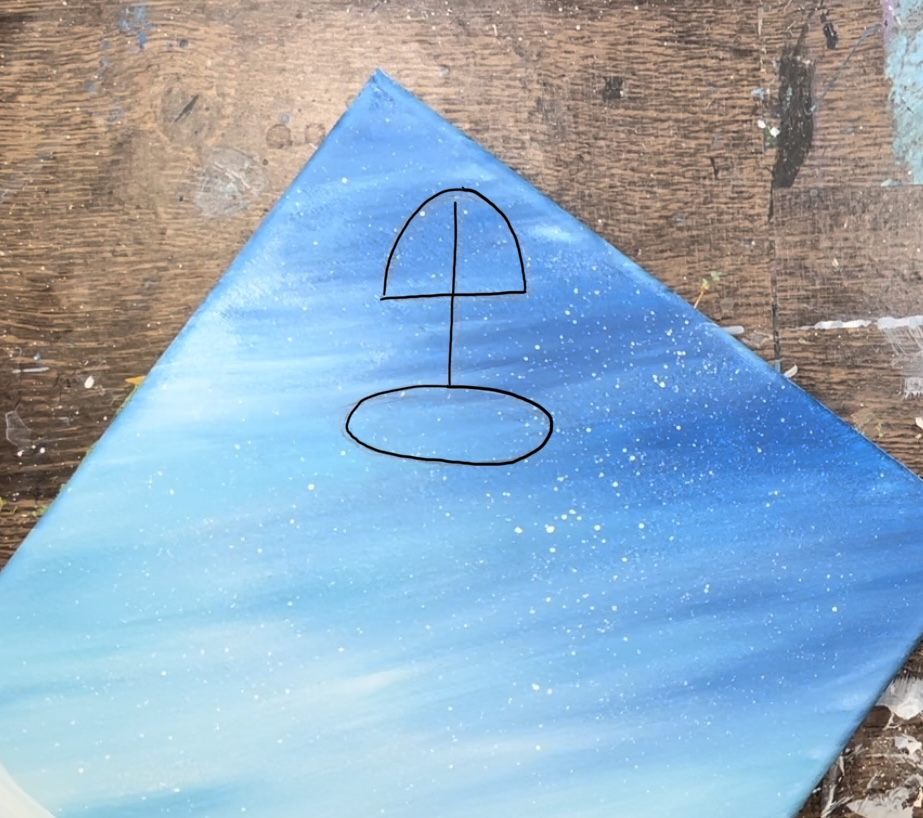
Then draw two lines going down diagonally and curving the connect the left and right side of the oval.

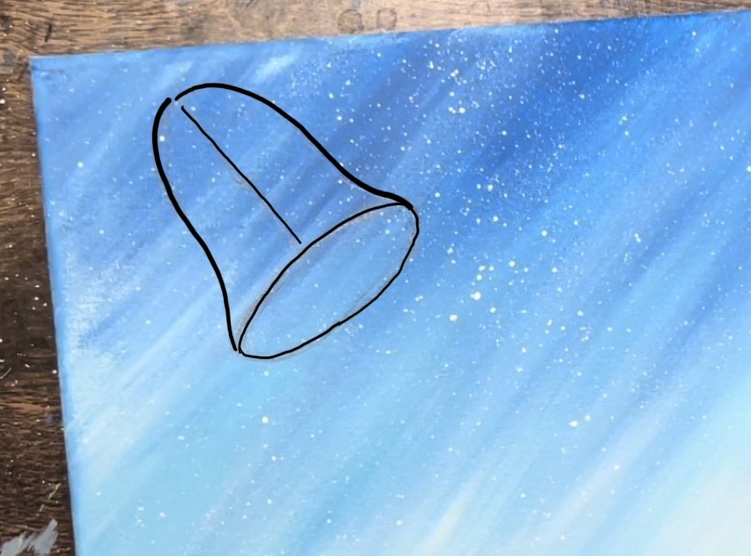
Draw the next bell. This one won’t have the bottom opening showing. Start by drawing a curved line.
Then draw another “S” style line connecting to the bottom curve line on each side. If it helps with symmetry, you can draw the vertical line in the center.

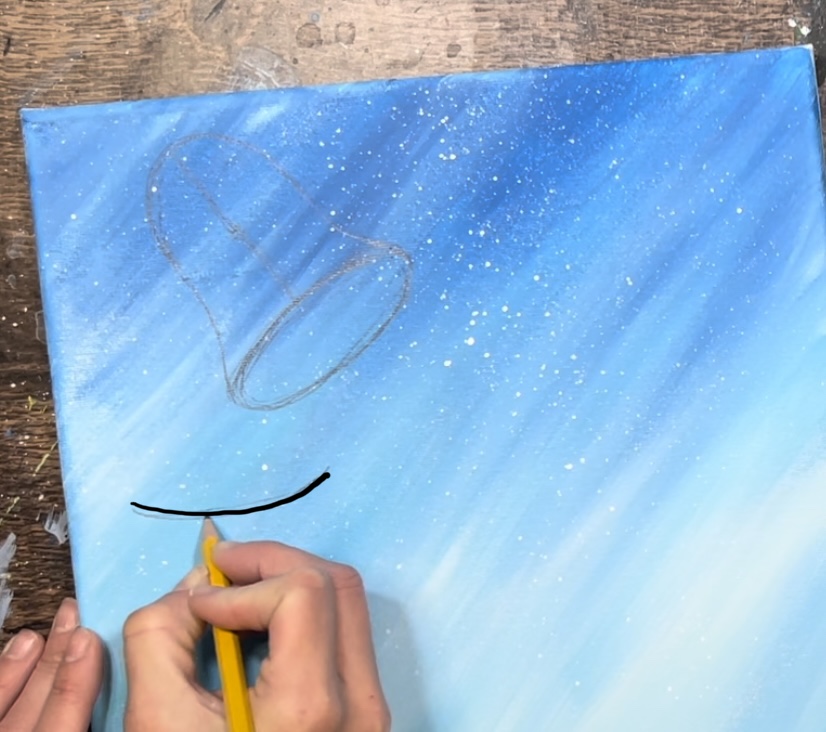
Next, draw the branches. You don’t need to draw all of the pine needles, just do the main branch lines that the pine needles will be attached too. Start by drawing a long line going vertically across the top of the sky above the top bell.
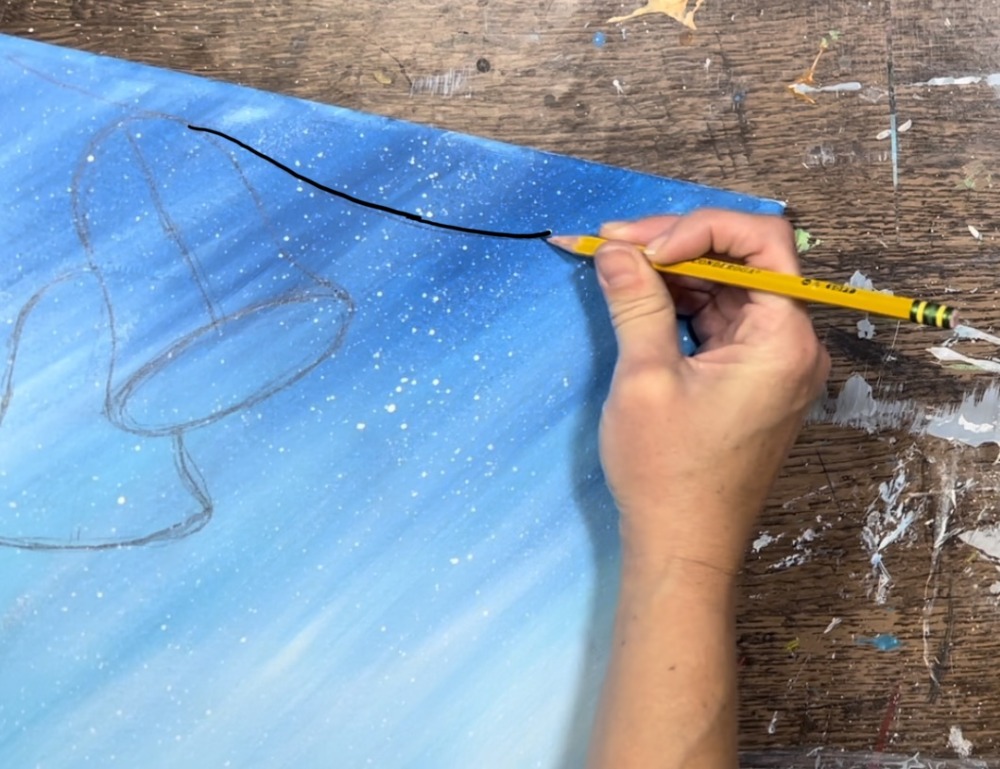
Then draw various curved branches that attach to each other. Do at least one branch hanging down vertically on the left of the bells. None of the branches overlap either of the bells.

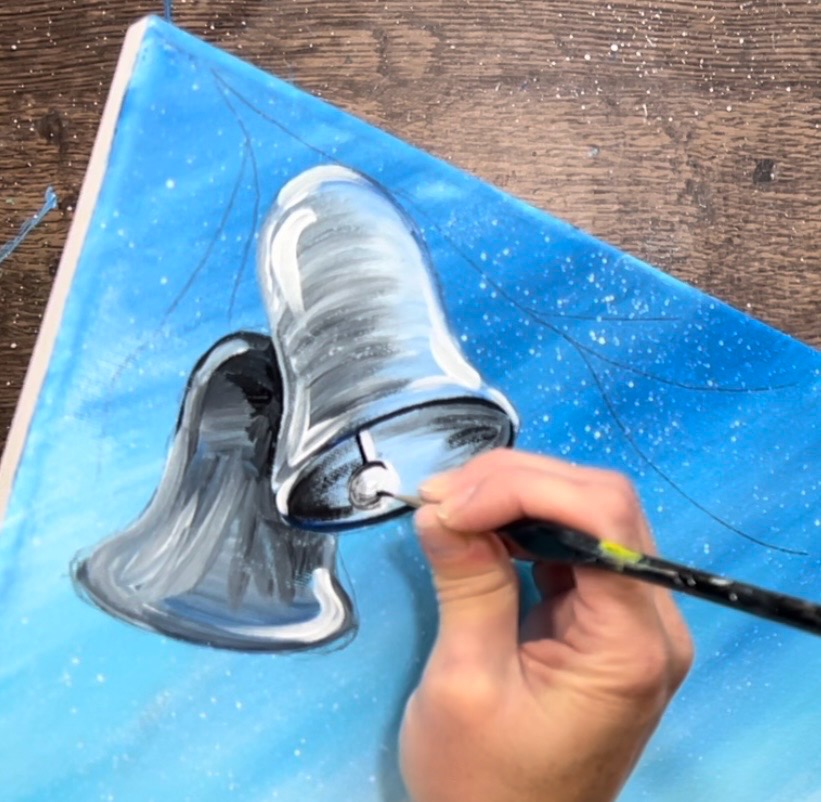
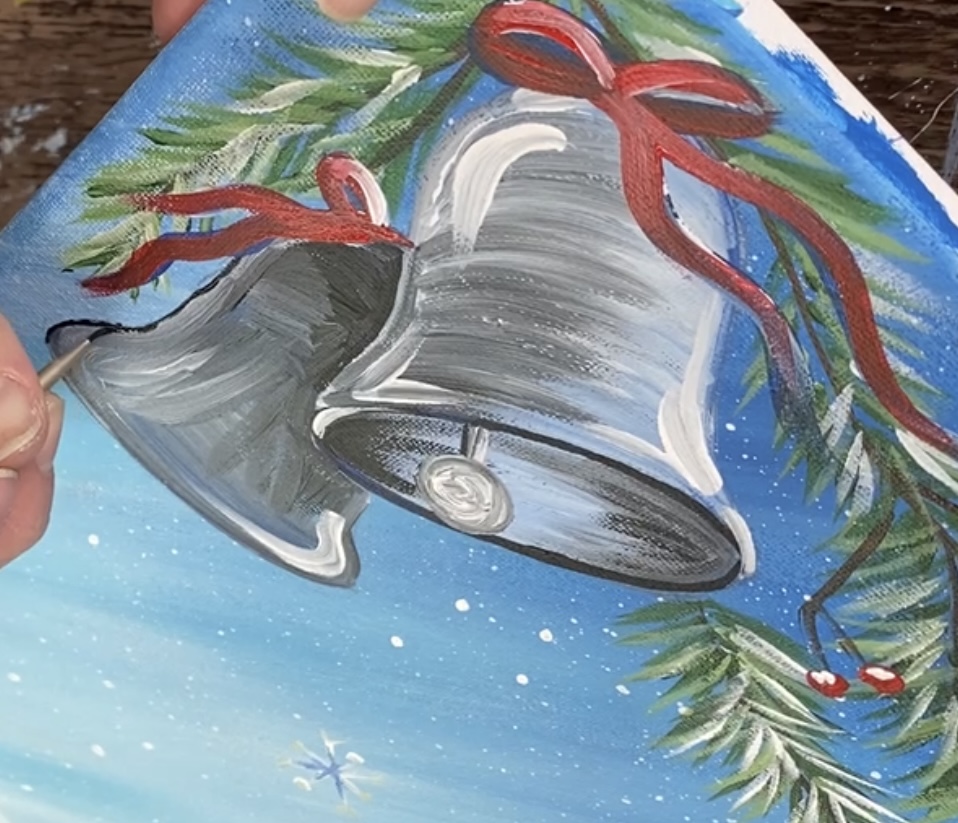
4. Paint Bells
Load your palette with titanium white, cobalt blue and mars black. Start by using your #4 round brush to paint the oval a solid coat of white. Before this dries, you will be blending in the shadowy color.
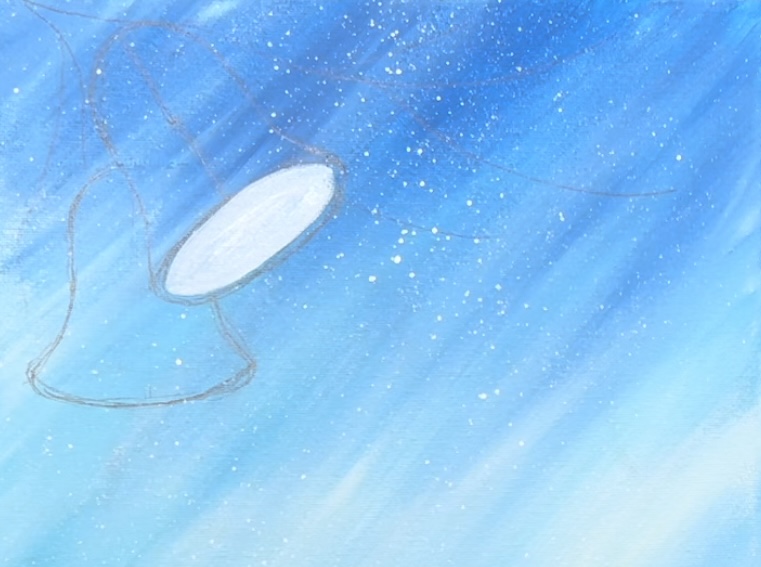
Then, without rinsing the white off of your #4 round brush, load it into just a tiny bit of mars black. Blend black on the edges of the oval by dragging the black in but leave the center of the oval light.

Next, use a 3/0 round brush and mars black to outline the oval with black.

Then use the #4 round brush and titanium white to outline the top edge of the bell.

As you fill the bell in solid with white, paint in curved strokes to create the form of the bell. Add a tiny bit of cobalt blue into the white so that it turns more of an off-white silvery color.
Then, on the left side of the bell, blend a tiny bit of black in. Do this with curved strokes just on the left side that blend in with the rest of the white. Leave the right side of the bell brighter/ whiter.
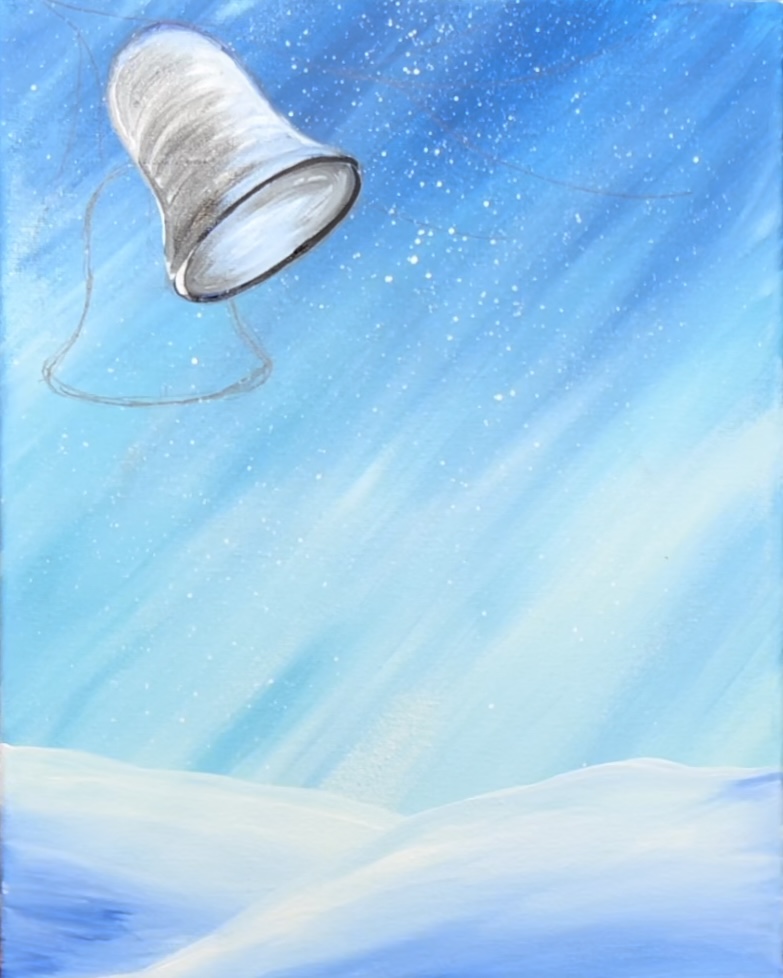
Add a little bit more black on the inside opening on the left and right sides of the oval.
Then paint the second bell. This bell is painted using the same technique of outlining and then filling it in with curved strokes. You want to make the gray a different color so that it will stand out from the other bell that’s the same color. Do this by adding more black or blue to the paint color so that it is darker than the other bell.
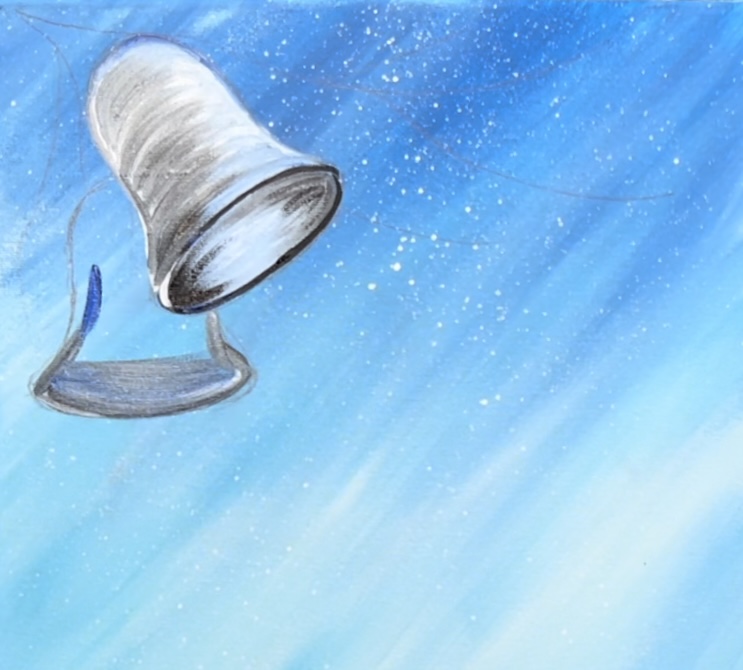
Make the part of the bell that is next to the other bell have slightly more black for shadowing. Then you can paint the bottom of the bell with strokes that go vertically down. (This is demonstrated a little more in depth in the video)
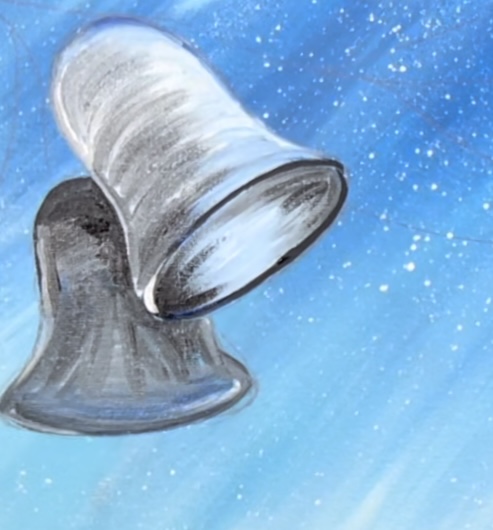
Add highlights to the bells. Use titanium white to paint one stroke curves on the edges of the bell. I did this on the top curves and the bottom parts of the bell close to the opening.
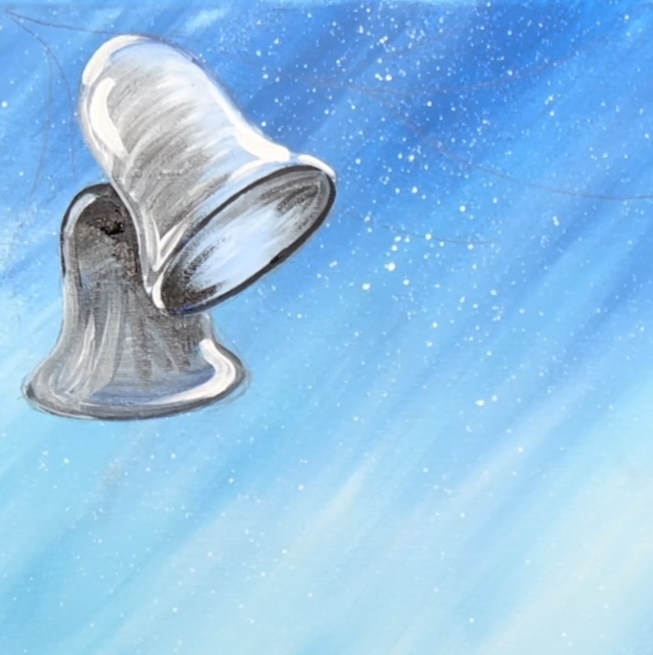
Then paint the “bell clapper”. Use titanium white to paint a small white circle and a line that connects to the circle. You can do this with either the #4 round or 3/0 round brush.
Then use the 3/0 round brush to outline the clapper with black. I only did outlining on the left side of it and top of the circle. Then I ended up blending that black in with the rest of the white so it looked more like a light gray clapper/ball.
5. Paint Branches
Use a 3/8″ angle brush to paint branches. Load your palette with the color “burnt Sienna”. Use the brush to paint thin lines, outlining the lines you drew earlier. These will be the middle of the pine needle branches.

Paint each of the branches using the tip of the angle brush.


Then load your palette with the color “hooker’s green hue”. Load your brush into this green. You don’t need to rinse the brush off. It is okay if the brown mixes with the green because this pine needle “first layer” needs to be dark.

Start at the end of each of the branches and work from the right side to the left. Create each paint stroke so that it starts at the branch line and then drag the tip of your brush outwards at an angle. As you work your way to the left, your paint strokes will overlap previous pine needle paint strokes.

Do this to each of your branch lines.

Next, without rinsing your brush, mix titanium white into the green to make a lighter green (about equal amounts of white and green). You don’t need to wait for your dark green layer to dry. Repeat the steps above for painting a second lighter layer of pine needles. Start on the right side of each of the branches and paint to the left. Try not to cover all of the dark green. That layer is supposed to show through as a shadowy layer.


Then rinse the 3/8″ angle brush. Load it into just titanium white. Paint another layer of pine needles with the white. This will make your pine needle branches look “frosted with snow”. Be sure not to add too many white pine needles and allow your other green layers to still be visible.
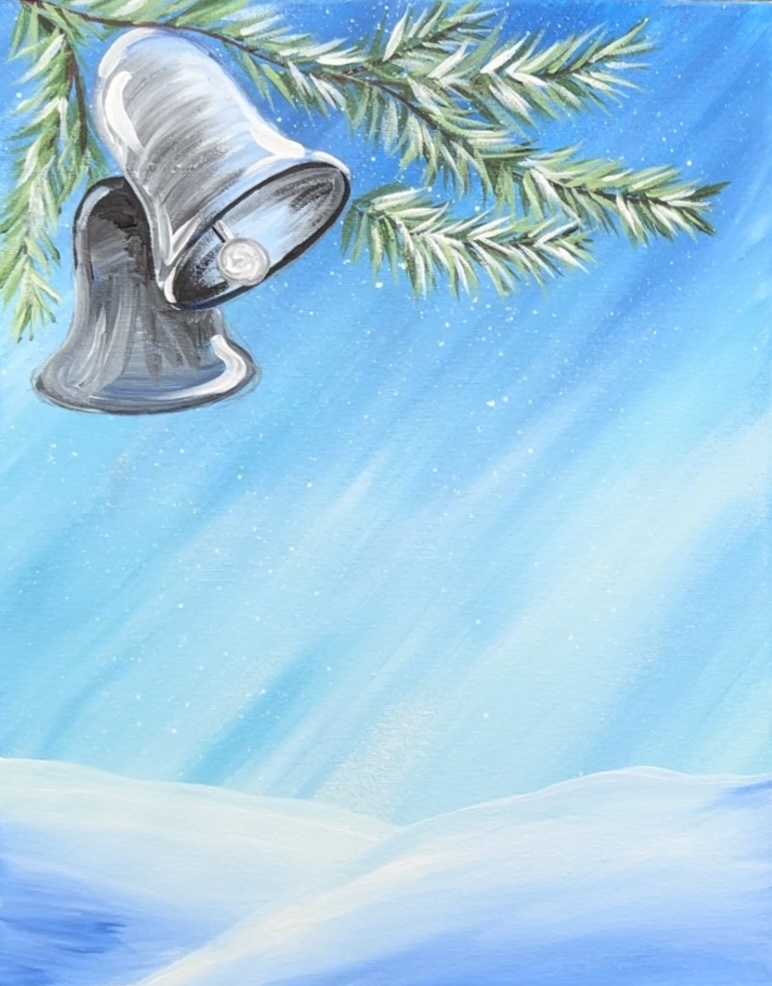
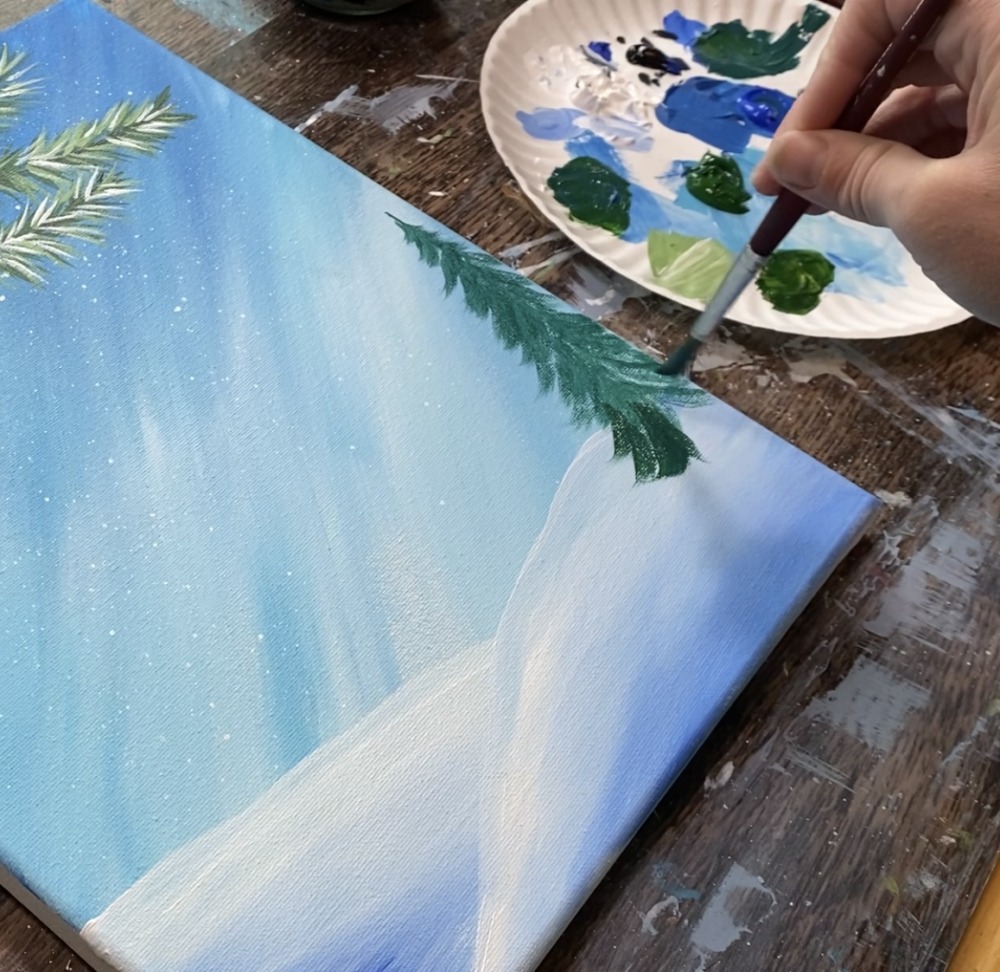
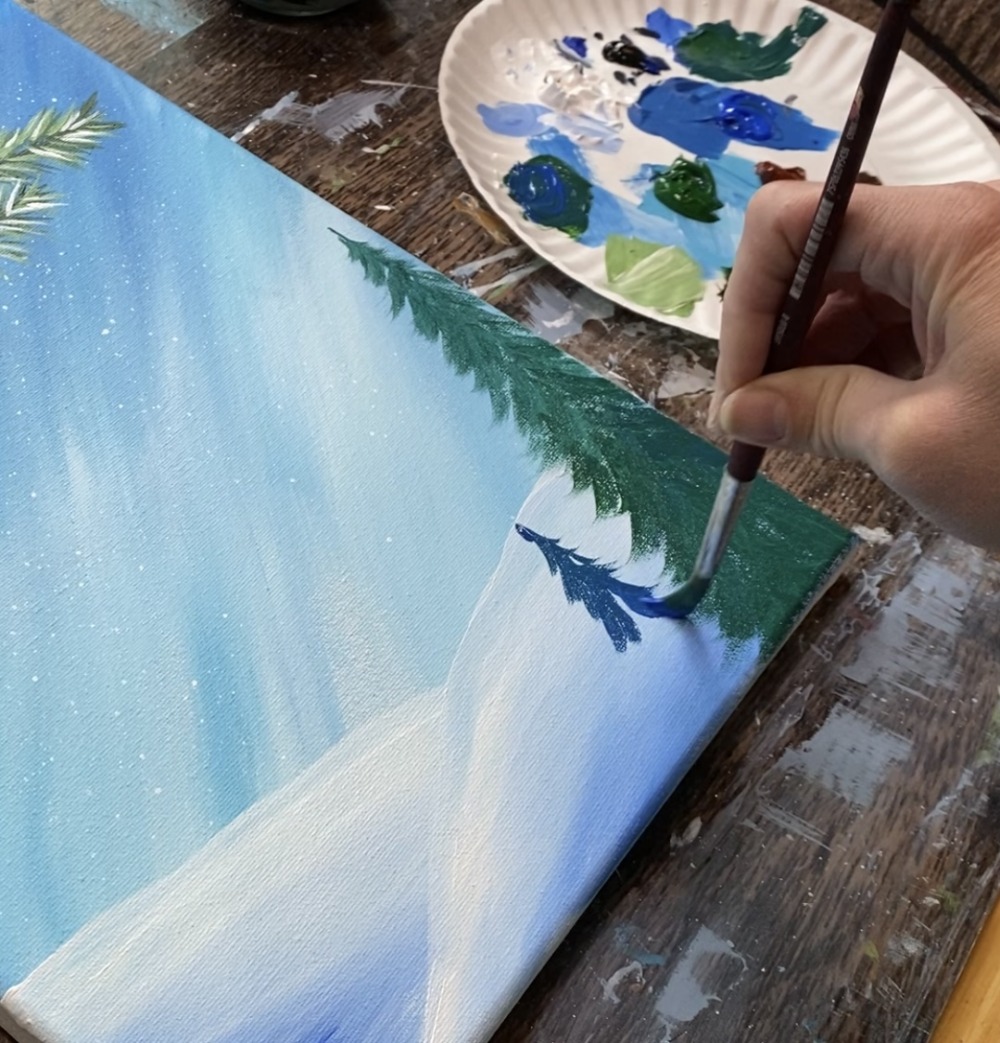
6. Paint Trees
Use a #8 round brush to paint the pine trees. On your palette, mix equal parts “cobalt blue” and “hooker’s green hue”. This will make a dark teal color. Start with the large tree on the right. Use just the tip of the round brush to paint little branch strokes that go downwards and curve outwards. As you work your way down, paint in “rows” of these curved strokes that start to get slightly larger and wider as you form a “triangular” shape of the tree.

Tip: sometimes it is helpful to paint a vertical line first to help your tree be symmetrical.
Paint this tree all the way to the bottom edge of the canvas. We do not see the trunks of any of these trees.

Paint a second tree next to this one. I added more blue to this color so that it would look slightly different and stand out (since it is right next to it). I also made this tree about half the height as the first one. Repeat this technique using the #8 round brush and paint the tree all the way to the bottom edge of the canvas.
Then paint a third tree on the lower left using any variation of the blue and green on your palette. Make it a different height from the other trees. I made this one intentionally shorter because I knew I was going to paint houses in the background on this side of the canvas. You can paint more trees and change the location and heights of the trees if you want.
Next, add a layer of snow to the trees. Load your brush into titanium white (you don’t need to rinse the brush unless there’s too much teal color on it). Start at the bottom of the tree this time and paint rows of branches that are curved strokes going downwards. When you work your way from the bottom to the top of the tree, you create pretty texture in these branches that look like they are overlapping each other.
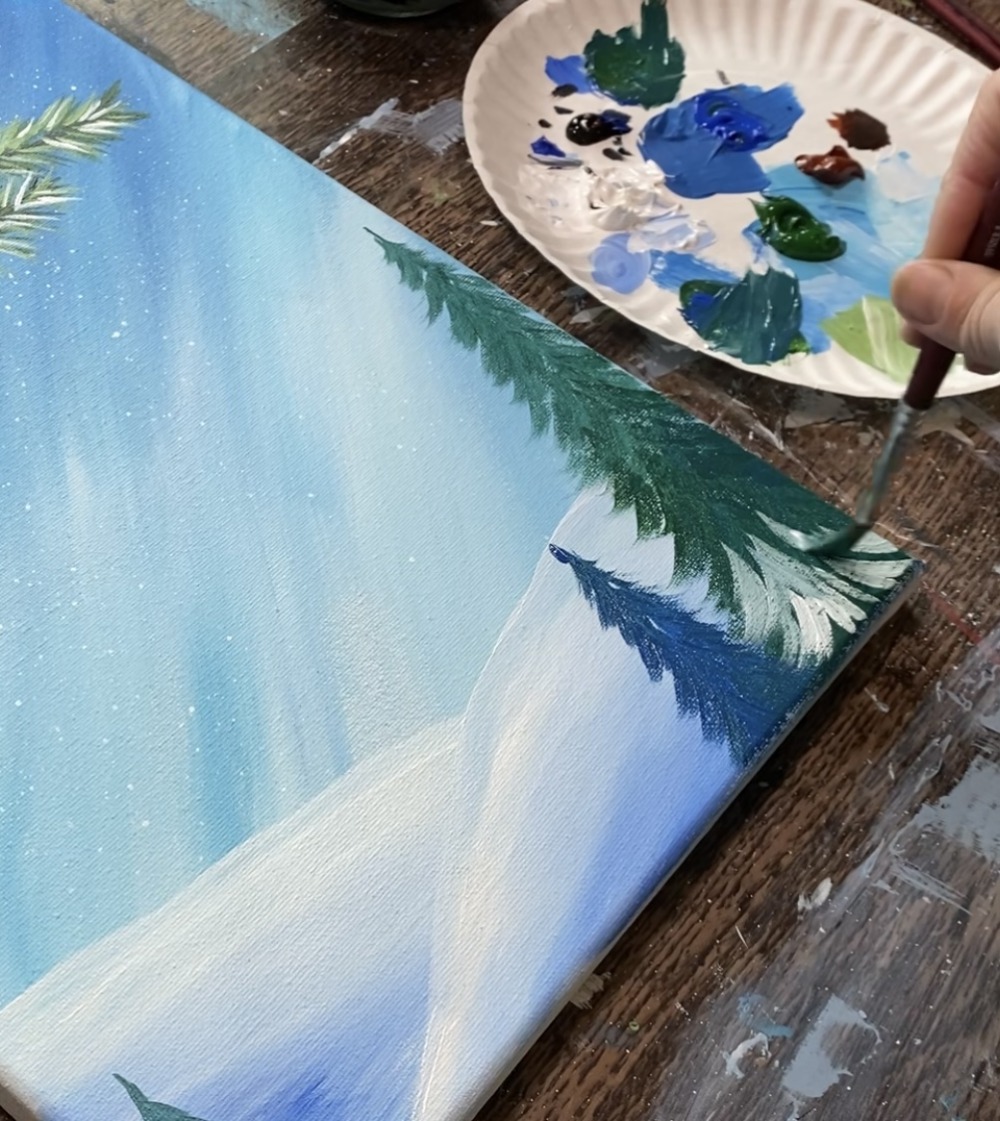
Paint one row at a time white leaving a lot of the dark green layer still showing through. Since the green layer isn’t dry, it may be mixing with the white and that is okay!
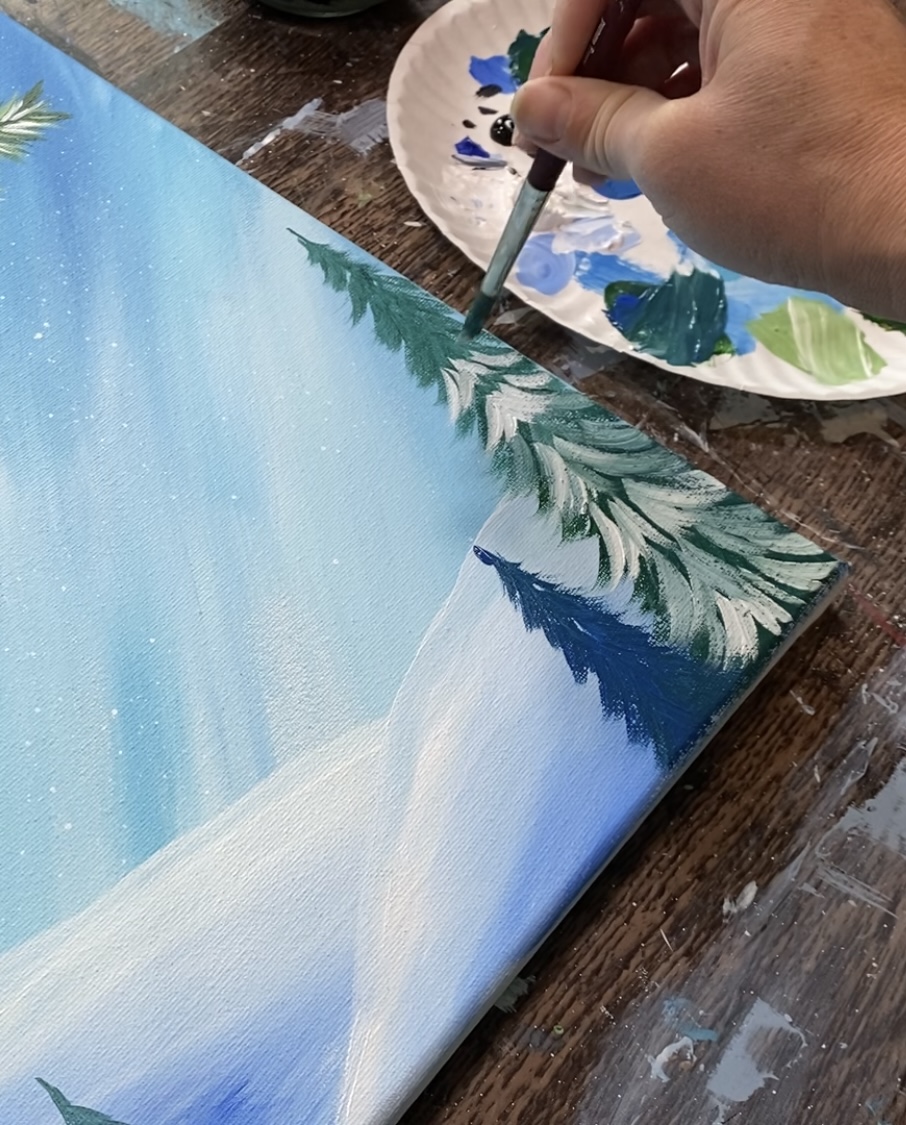

Repeat this step for the other two trees.


7. Paint Houses
Load your palette with “burnt Sienna” and more “titanium white” if needed. Mix about equal amounts of the brown and white together to create a lighter brown. Use the #4 round brush to paint a small house in the lower left area of the landscape.
Note: You can change the size and position of these houses if you want or even paint more!

Paint the shape of the front part of the house first and then fill it in solid white the light brown color. Then use just the burnt Sienna to paint the side of the house so that it shows up darker.
Then rinse the #4 round brush. Paint the roof of the house using the titanium white.
To add a little bit of shadowing on the snow of the roof, load your round brush in a very tiny amount of “cobalt blue” and blend a little bit of the blue on the lower parts of the roof.
Add a layer of snow on the base of the house so that it overlaps the house a little bit.
Then use the tiny 3/0 round brush and the brown (or black) to paint a little rectangle for the door.
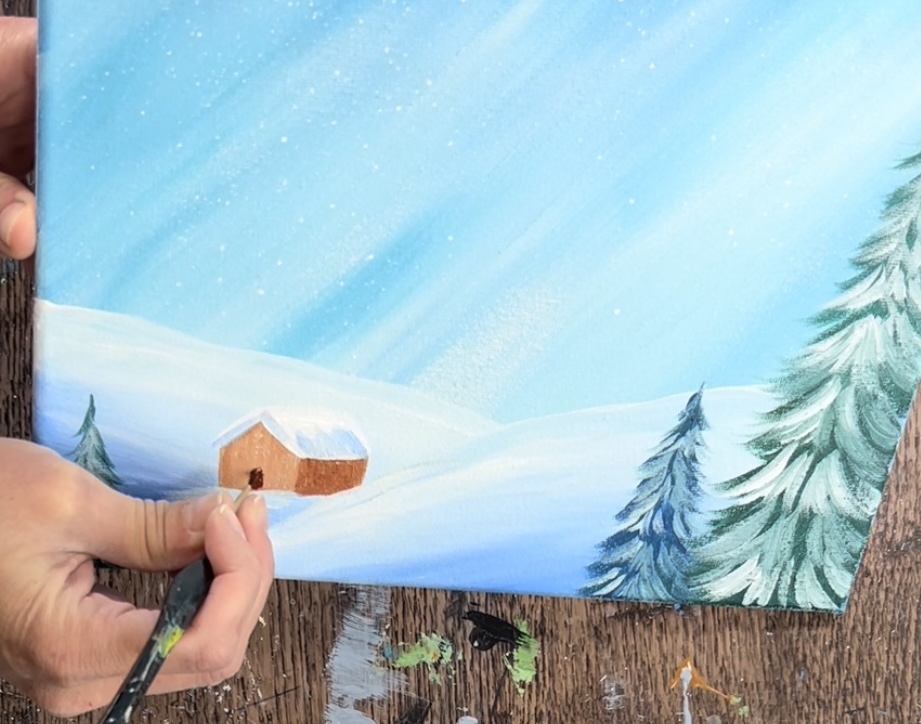
Use the color “cadmium yellow light” or any yellow paint color to paint the windows. Alternatively, you can paint these windows a light blue.
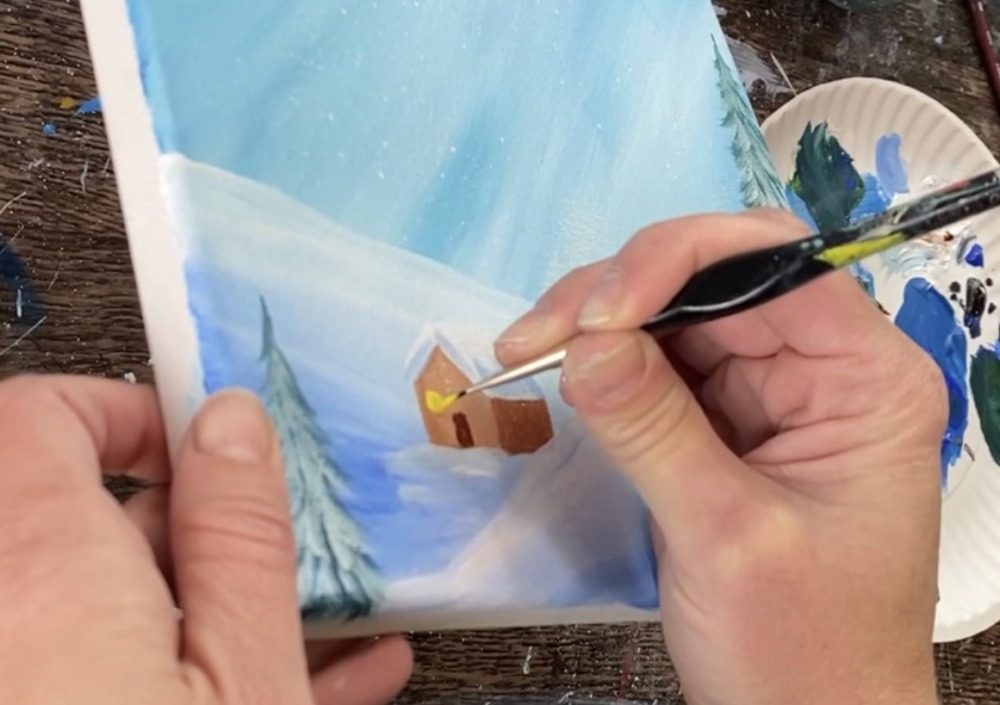
I did four windows.
Then use the light brown to paint the chimney on the roof. Paint a little “T” shape on the side of the hose towards the top of the roof.

Paint another house in the landscape. For this one, I just did the front of the house and used only the darker color. If you want, you can paint more homes throughout the landscape.
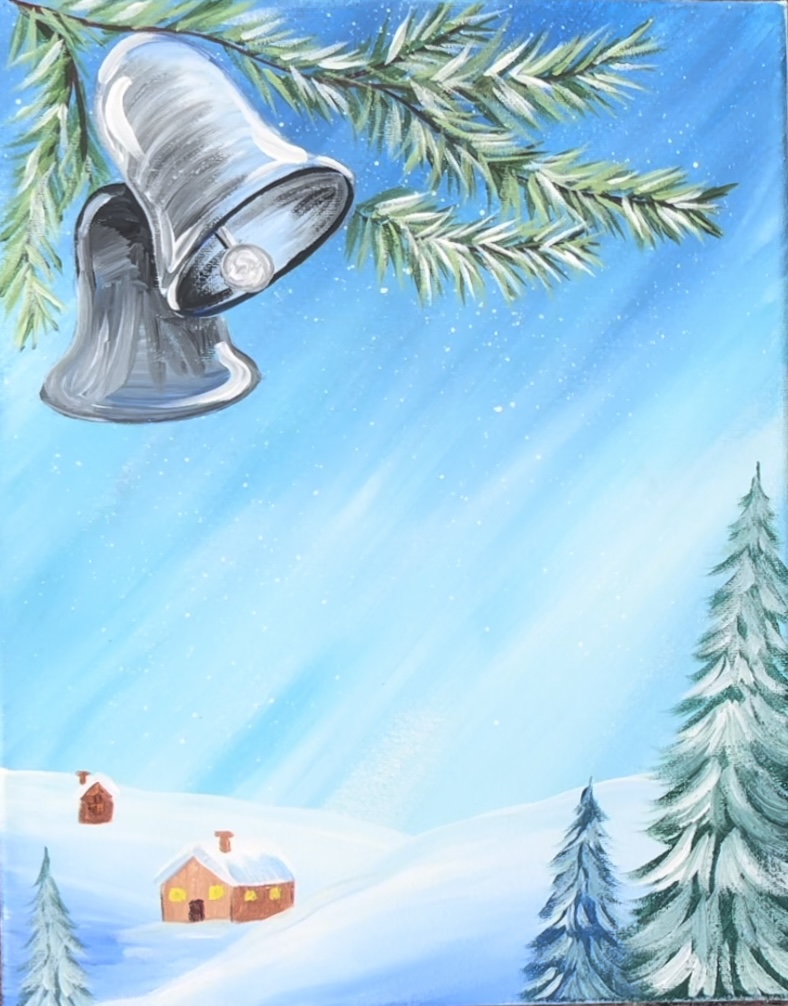
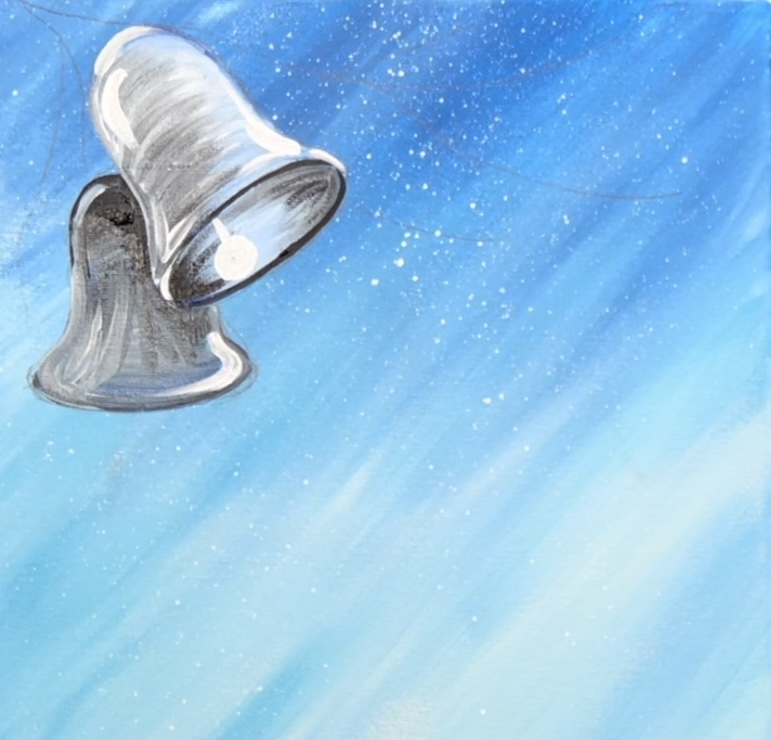
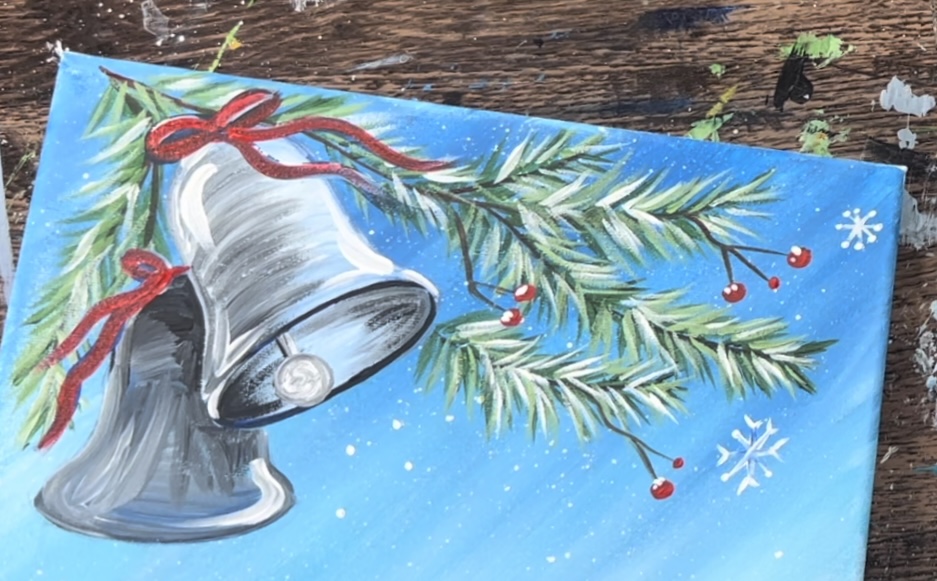
8. Paint Bows On Bells, Berries on Branches & Snowflakes in Sky
Use a #4 round brush to paint the bows on the bells. I painted these dark blue at first but changed them to red later on.
To make a “dark blue”, mix a small amount of “mars black paint” into “cobalt blue”. Then use the #4 round brush to paint a bow. Paint the two loops and paint the “ties” so they flow to the right.
Paint a second bow on the other bell. Use titanium white to highlight the blue (blend wet on wet on the canvas) before the blue dries.

You can add other decorations to these bows as well!
Then paint little branches with the brown coming forth from the pine needle branches. Then use the cadmium red medium color to paint little red dots on the ends of the branches.

Then use the 3/0 round brush and titanium white to paint snowflakes in the sky. Paint them all throughout and vary the sizes of them.
9. Final Touch ups
Some final touch ups include: painting little white “frost dots” on the berries, repainting the bow red (this stands out better than the blue but you can leave it blue if you like that color better) and loosely outlining the bells with black paint (if needed to help them stand out).
Finished!