
Would you like to save this?

This acrylic painting tutorial for beginners will guide you through the steps in rendering your own kite painting with a dusk background!
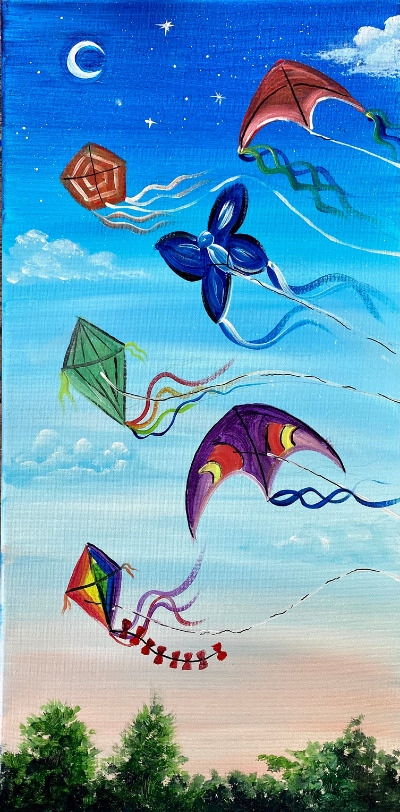
This painting is a unique whimsical perspective of a park skyline at the bottom and kites filling the sky to the top. It is a super easy and relaxing design and one you can do with the kids!
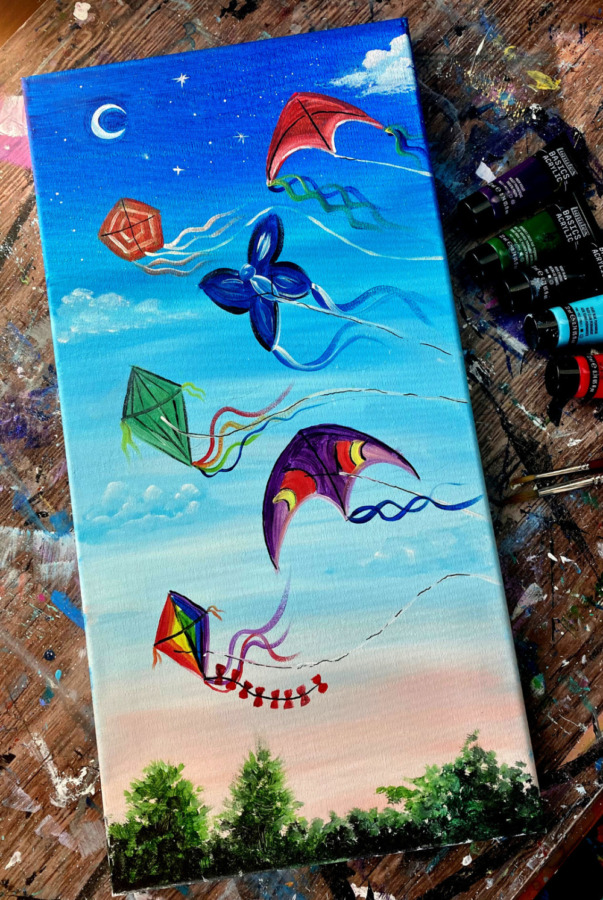
This design was painted on a 10″ x 20″ canvas. If you don’t have the long canvas or wish to do this on another size, you can crop the design or make the sky not go as high. You can also omit the bottom tree silhouettes.
Enjoy and happy painting!
Materials Needed
- 10 x 20 Canvas
- Acrylic Paint
- Brushes
- Drawing Pencil
- Black POSCA Paint Pen
- T-Square Ruler
- White Chalk Pencil (optional)
Colors
- Titanium White
- Mars Black
- Phthalo Blue
- Light Pink
- Light Blue Permanent
- Hooker’s Green Hue Permanent
- Cadmium Yellow Light Hue
- Prism Violet
- Cadmium Red Medium Hue
Brushes
- 3/4″ Flat Wash
- #4 Round
- #8 Round
- Toothbrush
- Round Bristle Brush (or q-tips)
Color Palette
I used Liquitex BASICS acrylic paint for this tutorial.

Using Craft Paints?
If you are using craft paints such as the Apple Barrel paints, you can try subbing for these colors:
- Black
- White
- Holly Branch
- Flag Red
- Parrot Blue
- Purple Iris
- Fuchsia (mix a little white into this to lighten it up)
- Too Blue
- Yellow Flame
Video
Step By Step Directions
1. Paint Sky Gradient
Use a 3/4″ flat wash to paint a gradient of dark blue, light blue to very light pink from the top of your canvas to the bottom. Load your palette with the four colors: titanium white, light pink, phthalo blue and light blue permanent.

Start at the top of your canvas. Load your brush in water and tap it dry. Load your brush in the phthalo blue. Paint left and right strokes going across the canvas. Paint a thin layer of this blue and go down about 5″ from the top of your canvas. Make sure your strokes are going all the way across the canvas.
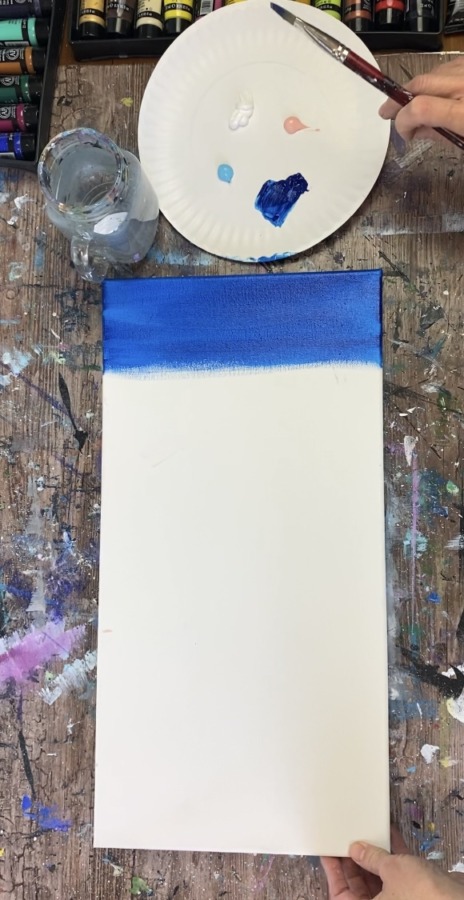
Then wipe your brush off (but do not rinse it). Load your brush in light blue permanent. Apply the light blue permanent below the darker blue and blend it up. Go down about 5″ with the light blue permanent. Your sky should be getting lighter.

Then load your brush in titanium white (wipe it if too much paint is on your brush). Blend the titanium white up into the light blue so that it blends and transitions to a lighter blue down the canvas. Continue to paint more white down the canvas.

Paint more white further down the canvas and go almost all the way down. At this point, your sky should be almost white with barely any blue in it. Then completely rinse your brush and dry it. Mix about equal parts titanium white and light pink on your palette. Then paint the very light pink on the bottom of the canvas and blend it up into the white/light blue area.

You will have a gradient of dark blue to a light pink sunset color on the bottom of the canvas. Next splatter stars on the very top of the canvas Use a toothbrush and load it into a little bit of titanium white paint that has been slightly watered down. Test another surface area first to make sure the stars splatter fine little dots of paint that is not too thick and not too thin.

You can splatter the stars everywhere but they will show up mostly in the dark blue area of the sky.

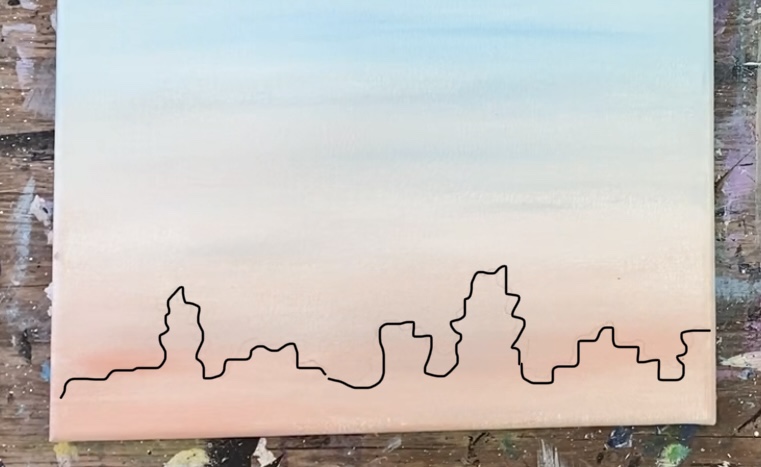
2. Draw Tree Line
Use a pencil to draw the tree line. Do this only a few inches from the bottom of the canvas. Draw a variety of bushes/trees. These can be very abstract and do not need to look realistic.

3. Paint Tree Tops
For the tree tops, I used a round “bristle brush” and a #4 round brush. The bristle brush is a brush that has natural hair bristles (not the soft, synthetic bristles). It is a great brush to use for tree/shrubbery texture.

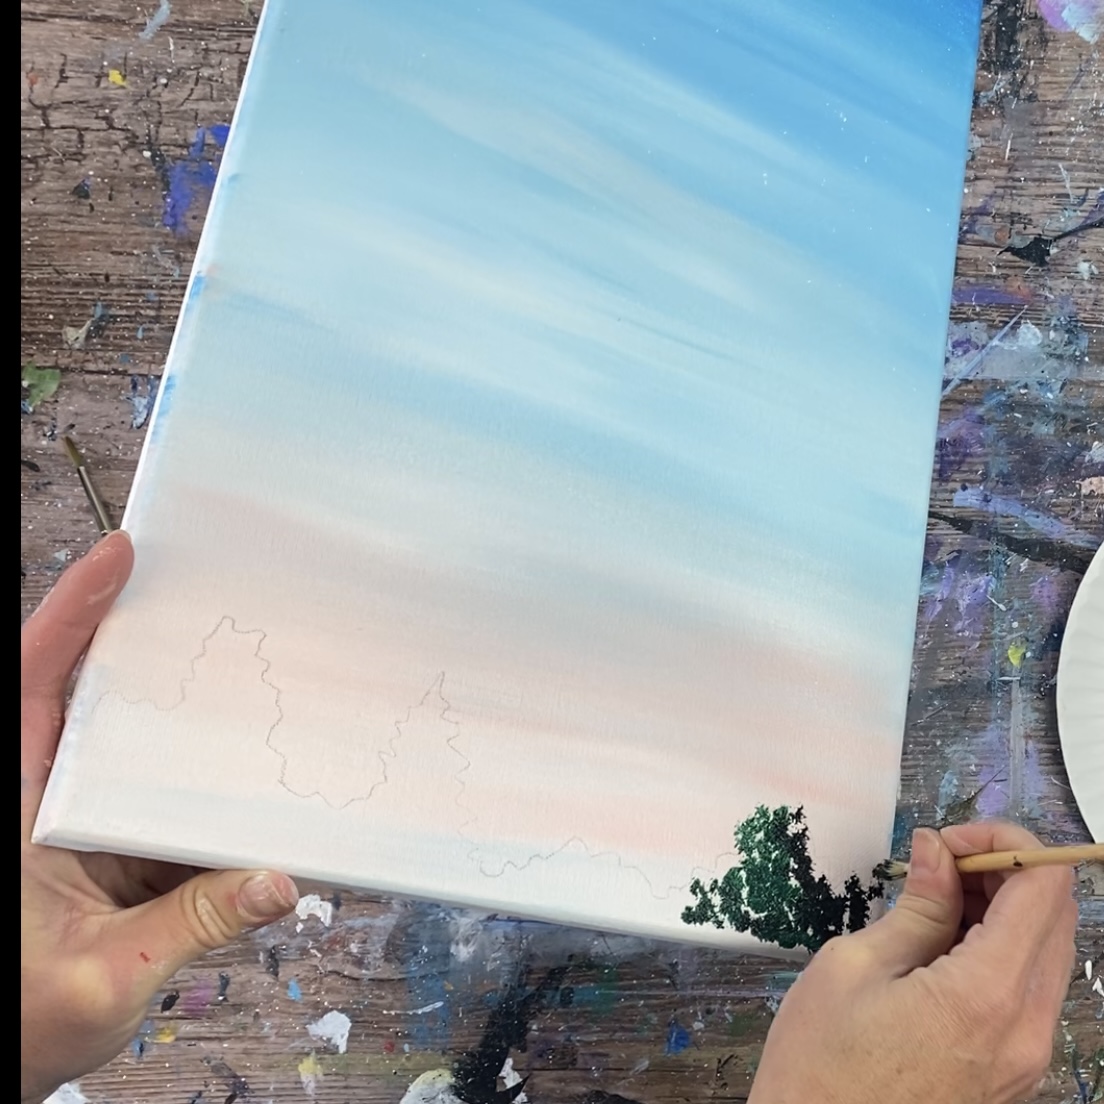
Also, load your palette with mars black and hooker’s green hue permanent. Start with your round bristle brush. Double load it in green and black. “Stipple” the brush by tapping just the tip of the bristles to fill in the tree line area. Create a variety of green/black. Leave some small openings that show the sky through the trees.

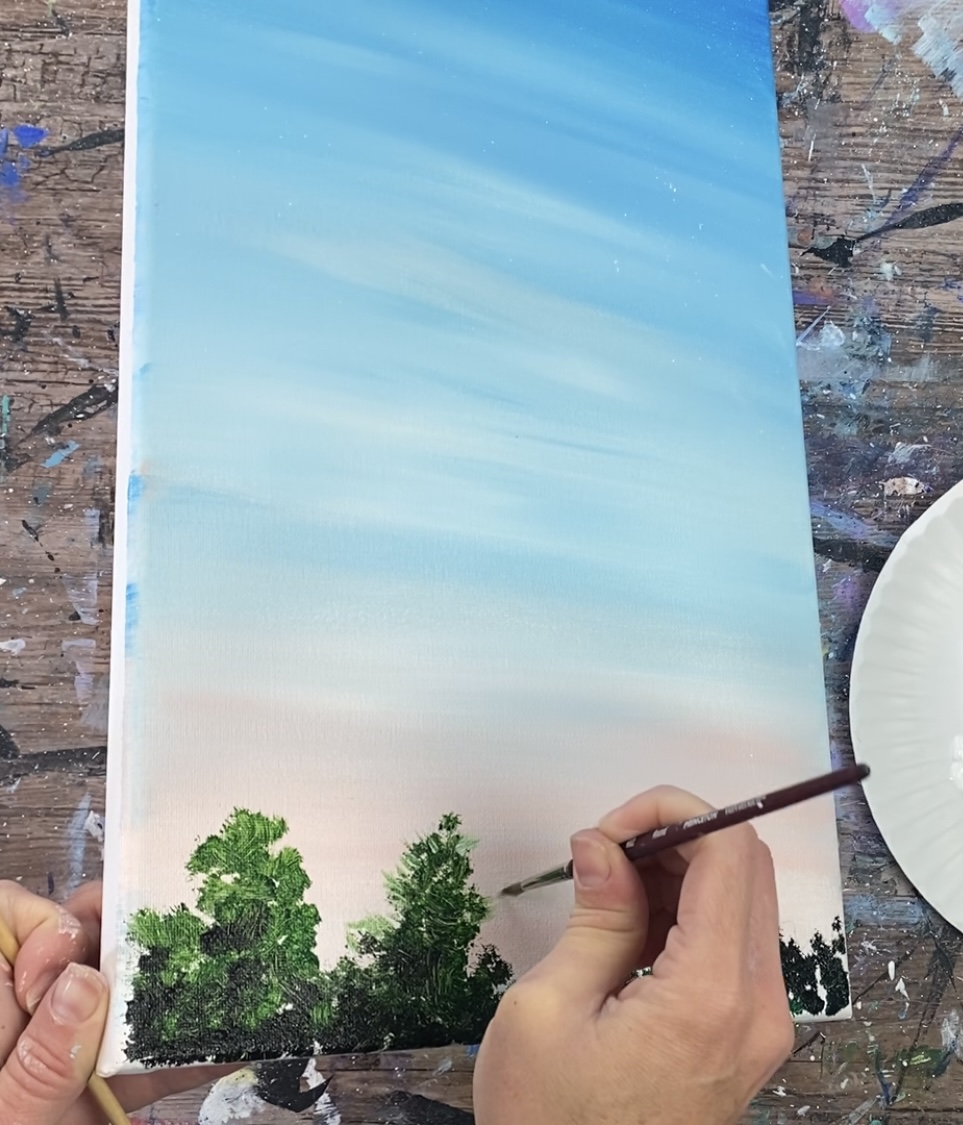
You can use your round brush to create some different types of textures on the edges of the trees and create more defined strokes for pine trees.
Keep in mind that this tree line is in the distance. The trees may be “blurry” and out of focus. They don’t have to look realistic.

Add a little titanium white to your green and add some lighter greens on the tops and edges of the trees. This will give your trees some highlights. Also, the bottom parts of the trees are darker and more shadowy.
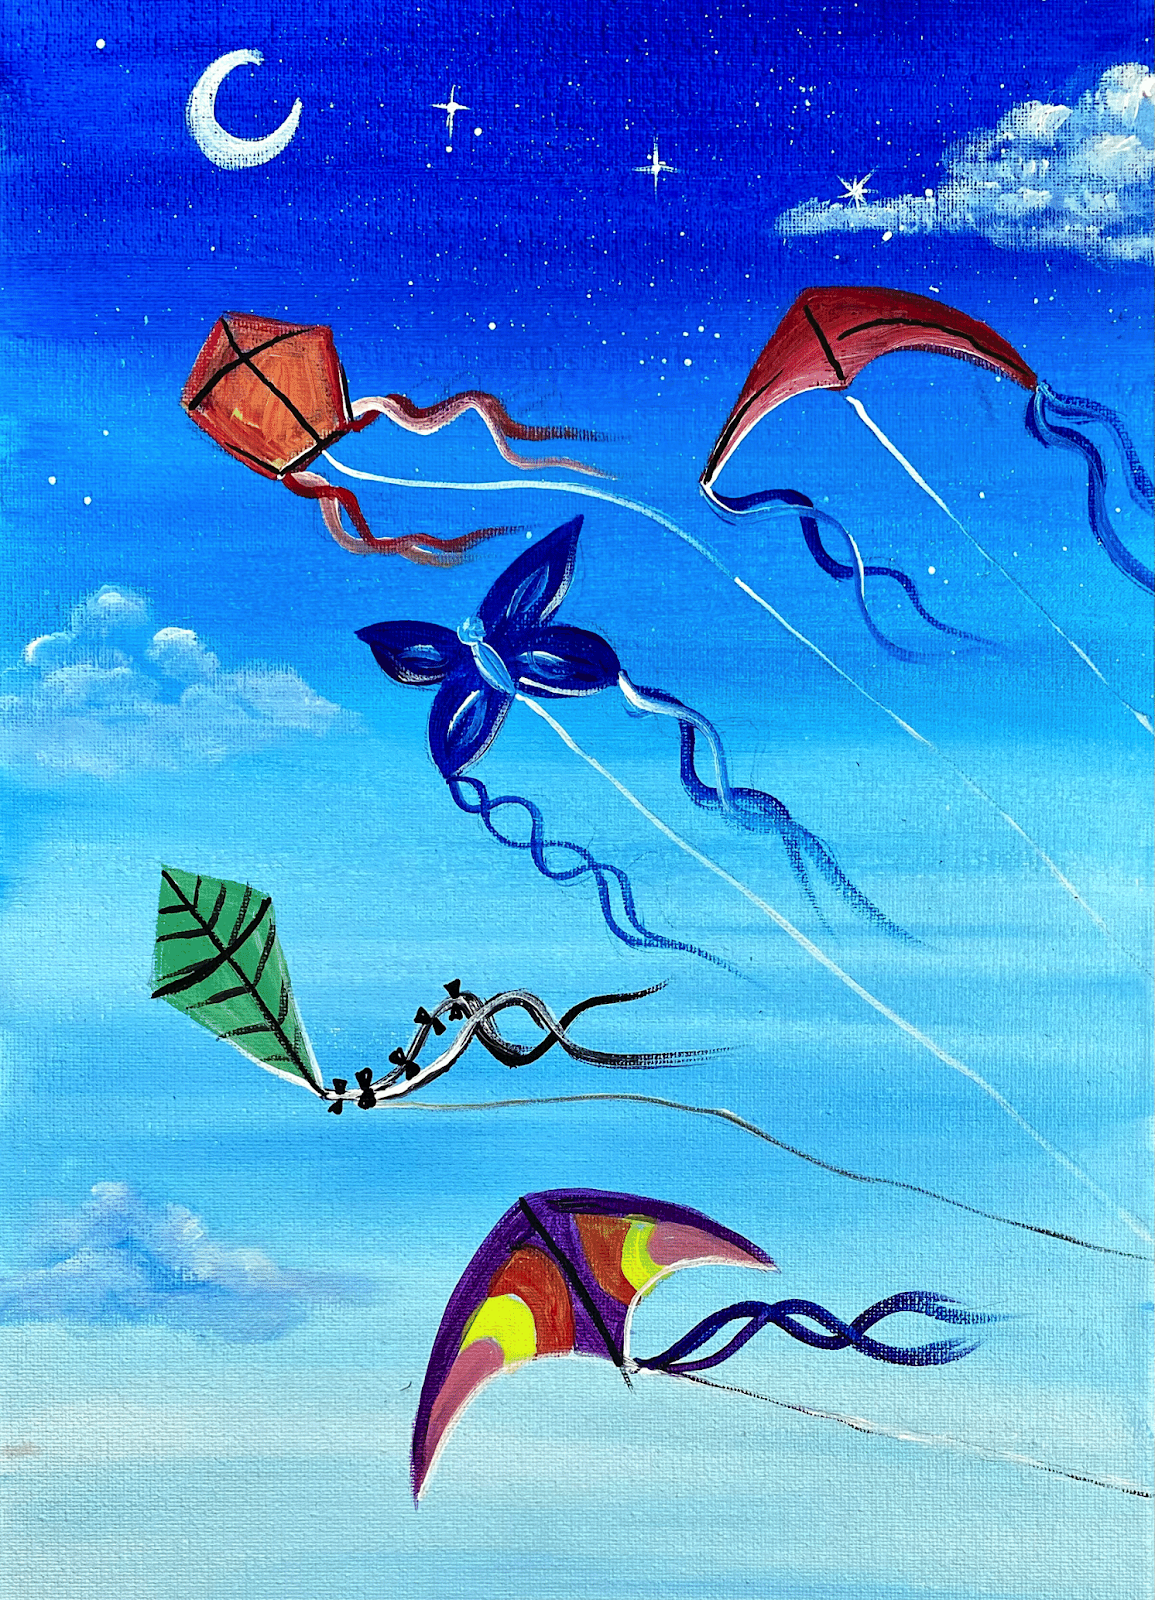
4. Draw Kites
Use a pencil to draw the kites. You can make them simple or more elaborate! Kites come in all shapes including diamonds, delta shaped kites, pentagons and even butterflies!
You can look on google images for inspiration. Check out kite design inspiration here: https://pixabay.com/images/search/kites/


5. Paint Kites
Load your palette with a variety of colors! Kites are very colorful with rainbow patterns/ bright cheerful designs!

I loaded my palette with: cadmium red medium hue, cadmium yellow light, hooker’s green hue, phthalo blue and prism violet.
Use your round brush to paint the kites. I started with the bottom kite and painted a rainbow design on it starting with red. I mixed orange by mixing red and yellow together. Use the round brush and various colors to do the tails of the kited.
Then use just titanium white to paint the string. You can have the string start from the bottom of the kite or more towards the center. Have it go to the right and off the canvas. (Tip: this white line should be very thin! If you have a white paint pen, it could help with this step)

Paint the rest of the kites using a variety of colors and designs. I did prism violet for the delta kite. I also made a pink by mixing a little red into titanium white. Then I did yellow and red in the kite as well.

Use a black POSCA paint pen for details on your kites. You can outline areas of the designs and draw the cross beam with the black pen.

Continue to paint each of the kits… For the green one, I mixed the hooker’s green hue with titanium white to make a lighter green. Sometimes it’s fun to mix new colors on your palette! Then I blended some white on the bottom.

For the butterfly, I used phthalo blue and then did white in the middle.

For the tail of the butterfly kite, I did phthalo blue and titanium white. When you paint the tails, put a little extra pressure on your round brush at first then release the pressure so the paint stroke fades out.

The top delta kite was done with red and I blended a little white on the bottom. The Pentagon kite was done with red mixed with a little yellow to make a dark orange.


6. Paint moon, clouds and star details
It may be helpful to use a white chalk pencil to draw the crescent moon. Then fill the shape in with your #4 round brush and titanium white.

Then paint some “twinkling stars” high up in the sky. Do this with the #8 round brush (it has a very thin tip to it), a white paint pen or a really small round brush.
Paint a small dot for the middle part of the star and then paint little horizontal and vertical lines to create the diamond star effect.


For the clouds I used a #12 bright brush. Load it with light blue permanent and a little bit of titanium white. Load only a small amount of paint on the tip of your brush and paint in circular strokes forming the shape of the cloud.
Then add a little extra white to the brush and paint just the top tips of the clouds (rounded strokes) to highlight it. Need more cloud practice? You can see my cloud tutorial here!

Then do some last minute touches like adding bows to some of your kits or using your POSCA paint pen to outline anything that needs to be outlined.

Finished!

Share Your Art Here:


