
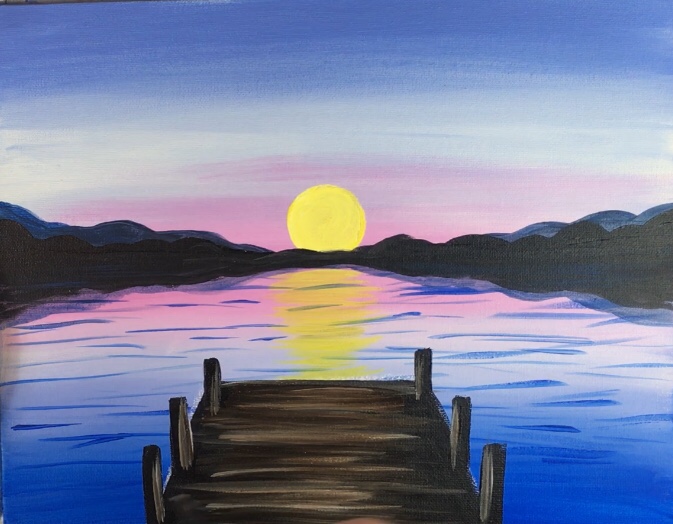
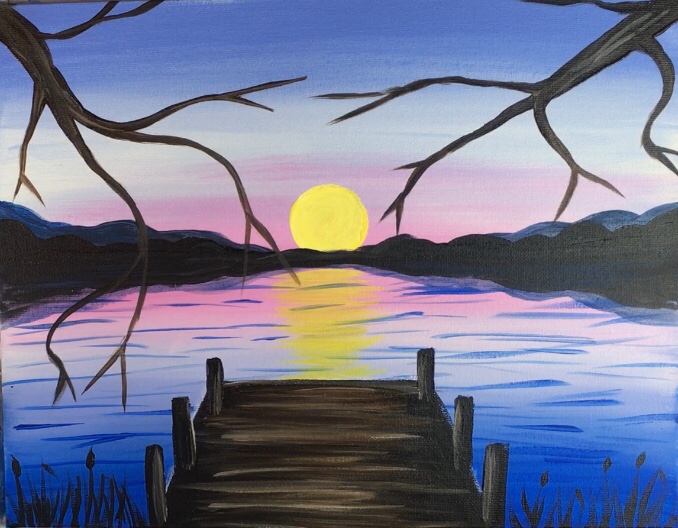
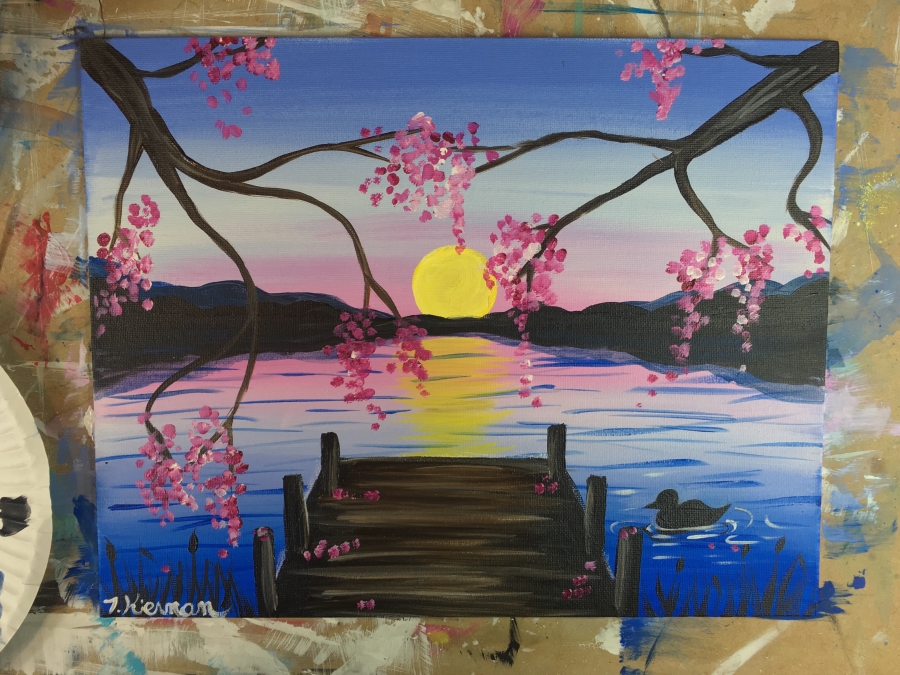
How To Paint A Sunset Lake Pier
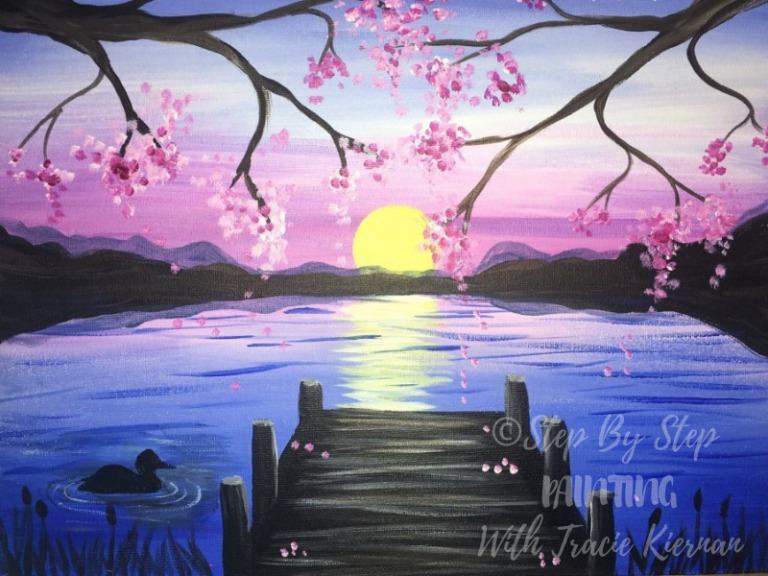
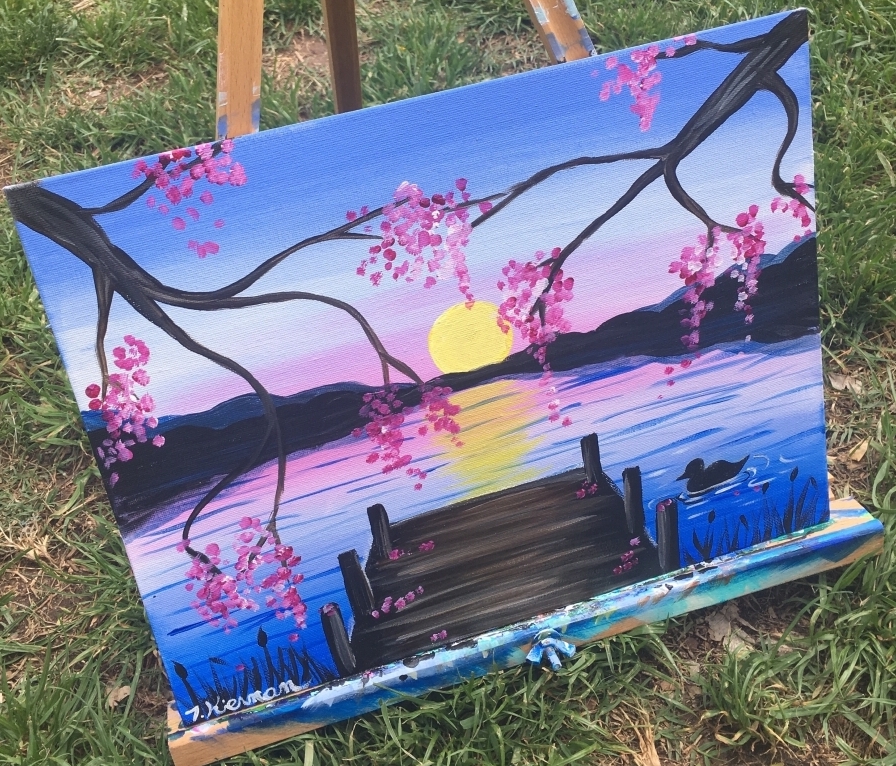
Wouldn’t you love to be sitting on this pier right now!? This scene is so peaceful and serene! I love the combo of the pastel blues, pinks and purples in the sky. And, of course, the cherry blossoms bring a whole new level of joy!
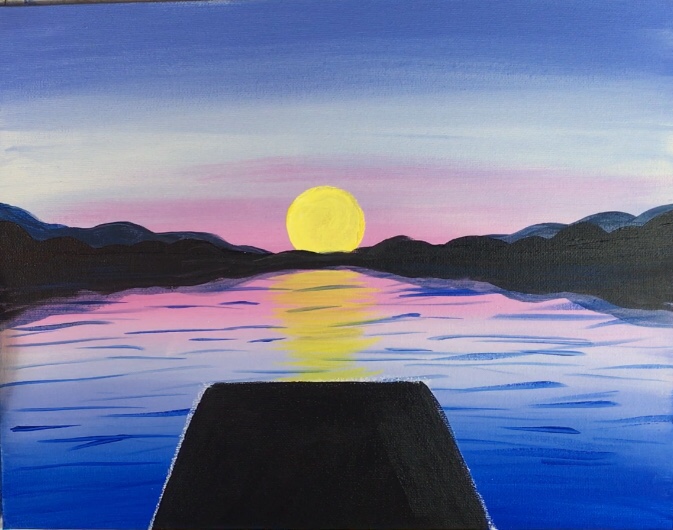
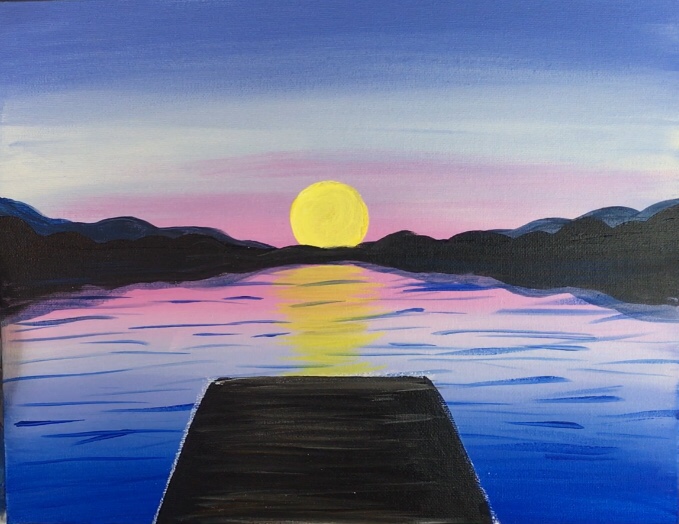
In this acrylic painting tutorial, you will learn how to paint a soft blue/pink sunset over a lake with a rustic pier in the foreground.
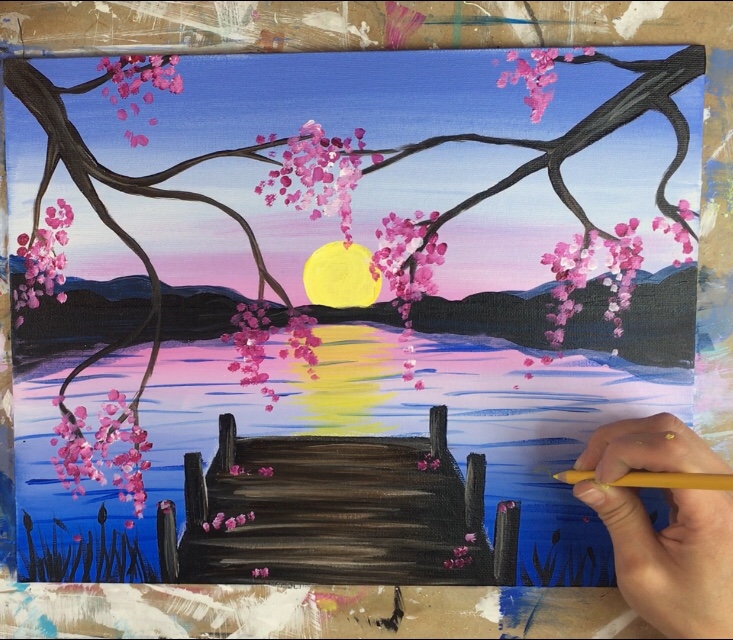
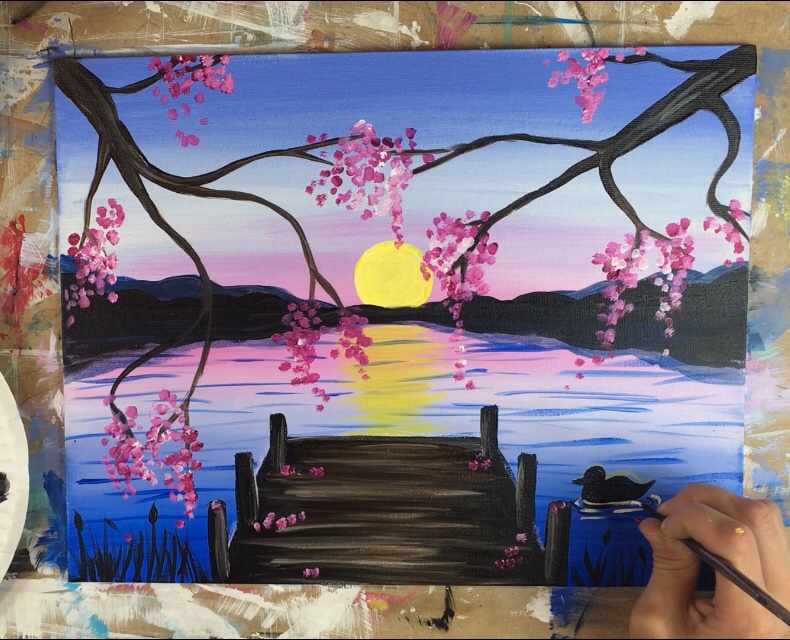
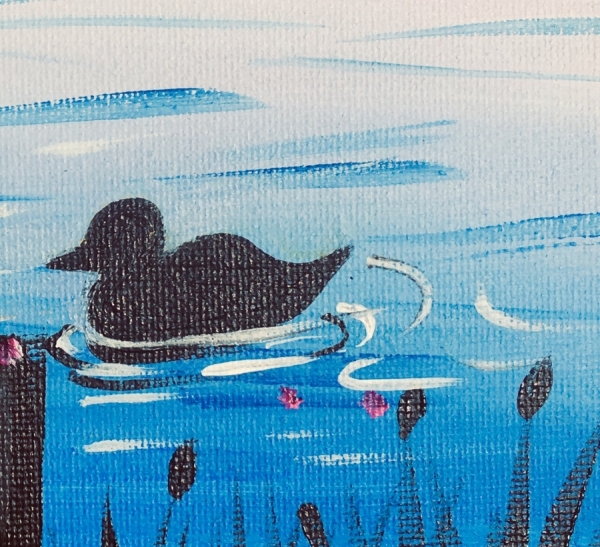
Hanging above the pier are Cherry Blossom Tree Branches. Then, I think my favorite part of the painting, is that little silhouette duck on the bottom!
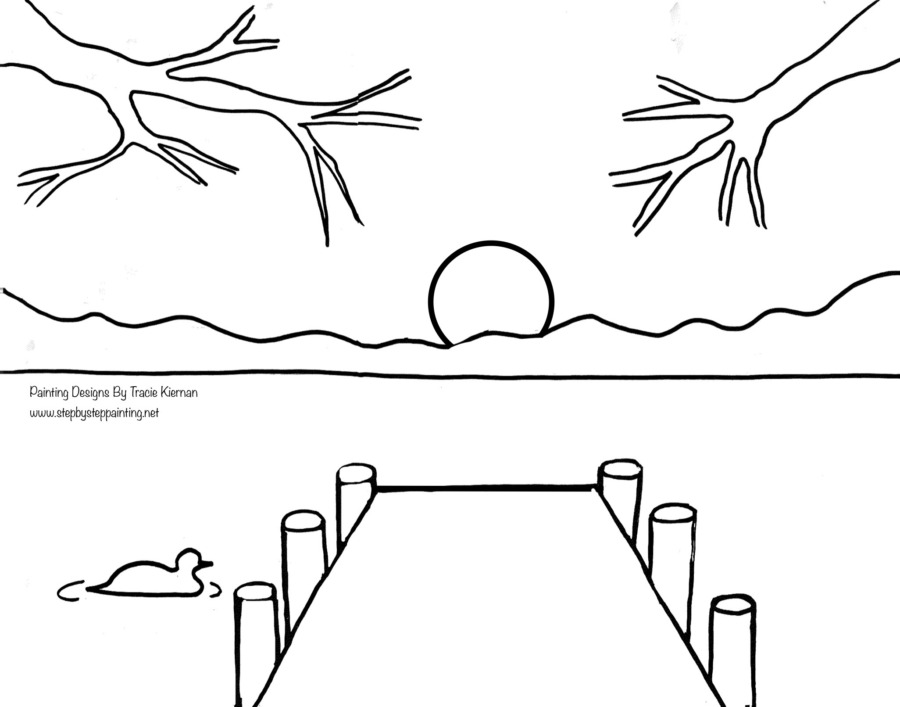
Don’t let that pier intimidate you! It was actually really easy to paint. It’s a simple trapezoid shape painted black with some brown/white details. It’s nothing but a simple shape – easy peasy! BUT if you still have troubles with it, I have you covered with my traceable!
I hope you enjoy escaping to this “happy place” while painting “Sunset Pier”. Enjoy and happy painting artists!
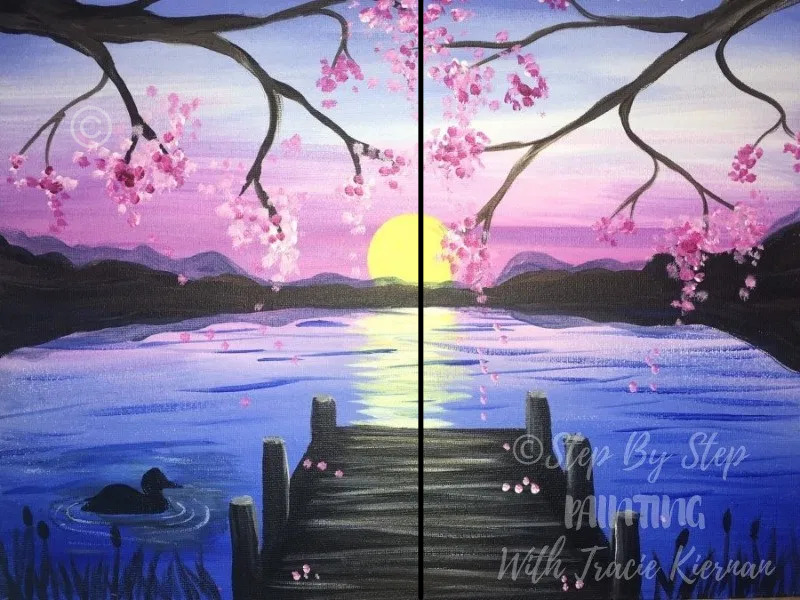
This design works as a couples painting!
Do this on two 11 x 14 canvases positioned vertically (or two 8 x 10s). Divide the design in half. You can do one side and your partner can do the other!
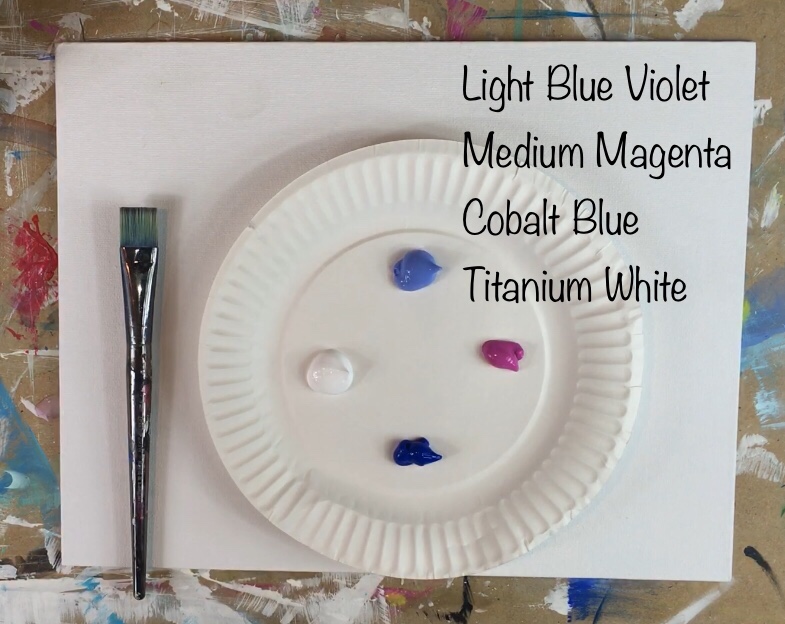
Materials:
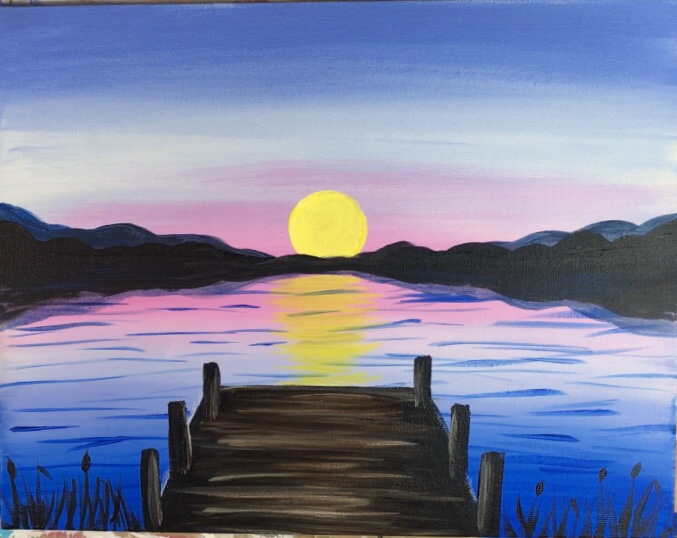
How To Paint A Sunset Pier
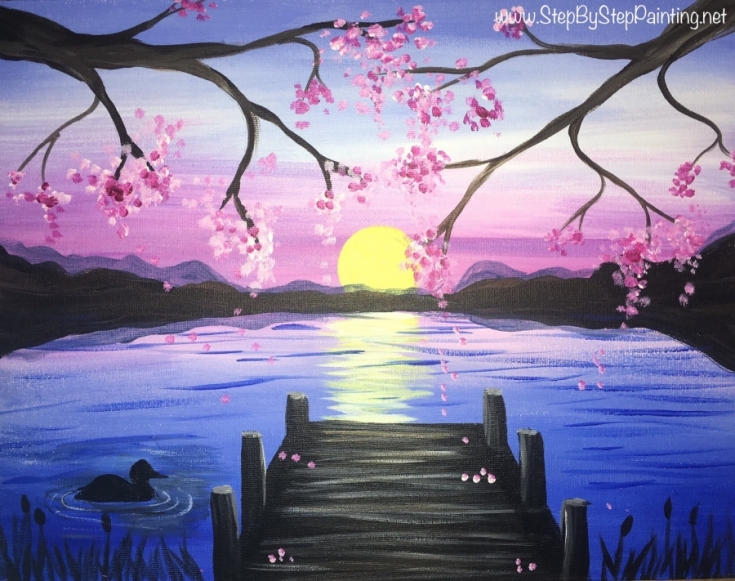
Learn how to paint a soft pastel sunset over a crystal blue lake with a rustic pier in the foreground.
Materials
Basic Supplies
- Acrylic Paint
- Paint Brushes
- Canvas
- Water Jar
- Chalk
- Ruler
Colors
- Titanium White
- Mars Black
- Raw Umber
- Light Blue Violet
- Medium Magenta
- Cobalt Blue Hue
- Quinacridone Magenta
- Primary Yellow
Brush Sizes
- 3/4" Flat
- #12 Flat
- #4 Round
- 10/0 liner (used only for the duck)
- #4 Chisel Brush (used only for the poles on the pier)
- Medium Size Pouncer (used only for the sun)
Color Palette: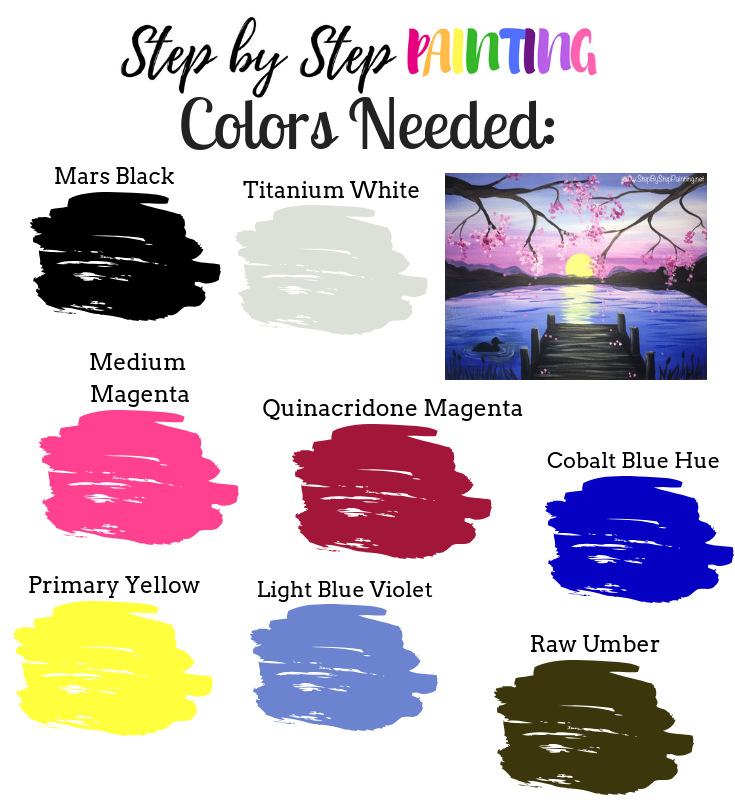

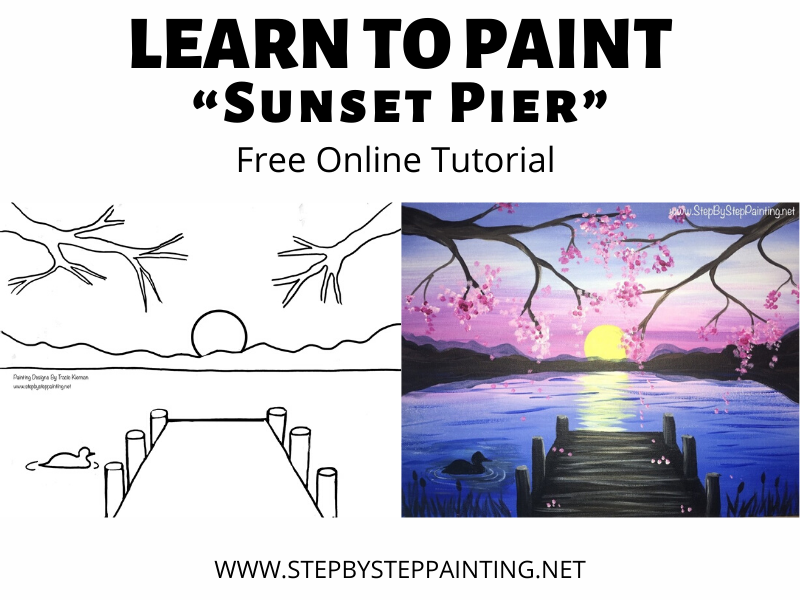
Traceable
You are welcome to print this traceable to help you with the composition of this painting! You can also find the PDF version in my traceable library. Need more information on how to use traceables? Check out my traceable reference guide.
Directions At A Glance:

Video:
Step By Step Directions:
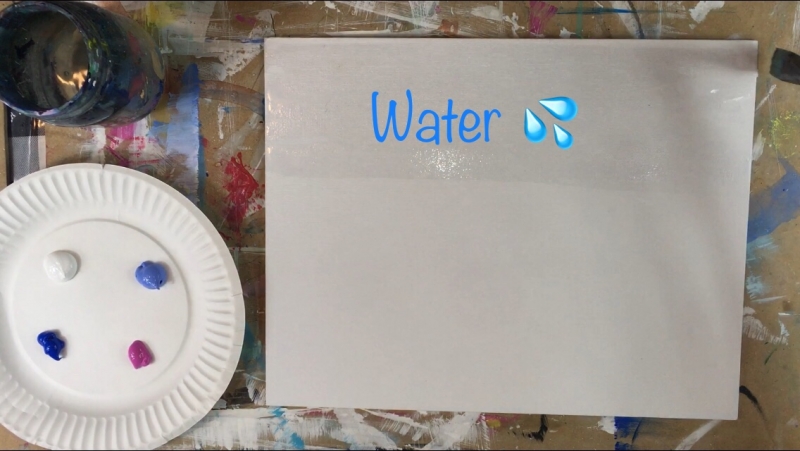
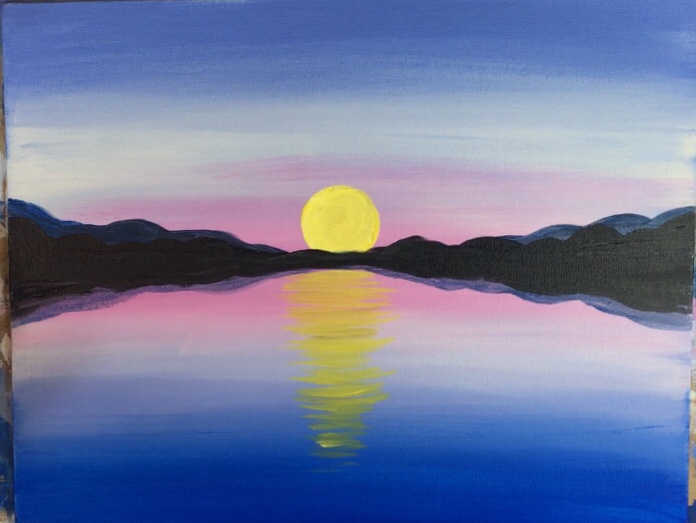
1. Paint The Entire Canvas Sky and Water
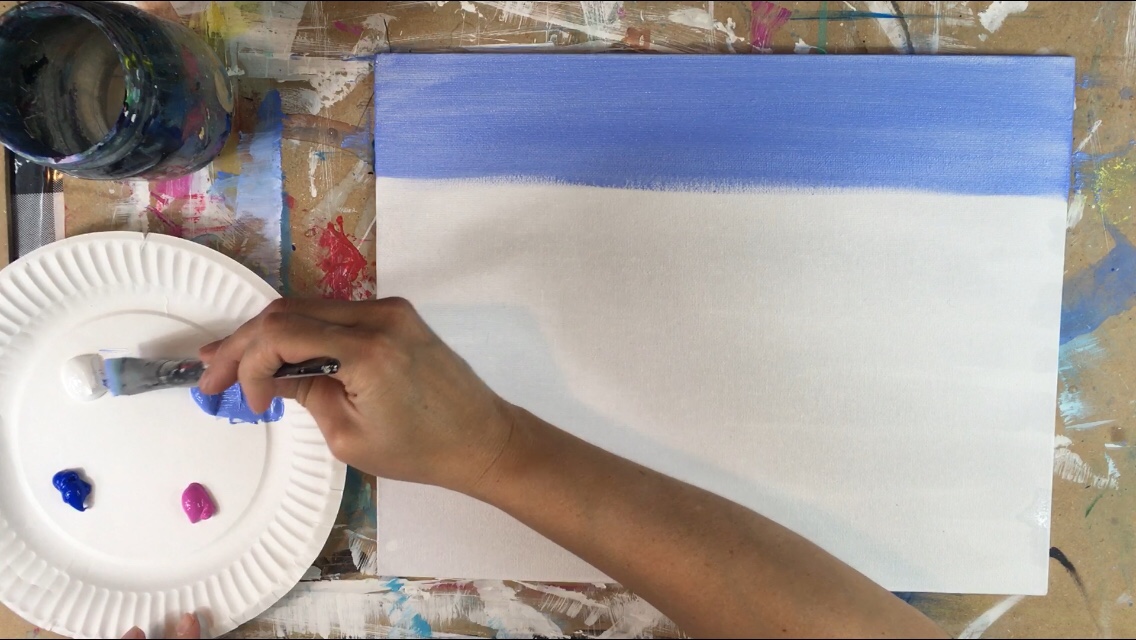
First load your palette with the colors: light blue violet, medium magenta. You will also need a 3/4″ flat wash brush.
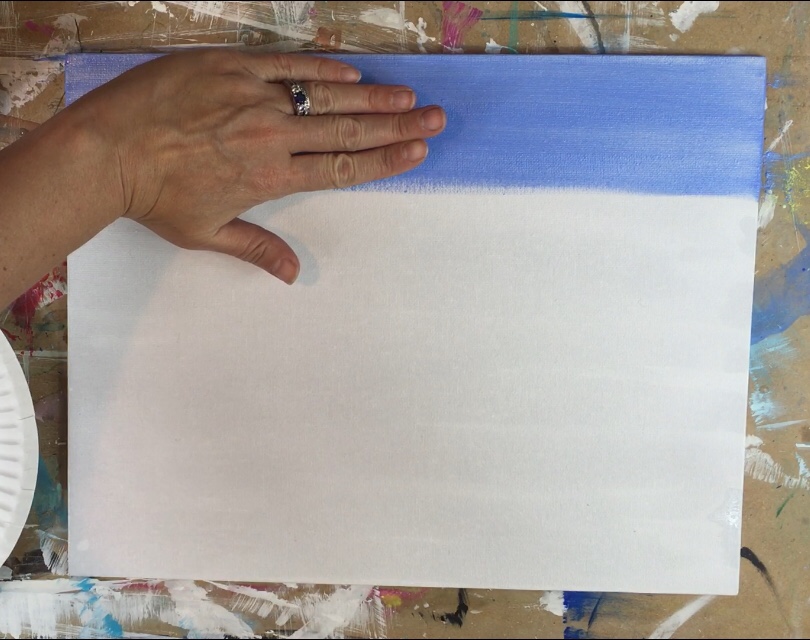
Since we will be filling the entire canvas with color and to help it spread faster and smoother, apply a nice even layer of water to the entire canvas. Use your 3/4″ wash brush and gently paint horizontal strokes of water all over the canvas.
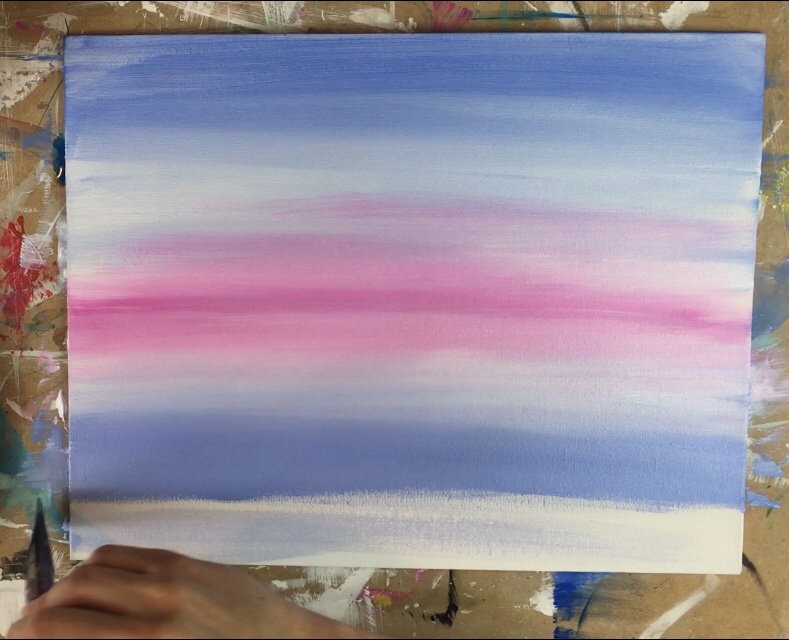
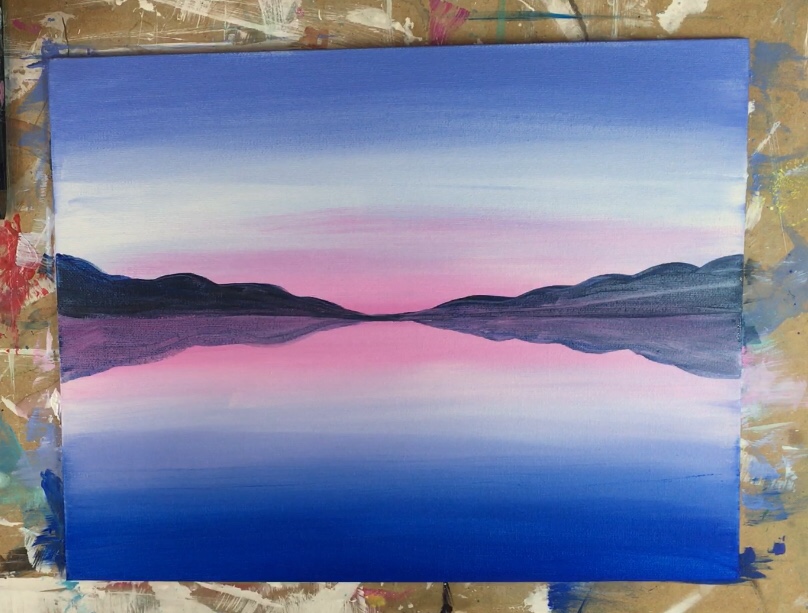
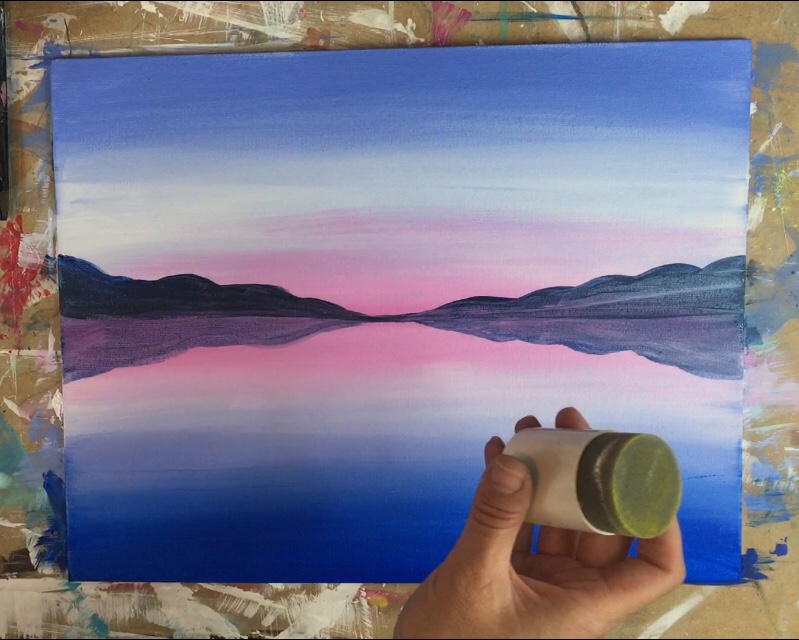
The canvas will be painted a gradation of light blue violet to titanium white to medium magenta, etc. The medium magenta is directly in the center of the canvas and is where the horizon line will be. Look at the image below:
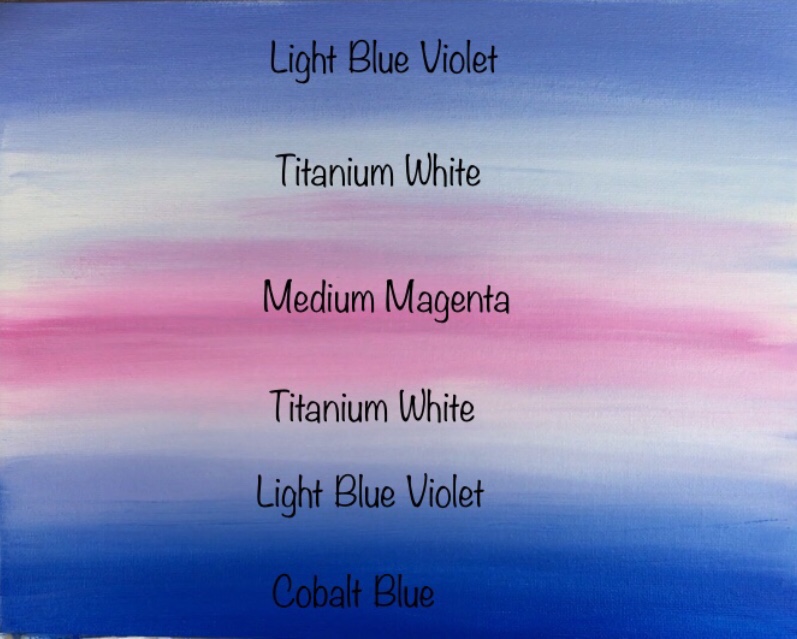
Start with light blue violet and paint horizontal strokes across the canvas. Go about four fingers down.

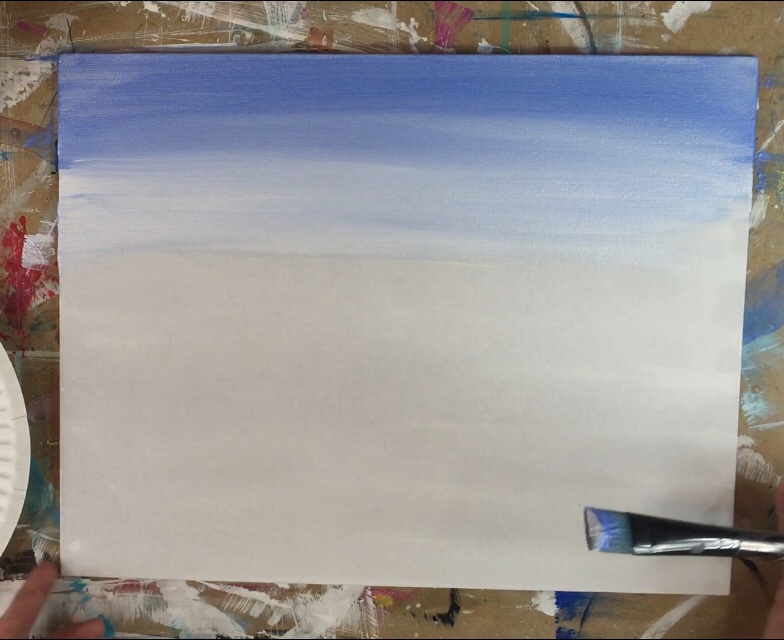
Next load your not rinsed brush in titanium white. Blend the white into the blue and work your way down to almost the middle of the canvas. It should turn to a very light blue and then almost pure white. Keep in mind that your gradation might vary slightly from mine! In fact, after doing this painting several times, each time was different so don’t stress to make the colors look just like how mine look in the pictures.
When you approach the middle of the canvas, apply medium magenta. Also, you do not need to rinse your brush. Blend the medium magenta into the white and then let it become a more pure form of medium magenta in the middle and slightly below the middle of the canvas.

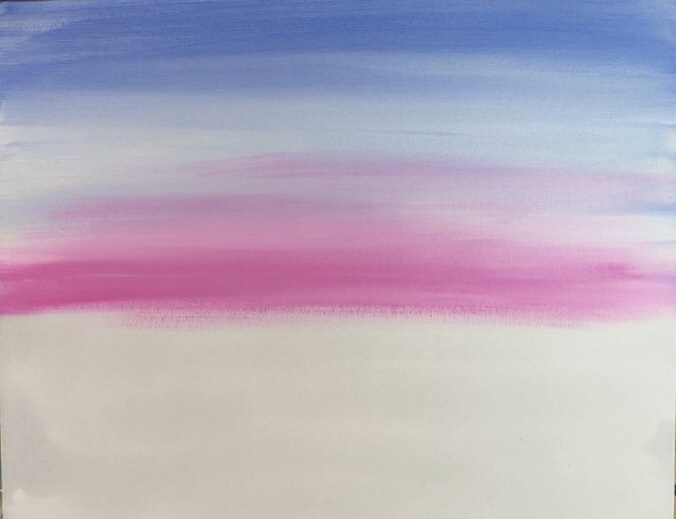
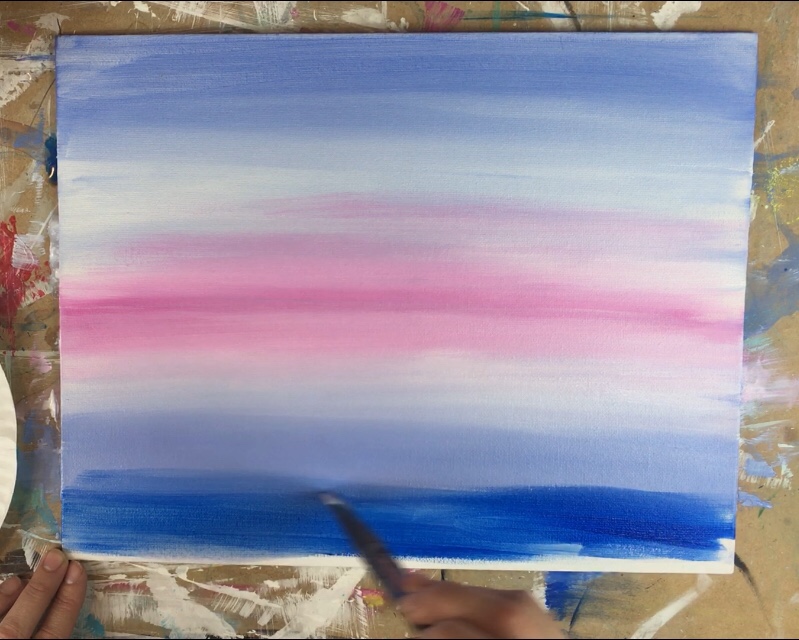
Now that you are below the “invisible horizon line” apply white to the brush and blend the medium magenta into a light pink and then almost pure white.

Then apply the light blue violet and blend it down.
And finally add the cobalt blue on the bottom. Just be careful with the cobalt when blending it back up into the light blue violet as that color is very strong and tends to take over.

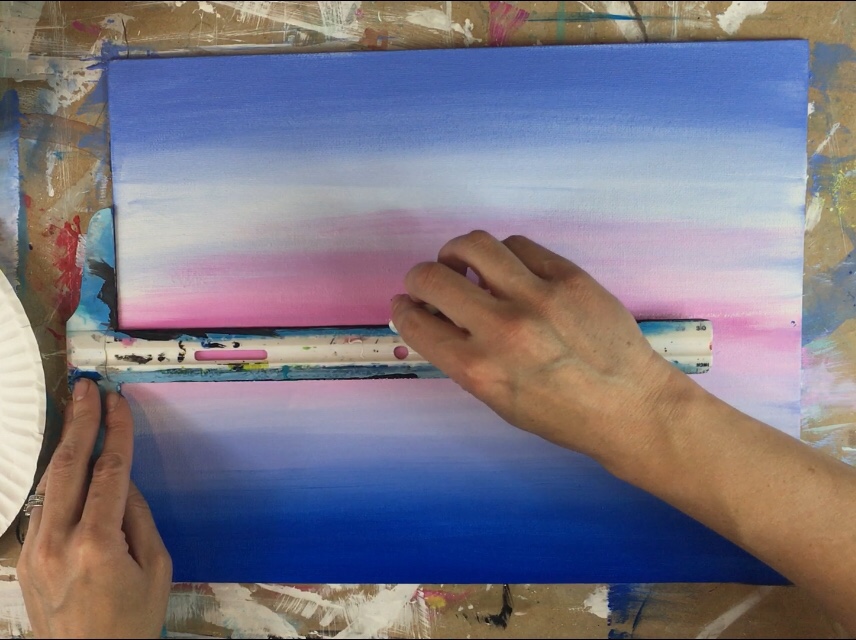
2. Draw A Horizon Line With Chalk
First, completely dry the painting (with a hair dryer or take a break and come back when it’s dry). Then, using a ruler, locate the exact middle of the canvas. Draw a horizontal line using a piece of chalk.
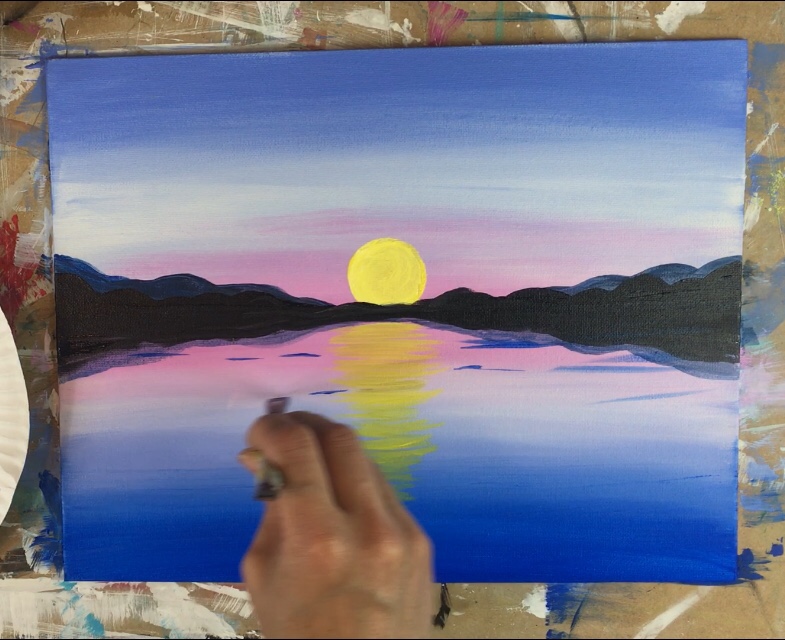
3. Paint The First Layer of Mountains
For the mountains I used a #12 flat brush you can also use a round brush for this step. I made a blend of the colors cobalt blue with a tiny bit of mars black. Then I watered that color down to a very thin ink like consistency so that when painted on the canvas, it is a bit translucent. Paint a lumpy line that is taller on the left and right sides and dips down very close to the horizon line in the middle.
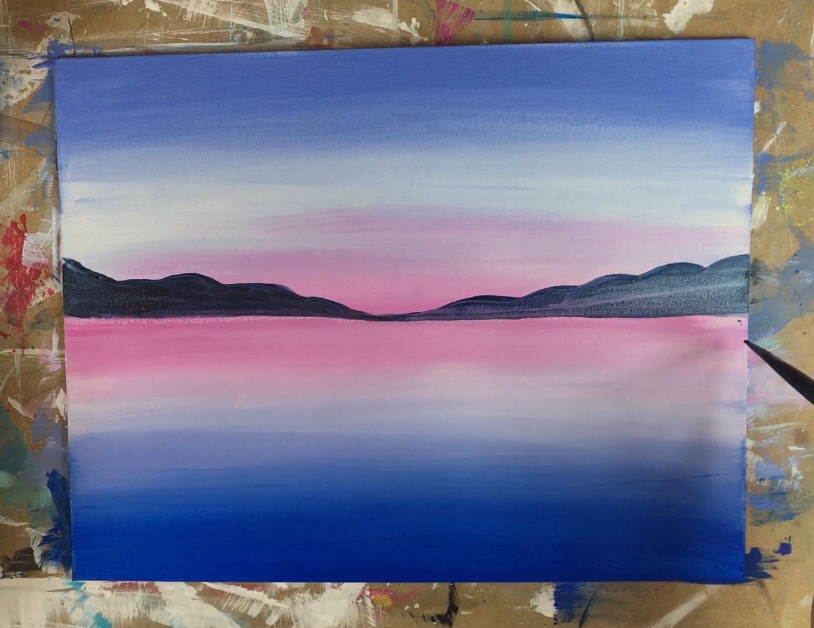
Next paint the reflection in the water. Do the same “mirror image” of the mountains. I made this layer a bit more translucent than the mountains.
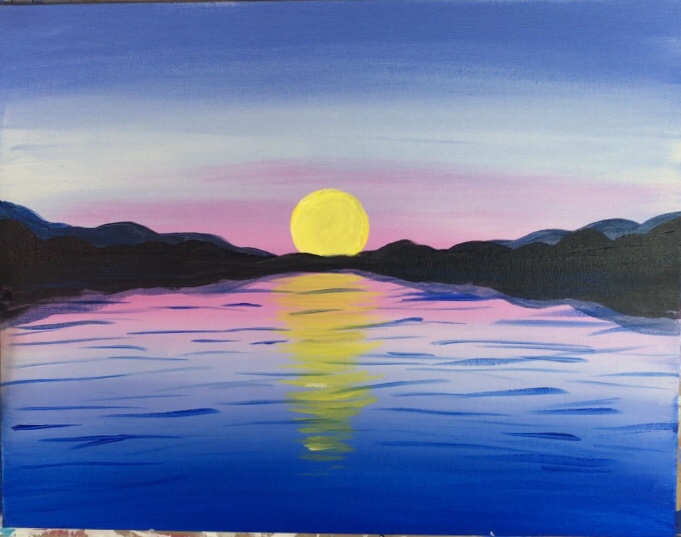
4. Paint The Sun
I used a round sponge for the sun (also known as a pouncer). You certainly can do this with a paint brush if you don’t have a pouncer. Basically dip the sponge in both primary yellow and titanium white. Using both colors will get a very bright and opaque sun.

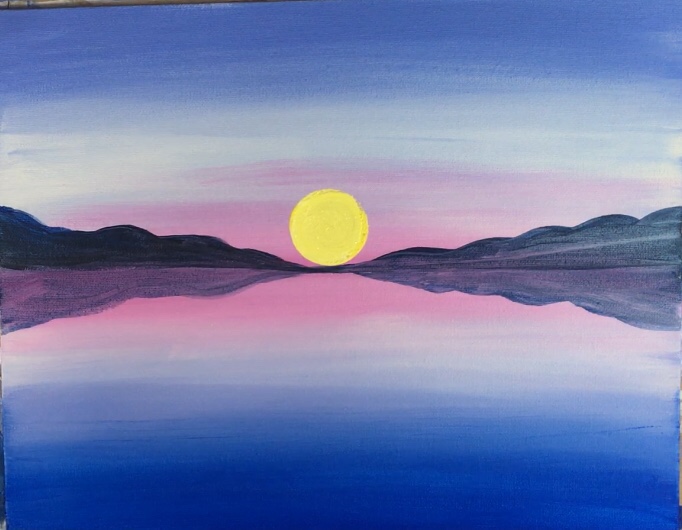
5. Paint Second Layer of Mountains
This step can be optional! However, it creates some nice depth to the painting having a darker shade of mountains in front of a lighter shade. I used pure mars black this time and painted another mountain range that was slightly shorter than the one in the back. Then I mirrored it in the water again.
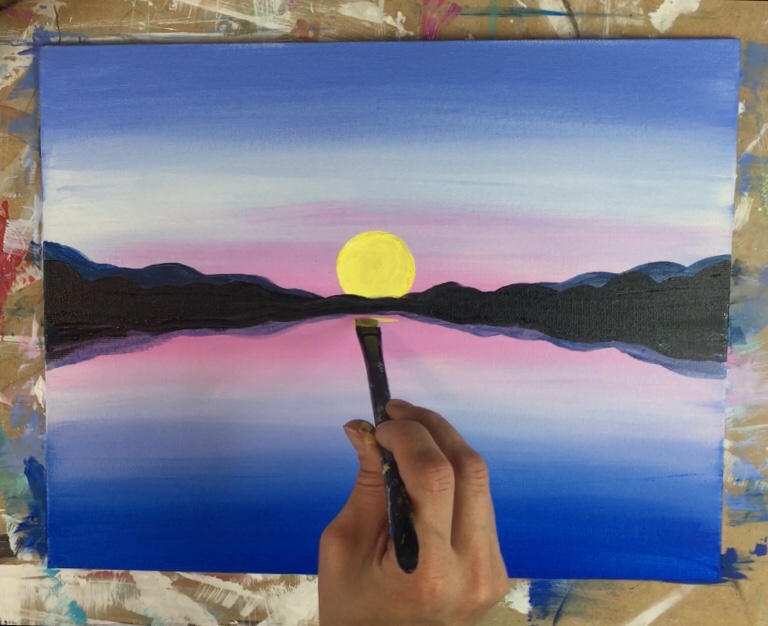
6. The Sun Reflection
For the sun reflection I used my #12 flat (very clean and rinsed off) and dipped it in the primary yellow and titanium white mix I used for the sun. Paint horizontal lines forming an upside down triangle shape almost all the way down the canvas. Don’t worry about where the pier will be.
7. Paint Blue Water Lines
Then completely rinse your #12 brush and paint little horizontal lines of cobalt blue. Do this all throughout the water and even a little where the sun reflection is and over the mountain reflections.
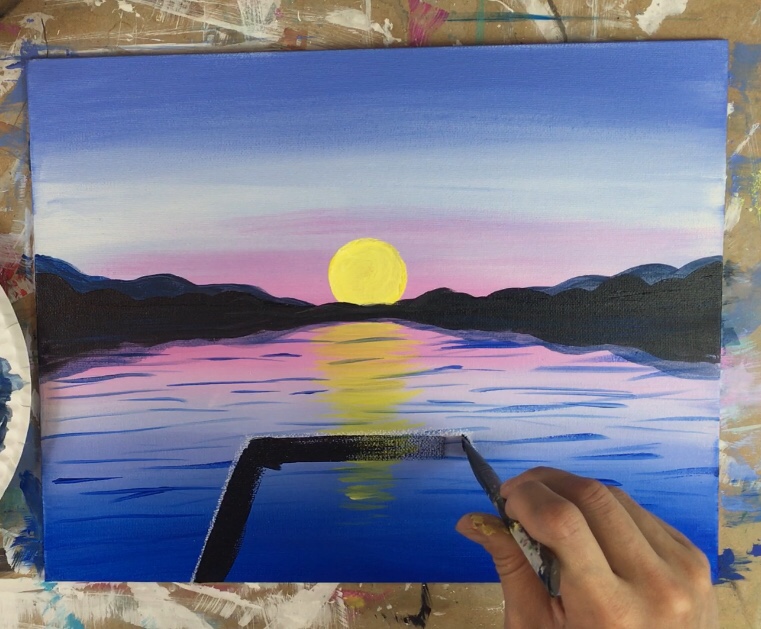
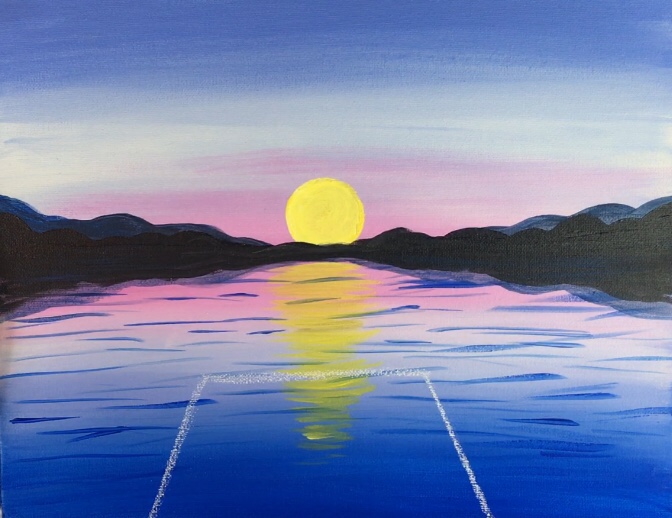
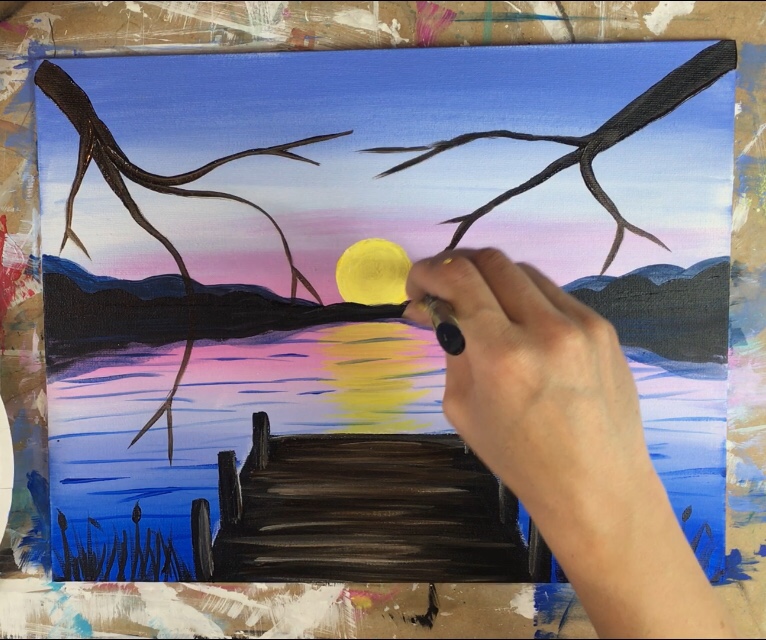
8. Draw the pier with chalk
Next you’ll need to use chalk to draw a trapezoid. Just estimate the size of this trapezoid. I made mine go up to almost half of the water and the width on the bottom is about seven inches. This is a very basic shape!
9. Paint the pier
Then use your #12 flat brush to paint the entire pier mars black.
Next add a little bit of titanium white & raw umber horizontal lines to the pier. Not too much! Since the black isn’t dry, it should blend to a grayish color. Just a few lines here and there, we will add more details later.
For the vertical beams, I actually used a chisel brush. This is just like a flat brush, only the bristles are much shorter. If you don’t have a chisel brush, you can use a round brush or even any of your flat/bright brushes.
To paint the vertical beams, start in the back and paint two vertical stroke lines. I did three beams on each side and each beam gets progressively taller (because of perspective).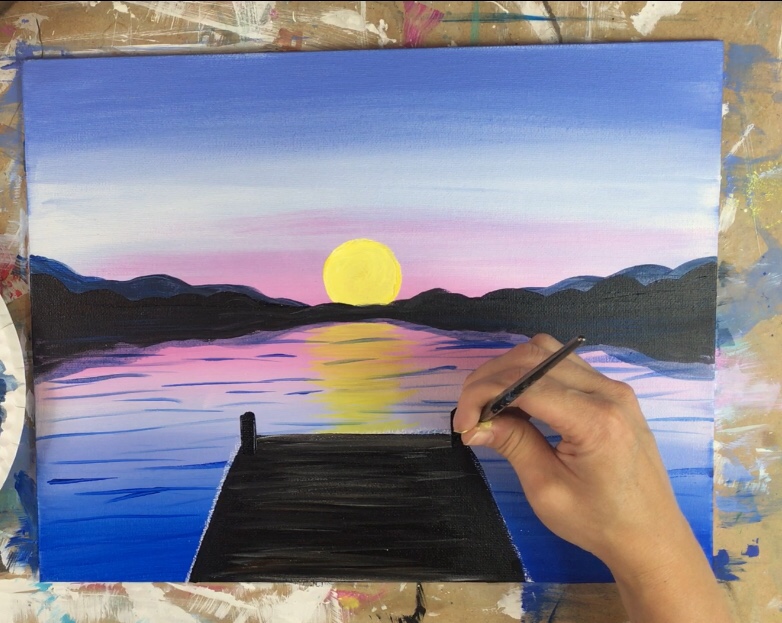
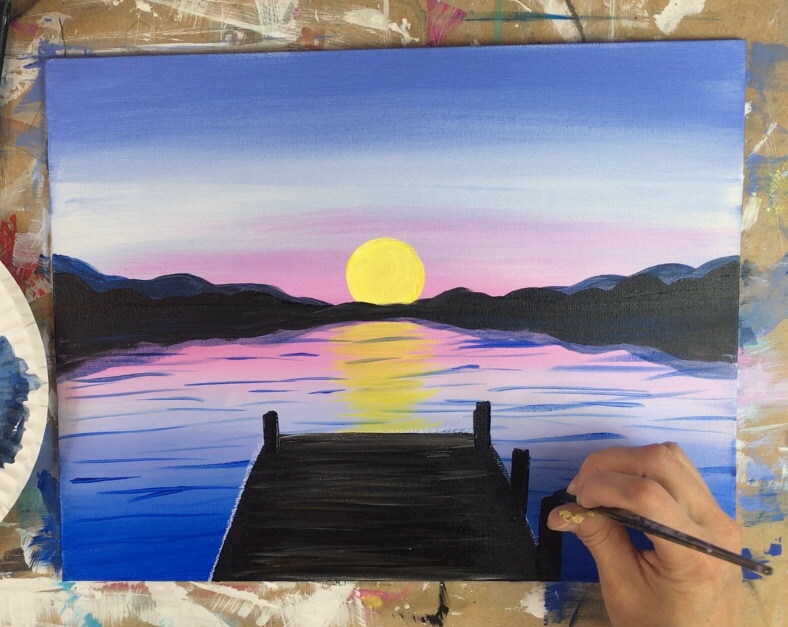
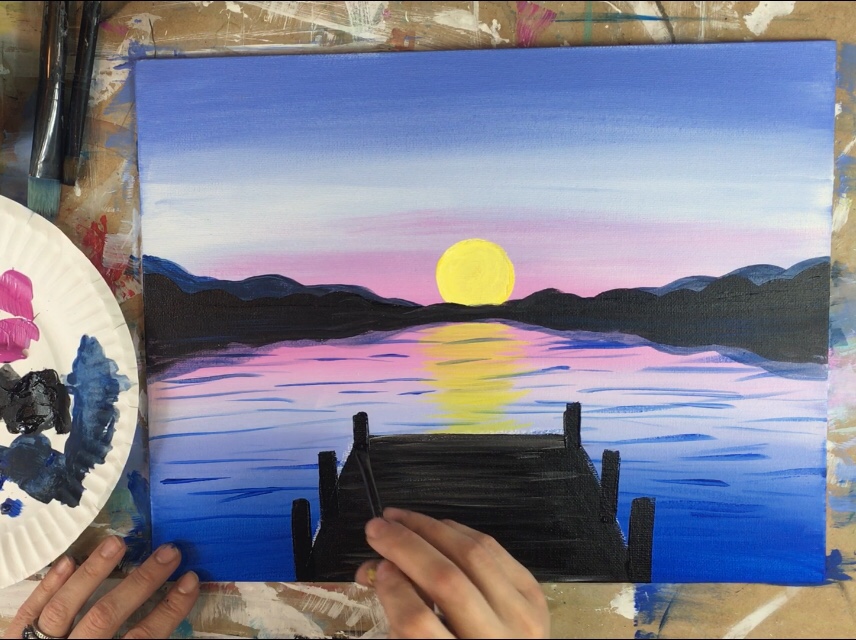
Next I added color to the pier. I used white and raw umber and painted horizontal lines that sort of blended to make a rustic effect.
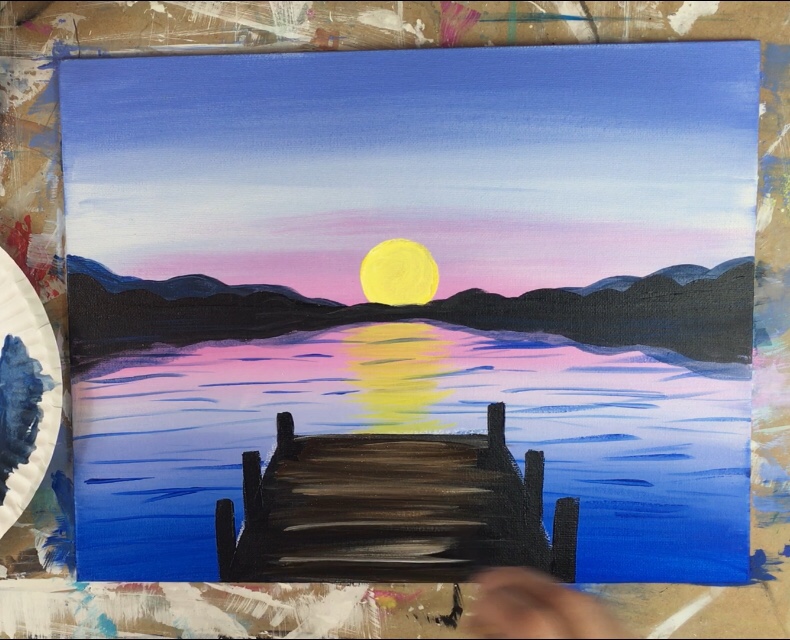
Then on the beams (the inner parts facing the pier) I painted a very faint white line. Blend that white line in a bit if it looks to strong.
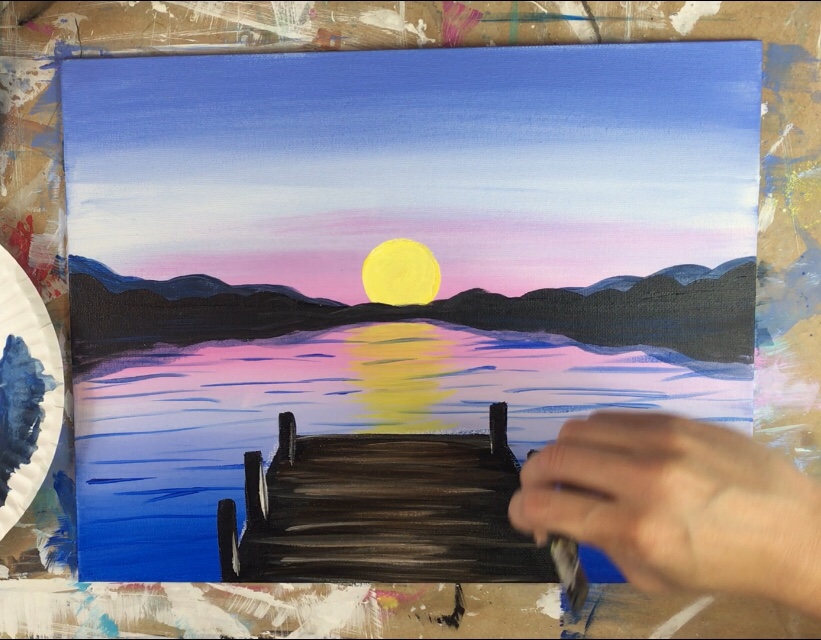
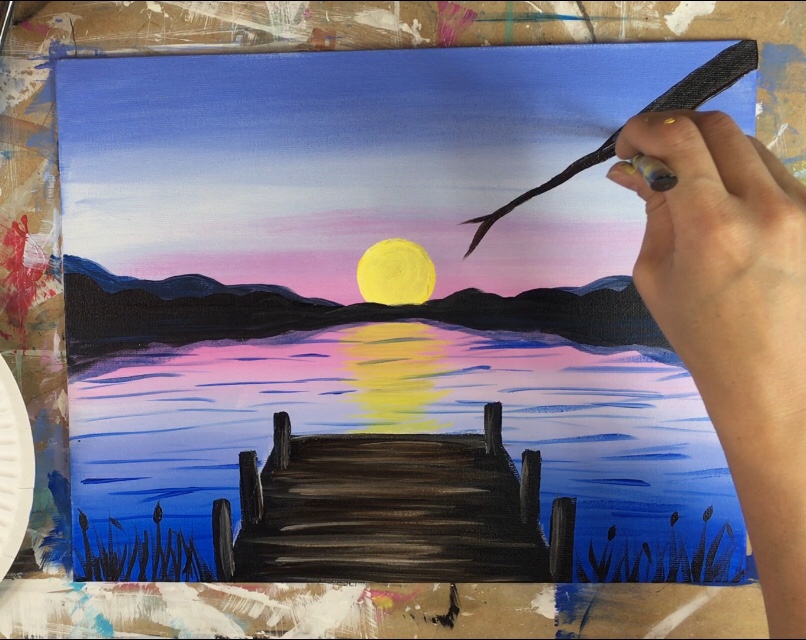
10. Paint silhouette of grass/ cattails on the bottom.
Use mars black and a #4 round brush. Basically paint simple blades of grass and a few cattails.
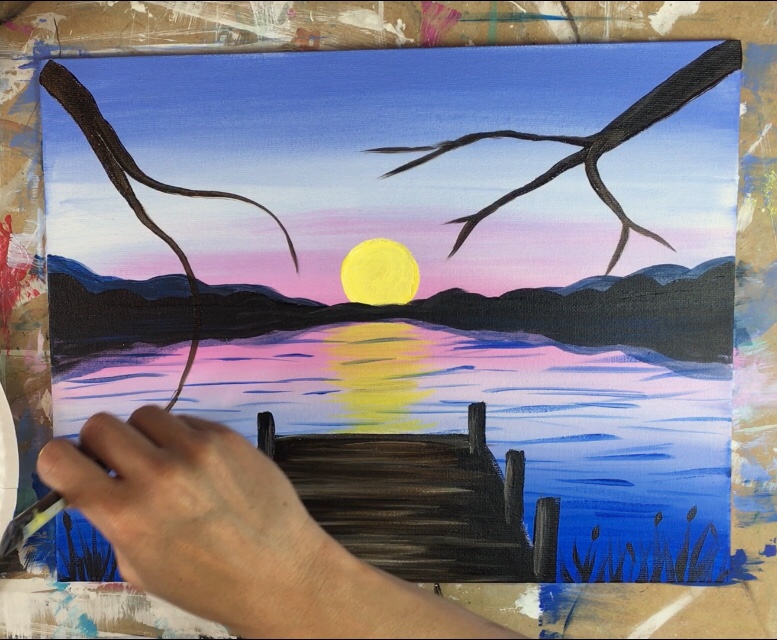
11. Paint the tree branches & blossoms
For the branches I used my #12 flat brush and double loaded it in mars black and raw umber. Start each branch at the corner with a thick line that gets thinner (like you’re painting a triangle). Then use the tip of the brush to paint thin branch lines that “branch off” like the letter Y. The color of the branch should be a very dark brown/black color. Since I double loaded, it is not mixed all the way – the colors blend on the canvas.
The branch on the left was painted so that it hung down very low.
To paint the blossoms, use a #4 round brush and the colors titanium white, medium magenta and quinacridone magenta. Dip it in the colors and paint little clusters of dots everywhere. You don’t need to rinse your brush between colors.
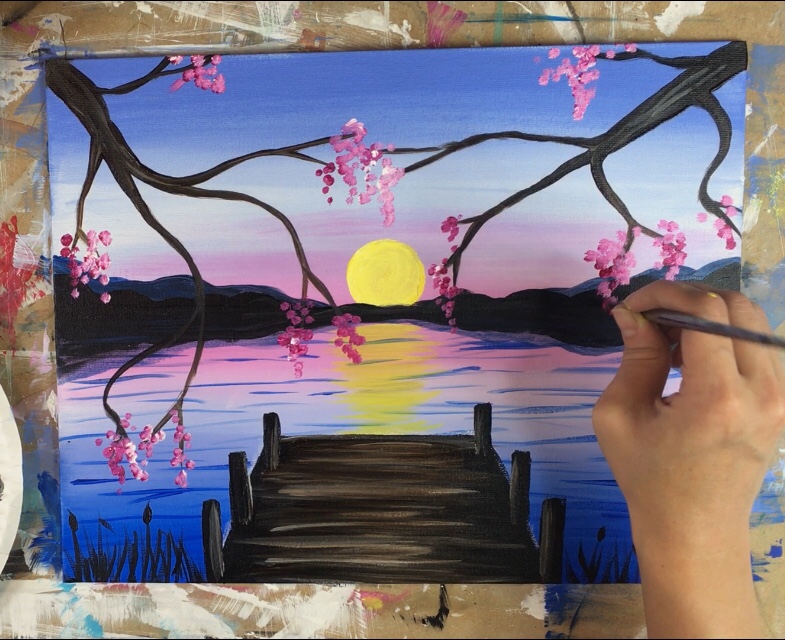
You may even paint little blossoms falling down, blossoms on the pier and maybe a few in the water.
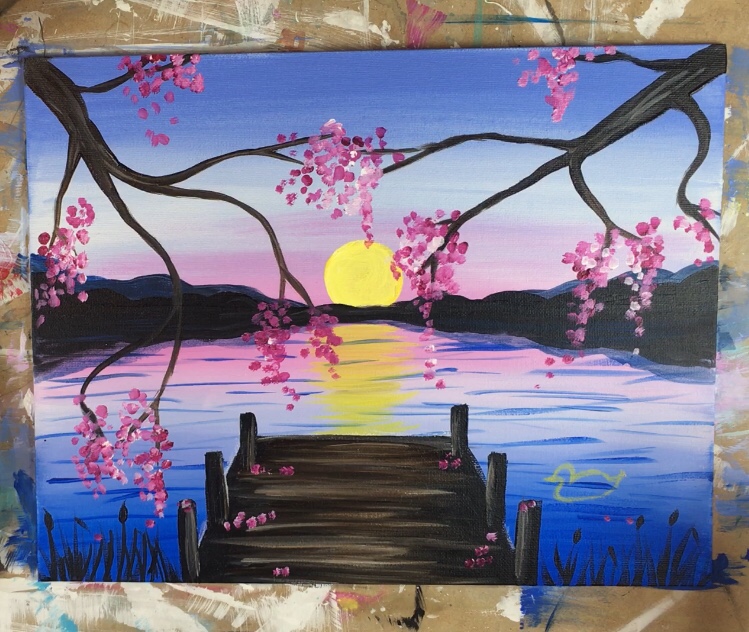
12. Paint the duck
To do the little duck silhouette, I looked up google images for a particular silhouette I liked. Then I used a color pencil to draw the duck onto the canvas. Color pencil will come off with eraser. Then I used my #10/0 liner to fill in the duck shape a solid black.
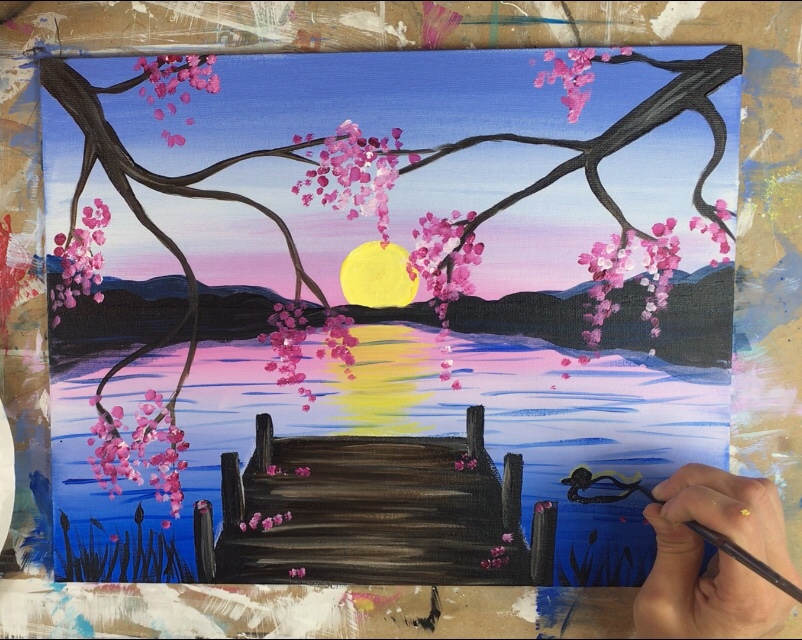
For the water lines, I used the 10/0 liner and titanium white. I painted little ripple lines surrounding the duck!
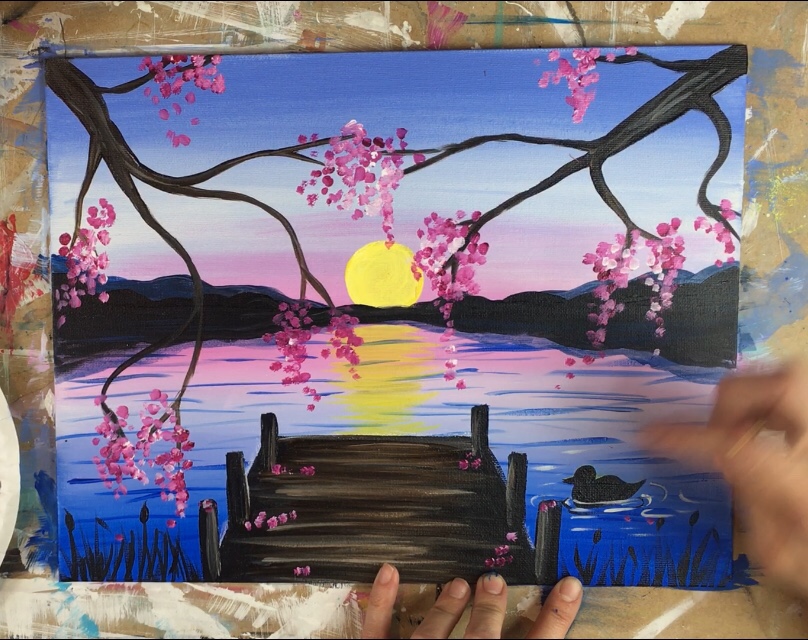
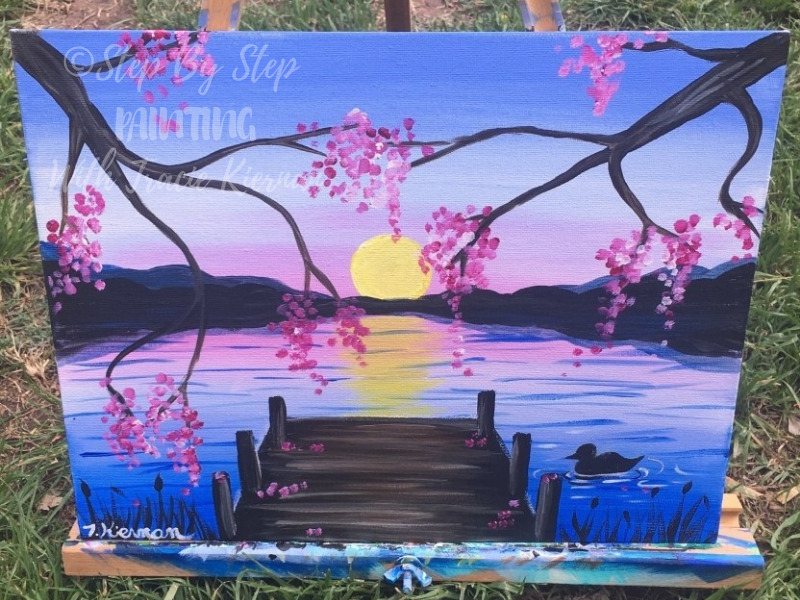
Finished!!
Share Your Art!


Would this be ok on a 4X6? Please help
Hi Anne! Yes absolutely it would be okay on a 4×6! ?
Is there any way you guys can post the half and half videos when it’s for two people? I really want to do half but not sure how i know that sounds silly ?
Hi Kiernan, I’m looking to have a paint party with about 30 ladies from Church. How do I convert the colors using apple barrel brand paint for this painting?
Hi! Can you upload or send me a traceable that would fit a 16 x 20 canvas?
Thank you!!!