
Mountain Painting Tutorial
Would you like to save this?
Learn how to paint mountains with acrylics. This online tutorial will show you the techniques for rendering mountains on your canvas.
There are several different ways you can go about doing mountains in paintings.
A popular technique is to use a palette knife. It helps to create the texture of the ridges and shadows.
However, since I don’t prefer using a palette knife, I’m going to show you how to use any size flat brush to do the technique.
This technique is helpful if you want to paint a landscape with mountains in the background.
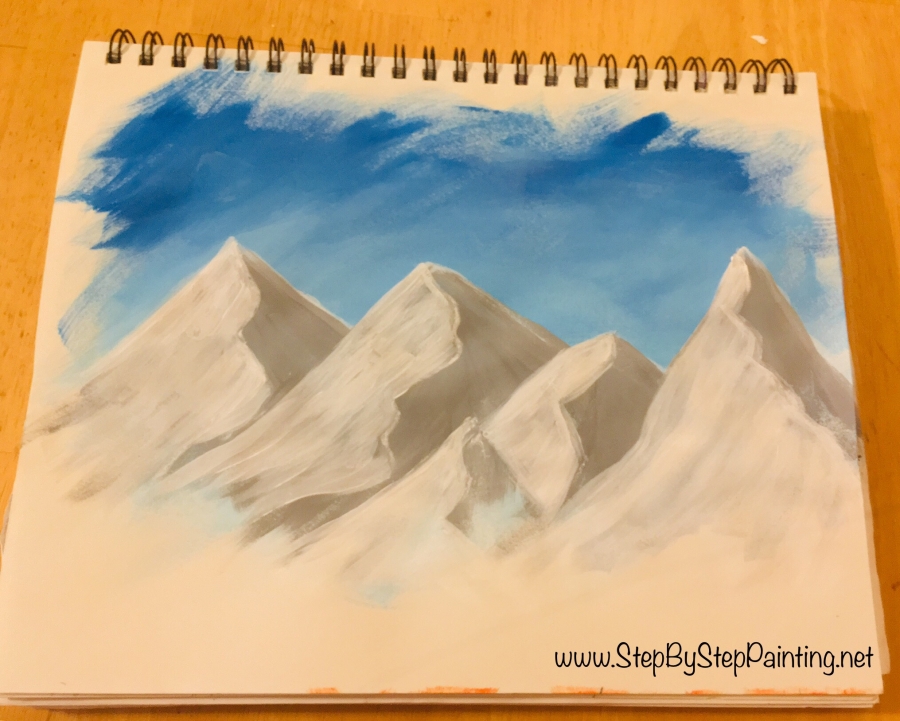
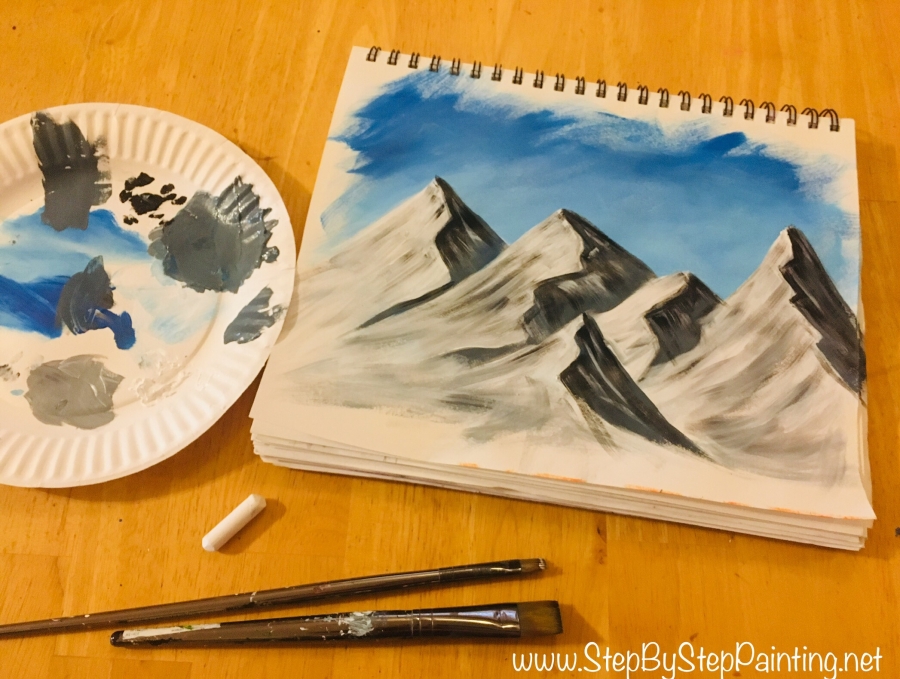
You can see an example of what this would look like here.
Also, you can paint these mountains on any surface – canvas, wood board, paper, etc.
I think this would look very pretty on a piece of wood with a quote in the sky!
For this demonstration, I simply painted it in my sketch book and the focus is on the technique of painting mountains. 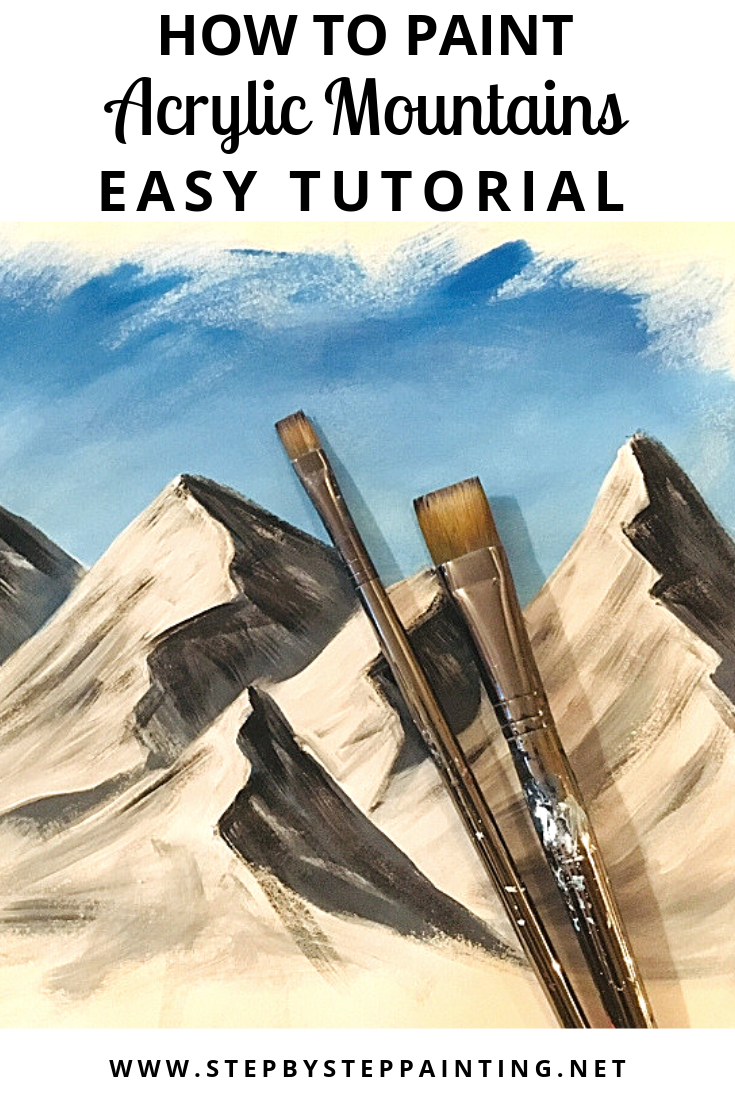
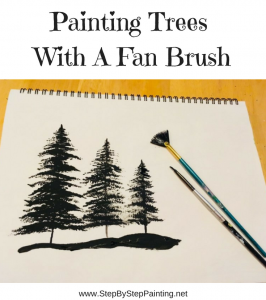
See Also:
Materials Needed For This Mountain Painting:
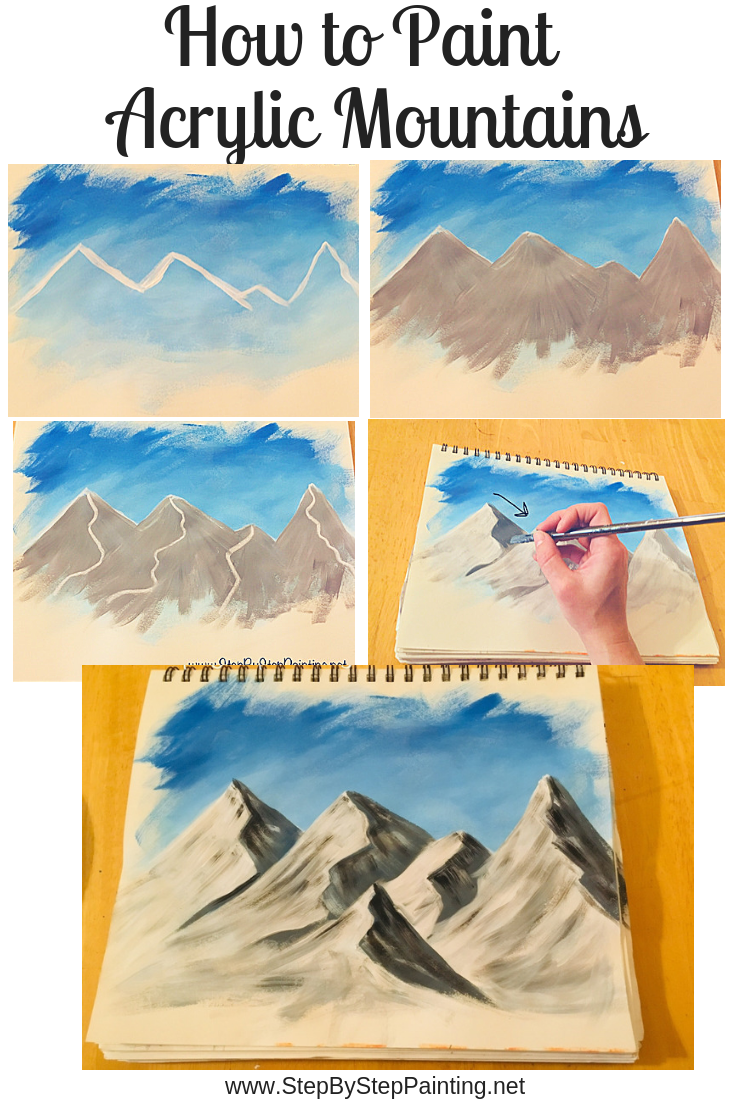
How To Paint Mountains
Learn this technique for painting mountains with acrylics on canvas.
Materials
- Acrylic Paint
- Brushes
- Surface such as a canvas
- White Chalk
Brushes
- 3/4 Flat
- 4 Bright Brush
Colors
Instructions
- Paint the sky a gradient of cerulean blue that lightens to titanium white.
- Use a 4 bright brush and titanium white to paint the outline of the mountain shape.
- Mix a medium gray on your palette. Then paint the mountain shapes with that gray by stroking downwards.
- Let the gray dry then use a piece of chalk to draw the division line of the mountains.
- Paint the left side of the mountains with titanium white.
- Mix a dark blue gray color on your palette and then paint the right side of the mountains with this color.
- Add some white dry brushing on the right side of the mountains.
- Add some black dry brushing on the left side of the mountains.
- Touch up with this same dry brushing technique on both sides of the mountains.
Directions At A Glance: 

Video For Mountain Painting:
Step By Step Directions For Mountain Painting:
1. Paint a sky
To paint the sky I used the colors cerulean blue and titanium white as well as a 3/4″ flat brush (dipped in water and patted dry).
I like to use cerulean for my skies because that color mixed with the titanium white makes for a nice sky blue. 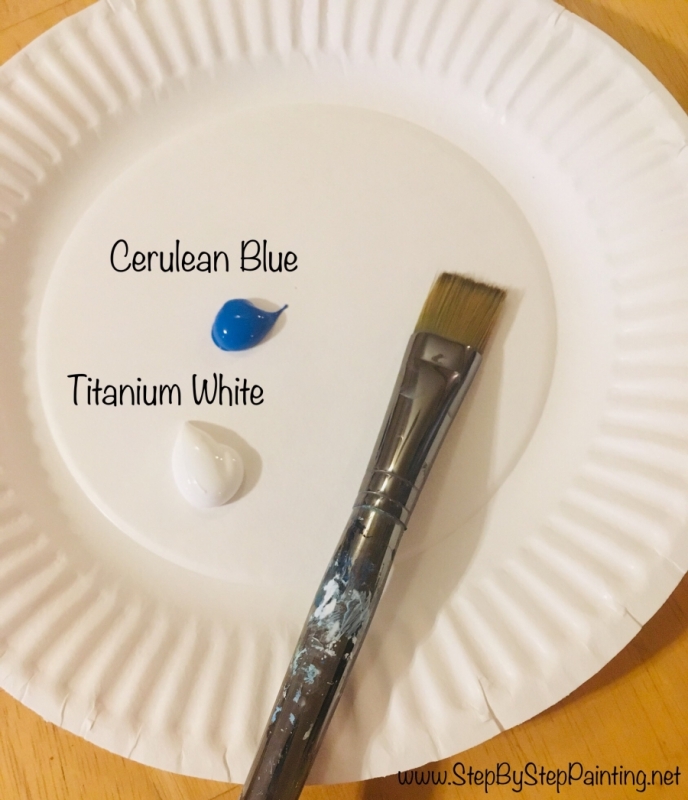
When I paint my skies, I like to do a gradient of the darker, pure blue at the top and gradually lighten the blue with white as I approach the bottom.
As an alternative, you can paint a pale blue instead of doing a gradient.
Basically dip your 3/4″ flat brush in titanium white and also grab cerulean blue on the corner. 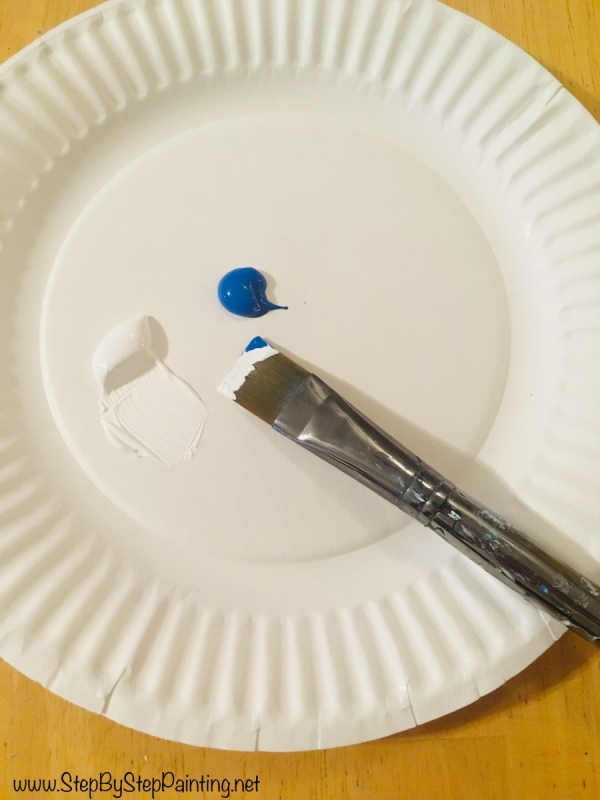
Start painting on the surface.
When I do skies, I like to be expressive and almost messy with my strokes and make them go angular so that the colors blend.
As an alternative, you can just paint left and right long horizontal strokes.
Just make sure you aren’t loading too much paint on the surface.
We need this to be a thin, fast drying layer so that we can get to those mountains! 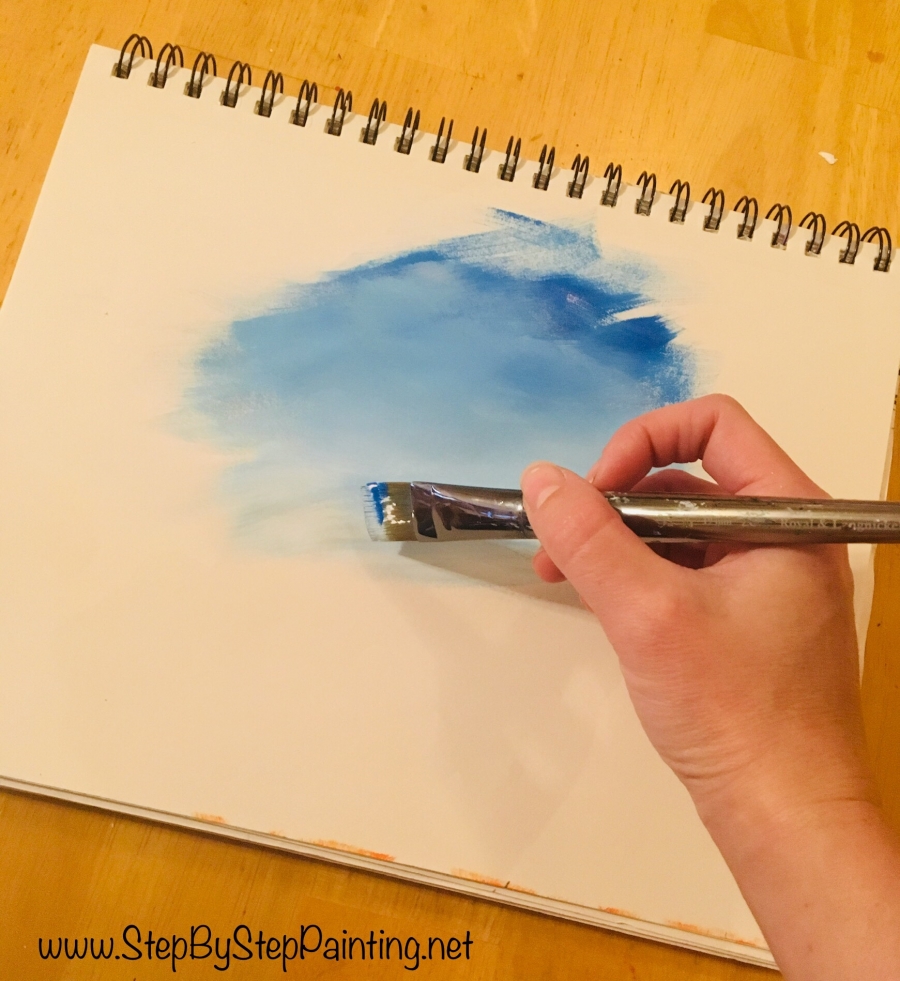
I didn’t really define my edges in this painting demo. I
suppose I could have lay painters tape down to define a boarder, but I kind of liked the look of a “big blob of sky” on the paper! 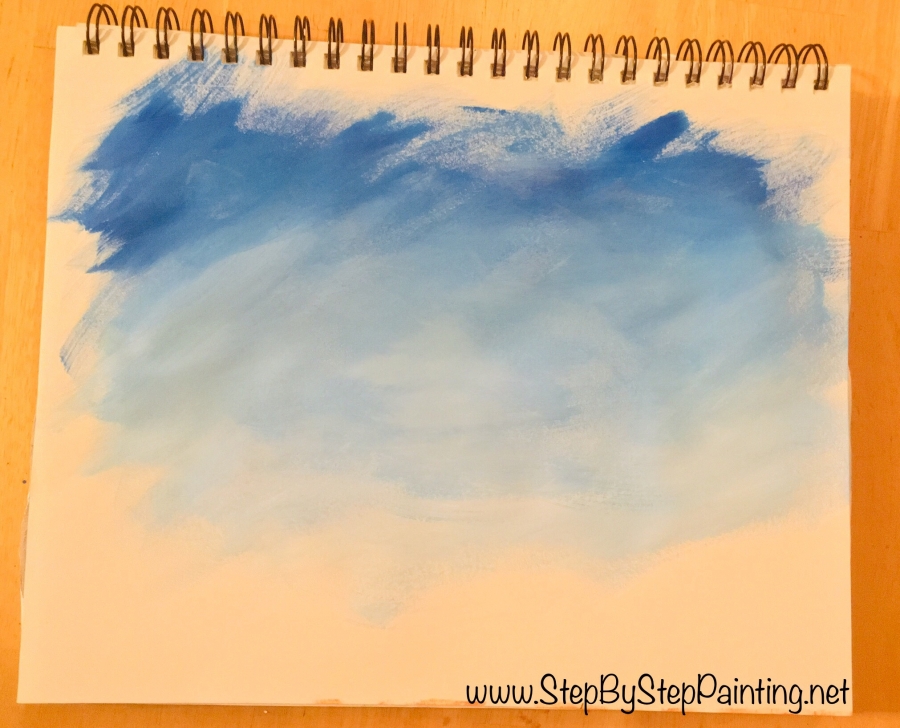
2. Use a #4 Flat & Titanium White to paint the mountain peaks
Now here is where we start the mountain painting!
You can use any size flat brush for this technique. I just happened to grab my #4 bright which is a flat brush that is about 1/4″ wide.
Also, load your palette with some fresh titanium white. 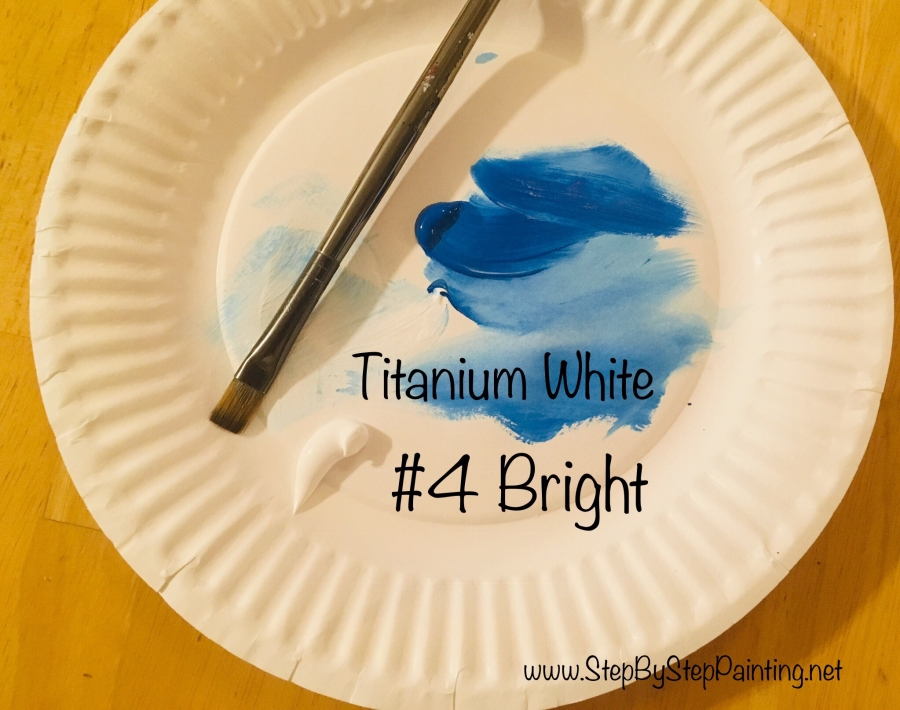
Dip the tip of the brush in the white and start painting the mountain peak lines.
Use that tip on its side (chisel) to paint those straight angular lines. 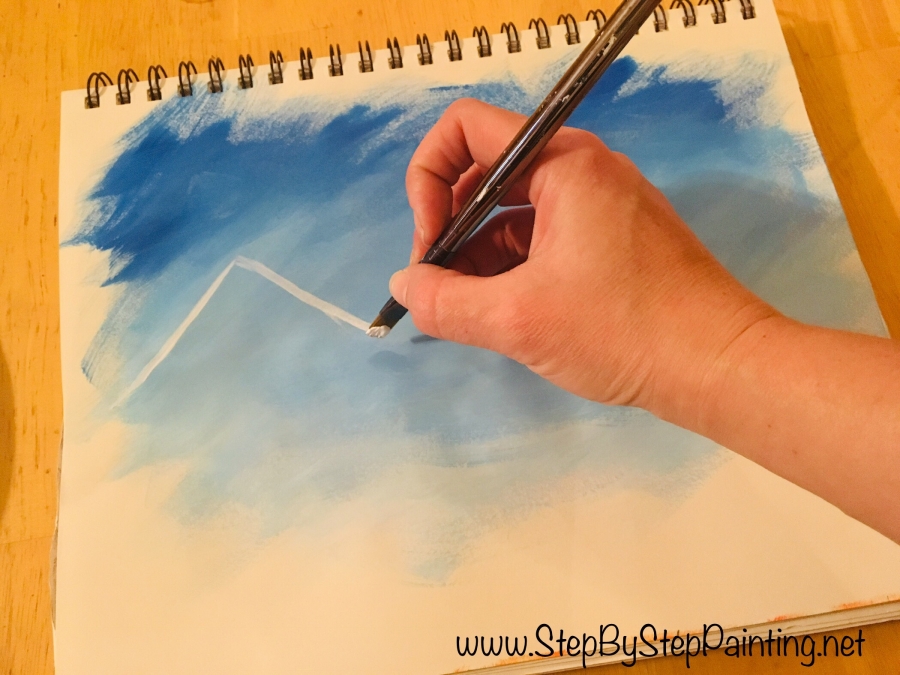
Try to vary the heights and widths of these mountain peaks.
I did my peaks as tall as the center of the piece of paper. My lines were slightly jagged, one of the mountain peaks is thinner, etc. 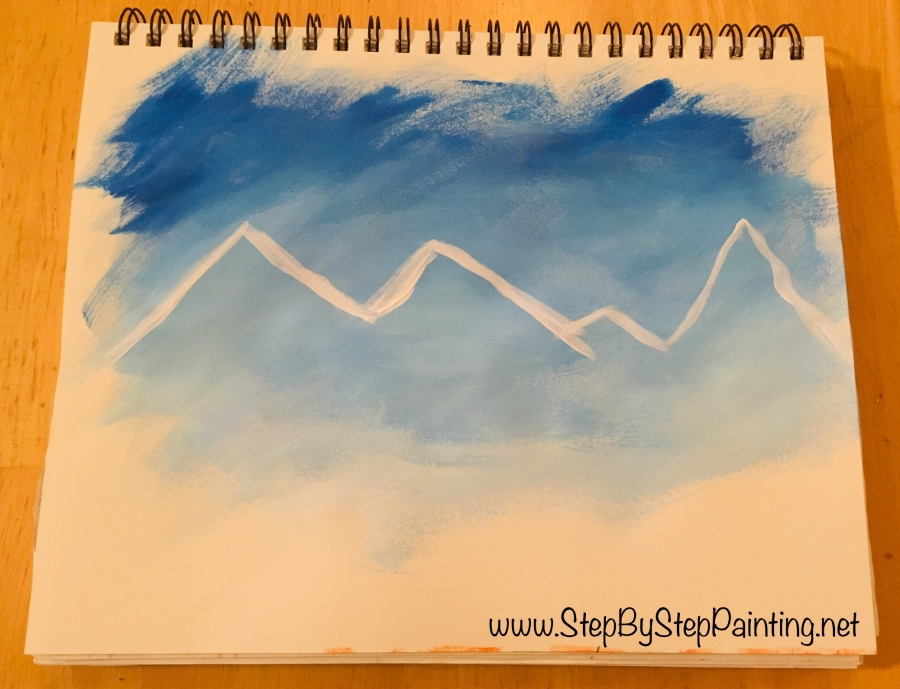
3. Mix a medium gray on your palette and use that color to paint the mountains.
On your palette, grab and mix unequal parts of titanium white and mars black.
I believe I did about 4 parts titanium white and 2 parts mars black. This doesn’t need to be exact, just mix a gray that’s kind of a medium shade of gray.
This will be used as the base color of the mountain.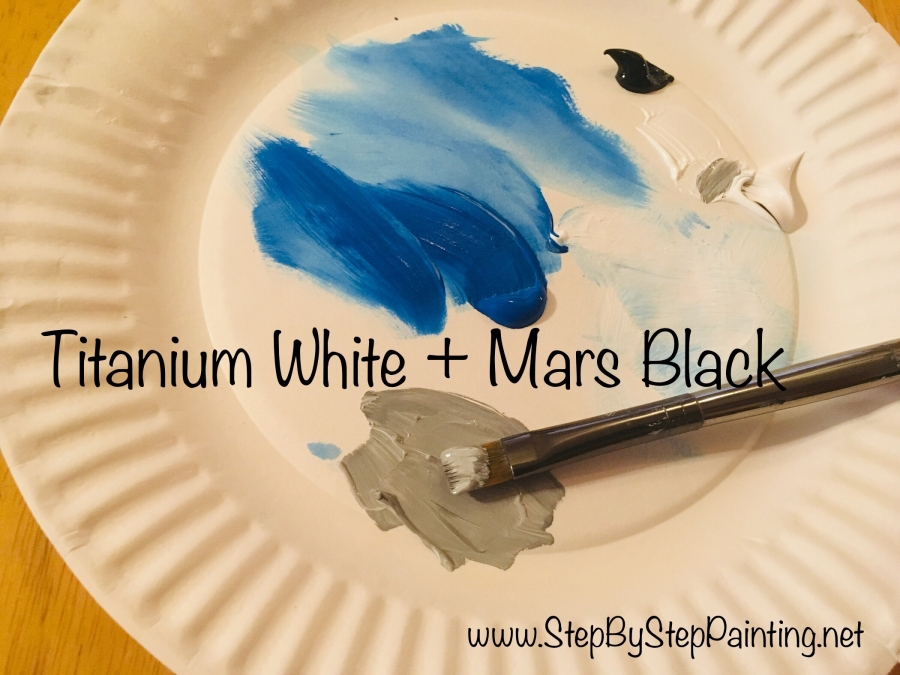
Next paint the mountains with this gray.
At this point, don’t worry about which mountain is overlapping which mountain. Simply paint in downward strokes. Fill in the entire area of the mountains with this medium gray. 
It’s important to note that I did not use excess paint on my brush.
You can see how the bottom parts of the gray mountains sort of dry out.
You can also still see a tiny bit of the sky showing through in some areas, especially on the bottom.
The point is, we want this to be thin as it’s only a “base layer”. We want it to dry fast so we can get to the next step without having to wait a long time! 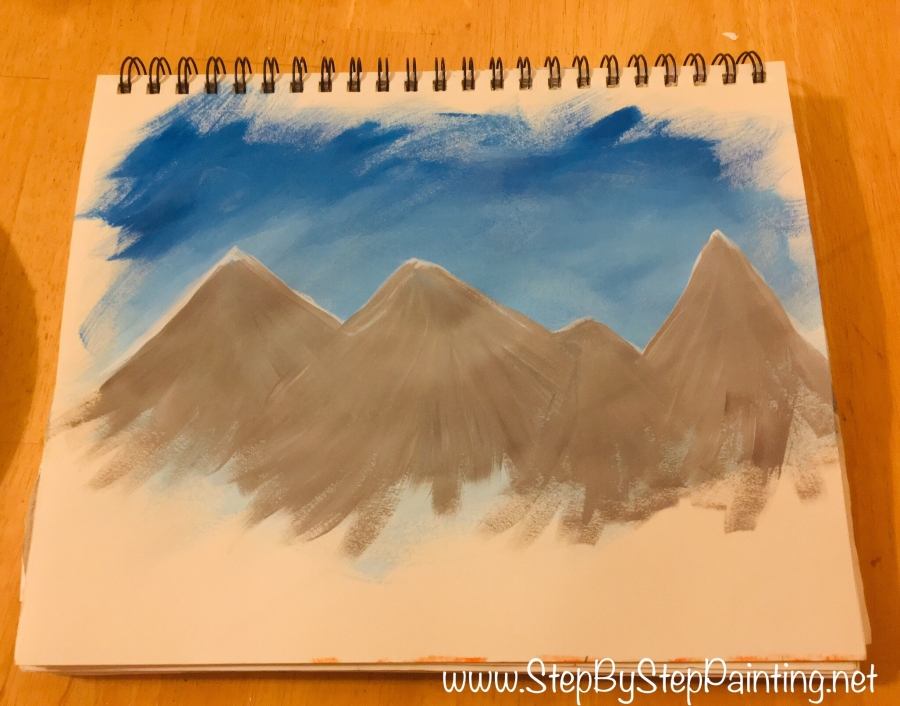
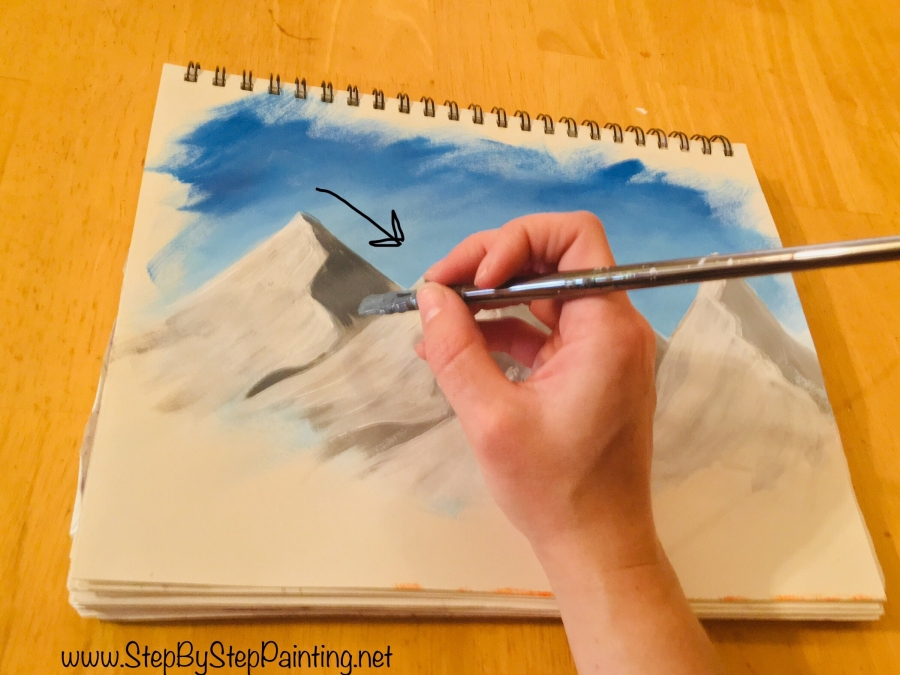
4. Use a piece of chalk to divide all the mountains in half vertically with jagged lines
This next step is fun and it helps to really get an overall picture of how these mountains will begin to look like real mountains!
Basically you need a white piece of chalk.
Make sure the gray paint is dry!
Start at the top tip of each of your mountains and draw a sort of “jagged” line that divides each mountain in half vertically. 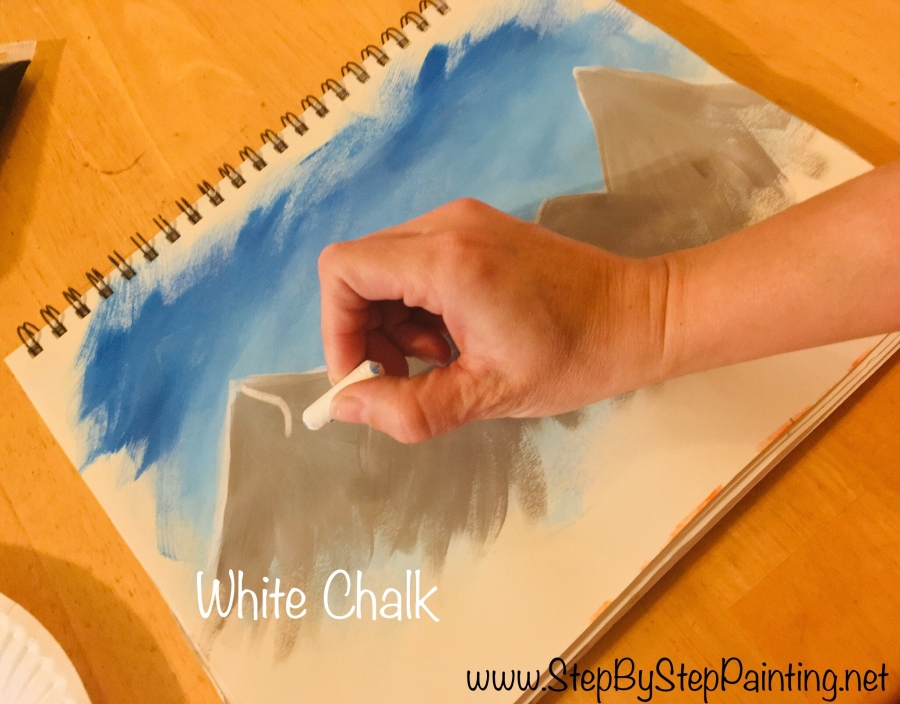
I swayed my jagged vertical line slightly to the left as I approached the bottom of the mountain. 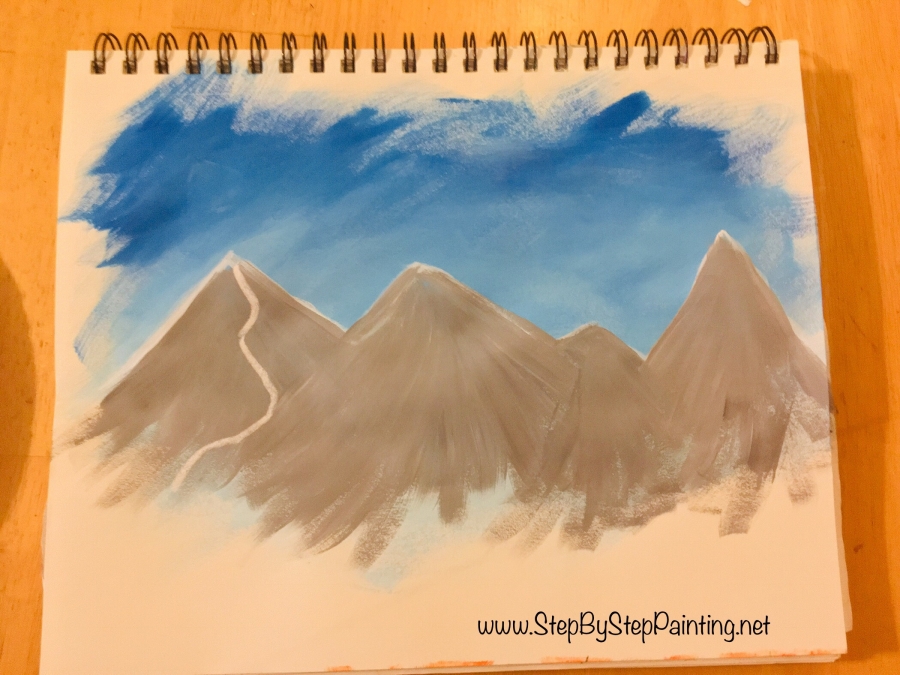
Continue adding the divider line with your chalk to each of the mountain peaks.
Vary these lines so that they do not look all the same on each mountain peak. 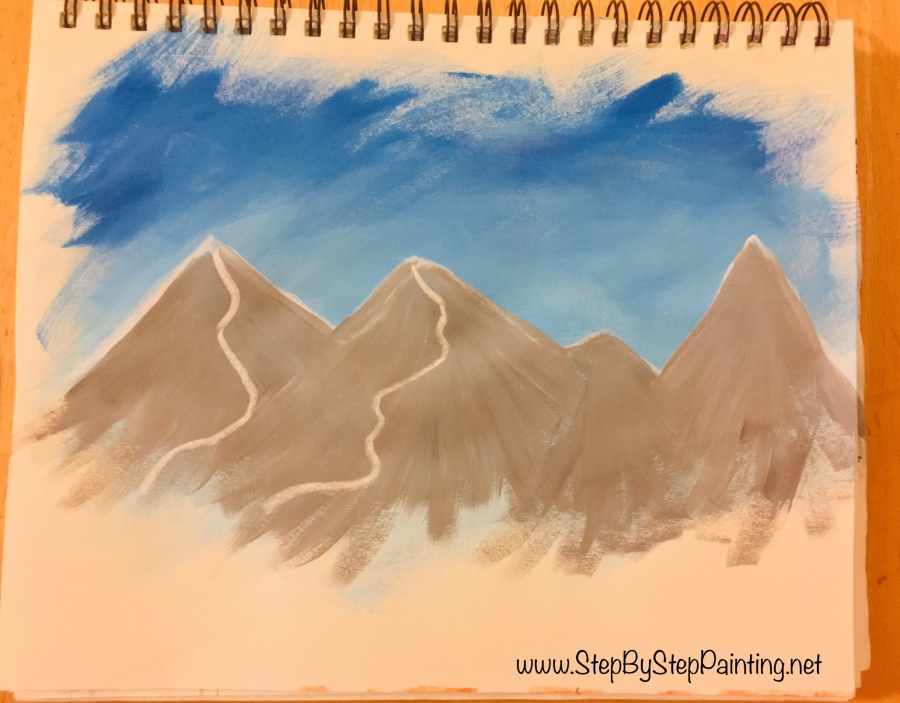
If you want to add a small mountain in front of the larger mountains, simply use the chalk to draw it in. I drew the peak first… 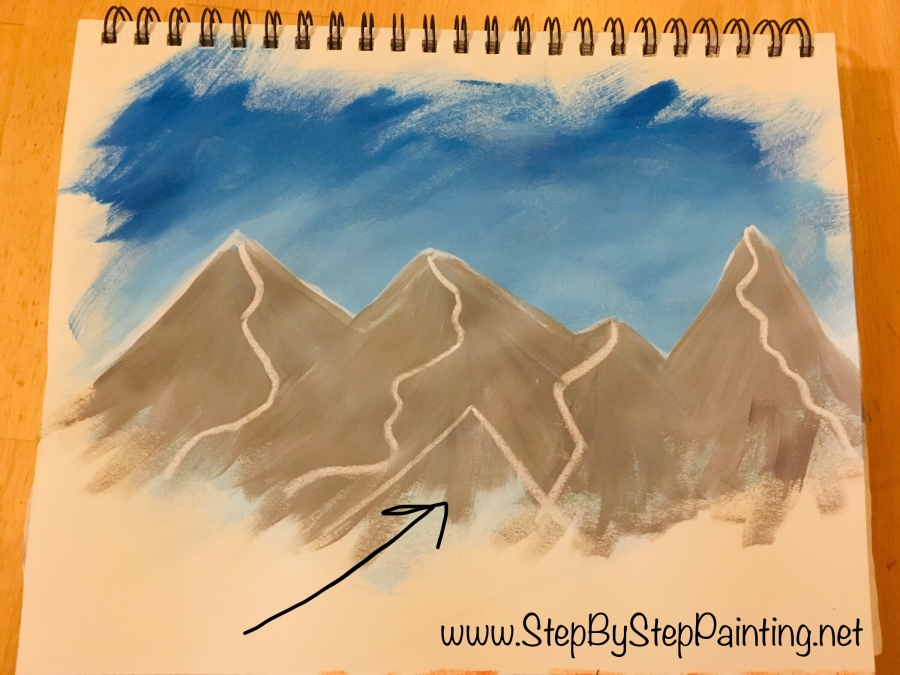
Then I drew the zig-zag divider. 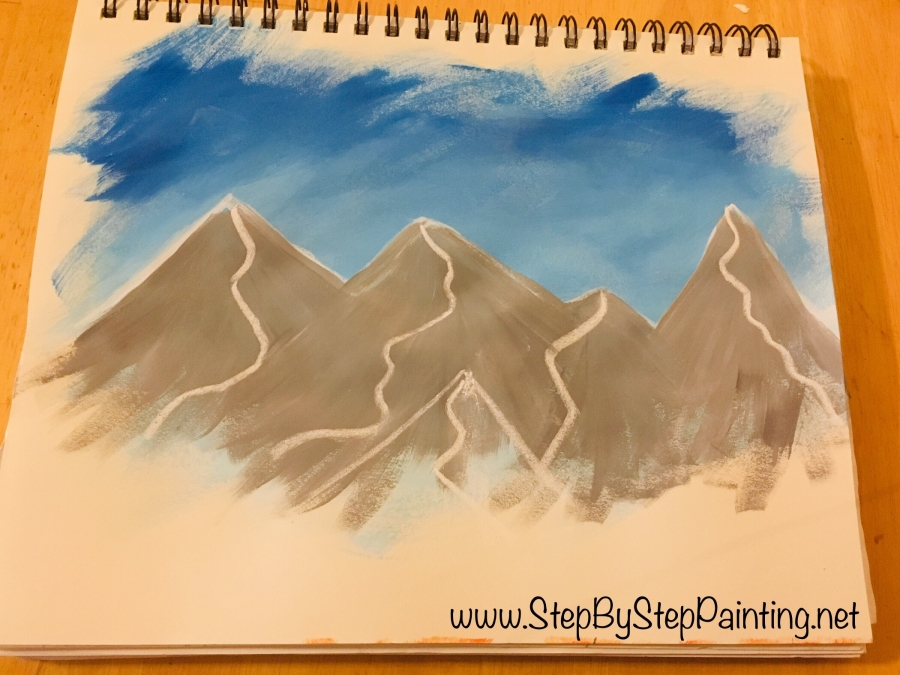
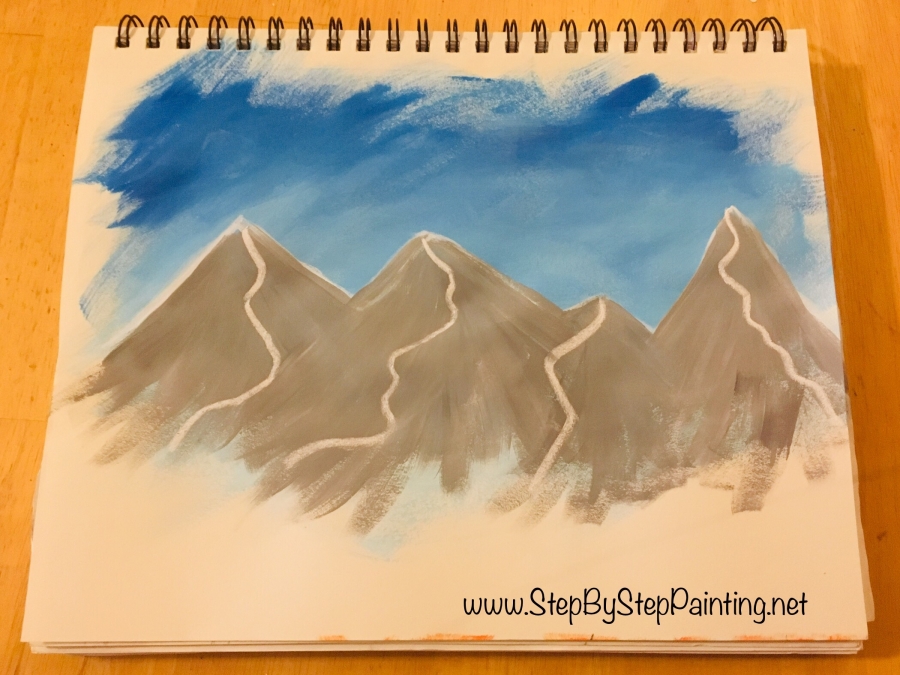
5. Paint the left side of all the “divider lines” with titanium white.
Next use your #4 bright flat brush and the color titanium white.
On the left side of all your divider lines, paint titanium white.
Make sure that the direction of the strokes are going diagonally as shown below. Use the full width of the brush. 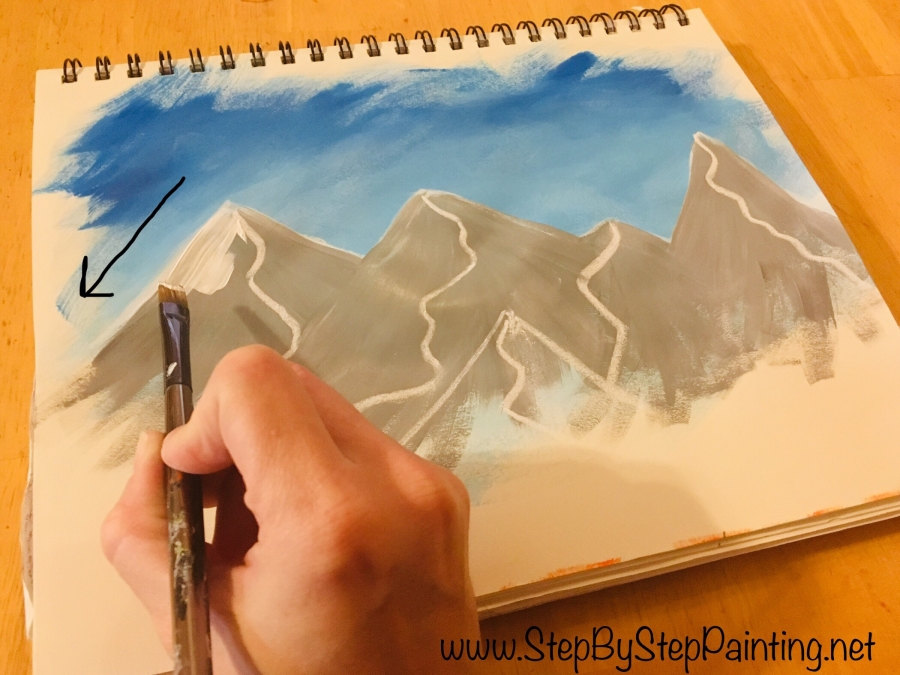
The white does not have to be 100% opaque.
This is a thin layer of white and I can still see a small amount of the base gray color showing through. 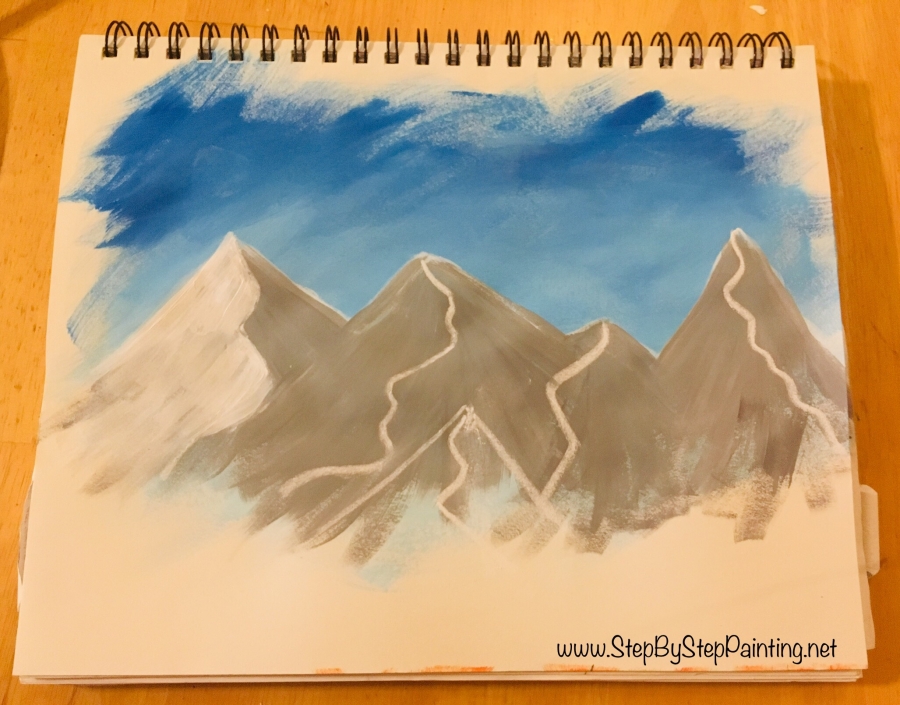
Continue on painting the left side of all your divider lines.
I am using the full width of my brush, dragging the white in the same diagonal direction and allowing a tiny bit of the gray to still show through. 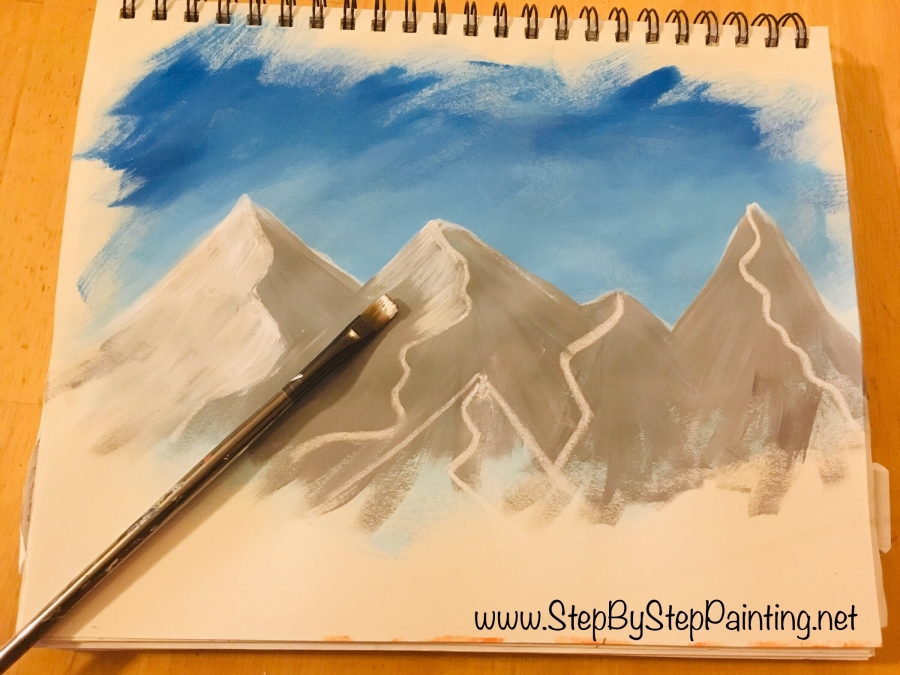
The white goes all the way to the bottom base of the mountain so it may have to overlap the mountain next to it.
This is how you define which mountain is overlapping which mountain. 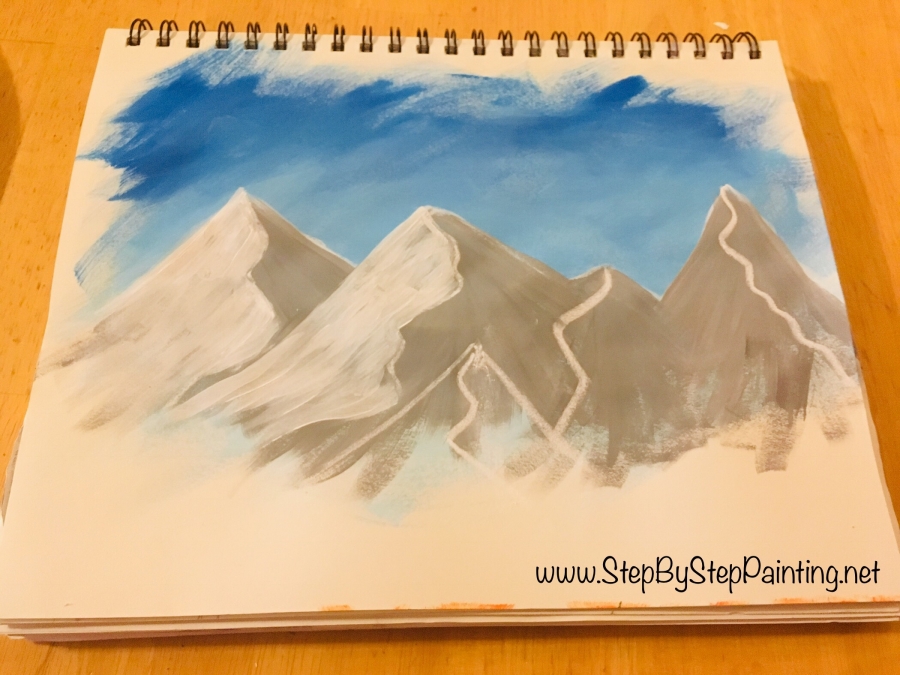
6. Paint the right side of the divider lines with a dark-blue-gray
On my palette, I mixed a dark blue gray. This gray is about 3 parts white, 2 parts mars black and 3 parts cerulean blue.
This does not have to be exact.
The color should be darker than the sky and darker than that base gray.
Also, if you prefer the blue look in the mountains, you can actually add more blue to your color and less black. 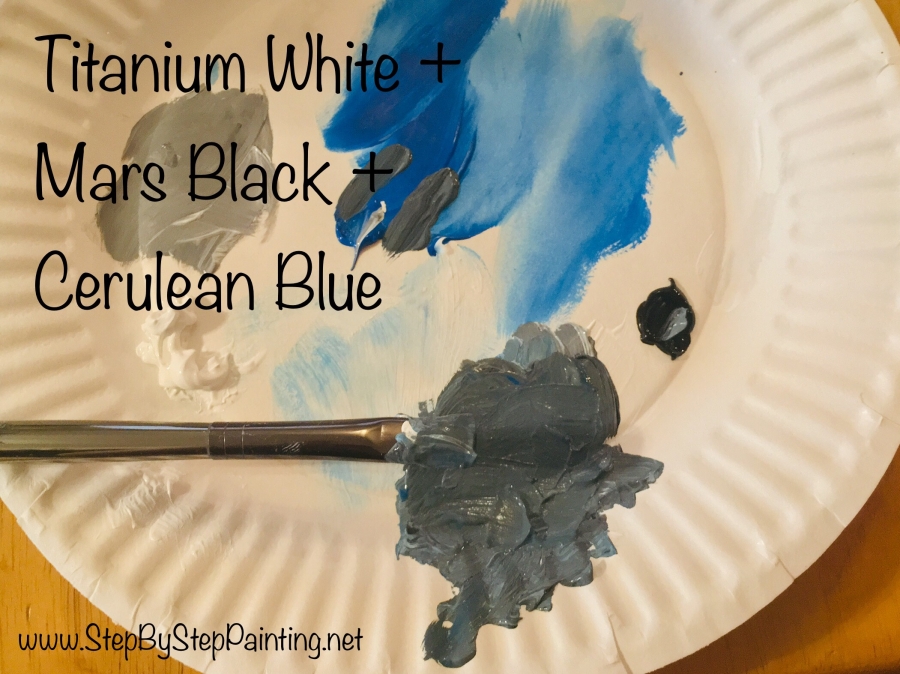
Next use this dark gray to paint the right sides of the mountains.
This time the angle of your strokes should be going the opposite direction of what you did on the left side.
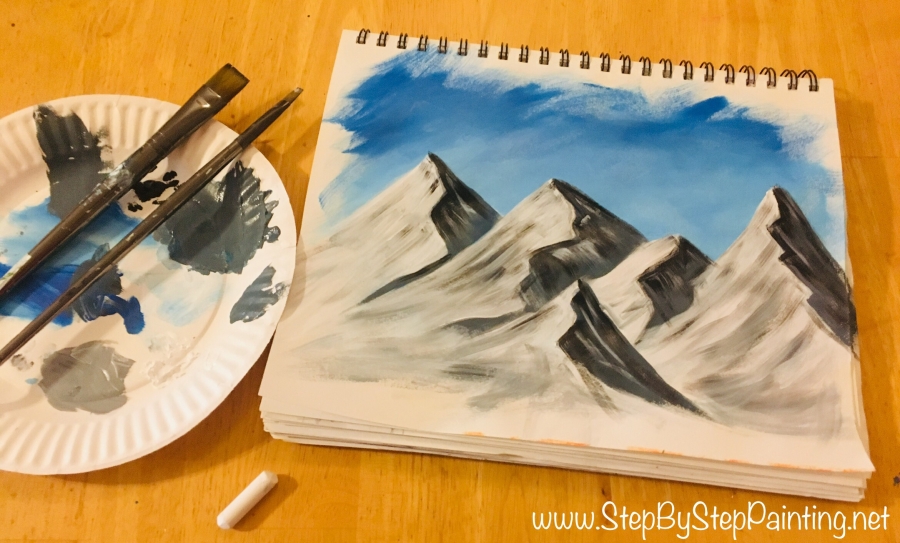
When you’re done with this step, you have yourself some very simple mountains!
In the next steps, I will show you how to add some texture to them to give them more depth and interest. 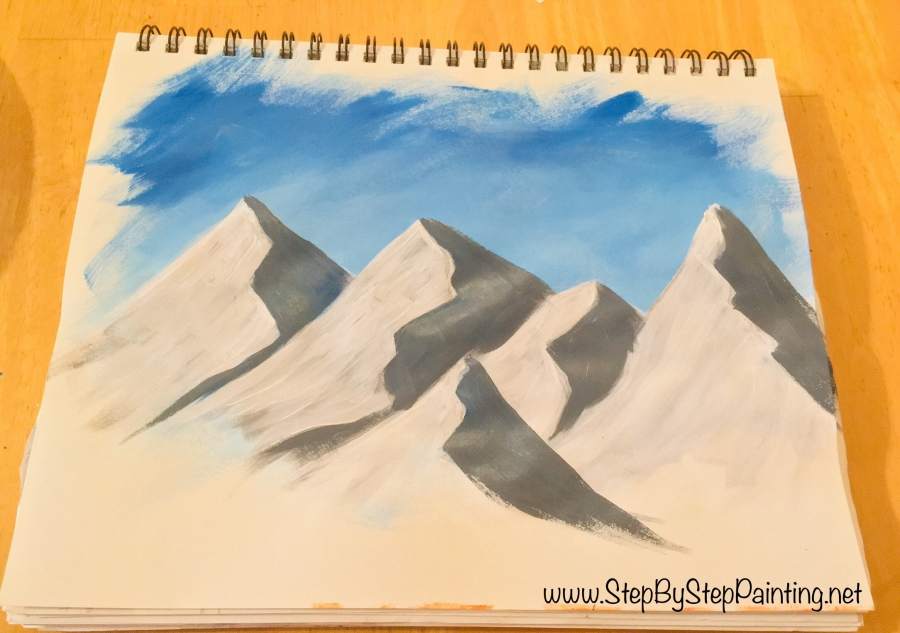
7. Add some white highlight to the right sides of the mountain with titanium white.
Clean off your #4 brush, dry it very well and then dip the tip in titanium white.
Paint short little strokes of white on the dark sides of the mountains. Just a few strokes here and there. 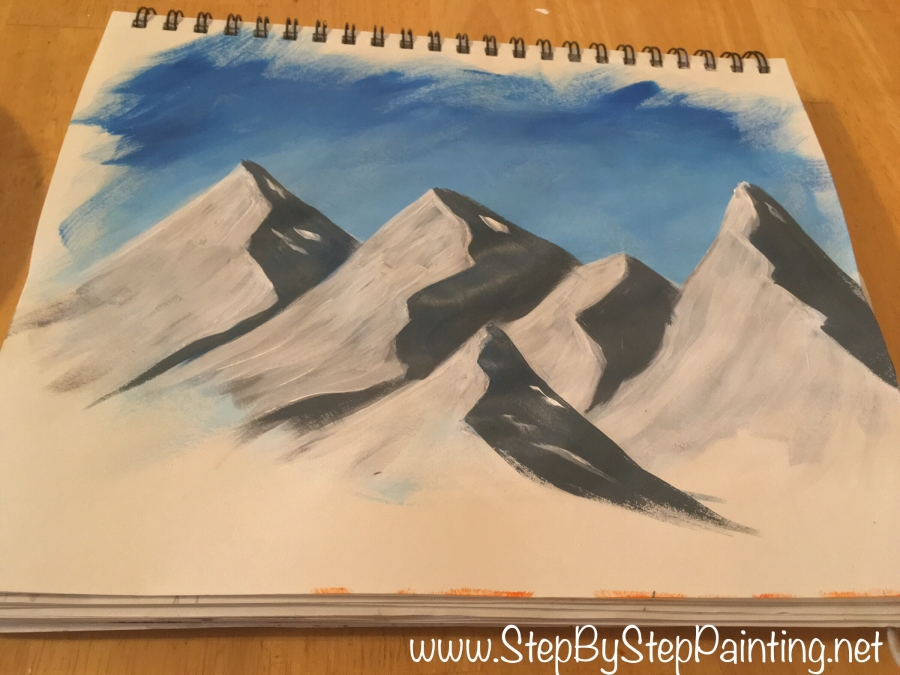
Then blend it in a bit by going over your strokes lightly. The point of this is to create “dry brush” strokes of texture.
The dark sides of the mountains should remain dark in terms of contrast.
However, the white adds just a bit of texture highlight and “interest” to this area! 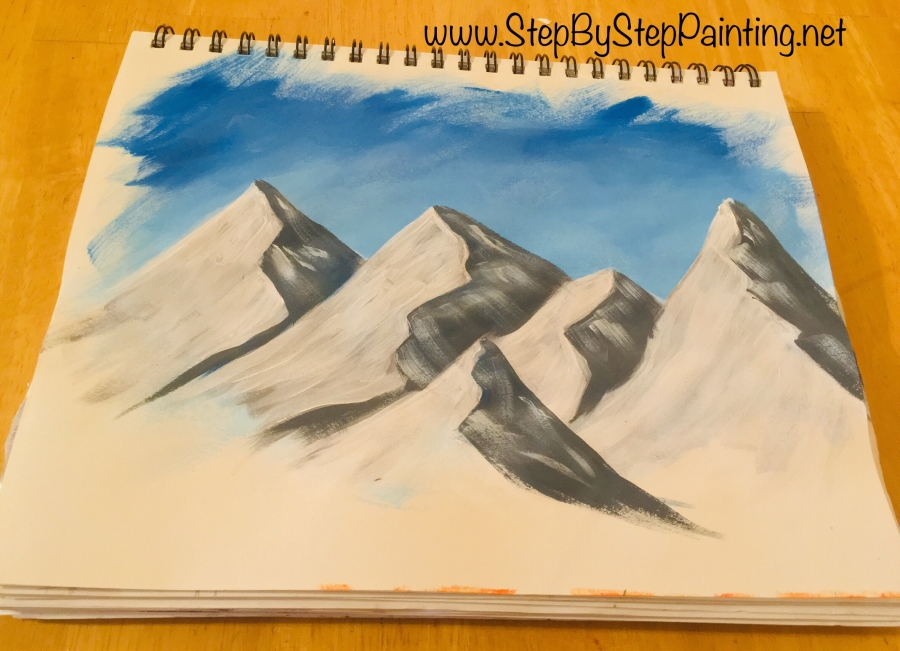
8. Add some shadows to the left sides of the mountains with mars black.
Next I did the exact opposite to the left side. I did some “dry brush” texture of black over the white.
Basically, wipe your brush (you don’t have to rinse the white off, just wipe it). Then dip the tip in mars black. 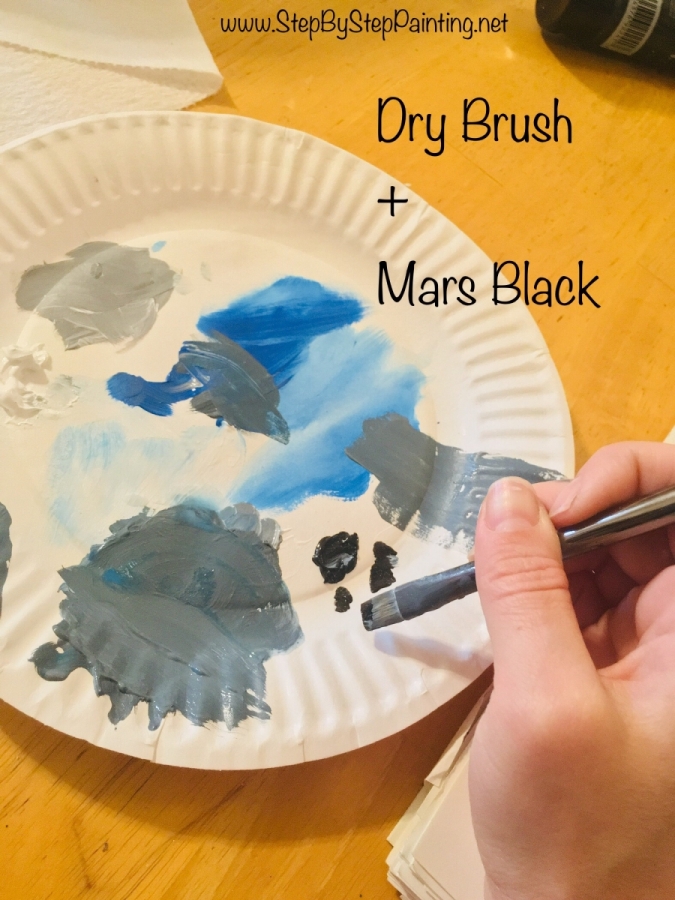
Paint small strokes of dry brush black texture marks in some of the areas only on the left white sides of the mountains. 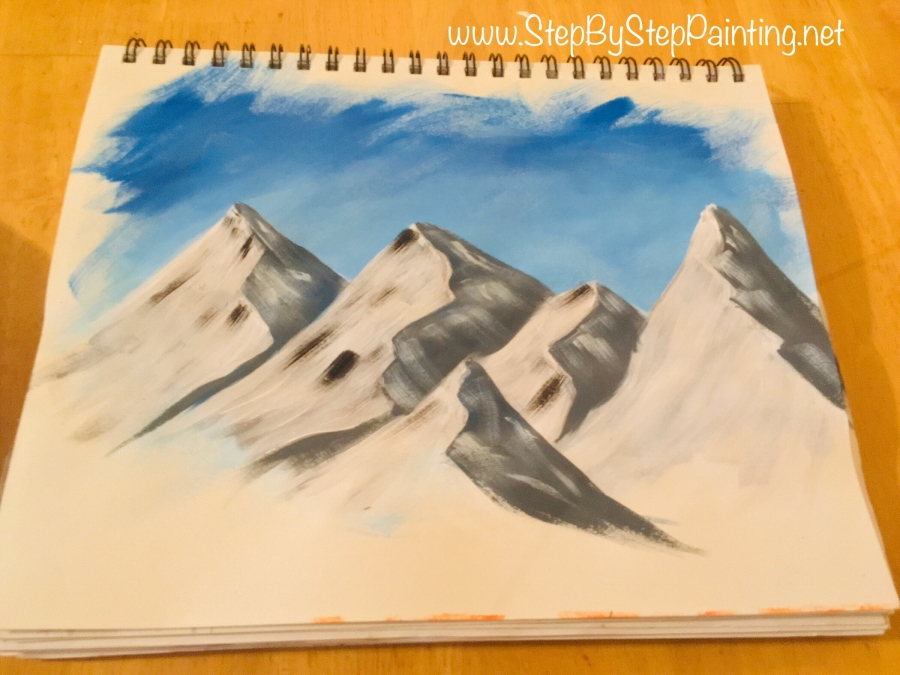
Dip your brush in more titanium white to blend that black texture in slightly so that black doesn’t take over.
Be very careful and use a light hand so this black doesn’t get too dark in this area.
Drag the strokes down in an angle. The point is to not mix it all to the same color, it needs to be an “unmixed” gray. 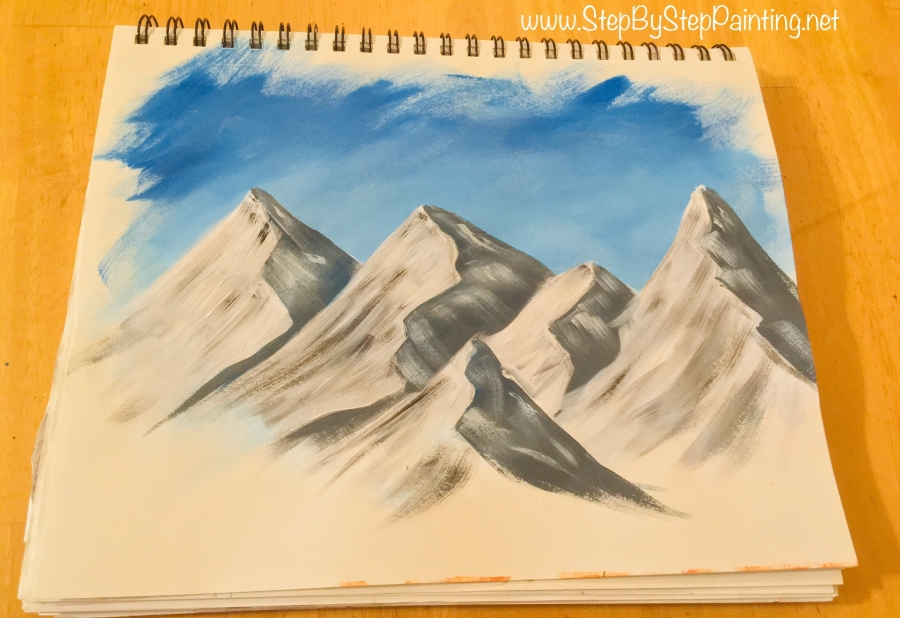
9. Add a bit more contrast close to the divider lines
To add a bit more contrast to these mountains, I cleaned my brush and added just mars black.
I painted some angular black lines just on the parts of the mountains close to the divider line.
It helps to use the side of the brush to get a nice sharp angle in these areas. 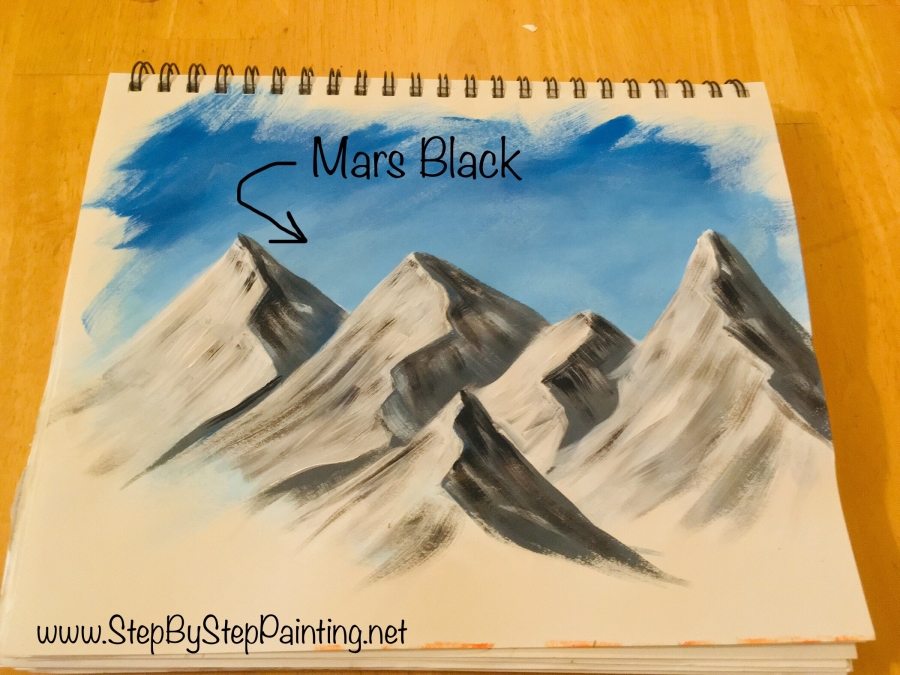
Just a bit of pure black here and there on the right side close to the divider line – not too much! 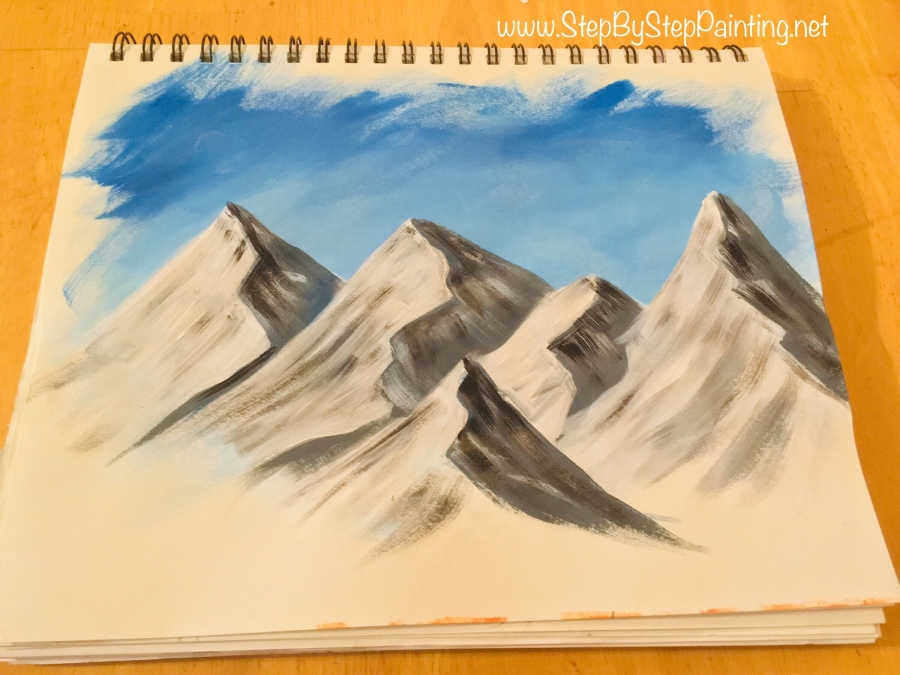
10. Fill in the bottom area with some more white (if needed)
Since I was only painting mountains and nothing underneath the mountains, I filled in some of the area with more mountain.
I dragged the titanium white down further and kind of expressively filled in the bottom area. 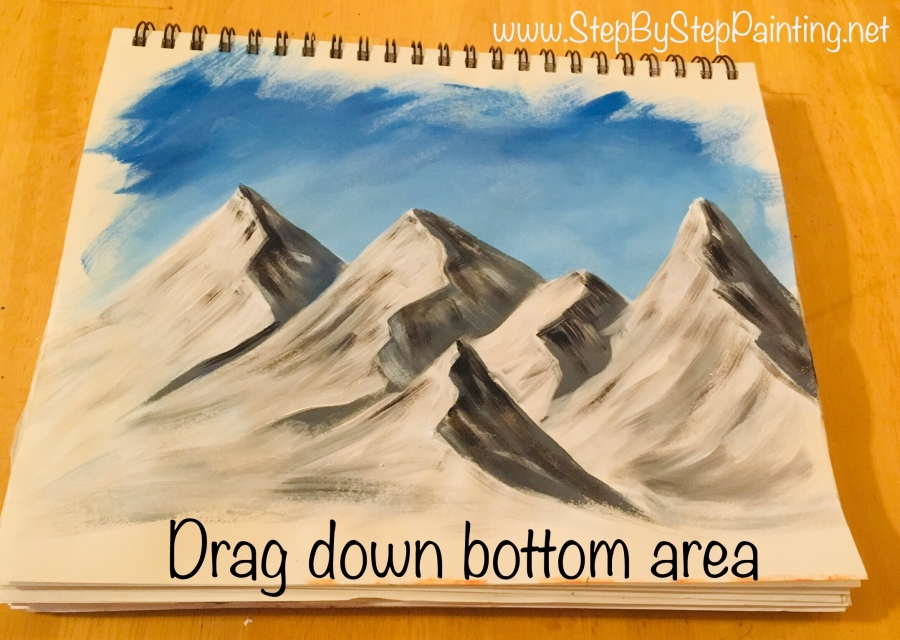
And that’s it!
If You were doing this in a painting, you may have to define your horizon line with a ruler at this point.
You can paint a tree line on the bottom of the mountains or more smaller mountains. 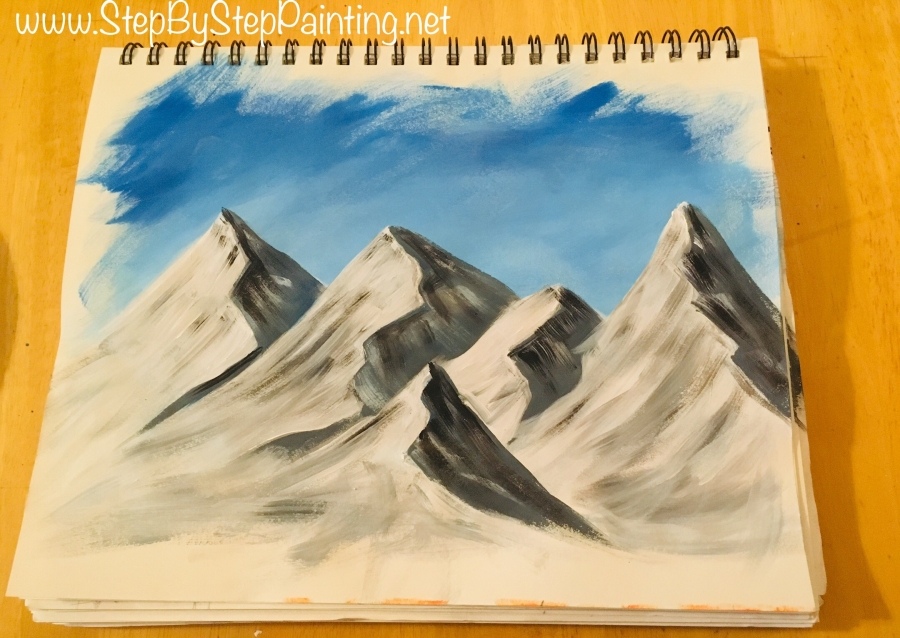
See Also:
Did you paint mountains using this tutorial? Share your art here!


Funny I am just starting my website and was looking up some help on a blog I’m doing. Yes! How to start it! Haha. So I’m fixing to finally get my site started and all a sudden I find myself wanting to paint when I saw your mountains! Love them! I’m working on them now!
How fun Kim! What kind of blog are you starting up?
Loved your video. You did an excellent job. Thank you so very much for posting it. I’m just starting out and can use the help. Thanks again.
I would like to try artist quality paint. What brand would you recommend? I am on a fixed budget so l don’t have a lot to spend. So could you tell me of one that is a good paint at a good price. Thank you David
I think Liquitex Professional Artist paint is at a decent price point. You can always just get the basic most used colors and slowly add to your collection.
Thank you for this tutorial! I was looking for some inspiration as i’d like to paint some white outline of the mountains on my denim jacket!
Wow wonderful paint
so excited to start painting from the look its wow