Would you like to save this?
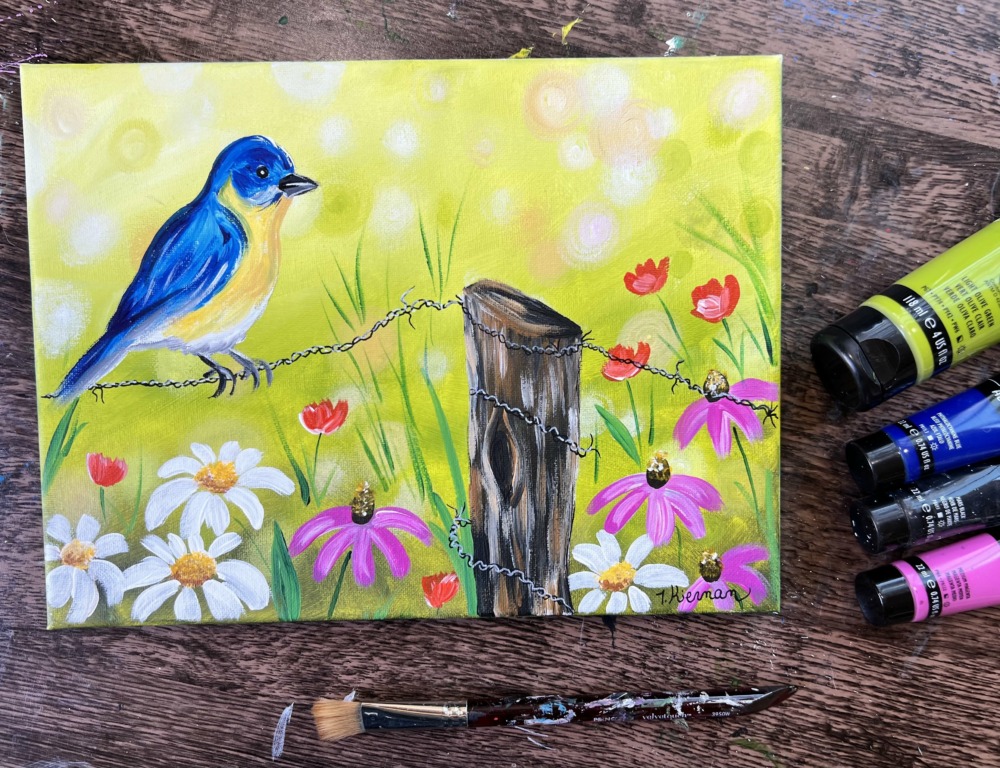
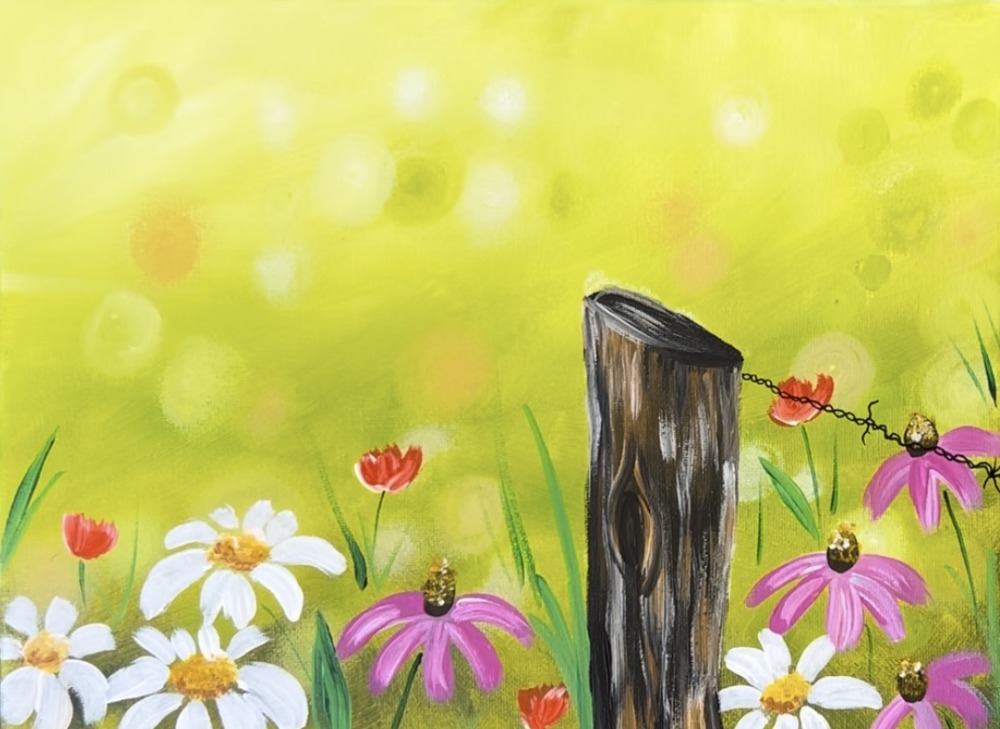
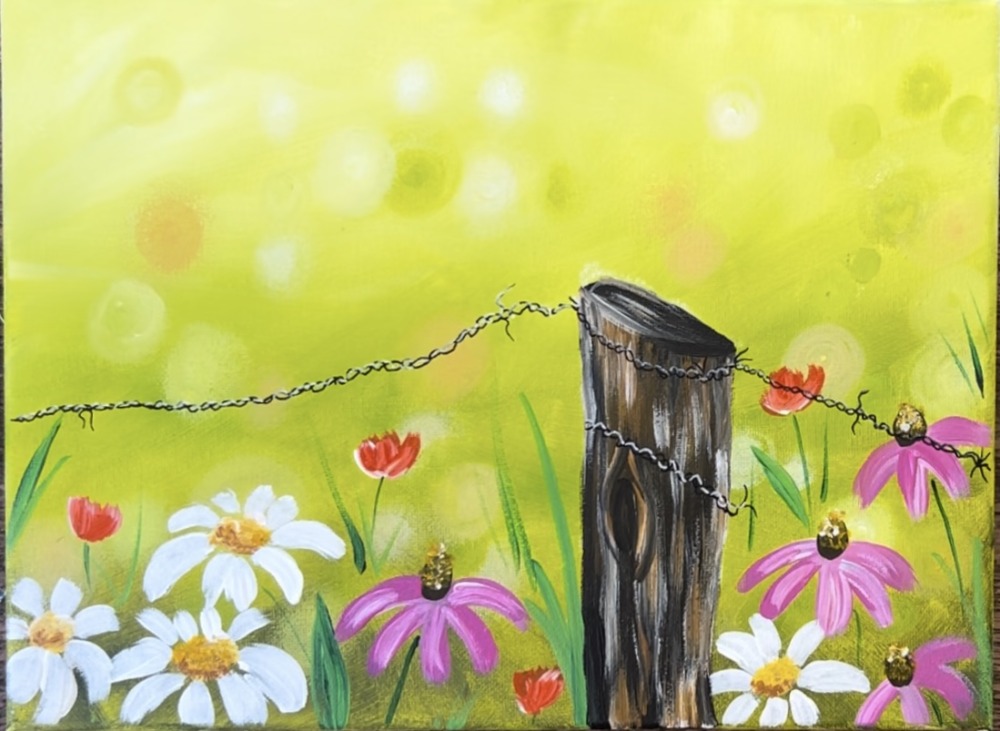
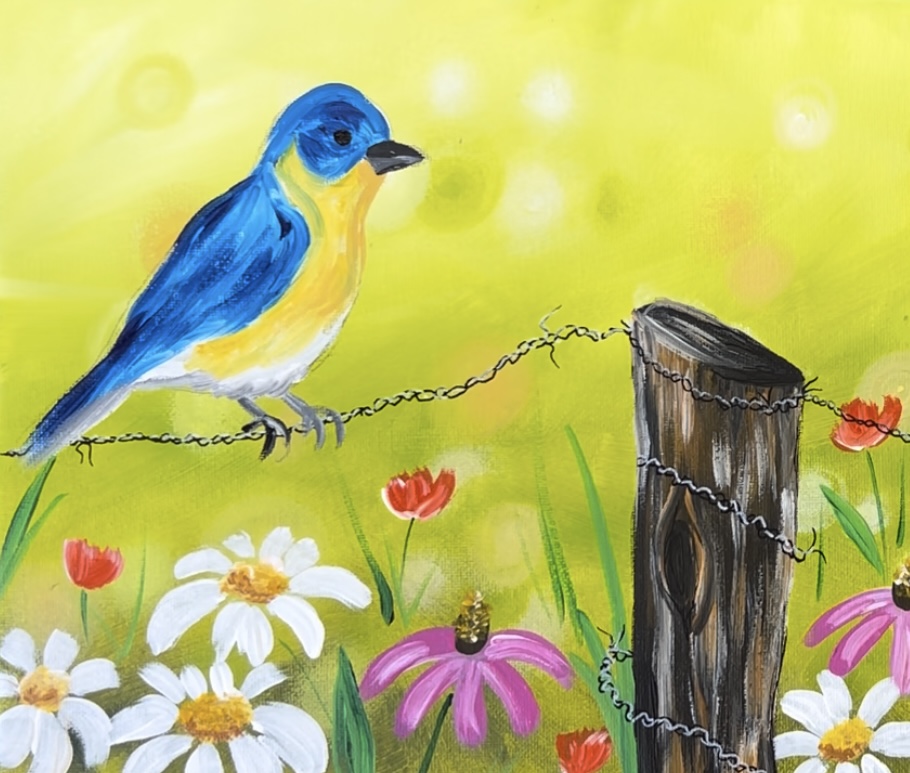
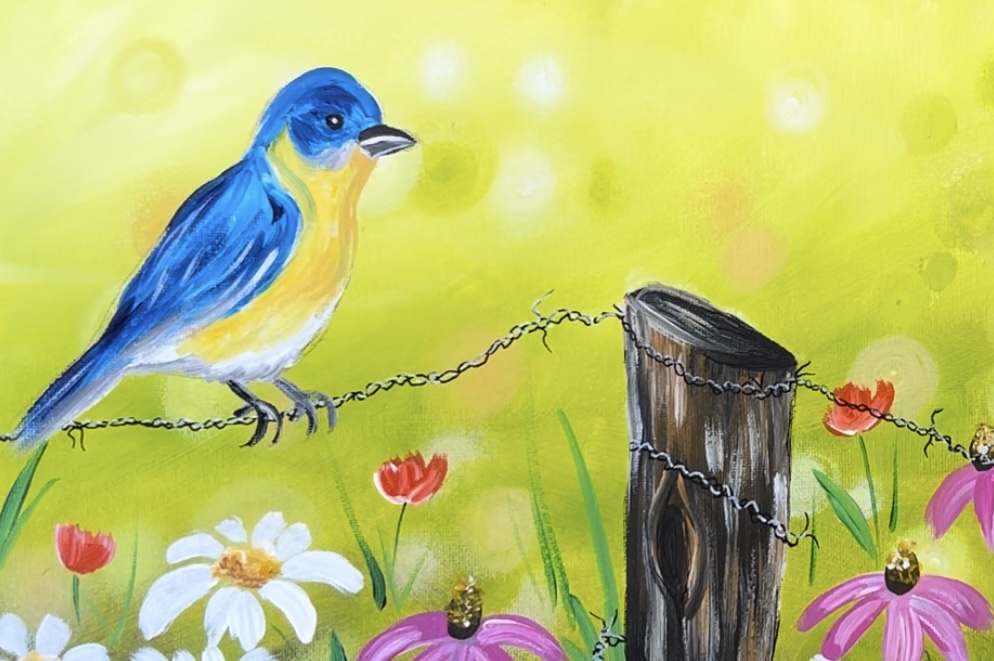
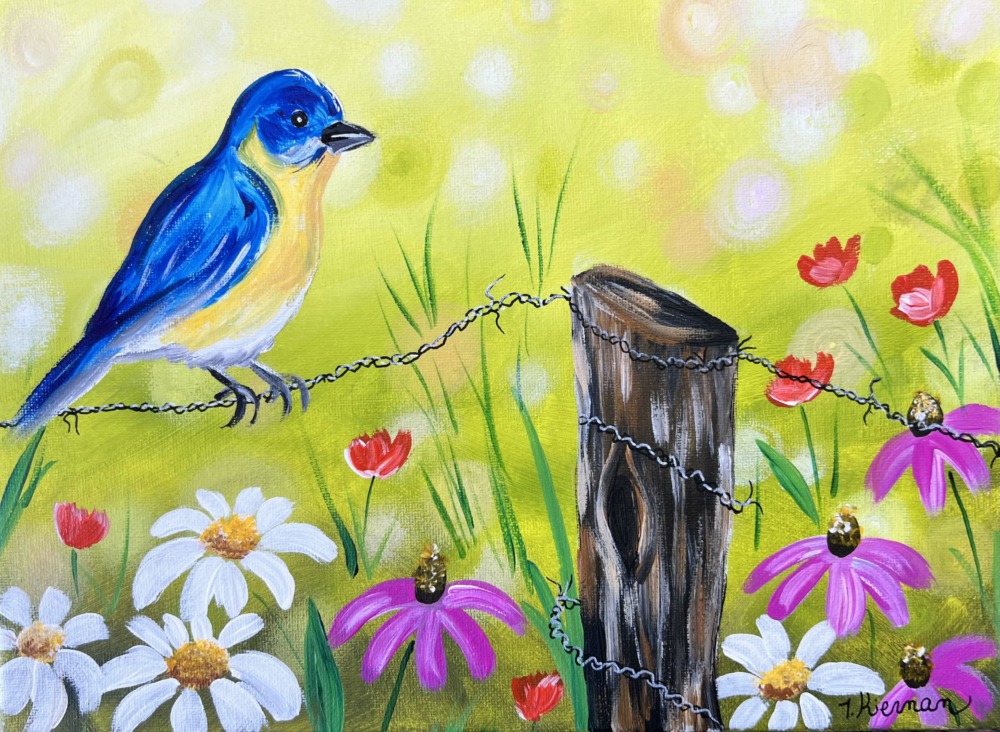
In this tutorial, we will be painting a bluebird on a wired rustic fence with wildflowers. The background is a bright spring green with bokeh blurry lights.
I am demonstrating this on a 9 x 12 canvas, however, you can do this on any size!

This painting is an intermediate level painting because of some of the advanced painting techniques used. But it can be simplified!
Some ways you can simplify this design is: not doing the bird or making the bird a little more cartoonish and not realistic. Another option you can do is add bees, butterflies or other flying critters in this painting instead of a bird.
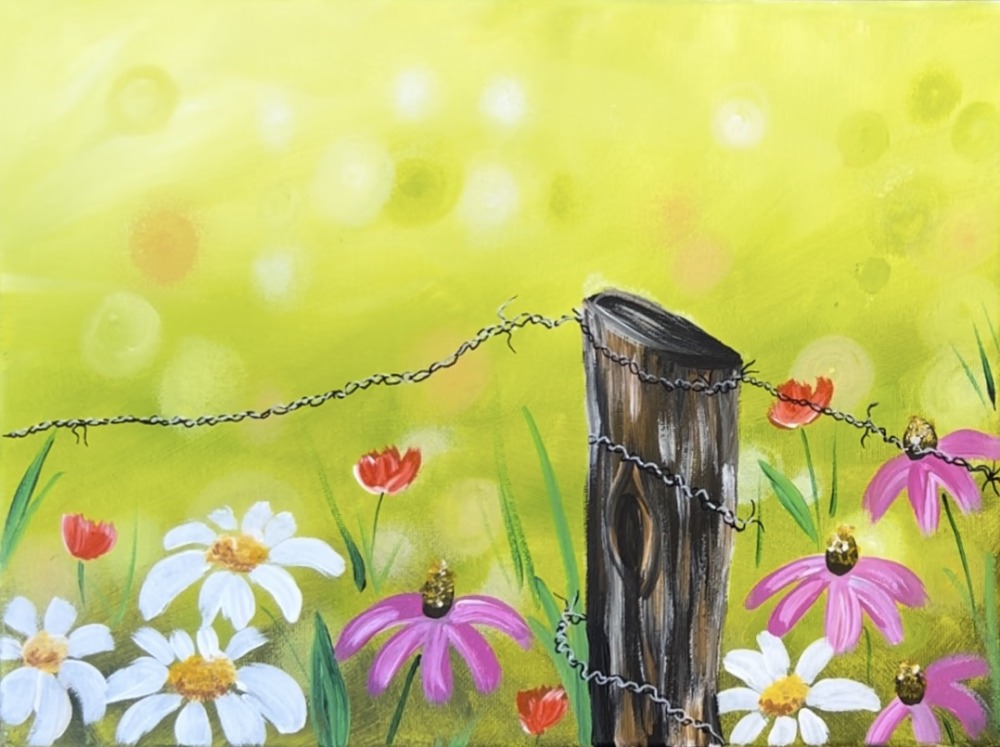
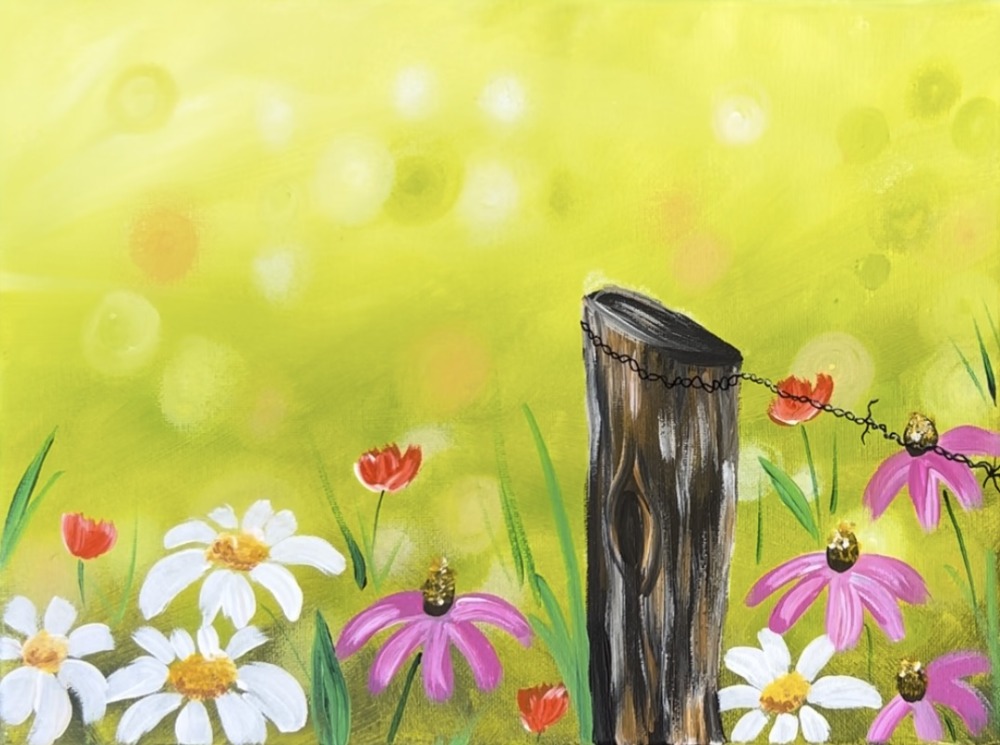
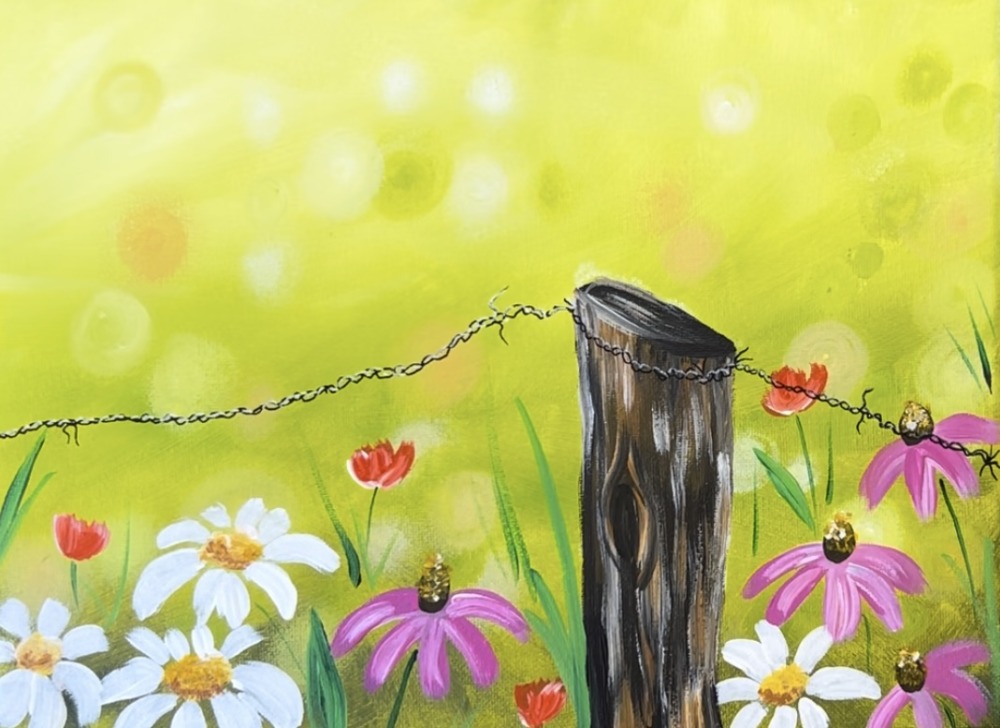
The design also works nicely with just the wire and flowers 🙂
Enjoy and happy painting!
Materials
Rustic Bluebird Wildflowers
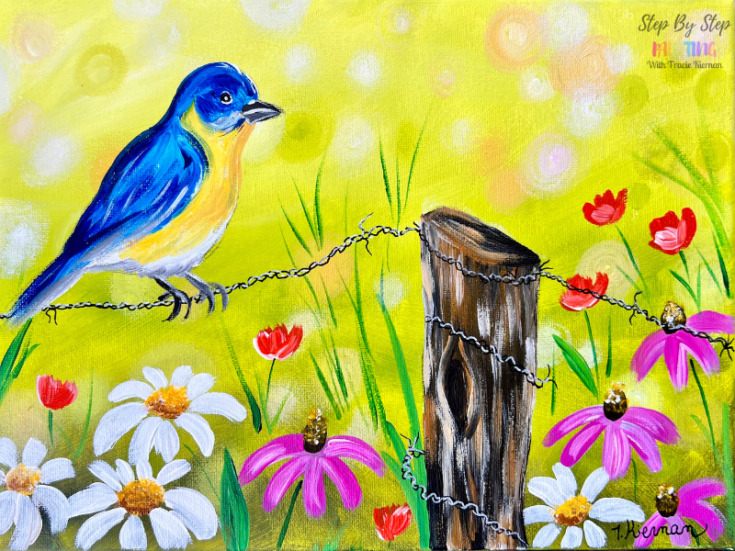
Learn how to paint a colorful wildflower background with bokeh and a rustic fence with a blue bird perched on wire.
Materials
- 9 x 12 Canvas (or any size you want to work on)
- Acrylic Paint
- Brushes
- White Chalk (used for drawing post)
- Pencil (used for drawing bird)
- Black POSCA Paint Pen
- White POSCA Paint Pen
Colors
- Titanium White
- Mars Black
- Raw Sienna
- Cadmium Red Light Hue
- Cadmium Yellow Medium Hue
- Naples Yellow
- Light Olive Green
- Phthalo Blue
- Medium Magenta
- Deep Green Permanent
Brushes
Color Palette
Note: if you want to simplify this color palette you can take out: “naples yellow” and “deep green permanent”.

Directions At A Glance
Video
Step By Step Instructions
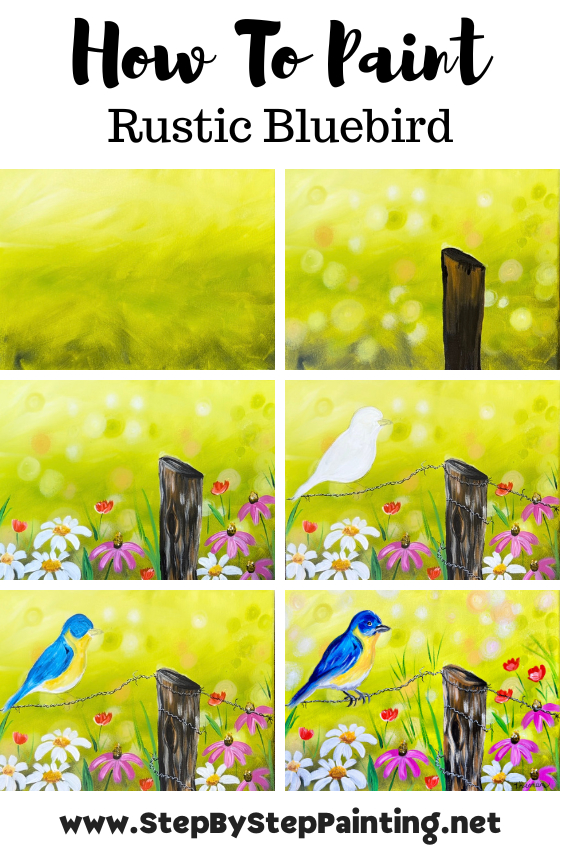
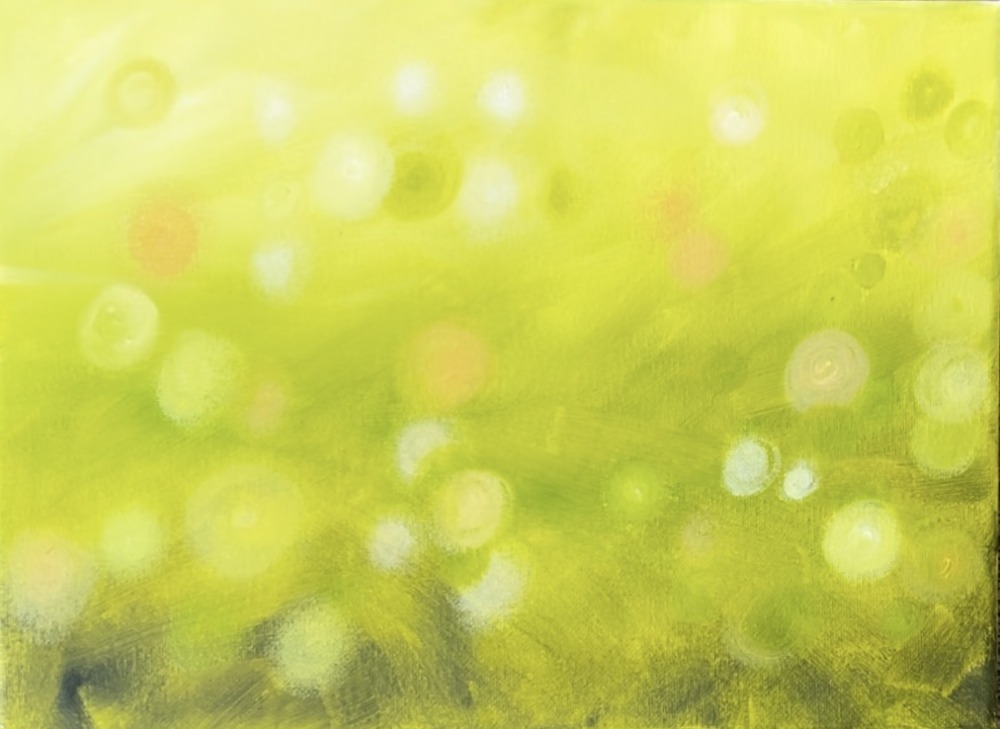
1. Paint Background
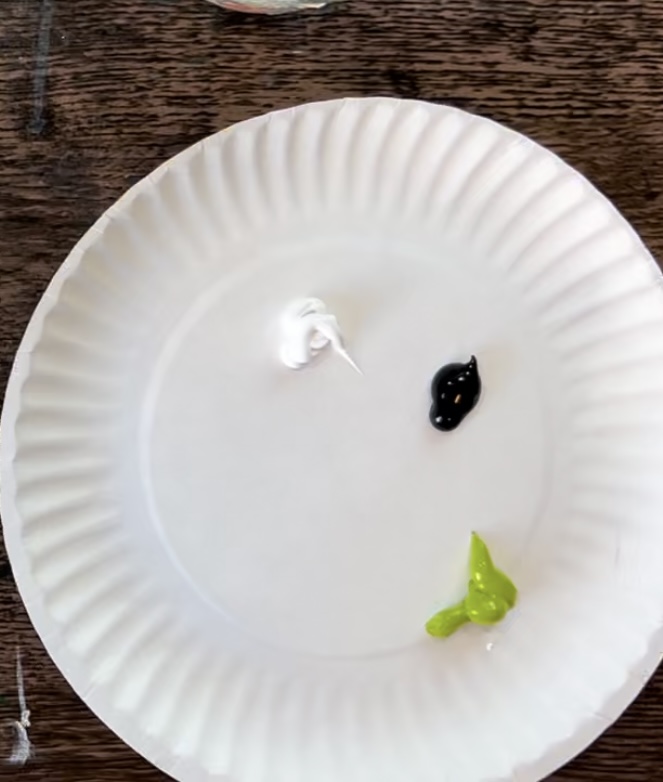
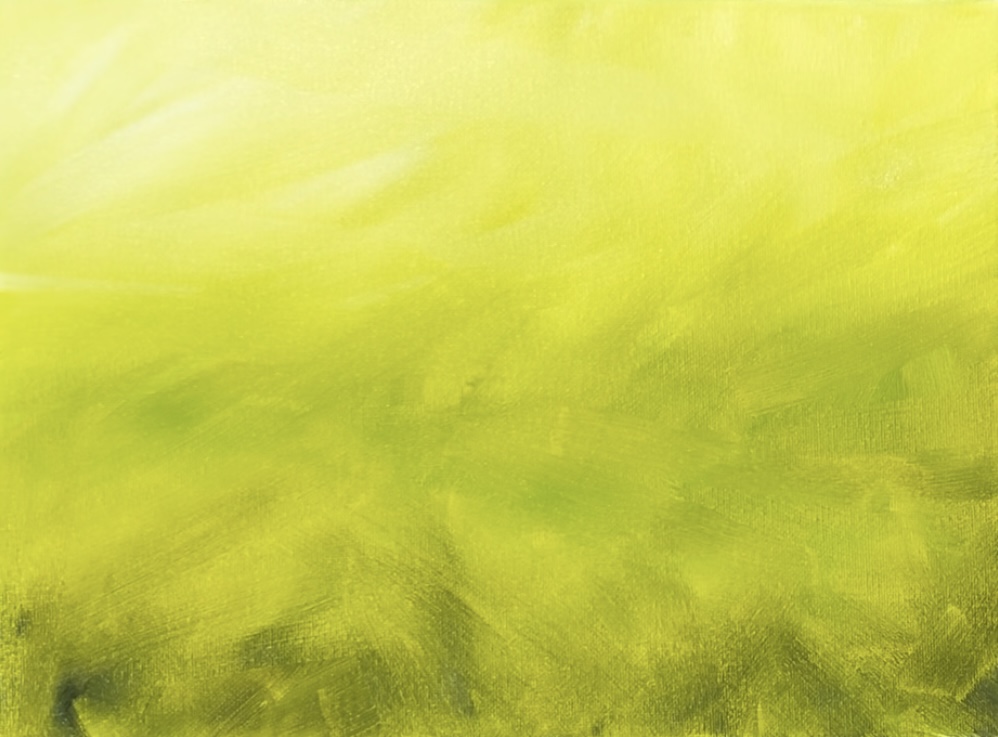
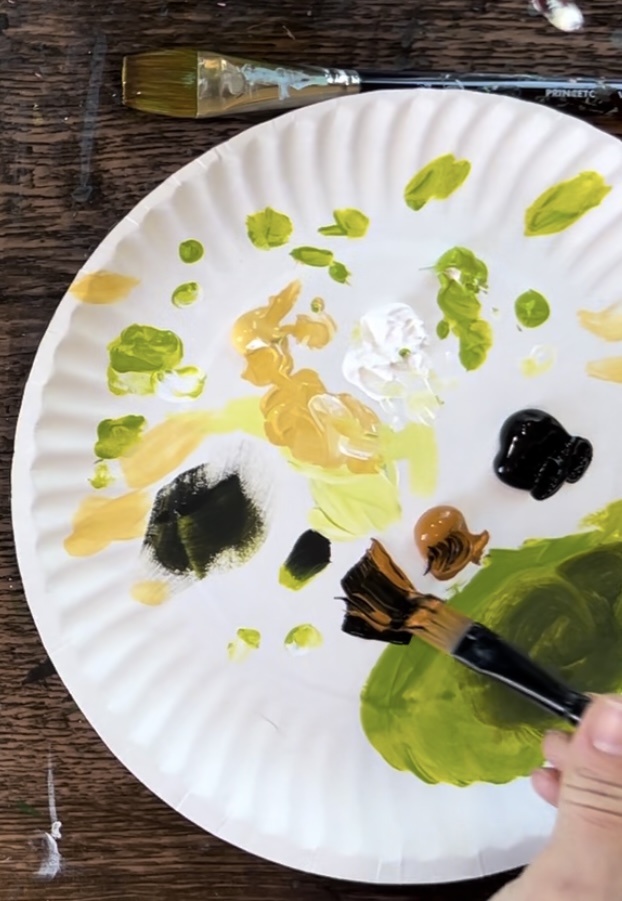
Load your paint palette with the three colors: titanium white, light olive green and mars black.
Load your 3/4 flat brush and load it into the light olive green color. Start on the bottom of your canvas. Paint large angle paint strokes going in different directions. Use the full width of your brush and “flip-flop” it as you apply the color to the canvas.
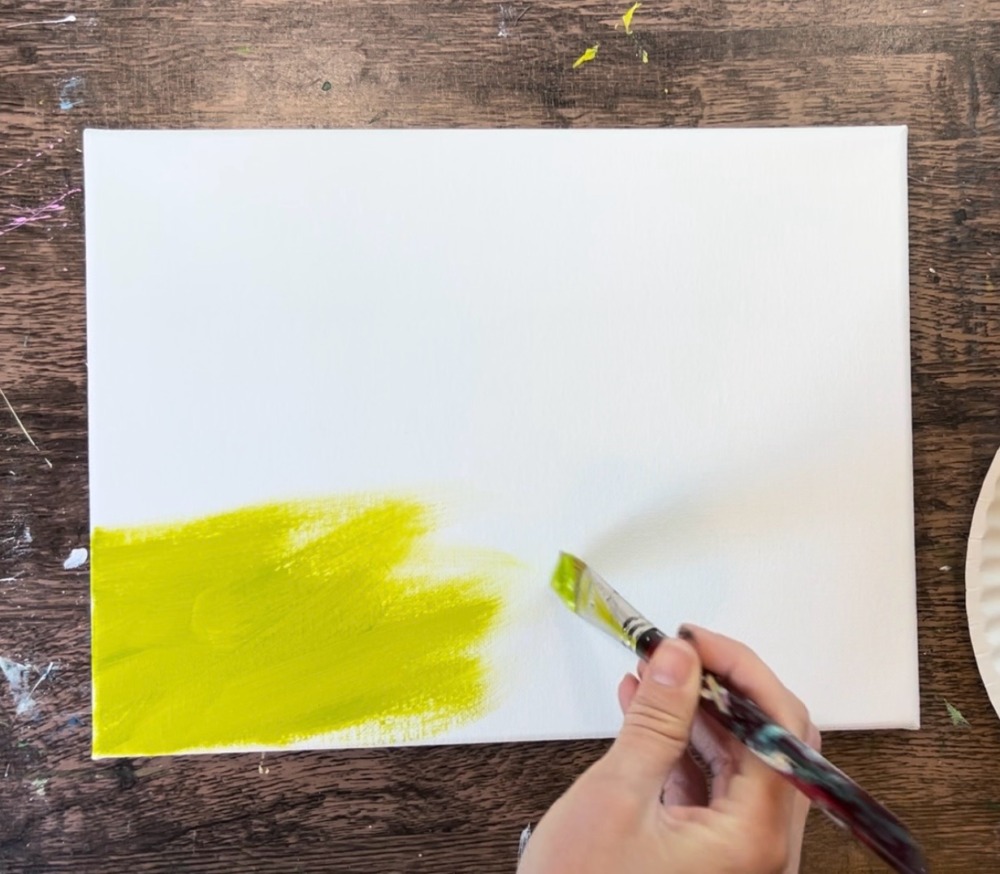
Fill about half the canvas with this green color.

Before this dries, add a tiny bit of “Mars Black” to one of the corners of the brush. Add this to the brush while the “light olive green” is still on your brush. Paint this on the bottom of the canvas and blend it with the green.
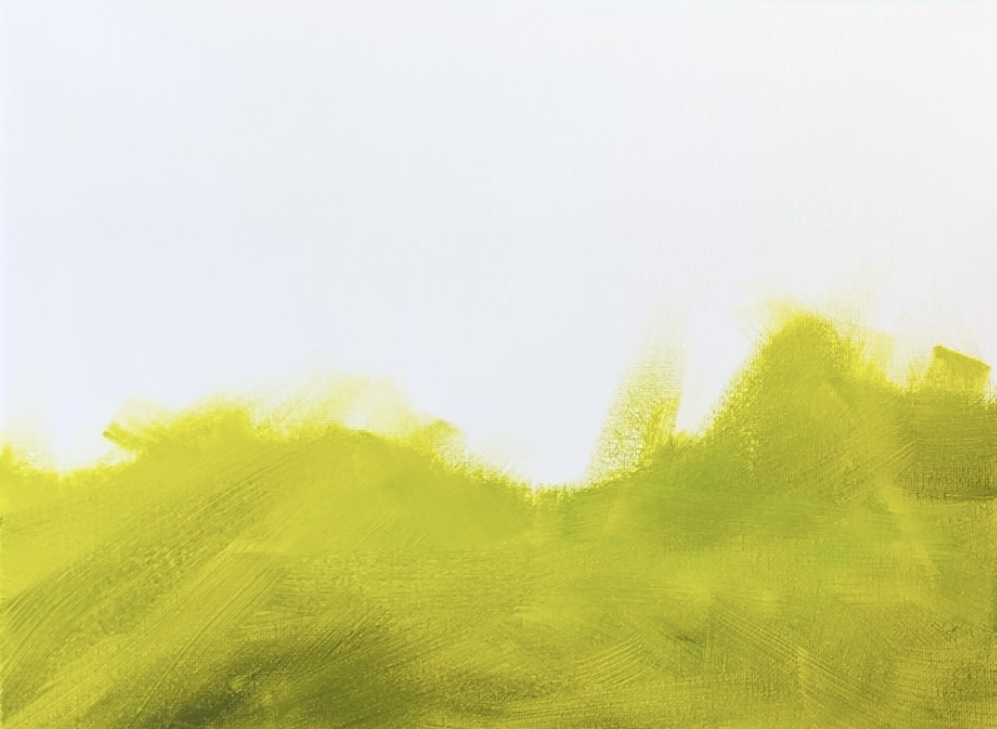
The black will make the green slightly darker but only if you add a tiny amount. Don’t add too much black or it will get too dark.
Rinse the brush. Then double load “light olive green” and “titanium white” on your brush. Blend this “light green” on the top of the canvas and allow it to blend with the “light olive green”.
Your background should look textured with light green at the top that fades to dark green on the bottom. It is a thin layer of paint everywhere and shouldn’t take long to dry.
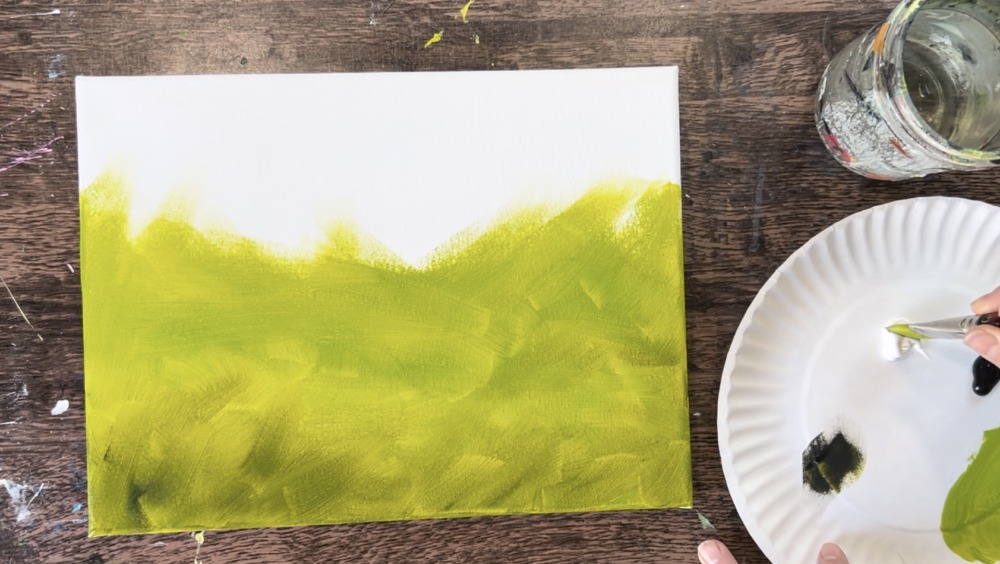
2. Paint Bokeh
You can paint bokeh with a round brush or simply use your finger tip to press and form a “blurry circle”. Both methods give similar results, however, the brush can create more precise circles.
The colors we will be using for the bokeh are: light olive green, titanium white and “Naples yellow”. Load those three onto your paint palette. Whether you are doing this with the #4 round brush or your finger, you need to make sure to only load a small amount of paint on your brush. This will allow the bokeh light circle to show up kind of translucent and blurry on the edge. When you load the paint, wipe off a small amount of paint off the brush.

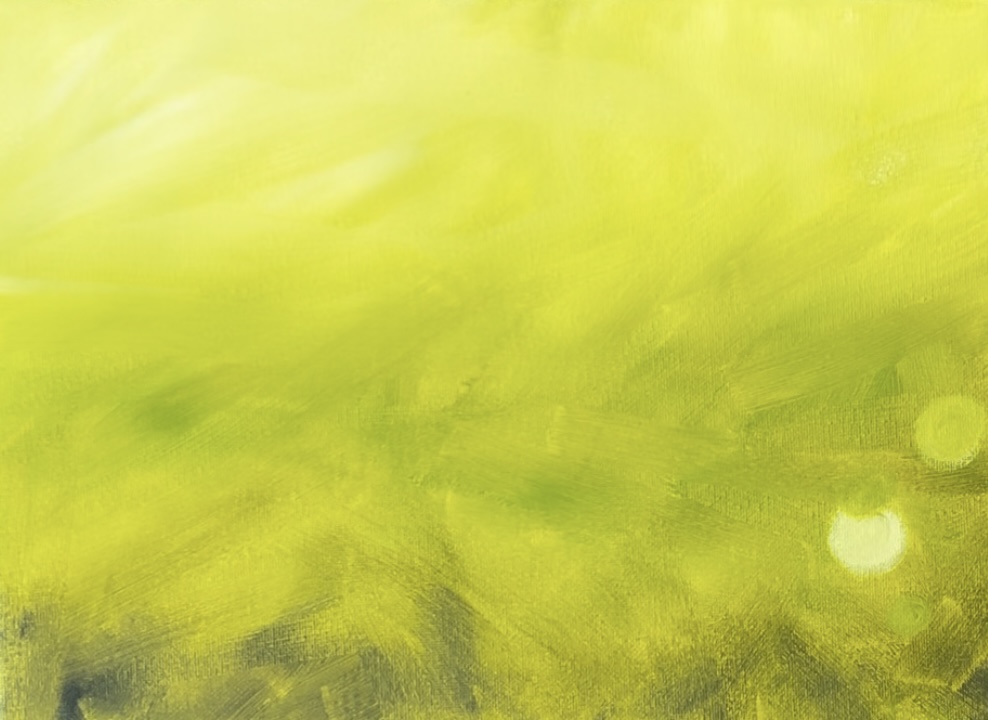
You can achieve a similar effect by using your fingertip to paint these dots.
Use a combination of the white, light olive green and Naples yellow to create all different color variations of these dots. When using the Naples yellow, be sure to mix white into it so it doesn’t show up too dark.
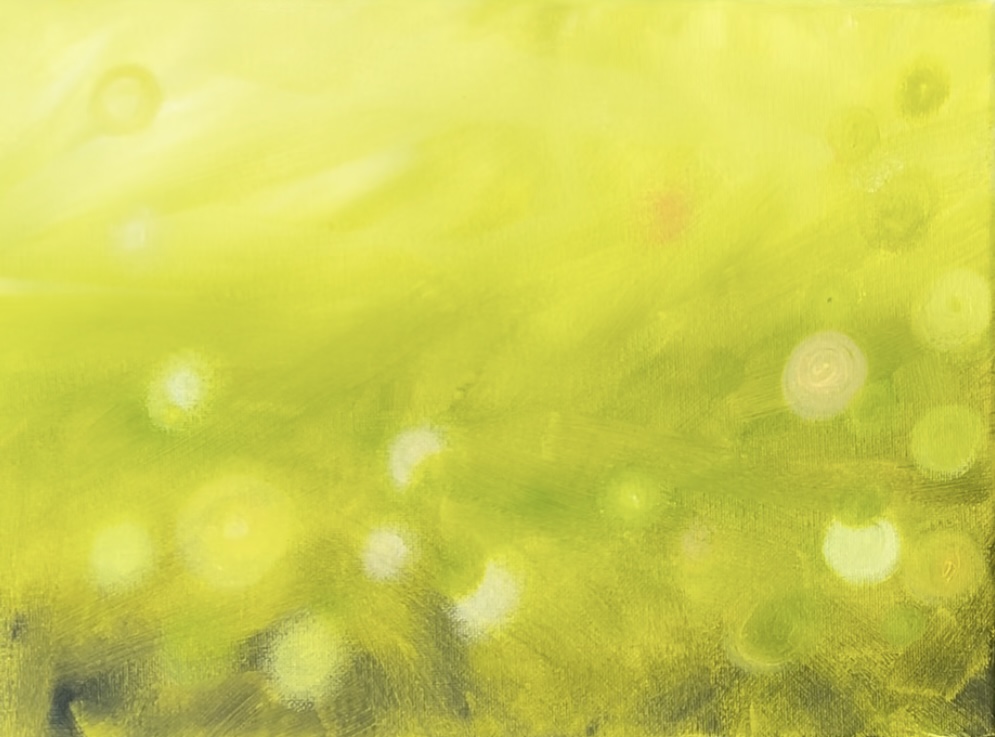
Overlap some of your bokeh and have some of the circles go off the side edge of the canvas.
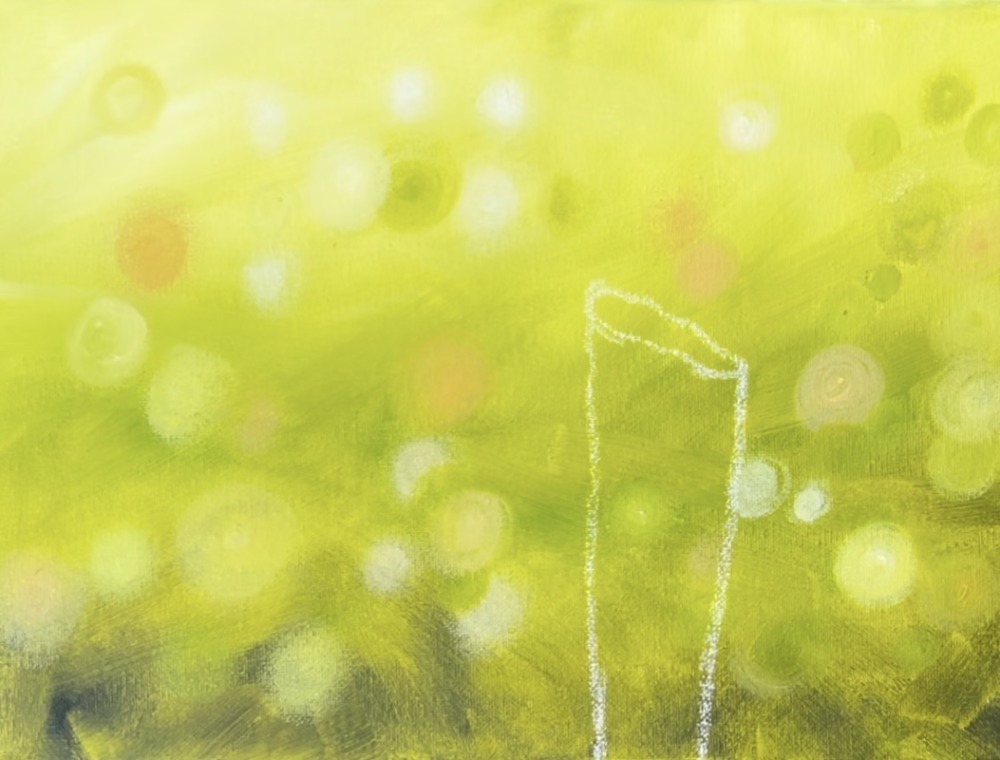
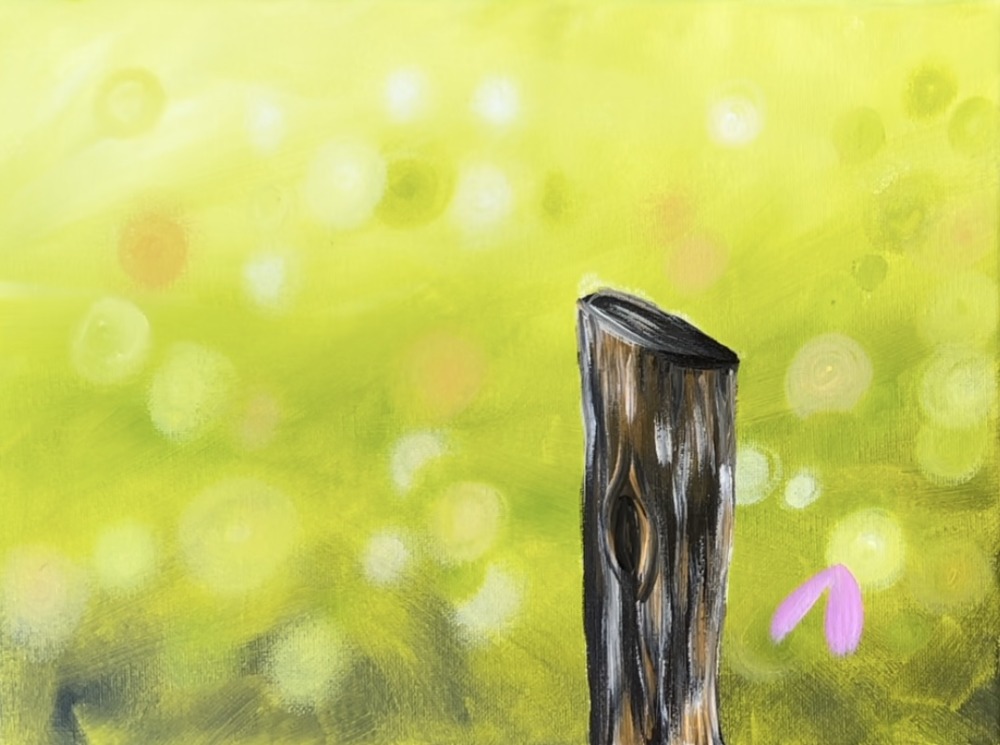
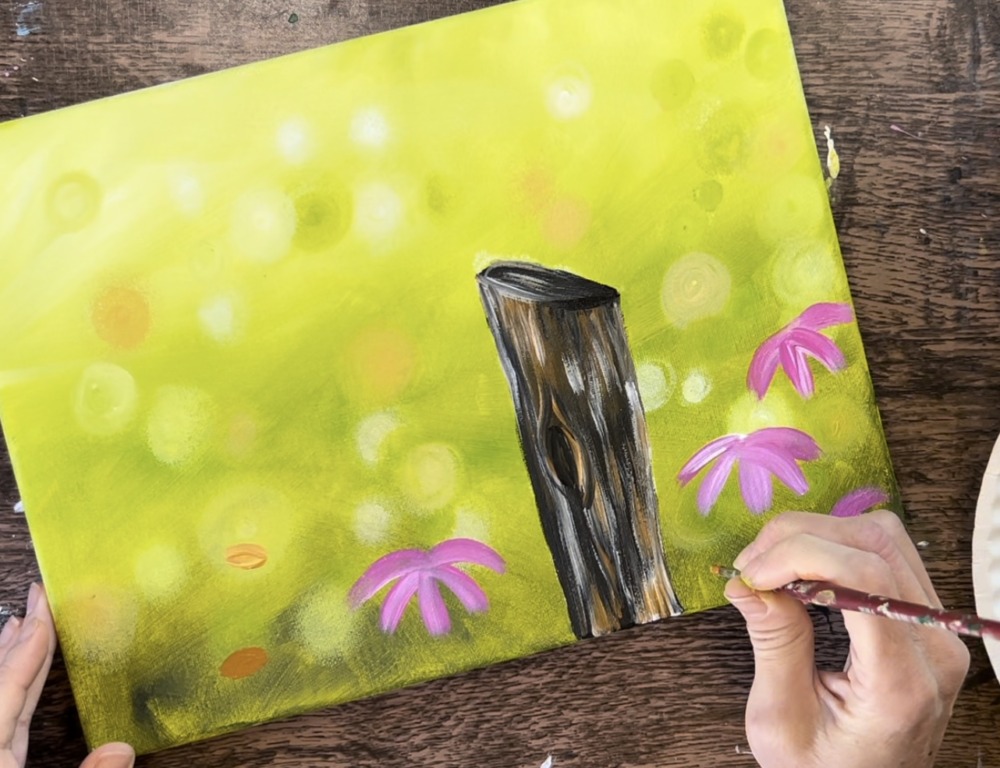
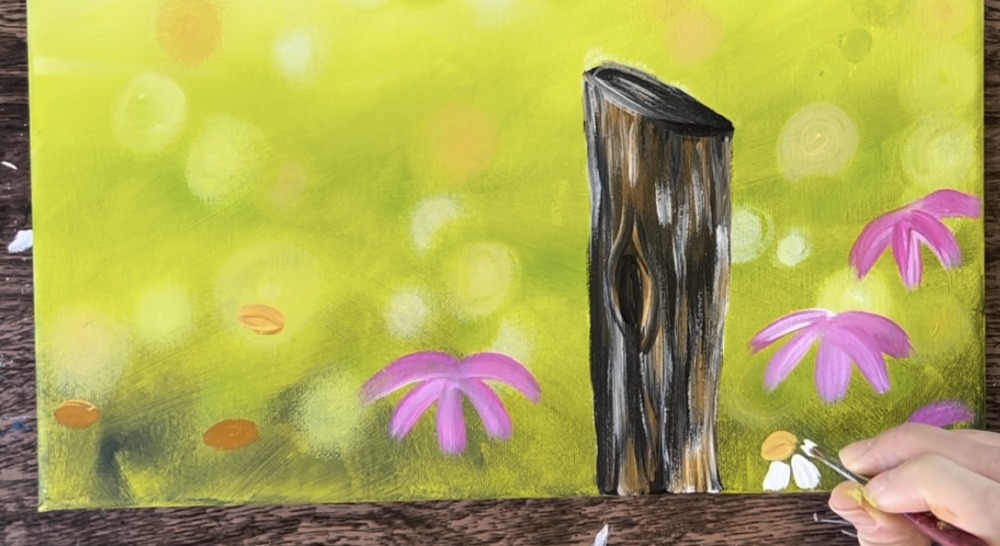
3. Draw & Paint Post
Use a piece of white chalk to draw the post. Draw two lines that start out narrow on the bottom and get wider towards the top. Then draw a small oval/ rugged flat are on the top (going at an angle).
This post is located at about the 2/3 point from the left edge of the canvas. The height is about 2/3 the height of the canvas.
Use the #12 bright brush to paint the post. Mix equal parts raw Sienna and mars black together. Paint the post and make your paint strokes go in a vertical direction.

Create variations of this brown by adding some lighter brown in areas and gently blend the brown with the dark brown but don’t over blend the color.
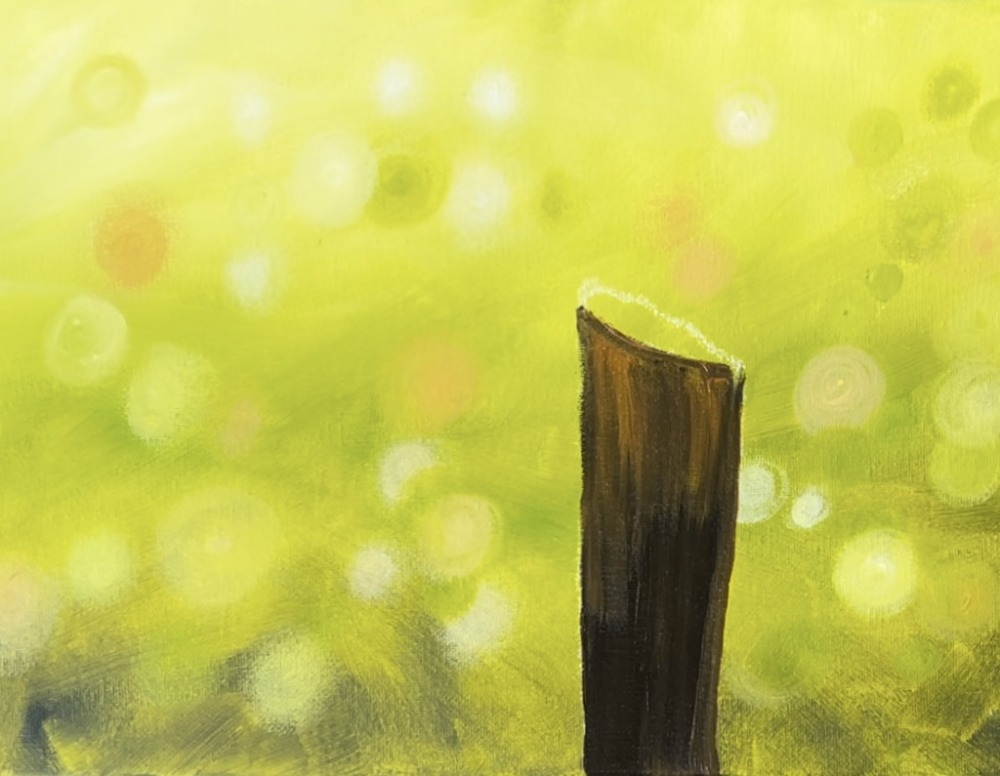
Paint the top edge of the post solid black.

Use a #4 round brush to paint texture on the post. Do this before the dark brown dries. Load the round brush in small amounts of titanium white and paint vertical paint strokes to create the wood grain look. Add a little bit of “raw Sienna” to the white on your brush as well to create some variations in the wood grain colors.

Paint a knot in the wood by painting a little oval shape with black. Then paint brown/ white grains around the oval shape.

Also, paint a little bit of highlight on the top flat area of the post.

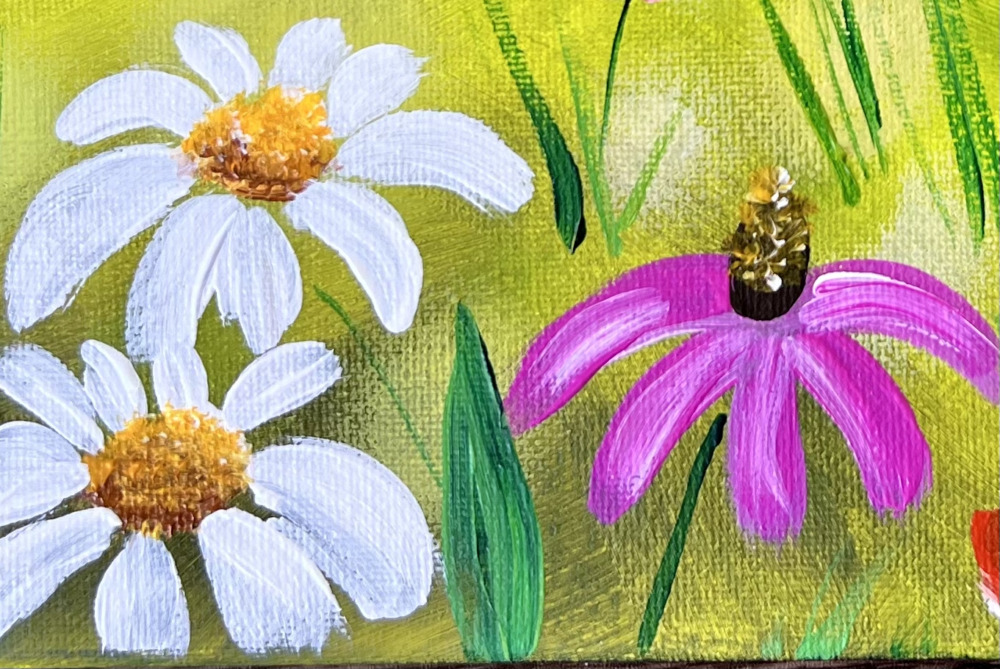
4. Paint Wildflowers
Load your paint palette with “the colors you’ll be using to paint the wildflowers: medium magenta, “medium magenta”. We will be painting the “cone flowers” first! Use a #4 round brush to paint oval petals that are all pointing downwards (because the cone on these flowers will be on the top/ these flowers are viewed from the side).
Double load your #4 round brush in both magenta and white (or slightly mix the two colors on your palette). Stroke each petal downwards.
Paint 3-4 petals all pointing downwards and meeting in the center on the top.
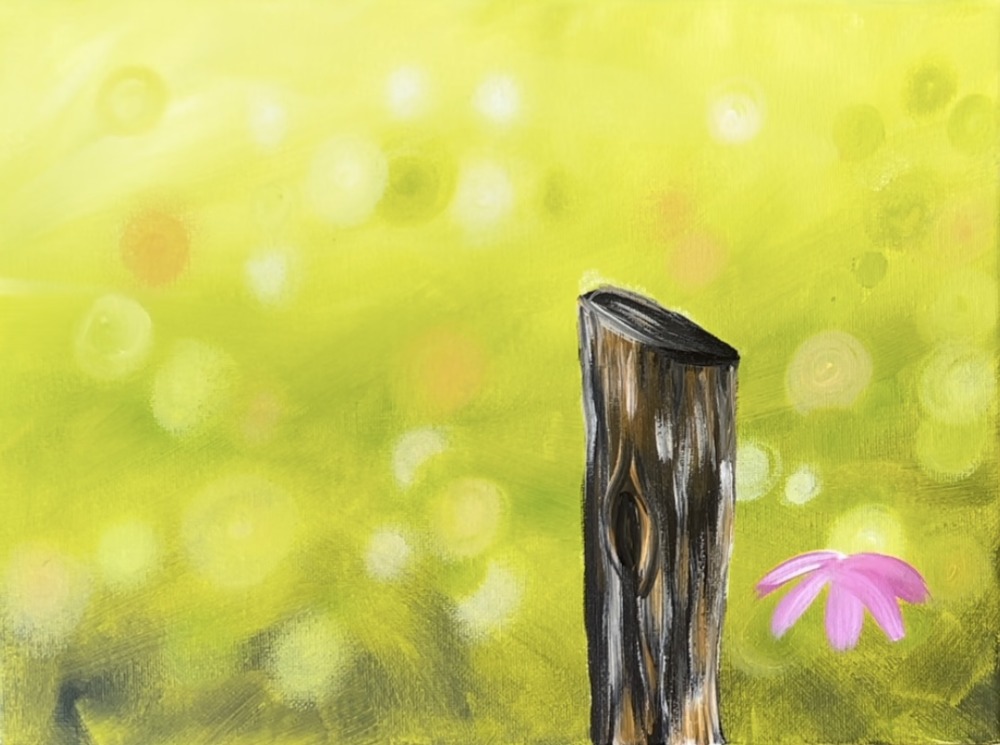
Paint multiple flowers using this technique. I did three flowers on the lower right and one on the left.

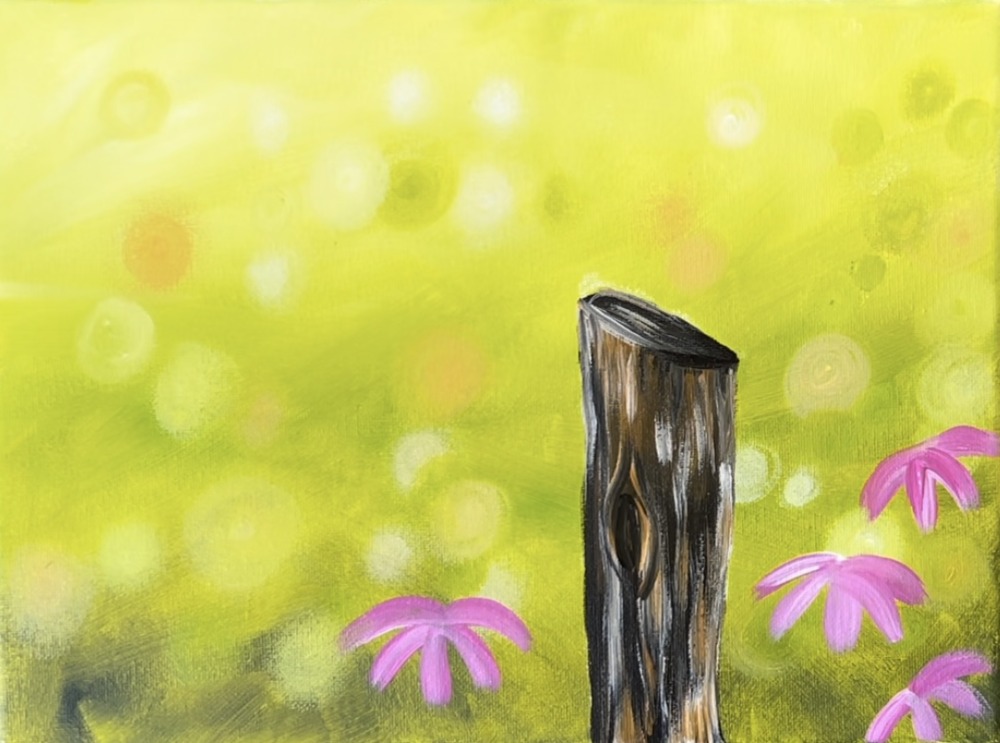
Next, paint the daisies. Start by painting the centers of each of the daisies. Use the color “raw Sienna” to paint little ovals. I did three ovals on the left and one on the lower right.
Rinse the brush. Then load it into “titanium white”. Paint each of the petals. This is a similar technique as the pink cone flowers but this time the petals are going all the way around. The petals on the bottom appear longer and the petals in the back appear smaller/ bent backwards.
Paint each petal so that it starts out kind of narrow and touches the oval center. As you stroke down, make your paint stroke thicker and then rounded at the end of the petal.
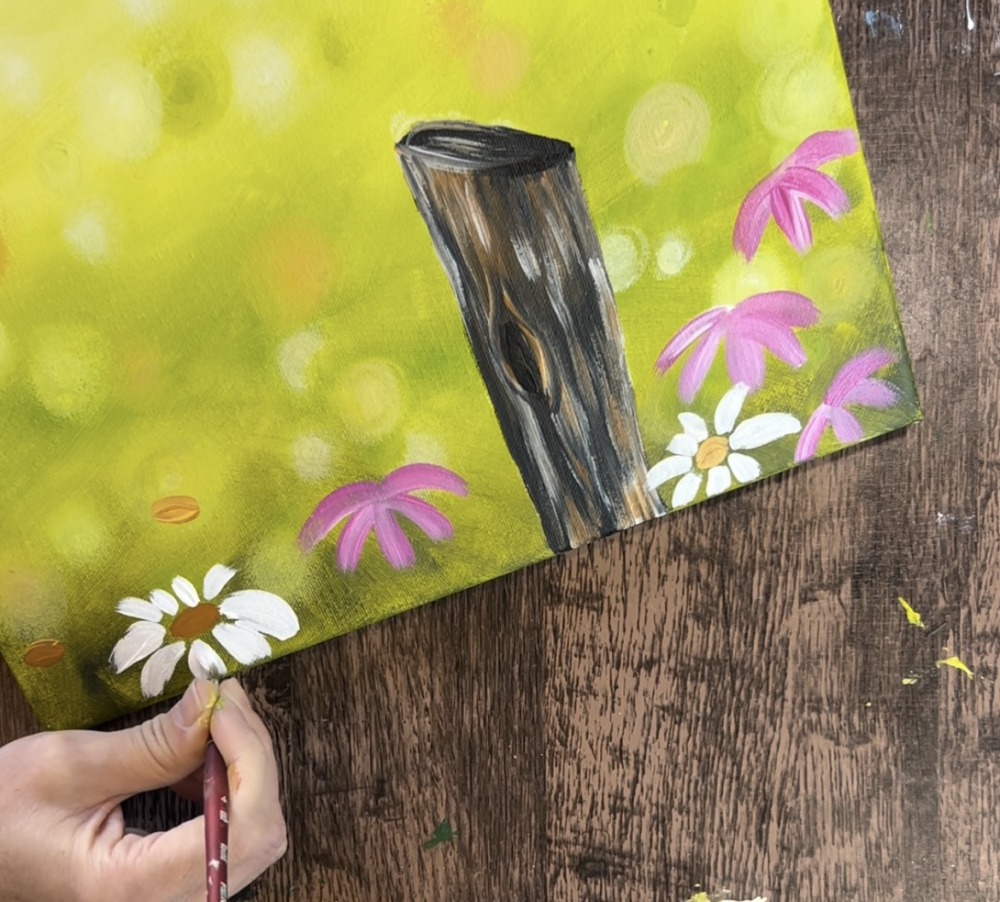
Repeat this for each of the daisies. Note the petals on the top are shorter.

Then paint the cones on the cone flowers. Mix Raw Sienna with Mars Black. Use the #4 round brush to paint little egg shapes on the tops of each of the flowers.
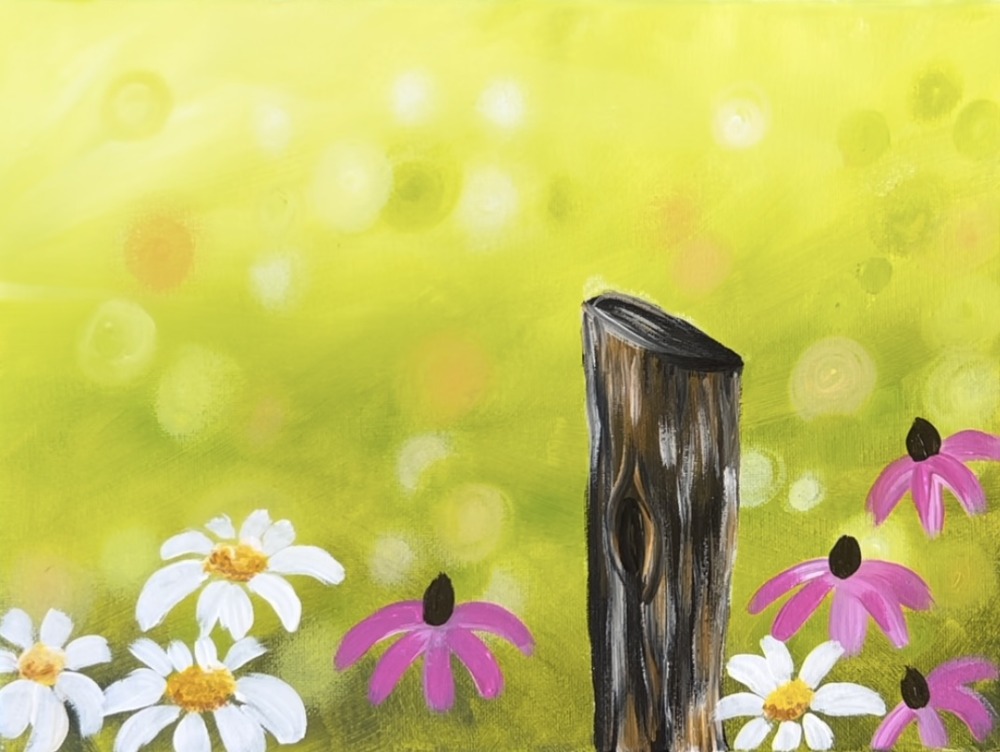
Use the #4 round brush to “stipple” texture on the centers of the daisies and the centers of the cone flowers. For the daisies, stipple “titanium white” mixed with “cadmium yellow medium hue”. Paint little dots on tops of the centers. Then paint little dots of “raw Sienna” on the bottoms so the bottoms are slightly darker.
For the coneflowers, paint little dots of “cadmium yellow medium” mixed with “titanium white” on the tops of each of the cones. Leave the bottom areas of each of the cones dark.

Here are close up pictures of the daisies and coneflowers so you can see the details.
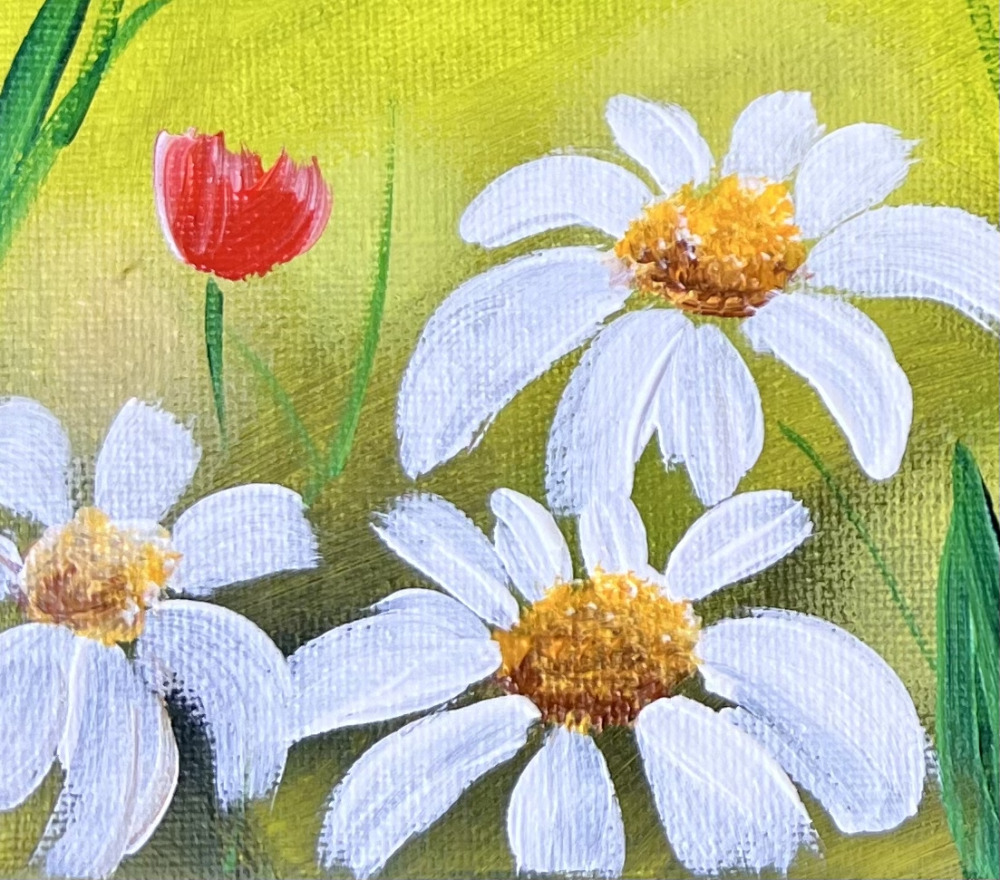
Next, paint the little orange flowers using “cadmium red light hue” and “titanium white”. Double load your #4 round brush with both of those colors. Paint each flower by making little “cup shaped” paint strokes that start from the bottom and curve up.

Next, paint the stems. Use the tip of the #8 round brush (or a tiny detail brush) to paint thin stem lines that go down from each of the flowers. Use the color “deep green permanent” so it will show up against the green background. If you aren’t using “deep green permanent” then mix a small amount of black into your olive green color to darken it.
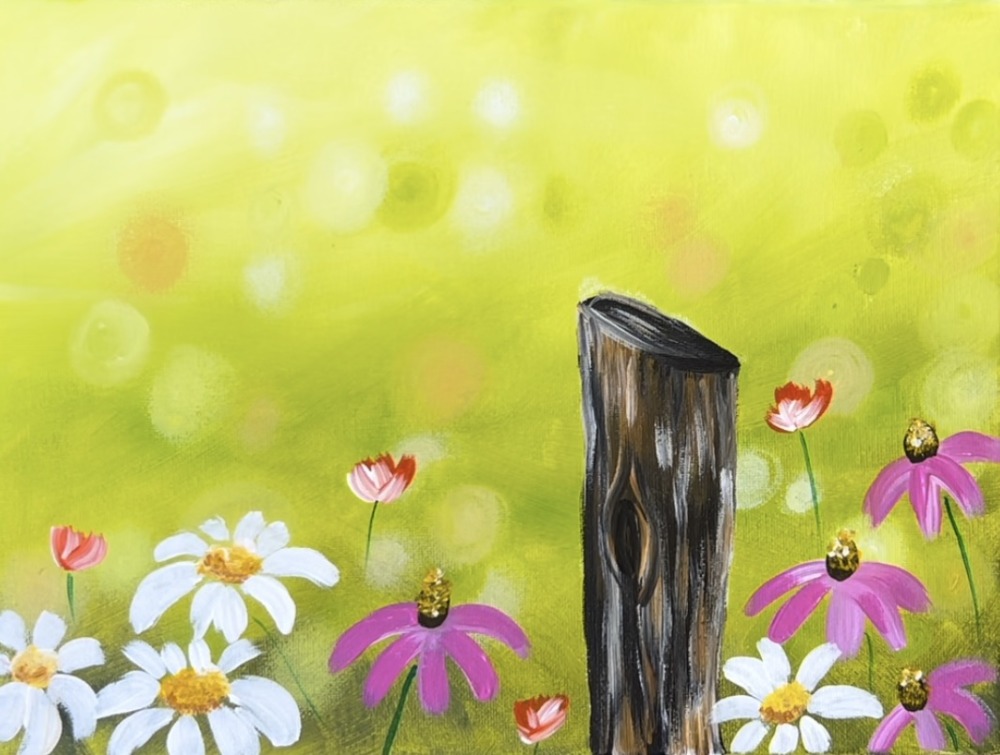
Paint each of the leaves. Make thicker green paint strokes that go to a point. You can change the pressure of your paint brush to make the lines thick and thin. Paint grass blades going at different angles.

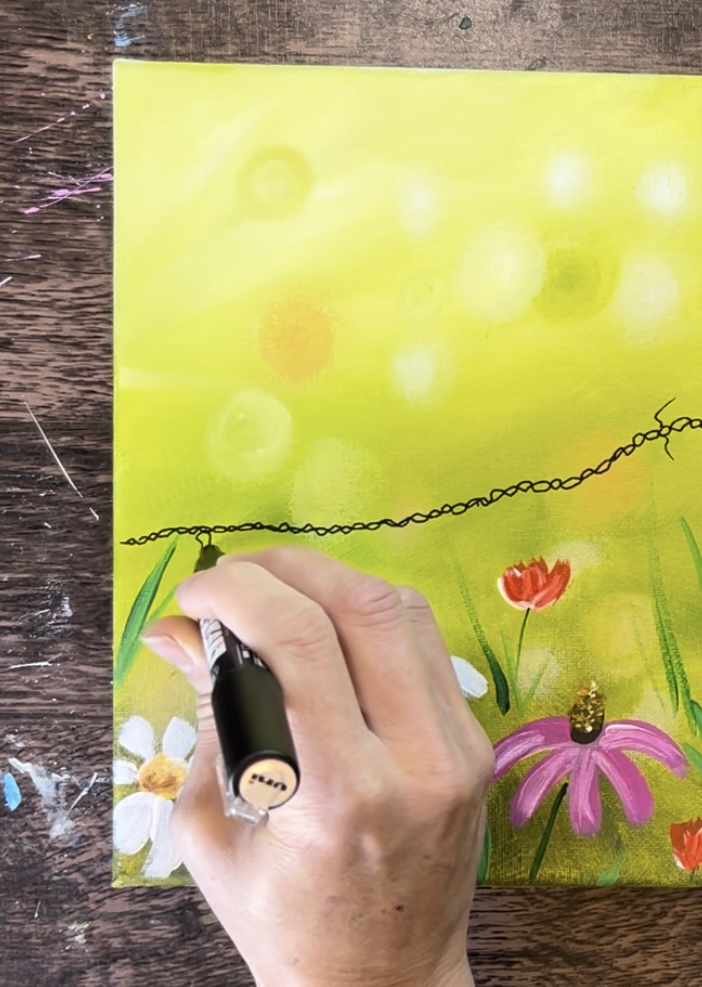
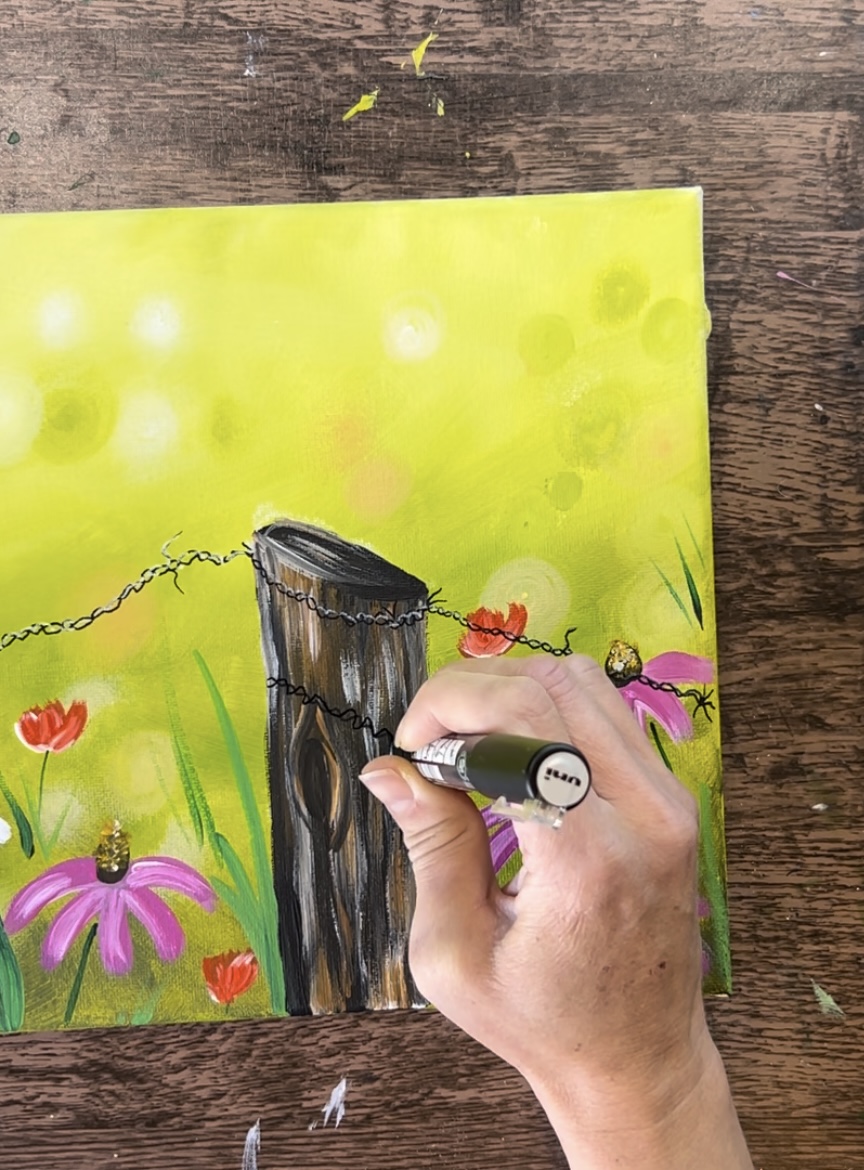
5. Draw Wires
Use a POSCA paint pen (or a tiny detail brush and thin, black paint) to draw/paint the wires. Paint a very wavy line (waves close together) that goes down at an angle. You’ll likely need to overlap flowers on the way and that’s okay!
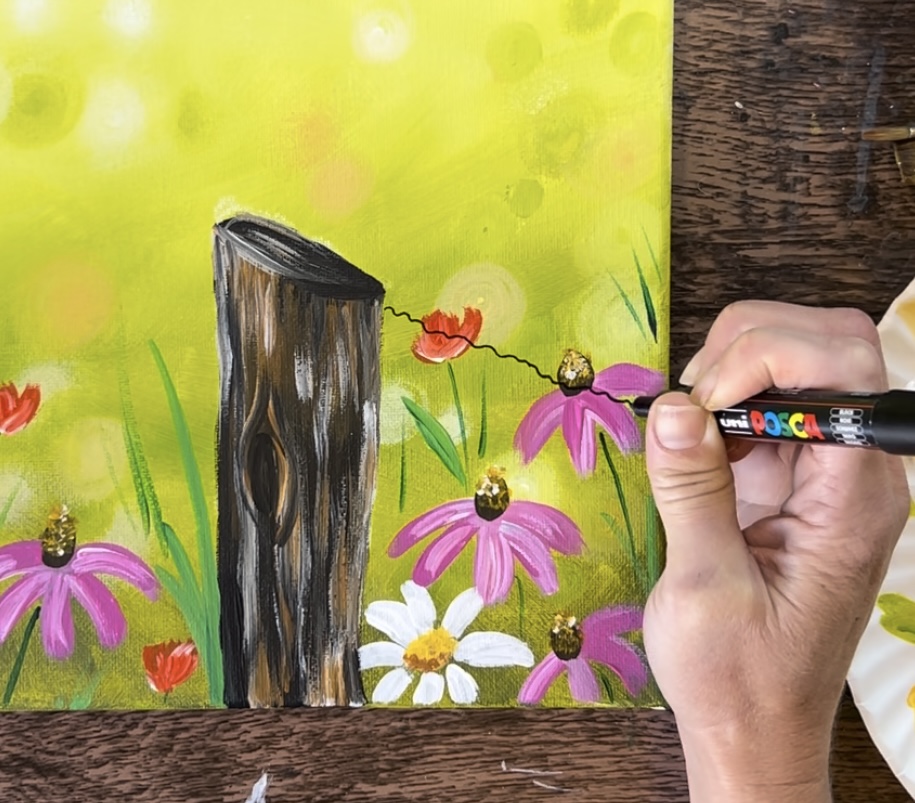
After drawing the first line, go back and paint little waves again going the opposite direction.
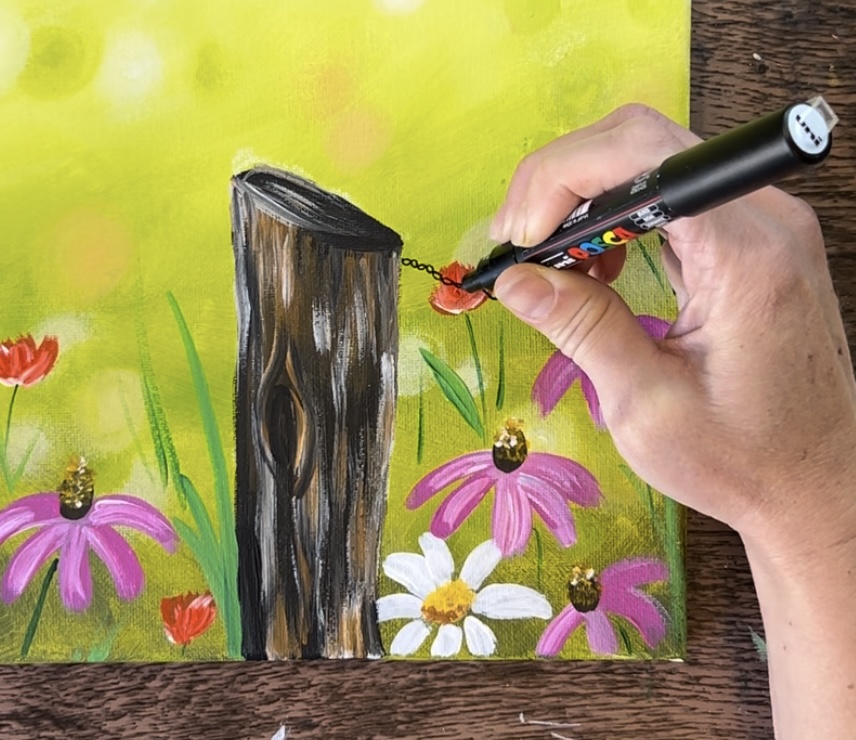

Then paint little spikes on the line randomly spaced apart. I did a set of two spikes on this part of the wire.
To highlight this line, use a white paint paint and draw the little wire lines on the top edge only of the wire.

Then continue to draw the wire wrapped around the top part of the post. Draw this so that it curves with the curve of the post (curves downwards).
Highlight it with the white paint pen and then draw a few spikes.

Next, draw the long part of this wire that goes from the top of the post and slightly dips downwards to the far left of the canvas.

Paint the other wavy line of the chain and then draw another set of spikes.
Highlight this with a white paint pen.
Then draw wires that go around the middle and bottom of the post.

If you want, you can add more wires (such as to the lower left or right).

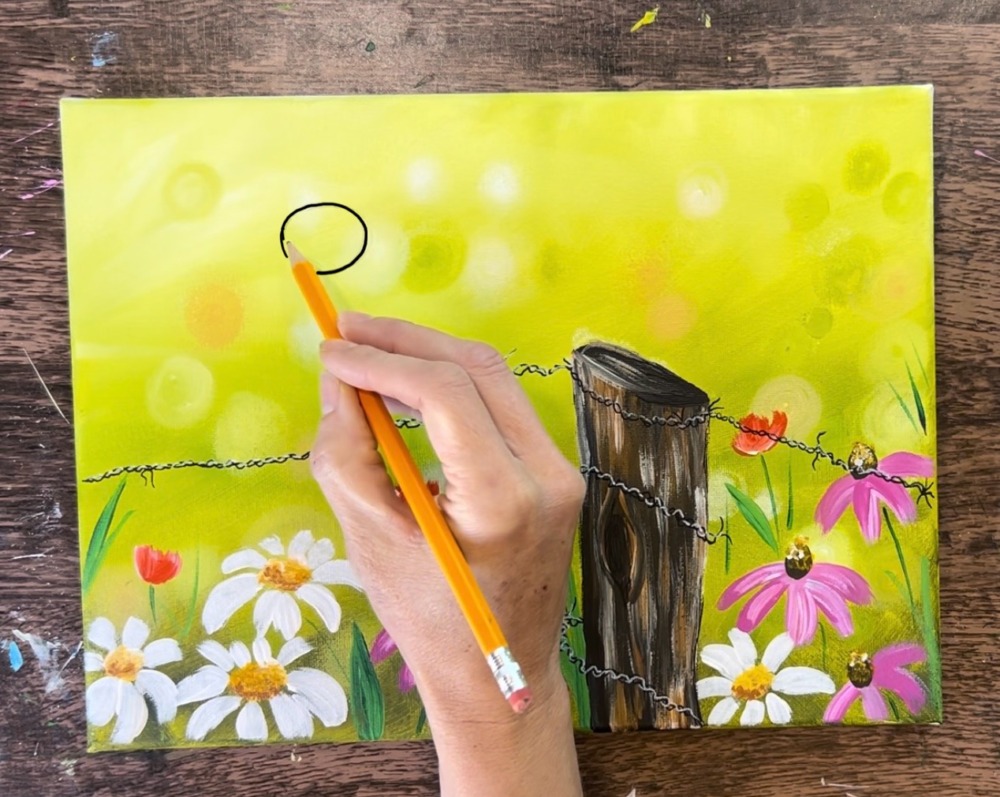
6. Draw & Paint Bird
Make sure everything is dry before drawing this bird. I used a regular pencil and sketch this bird lightly.
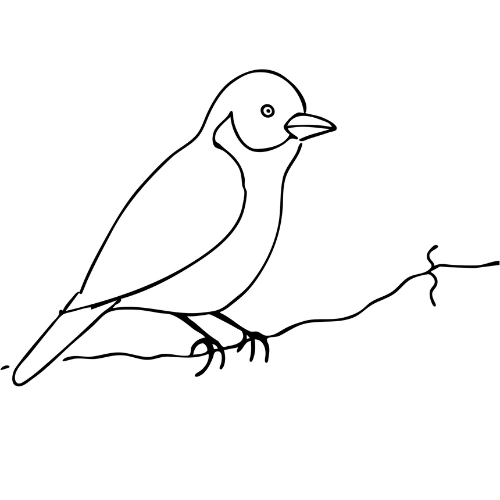
Start by drawing an oval about 2.5″ above the wire.
Draw the bird’s back. Start on the left of the oval. Slightly curve it inwards and then outwards.

Draw a straight diagonal line for the tail and then draw another straight diagonal line. Then draw the belly of the bird. This line starts under the oval head, curves inwards for the neck and then curves outwards for the belly and connects to the tail.
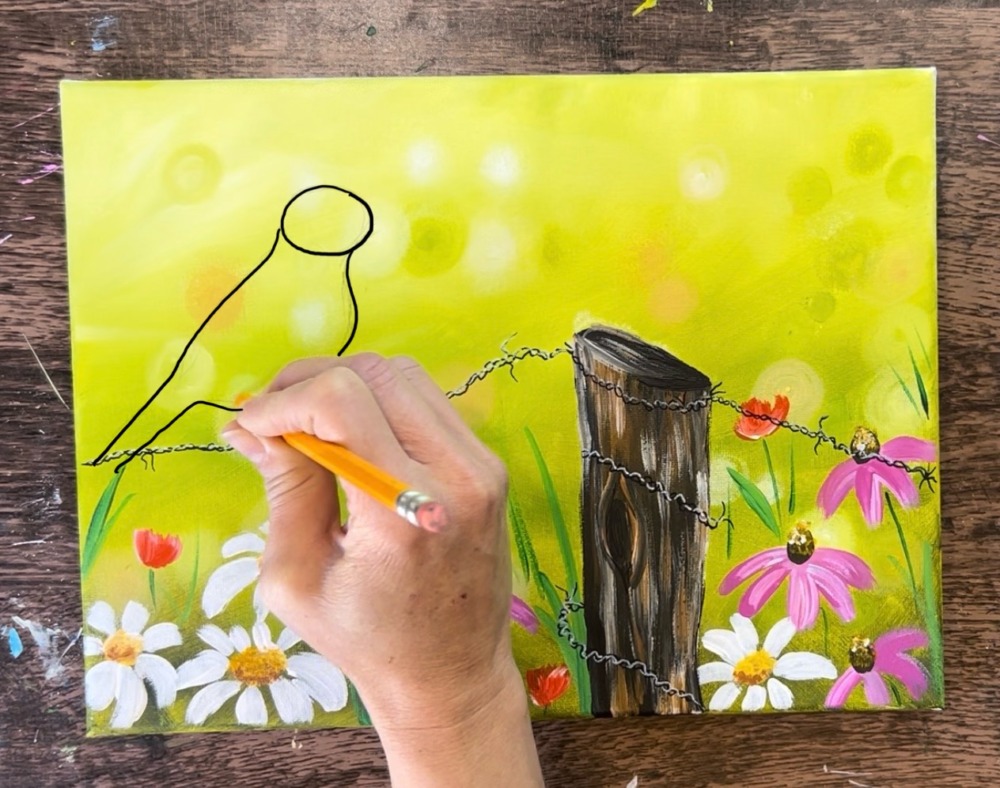
Draw the wing on the side of the body. Draw the legs as two diagonal lines that connect to the wire. Then draw the tows that curve and wrap around the wire. Draw the beak so that the left side of it is on the inside portion of the head and then forms a triangular shape. The beak is pretty much centered on the head.

It’s okay if your drawing looks “sketch like”. We will be able to define the shape of the bird better when we paint it in the next steps.

Use a #4 round brush and “titanium white” to paint the bird white. You’ll need to do a white coat of paint first to help with paint coverage against the green background.
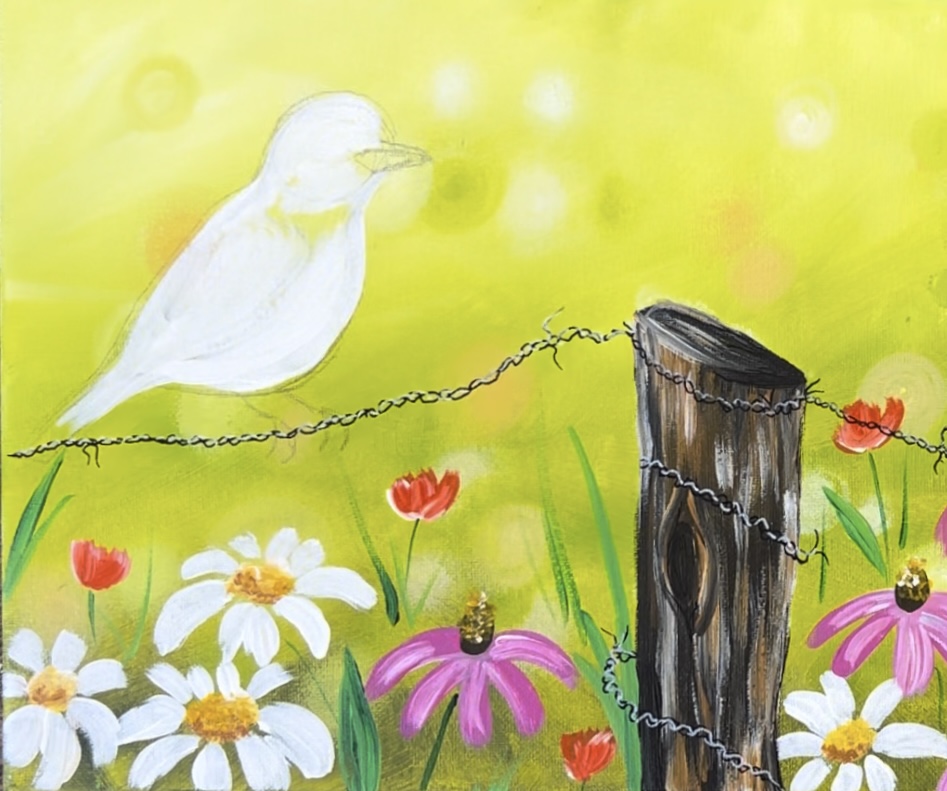
As you paint the bird white, make your paint strokes curve and go in the direction of the shape of the bird.

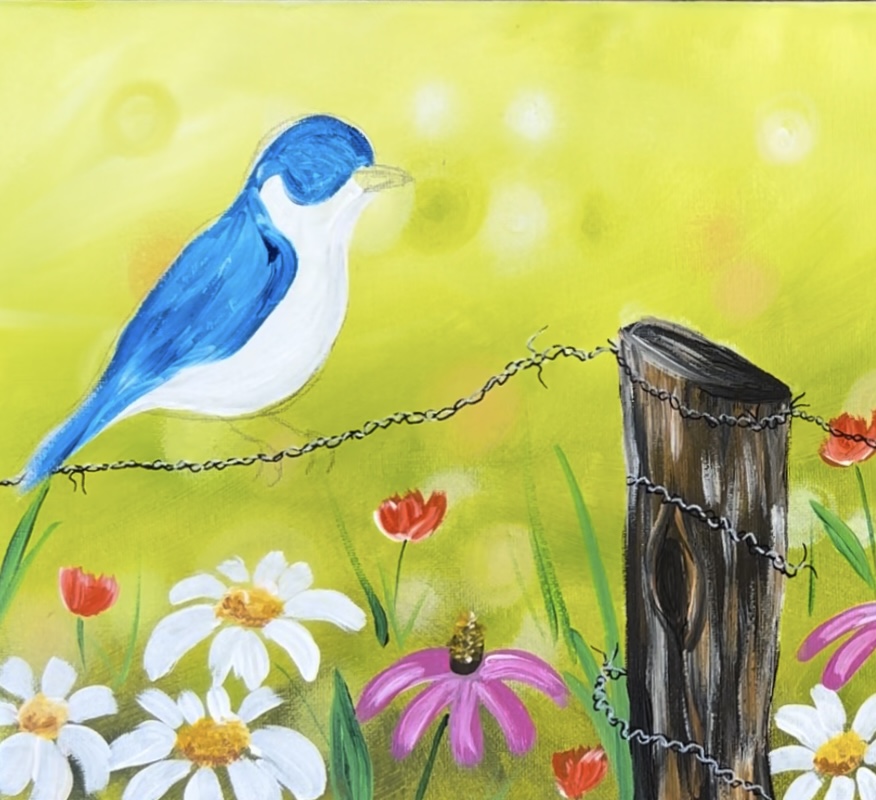
Load your palette with “phthalo blue”. Use a #4 round brush to paint the blue areas of the bird. Paint the top part of his head and then the curved “cheek area”. Outline the shape of the wing and tail and then fill those in with blue.

Note: it’s okay if your white layer is blending with your blue. The color does not have to stay the same/ it’s okay to have color variation as it adds to the texture. You also want to make sure your paint stroke direction is going in the same direction as the shape. Example: for the wing, the paint strokes are going diagonally downwards and slightly curved with the curve of the wing.
Next, use “cadmium yellow medium hue” to paint the yellow portion of the bird. This includes the neck area, area under beak and belly area.

I left a small area of white left on the very bottom portion of the body where the legs meet and a white area just under the tail area.
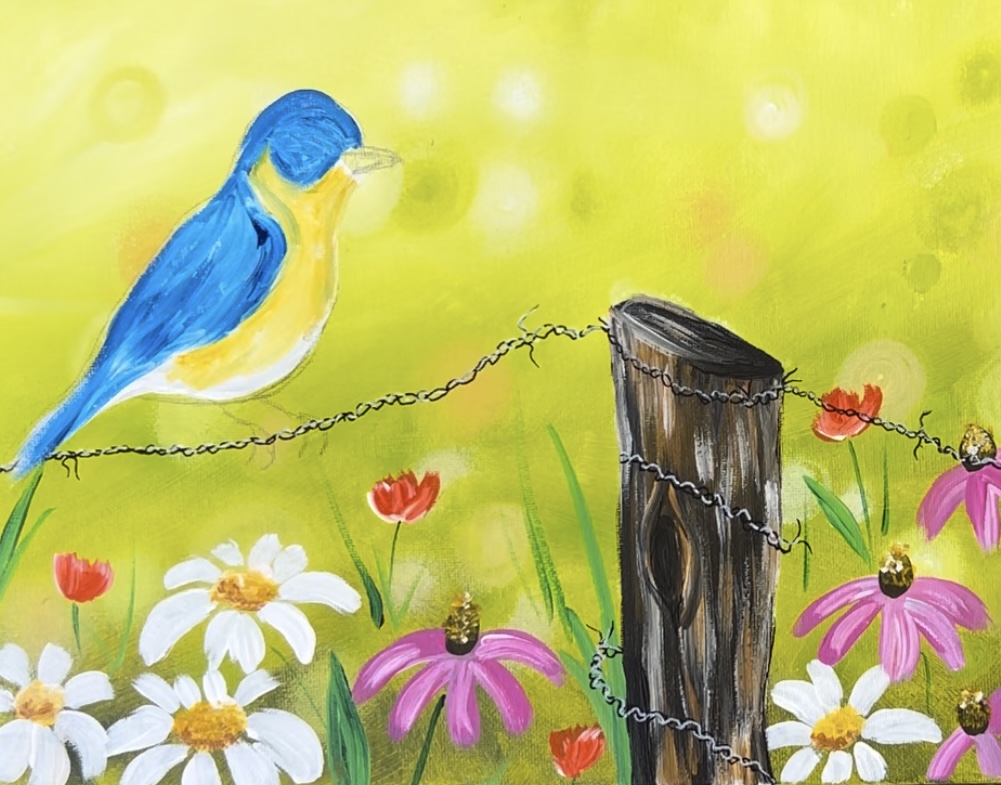
Mix a medium gray for the beak. Mix equal parts black and white together. Paint the top half of the beak with this dark gray. Add a slightly lighter gray to the bottom half of the beak. You can do this with your #4 round brush or use a smaller brush (or a paint pen) if needed for this detailed step.

Paint a tiny black circle for the eye. Then paint the legs using a dark-medium gray. I used the #4 round brush for the legs and eye, however, you can use a detail tiny brush if the #4 round is too big. Add a little bit of gray on the bottom area just under the tail and above the legs.
Then use the tiny point of the #8 round brush (you can also use a toothpick or a white paint pen) to paint a little white dot in the center of the eye. Paint a white line down the middle center of the beak. Then loosely add some white lines on the side of the wing for the feathers. If the white on the feathers shows up too bright, you can mix some blue into it.
7. Final Touchups (optional)
Sometimes touchups aren’t needed! That’s why I call them optional. Sometimes simple is better so you decide what you would like to add to your own unique painting!
Some final touch ups that I did for this painting can include: painting more flowers, painting more bokeh in the background and adding more details to the bird.
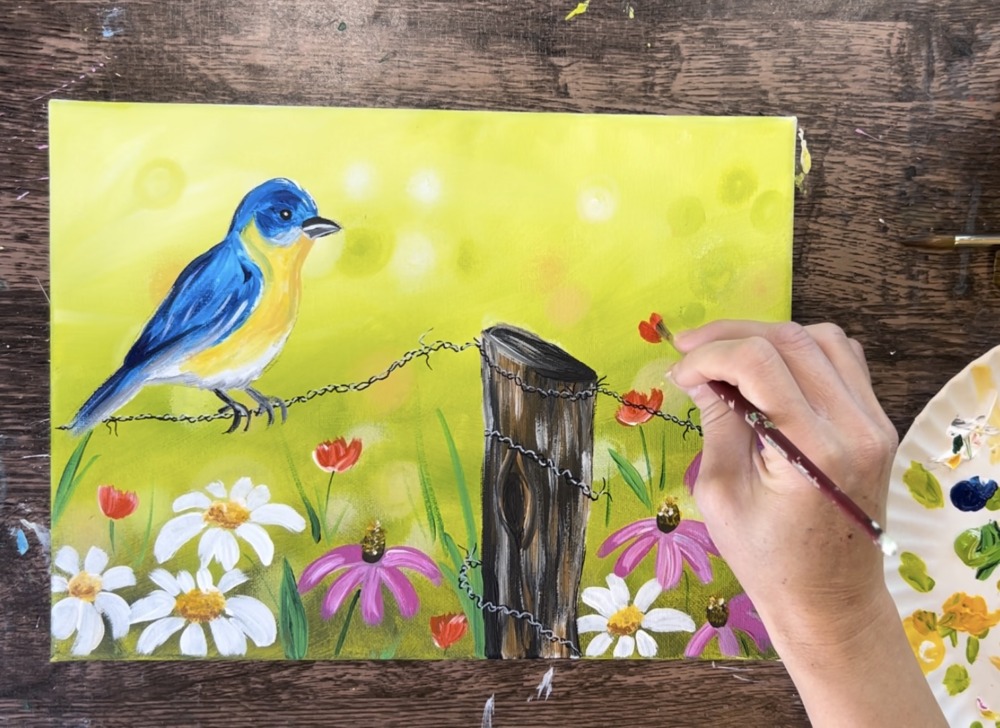
I did a few more orange poppy flower. I also outlined the bird’s eye with titanium white but later I decided I didn’t like how that looked so I went back over it with black.
I also did more bokeh in the background!
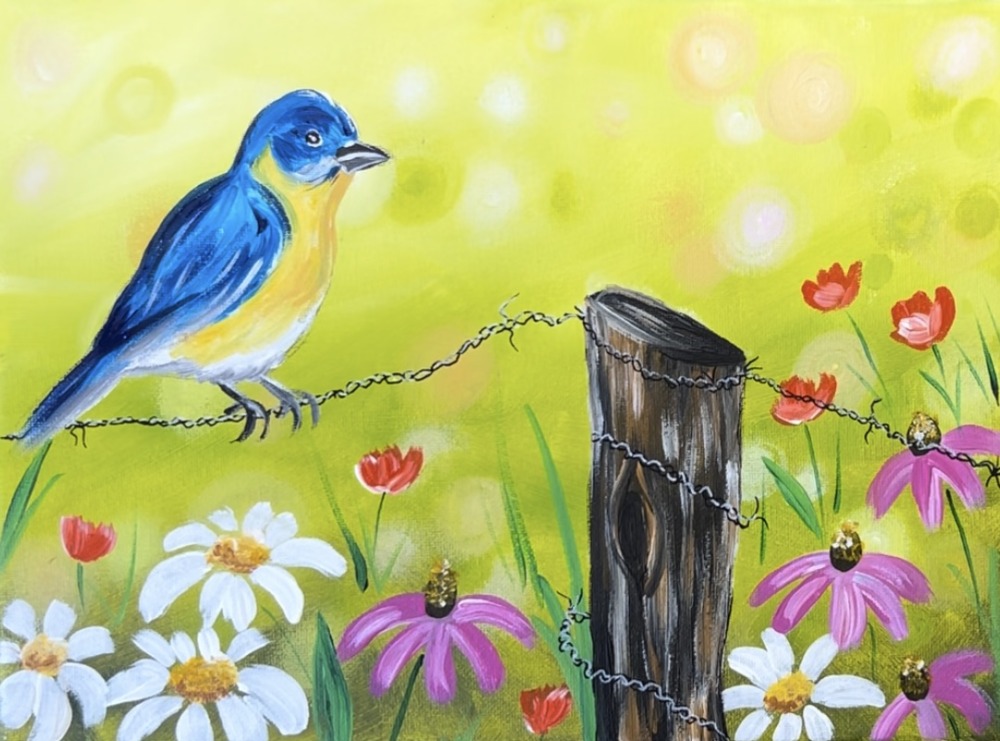
Finished!
Sign your name and show it off!