

Would you like to save this?
Learn how to paint a patriotic floral jar with acrylics on canvas!
This tutorial is demonstrated on a 12 x 16 canvas, however, the design itself works on literally any canvas size!

I love the light faux wood color in the background and the simple red, white and blue color palette. It is a perfect painting to display year round or during patriotic USA holidays!
Enjoy and happy painting!

Materials Needed
How To Paint A Patriotic Jar Bouquet
Paint a jar with a bundle of red, white and blue flowers and an American Flag. This paintign is great for your patriotic decor or as a year round design.
Materials
Colors
- Titanium White
- Mars Black
- Unbleached Titanium
- Raw Sienna
- Prussian Blue
- Pyrrole Red (or any red!)
- Hooker's Green Hue Permanent
Brushes
Color Palette

Using Craft Paints?
If you are using craft paints such as Apple Barrel, I would recommend substituting to these colors:
- Flag Red
- Too Blue (Or Navy or Any Dark Blue)
- New Shamrock
- White
- Nutmeg Brown (add a little white to it to lighten it up)
- Black
- Antique White
Traceable

Directions At A Glance

Video
Step By Step Directions
1. Draw Table Line
Measure approximately 3.5″ from the bottom of the canvas and then draw a horizontal line from one side to the next. If you are using a different size canvas, you will have to adjust this line higher or lower.

2. Paint Light Faux Wood Wall
The background above the table line consists of three colors: titanium white, unbleached titanium (beige) and mars black. You only need a very tiny amount of black so don’t load a lot on your palette! However, you do need a good amount of white and the beige because the background is very light in color.
Use a 3/4″ flat wash brush to load the edge of your brush in titanium white.

Grab some of the beige too on your brush. Then paint left and right strokes going across the canvas. Let the white and beige blend gently together but don’t over blend it.
Then load just a tiny dot amount of black on the corner bristles of your brush.

Gently blend the black into the background as well. This will make your background a slightly light gray color that blends nicely with the beige and white.

Continue to paint left and right strokes filling up the entire background wall area above your table line. Add variations of gray, beige and white. Try not to over blend. the colors.


Stop when you get to the table line.
3. Paint the table a light golden brown
Load your palette with the color raw Sienna and freshen up the white and beige if needed. The raw Sienna is needed to make that light golden brown color on the table.
Load your brush in the raw Sienna, titanium white, beige and a very tiny dot of black. Paint left and right strokes and fill the table area.

Your colors will blend on the canvas. It is okay if you have streaks of darker gray for lighter colors. Overall it should be a very light golden brown color because of the raw Sienna.

4. Paint The Panels In The Wood Wall
Mix a dark brown color on your palette by mixing raw Sienna with a small amount of black and add some white into it. Basically you want to make a dark color that will show up as horizontal “panel lines” for the wood on the wall. It shouldn’t be too dark but also make it so that it is darker than the background itself.
Slightly water down that dark brown. Then use a #4 round brush and your t-square ruler to paint horizontal lines across the wall. I did two horizontal lines to create three panels.

These do not have to be evenly spaced apart. Also, paint this line very loosely and very thin.

Then add wood texture lines using the same color and the round brush. Paint small horizontal lines all throughout the wood panels.

Also, paint wood knots by painting elliptical shapes and contouring curved lines.


Then divide the bottom table area into three panels by taking the ruler and the same dark brown color you mixed on your palette. Use the round brush to paint two very loose horizontal lines.

Then loosely paint the wood texture the same way you did it on the wall panels.


5. Draw Jar
You can use the jar template for this tutorial I have linked at the top of this page or you can hand draw your jar.
Note that the dimensions below are approximate to help you with the drawing but these do not have to be exact.

To draw the jar…
First draw the bottom curve. Mine was about an inch and a half from the bottom of the canvas. The width of this jar is about 5.5″ wide so make your curve about that width.

Next, use a t-square ruler to draw two vertical lines on each side of the curve (you can estimate the height of these lines for now).

Next, round the point at which the bottom of the vertical lines meet the bottom curve. In other words, both bottom corners should be rounded.

Then sketch the top of the jar so that it goes inwards and there is a small neck opening in the middle. Try to make that center opening in the center of the jar.

Draw a horizontal line at the top using a t-square.

Then draw a narrow oval shape on the top of the jar for the opening. That top opening is about 2.5″ wide. Again, these measurements do not have to be exact! Your jar may be a different size or shape and that is fine.

Then draw the flag. This will help you get the sizing of all the things in the jar. Draw a diagonal line that goes inside the top opening of the jar. Then draw a circle on the top of the line. Draw a wavy line and form the same of a wavy flag.

Draw two more lines going diagonal away from the flag to represent some of the flowers but you do not need to draw all your flowers at this time.

6. Paint Paint Jar
Load your palette with Prussian Blue and titanium white (you only need a small amount of those colors). Mix about equal parts of the blue and white on your palette to make a medium blue (Prussian Blue is a very dark color so adding white to it will lighten it up).
Use a #4 round brush. Load the tip of the brush in the blue and the white. Loosely paint the jar drawing.

Your blue and white will blend together as you are painting this jar line. Then paint the top rim/ opening of the jar. Add a little extra white to this so that it shows up lighter.

Next paint the inner bottom curve of this jar using Prussian Blue mixed with titanium white.

Optional: loosely highlight the same line you painted your jar by loading your brush in just titanium white. Paint this line very loosely but don’t cover up all of your blue line.

The line is almost dashed/dotted and is not continuous.

7. Paint Flag
Load your palette with mars black. Use your #4 round brush to paint the diagonal line that goes inside the jar. Make sure to make your line go behind the front part of the opening of the rim.

Then paint a small circle on the edge of the line.

Next, paint a curved rectangle shape to represent the top left of the American flag. I did this with Prussian Blue and the #4 round brush.

Then load your palette with pyrrole red. Paint the stripes. Start at the top of the flag and paint a curved line. Then paint each stripe parallel to the previous one and leave a gap between them.

I recommend waiting for the red and blue to dry before painting the white stripes and stars.

8. Paint Stems
Load your palette with hooker’s green hue permanent. Mix a tiny amount of mars black with green (about 1 part black to 3 parts green). This will make a dark green.
Paint diagonal lines for the flower stems going the opposite direction from the flag. I started with three stem lines.

Then paint branch-like stems on each side of the jar sort of dangling out the sides. These lines will be for the baby’s breath flowers.

9. Paint Bluebonnets
Rinse and dry your #4 round brush. Double load your brush in the Prussian Blue and titanium white. Start at the bottom of your bluebonnet flower (the stem just to the left of the flag).
Paint a very short, expressive paint stroke going at an angle upwards.

Let the colors blend gently. Continue to paint small strokes going upwards. Form a column bundle of flowers that go more narrower at the top.


Then paint a second set of bluebonnets on the stem to the left of the first one. I made this one angle to the left and also be slightly longer.

Be sure to vary the color by loading the tip of your brush in different amounts of the blue and white. Let the white and blue blend together on the canvas. Many of your strokes are overlapping previous strokes.


10. Paint Baby’s Breath
Use the tip of your round brush to paint small white dots on the edges of your branch-like stems.

Paint clusters of these little white dots cascading down each side of the jar.

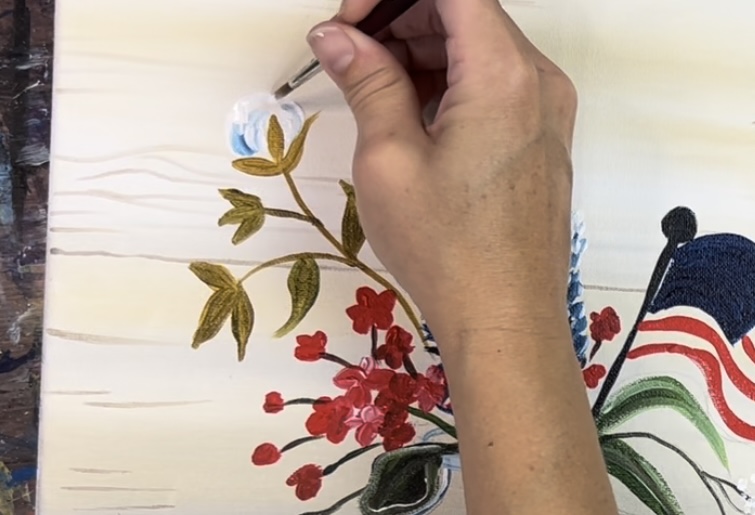
11. Paint Geraniums
Use pyrrole red and titanium white to paint the geraniums. Paint a cluster of little 4-5 petal flowers.
Double load your #4 round brush in the red and white and let the petal strokes blend on the canvas.


Some of the little red flowers are further apart and smaller. Keep this very loose and abstract, you don’t need to worry about making the geranium flowers look real.


I did a cluster of flowers towards the opening of the jar on the left with a few flowers that were further apart from the cluster. Then I also painted some geraniums between the flag and bluebonnet.

Next, use hooker’s green hue and mars black (same color you used to paint the other stems) to paint the stems of the geraniums. Attach the flowers to the stems.

Paint a few leaves that are just above the opening of the jar. For the geranium leaf, I made a very organic medium size leaf rounded on the edges. The other two leaves on the right are more narrow and pointing on the ends. Add a bit of white into the green to give it a bit of color variation.
12. Paint Cotton Bolls
For the cotton bolls, I first mixed a dark golden green color on my palette. Mix about 4 parts raw Sienna, 3 parts hooker’s green and 1 part mars black. It should turn a deep golden green color.

Paint the stem of the first cotton boll so that it is wavy and goes up to the left. Paint three leaves at the tip of the stem. This will be the base of the cotton flower.

Then paint a second cotton flower dipping downwards. You can also change the direction of these if you want!

Paint a third smaller cotton boll flower. Then paint a few leaves on the stem using the same color.

Next completely rinse and dry your #4 round brush. Freshen your palette with titanium white and a tiny bit of Prussian Blue.
Load a lot of white on the tip of your brush and form a ball shape around the base part of the leaves. Paint in thick, circular strokes forming a cotton ball shape.
Add a tiny bit of Prussian Blue to your brush. Blend a very minimal amount of blue on one side of the cotton boll without over mixing it. It should be very light! This gives the cotton boll just enough contrast to stand out against the light background.

Repeat this for each of the cotton boll flowers.


13. Paint Stripes & Stars On Flag
Use the #4 round brush and titanium white to paint the stripes of the flag. Then paint dots for the stars.

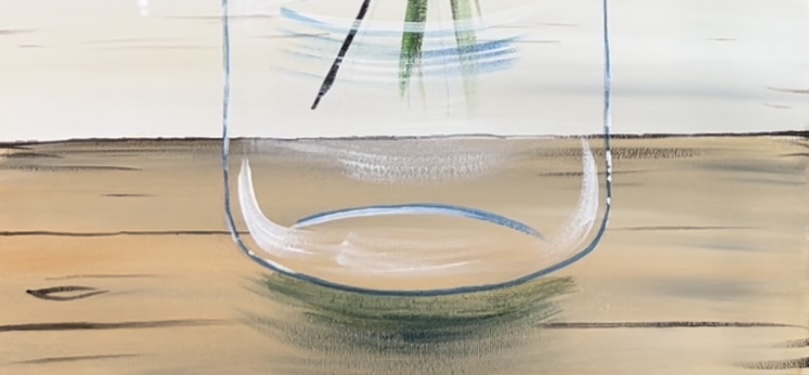
14. Paint Water Line Inside Jar
Use the tip of a #12 bright brush (or any small flat brush) to paint an ellipse shape that points on each side. Do this very loosely with titanium white (it shouldn’t be too bright). Make it go around the stems to make it look like the stems are inside the water.

15. Paint Water/Glare/Reflection Of Glass Jar
To do the glare and reflections of the jar, I recommend having a paper towel handy! This will help you achieve the “dry brush” style that I use to paint glass surfaces. Your strokes should be translucent and very light! That is because the jar is clear and we still want to see the stems and wall throughout the glass.
Double load your bright brush in Prussian Blue and titanium white (about equal amounts). Then wipe the brush off, especially the tip of the brush.

Create a curved stroke below that water line. This stroke should overlap the stems. Make sure to keep this very translucent!

Then load the tip of your brush in titanium white and wipe the brush off so there isn’t a lot of paint on the brush. Paint the bottom left and right corners of the jar. Paint a curved line on each side that contours that area. These strokes are somewhat bright.

Then paint very subtle white strokes going in a curved direction. You can overlap the stems. Do this from the top to the bottom of the jar. Also, paint a few more contouring strokes on the inner edges of the jar.

16. Paint Shadow
Mix hooker’s green hue permanent with raw Sienna and a little bit of black to make a green/brown color. Water it down to a water color consistency.

Use the 12 bright brush to paint curved strokes under the jar. Go down to the bottom edge of the canvas with these curved strokes.

Finished
Share Your Art Here!


