
Would you like to save this?
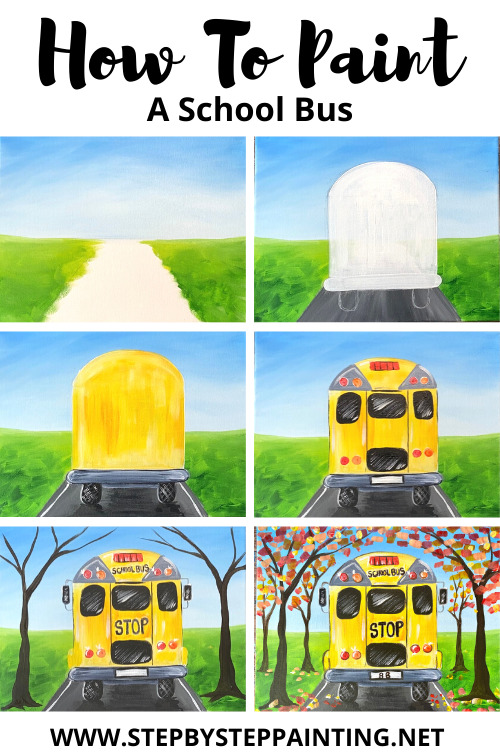
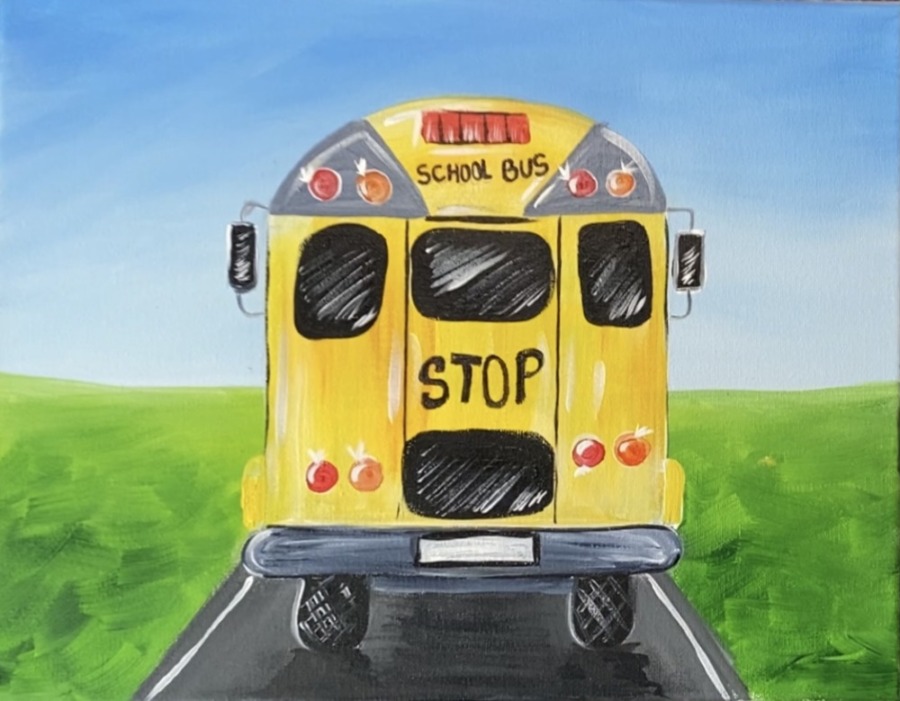
Learn how to paint the back of a school bus going down a path with fall trees! This tutorial comes with a free traceable download but I will also show you how to draw the school bus.
There’s a lot of creative directions you can go with this painting. Instead of fall, you can do a different season of trees such as spring. You can customize the words and numbers on this bus! Instead of “stop” you can paint a teacher’s name, you can put a special number on the license plate or even write in chalk how many days left (or until) school on the black windows!
Enjoy and happy painting!
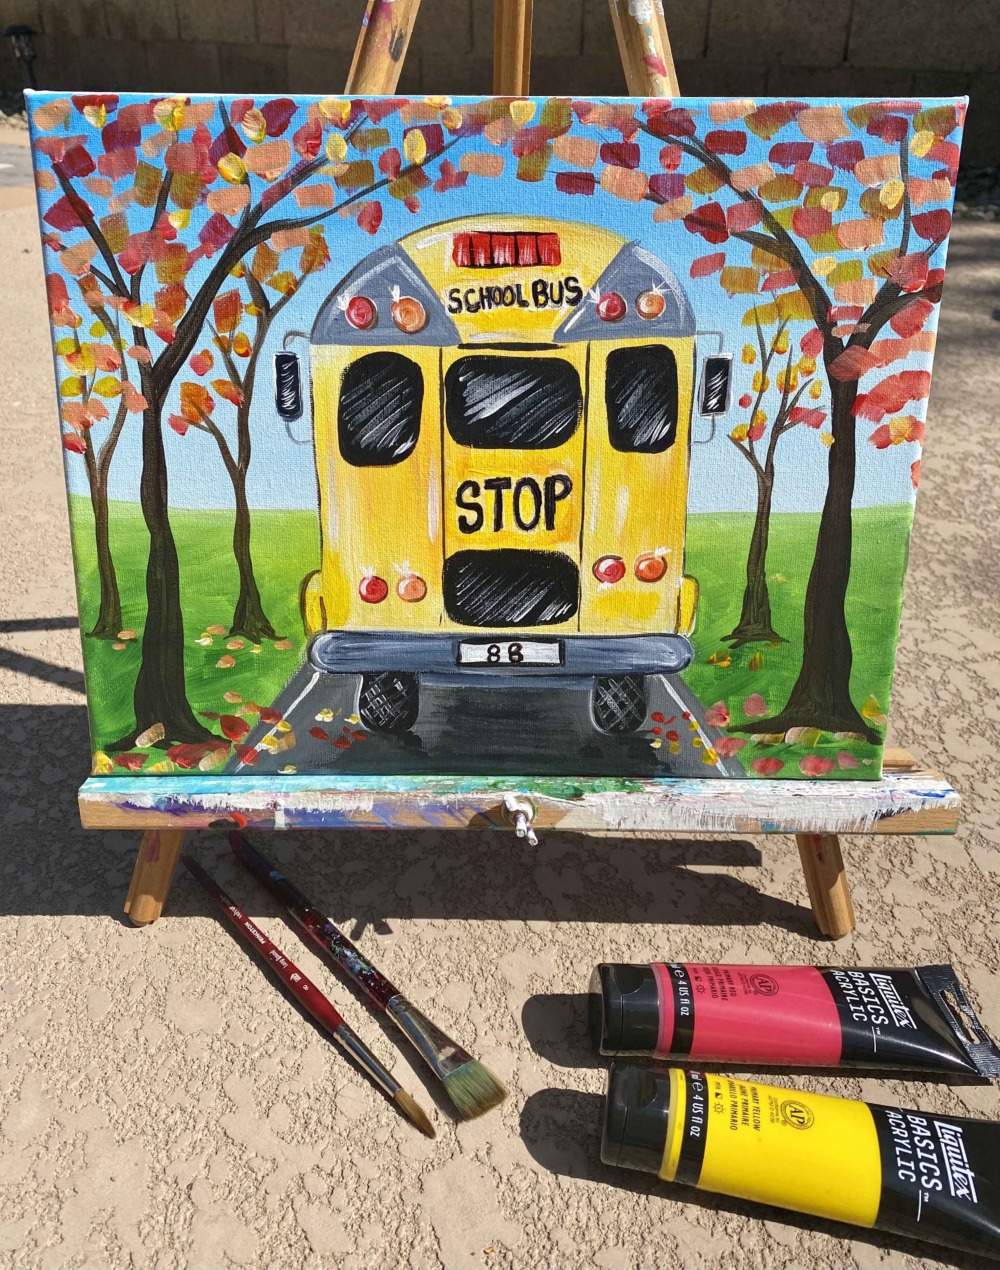
Materials needed:
School Bus

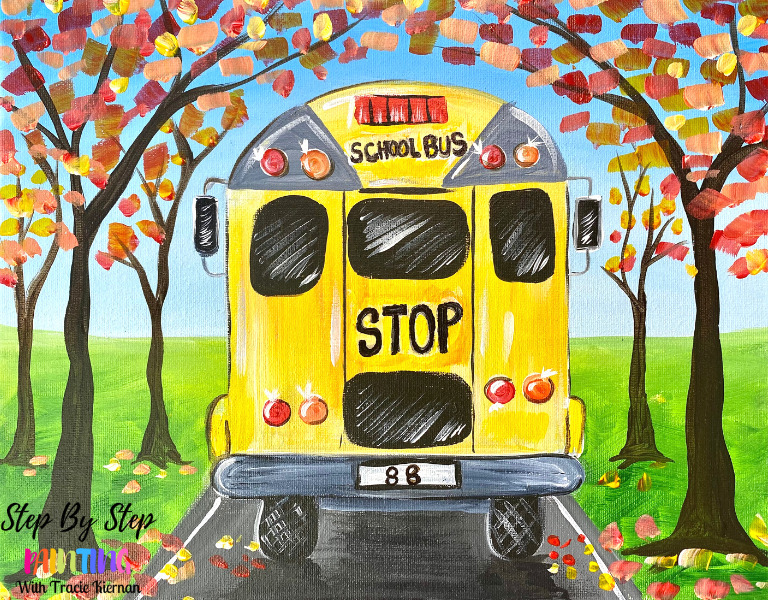
Learn how to paint an adorable yellow school bus going down a path lined with fall trees!
Materials
- 11 x 14 Canvas
- Acrylic Paint
- Brushes
- T-Square Ruler
- Pencil
- Optional Traceable
- Optional Traceable Transfer Paper
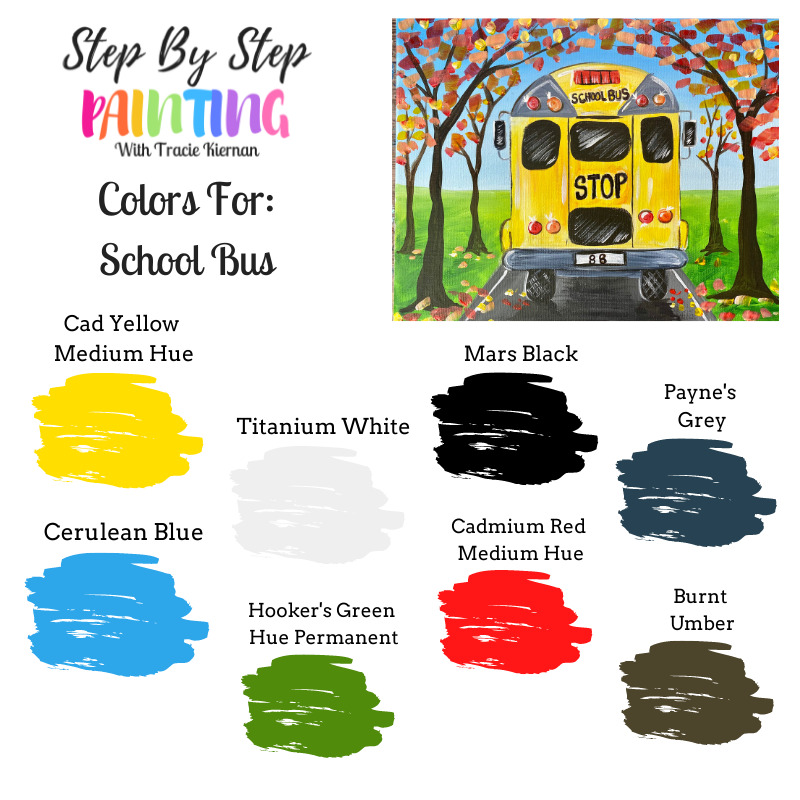
Colors
- Cad Red Medium Hue
- Cad Yellow Medium Hue
- Hooker's Green Hue Permanent
- Cerulean Blue
- Mars Black
- Titanium White
- Burnt Umber
- Payne's Grey
Brushes
- 3/4 Flat Wash
- 12 Bright (or any small flat brush)
- 8 Round Brush
- 4 Round Brush
- 5/0 Round Brush (optional)
- Sharpie or Black Paint Pen (optional)
Instructions
- See tutorial on www.stepbysteppainting.net for full directions!
Color Palette:
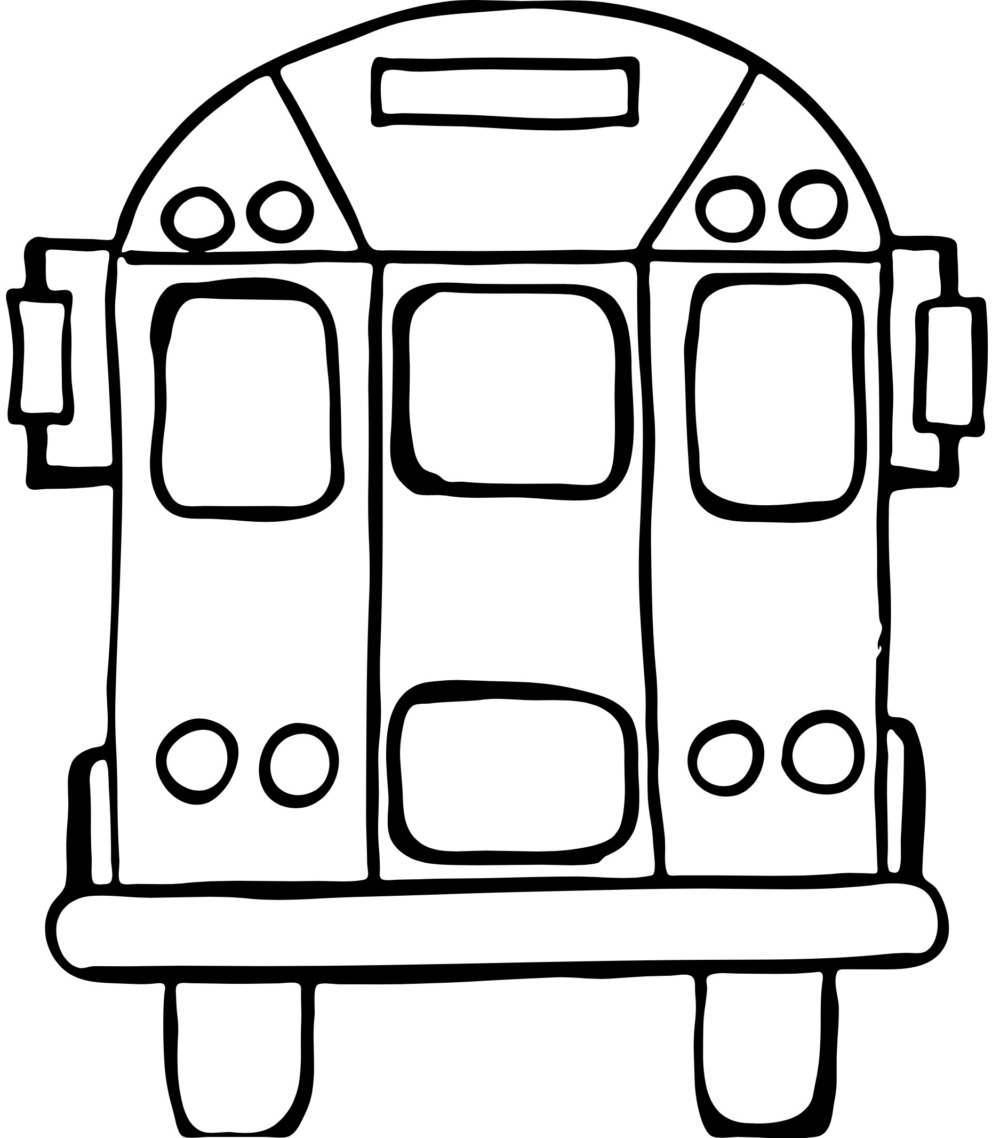
Traceable:
Tip: you can transfer this bus to the canvas first and outline it with a sharpie! The sharpie drawing will still show through your first layer of paint. This is great to do if you are doing this bus painting design for a DIY paint party gathering! Otherwise you can wait until step 5 to transfer the bus to the painting.
Click the image of the bus to download the JPEG or click the File Download below to download the PDF file.
Directions At A Glance:
Video
Step By Step Directions:
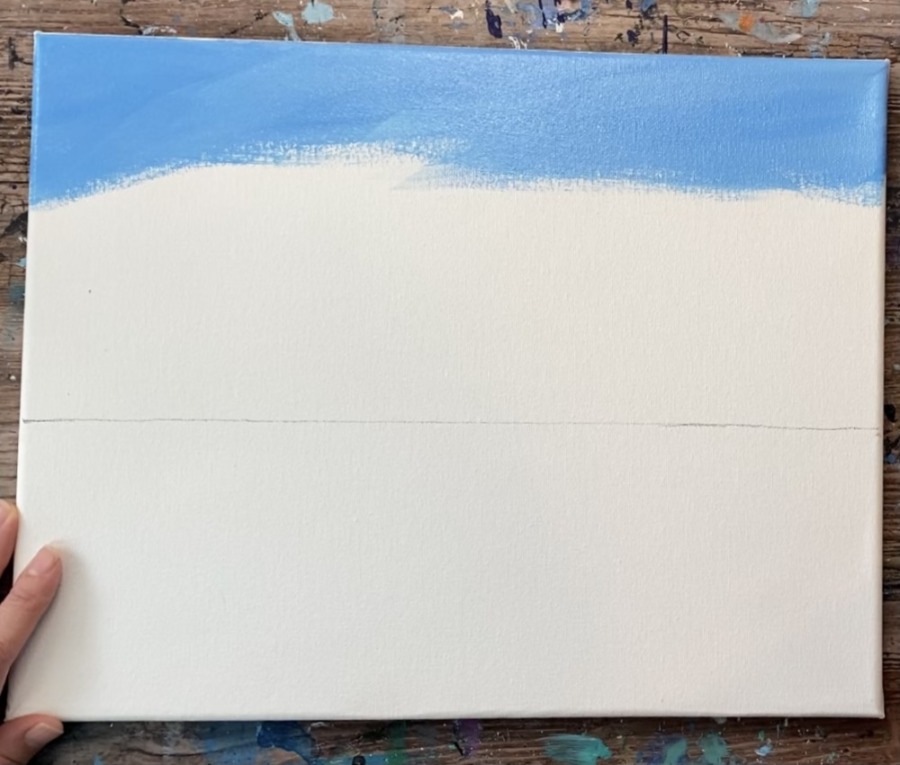
1. Draw Horizon Line & Paint The Sky
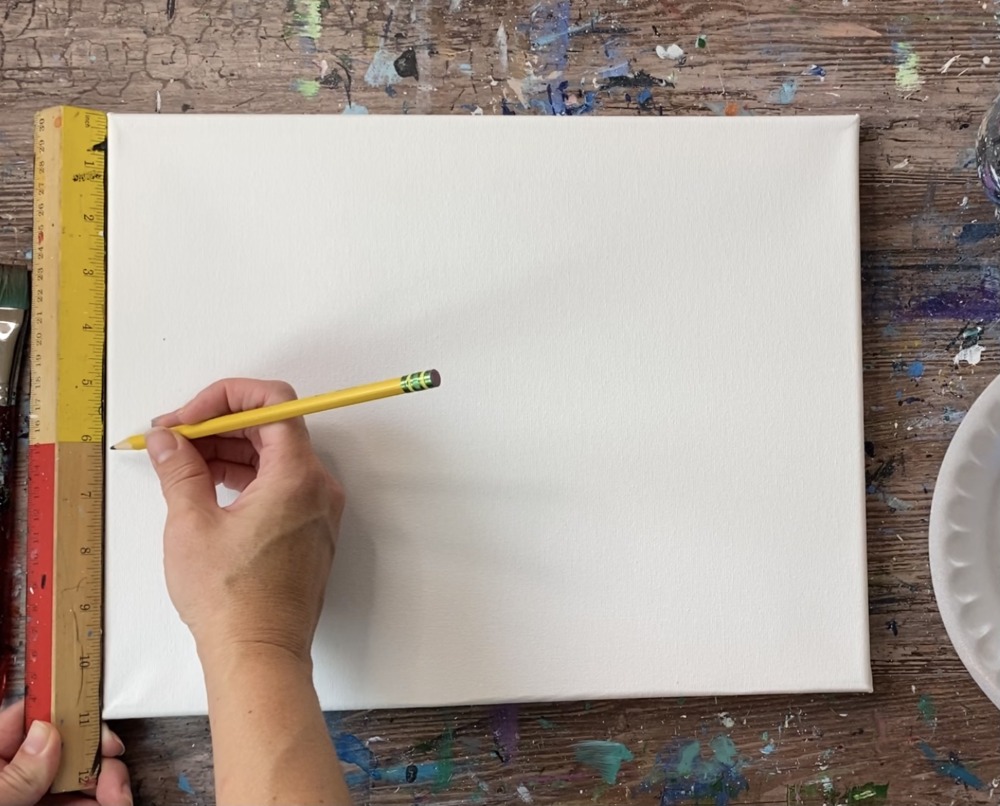
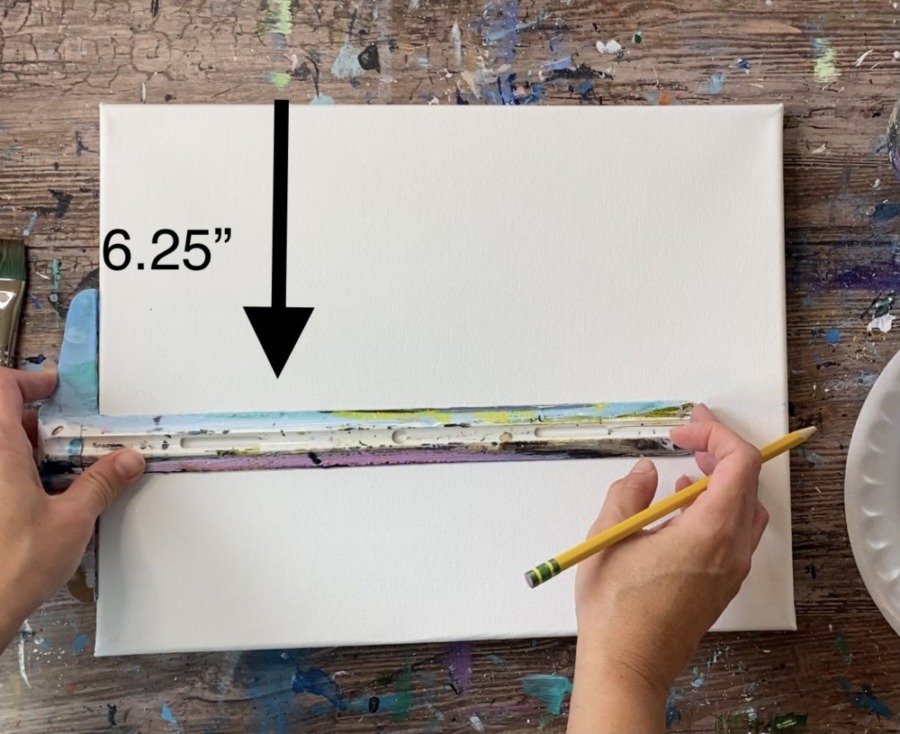
Place the horizon line of this painting at about 6.25″ from the top of the canvas. Use a ruler to make a mark and then draw a horizontal line across the canvas.
Then paint the sky above the horizon line. Load your palette with cerulean blue and titanium white.
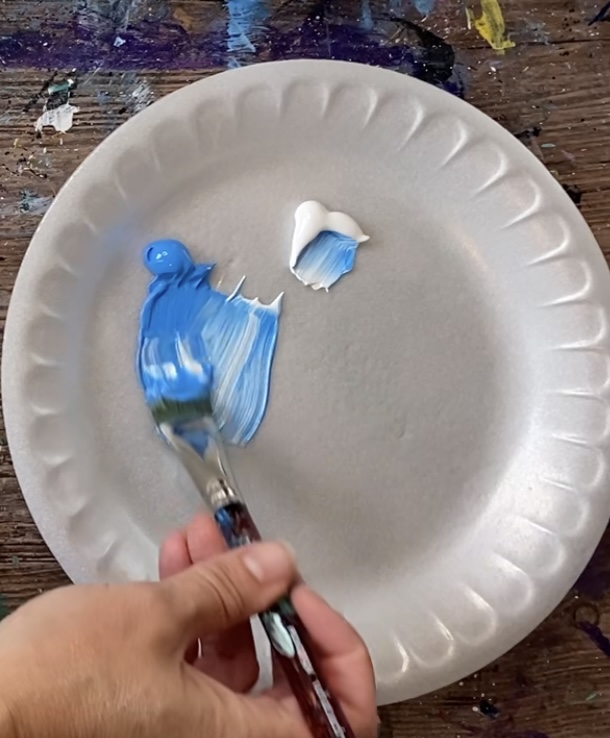
Load your 3/4″ flat wash brush in equal amounts of the light blue and the white. Start at the top of the canvas. Paint angular strokes at the top blending the blue and the white together.
Then gently blend titanium white into the blue and work your way down the canvas. continue to paint angular “x style” strokes so the white blends. The sky gets gradually lighter the further down the canvas towards the horizon line.
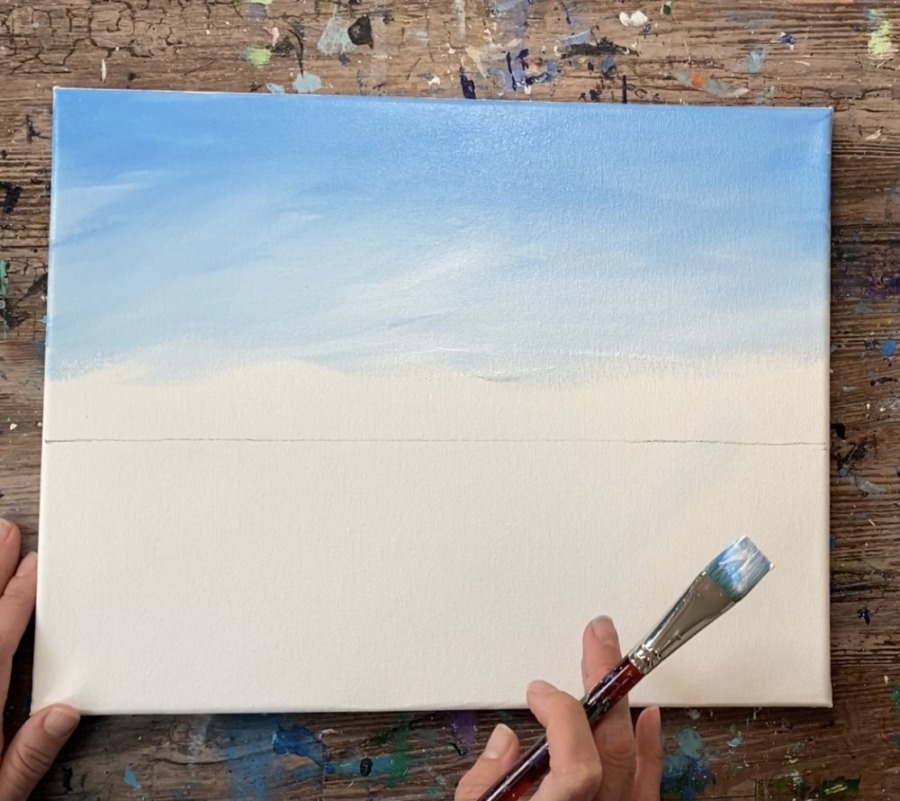
Stop when you get to the horizon line.

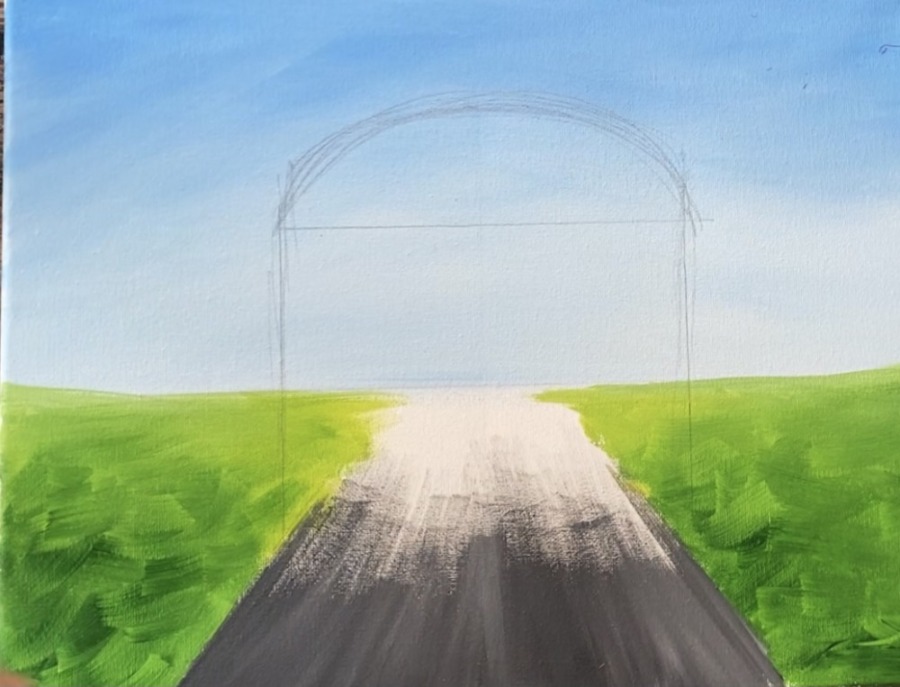
2. Draw The Road
Use a ruler to estimate the bottom opening of the road. This is approximately 9″ wide. Make marks with the ruler.
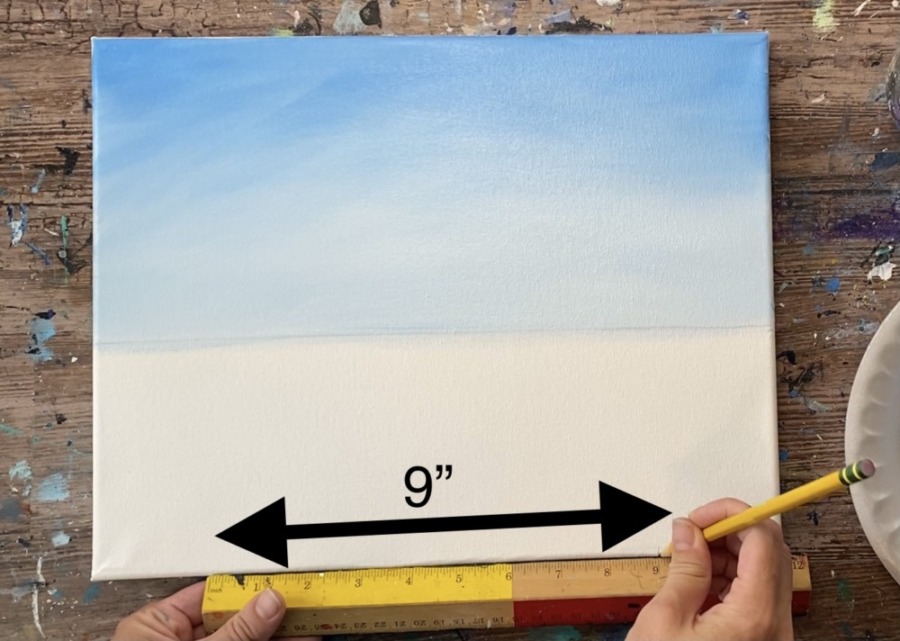
Then draw two angle lines at the 9″ marks. This represents the road. You do not have to draw the road all the way to the horizon line because the bus will be covering the majority of the road.

3. Paint The Grass
Paint the grass under the horizon line. Load your palette with hooker’s green hue permanent, cad yellow medium and titanium white. Make a “light spring yellow” color on your palette by mixing 1 part hooker’s green, 1 part cad yellow medium and 2 parts titanium white.
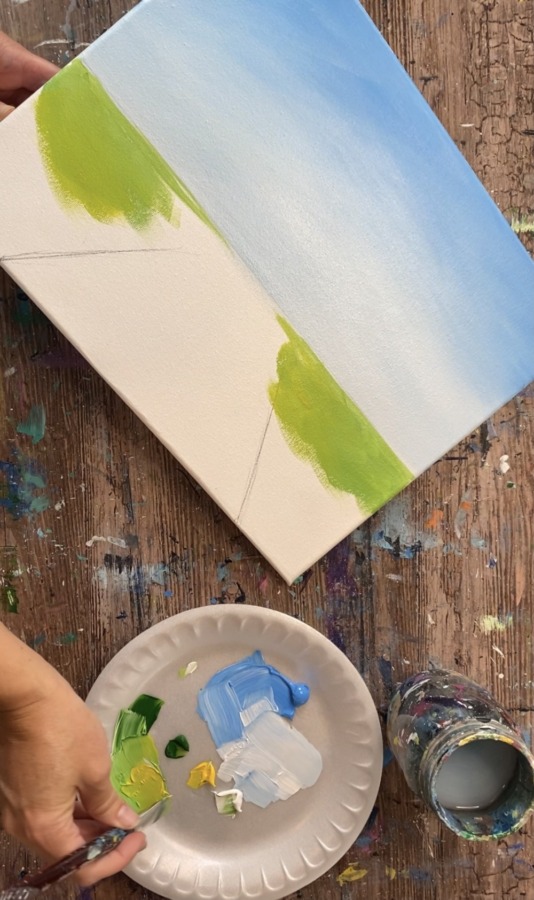
Use your 3/4″ flat wash brush and start painting the grass under the horizon line. Paint in “x style” strokes blending the colors. When you paint these style of strokes, you create texture in the grass.
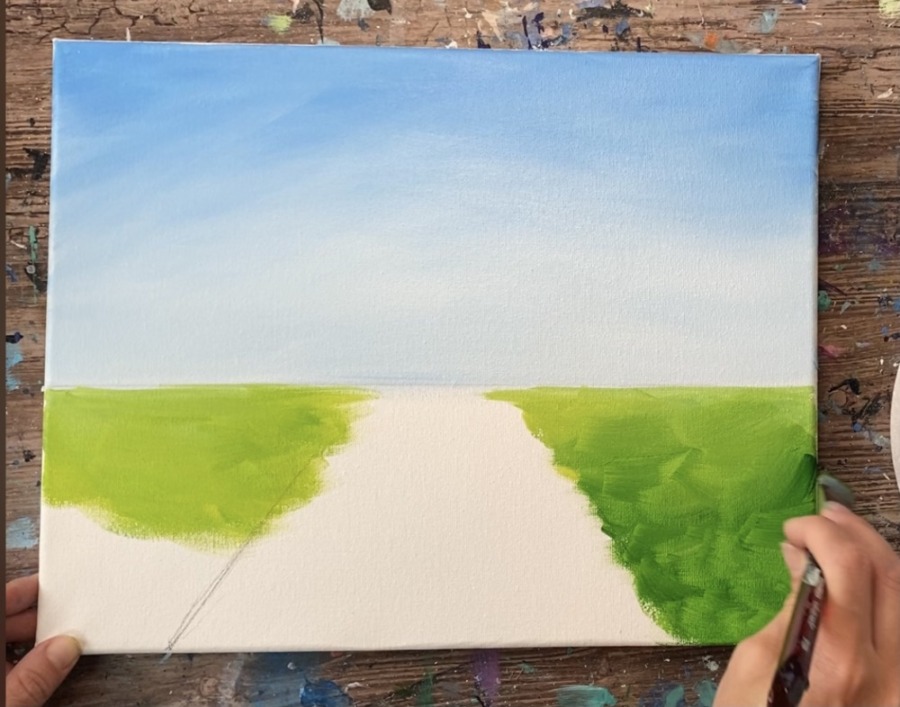
Then gradually add hooker’s green hue permanent into the lighter green so that it blends. The grass is lighter just under the horizon line and gets darker as you go down to the bottom of the painting.

Tip: to simplify this, you can just paint the grass one solid color of green!
4. Paint The Road
Load your palette with mars black and titanium white. Use your 3/4″ flat wash brush to paint the road. Paint in an angle starting at the bottom of the road. Load your brush in both the black and the white and let the two colors blend together on the canvas.
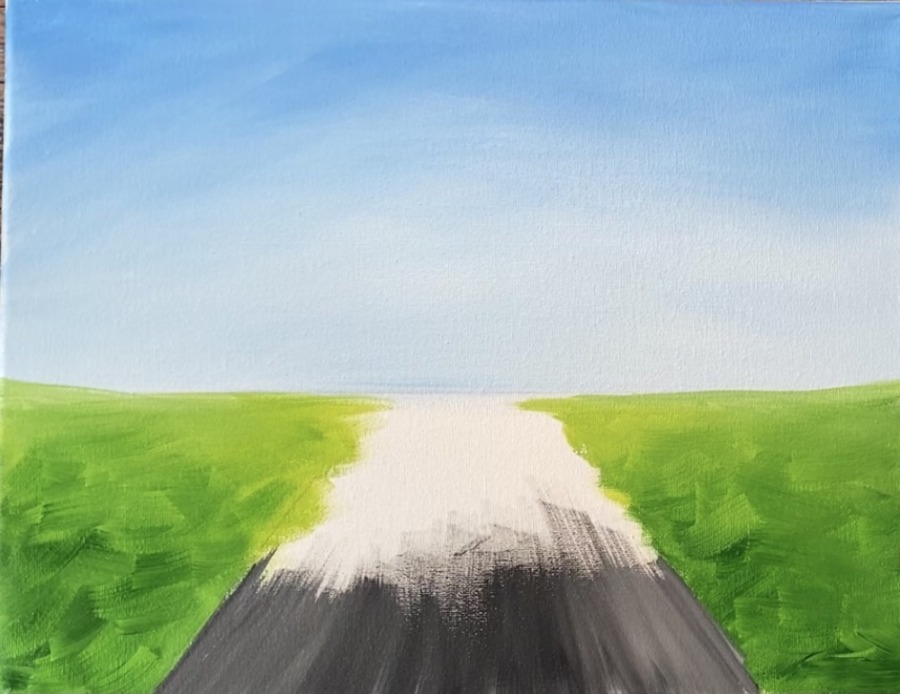
Gently blend more white into the black (if necessary) so there are light streaks on the road. You do not have to paint the entire road because the bus will be covering the majority of it. In other words, you can choose to paint only half way up the road and stop or paint all the way up.
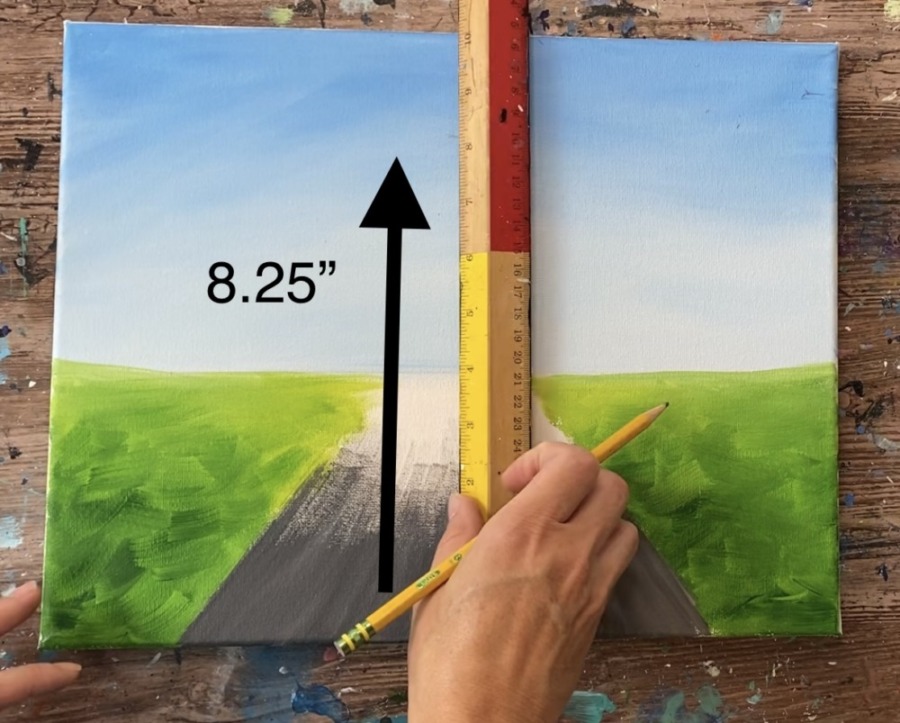
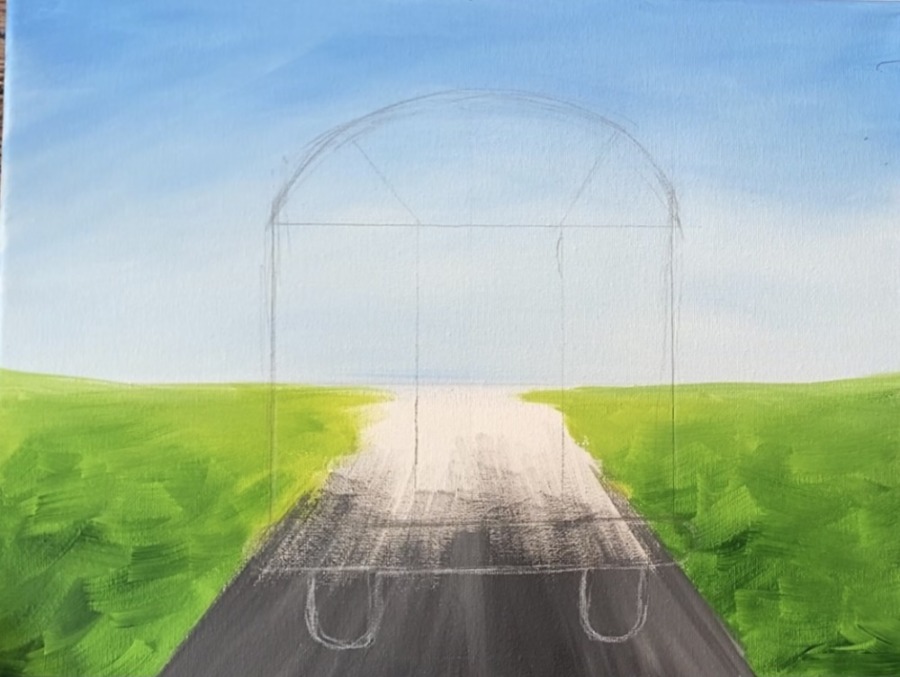
5. Draw The Bus
Use the provided traceable and a sheet of graphite paper to transfer/draw the bus. Position it so the wheels are about an inch from the bottom edge of the canvas.
The following instructions are how to free draw the bus:
The bus height from the bottom of the wheels to the top of the bus is 8.25 inches. Mark that with a ruler and draw a vertical line. This will be the center of the bus.
Then draw a stretched, horizontal curve on top of that vertical line. This curve is about 6 inches wide. You can use a ruler to measure the width of that curve.

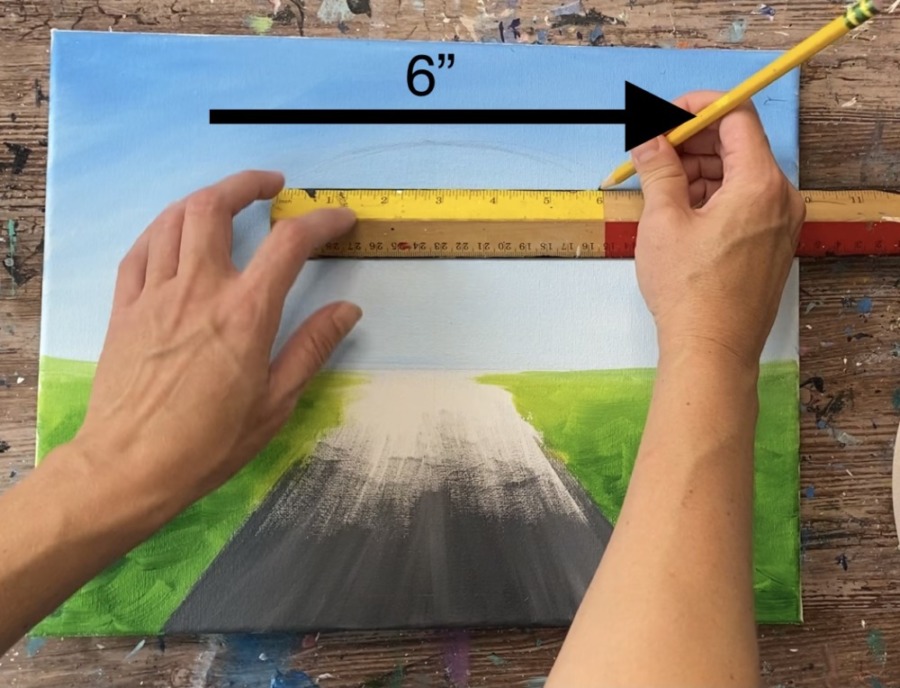
Then draw a horizontal line below that curve. This is the top portion of the bus. Then use your ruler to draw two vertical lines on both sides of the curve.
Lightly draw the bumper. This number is a stretched rectangle about 3/4″ thick with curved sides. Then draw your two wheels. These are rectangular shapes with curved bottoms. (Note: I drew this part with a white chalk pencil so you can see the drawing better).

This next part is optional because you will be painting over it but draw the two diagonal lines on the top of the bus where the arch is. Then draw two vertical lines splitting the bus into thirds.
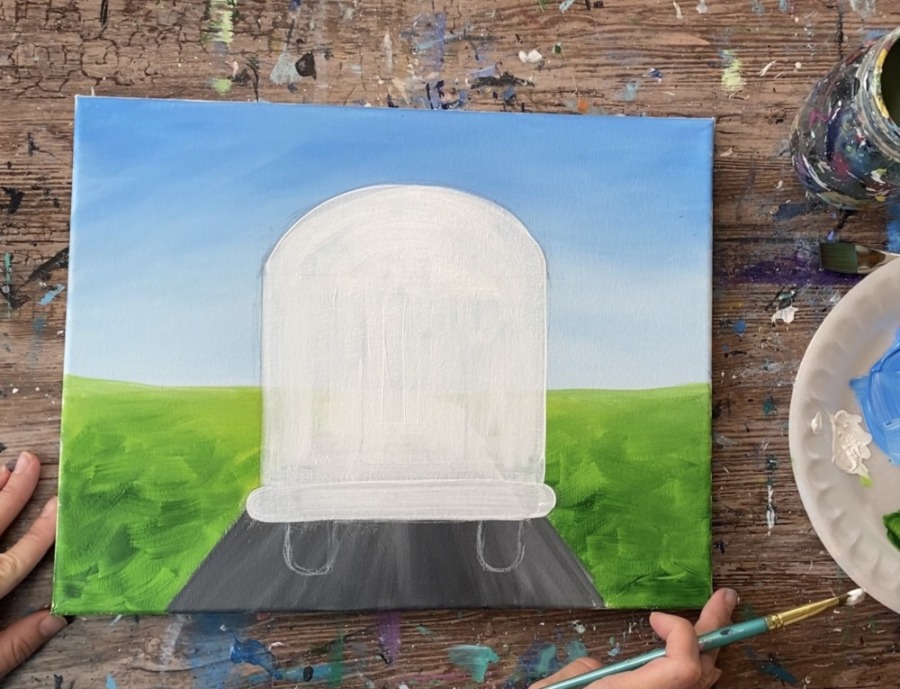
6. Paint The Bus
Load your palette with titanium white. Use a #12 bright brush (or your 3/4″ flat). Paint the bus a solid coat of titanium white. Paint the bumper titanium white.
Wait for the white coat of paint to dry. Then paint the bus yellow. To get the different variations of color in the yellow, blend some white into the yellow as well as a TINY bit of cadmium red medium hue. When you blend the bit of red into the yellow it will give it some warm tones.
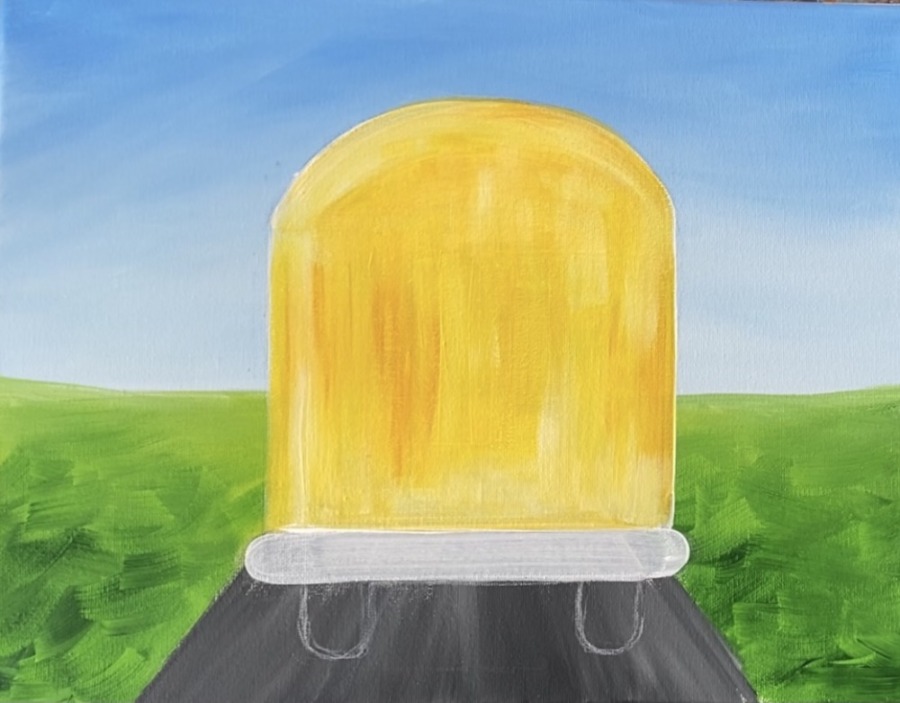
Paint your strokes in mostly vertical strokes blending the colors on the canvas.
7. Paint Bumper & Wheels
Load your palette with payne’s grey and titanium white. Use your #12 bright brush or a #4 round brush to paint the bumper. Blend the white and the payne’s grey together but do not over blend.
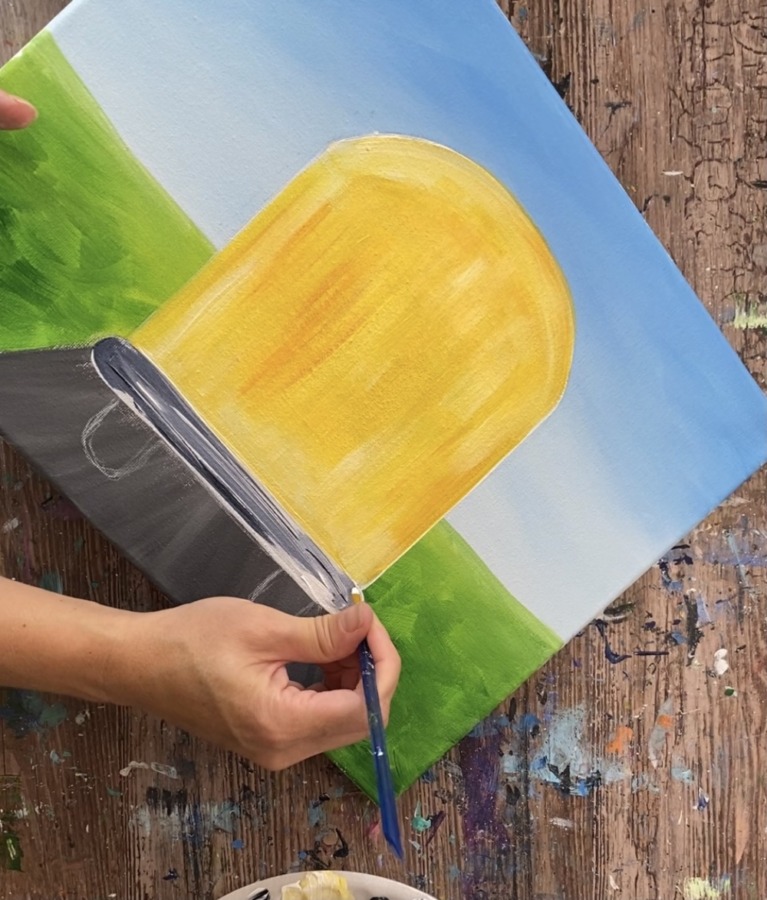
Paint the wheels mars black using the #4 round brush. Then loosely outline the outer edge of the bumper shape with the black.
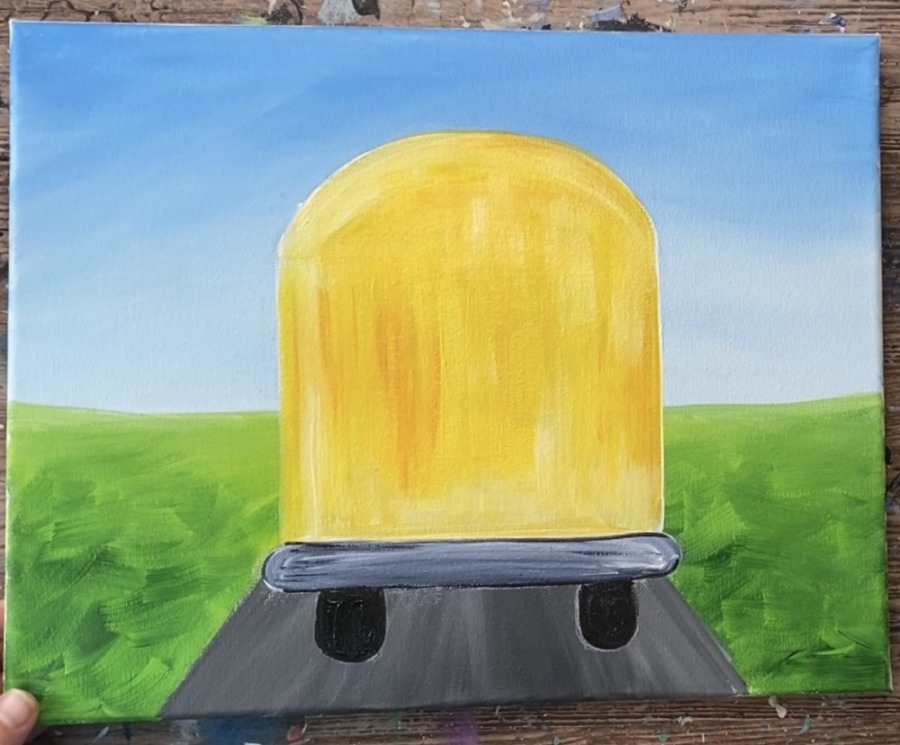
8. Paint Shadow, Street Lines & Wheel Texture
Rinse your #4 round brush and load it into just titanium white. Paint a diagonal white line on both sides of the road. Then paint diagonal lines going in both directions on the wheels to create the wheel texture.

To do the shadow, water down mars black to a very runny watercolor consistency. Use the #4 round brush to paint the black water color under the wheels. Paint a “blob” to create a shadowy area under both of the wheels. Then paint left and right strokes under the bus all the way up to the bumper.
Also note: another gray piece was painted between the wheels just under the bumper.
9. Paint Top Of Bus & Windows
Paint two gray triangles at the top of the bus on the left and the right side. Mix the grey on your palette by mixing 1 part Paynes grey to 3 parts titanium white (or until you get a medium shade of grey).

Use your #4 round brush to paint both of the triangles.
Then rinse your round brush and load it with just mars black. Loosely outline the middle rectangle shape.

Then paint the top middle window with mars black. Outline the shape and then paint it solid black.

The shape of these windows are rectangular with curved corners.

Paint a vertical window on the left and right of the bus. Then paint another horizontal shaped window on the bottom.
Top: these windows do not have to be perfect or symmetrical! Your bus has more character if it is not perfect 🙂
10. Paint Reflectors
Use a #4 round brush to paint four small titanium white circles for the reflectors on the bottom of the bus. Then loosely add some highlights with titanium white. Paint these curve highlights on the edges of the grey triangles. Then paint some vertical highlight lines.
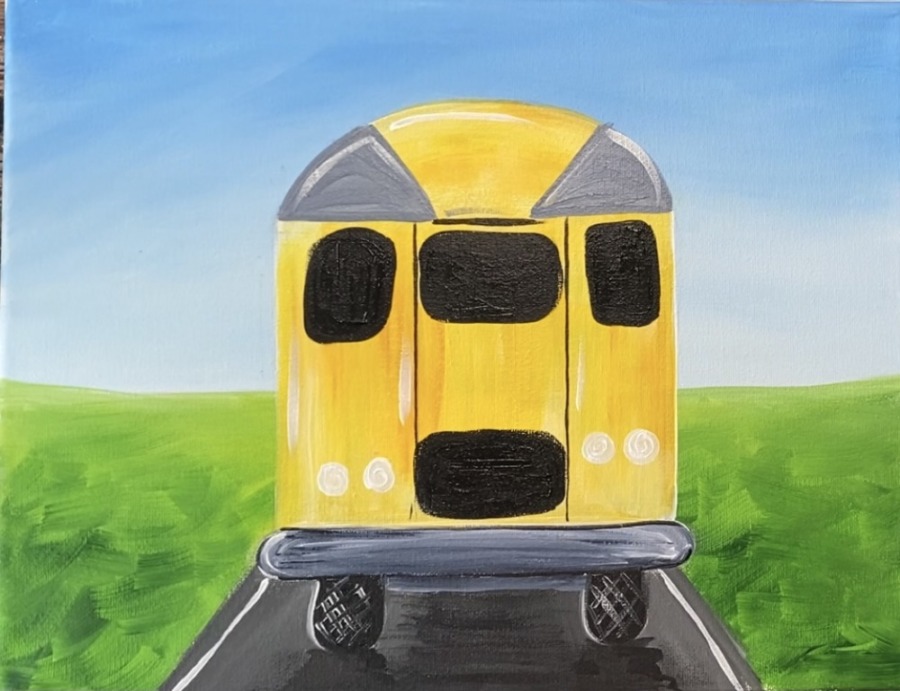
Paint a small red rectangle on the top of the bus for another reflector.
Then paint window reflections on the black windows. To do this, load your #4 round brush in some titanium white. Paint diagonal lines on the windows. Then paint a white rectangle on the bumper for the license plate.

Loosely outline the rectangle of the license plate with mars black. Then paint vertical lines on the red reflector rectangle.

11. Paint Rear View Mirrors
To paint the rear view mirrors, start by painting a small black rectangle on the sides of the bus. Then outline the rectangle with titanium white. Then draw two 90 degree lines to connect the mirrors to the side of the bus.

Loosely paint white diagonal lines on the black part of the mirrors for reflections.

Optional: Then use a 5/0 round brush to paint some white diagonal lines on the reflector circles (to make them look like they are blinking).
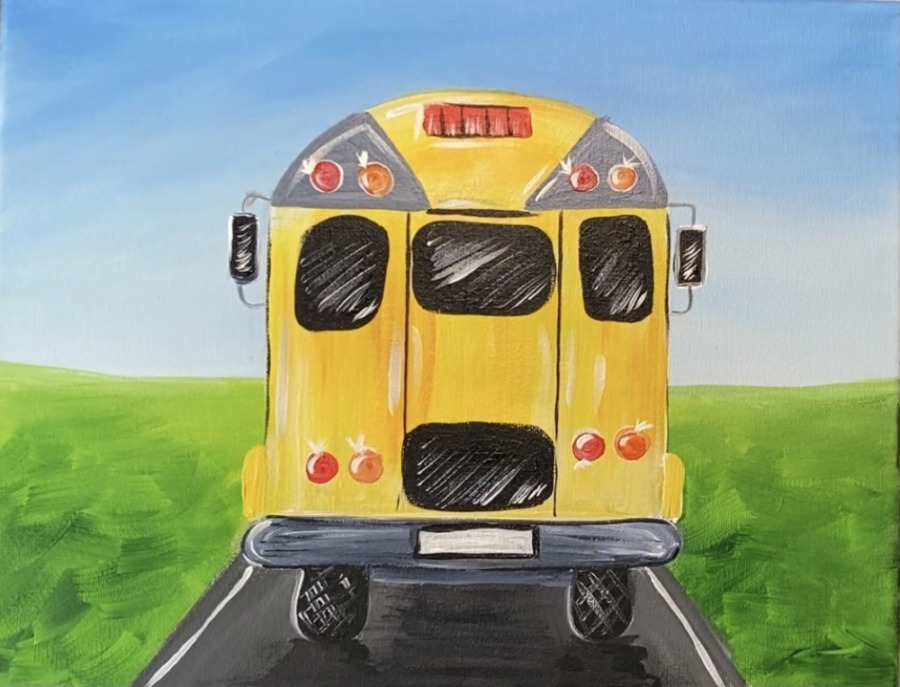
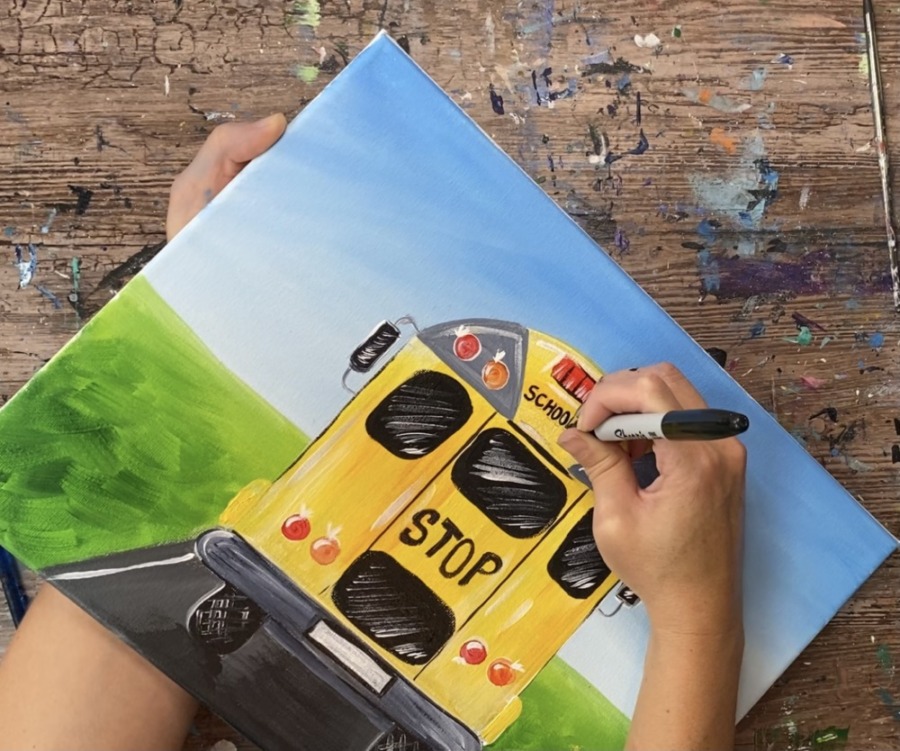
12. Write “Stop” & “School Bus” or Custom Letters
You can do your letters with a black paint pen, sharpie or a small brush and black paint. I used a sharpie for this step! It also helps to draw the letters out with pencil first so you get the placement right.

I wrote the words “stop” and “school bus”.
13. Paint Trees & Fall Leaves
Next, paint the trees. Use a #8 round brush and the colors: burnt umber & mars black. Mix about equal parts brown and black. Then slightly water it down to make the color flow a bit better.
Paint the tree starting at the bottom forming the roots and the bottom of the trunk so they “flute out”.

Then paint your branches so they get thinner as you work up the tree. The tree splits into two main branches and then smaller thinner branches.

You don’t have to do too many details with these trees! Keep them simple. Paint another large tree on the left the same way you did the tree on the right.
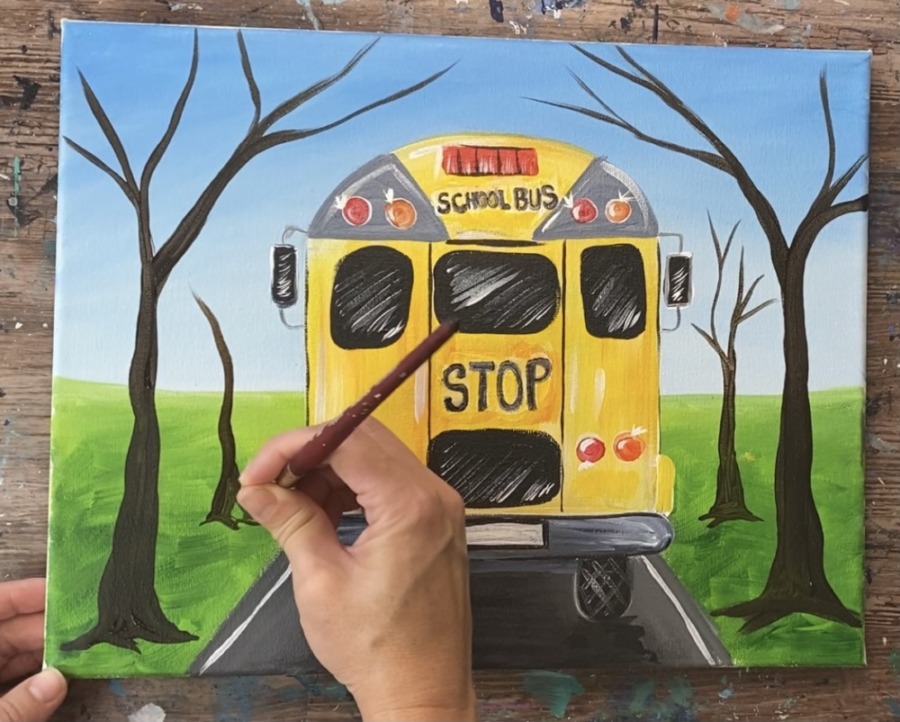
Then paint two smaller trees in the distance.

If you want, you can paint one or two more smaller trees further in the distance.
Then paint the leaves. Use a #12 bright brush. Load your palette with cad red medium hue, cad yellow medium hue and titanium white. Paint small square angular strokes to create the leaves starting with the red.
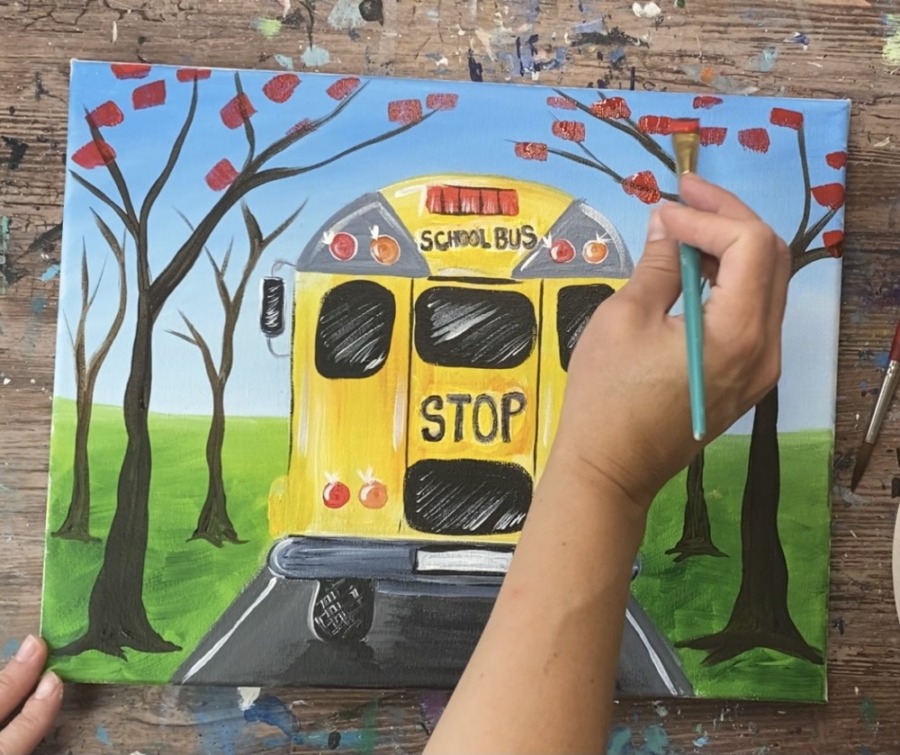
Then, without rinsing your brush, load it into other colors as well. Use the yellow and the white to create different variations of yellow and orange.
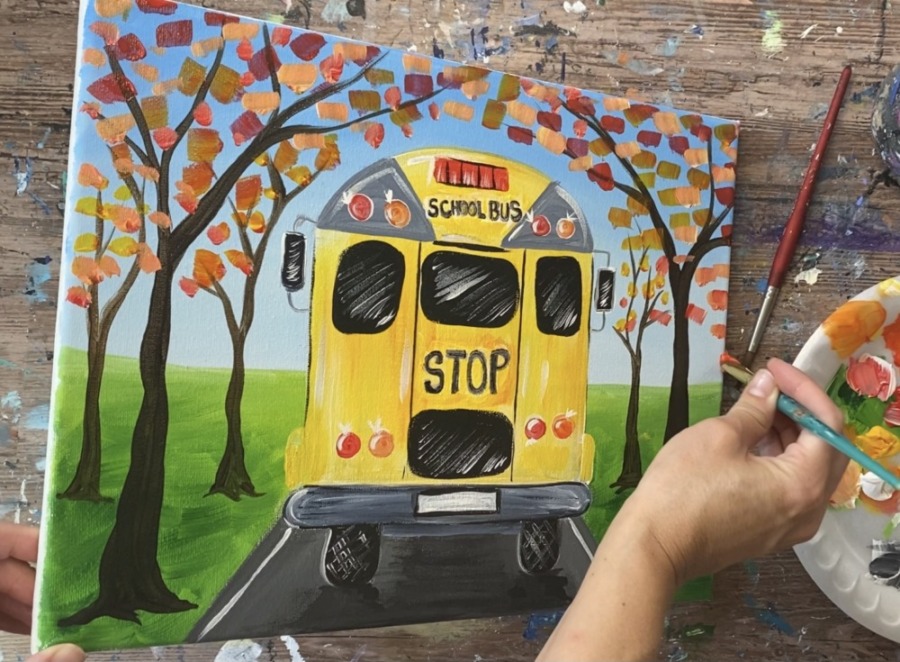
Paint your leaves all over the top part of the sky. For the smaller trees in the distance, use just the corner of your brush to paint smaller leaves.

Paint some leaves on the ground as well!
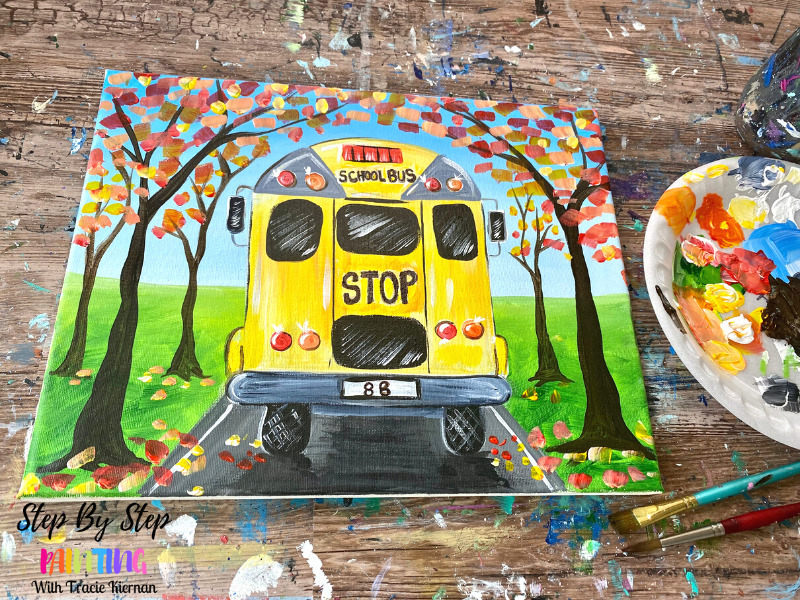
Finished!
That’s it! Sign your name and show it off!
Share Your Art Here:


