
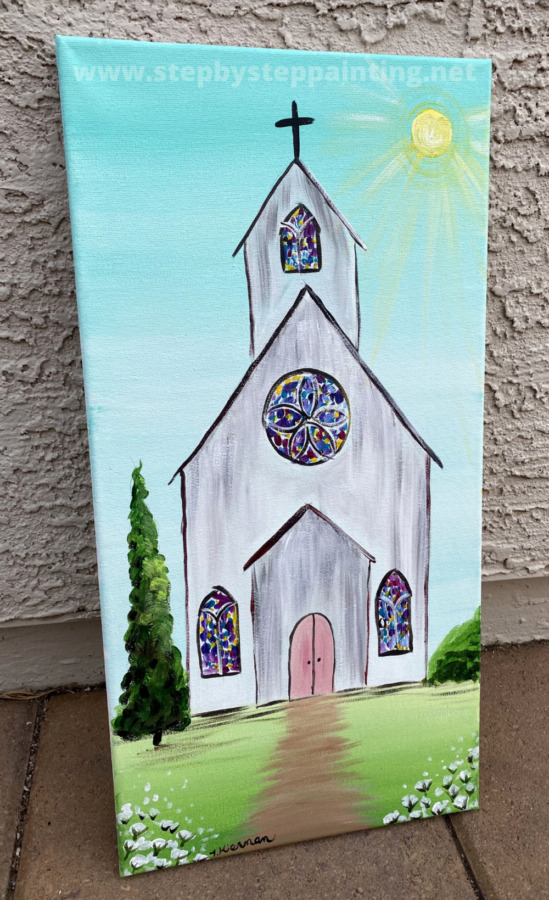
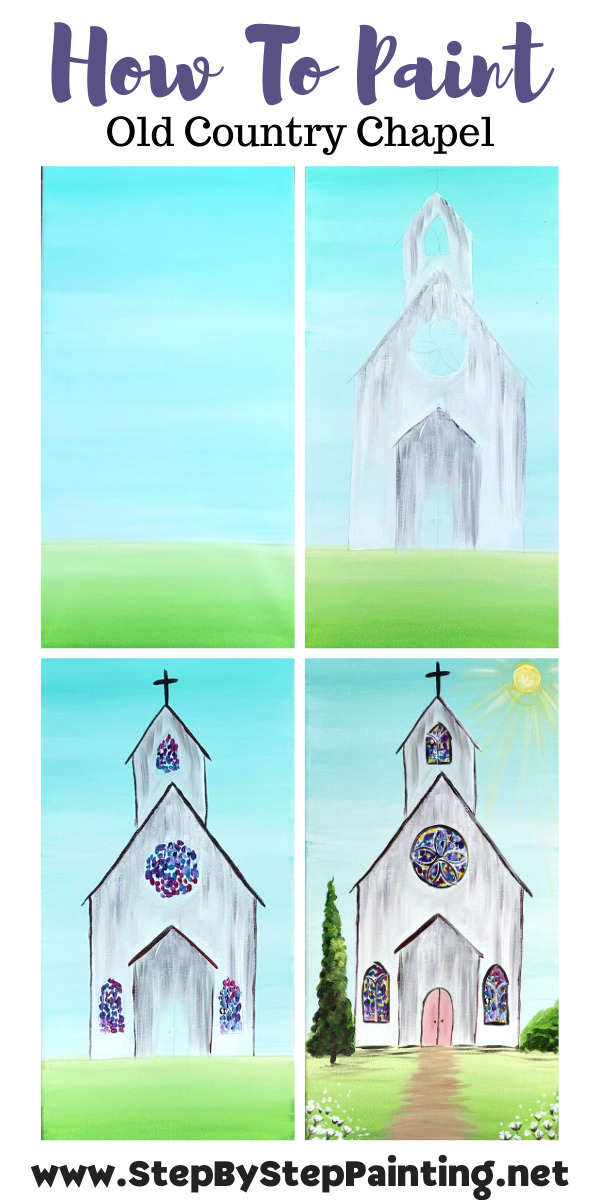
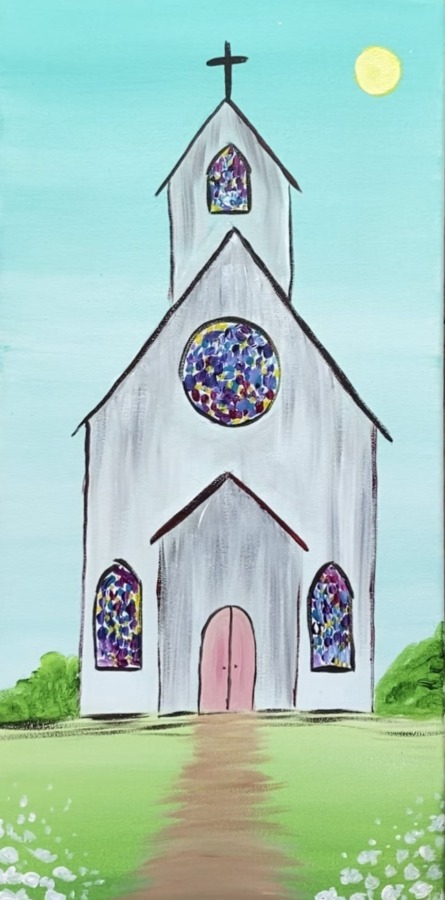
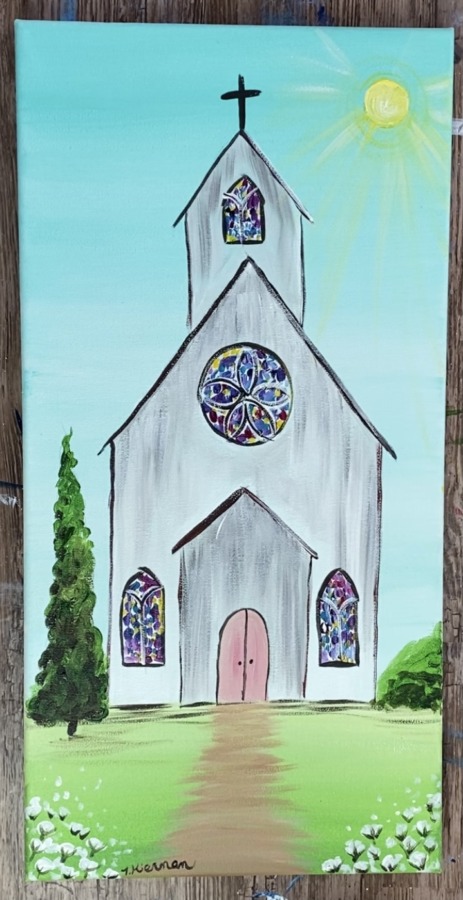
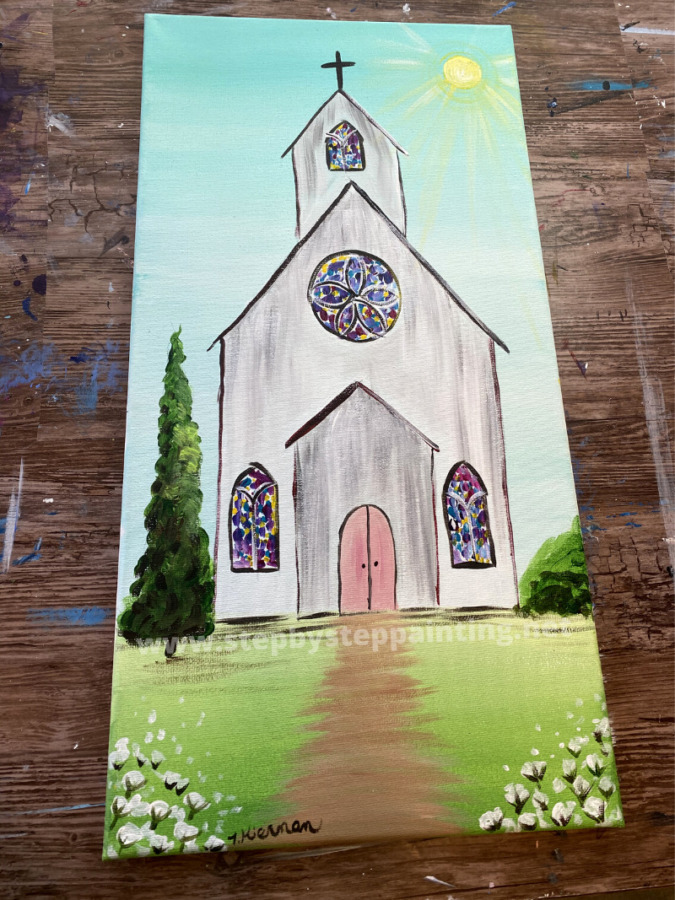
Learn how to paint a simple old country church painting with acrylics on a 10 x 20 long canvas! This is a very easy beginner level painting.
Would you like to save this?
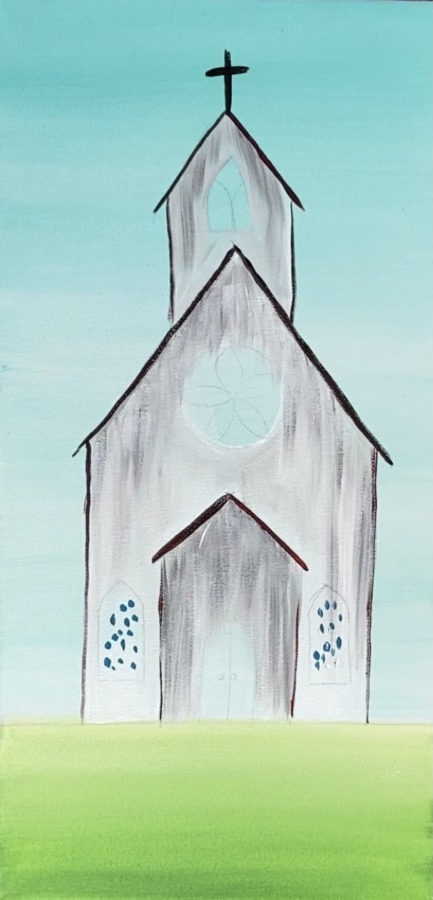
I get a lot of requests for a country chapel style church painting! I think this one can be painted throughout the seasons. You can add snow on the ground for winter or keep the spring theme!
If you do not have the 10 x 20 you can do this on another size such as 11 x 14.

Don’t be afraid to get creative with this one! It is also a very loose, simplified style painting. So do not be afraid to “loosen up”. Do not get caught up with details and trying to make things look real. Relax and have fun!
You can also add a quote or a bible verse in the sky!
Enjoy and happy painting!
Materials For Church Painting
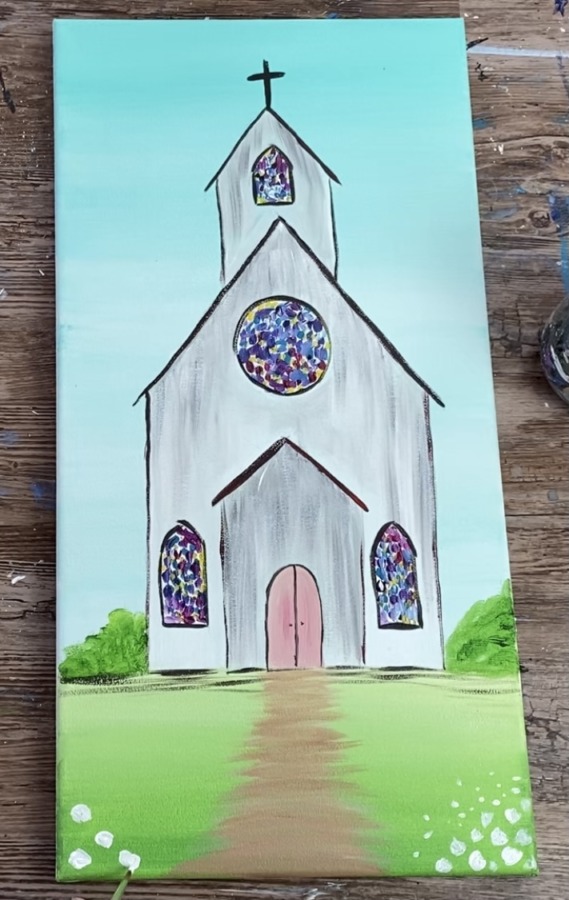
Old Country Chapel Painting
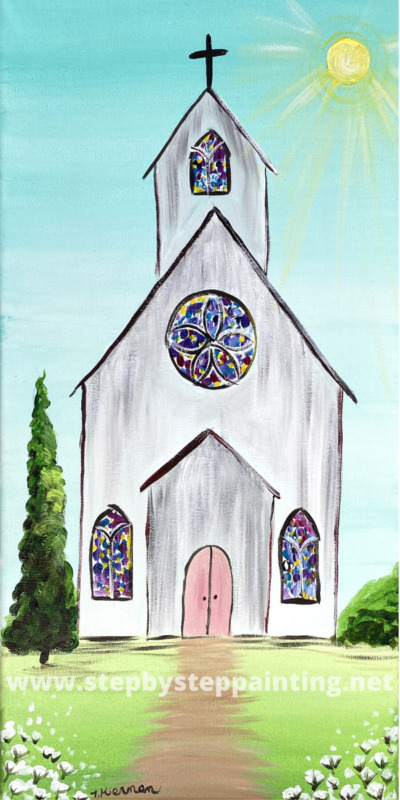
Easy beginner level acrylic painting tutorial. Learn how to paint an Old Country Chapel on a 10 x 20 Canvas.
Materials
- 10 x 20 Canvas
- Acrylic Paint
- Brushes
- Ruler
- Pencil
- Traceable
- Graphite Paper
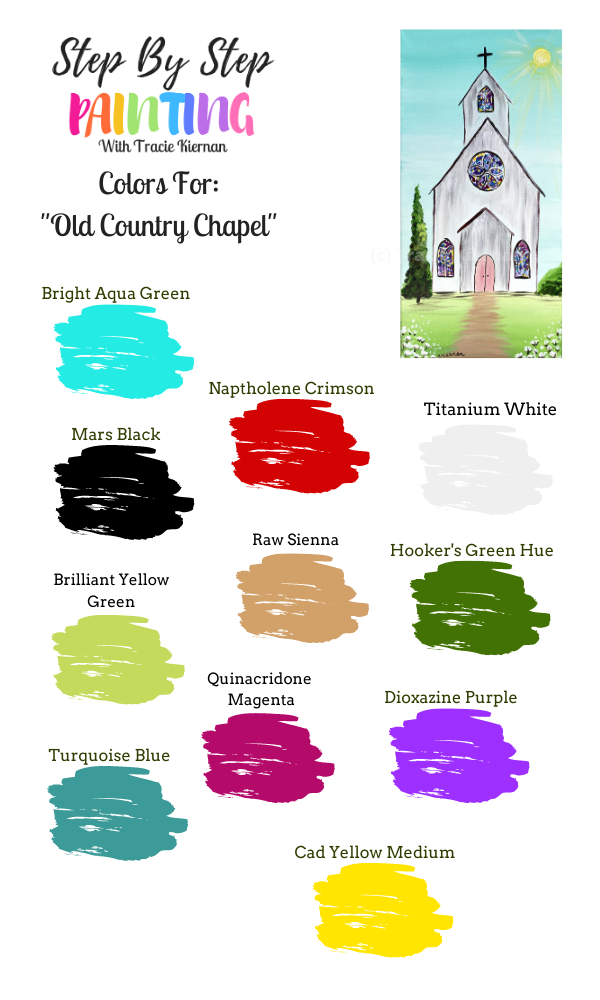
Colors
- Titanium White
- Mars Black
- Cadmium Yellow Medium
- Hooker's Green Hue Permanent
- Brilliant Yellow Green
- Bright Aqua Green
- Raw Sienna
- Quinacridone Magenta (stained glass color)
- Turquoise Blue (stained glass color)
- Dioxazine Purple (stained glass color)
- Naphthol Crimson (optioinal)
Brushes
Instructions
- See tutorial on www.stepbysteppainting.net for full instructions!
Recommended Products
As an Amazon Associate, Michaels Affiliate and a member of other affiliate programs, I earn from qualifying purchases.
Color Palette
There are quite a few colors in this church painting design! Part of it is because the stained glass windows are so colorful. If you want to simplify this color palette you can omit some of the stained glass colors: naphthol crimson, dioxazine purple, quinacridone magenta and turquoise blue.
Directions At A Glance
Traceables

Video For Church Painting
Step By Step Directions For Church Painting
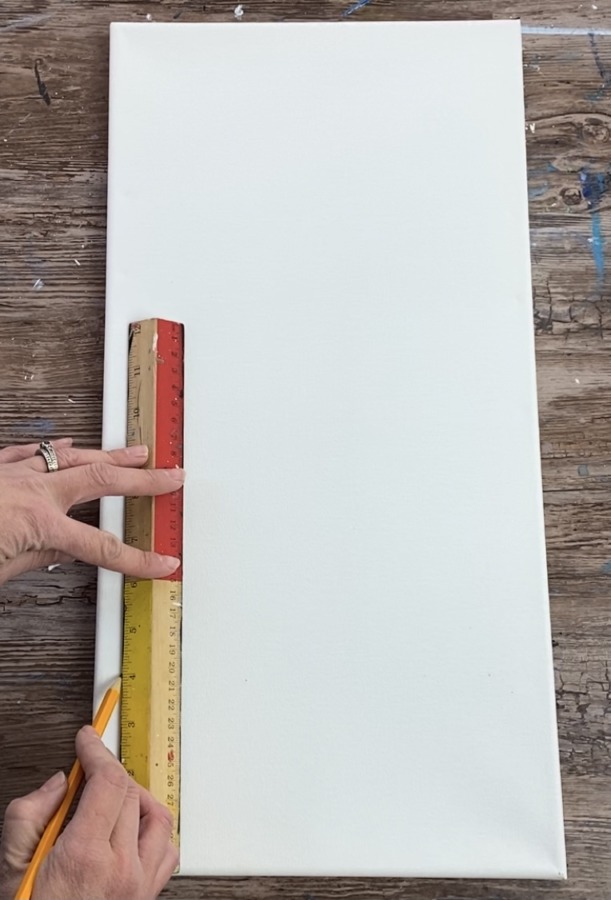
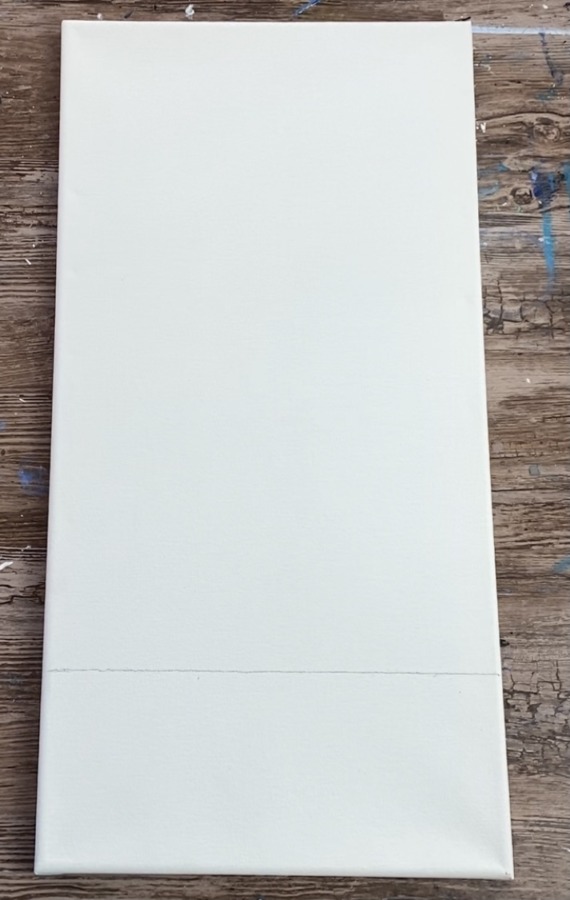
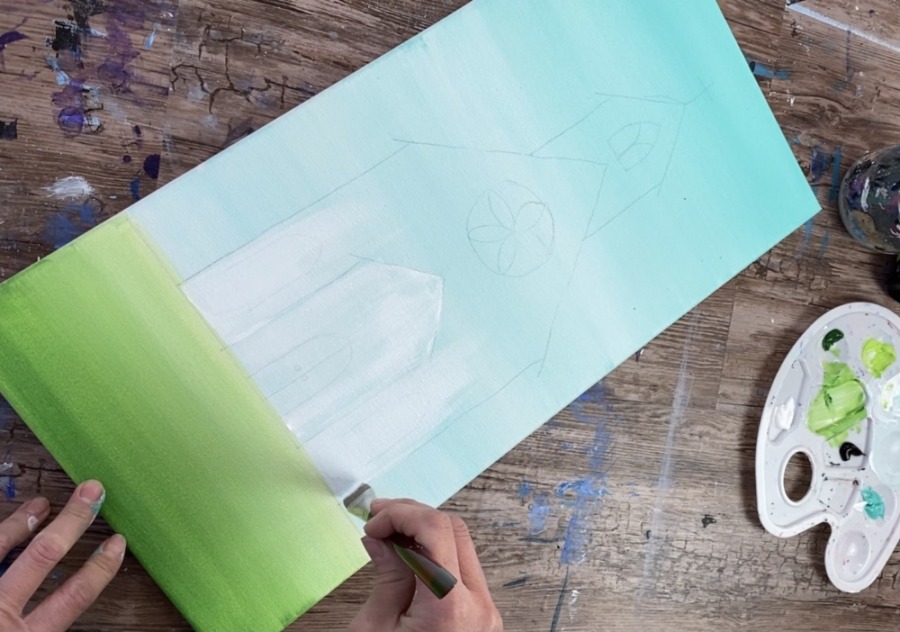
1. Draw a horizontal line 4″ up the canvas
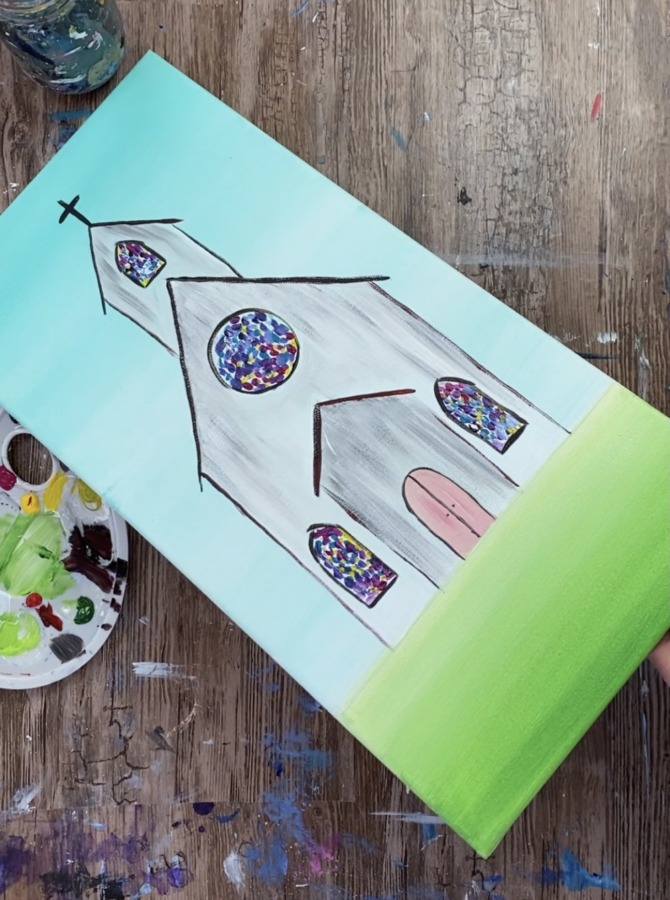
Position your 10 x 20 canvas vertically. Measure with a ruler the 4″ mark and draw a straight line across. This line divides where the sky is and where the land is.
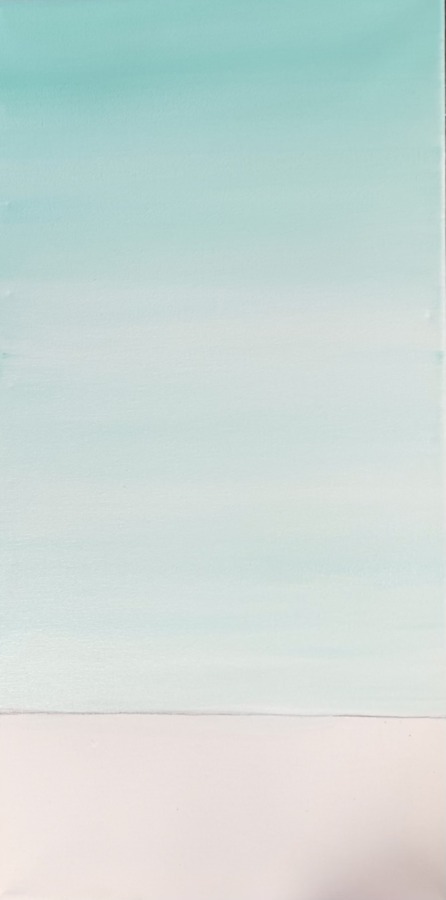
2. Paint the sky
I used a large flat brush (about 2″ wide) for this area because there is a lot of canvas to cover! The two colors in the sky are bright aqua green and titanium white.
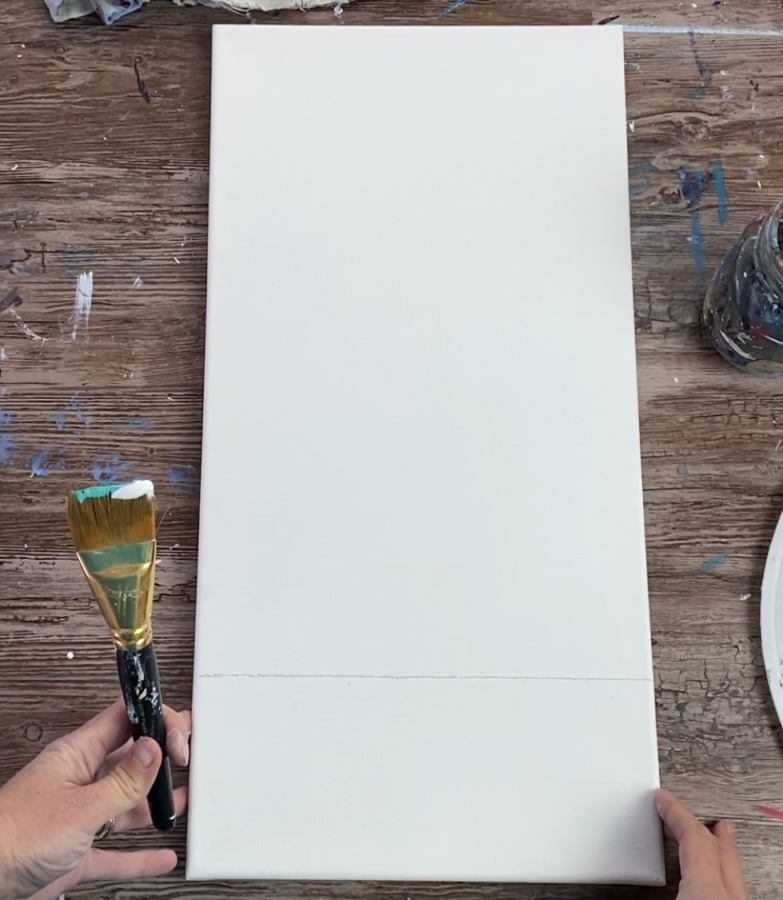
Load your brush in the water and pat it dry. Double load your flat brush in about equal amounts of the aqua and the white. You want this sky layer to be thin so make sure your brush is slightly wet and that will thin down the paint as you apply it to the canvas.
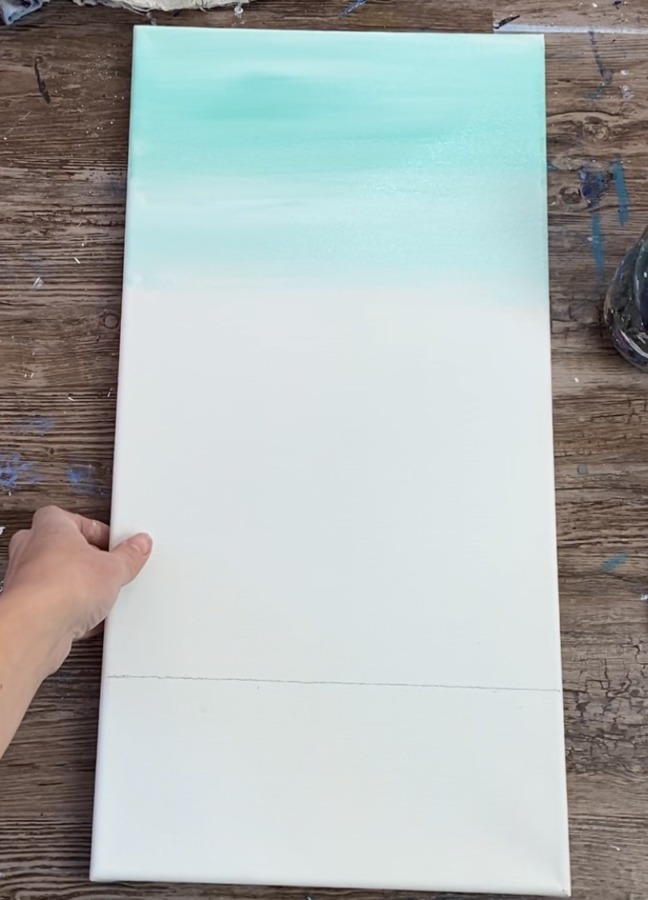
Paint left and right horiztontal strokes starting at the top of the canvas. You want your top part of the sky to be slightly darker (so 1:1 ratio of the aqua to white at the top). Then as you work your way down, start adding more white to your brush.
As you blend the lighter white into the aqua, it will make the color lighter. Gradually let the sky get lighter and lighter as you work your way down to the horizon line.
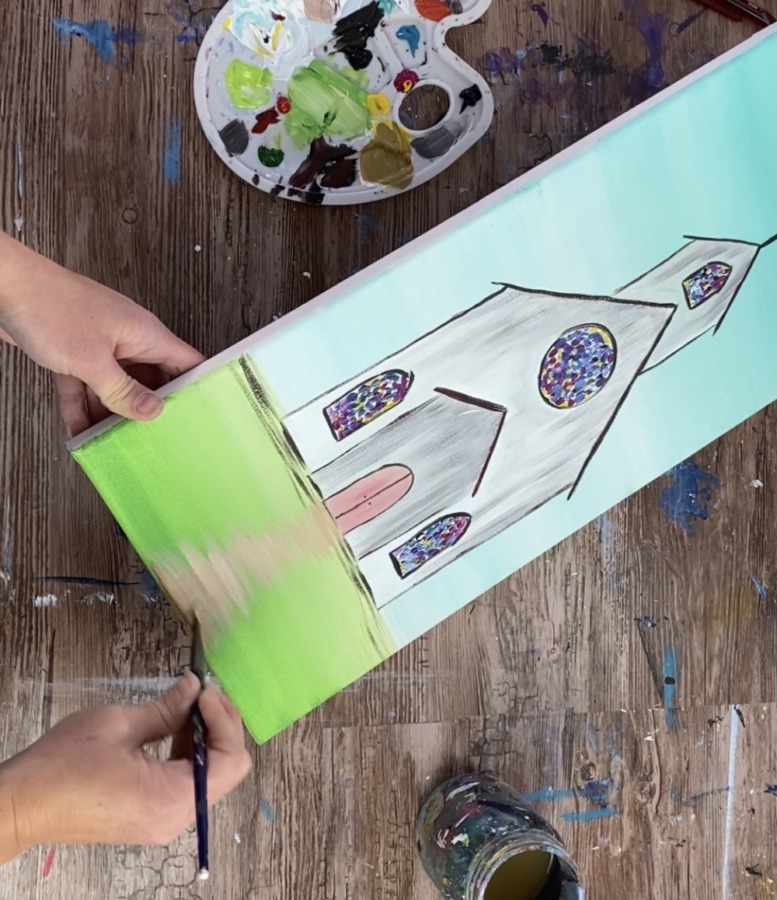
3. Paint the ground
The ground contains 3 colors: brilliant yellow green, titanium white and hooker’s green hue permanent.
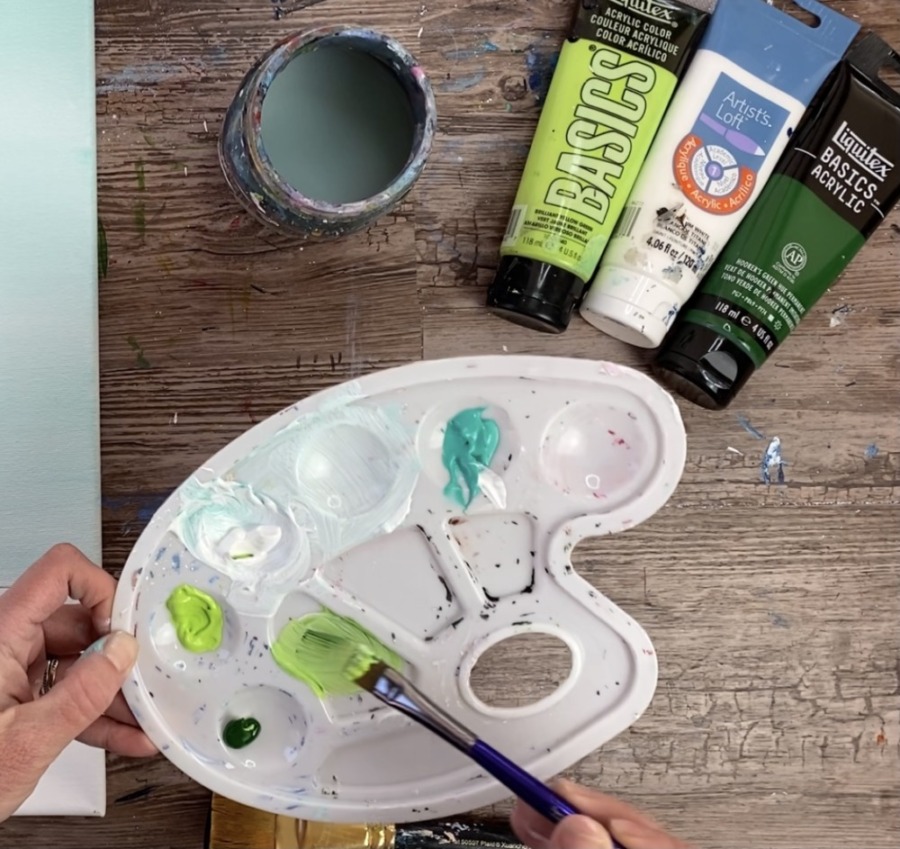
Mix a light green on your palette by blending a small amount of the dark green into the light green and add a small amount of white. (3 parts light green, 2 parts white and 1 part dark green)
The color should be a pretty spring green color. Start at the bottom of the canvas and paint left and right horizontal strokes. You can use that large flat brush or a 3/4″ wash brush for this step.
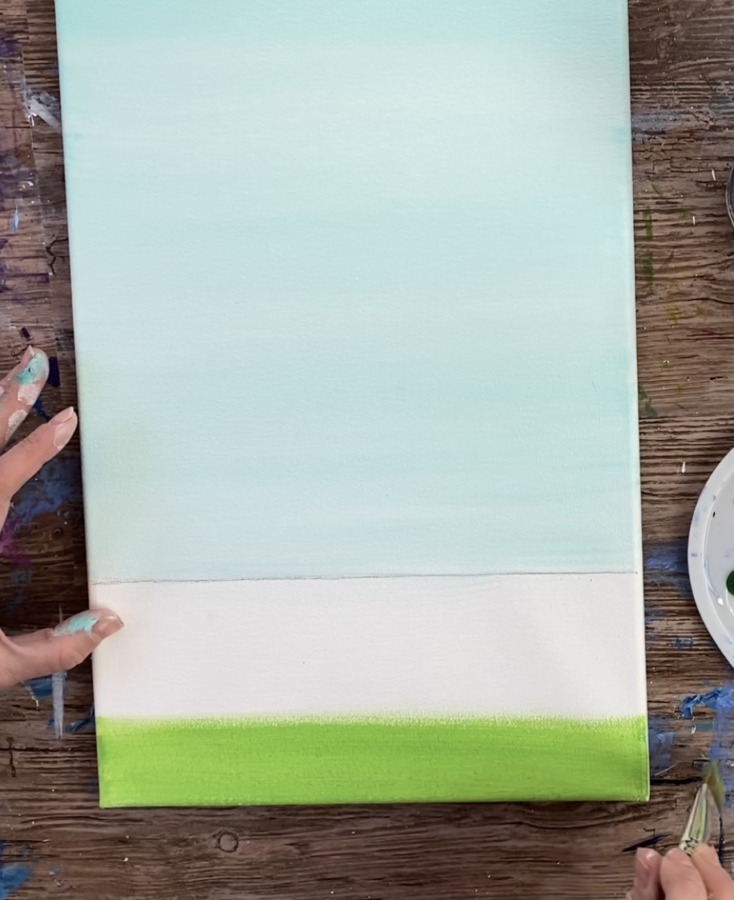
Then mix some white into your green so it is much lighter and apply the lighter green at the top. Continue to paint left and right horizontal strokes.

You want to try to make the green lightest in the distance and slightly darker on the bottom.
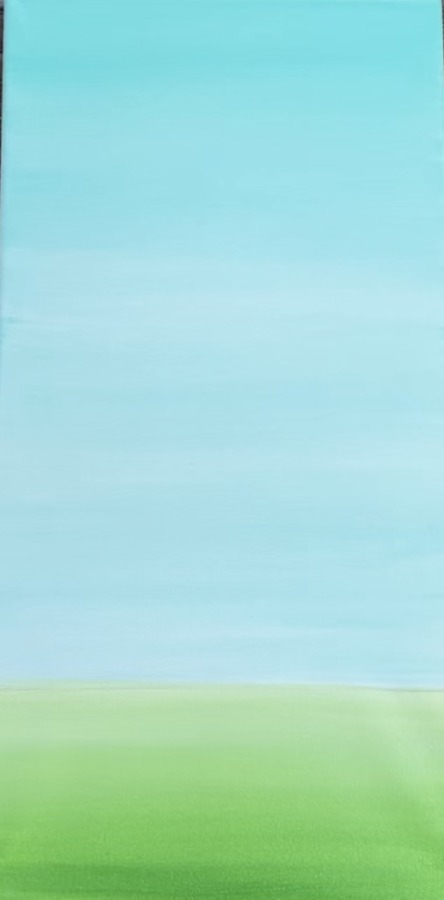
Wait for this to dry before going onto the next step.
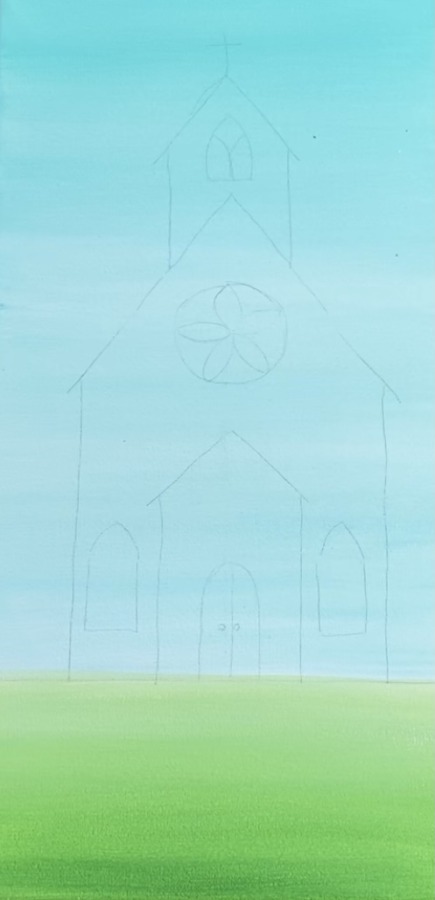
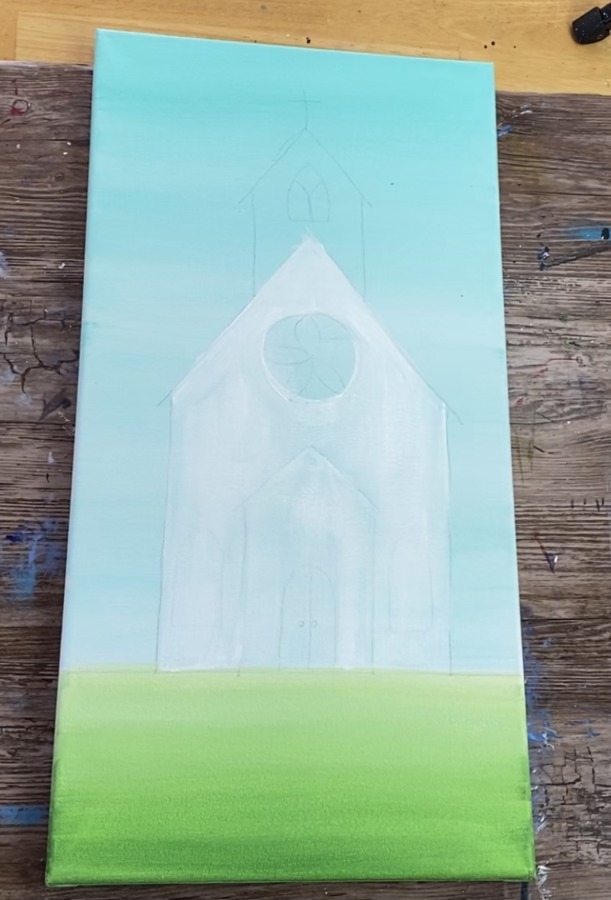
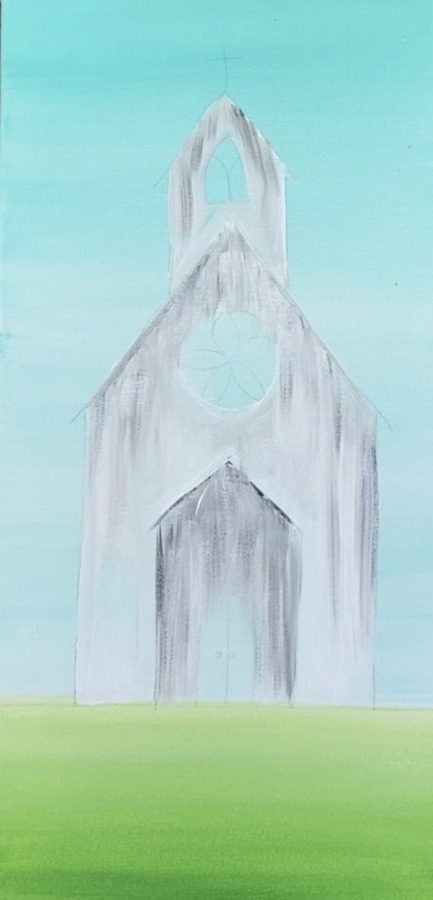
4. Draw or transfer the chapel
I tree my chapel on a paper and traced it with sharpie to be used to transfer to the canvas. This traceable is available for free and you can download it in two different sizes here!
You can always hand draw the chapel too if you do not want to use the traceable!
Take the 10 x 20 size traceable and place a sheet of graphite paper below it. Position the church to where the bottom horizontal line is in line with the horizon line.
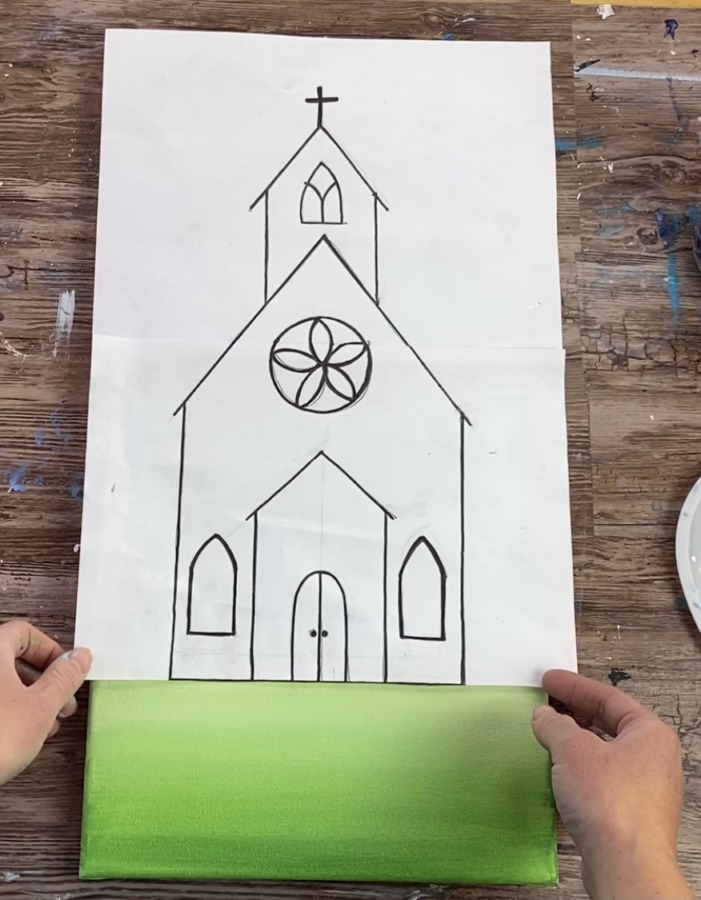
Then simply trace the design so it transfers to the canvas.

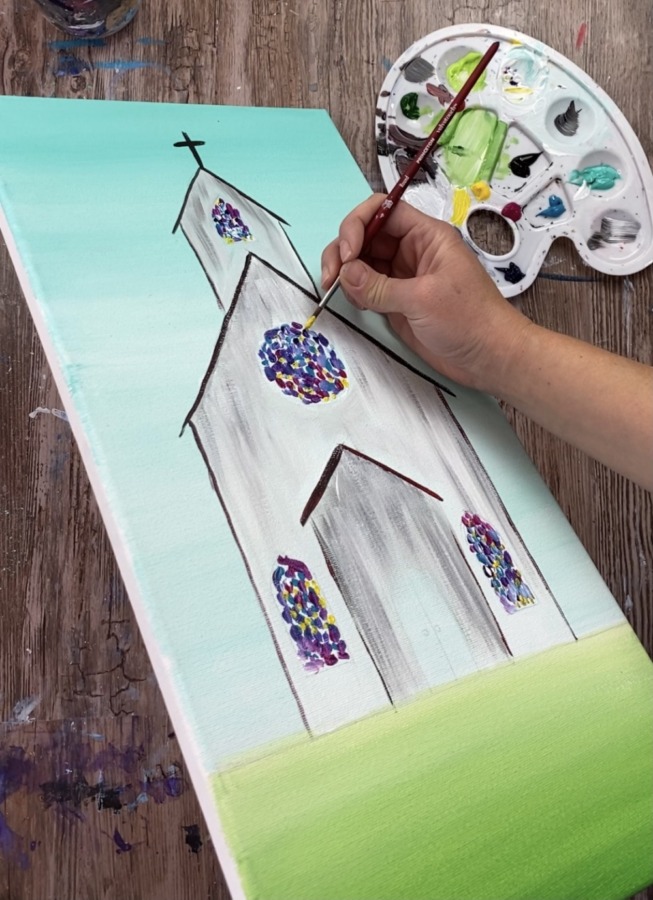
5. Paint the chapel a layer of white
Next you will be using the 12 bright brush (smaller flat brush) AND the 3/4″ wash brush (larger flat brush) to paint the chapel. The larger brush will be for the larger areas and smaller to get into the smaller areas. You may also need to use a round brush to get into even smaller areas.
I did this in sections starting with the middle entrance part of the building. Paint all vertical strokes (the best you can).
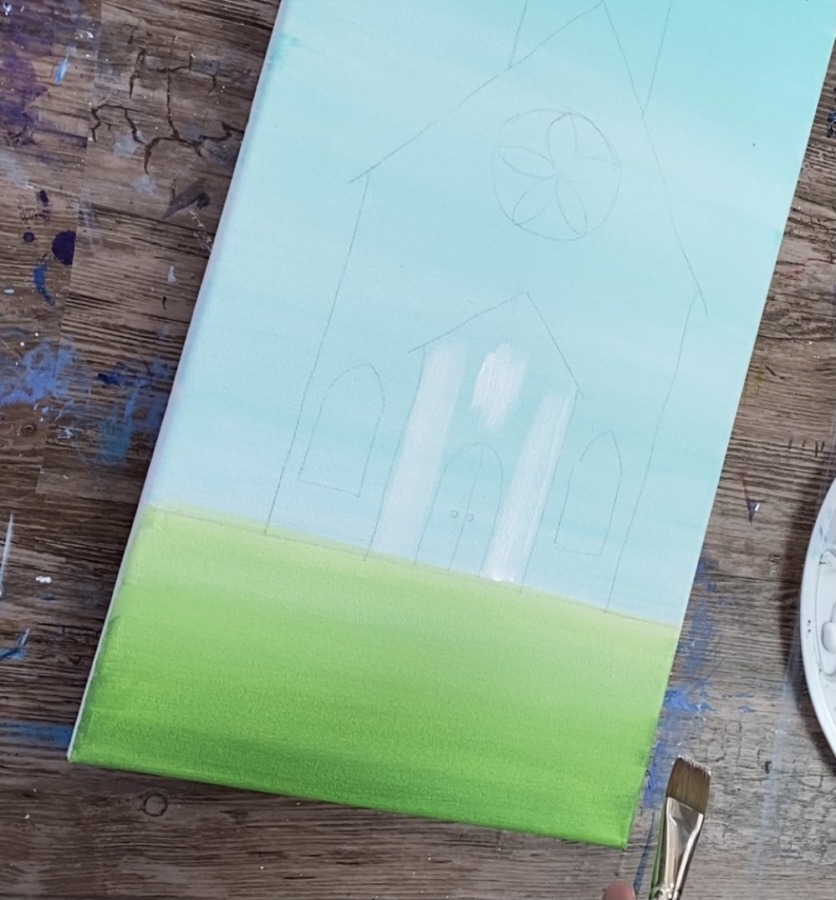
When you add this vertical white layer of paint, it is okay that it doesn’t give 100% coverage at first. You will be doing multiple layers and it will eventually cover all that blue.
When you get to the sides, use the brush on its side to “cut in” and get that vertical line.
When you get to the angles of the roof, it is okay to paint in a diagonal direction.
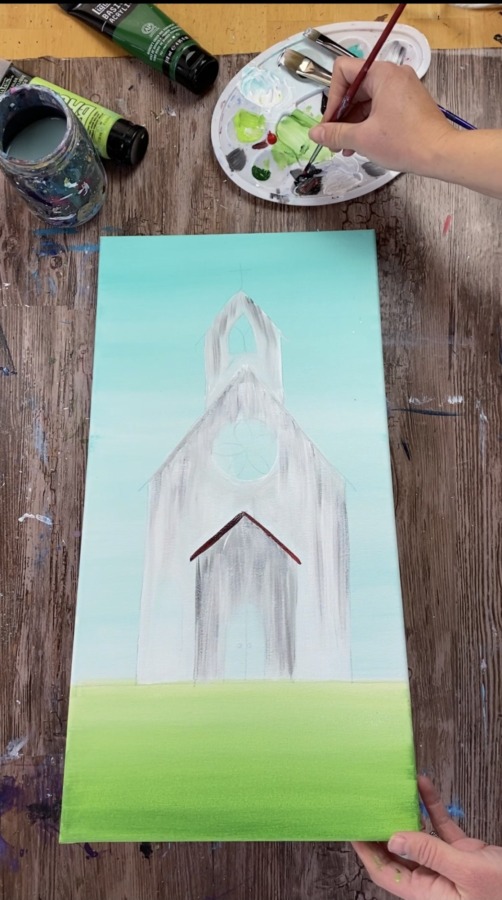
6. Add a gray dry brush layer of gray
To make the chapel look “older” and more “rustic”, I dry brushed some gray into the white. To do this, mix a little mars black into your white on the palette. Only load a small amount of the paint on your 12 bright brush.
Then paint up and down strokes. I did this more towards the top area under the roof.
Note: I outlined the bottom roof below with a #4 round brush and mars black to help define that roof area. You can do that now or at a later step.
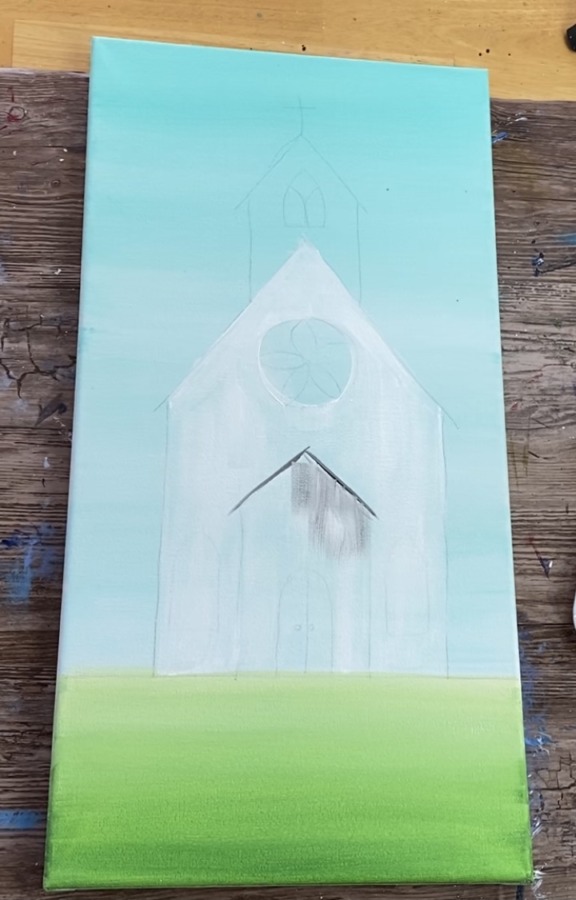
Do the gray streaks in the top areas. If you think it got too dark or too gray, you can always rinse your brush off, add more white to it and apply the white over the gray.
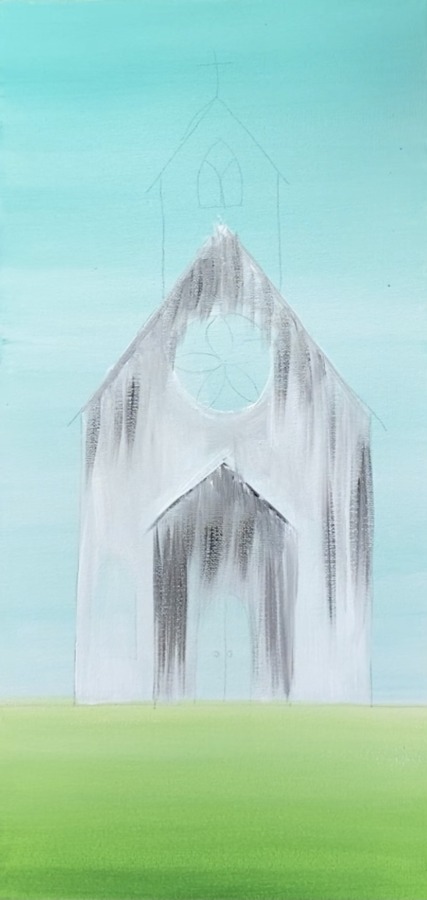
Simply use the white and gray to paint up and down strokes on all of the chapel. Try to keep it unblended. The chapel is not all one solid color. Additionally, I made the bottom entrance area slightly darker so it would stand out from the rest of the building.
You can leave the doors and windows blank or paint over them if you like!
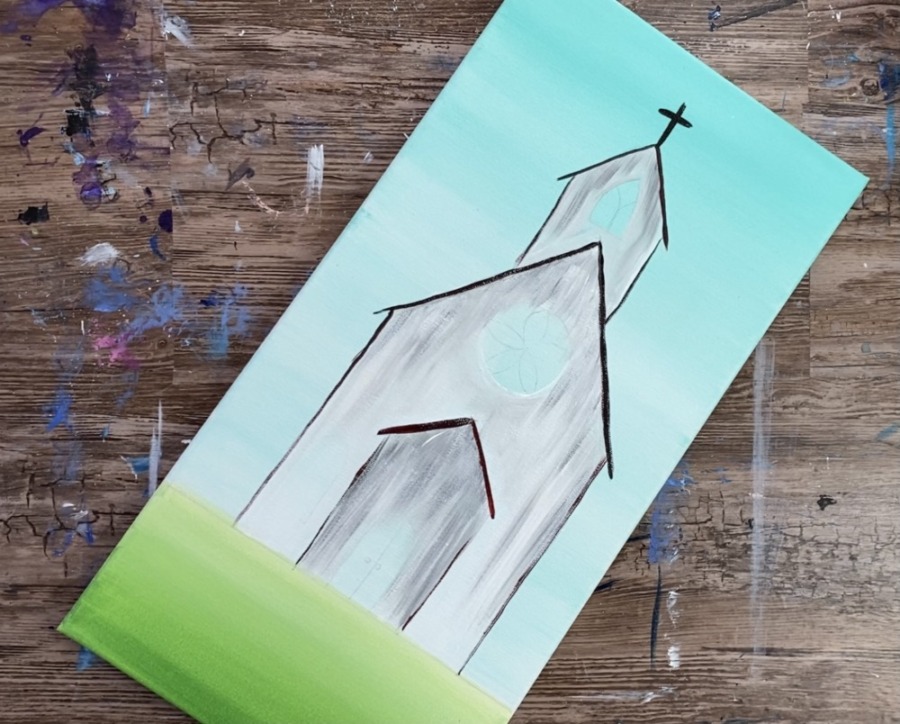
7. Outline the roof and vertical lines and cross
Next outline the roof lines. I used a #4 round brush and the colors mars black + naphthol crimson. Basically I loaded my brush in the black and the red. The red gives it a little bit of color interest. You do not have to do the red if you do not like that (or you can just simplify and use just black).
It helps to water down the black/ red so it will flow better.
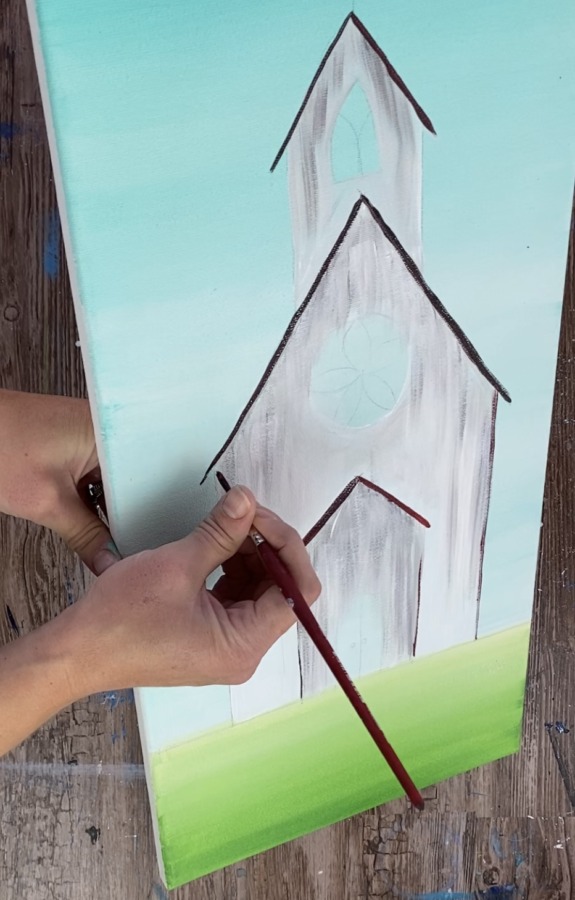
Additionally, slightly outline the vertical lines on the outsides of the buildings. These lines are very loose and not consistent.
Paint the cross on the top of the chapel as well.
8. Paint the stained glass window
This is such a fun part! You will want to load your palette in the colors you want to see in your stained glass windows. I did: quinacridone magenta, turquoise blue, dioxazine purple, cadmium yellow medium and titanium white.
Tip: if you cannot see your window shapes anymore, use a pencil to draw them in.
Use the # 4 round brush. Start with your first color and paint little marks on the inside of the windows. Then wipe or rinse you brush and go on to the next color. Continue to “stipple” little marks all over your windows. It’s okay to overlap some of the colors a bit.

If you want even more variety of colors, you can mix titanium white into some of the colors. This brightens up some of the stained glass pieces.
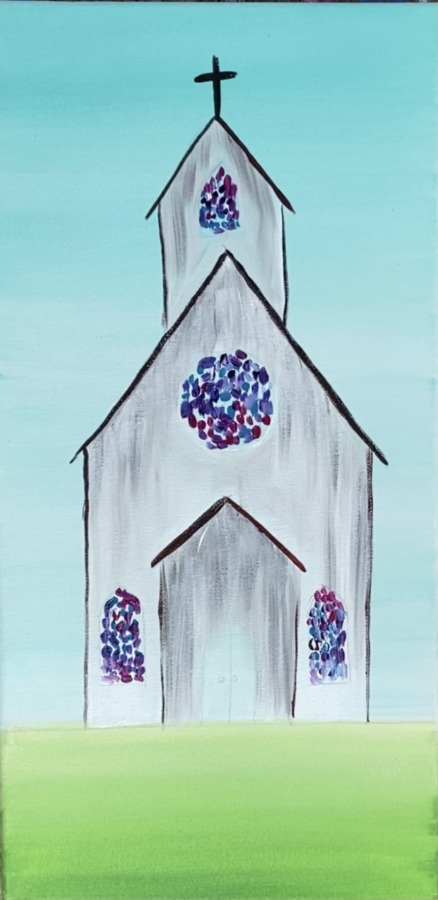
Be careful with the yellow because it can make some of your colors look muddy. I only applied a few dots of the yellow.
9. Paint the door
For the door, I mixed a light pink color. You can choose a different color for the door if you want! I mixed that naphthol crimson with white and a very small amount of yellow. (1 part red, 3 parts white, 1 part yellow)
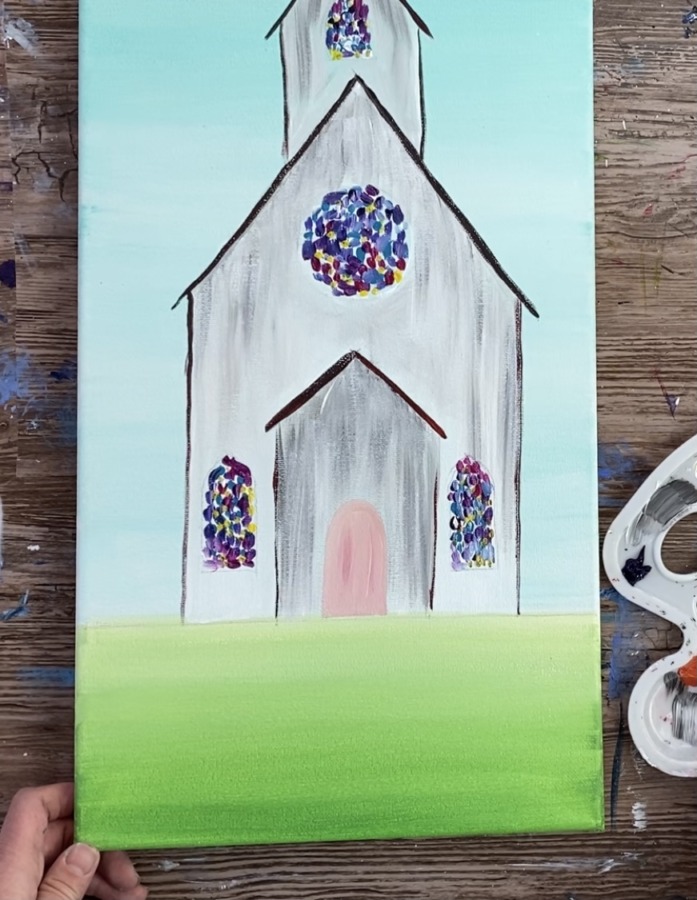
Use any brush to paint the door and go in vertical strokes to match the rest of the chapel.
Then you will want to loosely outline the door and all the windows. Use a round brush and mars black. Slightly water down the black so it will flow nicely.
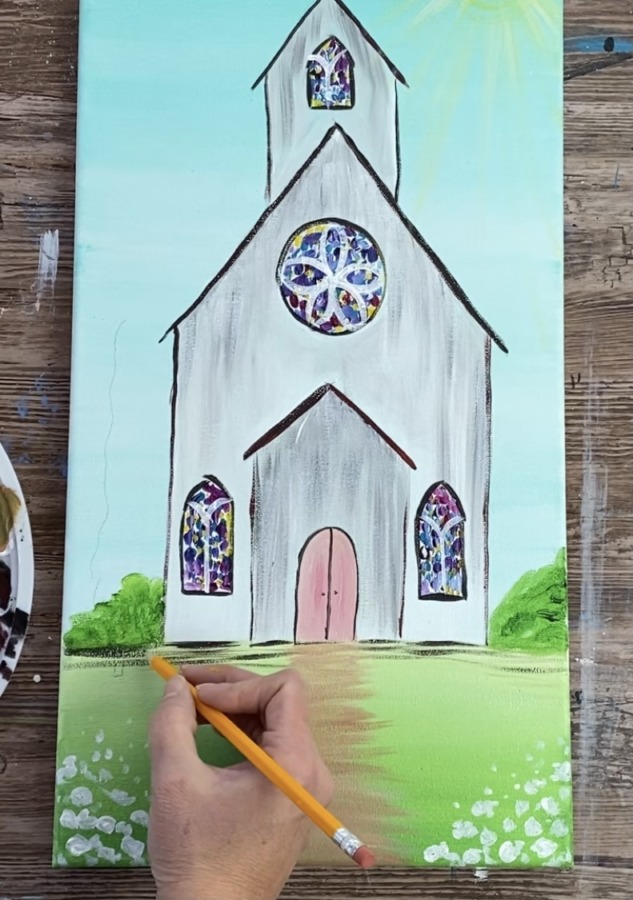
10. Add some shadow on ground under the chapel
This is optional but it does add to the “rustic feel” of the painting! Use a round brush and mars black to “dry brush” some horizontal strokes just under the chapel and under the horizon line. To dry brush, load you brush in mars black and then wipe it off with a paper towel. Then do a few horizontal strokes across.

11. Paint the path
The path was done with: raw Sienna mixed with a little titanium white. Use a 12 bright brush. Double load it in both the white and raw Sienna.
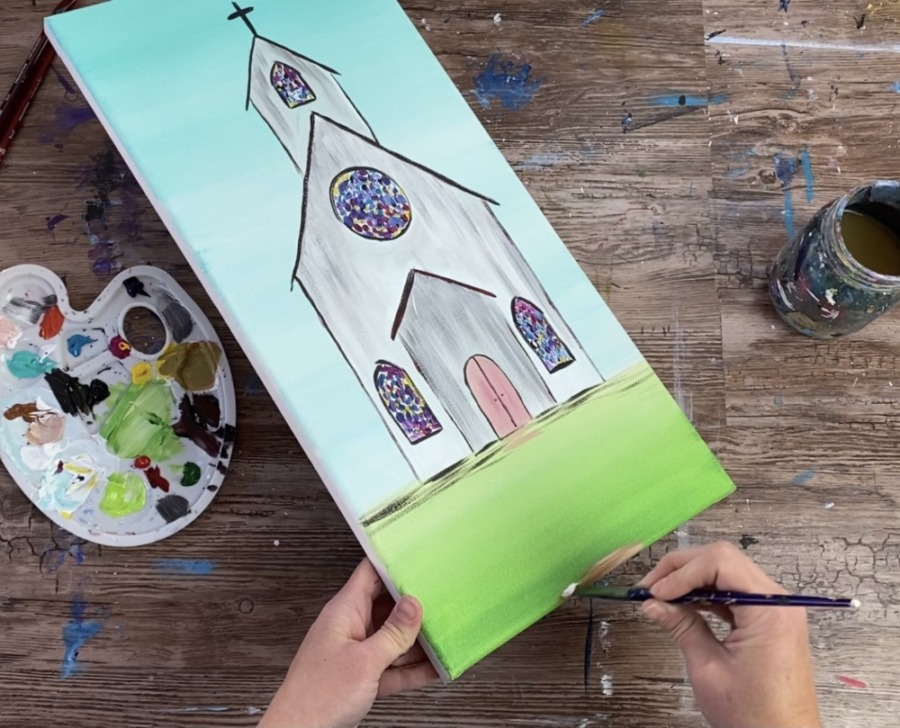
Paint left and right strokes to form the path. The path starts out sort of wide on the bottom and gets a little narrow as it reaches the door. Do this very lightly. You can allow the green to still show through the paint color.
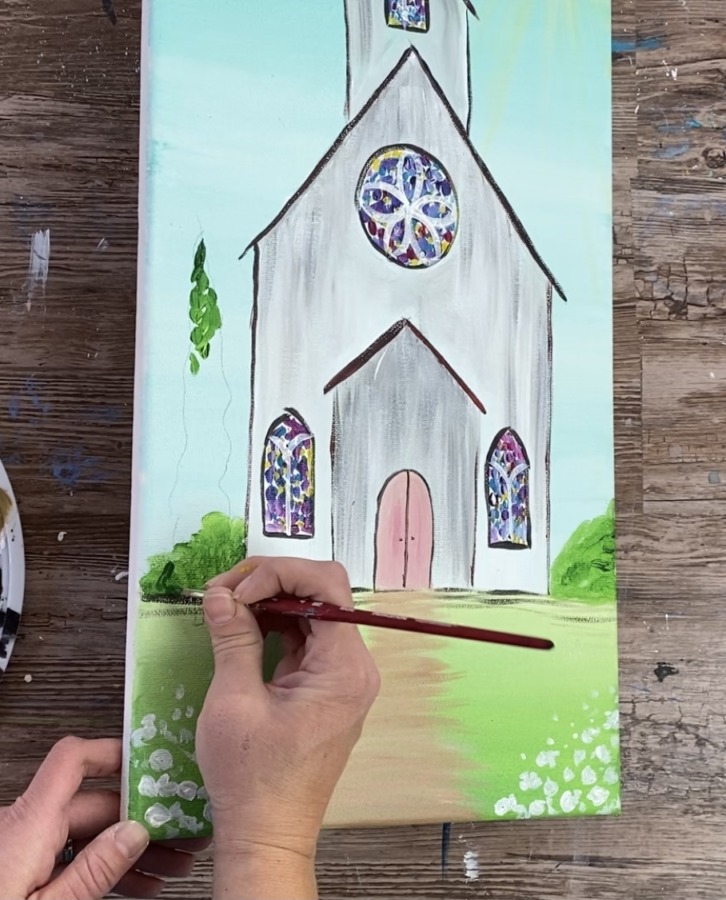
12. Paint shrubs
Use either a round brush or the 12 bright brush for the bushes. Mix hookers green hue permanent with a little bit of brilliant yellow green. Paint little “x style” loose strokes forming the shapes of bushes on each side of the chapel.

13. Paint the cotton bolls
Use a #4 round brush and titanium white. Paint small little circles on the bottom of the canvas. Then paint smaller circles higher than those circles. Then little dots further in the distance. These cotton bolls are very loose and abstract!
You’ll want to wait for the white to dry before doing the stems.
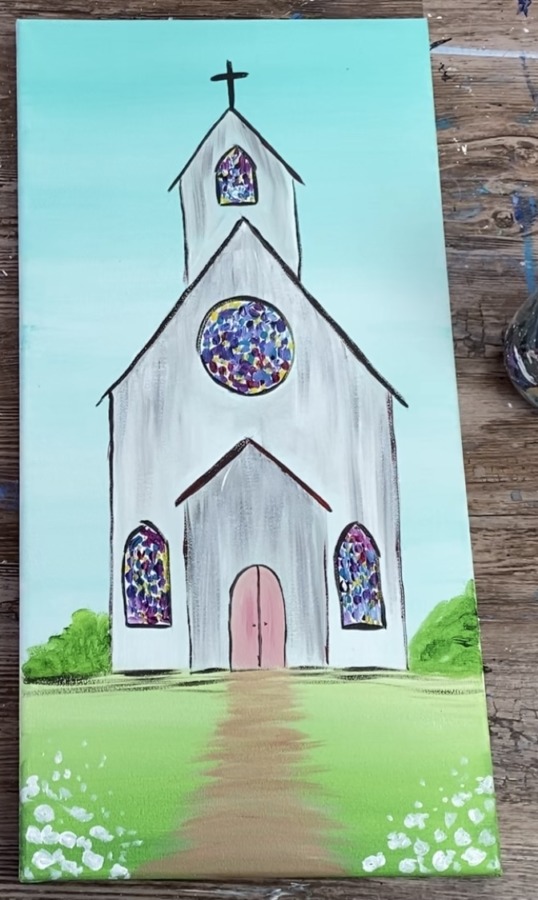
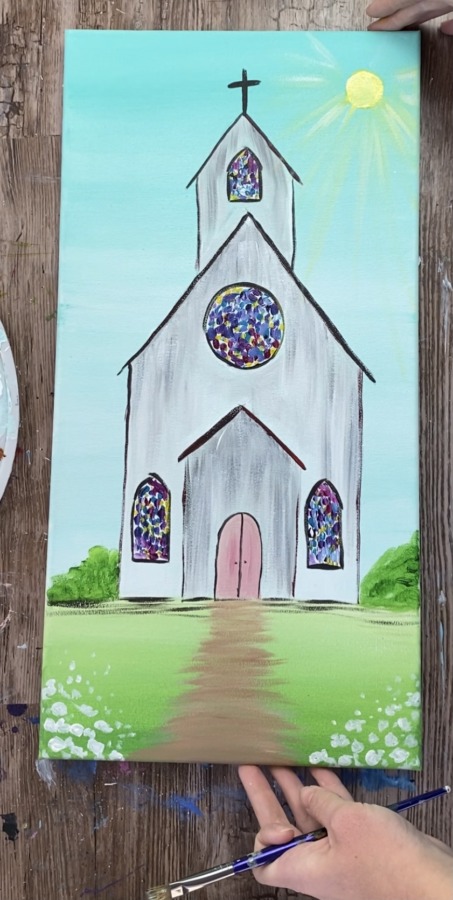
14. Paint the Sun
Mix titanium white with cadmium yellow medium (equal amounts). Paint a small circle in the upper right with a round brush.
Next used a 12 bright brush to “dry brush” the rays. Load that brush in only a small amount of the yellow and white combo. Wipe off your brush so there is hardly any paint on the brush.
Drag the strokes going in a radial direction around the sun.
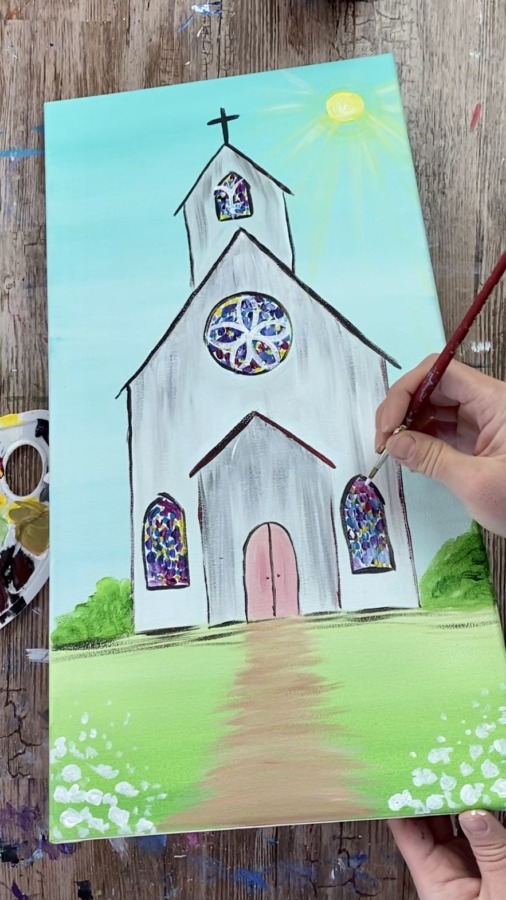
15. Add window frames
Use titanium white white and the #4 round brush to paint the window frames over the stained glass windows. I did five petal shapes on the inside of the circle and then small “Y” shapes in the other windows.
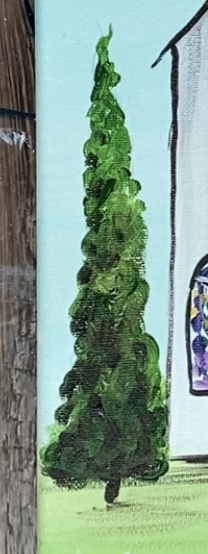
16. Paint the cypress tree
The cypress tree is optional! It helps to draw the shape first with a pencil and then fill it in.
Paint the tree in with very loose strokes using the hookers green and the brilliant yellow green. I made my tree slightly darker at the bottom.
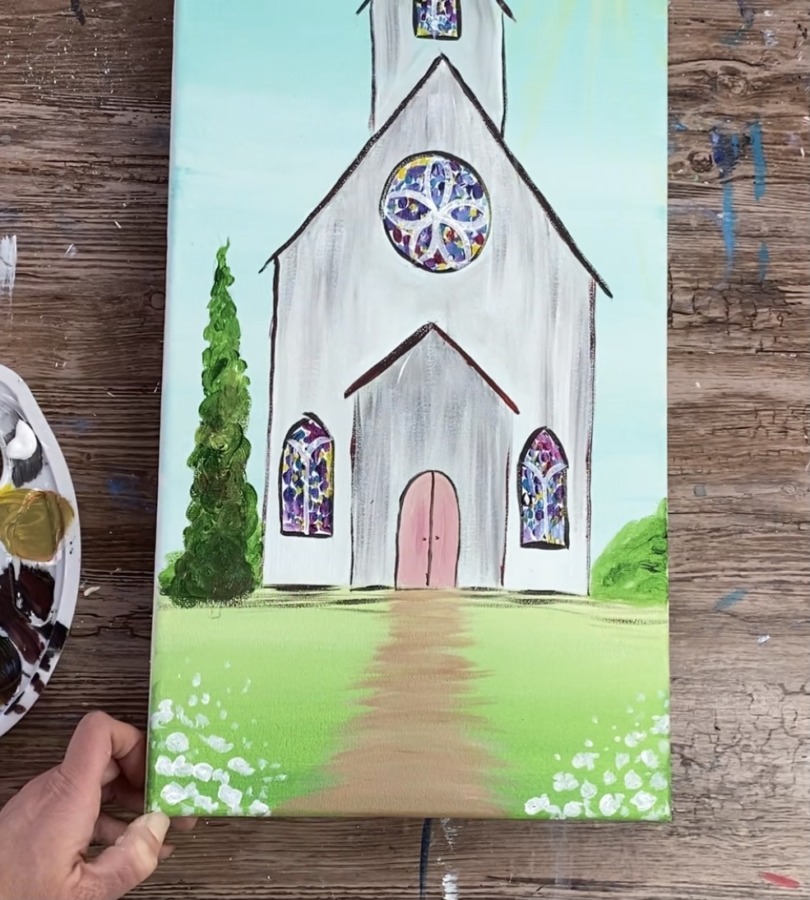
Add some lighter green strokes in the upper right area (where the light would be hitting it).
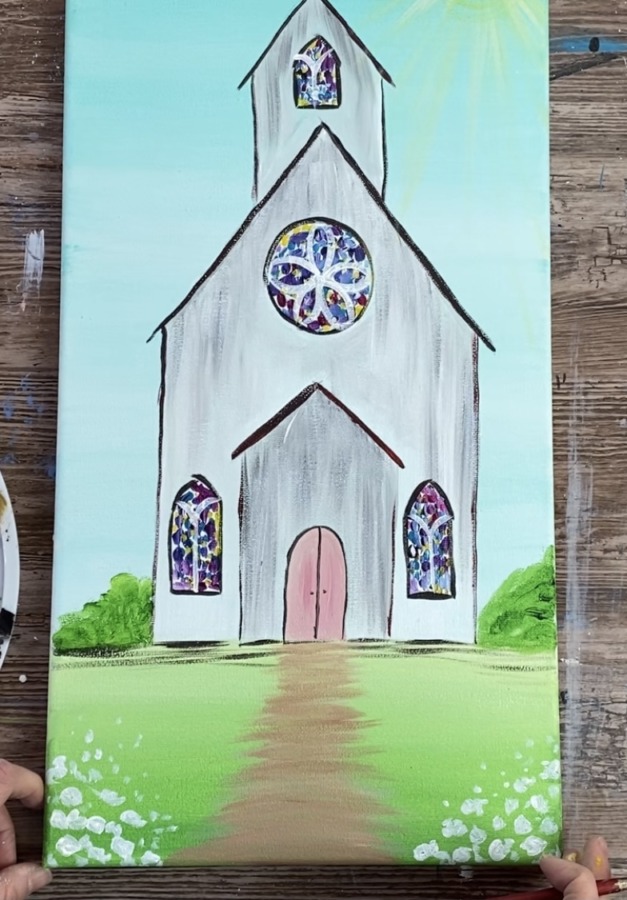
17. Finish cotton bolls & final touches
Use the #4 round brush to loosely paint the branches on the circles of the cotton bolls. Do this with black and a little bit of hookers green (so very dark green). You do not have to paint stems on every white circle that you painted.

Finished!
Sign your name and show it off! Hope you enjoyed this painting tutorial!
Share Your Art Here!


Love this one! On my to-do list 🙂
Thank you Kim!
This will be my next painting. Love it. Thanks.
You’re welcome Susan! Enjoy!
This is my very first tutorial that had written instructions.
So helpful. It really showed me pretty much in detail what to do.
I think this is the third tutorial I will have done of yours. Thanks so much. ❤
You’re welcome Susan!!
I live in a small town and have access to Apple barrel paints. What would these colors be in apple barrel. Thanks, RR
I would try using: black, white, parrot blue, flag red, new shamrock, Bimini blue, fuchsia, bright yellow, purple iris & nutmeg brown
Help! I can’t find the link to down load the Church outline to be traced.
If you go here: https://stepbysteppainting.net/2018/03/08/printables/
Do a control “f” and search for “church” you will find it 🙂
I love this church painting tutorial! It was easy to follow and very good instructions.
I painted one for a wedding gift and the 2nd painting, I’m giving as a birthday guy/ house warning gift. I added steps to the 2nd painting.