
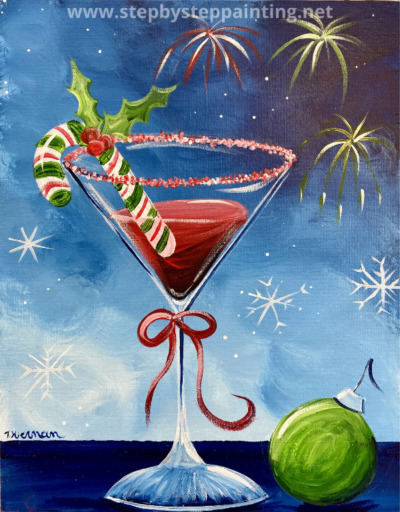
Learn to paint a fun Christmas bubbly! This one doubles as a Christmas and a New Years painting.
The design is super fun and simple. You can also customize your colors and add fun, festive fireworks for a New Years theme background!

Would you like to save this?
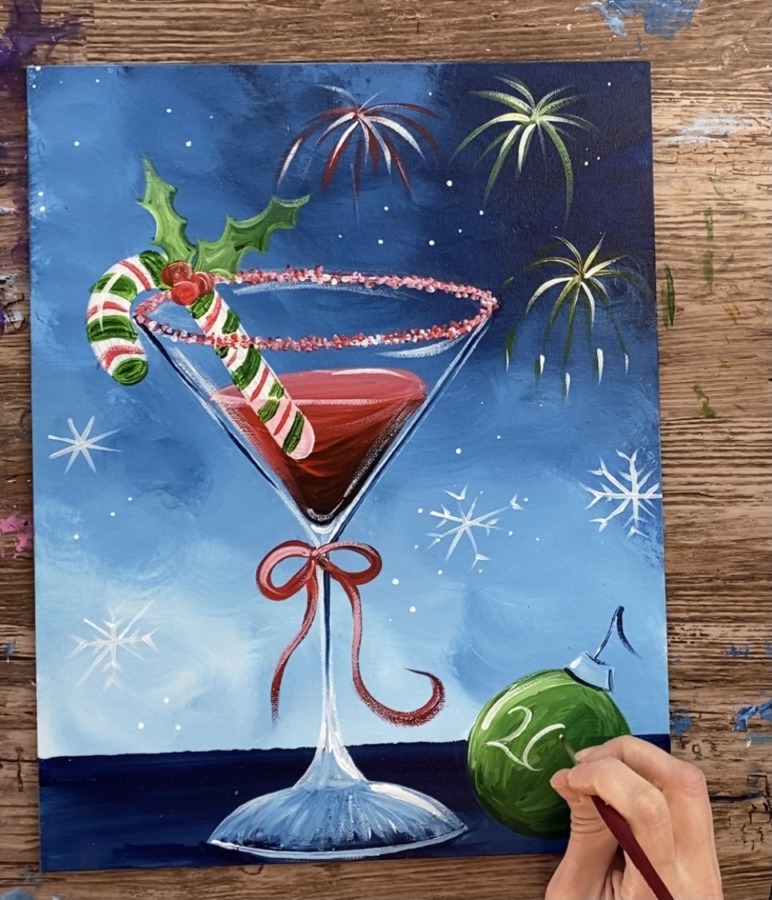
Customize your ornament with a different color and a year! I painted the year 2021 on my ornament and chose green for good luck!
Enjoy, happy painting and happy New Year!
Materials
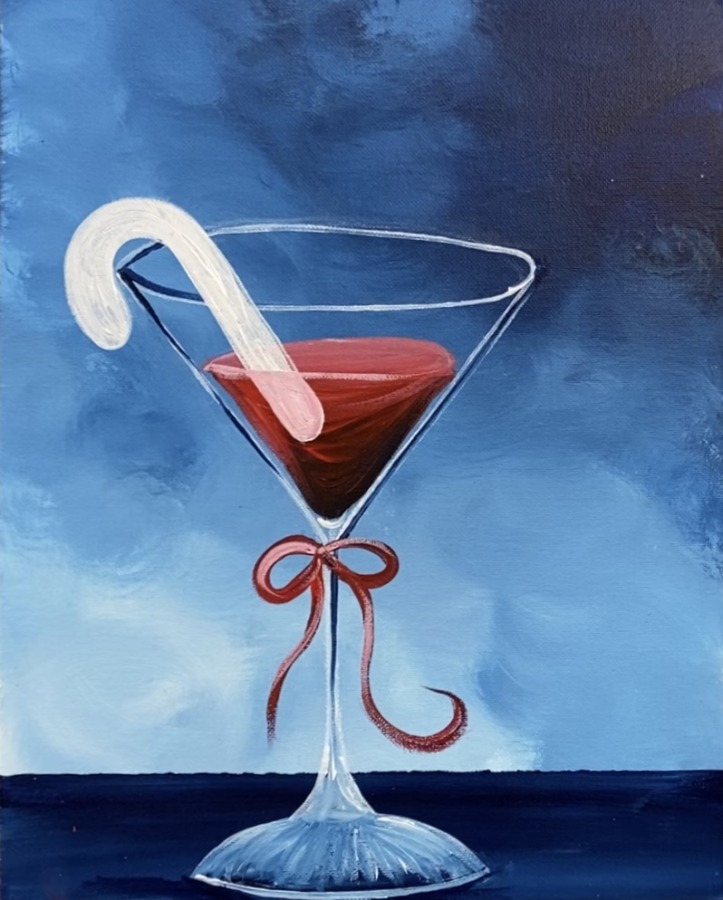
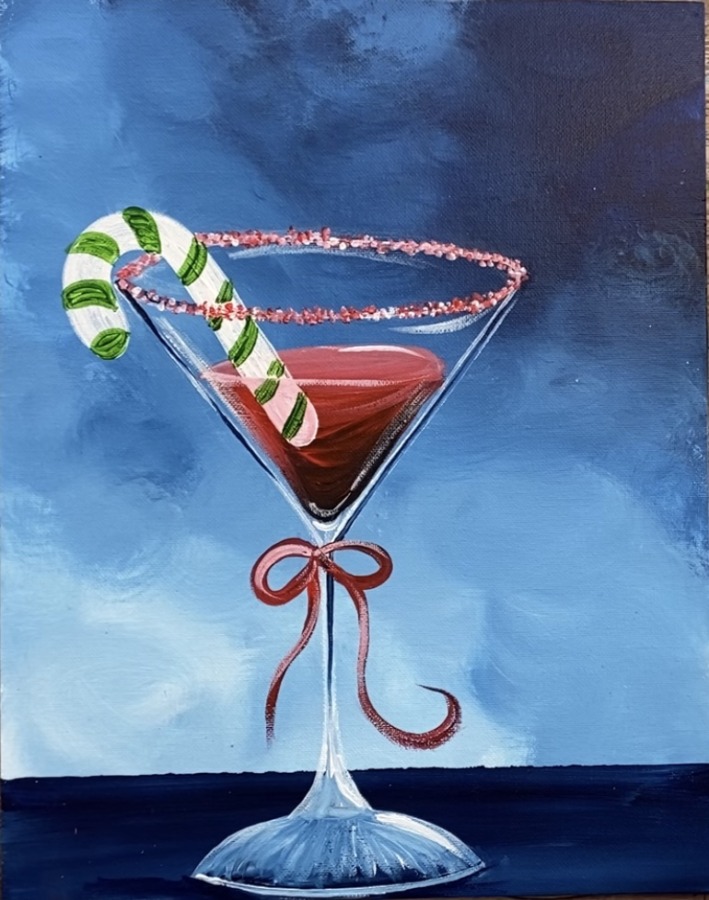
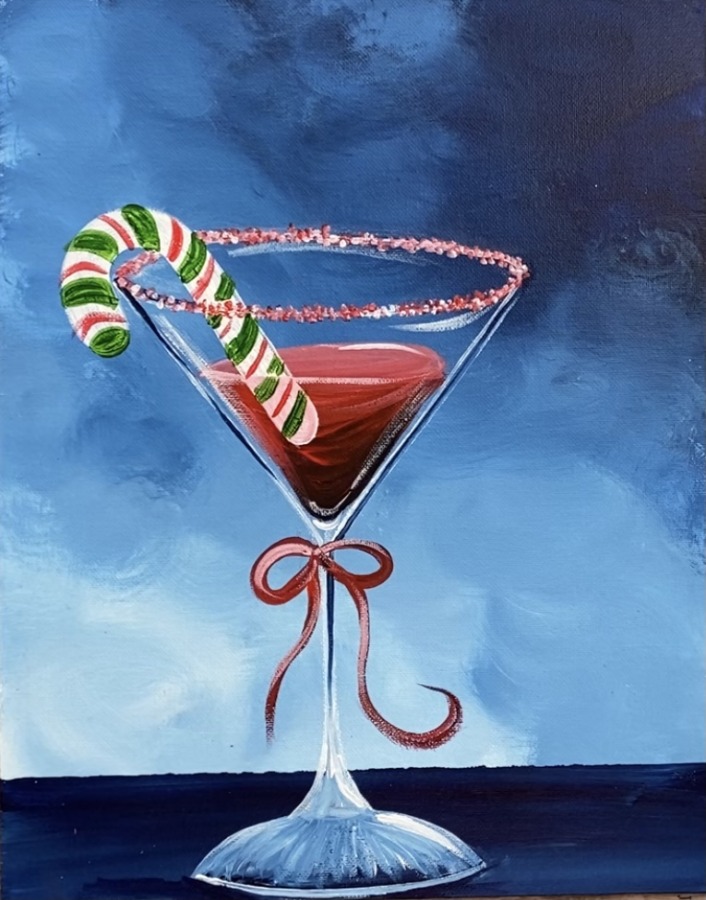
Candy Cane Martini Painting
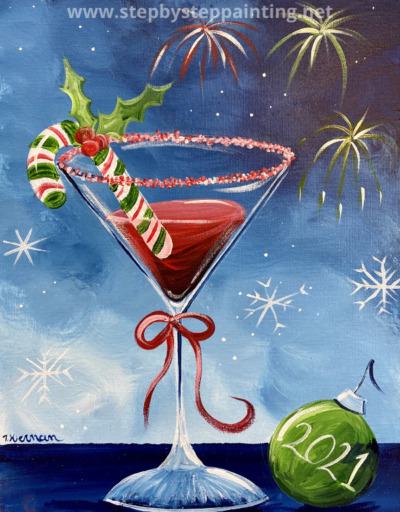
Learn to paint a fun candy cane martini drink with a beautiful winter backdrop. Customize the ornament with a year, word or phrase.
Materials
- 11 x 14 Canvas
- Acrylic Paint
- Brushes
- White Chalk Pencil
- Optional Traceable
- Optional Graphite Paper
- Water Cup, Palette, Towel/ Rag
- T-Square Ruler, Painters Tape or Straight Edge
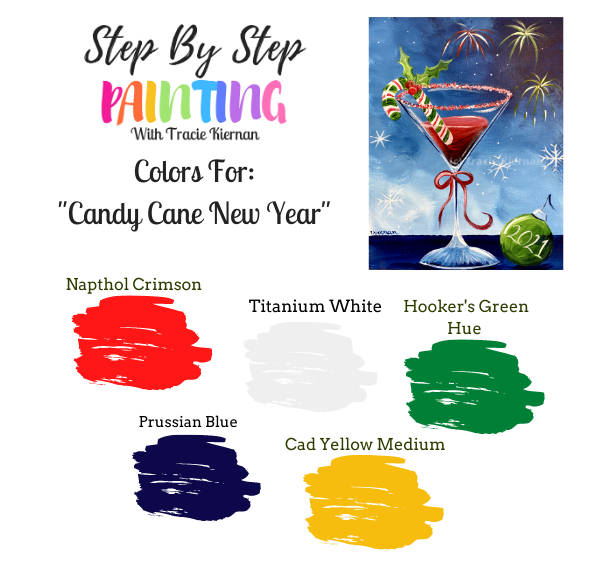
Colors
- Prussian Blue
- Titanium White
- Naphthol Crimson
- Cadmium Yellow Medium Hue (only a tiny bit shows up in the fireworks)
- Hooker's Green Hue Permanent
Brushes
Instructions
See full tutorial on https://stepbysteppainting.net!
Color Palette
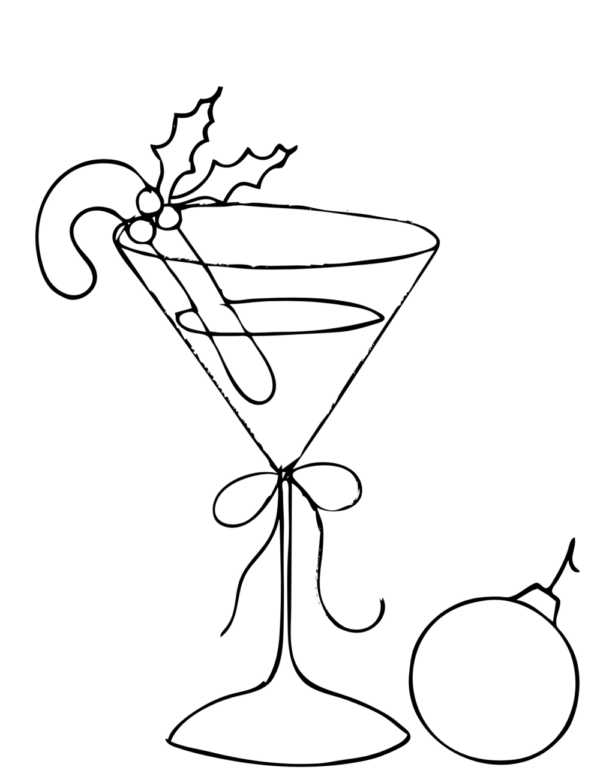
Traceable
The martini glass is a super easy drawing. I will guide you through it in the steps below and in the video. You CAN do this!
If you need the traceable, you are welcome to print and download it below. White graphite paper may be necessary since the background is dark.
Directions At A Glance
Video
Step By Step Directions
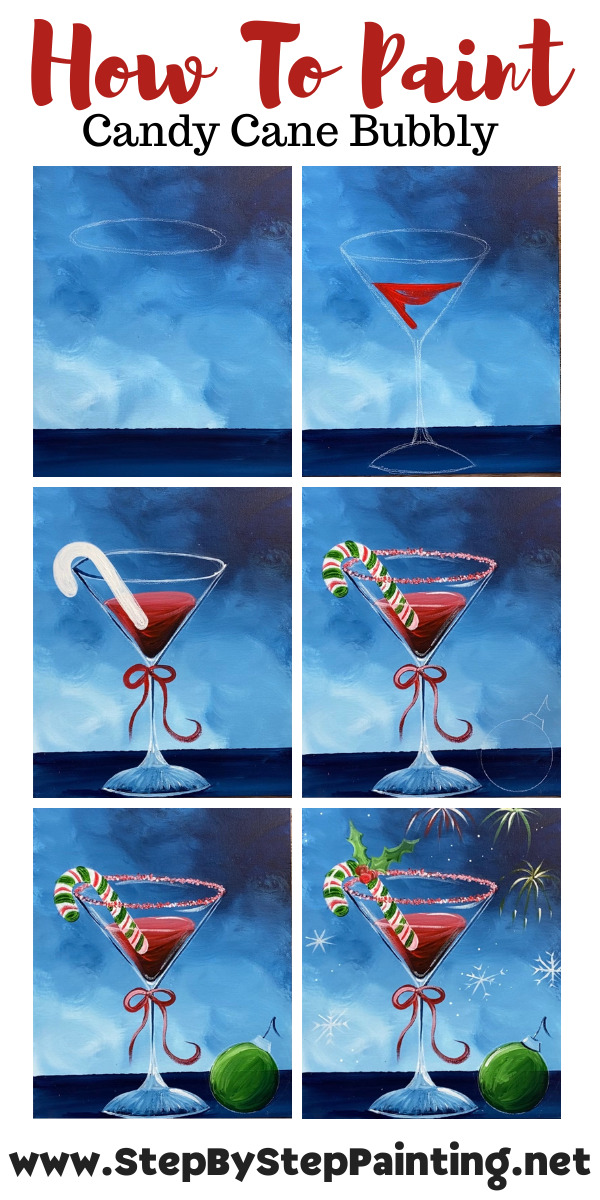
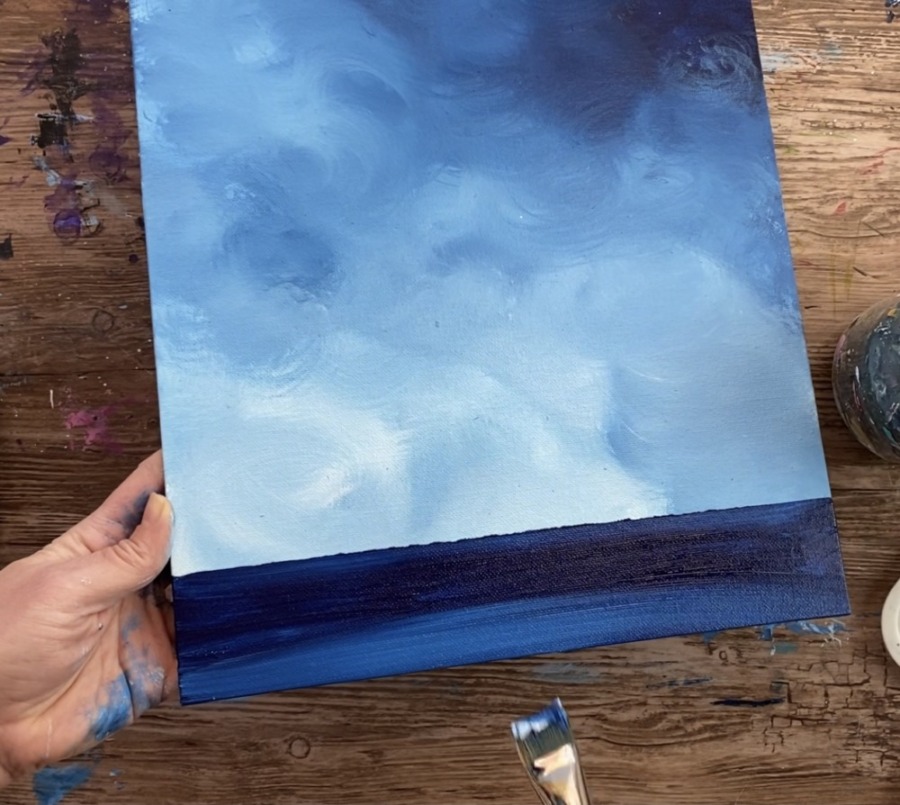
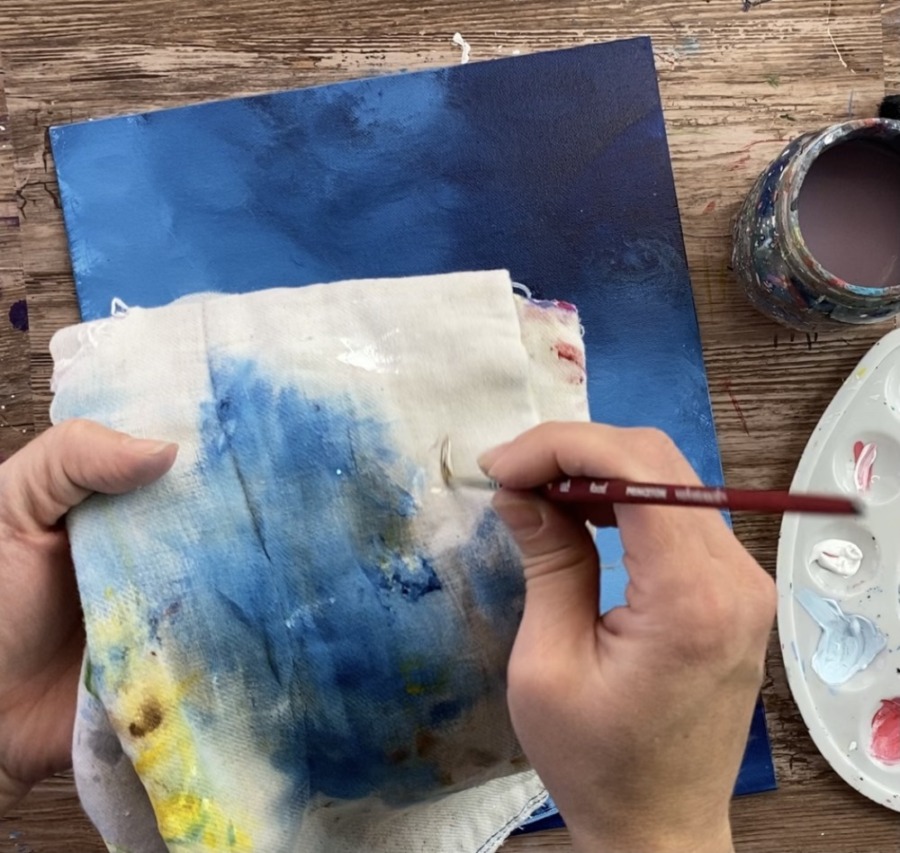
1. Paint the background
The background consists of two colors: titanium white and Prussian blue. Note: if you do not have Prussian Blue you can use any dark blue such as a navy blue or a phthalo blue.
Use your 3/4″ flat wash brush and start in the upper right corner. Paint long curved strokes filling the top right quadrant of the canvas with the Prussian Blue.
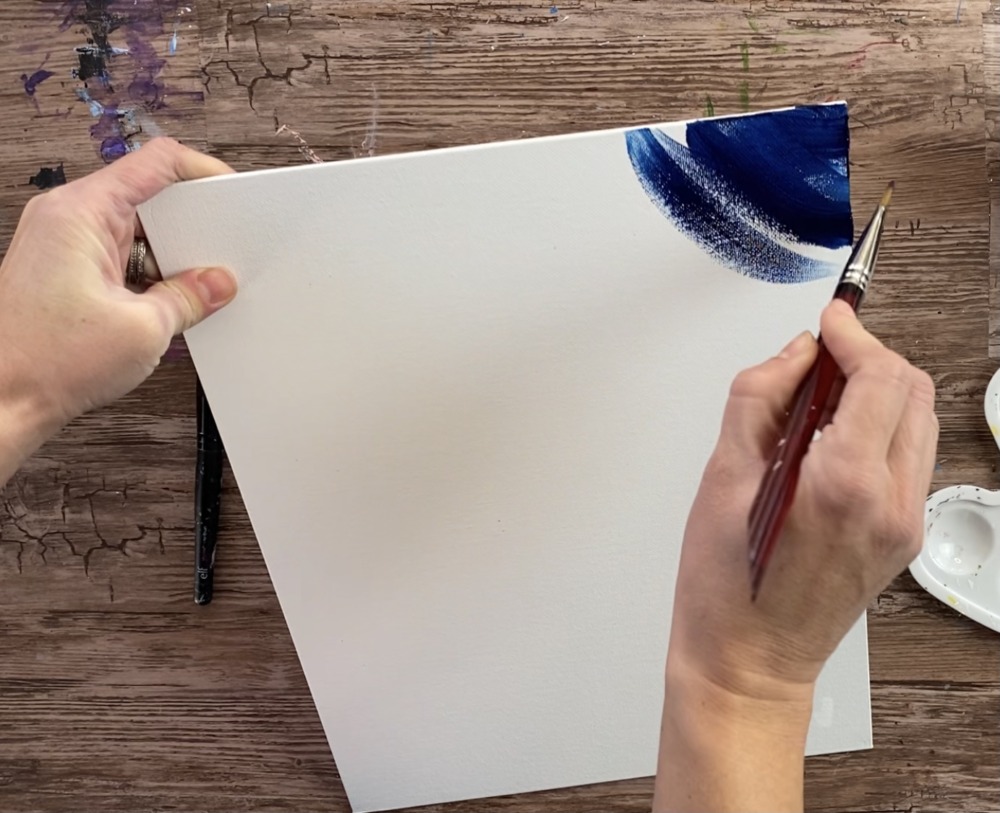
Your strokes can go curved or in textured directions. I did “texture” “x” style strokes. Note: the background will be blended with a mop brush to smooth out the strokes.
Then apply three dabs of titanium white under the blue area. You do not have to rinse your brush to do this, just load in some white and apply it to the canvas.
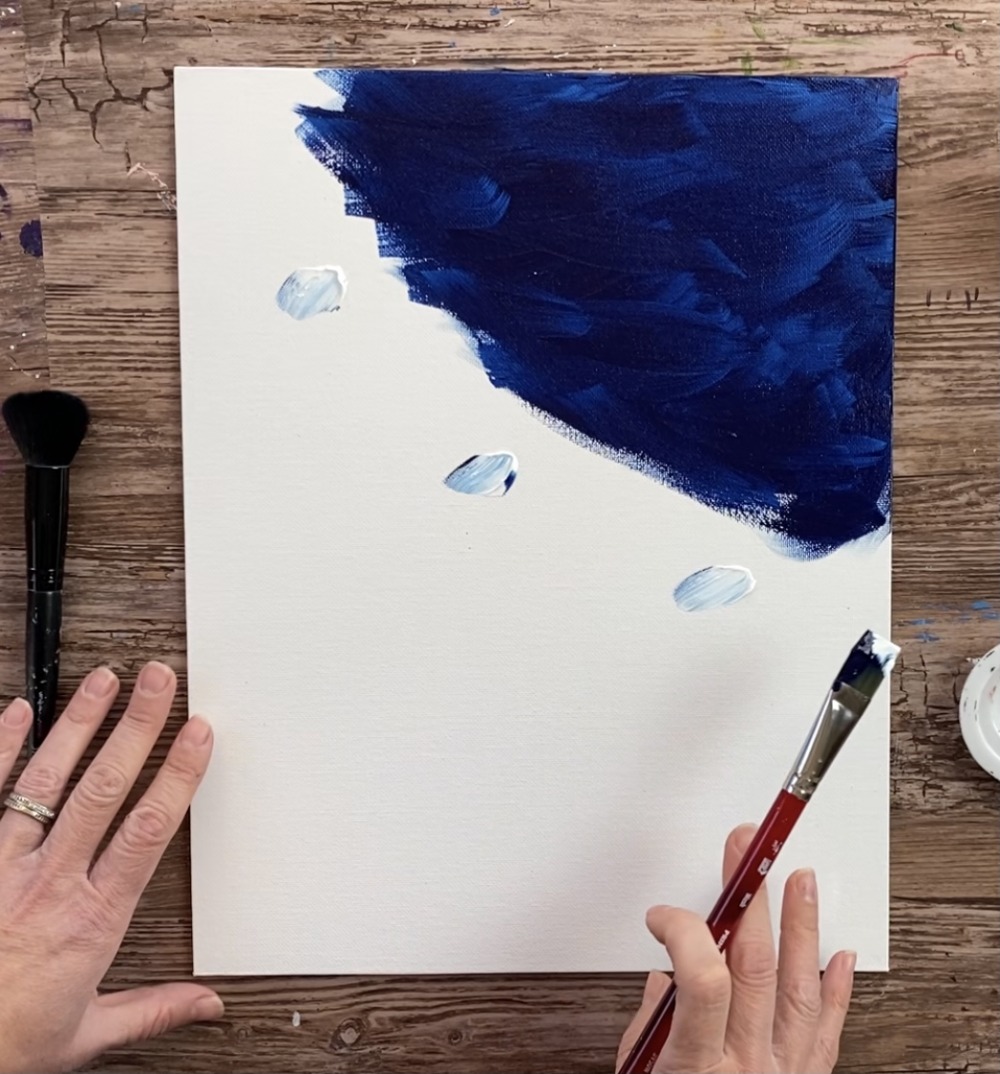
Then fill a curved area in the middle/ diagonal area of the canvas. You do not necessarily need to blend the white with the blue yet. Because my brush wasn’t rinsed, the color will end up being a lighter/ medium tint of that Prussian Blue.
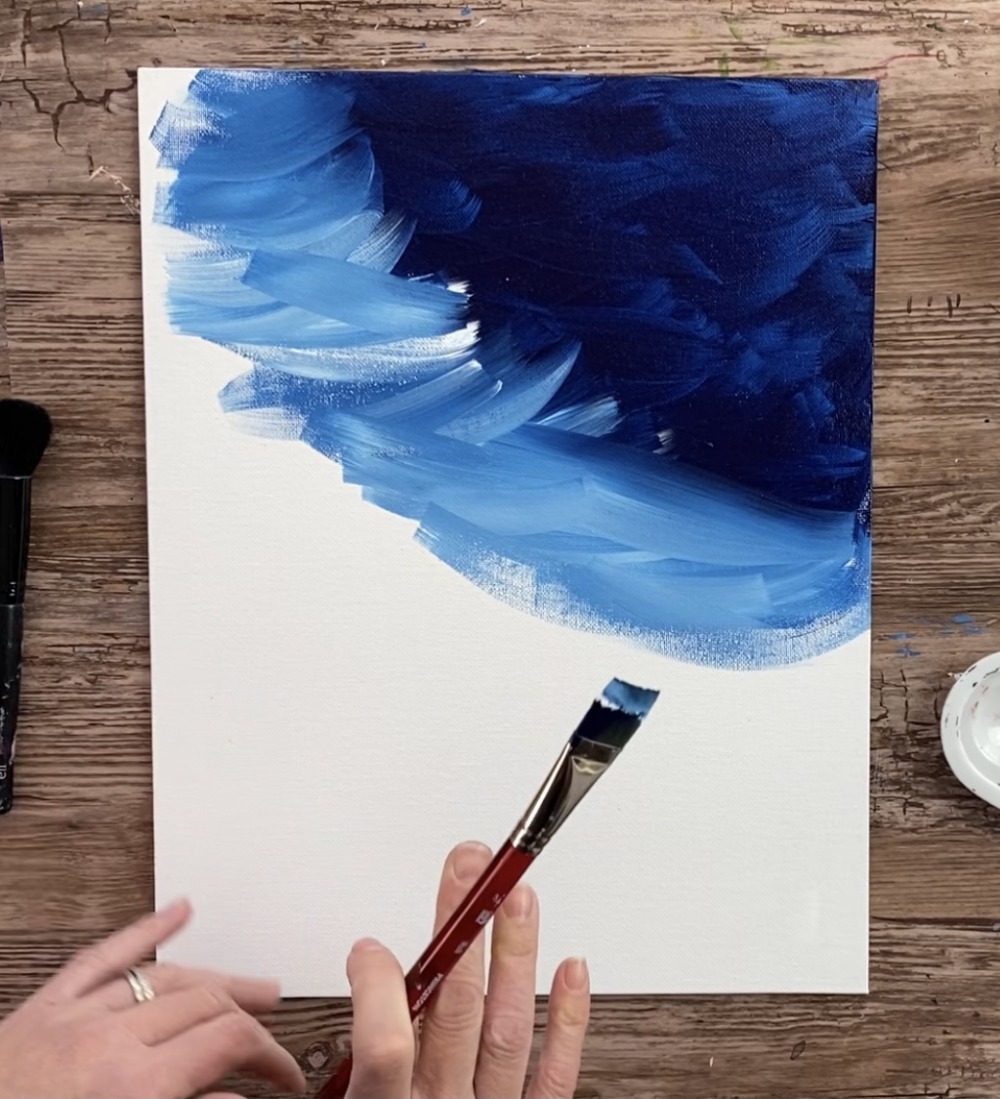
Next take your “mop blending brush” (in this case I used a makeup brush) and gently blend the two colors together. Do circular strokes to blend the colors. You don’t have to press too hard on the brush to do this.
Your background will look like a “swirly abstract” blend of the colors. Then go back to your 3/4″ flat wash brush and add white below that light blue area. This should be a lighter blue with more white.
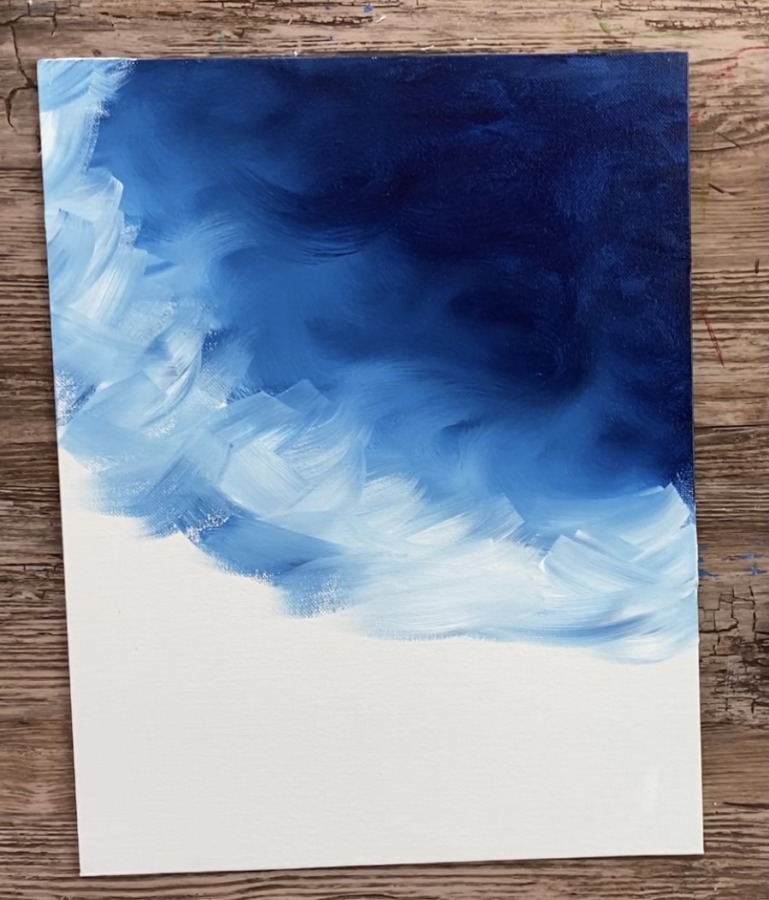
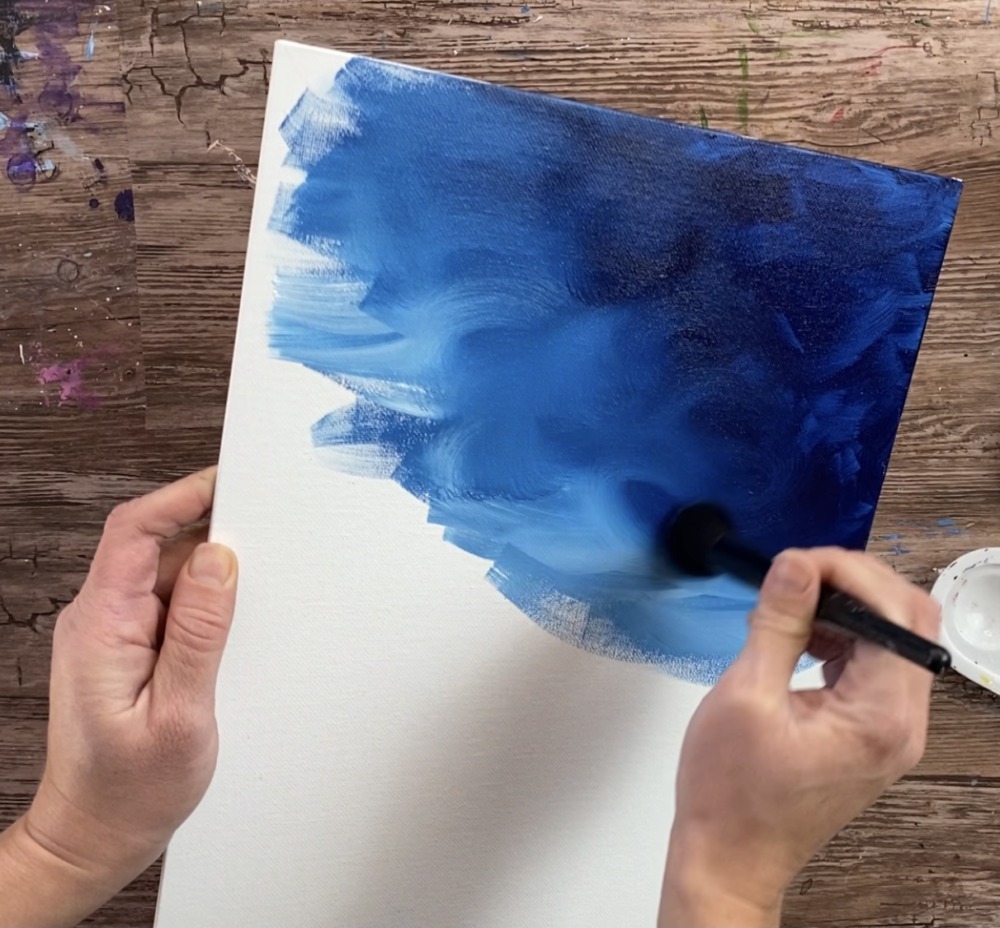
Repeat with your mop brush to blend that lighter blue in. Then fill the rest of your canvas with white and blend that in with your brush as well.
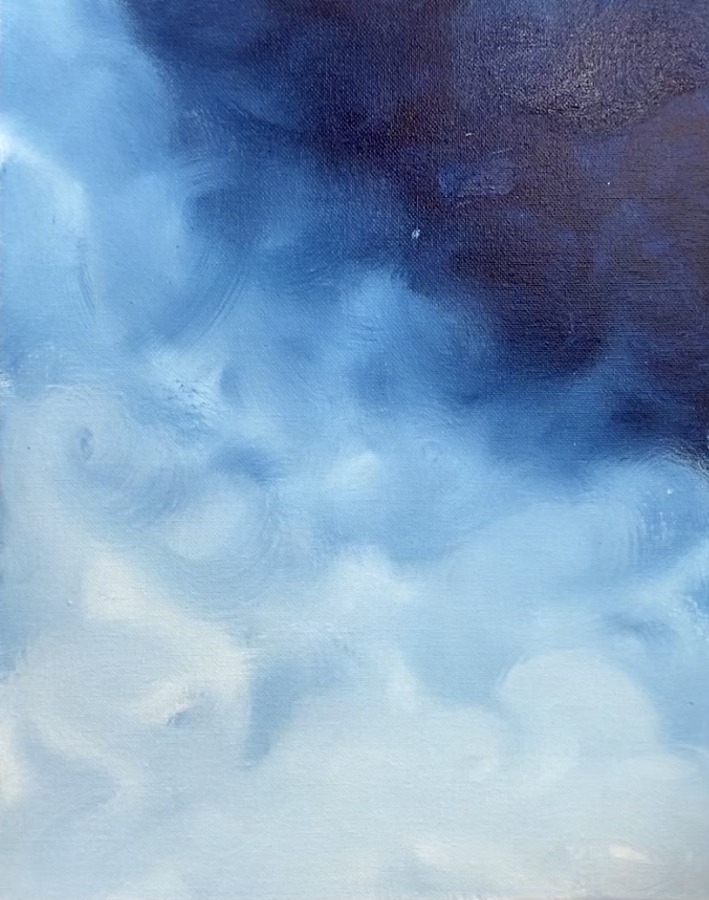
The background is a blend of very dark blue in the top right corner all the way to a light blue on the bottom. Don’t stress too much about the background! It is supposed to look abstract and is not necessarily the focus of the painting!
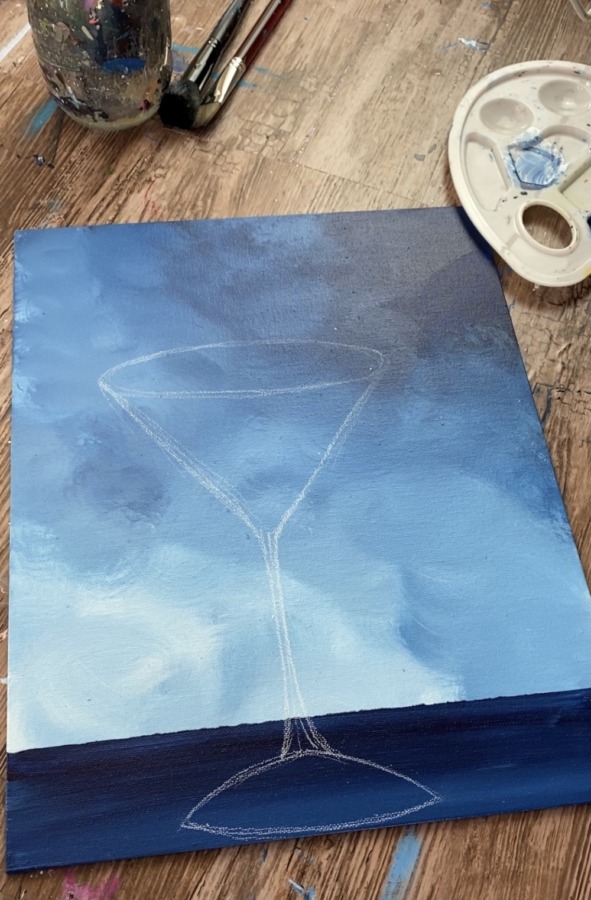
2. Paint the table/ ground area
Use a straight edge or some painters tape to define the table area. I used a t-square ruler. Measure about 3-4″ up the canvas. This doesn’t have to be exact.
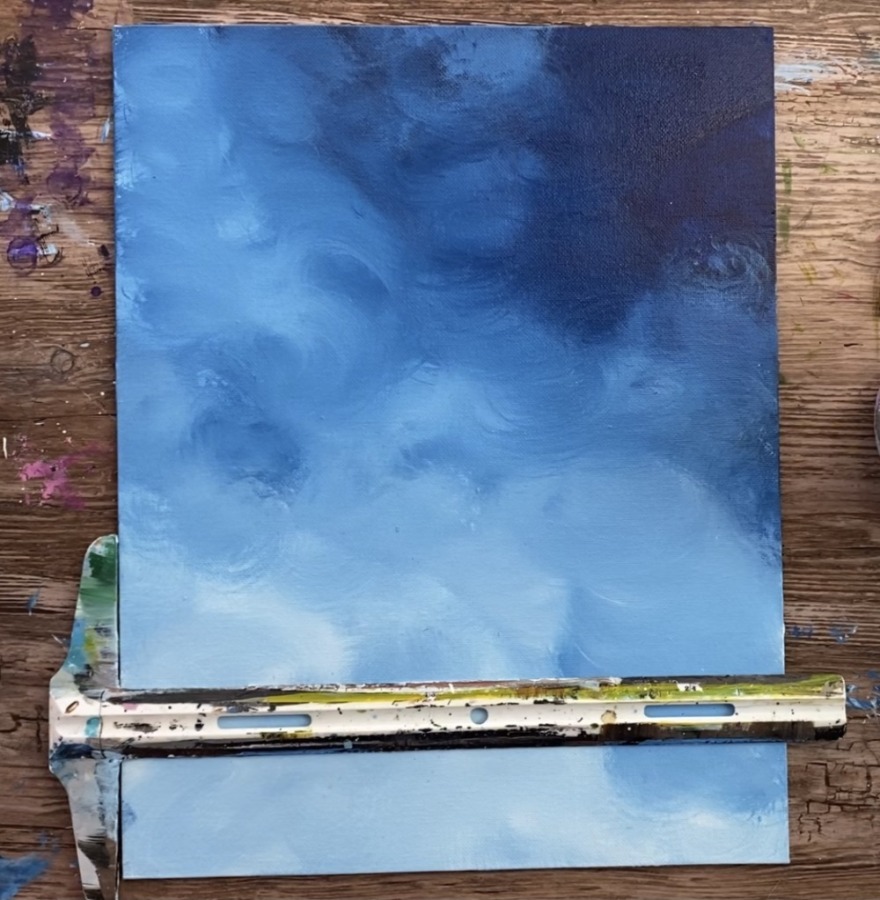
Paint that area a solid Prussian Blue using your 3/4″ flat wash brush.
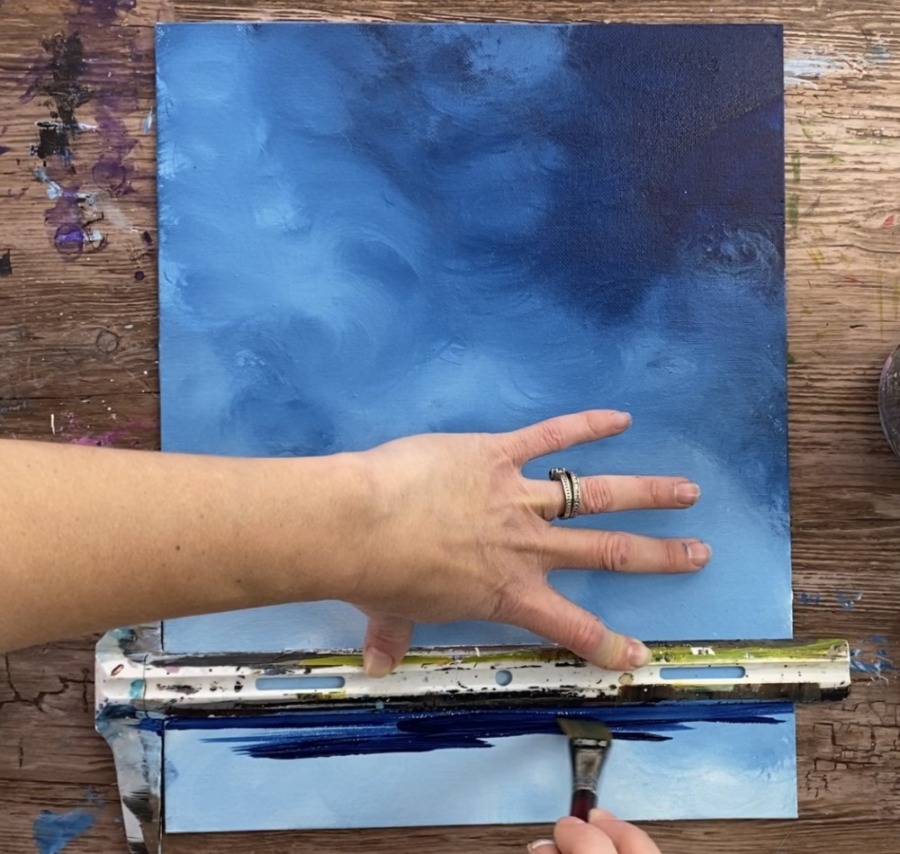
Then (optional) add a bit of white to the bottom and blend it up.
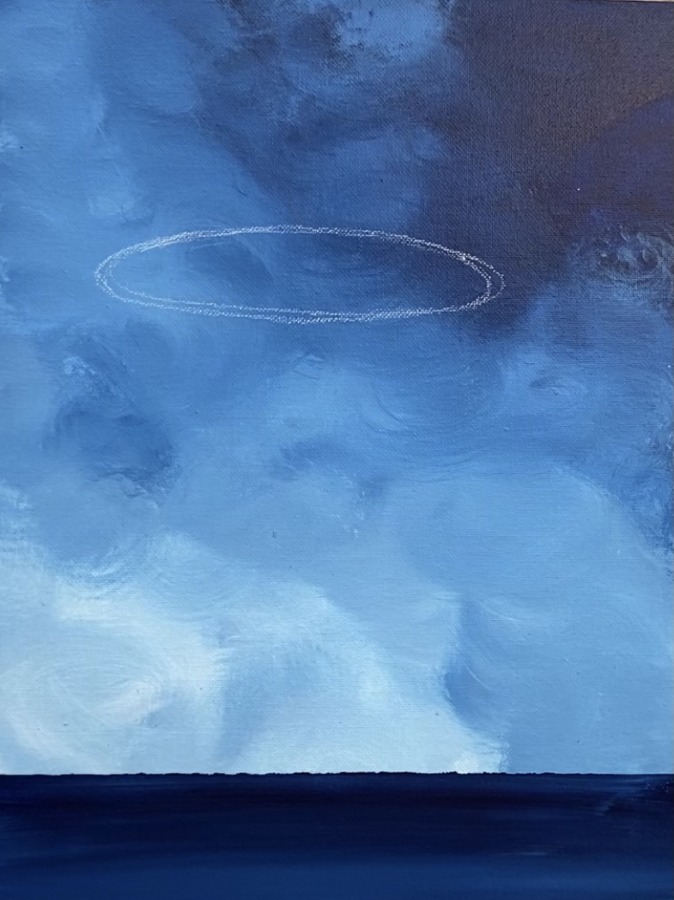
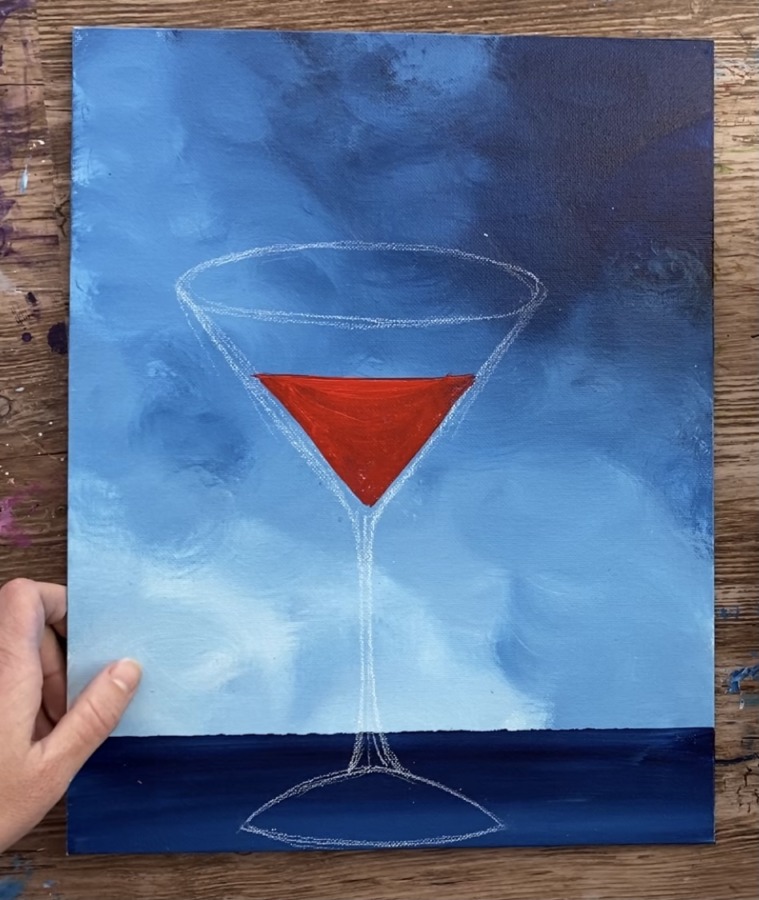
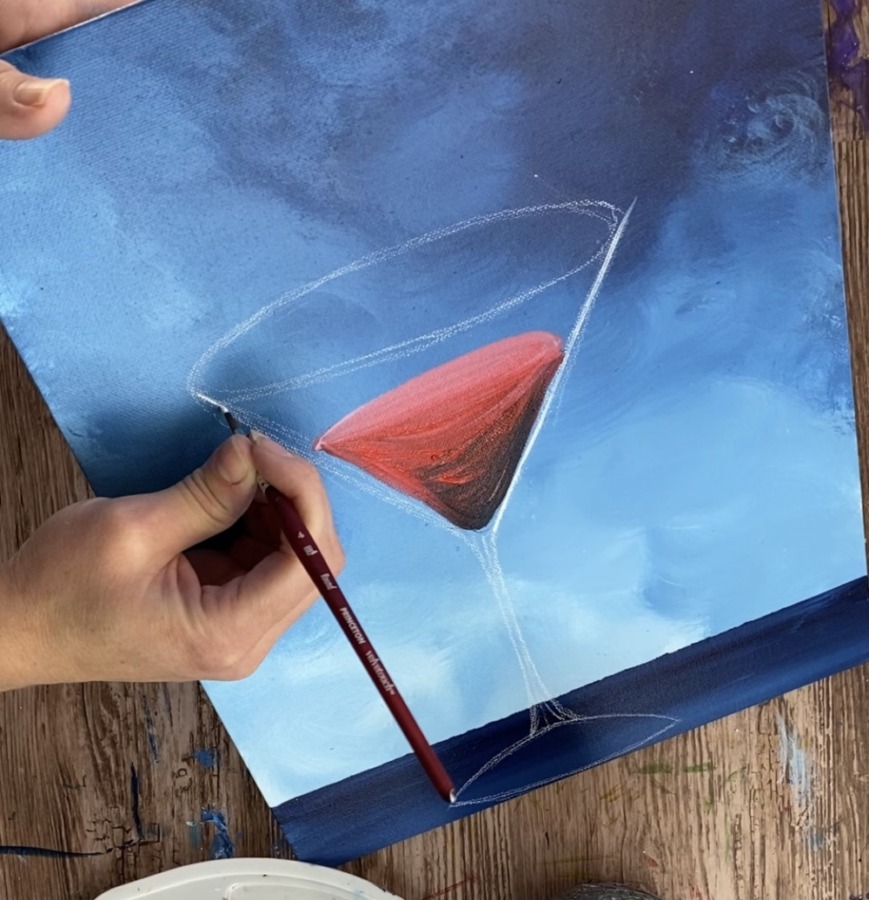
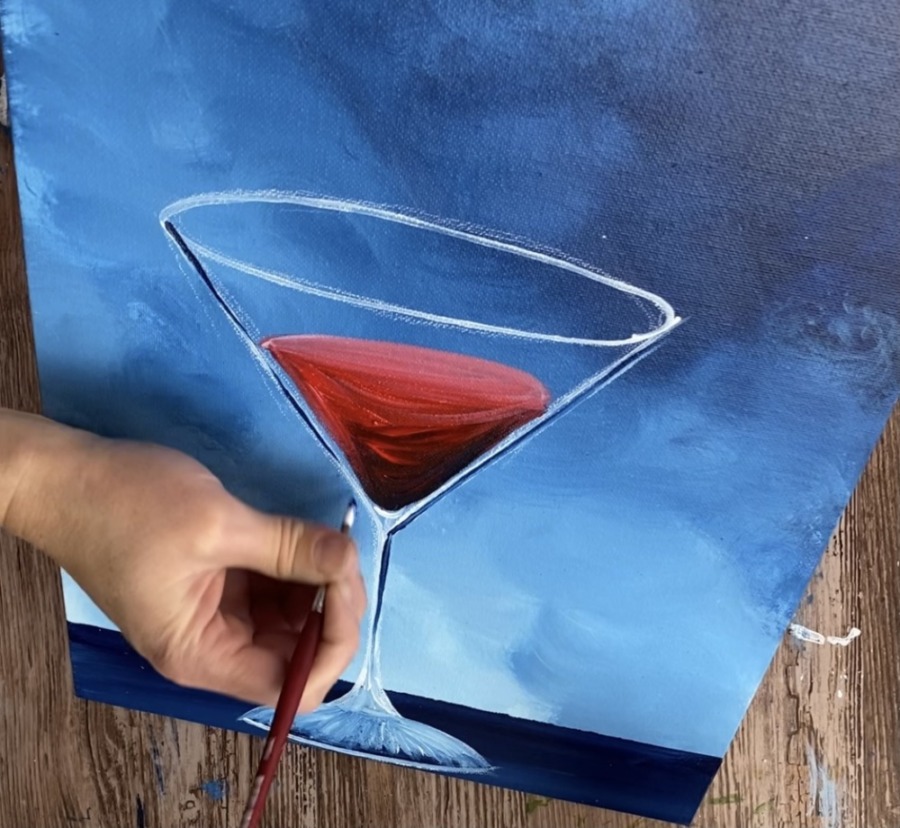
3. Draw the martini glass
Use a white chalk pencil or a regular piece of chalk. Draw a long oblong oval for the opening of the glass.
Then draw two diagonals going to a point on the bottom of the glass. This forms an upside down triangle.
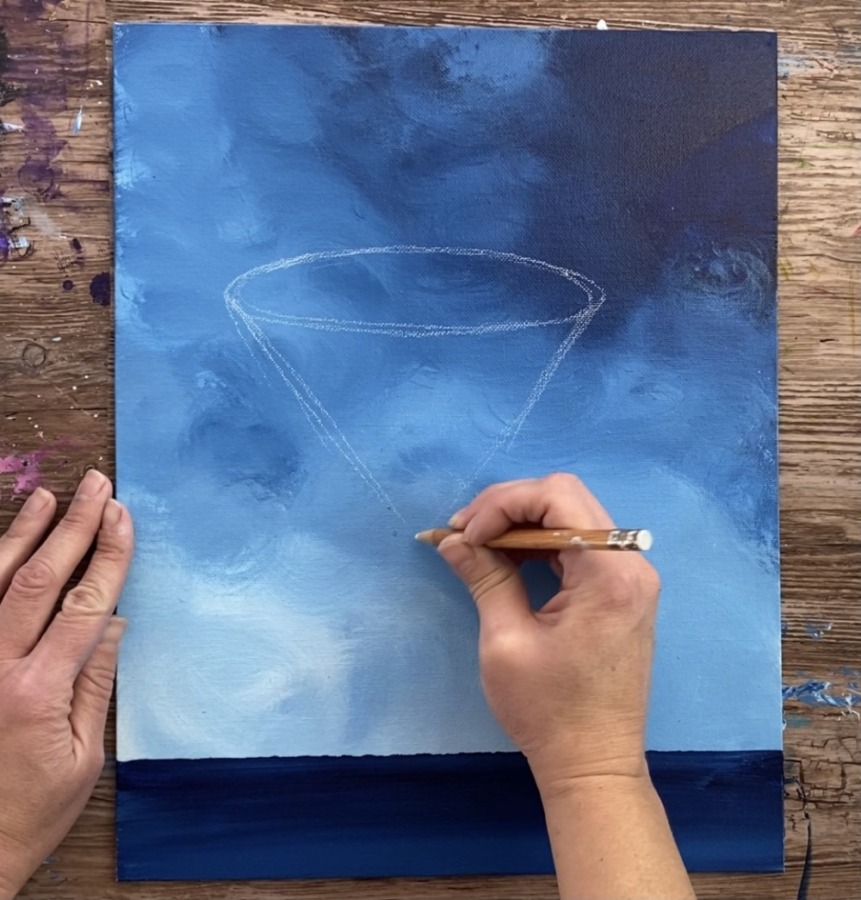
Next draw a vertical line that goes all the way down to the table area.
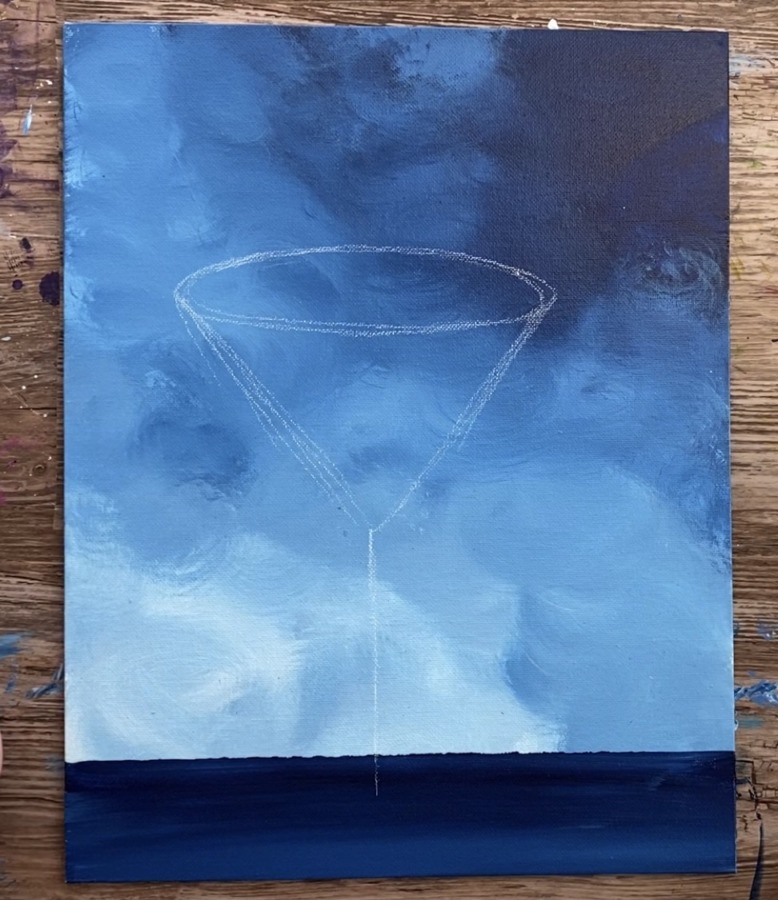
Then draw the base of the glass. This is like a “flying saucer shape”. It is curved on the bottom.
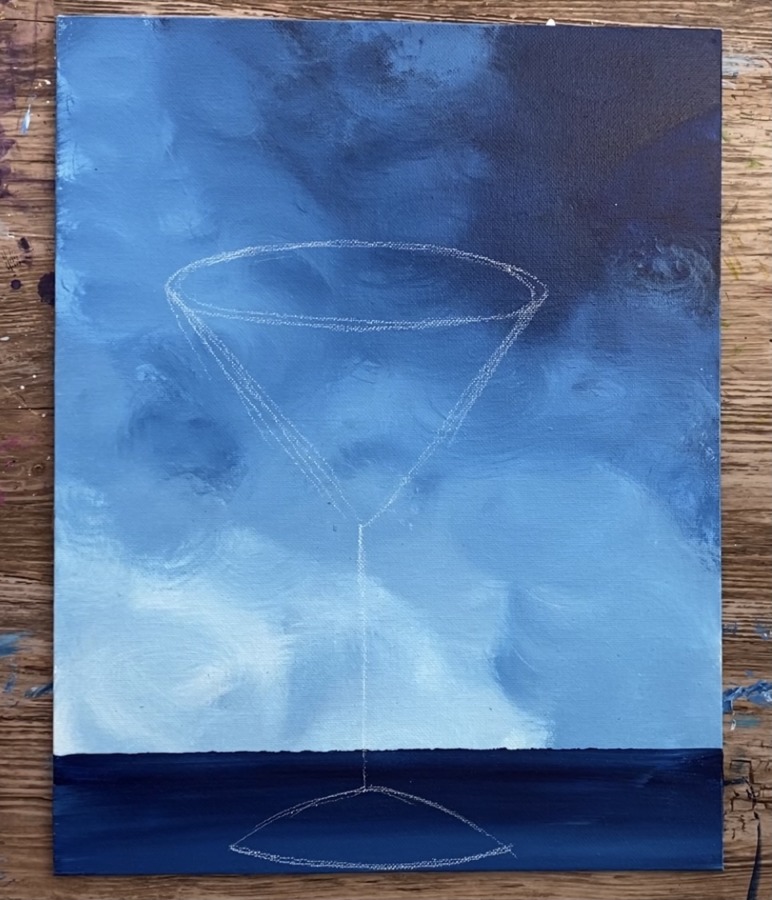
Then give the stem of your glass some shape. Draw two curved inward lines on the bottom and have those lines go vertical up so your stem is not just a line but a very thin rectangle.
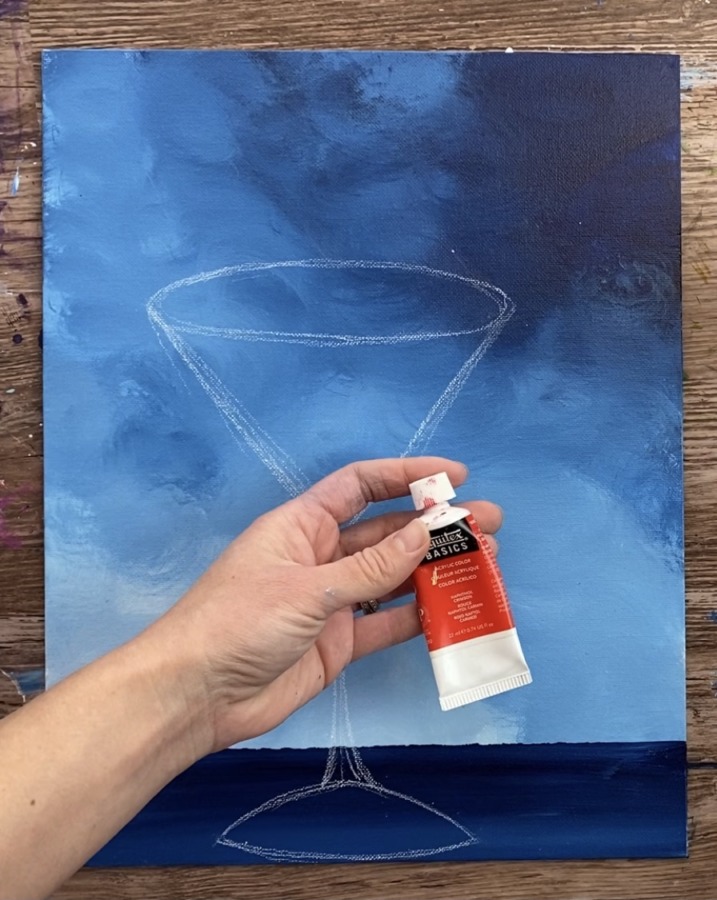
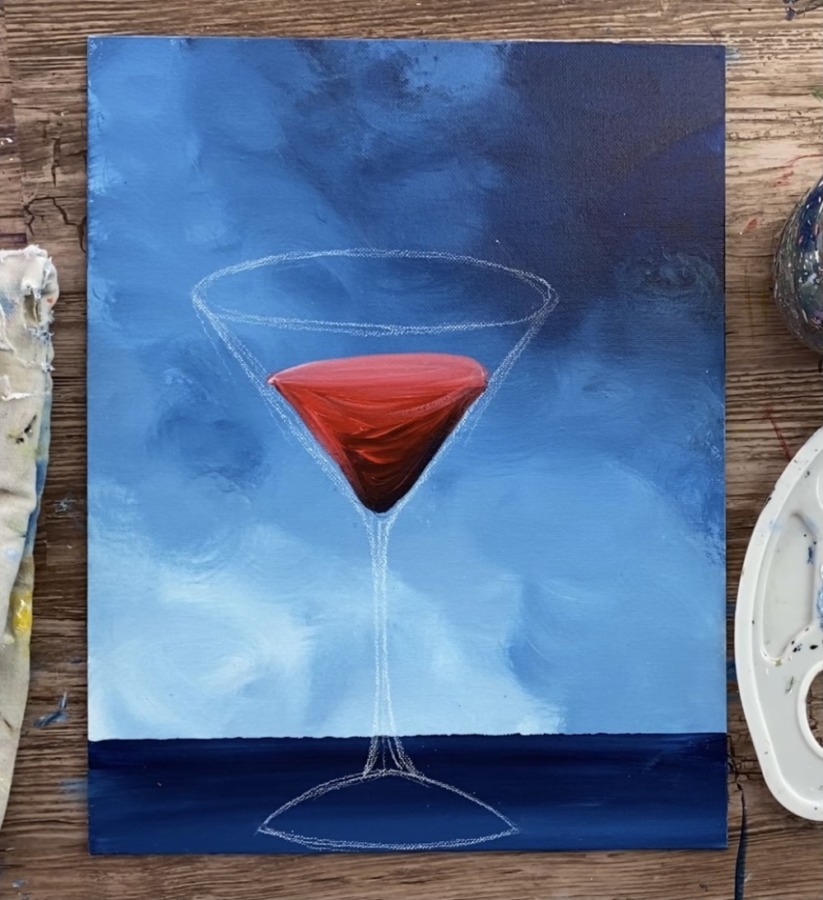
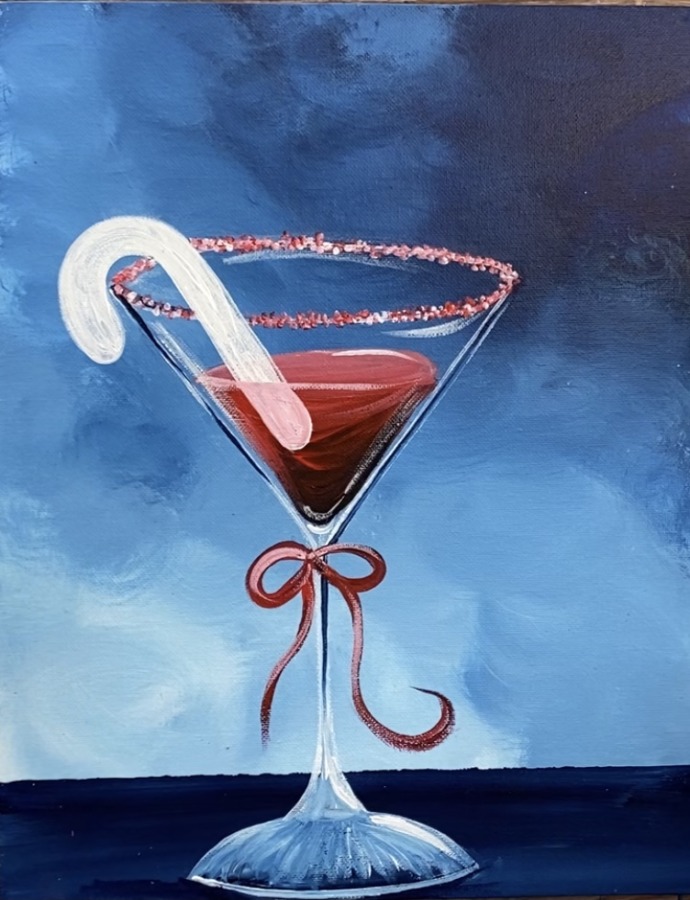
4. Paint the red liquid inside the glass
For the liquid inside the cup, I started with a layer of the color “naphthol crimson”. This is a very bright red that will show up against the dark blue background.
Define where the top of the liquid will be by painting a somewhat curved line inside the glass.
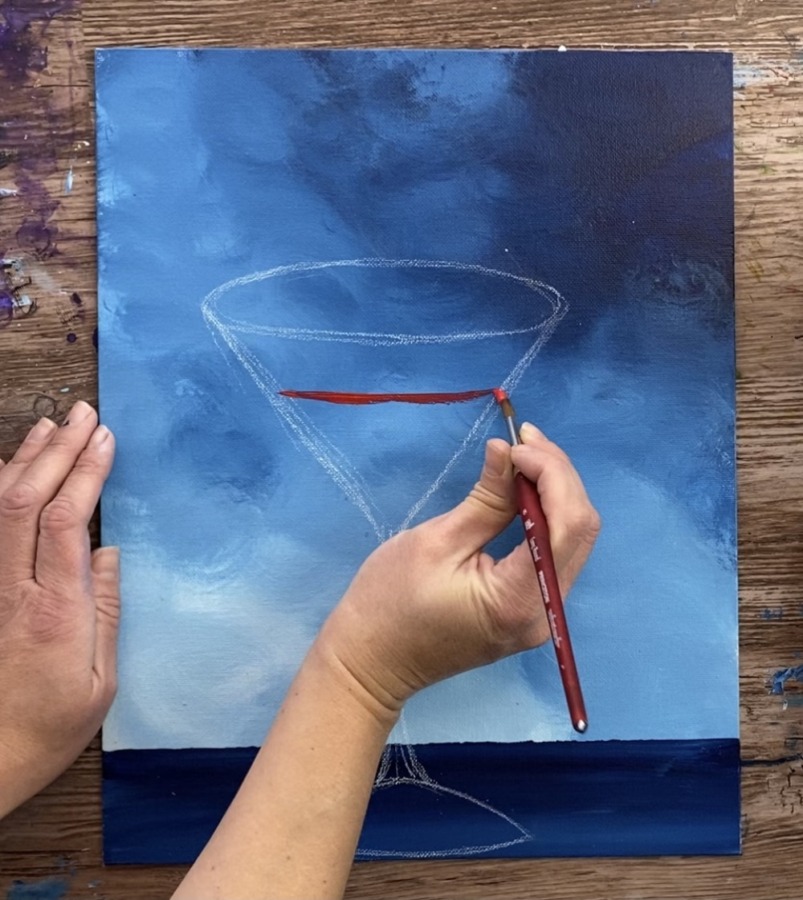
Then fill the bottom triangle area in with the red. Do not go outside the lines of your drawing, stay inside the glass area and leave a very slight gap between the liquid and the lines you drew.
Then blend a darker color at the bottom of the glass. Dip the tip of your brush in a tiny bit of Prussian Blue.
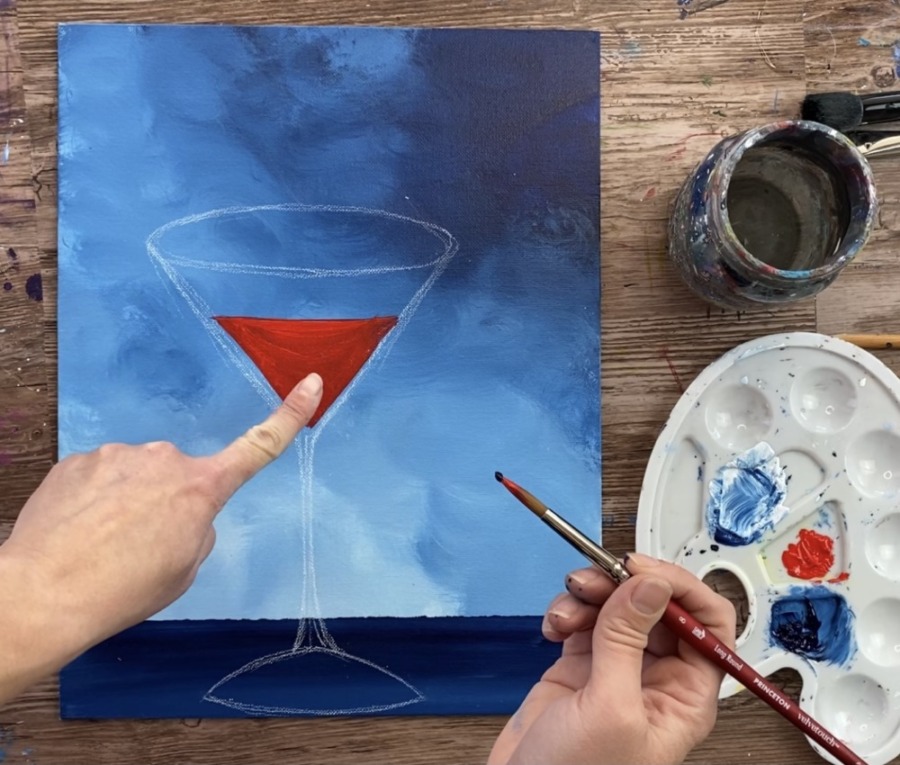
Add that Prussian Blue to the bottom of the red area.
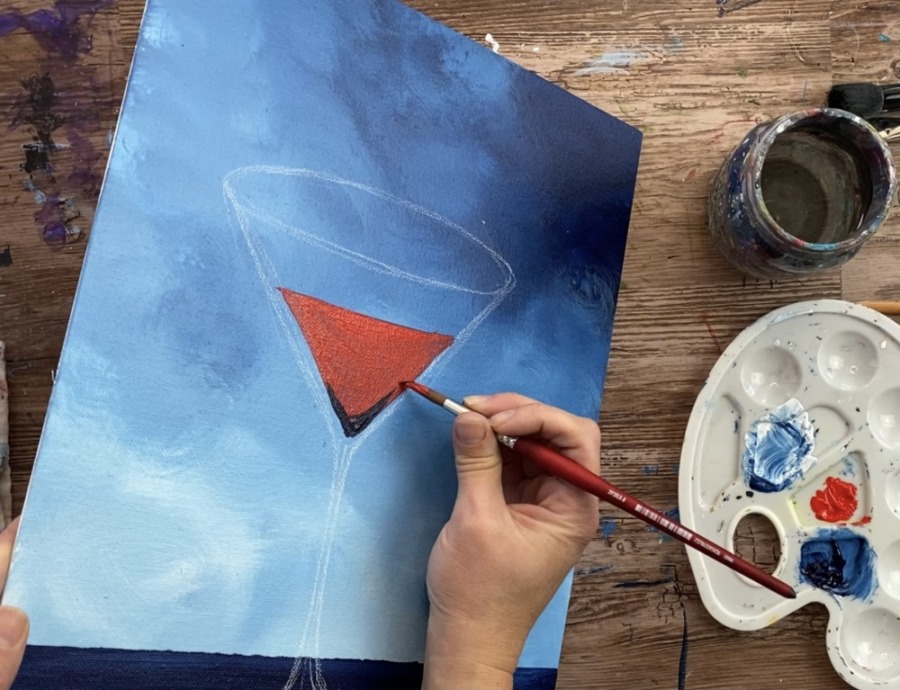
Then blend it up into the read. Do short textured strokes to blend. You may have to wipe or rinse your brush and then add just red to your brush and use that to blend the dark blue and red together.

Next completely rinse your brush. Mix titanium white into the naphthol crimson. Paint a light red oval at the top of your liquid.
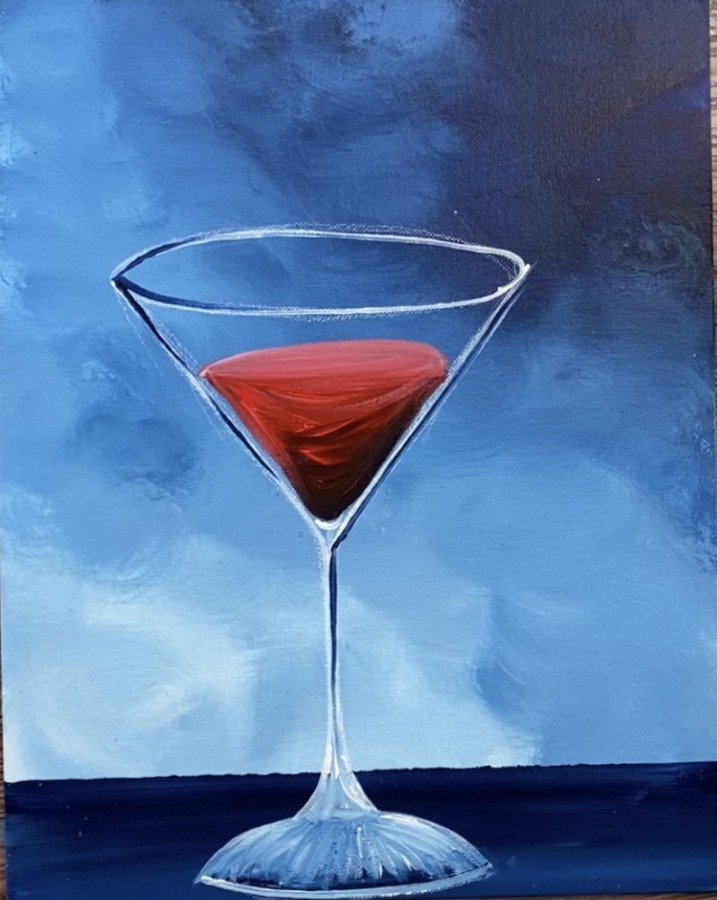
5. Paint the glass outline
Next use a #4 round brush and titanium white to paint over all the lines you drew with the chalk. Your chalk lines might erase as you paint (and that’s a good thing).
If any chalk lines still show after you paint the lines, you can wait until your white paint lines dry and then erase your chalk lines. Chalk lines will erase with a clean wet paint brush or a baby wipe. If you used a chalk pencil, you can erase your lines with a standard eraser.
My chalk lines show until the very end when I erased them. Also there is a curved white line on the very bottom of the triangle point where the bottom of the liquid is.
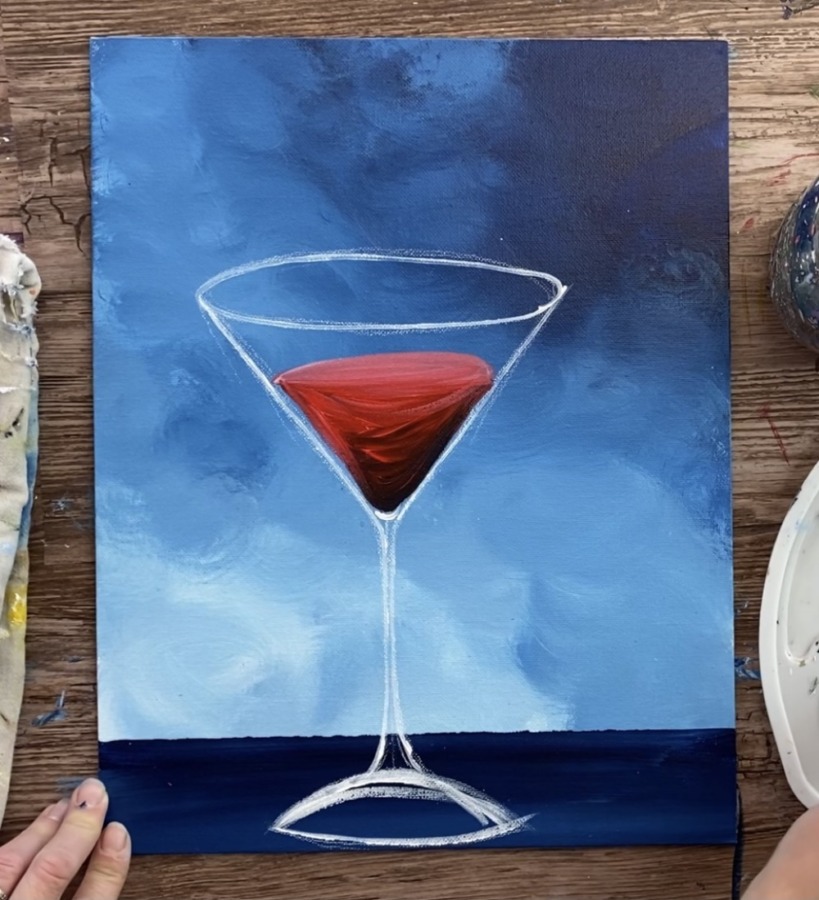
The base of the glass is a bit tricky but try not to stress about it! I started with titanium white and painted short sort of curved strokes going down to form the shape of the base.
Then add some Prussian Blue on the bottom and blend up. Outline the bottom base line of the cup with Prussian Blue as well.
Then rinse and dry your brush. Add just Prussian Blue to the tip of it. Paint some of the lines over the white but not all of them.
You can see where I added the darker lines. Only some of it is outlined with the Prussian Blue white the rest is white.
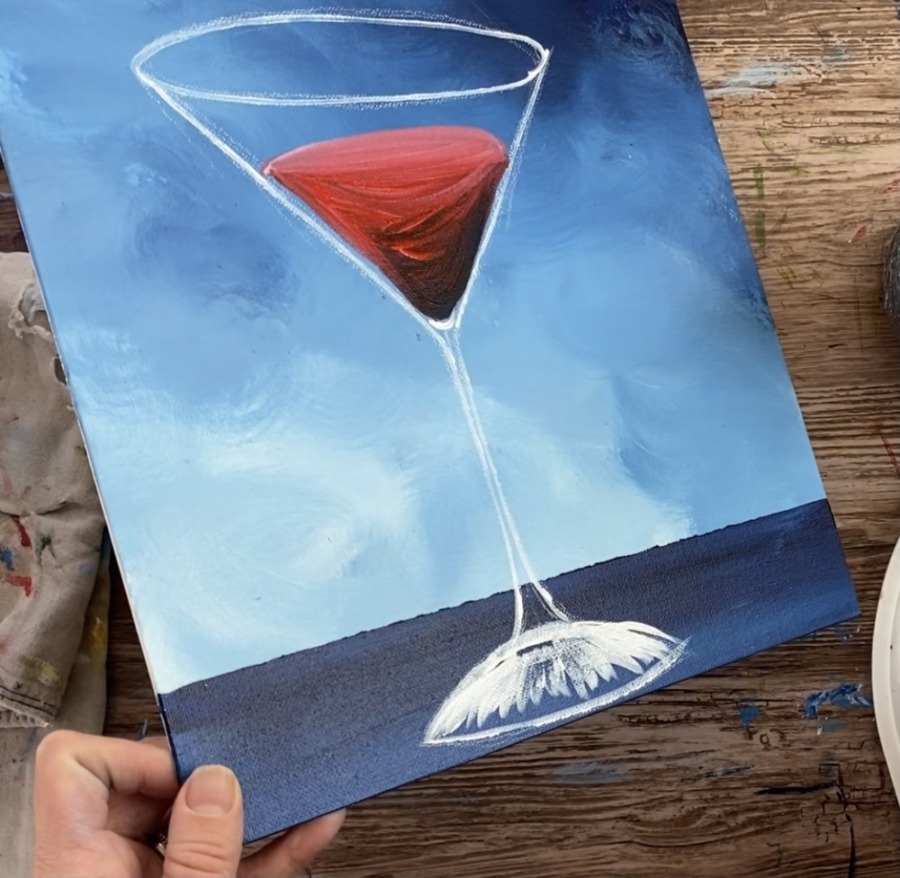
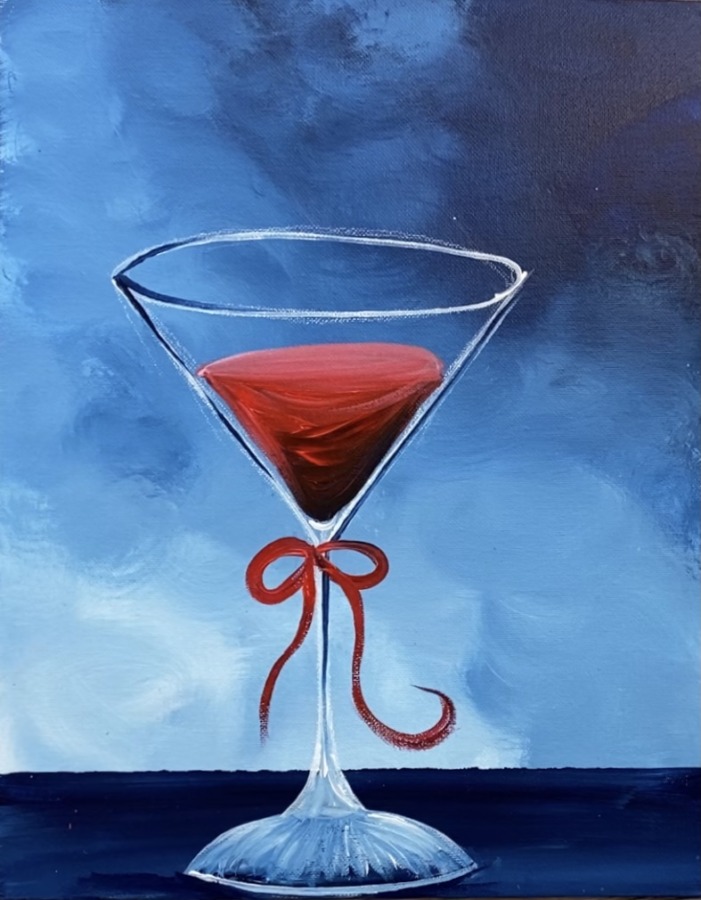
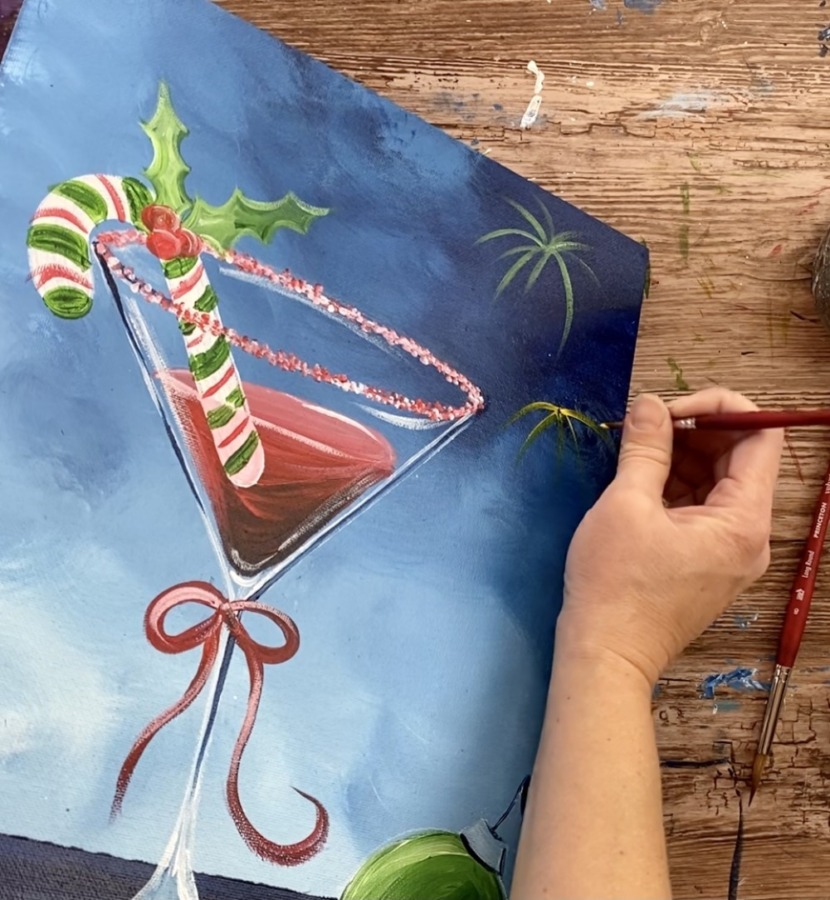
6. Paint bow
For the bow, I used my #4 round brush and naphthol crimson. Paint a bow line on the top part of the stem of the glass. You can also customize your color or add some fun designs to the bow!
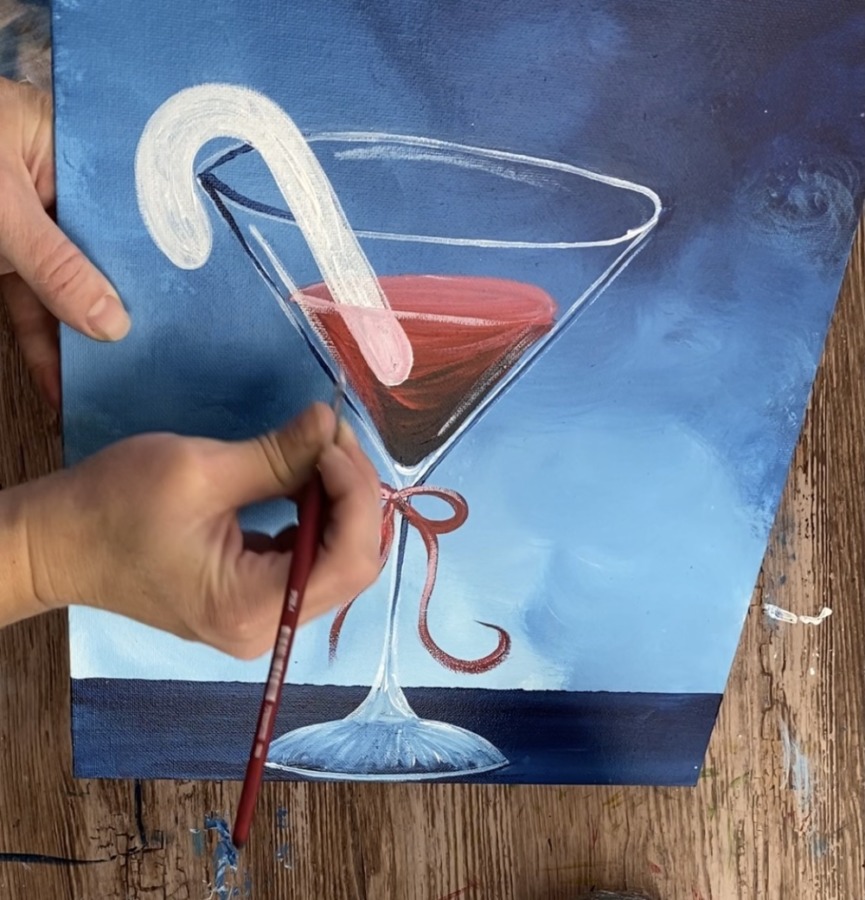
7. Paint the candy cane
Use your #4 round brush and titanium white. Paint draw the candy cane shape OR use a piece of chalk to draw it first.
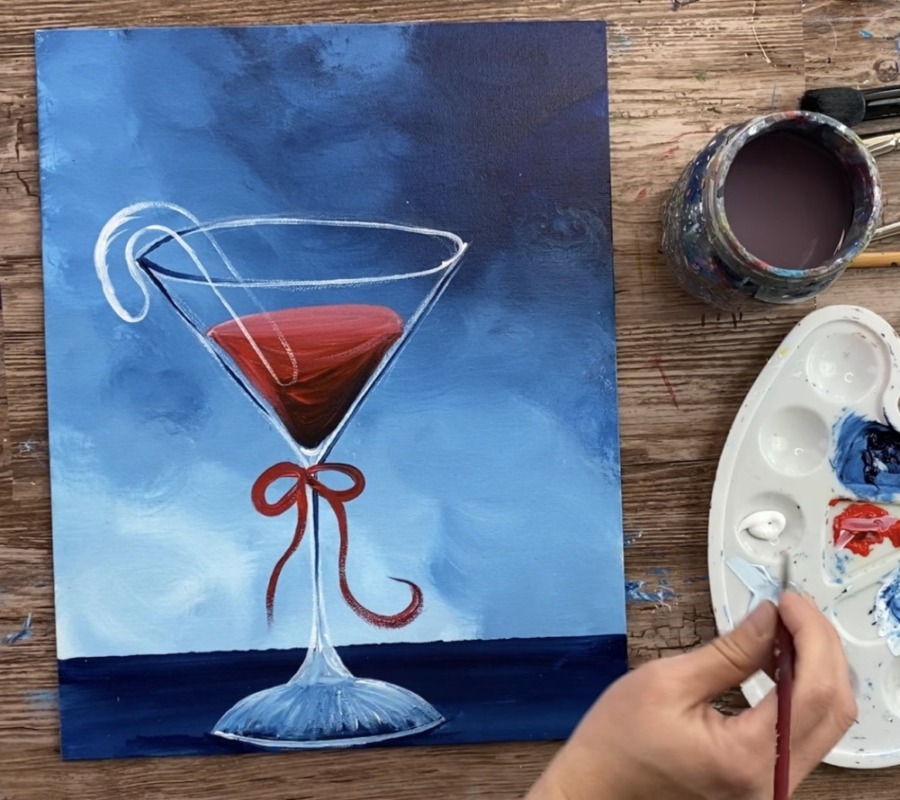
Paint the candy a solid coat of titanium white. Note: I painted mine to overlap the rim line at first.

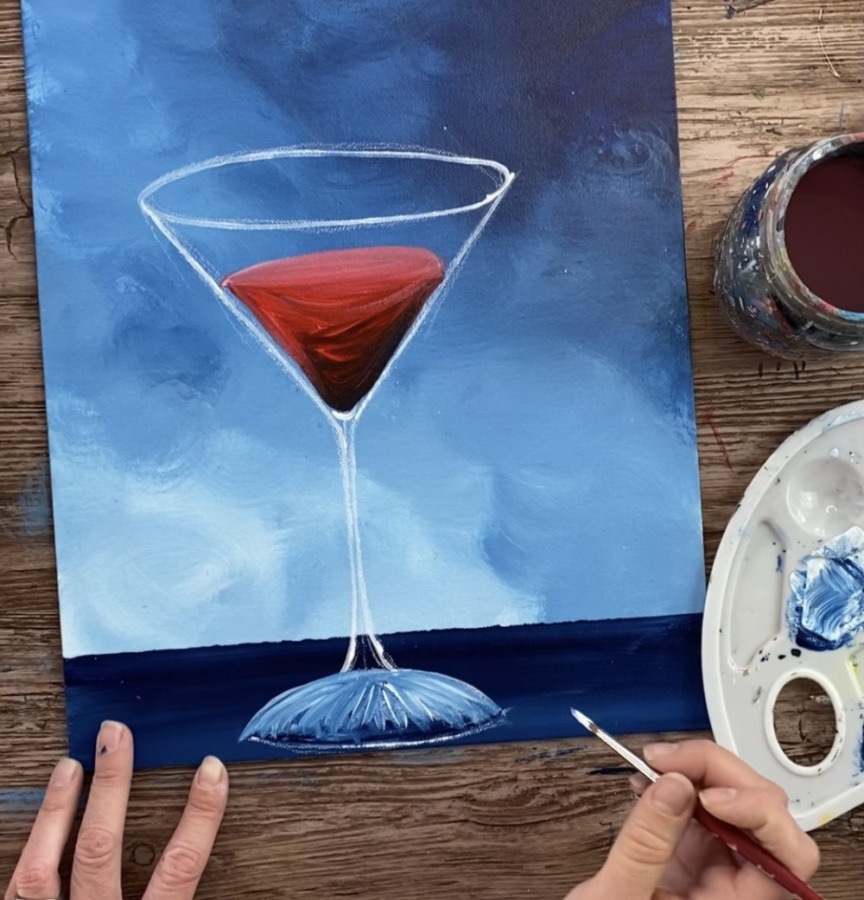
Then look closely at where the candy cane is submerged in the drink. Mix a light pink on your palette (about 3 parts white and 1 part red). Paint the bottom part of the candy cane with this light pink color.
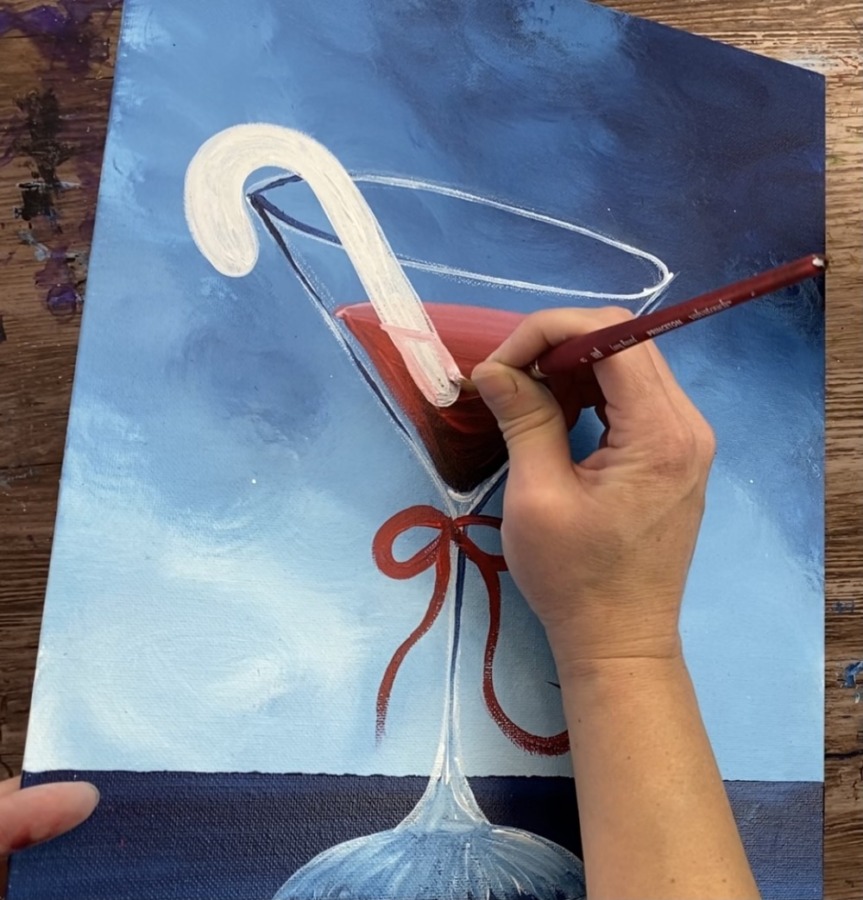
Then take that light pink color and add it to the bow. Then paint the curved line where the top of the liquid is that overlaps the candy cane.
8. Paint glass highlight marks
To create the effect that glass has a “glare” on it, I recommend doing a “dry brush stroke”. To do dry brush, load your #4 round brush in titanium white and then wipe it off with a paper towel so only a little bit of white paint is left on the brush.
Then gently paint strokes of this “dry brush white” on the inner edges of the glass and on the inside top part of the rim.
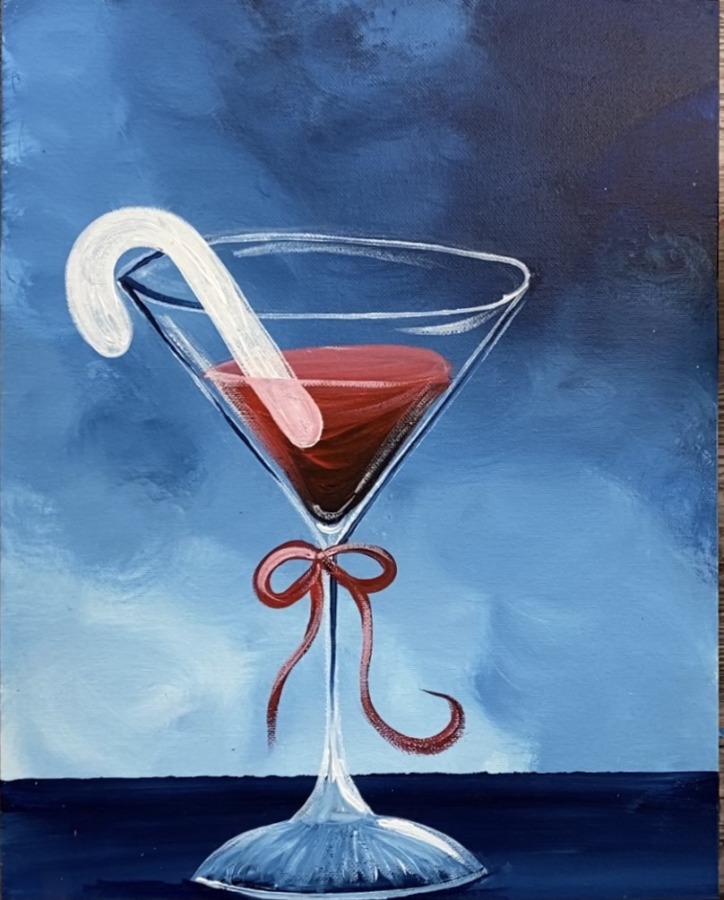
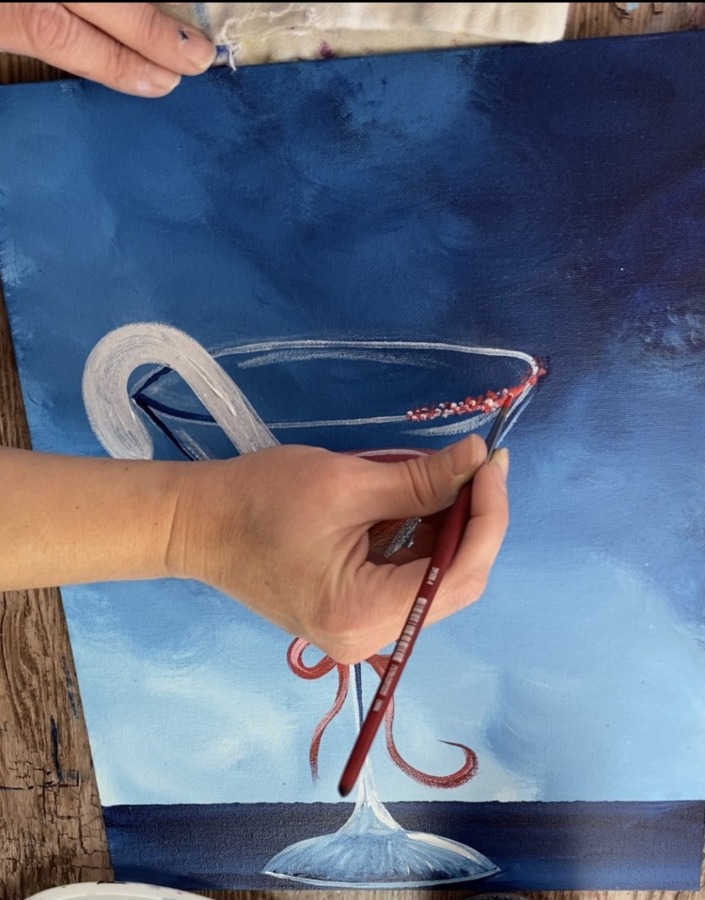
9. Paint candy pieces on rim
This step is super easy! Use your #4 round brush. Load it in both naphthol crimson and titanium white. “Stipple” or paint little dots all along the rim. Vary the colors of the red and white.
10. Paint stripes on candy cane
I chose green and red stripes but you can customize this as well! Use your #4 round brush and hooker’s green hue permanent Paint curved diagonals going all up the candy cane.
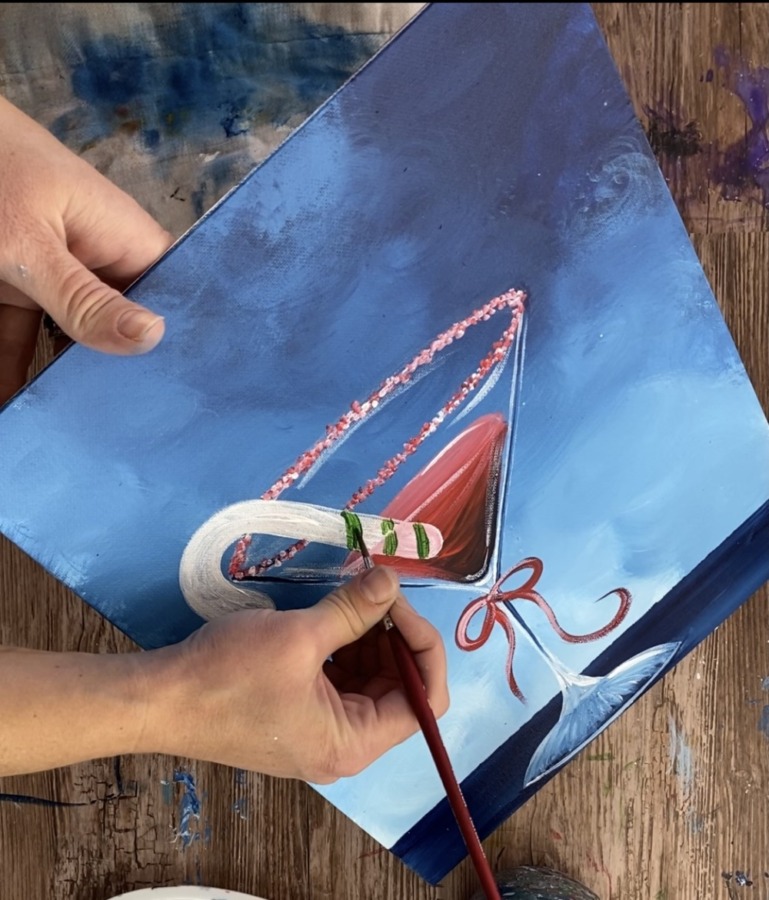
I also finished the candy cane pieces on the rim so they overlap the candy cane correctly.
Then I did small red stripes between the green stripes.
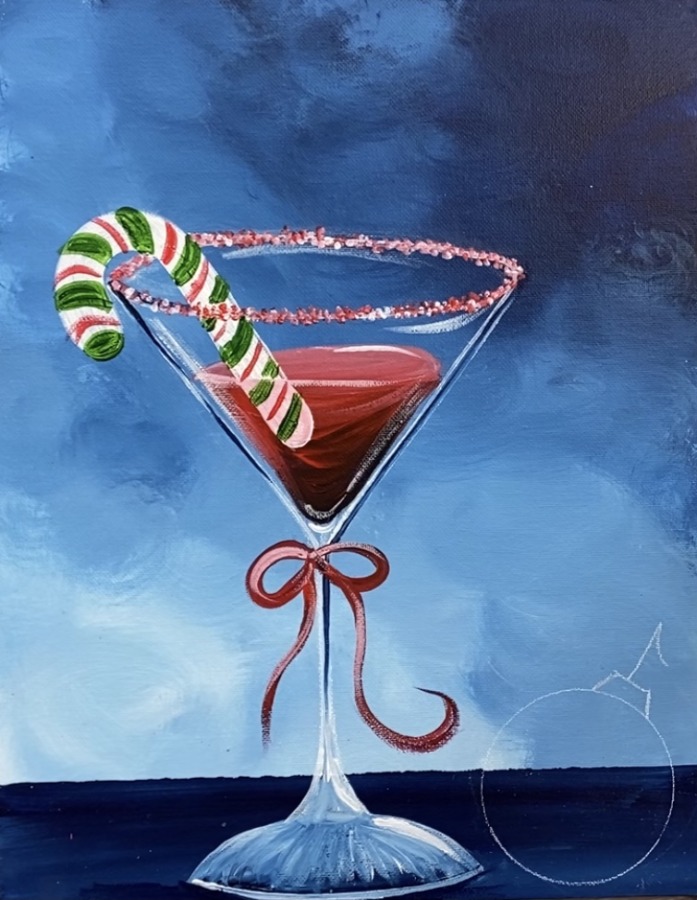
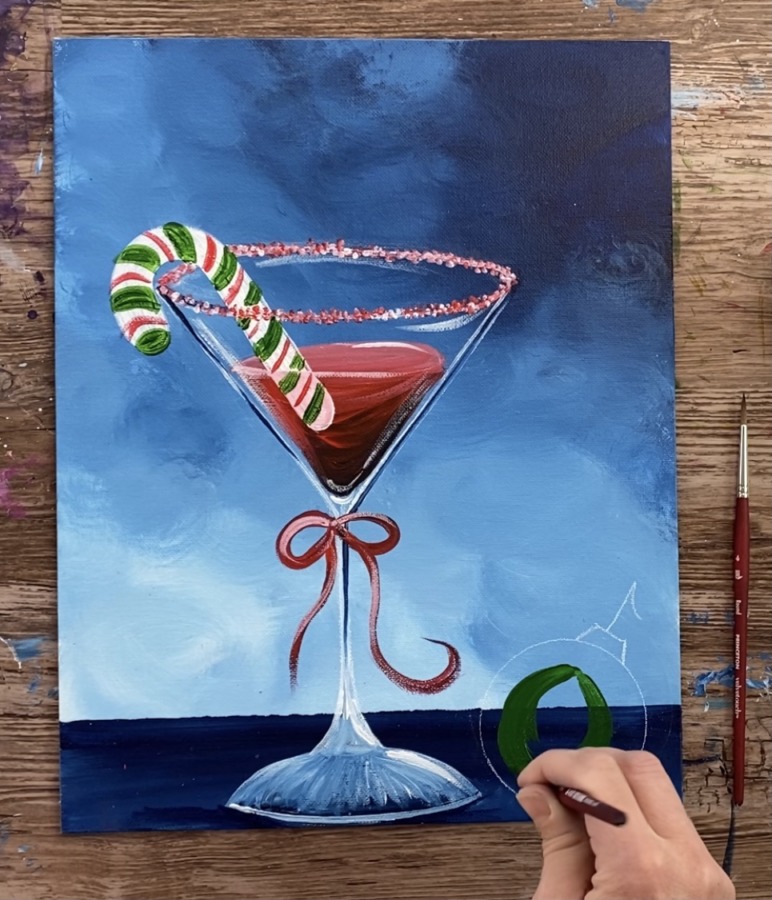
11. Draw/ paint ornament & holly leaves on candy cane
If you aren’t using my traceable, find a small circle to trace. My circle is one of those Masters Touch brush cleaner circle containers. It’s about 3″ in diameter.
Trace the circle with your chalk pencil and then draw the top part of the ornament as well as the hook.
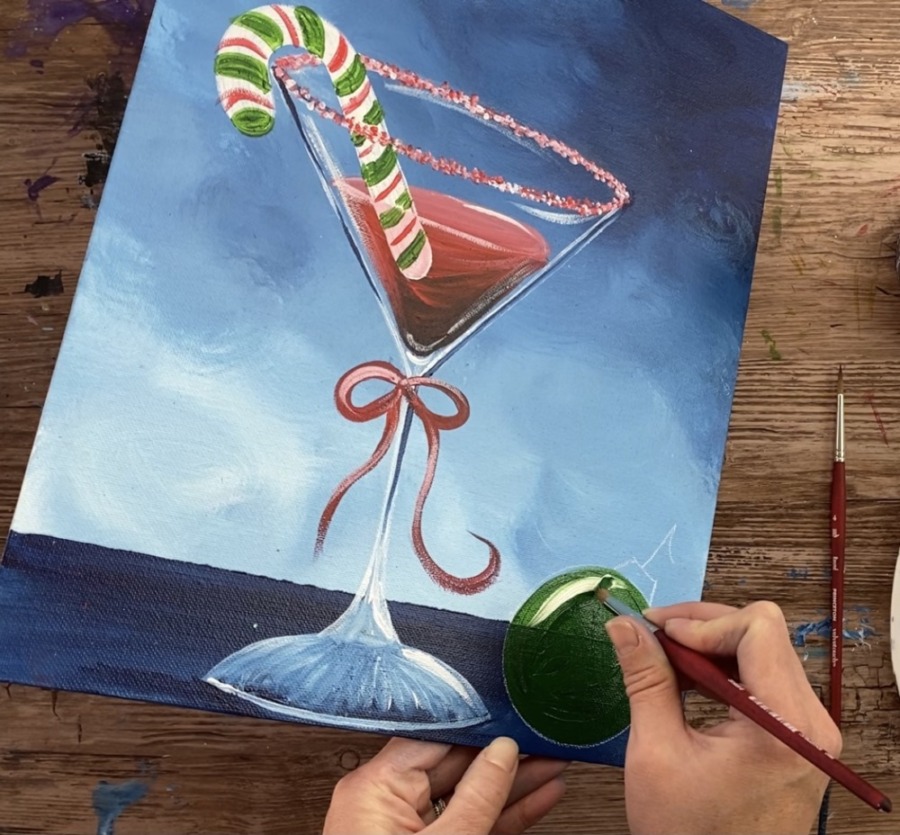
Next paint the ornament a solid coat of hooker’s green hue permanent. I used a #8 round brush for this step.
Then after you paint it solid green, add a little bit of titanium white to the ornament on the top and blend it in (this gives the ornament some highlight).
To do the shadow on the ornament, use a little bit of Prussian Blue mixed with the hooker’s green permanent. Paint curved strokes on the bottom of the ornament for the dark shadow area.
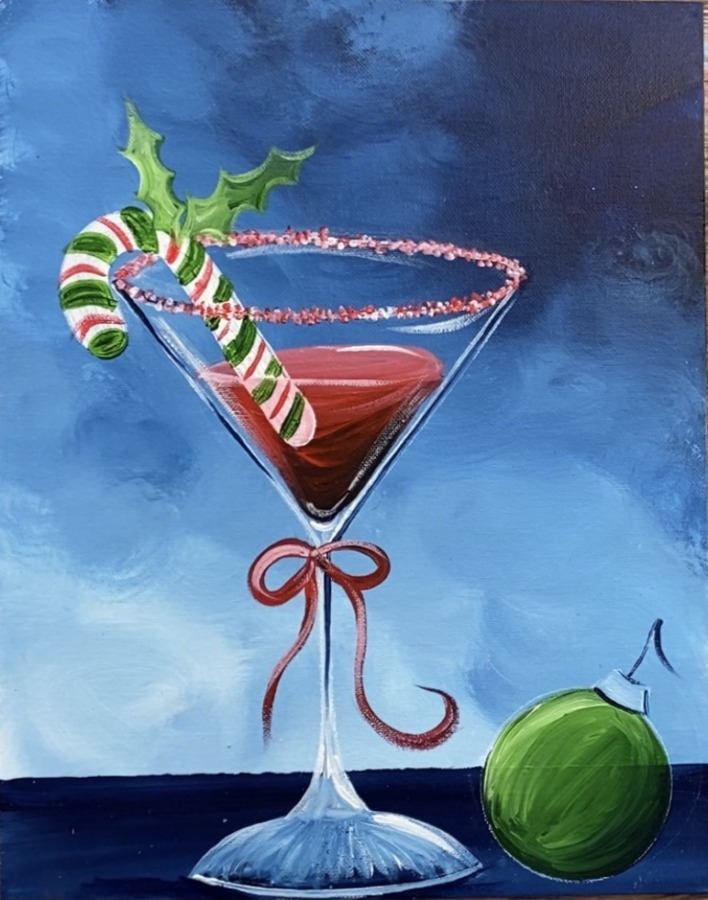
For the top piece of the ornament, I painted that white mixed with a little Prussian Blue. Then I used Prussian Blue to outline the trapezoid shape on the top of the ornament as well as the hook.
12. Paint fireworks & snowflakes
To do the fireworks, use a #4 round brush. Load it in green mixed with a little white. Start in the center of the firework and drag your stroke outward and down to make a curved line.
You can see my post about round brush strokes here. Scroll down to technique #4. This is what I call a “starburst” stroke!
Then load your #4 round brush in just white. Add strokes of white onto the firework just in the middle of the lines. This will brighten them up a lot and make them stand out against the dark blue background.
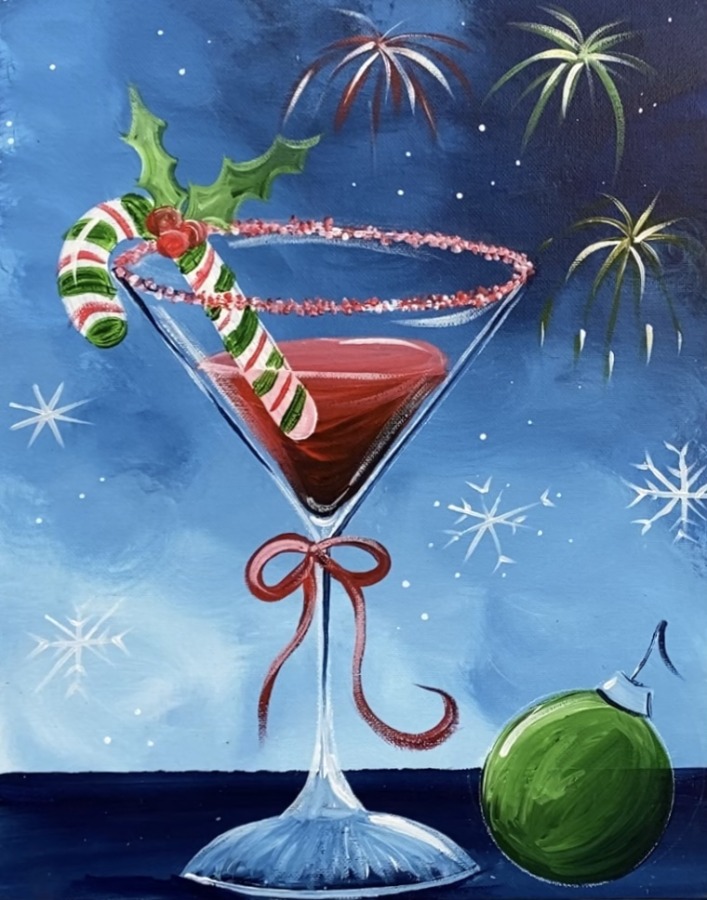
For the snowflakes, I used a #4 round brush and titanium white. Paint different size and shape snowflakes everywhere as well as little snow dots.
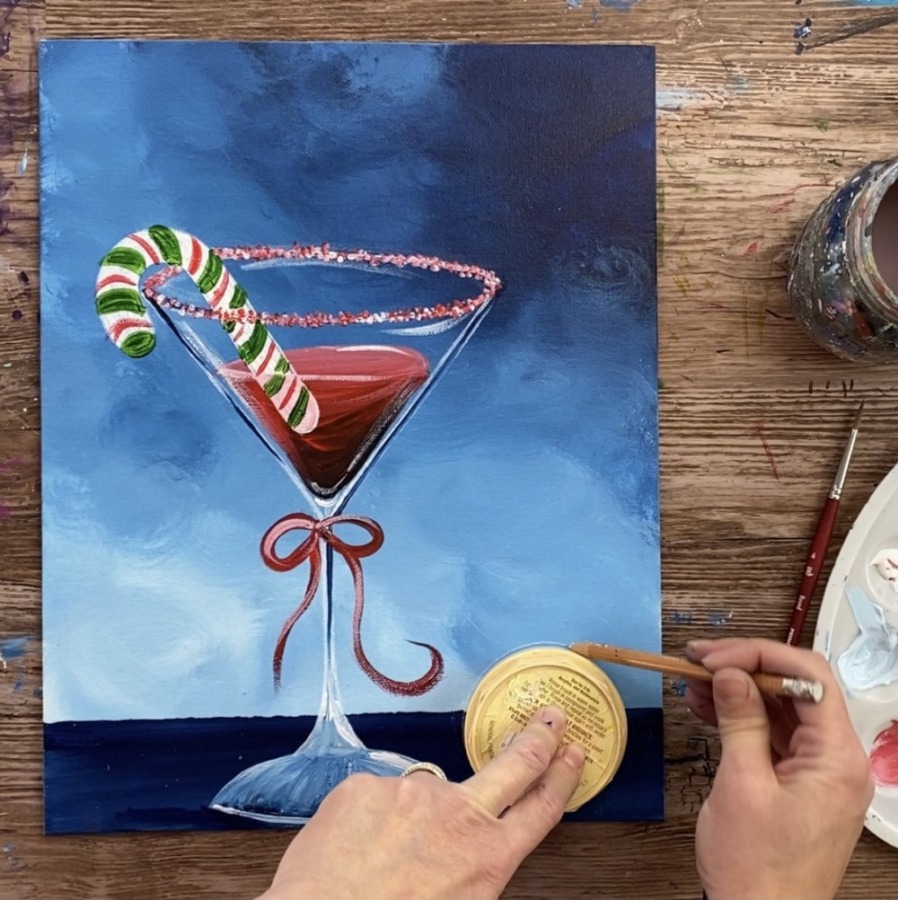
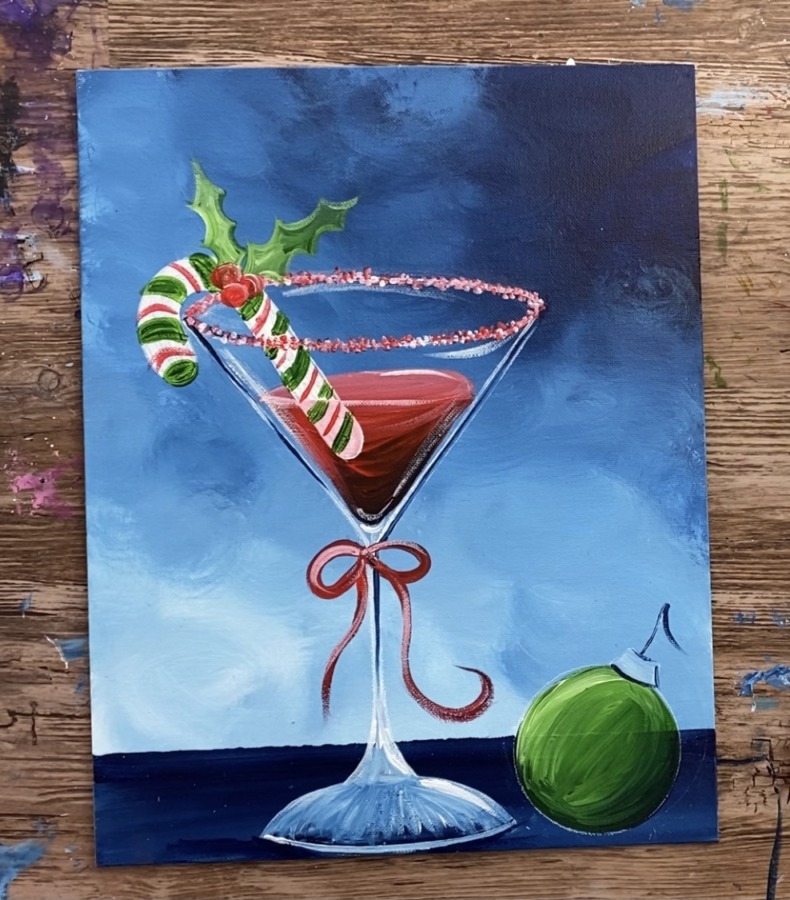
13. Paint year on ornament
If you want to put a year on the ornament, use a paint pen or your #4 round brush and titanium white. Paint the year on the ornament.
Finished!
Sign your name and show it off!
Share Your Art Here!


is there a pdf of this so I can take it into my studio to paint it
There will be a PDF printable of this one soon!