

Would you like to save this?
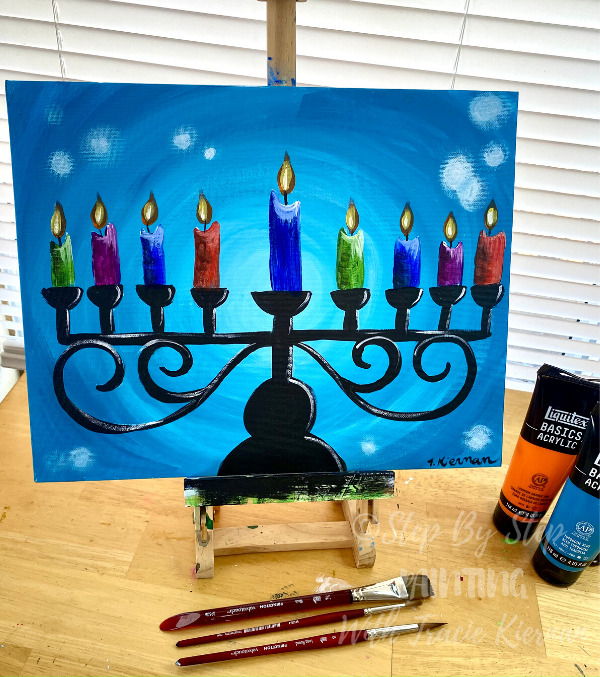
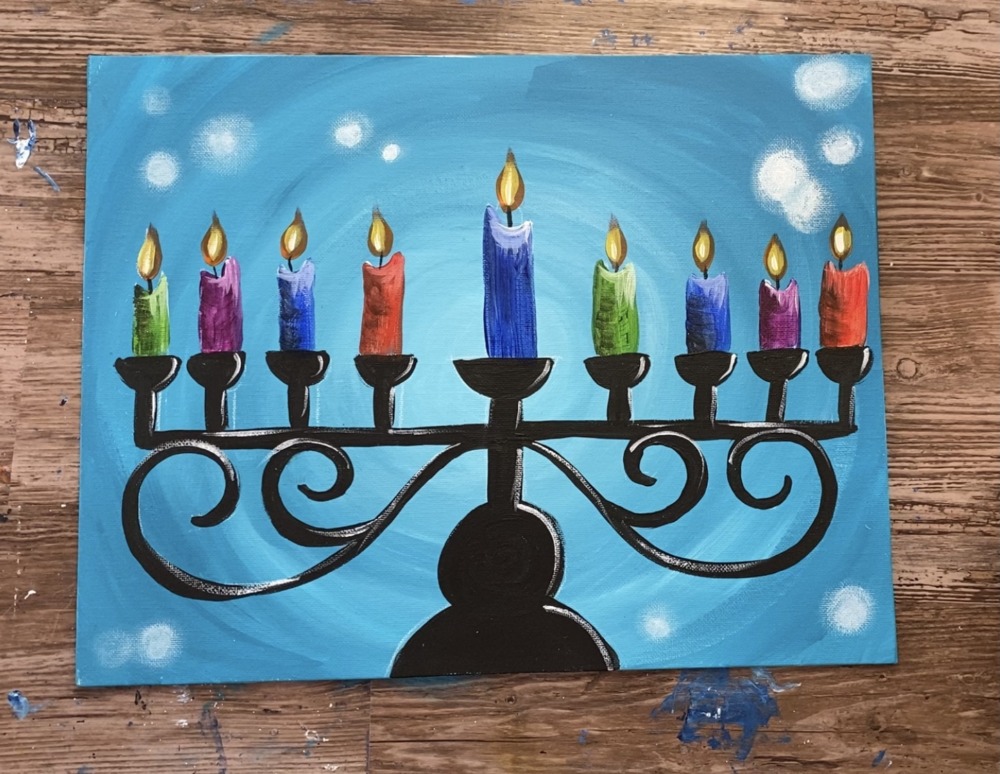
This tutorial is made especially for my fans that celebrate Hanukkah or who want to learn how to paint a Menorah design! I love the colors in this one with the pretty turquoise background and the few bokeh lights. It’s a simple design and a lot of fun to paint.
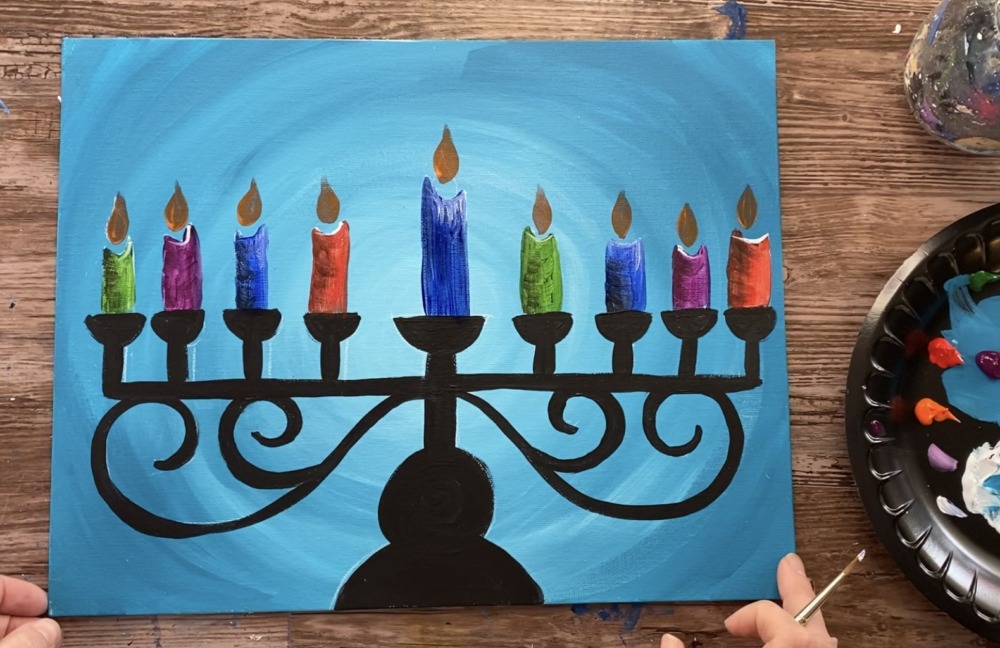
This painting was done on an 11 x 14 canvas with acrylics. You do not need a traceable because I will show you how to draw the menorah.
Enjoy and happy painting!
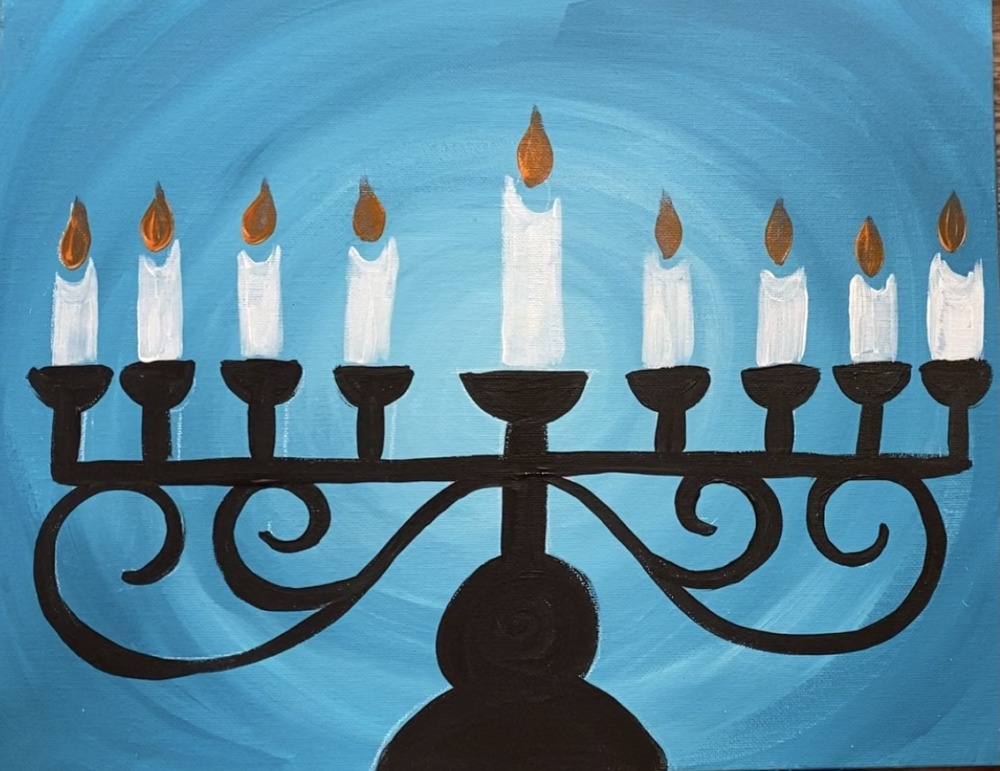
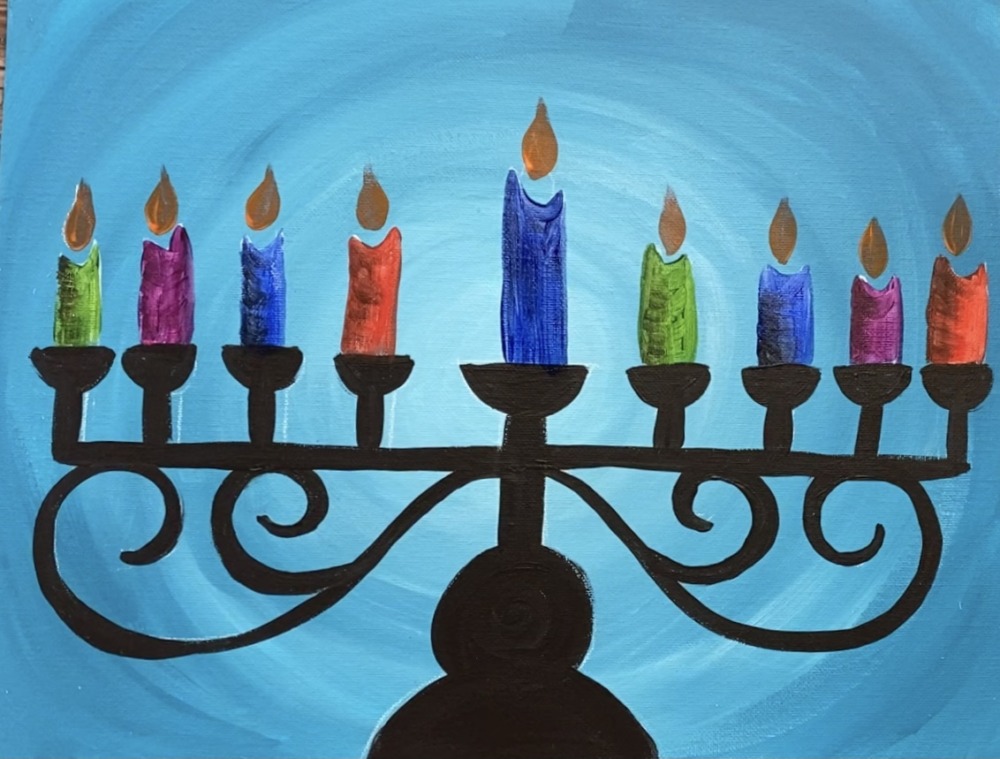
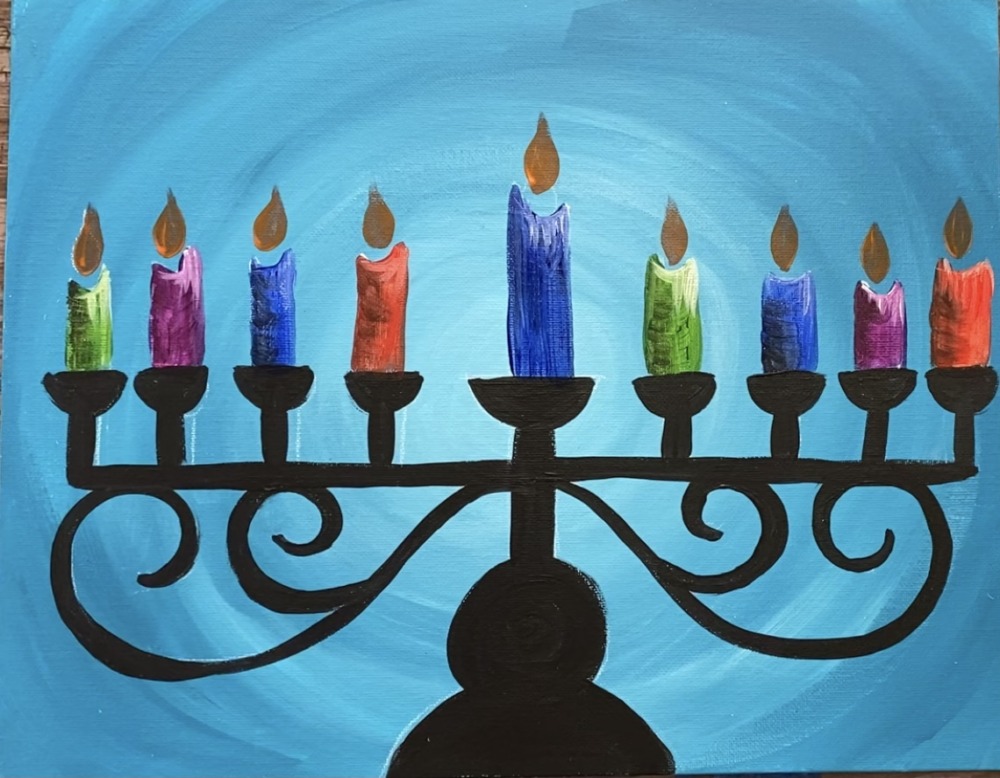
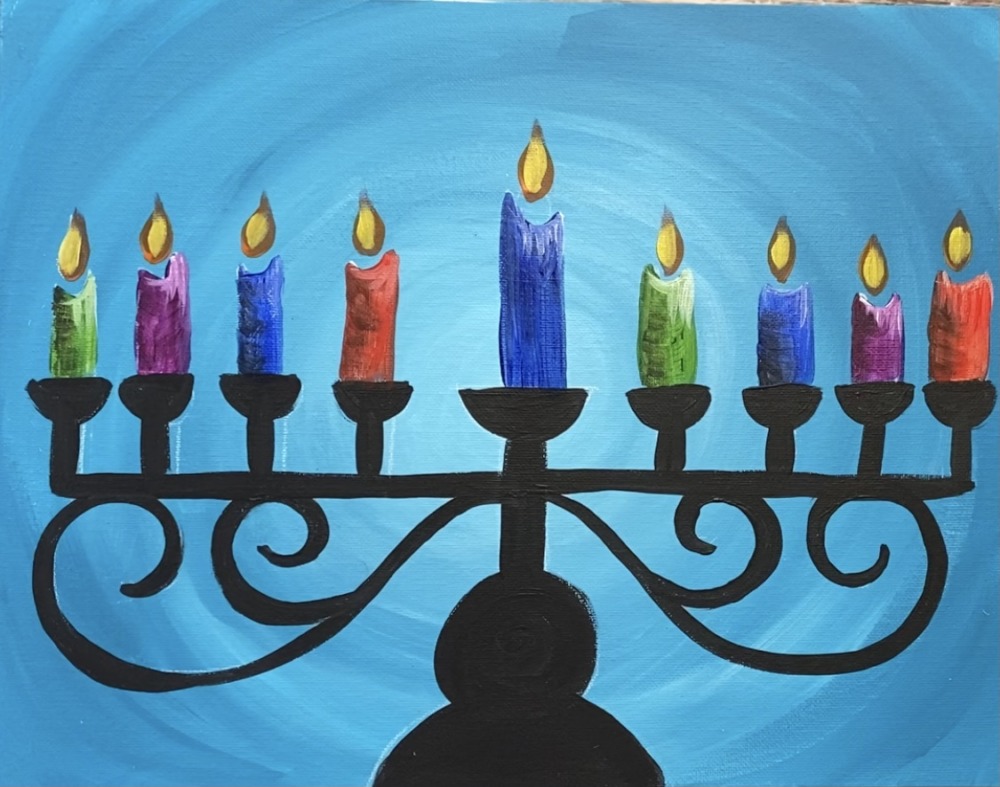
Menorah Acrylic Painting
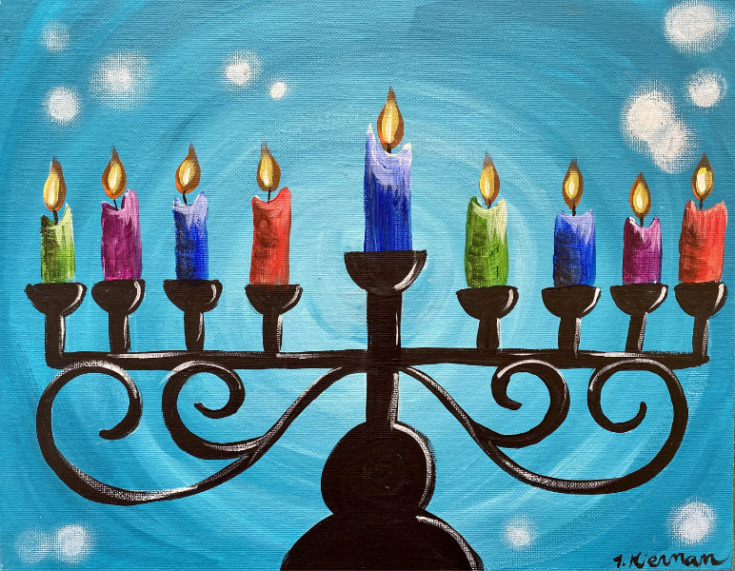
Paint a beautiful Menorah painting on an 11 x 14 canvas. I love the turquoise background and bokeh lights! The candles can also be customized with different colors.
Materials
- 11 x 14 Canvas
- Acrylic Paint
- Brushes
- White Chalk or White Chalk Pencil
- Ruler (preferable a t-square)
- Paper towel or rag for wiping brushes
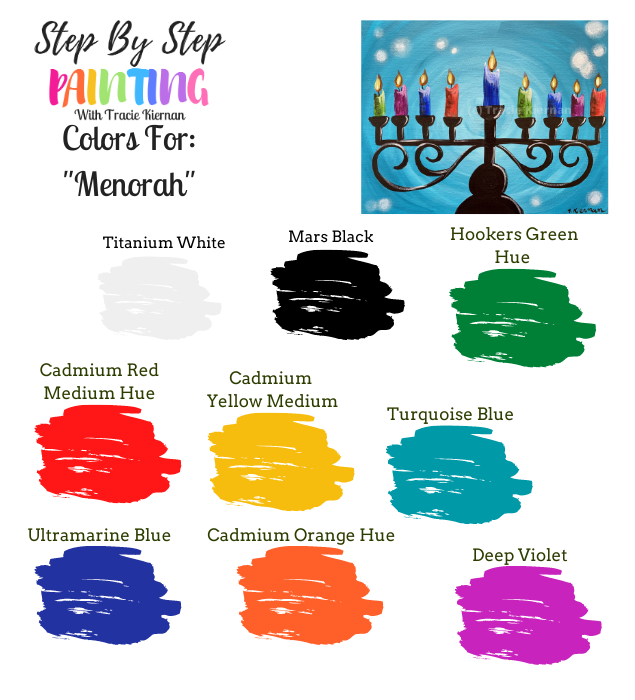
Colors
- Titanium White
- Mars Black
- Turquoise Blue
- Cadmium Red Medium Hue
- Cadmium Orange Hue
- Cadmium Yellow Medium Hue
- Hooker's Green Hue Permanent
- Ultramarine Blue
- Deep Violet
Brushes
- 3/4" Wash Brush
- #8 Round Brush
- #4 Round Brush
- An old round brush for the bokeh
- #8 Flat brush (or any small flat brush)
Notes
For a simplified color palette, you can omit the purple, green, red and dark blue and paint all the candles the same color.
Color Palette
Directions at a glance
Traceable
This is optional because I show you how to draw the menorah.

Video
Step By Step Directions
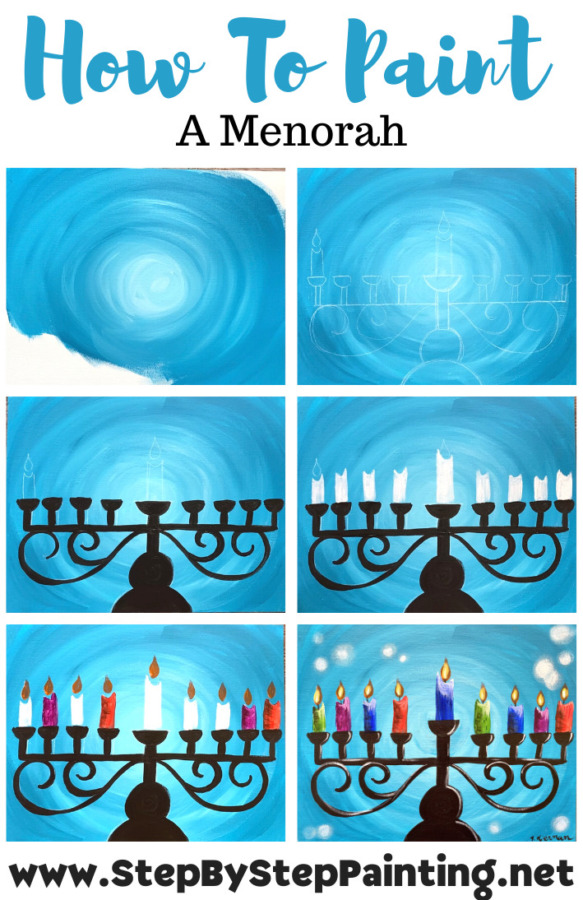
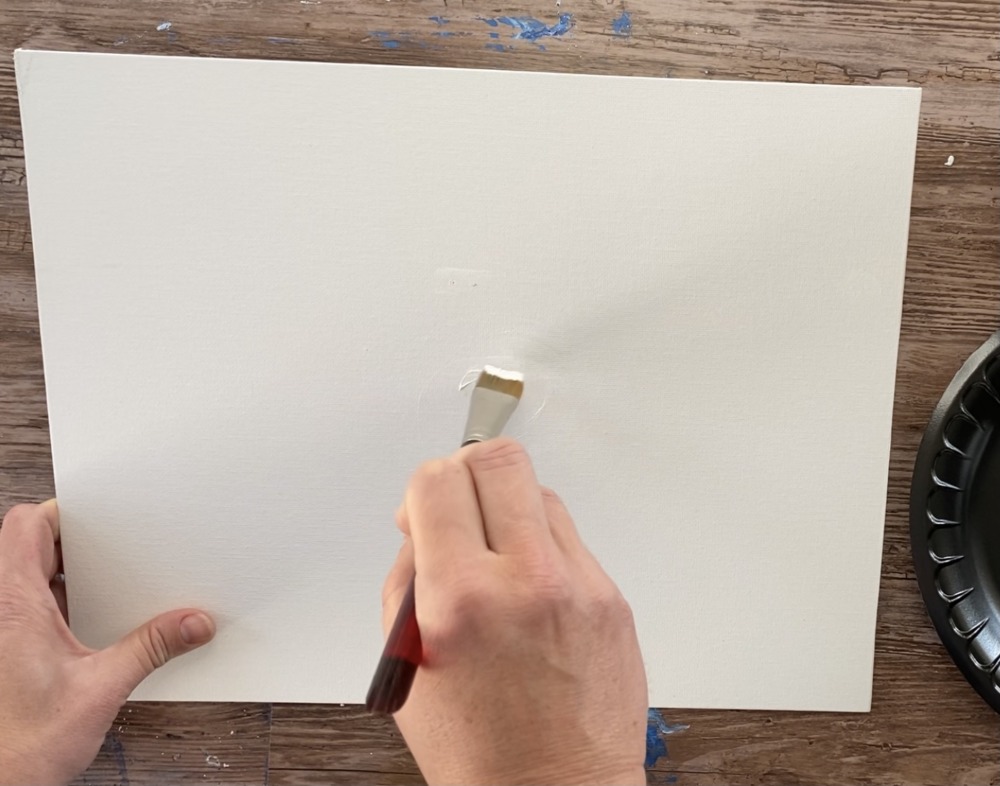
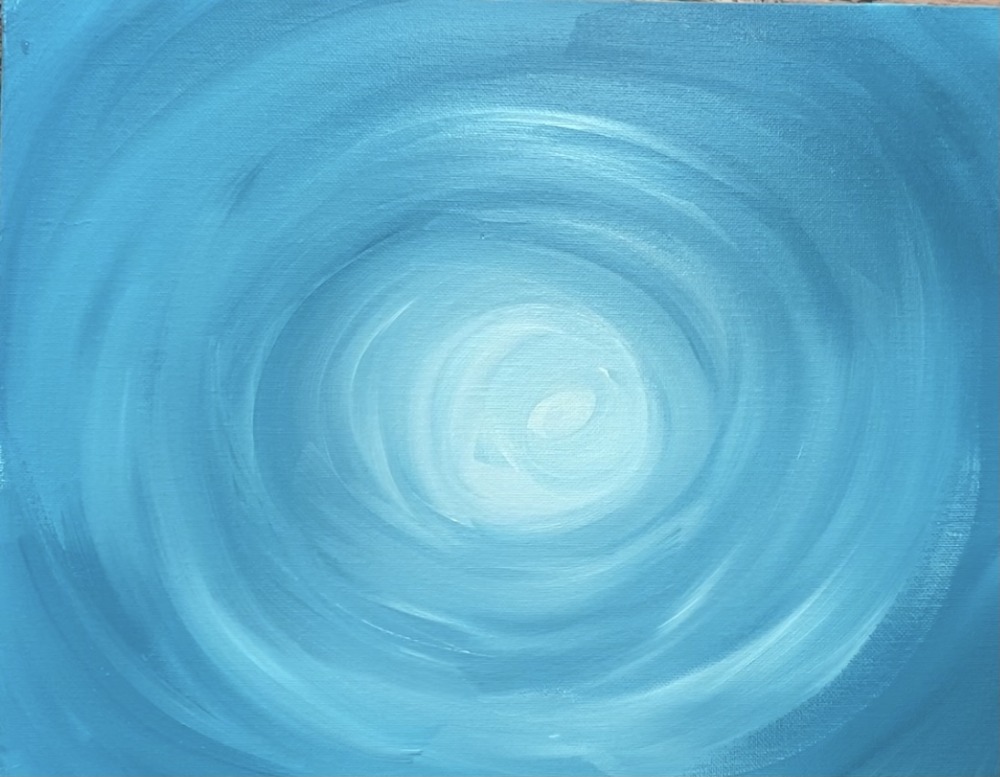
1. Paint the background
This is a blended technique background utilizing the two colors: titanium white and turquoise. The center is the brightest and it gradually fades to the pure turquoise color on the edges.
To do this technique, use your 3/4″ Flat Wash Brush and Titanium white to paint a white blob in the center of the canvas.
Then, without rinsing your brush, add a little bit of turquoise to the brush. Add the turquoise on the outer part of the “white blob circle”.
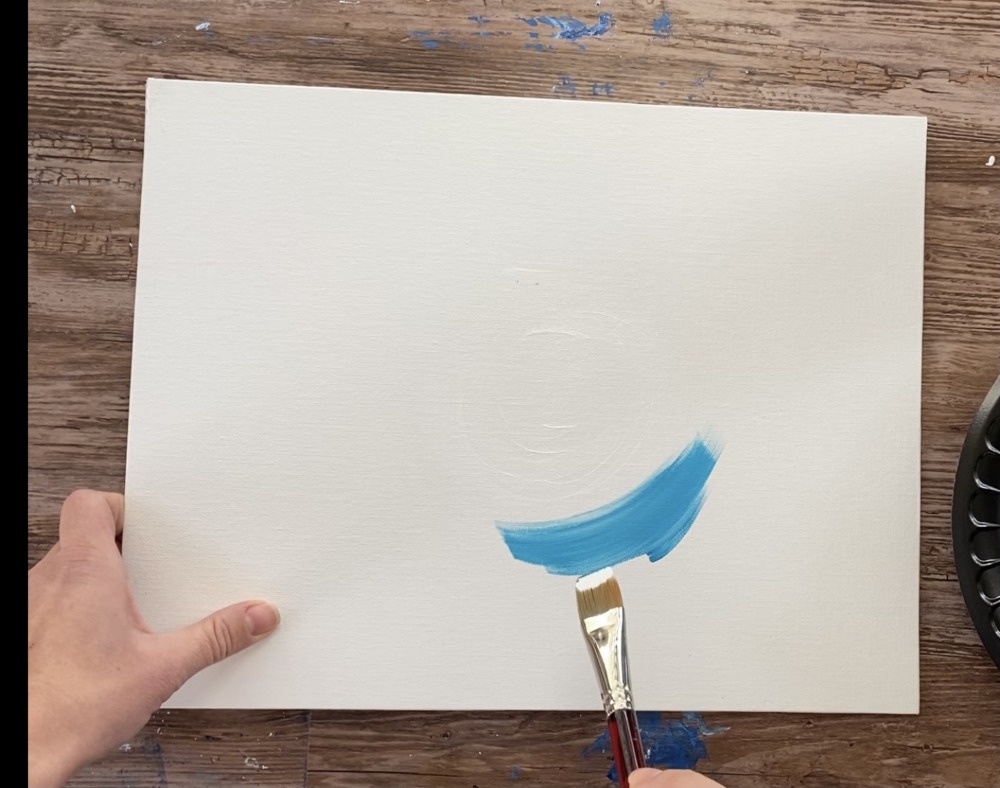
Then gently blend the turquoise into the white until the center circle is very light turquoise.
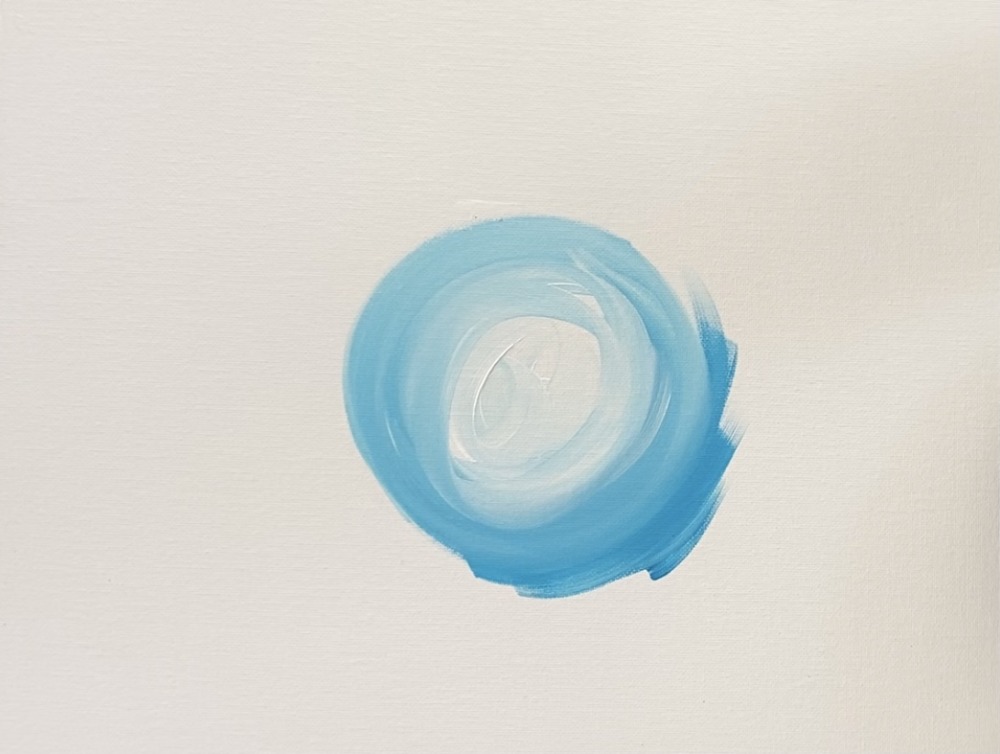
Paint in circular strokes going outwards. Gradually add more turquoise to the brush as your work your way outwards.
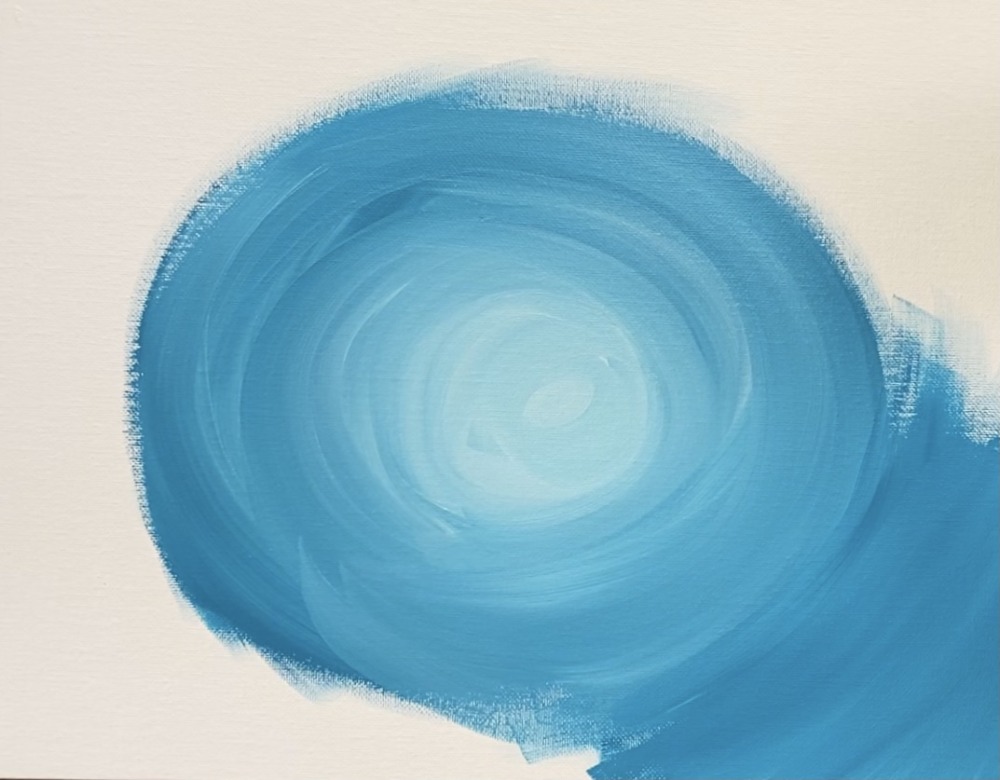
Keep painting in circular strokes. You can add more titanium white to the brush to help it to blend more. The outer edges of the painting should be more “pure turquoise”.
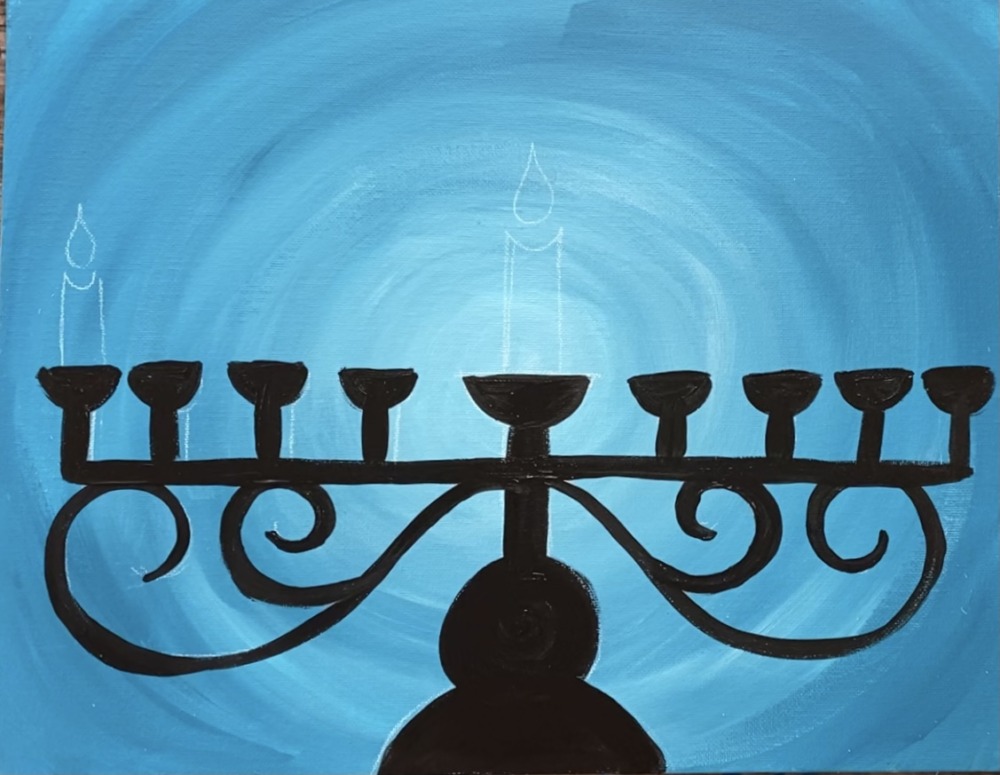
2. Wait for background to dry then draw the menorah with chalk
You can dry your painting with a blowdryer or take about a 30 minute break and come back!
If you are using the traceable, place a sheet of graphite paper (dark or white) under the tracer and firmly trace with your pencil.
To draw…
*Thanks to one of my fans that pointed this out for me! The Shammash Candle (middle candle) should not be level with the other 8 candles. The base should be higher or lower. This was an easy tweak and I changed it after the painting was finished! If you are drawing this for the first time, you can make your center base higher (or lower) than the other 8 bases.
- Use a white chalk pencil, regular drawing pencil or a piece of chalk to draw the menorah.

Start at the bottom and draw a medium size half circle. And then draw a sort of stretched out circle on top of that.
2. Next draw a rectangular shape above that circle and then a half circle shape on top of the rectangular shape.
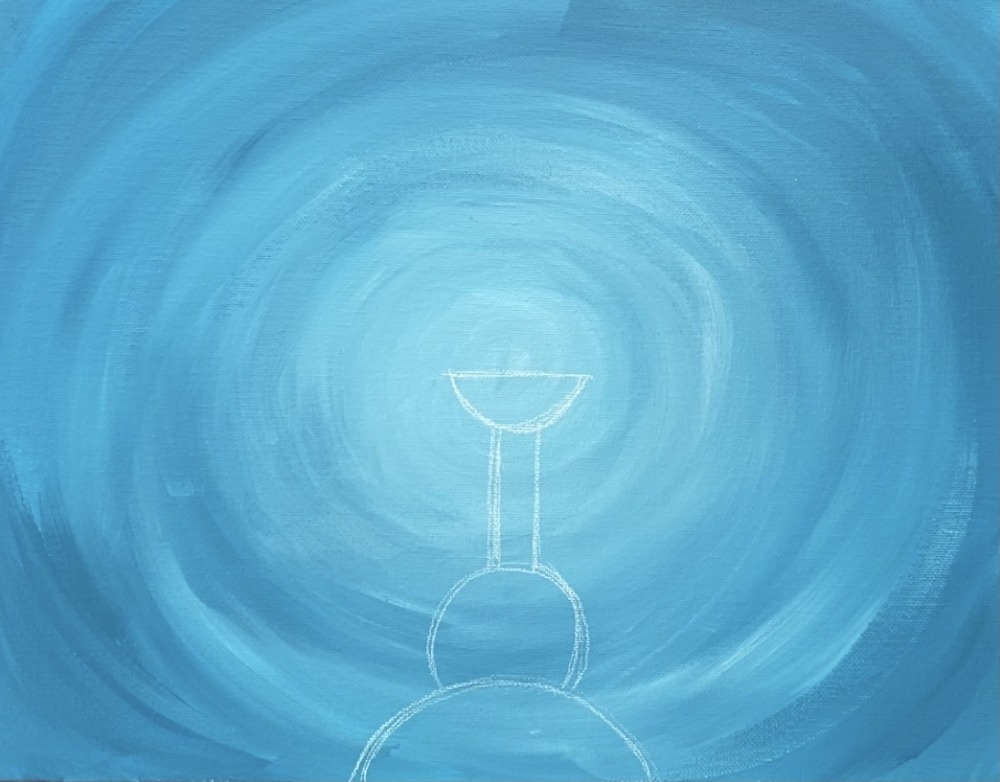
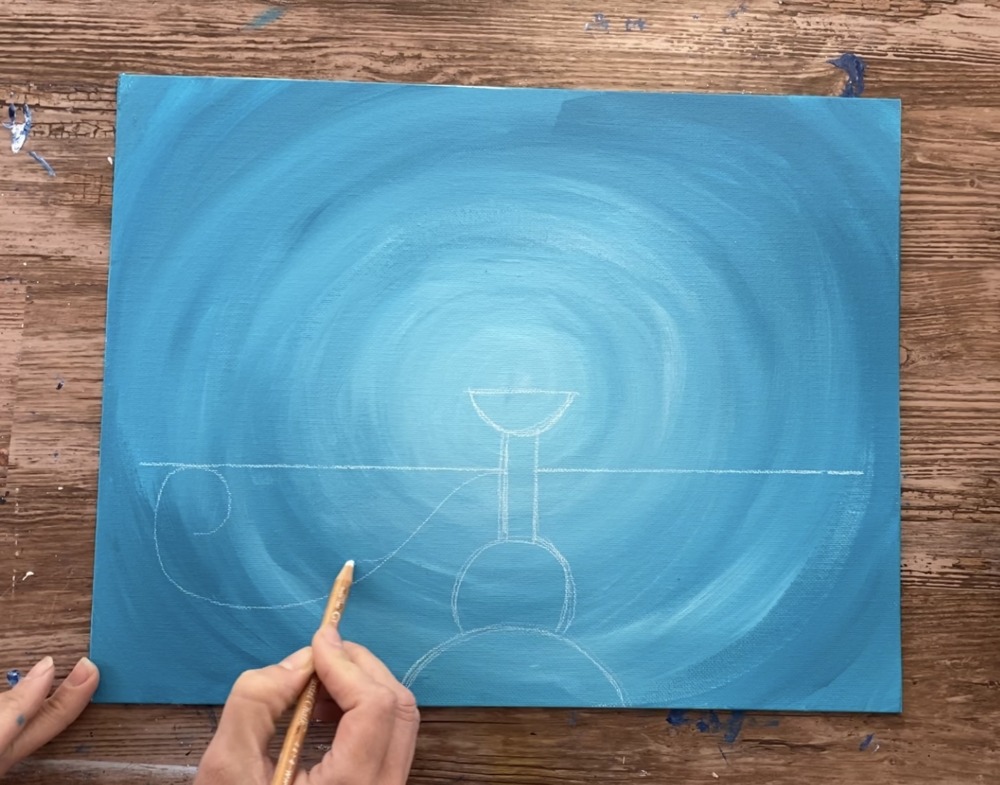
3. Use a straight edge or t-square ruler to draw a horizontal line on each side of the rectangular shape. This will be the base for the candles.
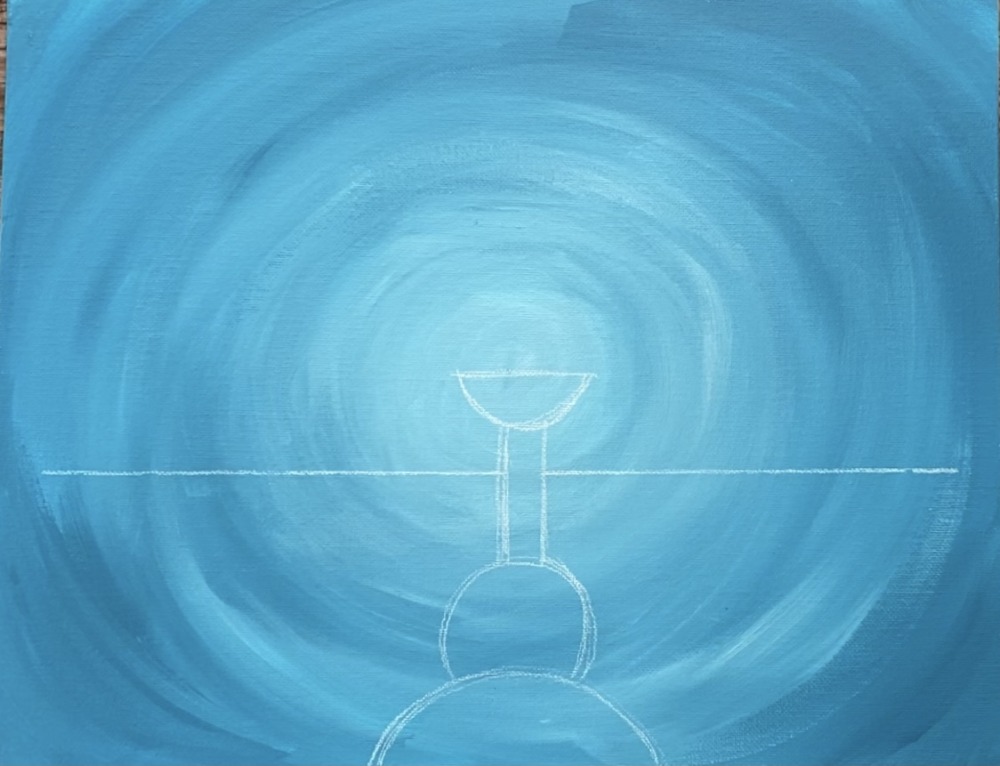
4. Next draw a large spiral line under the horizontal line.
5. Draw a smaller spiral line attached to the larger spiral.
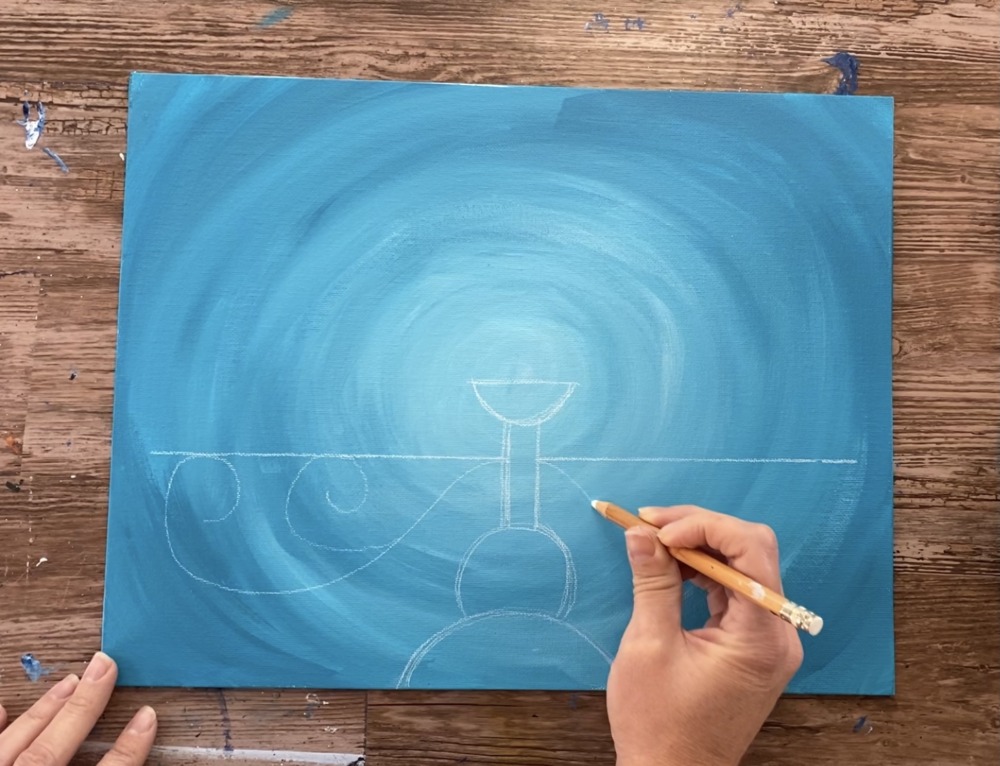
6. Repeat the spirals on each side.
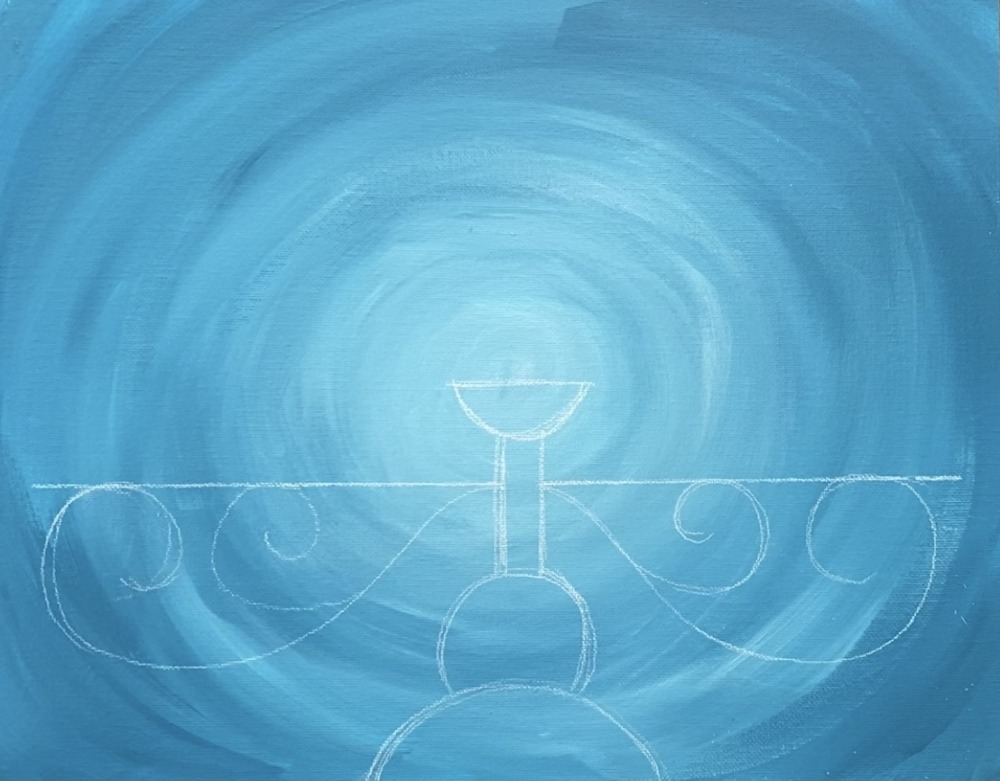
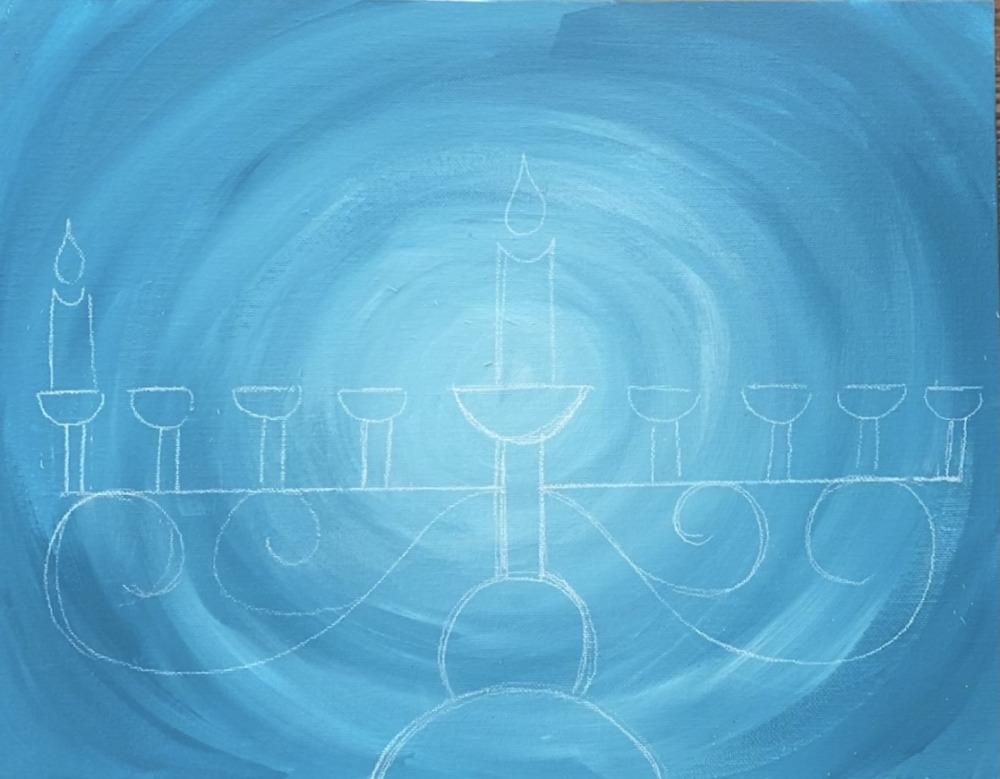
7. Then draw the large candle in the center and the flame shape.

*8. Draw four small candle holders on each side. See my note above about making the center baser higher than the other 8 candle bases.
9. Then draw the candles. Note that I only opted to draw two candles, the rest were painted in later. You can draw all the candles if it is helpful!
3. Paint the menorah black
For this step, you will need your #8 round brush and mars black. It is preferred that you slightly water your black down so that it flows as mars black tends to be a thick color.
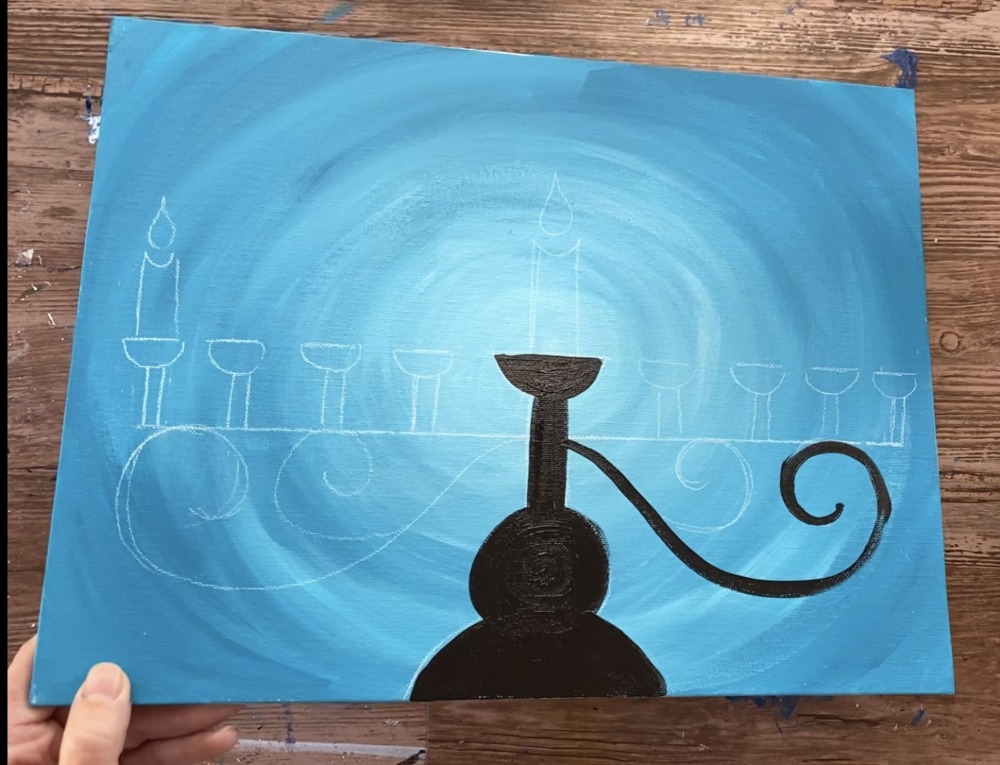
Paint the base of the menorah in as well as the spirals and the candle holders.
4. Paint the candles white (base color)
Next the candles need to be painted white. This is to ensure the color of the candle shows up nice and bright against the background.
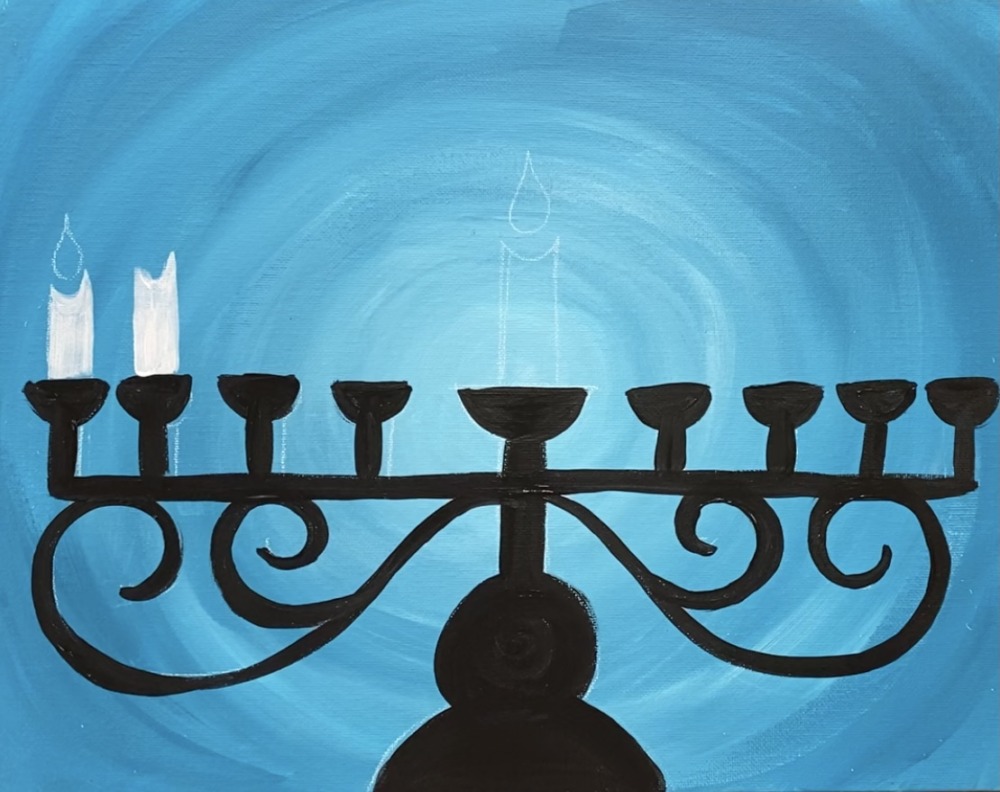
I painted the candles to look like the top parts were slightly melted downwards (an inverted curve shape at the top).
It’s important to note that not all your candles have to be perfectly even or even the same size. If you do want all the candles to be even, then I recommend using the t-square ruler to make sure the heights are all lined up.
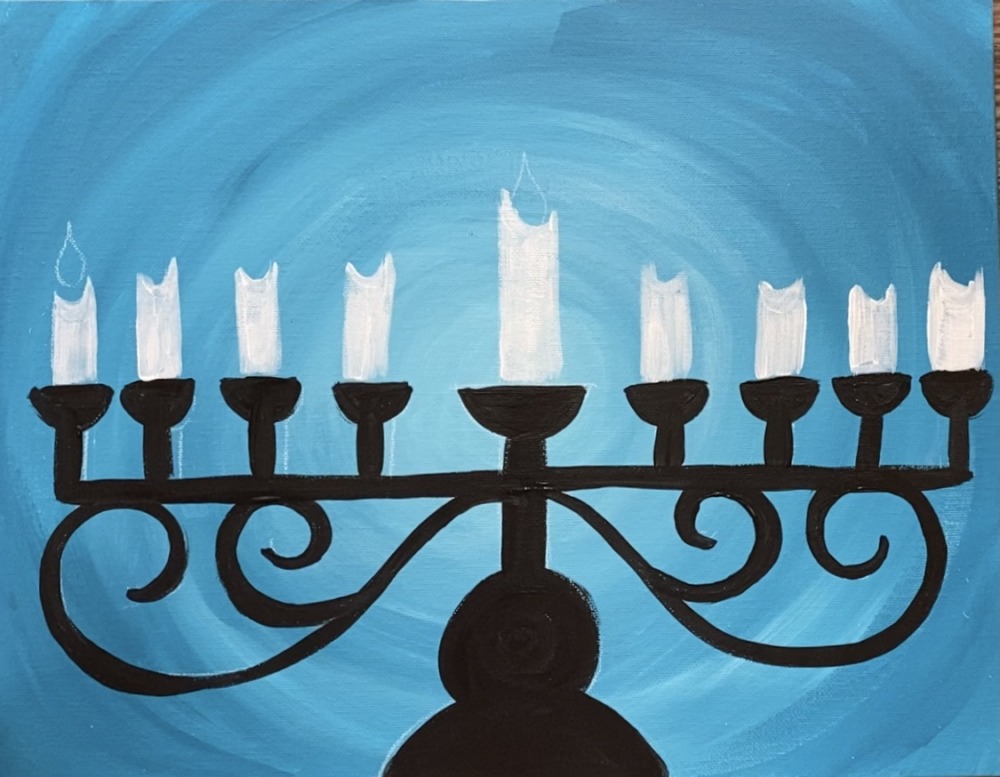
5. Paint the flame orange
The base shape of all the flames are painted a solid coat of cadmium orange hue. Use your round brush to do this. When you paint this first shape, the orange will naturally look “dull” and that is okay! We will paint two more colors on top of that orange to brighten the flame up later.
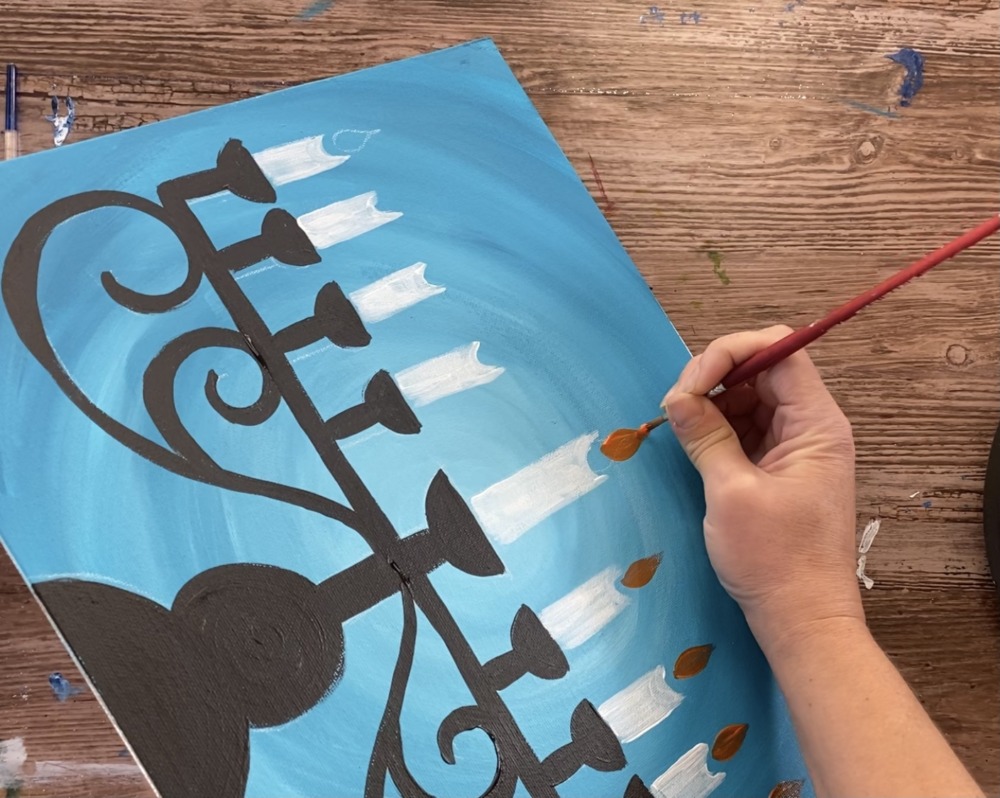
6. Paint the color on the candles + add optional shading
I decided to paint the candles different colors starting with cadmium red medium hue for two of the candles. Use a #8 flat brush (or really any brush you feel comfortable with) and paint over the white base of the candles.
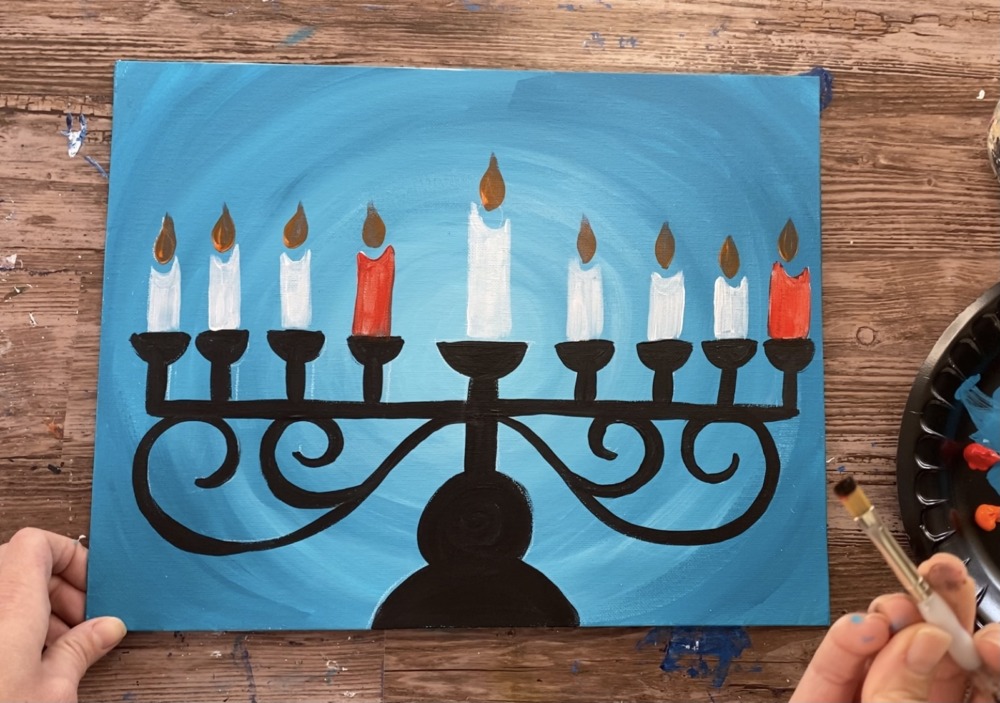
If you want to do shading, wipe off your brush and load a TINY amount of black onto the brush. This will make a dark red. Paint some curved/ diagonal strokes on one side of the candle and blend it onto the red.
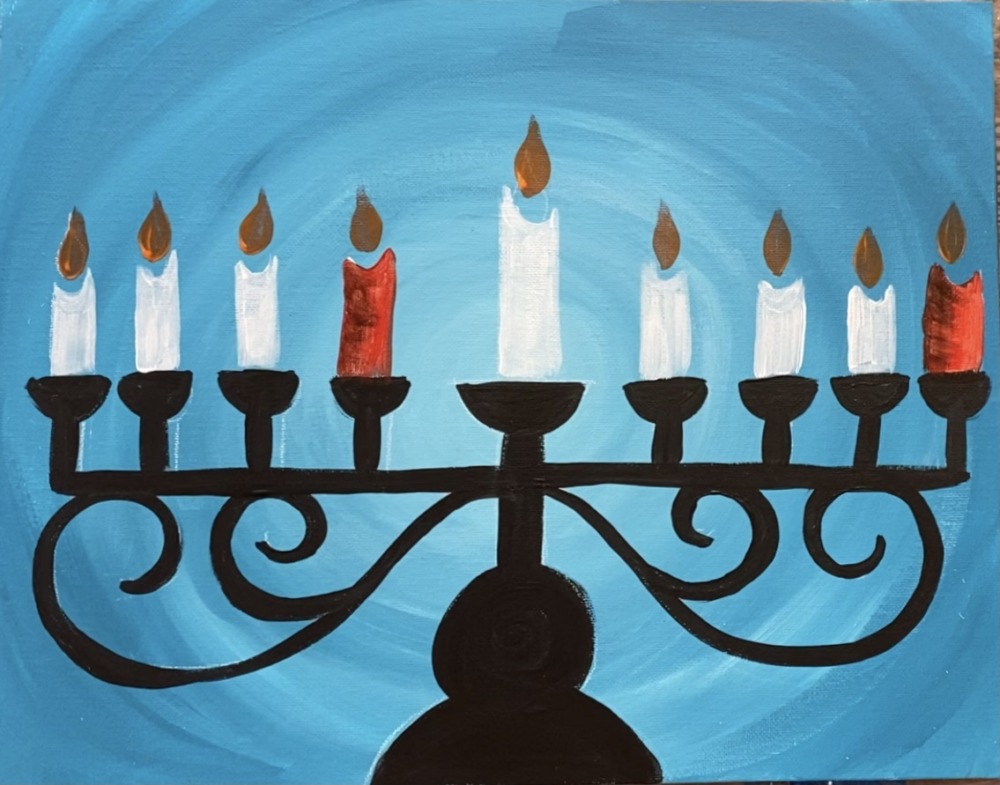
Repeat those steps for each of the candles. I did “hooker’s green” for the green candles and “deep violet” for the violet candles.
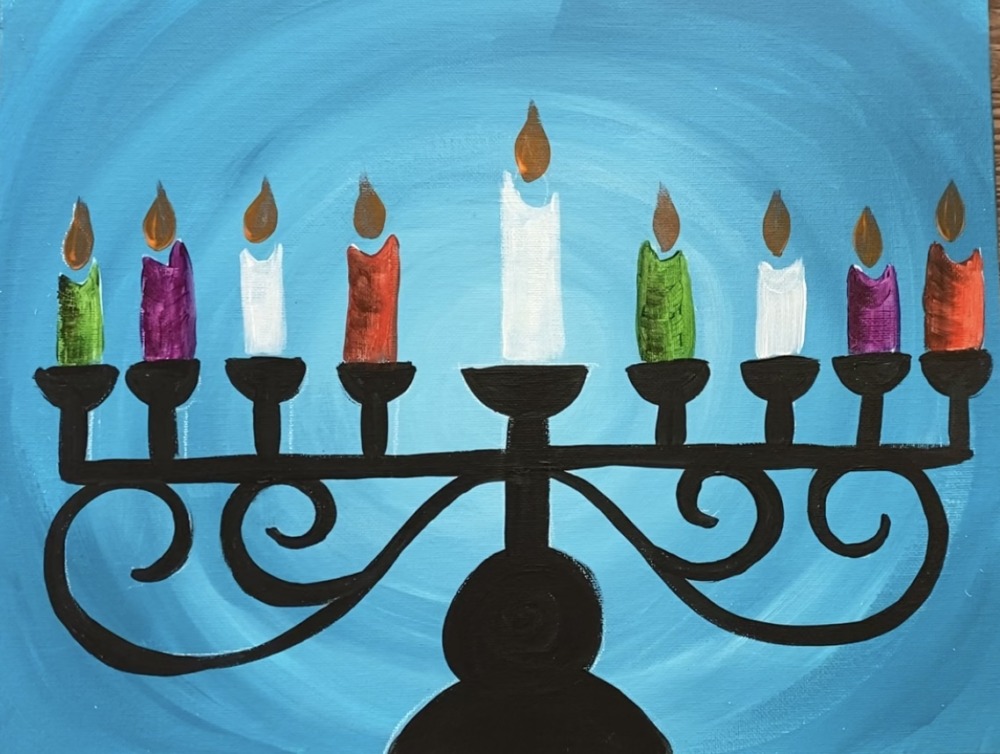
The darker blue candles as well as the larger candle in the middle were painted with “ultramarine blue”.
7. Add optional highlight to candles
To give the candles some “highlight” add some white on the top of each of the candles. I did this with my #4 round brush and titanium white.
Start off by painting the top inner curve white. Then mix white with the color of the candle (for example white + red) to make a lighter version of that color.
Add the lighter version of that color on the top part of the candle and paint some downward strokes on the left and top part of the candles. The lighter vertical strokes could be melted wax!
8. Add detail in flame
To make the flame brighter, use your #4 round brush to paint a “cadmium yellow medium” flame shape on the inside of the orange shape.
Then paint a smaller stroke in the center of all the flames with just titanium white.
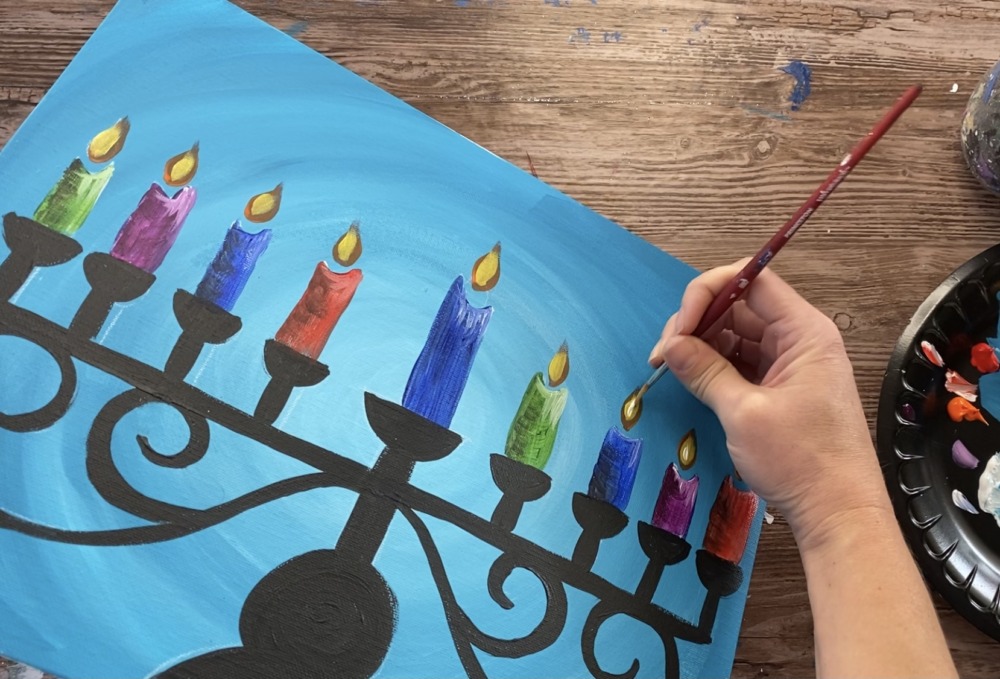
As you can see, the white really brightens the center of the flame! Then paint a small black line for the “wick”.
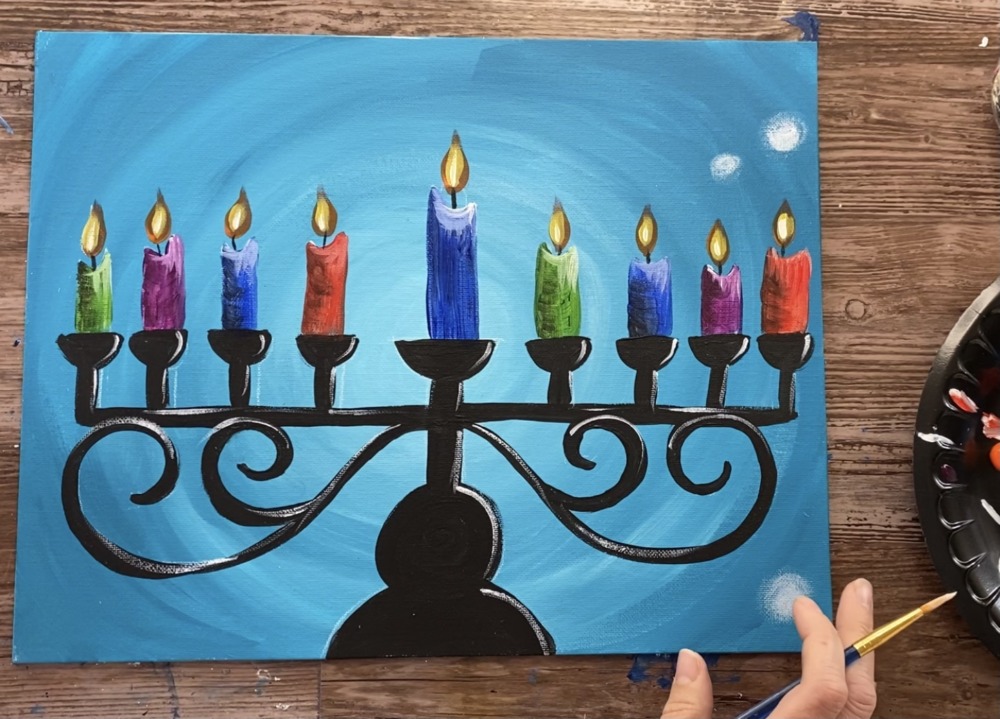
9. Add highlight to the menorah base
Use a #4 round brush and titanium white to paint a “highlight” line on the left and top part of some of the areas on the menorah.
Do this on the top part of the spirals as well. Try to get your line to be “dry brush” style. In other words, only load a small amount of white on your brush. This should be very loose outlining too!

10. Paint bokeh
“Bokeh” is a term to describe blurry lights that appear in photography. There are multiple ways you can paint “bokeh”. In previous tutorials, I’ve used “Foam Sponge Pouncers” and different types of brushes. If you have a technique you prefer to use when painting bokeh, you dan use that technique!
For this painting I used an older, small round brush (one that I wasn’t worried about ruining too much). Load the brush in a small amount of titanium white and then wipe the brush.
Paint a circle. It should appear dry. Then have the outer parts of the circle sort of “blur” outwards.
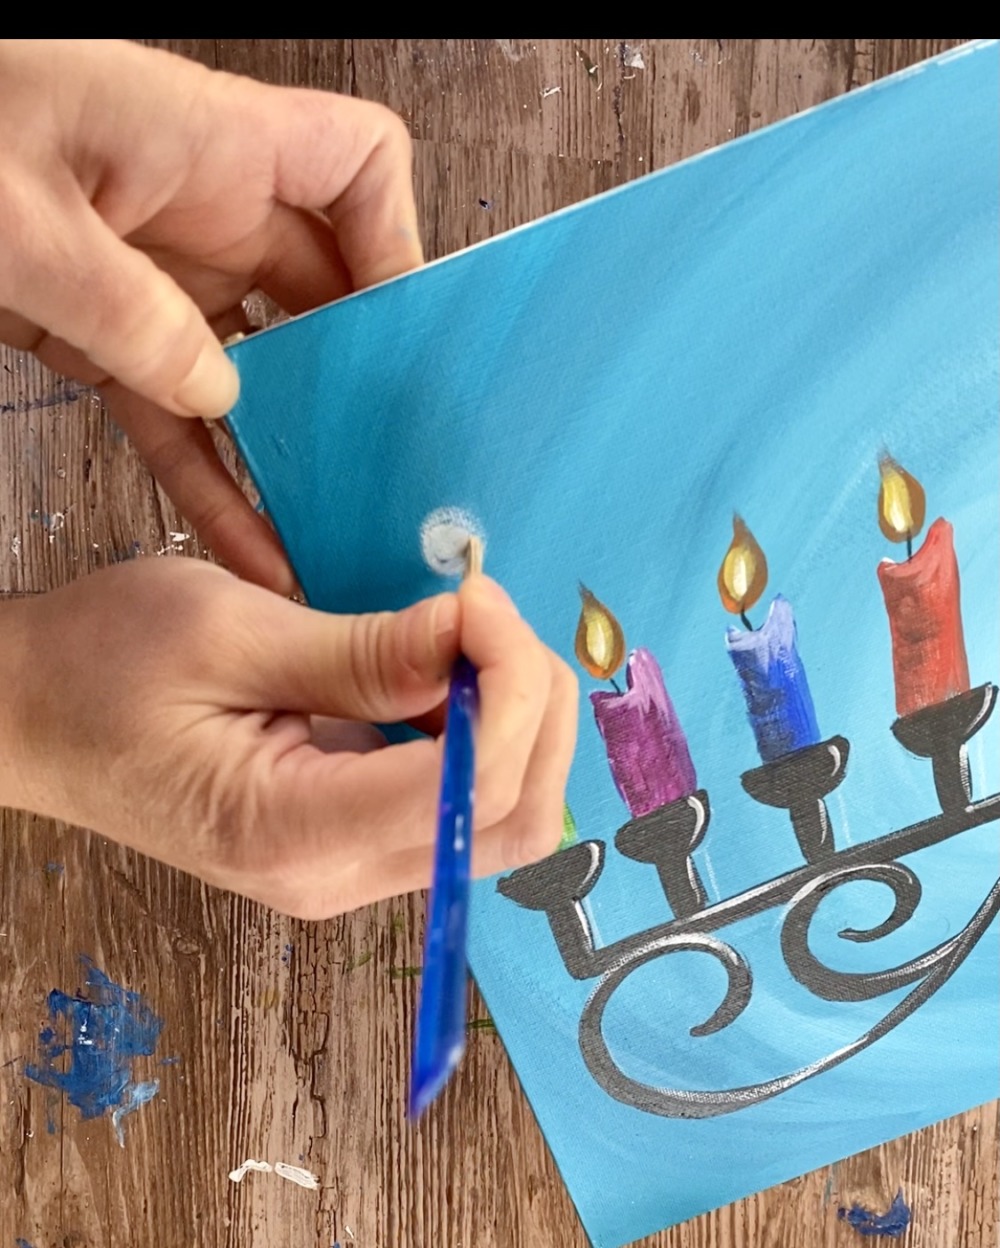
The trick is to paint multiple circles that are multiples sizes and intensities. To make a brighter circle, simply add more white and wipe off less paint. To make a really dim circle, make sure there is barely any white on your brush.
Some of your lights do overlap each other.
You can do as many bokeh circles as you want! I decided to keep it subtle.
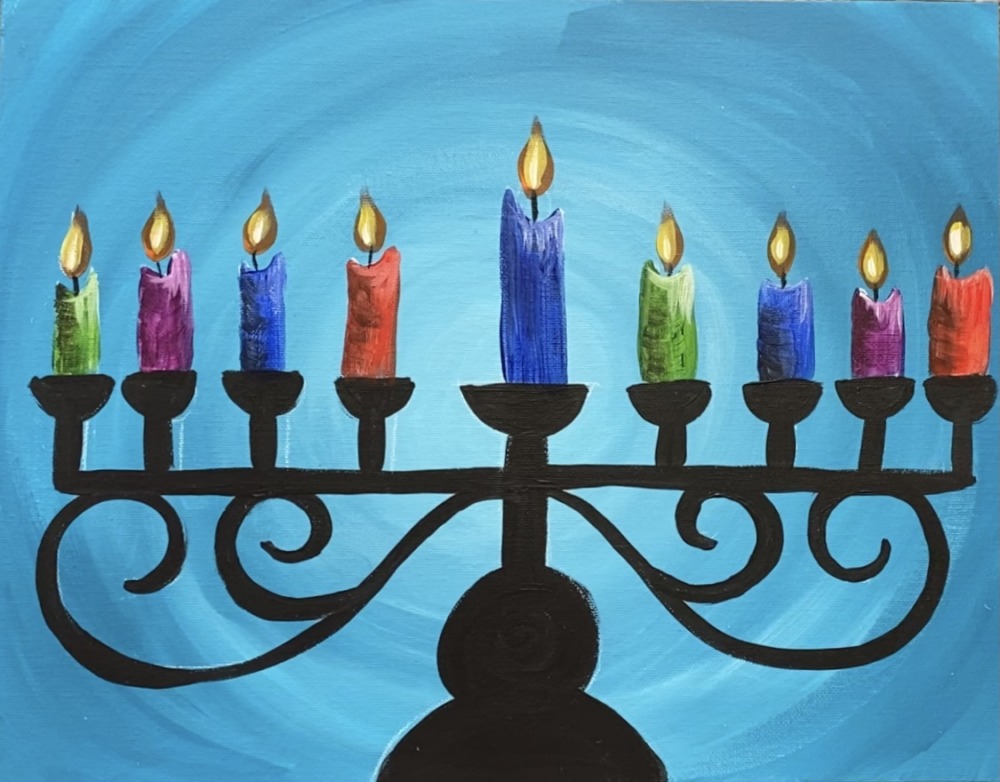
Finished!
Sign your name and show it off!
In this version below, I made the center base higher than the other 8 bases. It was an easy tweak and all I did was paint over some of the background and made the black candle holder higher! 🙂

Share Your Art Here!


Love this painting and had fun creating mine! Only had 12×12 canvases on hand so that’s what I used! Would love to share a picture of mine, but don’t see that option here!
Hi Karen! If you have Facebook or any other social media like Instagram you can share there! Otherwise you can email a photo to: hello@stepbysteppainting.net