
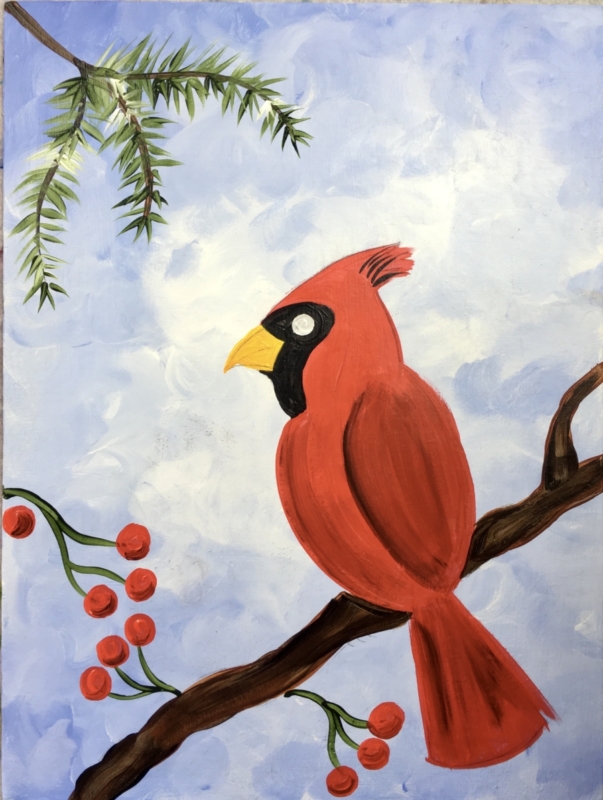
How To Paint A Snowy Cardinal
Would you like to save this?
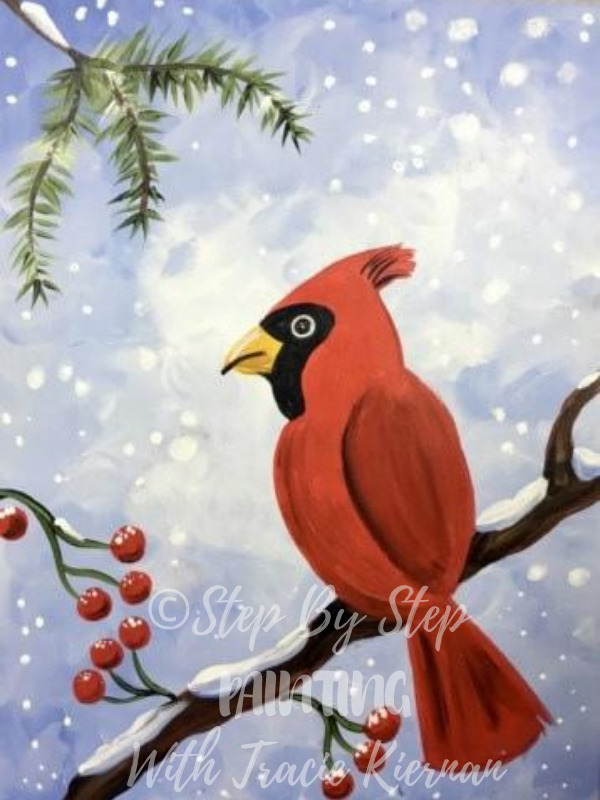
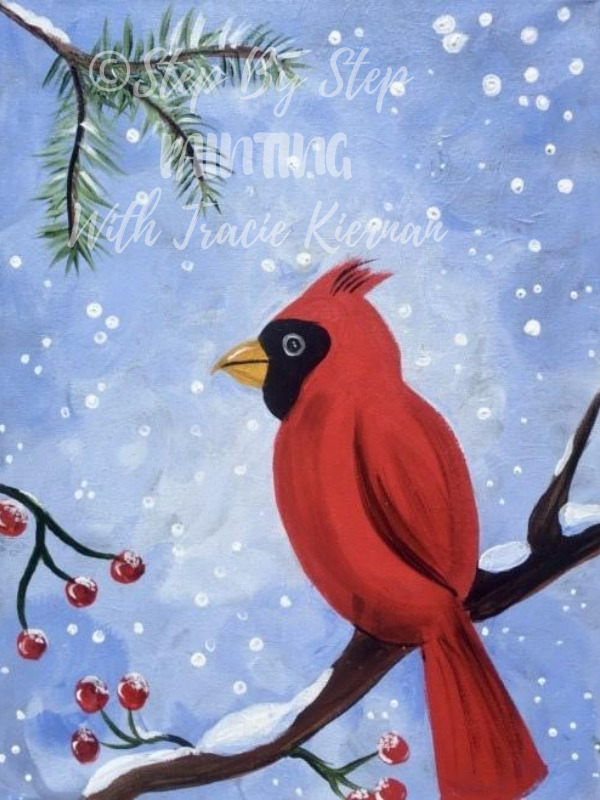
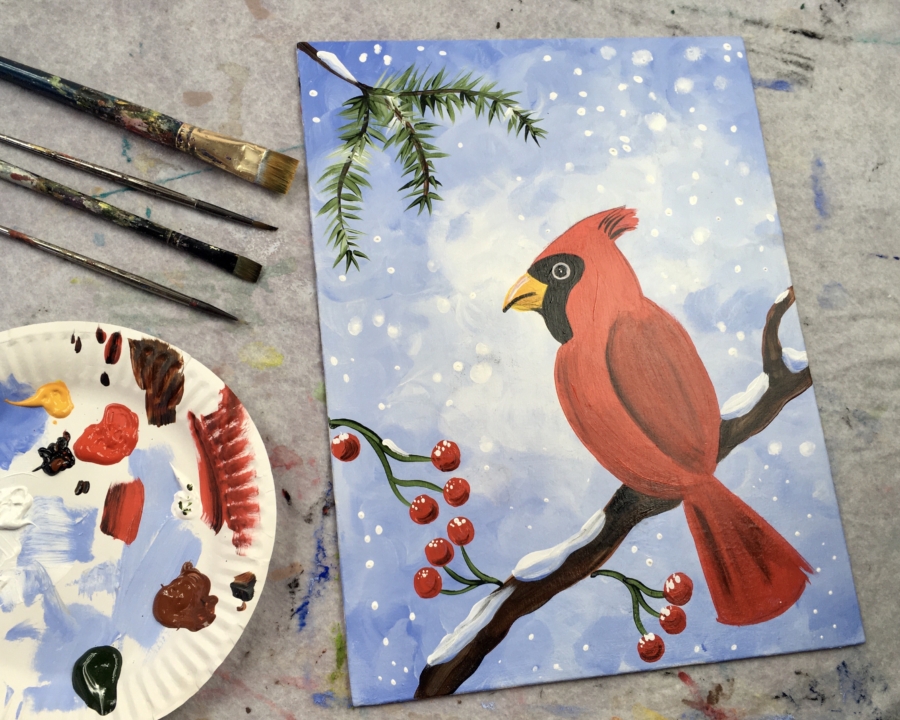
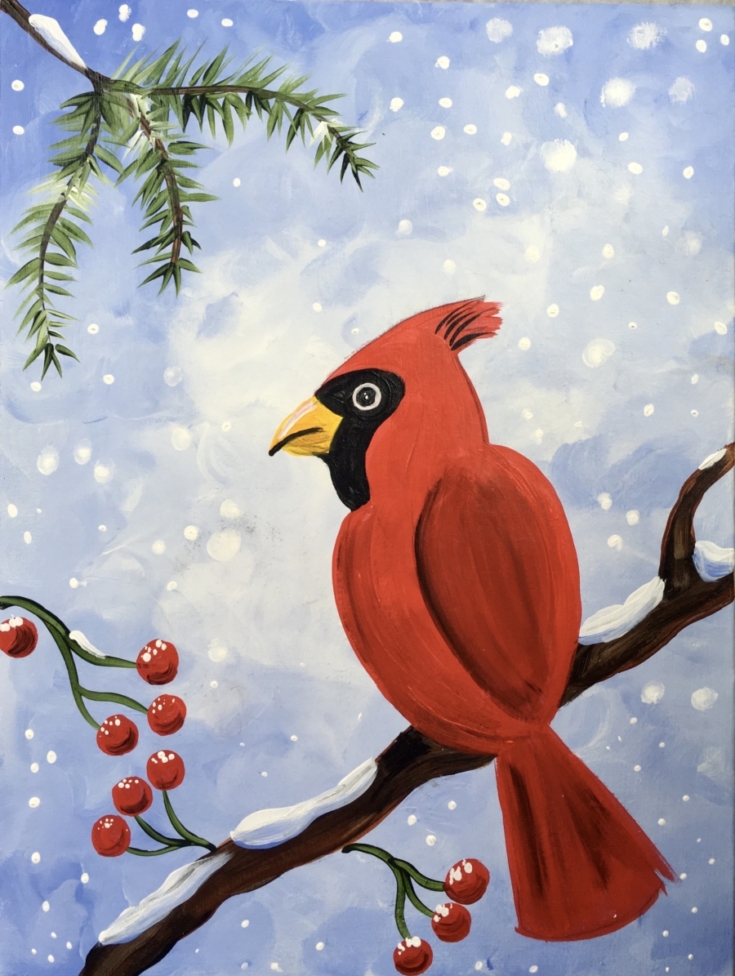
This is a beginners acrylic painting tutorial you can do at home! Learn how to paint a cardinal on a branch in the snow.
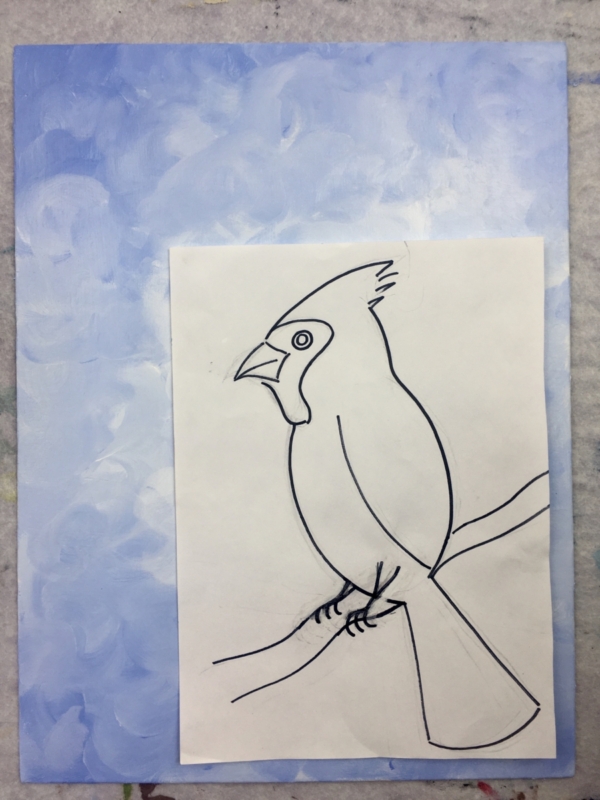
This tutorial comes with a traceable for the cardinal and also instructions for how to draw a cardinal. If you wish, you can draw the cardinal on a separate 8.5″ x 10″ sheet of paper (or similar size) and transfer it to the canvas after painting the background.
The simplicity of this painting is very relaxing! I love the light blue violet color in the background!

Enjoy and happy painting!!
Materials
How To Paint A Snowy Cardinal
Materials
- 12" x 16" Canvas
- Traceable Of Cardinal
- Graphite Transfer Paper
- 3/4" Flat
- #12 Bright
- #4 Round
- 10/0 Liner
*Colors
Notes
Some of the colors I used in this painting were DecoArt Americana Premium tubes. I put in parentheses a sub suggestion.
Recommended Products
As an Amazon Associate, Michaels Affiliate and a member of other affiliate programs, I earn from qualifying purchases.
Color Palette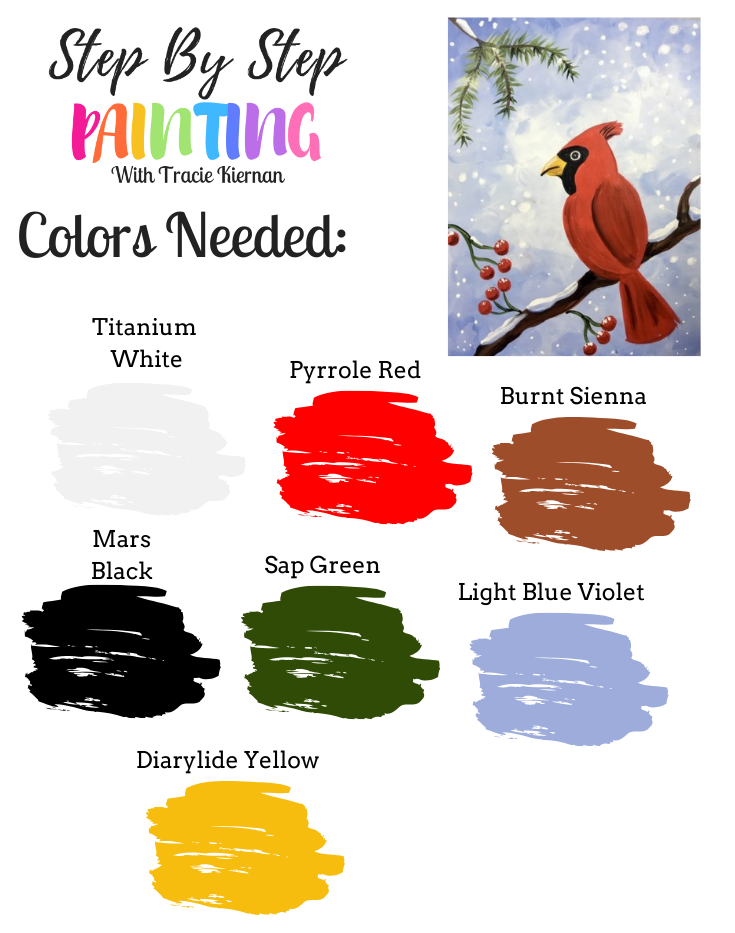

Directions At A Glance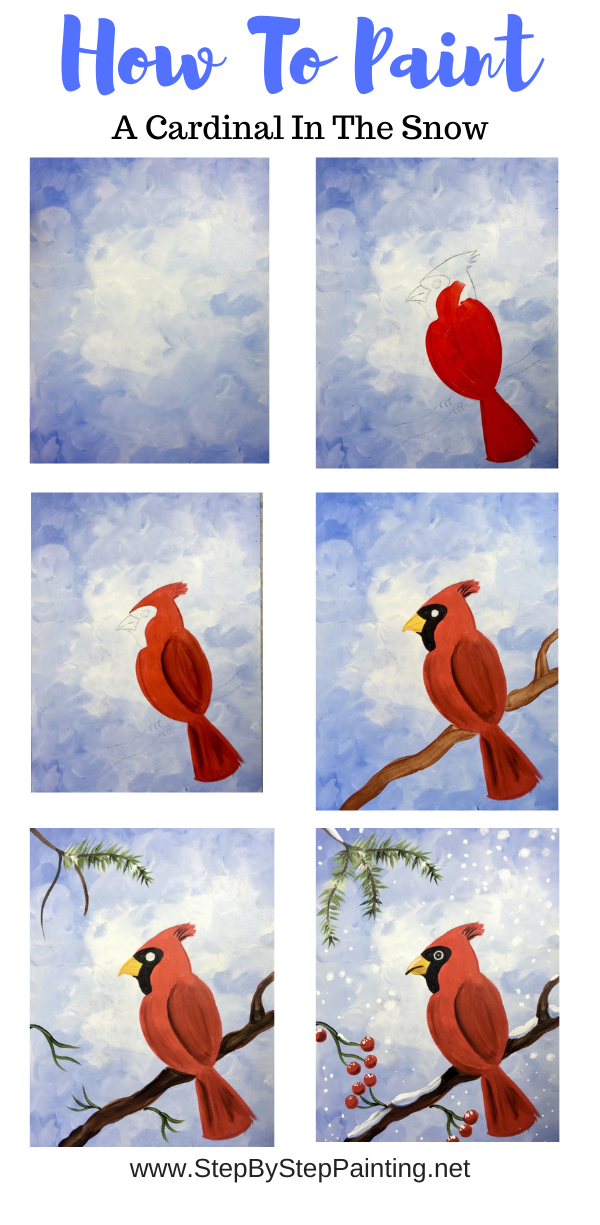

Traceable

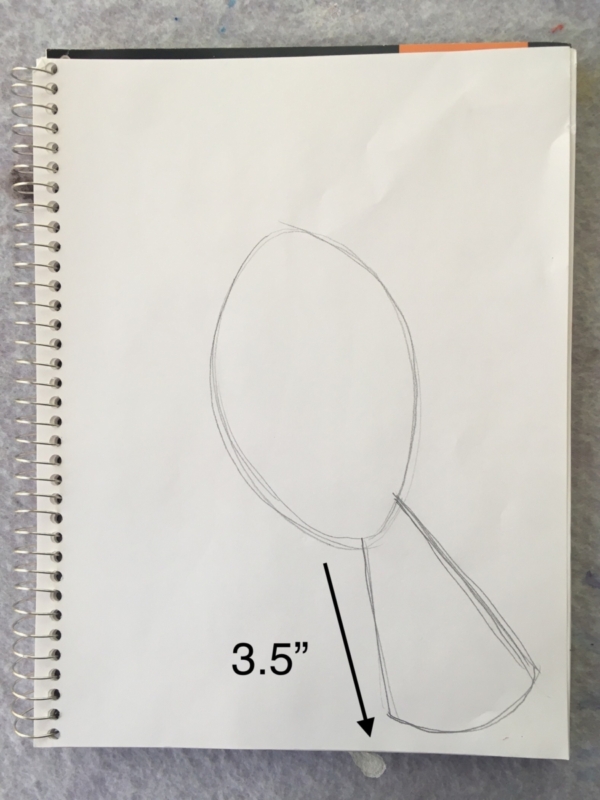
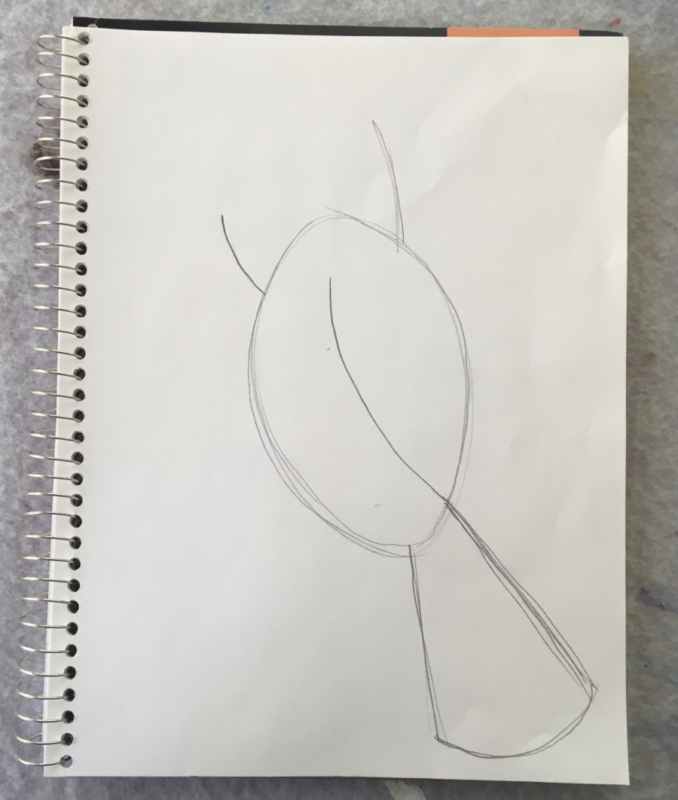
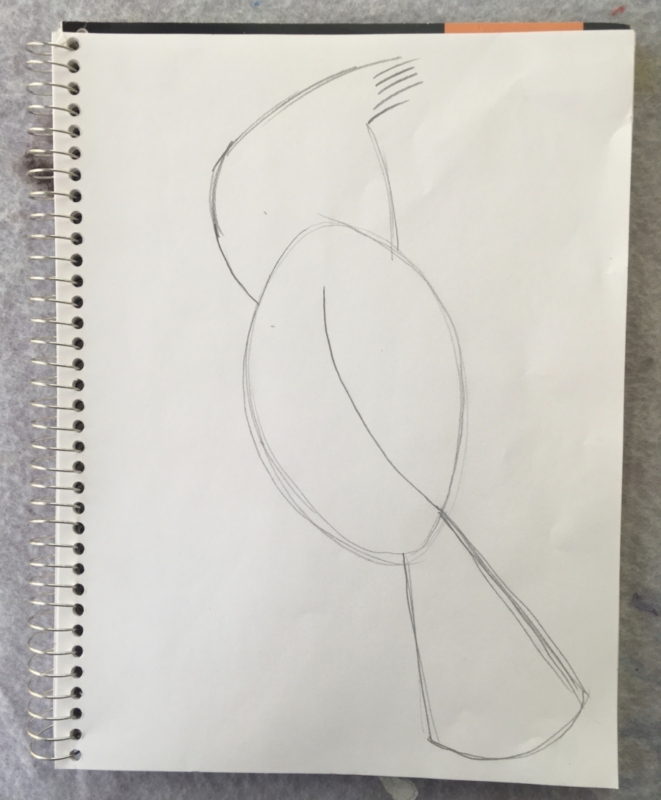
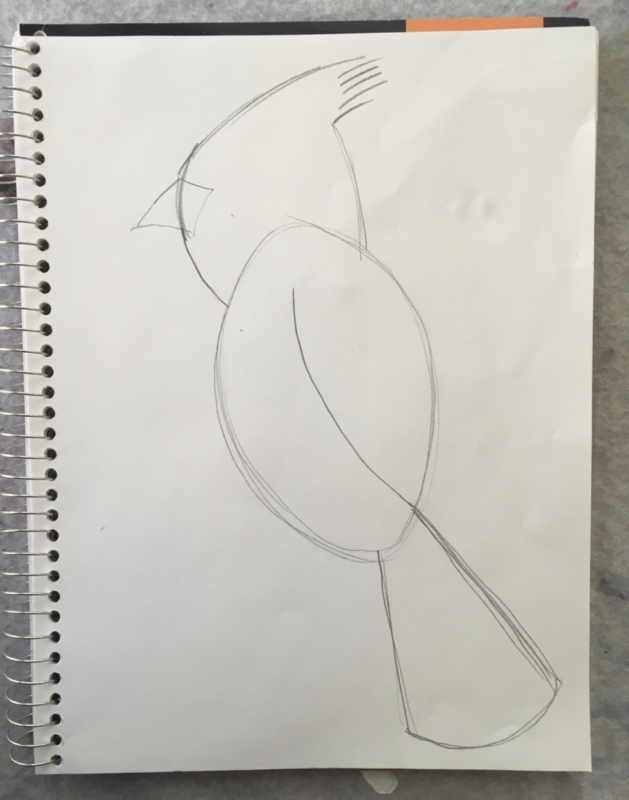
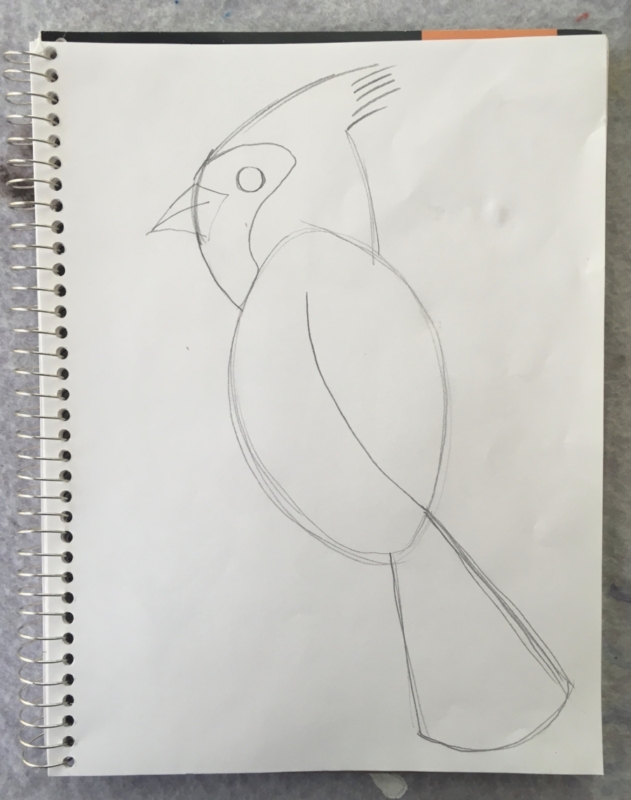
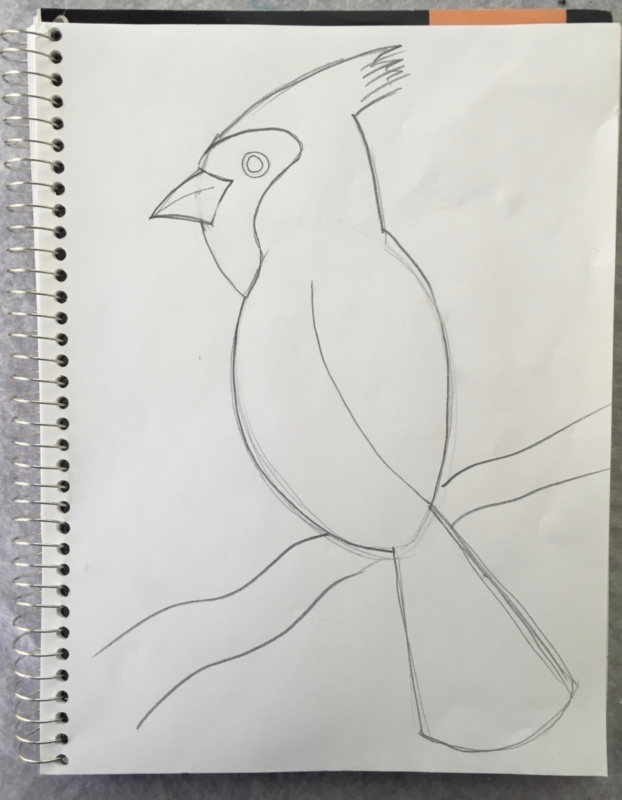
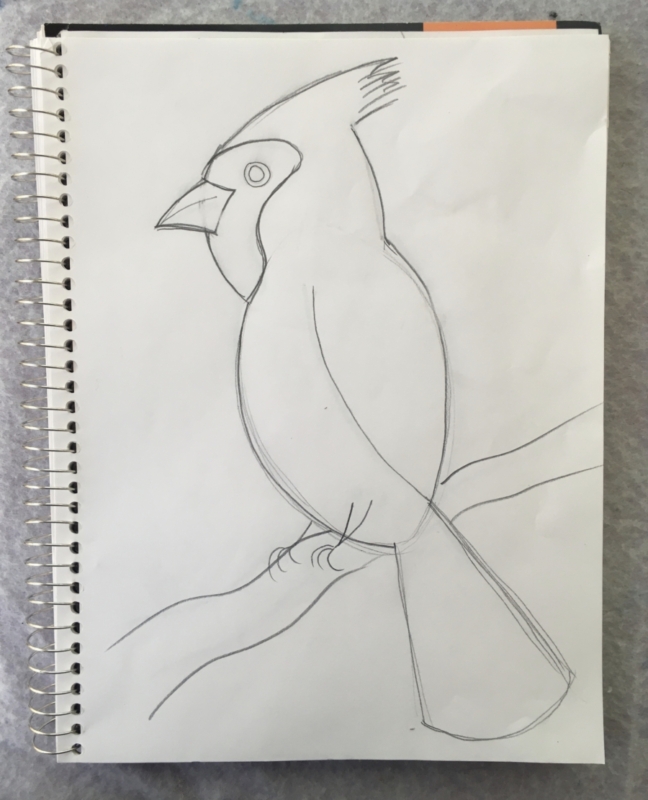
How To Draw The Cardinal:
If you’re drawing this cardinal, sketch lightly with pencil.

Video:
Step By Step Directions:
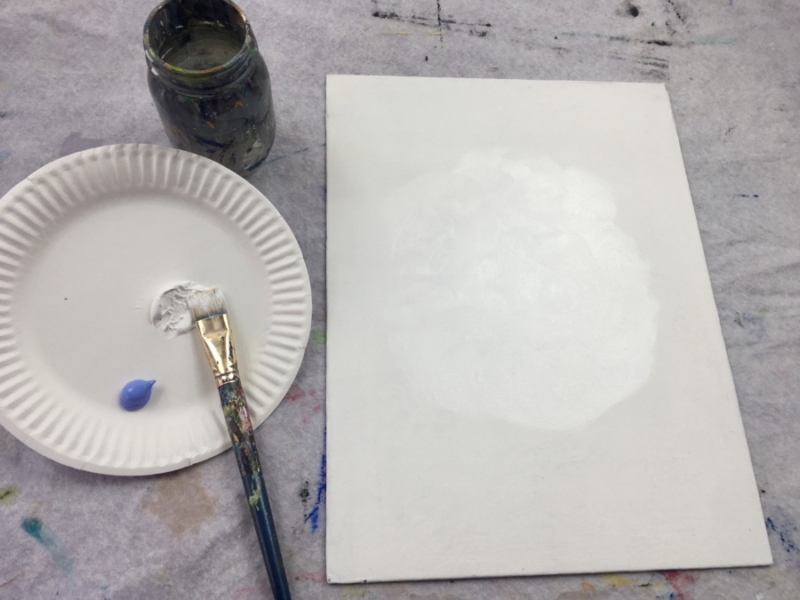
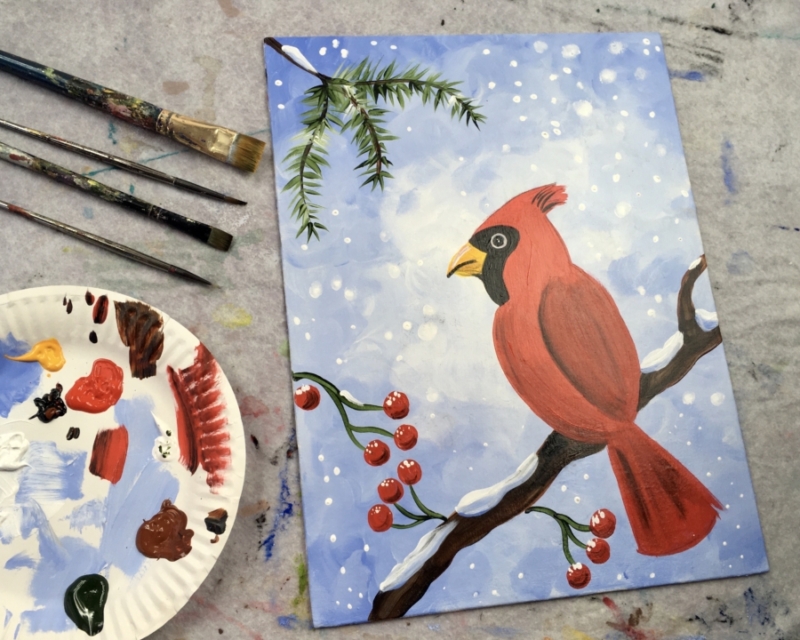
1. Paint The Background With A 3/4″ Flat And Using A Combo Of Light Blue Violet and Titanium White
Use your 3/4″ flat brush to paint the center of your canvas a big blob of titanium white. Paint in circular strokes much like you are painting a giant cloud.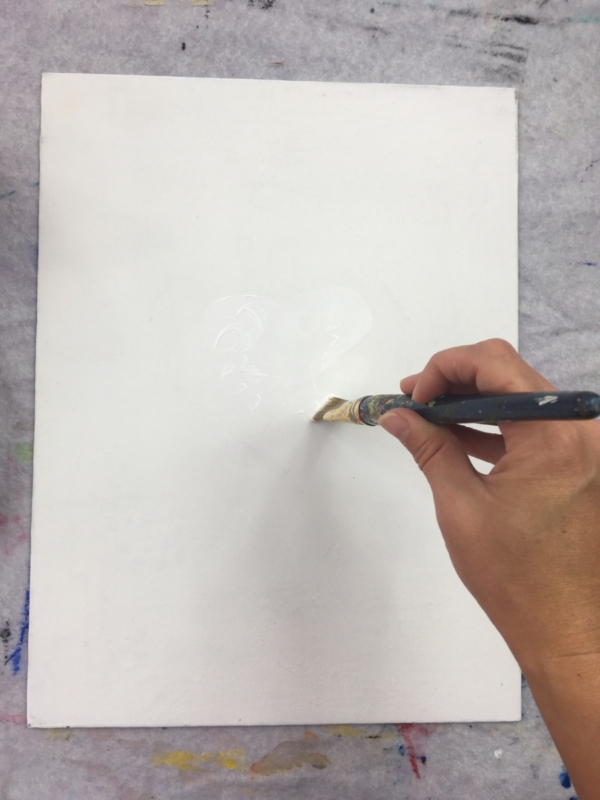
I painted my “blob” to where there was about 3-4″ left of space on the edges of the canvas.
Next load the corner tip of your brush in light blue violet. Note that the titanium white was not rinsed off so the brush will be purposefully double loaded.
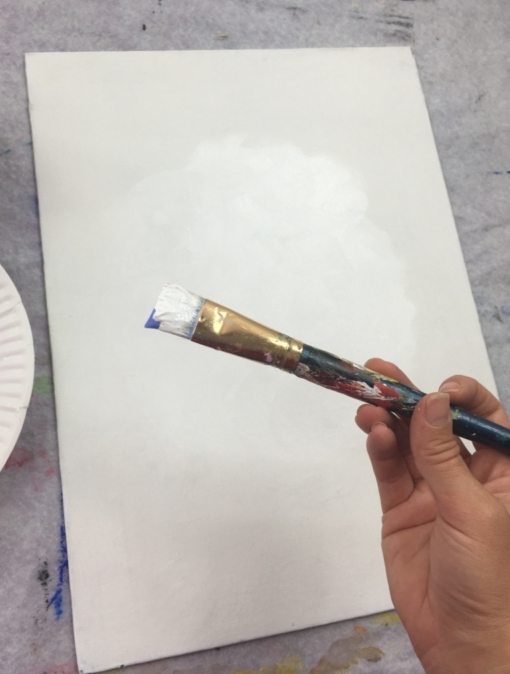
Continue to paint in circular strokes blending the light blue violet with the white. Keep the center of the canvas as light as possible. As you work your way out from the center, add more light blue violet so the color gets slightly darker as you go to the edges of the canvas.
To blend, you may need to add more white to your brush.
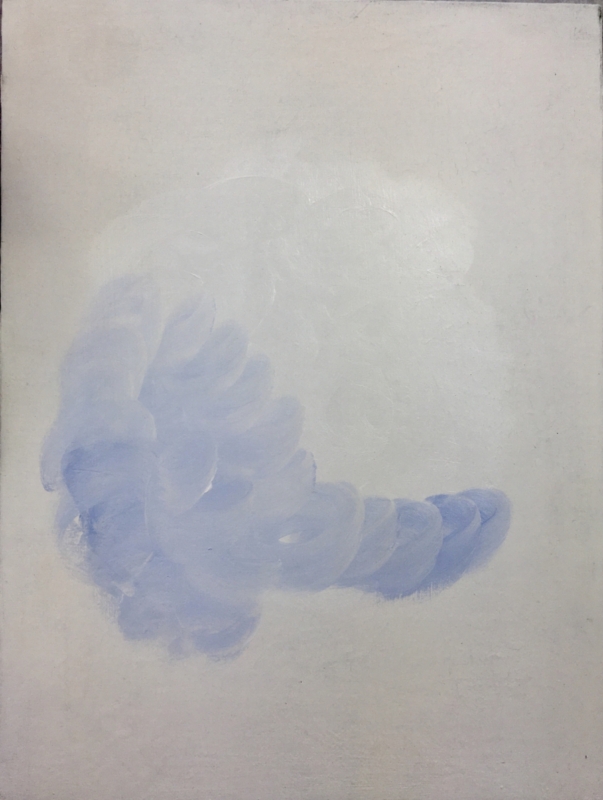
The corners of the background had the most light blue violet.

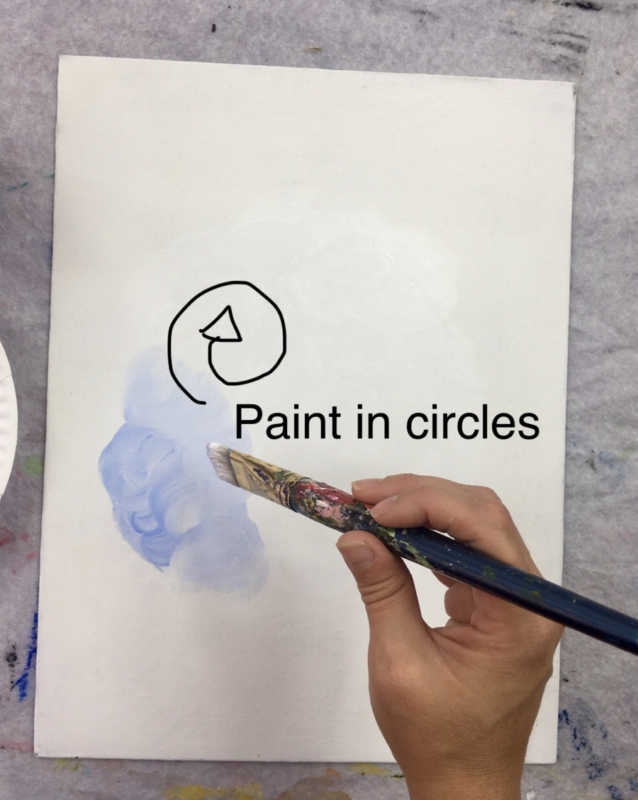
Keep blending the colors, keep painting in circular strokes until the entire background is painted in. You don’t need to blend everything perfectly, just try to keep the center as light as possible and the corners darker.
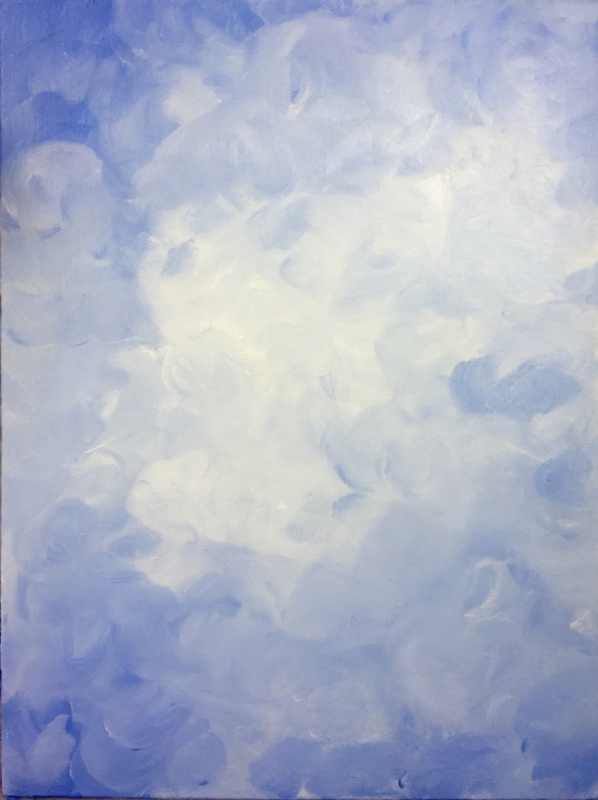
Wait for your painting to dry before going onto the next step.
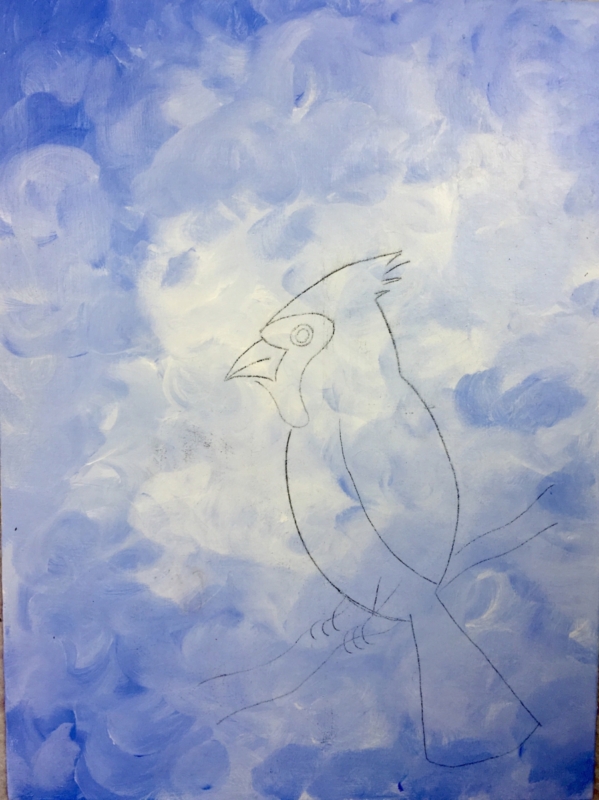
3. Transfer The Cardinal To The Canvas
I positioned my cardinal in the lower right corners with about 1/2″ space left to spare on the right and bottom. Place a sheet of graphite paper below and trace the bird.
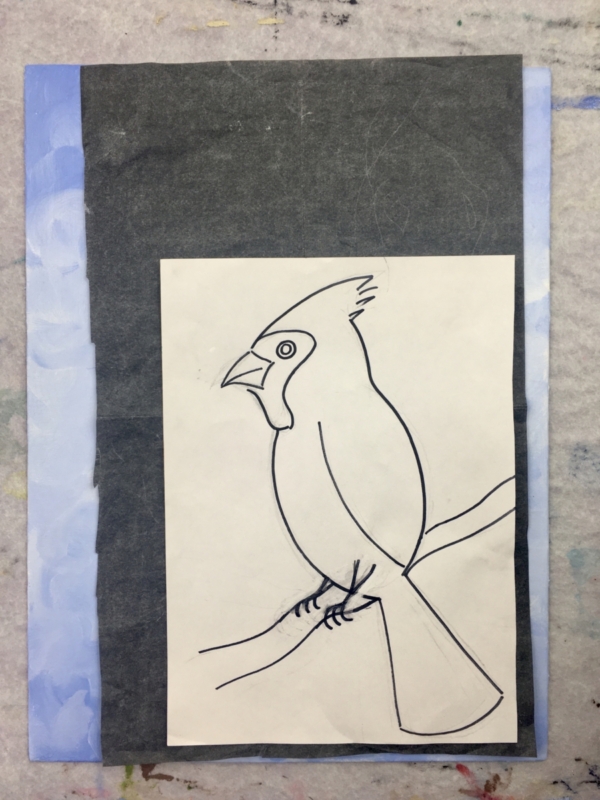
Tip: when using graphite paper, it’s best to lay the canvas flat and press firmly with a dull pencil. This will ensure your drawing will show up dark enough on the canvas.
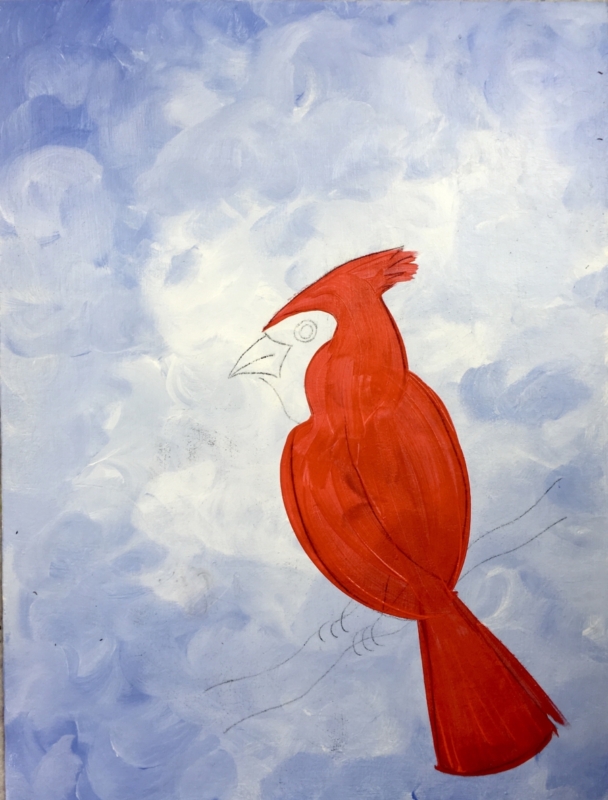
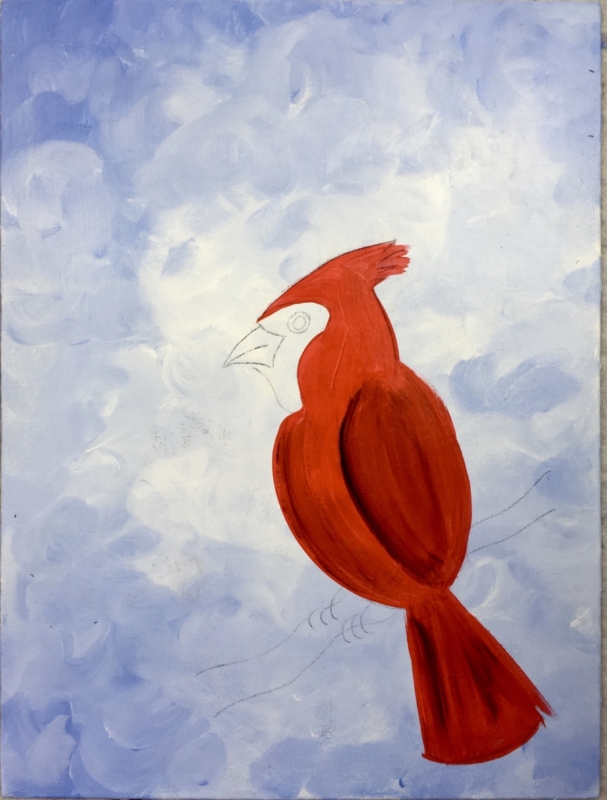
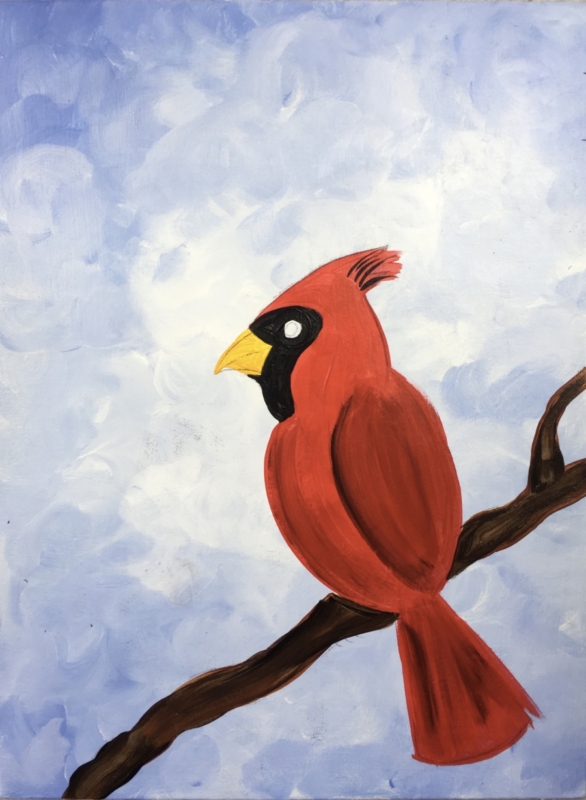
4. Paint Two Coats Of Paint On The Cardinal With Pyrrole Red And A 12 Bright Brush
Paint the entire cardinal including the tail, body & head with pyrrole red. Do this in two coats (wait for the first coat to dry a bit and then paint the second). The red should be very opaque and cover the background nicely.
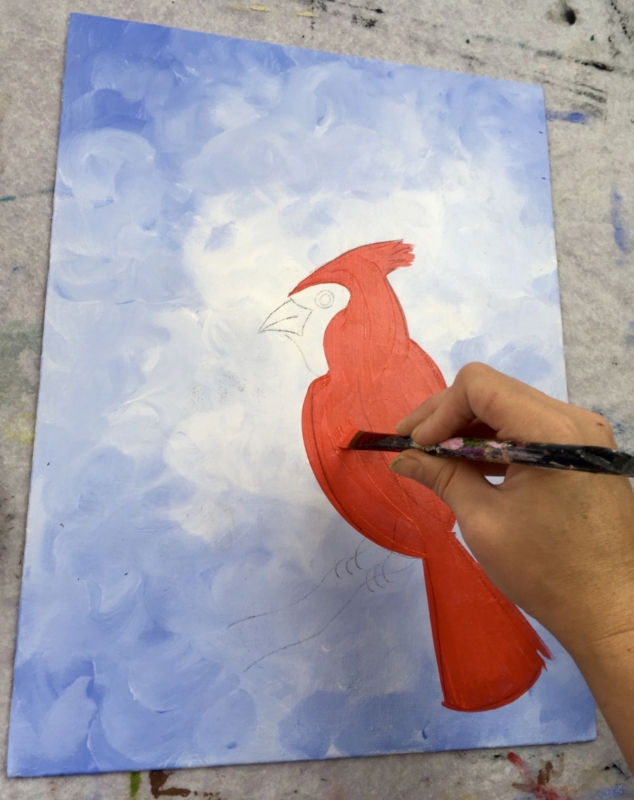
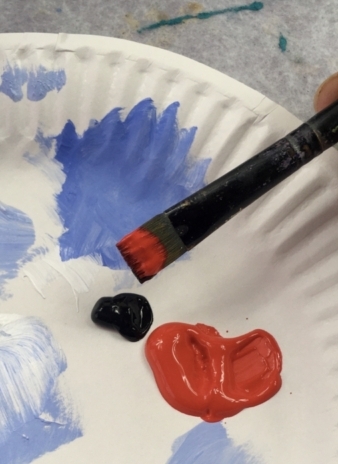
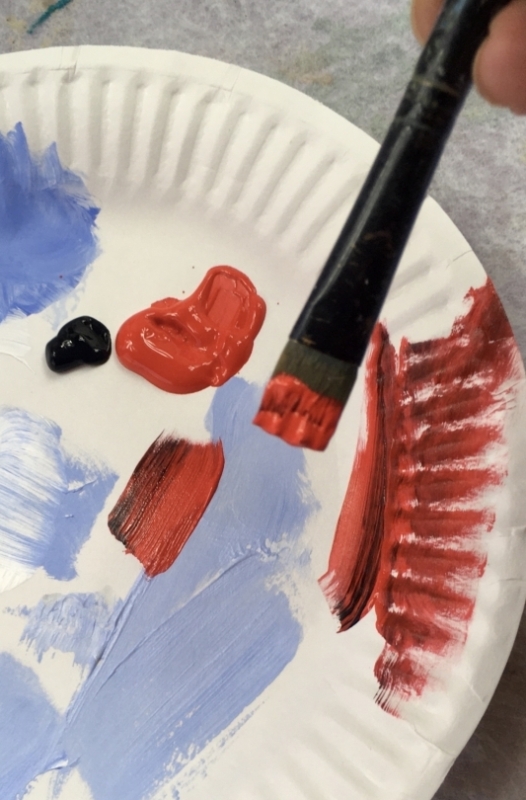
5. Add Some Shading To The Cardinal Using Mars Black Mixed With Pyrrole Red
Add a TINY bit of mars black to the tip of your brush (the brush still has the red on it).
Paint the wing and some lines on the tail.

Then spread this black/red out a little bit on your palette so the red and black mesh together more. This should be a dark red. If it looks too dark, you’ll need to add more red to the brush.
Then paint some dark areas one the wing and tail with this red/black combo. I also did a little bit of this dark red on the chest.
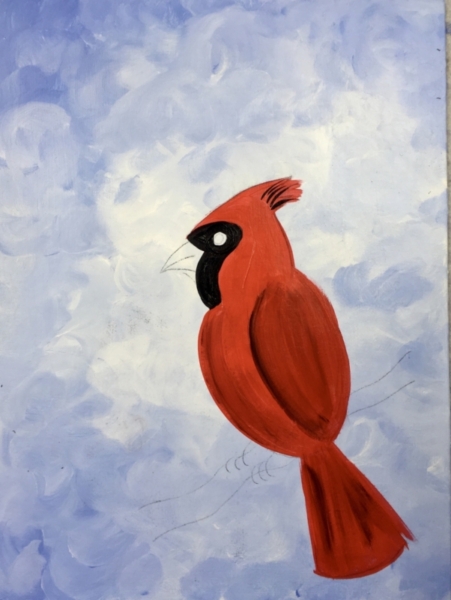
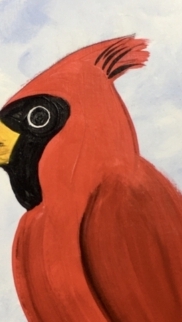
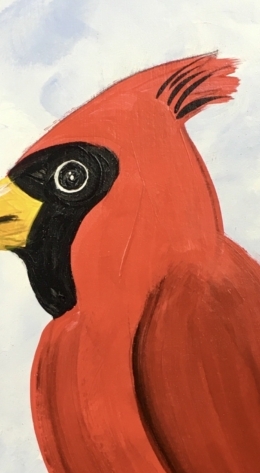
6. Paint The Black Part Of The Cardinal’s Head
Use a #4 round brush and mars black to paint in the cardinal’s head. Try your best to go around the shape of the beak and the circle of the eye.
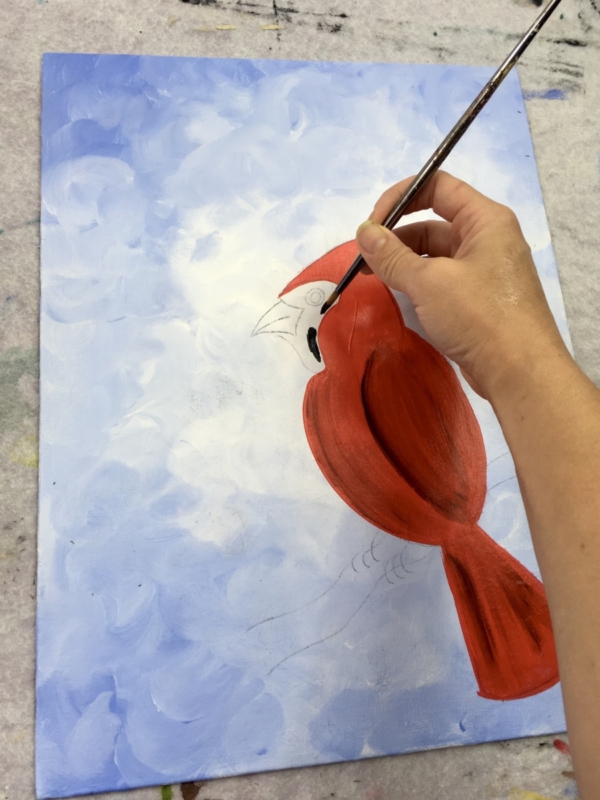
I also did a few lines of black on the cardinal’s head feathers.
7. Paint The Beak With Diarylide Yellow And The Round Brush
You will need to do two coats. So when this first coat dries, paint another one. This makes sure it shows up nice and opaque.
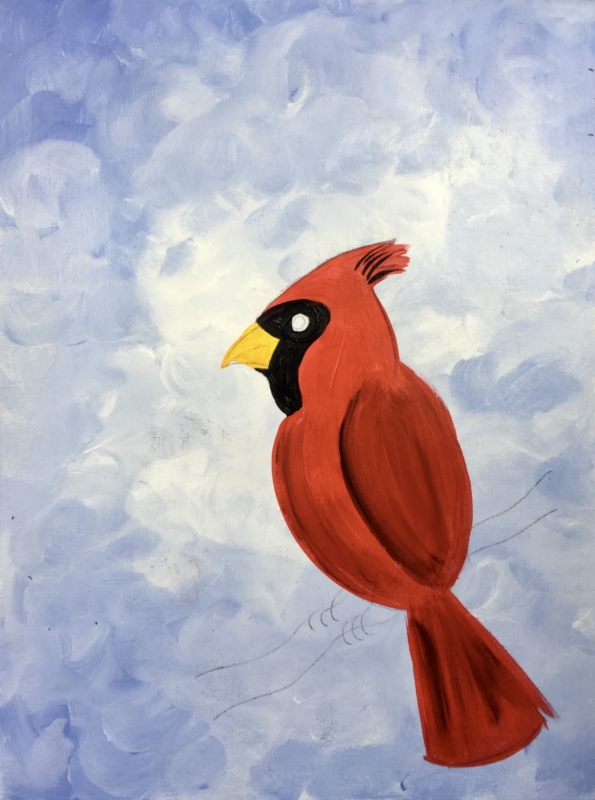
Note: I decided later on in this painting to not do the feet. I felt it looked more simple without them 🙂
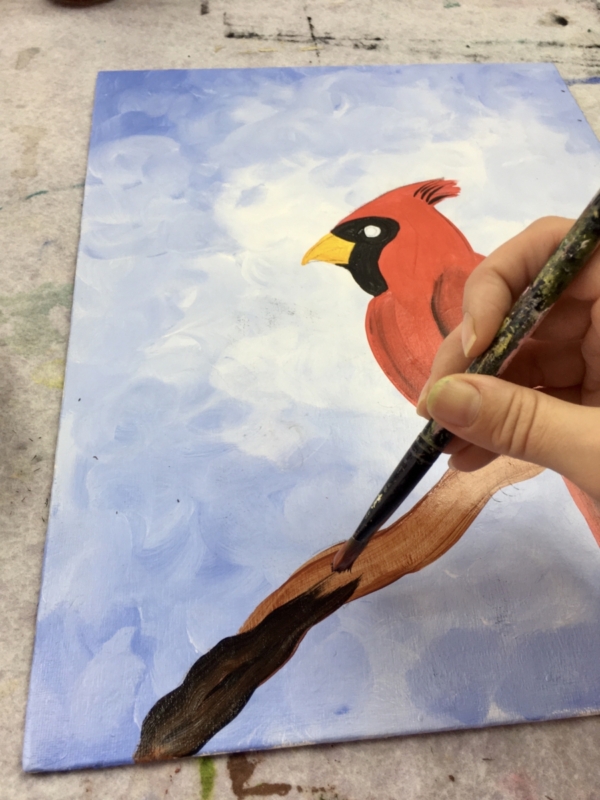
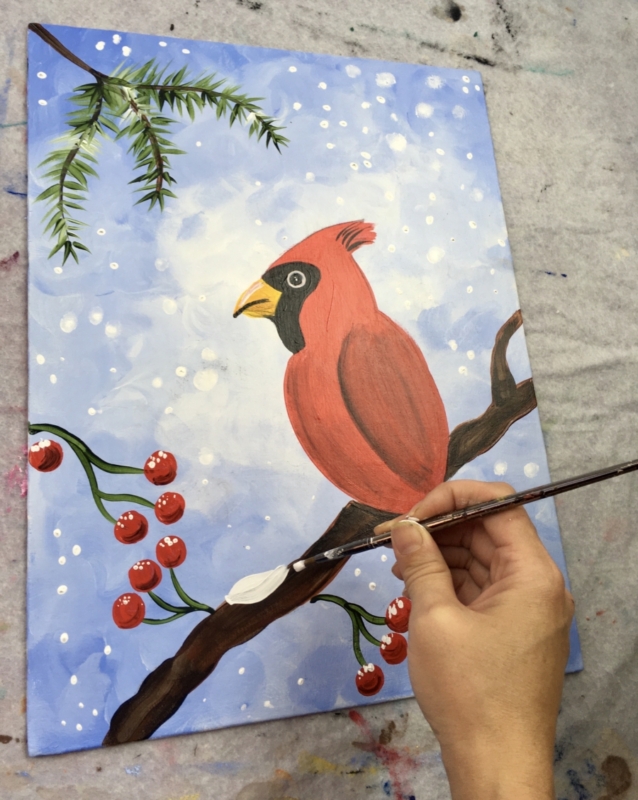
8. Paint The Branch A Combo Of Burnt Sienna And Mars Black
The first layer of this branch was painted with burnt sienna and the 12 bright brush. Typically this first layer will look transluscent and that is okay. If you used the traceable, you’ll need to extend the branch all the way to the edge of the canvas. I also added a smaller branch sticking up behind the bird.

Then to get the branch to be darker, I added a little bit of mars black to the tip of it. Paint over the burnt sienna while blending it to a very dark brown. You can do this a solid color or you can leave it un-blended completely to give it a “textured look”.
9. Paint The Pine Needle Branches and Berry Branches
Next I used my #4 round brush double loaded in burnt sienna and mars black (dip the tip in both colors). Paint a pine needle branch consisting of one main branch that stems off into three.
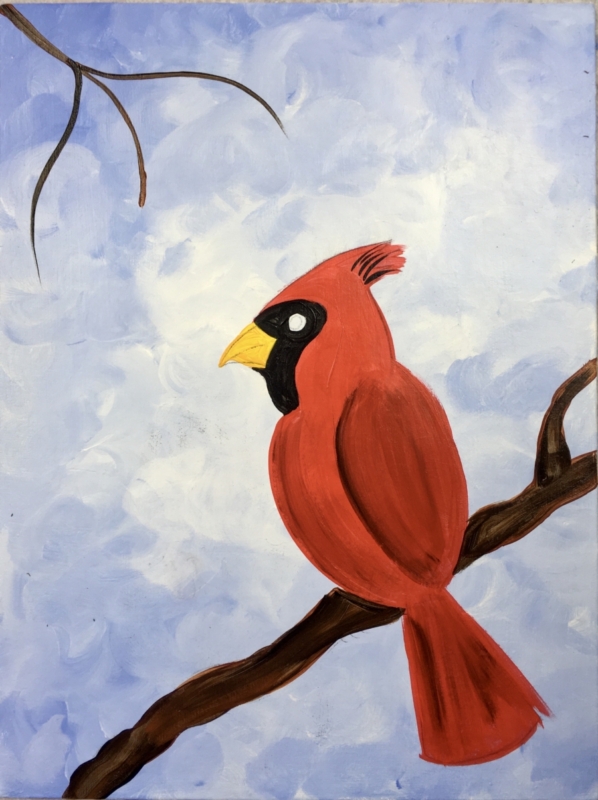
Then rinse your brush and use sap green to paint the berry branches. I did three different berry branches stemming off into threes like the pine needle branch above.
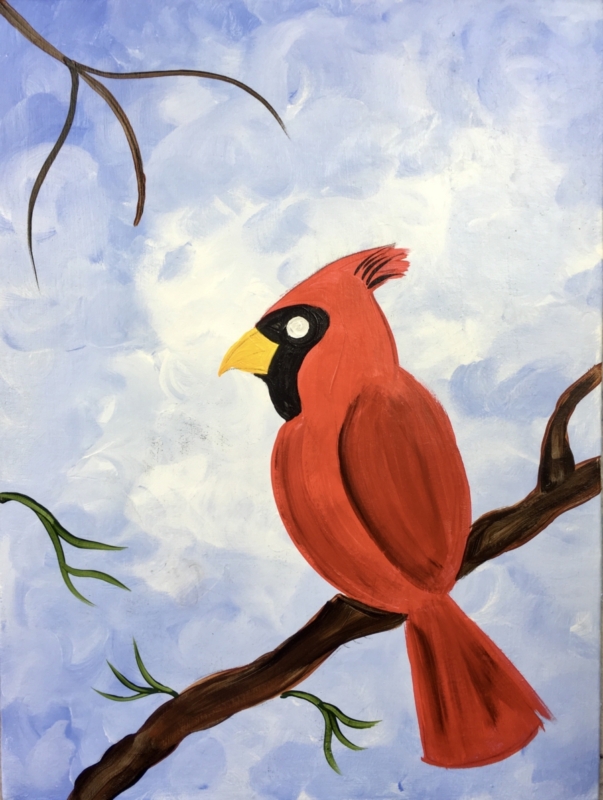
10. Paint The Pine Needles & Berries
Next I used my round brush double loaded in white and sap green. To do the pine needles, start at the end of the branch and paint each stroke from the middle outwards. The pine needle “clusters” will overlap each other as you work your way to the left of the branch. (In other words go from the far right to the far left).
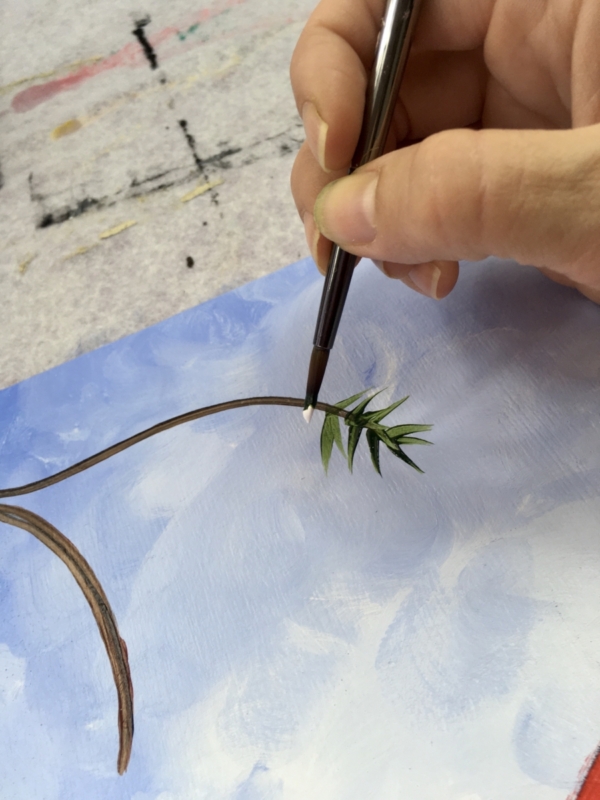
To get the “color variation” load your brush in different amounts of sap green and titanium white.
Repeat with each pine needle branch.

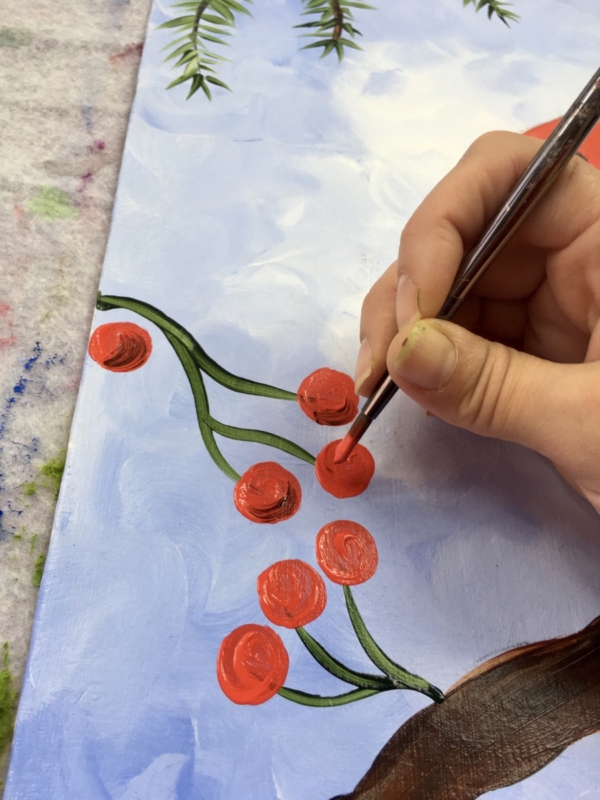
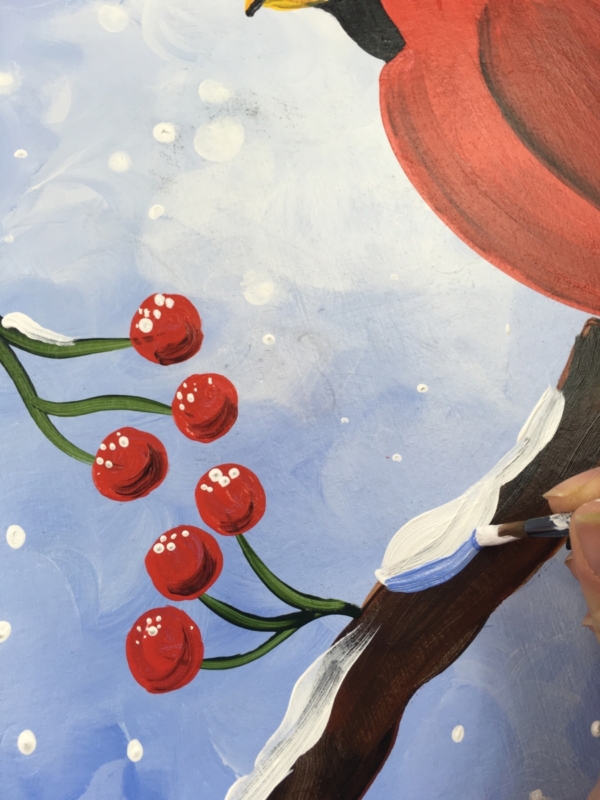
Then rinse off your brush and load it in just pyrrole red. Paint berries on the tips of all the berry branches and any extras you feel like painting!
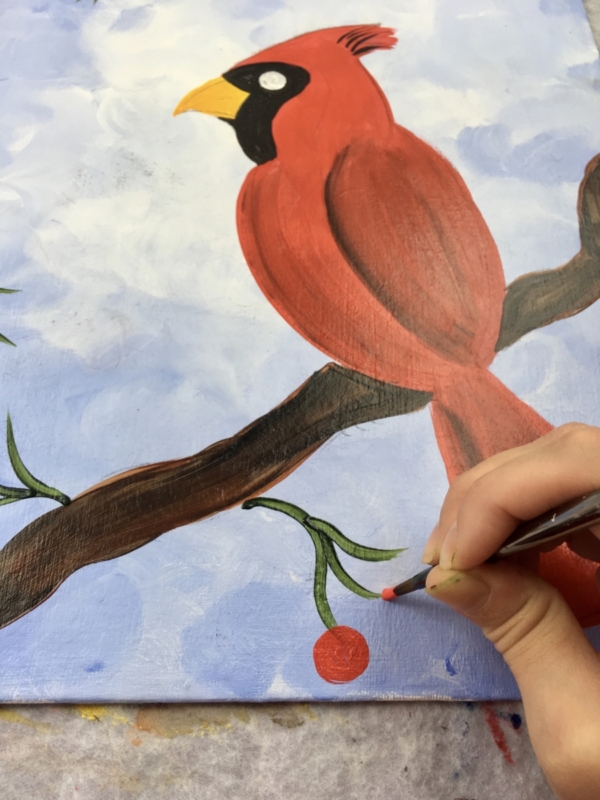
Then, before the red dries, add a TINY BIT of black to the left side of all the circles and blend it back in with the red. This gives the berries a little bit of shadow. I just painted a curve.
11. Paint The Eye
First, use your round brush to paint the eye a solid white. Wait for it to dry (or use a blow dryer).
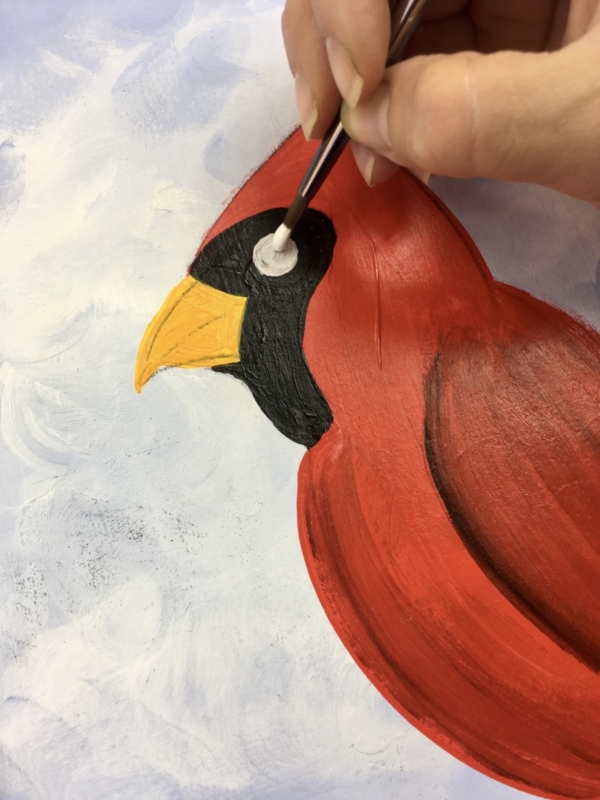
Then paint the solid black circle within the white circle. This step requires a steady hand. You can also use a paint pen or a sharpie for more control.
Then paint two little dots on the black circle (after the black dries).
12. Paint The Snow
There’s a few different ways you can do the snow! You can use the back of your paint brush handle to stamp dots. You can use your round brush to stamp dots. You can also use your finger to paint larger snow circles.

Do a variety of circle sizes all over the background.
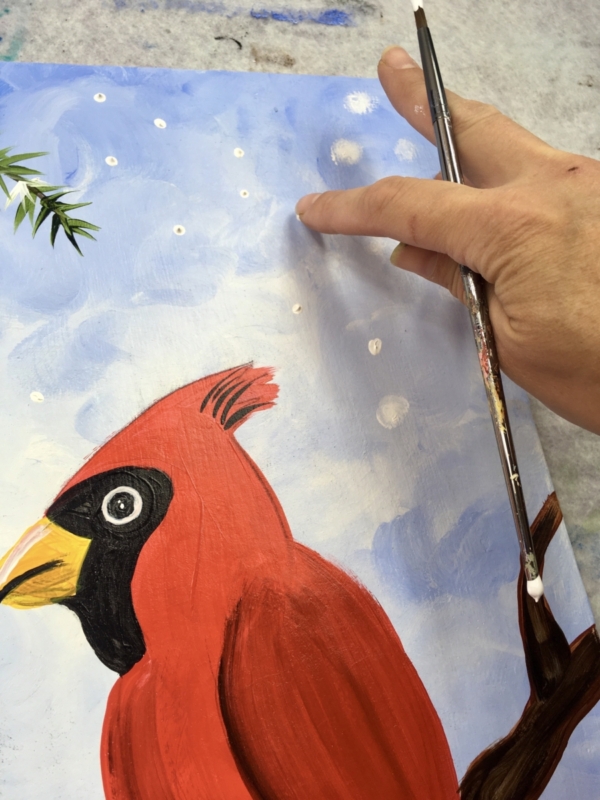
Lastly, paint the snow on the branches and a few dots of snow on all the berries. To do this use a round brush and titanium white.
To get some shading in the snow, add a little bit of light blue violet to the bottom of the snow and blend it up.
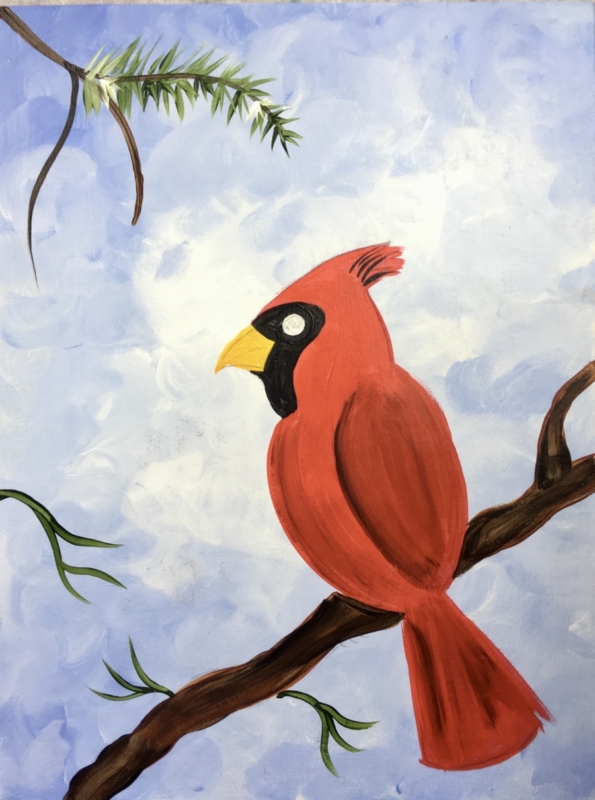
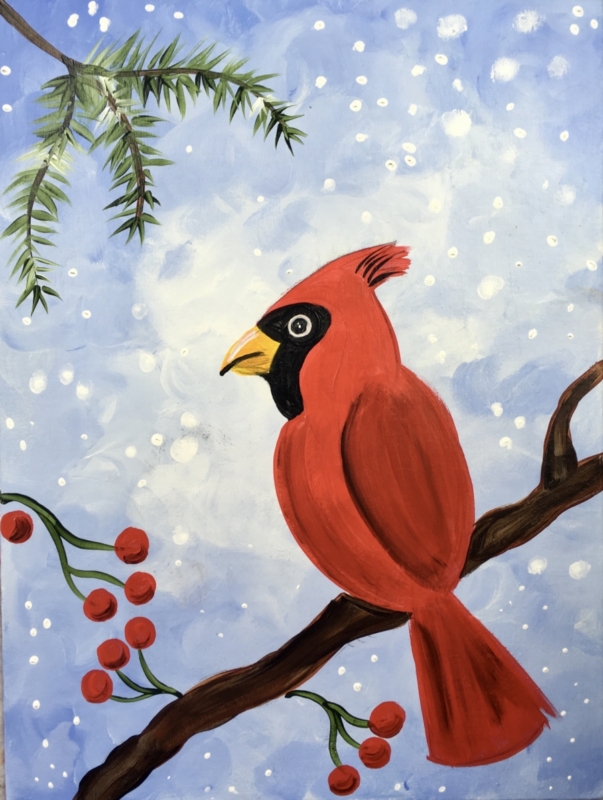
Finished!
Hi Tracie. THANK YOU for your tutorial! We hosted a painting party for my daughter’s 11th birthday and it was a real hit! They watched the tutorial as they painted. Your instructions are so clear and easy to follow. Purchasing the necessary supplies was so convenient with the list and links you provide. We could not have achieved this without your tutorial! We’ve hosted a painting party at a kids art studio before and it was not only very expensive but not at all fun since the goal seemed to be to just get us through our party time slot. THANK YOU for helping us have a fantastic and memorable birthday party for my daughter! I’m sharing your website with all the guests. The Moms now want to have a paint and sip party!
You are very welcome! Thanks for sharing as well! Glad your daughter had a fun and successful paint party!
Hi Tracie,
I really want to try this as a gift for my mother. I am not used to using satin finishes. I am more familiar with Acrylic Matte finishes, do you think that would work?
I am very new to painting, other than word signs.
Thank you
Hi Brittany! You can definitely do this with an acrylic matte finish type of paint. For me, the only difference will be the sheen. The technique is pretty much the same. Enjoy!
This is our second time using one of your videos. Our paintings turned out great! My kids love to follow along with you. Thank you so much for posting these!!!
You’re so very welcome Amanda!
Hi Tracie,
Thank you for this tutorial. My fourth grade class painted this scene as a present for their parents for Christmas. It’s interesting to see each child’s interpretation of the same subject.
Wonderful! And isn’t it so interesting!? I love when the children add their own things to the paintings too. Thanks for using my Cardinal painting, I’m sure their parents will love their gifts!
Amazing work I want to try
If I Dnont hv light blue violet , wat else color can I used?
Any kind of light blue that sort of has a purple or gray tone to it ? You can also try it with light blue or cerulean Blue.
I used grey purple in masters touch and it’s pretty with a blue and purple hint to it Tracie so you have that in any future paintings I never get to use that color in your paintings so I was excited lol
Thanks Tracie! This cardinal was so fun to put together. I painted it to give to the school since the mascot is a Cardinal!!! 🙂
I have enjoyed painting several of your tutorials, always a fun and relaxing time. I think it really helps to see what the finished product is supposed to look like, but it almost always comes out a little different, but that’s what I like about it the most!
Thanks again!
Tracie you are amazing!