
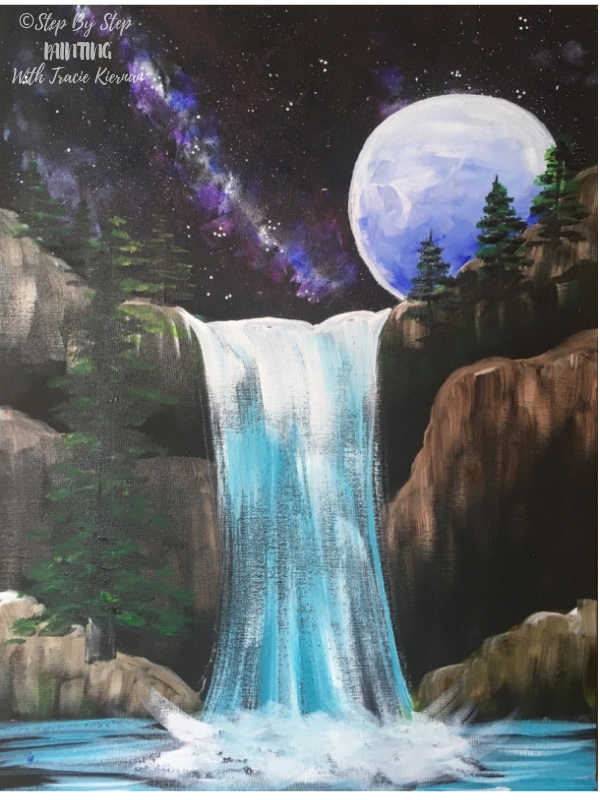
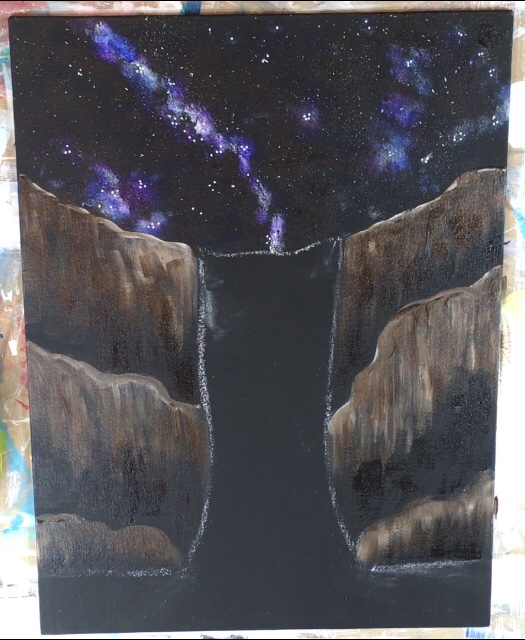
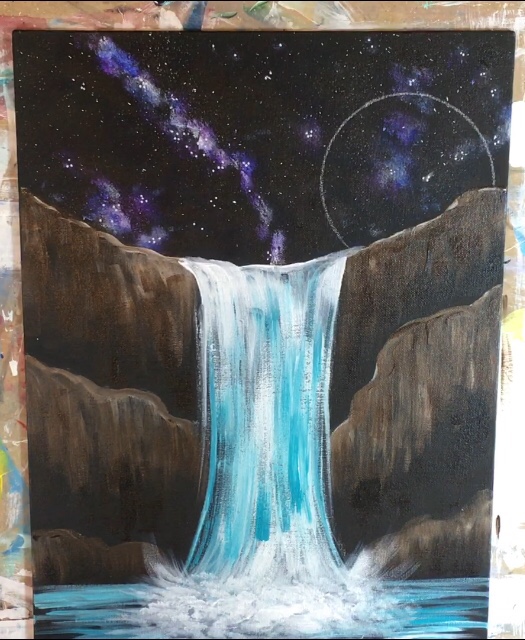
Waterfall Painting
This beginner acrylic painting tutorial will teach you how to paint a waterfall with a galaxy night sky.
It’s actually quite easy to paint a waterfall and I did so using my fan brush! Continue reading to learn more!
Would you like to save this?
This painting was done on a 12″ x 16″ canvas. I selected this size canvas because it is taller. If you only have the 11″ x 14″ size, this can still work! Your waterfall can be a tad shorter 🙂
The canvas I used was a white canvas painted black using Apple Barrel matte black paint. Simply get a large wash brush and paint 1-2 coats of black.
You can also use a black canvas.
Enjoy and happy painting!
Materials
How To Paint A Waterfall

Escape to "Galaxy Falls"! In this tutorial, you will learn how to paint a night sky over a waterfall. You will paint a full moon rising over the cliffs as well as sparking blue water below. This painting is extremely fun and very relaxing.
Materials
Basic Supplies
- 12" x 16" canvas
- Acrylic Paint
- Brushes
- Sponge
- White Paint Pen (Optional)
- Chalk
- Matte Black Acrylic Paint (I used Apple Barrel)
- Water, Paper Towel, Protected Workspace
- Circle To Trace Moon
Colors
- Mars Black
- Titanium White
- Dioxazine Purple
- Ultramarine Blue
- Hooker's Green
- Cobalt Teal Hue (DecoArt)
- Raw Umber
Brushes
- Sponge
- Fan Brush
- #12 Flat Brush
- Toothbrush
Instructions
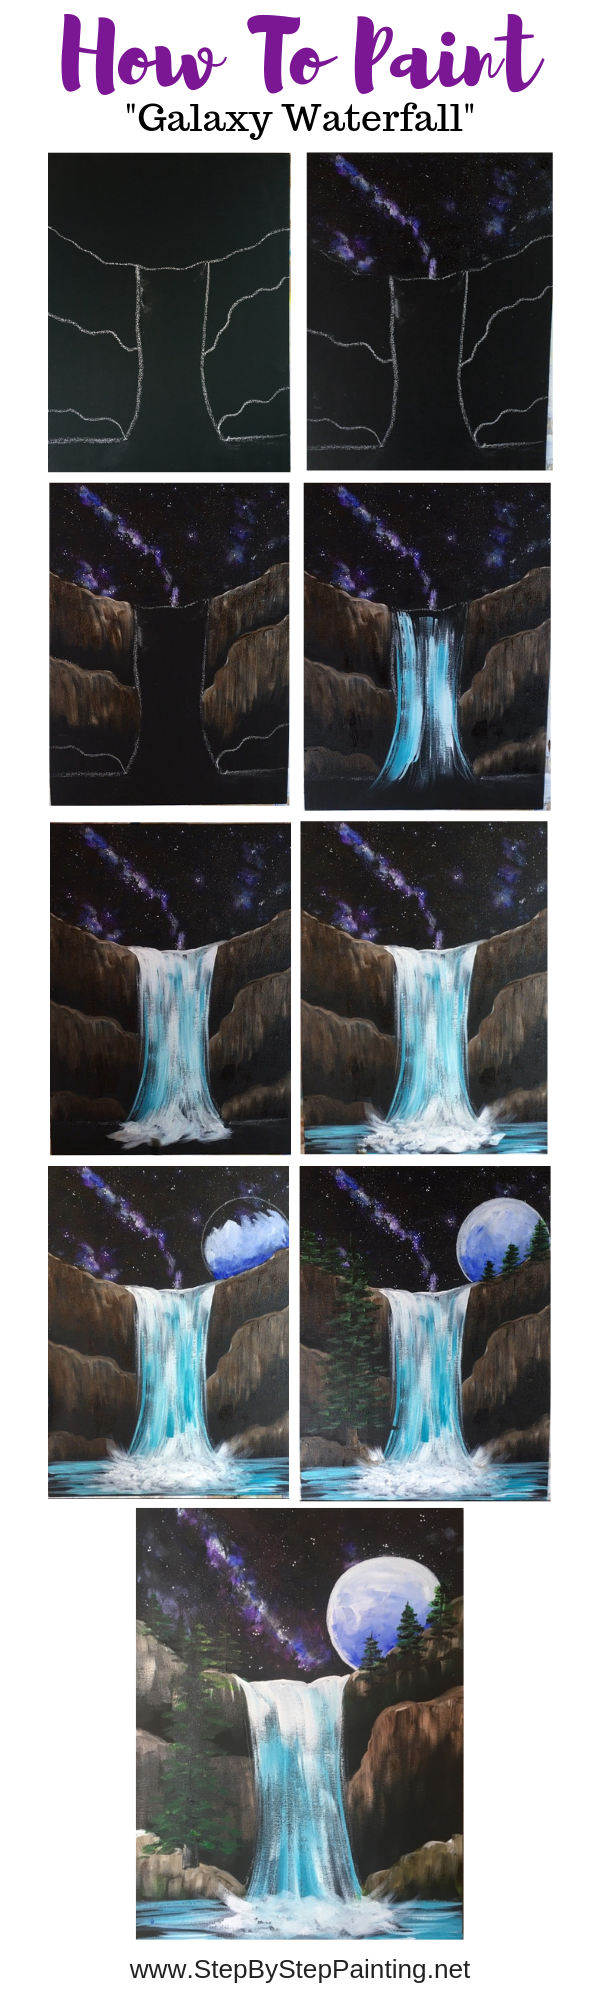
- Start with a black canvas or paint a 12 x 16 canvas black.
- Draw the layout of the painting including the cliffs and waterfall shape with white chalk.
- Paint the stars and galaxy in the sky using a sponge and a little tiny round brush.
- Paint the cliffs using a bright brush and dragging ground strokes downwards.
- Paint the waterfall using a fan brush and cobalt teal hue double loaded in titanium white. Gently stroke the fan brush downwards to create the waterfall effect.
- Paint the moon by tracing a circle and then use a small flat brush to paint little short strokes of white and blue. .
- Paint the trees using the fan brush or the bright brush and two different greens.
Color Palette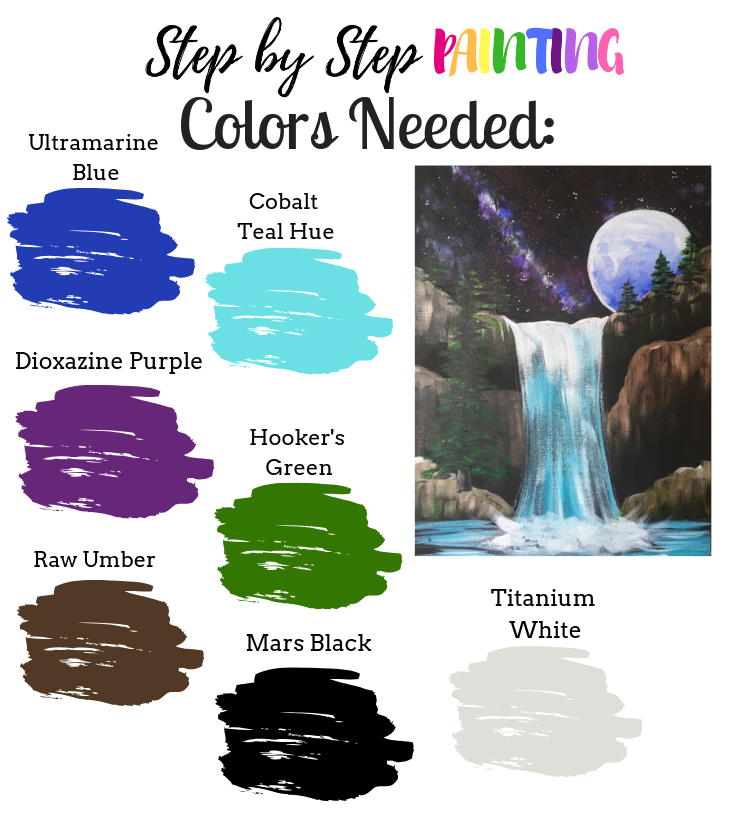

Directions At A Glance
Traceable
There is no traceable for this tutorial! You will be able to easily draw the layout of this painting with chalk (and I’ll guide you through it).
Video:
Step By Step Directions:
1. Paint your 12″ x 16″ Canvas Black
I did not get a picture of me actually painting my canvas black. I used a large brush (1″ wash) to paint the entire canvas.
I used Apple Barrel Black paint because of its matte finish. As stated earlier in this post, if you don’t have Apple Barrel Black, you can use your Mars Black. The satin finish will be okay.
After painting your canvas black, you’ll want to wait for it to completely dry.
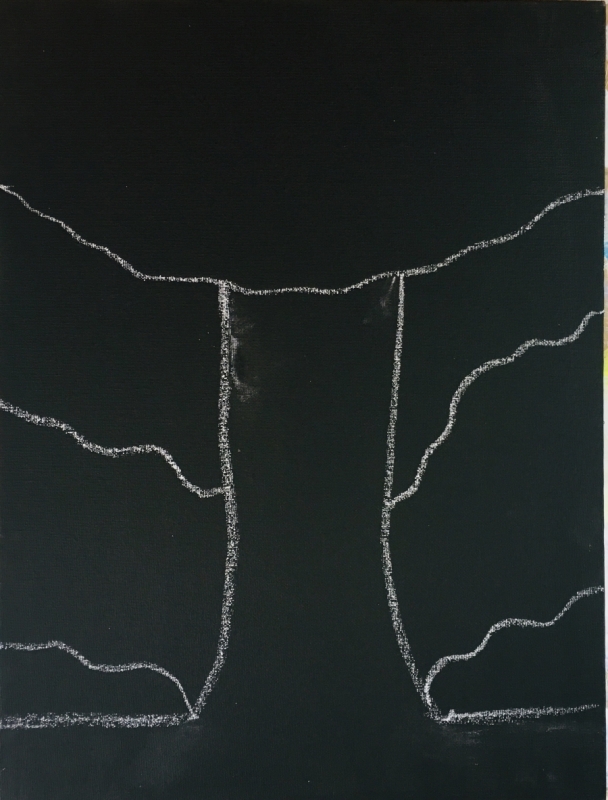
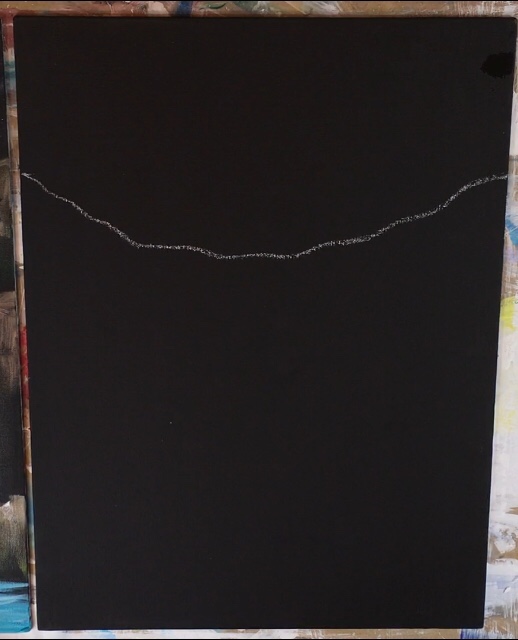
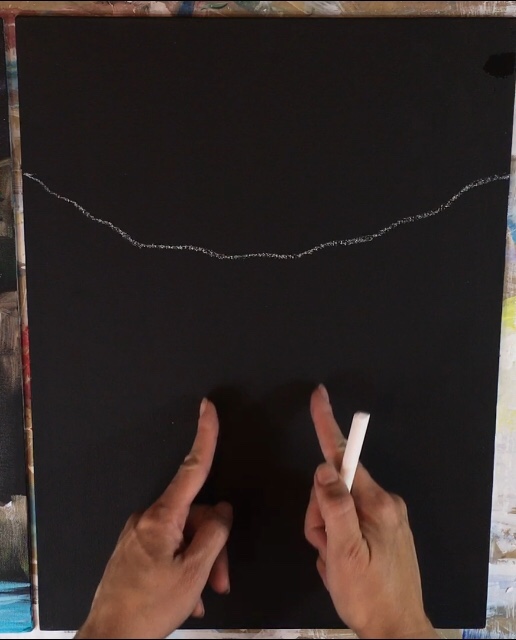
2. Draw the layout of the cliffs and waterfall with white chalk
At the top of the painting, I estimated about four fingers down and made a mark with my chalk.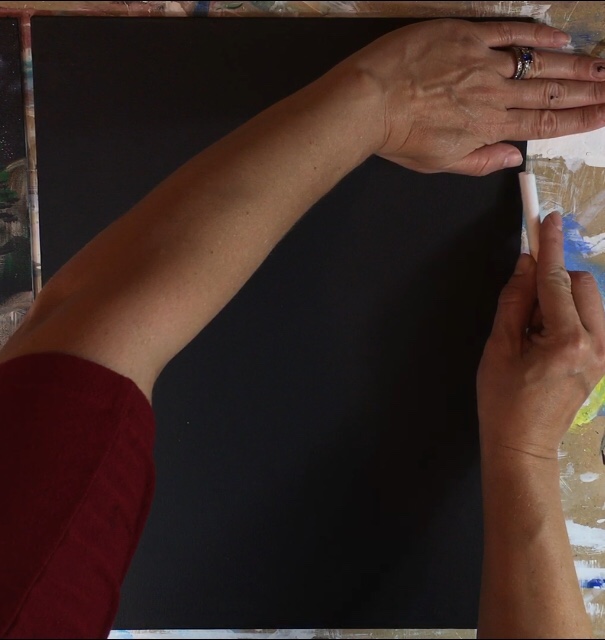
I made this same mark on the other side. Those marks will be the highest points of land and everything above will be sky.
Using those points as a guide, draw a rough line that dips down and then back up to the other point. 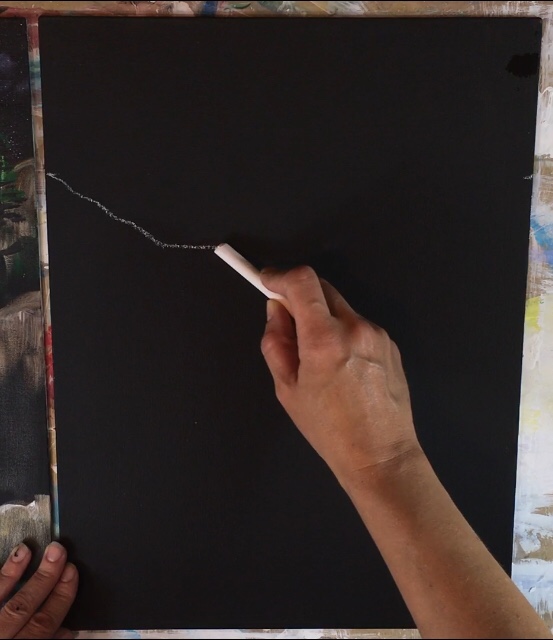
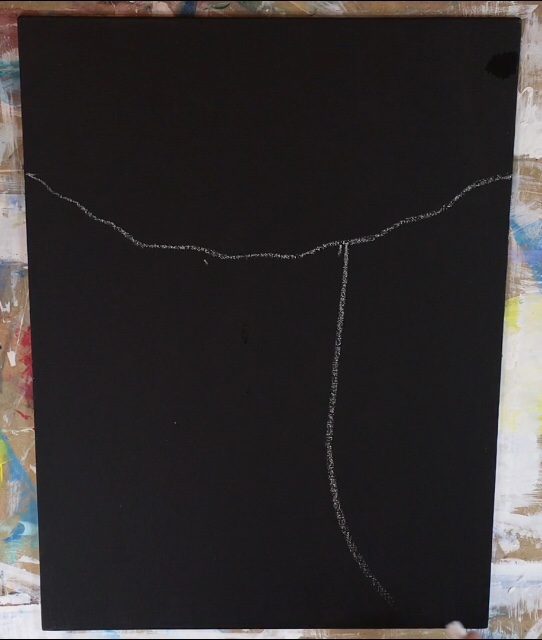
Next draw the water fall. Mine was about four fingers wide.
When you draw the vertical lines for the fall, imagine that it is vertical at first but then it opens wide on the bottom.
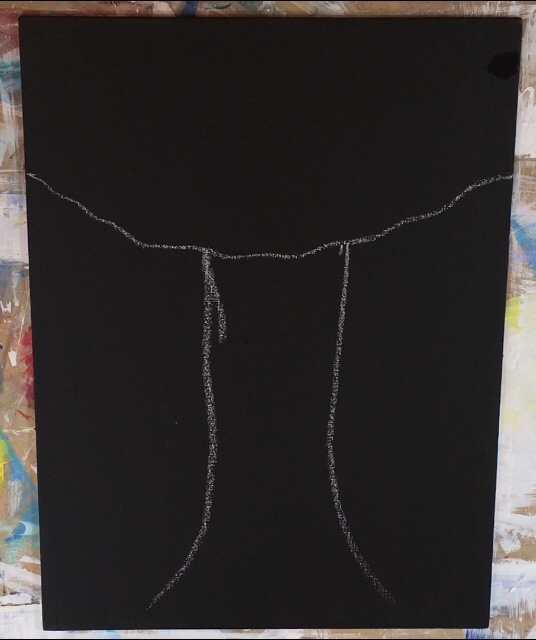
Next draw the layers of the cliff. I estimated these to be slightly above the center of the canvas.
They dip down just like the top of the land. 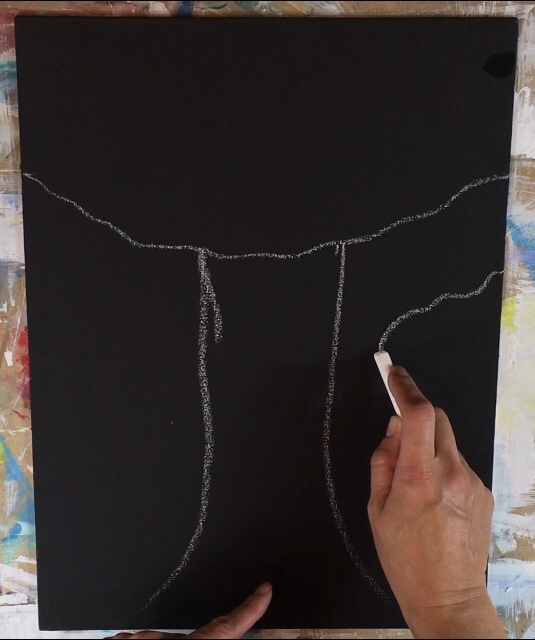
This jagged line was done on both sides of the waterfall. You do not need to make it exactly symmetrical.
Next I made a horizontal line on the bottom for the water line.
This was slightly above the bottom of the waterfall (estimate about 2-3 fingers from the bottom).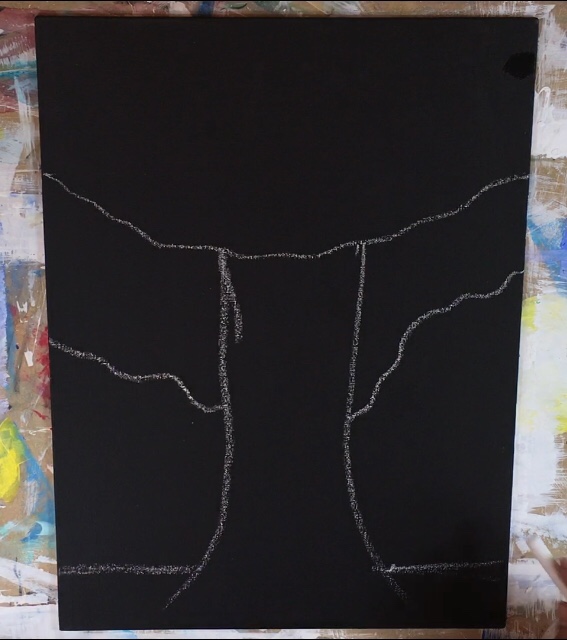
Finally I drew the bottom cliff line. I made a jagged line on both sides just above the water line.
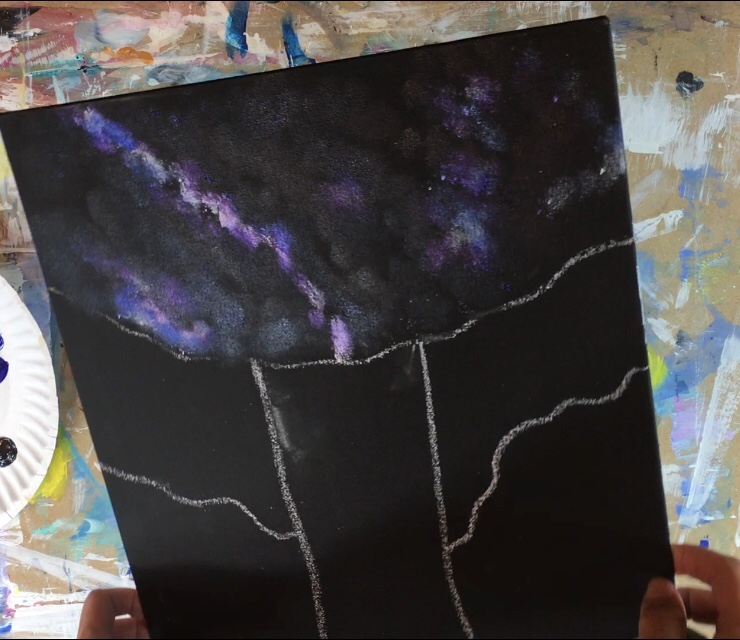
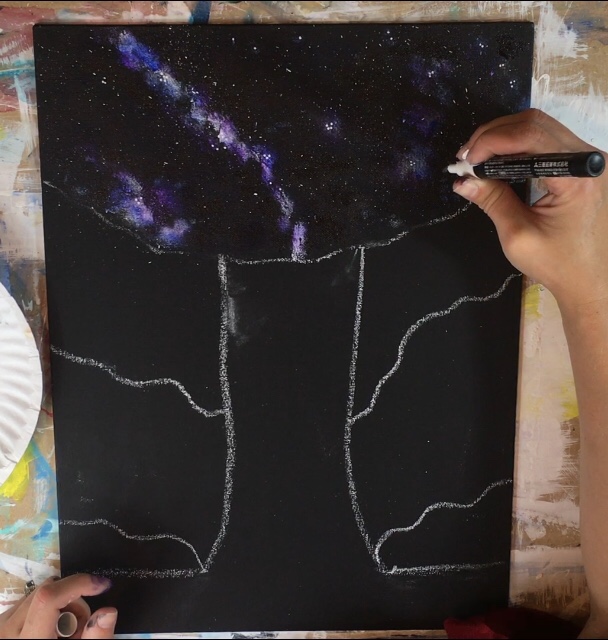
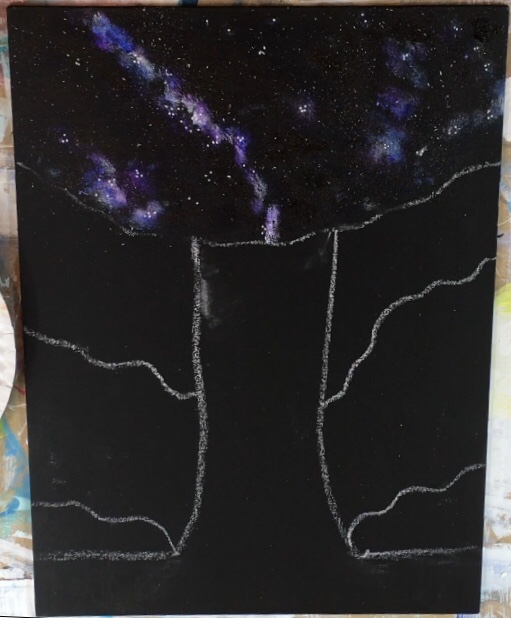
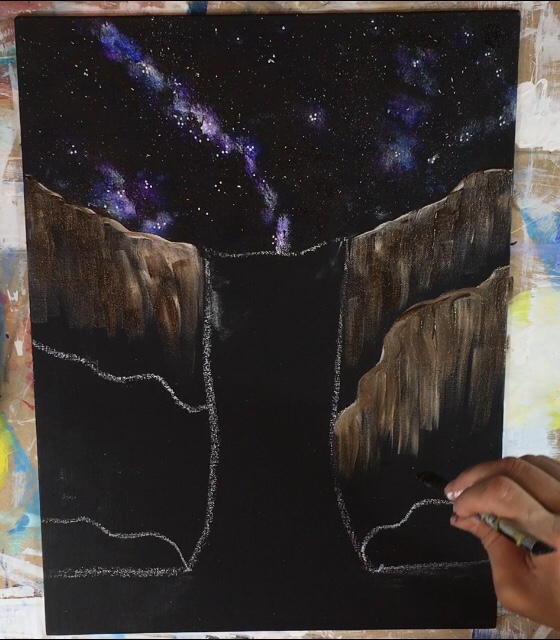
And there is the layout for our entire painting! 
3. Paint the galaxy
Everything above the top line is going to be painted as a galaxy.
To do the galaxy, I used a sponge and the colors titanium white, mars black, dioxazine purple and ultramarine blue.
Start by dipping your sponge in titanium white. Just a little! There’s no need to overload the sponge 🙂 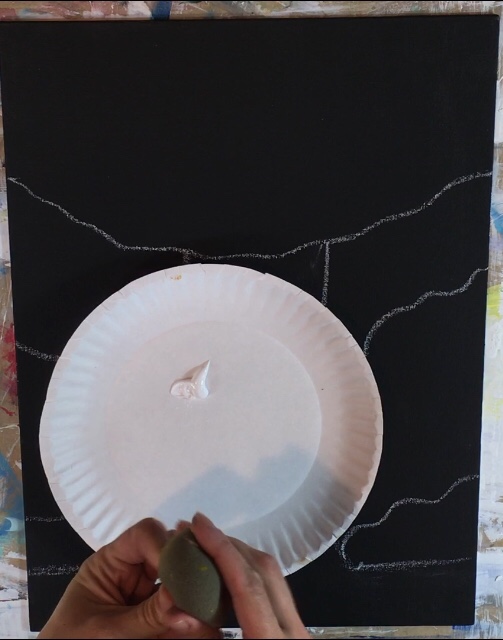
When I do galaxies, I like to start off by sponging a diagonal line to represent the milky way.
So I did just that.
This is not a perfectly diagonal line. It’s inconsistent as far as brightness of the white and it’s kind of jagged. 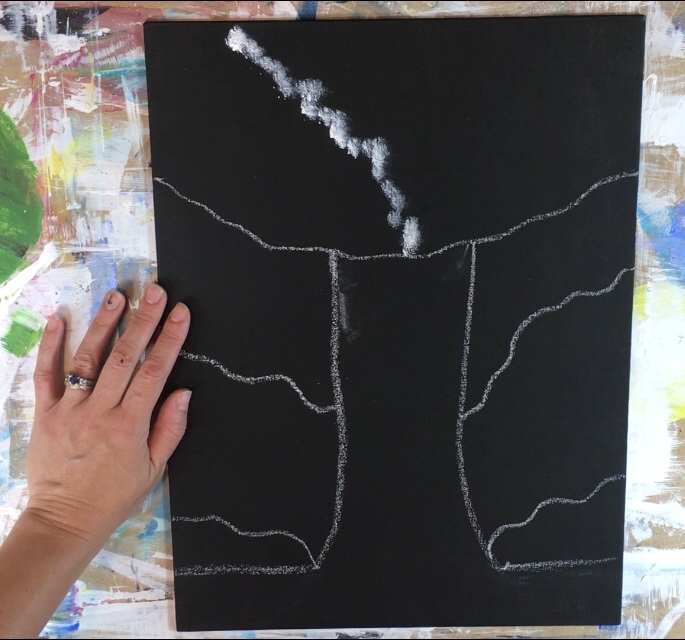
Then I lightly sponged the white in other areas letting it run dry on my sponge so the white wasn’t as bright.
I did this in clusters.
There’s no need to make a uniformed pattern. This is the sky and everything is kind of random and not geometrical. 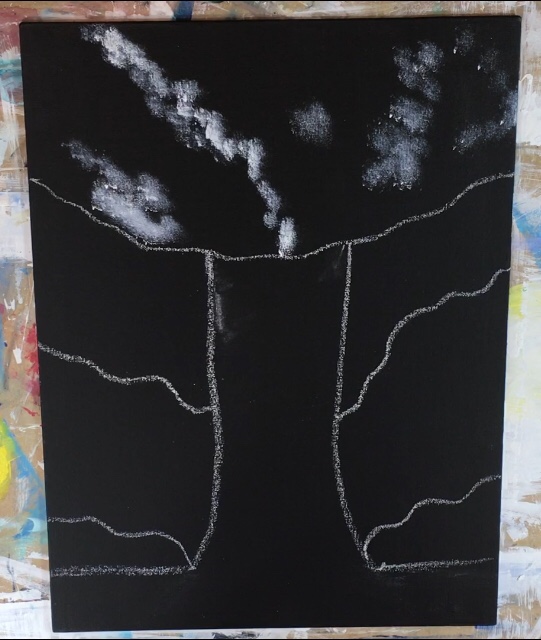
Then I turned my sponge to a clean area and loaded it with dioxazine purple. 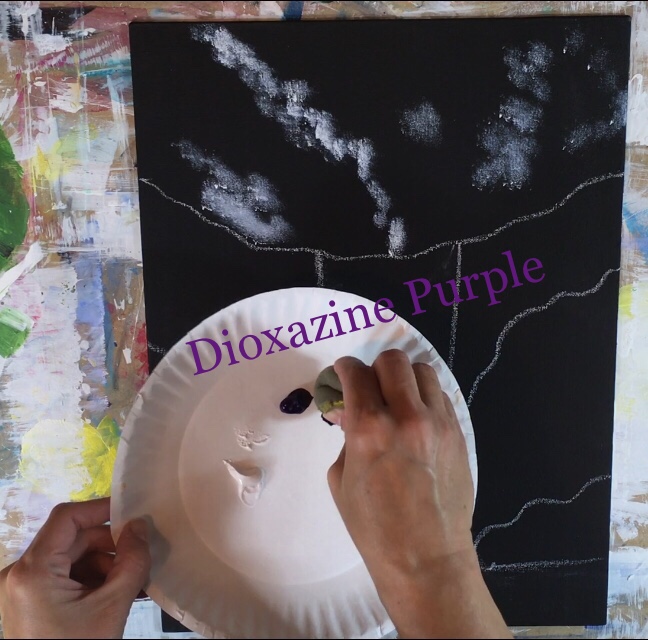
When I sponged on the purple, I put it in the same areas as the white but I didn’t exactly paint over the white.
I painted very close to/ next to the white so that the middle parts can still be white and bright.
Then I sponged it in other random areas. It may only be subtle against that black because dioxazine purple is a dark color. But it is there and it makes a difference!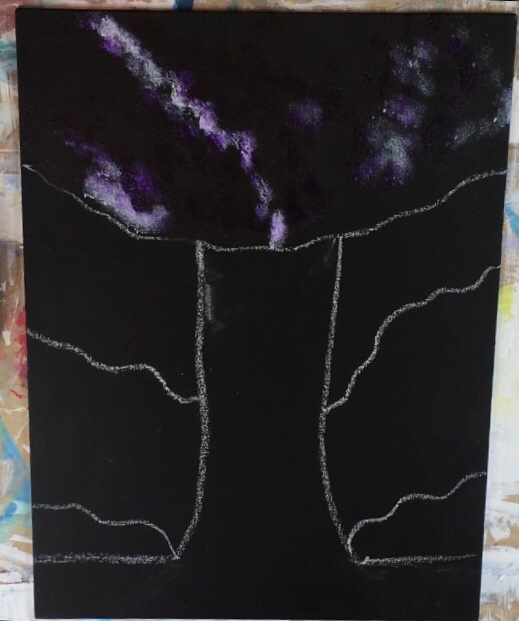
Next I found another clean area on my sponge and loaded it with ultramarine blue. 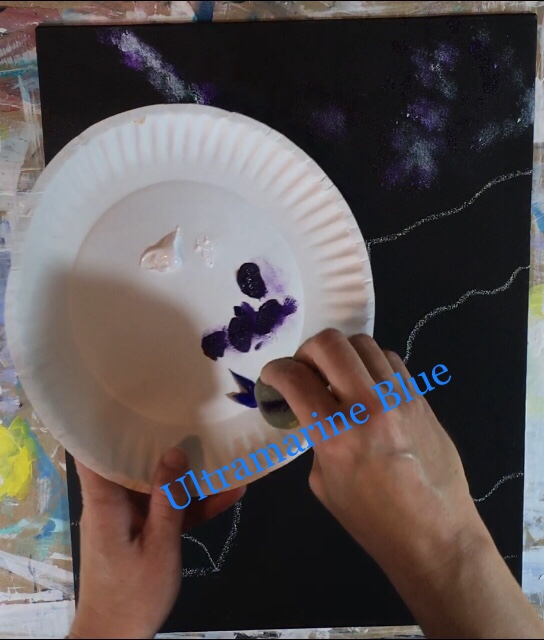
Again, I sponged the blue fairly close to the white areas and a little over the white. I also sponged it in a few random areas. 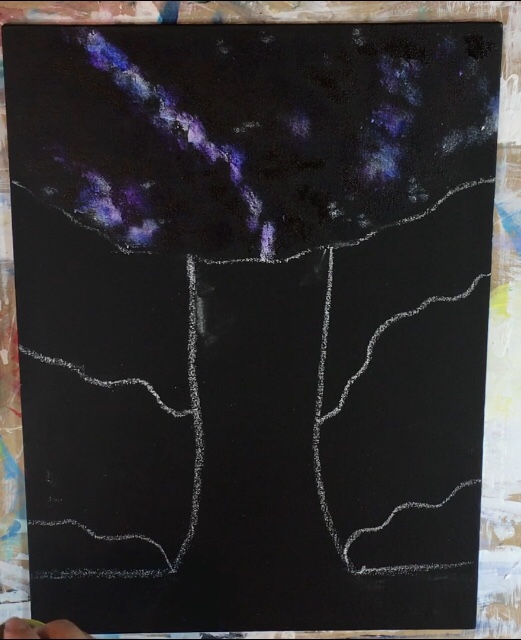
Then I loaded my sponge (clean area) in mars black.
Remember do not overload the sponge with paint. Less is more.
I sponged random areas and a few areas over the color. When you lightly sponge on the mars black it will dull some colors making it look like stars that are further in the distance.
Just be light and gentle with the mars black because it can take over fast! I also sponged it in blank areas and this gave depth of deep black in the sky. 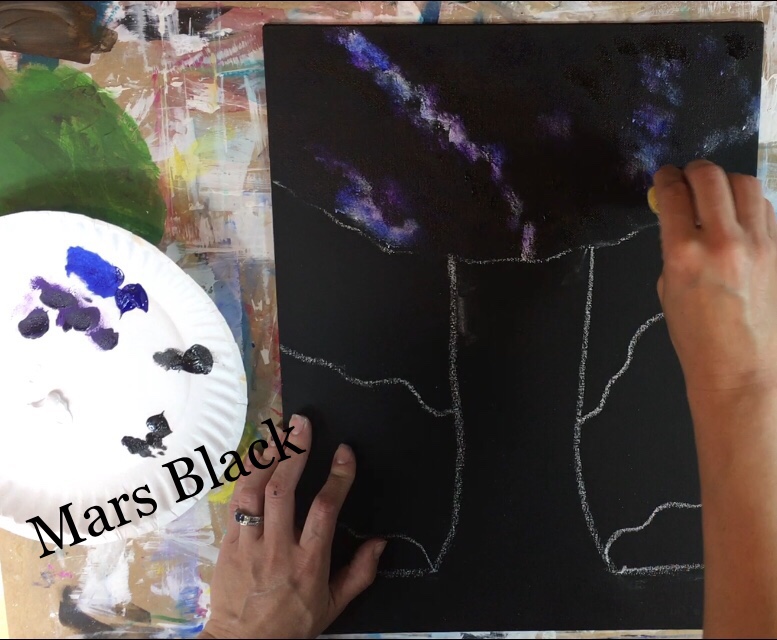
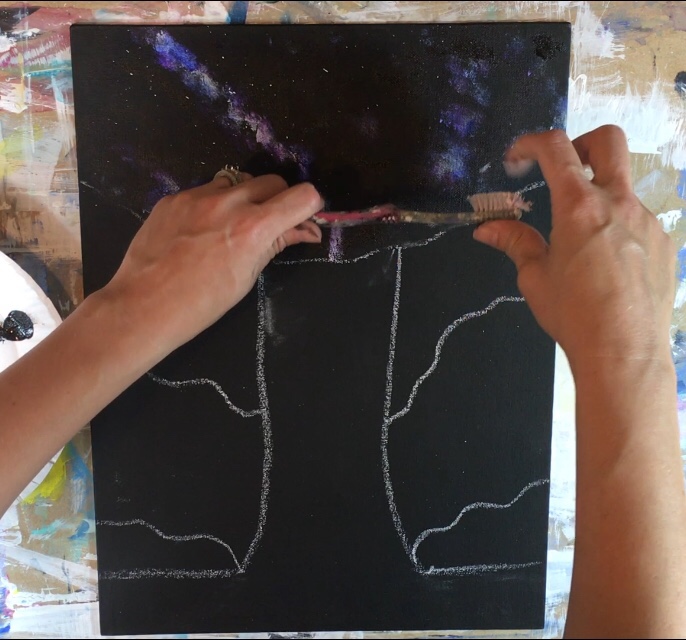
Next I got my art toothbrush out and loaded it with white. Be sure to test this separate from your painting before you start splattering.
You may need to add a TINY bit of water to the brush if your white is too thick.
Basically flick titanium white stars onto the canvas. You will see your sky instantly transform into a galaxy at this point!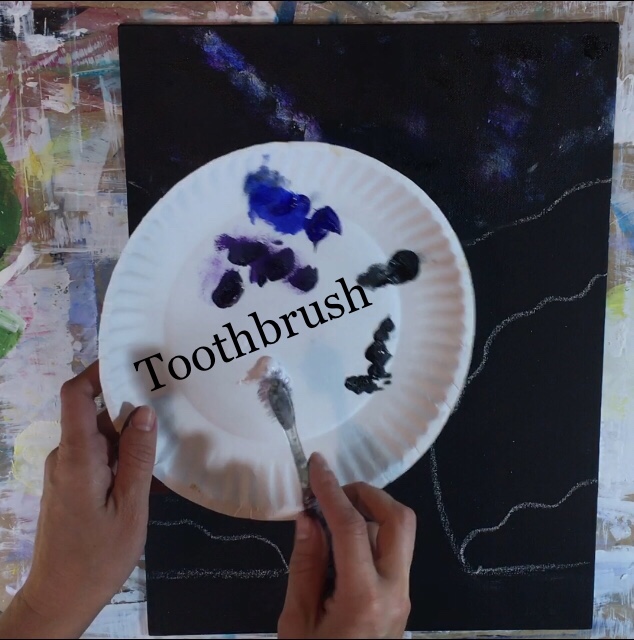

This next step is always fun!
If you have a white paint pen, you can use it to dot on some larger brighter stars. I did this in clusters over some of the brighter areas.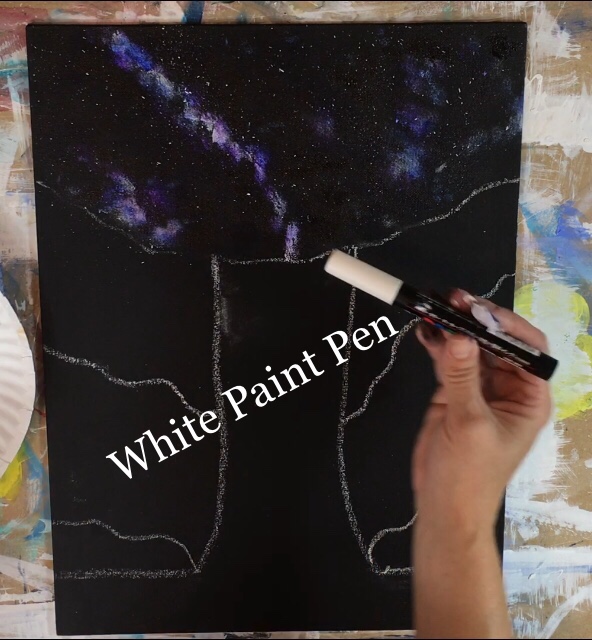
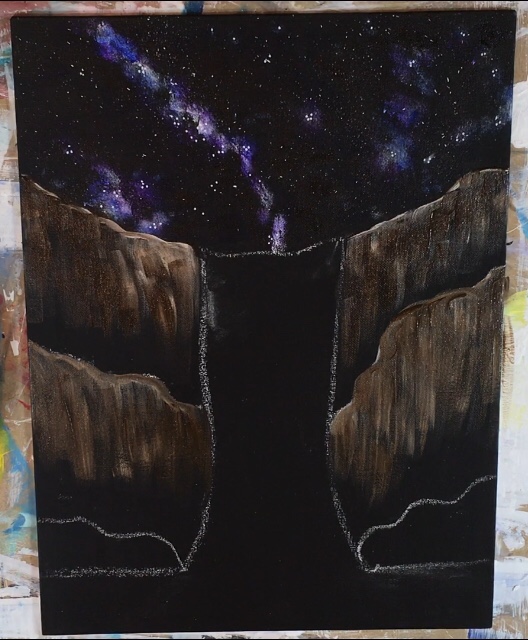
4. Paint the cliffs
Next you’ll need your #12 flat brush and the colors titanium white & raw umber.
We’ll be doing some “dry brush style” so don’t load your brush in any water. 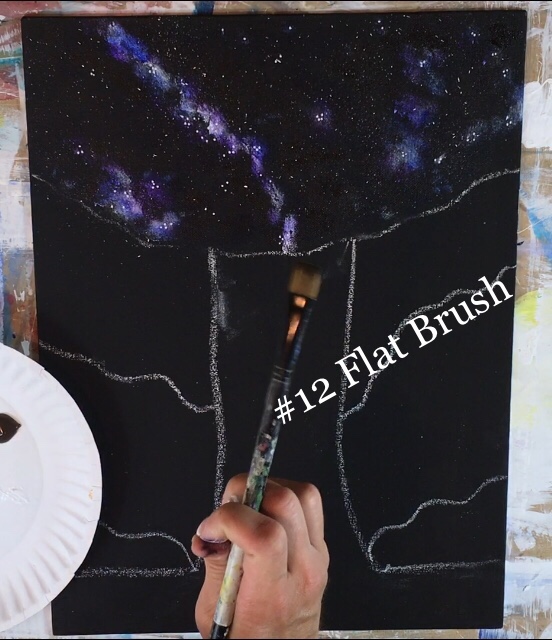
Load your brush in the raw umber but do not load your brush in any water – keep it dry.
Start with the top cliff. Outline the top line. It will look dark against that black for now but we’ll add some white in it to lighten it up.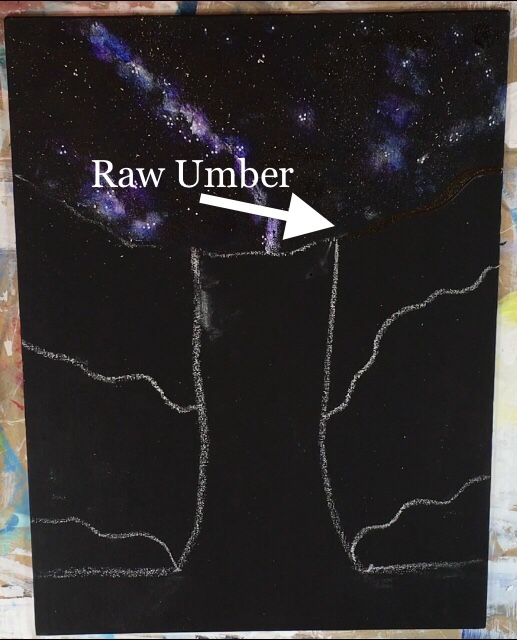
After outlining the top of both clips, use the full width of the brush to draw the strokes down.
Go only about an inch down and let the paint run out on your brush as you stroke down. 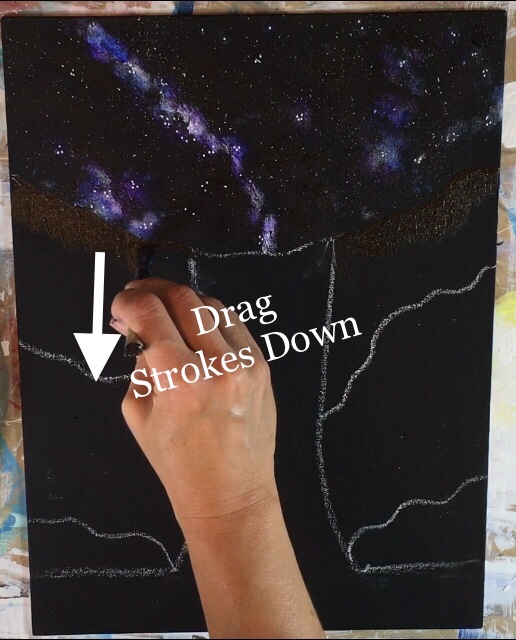
The style of strokes in these cliffs are short and vertical.
We want the top of the cliffs to be lighter and the bottom to be darker.
Essentially we are going from light brown to black.
To get the lighter color, load your brush in titanium white (without rinsing the raw umber off). 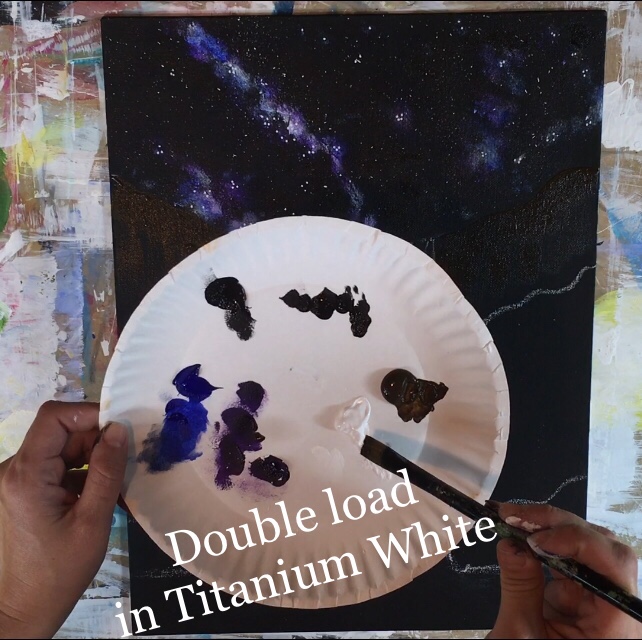
Paint over the areas that you have already painted starting at the top of the cliff and stroking down.
That white will blend with the brown to create a lighter brown. Remember, short vertical strokes that run dry as you stroke down. 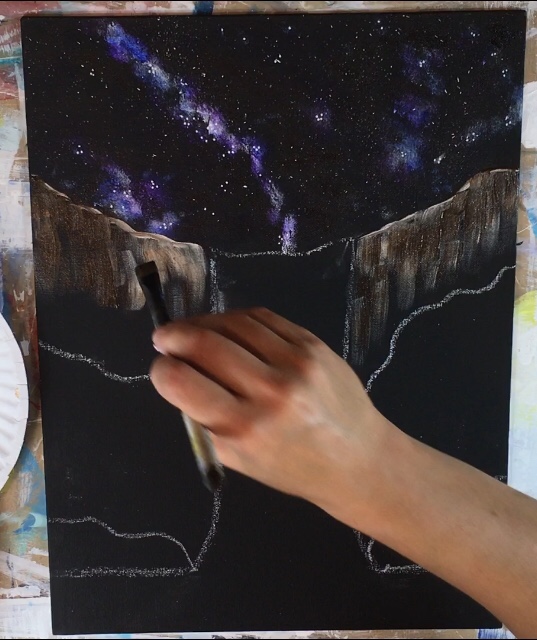
Continue on painting the middle cliffs.
This time, I just double loaded my brush in titanium white and raw umber, outlined the top and stroked down.
Remember that the bottom of the cliff should be left black. 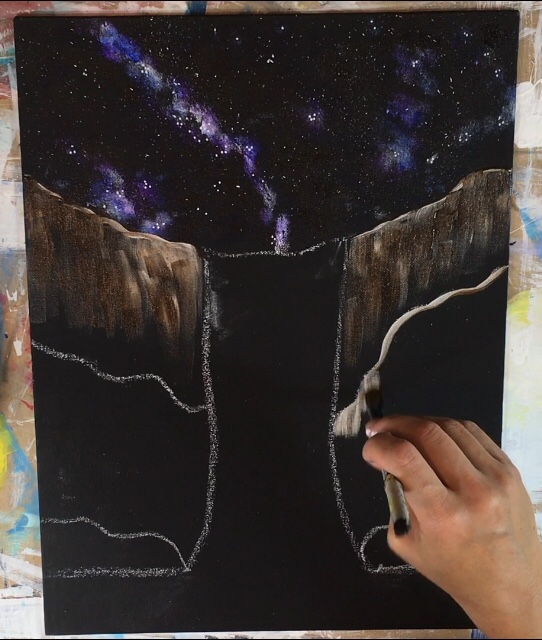
Then I repeated this same technique for the bottom cliffs. 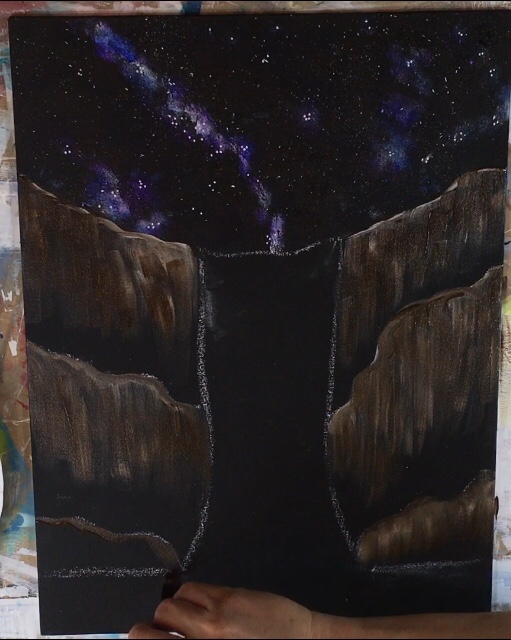
Optional: if it helps, you may add some mars black to the bottom areas of all the cliffs to make that area darker.
This creates depth and contrast against the light brown. 
5. Paint the waterfall
For the waterfall, I used a fan brush (then later a #12 flat brush) and the colors cobalt teal hue and titanium white.
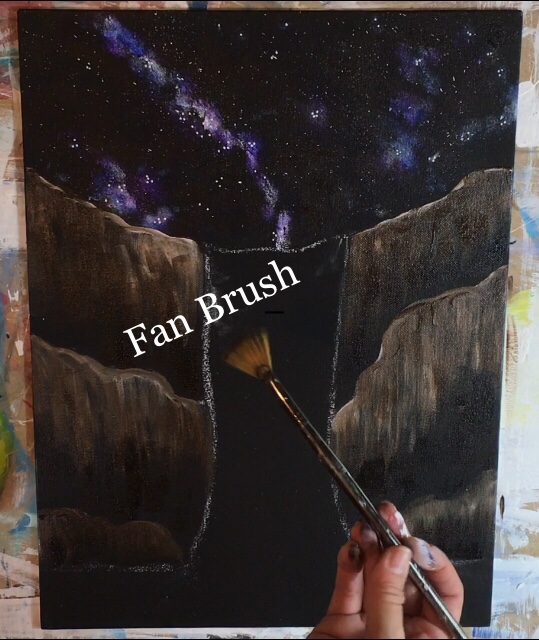
Double load your brush (dip it in titanium white and cobalt teal hue) but don’t blend the colors all the way. 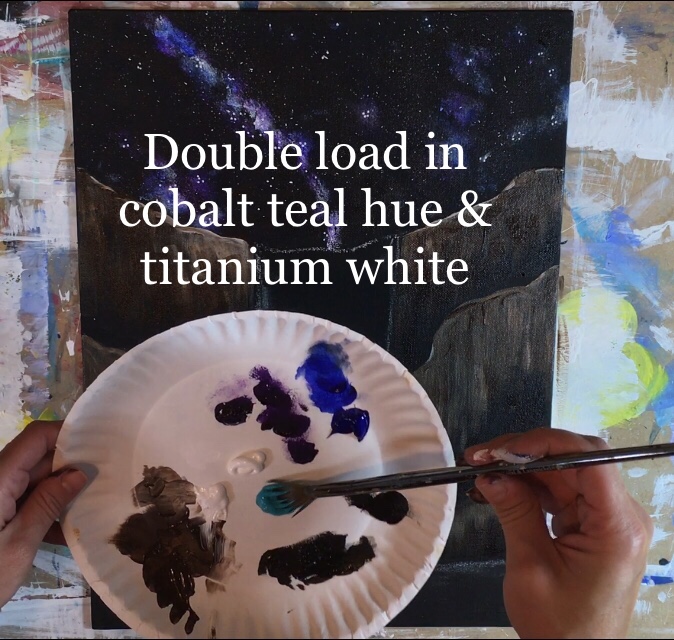
When you create this waterfall stroke, use the full width of the fan brush and gently stroke down. 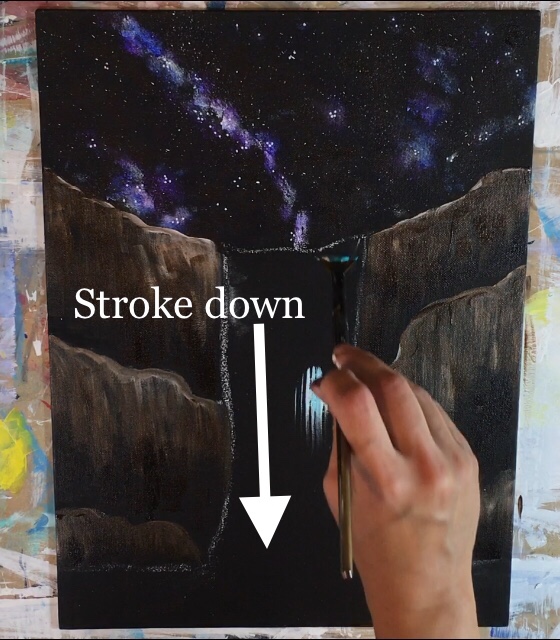
The colors will blend together on the canvas.
There’s no need to go over your same stroke, just let the colors do their own thing.
You’ll have areas that are more teal and areas that are more white because of how you loaded the brush.
Also, allow black to still show through. 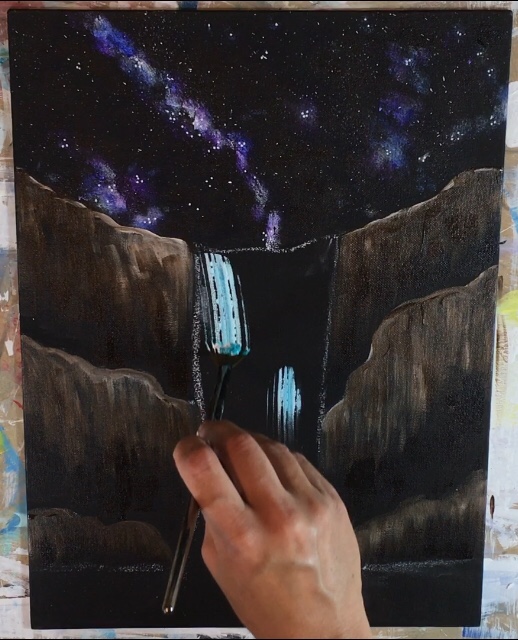
If you want to define the left and right side of the waterfall, you can turn the brush on its side to create a more narrow line.
Also, I let my waterfall trumpet out on the bottom. 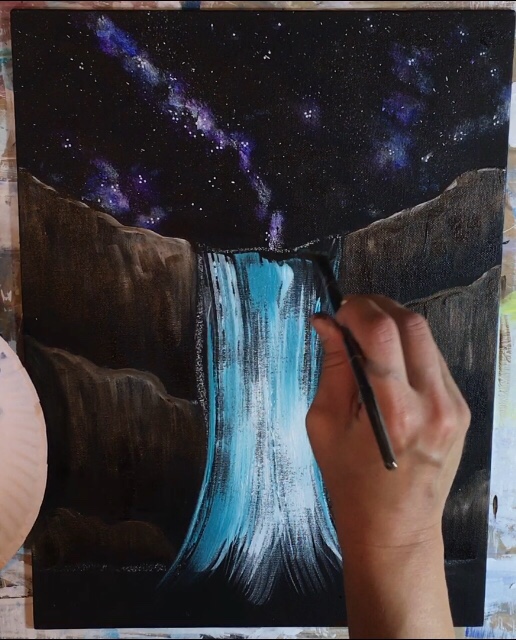
Next I wanted to create some more defined areas of this waterfall. At the top of the fall the area has more pure white than teal.
I used a #12 flat brush for this step.
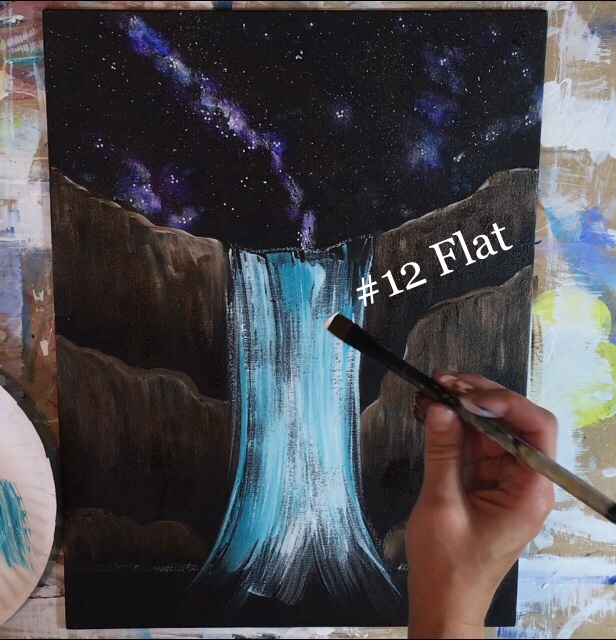
Use the tip of your #12 brush to outline the top area of the waterfall with pure titanium white. 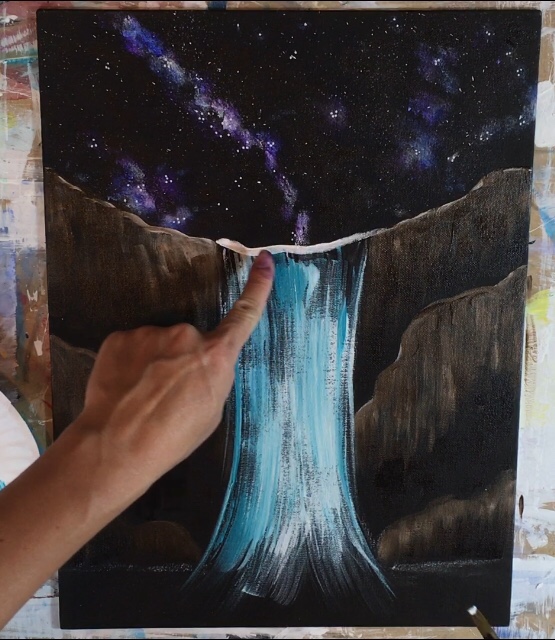
To make it look like it is falling over the cliff, I painted this line just slightly wider than the waterfall width.
You can see at the top how this white line lines up with the cliff line. I also painted vertical strokes/ slightly curved stokes of this titanium white at the top.
As stated earlier, this waterfall has more white at the top. And remember there should still be some black showing through. 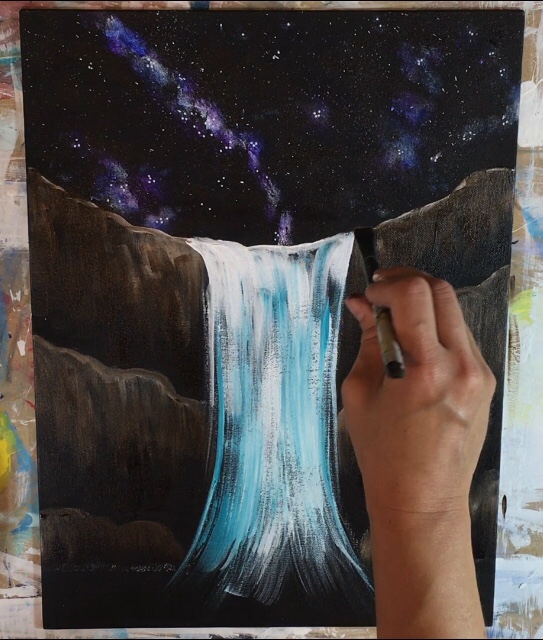
To do the splash at the bottom, I used the #12 flat brush and pure titanium white.
I did not dip it in water because this is also a dry brush effect.
Go crazy in this step (but still keep it contained in that one area)!
Make short choppy strokes.
Stamp the brush in some areas. Make some translucent lines that splash diagonally up.
Scribble your strokes!
This was all done on the bottom area of the waterfall. 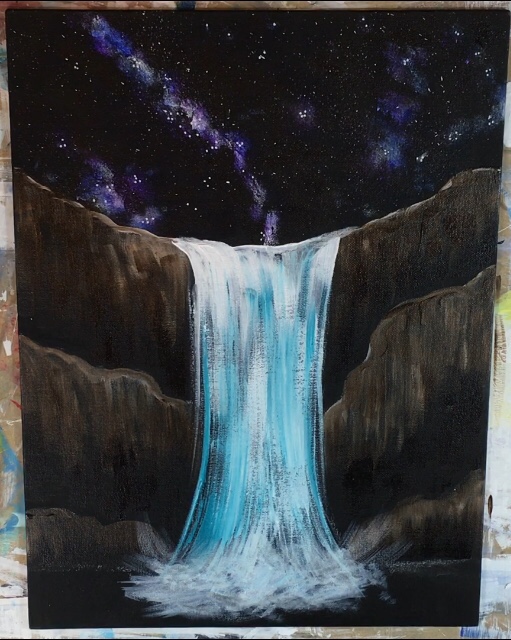
Next I painted the water with cobalt teal heal and a tiny bit of titanium white. Paint horizontal strokes in this bottom area but leave a lot of areas left black. 
You can leave the painting like this! Simplified waterfall with a galaxy sky!
6. Paint the moon
To do the moon, I first traced a cup with a piece of chalk.
This is actually a 16oz movie theater cup.
You can position the circle wherever you’d like. I did mine on the right, rising over the cliff. 
To paint the moon, I used the colors ultramarine blue and titanium white.
I also used a #12 flat brush.
Double load your brush in ultramarine blue and just a little bit of titanium white.
Start painting the moon from the bottom.
This moon starts out dark on the bottom and then fades to titanium white on the top. 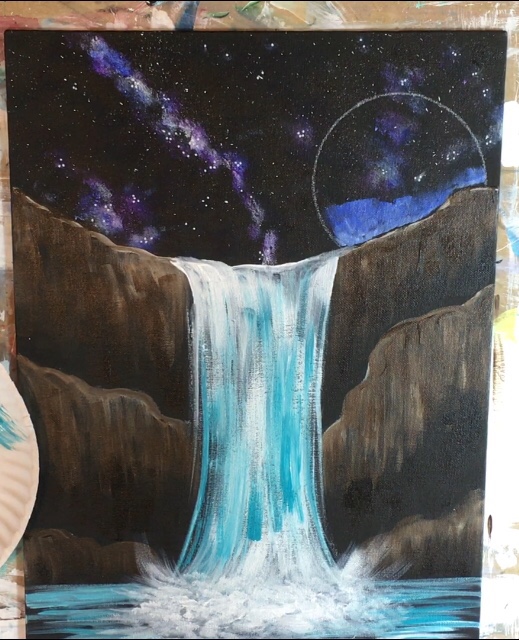
Do short choppy strokes as you work your way up.
When you go to reload the brush, load it in titanium white so the moon gets lighter and lighter as you work your way to the top. 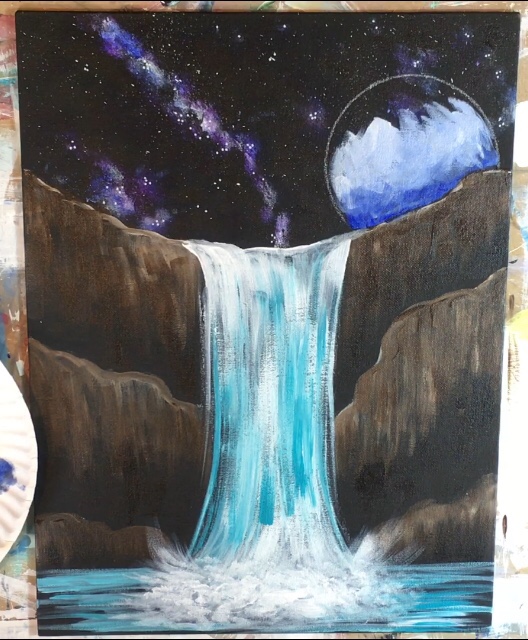
The short choppy strokes create texture in the moon but also help to blend the colors. 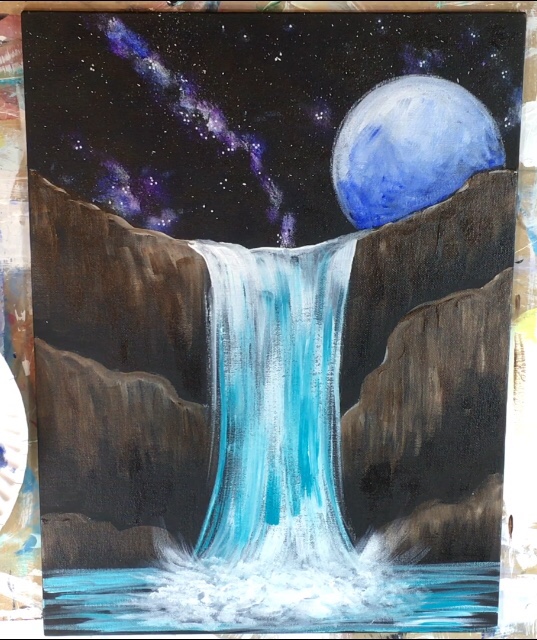
Next I used the white paint pen to outline the moon.
This helps to define the shape of the circle but also make it appear brighter on the edges giving it a “glow” and depth.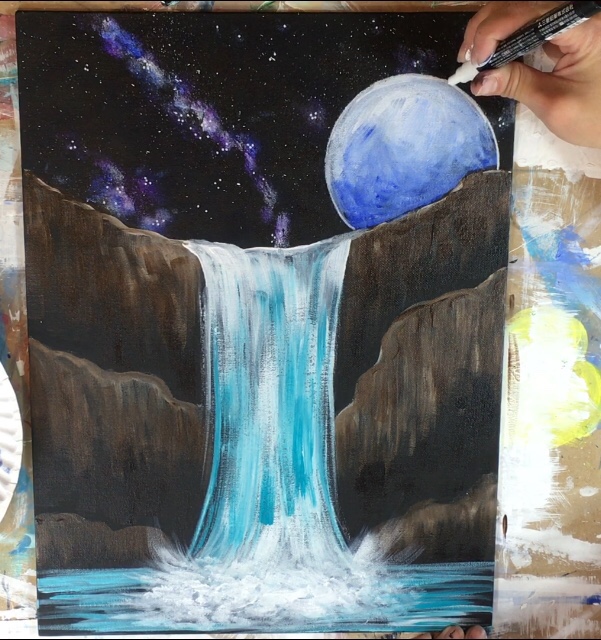
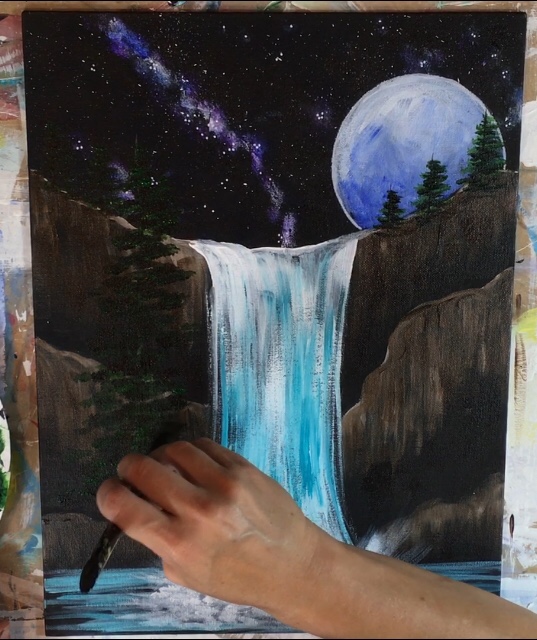
7. Paint the trees.
The small trees against the moon especially look stunning!
The other trees in this painting are kind of camouflaged because the background is so dark.
Any how, to do the trees, I started with my #12 flat brush and painted the trunks using the tip of the brush on its side.
Double load the brush in both mars black and raw umber.
I did three vertical lines on the top cliff. 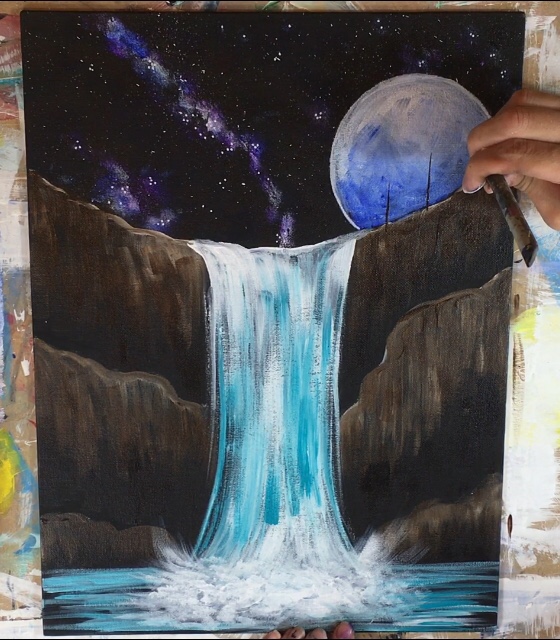
And I did three vertical lines on the left side of the cliff (they are super hard to see because it’s so dark).
For the large tree, I made a thicker line. I also added a bit of white into the raw umber/mars black to get it to be lighter.
Then I cleaned off my brush and loaded it in just hooker’s green.
To create the the pine tree, I stamped my brush from the tip starting from the top and working my way to the bottom.
These trees sort of form a triangle shape so make the pine needles narrower at the top and wider on the bottom. 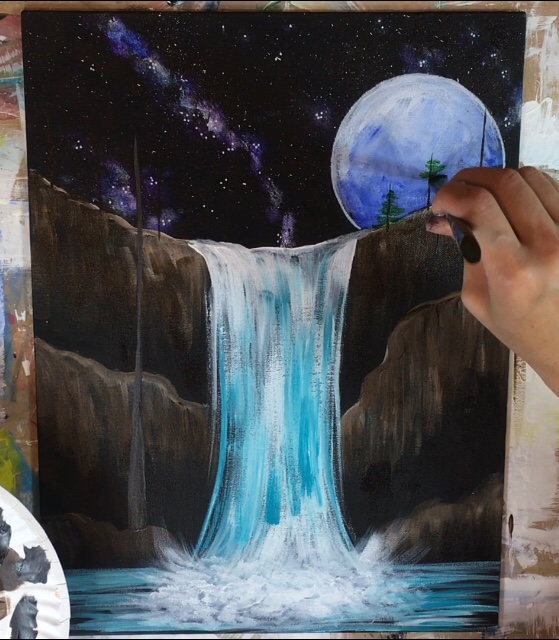
Tip! If you want more help with the trees, you can see my post about how to paint pine trees here. Instead of the fan brush, I am using a flat brush but the technique is EXACTLY the same.
Then I loaded my (not rinsed flat brush of hooker’s green) with a little bit of mars black.
I made another layer, this time it came out darker.
Again, start at the top and stamp left and right to the bottom making it wider at the bottom. 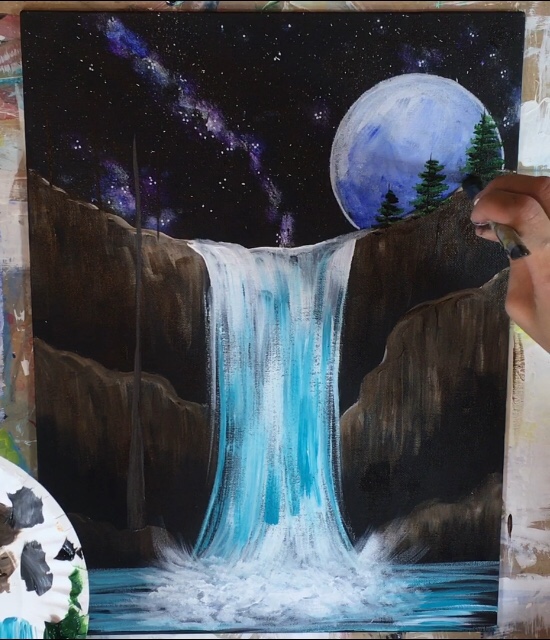
I did the same thing with the trees on the left and the large tree.
Stamp the tip of the flat brush starting at the top.
Paint left and right in a zig-zag motion working your way to the bottom so that it is wide at the bottom and narrow at the top. 
Then, because these trees are SO DARK, I decided to add a bit of lighter green to them. I
rinsed my brush and dried.
Then I mixed white with hooker’s green to lighten that green.
Then I painted another layer of those pine needles using the same stamping technique. This blended a bit with the layer I already had on the canvas – giving it great color variation.
It also allowed trees to stand out a bit more!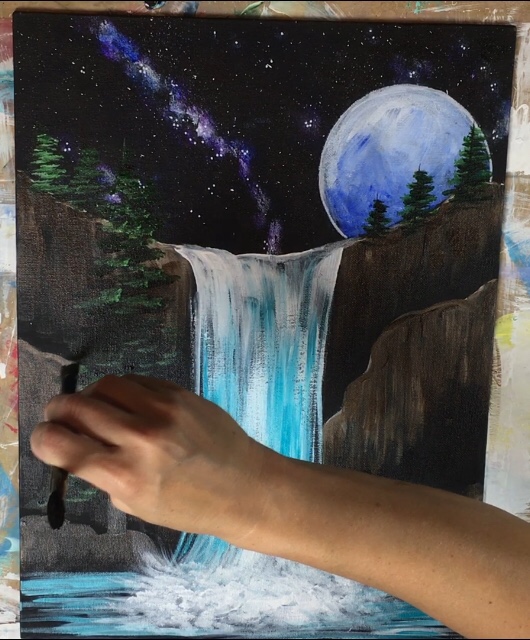
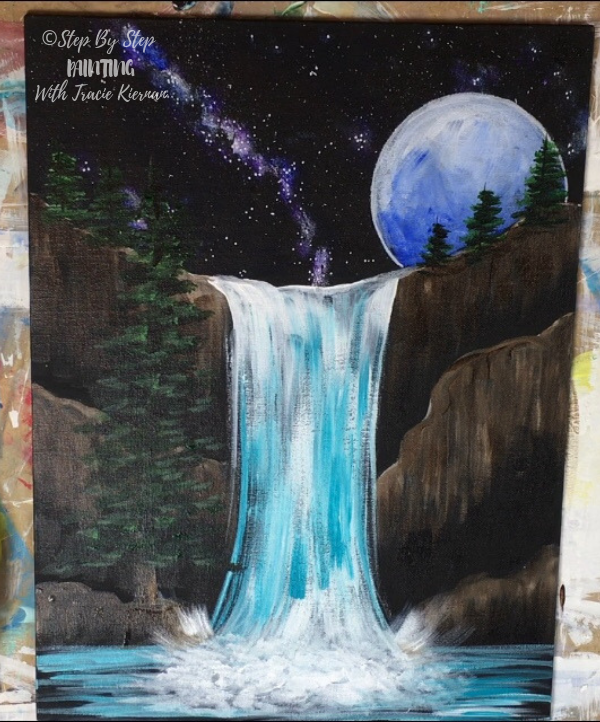
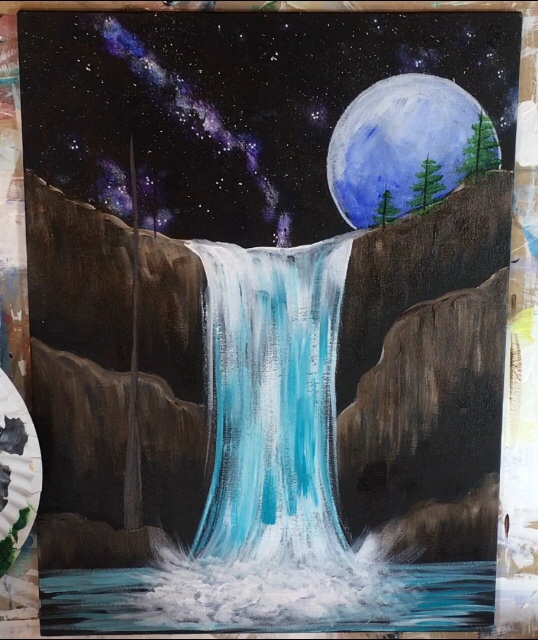
Finished!
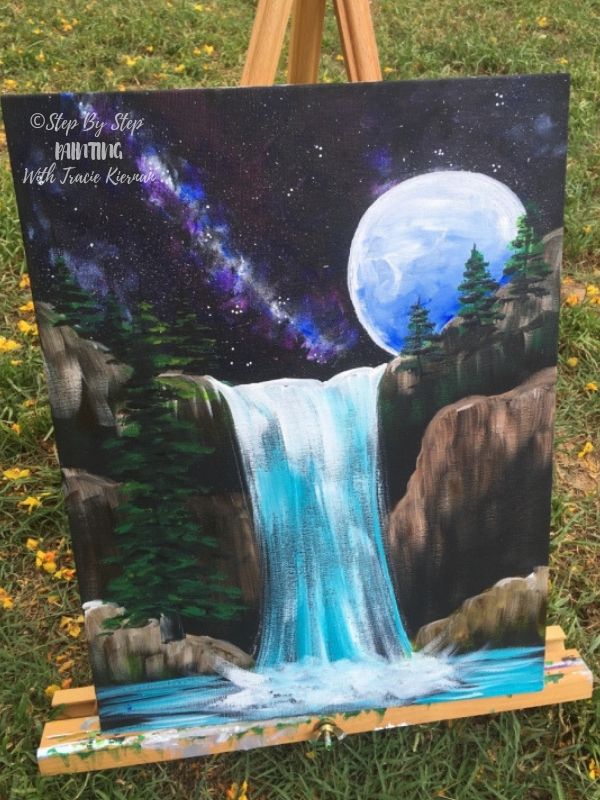
I took some pictures of the painting outside with natural lighting so you can see the details with the trees. Hope you enjoyed this tutorial! I can’t wait to see your waterfall galaxy paintings too!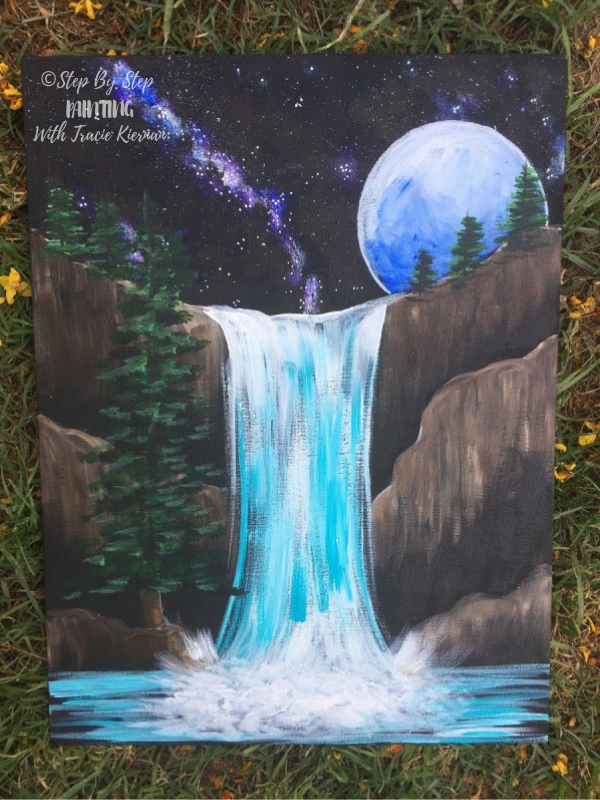


Just completed this galaxy falls painting. My 1st painting tutorial ever done. Turned out fantastic! I didn’t have the exact colours or brushes, but it still turned out great! Thanks!
I just painted this today and I love it. Your directions were perfect and you did not go so fast that I could not keep up. My trees were a bit crooked but I a, happy as heck with the result. I can’t believe that I painted this! Thank you.
Karen that is so great to hear! Thanks so much for the feedback, I’m so glad you love your Galaxy Waterfall Painting!
Hi there, thankyou so much.
Here is my creation.
Wish I could send you the picture
Loving your galaxy tutorials, thank you so much. I’m just a SAHM trying to keep busy and finding a way to chill once kids are asleep. I now know I need to build my colour collection and brush styles.
Glad you enjoy painting! Don’t worry about having all the brushes and colors right away. You can still learn and grow your skills with what you have on hand ?
My daughter wanted to do a painting with me for Mother’s Day. She picked this picture, I ordered the supplies online and we really enjoyed the process. Thank you!!
Wonderful Jocelyn! So glad you enjoyed this painting ?
Dearest Tracie ~ I can not thank you enough for your website! I’m just getting back into painting and these are SO useful, thorough, and detailed. I love how you provide multiple modes of instructions, catering to different levels of painting experience. Thank you for doing what you’re doing!!! Hoping you and yours are safe and healthy 🙂
Thank you so much for this. Now I can finish my 24×36 painting. Rocks are the hardest for me. Trees too. I’m blind so I usually have my nose to the canvas. I love how easy you make it.
Joan Lewis
I’ve been painting for a year now and only found out the other day that there were also black canvases in art stores! So I bought a few and decided to do this galaxy waterfall on one of the canvases. Love how it turned out, thank you so much for the great tutorial!
That’s awesome Violeta! I like painting my canvas black but I’ve also done this one as an in person class before and we used black canvases. Really enjoyed them!
I just painted Galaxy Falls and I love it Tha nks for the step by step instructions!