
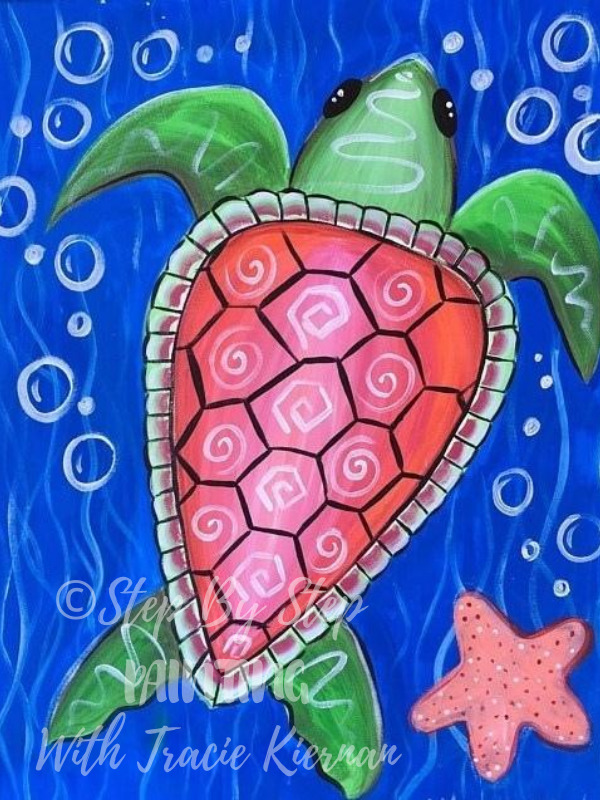
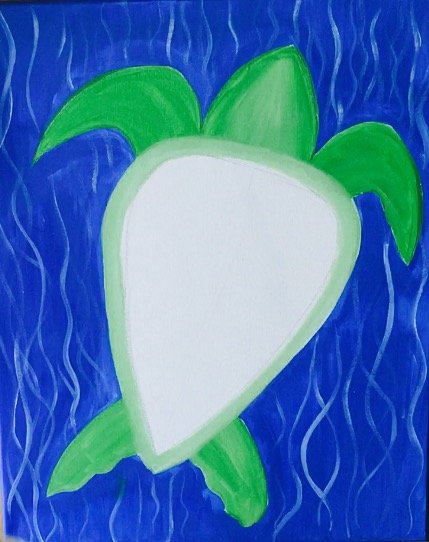
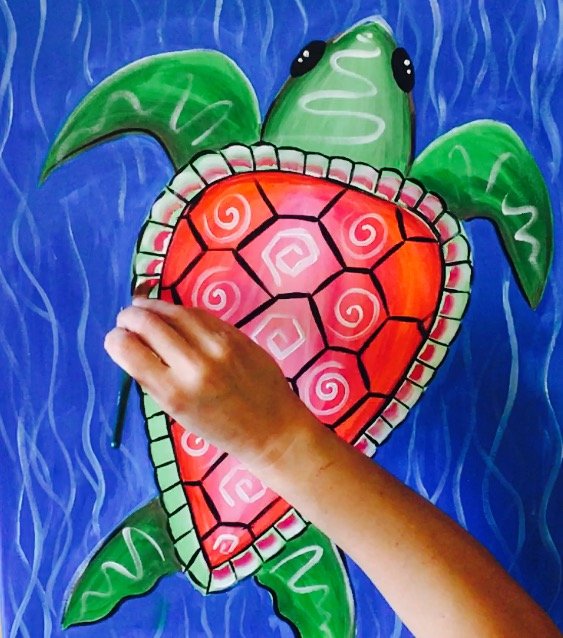
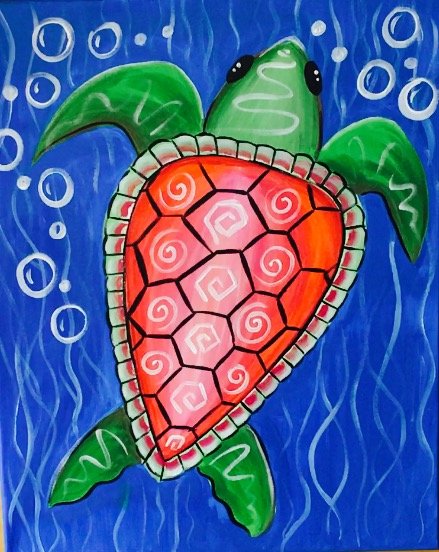
Sea Turtle Painting

Would you like to save this?
Would you like to save this?
Learn how to paint your own sea turtle with this online step by step acrylic painting tutorial.
This is an adorable abstract, sort of stylized turtle with a fun wavy water background.
I did this on a 16 x 20 canvas size with acrylic paints.
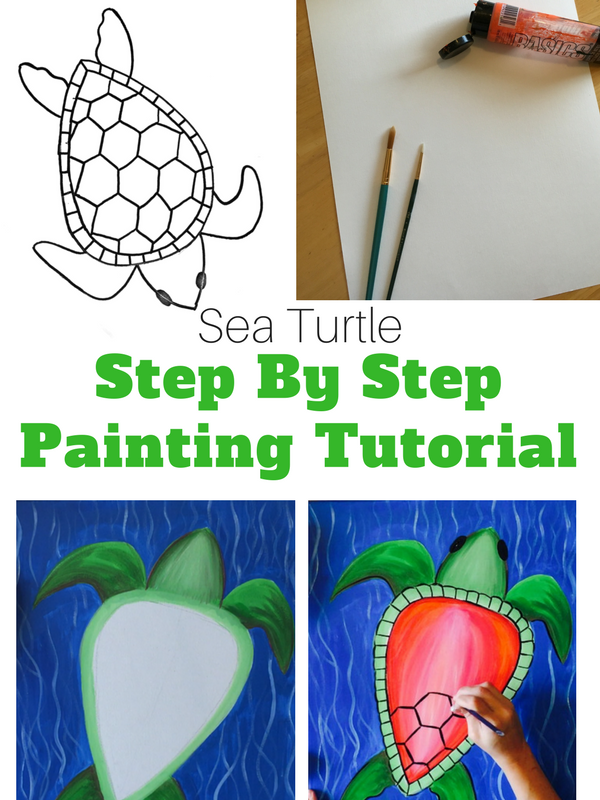
I have included in this tutorial, a video and step by step picture directions.
There is a traceable template that you are welcome to print out.
If you don’t want to print and trace, there are instructions on how to draw the turtle. It’s really quite simple to draw!
Happy Painting Artists!

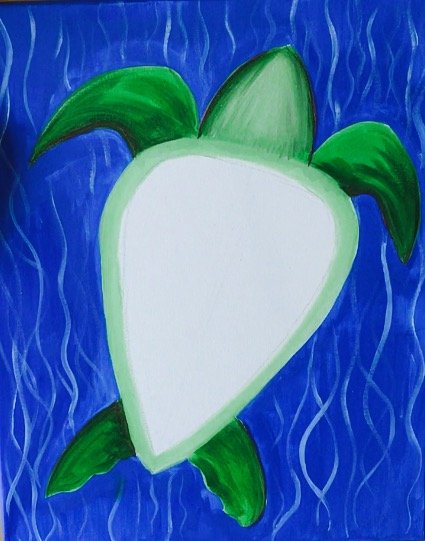
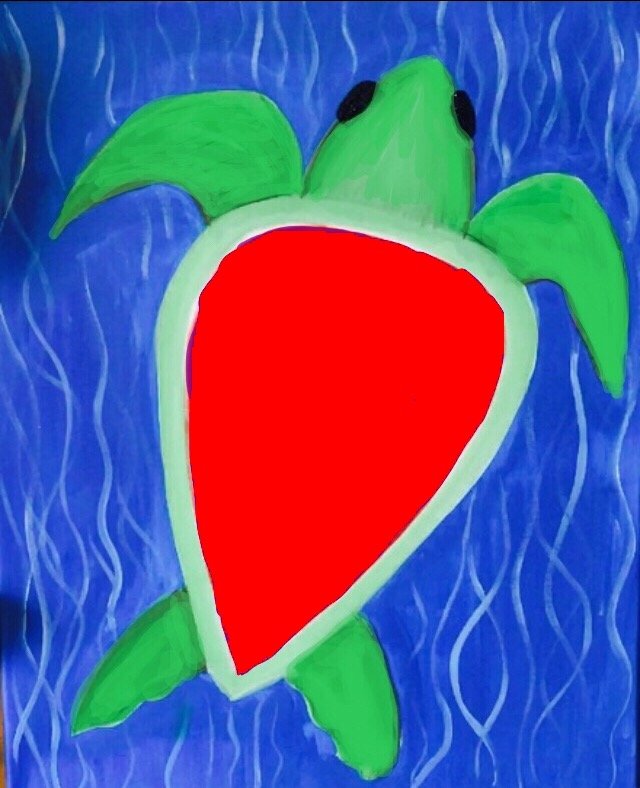
Traceable:

This Post Contains Affiliate Links To Amazon.com
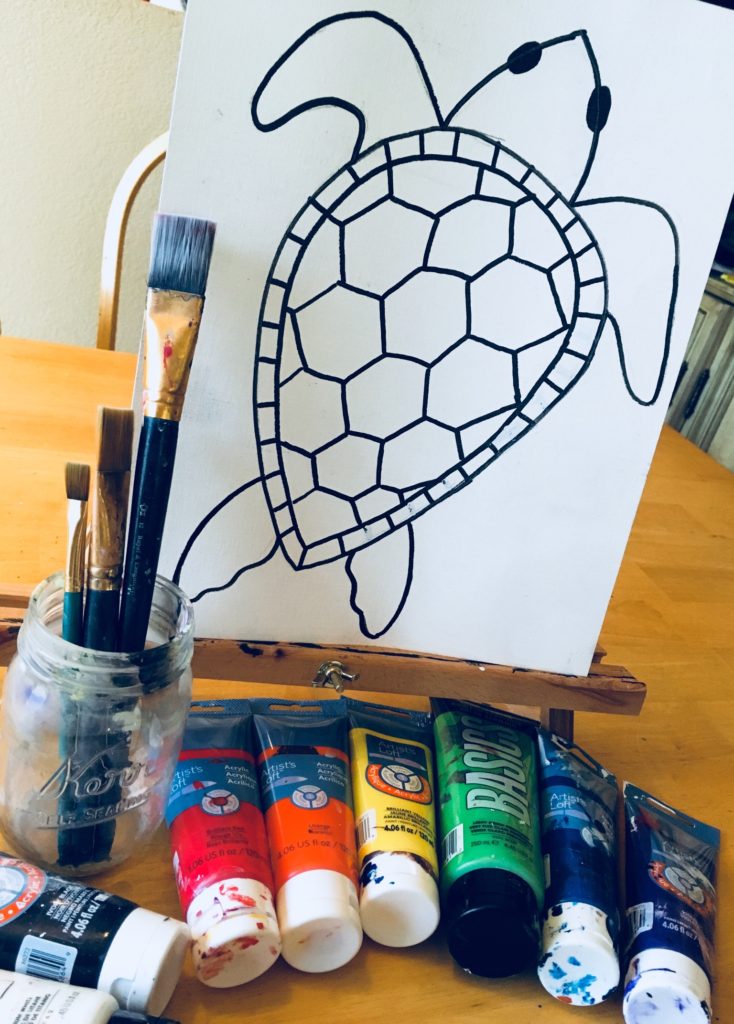
Materials
How To Paint A Sea Turtle
Learn to paint your very own sea turtle using this step by step acrylic painting tutorial guide.
Materials
- 16 x 20 Canvas
- Acrylic Paint
- Brushes
- Optional Template
- Optional Graphite Paper
- White Chalk
- Pencil
Colors
- Cad Red Medium
- Primary Red
- Cad Orange Medium
- Light Green Permanent
- Phthalo Blue
- Mars Black
- Titanium White
Brushes
- 1” Flat
- 3/4” Flat
- 1/4“ Flat (12 Bright Brush)
- 0 Round
- 4 round
Instructions
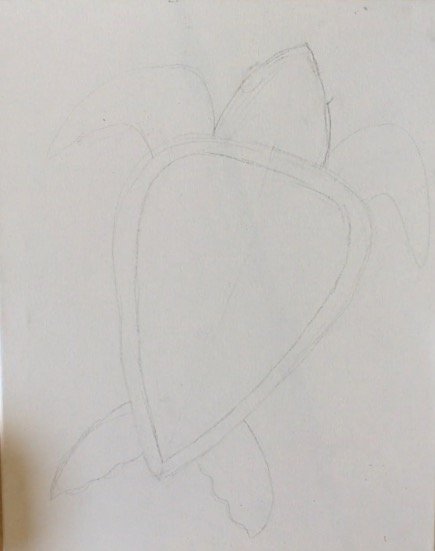
- Draw the sea turtle lightly on the canvas with a pencil or use the provided traceable and graphite paper.
- Paint the entire background around the turtle with phthalo blue. Use your 1” flat for the larger areas and one of your smaller brushes to get into the smaller areas around the turtle.
- Before the blue completely dries, use your 4 round brush and titanium white to paint vertical wavy lines over the phthalo blue to represent the water lines.
- Double load your 12 bright brush in light green permanent and titanium white. Paint the head and legs of the turtle with a combo of light green permanent and titanium white.
- Mix titanium white and light green permanent to create a lighter green than the head and legs. Paint the rim of the turtle shell.
- Optional: do some shading on the turtle head and legs using primary red mixed with light green permanent. This creates a darker shade.
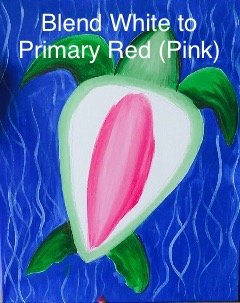
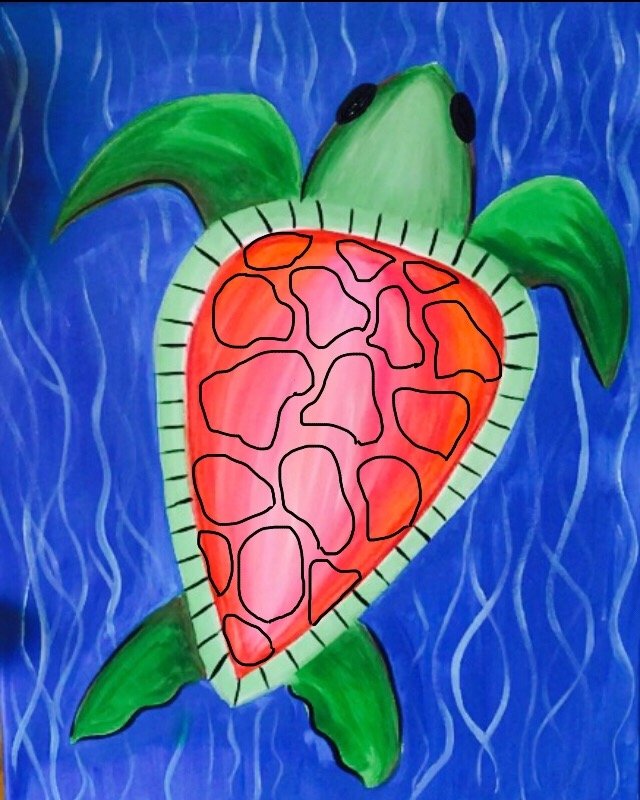
- Paint the turtle shell starting in the middle with titanium white mixed with primary red.
- As you work your way to the outer part of the shell, mix in cadmium orange medium and then cad red medium. Alternatively you can paint the shell a solid color.
- Paint the eyes with one of your small round brushes and the color mars black (just two small ovals).
- Use a 0 round brush and mars black to paint the lines on the turtle shell rim.
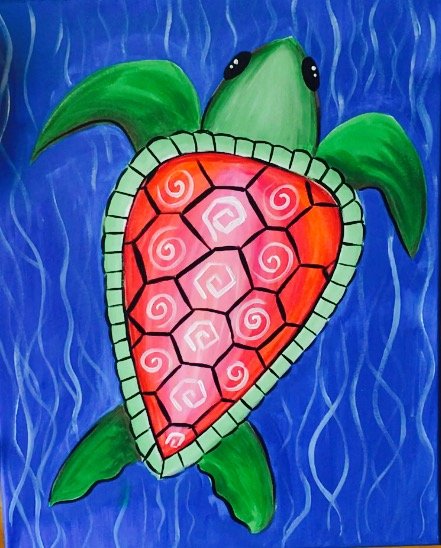
- Then outline the turtle shell rim and paint the hexagonal pattern.
- Paint some white dots on the eyes to represent highlights.
- Optional: paint some white wavy lines on the head and legs.
- Optional: add some shading to the turtle shell by double loading your bright brush in primary red and titanium white.
- Use your 4 round brush and titanium white to paint bubbles in the background.
- Draw a starfish with your chalk and paint it in.
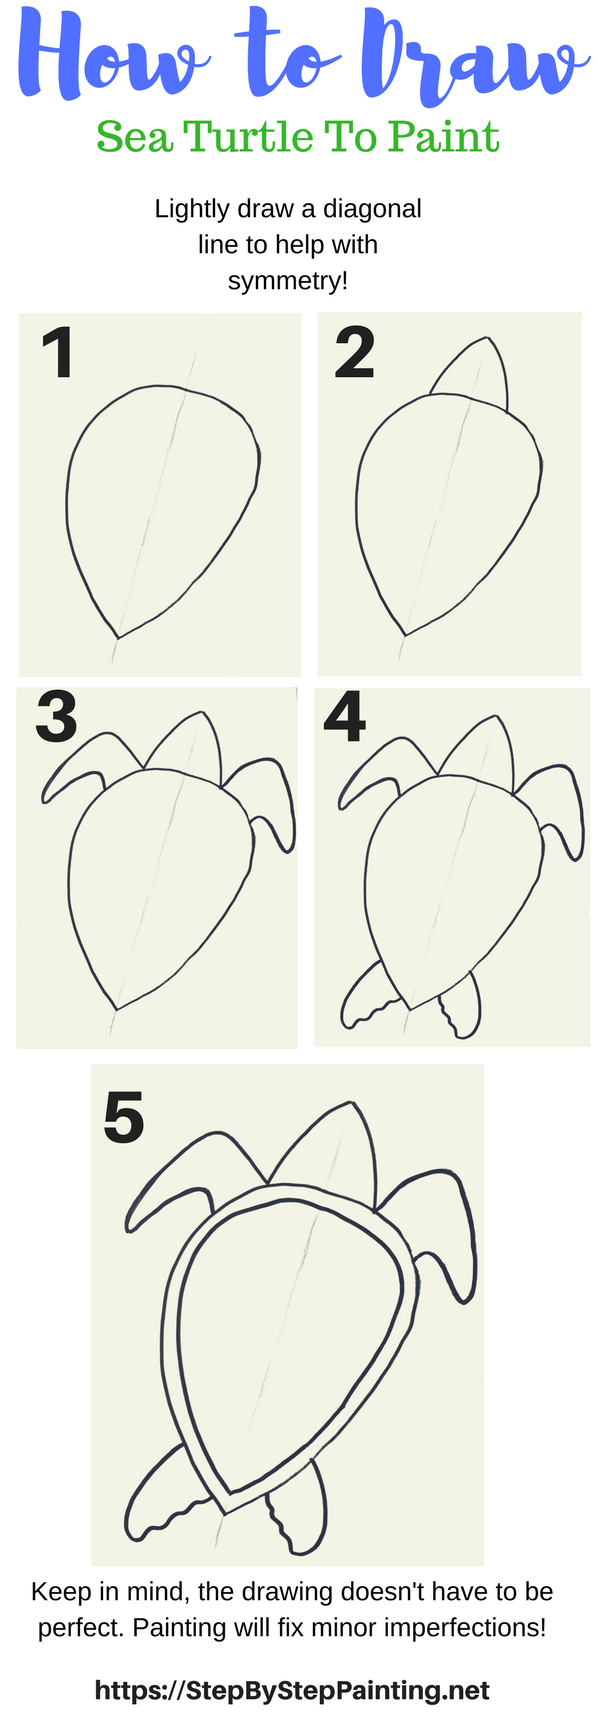
Drawing The Sea Turtle:
Draw this BIG!! It should fill up almost all the canvas!
Directions At A Glance:
Video Directions:
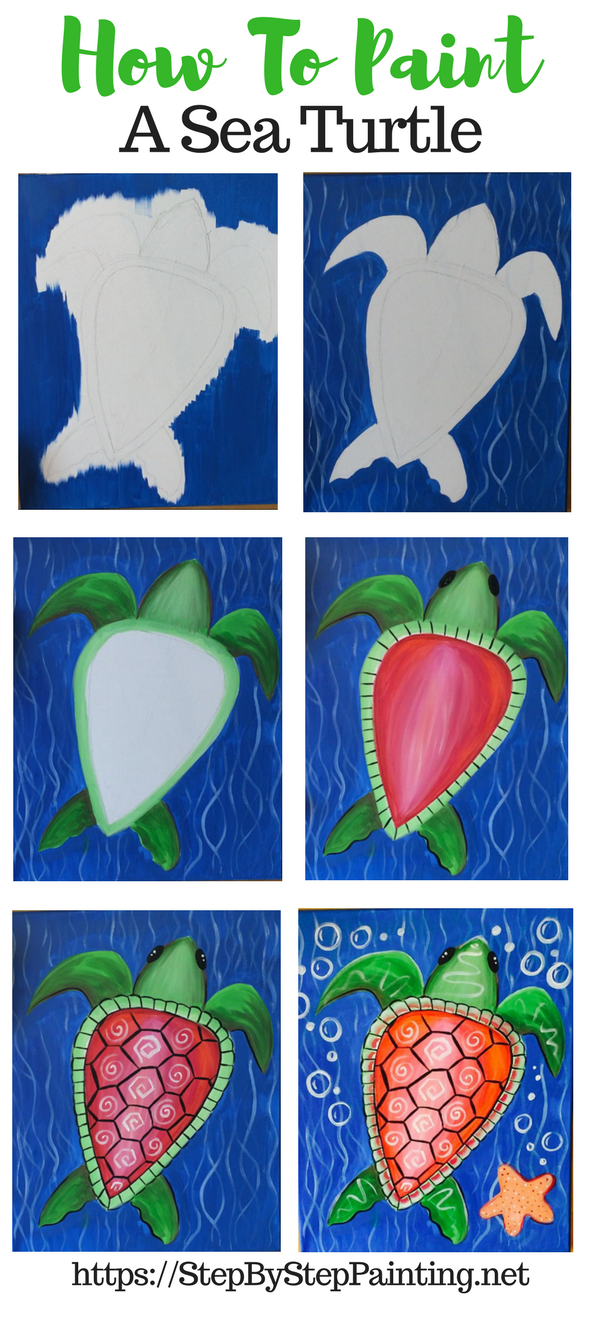
Step By Step Pictures:
1. Draw The Turtle
 Draw your turtle lightly with a pencil! He’s going diagonally across the canvas.
Don’t press too hard on the canvas because it will be too hard to erase if you mess up!.
Refer to the step by step drawing guide above. Or transfer your turtle with graphite paper.
Also, draw the turtle BIG!! He’s the main subject in this painting so you want him to fill up most the canvas!
2. Paint The Background Phthalo Blue
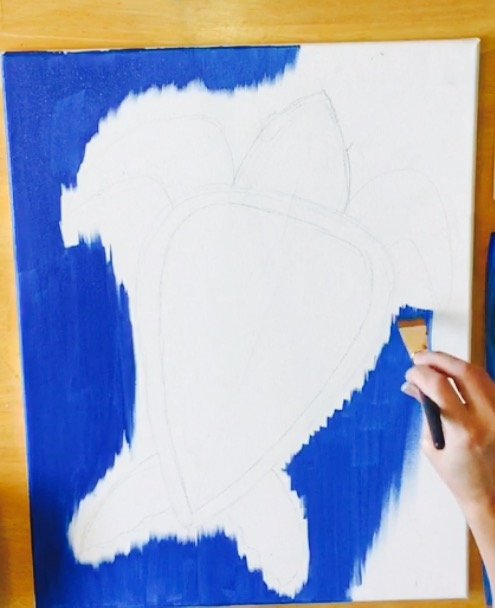
Paint the background phthalo blue using a 1″ flat brush for the large areas and one of your smaller brushes to get into the smaller areas.
Make sure your strokes go all up and down.
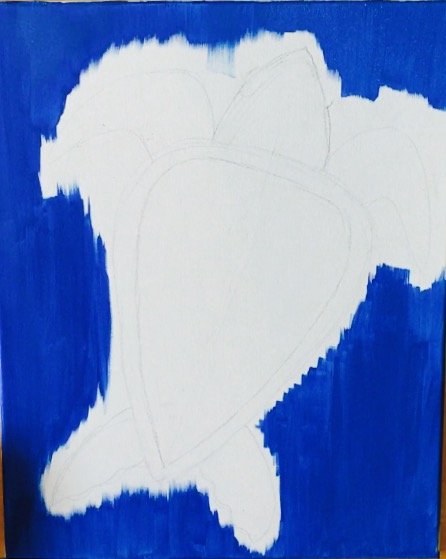
Cut in as close as possible to the turtle and then switch to a smaller flat brush to paint the small areas.
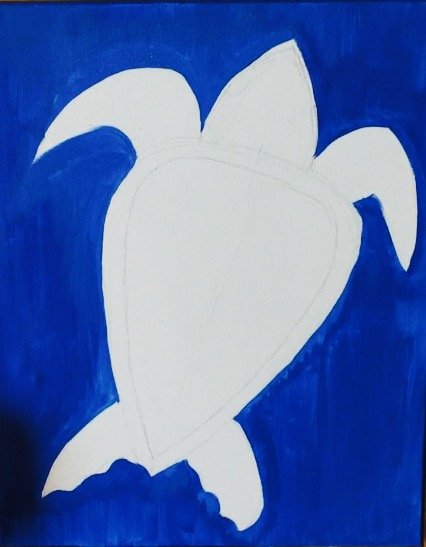
Paint as close to the turtle as possible.
3. Paint The White Water Lines Before the Blue Completely Dries
 For this next step, use a small round brush (#4).
The wavy lines are all Titanium white!
Alternate the pressure of the brush between light and hard. This will give some indication of water!
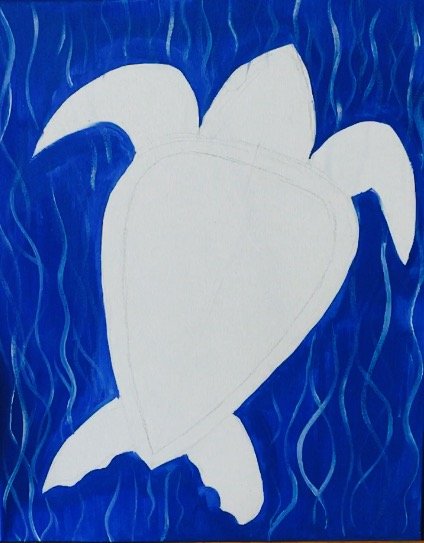
It works beautifully if your Phthalo blue isn’t completely dry yet!
That way the white will blend with the blue a bit to make a beautiful color variation.
4. Paint The Head, Arms & Legs
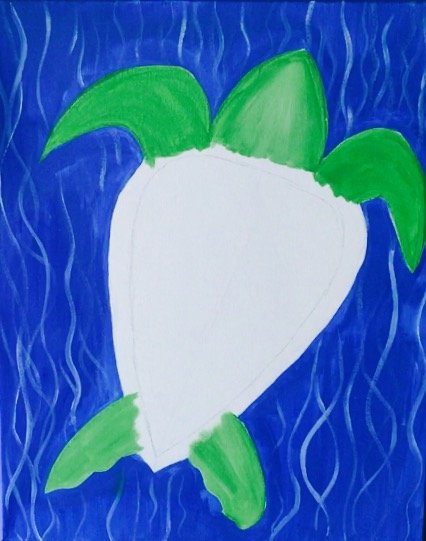
Next I mixed light green and white on my palette but didn’t blend the two colors all the way.
Use one of your smaller flat brushes (12 bright). Paint the arms, head and legs with this light green color mix.
5. Paint The Shell Rim
Paint the rim around the shell using the 12 bright.
It looks lighter because I actually added a bit more white to this green. Do this by adding more white to your light green mix you used for your head and legs.
6. Optional Advanced: Paint Some Shading
If you are feeling up to it, do some shading on the arms, legs and head.
To do this, I used primary red and blended it with light green permanent to create the darker areas of the turtle leg.
Then I “dry brushed” the shading of the primary red over the green. This allows you to see the green underneath.
Refer to the video exactly how I did this.
Note: This is a more advanced step. If you get frustrated, let your turtle legs dry and paint over it with solid green instead. It will still look beautiful!
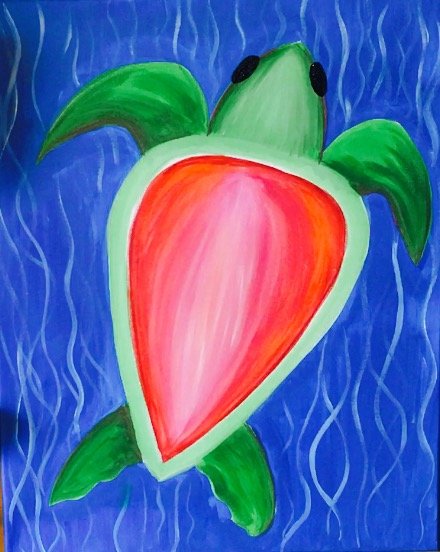
7. Paint The Shell
Next I blended the colors right on the canvas to create the shell.
It’s a blend of lighter colors on the middle of the shell going to darker colors on the outside.
The center is white and it fades outward to dark red.
First paint some white in the center. Then add primary red and blend out.
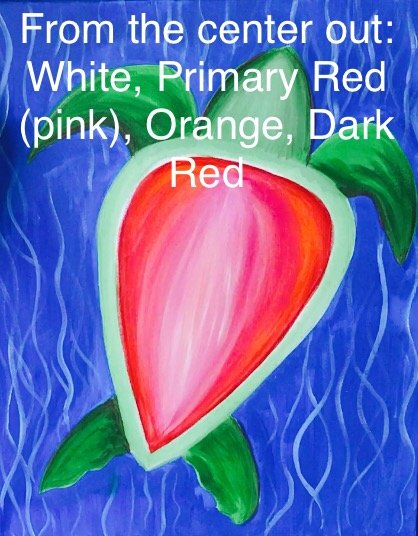
Keep blending colors outward.
The next color I used was orange and then dark red.
Basically it goes from white to primary red to orange to dark red!
Yes, I have a simpler design modification! Refer to the next step!
8. Simpler Way To Paint The Shell
You can also paint the shell one solid color!
This is what it would look like. I think it looks great as a solid color! Your turtle will still look lovely if you simplify this step!

Or, if you like, you can paint the shell any color you want!
9. Paint The Eyes
Use Mars black and a small round brush (4 or 0) to paint on the eyes.
10. Details On The Rim of the Shell
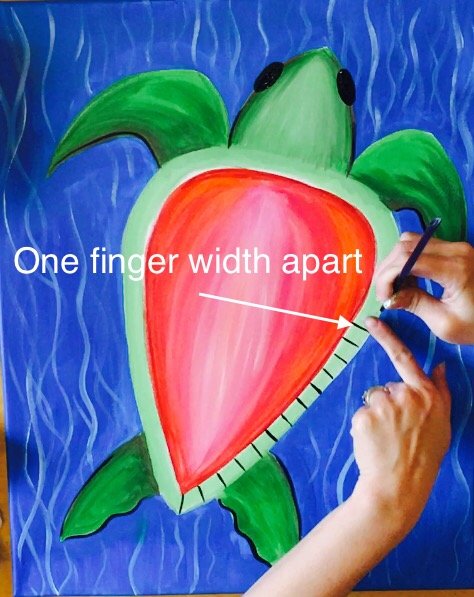
Use a tiny round brush (0) to paint mars black lines on the rim of the shell. Each line is about a finger width apart.
Also note there is a little bit of outlining on the legs. I call this “loosely” outlining.
I never like my paintings to look like coloring books but sometimes outlining a little bit allows the image to “pop” some more.
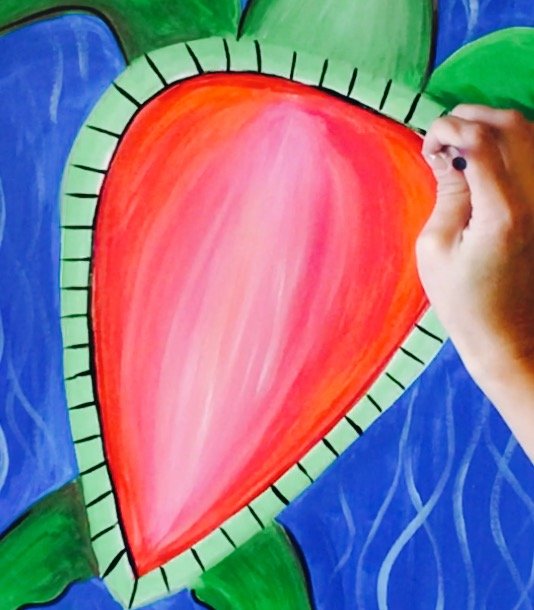
Speaking of outlining, next I outlined the entire inside of the rim! I also used black and that same tiny brush.
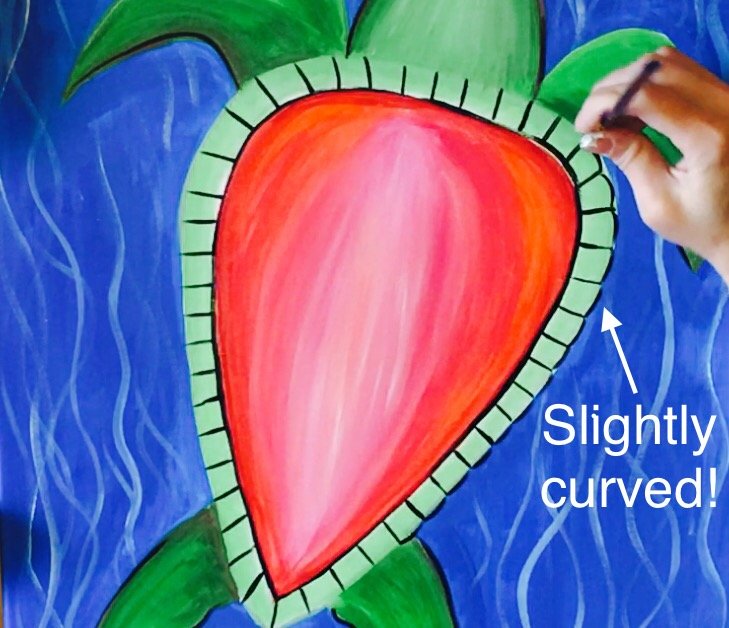
The edges of the shell were painted individually. Those lines are slightly curved. Don’t curve them too much, just slightly!
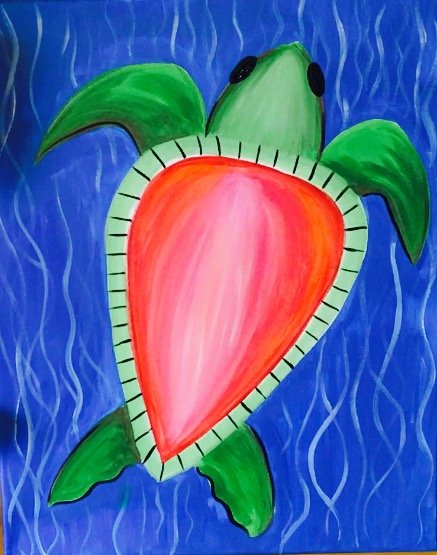
11. Paint The Designs On The Shell
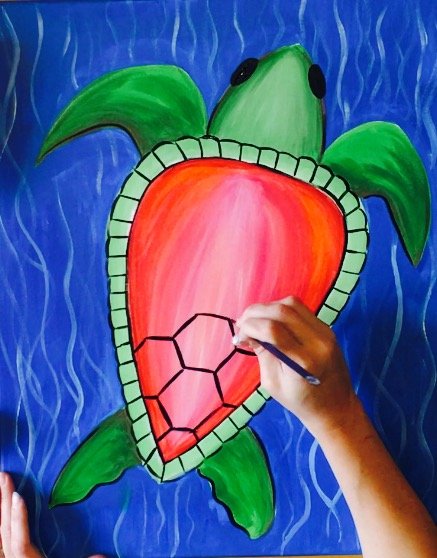
Now, this next step might be something you want to practice on a separate sheet of paper or draw out with chalk first.
You will be drawing a hexagonal pattern. Refer to the video for more detailed steps on this one!
 It’s almost like a soccer ball design on its shell!
An alternative would be to just paint some organic shapes on the shell!
This looks fine too if you’re struggling with those hexagon shapes.
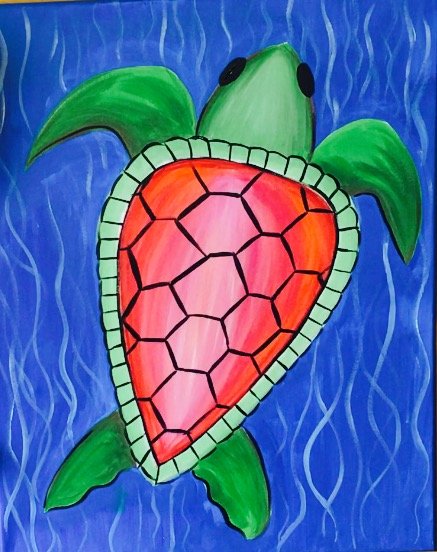
12. White Designs On Shell & Light In Eyes
This is where it really gets stylized!
Paint some designs on the shell with that 0 tiny round brush and titanium white.
Also note that there are two tiny dots on the turtle’s eyes.
Isn’t it magical that two tiny dots on eyes can bring something to life like this?
13. White Reflection Lines On Turtle (Optional)
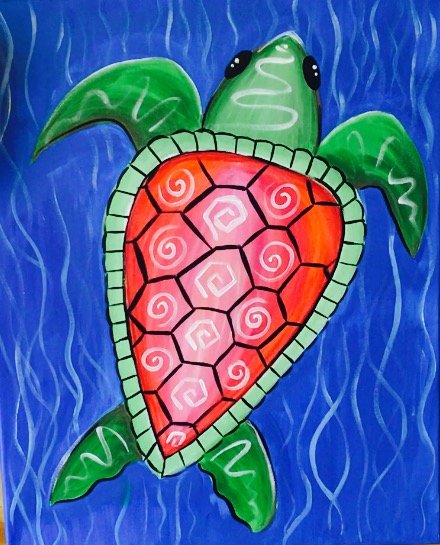
I did some white squiggle lines on the head and legs.
This was an added design touch to make the illusion that the water is reflecting on the turtle.
Or maybe it’s texture!
This is totally optional by the way!
14. Some More Detail On The Shell Rim
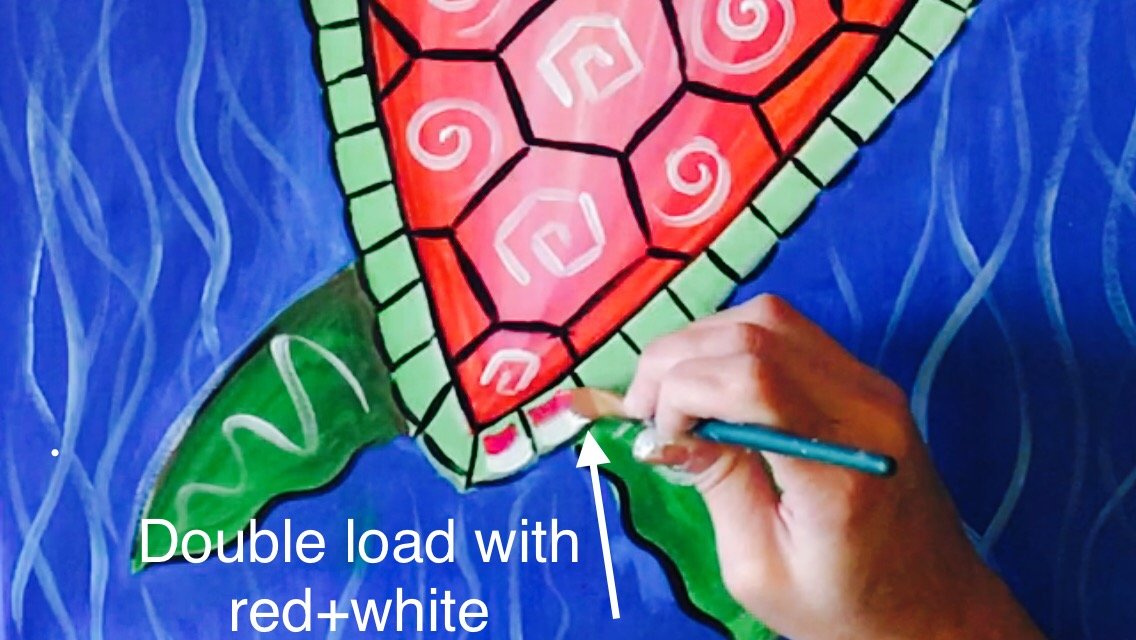
For The rim of the shell, I double loaded a 1/4″ (#12) flat brush.
On one corner of the brush was primary red. The other corner was white. I painted one slightly curved stroke in each of the squares.
Do this one stroke “double load” all the way around the rim. So many details in this painting!!
You can decide not to do this step if it’s too challenging. The beauty of acrylic paint is that we can always paint over it if we mess up!
15. Paint Bubbles
For the bubbles, I used the same round brush that I used to make the wavy water lines.
Paint a circle in a single stroke and add one little arc line on the left of each circle.
16. Paint A Starfish
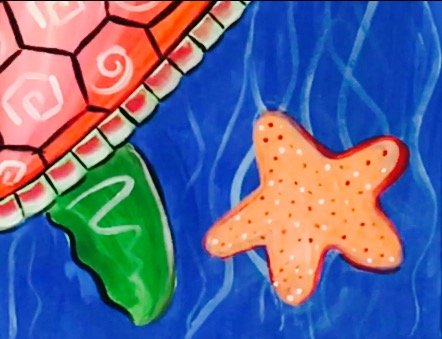
The color of this starfish is equal parts cadmium orange mixed with titanium white.
It makes a pretty coral color.
Draw your starfish first with chalk then paint in.
Use a tiny brush to stipple on some small dots and do some “loose” outlining around the starfish.
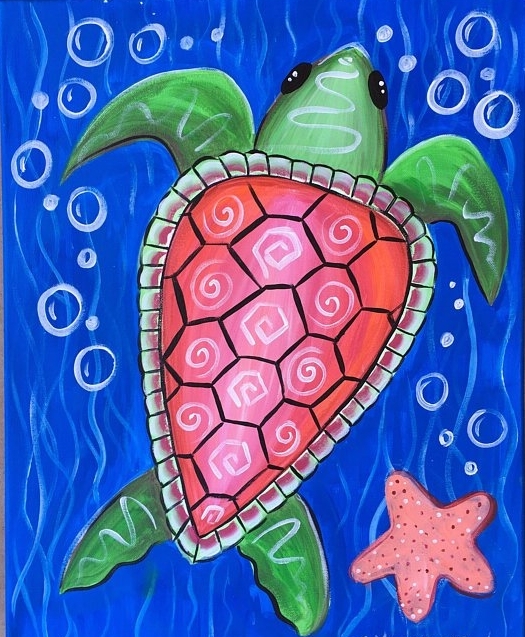
17. Finished!
Would you like to save this?
I painted a few more bubbles and I was done! What a fun and challenging painting! This makes such a lovely piece to hang in your home year round!
Share Your Art Here:


I love watching you paint.
And I absolutely love the sea turtle.
Please keep them coming
Thank you Amy!
Love your paintings just found you love it love it thank you for sharing so nice of you Lucille
Thanks Lucille!
Will have a website soon
Hi Tracie
Thank you for your extremely generous advice, videos,and instructions. Inspiring. I can’t wait each day to try another painting.
I just love your style which really meshes with my love for bright colours, flowers and the sea.
I did one piece of work combining pouring for the sea ( which I have been doing for quite awhile) and then painting the fun flip flops or thongs in Aussie language.
Thank you once again for your diligent detailed works.
There is no other website which provides so much for the eager learner.
Cheers
Terri (from Australia)
Hi Terri! You are so very welcome!