


Would you like to save this?
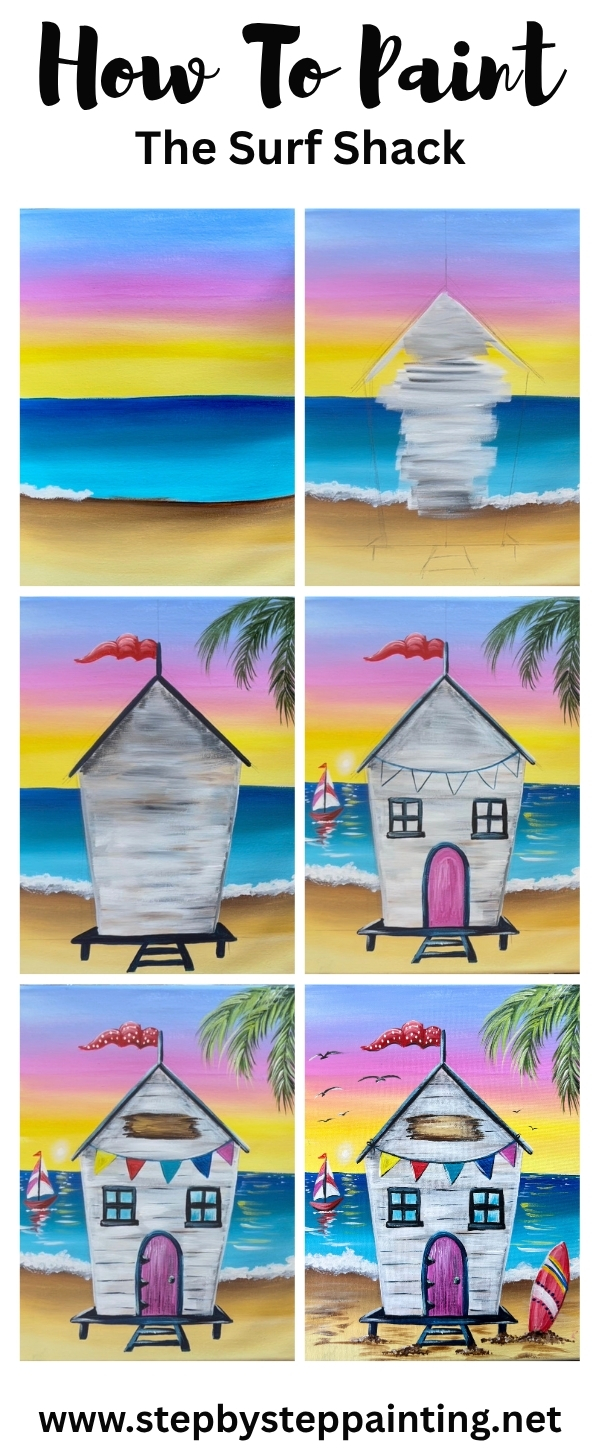
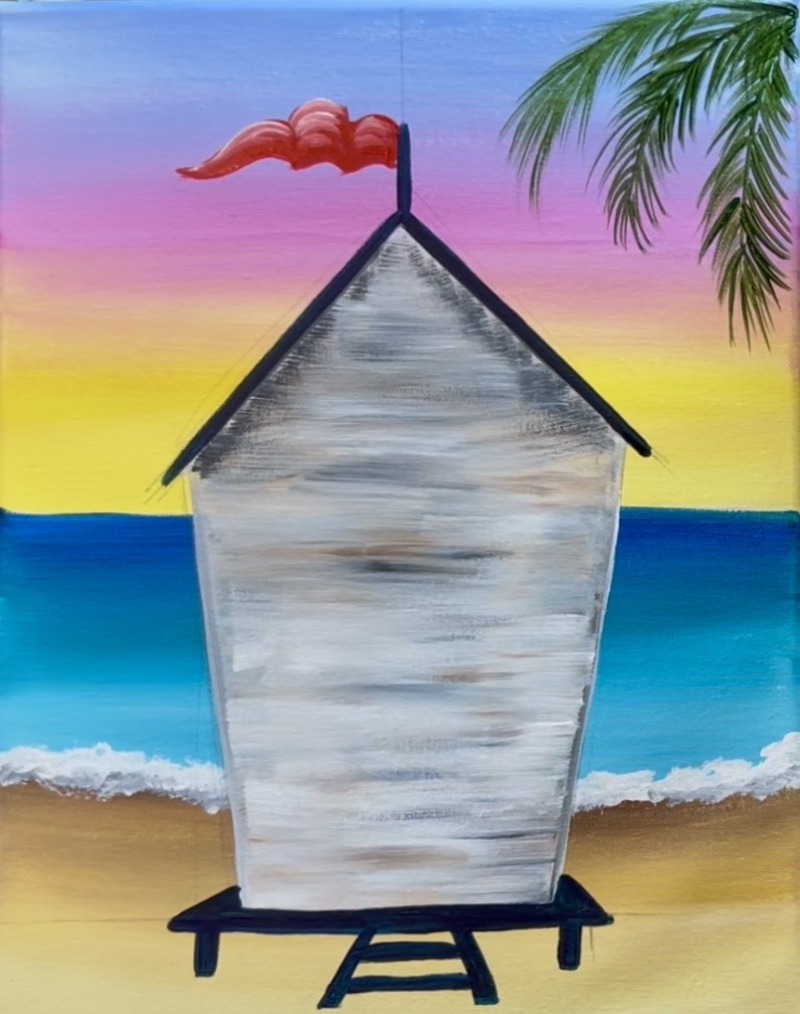
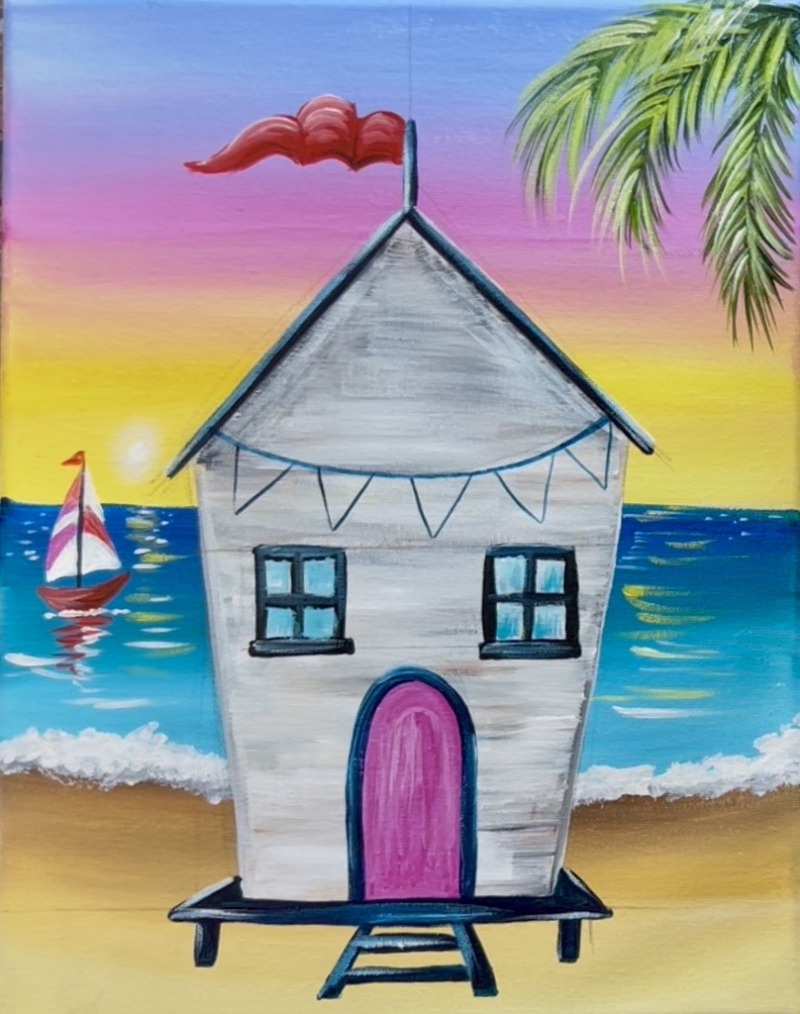
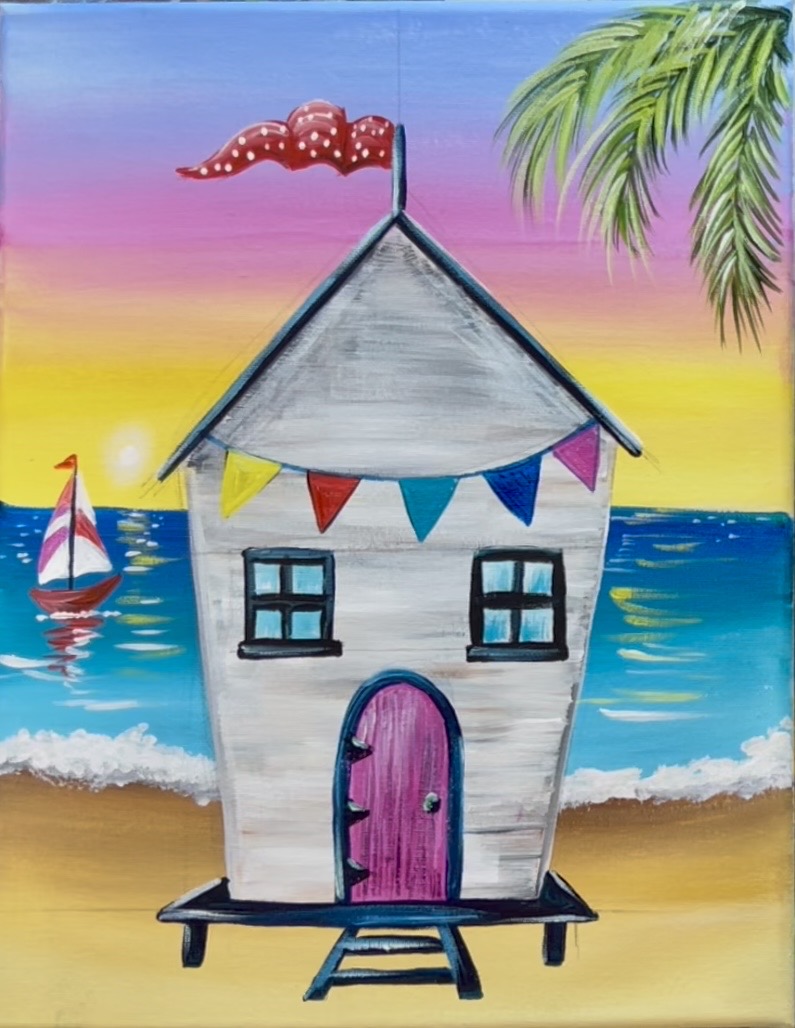
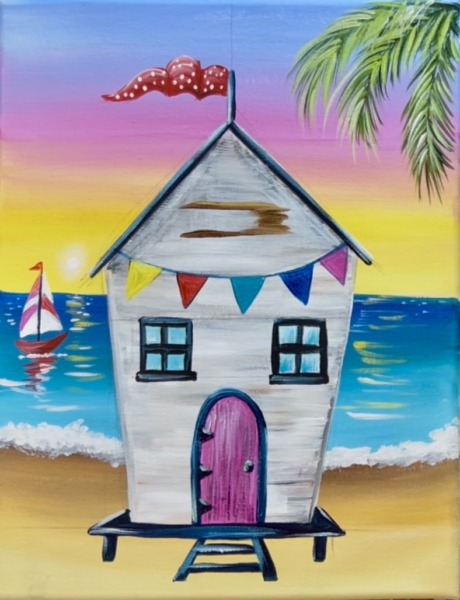
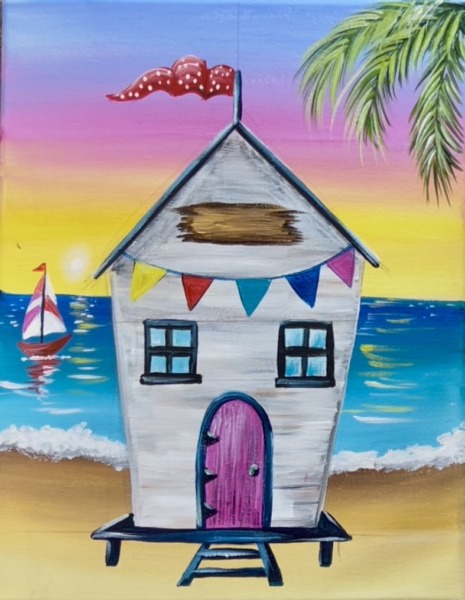
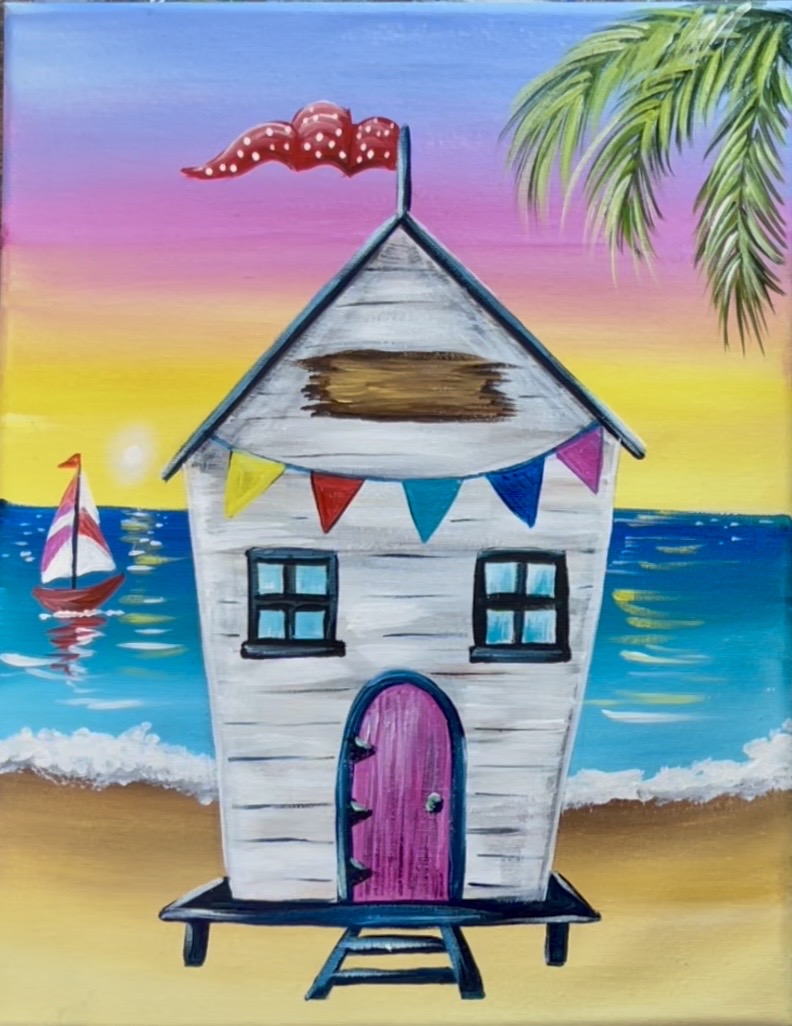
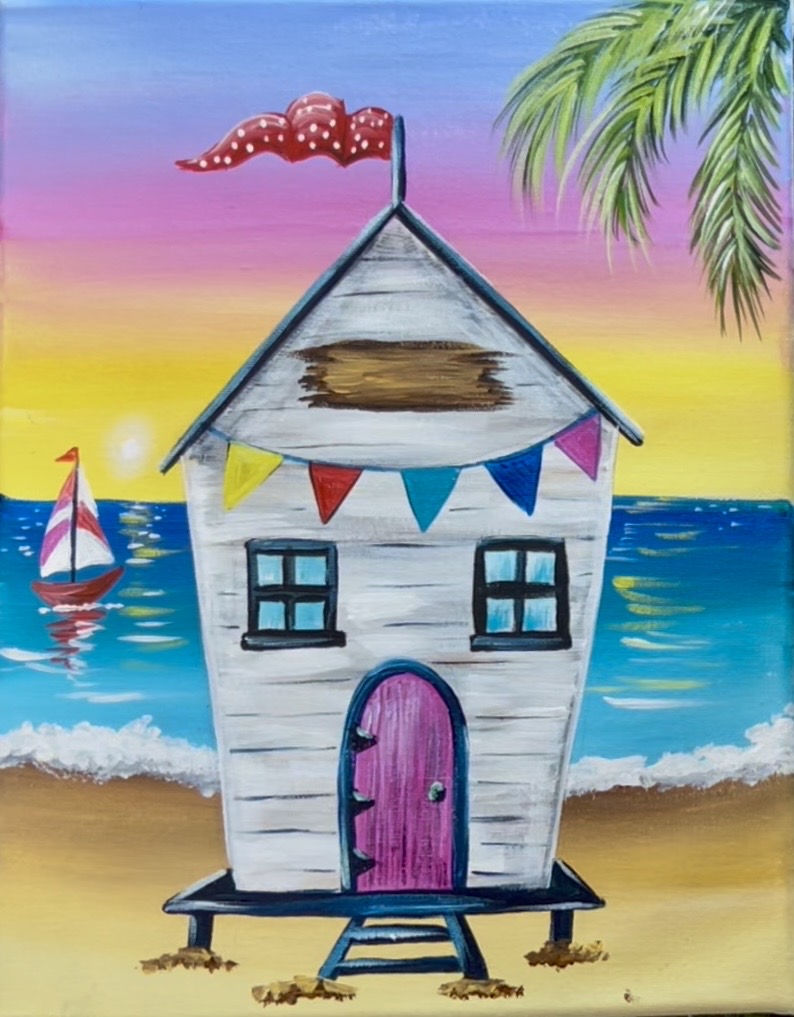
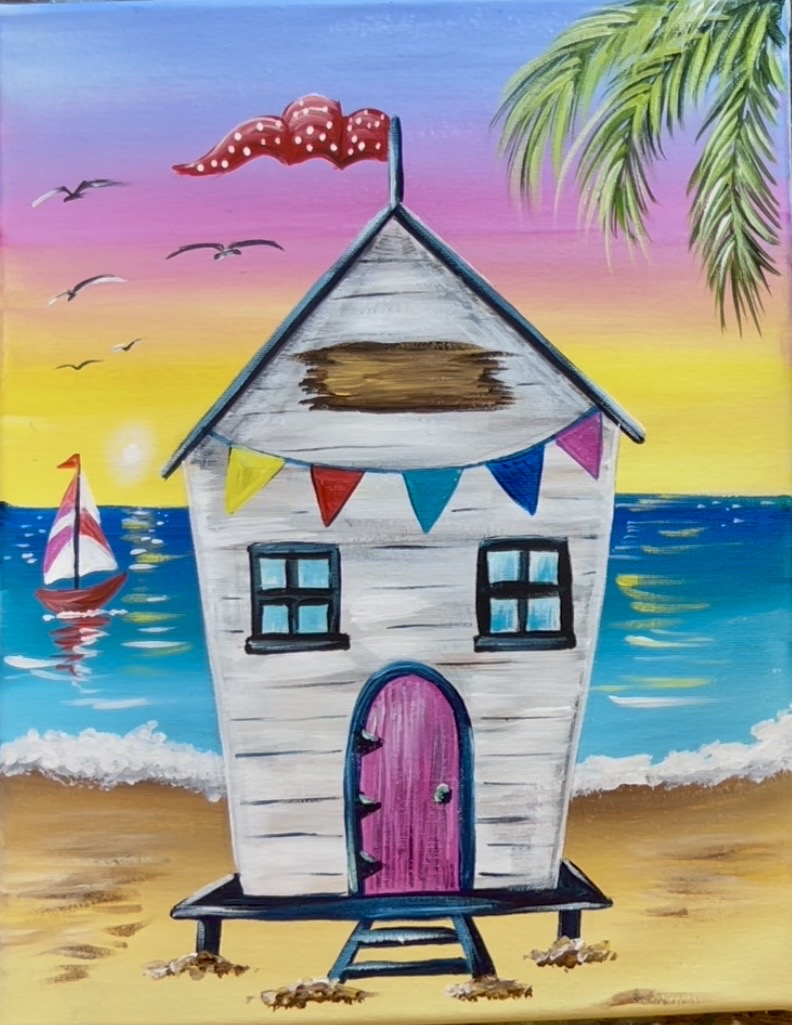
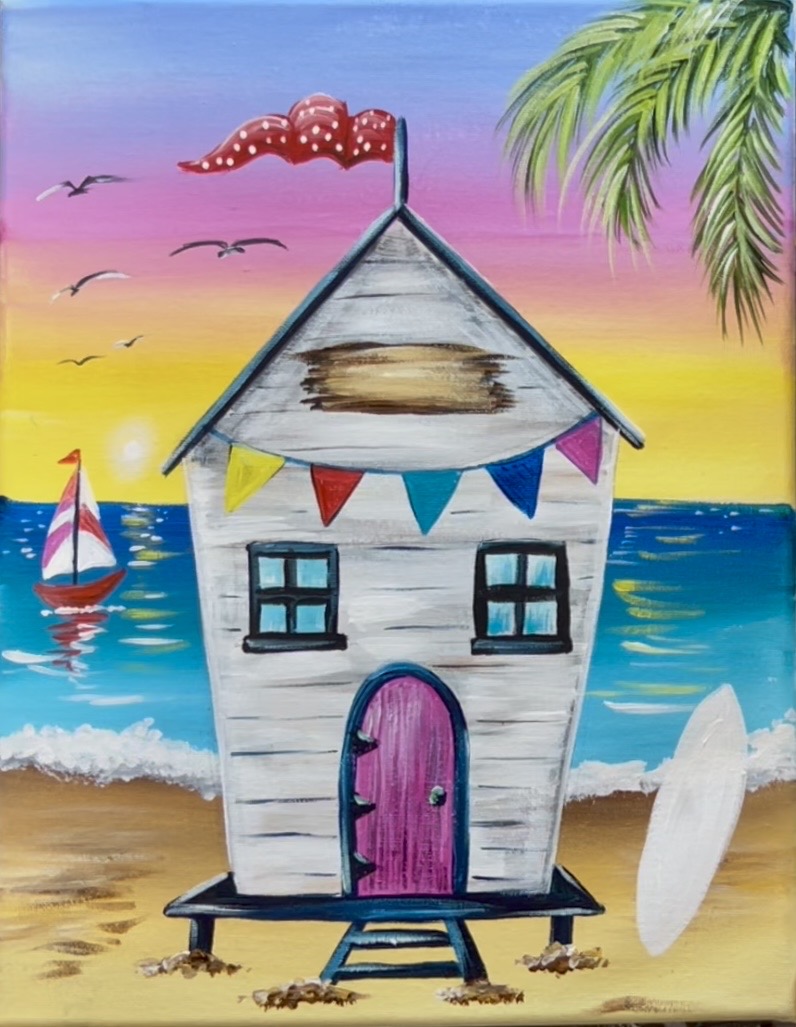
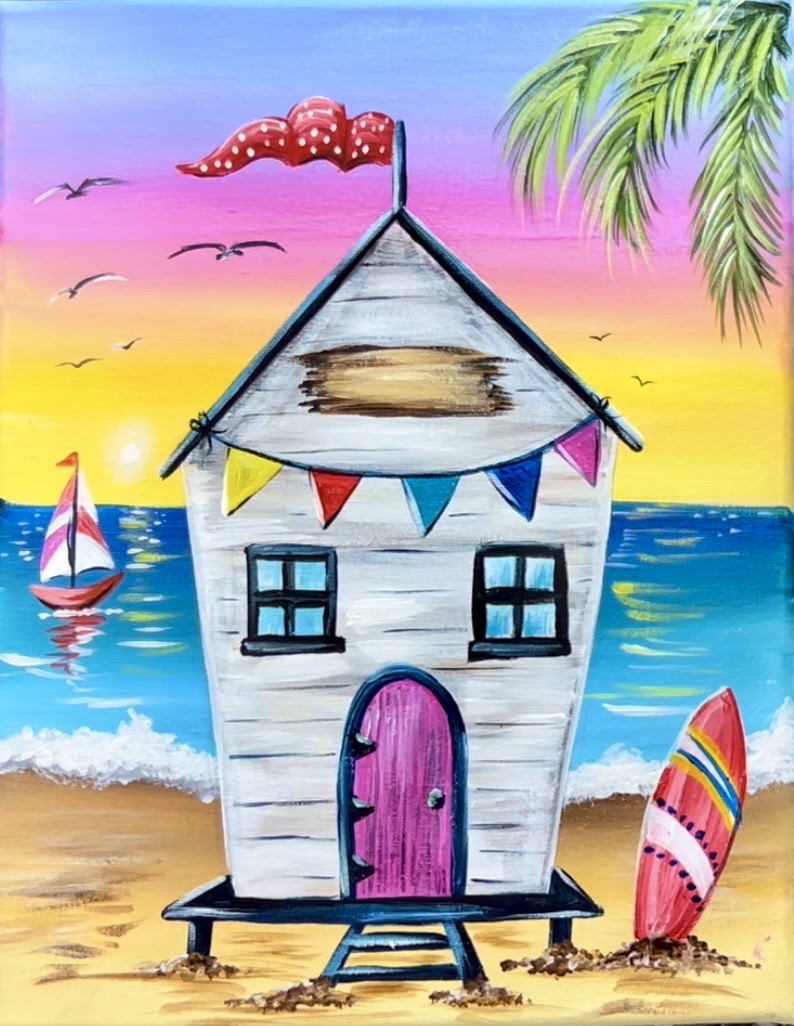
Create this whimsical beach cottage painting with easy-to-follow acrylic painting techniques designed for beginners! In this relaxing coastal tutorial, you’ll paint a charming seaside beach hut, colorful flag, a tropical sunset sky, sparkling ocean water, a sailboat, and a bright surfboard resting in the sand.
This step-by-step lesson breaks the painting down into simple shapes and manageable sections, making it perfect for new painters who want to practice blending, layering, and adding fun details without feeling overwhelmed. You’ll learn how to create a glowing sunset, paint ocean reflections, add texture to a weathered beach cottage, and finish with playful coastal accents.
Enjoy and happy painting!
Materials:
- 11 x 14 Canvas
- Acrylic Paint
- Brushes
- Pencil
- Ruler
Colors:
- Cadmium Red Medium Hue
- Primary Yellow
- Naples Yellow (This is like a butter yellow/ sand color)
- Hooker’s Green Hue
- Light Blue Violet
- Medium Magenta
- Phthalo Blue
- Turquoise Blue
- Mars Black
- Burnt Umber
- Titanium White
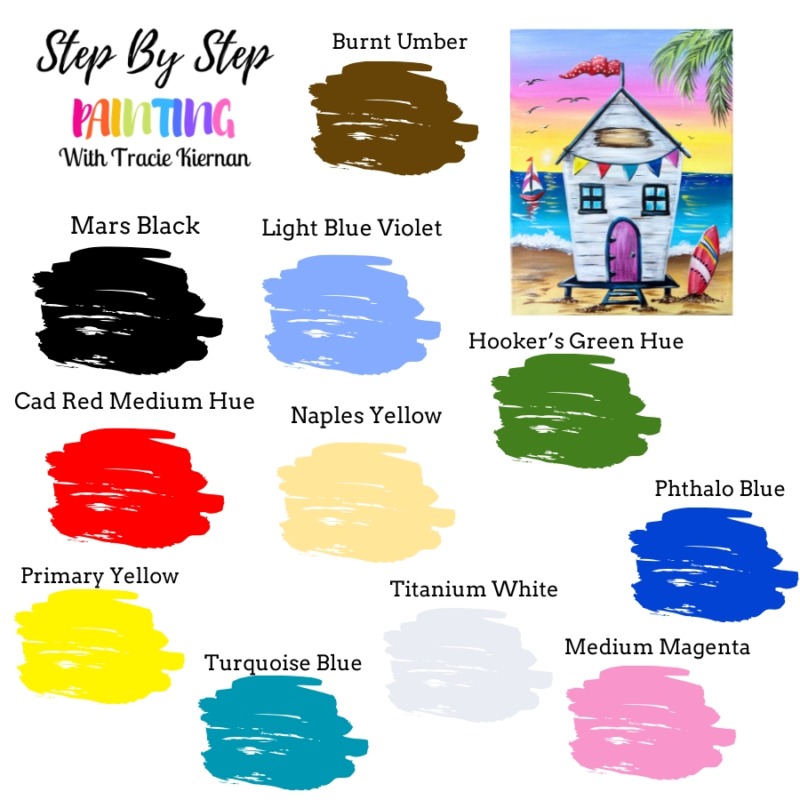
I use all the colors in the rainbow in this painting! 🌈 If you want to eliminate colors, you can take out: turquoise blue (make a turquoise blue with blue & green), light blue violet (mix blue and white to make a light blue), and naples yellow (make a sand color with brown, yellow and white). You can also customize the styles and colors on the shack!
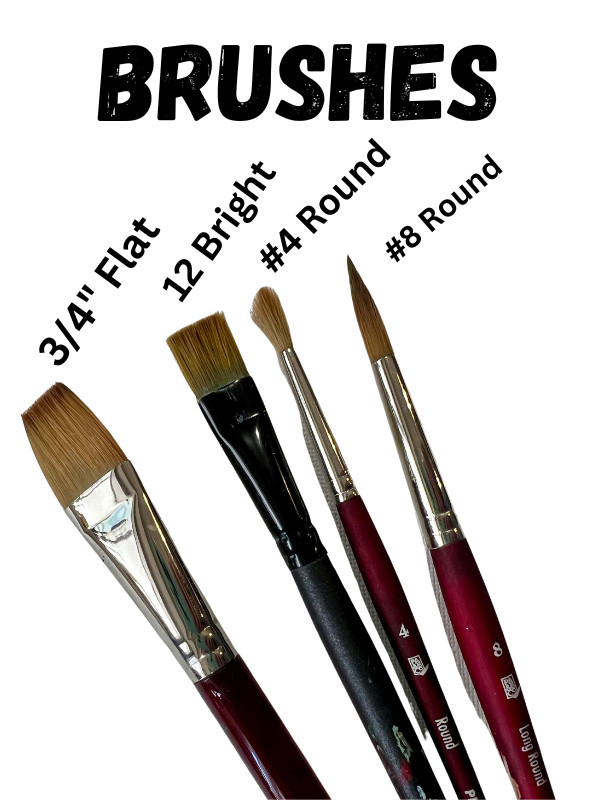
Brushes:
- 3/4″ Flat
- #12 Bright Brush
- #4 Round Brush
- #8 Long Round Brush
Want to download this tutorial?
You can purchase this as an offline download including BONUS traceables, the ability to download the video and PDF printable instructions. Find out more here!

Directions At A Glance:
Video:
Step By Step Directions:
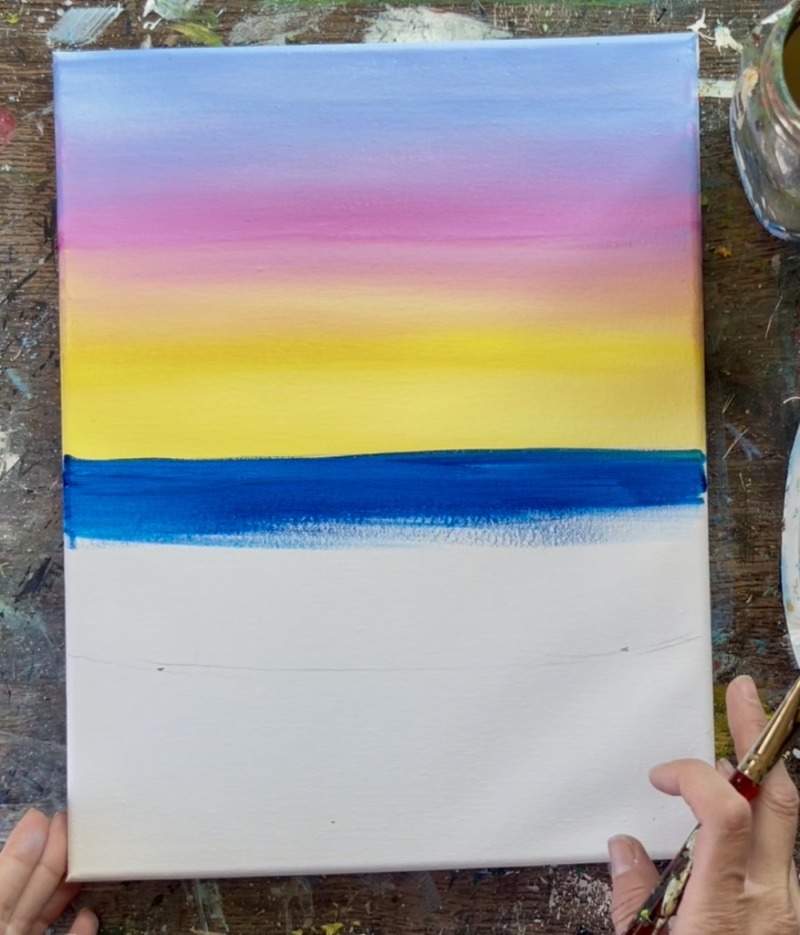
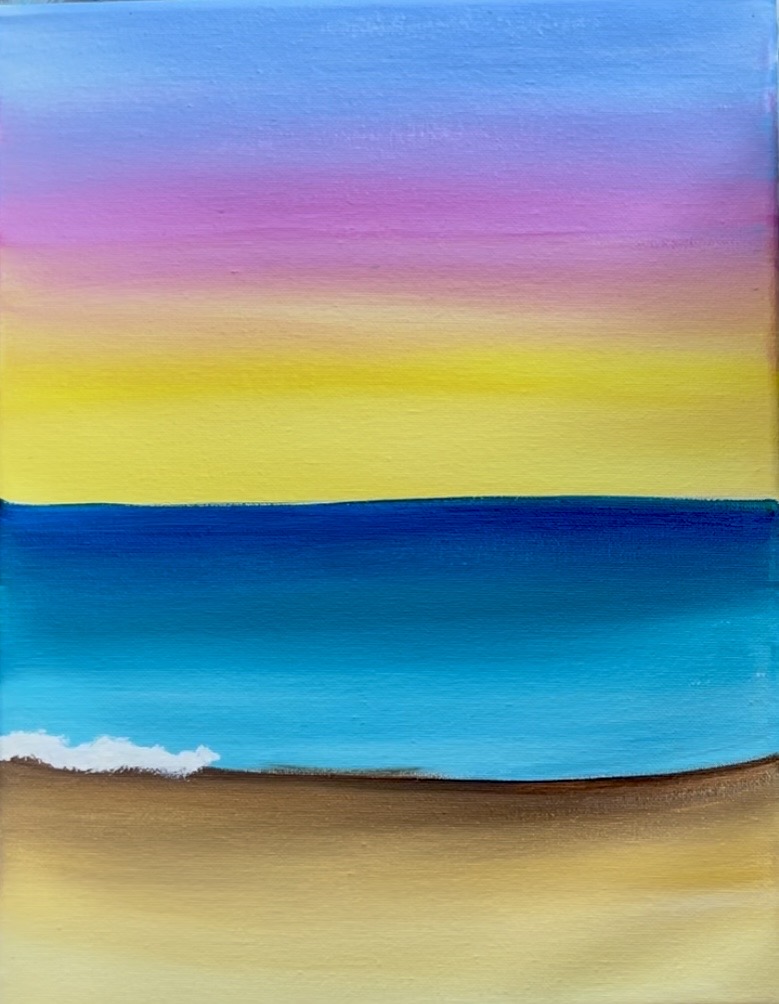
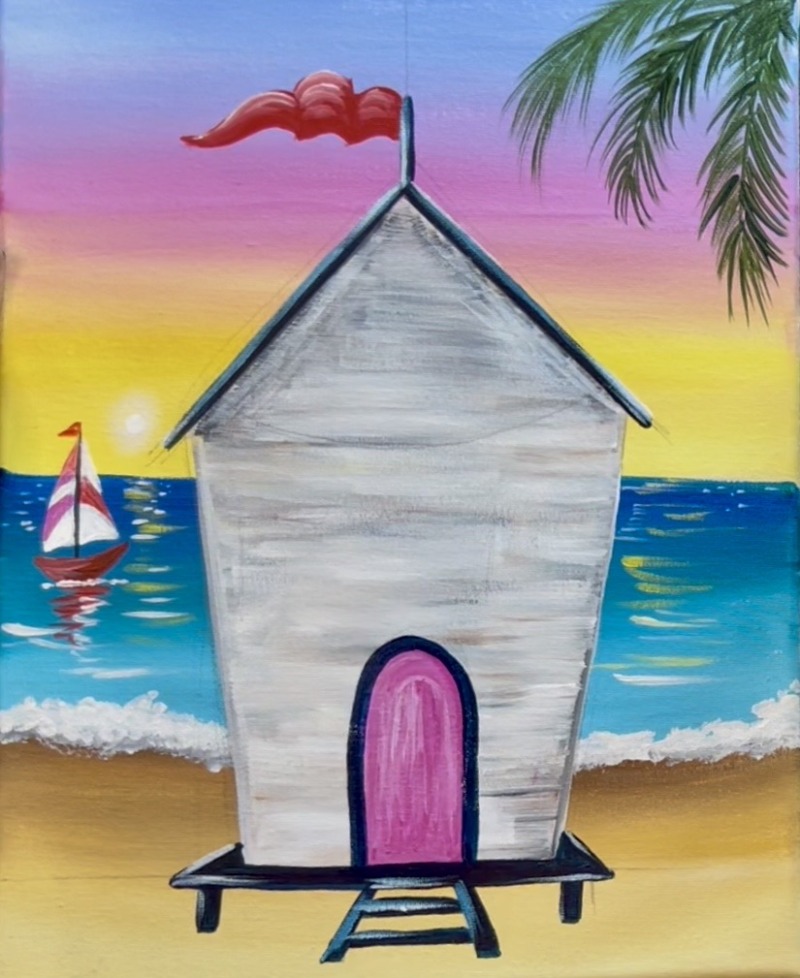
1. Paint Sky
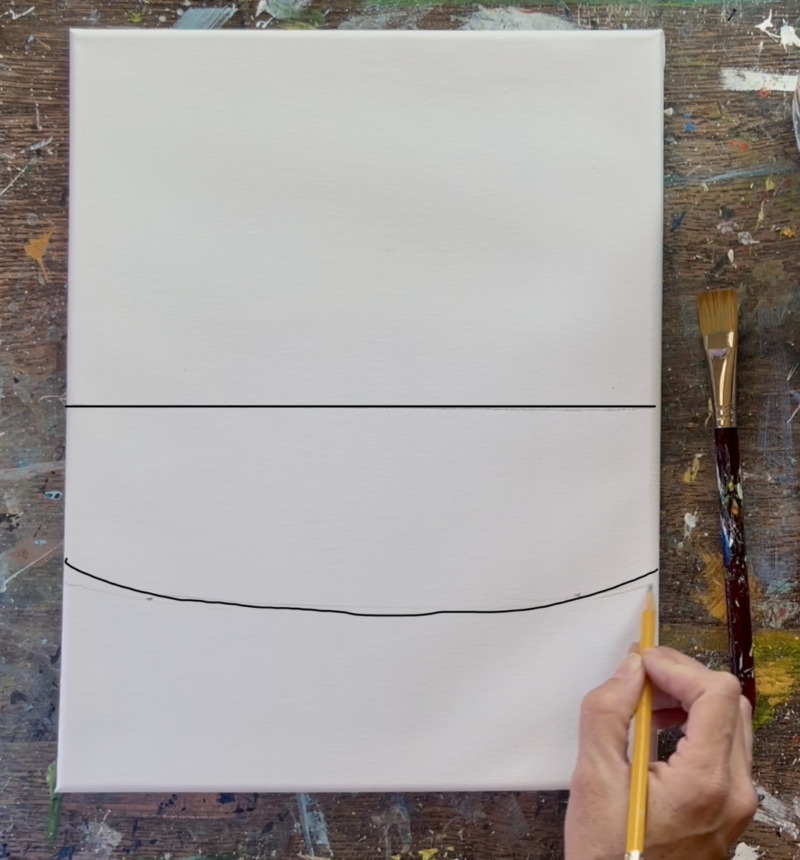
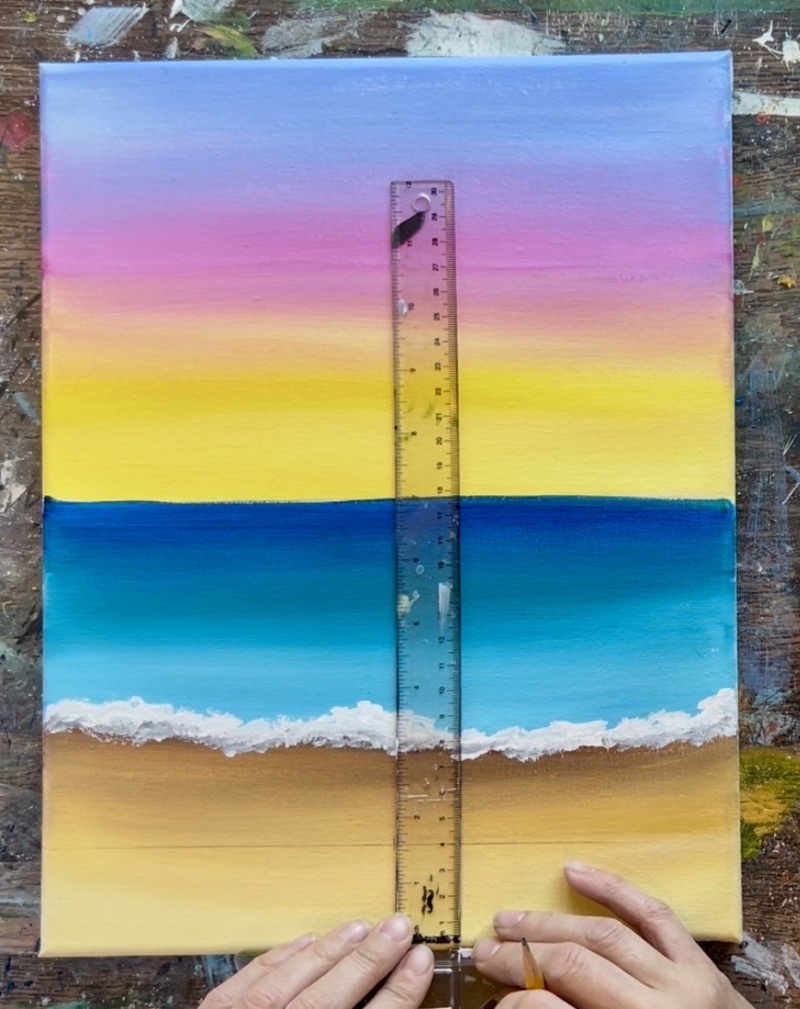
Position canvas in a vertical format. Locate the center of the canvas and use a ruler and pencil to draw a light line all the way across the canvas. This will be the “horizon line” in the painting!
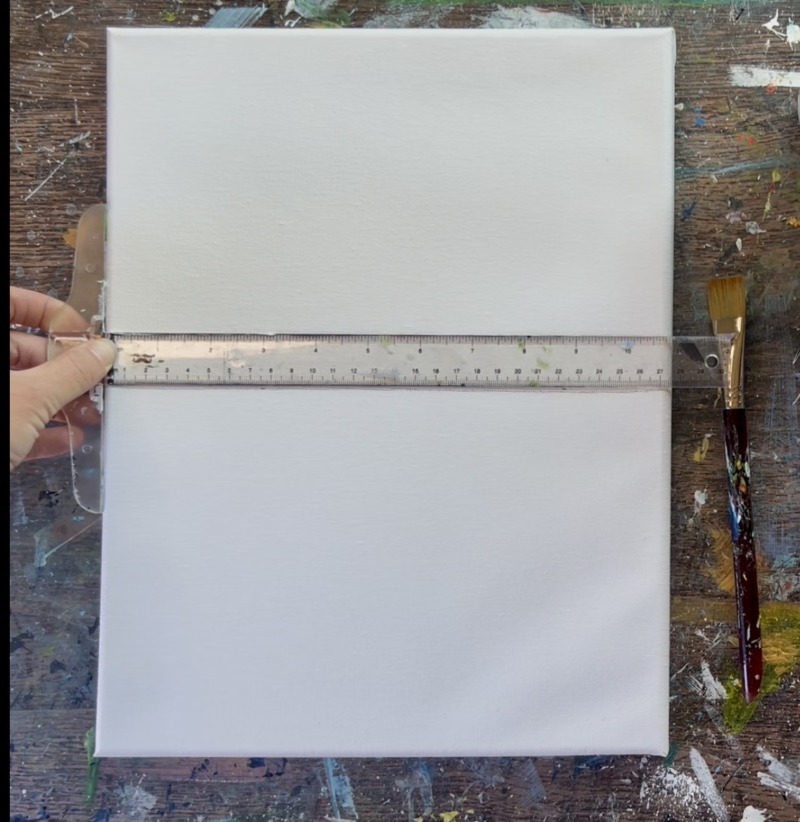
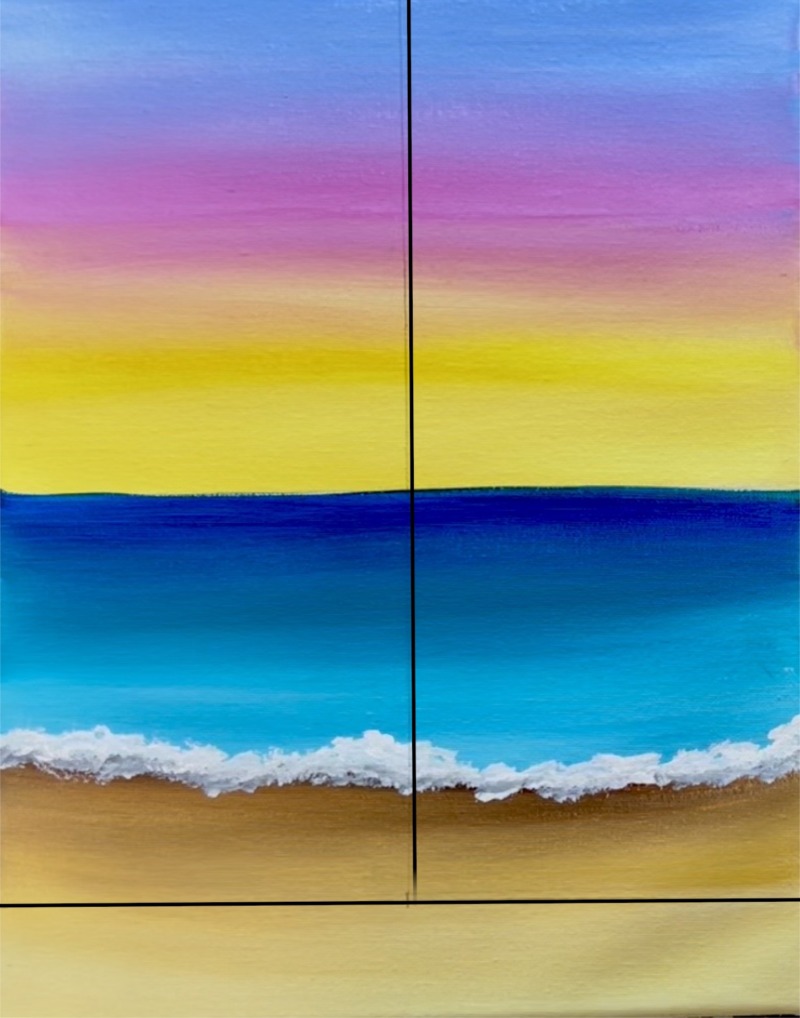
Next, locate the center between the horizon line and the bottom of the canvas. Make a small mark and then draw a slightly bowed line across. This line will be the “shoreline” where the waves meet the sand.
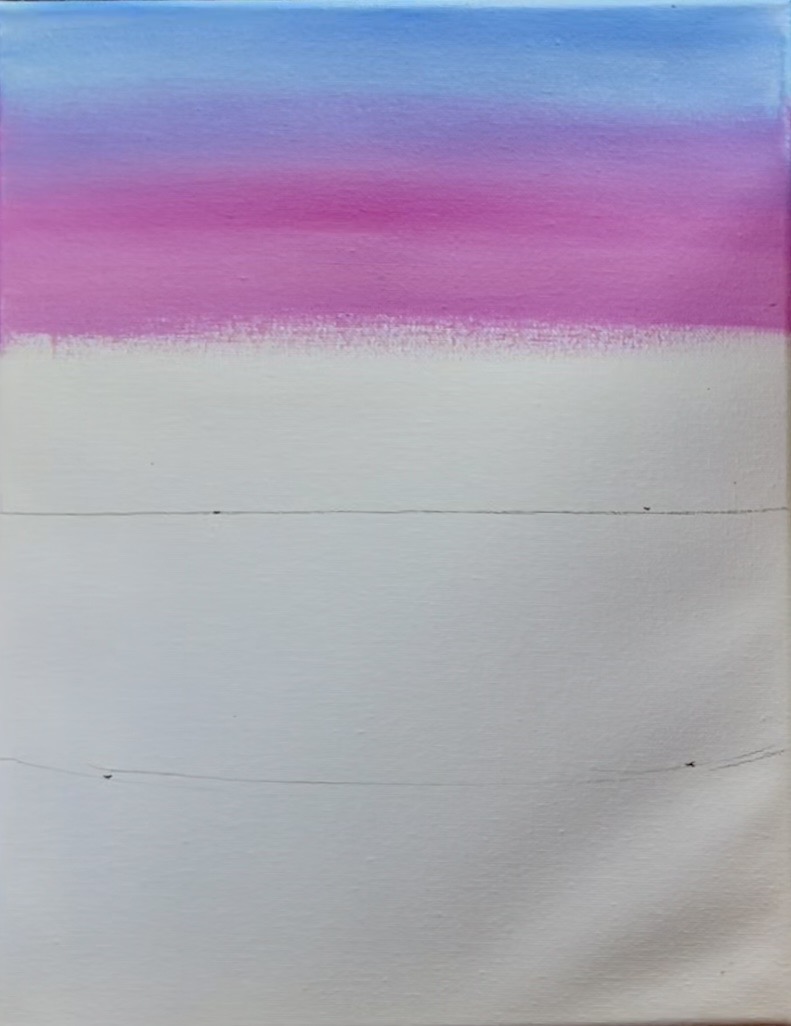
Next, load your paint palette with three colors that you will be using for the sky: “light blue violet”, “medium magenta”, “primary yellow” and “titanium white”. We will be painting a horizontal gradient of blue that blends to pink and then yellow.
Use the 3/4″ wash brush. Load it into water but squeeze excess water out of the brush. Mix equal amounts “light blue violet” with “titanium white”. Paint left and right paint strokes across the top of the sky and go down about a quarter of the way down the canvas.

Wipe the brush but don’t rinse. Load a small amount of “medium magenta” onto the brush and gently blend it into the sky with the blue. I suggest starting the pink color below where you stopped the blue and slowly bring it up into the blue. Brush over your “transition zone” multiple times. The color will turn to a purple color in the area where the blue and pink blend. Go down about another 1/4 of the canvas with this pink area.
Next, rinse the brush and squeeze out excess water (or wipe on towel). Load it into a small amount of “titanium white”. Apply the white below the pink and blend it up into the pink. The white is going to help transition to the yellow in the next step. You are going to get a light pink color in the area where you blend the white into the pink. Also, bring the white down a little further so there is a white base layer in the sky.
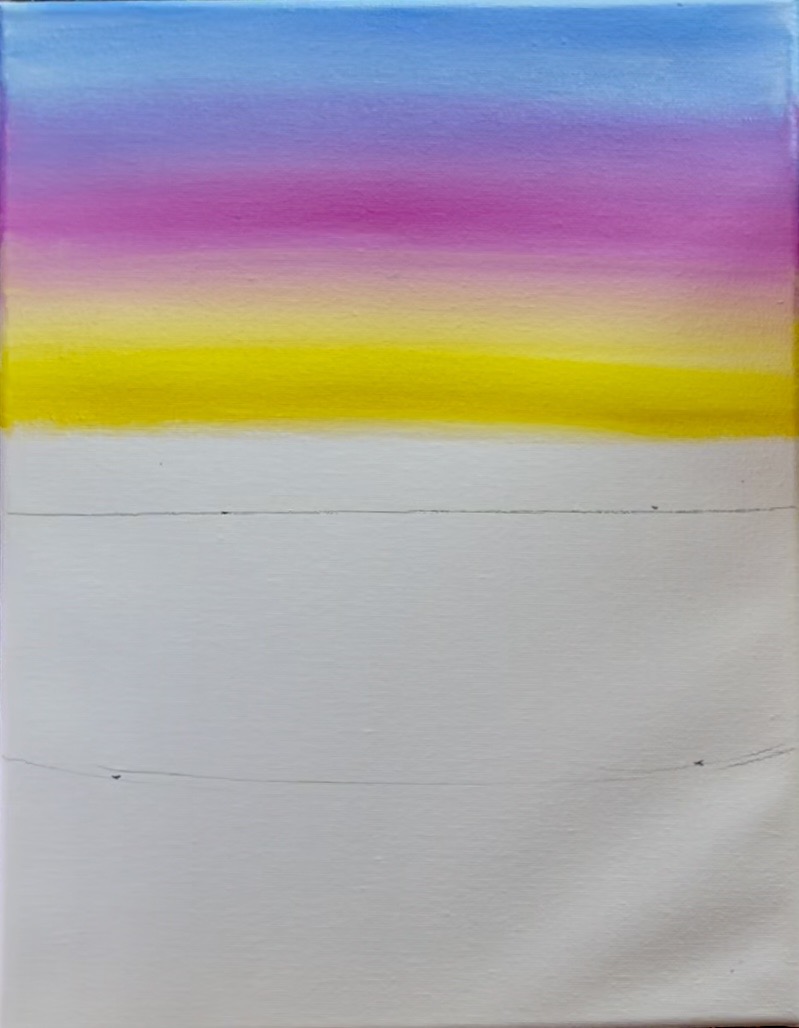
Wipe or rinse the brush (you don’t want pink on your brush for this step). Load the brush into “primary yellow”. Then blend the yellow over the white layer you just applied to the canvas and blend it up into the pink area (just slightly). Bring the yellow all the way down to the horizon line and stop.
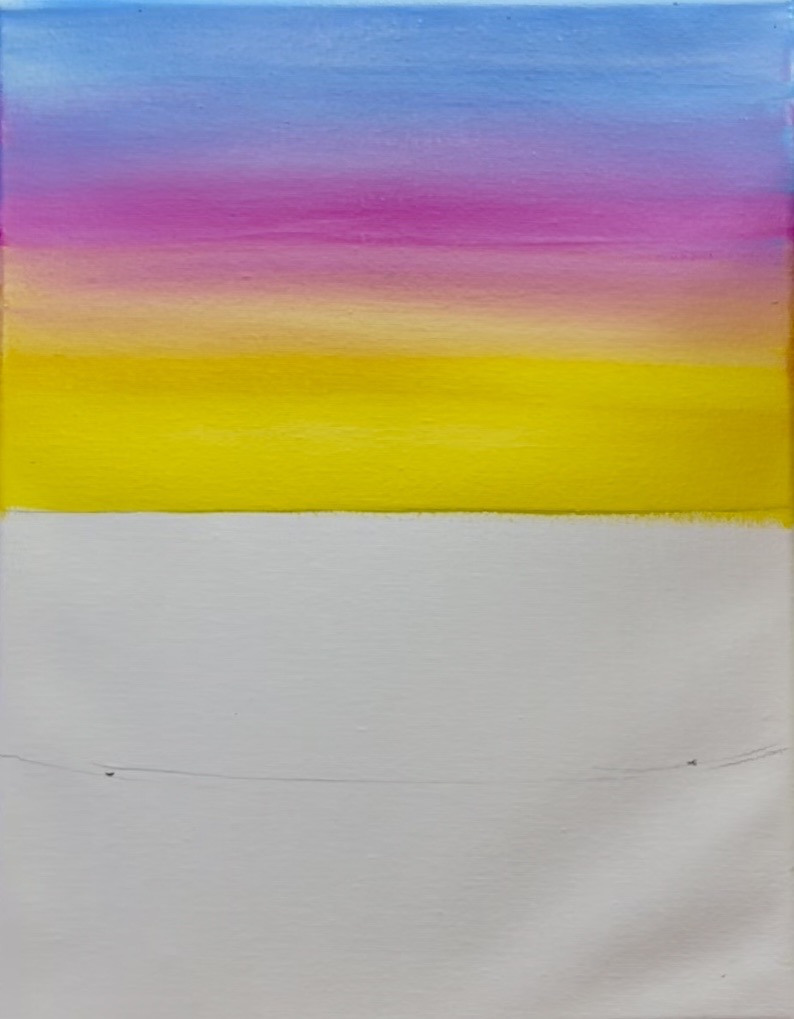
You can go back and blend more of your colors in the sky but I suggest not to over blend!
2. Paint Water
The two colors we will be using to paint the water are: phthalo blue and turquoise blue. Use a clean and rinsed 3/4″ flat brush. Load it into just phthalo blue and paint about a quarter of the way down below the horizon line into the ocean.
Wipe the brush but do not rinse. Load it into “turquoise blue”. Blend the turquoise up into the “phthalo blue” but don’t go all the way up. You will have a very dark blue water line along the horizon and then it turns to turquoise in the middle of the ocean area. Go down to almost your “shoreline” and stop.
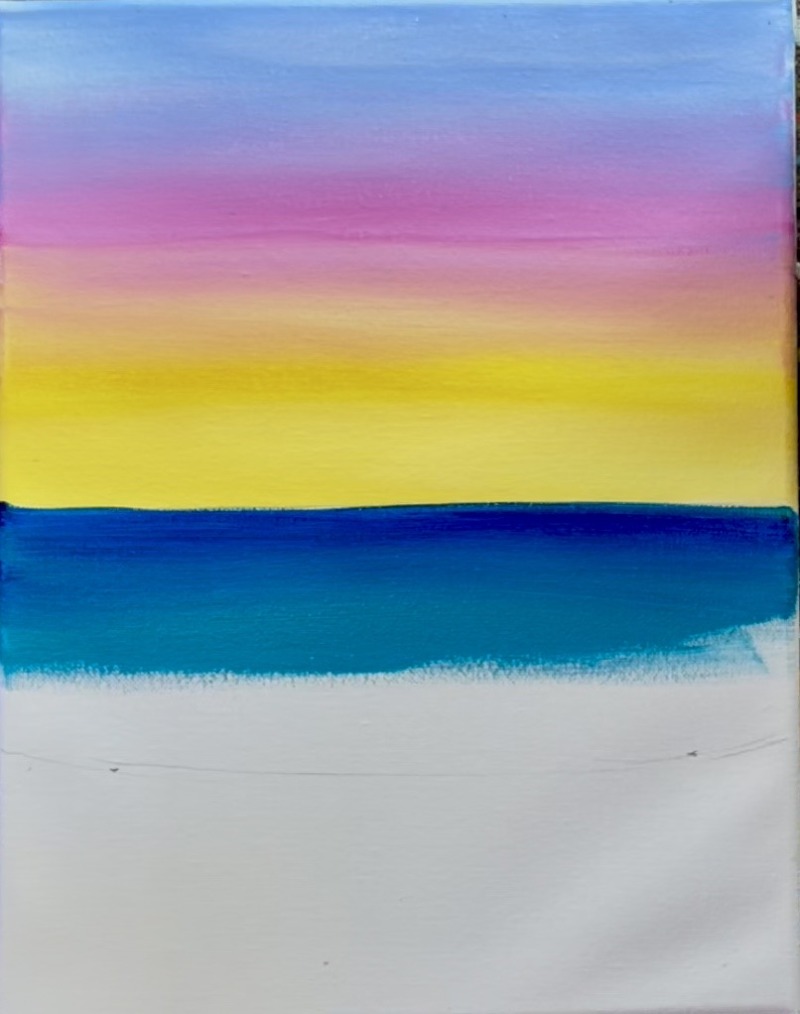
Wipe the brush but do not rinse. Load it into “titanium white”. Blend your white along the shoreline and up into the turquoise.
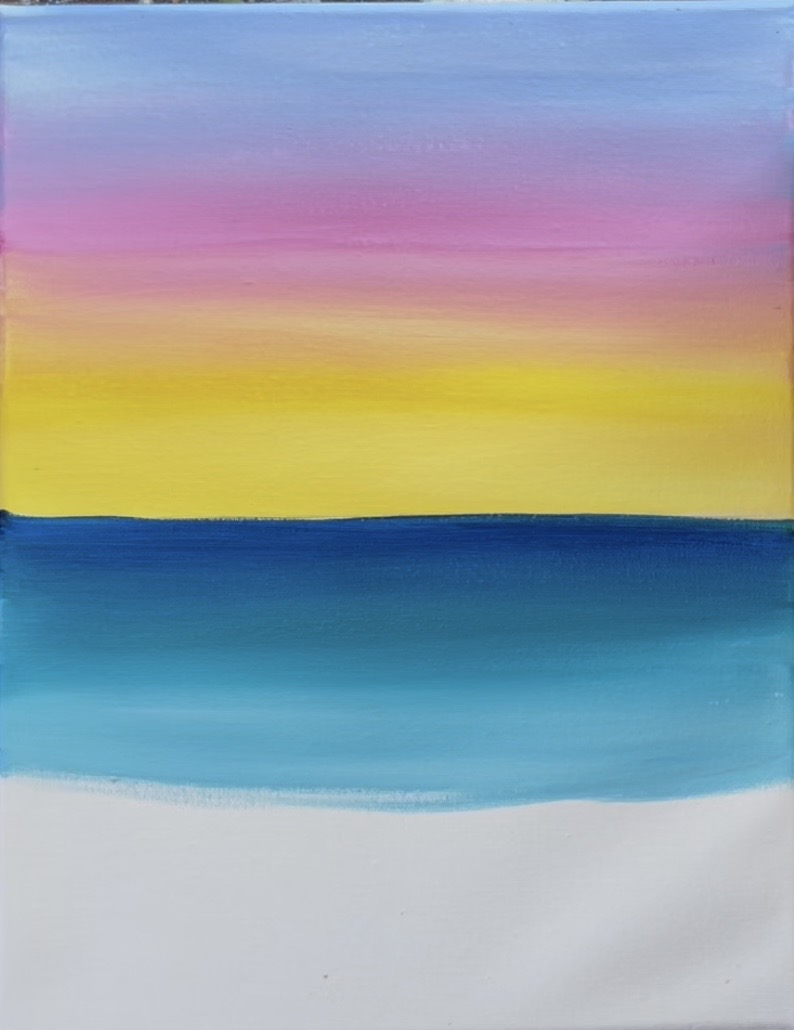
Bring this all the way to the line that you drew and stop. It should look like a light turquoise color on the bottom of the ocean area.
3. Paint the sand
Use a 3/4″ flat wash brush and the colors: Naples Yellow, Burnt Umber and Titanium White.
Start by mixing equal parts Titanium White and Naples Yellow on your paint palette. Use the 3/4″ wash brush and paint from the bottom of the canvas up to almost the shoreline and stop. Then, wipe the brush but do not rinse. Load the end of the brush into “Burnt Umber”. Then blend this brown in with that lighter sand color. Essentially, you want the sand to be darkest as it touches the shoreline. You will have dark brown right up against the light turquoise color.

Right now there are no white waves. We will paint this later after this layer dries.
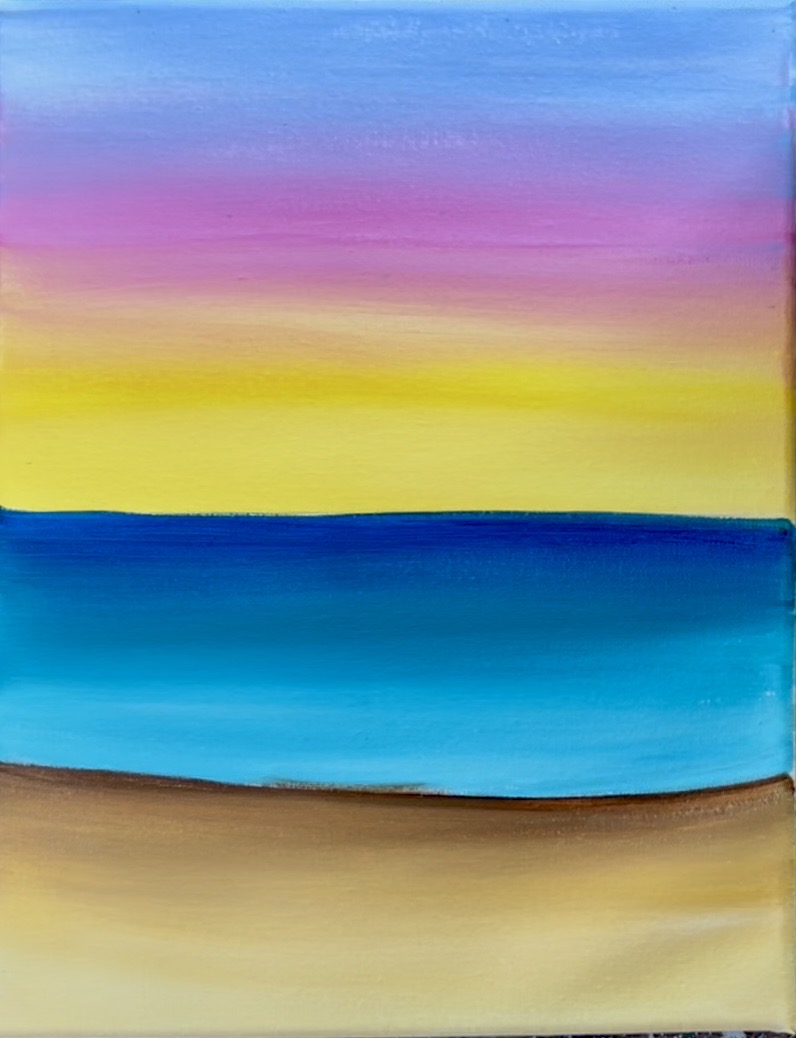
Wait for everything to dry before going onto the next step.
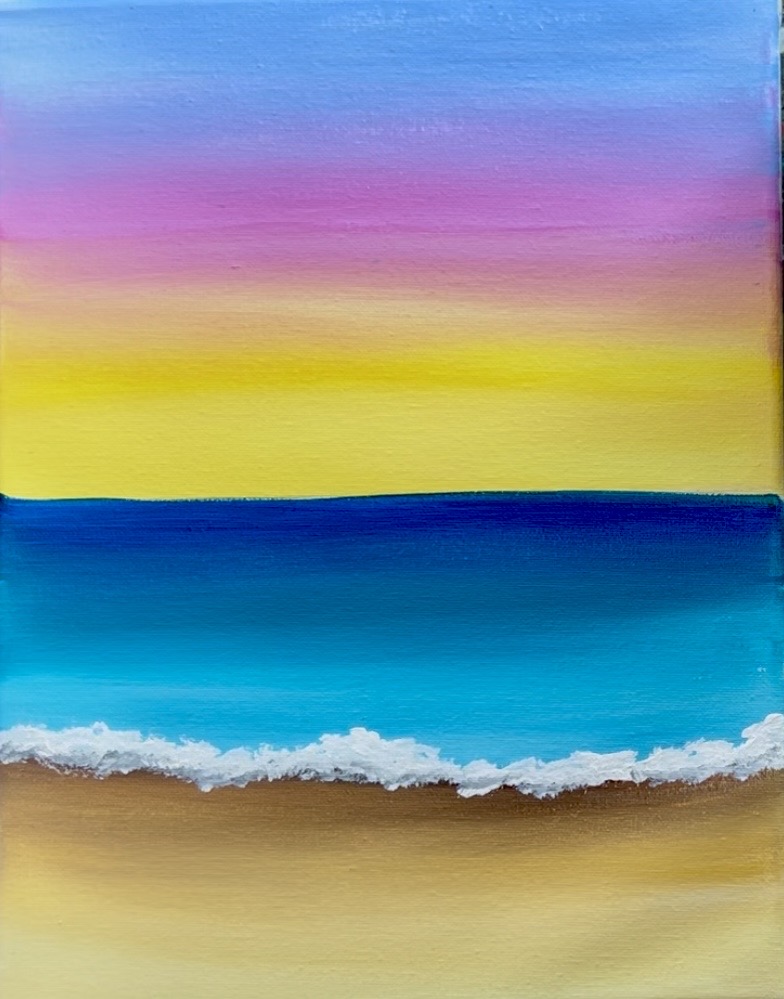
4. Paint Shoreline Waves
Use a #12 bright brush (1/2″ flat brush) and titanium white. Load just the tip of the brush into white and stamp/ stipple wave texture just along the edge of the shore where the light turquoise color touches the dark brown color.
Brung this all the way across. You can vary your waves a little by piling up higher amounts of white to look higher and more “arced”. Keep in mind that the middle area of this shoreline will be covered by the surf hut! So you don’t want to detail it too much just to paint over it later.
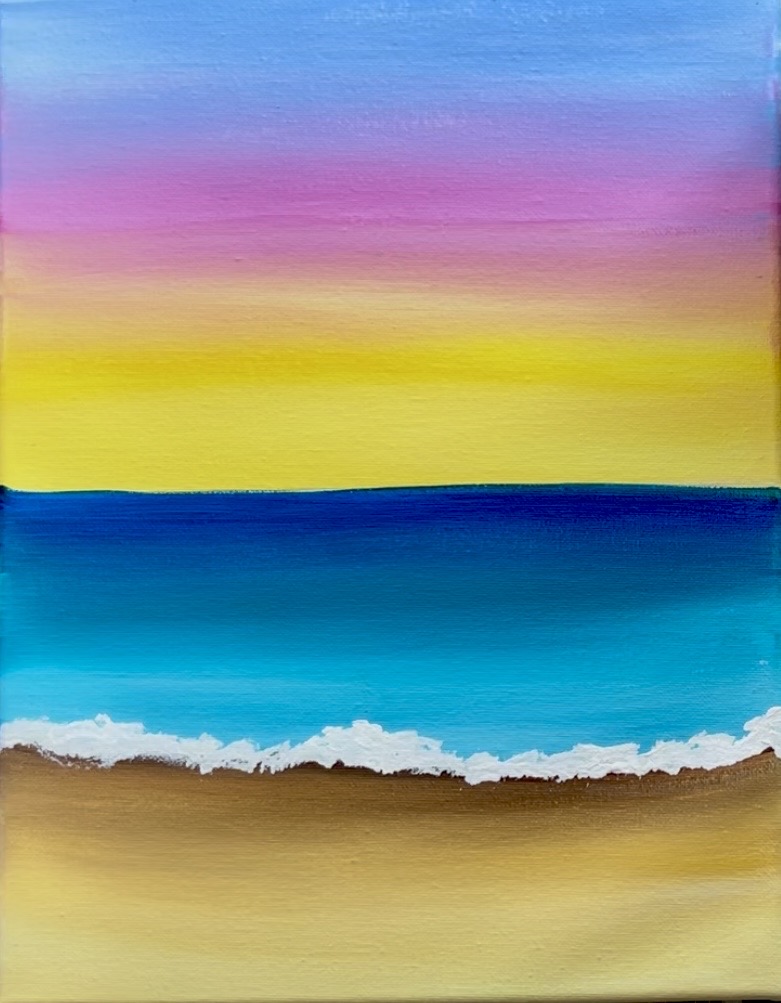
Then add shadowing under your waves. Blend a small amount of light gray into the white. Then paint this gray only at the bottom of your white waves you just painted. The idea is to make the bottom of these waves just slightly darker in color to give them shadowing. Later on we can add brighter white layers on the top of these waves after they dry.
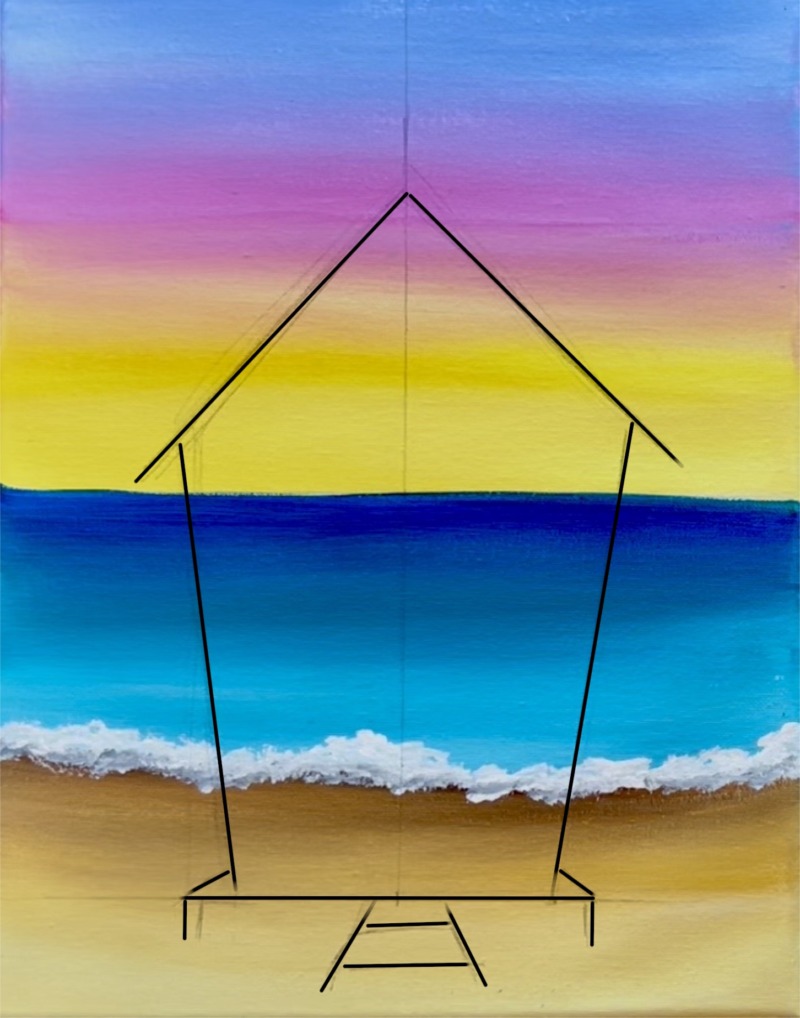
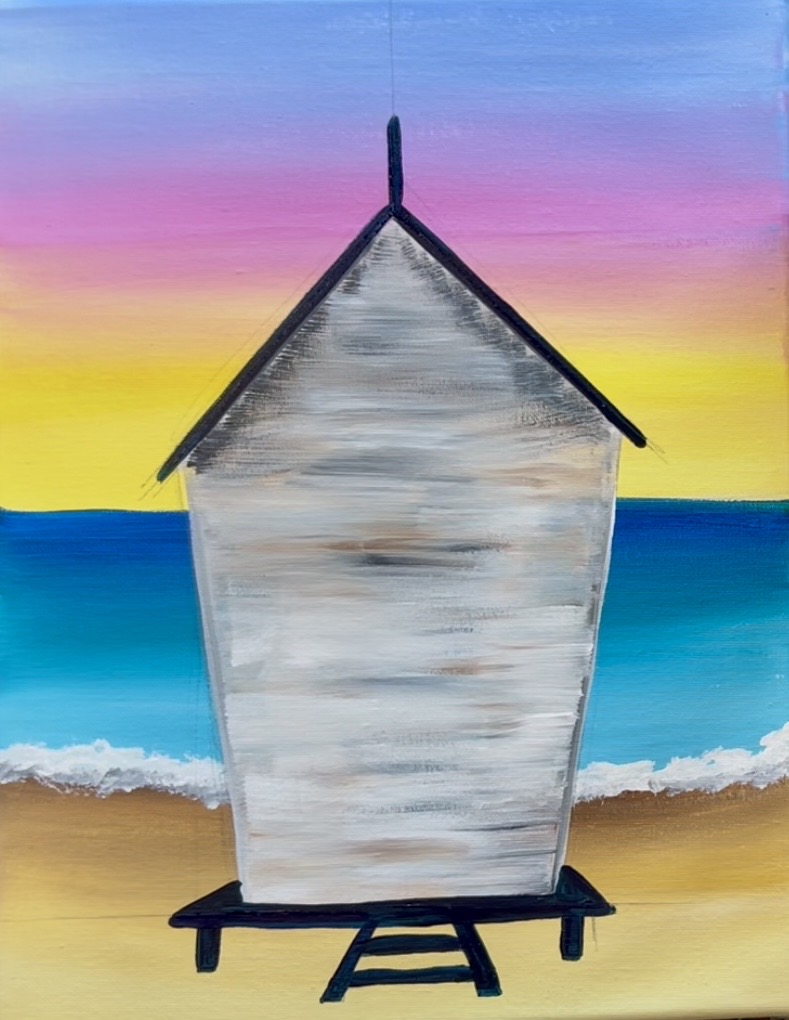
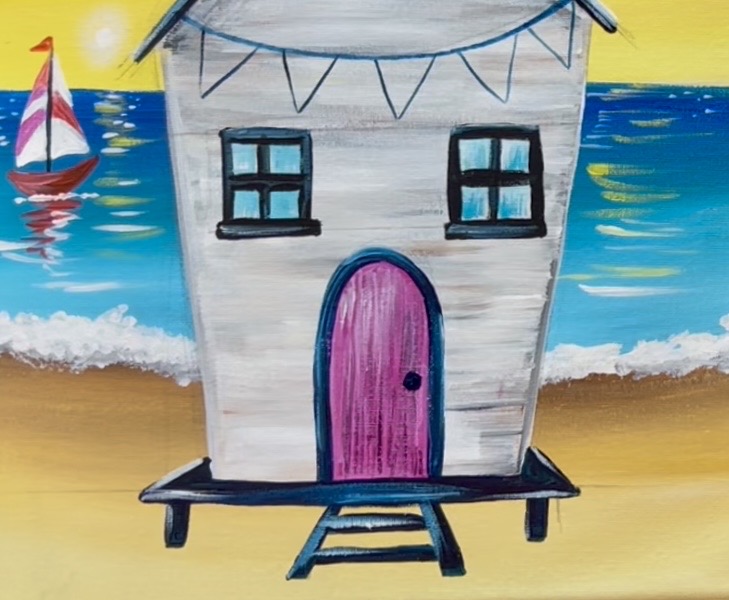
5. Draw Surf Hut
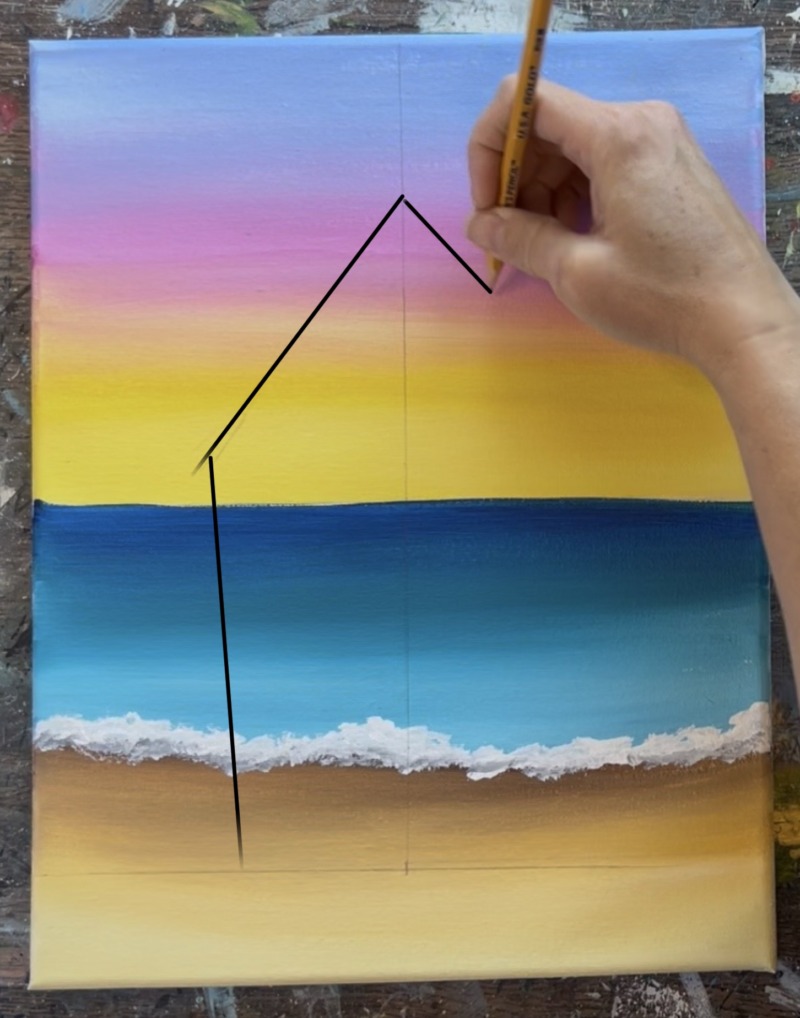
Locate the center of the sand area and draw a horizontal “guideline” across with a ruler.
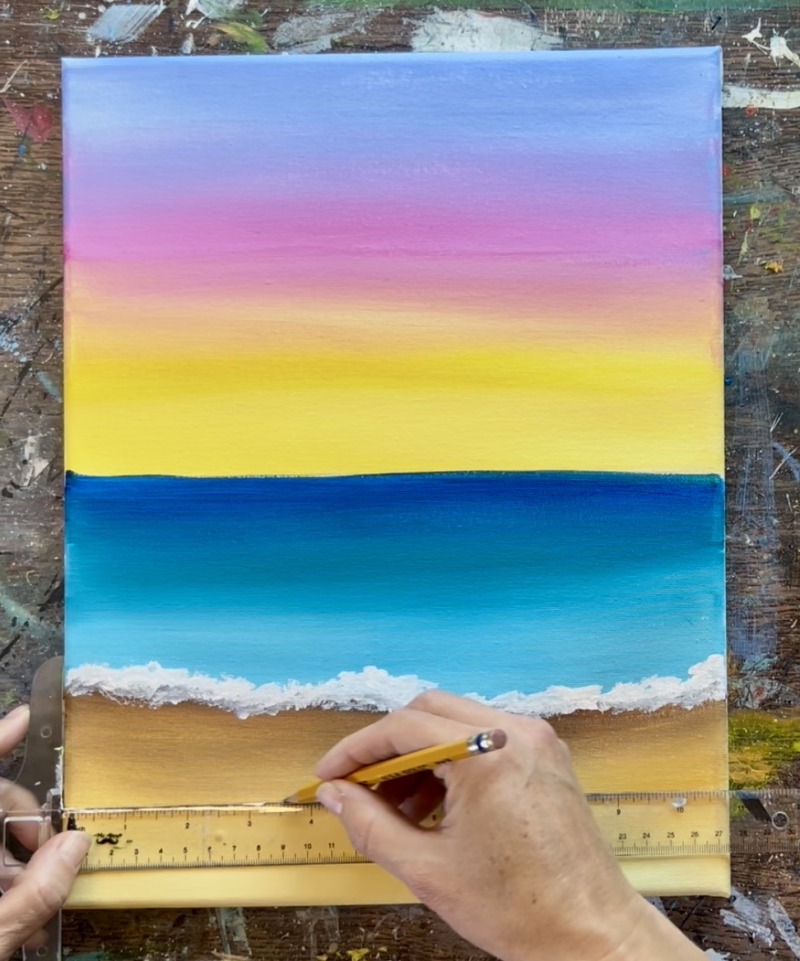
Then locate the center of the canvas (vertically) and draw a vertical line all the way to the top edge of the canvas.
This giant upside down “T” will act as a guideline for the drawing.
Next, sketch the triangular roof shape and the side of the house. I found it easier to lightly draw this with a pencil first and then go back over it with a ruler to make the lines straight. The house is relatively tall. The roof “triangle” shape is right on top of the horizon line but leaves a little space in the top part of the sky for a windsock.
After doing an initial sketch of the house shape, go back with a ruler to straighten/ define the lines. I make the siding lines on the house go slightly diagonally outwards like a kite shape but you can change the shape of the house if you want!
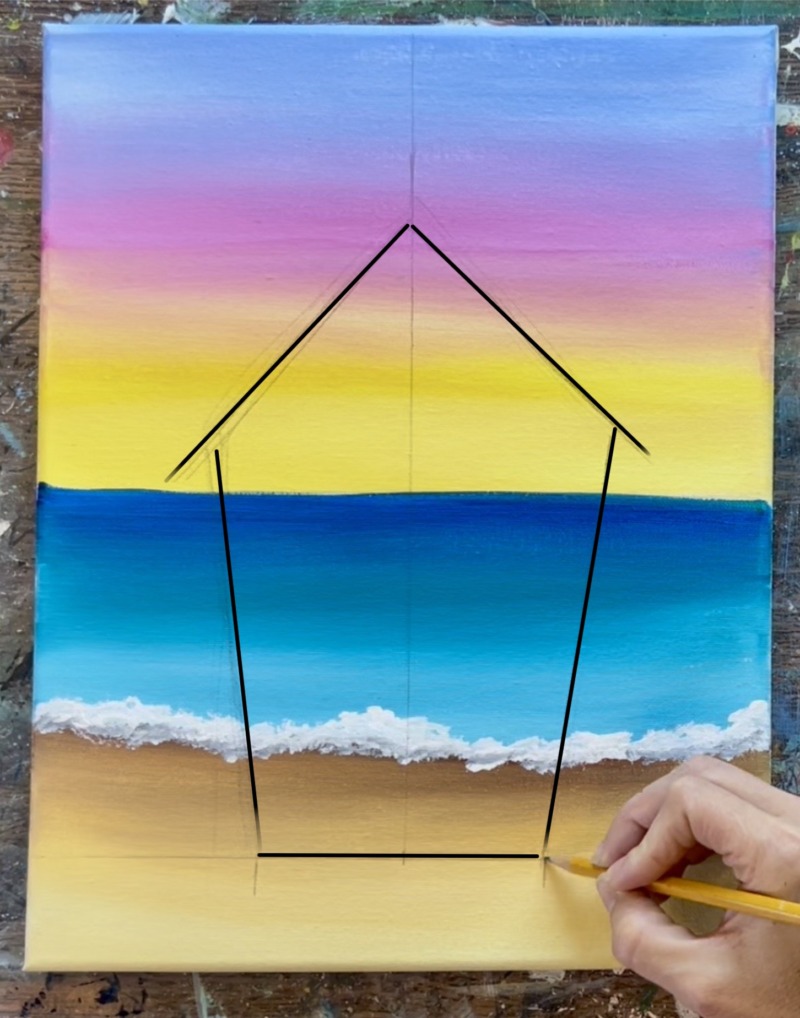
Next, use the bottom horizontal guideline to help define the “base” of the shack. Draw little vertical pillars under that horizontal line as well as a set of diagonal lines extending outwards for the stairs/ladder. Then draw two small diagonal lines on the left and right going inwards to the shack to make it look more three-dimensional.
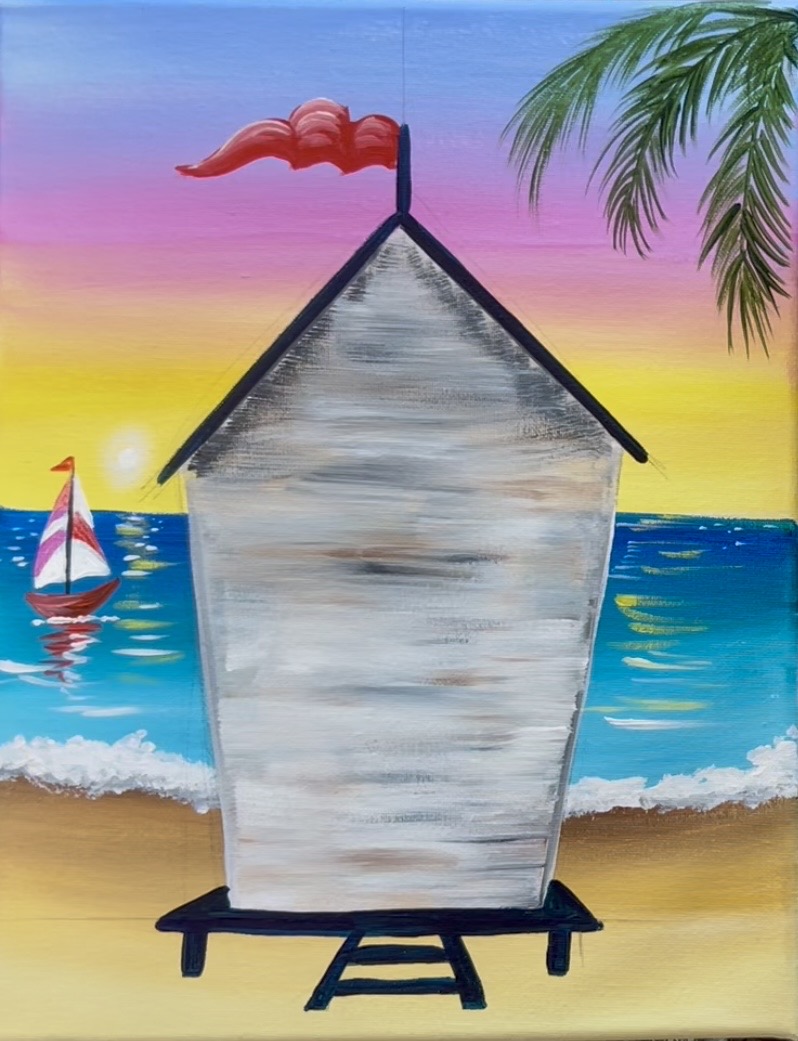
6. Paint First Layer On Surf Hut
Use a combination of the 3/4″ wash brush and the #4 round brush to paint the surf hut. You can “cut in” on the shape first with a round brush if it is helpful. Use a combination of the colors: Titanium white, Burnt Umber and Mars Black. Start by loading your brush into titanium white and load just a dot of black and brown on the corners of the brush. Paint full width, left and right paint strokes to fill in the shape of the hut. You want to ensure your paint strokes go in horizontal directions because the wood siding of the hut is going horizontal.
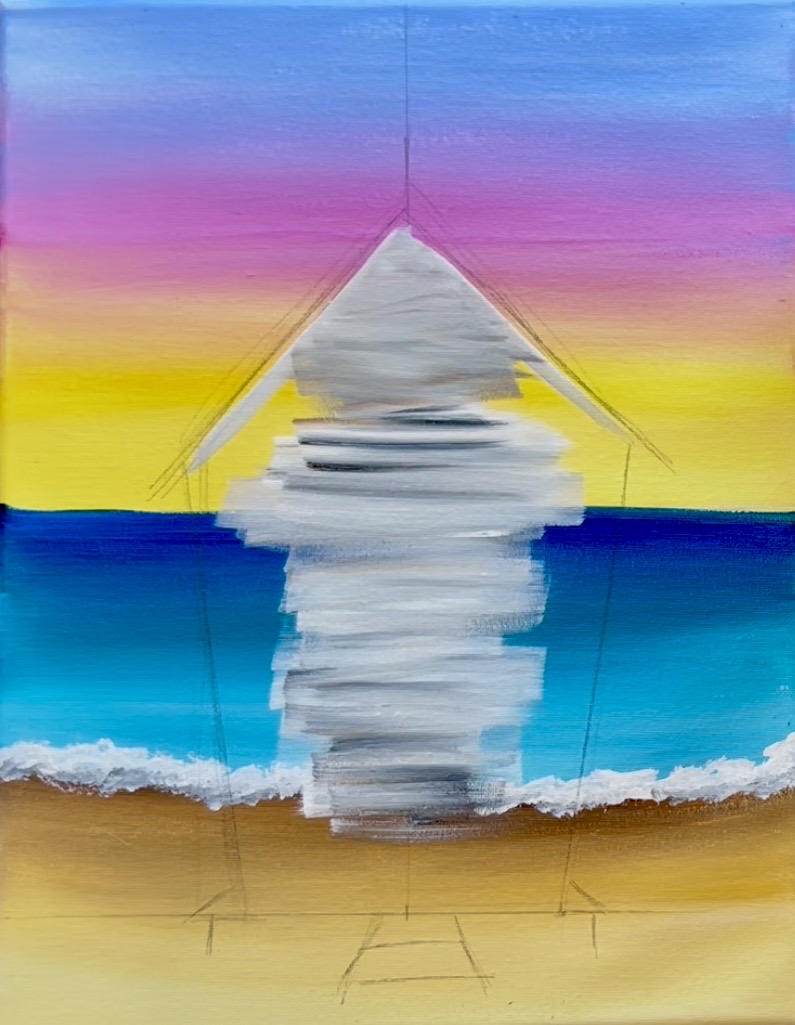
Use the round brush to outline the inner shape of the hut but bring the rest of your paint strokes to the edges to fill it in. Your first layer of this hut will actually look slightly dark and that’s okay! We will layer on more white to give it more of the white beach wash look!
At the top of the roof, add just a little bit more black to your brush and “dry brush” that area so it’s a little more darker/ shadowy. Then use the #4 round brush and “Mars Black” to outline the two angle lines of the roof.
7. Paint Roof, Pole, Hut Base With Stairs
Use “Mars Black” to outline the base of the surf hut as you drew it earlier and paint it in solid black. Then paint the ladder/stairs and two support beams as a thicker line. If needed, add just a little bit of water to your paint to help with these finer line details. Then paint the roof and a vertical pole for the windsock on the top of the roof.
8. Paint Wind Sock
Use the color “Cadmium Red Medium Hue” to paint the flag/ wind sock shape.
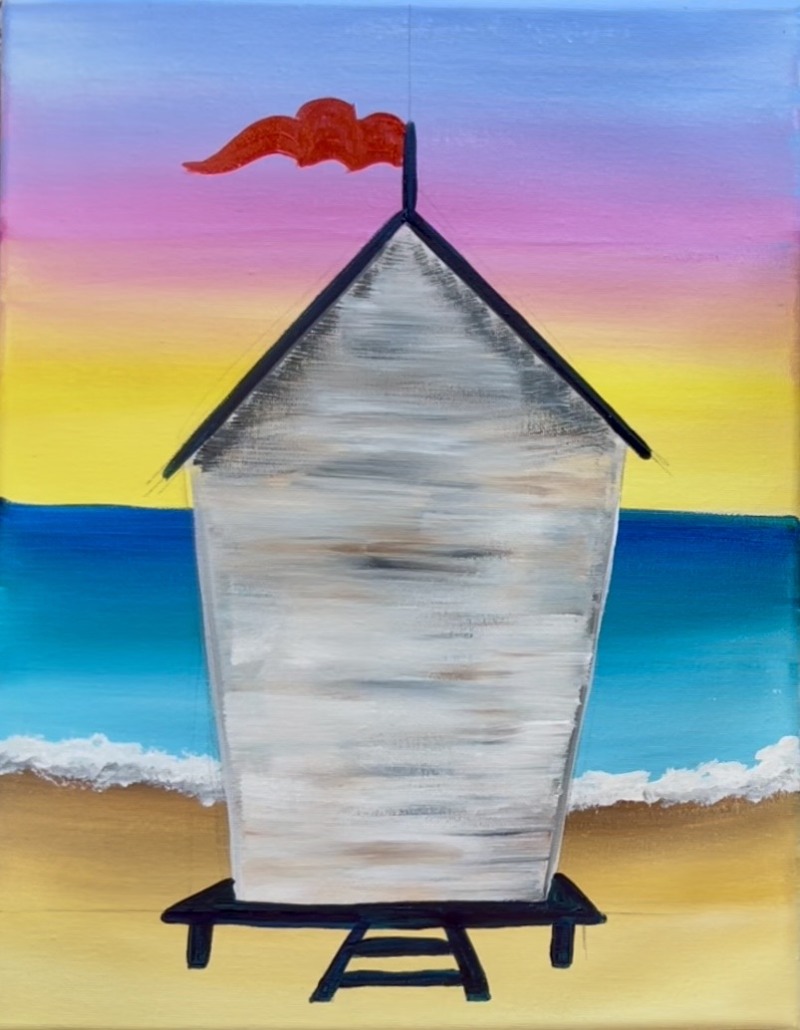
Before the red dries, use “titanium white” to lightly highlight the top of it. Make your paint strokes go in a curved direction to give the wind sock more form.
9. Paint Palm Fronds
Use the #8 LONG Round brush for this step. Mix on your paint palette 1 part “Mars Black” and 3 parts “Hooker’s Green Hue” to make a very dark green. Start each palm by painting a curved line that extends down from the upper right corner of the canvas.
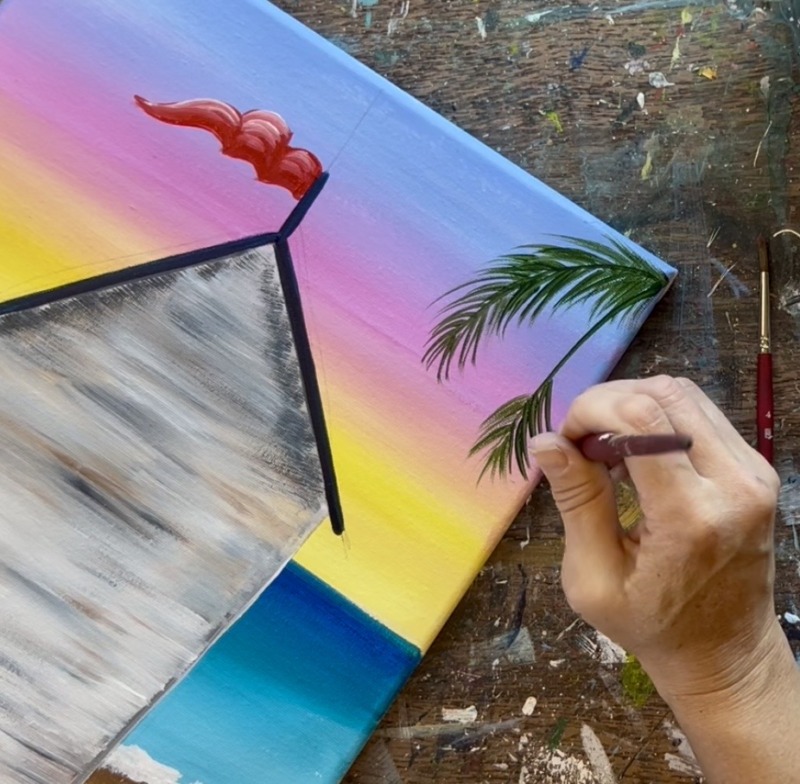
After painting a line, paint little palm frond leaves extending out from the line. Paint little diagonal paint strokes going outwards and slightly curving. I recommend using just the very tip of the #8 long round brush because the bristles will give you that thin line needed to paint the palms.
This first layer of palms is supposed to look dark. We can highlight them later with lighter green layers.
10. Paint Sailboat, Sun & Water Reflections
Use either the #4 round brush or the #8 long round brush to paint a simple sailboat in the middle of the ocean area to the left of the surf hut. I used “Cadmium Red Medium Hue” to paint a crescent shape for the boat. Then “Mars Black” for a vertical line for the mast. And then “Titanium White” for two right triangular shapes on each side of the mast.
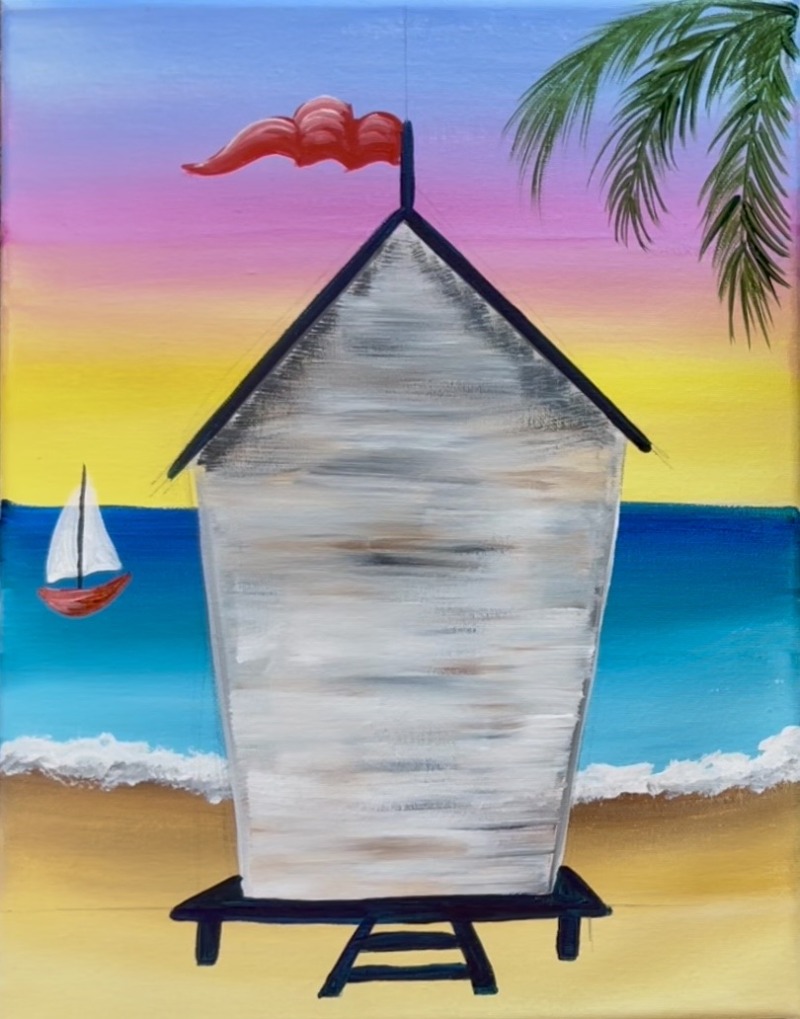
After painting a sailboat, paint reflection in the water under the boat. Use the #4 round brush to paint small, squiggle paint strokes with red below the boat. Paint a few white squiggle strokes as well and a little bit of white “stippling” just under the boat.
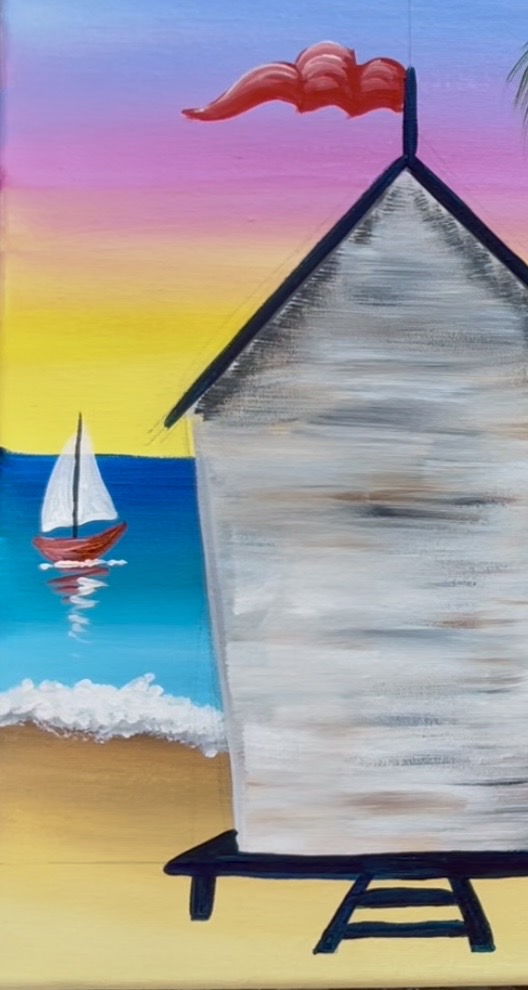
Next, paint a glowing sun above the horizon between the boat and the surf hut. To do this, use just the color “Titanium White”. Paint the tiniest dot in the sky using the #4 round brush. Then use your finger or a dry brush to smear the dot outwards to create a glowing white circle. Finish this by putting a pure white circle inside of the glowing circle.
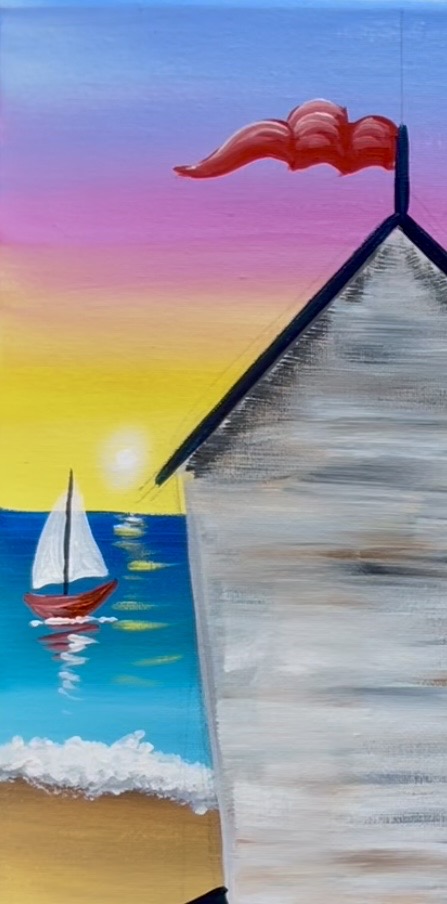
Paint water reflection lines in the water using either of the round brushes. Paint a combination of “Primary Yellow” and “Titanium White” lines over the dark turquoise ocean color. In the distance, ensure your water lines are very thin and not very wide and also closer together. Closer, the lines are longer and wider and somewhat thicker. This creates depth on your water. Do this throughout the ocean, especially right under the setting sun!
In addition to the water lines, you can decorate your sailboat with a fun color design!
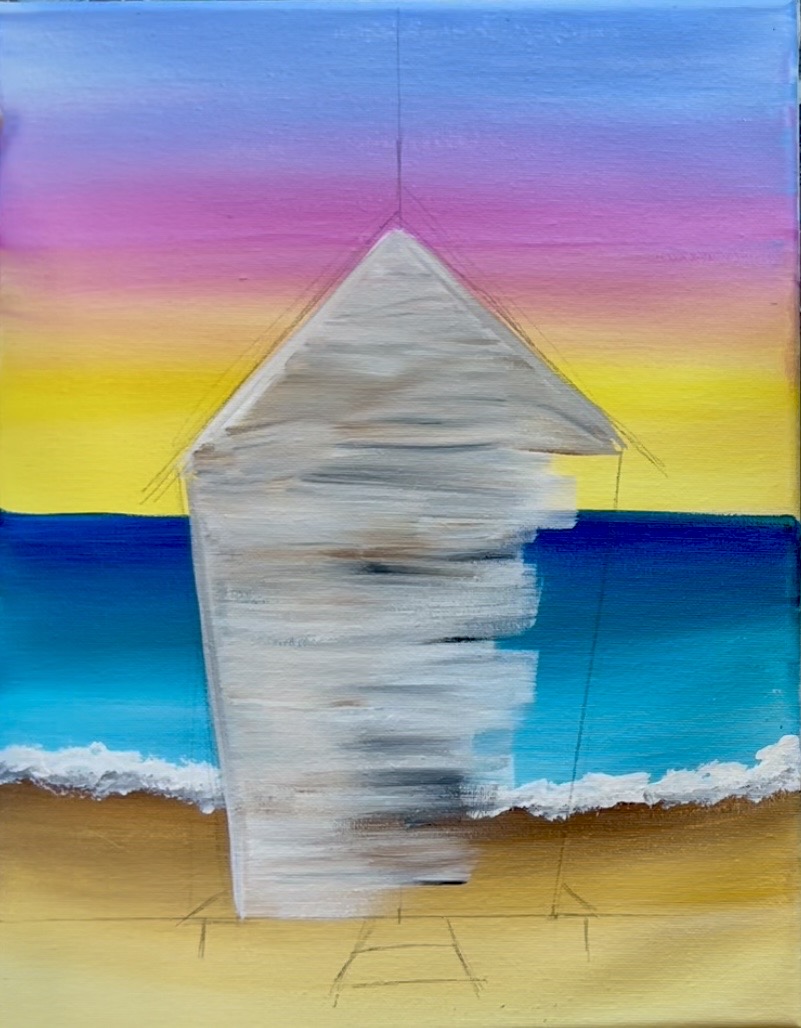
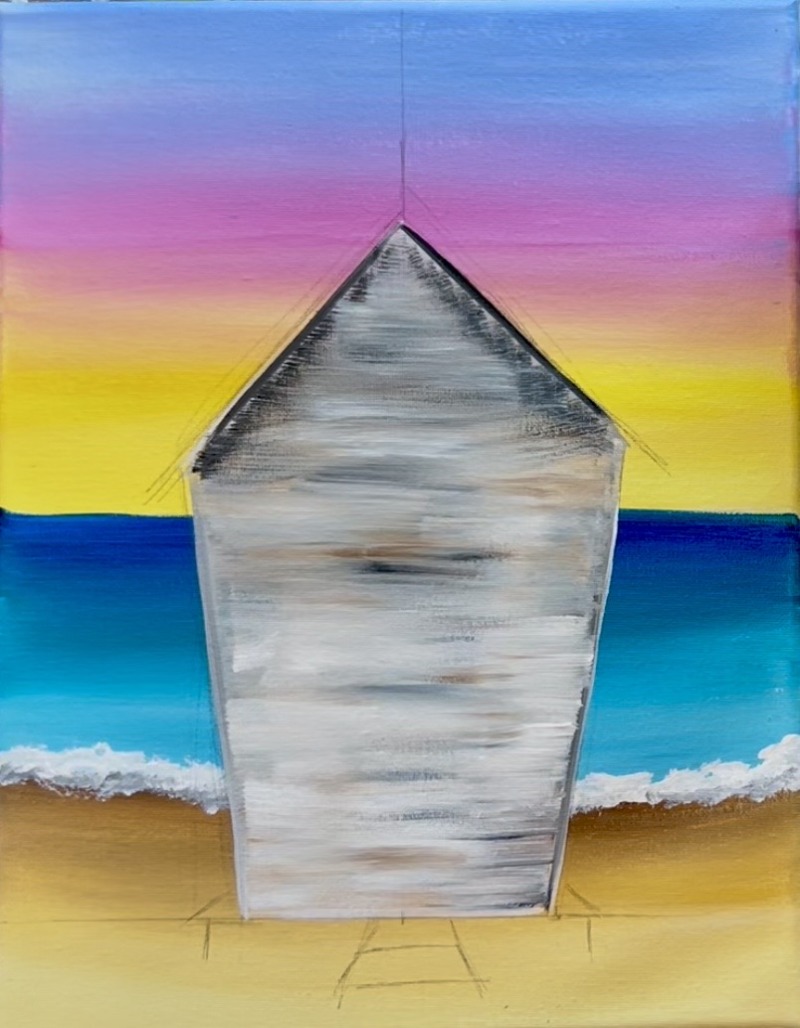
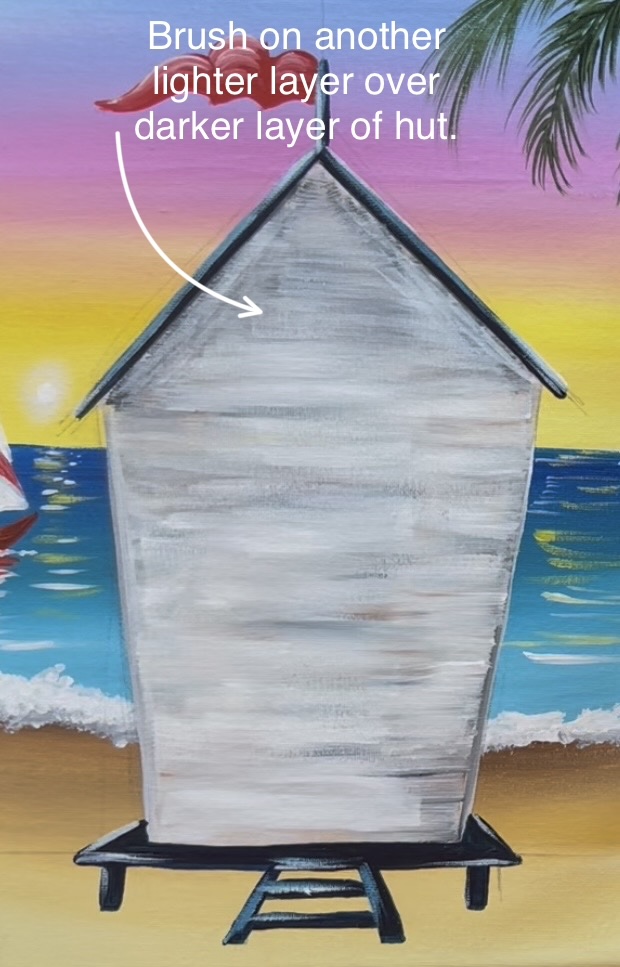
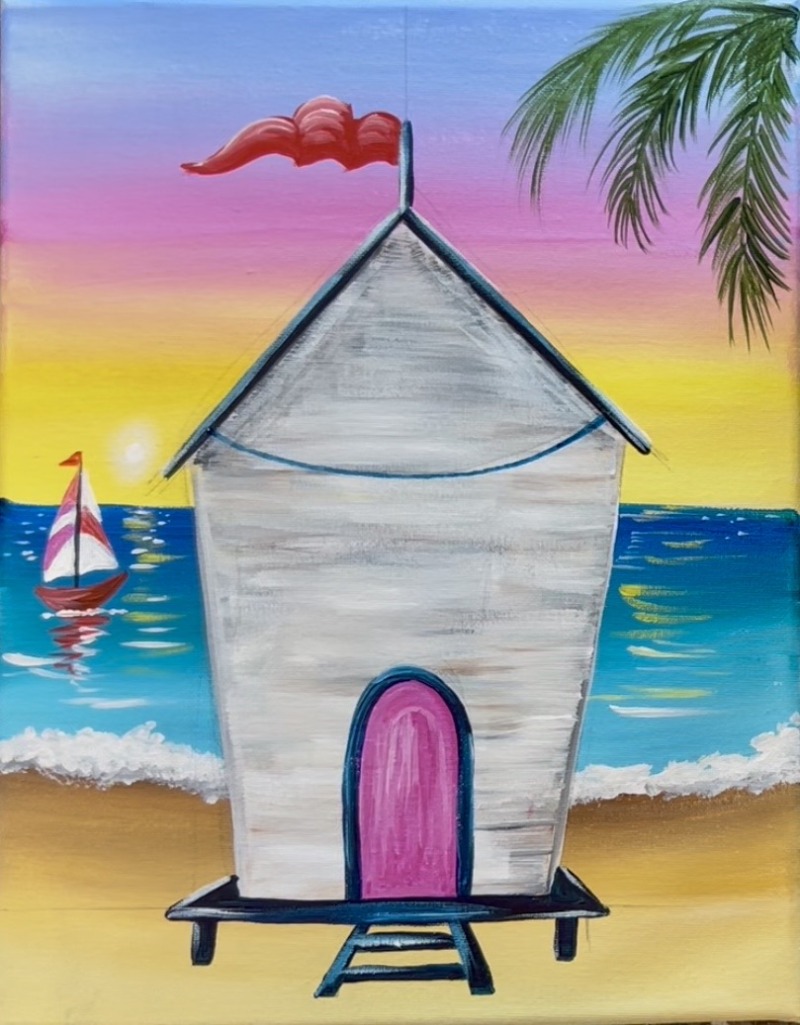
11. Paint Second Layer Of White Over Hut
Next, do a second coat of paint over the hut. This time you still want to use white with just a tiny bit of brown and black (but lighter this time). Essentially you want to brighten the house especially if your first layer ended up too dark. If needed, don’t add any brown or black into your paint mixture and “Dry Brush” white over your house to create a white wash effect.
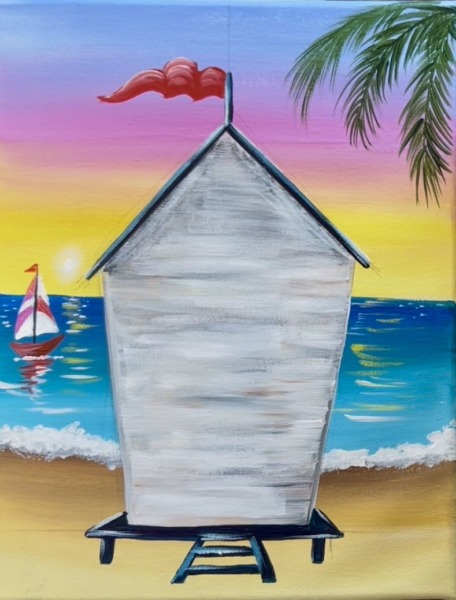
12. Highlights On Roof, Stairs & Base
There is a slight blue tint to the roof and base! Mix on your palette 2 parts “Phthalo Blue” and 1 part “Mars Black”. Use a #4 round brush to re-paint the roof, pole, base and stairs.
Then add a little bit of white to your brush and add a highlight to the edges. Paint just the top of the roof and left side of the windsock pole. Then paint the base so the edges of the lines are highlighted a lighter color. Do this to the ladder stairs as well.
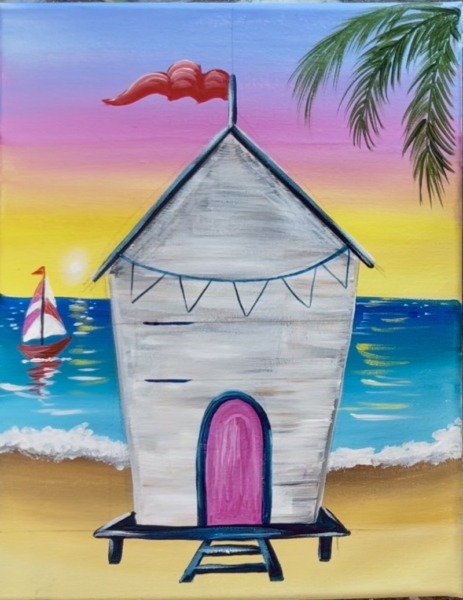
13. Paint Door, Windows & Bunting
Use the color “Medium Magenta” to paint a tall door with curved top to it. It may be helpful to pre-draw the door first with a pencil before painting it in. Paint this with all vertical paint strokes.
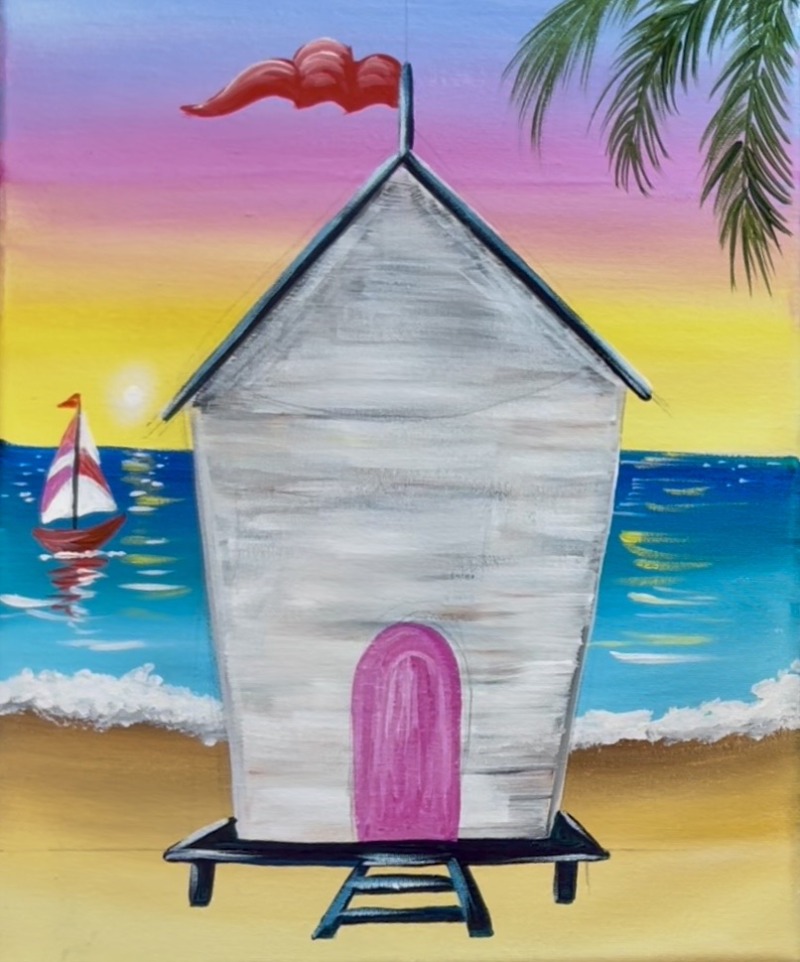
Then use your same “Mars Black/Phthalo Blue” color combination and the #4 round brush to paint a border around the door.
Use the #8 LONG Round brush to paint a curve/ string for the bunting. I decided to paint this first before adding windows to ensure I had enough room for the placement of the bunting.
After painting the initial line for the bunting, paint the triangle shapes going across. I had room for 5 triangles, however, you can do more or less! Alternatively, you can do this step with a black paint pen.
After placing the bunting, paint the windows. It may be helpful to draw the windows out first with a ruler and then paint them in. Use the same dark blue color and the #4 round brush to paint a set of two squares and then a + for window pane lines.
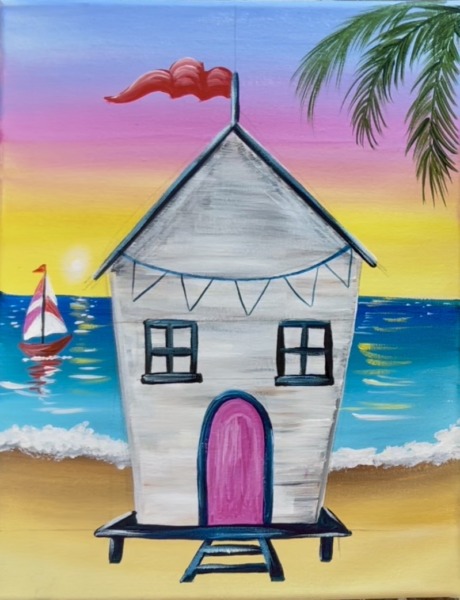
You can leave the inside of the windows blank or paint a color on the inside. I decided to use turquoise and white to paint the inside of the windows.
14. Paint Light Green On Palm Fronds
Use the #8 LONG round brush and light green to paint a second layer over your dark palm fronds. To make light green, mix equal parts: “Titanium White”, “Hooker’s Green Hue” and “Primary Yellow”. Slightly water the color down and use just the tip of the brush to paint the thin lines. Don’t cover all of the dark green because that gives your palms more dimension.
15. Door Details, Bunting Details & Wind Sock Details
For detail on the door, mix “Medium Magenta” with just the tiniest amount of “Mars Black”. Paint a second layer over the door using the #4 round brush but paint vertical marks to create more of a wood texture. Then use the same dark blue color (or black) to paint a little circle for the doorknob.
Next, paint little triangle shapes on the left of the door for decor. Highlight the doorknob with just a dab of white.
Paint the bunting triangles with various colors of your choice! Then (optional) paint tiny little white dots on the windsock!
16. Paint Wooden Sign
Use a combination of the colors: “Burnt Umber”, “Naples Yellow” and “Titanium White”. Start by mixing the brown and yellow together. Then use the #4 round brush to paint a piece of driftwood for the sign above the bunting. It may be helpful to draw it out first.
Fill it in with the brown and yellow combination. Then, in the middle of the sign, add just a little bit of white to your brown/ yellow mixture. You want the middle of the sign to be just slightly lighter so black lettering can show up.
17. Lines On Front Of Hut
Use the #8 LONG round brush and dark gray to paint lines along the front of the house. I did this very loosely. To make the gray, mix equal parts “Titanium White” and “Mars Black” together. Slightly water it down then use just the tip of the brush to paint very thin siding lines. The lines don’t all need to be perfect or connect. They can also break and continue as they go around the objects such as the doors and windows. They don’t have to be equally spaced apart either (but don’t make them too close together).
18. Sand Piles
Use the #4 round brush and “Burnt Umber” to stipple little dots over the post lines and ladder stair lines to make it look like sand piling up. Add a little “Naples Yellow” and/or “Titanium White” to the top of the brown for a little bit of highlighting.
Then use the #4 round brush to paint a few loose, left and right paint strokes with the brown, yellow and white combination along the sandy area. This creates some more coloring and interest on the sand.

19. Seagulls
Use the #4 round brush and black mixed with a little white to paint seagull lines in the sky. You can do quite a few tiny ones in the distance and even some larger ones up close that may have more detail. Sometimes it helps to look at actual silhouettes of flying birds to help you with the lines and the shapes!
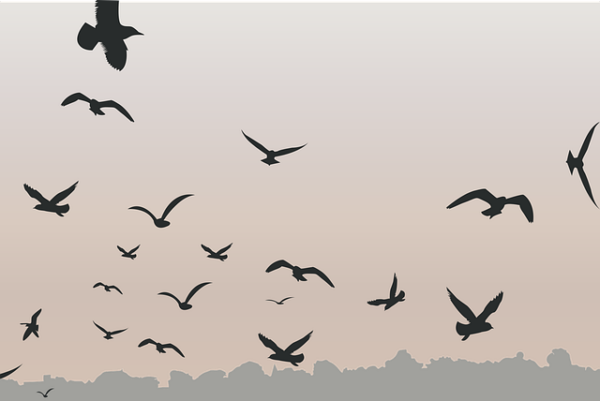
I did a few smaller birds lower in the sky and a few larger ones higher in the sky to create some depth/ distance.
20. Surfboard
Use the #4 round brush and titanium white to paint the surfboard shape in the sand. I made the board about the same height as the door.
Then paint it any color you want! I chose to paint it red. Then add little dots of sand piling up on the bottom of the surfboard to make it look like it’s stuck in the sand.
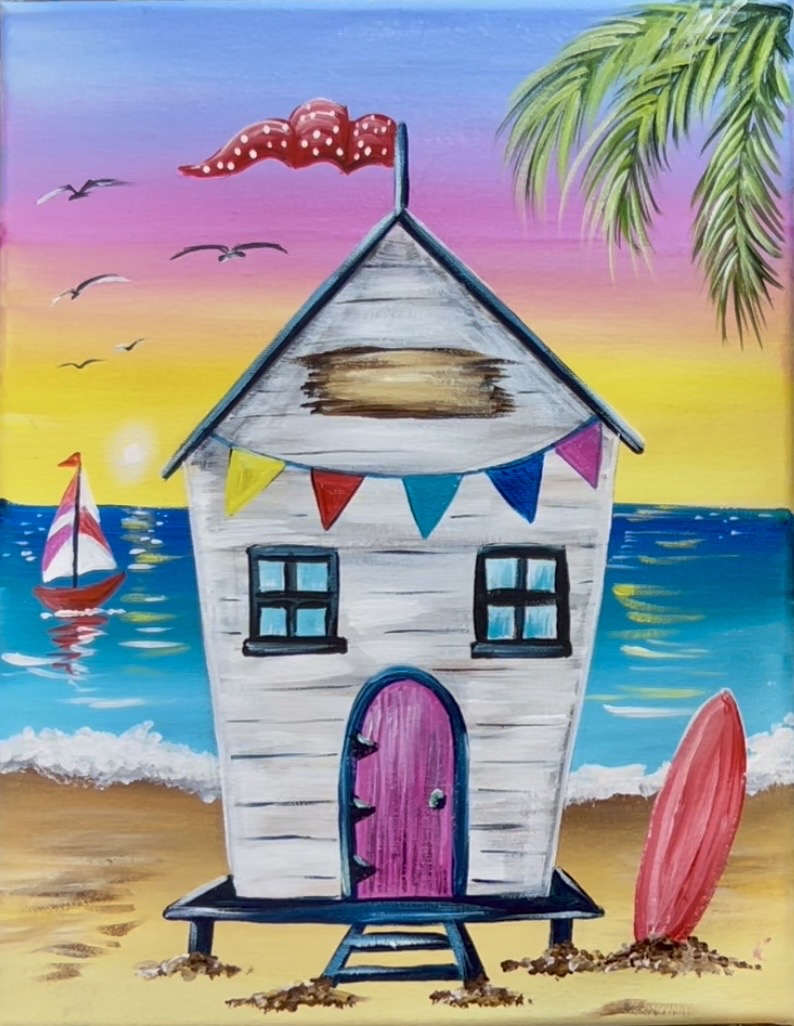
Finally, add some fun designs and coloring to the surfboard!
If you want, you can add your own custom words/ name to the sign on the surf hut!