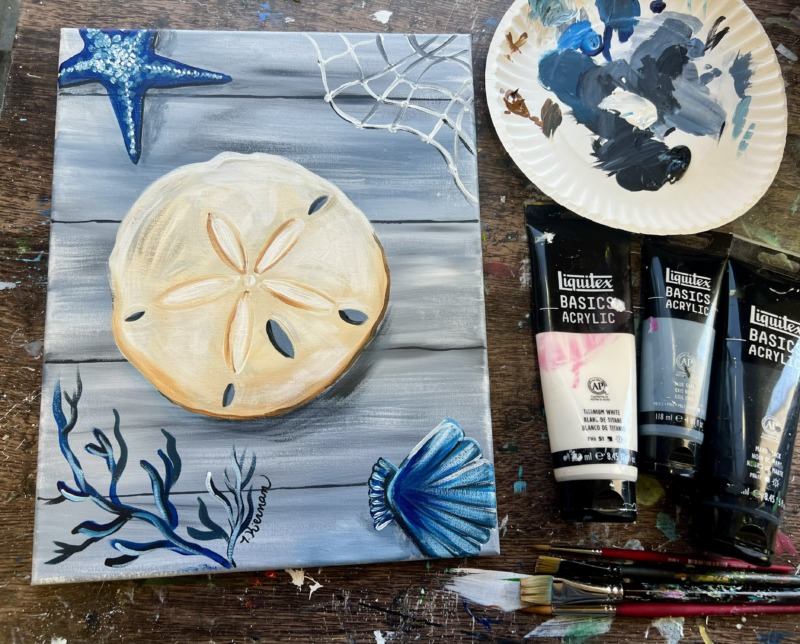
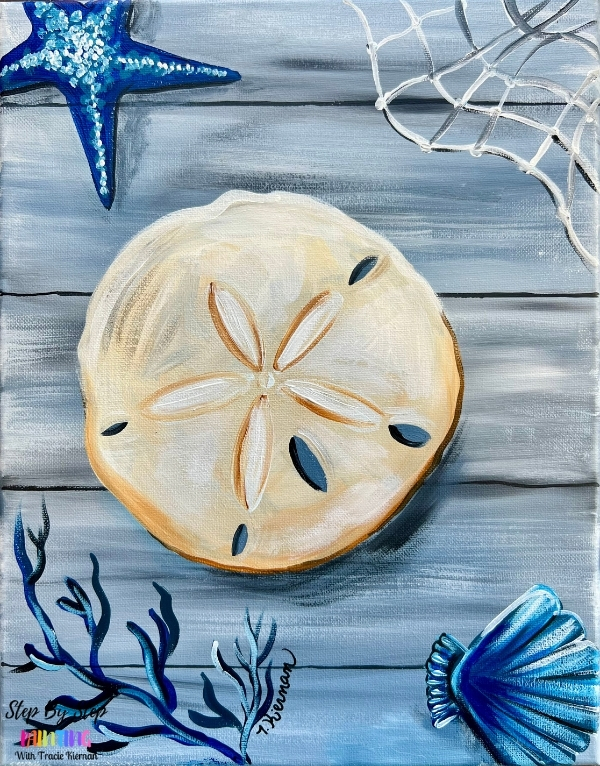
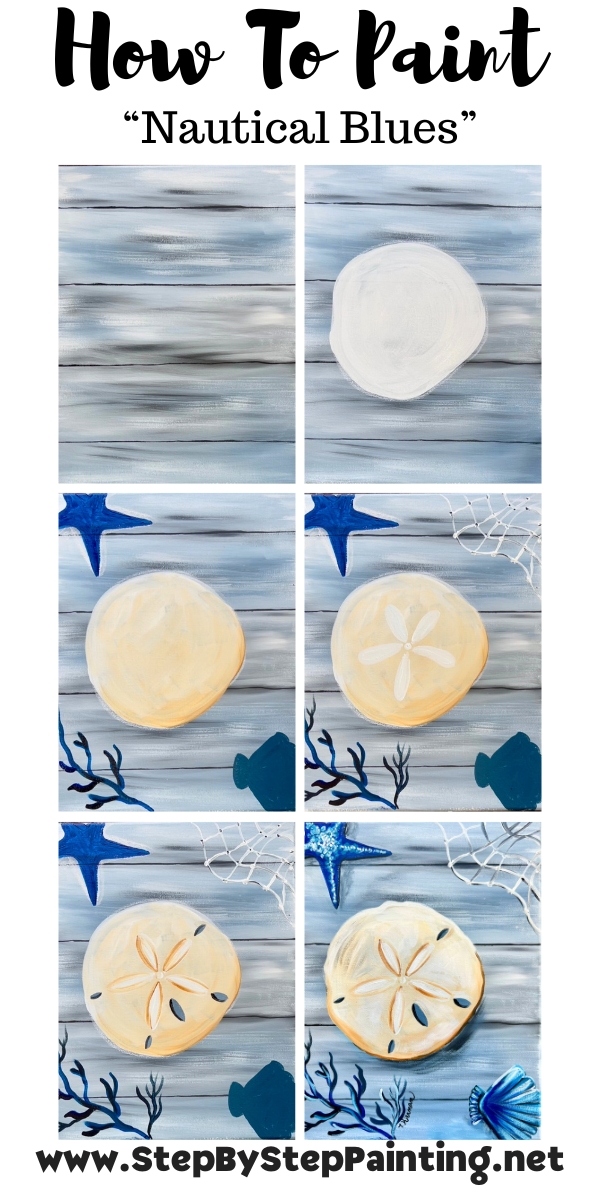
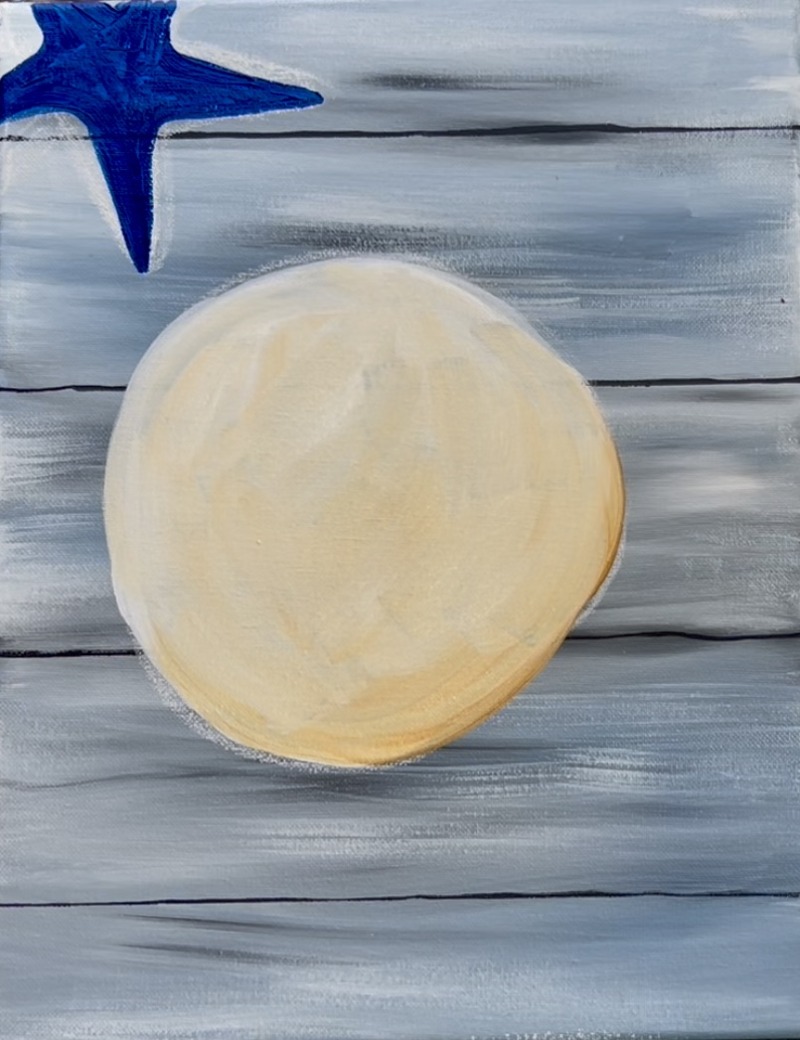
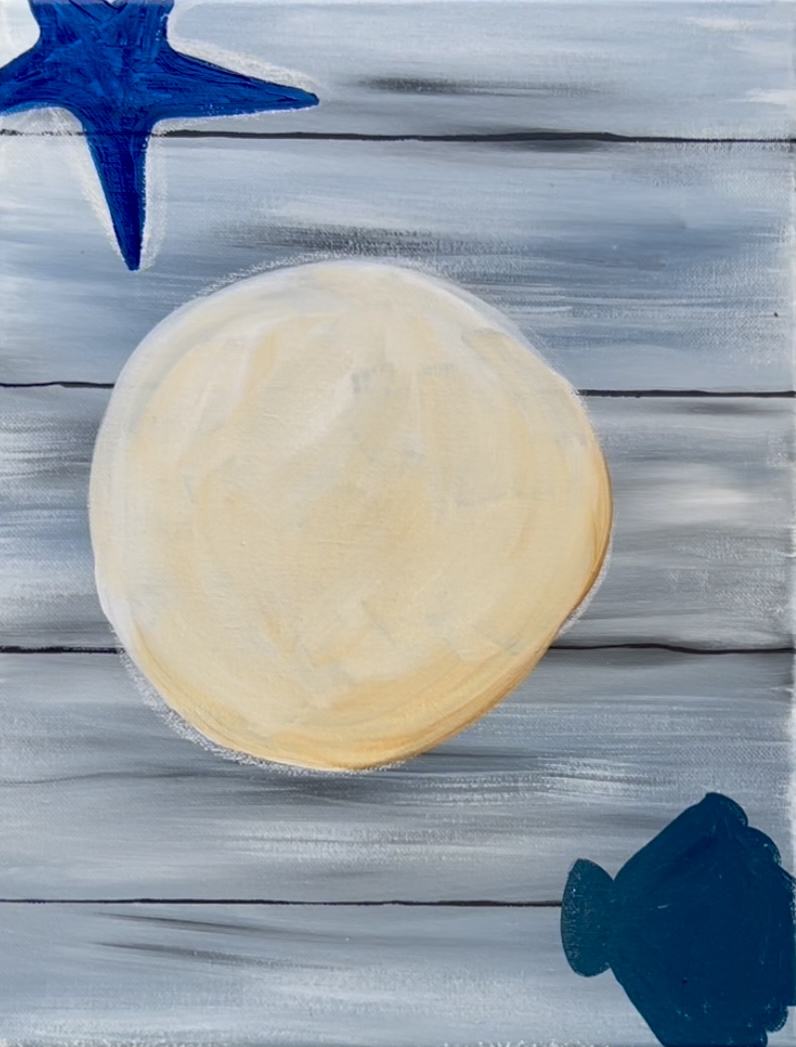
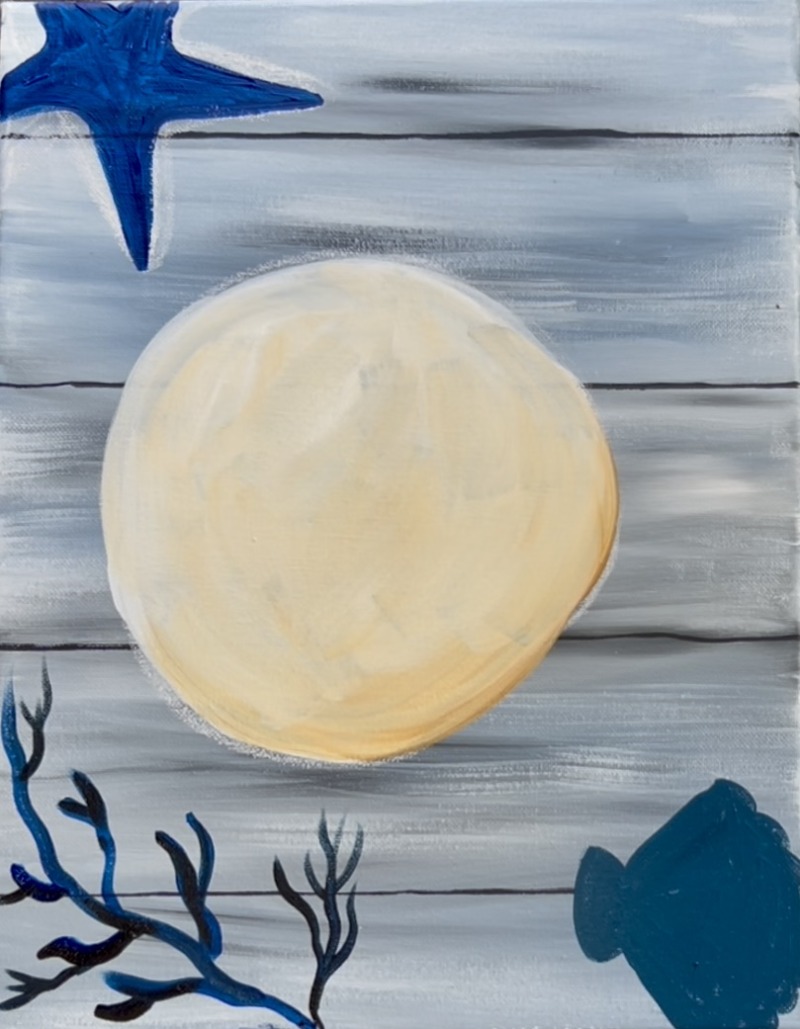
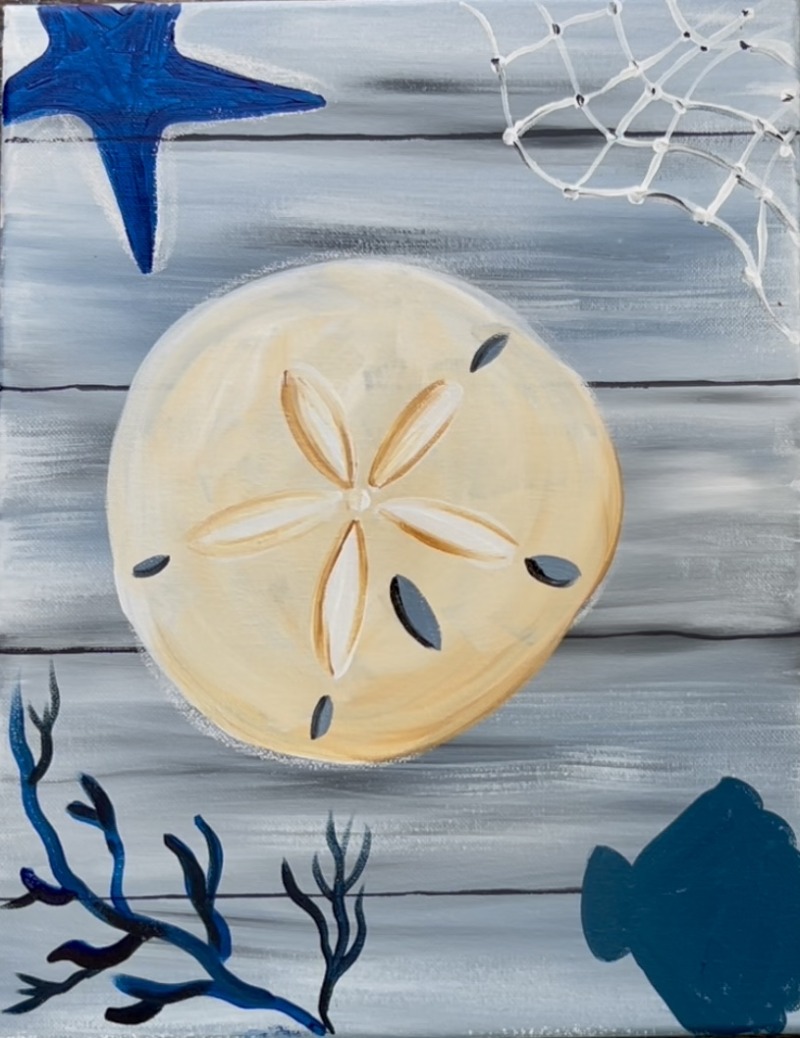
“Nautical Blues” is a simple painting featuring a sand dollar, shell, fishing net, seaweed and sea shell. This is a minimal color palette using only 5 colors!
Would you like to save this?
Enjoy and happy painting!
Materials
- 11 x 14 Canvas
- Acrylic Paint
- Brushes
- Chalk (for drawing shapes)
- Ruler
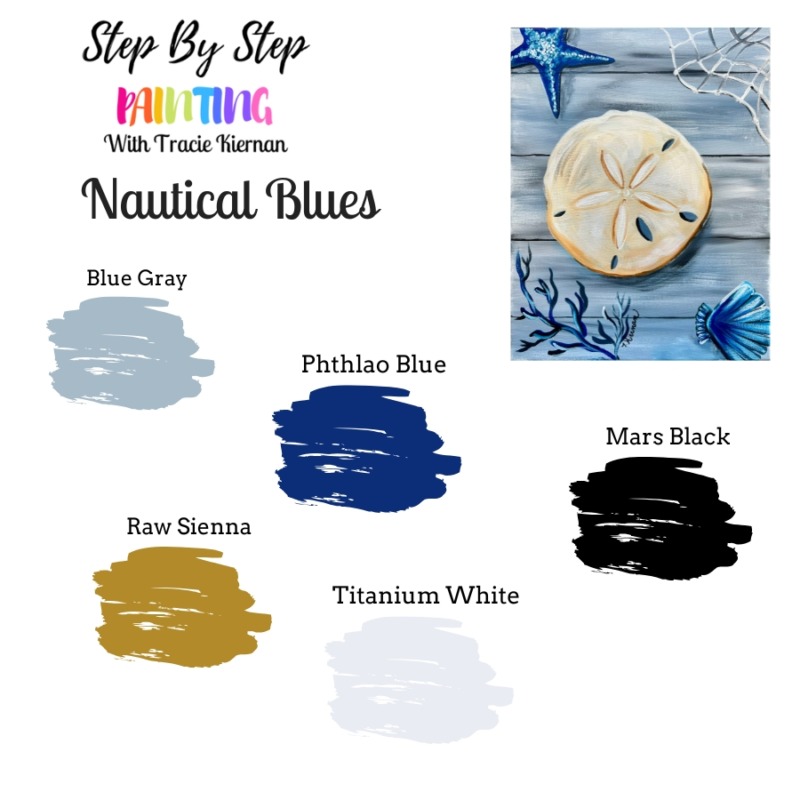
Colors:
- Titanium White
- Mars Black
- Phthalo Blue
- *Blue Gray (see note below about this color)
- Raw Sienna
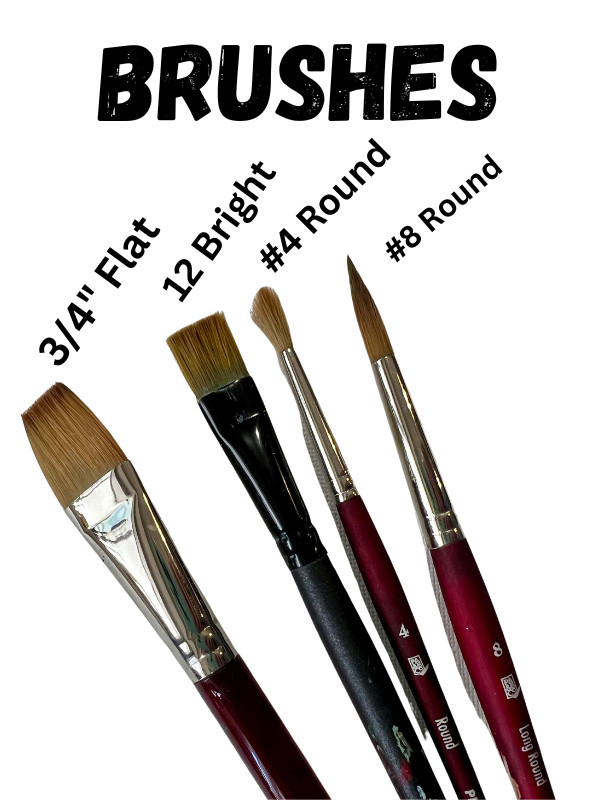
Brushes
- 3/4″ Flat Wash
- 12 Bright
- #4 Round
- #8 Round (optional)
Color Chart:
“Blue Gray” is a specific Liquitex BASICS color. It is the dominant color in the background of this painting. There are some craft paint brands that are similar to this color such as “Dark Blue Gray” by Apple Barrel, “Cloudy Day” by FolkArt or “Winter Blue” by DecoArt. Alternatively, you can take any light gray and add just a little into it to tint the gray blue.
Brush Visual:
Directions At A Glance:
Video
Step By Step Instructions
1. Paint Background
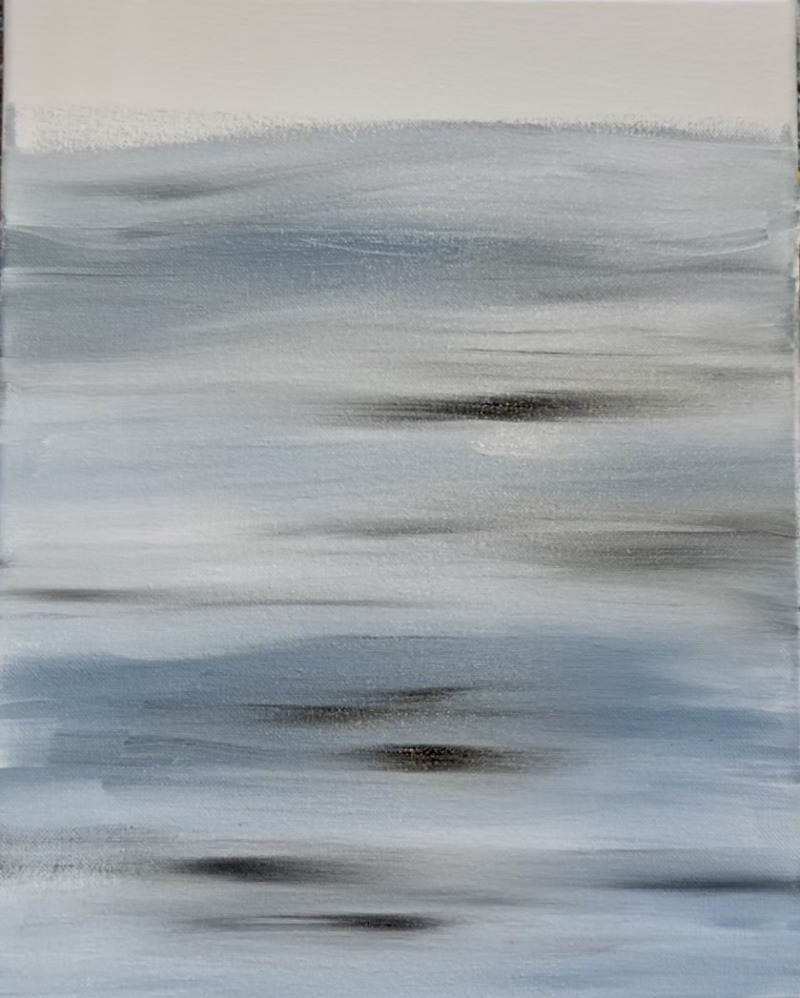
The background in this painting is a blend of three colors going in a horizontal direction to create a weathered blue-gray faux wood look.
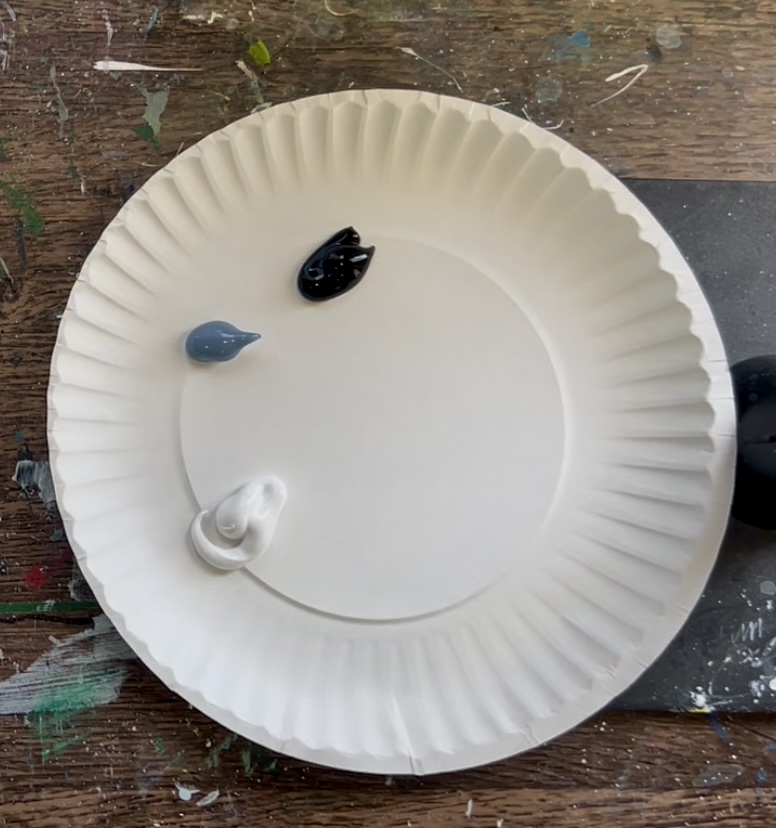
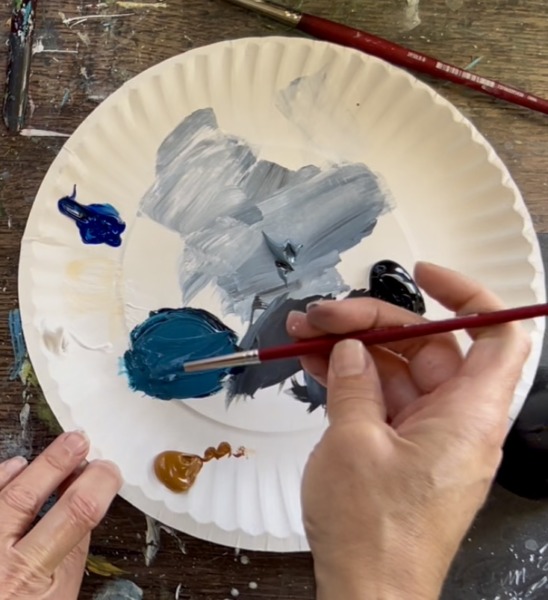
Load your paint palette with the three colors: “titanium white”, “blue gray” and “phthalo blue”.
Load your 3/4″ flat brush with “titanium white” and “blue gray” (about equal amounts of both those colors on the brush). Paint left and right paint strokes across the canvas. You want the colors to gently blend together on the canvas to create a pretty and blended “faux wood” look.
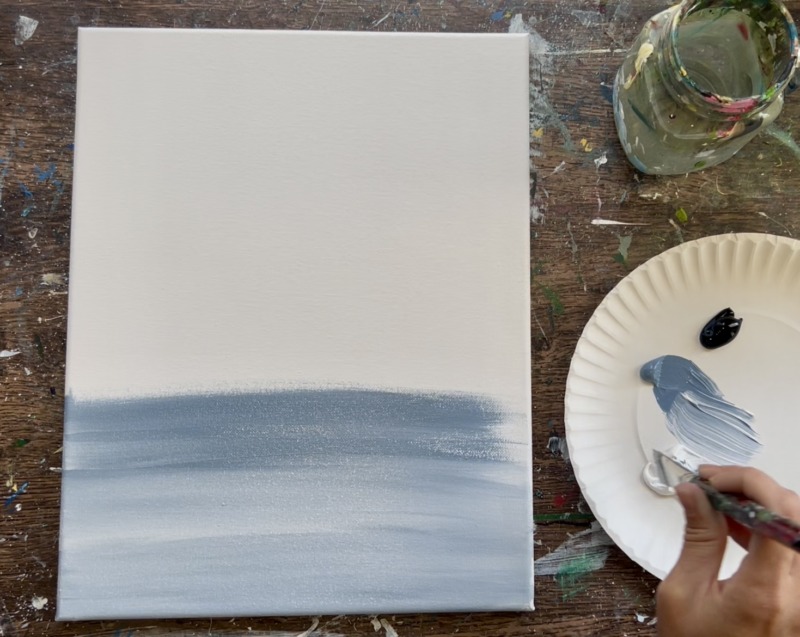
As you fill the canvas, add very tiny bits of “black” to the corner of your brush. Gently blend in the black with the white and blue gray on your canvas to create dark streaks of color. This adds to the weathered look we are trying to create!
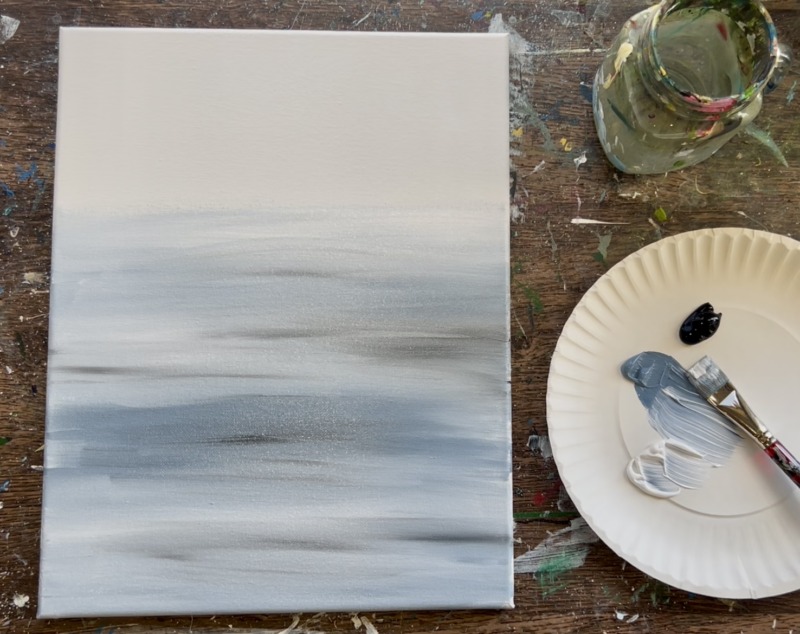
Fill this all the way on the canvas. It is okay to have variations in the dark and light to create this weathered background!
Blend in more streaks of black or white as needed.
Wait for this to dry before going onto the next step.
2. Paint Horizontal Lines For Wood Boards
Next, paint horizontal lines to create faux wood boards. Use a ruler, the #8 long round and the color “mars black” to paint a thin horizontal line. Start on the bottom (or top) at about 3″ from the edge of the canvas.
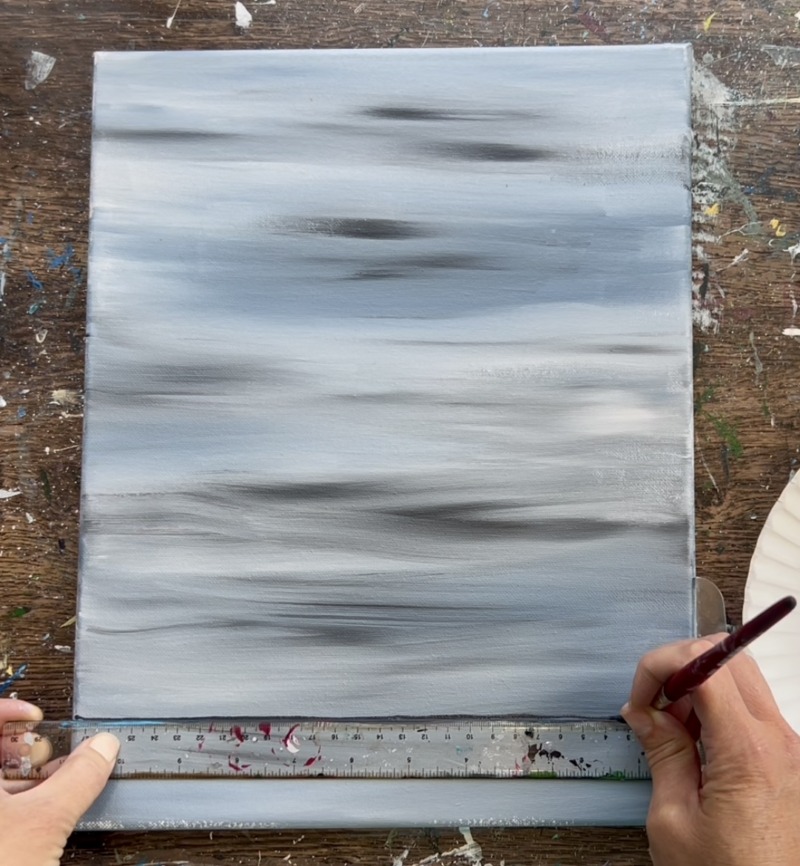
Note: if the line is too dark, try mixing some gray blue into it.
Space your horizontal lines about 3-4 inches apart. This doesn’t have to be exact and the spacing can vary a little bit. Also, your horizontal line doesn’t have to be perfect! Imperfections I the line adds to the weathered look in the background.
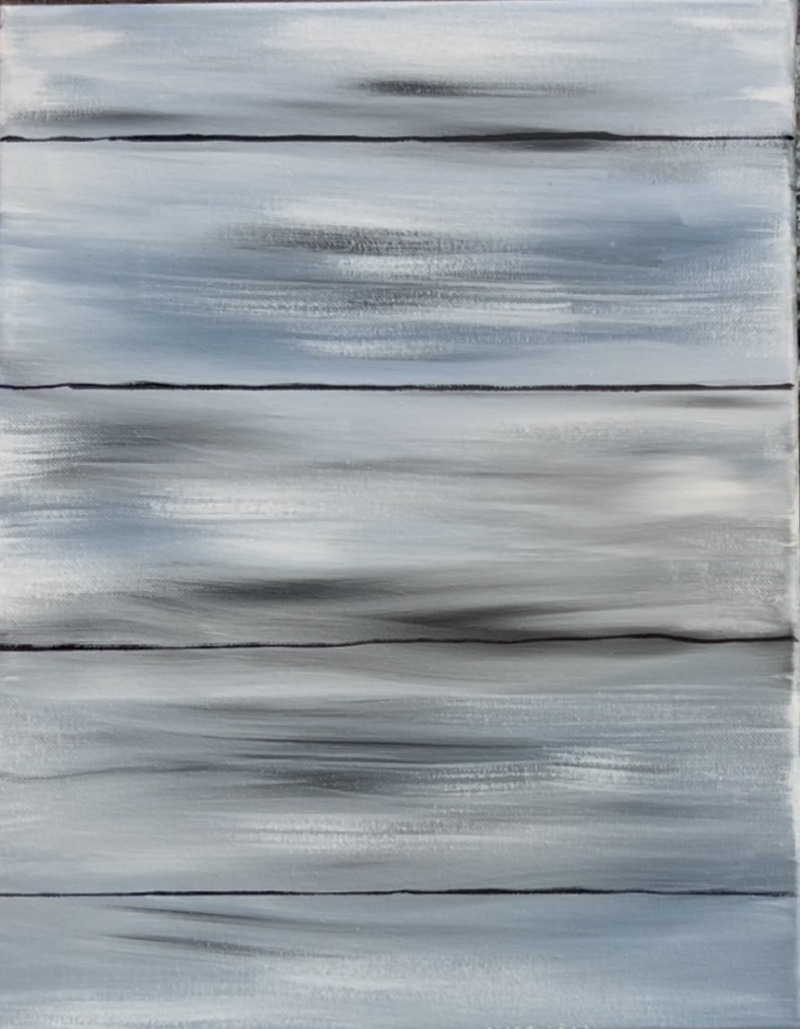
After you paint your lines, you can go back with the 3/4 flat brush and “dry brush” white or dark gray (mix black with blue gray) marks throughout the background.
Wait for this to dry before going onto the next step.
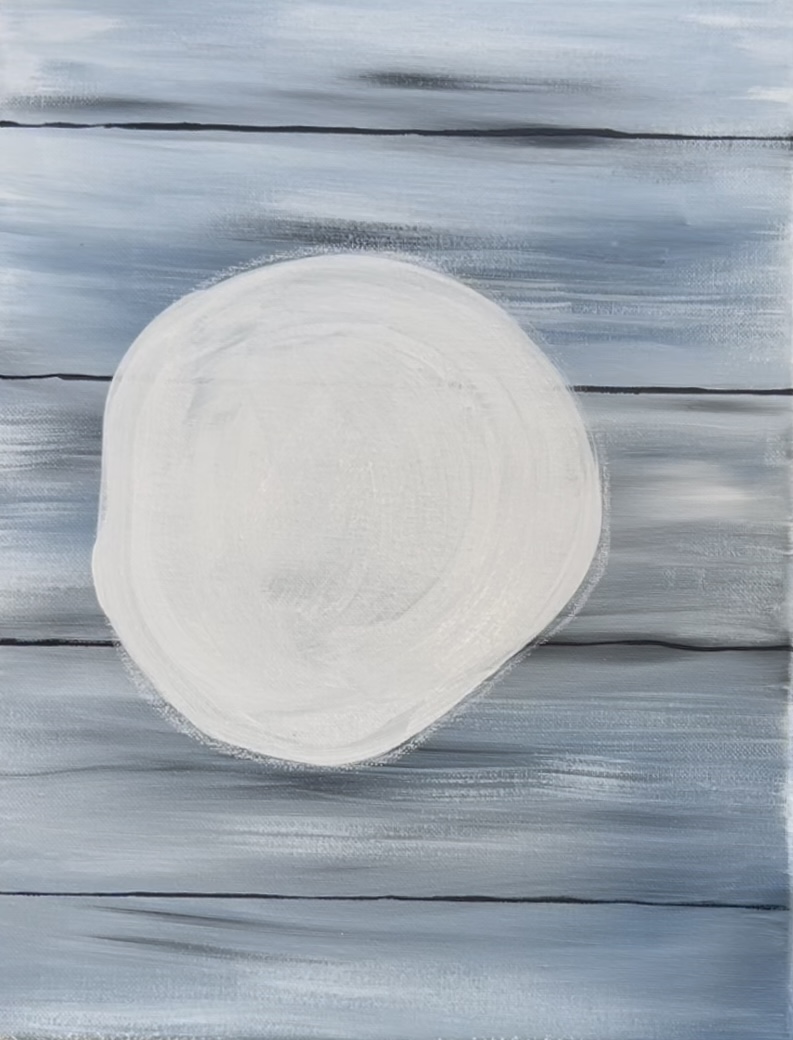
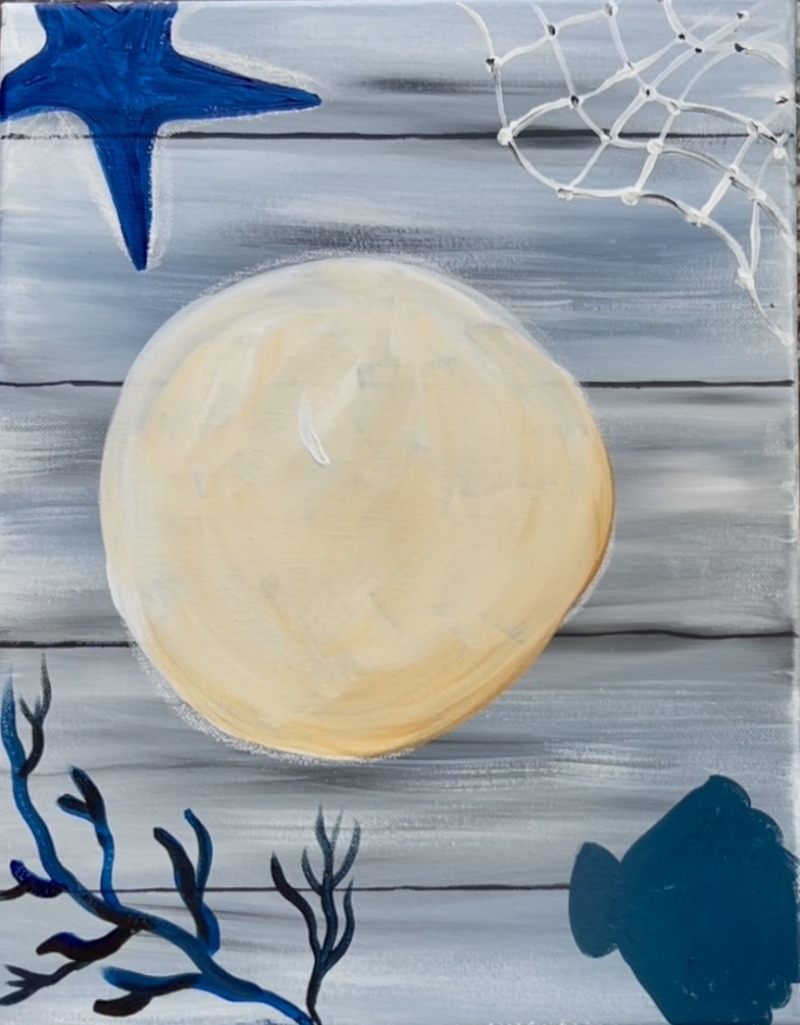
3. Draw And Paint Sand Dollar
Use a piece of chalk to draw the sand dollar. This is a large circle shape (not a perfect circle) that dents slightly inwards. I drew mine in the middle of the canvas, slightly offset to the left.

Use a 3/4 flat brush to paint the sand dollar titanium white. This is to cover the background color and provide a good base for some of the color variations we will add to the sand dollar.
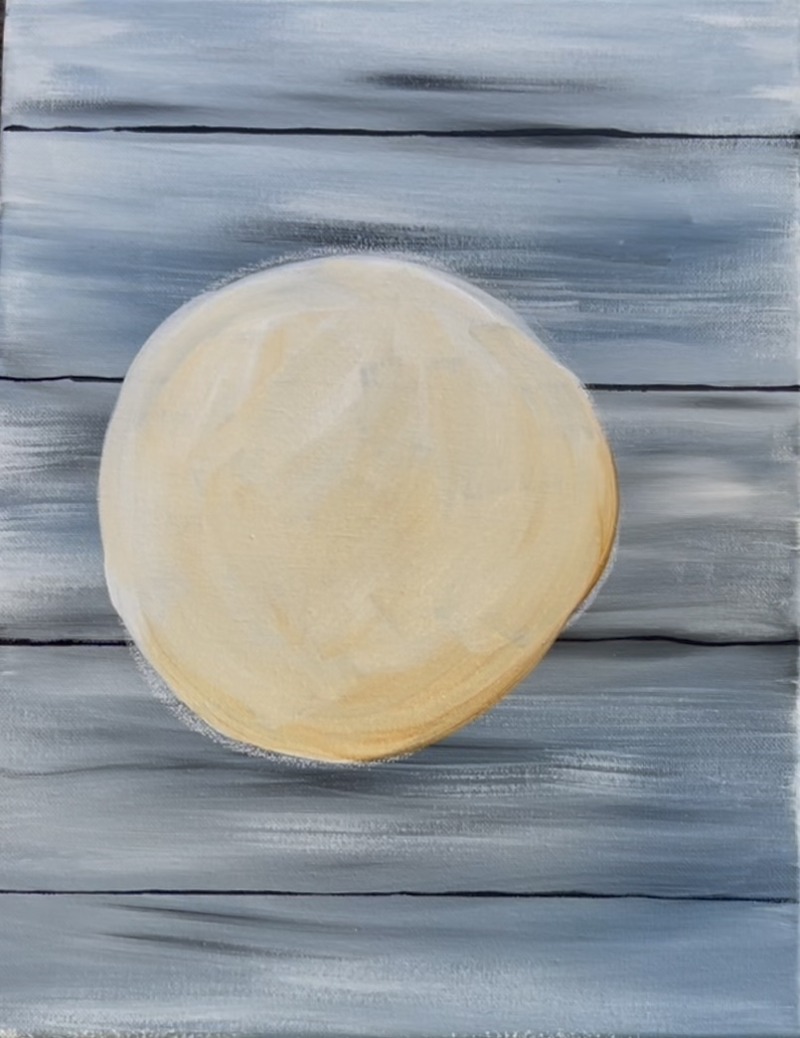
Next, load your paint palette with the color “raw sienna”. Load your brush into a tiny bit of “raw sienna” on the corner and the rest of the brush into “titanium white”. Alternatively, you can mix on your palette 1 part raw sienna and 4 parts white. This will make a light beige color.
Paint this “beige color” over the initial white layer. Outline the shape of the sand dollar and fill it in with paint strokes going different directions (for a bit of expressive texture).
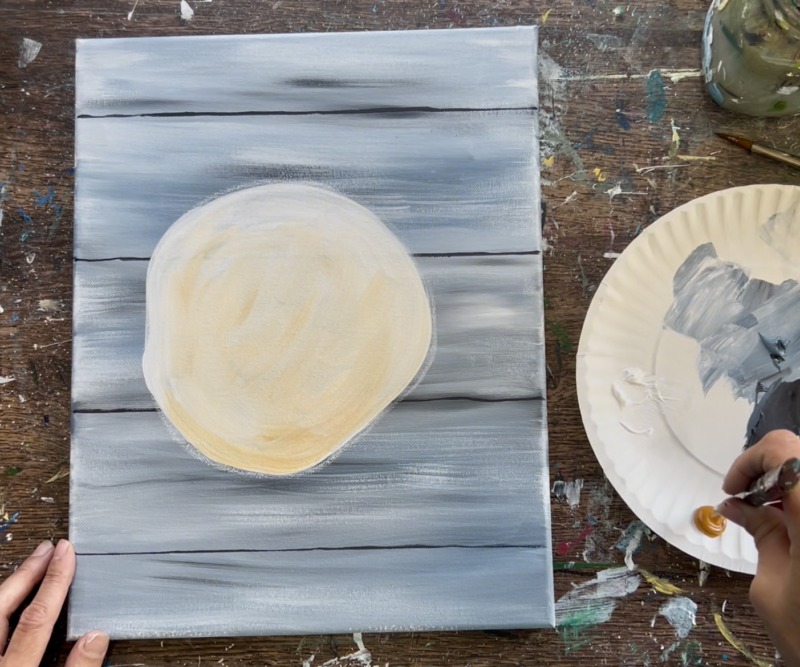
I intentionally made the bottom edge of the sand dollar slightly darker and the top edge slightly whiter.
4. Draw And Paint Starfish, Seaweed and Shell
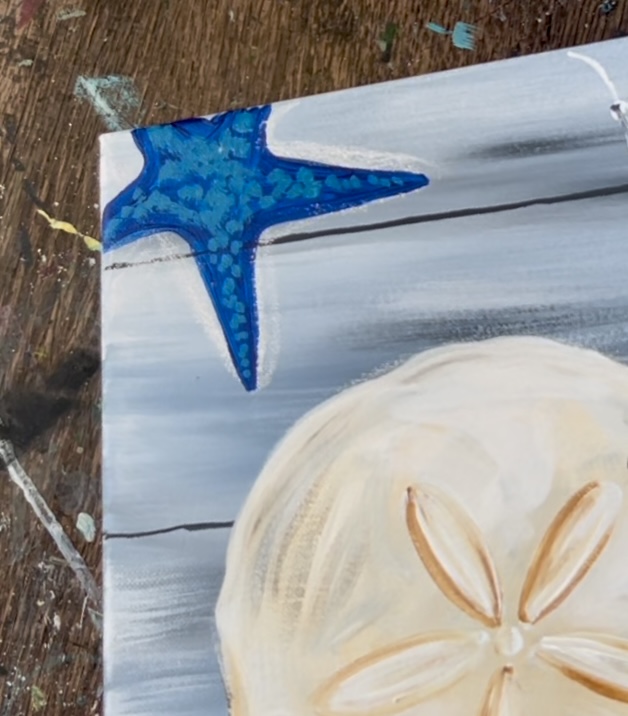
Draw the starfish in the upper left corner using a piece of chalk. This star goes off the top right corner edge of the canvas.
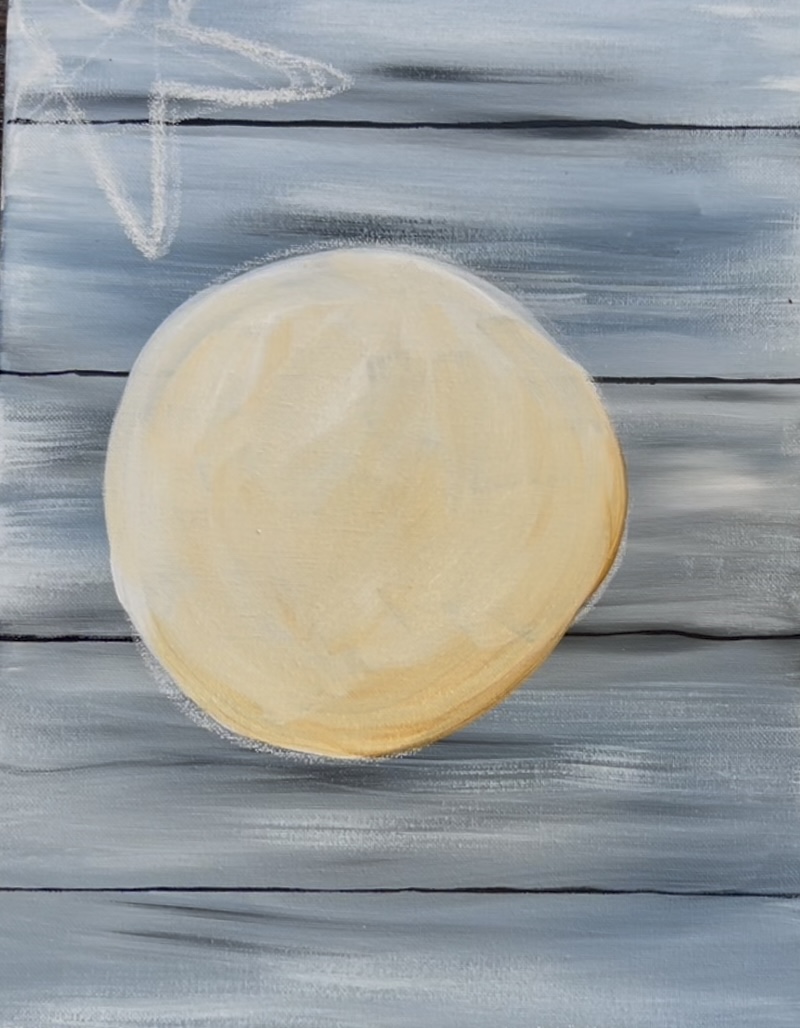
Use the #4 round brush and the color “phthalo blue” to fill the star in a solid coat of this dark blue. Wait for this to dry before adding more detail to the starfish.
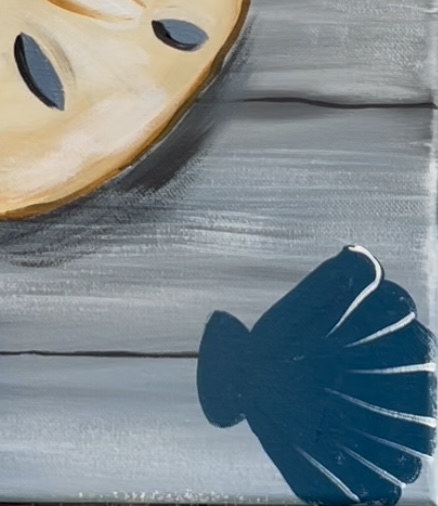
Next, paint the shell shape. This is in the lower right corner of the canvas. Mix the colors: phthalo blue (3 parts), mars black (1 part) and titanium white (1 part).
Paint a fan shape for the main part of the shell.
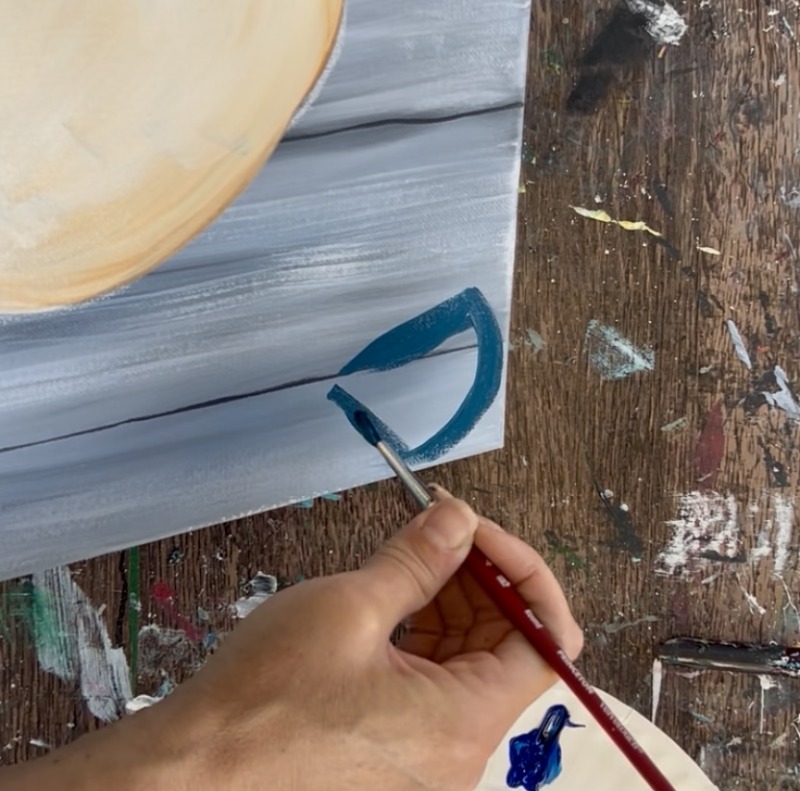
Then draw the bottom of the shell (a semi-circle shape).
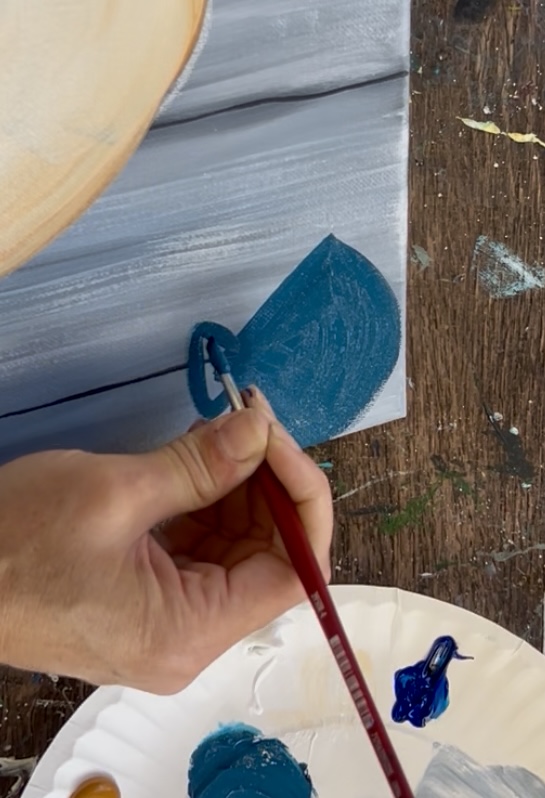
Fill the shell shape in solid with this dark blue-gray color. On the edging of the shell, you can paint curved lines to make the edging of the shell look scalloped.
Then paint the sea-weed. The color used for the sea-weed is: “phthalo blue” mixed with a small amount of “mars black”. Use the #4 round brush to paint branch-like lines to form the shape of the sea-weed. Vary the color on some of the branches where the color is more pure blue and other parts are darker.
5. Paint Fish Net
Use the #4 round brush and “titanium white” to paint the fish net in the upper right corner. Paint thin curved lines going one direction. Most of the lines can be parallel but they don’t have to be perfectly parallel.
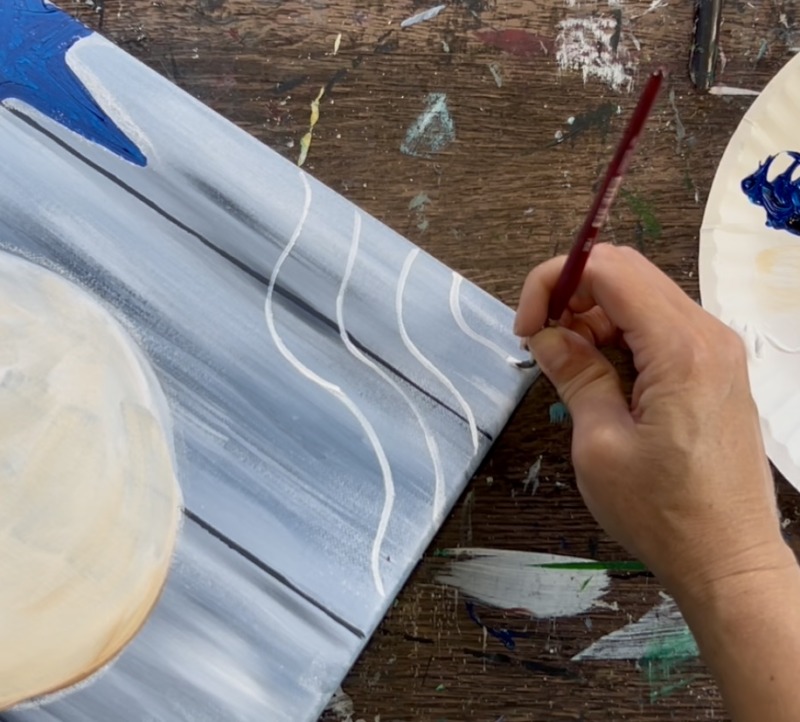
Then paint lines going the opposite direction going parallel or mostly parallel.
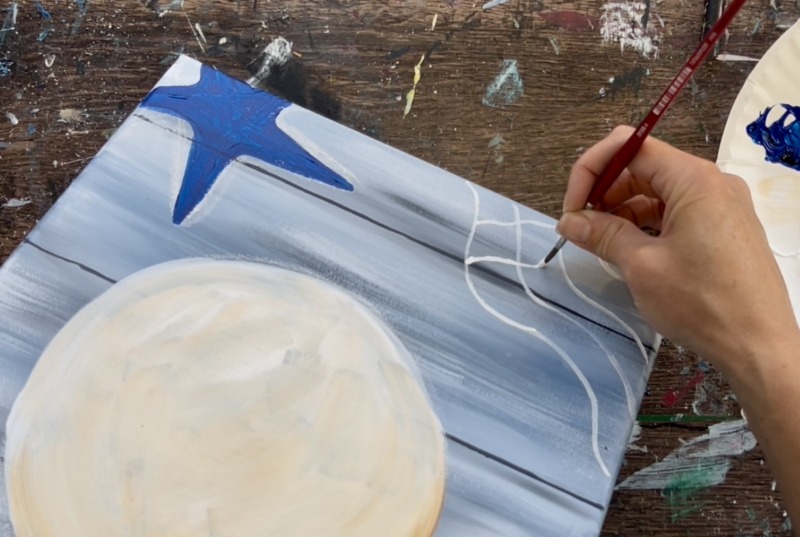
Some lines can be closer to the other lines and some further away. This makes the netting look like it’s sort of bunched up and not all stretched out. Paint little dotted circles on the corners of the lines and on the edges for the knots on the net.
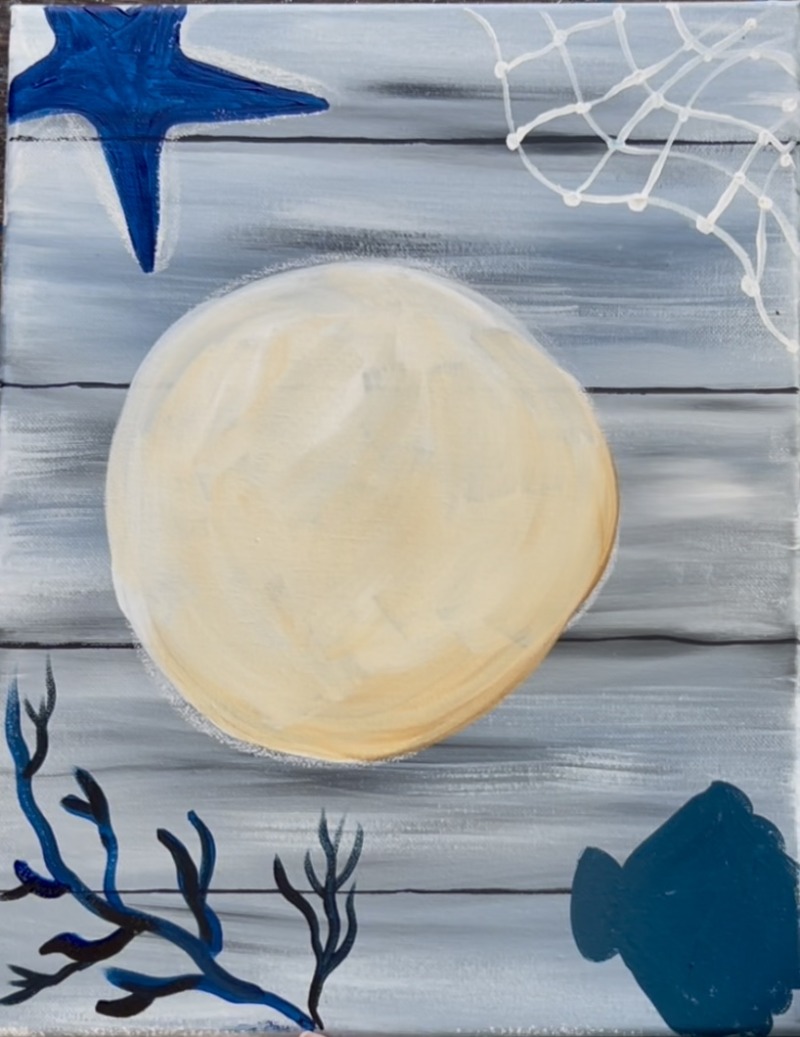
Then take the “mars black” and mix “titanium white” into it to make a dark gray. Use some of that dark gray to paint some of the edges on the lines and some of the knots.
6. Paint Details On Sand Dollar
Use the #4 round brush and “titanium white” to paint the central pattern on the sand dollar. This is a five lobed flower-like pattern with a little circle in the middle. Leave enough space on the outside edge of the lobes for the notches/ openings we will paint on this sand dollar.
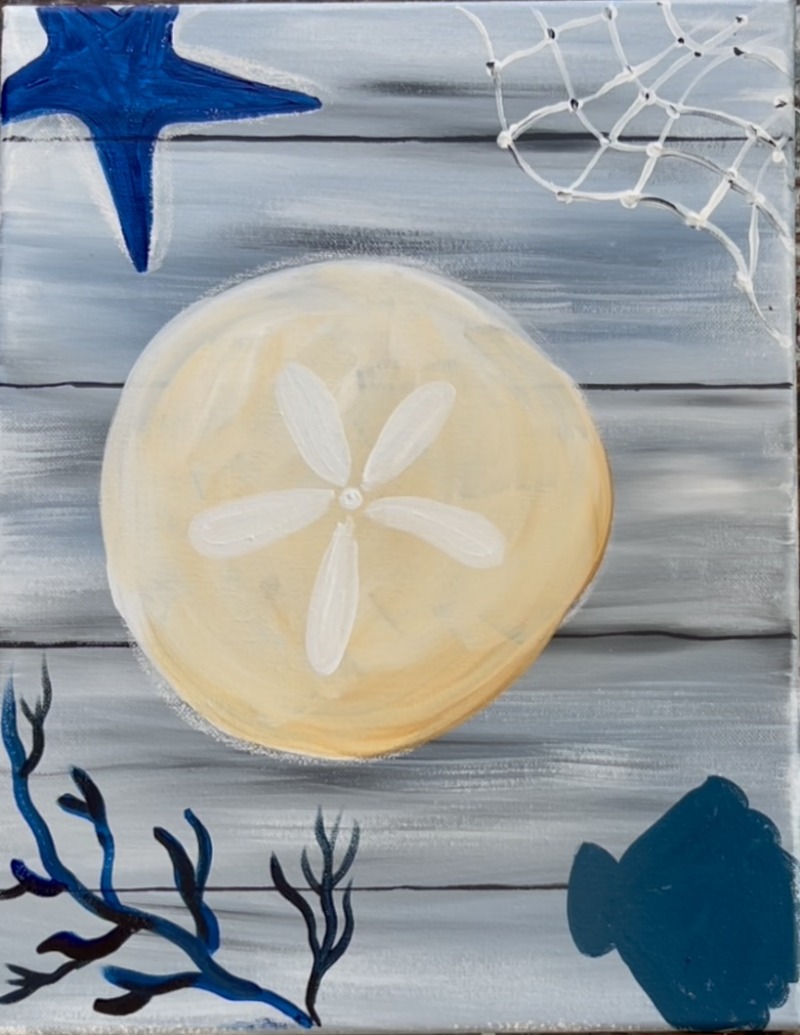
Next, use the #4 round brush. Double load it into “raw sienna” and “titanium white”. Paint/ loosely outline the edges of the petal pattern but leave the interior of each of the petal shapes light in color.

Sand dollars have “notches” or oval shaped openings. To make these shapes look like they go all the way through the disc shaped sand dollar, use the color “blue gray” (same color as background).
Paint small oval shapes below two of the petals. Then paint an elongated oval shape in between two of the petals.
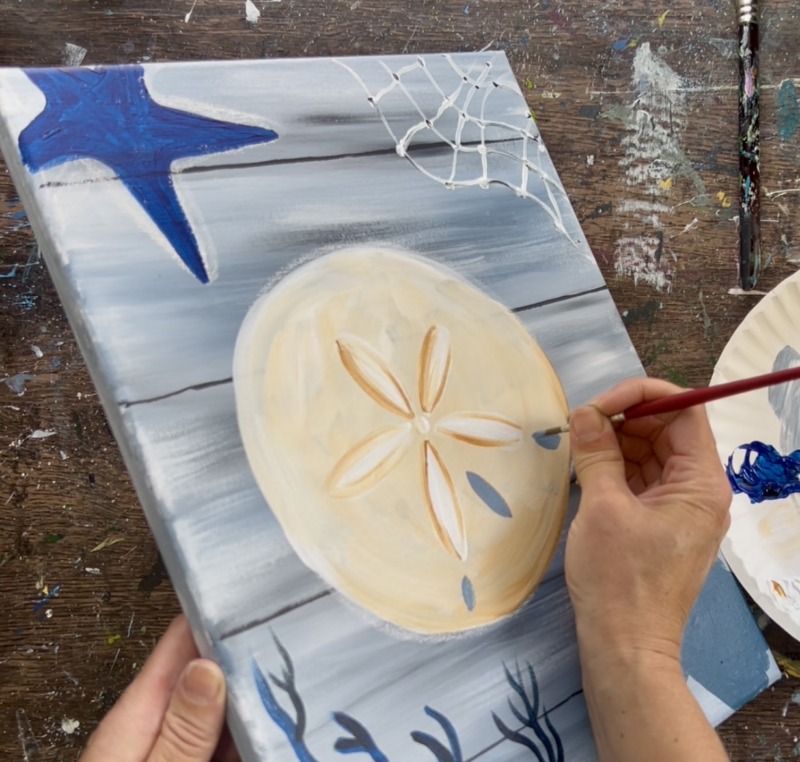
Paint another set of ovals on the ends of two more of the petal shapes. There are no oval shapes on the top petal shape (as pictured below).
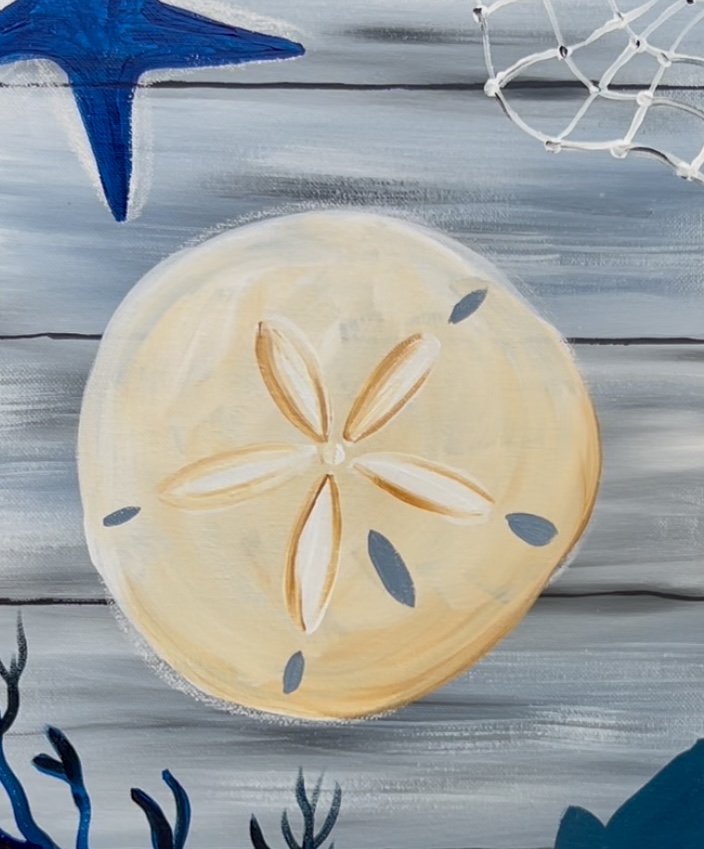
Next, load the tip of the round brush in a small amount of “mars black”. Paint one edge of each of the oval shapes to outline but don’t outline the entire shape. This helps them look a little three-dimensional.
Next, lightly outline the right edge of the sand dollar with “raw sienna” mixed with a little “mars black” (to make a darker brown). Outline just the lower right edge (about half of the sand dollar) and this will help with our shadowing later.

Add a second coat to the sand dollar using the #12 bright brush. Use “titanium white” mixed with a very small amount of “raw sienna”. Add this coat of paint everywhere on the sand dollar using textured paint strokes. Don’t cover all of the first layer and go around the petal shapes and notches. This adds a pretty subtle layer to the sand dollar and ensures all of the background is covered/ not showing through.
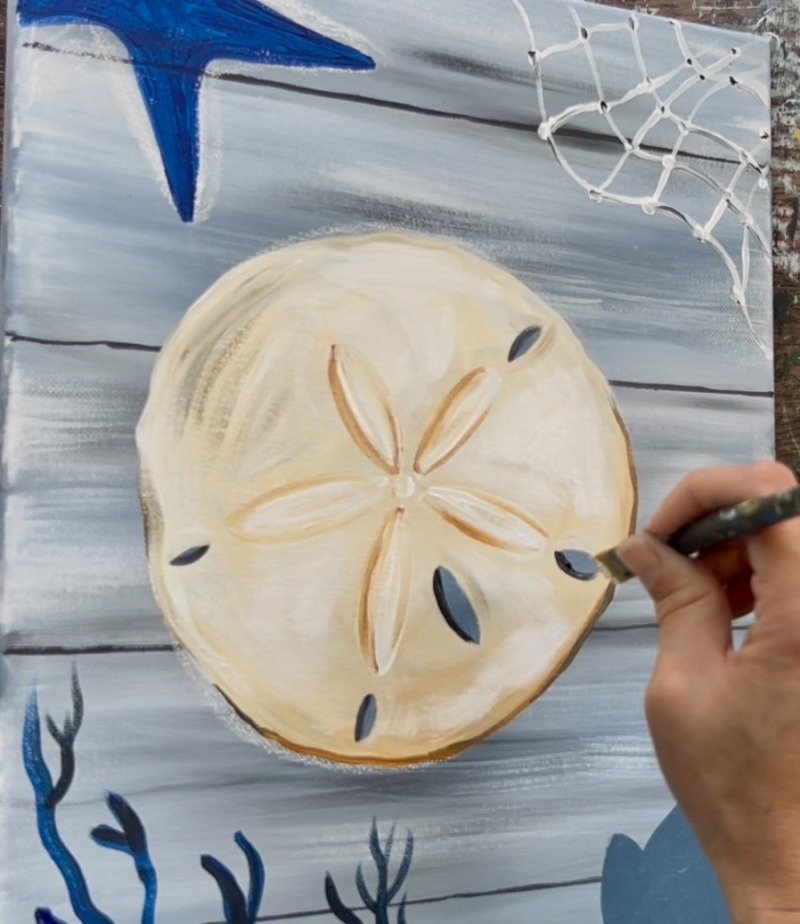
Paint a shadow layer on the bottom right of the sand dollar. Mix “mars black” with “gray blue” (about equal parts). Use the #12 bright brush to dry brush this shadow. When you “dry brush”, you load the brush with the color but wipe off some of the paint on the brush so there’s only a little bit of paint on the brush. The layer should show up translucent and not very solid. Paint this shadow in a curved direction just next to the lower right quadrant of the sand dollar.

7. Paint Details On Starfish
Next, we will be using the #4 round brush to “stipple” texture on the starfish. Since our first layer is a dark blue, our “stipple texture” needs to be lighter than this dark blue to show up. We are going to layer dots from darkest to lightest.
Mix about equal parts “titanium white” with “phthalo blue” to make a medium blue color.
Use the #4 round brush to paint dots on each of the starfish arms. Do this mostly in the center but leave the edges dark with no dots. Leaving the edges dark is important!
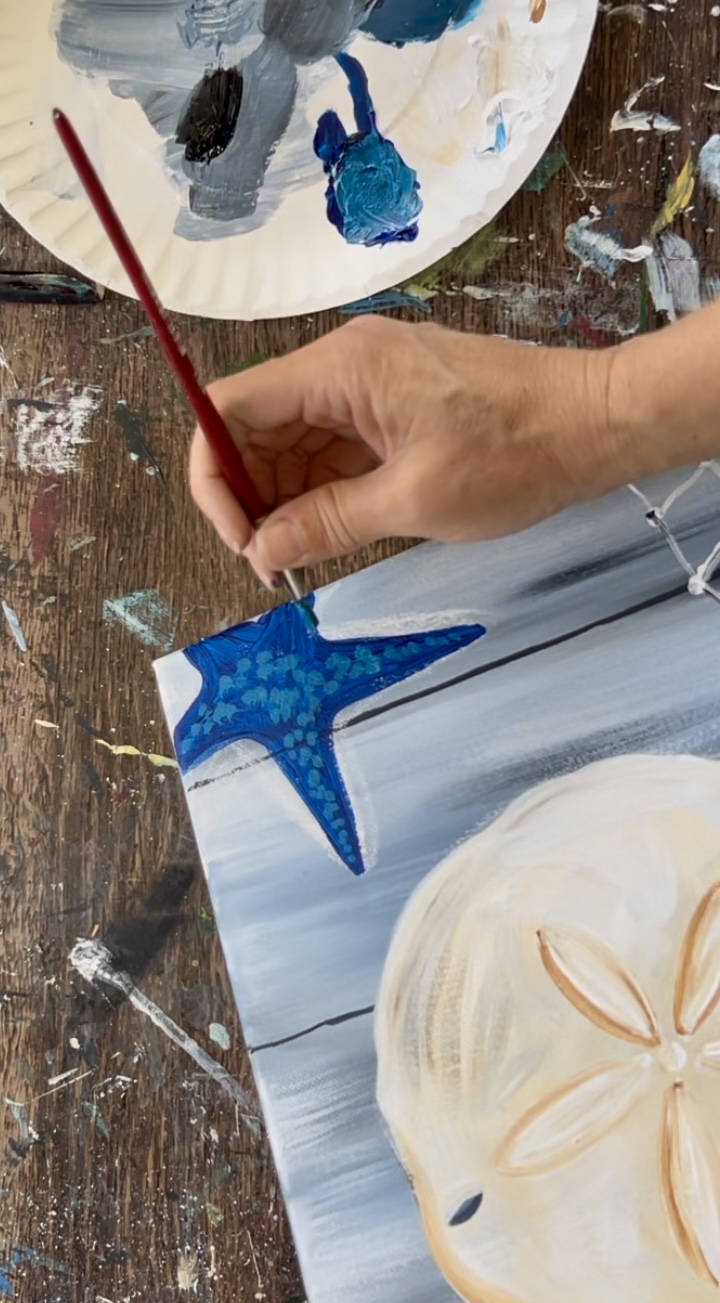
After you do your first layer, you are going to add a second layer! Add more “titanium white” into the color you just mixed so that it becomes a brighter blue. Then use the #4 round brush to paint these lighter color dots in the middle parts of the starfish. This goes over what you just painted but don’t paint as many of these dots and don’t cover all of your previous layer.
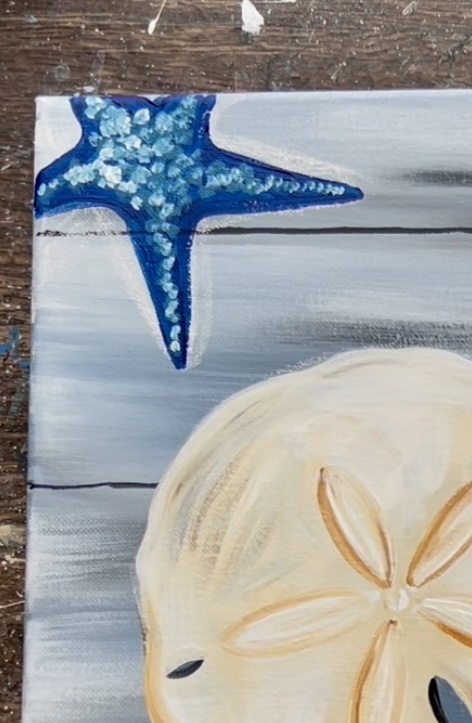
Let this dry a little bit.
Use a clean #4 round brush and load it into just “titanium white”. Paint a thin line of white dots in the center of each of the starfish arms. One row of white dots is all that is needed! Then do a few in the very center of the star. This really makes the starfish pop! When you layer on dark to light, you create this three-dimensional effect!
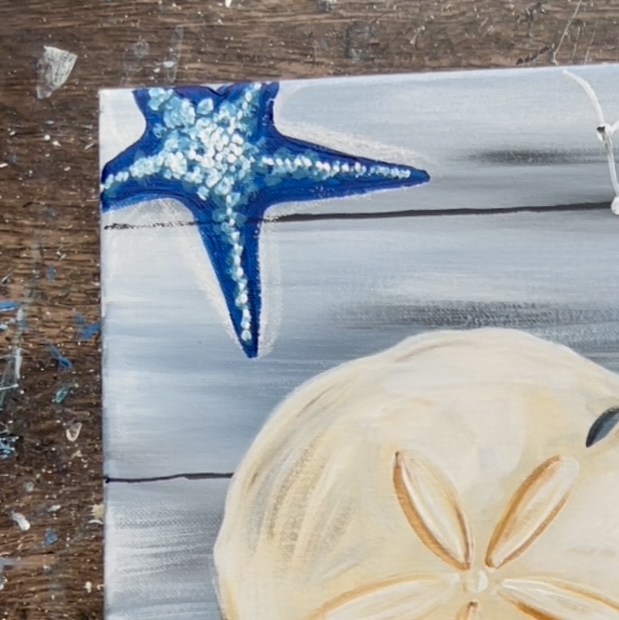
Optional: add shadow next to the starfish using the same technique as the shadow you painted next to the sand dollar. I used the #4 round brush to create the shadow on the right side of the starfish. Make sure to do this “dry brush style” so the shadow shows up translucent.
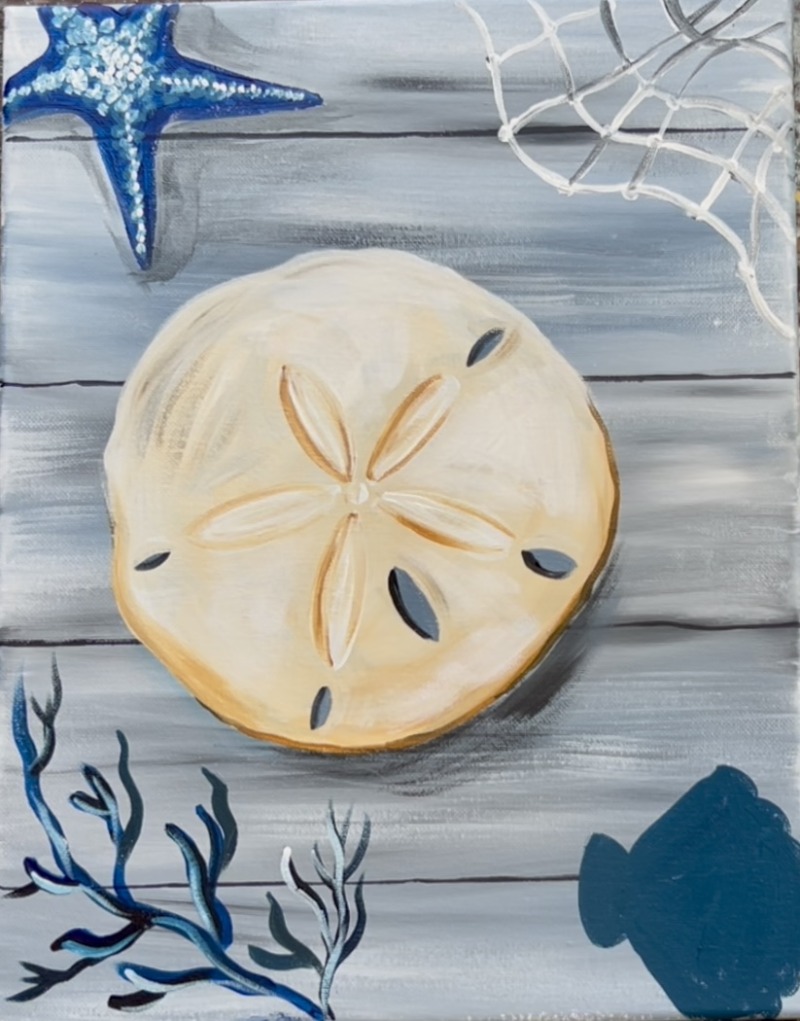
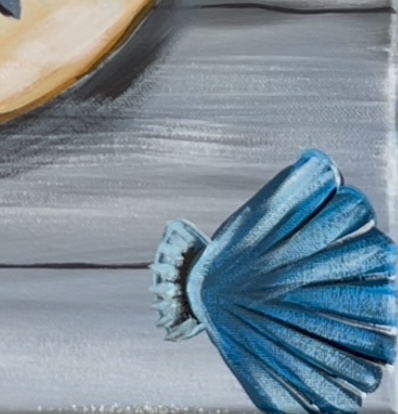
8. Paint Details On Shell
This is how I painted the shell but if you want to make things a little simpler, you don’t have to paint as many layers to it.
Use the color “titanium white” and the #4 round brush to paint the lines that divide the segments of the shell. Don’t paint the lines all the way down, paint them about halfway down.
Outline the bottom curved shape of the shell with white as well.
Next, “dry brush” another layer on the shell in between each of the white lines you just outlined. Mix “titanium white” into “pthahlo blue”. Use the #4 round brush and lightly paint this blue in between each of the lines. Drag your brush downwards and don’t cover it solid.
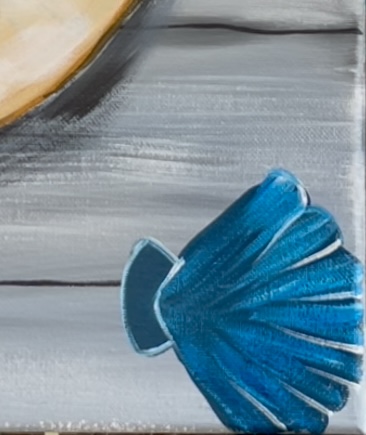
Next, outline the lines again loosely with “mars black”.
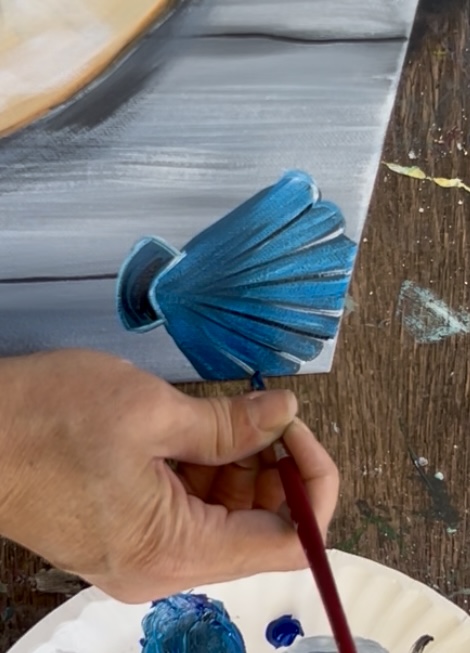
Next, add your lightest layer to the shell. Add more white to your medium blue color you just used. Then dry brush your next layer in the middle on each of the shell divisions. Optional: paint little lines on the bottom of the shell to make the bottom piece “scalloped” too.
9. Final touches
Some final touches could be: darkening some of the fish net to create more contrast (go back over some of the lines with black and white), adding more branches to the sea weed and adding more color variations to the sea weed branches and adding shadowing next to the shell.