Would you like to save this?
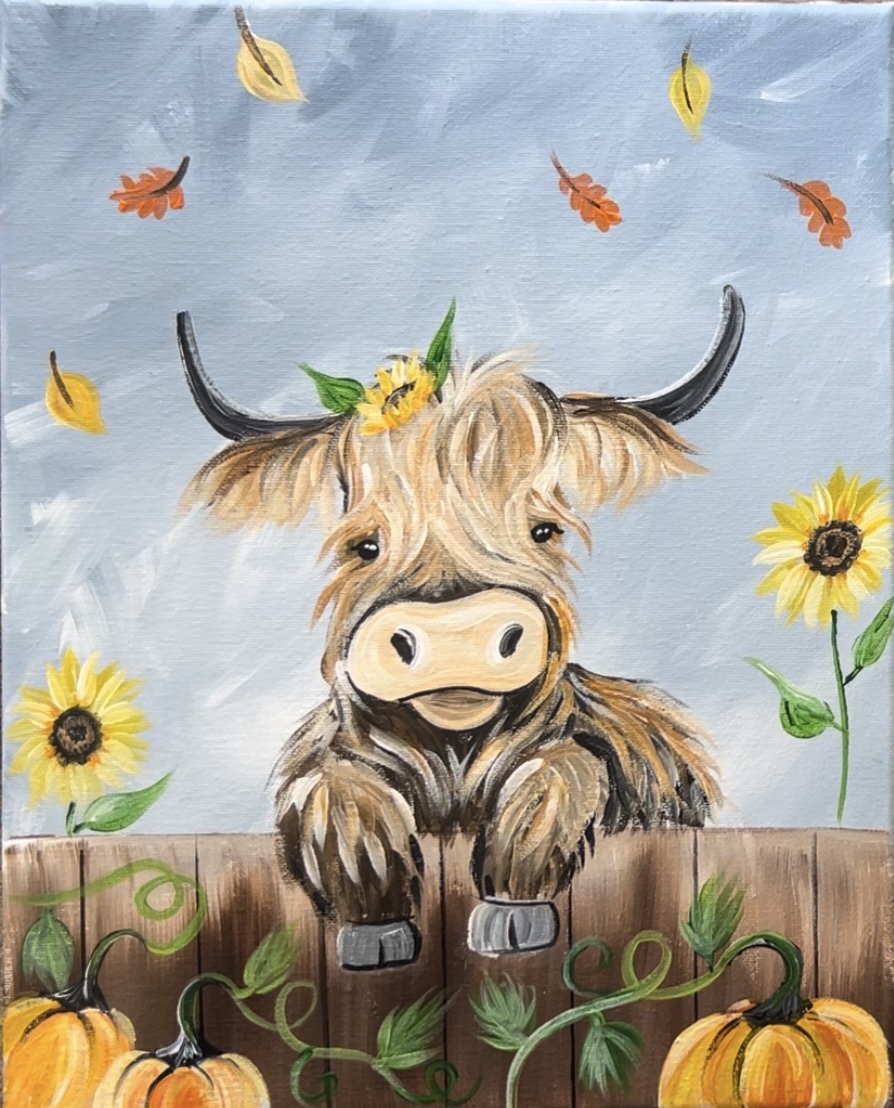
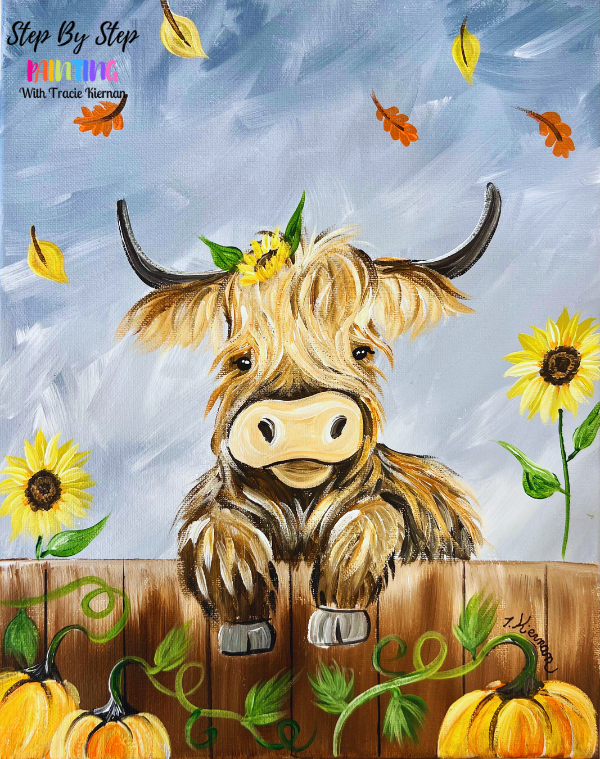
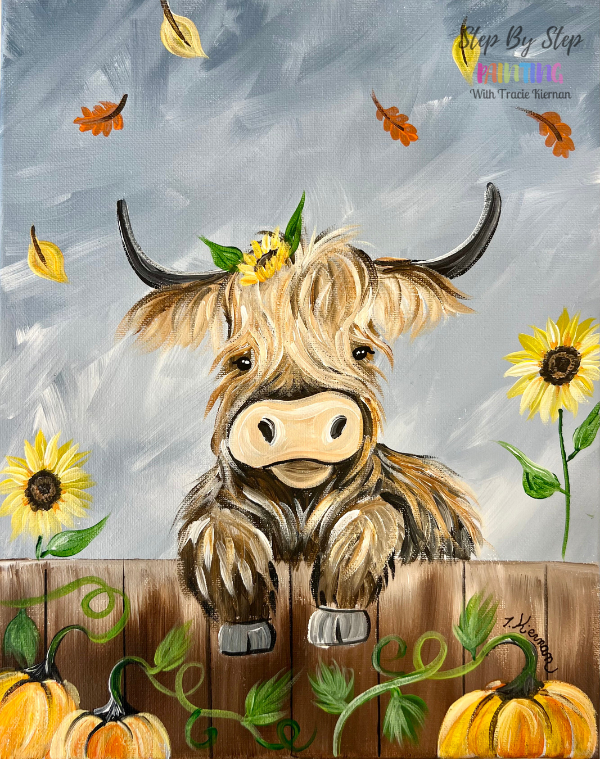
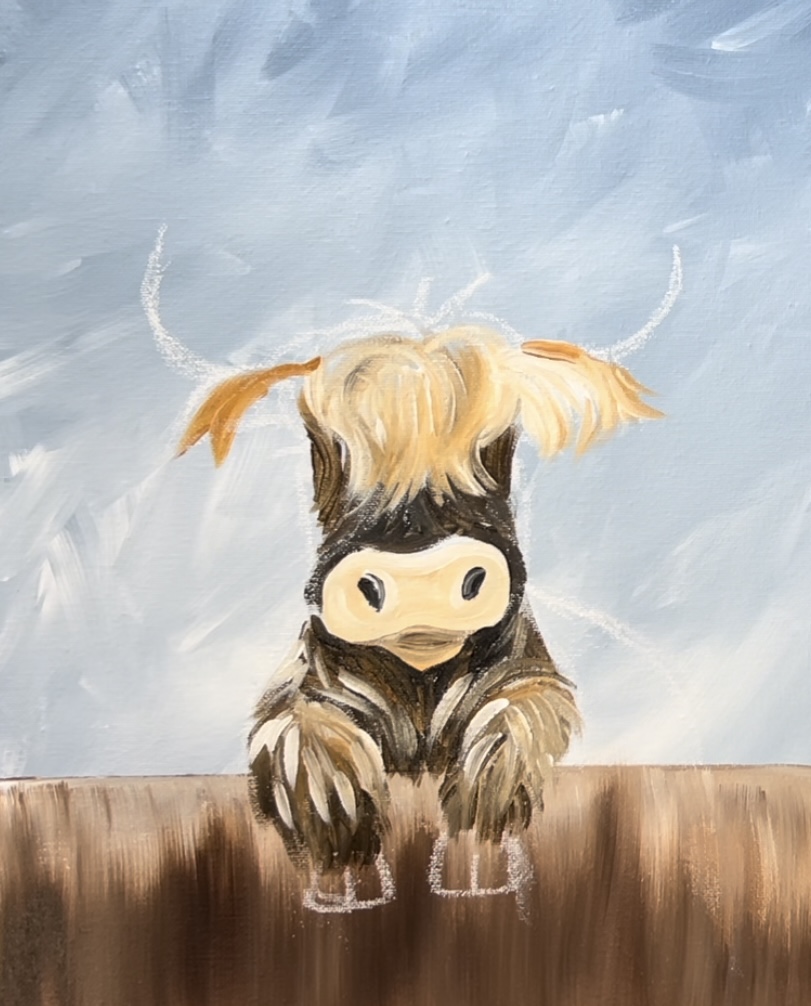
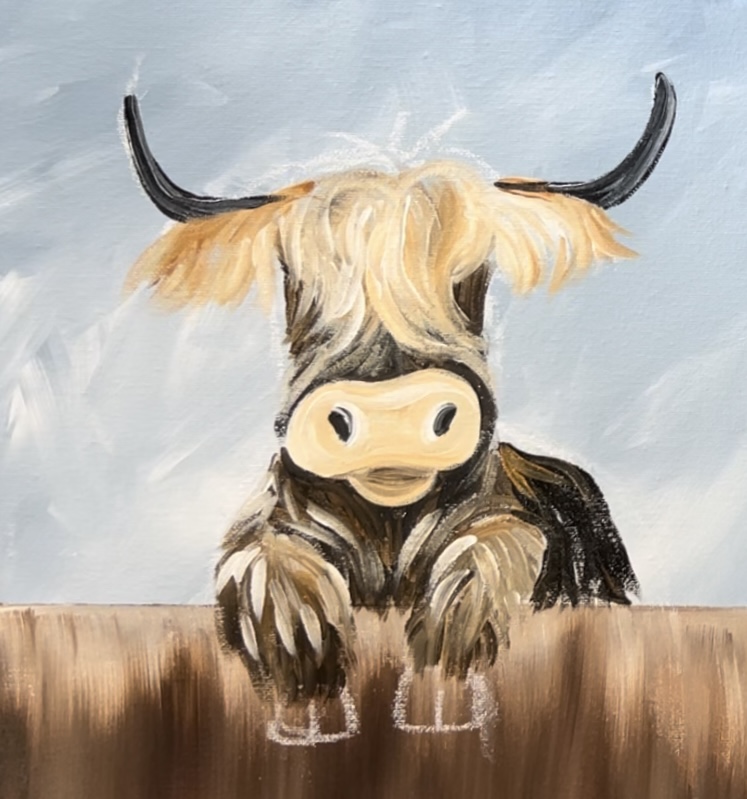
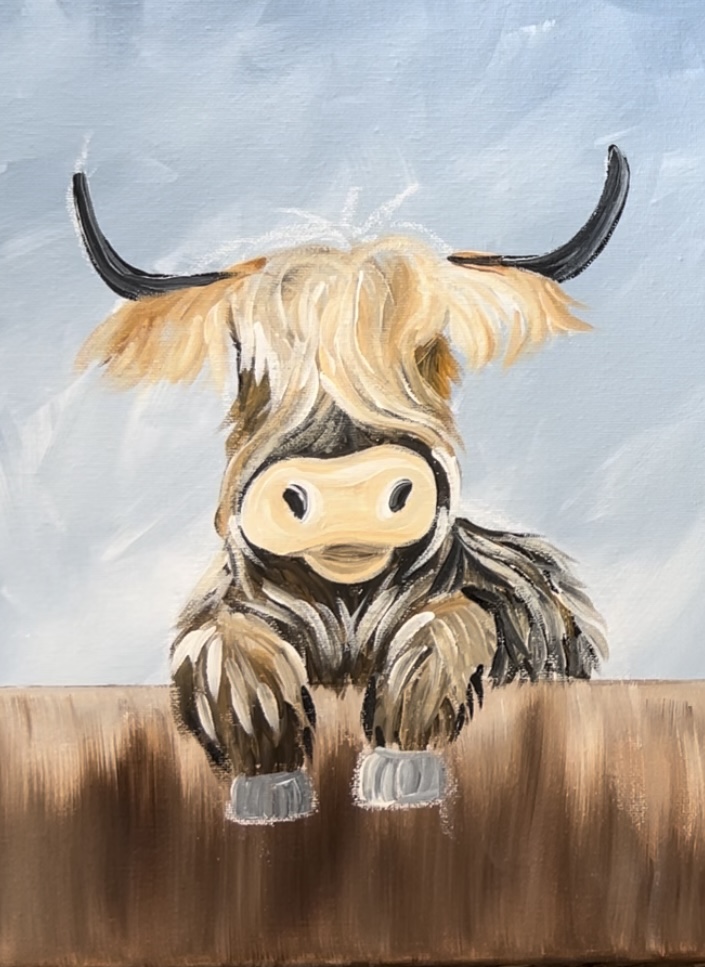
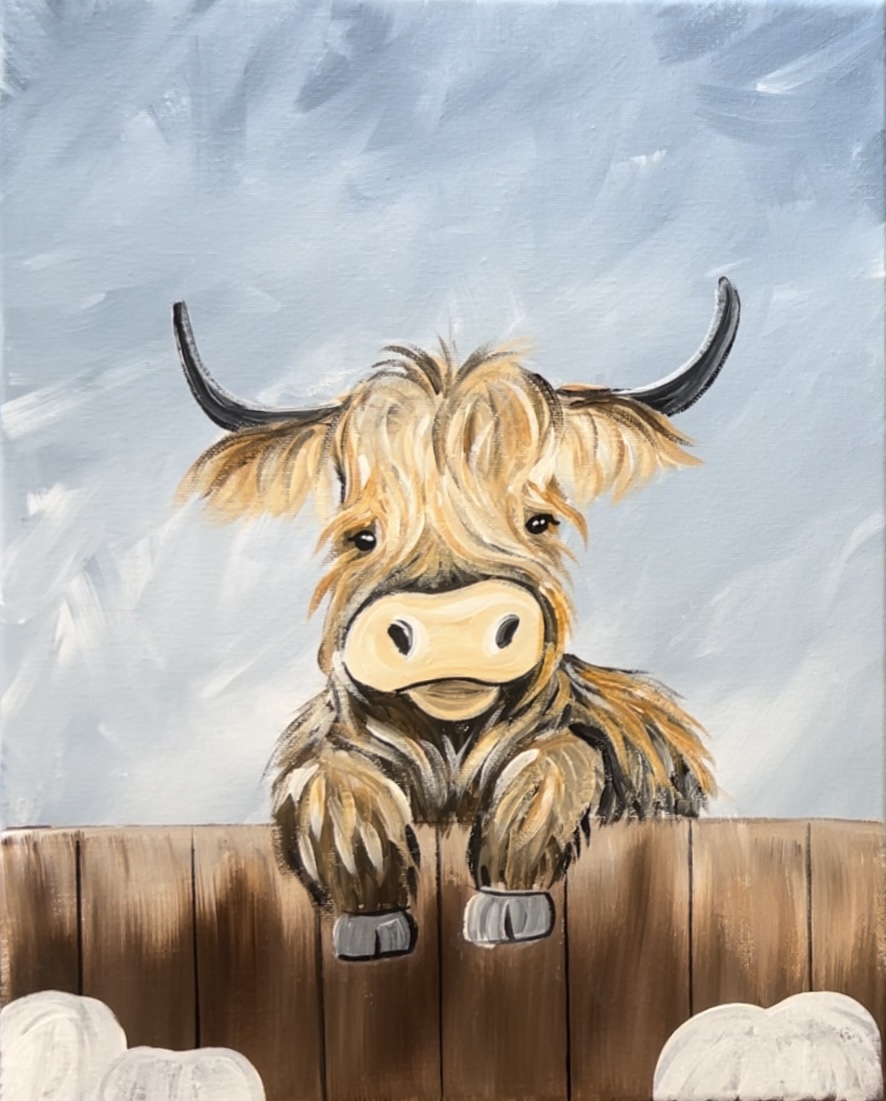
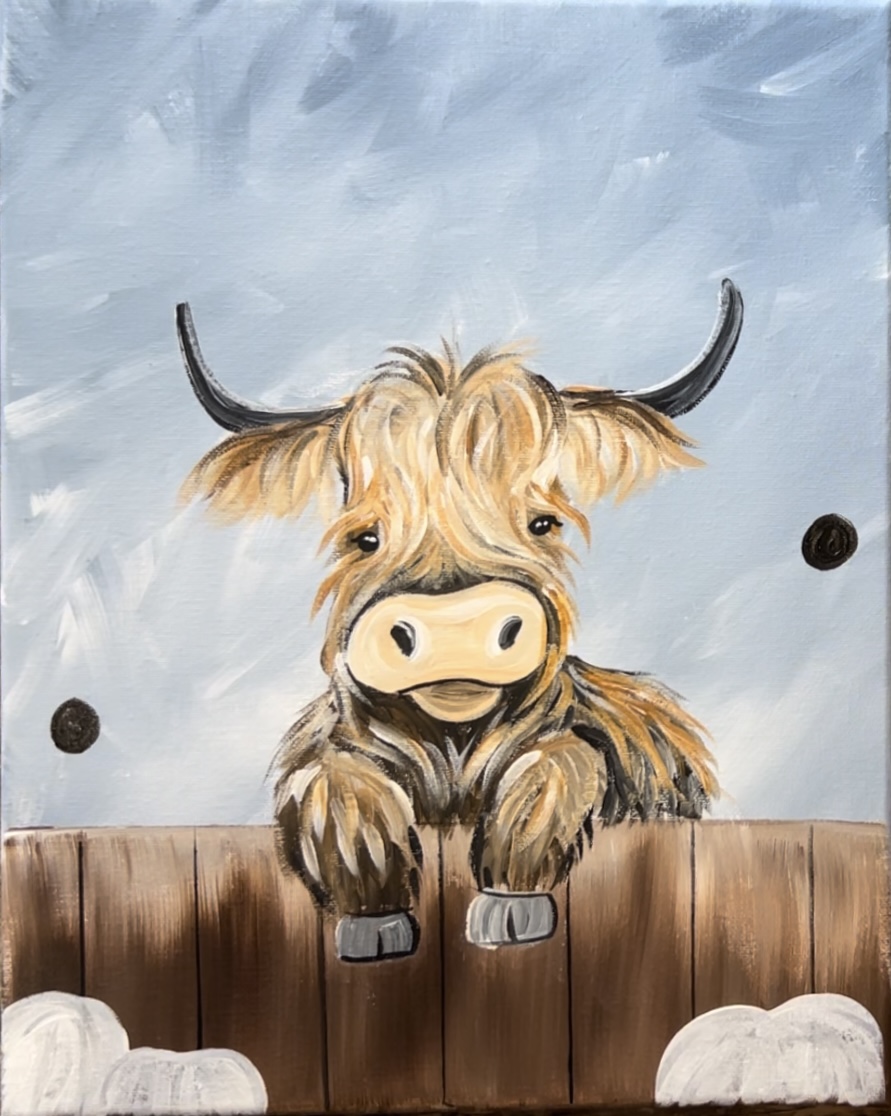
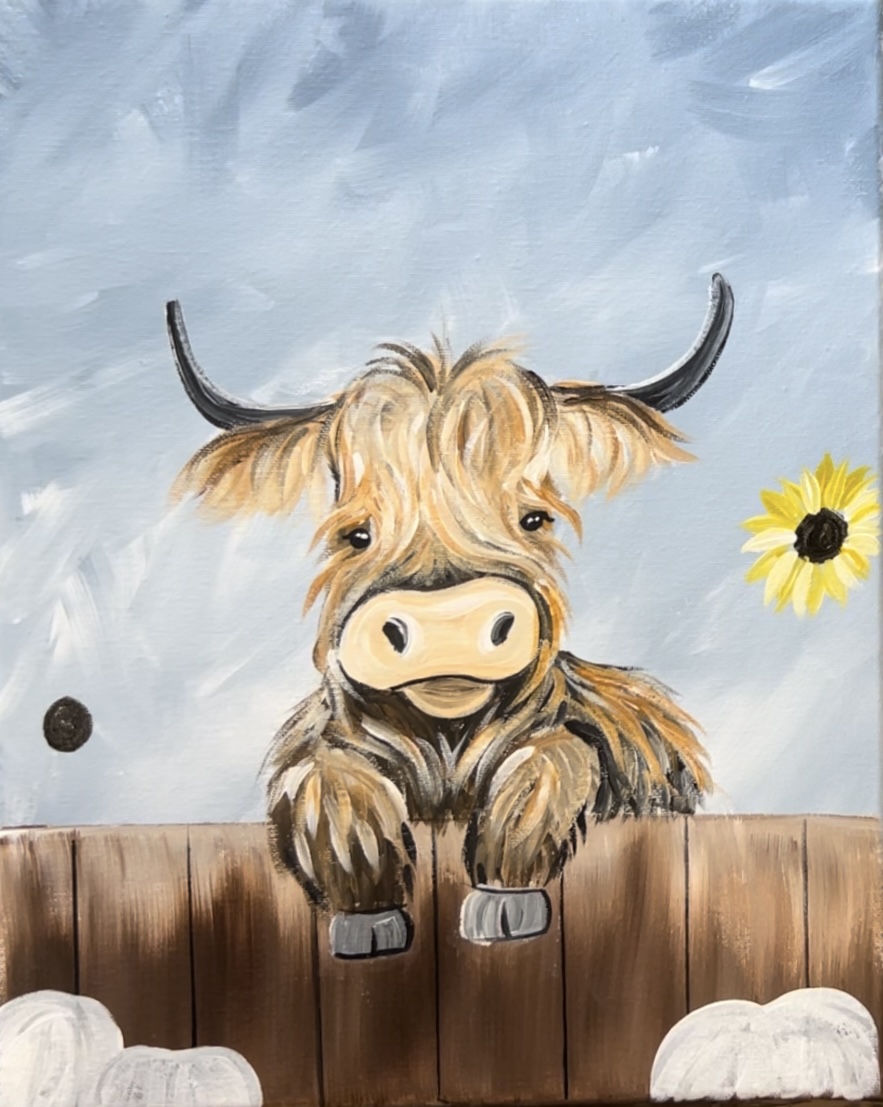
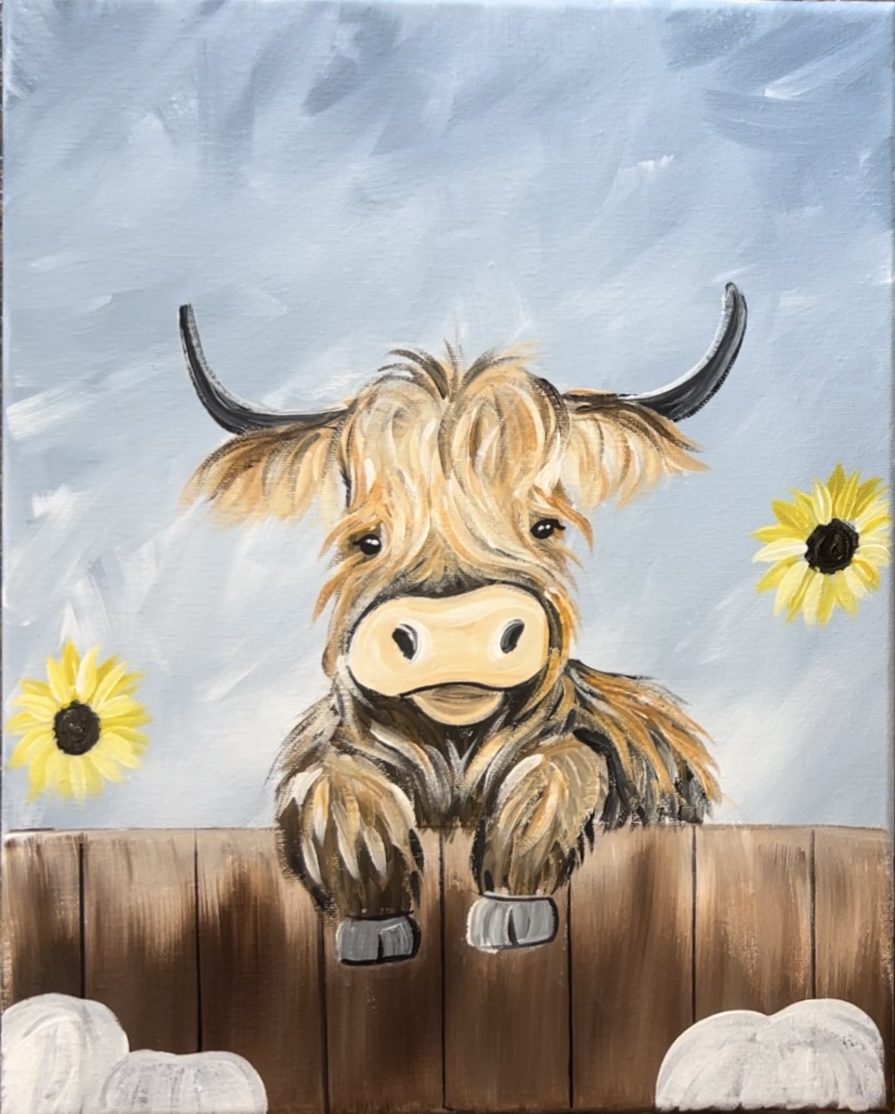
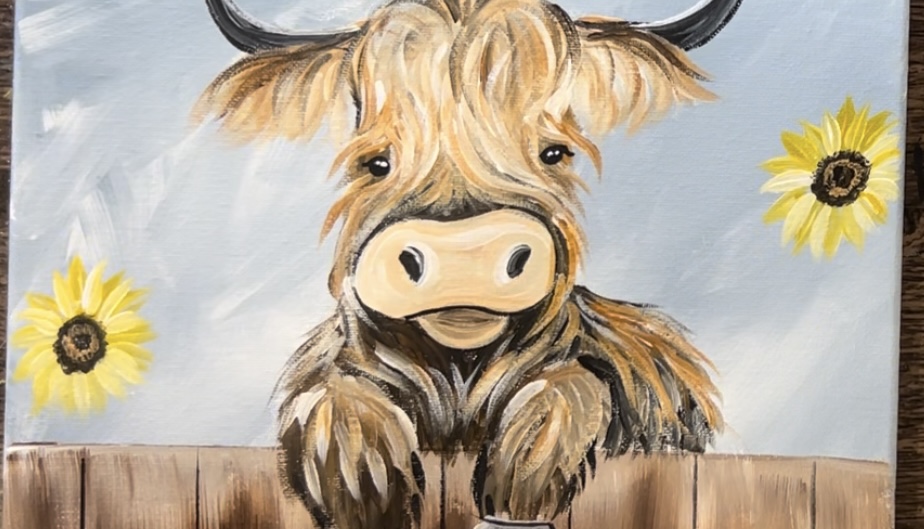
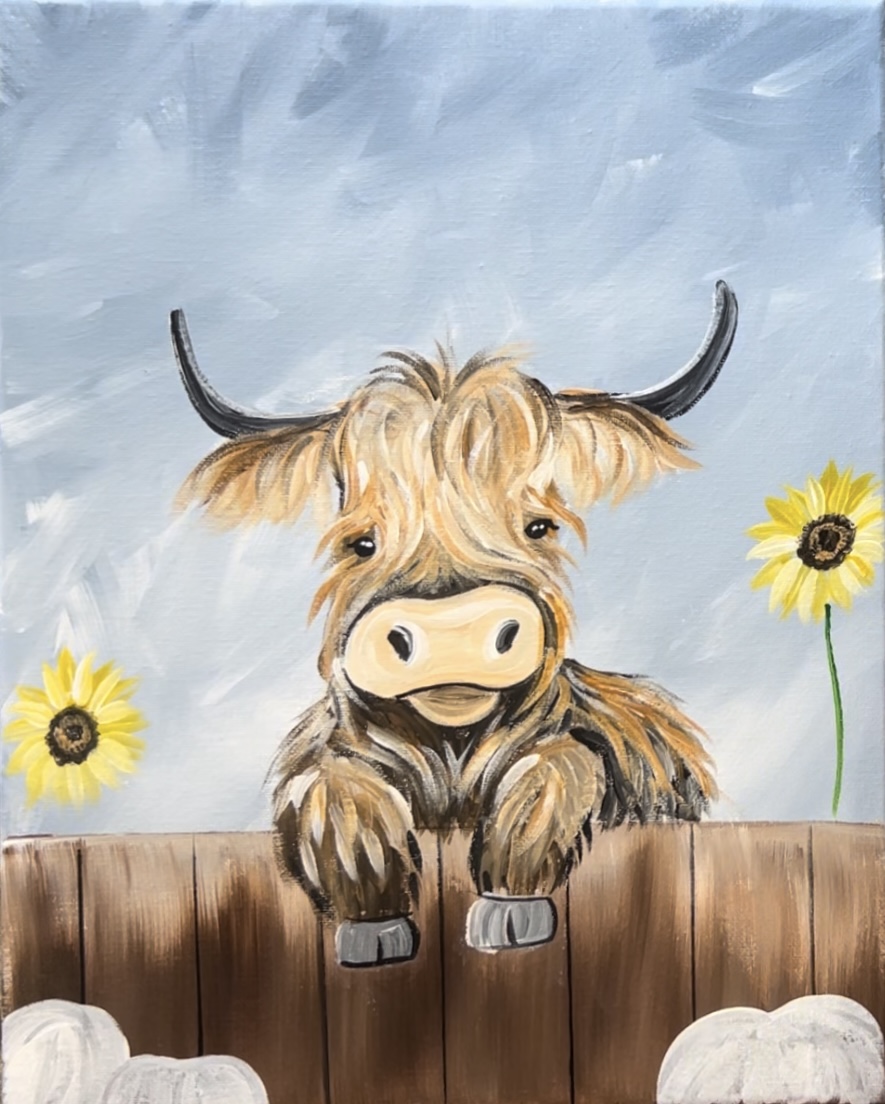
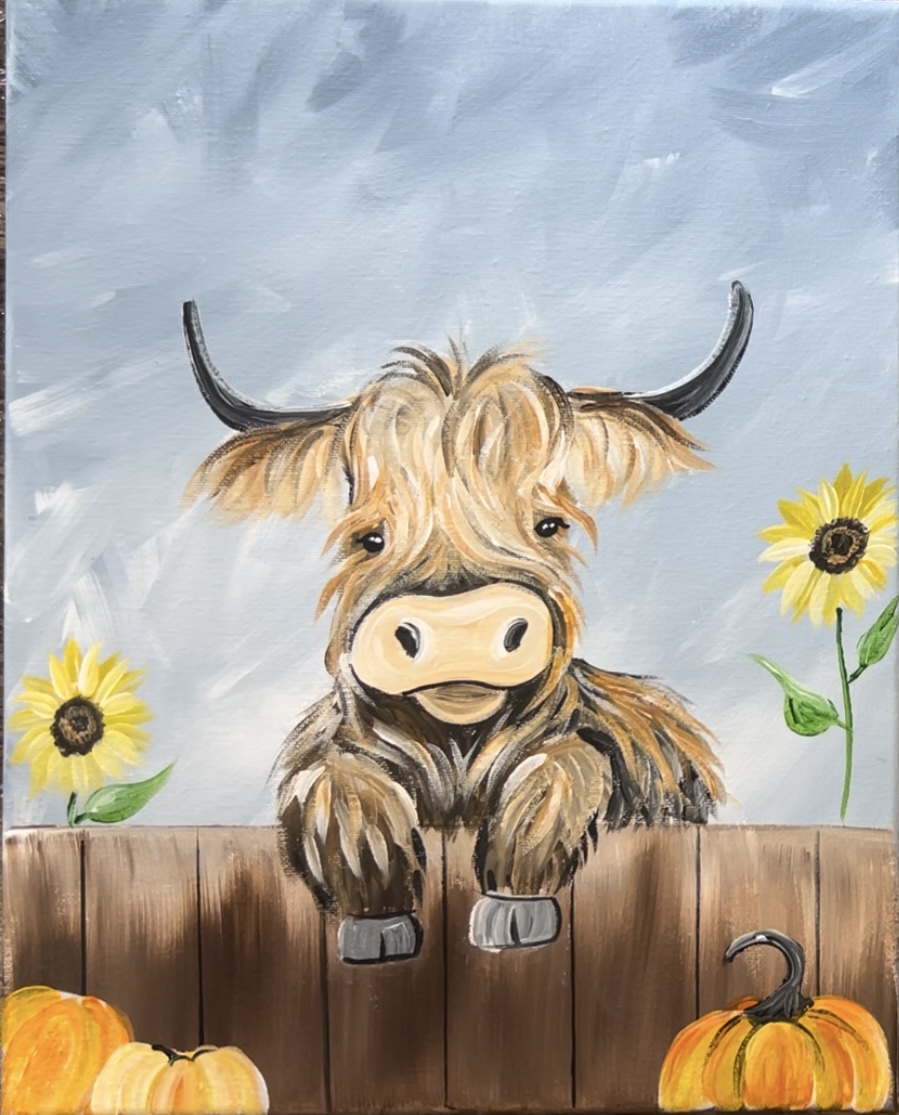
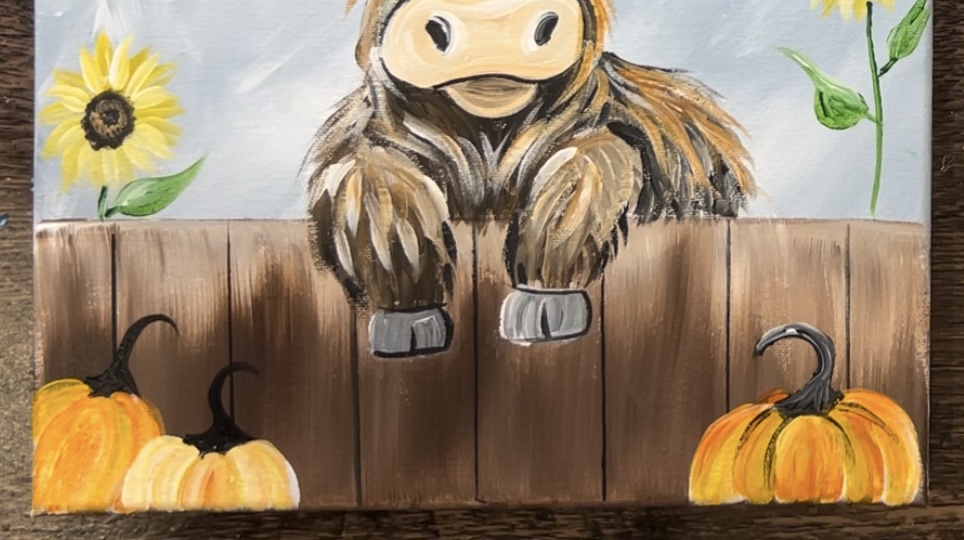
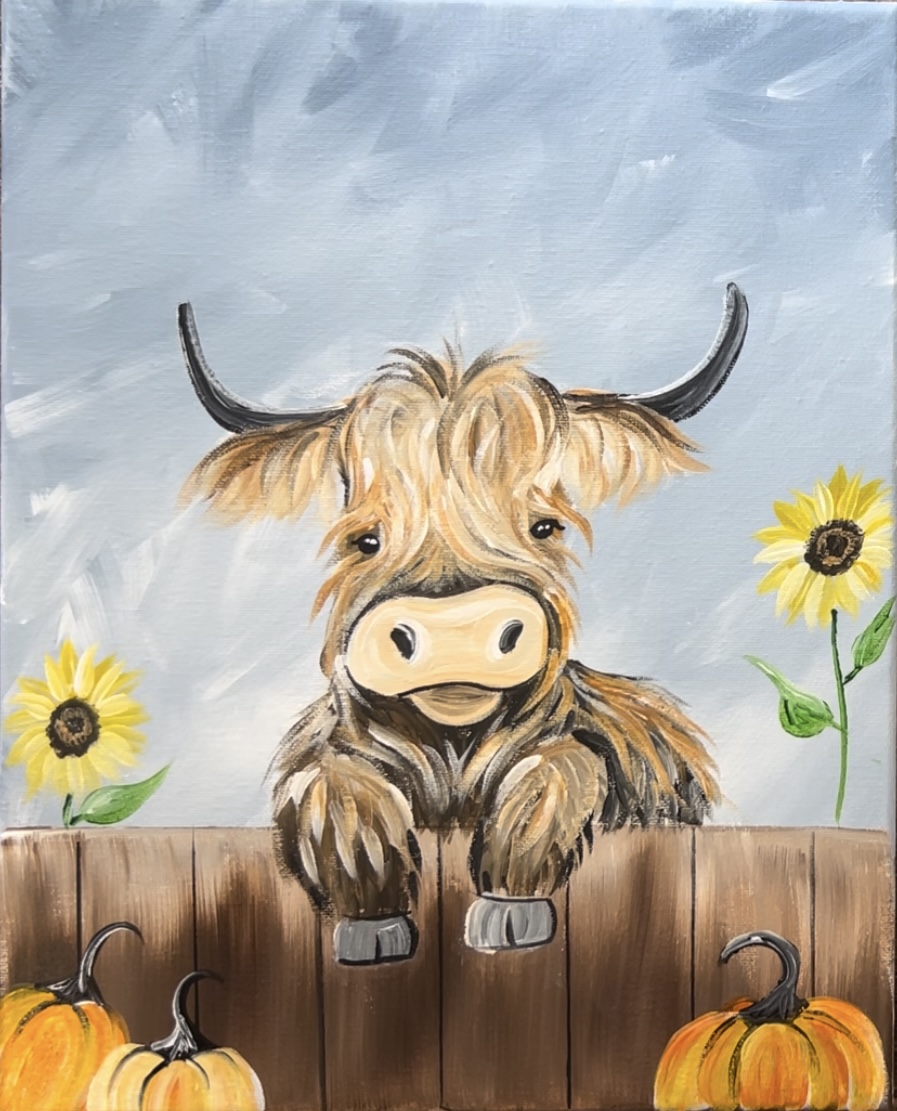
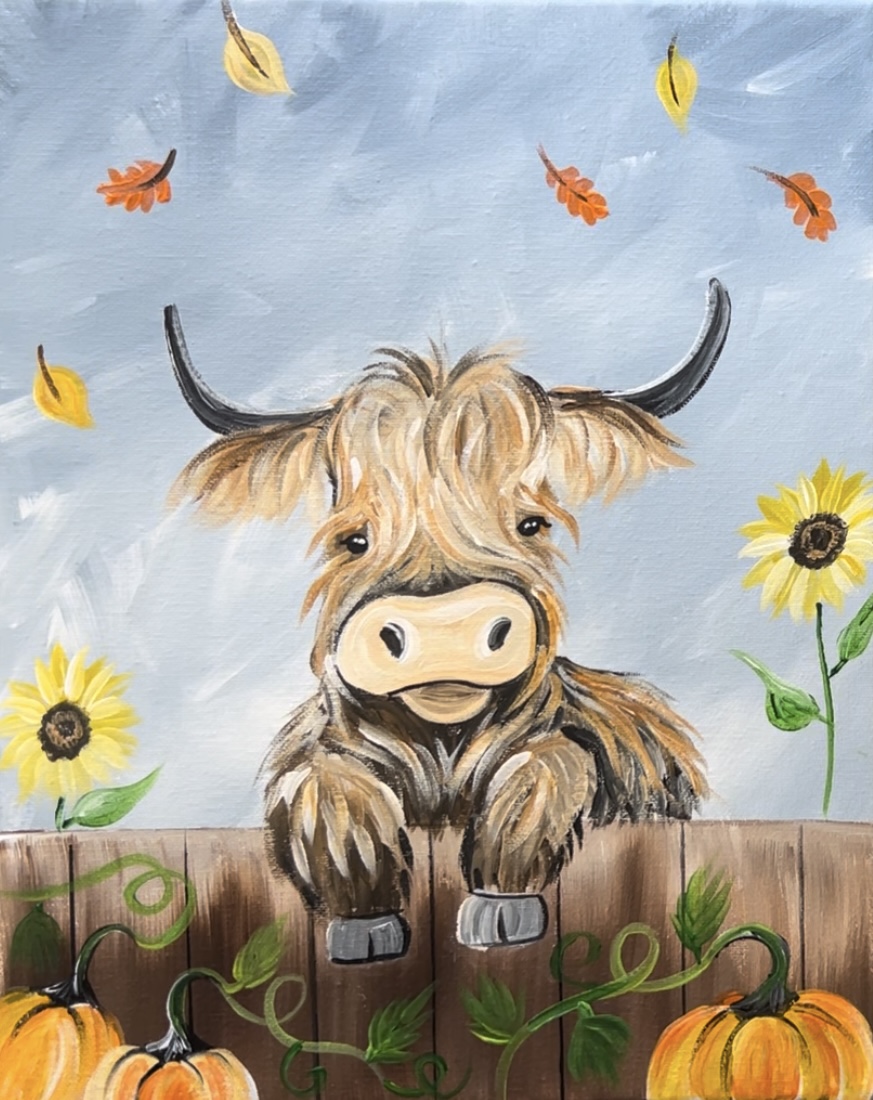
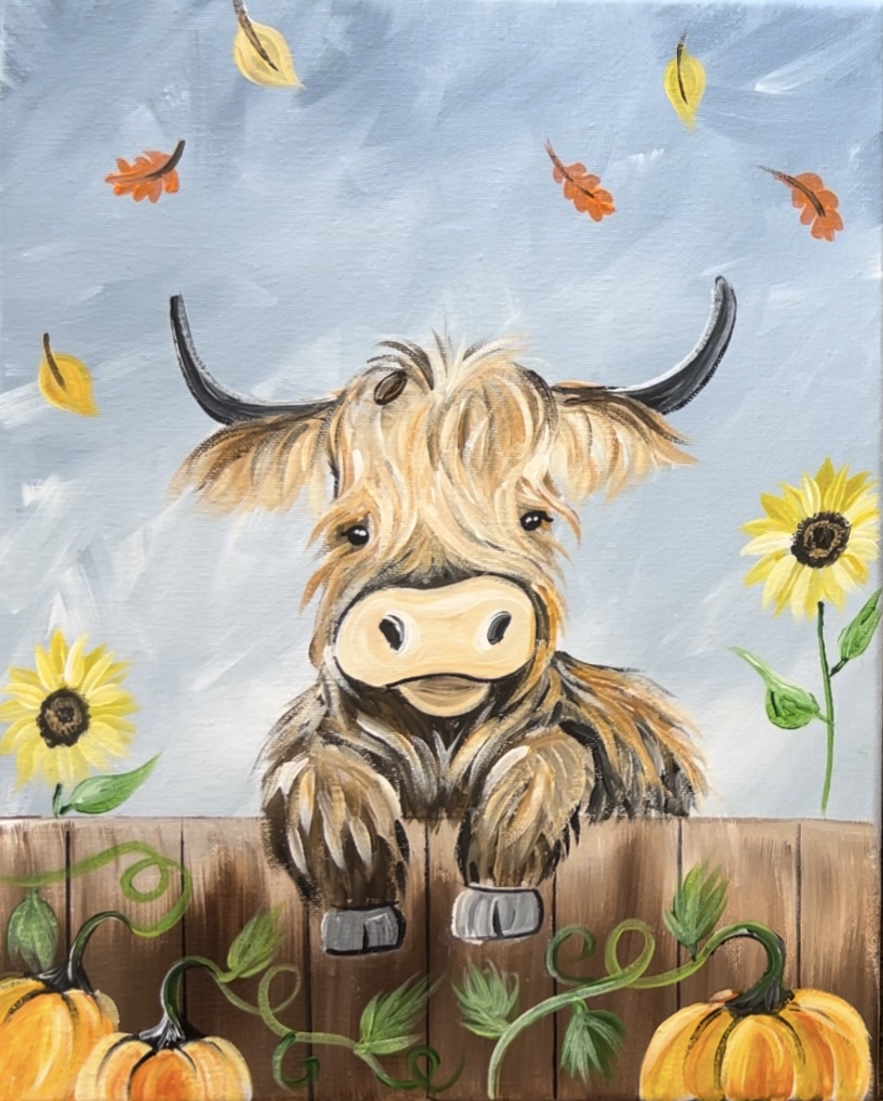
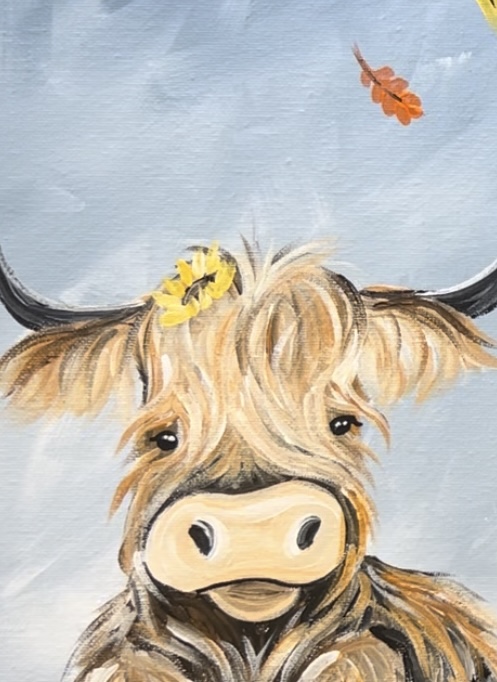
This highland cow is ready for fall with its sunflower crown and pumpkin pals.
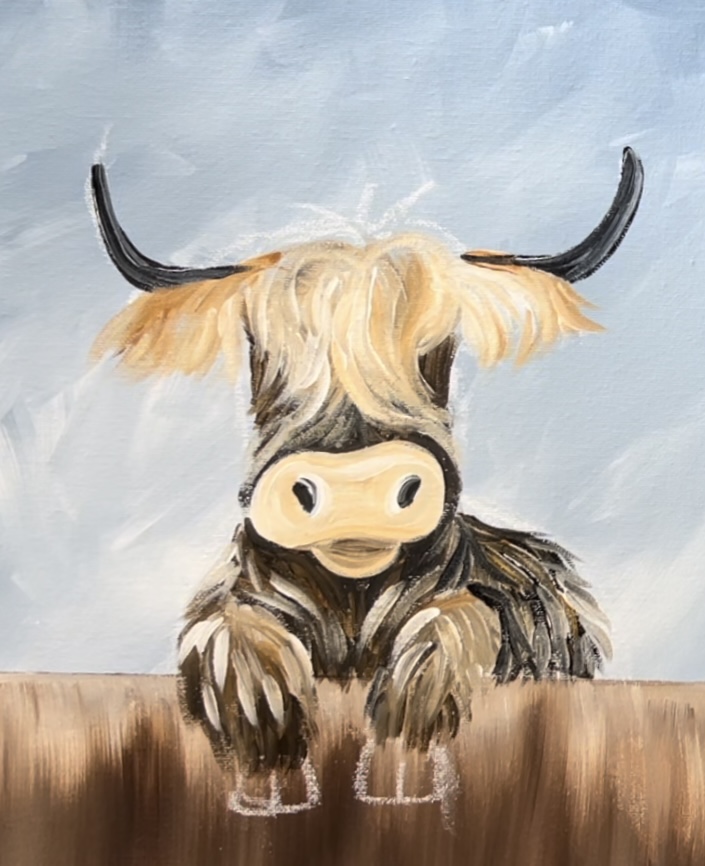
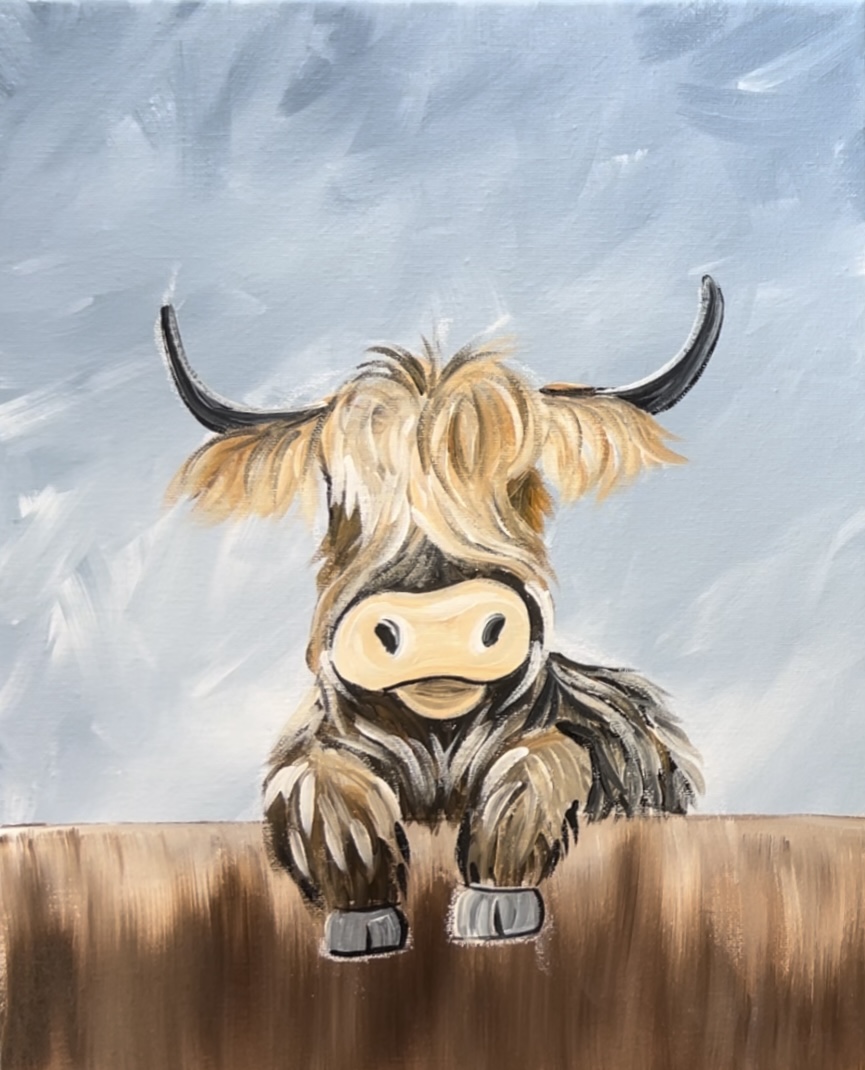
In this tutorial, we will be learning how to paint a fall themed highland! This painting is an intermediate level painting because of the challenge in painting fur texture.
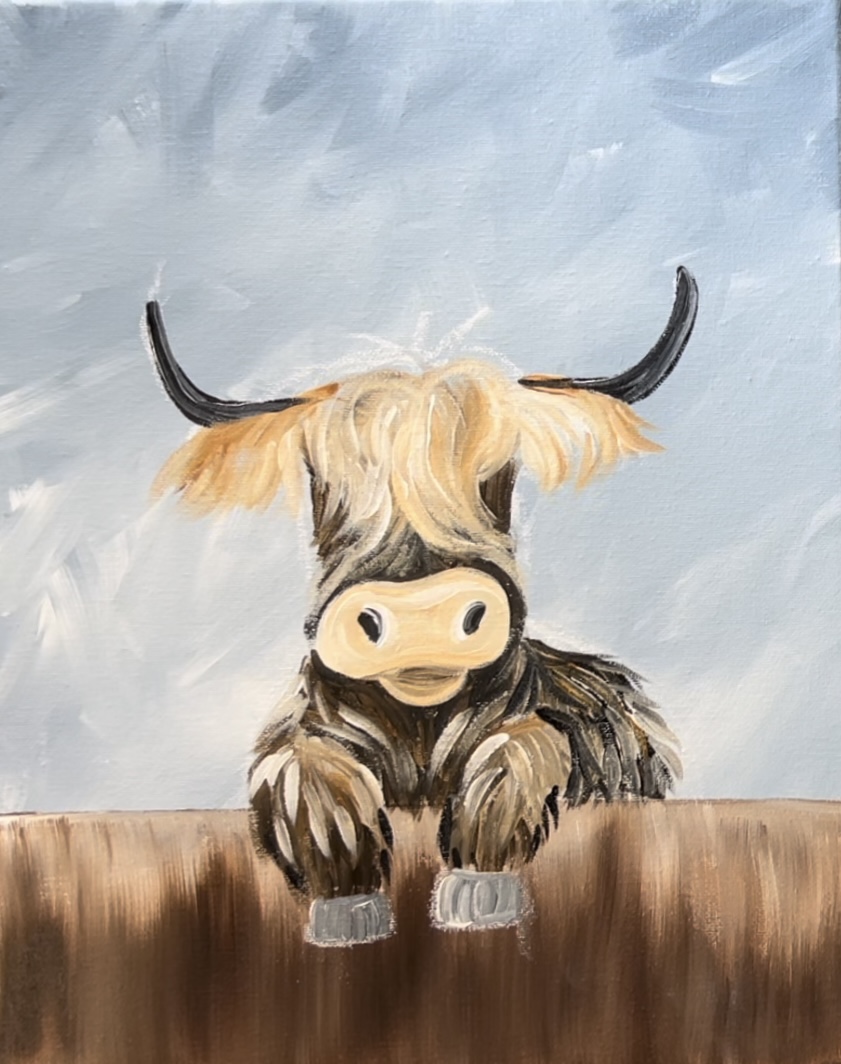
You can, however, simplify this painting and not go in as much detail with the fur texture. You can also make this a different season instead of fall! If you want a more summer or spring look, you can paint flowers on the bottom of the painting instead of pumpkins!
Enjoy and happy painting!
Materials Needed
Fall Highland Cow - Acrylic Painting Tutorial
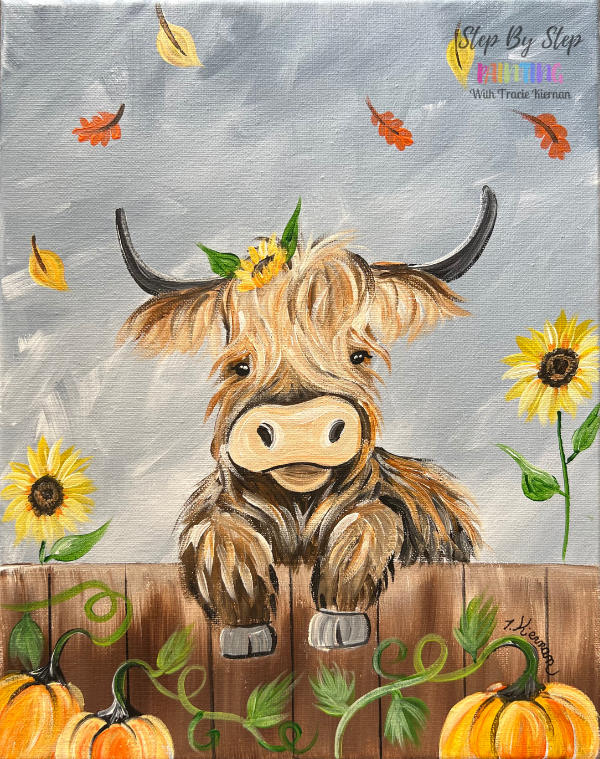
This highland cow is ready for fall with its sunflower crown and pumpkin pals. Learn how to paint a fall theme highland!
Materials
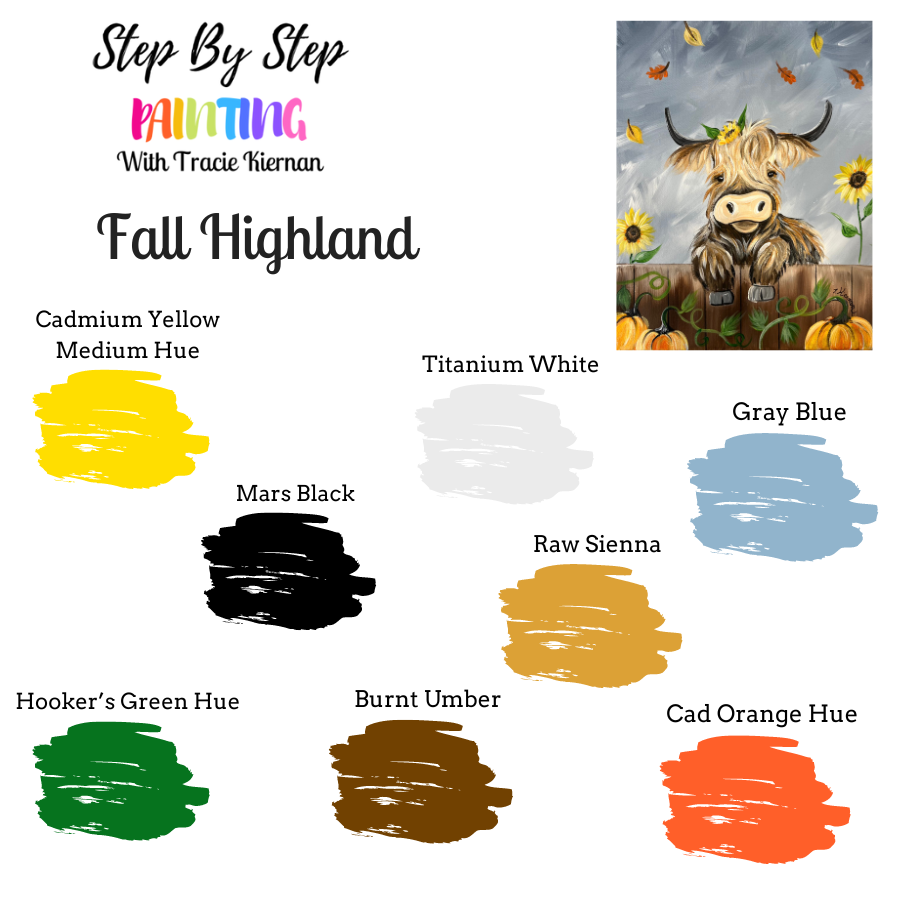
Colors
- Titanium White
- Mars Black
- Cadmium Orange Hue
- Cadmium Yellow Medium Hue
- Burnt Umber
- Raw Sienna
- Hooker's Green Hue
- Blue Gray
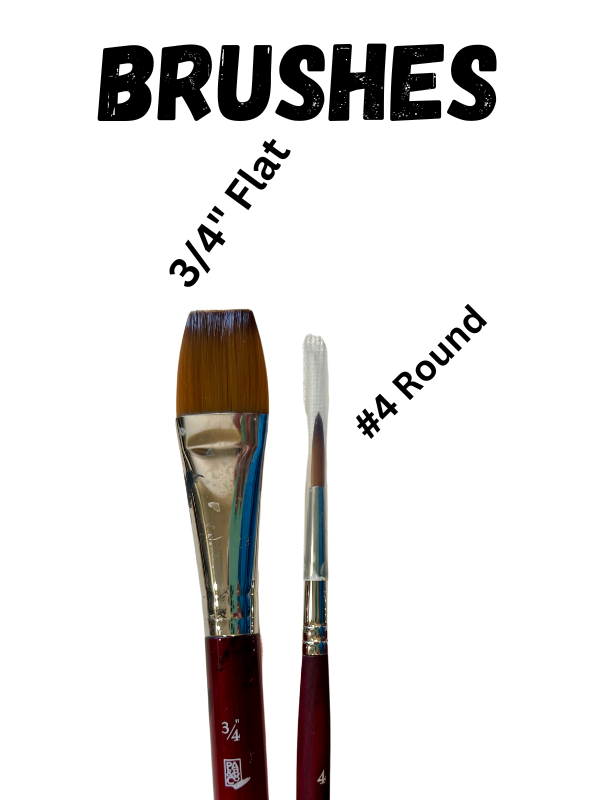
Brushes
Color Palette
Note: the tutorial references the browns as “light brown” and “dark brown”. The light brown is the “raw Sienna” and the dark brown is the “burnt umber”. Also, if you don’e have “gray blue”, you can use “light gray permanent” or change the sky to a light blue color.
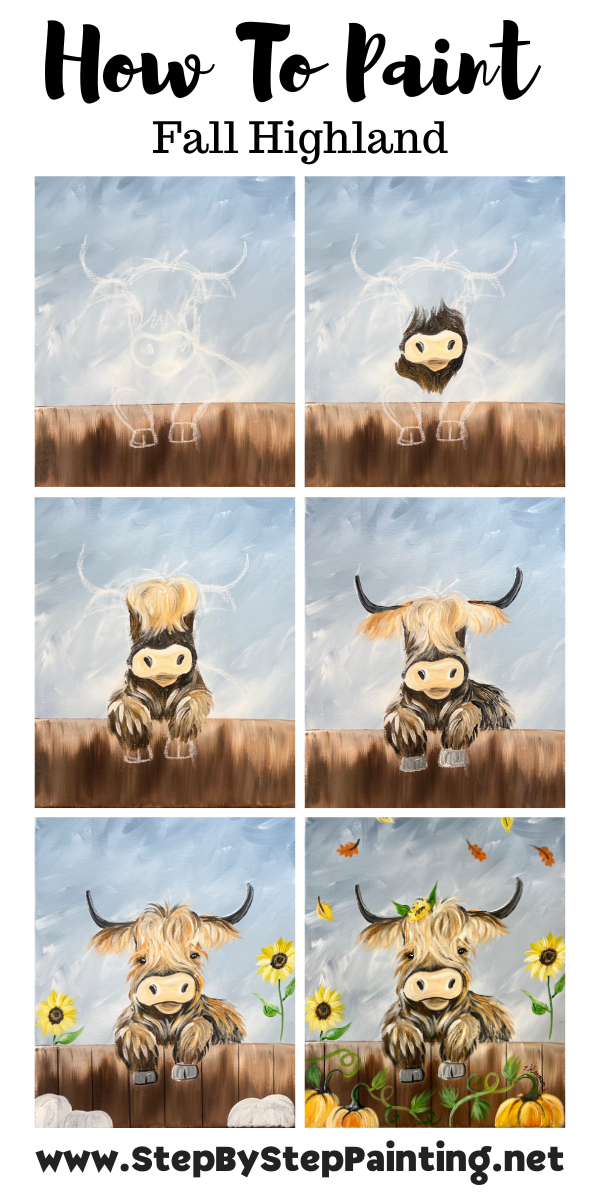
Directions At A Glance
Video
Step By Step Instructions
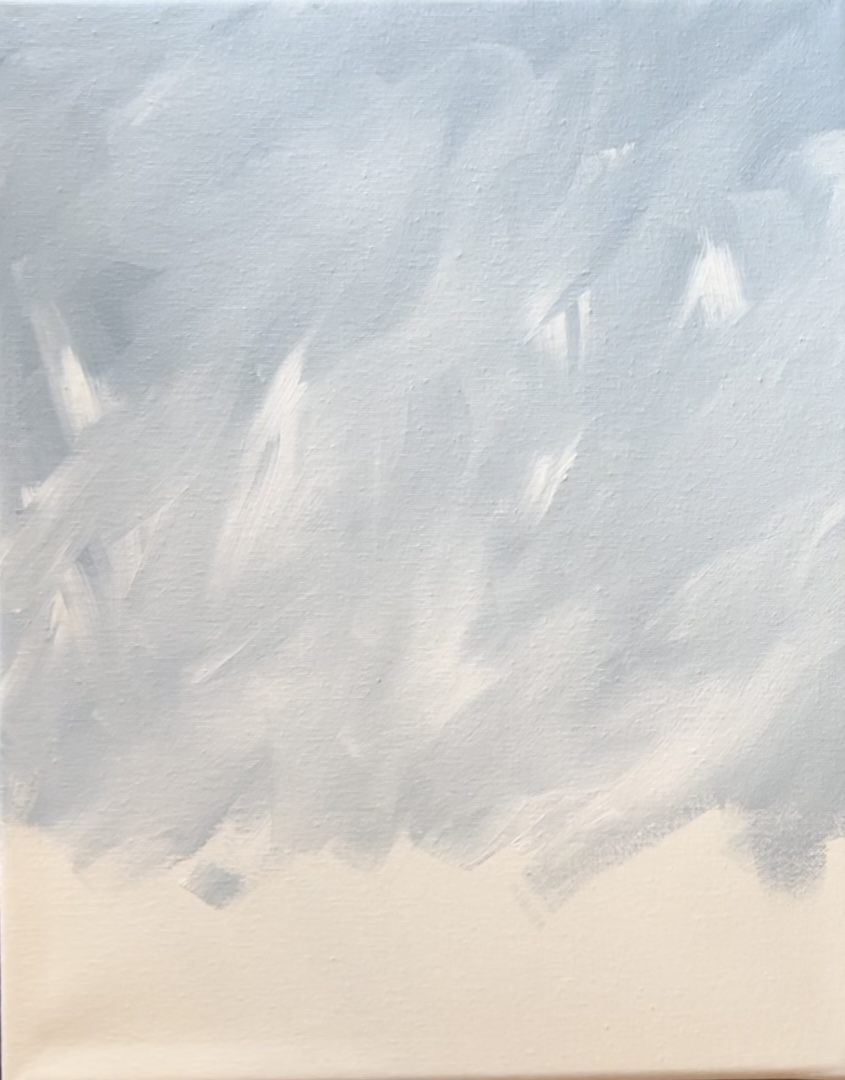
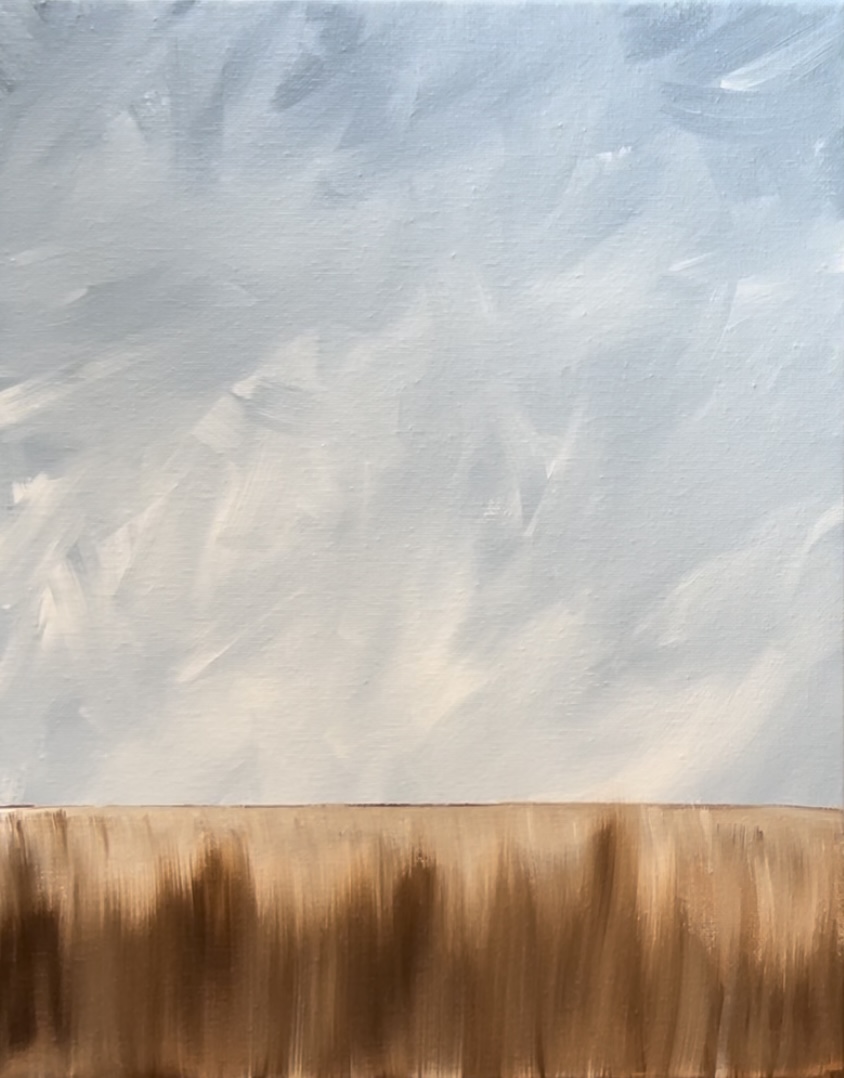
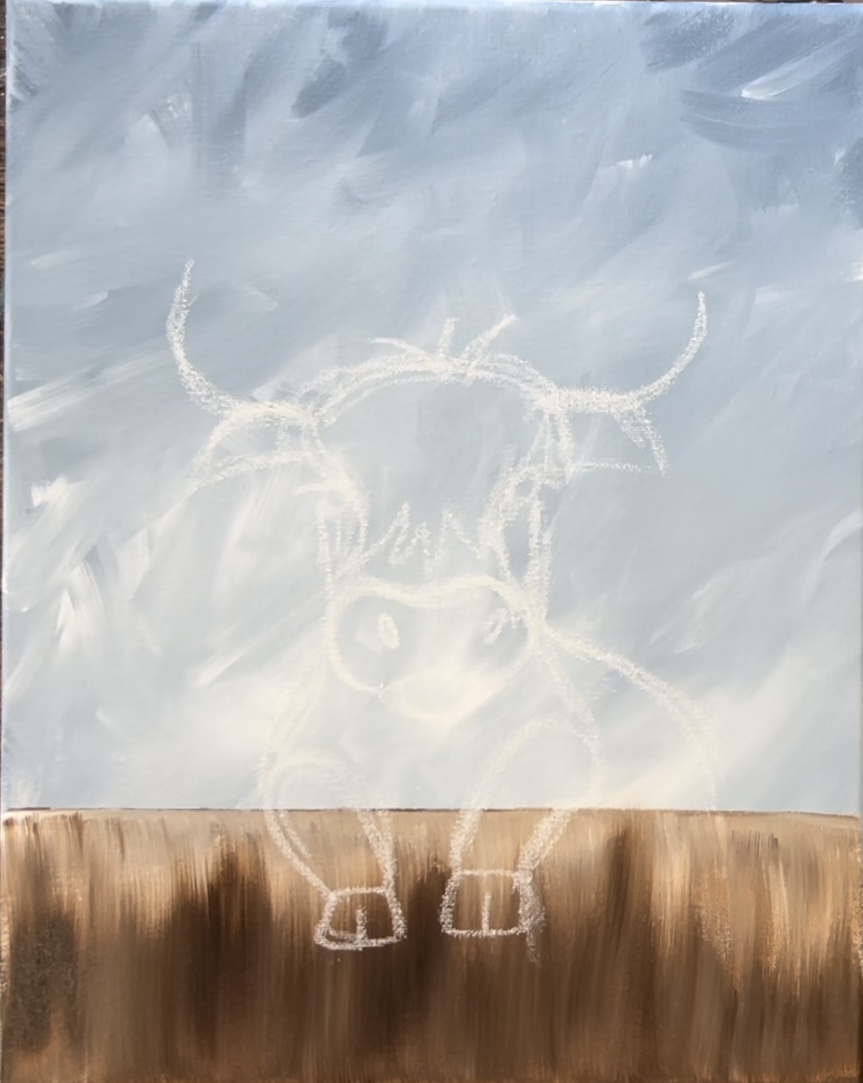
1. Paint The Sky
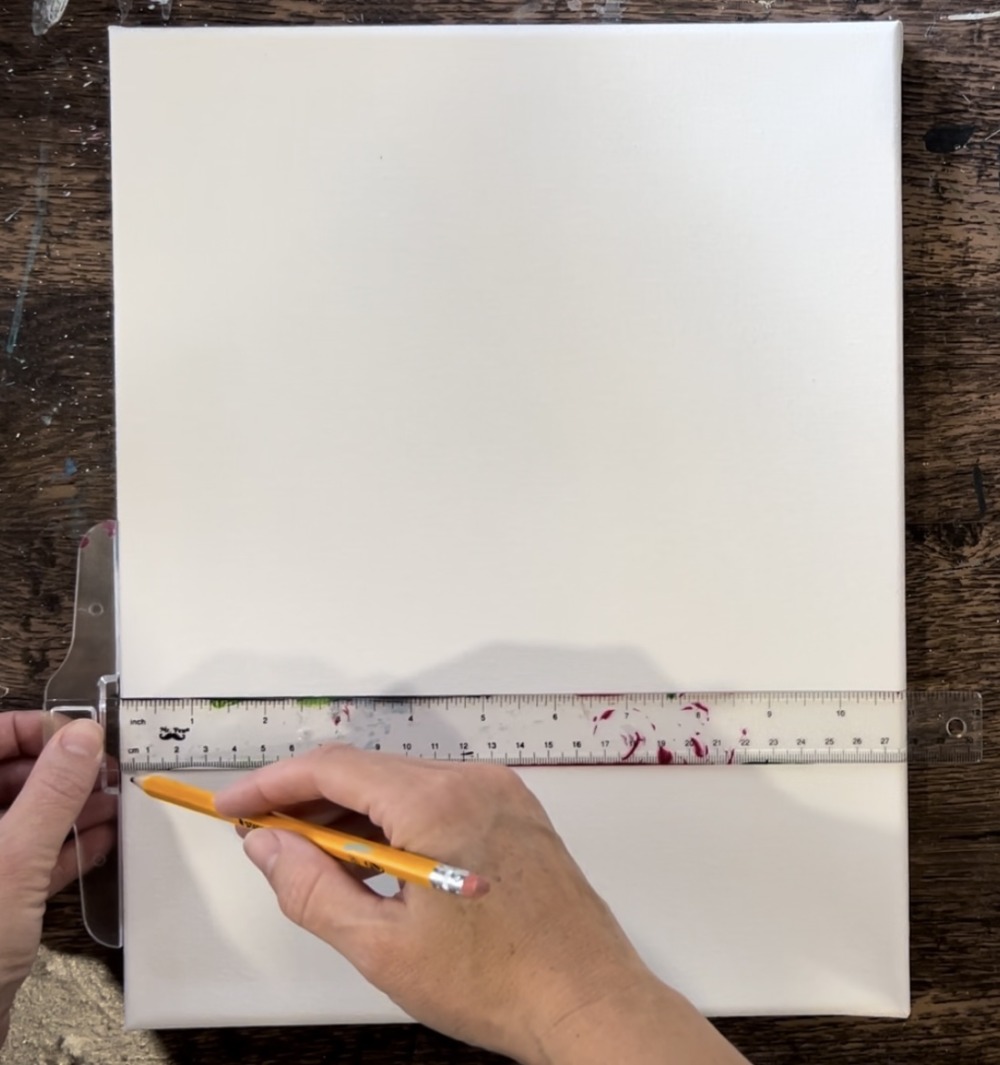
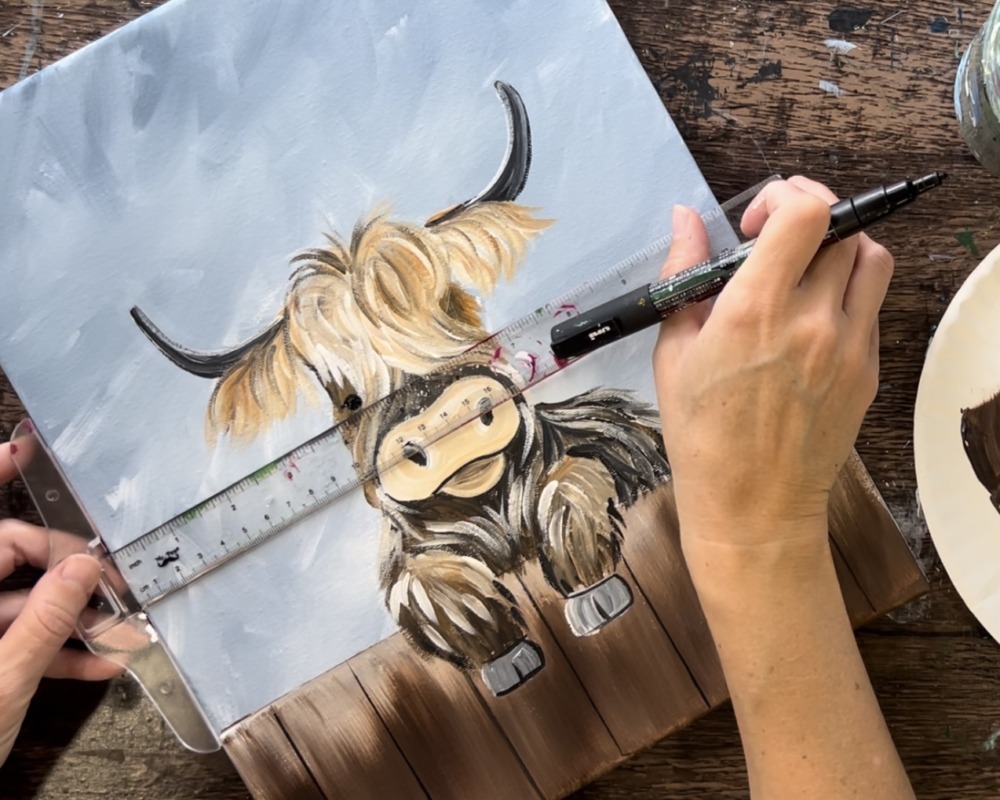
First, draw a horizontal line at 3.5″ from the bottom of the canvas. If you are using a different size other than the 11 x 14, measure about 1/4 of the canvas height. Example: do “5” for a 16 x 20 canvas, “3” for a 9 x 12 canvas, etc. Use a ruler and pencil to draw a light horizontal line. This will be the fence line.
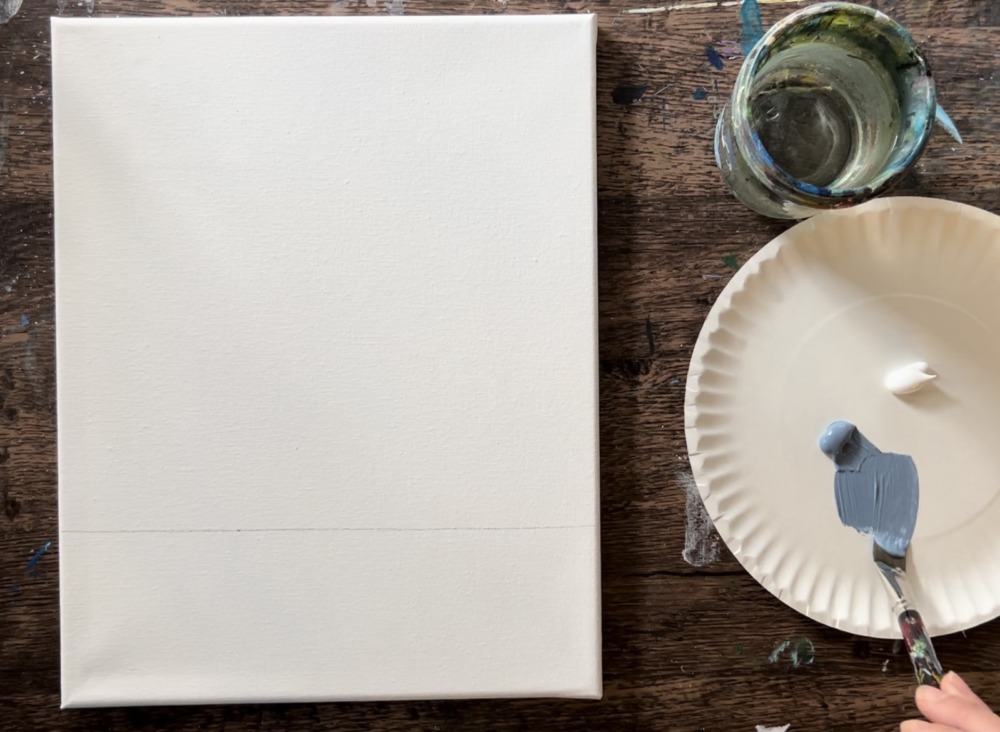
Next, load your paint palette with the two colors: “titanium white” and “blue gray”. Load your 3/4″ flat wash brush in both the gray and the white. Start at the top of the canvas and paint large angle paint strokes that blend both of the white and gray together.
Add a little more white in the middle of the sky and towards the bottom.
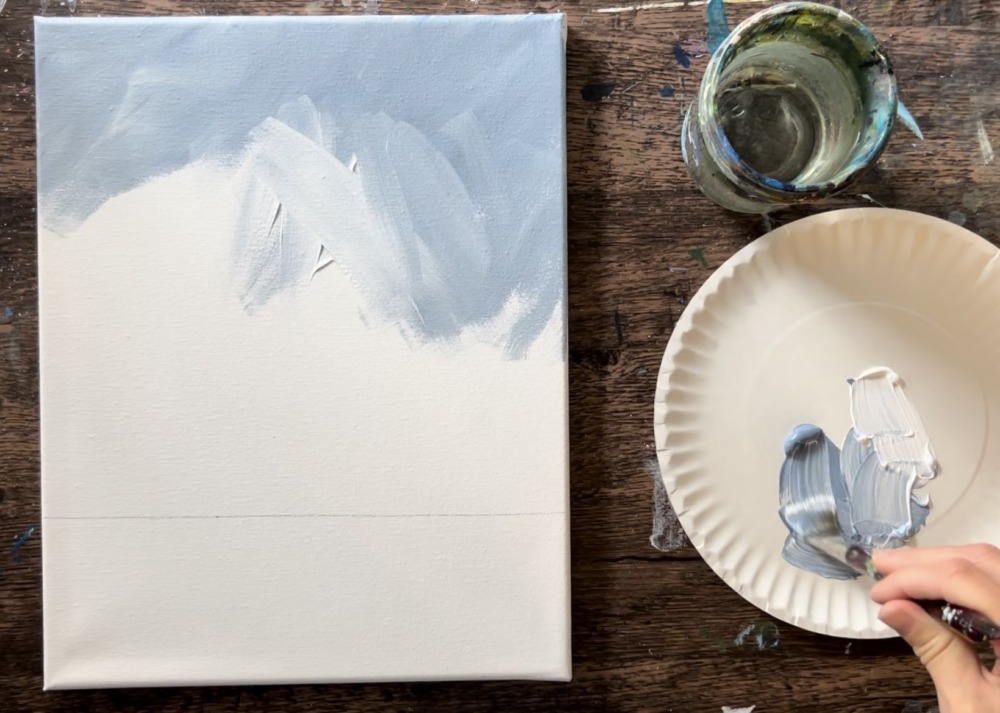
Fill your entire sky with expressive angle paint strokes using the full width of the brush. Let your gray and white blend together but not all the way. You want different variations of gray in the sky. You also want the center and bottom to be slightly lighter in color.
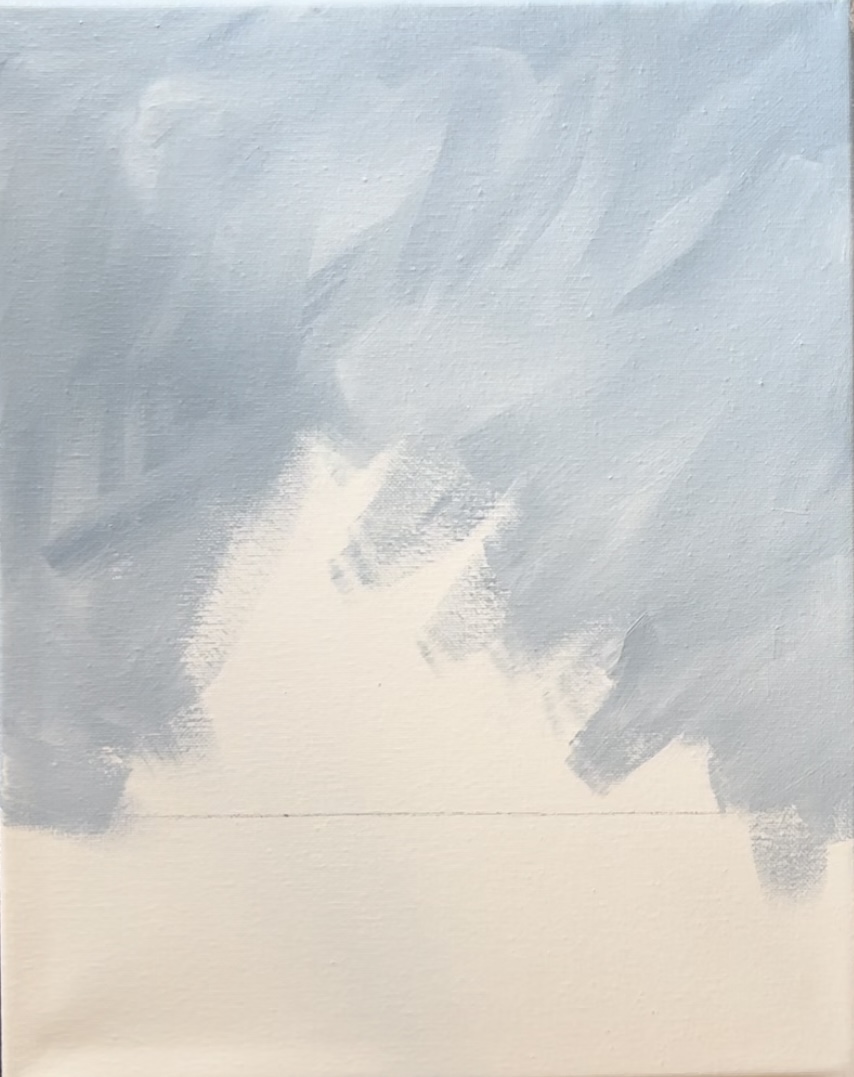
Go all the way down to the fence line and stop.
2. Paint The Fence
Load your paint palette with the colors: burnt umber and titanium white. Use your ruler to help you line this fence lineup as you paint.
Start on the bottom of the fence with just the “burnt umber”. Use the full width of the brush to paint upwards in a vertical direction.
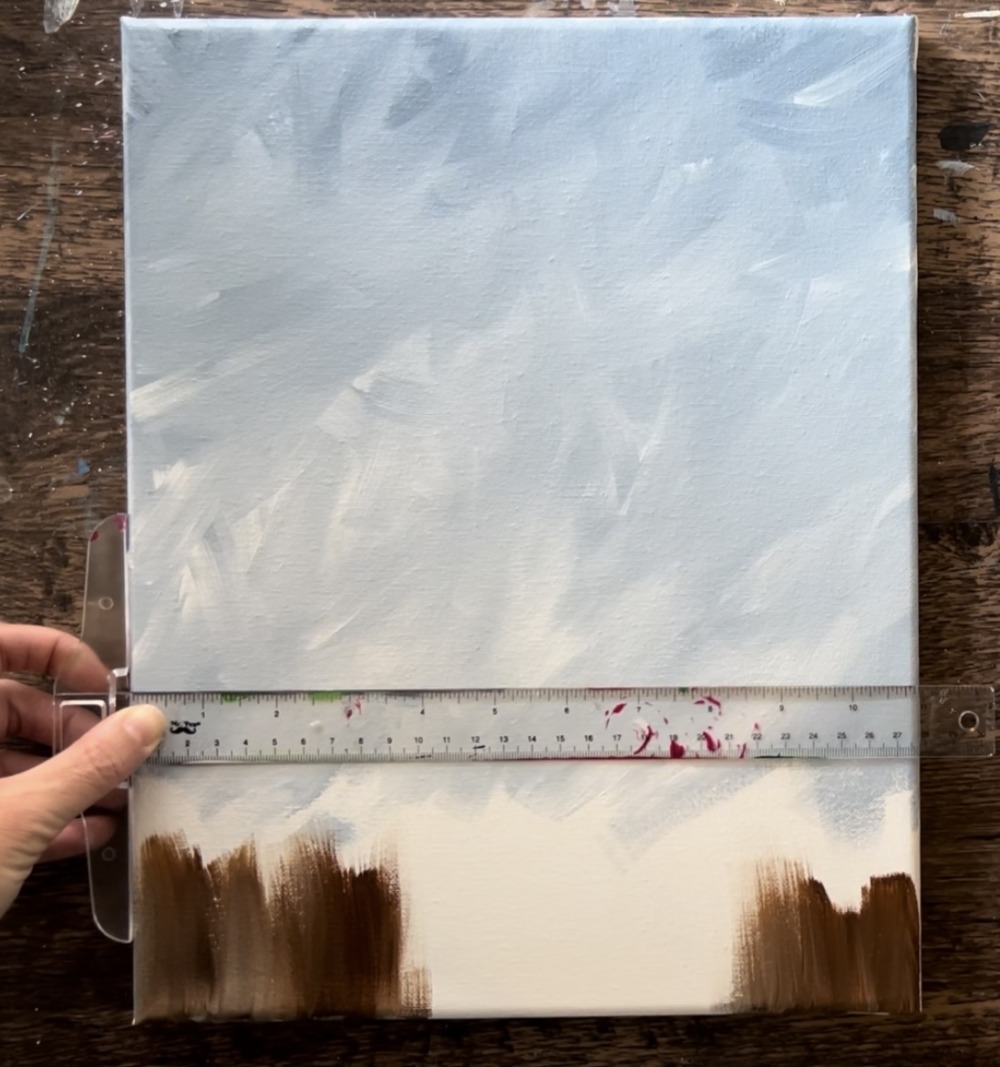
Load small amounts of titanium white on the brush and paint the top of the fence so that it is lighter. The bottom of the fence will be darker.
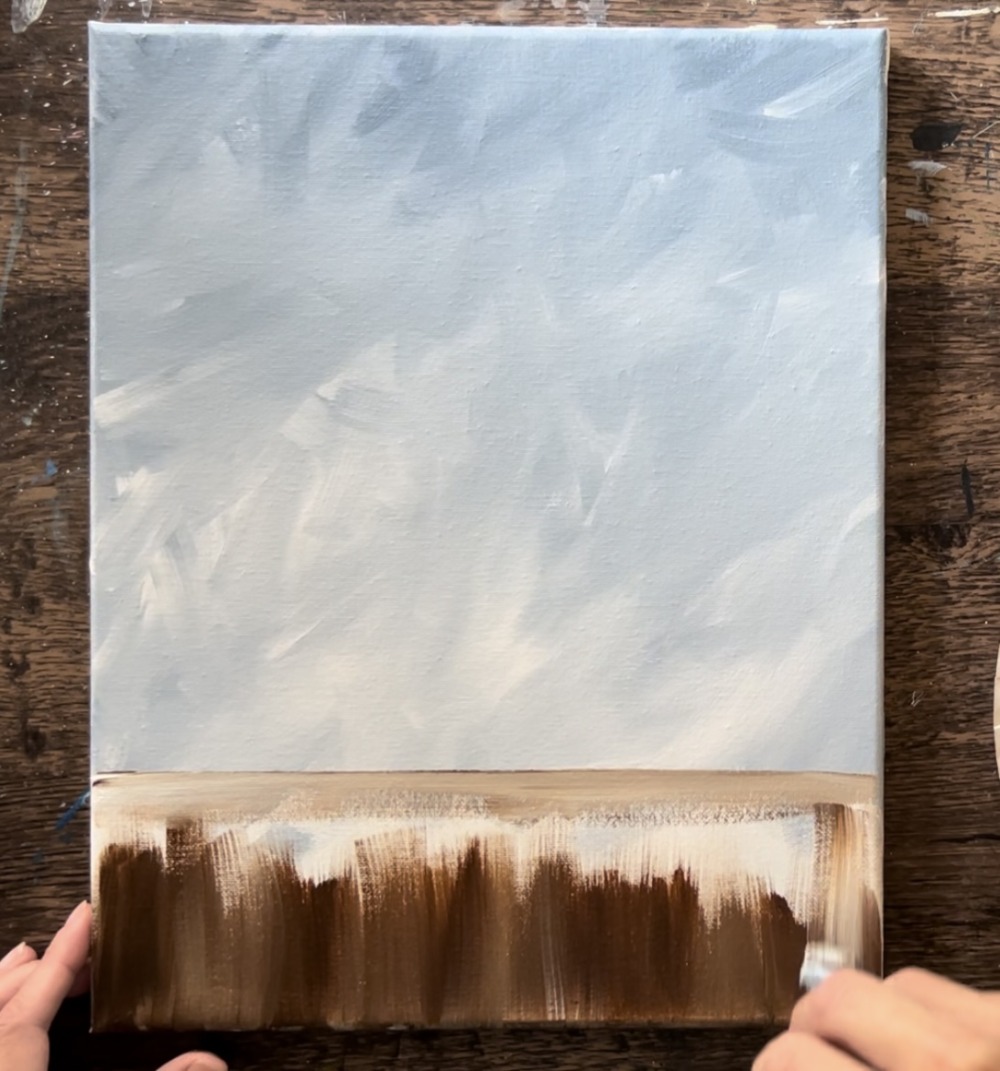
Blend the white with the dark brown so that it becomes sort of a “gradient” of light to dark. However, it doesn’t have to blend all the way. You just want the top of the fence to be lighter so the cow’s legs will show up. Also the darker bottom of the fence will allow the lighter color of the pumpkins to show up better.
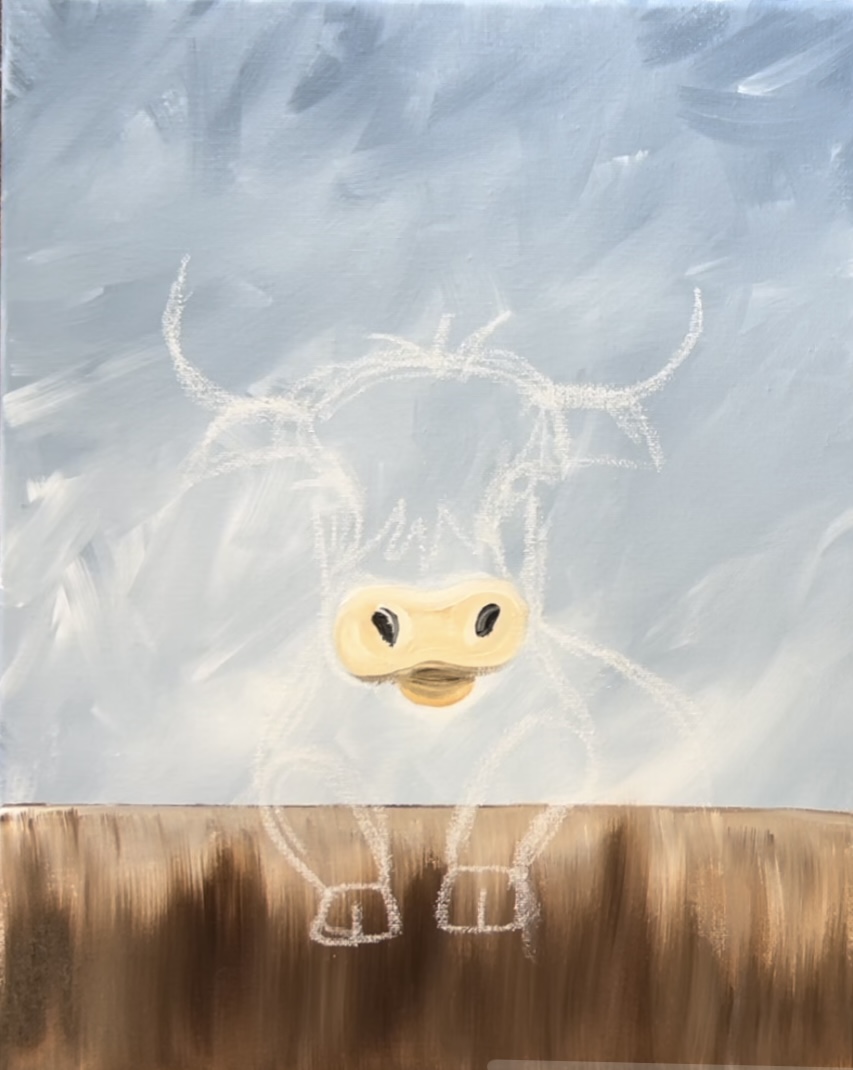
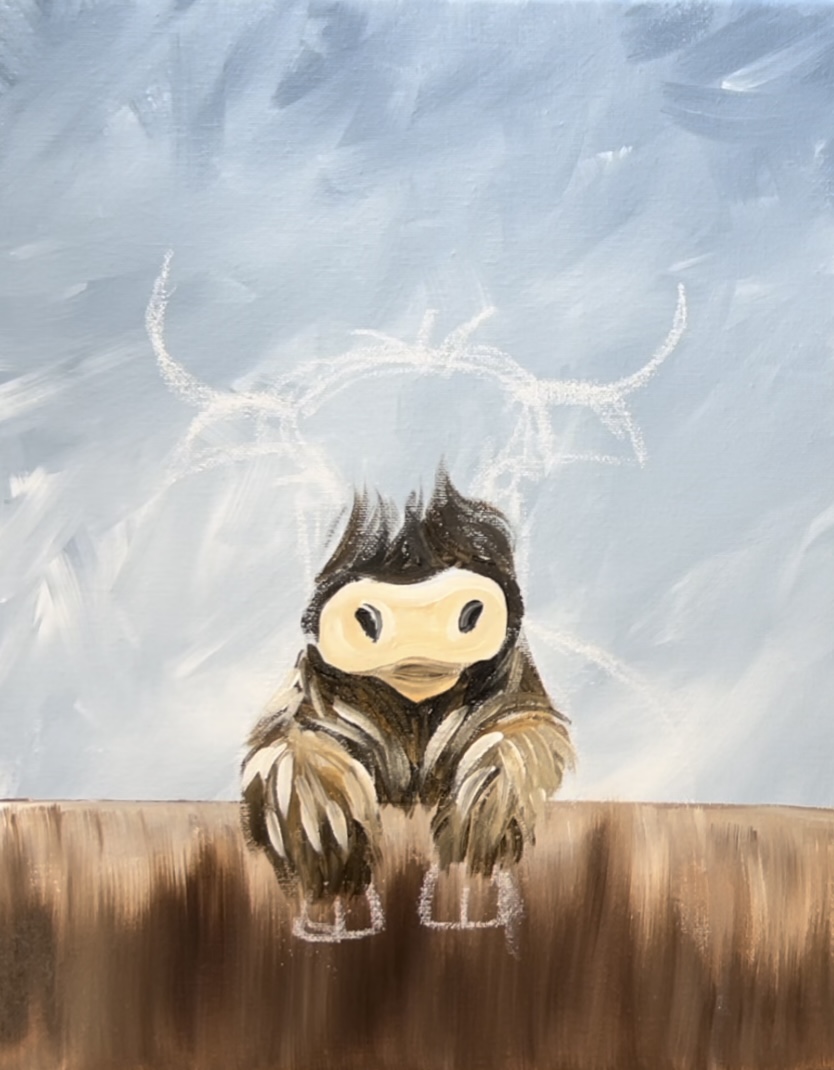
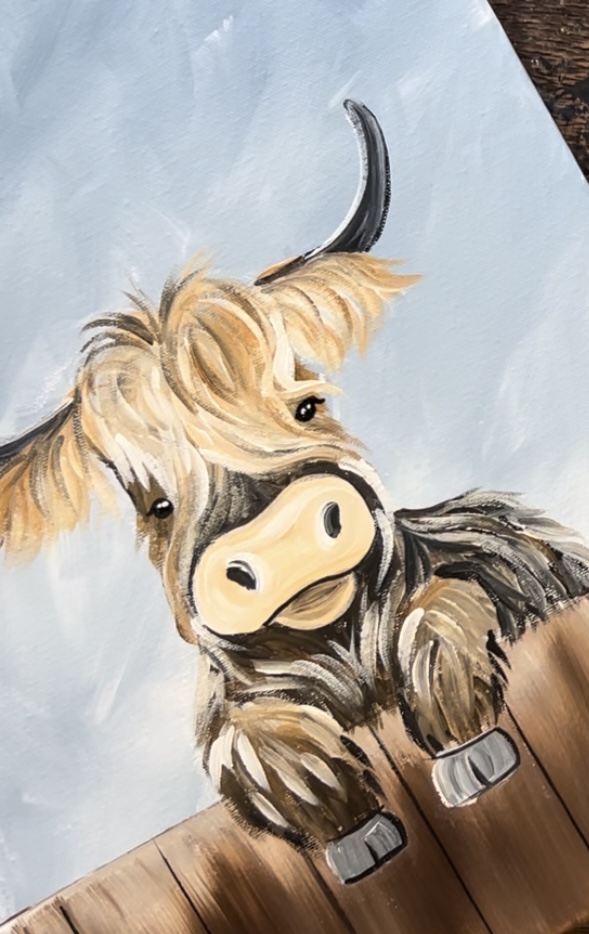
3. Draw The Cow
Tip when drawing with chalk: the lines will be thick and that is okay! Your lines will be “sketch like” and can be adjusted when we paint this in. Also, chalk lines will erase with a clean, wet paint brush or soft baby wipe.
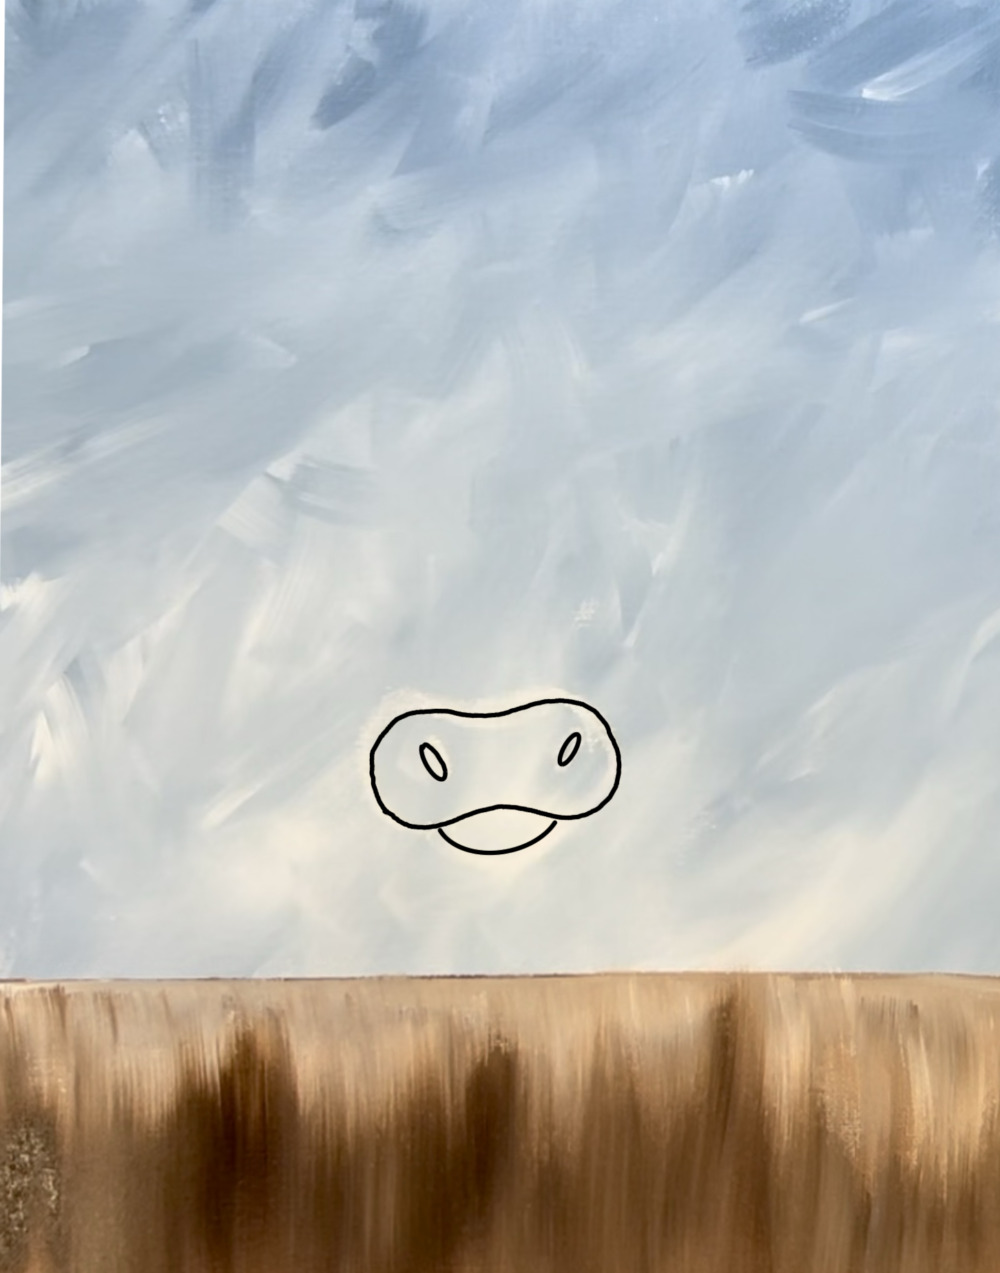
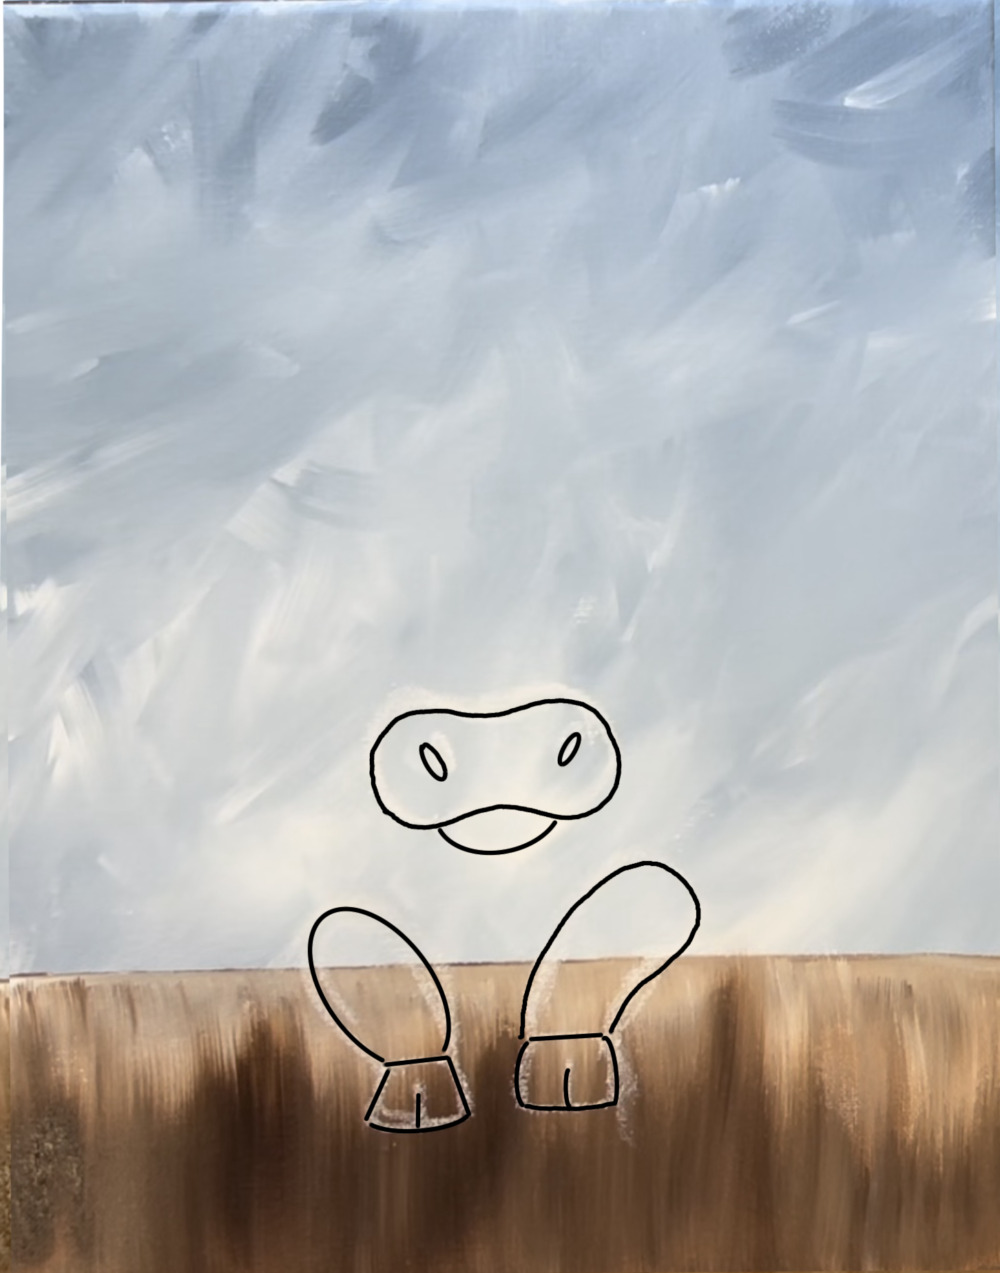
Start by drawing the snout of the cow. Draw a kidney bean shape with two ovals for the nostrils and a curved line below for the mouth. I drew this about 5.25″ from the bottom of the canvas and it is about 2.5″ wide. These measurements do not have to be exact.
Next, draw the legs that are hanging over the fence line. Draw two legs that are almost like a stretched “horseshoe shape”. Draw two “trapezoid like” shapes for the hooves. Draw a line down the middle of each hoof.
Draw two sets of eyes above the snout. Draw a rounded line for the top of the head and connect two lines on each side of the snout to just under the eyes.
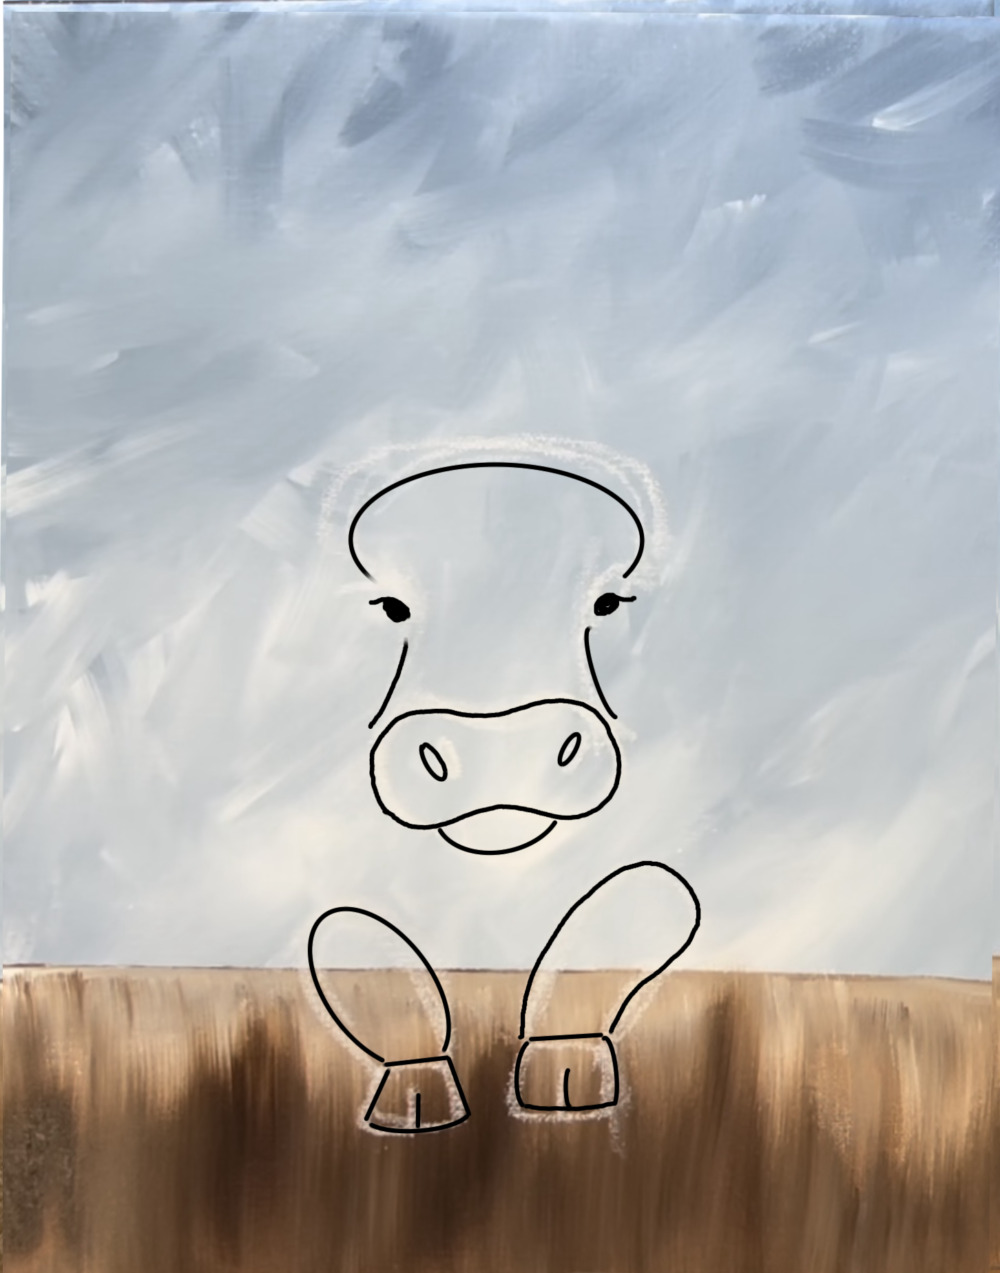
Next, draw the hair. There are two hair parts on the top of the cow’s head the part separate ways. Then draw the ears as two curved lines with hair pieces hanging down. Draw pieces of hair sticking up in the middle of the cow’s head.
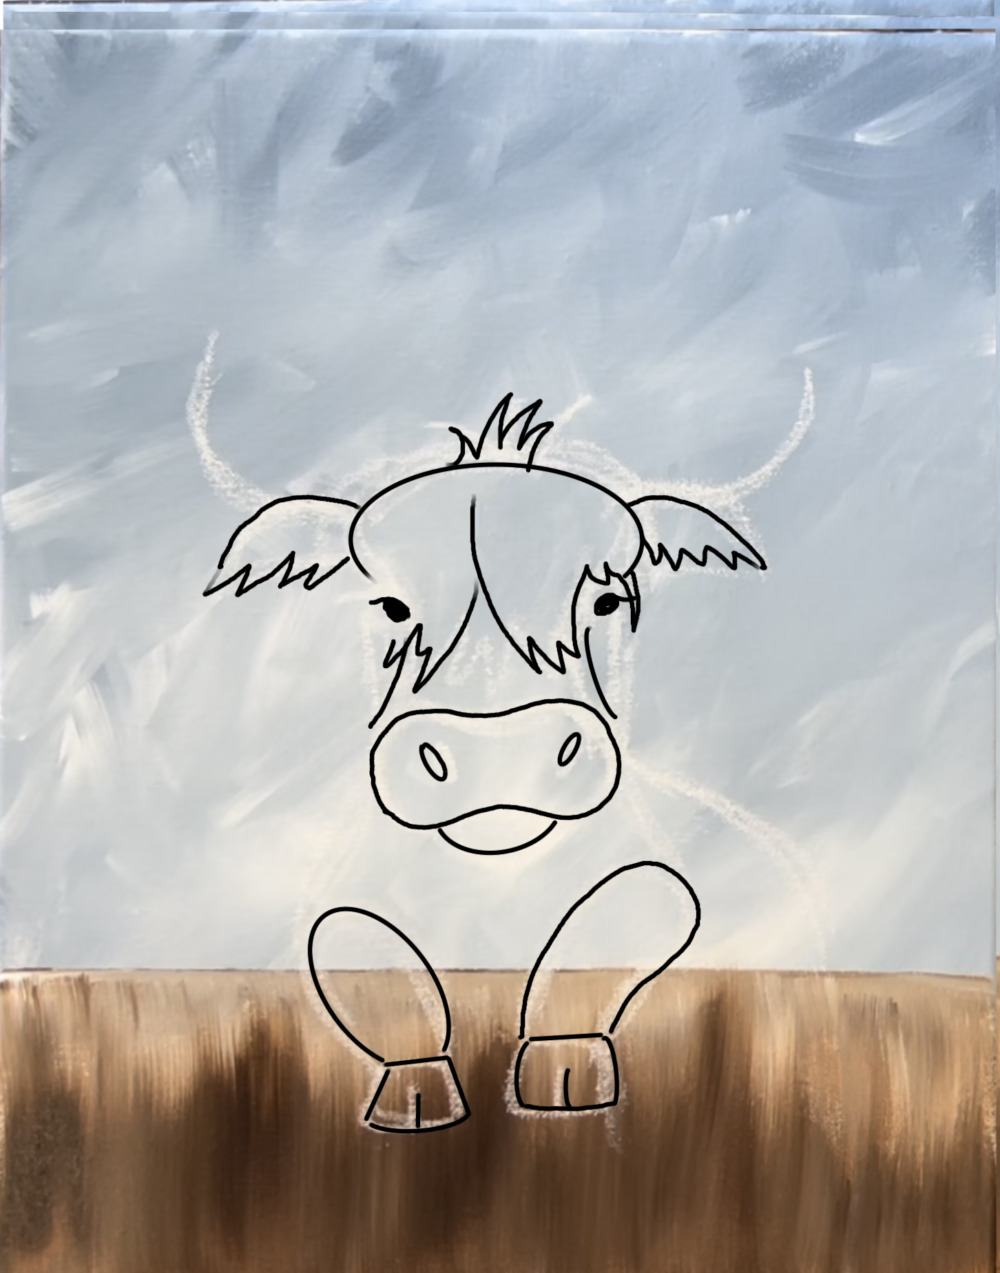
Next, draw the cow’s horns. Draw two curved lines that go upwards. The horns are wider towards the bottom then go narrow and almost go to a point at the top (I made mine curved on the ends). Draw the cow’s back that goes to the right and then behind the fence. Then draw the cow’s chest on the left of the legs.
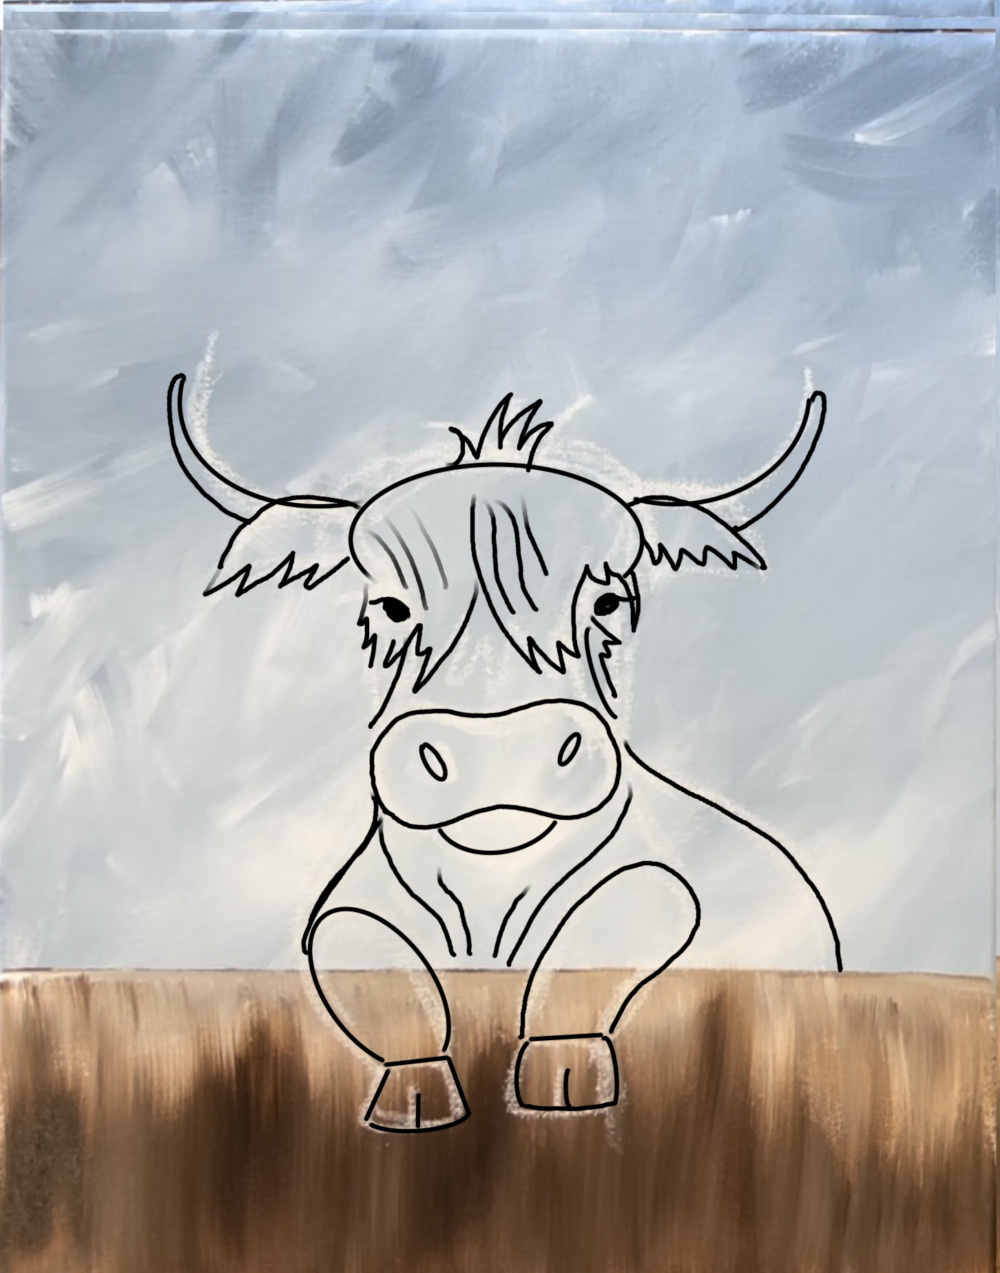
4. Paint Snout
With cow paintings, I always find it easier to paint the snout first!
Load your paint palette with the colors: titanium white, mars black, burnt umber and raw Sienna. These are the four colors we will be using for the cow. We will also be using the “#4 round brush” for the remainder of the painting.

Load your paint palette with the colors: “raw sienna” and “titanium white”. Use a #4 round brush to mix both of those colors together to achieve a light brown/ beige color. Paint the entire snout shape but leave the nostrils blank.
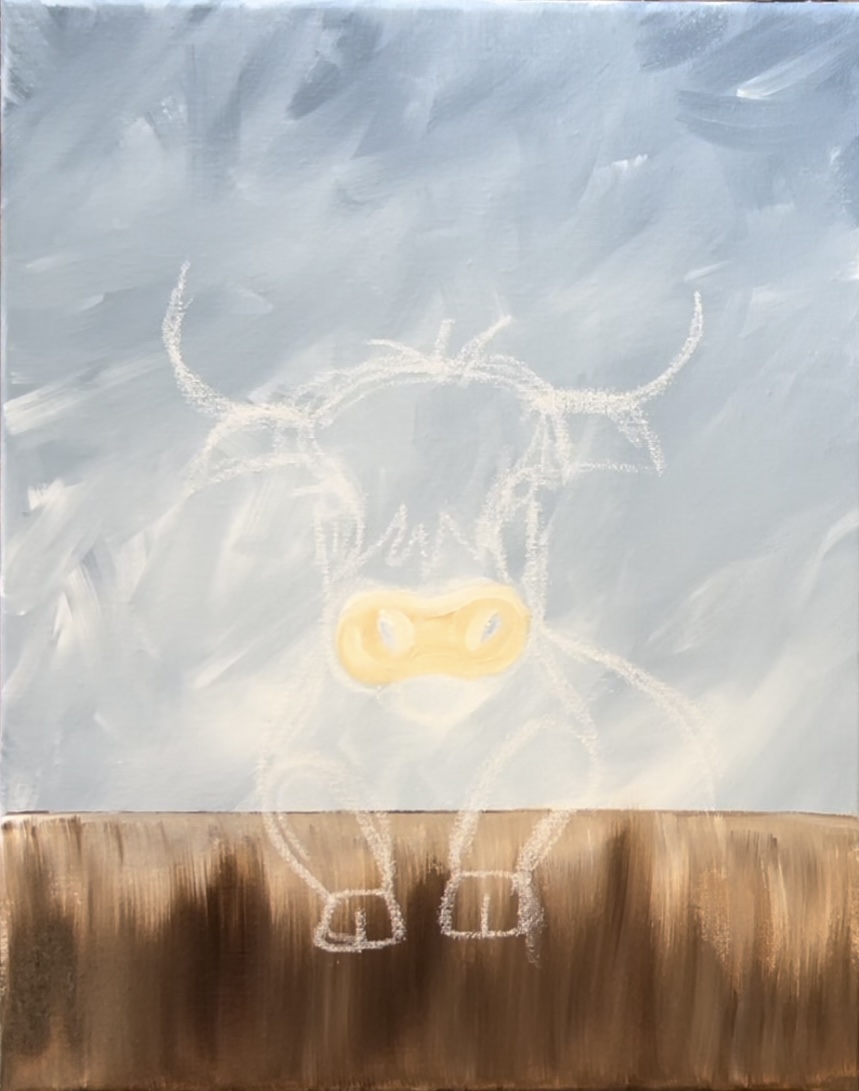
Then, load your brush in “mars black” and paint the nostrils black. Wipe the brush then double load it into the “burnt umber” and the “raw Sienna”. Paint the bottom of the mouth area with this medium brown color. Blend a little more dark brown just below the snout so it shows up a little darker.
5. Paint Dark Fur Around Snout
This highland cow has light colored hair. However, we will be painting a lot of the first layer with the dark brown. Painting a dark layer first helps us create lighter hair strands that show up nicely against the dark.
Use the #4 round brush and the “burnt umber”. Paint curved paint strokes that go around the snout of the cow. Go around the larger hair area of the cow (towards the top of his head).
Your paint strokes are short and go in a curved direction.
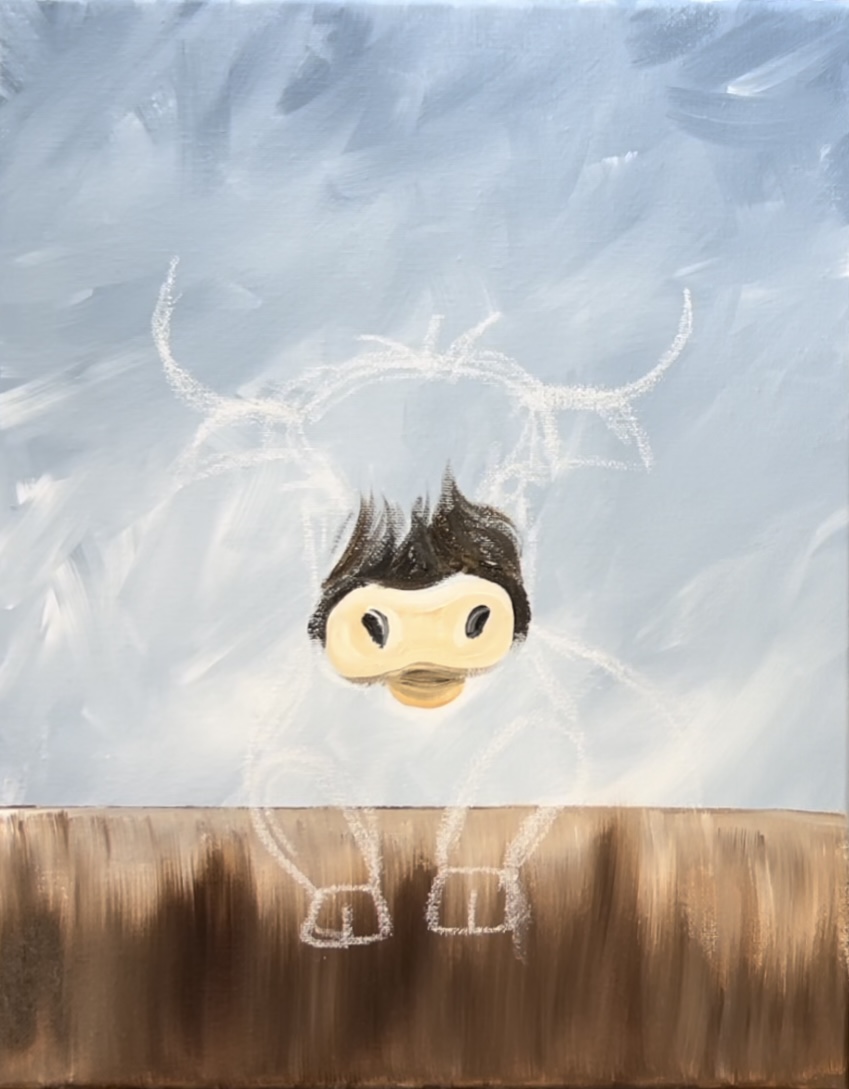
Paint the dark fur lines under the snout and have them curve and meet in the center. Double load your brush in small amounts of “raw Sienna” to create some color variation in the fur. Some of the paint strokes will show up lighter and some darker.
6. Paint Legs
Use the round brush and a combination of the “raw Sienna”, “burnt umber” and titanium white to paint the legs. Fill in the leg shapes with paint strokes that curve downwards.
Vary your browns (use dark brown and light brown) and have them blend on the canvas. When you create variations in your fur paint strokes, that adds to the textured effect.
Before this dries, double load your brush in the light brown and a small amount of white. Paint curved strokes going downwards on the legs. This will create light colored fur pieces.
Tip: if the legs are blending in too much with the fence, you can add some little black outlines or little black fur pieces on the outer edges of the legs. This will help it to stand out better. The top of the fence was intentionally painted lighter to help the legs of the cow stand out.
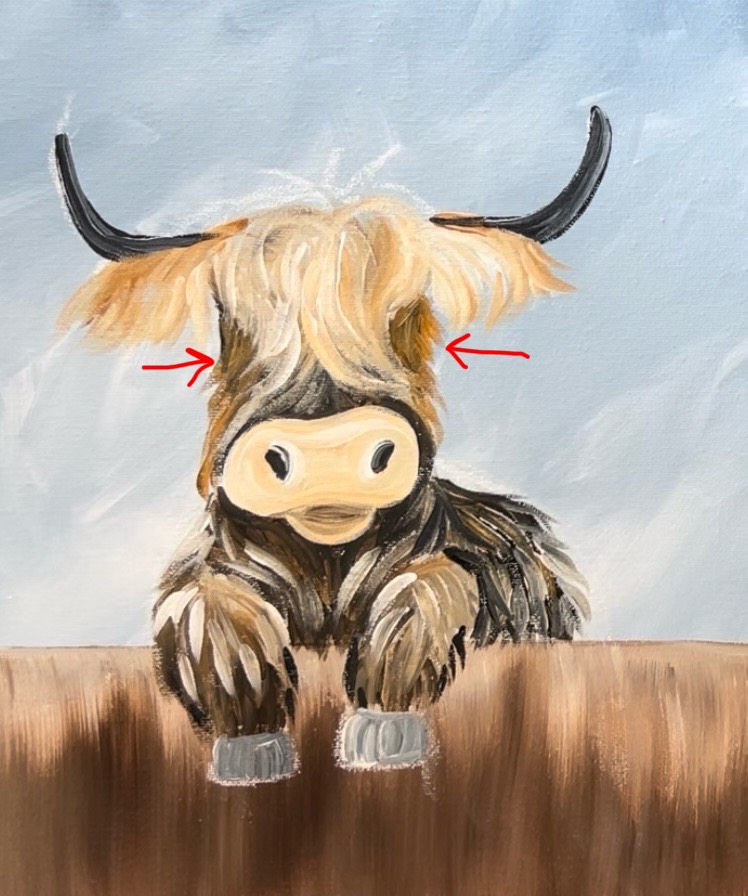
7. Paint Ears & Hair On Head
The hair on the top of the cow’s head is parted two directions. One side is swaying to the left and the other side is swaying to the right. Also, this hair is lighter and will be overlapping some of the dark parts that we already painted on the cow.
Use the #4 round brush and “raw Sienna” mixed with “titanium white”. Paint curved, loose paint strokes to form the left part of the hair that sways to the left.
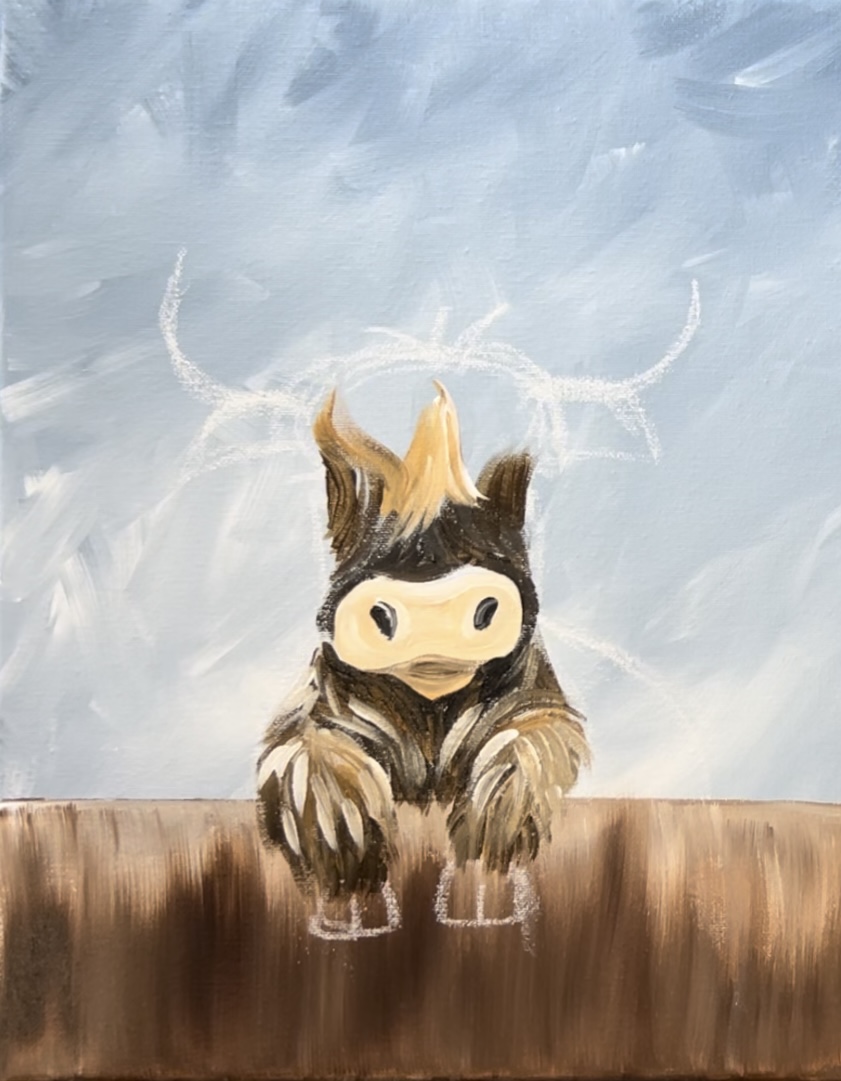
The texture of the hair is created from the variations of color blending on the canvas.

Fill the whole top hair piece in.
Then paint the right ear. Use the same white and light brown color combination on your brush. Paint a curved line and then pieces of hair hanging down in a curved direction.
Paint the left ear using this same technique. Add some more brown onto the hair pieces for more “color variation”.
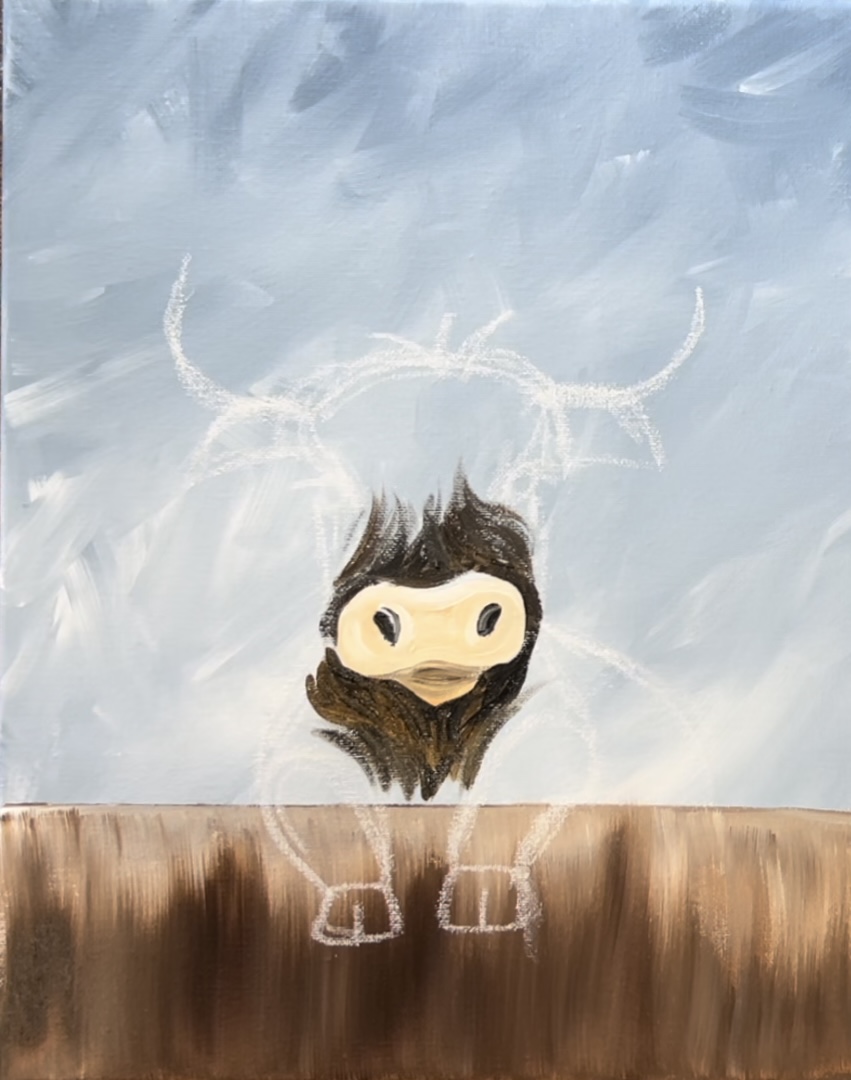
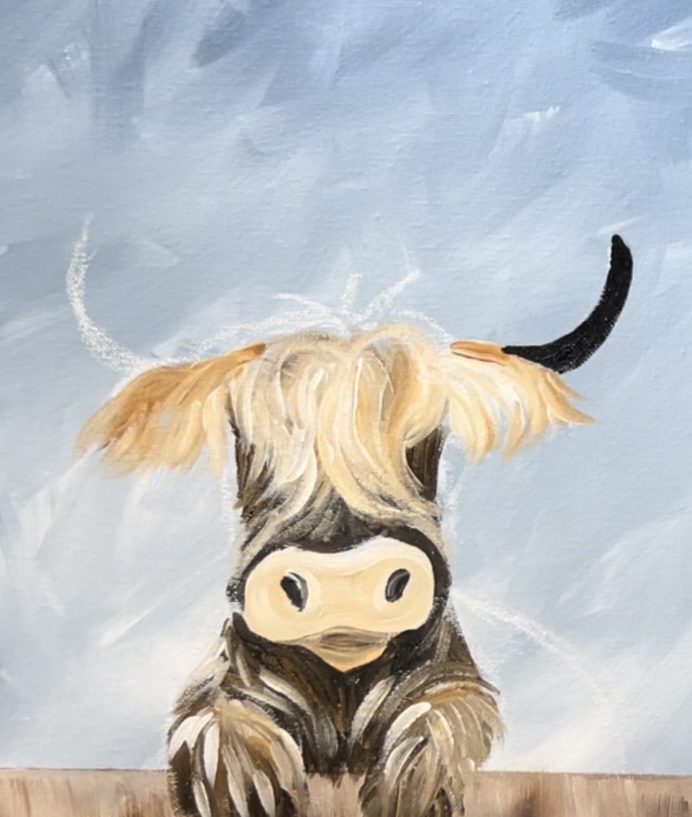
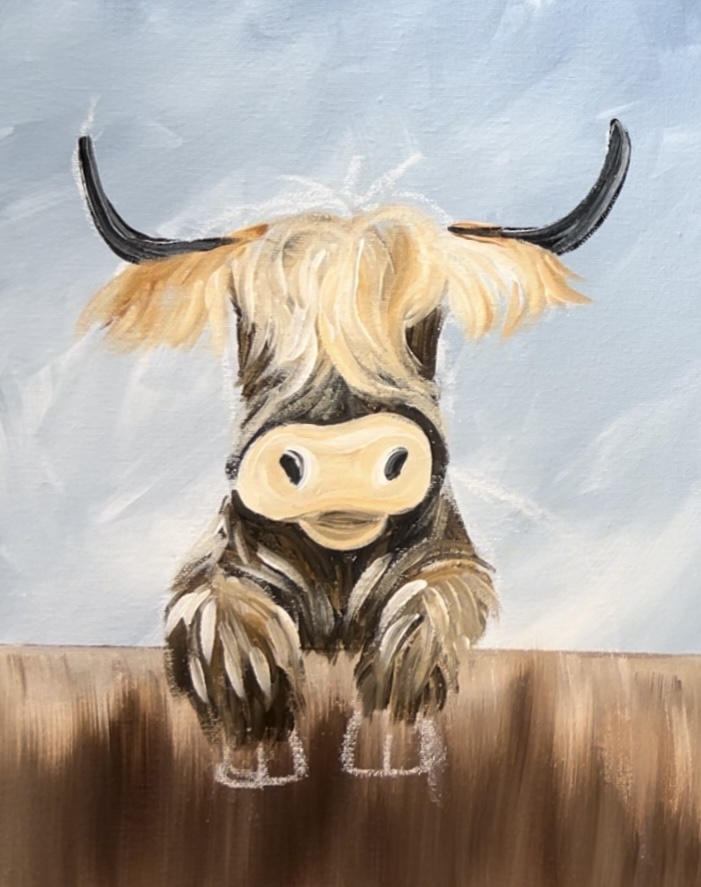
8. Paint Horns
Use “mars black” to paint the horns. I did them solid black at first and then used white to blend a little bit of white on the top edges of the horns to give it some highlight. Note how the horns go behind the hair of the ears.

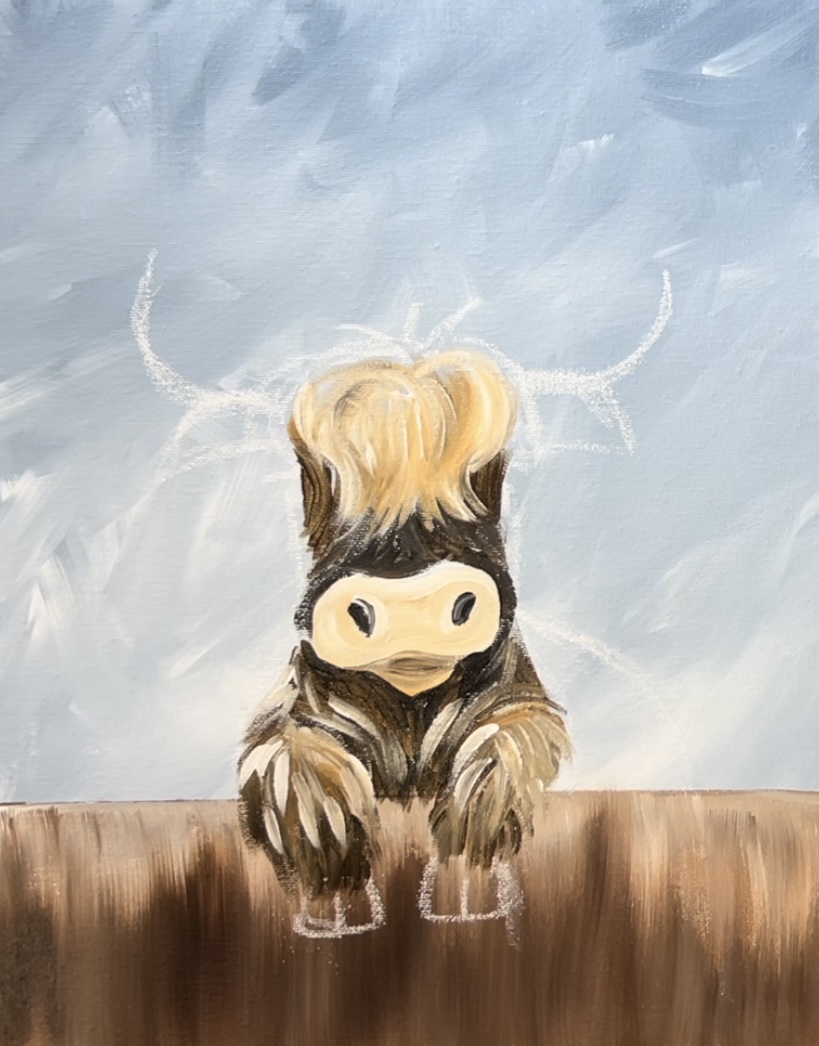
9. Touch Up Snout Area & Paint Back
If needed, go back and repaint the outline of the snout/nose area of the cow. This is because we painted dark brown around it and we may need to redo the shape to make sure it is overlapping/ in front. Use the same colors (light brown and white) to outline the shape.
Next, paint the back of the cow. Paint the first layer with dark brown.
Then you can add lighter brown fur paint strokes over it. Also, it’s okay if some fur pieces overlap portions of the fence.
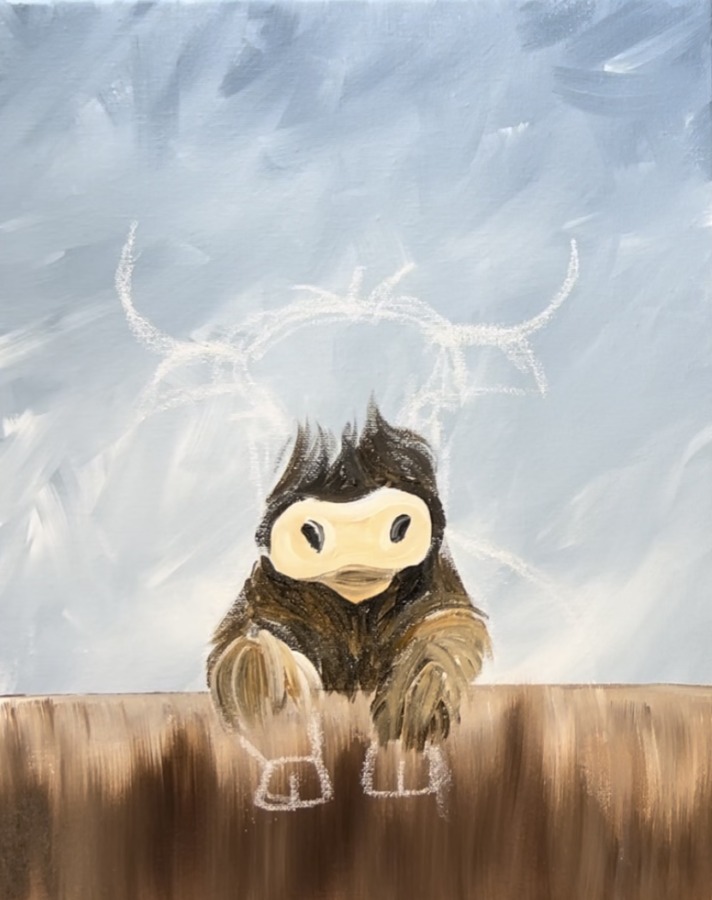
10. Paint Hooves
Mix a gray on your palette by mixing about 1 part black and 3 parts white together. Use the #4 round brush to paint each of the hoof shapes.
Also note: I added some black fur lines on the edges of the legs. This helps them to stand out against the fence background by giving it this sort of dark outline.

Wait for the color of the hooves to dry before outlining them and painting the black line in the middle.
11. Paint light brown in the area where the eyes are going to be & touch up fur
I painted light brown (raw Sienna) in this area as shown below. This will help the black from the eyes show up when we draw/paint the eyes in.
Paint little fur pieces on the sides of the head that go down and around the snout area. We need to wait for this to dry before painting or drawing the eyes in.
Optional: then I added a little bit of white to my brush and painted white fur strokes (the white mixed with light brown that’s already on my brown). These fur strokes were painted around the snout and a little in the front chest area (under snout) of the cow.
12. Outline hooves
Use mars black to outline the hooves (I only outlined the right side, I left the left side open). Then paint the middle vertical line inside the hooves. Also, outline the under part of the snout (bottom part of the kidney bean shape).
Use some of the darker brown to paint more hair strands over the lighter hair area. This will give it some more “texture”. Also, paint some hairs that are sticking up on the top of the head in the center.
13. Paint Fence Lines
Use a ruler to help you with this step. You can draw the lines with a black paint pen or use the round brush for this. I spaced each vertical line about 2 fingers apart. You don’t have to make your fence perfectly even. You can also make some of your posts slightly higher than others for a more natural/ rustic look. You can even get creative and add wood texture or holes in the fence!
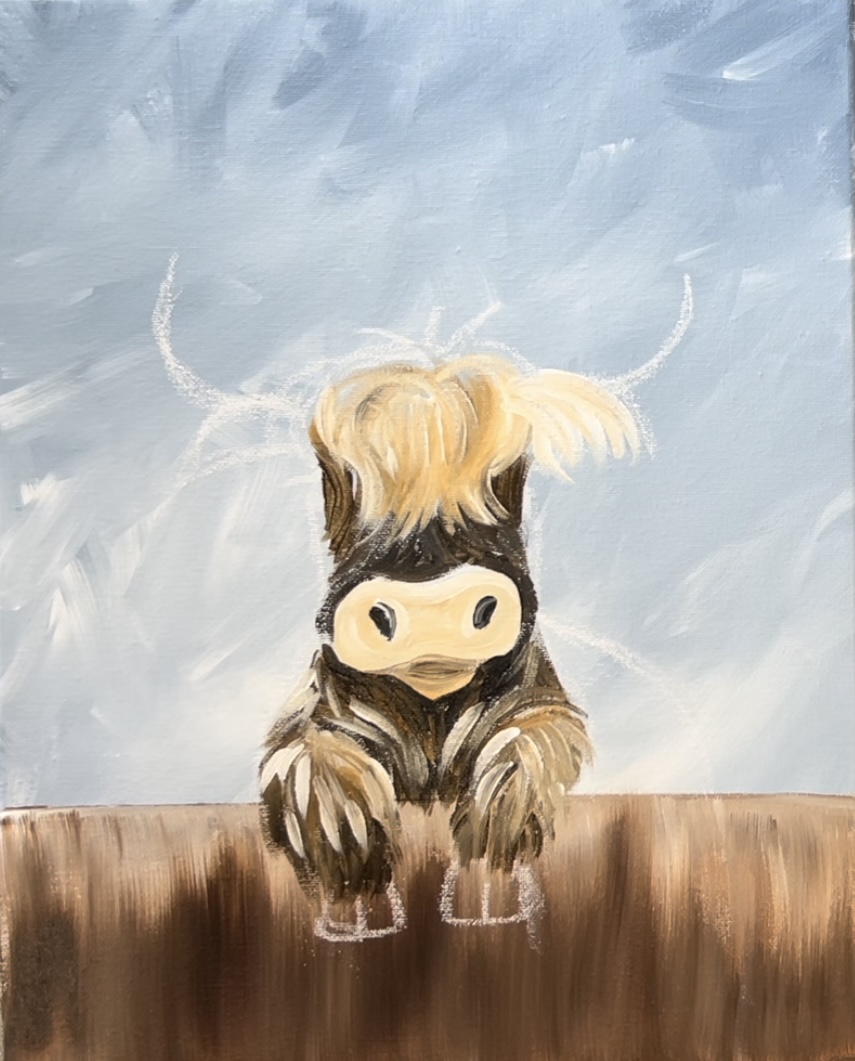
14. Draw Eyes
When the head area of the cow is completely dry, draw the eyes in. I found it easier to draw them with a black paint pen, however, you can use a round brush and black paint for this too!
I used a ruler to help line the eyes up. I placed the eyes at about .5″ above the snout and about 1.75″ spaced apart. Yours might be slightly different. Also if you have to paint eyes over the light colored hair that is okay! We can always go back and paint more hair that goes around the eyes. You can also decide that maybe only one eye is showing or even no eyes are showing because the hair is covering one or both!
The eyes are a simple circle shape with a curve on top for the eyelid/eyelash.

Let the eyes dry a bit. Then use the round brush to paint one or two dots in the middle of each of the eyes. These dots will give the eyes a highlight/ sparkle look!
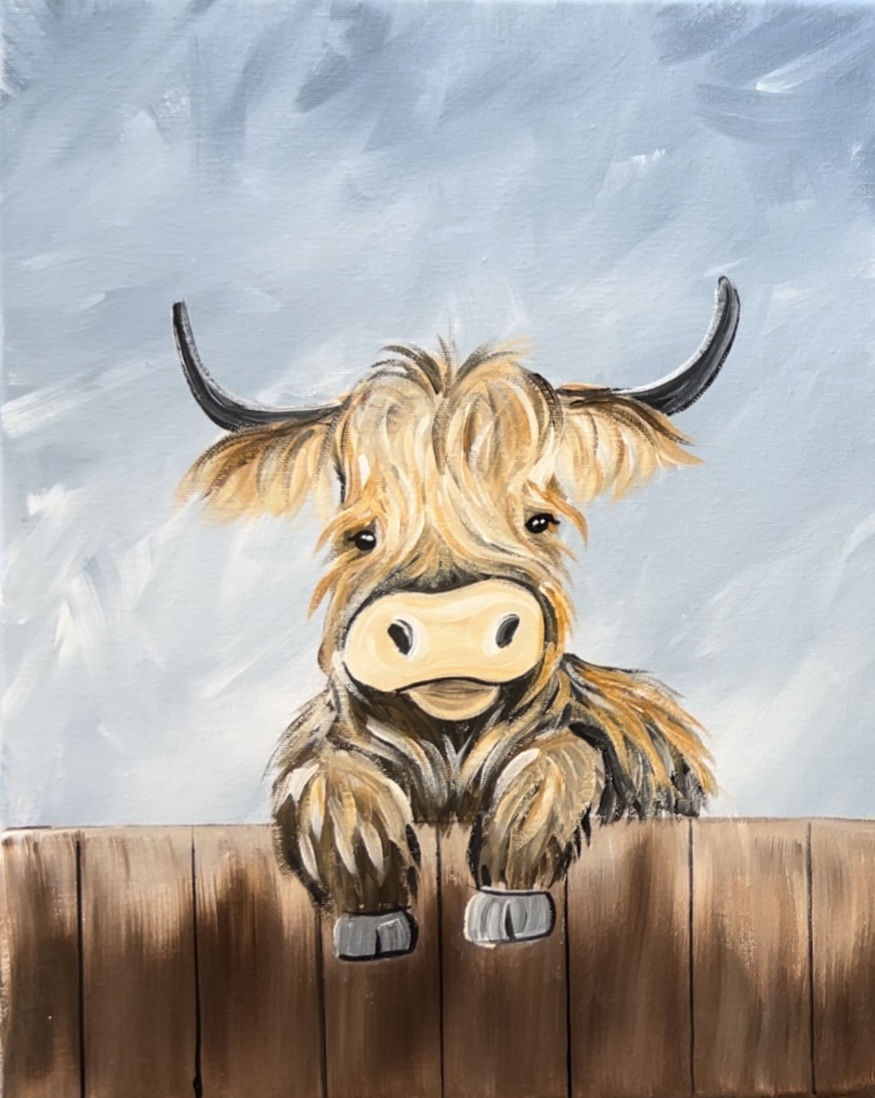
Whew! We are done with this cow! He was a challenge! Now we get to paint all the fun fall detail around the cow!
15. Paint Pumpkins & Sunflowers
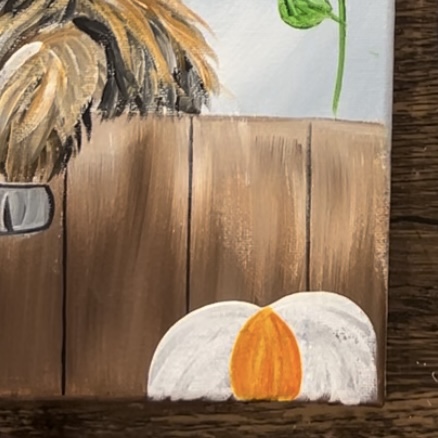
Pumpkins will be painted orange. However, orange tends to be a “see through” color. To get around this, we need to paint the pumpkin shapes white first.
Use the #4 round brush and titanium white to paint each of the pumpkin shapes. I did a wide and short pumpkin on the lower right. Then I did a tall and slender pumpkin on the left that is going behind another short and wide pumpkin. Note that these pumpkins are only showing their top 1/4 or 3/4. We don’t see the bottom of the pumpkins.
You’ll need to wait for your white layer to dry before painting them orange.
Next, paint the centers of each of the sunflowers. Use “burnt umber” to paint two circles. I did one higher on the right and a lower one on the left. Both are about the same size.
Then paint the petals of the sunflowers. Load your paint palette with: “cadmium yellow medium hue” and “titanium white”. Double load your round brush into both of the colors. Paint your first set of petals that attach to the circle and go around the circle. Each petal is an oval shape that goes to a point on the tip.
Then paint the second set of petals that overlap this first set. I added a bit more white to my brush for this second set of petals.
Repeat this step for the sunflower on the left.
Next, rinse the round brush. Load it into the dark brown and “stipple” (paint little dots) the circumference of each of the circles. This brown will slightly overlap parts of the bottom of the yellow petals.
Then load your brush in a small amount of “light brown”. Stipple a small circle in the center of the brown circle.
Load your paint palette with “hooker’s green hue”. Paint a stem that curves below the sunflower and then behind the fence.
Then paint the leaves of each of the sunflowers. Add a small amount of white on the top of the leaves for “highlight” and blend it into the green.

Next, paint the orange of the pumpkins. Use the #4 round brush and “cadmium orange hue” mixed with some yellow. Start with the middle “bump” of the pumpkin. Paint this half oval shape by stroking your brush downwards.
Then paint each pumpkin bump a slight variation of color. Add a little yellow or white into the orange. Stroke your paint stroke down starting at the top and then going to the bottom edge of the canvas.
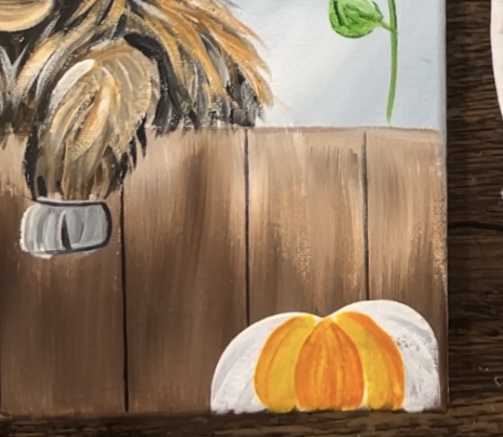
By varying the colors of each of the “pumpkin bumps”, you get them to stand out and this makes the pumpkin look 3D.
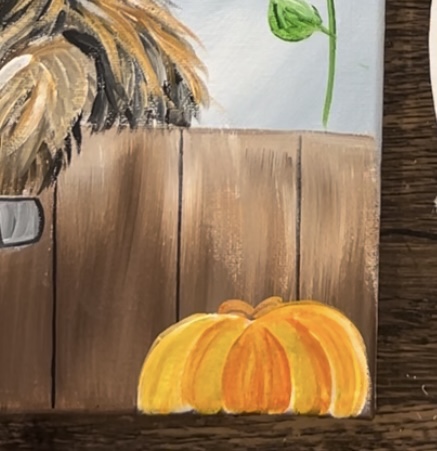
Next, paint the stem of the pumpkin with mars black. Use the round brush to paint a stem that has a “scalloped” edge on the bottom and then curves to the left.
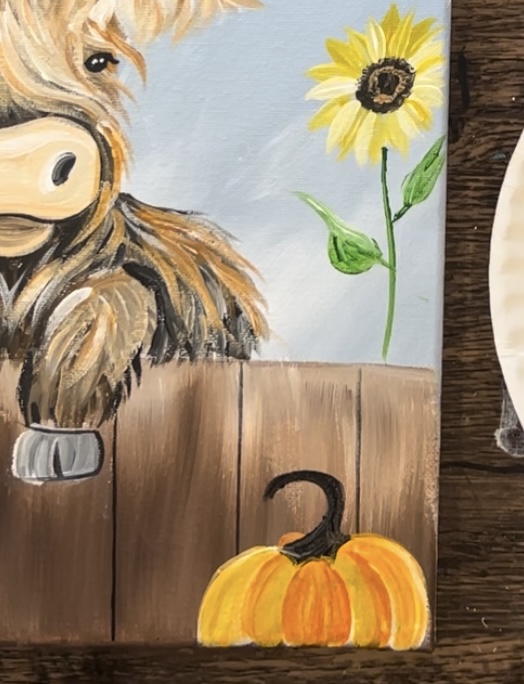
Then add a little bit of “titanium white” into the black to give it some texture.
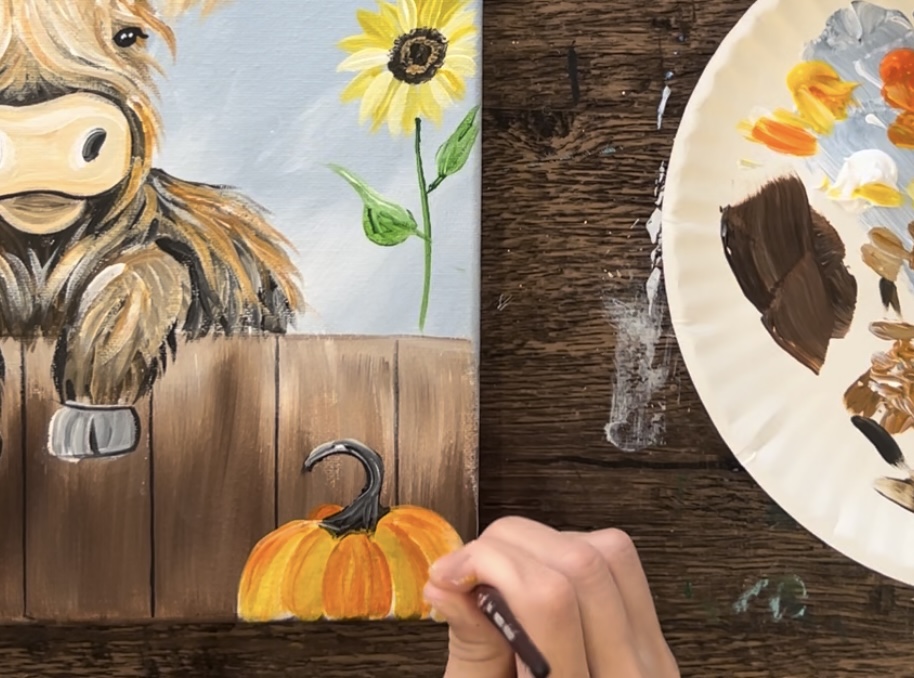
Repeat this technique for the pumpkins on the left.
Use brown or black to outline the curved lines on the pumpkins (between each of the “pumpkin bumps”). I usually only go about 3/4 of the way down but you can also outline all of the pumpkin if you want.
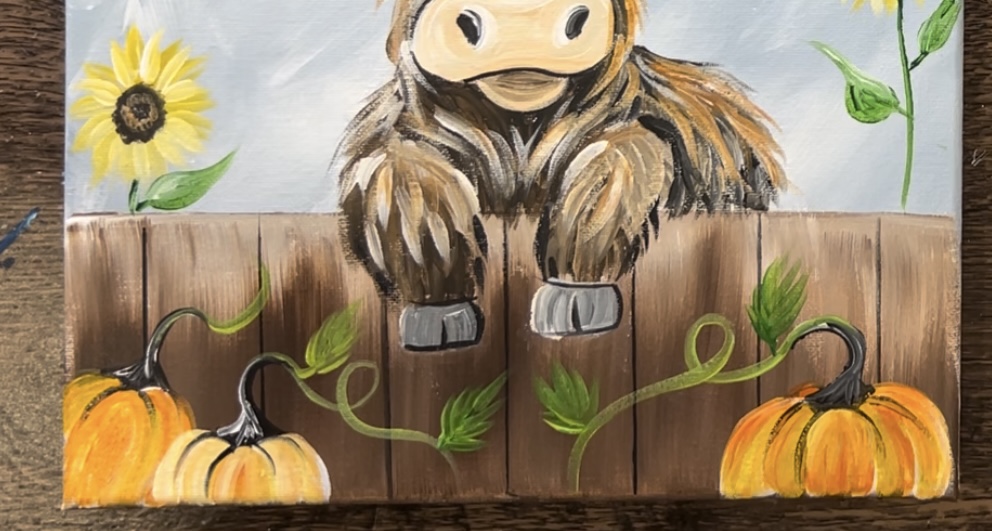
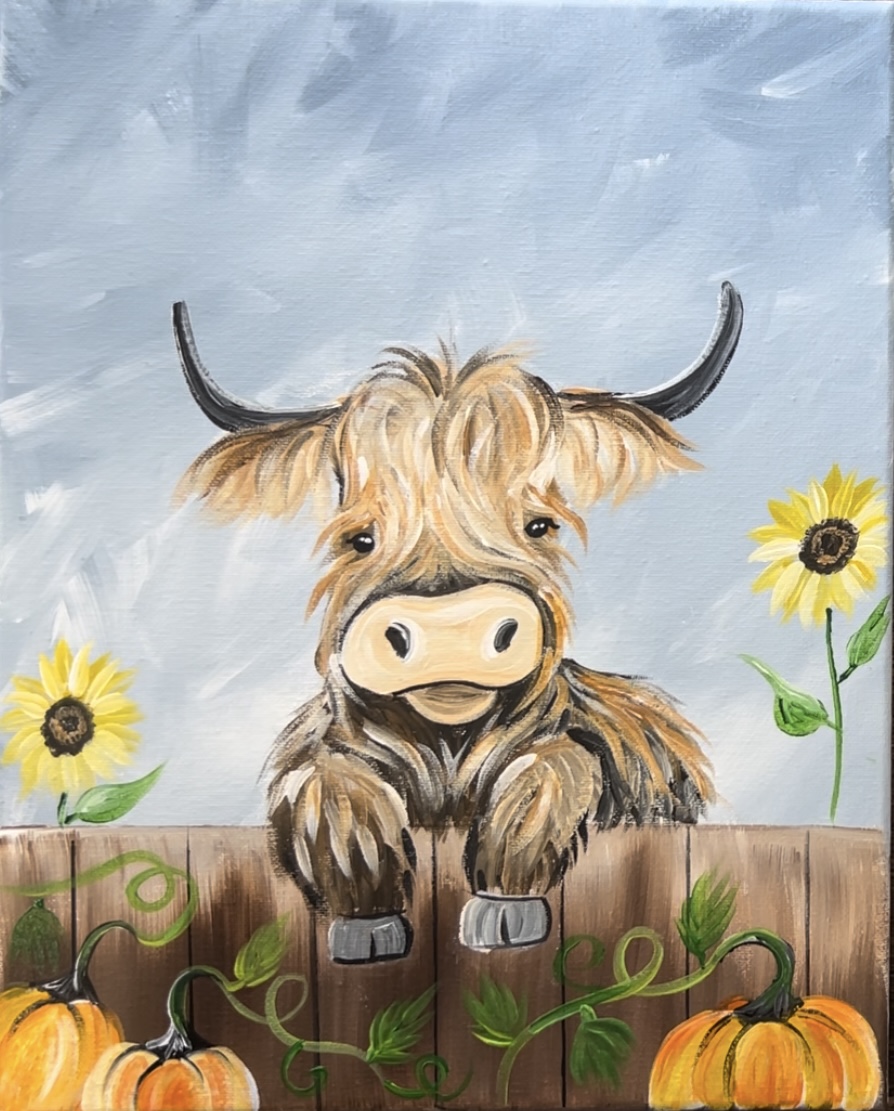
Next, paint vines! Use the “hooker’s green hue” and the round brush. Mix a little “titanium white” into the green (or even some yellow) and paint curvy lines that attach to the stems. Also, paint simple leaves that have jagged edges.
16. Paint Leaves
Use the round brush and orange to paint little oak leaves falling in the sky. You can start by painting just a small curved line that has rounded prongs extending from the leaf.

Paint simple rounded/ pointed leaves with the yellow. Then use the dark brown to paint the center line of all the leaves.
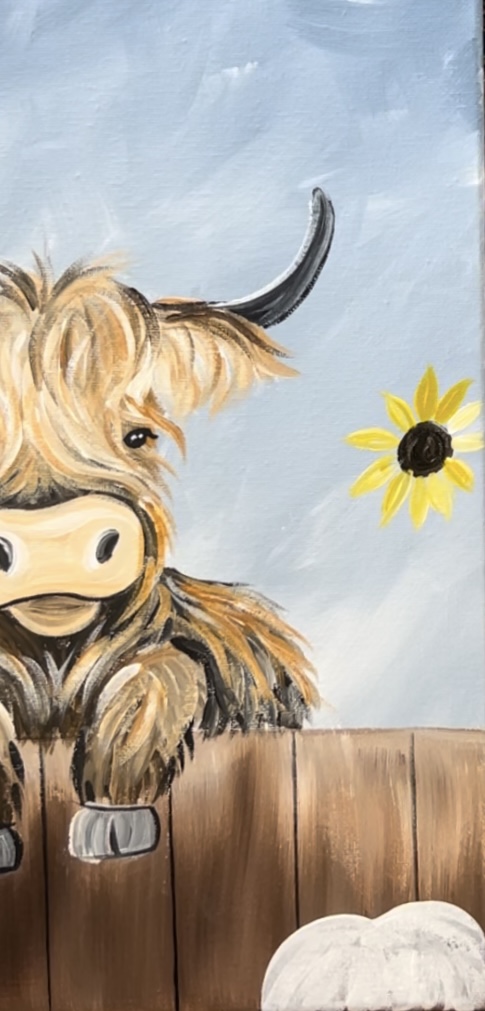
17. Paint Flower On Cow’s Head
As a final detail in this painting, I painted a small sunflower on the cow’s head! This sunflower is on its side. Start by painting a dark brown oval.
Wait for this to dry…
Then use the yellow and white to paint little petals on the top of the oval.
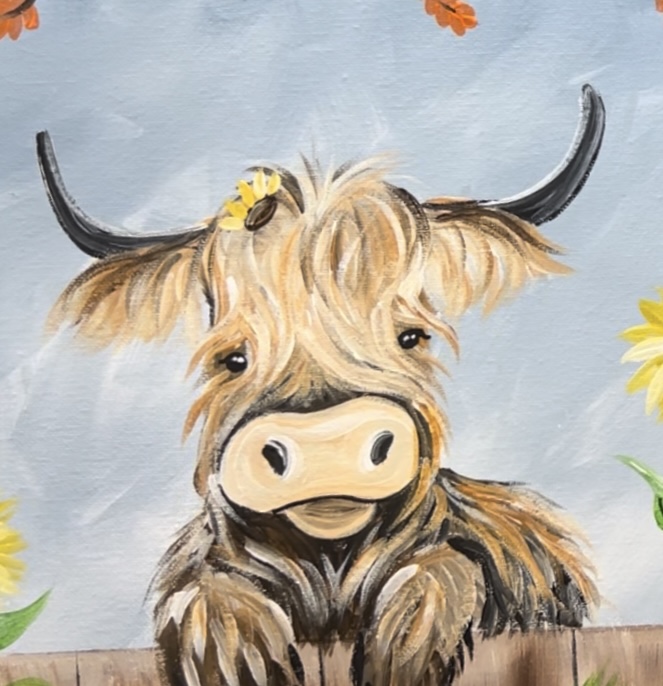
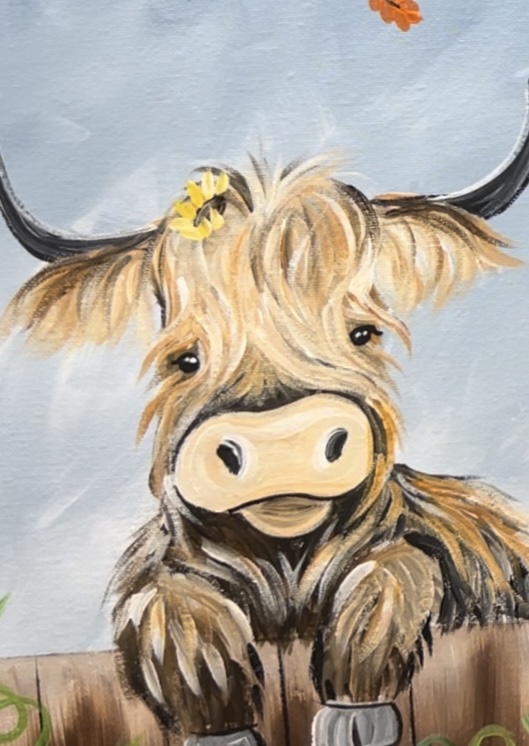
When you get to the front of the flower (bottom of the oval), paint your petals so they overlap.
Then use the green to paint two pointed green leaves on each side of the flower.

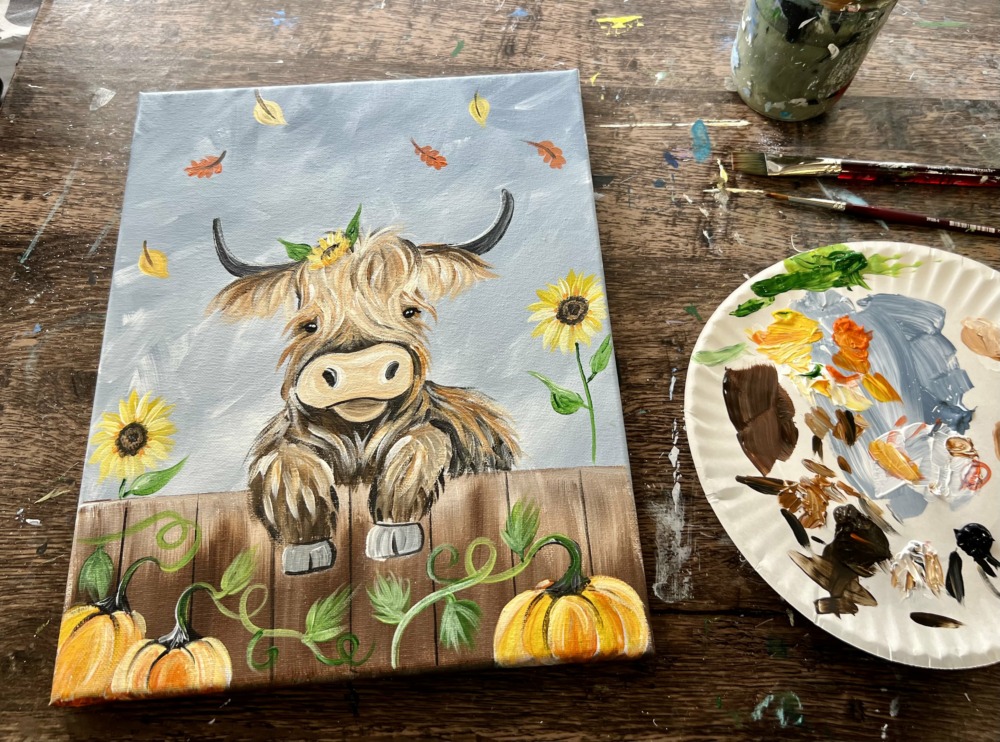
Finished!
And you are finished! Sign your name and show it off!