

Would you like to save this?
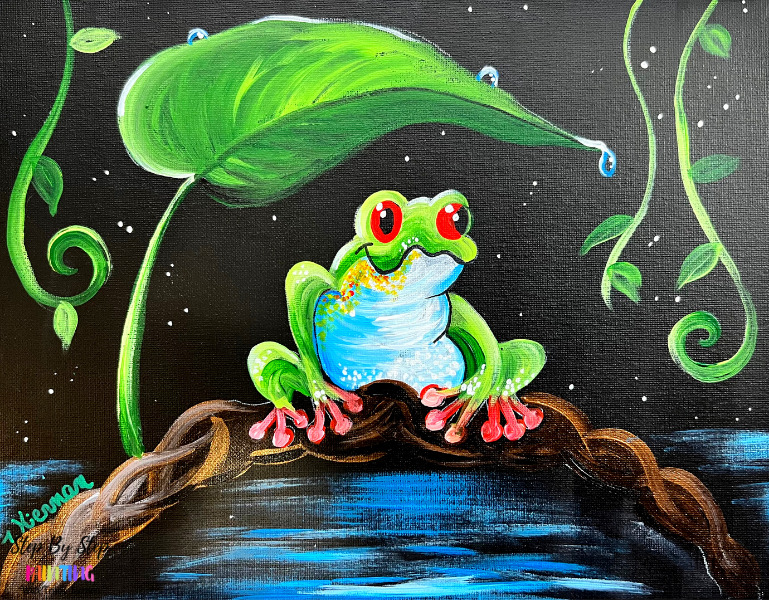
Learn how to paint this super adorable tree frog with acrylics on a black canvas! This painting tutorial is demonstrated on an 11 x 14 canvas that I painted with a coat of “Mars Black” acrylic paint.
Black canvas paintings are great to use as “mess up paintings” or as a unique style of acrylic painting. I love working on dark backgrounds and have several painting tutorials like this! Adding bright colors to your black background create stellar contrast!

If you are painting over a white gesso canvas, simply add one coat of black paint to your canvas. You can also buy them pre-primed with black paint.
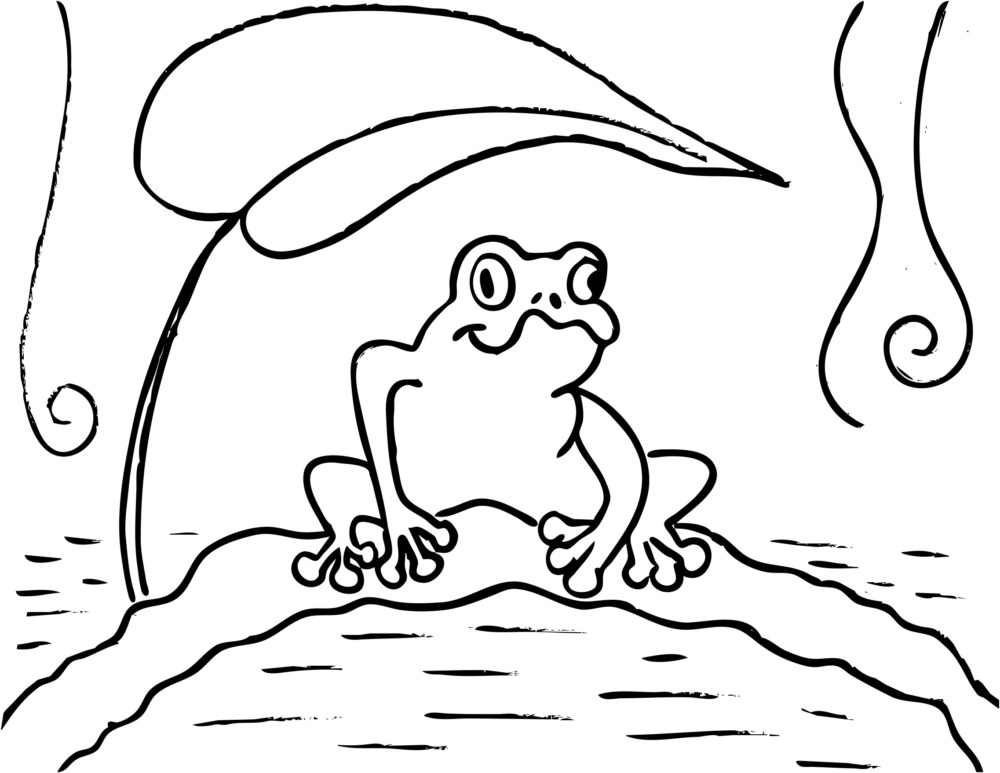
This painting tutorial is demonstrated with a traceable. In the video and instructions, I will show you how to transfer the design to the canvas. Of course you can sketch/draw your frog design without using the traceable.
Using a white chalk pencil is helpful for drawing on a dark canvas background! If you are using the traceable, I recommend getting a sheet of white graphite paper to help you transfer the design to the dark background.
Materials Needed:
Tree Frog Acrylic Painting Tutorial

This acrylic painting tutorial will demonstrate how to paint a tree frog on a black 11 x 14 canvas.
Materials
- 11 x 14 Canvas Painted Black
- Acrylic Paints
- Paint Brushes
- Traceable
- White Graphite Paper
- Pencil
- White Chalk Pencil (optional)
- Black POSCA Paint Pen (optional)
Colors
- Titanium White
- Mars Black
- Brilliant Yellow Green
- Hooker's Green Hue Permanent
- Phthalo Blue
- Pyrrole Red
- Primary Yellow
- Bronze
Brushes
- 3/4" Flat Wash Brush
- #4 Round Brush
- #8 Round Brush
- 5/0 Round Brush (if not using paint pen)
Color Palette:

Using Craft Paints?
If you are using craft paints such as the Apple Barrel craft paints, I suggest substituting to these colors:
- White
- Black
- Too Blue
- New Shamrock (or any lime green color)
- Holly Branch (or any dark green color)
- Nutmeg Brown
- Bright Yellow
Traceable:
Directions At A Glance:

Video:
Step By Step Directions:
1. Draw or Transfer The Frog Design To The Black Canvas
If you are using the template for this painting, simply print it on two sheets of paper and tape the two papers together.

Then place a sheet of white graphite paper below the template and trace with a pencil.

Your design will transfer to the canvas and be ready to paint! As an alternative to white graphite paper, you can also rub chalk or white color pencil on the back of your traceable template. If you are drawing this by hand, I recommend using a white chalk pencil.

2. Paint The Frog Green Sections
Next, load your palette with brilliant yellow green, hookers green hue permanent and titanium white.
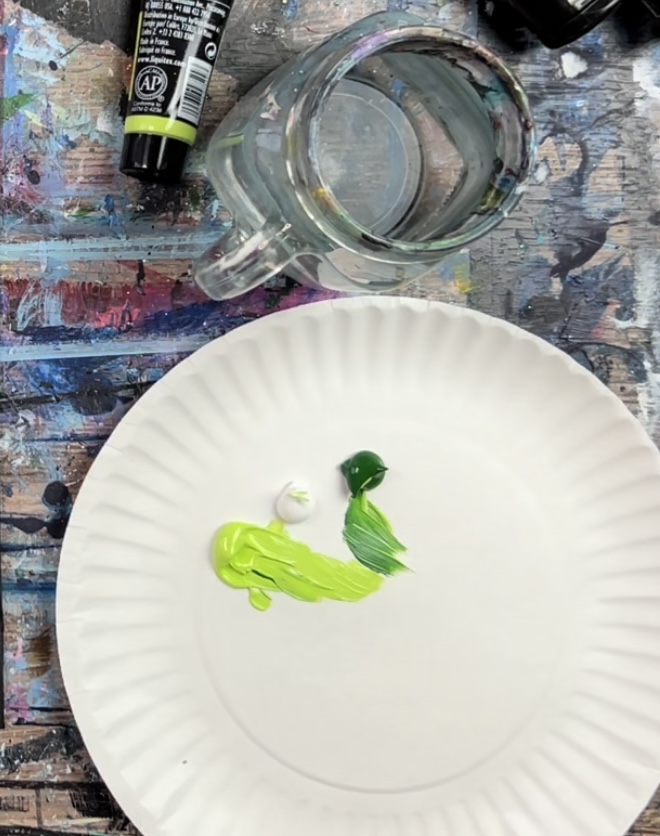
Use a #4 round brush to mix equal parts brilliant yellow green and titanium white. Start at the top of the frog and paint using “contouring strokes” that go in the direction of his shape. Go around the eyes and around the top part of his mouth.

Load small amount of the “dark green” on your brush too for color variation. Create contrast in the legs by making some parts darker and some parts lighter.

3. Paint The Frog White Sections
Next, paint the belly area of the frog white. Make your strokes go in a curved direction to give the frog “form”.


4. Add Shading
Next, double load your round brush in titanium white and phthalo blue. On the left part of the belly area add some blue.

Then drag the blue towards the center going in a curved horizontal direction. This creates shading on the frog’s belly and highlights some parts that may be wrinkled. Add some of this light blue on the right too.

5. Paint The Red Eyes
Load your palette with pyrrole red. Use the #4 round brush to paint the eyes. Leave the center part of the pupils blank for now. (An alternative is, you can paint the eyes solid red first and then go back later and add the black centers).

6. Paint The Toes
Load your palette with a small amount of primary yellow. Mix about equal amounts of the yellow and red together to make a dark orange.
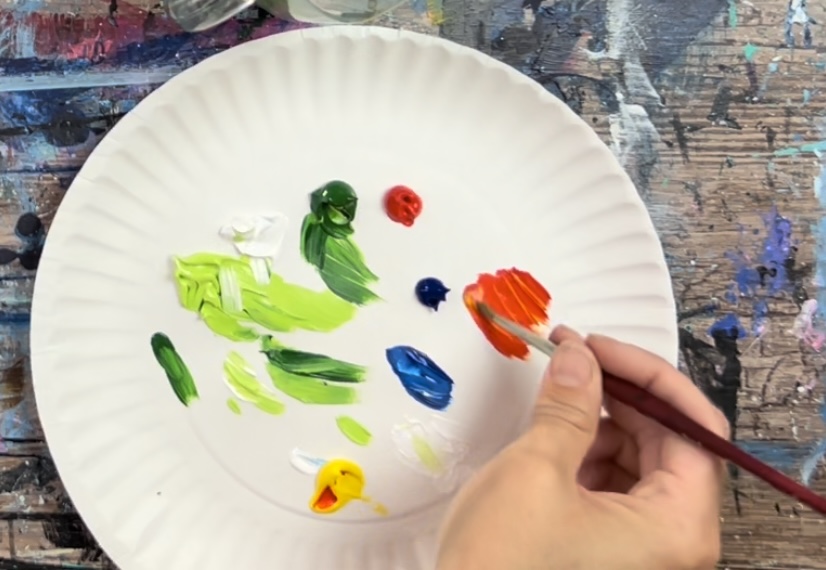
Use the #4 round brush to paint the toes. These are small circles with a narrow rectangular shape.


Next, add a tiny bit of white to your brush and go over the toes with a second coat. Let the white gently blend with the orange color but not all the way.

Next, rinse the brush. Add green to the brush and gently blend some green down into the red-orange toes.

7. Paint Texture
Use the tip of your round brush to paint little white dots on the frog to create texture. Load white just on the tip of the brush and create clusters of dots in different areas on the green and white part of the frog.


8. Paint Mouth, Pupils & Outlining
I would recommend using a black paint pen for this step! If you don’t have a black paint pen, you can use a small liner round brush and black paint. Start by outlining the line on his mouth. Then outline the right side of the belly area. Then paint the pupils on the eyes.


9. Add Some Yellow Texture/Dots
Next, load the tip of your brush in primary yellow. Create dotted yellow texture in the upper left area of the frog’s stomach.


10. Paint Branch
Load your palette with bronze, mars black and titanium white. Use a #4 round brush to paint the branch. Paint this branch in curved strokes that overlap each other in a twisting manner.

Gentle blend the black with the bronze but try not to add too much black.


Add a little bit of white to the brush and gently blend it with some of the bronze at the top. Gently blend the strokes by creating twisting and overlapping strokes but try not to over blend it.

11. Touchup Eye (If Needed) and Add Highlights On Eyes
Use a paint pen to touch up the black pupils in the eyes if necessary .

Then use your round brush and dip the tip in titanium white. Paint one white dot in the upper left of the eye in the red area.

Then paint a second white dot diagonally in the upper left part of the pupil. Do the same thing for the eye on the right.

12. Paint Leaf & Vines
Use a #8 round brush to paint the leaf. Load the brush in equal parts light green and dark green and a small amount of white. Paint the leaf going in a contouring direction.

The top part of this leaf is lighter and brighter and the bottom part of the leaf is darker. For the bottom part, I used mostly the dark green and not so much the lighter green. To create some of the vein texture, drag your strokes going outwards from the center.

Paint the stem using the dark green. Make the stem a little thicker on the bottom and go thinner at the edge. Use the tip of your brush to paint the center line as a very thin line that goes across the center of the leaf.

Next, paint the vines. Use varying colors of the light and dark green. Let the colors blend on the canvas and vary the thinness and thickness of the lines.


Then paint some smaller leaves on the vines. Use the smaller #4 round brush for that step. You can do 2-3 leaves (or more or less) on each of the vines.


13. Paint Water
Mix phthalo blue with titanium white (about equal amounts each). Load the tip of your 3/4″ flat wash brush in this medium blue. Paint left and right strokes to add water texture to the water area.

This water area is below the tree branch and on the left and right sides of the canvas. Add small amounts of white to the brush and gently blend. Try not to over blend the colors and leave a lot of black still showing through.


14. Paint Water Drops
Use the #4 round brush and the medium blue color. Paint two half circles on the top of the leaf. Then paint a water droplet going down from the tip of the leaf.

Then paint a very thin white line around the first blue lines.

Then paint little white dots on the right side of each of the water drops.

Then paint a small white line to the left of the falling droplet that is attached to the leaf.


15. Add Stars/dots in background
As a final touch to this painting, paint tiny clusters of dots all throughout the black area.

Finished!
Sign your name and show it off!
Share your art here:


