
Would you like to save this?
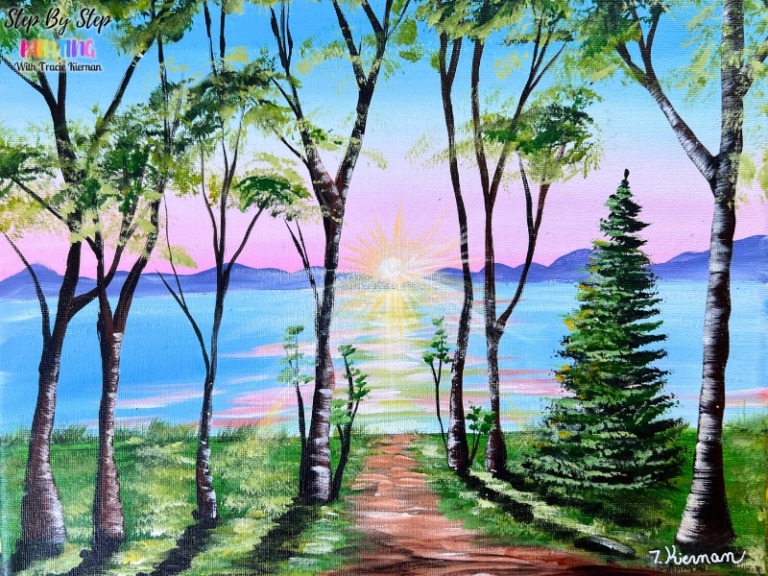
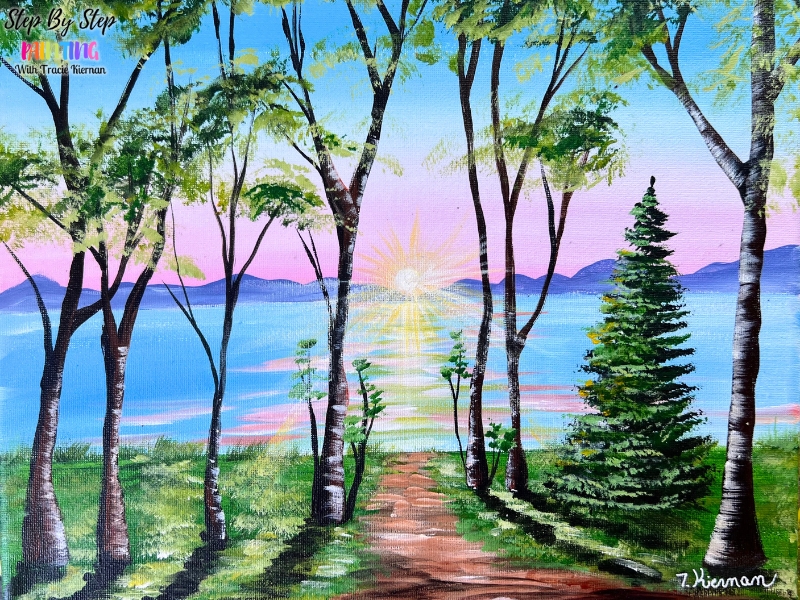
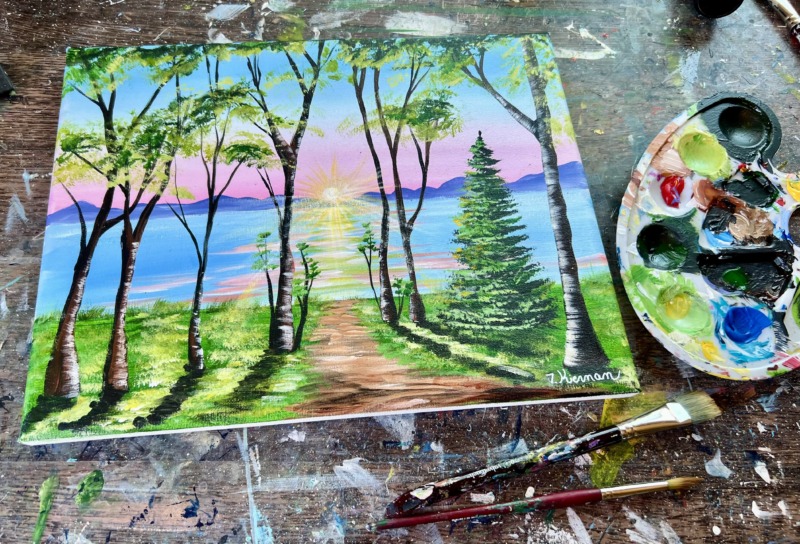
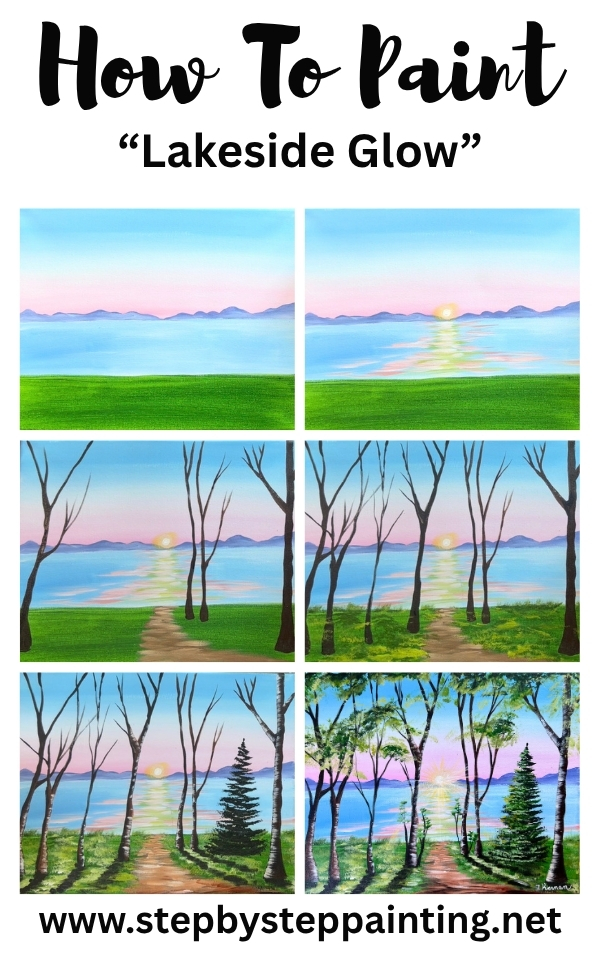
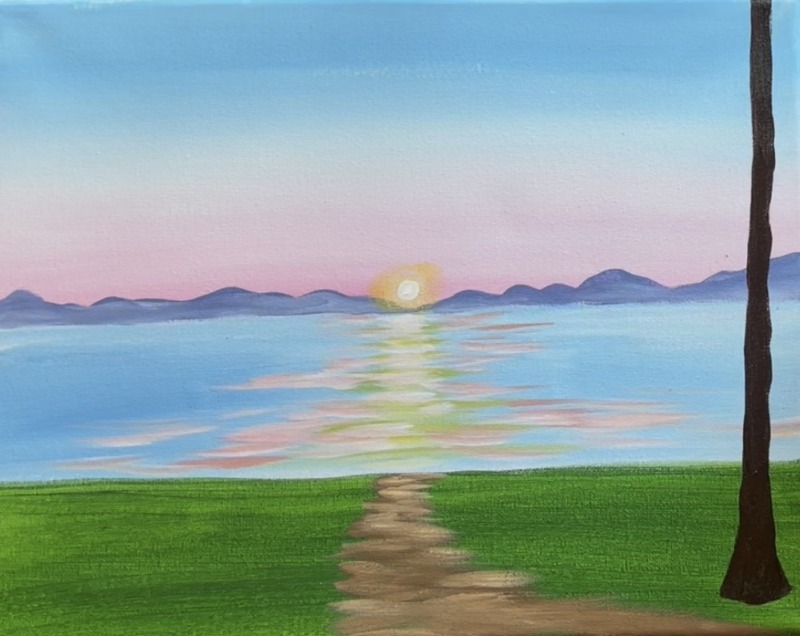
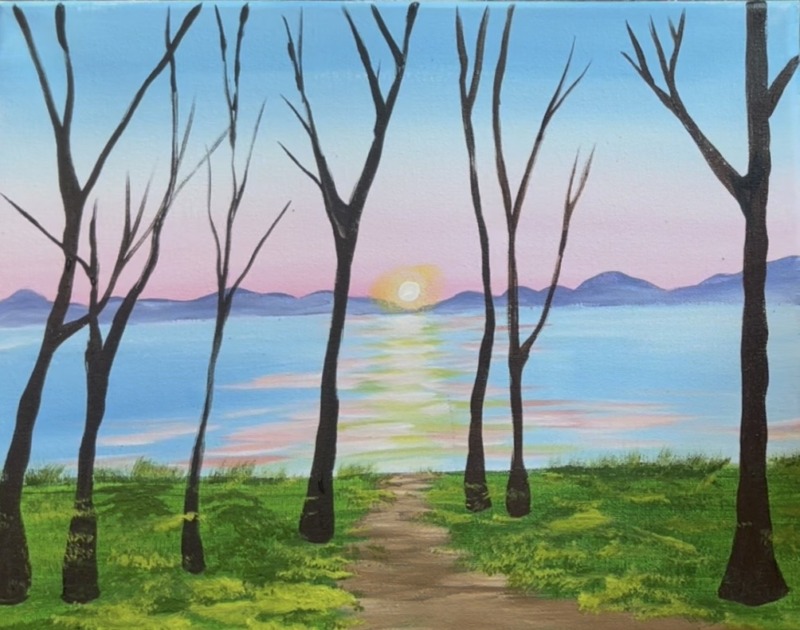
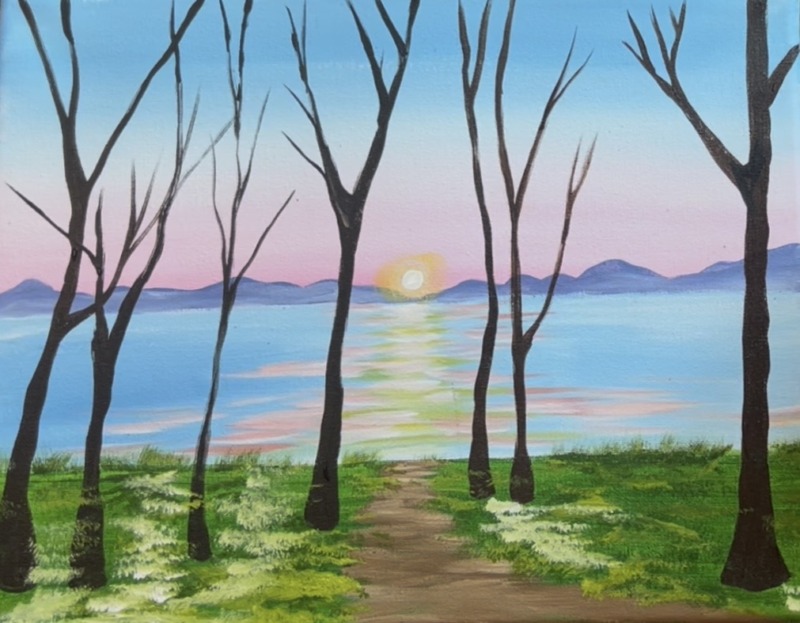
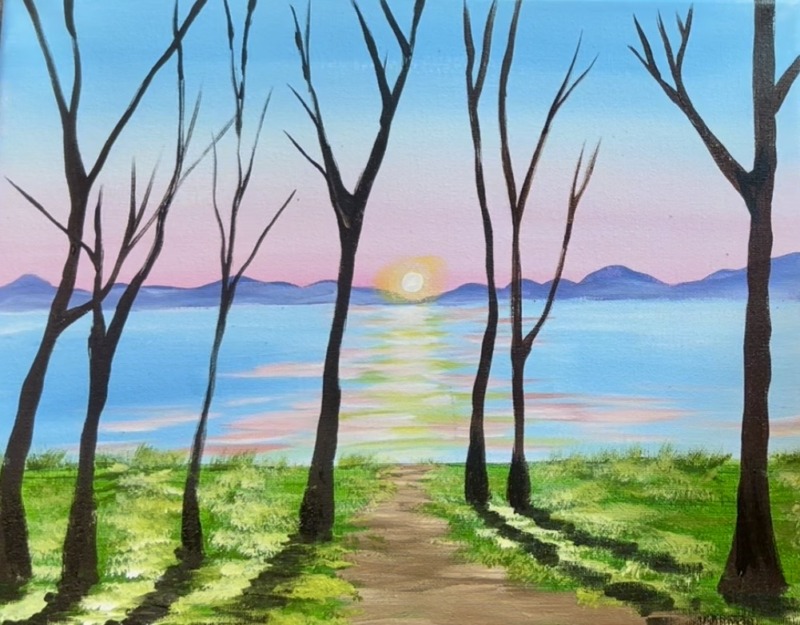
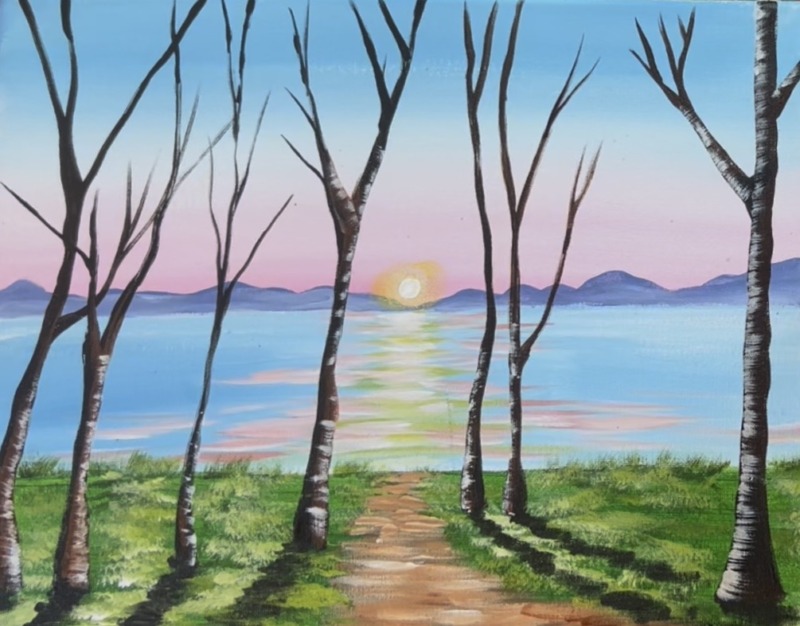
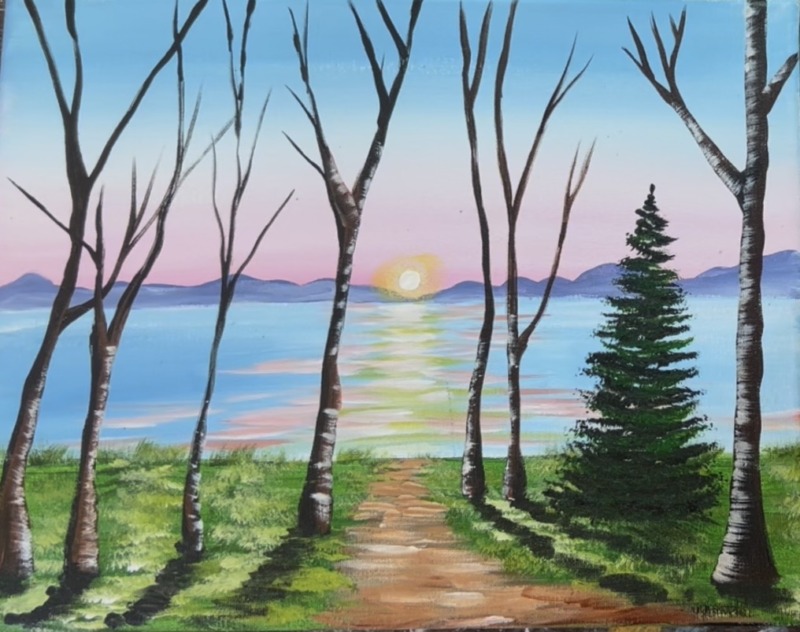
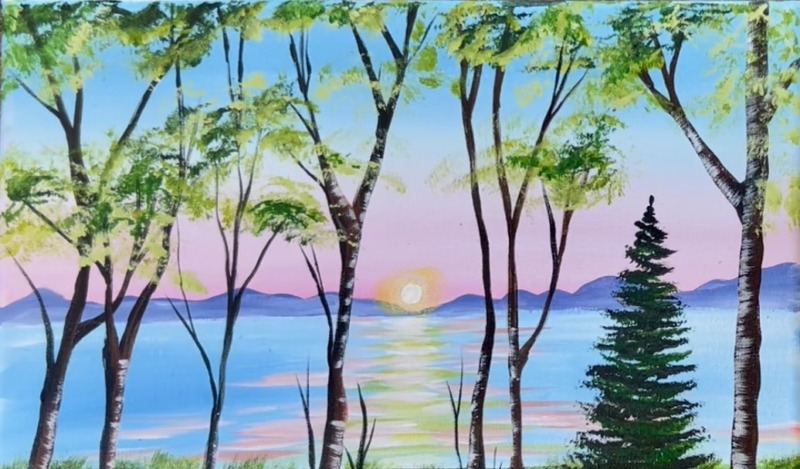
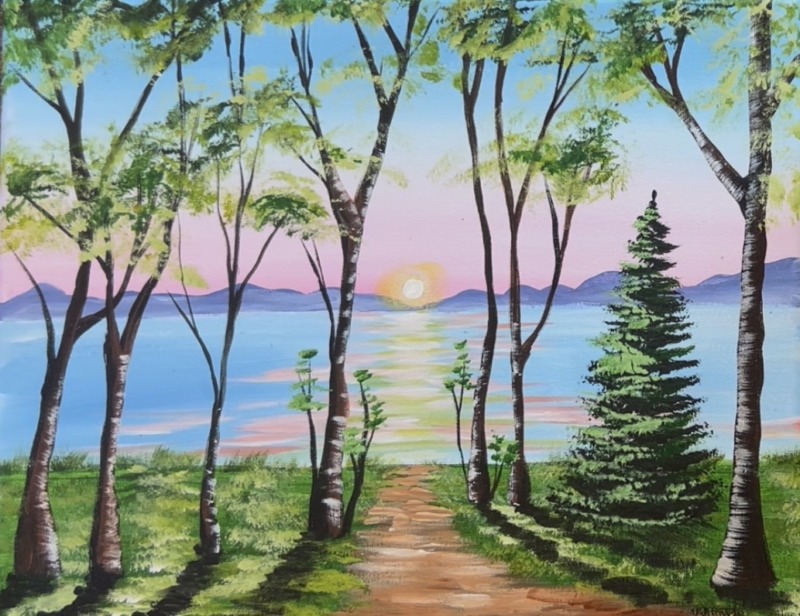
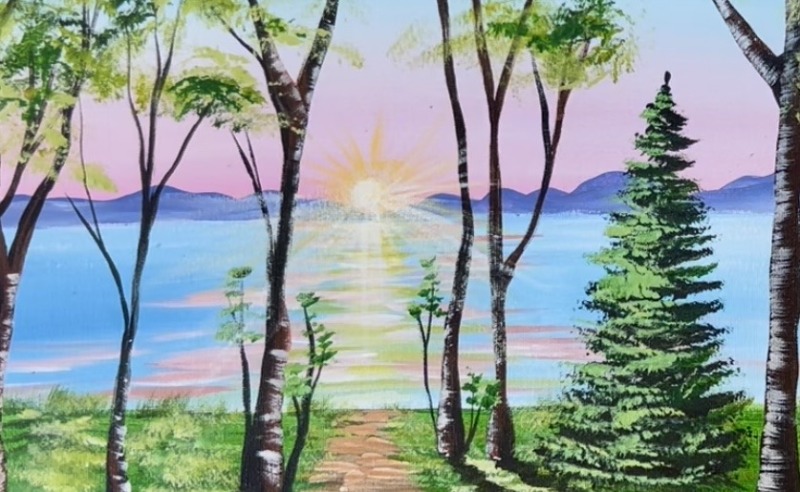
Create a peaceful lakeside landscape filled with soft pastel colors and glowing sunset reflections in this acrylic painting tutorial. In this lesson, you’ll learn how to paint a dreamy sky, distant mountain silhouettes, shimmering water, and a woodland path leading to the lake’s edge. We’ll use fan brush techniques to create airy tree canopies, textured grass, and an evergreen tree.
Enjoy and happy painting!
Materials Needed:
- 11×14 Canvas (or any size)
- Acrylic Paints (Liquitex BASICS)
- Brushes
- Ruler
- Pencil
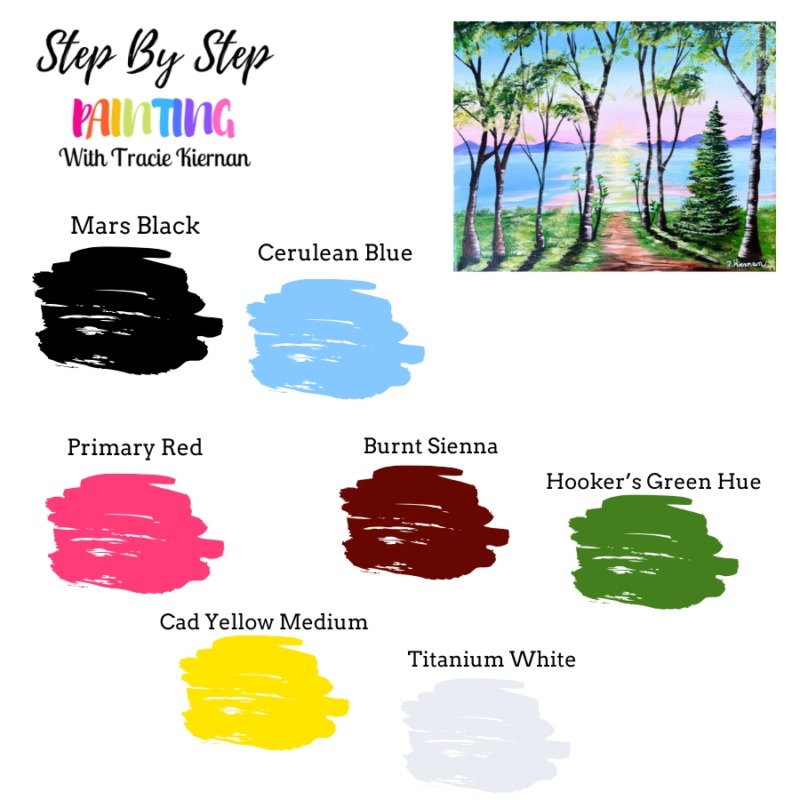
Colors:
- Primary Red
- Cadmium Yellow Medium Hue
- Hooker’s Green Hue
- Cerulean Blue
- Mars Black
- Burnt Sienna
- Titanium White
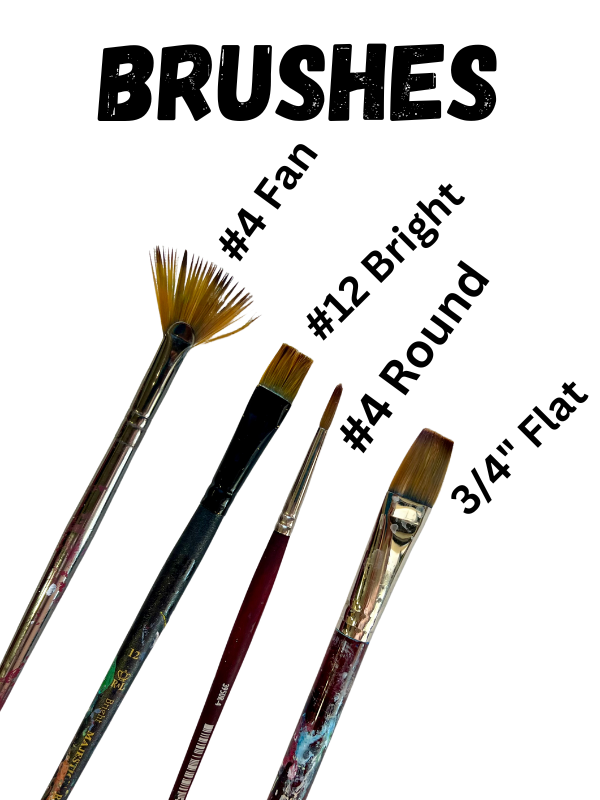
Brushes:
- 3/4″ Flat Wash
- #12 Bright (1/2″ flat)
- #8 LONG Round
- #4 Round
- Fan Brush
Note about fan brush: I recommend a smaller fan brush or one that has the stiff bristles such as hog hair. It’s harder to control if the bristles are too long or too soft. I linked to one from Amazon but this on from Michaels could also be great for creating trees!
Directions At A Glance:
Download This One!
If you want to download this tutorial, you can find the download in my PDF shop. This includes PDF instructions, video tutorial and optional tracers.

Video:
Step By Step Instructions:
1. Paint Sky
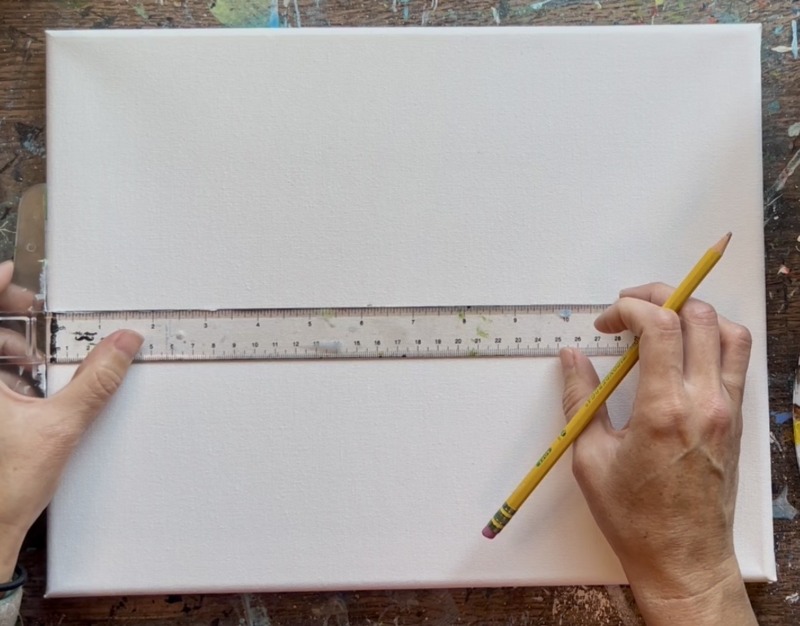
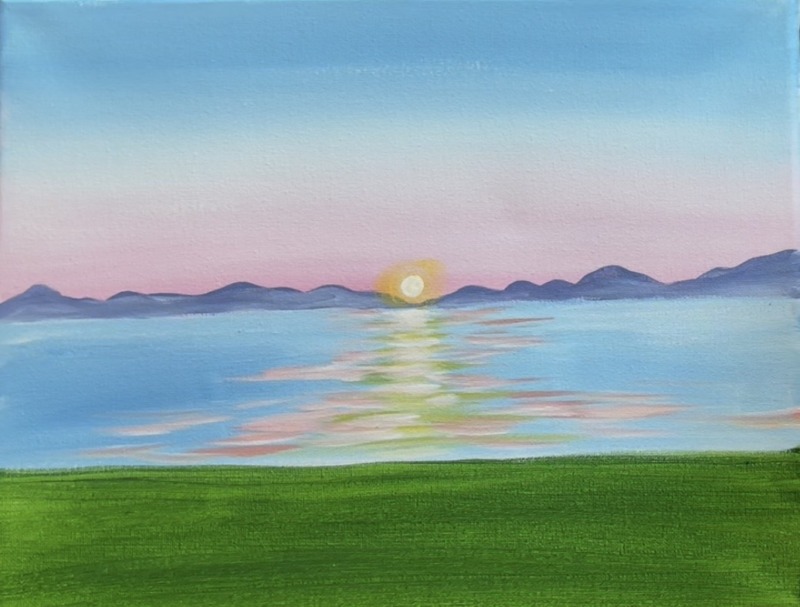
First, locate the center of the canvas. This is about 5.5″ from the top or bottom on an 11×14 canvas (adjust it for different size canvases). Use a ruler and pencil to draw a horizontal line all the way across.
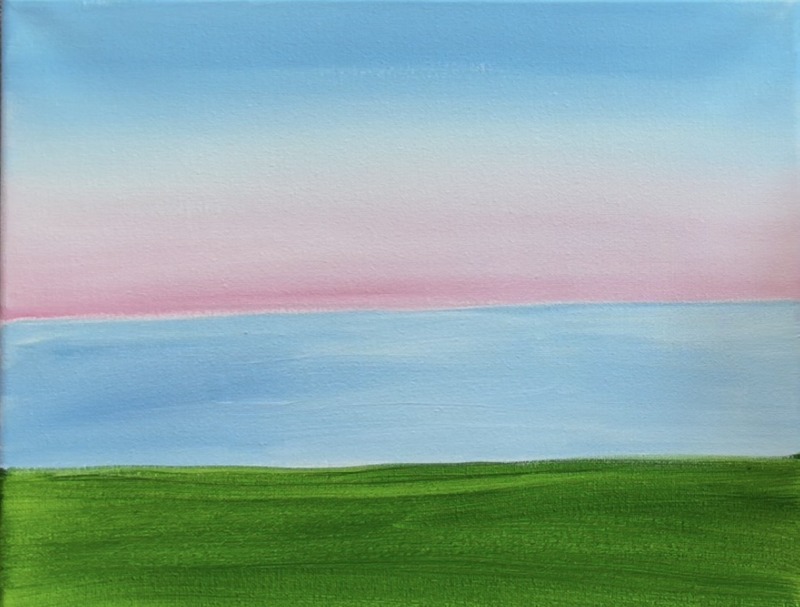
Next, load your paint palette with “cerulean blue” and “titanium white”. Use the 3/4″ wash brush to mix equal amounts of white and blue together. Then paint horizontal paint strokes across the canvas. Fill half of the sky with this light blue color.
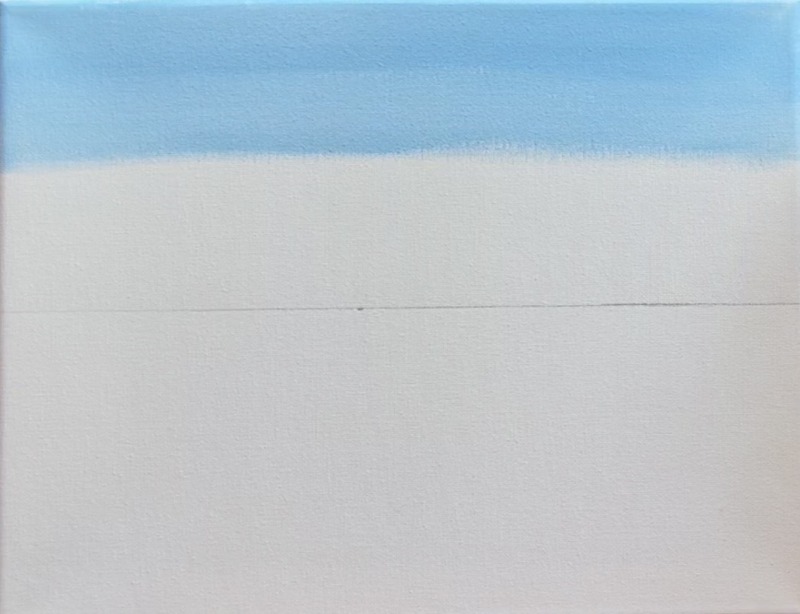
Next, paint a layer of white under the blue. Rinse the 3/4″ wash brush and load it into just the “titanium white”. Then blend white just under the blue and up into the blue so that it becomes a very light blue!
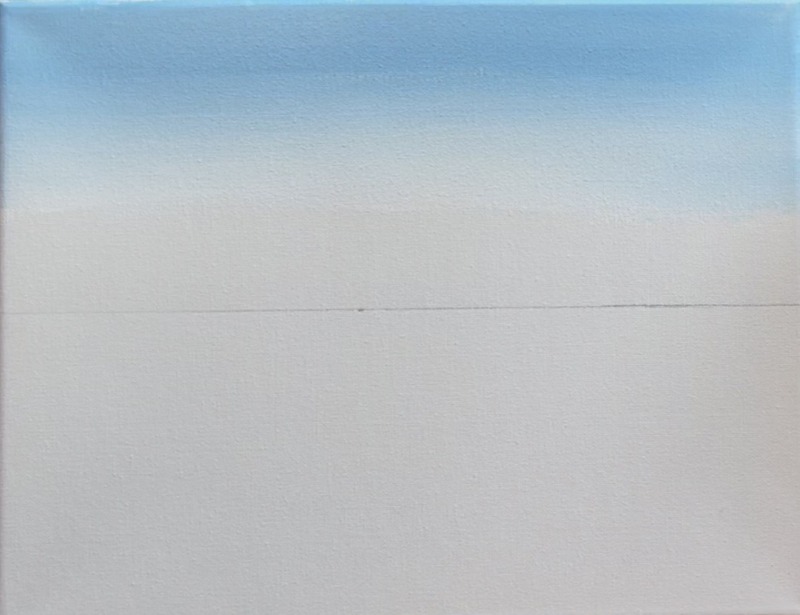
Next, mix about 3 parts “titanium white” to 1 part “primary red” on your paint palette. This will make a very light pink color! Use this pink color to paint the bottom of the canvas and paint left and right horizontal paint strokes to blend into the middle of the sky. Note: the pink is darkest just along the horizon line.
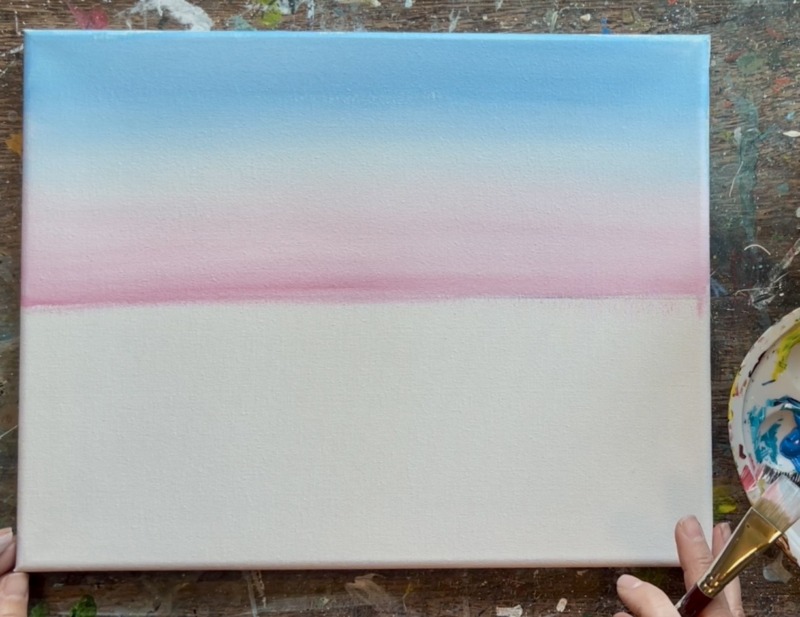
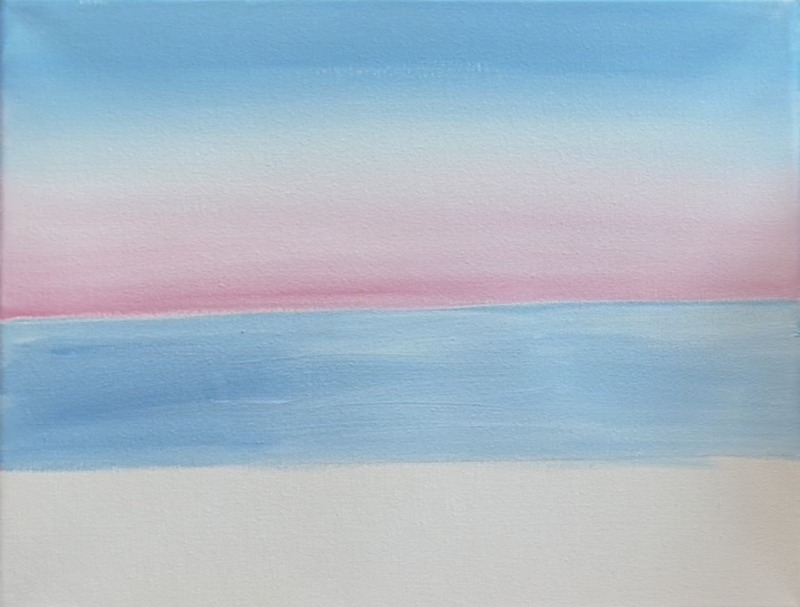
2. Paint Water
The water is the same color as the sky (the cerulean blue mixed with titanium white). Use the 3/4″ wash brush and this light blue to paint the lake area.

Go down about halfway with this water and stop. If it helps, you can use a ruler and draw another horizontal line to divide the lake and the land.
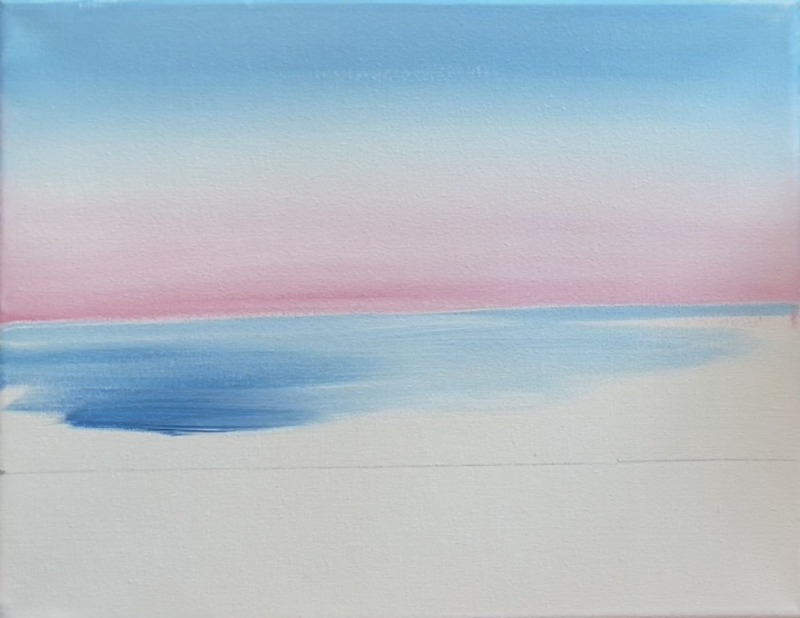
Your blue does not have to be even. If there are streaks of unblended color, that is fine!
3. Paint Grass Ground
Use “Hooker’s Green Hue” to paint the bottom of the canvas! Just this one solid coat of green is all that is needed for now. Use the 3/4″ wash brush and fill this area with left and right strokes.
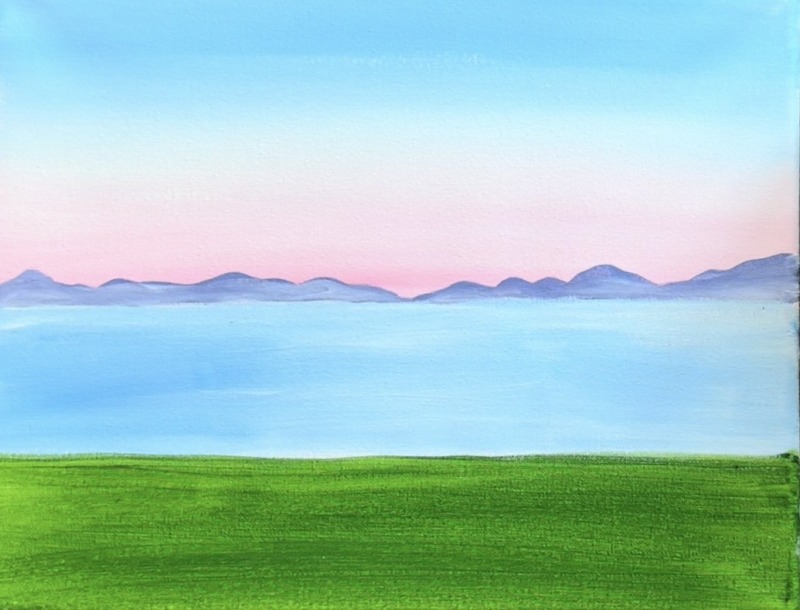
4. Paint Mountains
Mix equal amounts of: Cerulean Blue, Titanium White and Primary Red together. This will make a medium lavender color (color doesn’t have to be exact). Then use the #4 Round Brush to paint a low mountain range. These mountains only go up maybe an inch above the horizon line and go all the way across the canvas. In the center of the canvas, dip the mountains down slightly to give yourself room for the sun.
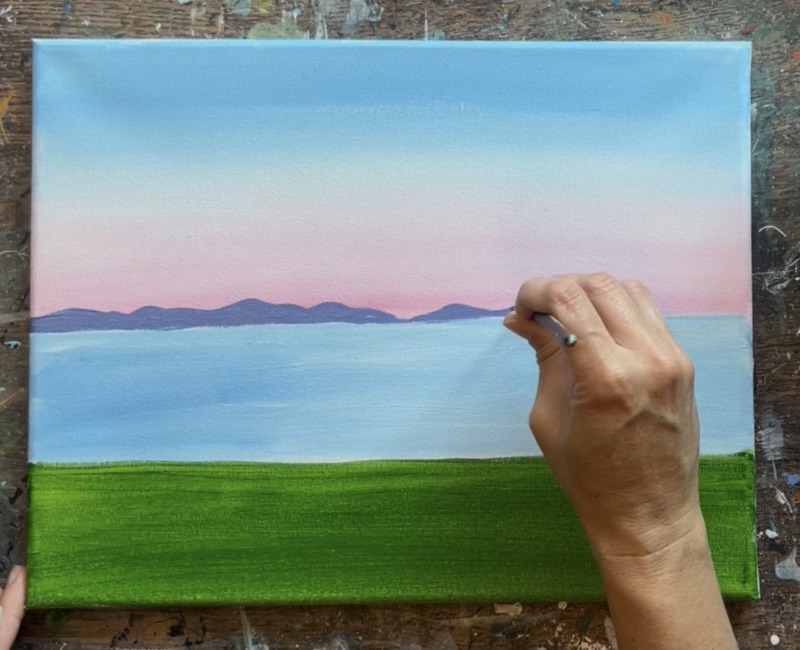
Optional: after doing an initial layer with the light purple color, blend just a little bit of white on the bottom of the mountain and up into the rest of the purple. This creates a little bit of perspective by making the mountains appear hazy on the bottom and darker on the top.
5. Paint Water Reflection Lines
Use a pencil to draw a very small circle in the middle bottom of the sky. Use a #12 bright brush and “cadmium yellow medium hue”. Load just this yellow on the end of the flat brush. Lightly paint very thin lines that are close together just under the sun. Then paint a “column” of these lines. The lines get bigger and wider as you approach the bottom of the lake.

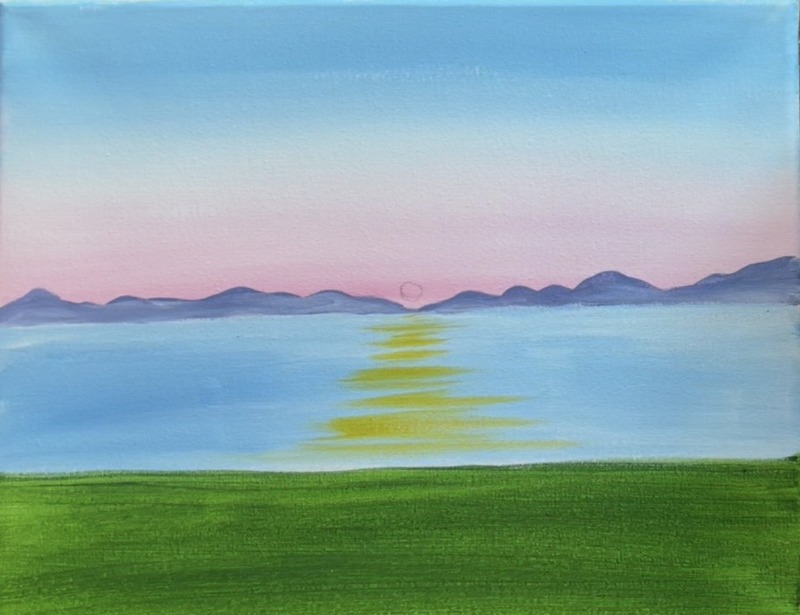
Next, repeat this but add a layer of white over the yellow marks. Without rinsing the brush, add “Titanium White” to the end of the bristles. Then very lightly paint left and right horizontal strokes over the yellow but don’t cover all of the yellow (the white is mostly in the middle just under where the sun will be).
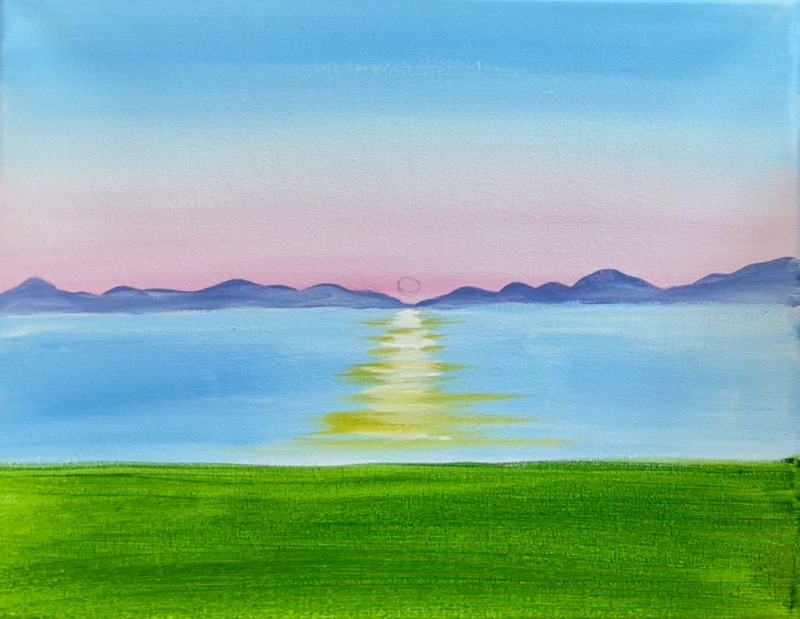
Next paint light pink water lines in the lake around the middle yellow reflection. Wipe the brush but do not rinse. On your palette, mix “Primary Red” and “Titanium White” to make a light pink. Use the #12 Bright Brush to loosely paint long, extended lines on the bottom of the lake. Paint shorter, thinner lines towards the back of the lake.
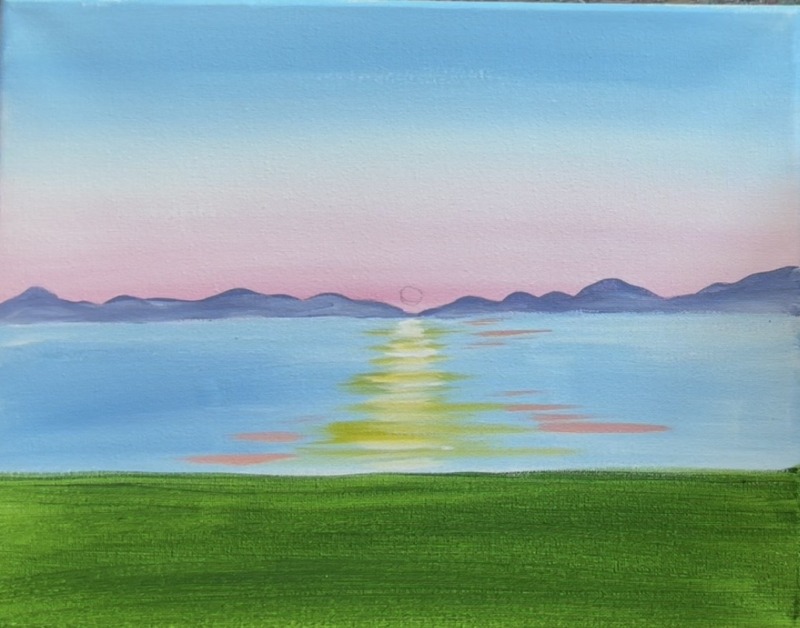
Then load the brush in “Titanium White” and your light pink color. Gently paint this lighter pink color overs your darker pink lines. I mostly did these pink water lines in the middle of the lake area and left a lot of blue not the left and right of the lake.
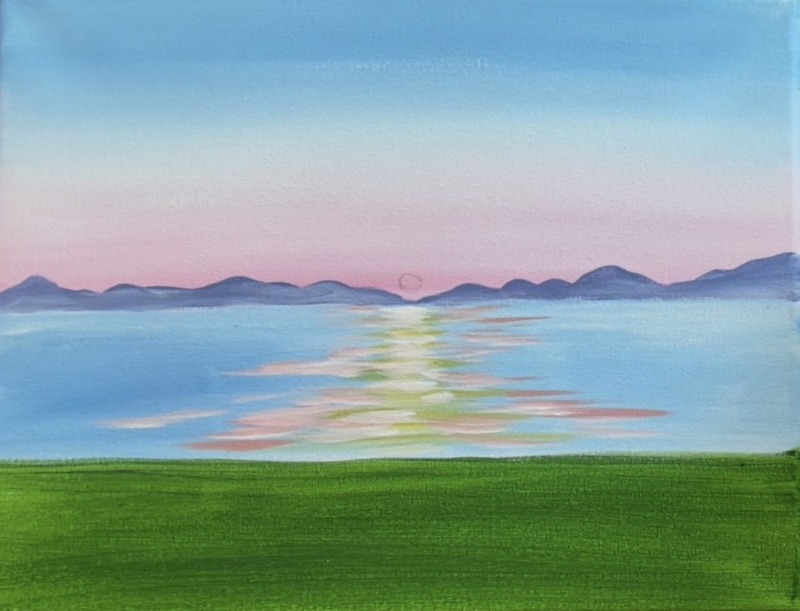
6. Paint Sun
To make the glowing sun, start out with a layer of just “Cadmium Yellow Medium Hue”. Paint your circle using the #4 round brush but then use either your finger or a dry brush to “smear” the yellow circle outwards. This creates a blurry dark yellow circle.
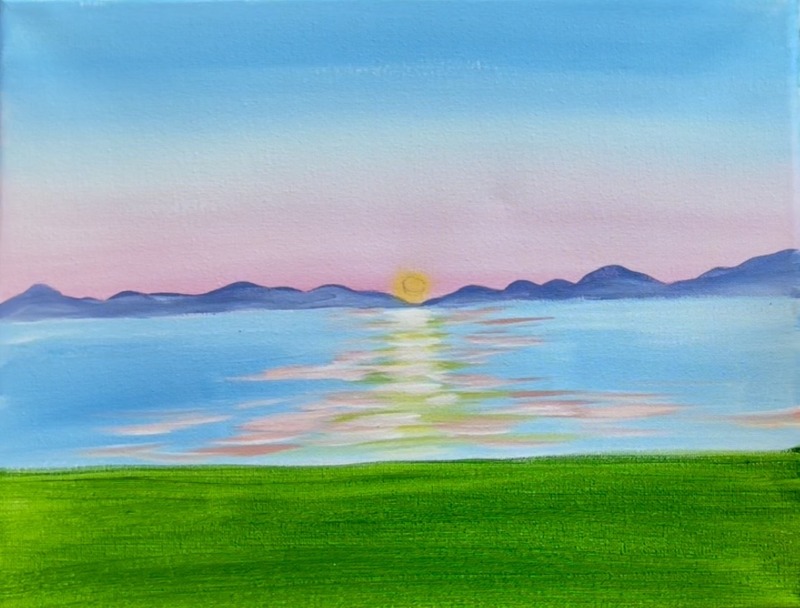
Next, paint the middle of the circle with “Titanium White” (just a LITTLE bit of white for now). Then use your finger or dry brush to smear the white circle outwards. This will make that yellow circle look like it’s getting brighter!
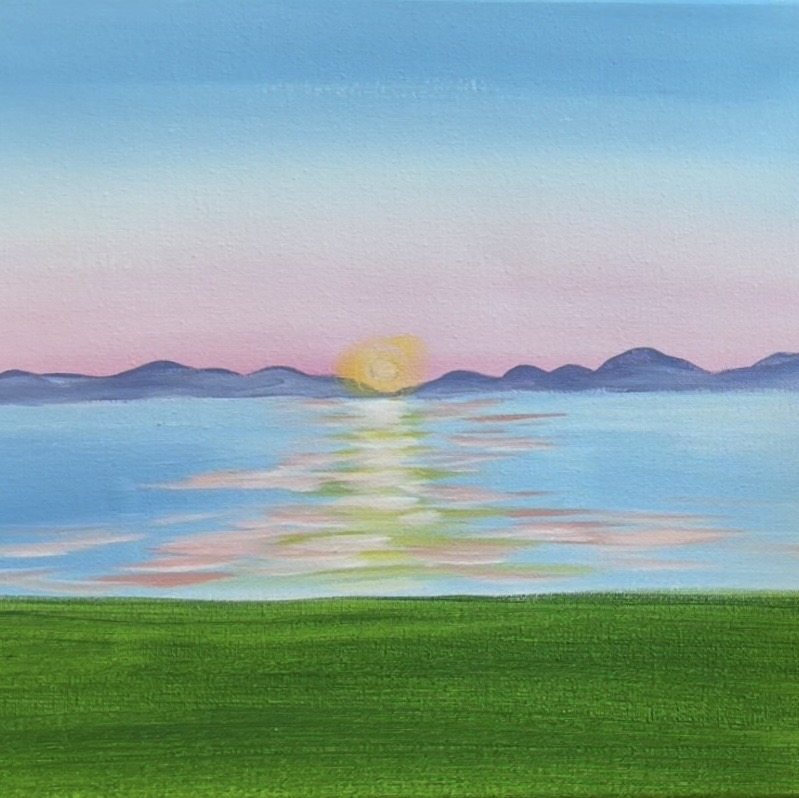
Finally, use the #4 Round Brush and “Titanium White” to paint a pure white circle in the middle for the sun (the circle you drew earlier with pencil is painted white).
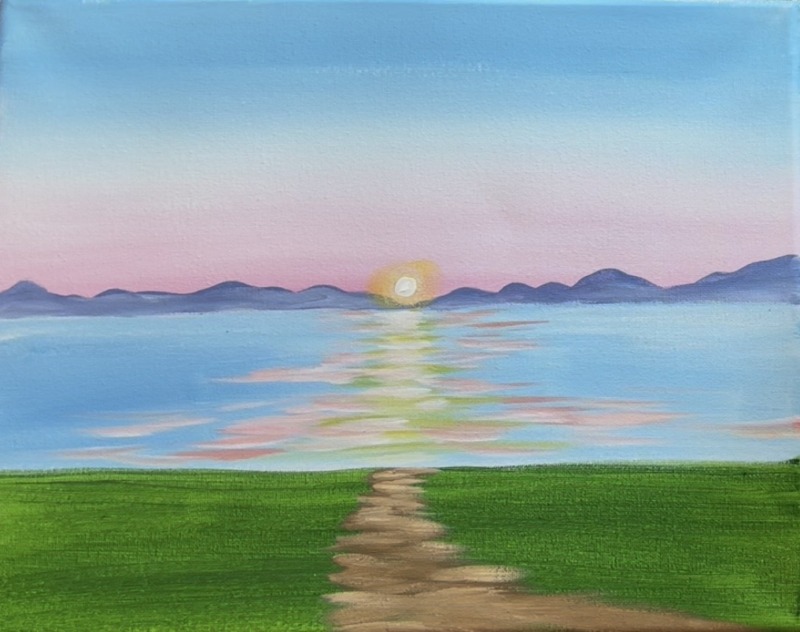
7. Paint Path
Mix a medium brown on your paint palette by mixing equal amounts of “Burnt Sienna” and “Titanium White”. Then add just a small dab of “Mars Black” into it.
Use the #4 round brush to paint very loose, left and right paint strokes that form an uneven path that goes very narrow at the lake but becomes wider on the bottom of the canvas and slightly curves. The first layer of brown should look dark brown to medium brown. We will layer on lighter colors as we build the path.
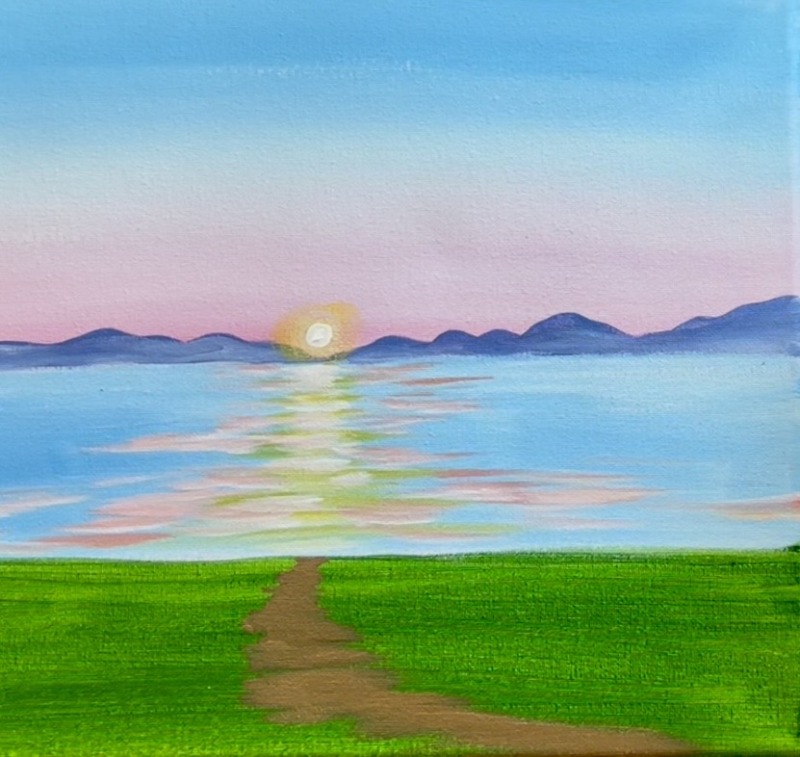
Add just a dab of “Titanium White” to the round brush. Then continue building the path using left and right paint strokes. The edges of the path are a little jagged and created by painting those horizontal lines that slightly overlap your green layer.
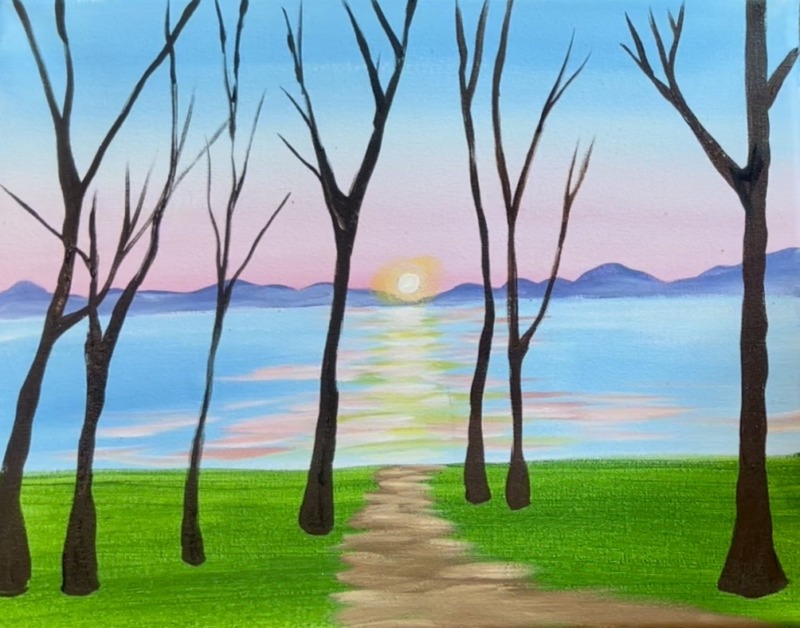
8. Paint Trees
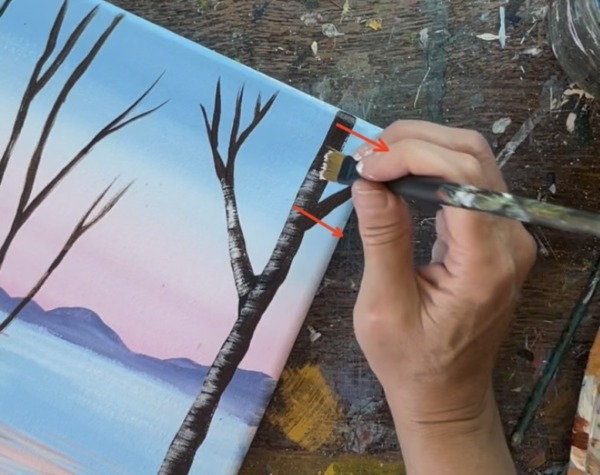
Use the #4 round brush and mix equal amounts of “Mars Black” and “Burnt Sienna” together to make a very dark brown. Slightly water the paint down to make it easy to flow. Start with the largest tree on the far right. Paint a trunk that is slightly wide and rounded on the bottom. Then paint a vertical line going up to the top edge of the canvas. Make your vertical tree trunk shape go slightly thinner as you go up to the top edge of the canvas.
Next, paint a few branches extending out from the tree towards the top. Use the #4 round brush (or a smaller brush if easier) to paint branches going out from angles. Use light pressure and just the end of the bristles of the brush to create thinner lines for the branches.
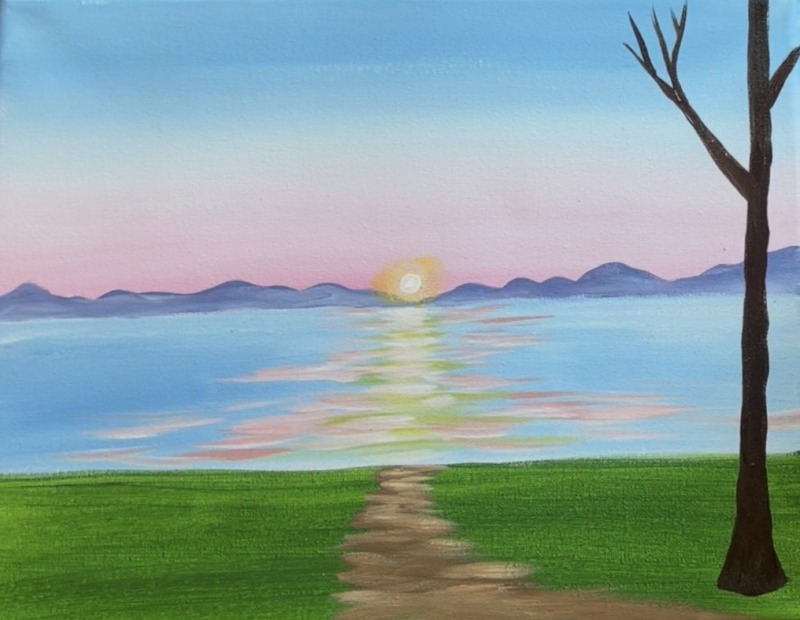
Repeat this technique for three more trees. This time, make the trees thinner further back to create a sense of depth. Another larger tree is then painted on the front left of the canvas. You can vary your tree branches to create different varieties in the trees. Not all of them have to look the same.
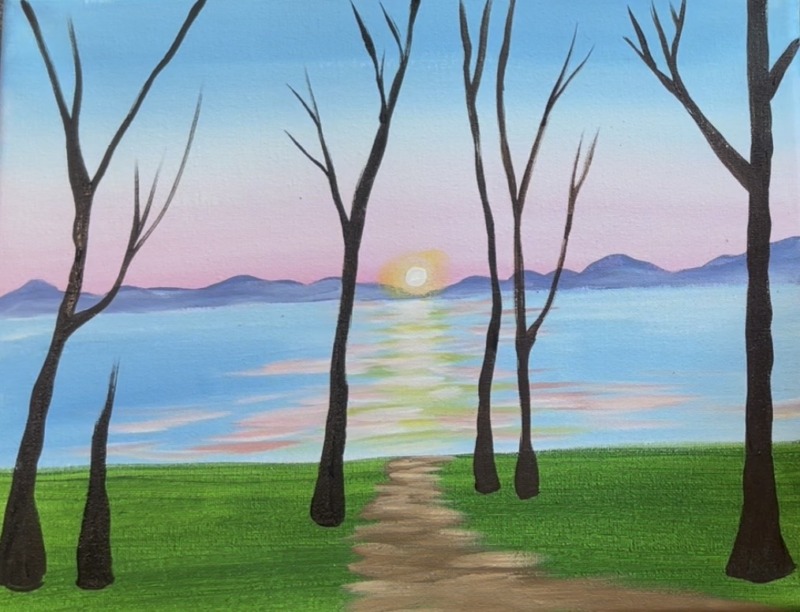
If you will be painting the evergreen tree on the right side of the path, I recommend leaving a gap with no trees to allow for space. On the left side of the path, I did 4 trees and on the right side, I did 3 trees.
9. Paint Texture On Grass
Use the fan brush to create texture on the ground. Start by mixing on your palette a dark yellow-green color. Mix equal amounts green and yellow together and then add just a tiny bit of brown/black into it to darken it. Then apply this dark green color to the very edge of your fan brush tips. Stamp the brush on the ground to create texture in the grass. Towards the back, you can drag your fan brush upwards a little to create some grass that sticks up and overlaps part of the lake. Do this all around the path and trees but you don’t need to cover all of your first green layer.

Next, layer on a lighter color of green. Take the color you were just using and mix some yellow and white into it to lighten the green. Go back over your green layers with this lighter green but don’t cover all of your first layer. You are now starting to build more and more texture on your ground!
Next, do another layer with an even brighter color green! Mix more white into the green. This time, add this just between the trees. This will start to create the effect that the sunlight is brightest on the ground between the trees.
Note: if you paint over your tree trunks with the texturing, you can always go back and repaint them after your green layers dry.
10. Paint Shadows
Use a #4 round brush to paint shadows under the trees. These shadows go diagonally opposite from the sun. Therefore on the left side, the shadows go diagonally to the left and opposite on the right side. Mix a very dark green for the shadows by mixing equal amounts of “Mars Black” and “Hooker’s Green Hue” together.
Then use the round brush to paint little left and right lines forming an angle from the bottom of the tree trunk to the bottom edges of the canvas. These can be very loose marks and your paint should be relatively thin.
Next, go back and paint over any parts of the tree trunks where you might have textured grass over them.
11. Paint Highlights On Trees
Use the #12 bright brush for this step. Mix a very light brown on your paint palette by mixing white with a very tiny amount of “Burnt Sienna” and a very tiny amount of “Mars Black” (the black helps to neutralize the red so it looks more like a light gray-brown). The color should look almost white when you apply it to the trees. Load the end of the bristles of this brush into that light color then wipe the brush. Because we want to make these marks look “dry brush style”, wiping the brush off ensures there’s very little paint on the brush.
Then you want to drag the brush (full width) from the far left of the tree to about halfway across (leaving the other side completely shadowy). Do this all up the trunk and larger branches.
Repeat that technique for the other trees except that the highlight is on the opposite side on the left side of the painting.
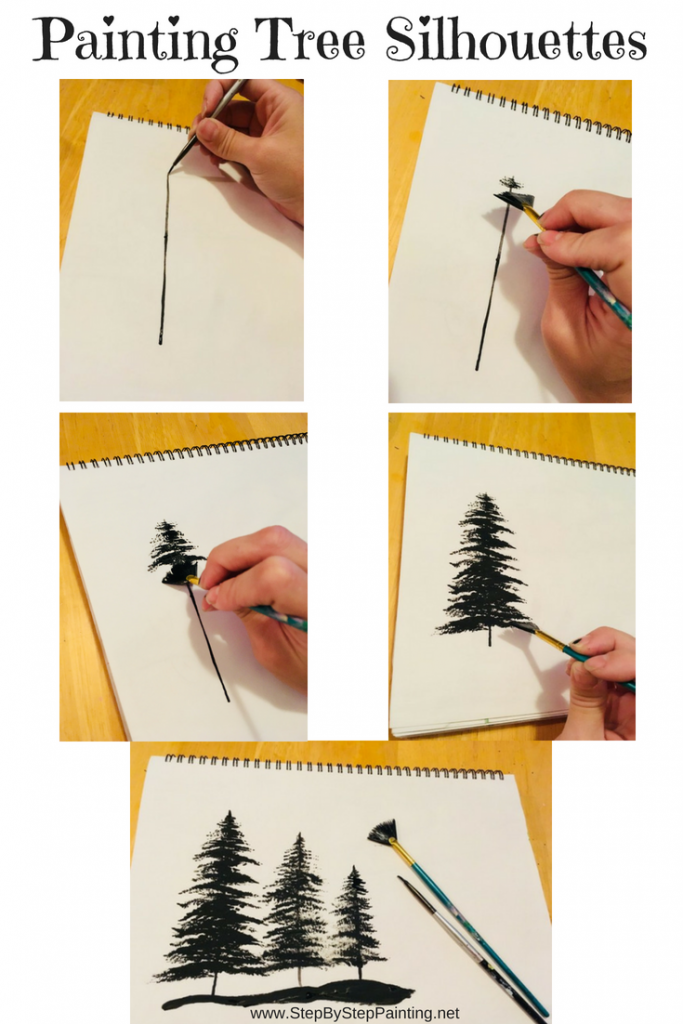
12. Paint Evergreen Tree
I recommend practicing this evergreen tree before you begin. The instructions below show my process I make to paint an evergreen tree silhouette.
- Start by painting a vertical line for the center of the tree. You can use a small round brush or paint pen for that line.
- Then load the fan brush into slightly watered down black paint. Make sure your bristles are not all clumped together and are all evenly spread apart.
- Hold the brush slightly at an angle so you aren’t using the full width of the bristles yet. You want to lightly stamp a small peak for the tree.
- Then work your way left and right in a zig-zag formation stamping just the end of the bristles to make your marks.
- As you work your way down, your branches should get larger and form a triangular shape which is reminiscent of evergreen trees.
- You can go back and fill in more branches if needed using the same technique of stamping in a left/ right zig-zag direction.
After practicing some fan brush trees, paint it on the canvas between the trees on the right side. This time, you are going to use “Mars Black” mixed with “Hooker’s Green Hue” to make it a dark green color. For this tree, I didn’t use a small round brush for the top of the tree or the trunk. I just did the branches. However, if you prefer painting that vertical line, it definitely helps!
Decide where the tip of the tree will be and begin your smallest branches using only the corner of the fan brush. Then stamp in a zig-zag direction. You can make your branches point upwards a little by curving your zig-zag lines slightly up on the edges.
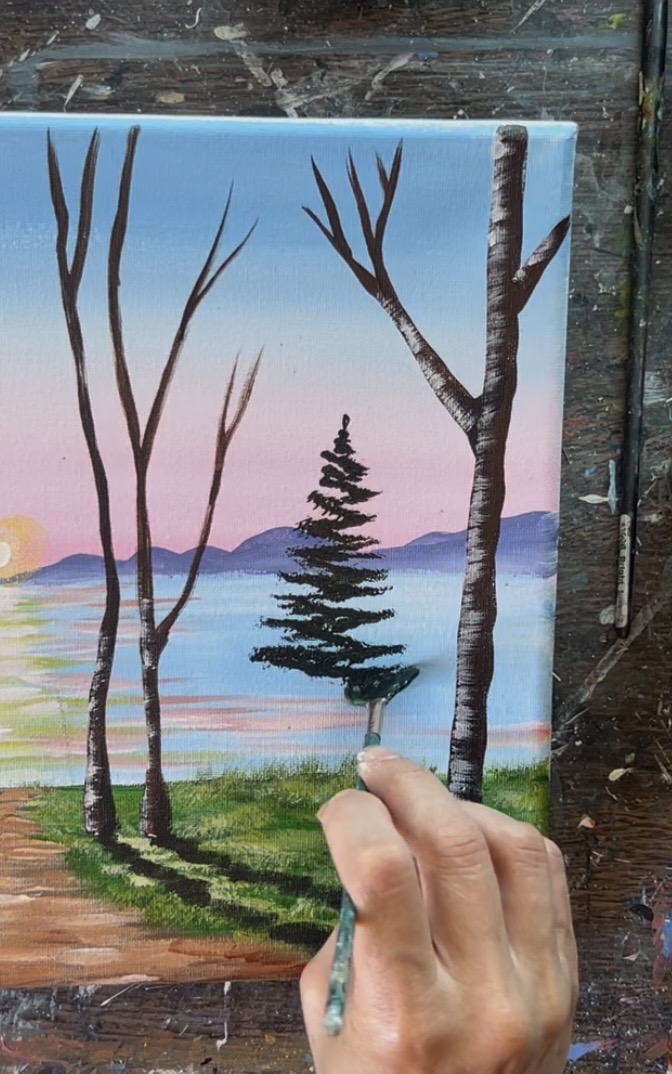
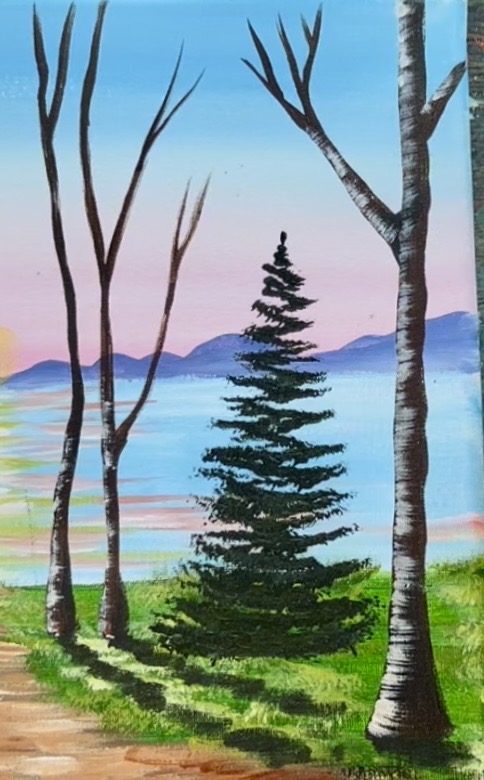
Go all the way down to form the shape of the tree. Then go back and fill in the tree with another round of paint for a more bushier looking tree. We will highlight this later after it dries!
13. Leaves On Oak Trees
I’m going to call these Oak Trees! Mix a dark green on your palette by mixing “Hooker’s Green Hue” with just a little bit of “Mars Black”. Use the fan brush to stamp on bunches of leaves at the tops of the branches and at the top of the canvas to create the “tree canopy”. It really is a bunch of random “stamp” motions from the fan brush. You can angle it differently, use the full side of the brush and/or use just the and of the bristles.
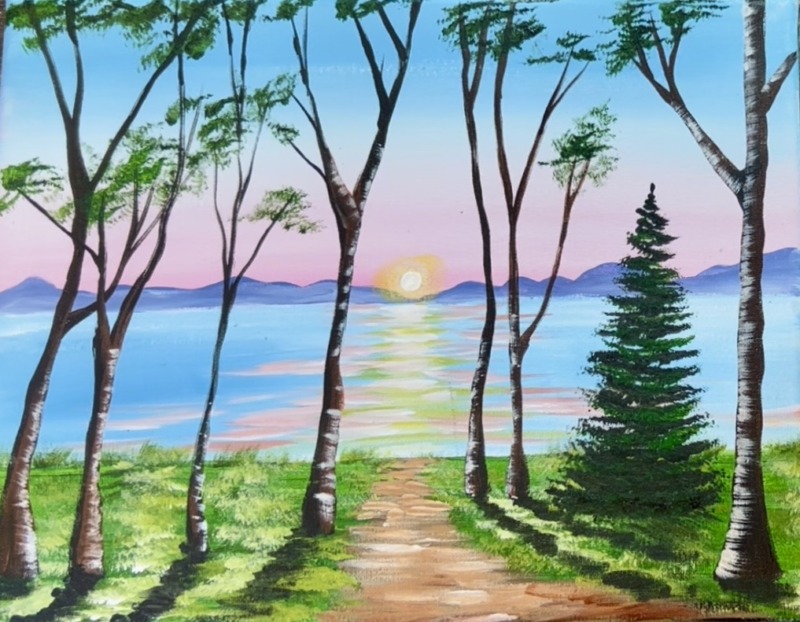
Next, layer on a lighter green color. Use the same color you were just using but add yellow and white into it. Then do a round of stamp marks with the fan brush to fill in more of the tree branches.
Add just a tab bit more white into the green for another round of much lighter colored leaves! This time, you don’t need that much light color, just a little bit mostly on the edges facing the sun. If needed, go back and paint some darker green in the middle portions of your leaf bunches.
Next, use the #8 long round brush to fill in more branches (if needed). On the bottoms of the two trees in the middle, I painted little branches extending up from the base of the trees then added more foliage on top of that.
Highlight the evergreen by loading the fan brush into your lighter green you were using for the tree leaves. Then stamp only on the left side of the tree (facing the sun). Leave the right side shadowy and leave plenty of shadows in between your rows of branches. This really helps to make that evergreen tree pop!
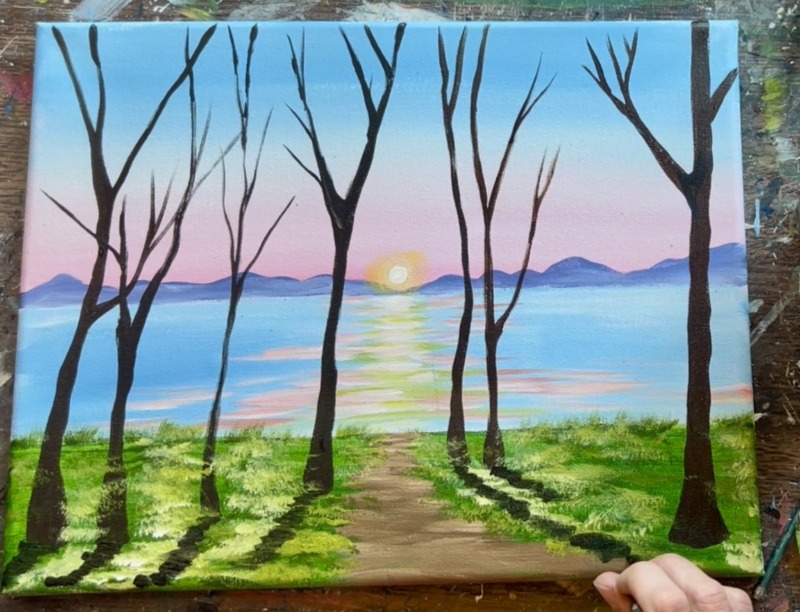
14. Optional Sun Rays/ Final Touches
A final touch for this painting are those stunning sun rays! Use the #4 round brush and “cadmium yellow medium hue”. Load the brush into the yellow but wipe it off (for dry brush style). Then drag lines outwards from the sun. Do this very gradually and release the pressure of each brush mark so the end of the paint stroke goes pointed and fades out. Do this all around the white circle from the sun (it’s okay if you paint over the actual sun because we can always repaint that).
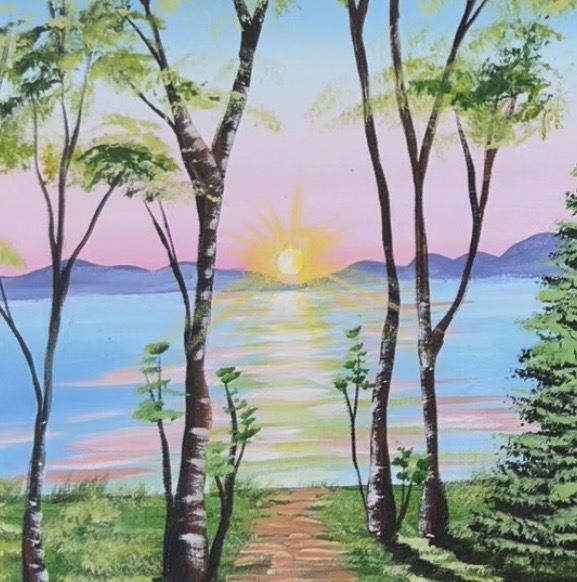
Repeat that technique but this time, do so with the color “titanium white”. Make sure you only load a small amount of white on the brush and wipe excess paint off. Then drag your white outwards. You can have it overlap the trees or just go behind the trees.
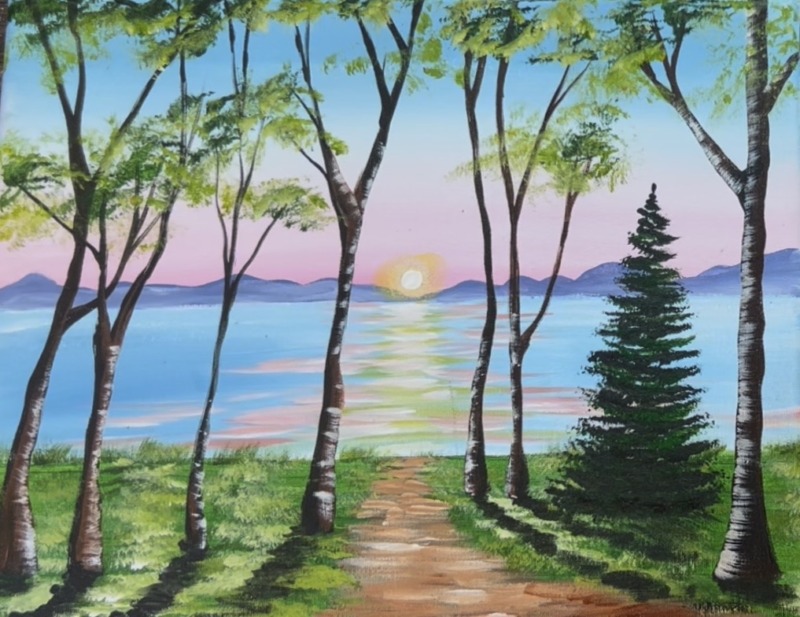
Finished! Sign your name and show it off!