
Would you like to save this?
Learn how to paint a super cute summer car with tropical sunset background! Customize the license plate, surfboard and even color of the car!
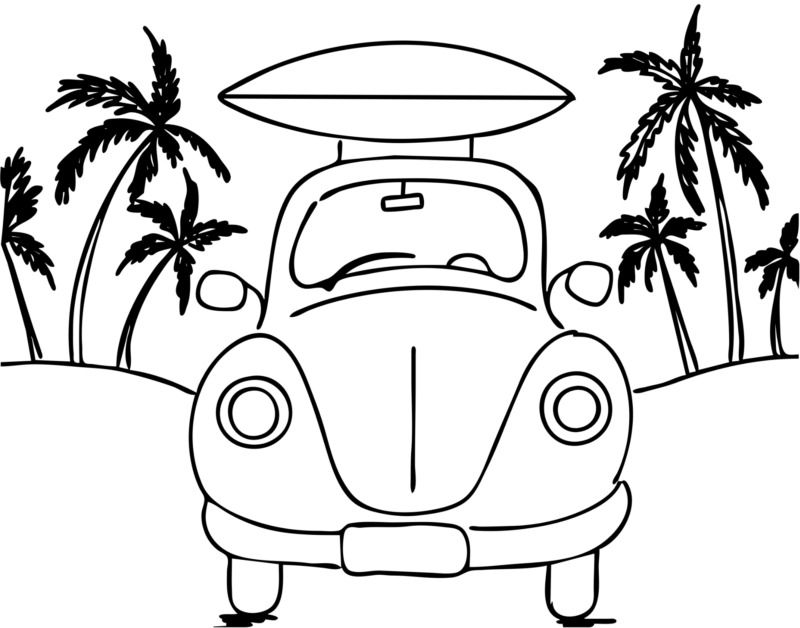
This tutorial includes an optional traceable template that you can print and trace to on your canvas. Or you can hand draw the car step by step with pencil.
Enjoy and happy painting!
Materials Needed:
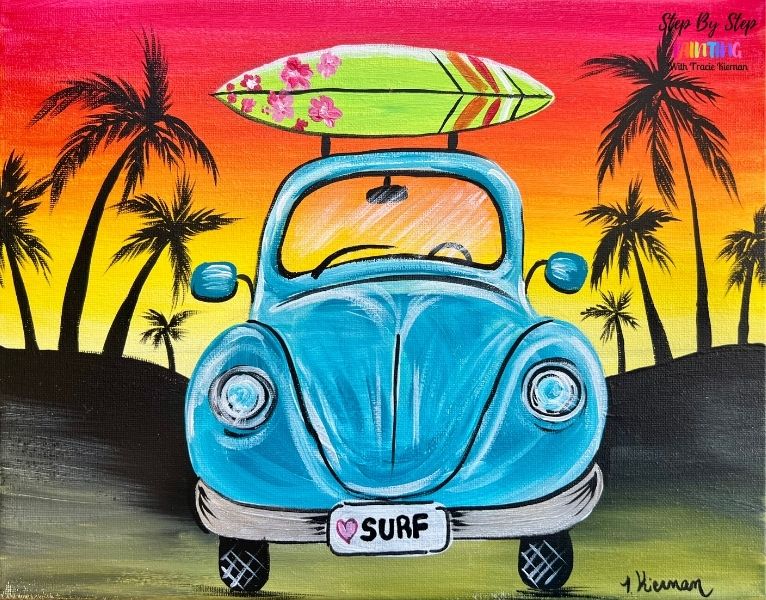
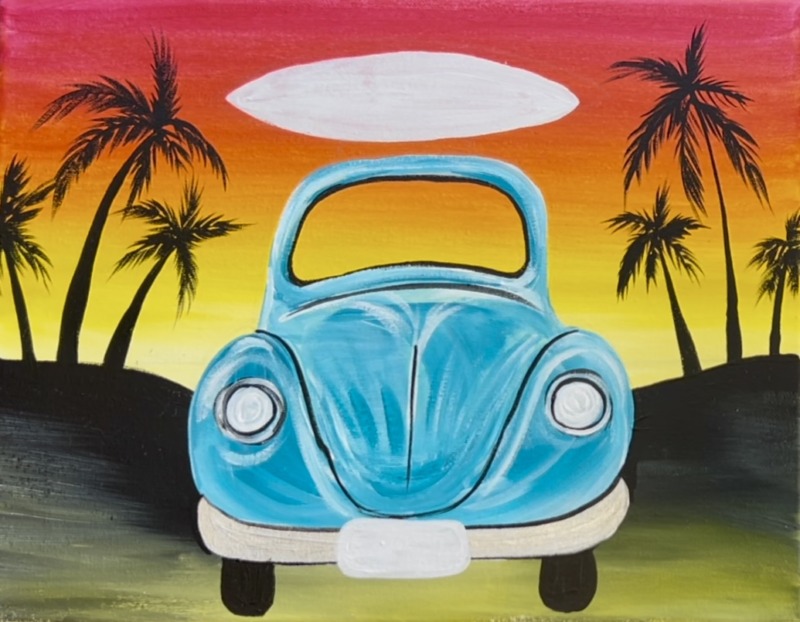
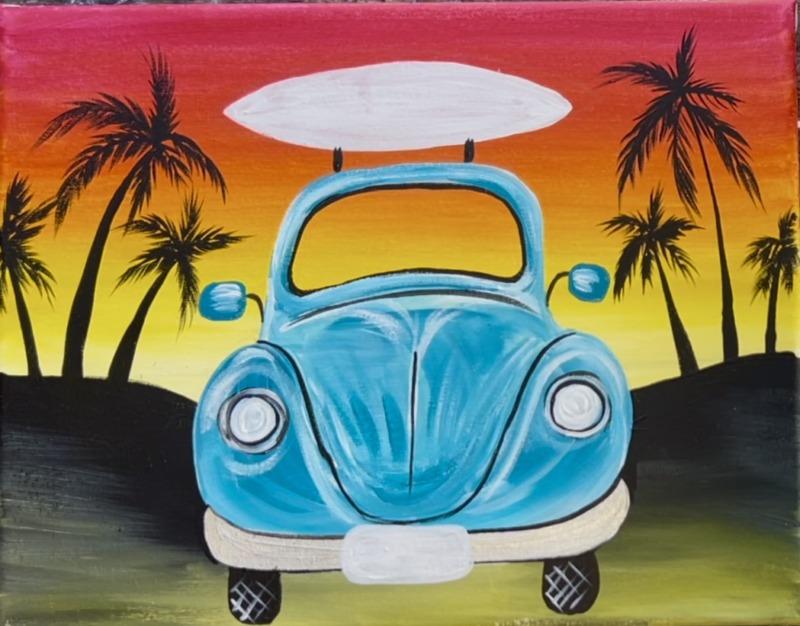
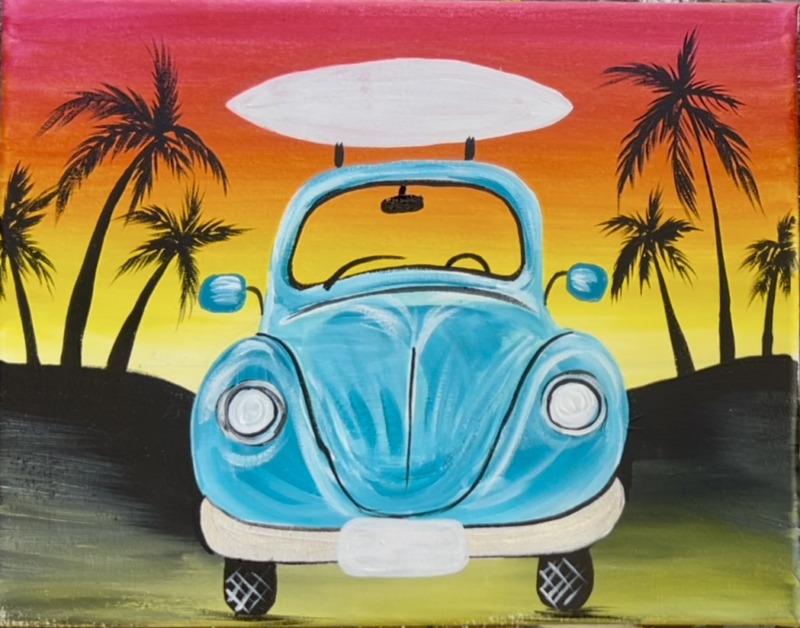
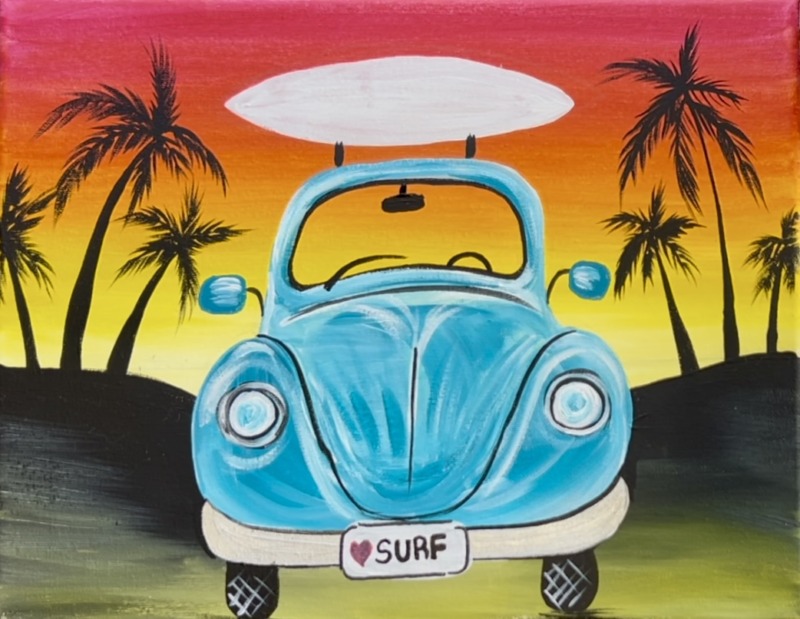
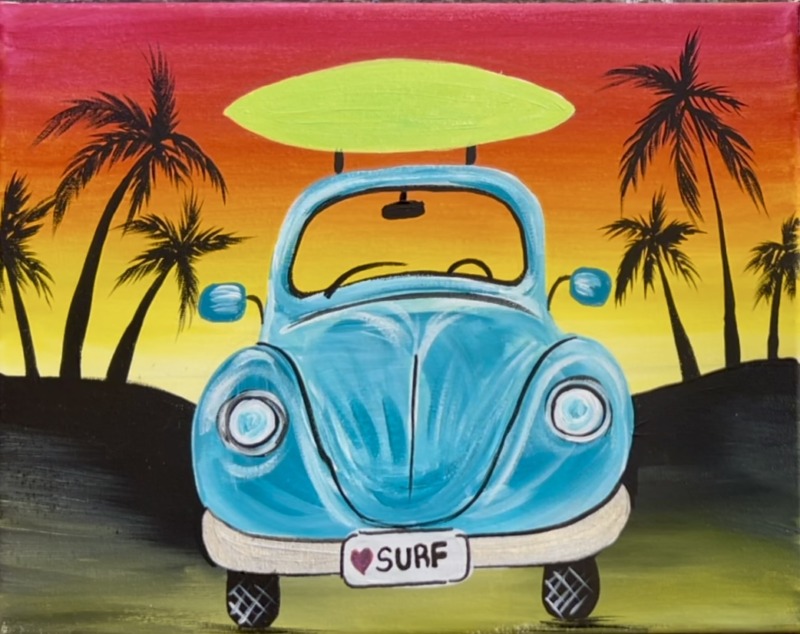
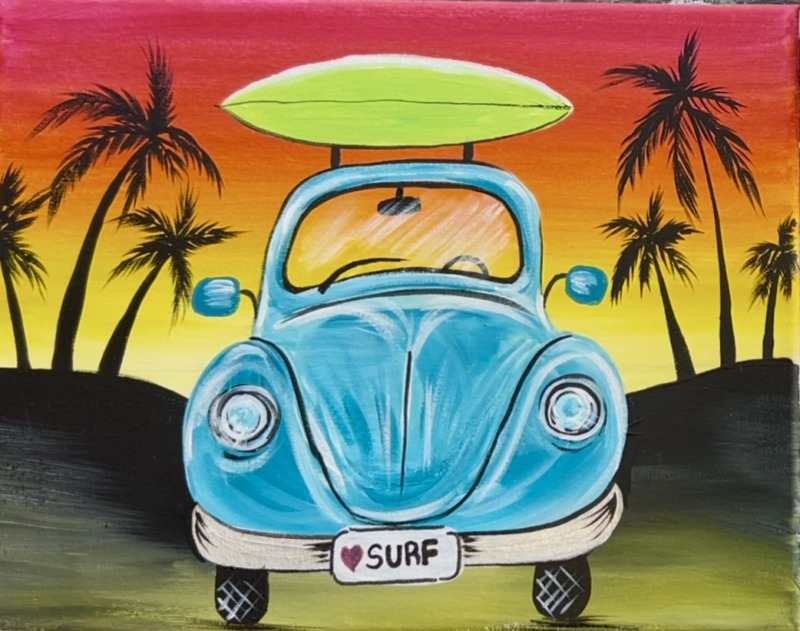
Sunset Surf Bug - Acrylic Tutorial

Paint a super cute turquoise suft bug with vibrant sunset background.
Materials
- 11 x 14 Canvas (or any size)
- Optional Traceable
- Optional Graphite Paper
- Acrylic Paint (I use Liquitex BASICS)
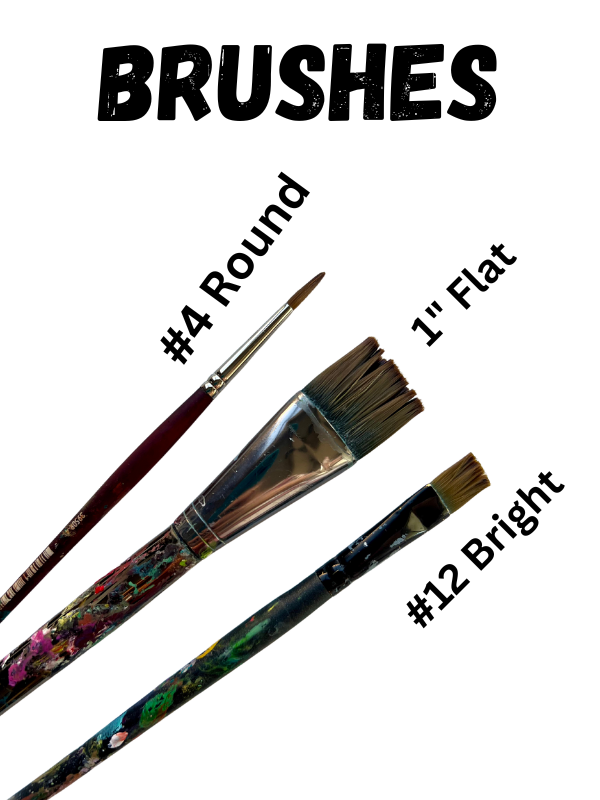
- Brushes (I use this pack)
- Pencil
- Ruler
- Black POSCA Paint Pen
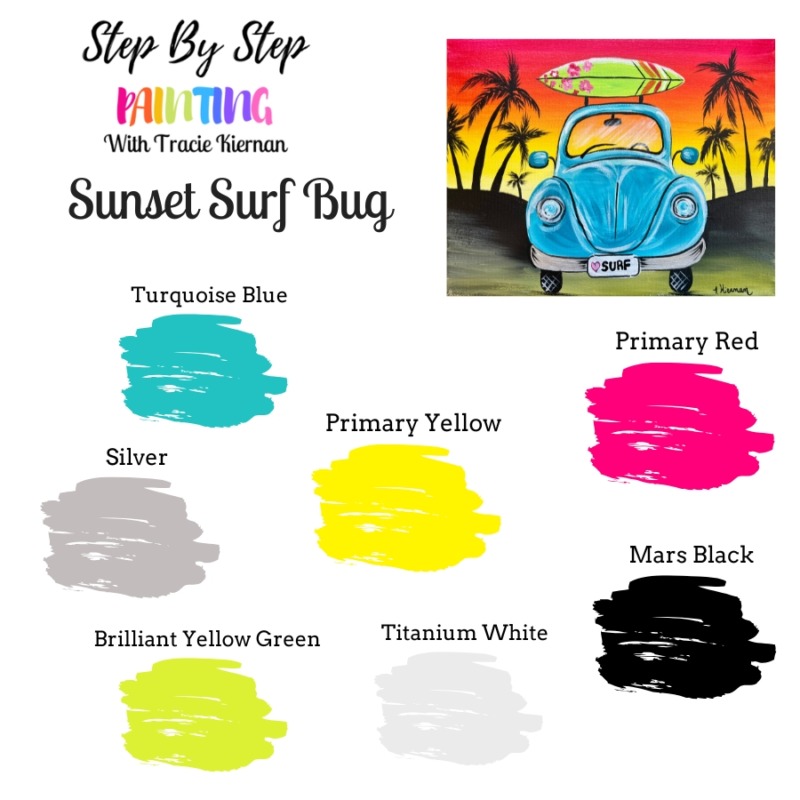
Colors
- Titanium White
- Mars Black
- Primary Red
- Primary Yellow
- Brilliant Yellow Green
- Turquoise Blue
- Silver (optional)
Brushes
Color Palette:
I use Liquitex BASICS paints. If you don’t have that brand of paint, you can use whatever you have available!
Directions At A Glance:
Traceable:
Video:
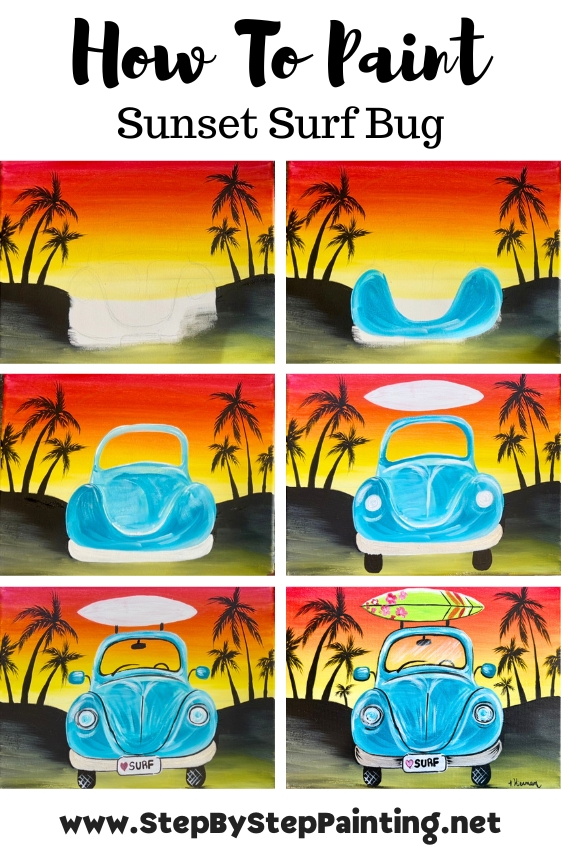
Step By Step Instructions:
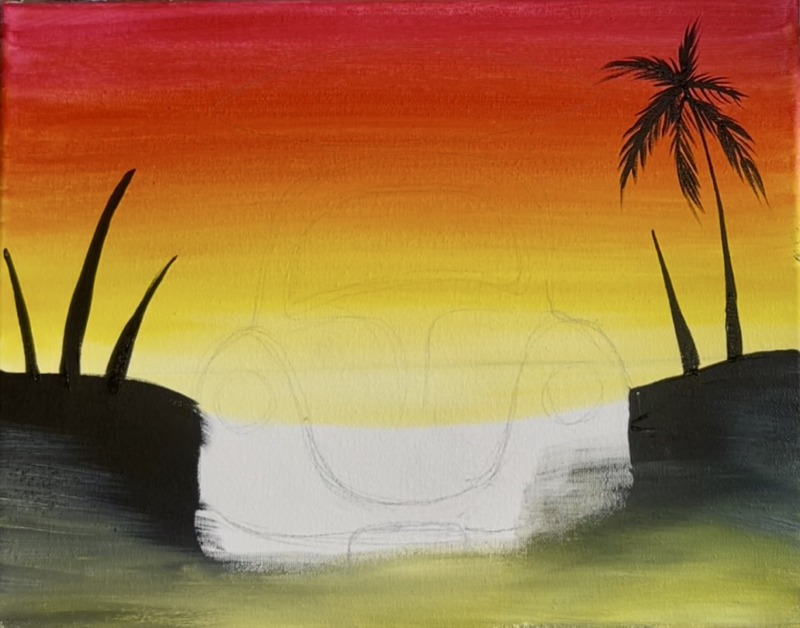
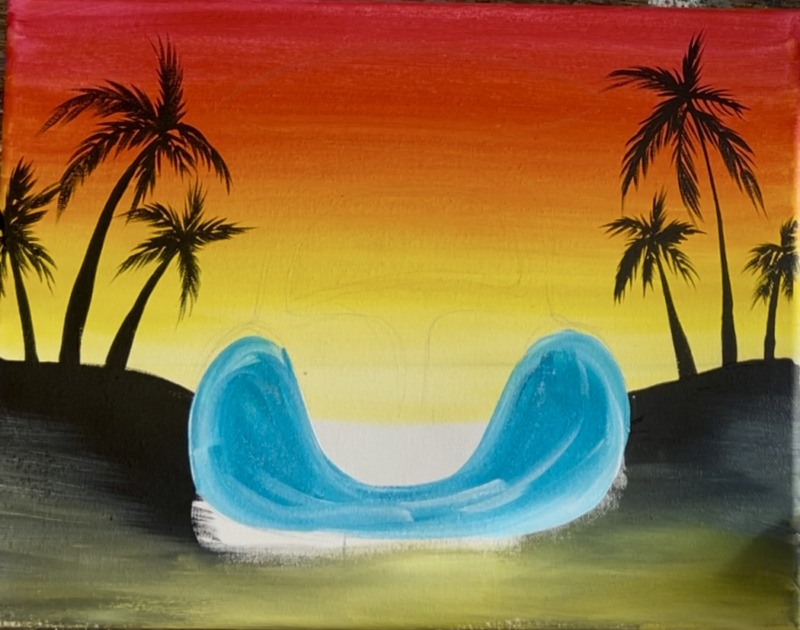
1. Paint Sky
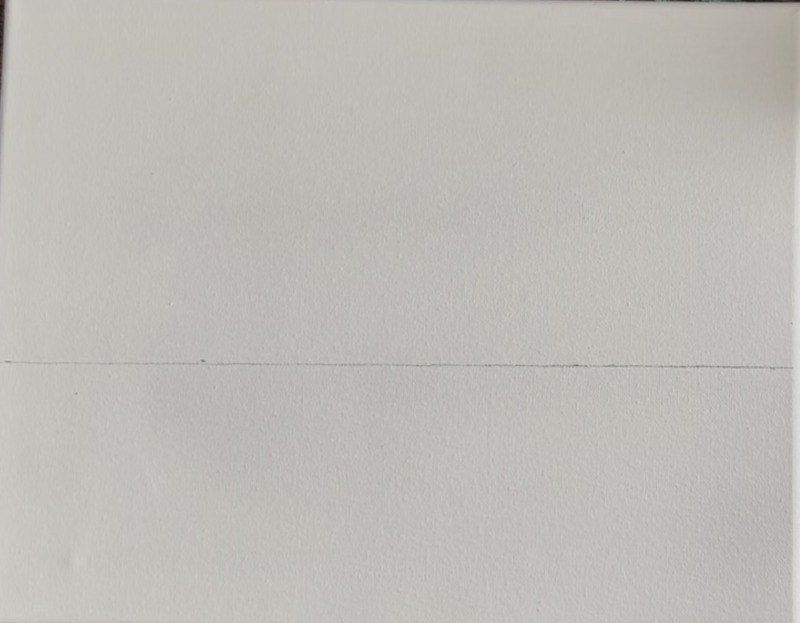
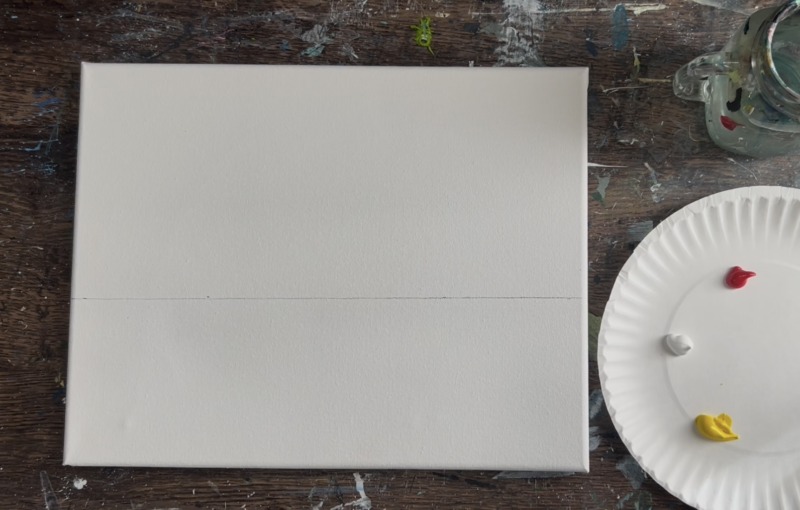
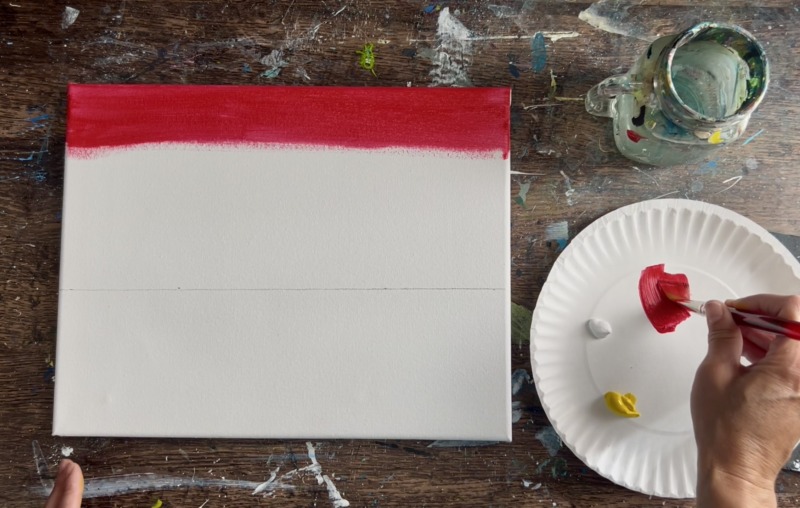
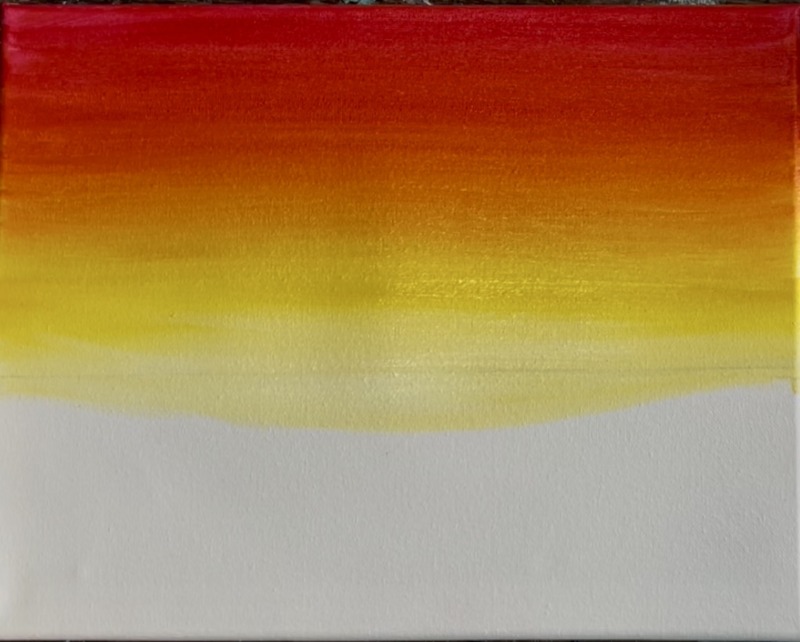
Use a ruler to draw a horizontal line across your canvas. Measure 4.5″ from the bottom of the canvas for this line and draw it lightly with a pencil.
Note: if you are using a different size canvas, estimate a little less than halfway for this line.
Load your paint palette with: “primary red”, “titanium white” and “primary yellow”.
Use your 3/4″ flat wash brush. Load it into “primary red”. Paint left and right paint strokes with this color and fill up almost the whole top half of the sky.
Go down almost half way and stop.
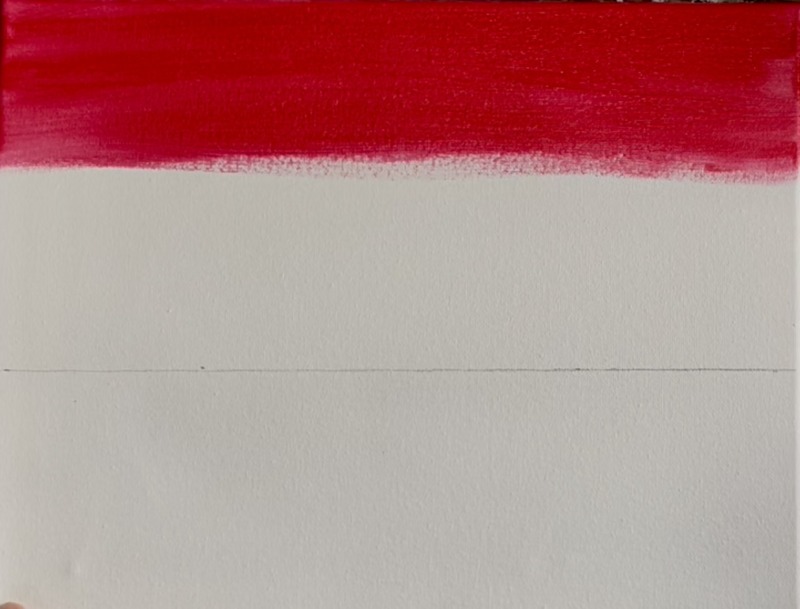
On your palette, mix the primary red that is on your brush with primary yellow to make orange.
Blend that orange with the primary red on your canvas so that your sky becomes a gradient of bright red to orange.
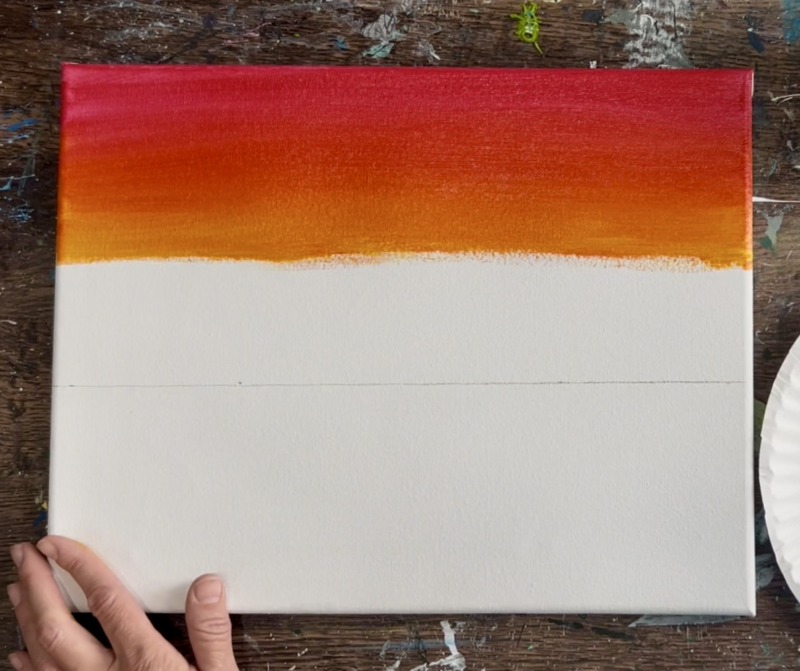
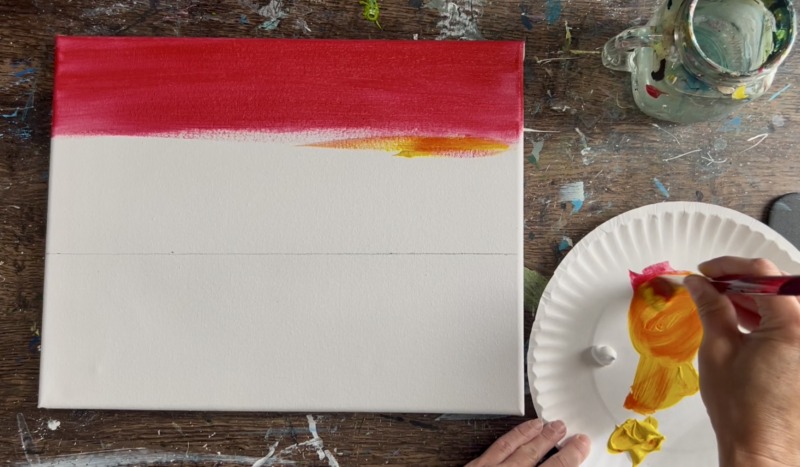
Rinse the brush off. Load it into just “primary yellow”. Blend your yellow below the orange.
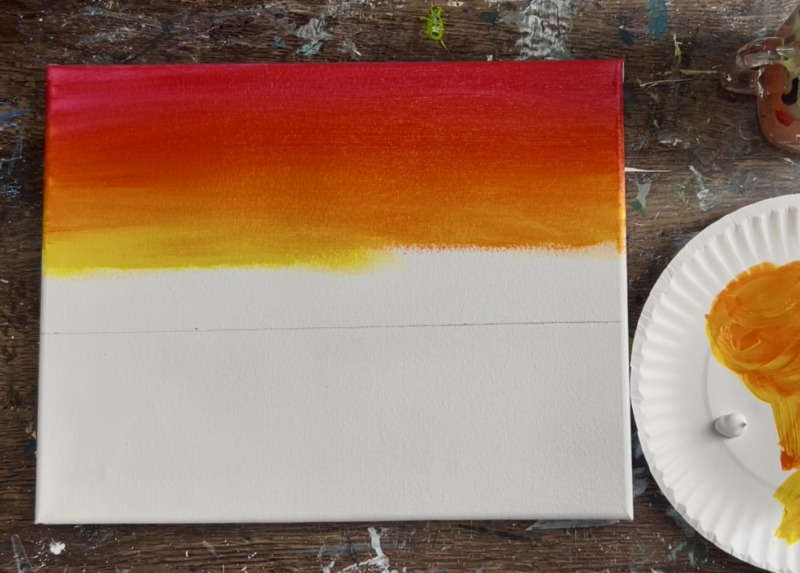
Leave about 3/4″ gap above the “horizon line”.
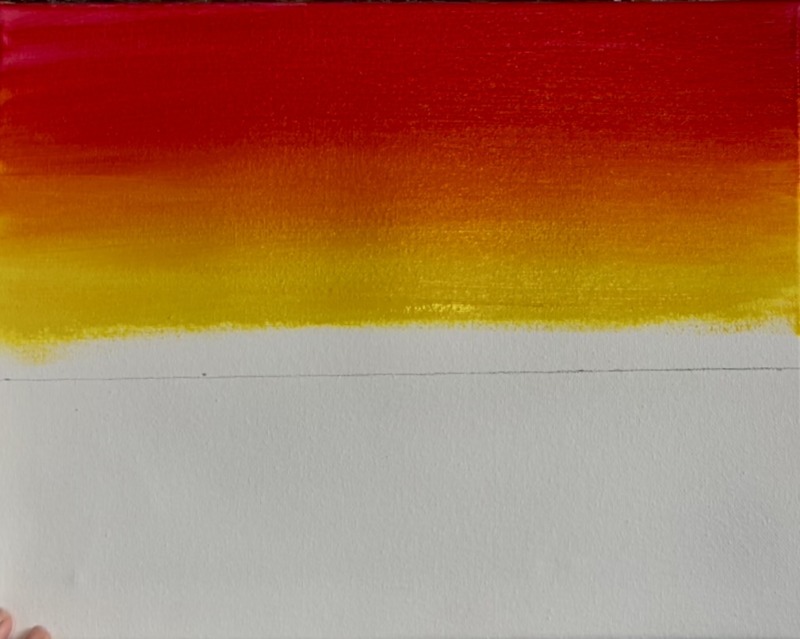
Mix “primary yellow” with “titanium white” on your palette (about equal parts). This will turn a really bright lemon yellow color! Use that lemon yellow color to paint the rest of the bottom of the sky and blend it up into your yellow.
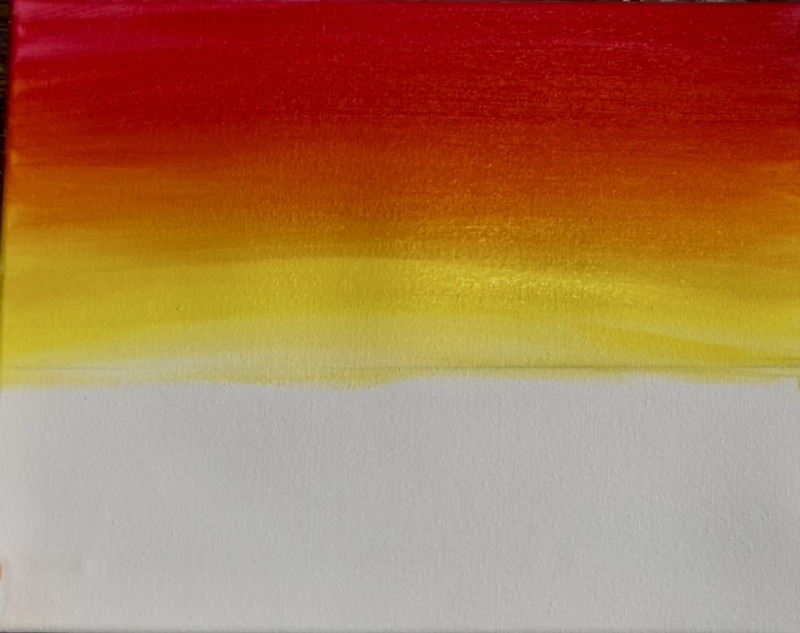
Then take this light lemon yellow color and curve/ dip it down below the horizon line. Later on this will look more like a hill in the background when we paint the black silhouette ground.
2. Draw Car (or use tracer)
You can use the tracer template or draw this with me! If you are using the tracer template, I recommend graphite paper below the printable. Position the car in the center of the canvas.
If you are drawing this…
- Start by drawing an arc with a sort of flat top to it. This will be the roof of the car.
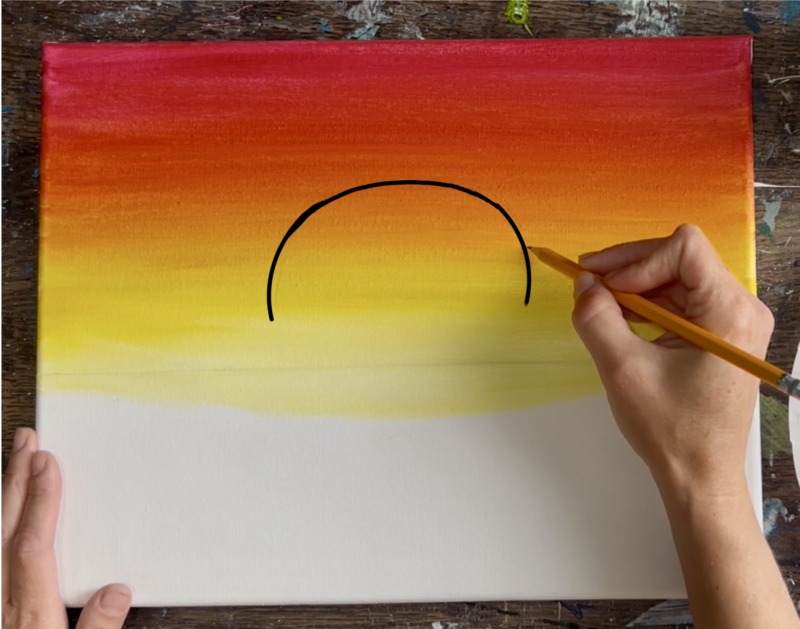
Draw the windshield glass shape. This is also an arch shape and has a curved bottom to it.
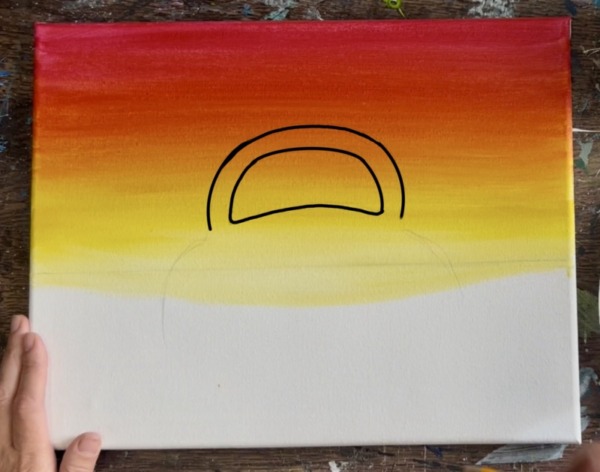
Draw two curved lines on both sides of the car for the side fenders.
Draw a large “U” line that connects both the left and right fenders to form the hood of the car.
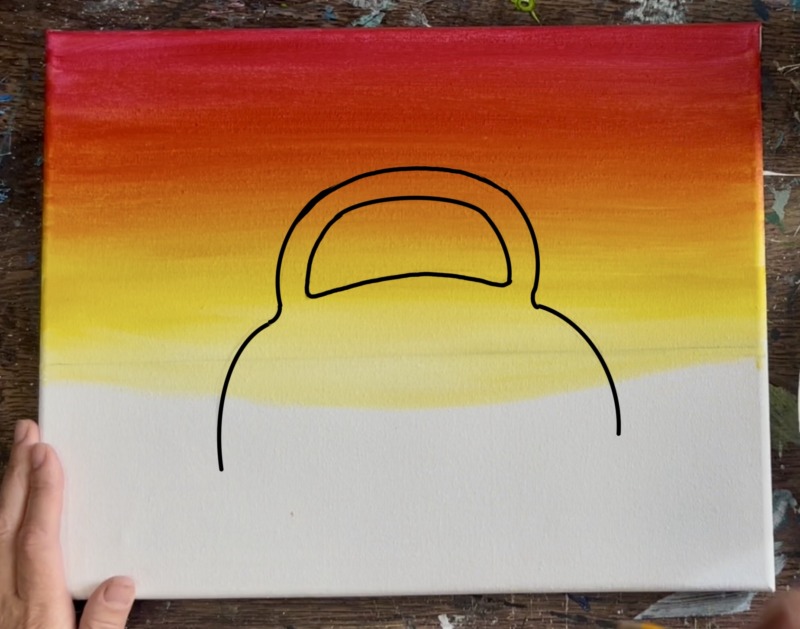
Draw a large curve for the bottom of the car. This will be where the bumper is.
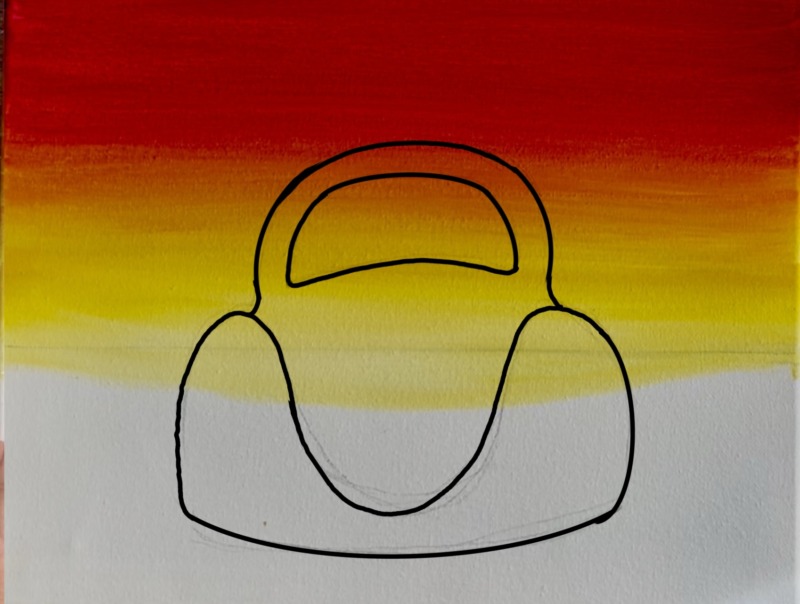
Draw two circles for the headlights and then draw a large and narrow bumper on that bottom curved line of the car. Then draw two tires (two U shapes).
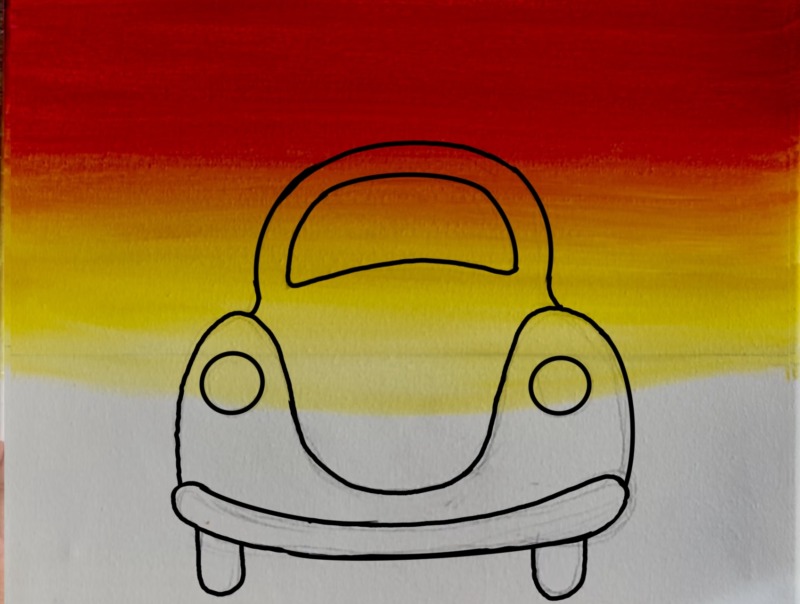
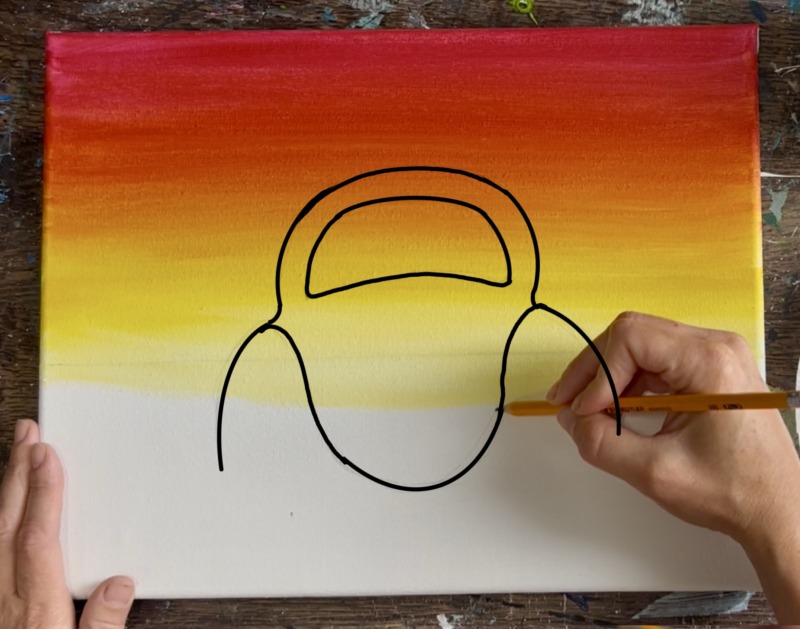
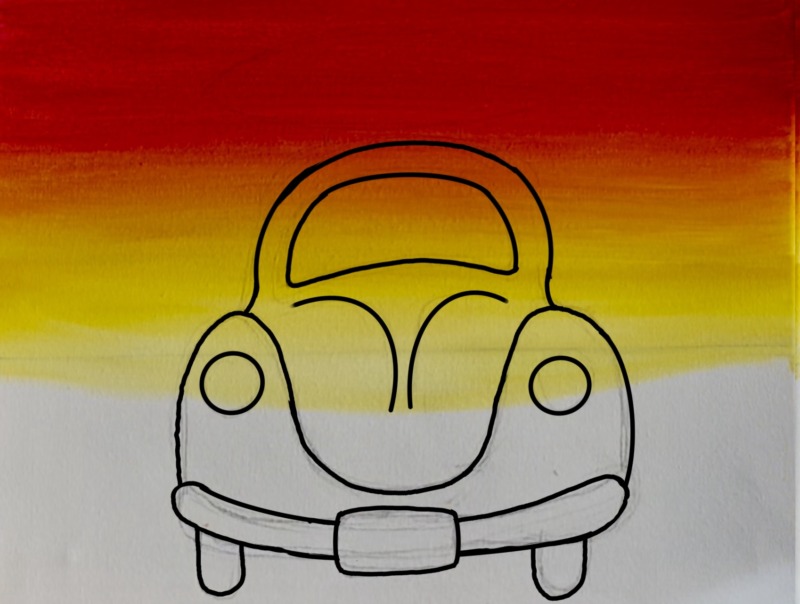
Draw a license plate in the center of the bumper under the hood. Then draw two arc lines mirroring each other on the hood.
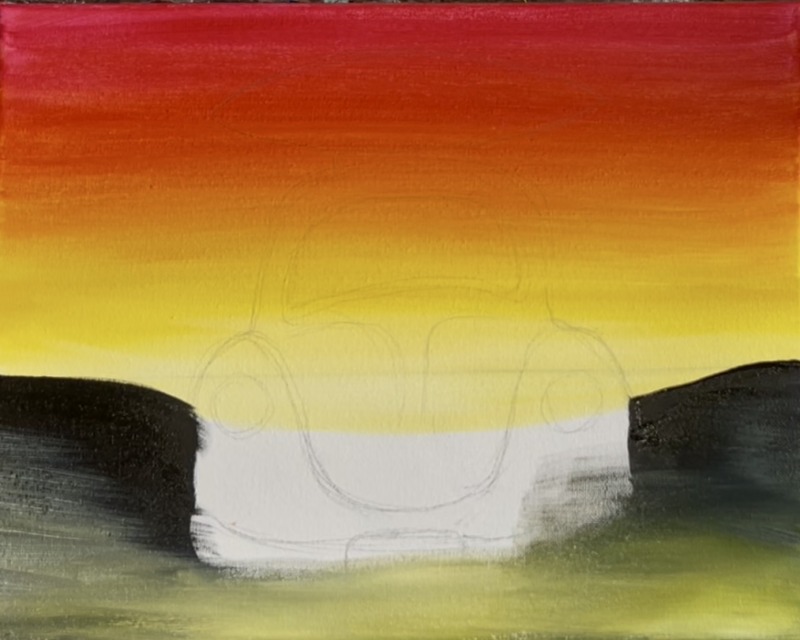
3. Paint Ground
Load your paint palette with “mars black”, a small amount of “titanium white” and a small amount of “primary yellow”. Use the 3/4″ flat brush to paint the ground black but leave the area where the tires are blank.

Do this on both sides of the car. Make the top part of this go kind of curved so it looks like the land is slightly sloped in the background. Go around your car drawing as much as possible.
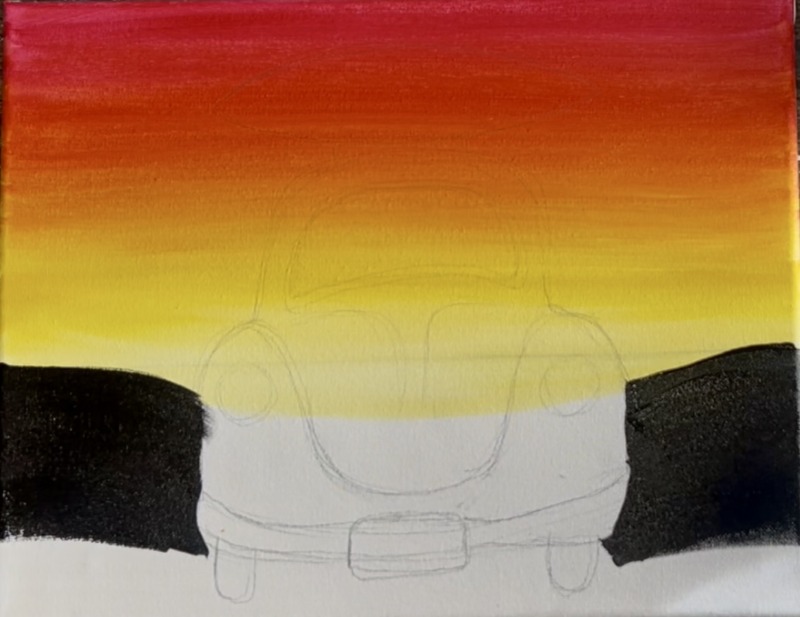
Before this black dries, we are going to blend it to a yellow-gray color so that the ground can be a lighter color. This will help the wheels stand out better and also give the car some really pretty contrast!
Rinse the brush. Then load it into “primary yellow” and “titanium white”. You only want a very small amount of those colors on your brush. Then blend that color starting below the black and then blend it up into the black. You want your color to fade to that black. You’ll need to brush over it several times to get it to blend with the black.
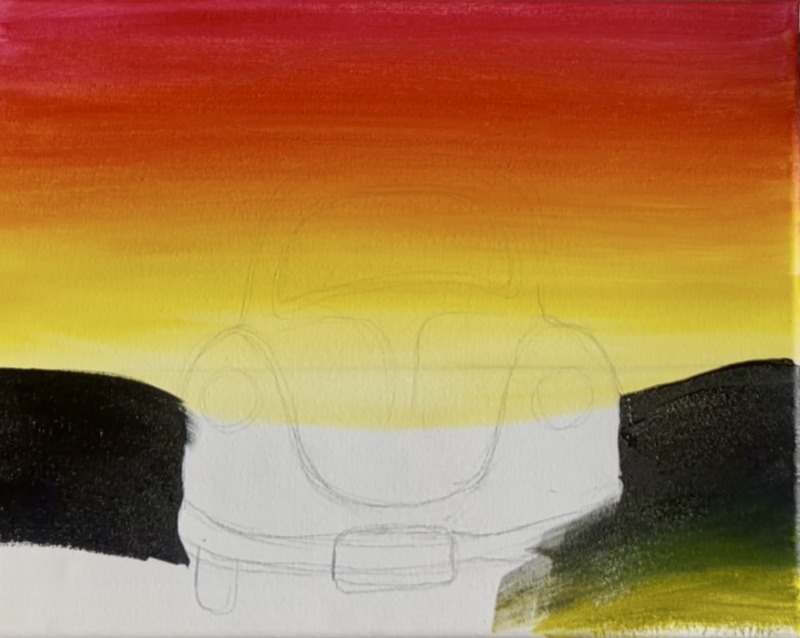
Do this on both sides. I tried to keep as much as the drawing still visible as possible but did end up painting over a lot of it. This bottom area should look like a gradient of black that blends to yellow-gray on the bottom.
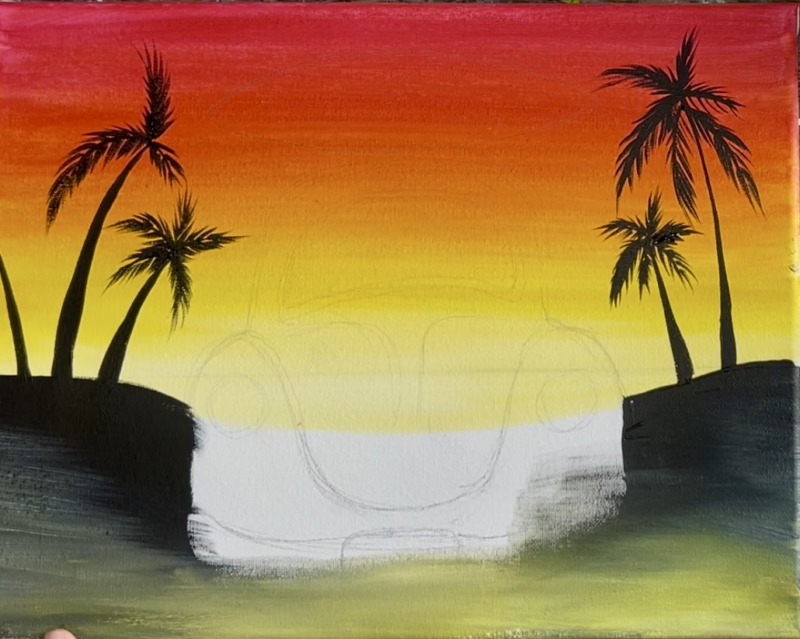
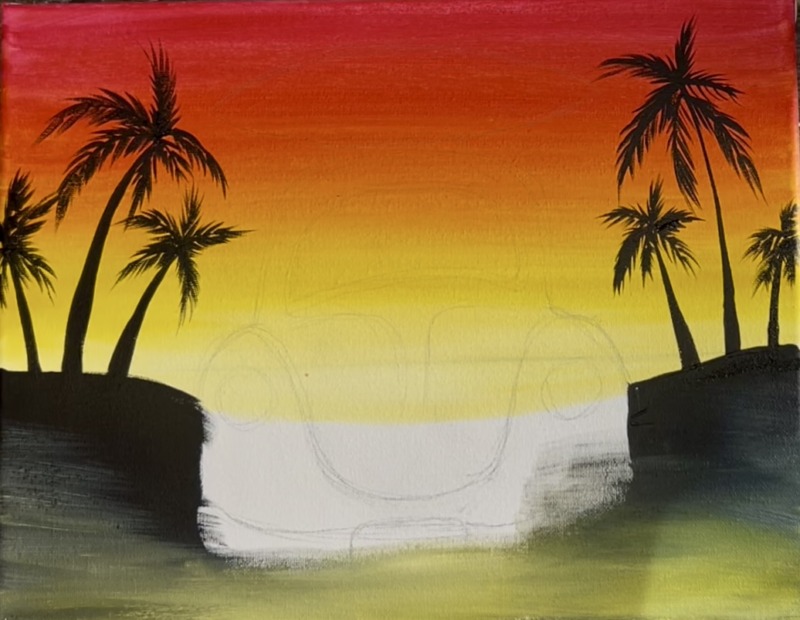
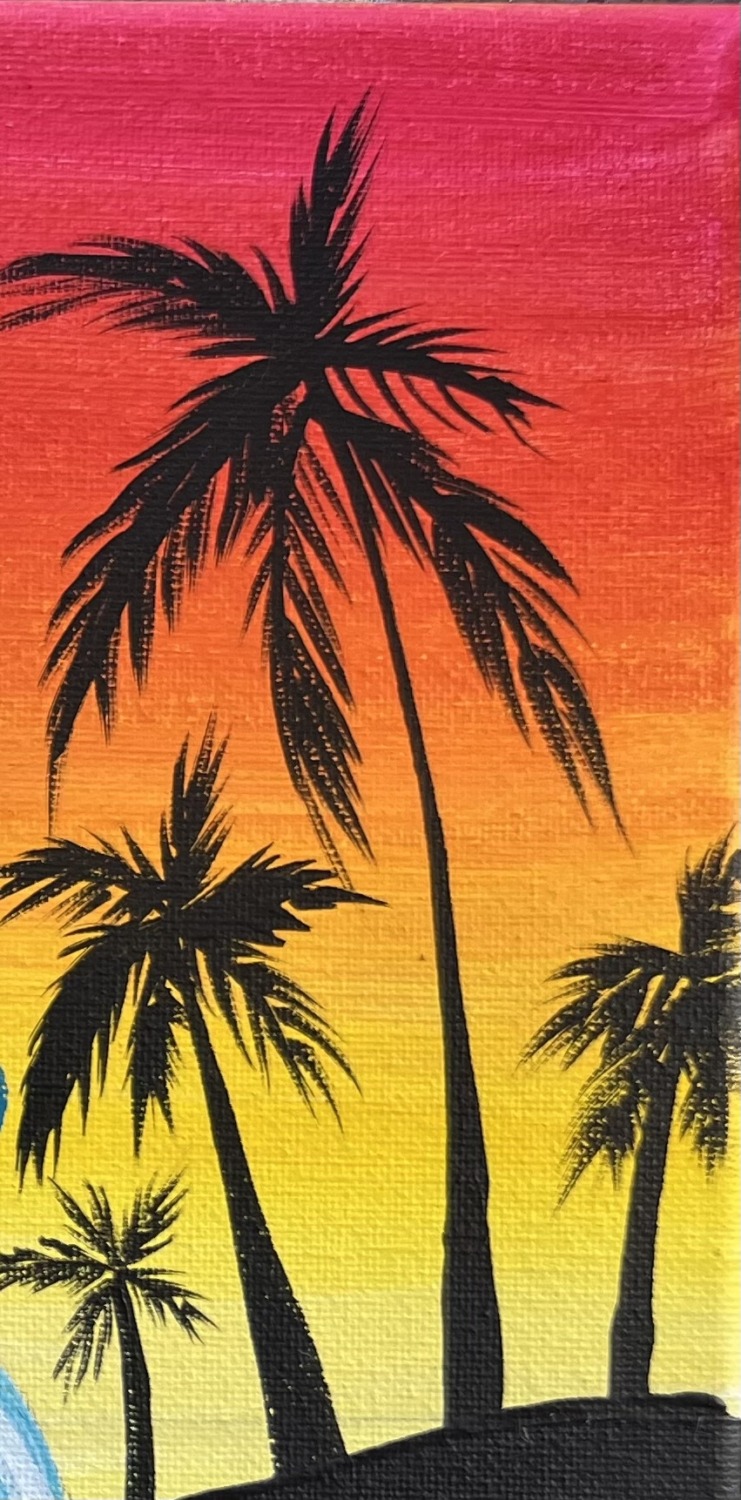
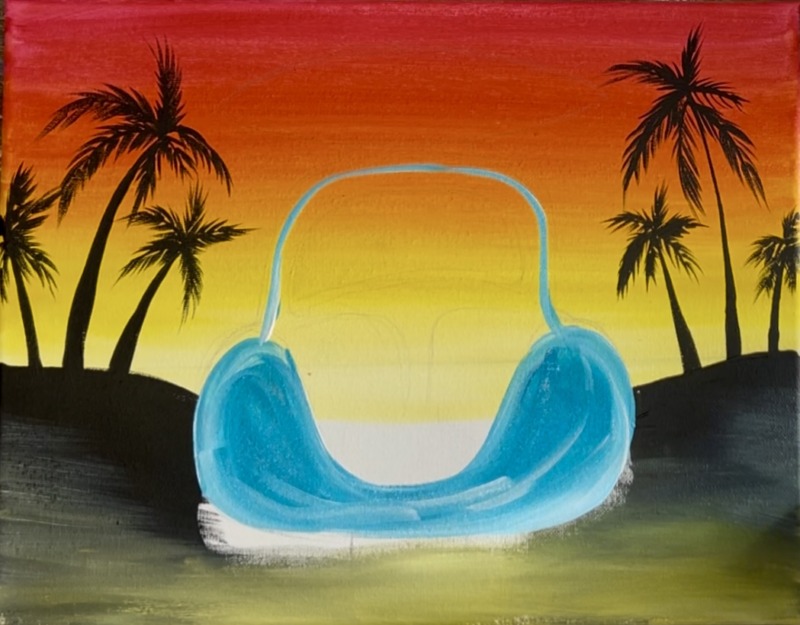
4. Paint Palm Trees
Use a #4 round brush to paint the silhouette palm trees with “mars black”. When painting these trees, sometimes it’s helpful to add a small amount of water to make the consistency of the paint a little loose (ink consistency).
Paint the trunks of the trees first. Each of the trunks are slightly thicker on the bottom and thinner to almost a “point” at the top.
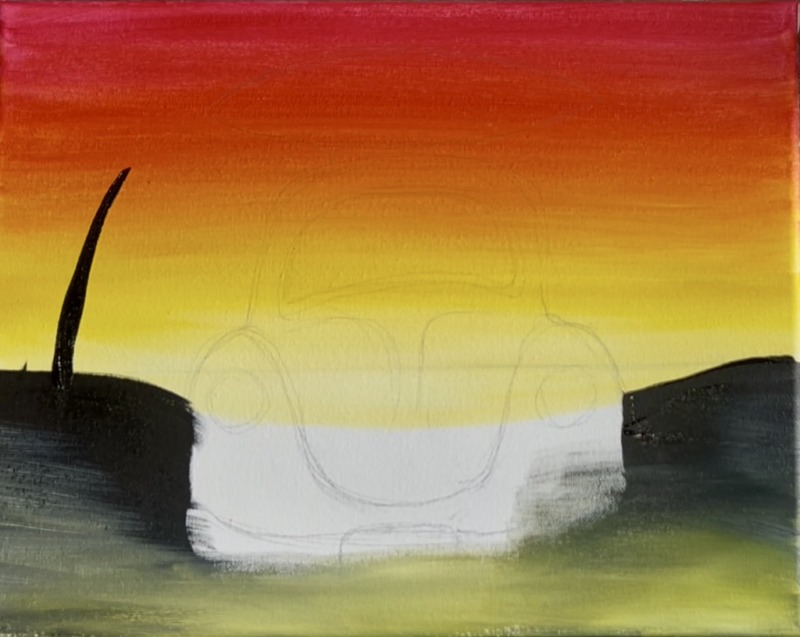
Make several palm tree trunks that are differing in heights and also thicknesses.

Then paint the palm fronds. Start with the middle of the frond by painting a slender line just like the trunk of the tree. This line could be the same thickness or you could make it thicker on the base and thinner at the tip.
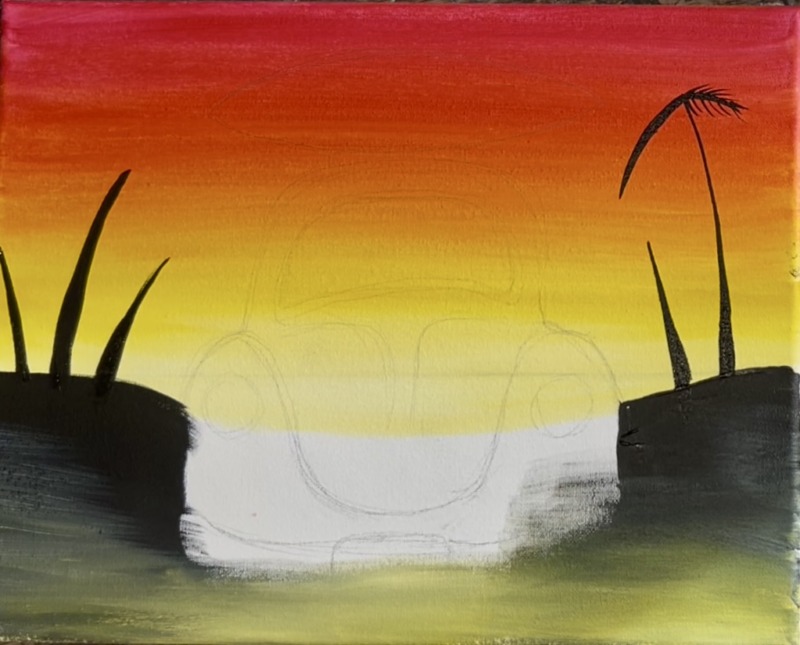
After painting the center of the palm front, paint each of the individual leaves. Paint thick paint strokes using only the tip of the round brush. Start at the stem and stroke outwards.
Repeat this step for each of the palm trees.
5. Paint Car (first layer)
Use the #12 bright brush for this step. Load your paint palette with “turquoise blue” and “titanium white”.
Tip: if you want to change the color of this car, use any color (such as purple, green, pink, etc.) plus titanium white!
Paint the front fender area first. Double load your brush (that means loading it into both the colors…sometimes I load one corner in one color and the other corner in the other). Outline this “bean shape” and then fill it in with paint strokes going in the direction of the shape. Blend the turquoise and white together but not all the way. When you have “color variation”, you create this shiny look to the car!
Then outline the roof of the car with the same color combination.
Define the shape of the window by outlining the outer part of it.
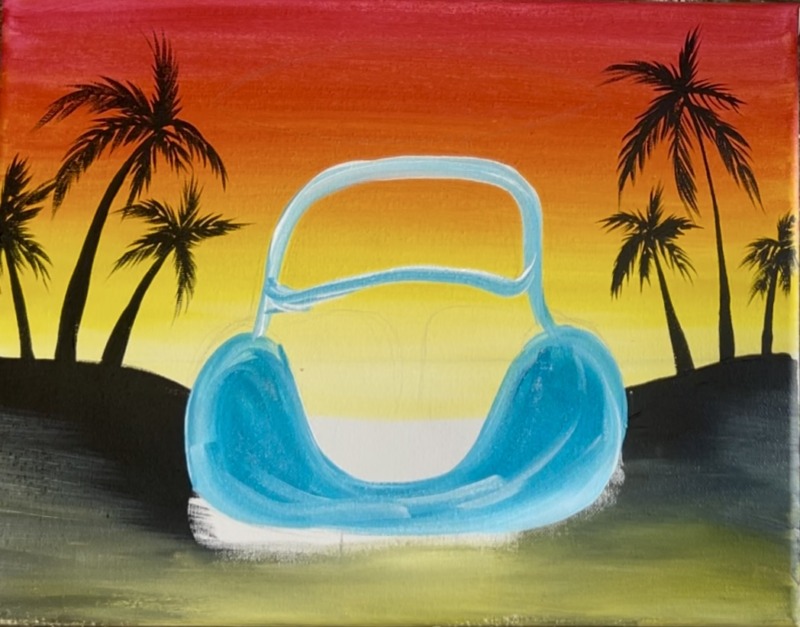
Then paint the front hood of the car. You want the color to be either lighter or darker than the fender that we painted first. That way the hood will stand out and that shape will be more defined.
Fill the hood in with paint strokes that go in the direction of the shape.
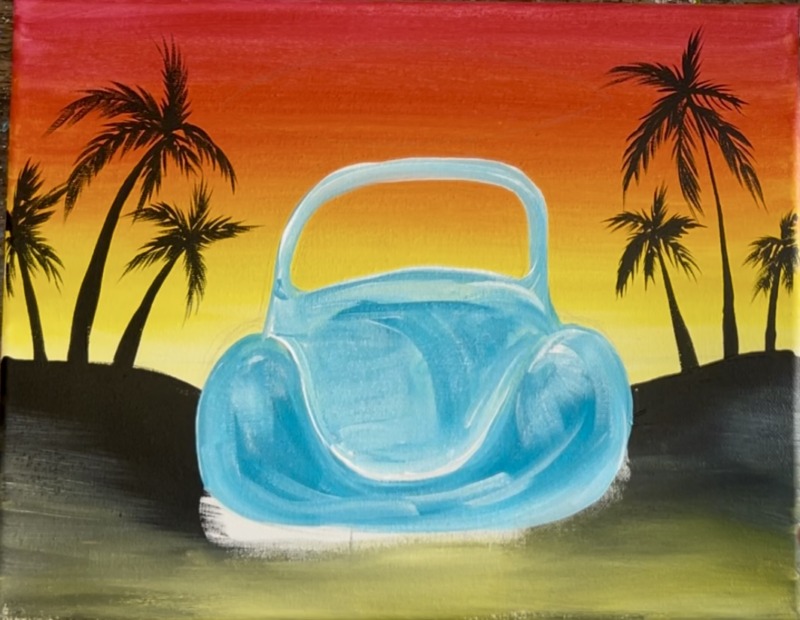
Then use the #4 round brush to paint the front bumper of the car. I recommend painting this with “titanium white” first if any of the background color got painted over this shape. Then when the white dries, paint a layer of “silver” paint color on top of that. If you don’t have silver, you can paint the bumper light gray or any color you want!
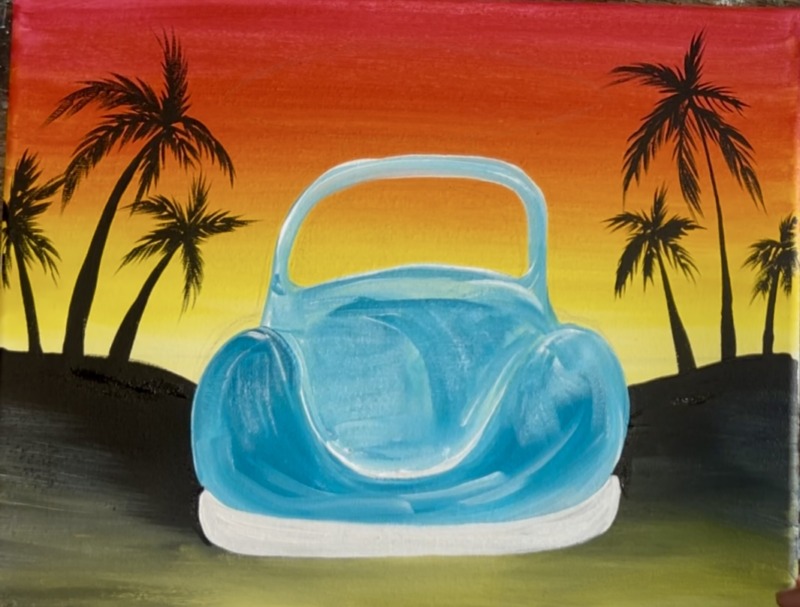
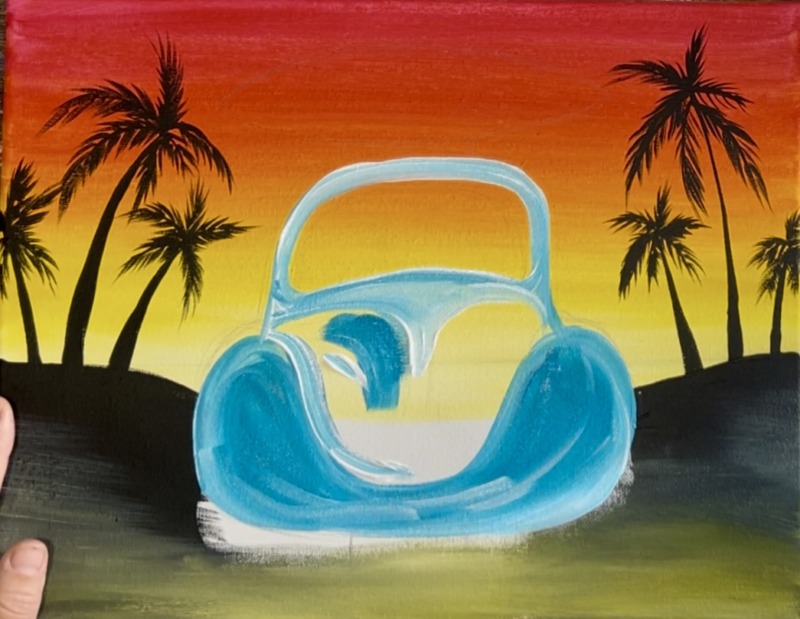
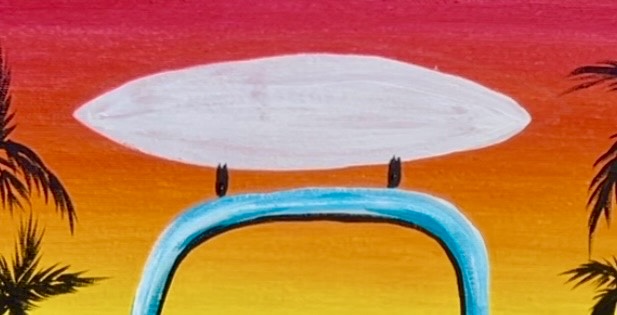
6. Paint Surfboard And Tires
Use the #4 round brush and “titanium white” to paint the shape of the surfboard. It is recommended to paint this white first so the final color that you will paint the surfboard will show up nice and bright!
Paint two “U” shapes for the tires and paint those “mars black”. Note: the inner part of the tires line up with the outer part of the car’s roof.

7. Headlights & Highlighting
Use “titanium white” to paint two circles for the headlights.
Then add highlighting on the car. Use the #4 round brush and mix a light blue color (white with the turquoise but make it lighter than your first coat so that it will show up). Paint loose rounded lines around the headlights and on the hood of the car.
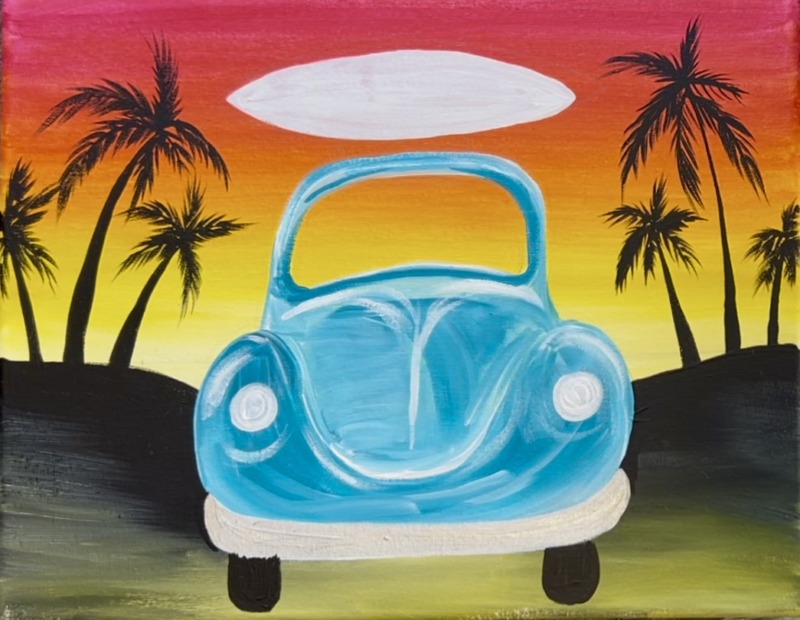
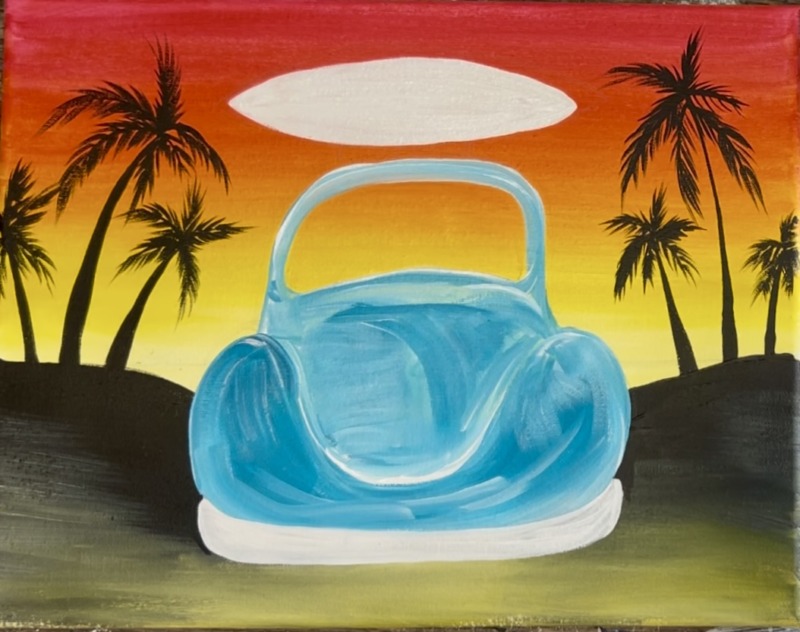
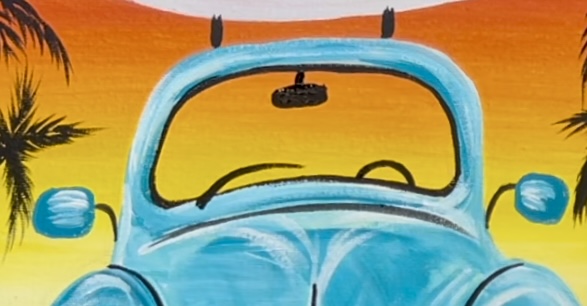
8. Outlining
Use the #4 round brush and “mars black” to outline the inner part of the windshield. Make sure this line is very thin. You can also use a black paint pen or sharpie for the outlining detail work.

Next, outline the front part of the hood of the car, outline the headlight circles and outline the bumper. Note: I made the bumper slightly longer by extending that line a little further down.
In addition to the headlight circles, loosely outline another circle around the white circle for a fun expressive effect!

Outline a vertical line down the center of the hood. Then outline a curved line just under the front window/ top of the hood.
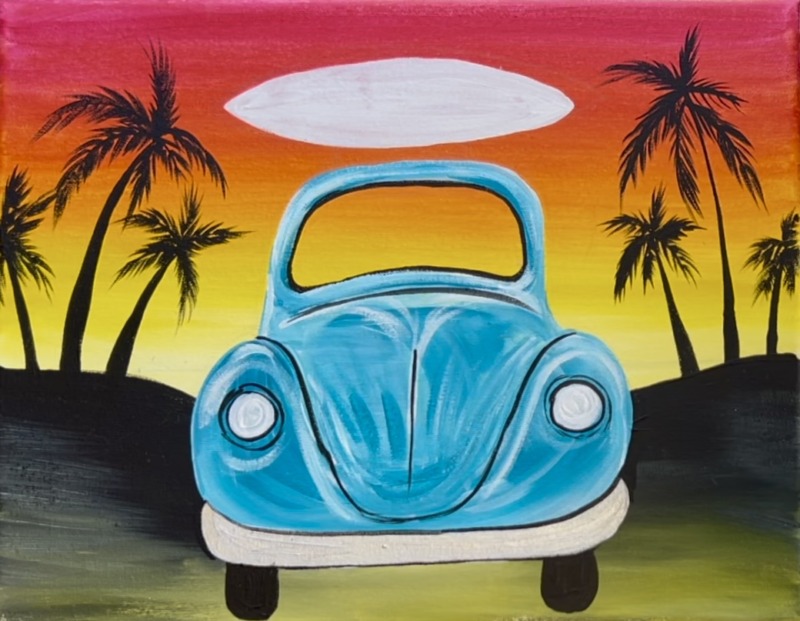
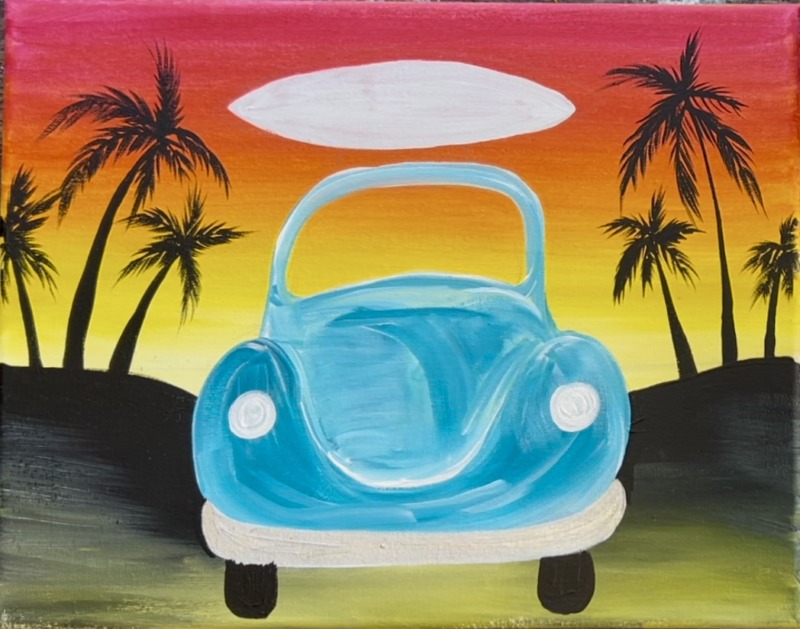
9. Detail Work
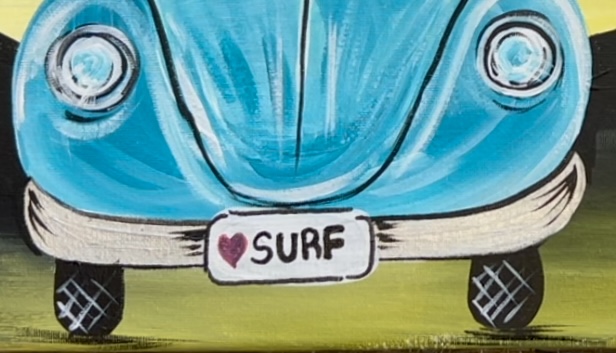
Use the #4 round brush and “titanium white” to paint the shape of the license plate.
Then paint little black lines extending down from the surfboard for the roof rack that is holding the surfboard.
Paint exterior rearview mirrors on the sides of the car. Use “mars black” to paint two angled lines. Then paint a little square/ rectangle shape using the same color as the car. Add “titanium white” to highlight each of the mirrors.

Paint little textured lines on the tires. Use “titanium white” and the #4 round brush. Paint a set of diagonal lines that criss-cross each other. Do this very lightly with very thin lines.
Paint details on the inside of the car including: rearview mirror, steering wheel and windshield wiper. Do this with the #4 round brush and “mars black”.
Add black shadows under the tires. Do this with the #4 round brush and “mars black” and “dry brush” horizontal lines under the tires.
Use a paint pen (or paint brush) to write the letters on the license plate. I made my say ♡︎ SURF but you can do any word you want on this!
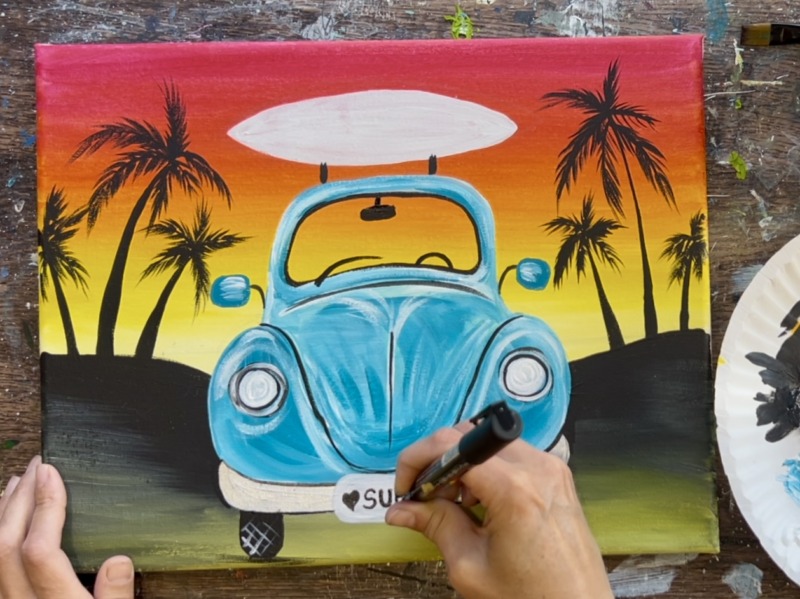
After doing the lettering, lightly outline the license plate with the paint pen. Additionally you can paint the little heart a different color. I went over the black with “primary red”.
10. Surfboard Details & Windshield Glass
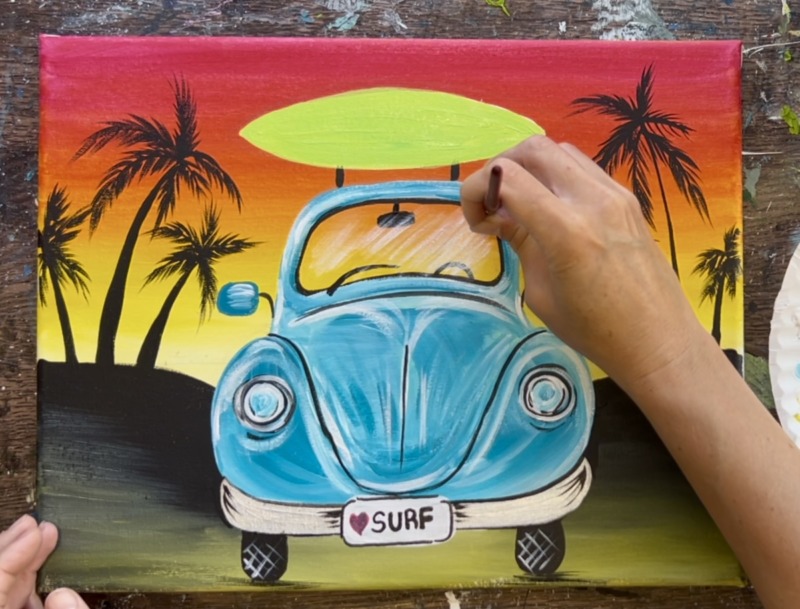
Use the #4 round brush to paint the surfboard “brilliant yellow green” or other chosen color.
Then use the #4 round brush to “dry brush” titanium white diagonal lines over the window glass area. You want to do this very lightly. Add only a small amount of white paint to your brush and wipe off the paint after loading it. Your paint stroke should be very translucent when you do this because you want to see the background through the glass.
Other details include adding a little bit of black shadowing on the bumper. Use the #4 round brush and “mars black” to lightly paint little black marks on the sides of the bumper and just to the left and right of the license plate. Additionally you can “dry brush” little diagonal white lines on the headlights to give those that “glass effect”. (This is optional)
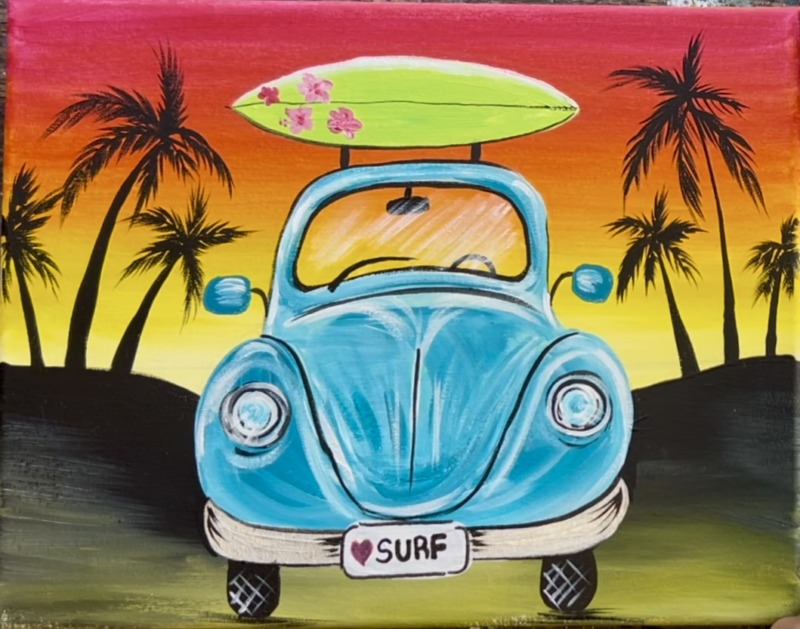
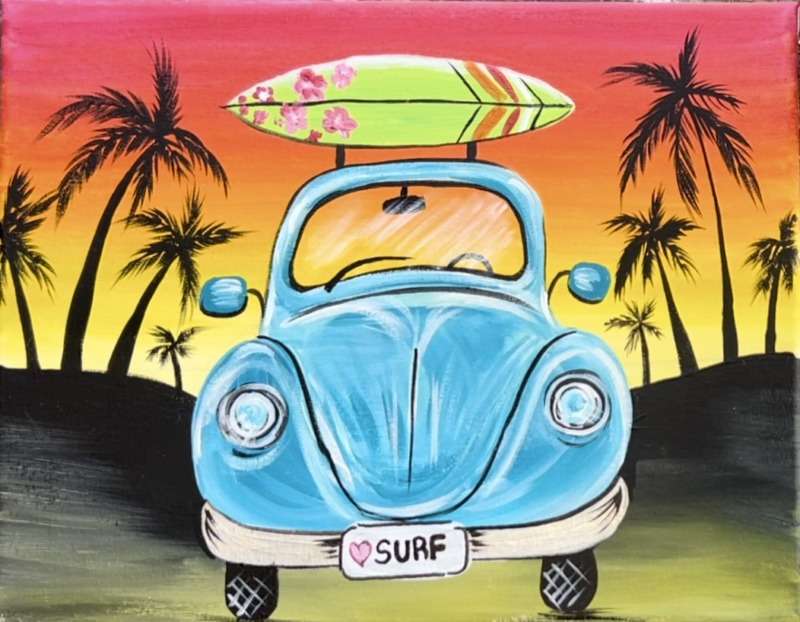
Then use “primary red” mixed with “titanium white” to paint little flowers on the left side of the surfboard. You could also decorate this with other fun designs and patterns!
Then paint little diagonal stripes on the right side. I used orange, primary red, mars black and titanium white for these stripes.
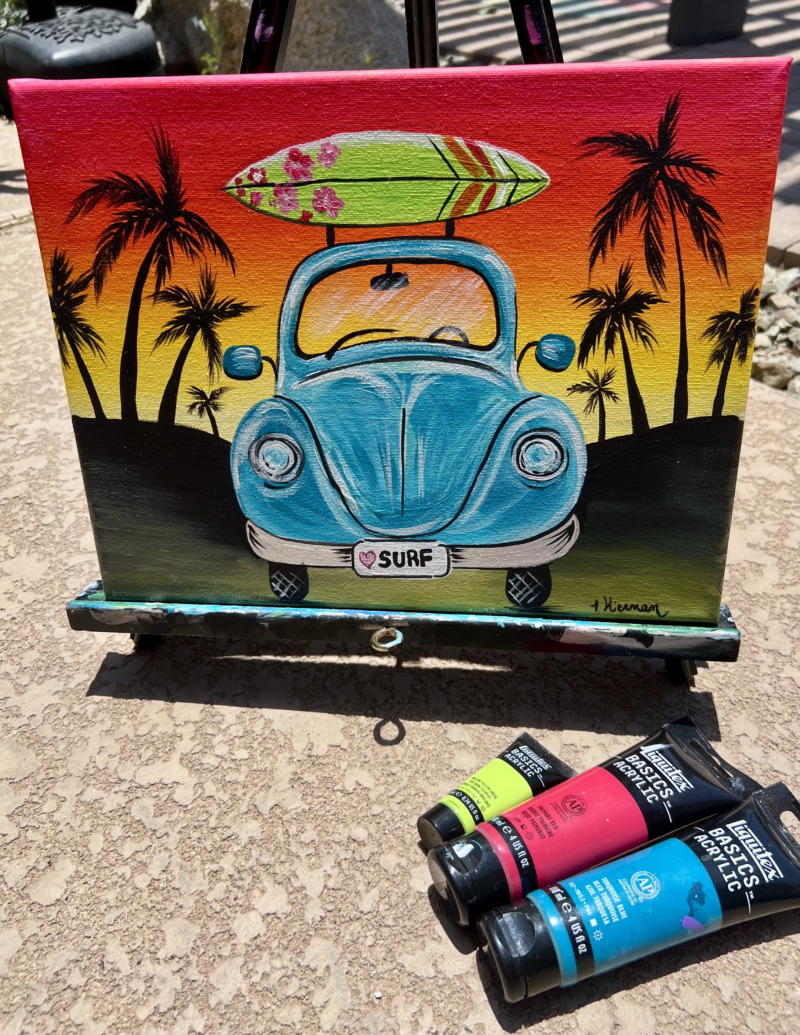
Finished!
Sign your name and show it off!
