Would you like to save this?
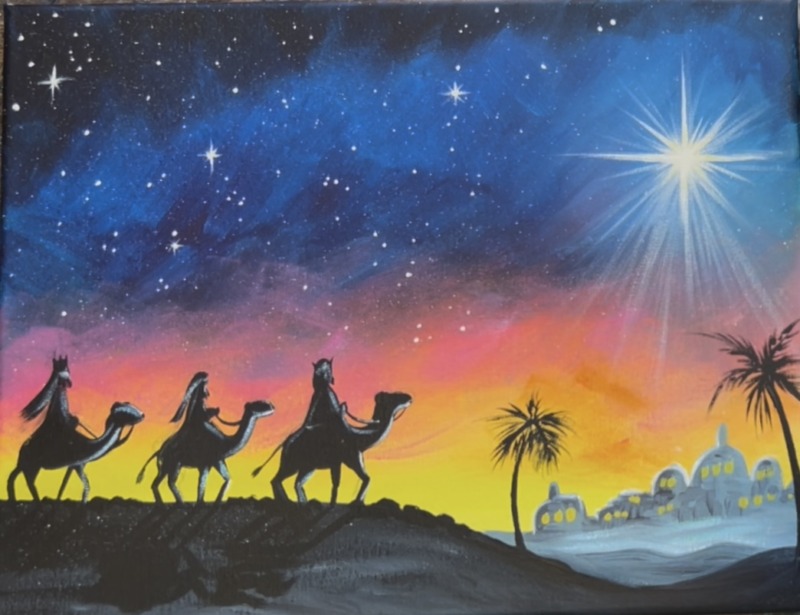
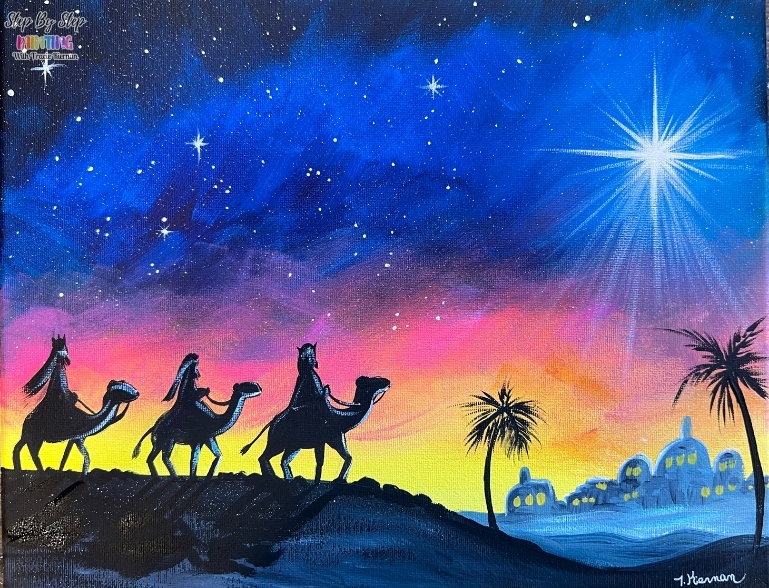
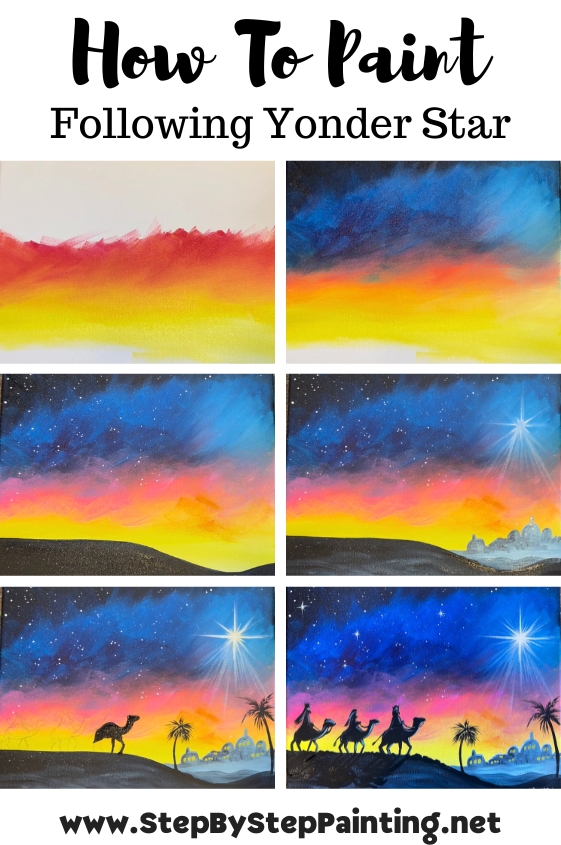
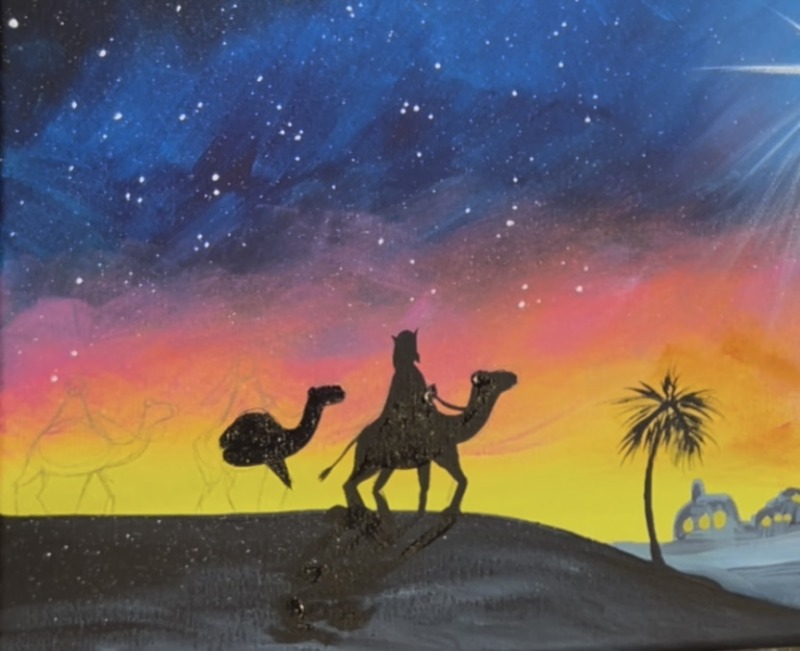
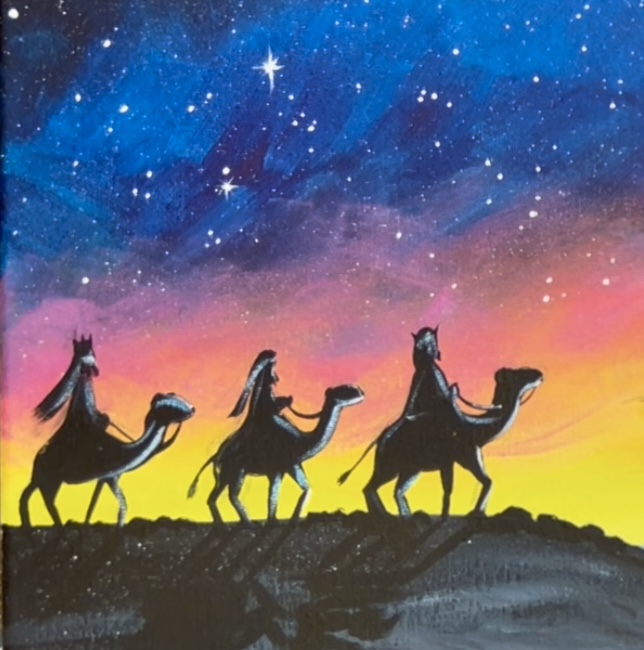
Create your own stunning Christmas canvas with this beginner acrylic painting tutorial featuring the Three Wise Men traveling under the bright Star of Bethlehem. This step-by-step lesson walks you through blending a vibrant sunset sky, adding simple silhouettes, and painting a vibrant Christmas star.
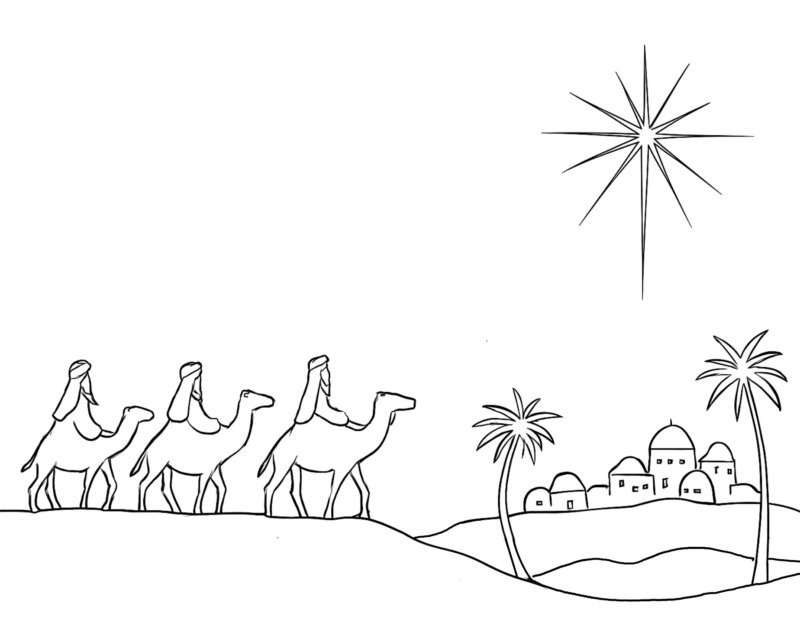
There is instruction for how to draw as well as an optional traceable template for this one! Also, there is a limited color palette for this one, only 5 colors!
Enjoy and happy painting!
Materials Needed
- 11 x 14 Canvas (or any size)
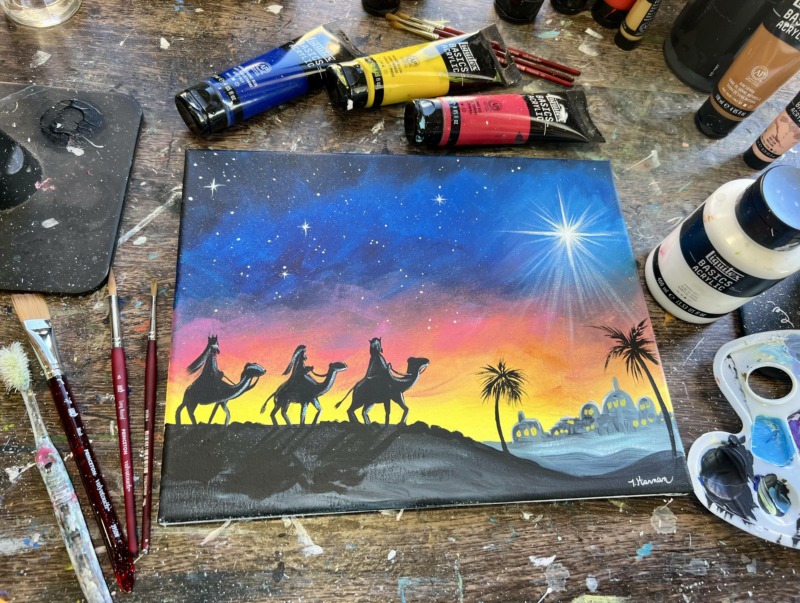
- Acrylic Paints (I like Liquitex BASICS)
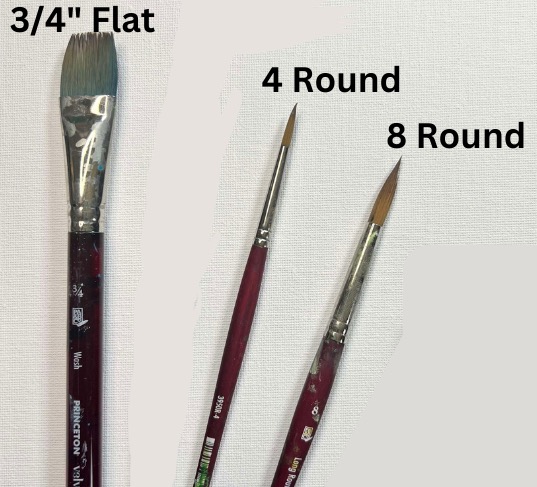
- Brushes (Princeton Velvetouch)
- Optional Traceable Template
- Optional Graphite Paper
- Pencil
- Ruler
- Optional toothbrush for star splatters
Colors
- *Primary Red
- Primary Yellow
- Phthalo Blue
- Mars Black
- Titanium White
*Use Quinacridone Red or Alizarin Crimson if you don’t have Primary Red. You want a red that will “pull pink”.
Brushes
- 3/4 Flat
- 4 Round
- 8 Long Round (optional but helpful for small detail work)
Color Palette
I like to use Liquitex BASICS acrylic paints! You can use whatever color brands you have available. Use the chart below to help you match colors:

Directions At A Glance
Traceable Template (optional)
Video
Step By Step Instructions
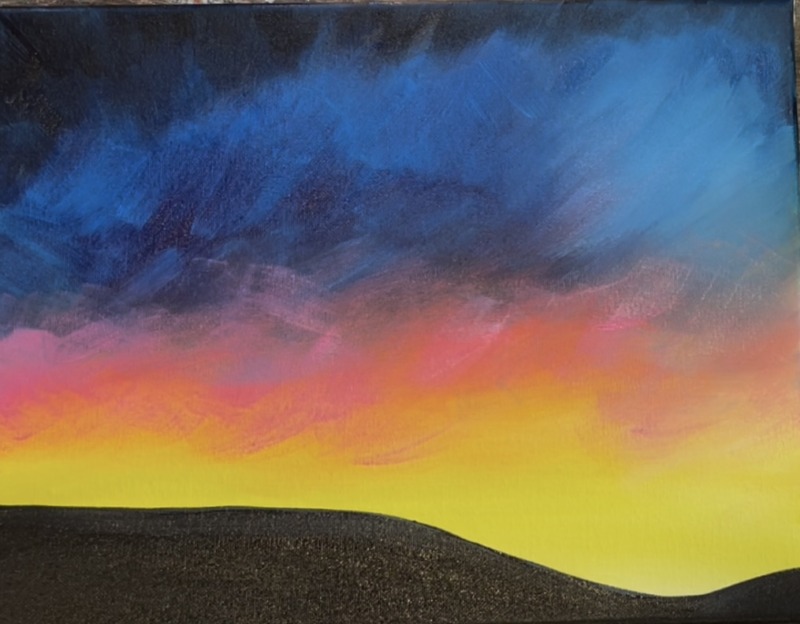
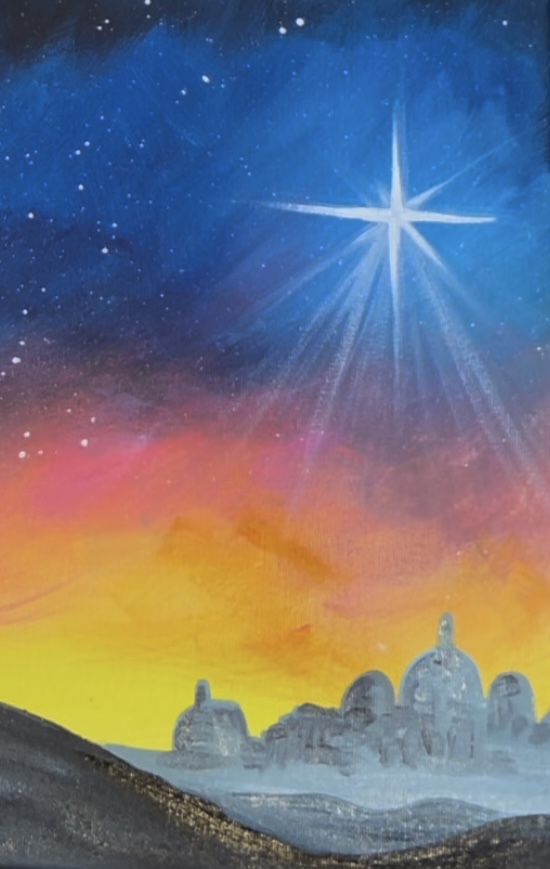
1. Paint Sky
Load your paint palette with the colors: titanium white, primary yellow, primary red, phthalo blue and mars black. These are all the colors we will be using in the sky! The sky will be started on the bottom of the canvas with the brightest and lightest colors and we will blend up to our darkest colors!
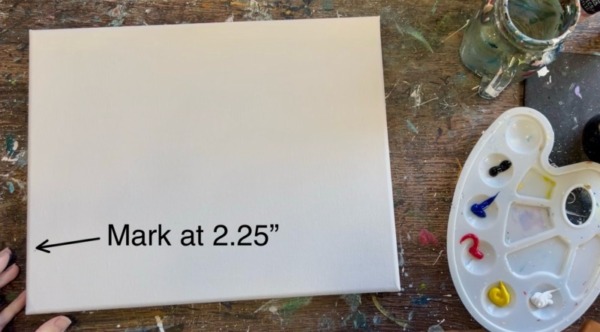
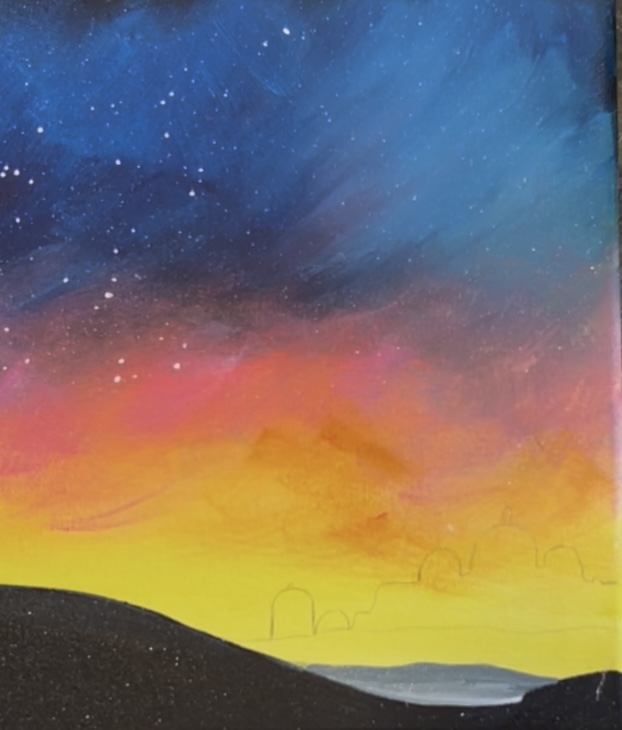
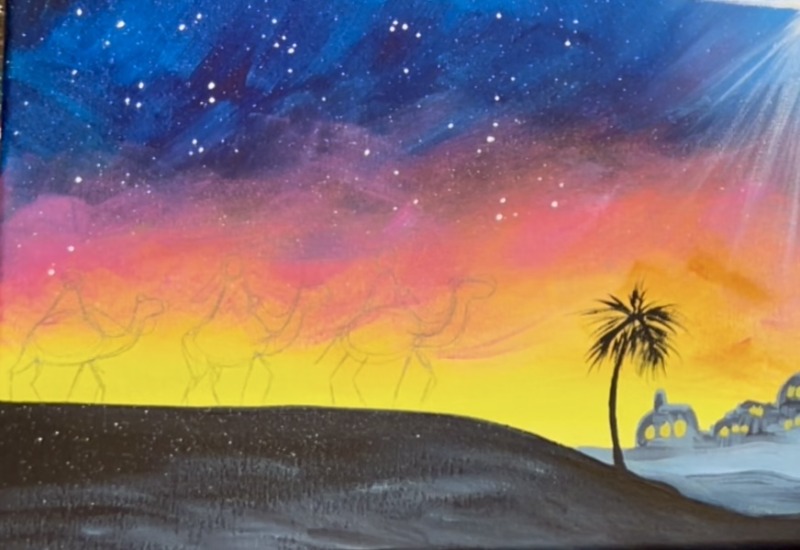
Start by measuring 2.25″ from the bottom of the canvas and making a little mark. If you are using a different size canvas, estimate about 1/5th of the canvas. This will be where the black shadowy silhouette land will start and where the three wisemen will be. We want to ensure this area above this mark will have bright colors so that the silhouette will stand out.
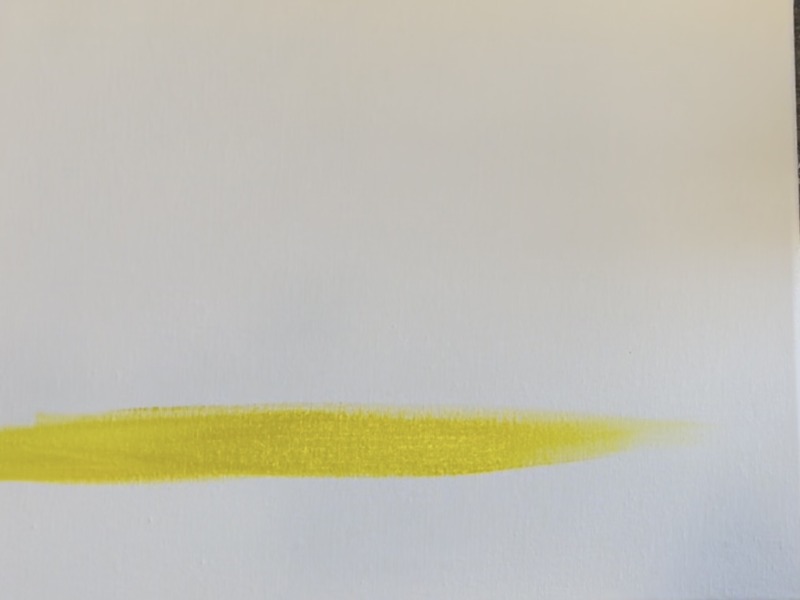
Next, use the 3/4″ flat brush and double load it into yellow and white. Paint left and right strokes across the canvas at that 2.25″ mark.
Go up about 2-3 inches with that light yellow color. Then load the brush with a tiny bit of “primary red”. You only want a tiny bit on your brush to start with! Gently blend that red into the yellow area to create an orange on the canvas. Do this very gradually and do this with paint strokes that go in different angles (blending right onto the canvas).
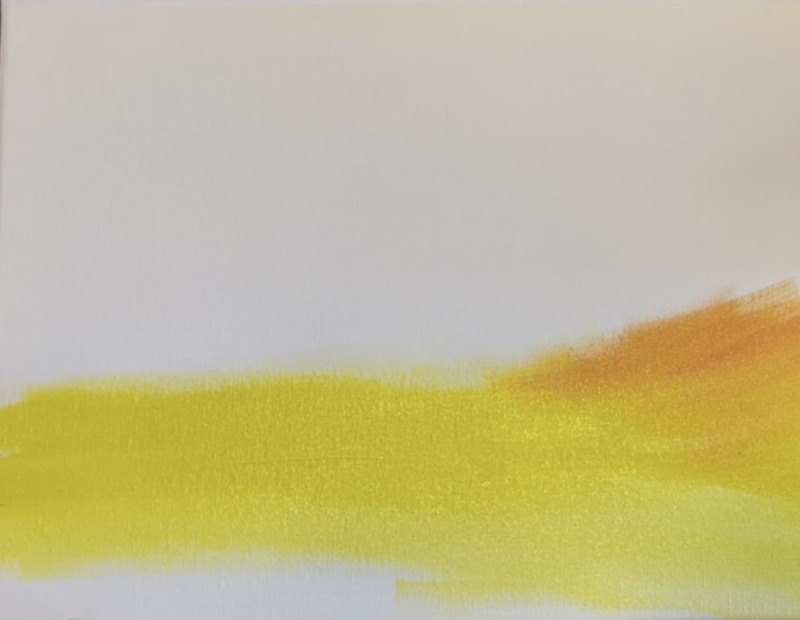
Create an orange area above your yellow across the canvas. Continue to blend tiny bits of the red into the yellow by painting choppy, angle paint strokes.
Tip: blending is helpful if you try drying your brush/ wiping excess paint off the brush and then using the bristles to blend the color right on the canvas. Adding too much paint to the brush makes it harder to blend.

Add some more “primary red” not blended with yellow. Bring it up to past the halfway point of the middle of the canvas (choppy angle paint strokes).
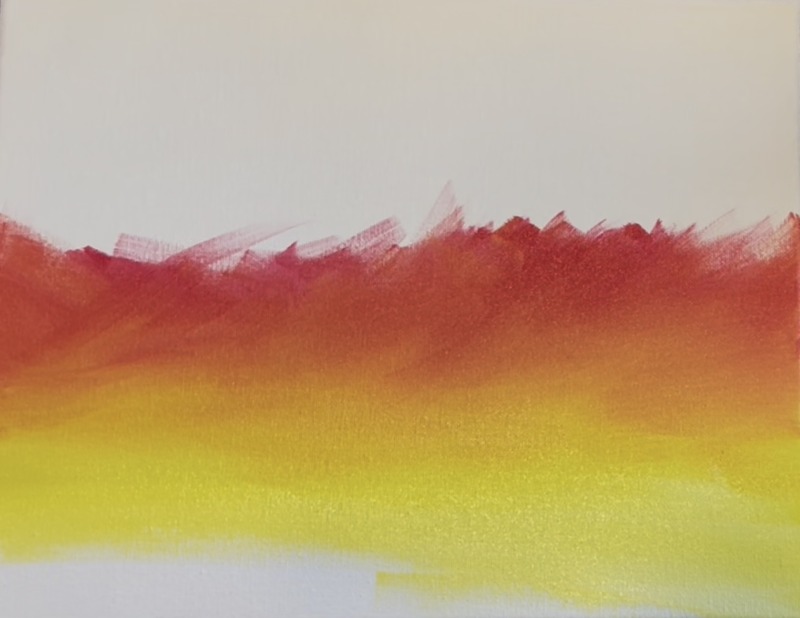
Rinse the brush. Next, you will be introducing the blue in the sky but make sure you do this very gradually. “Phthalo” blue is a dark, strong color that can take over fast if you add too much to the brush. Add only a small amount and blend it with the primary red. Do this very slowly and gradually. It will make a dark purple area where the blue and red blend. Work the canvas a bit more by painting angle/ choppy brush strokes. Try using just the dry brush to help the colors blend.
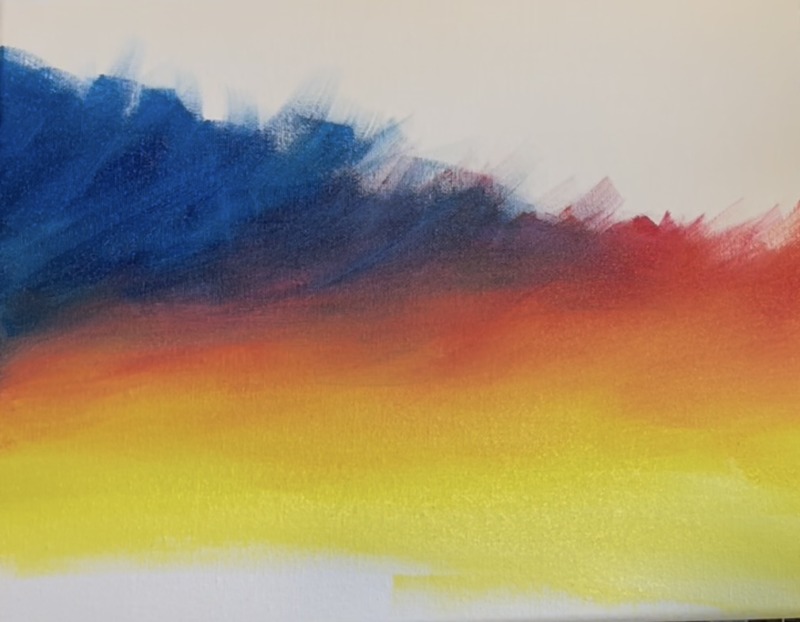
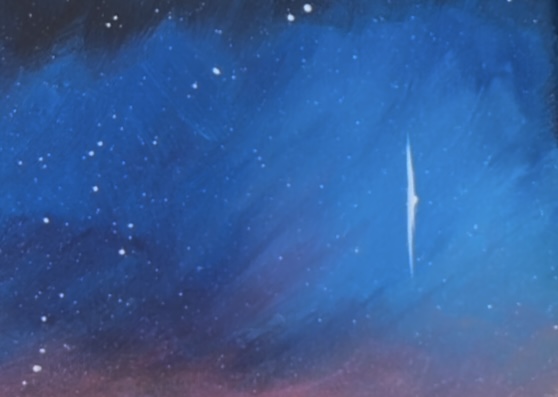
Bring the blue up all the way to the top edge of the canvas. Leave a blank area around where the Christmas star will be. This area will be painted and blended with a lighter blue.
Mix equal parts “titanium white” and “phthalo blue” on your paint palette. Use the 3/4 wash brush to blend this light blue in the area where the Christmas star will be. It will look like a light blue “blob” for now! Use a dry brush and blend it into the rest of the colors below it (but it doesn’t have to blend perfectly).
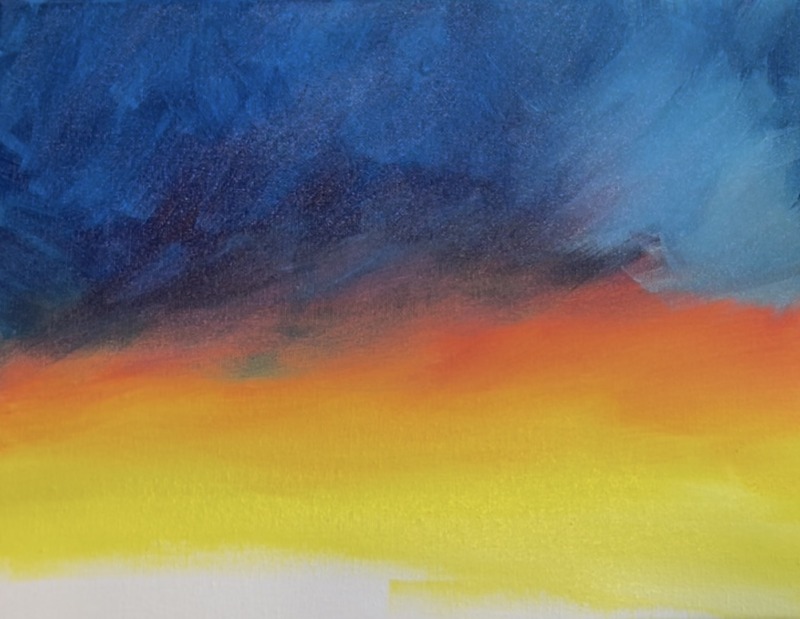
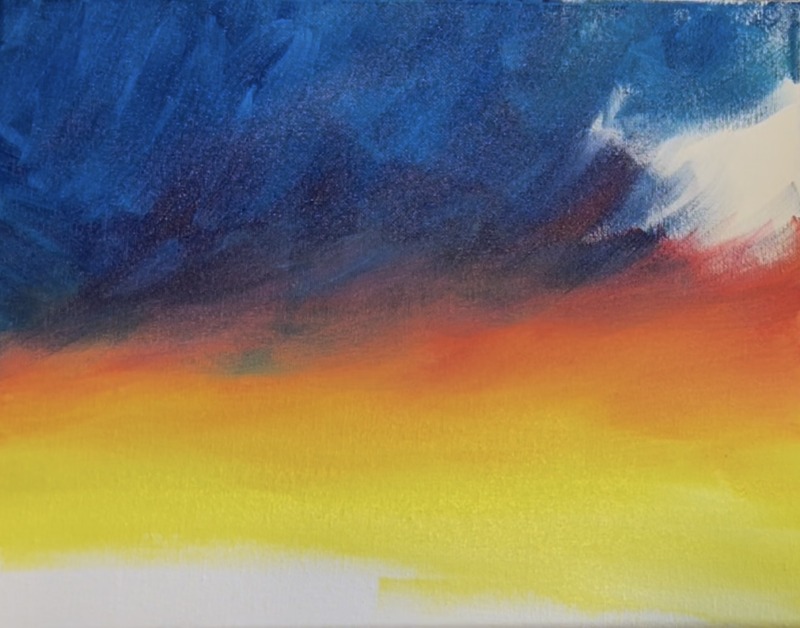
Next, rinse the brush. Mix “mars black” and “phthalo blue” together. Paint the very top left of the canvas with this very dark blue and blend it into the rest of the blue on the sky. Add this along the top edge of the canvas as well!
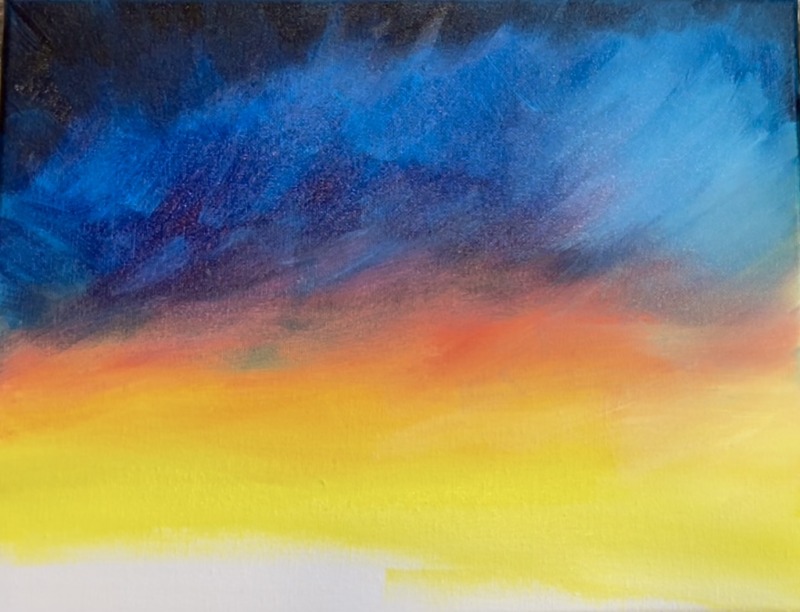
2. Paint Black Ground Area
Use the 3/4″ flat wash brush and “mars black” to paint the bottom of that land area. Start this at the 2.25″ mark and paint a horizontal line across the canvas. Dip this line down (a little past halfway) and bring the line to the bottom right corner of the canvas.
Fill this land area in with solid black. Then bring the line up just a little bit on the right to create a small hill that dips back up.
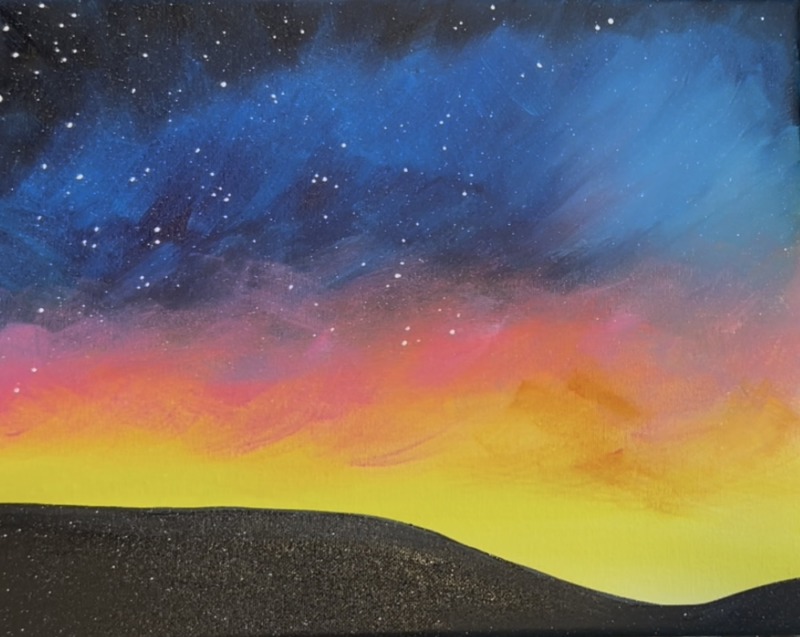
3. More Pink In Sky & Paint Small Stars
This is optional! I wanted to have more pink in the sky so I went back over the part where the blue transitions to the red. I mixed “primary red” with “titanium white” to make more of a pink color. Then I painted choppy/ angle paint strokes in that area. To blend with the rest of the sky, I used a dry brush to let it sort of fade away over the yellow and some of the dark blue.
To paint the stars, use a toothbrush and titanium white (slightly watered down) to splatter little fine white specks. I did this all over the canvas, even over the bottom black land area. Then use the #8 “long round” brush (specifically the tip of the brush) to paint small white dots of clustered stars throughout the sky.
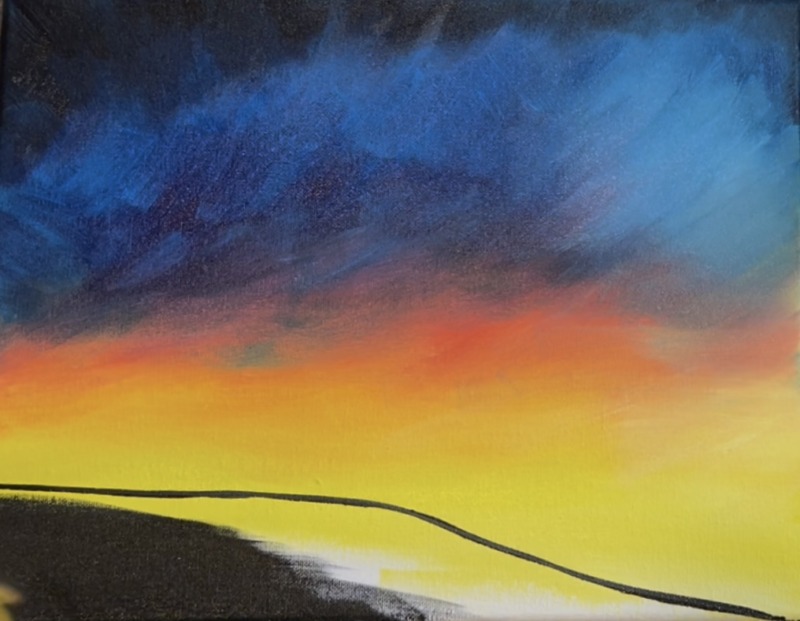
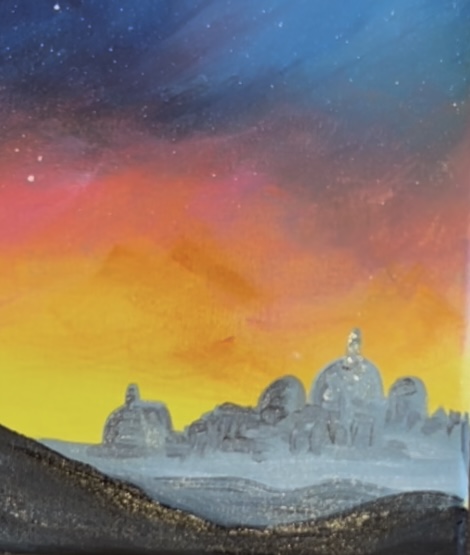
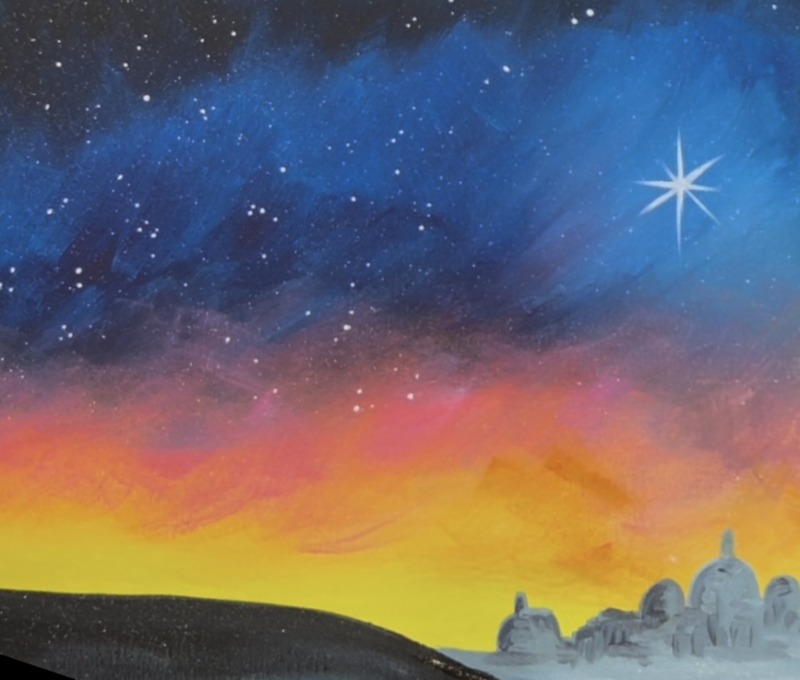
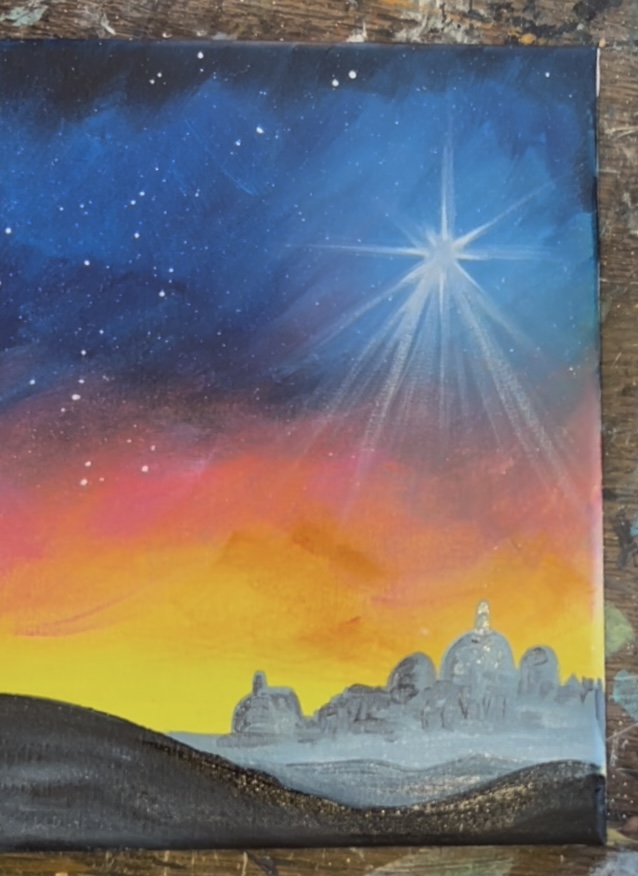
4. Draw/ Paint Bethlehem Town
Use a pencil to sketch the town of Bethlehem. This is in the distance in the area where the hill dips down. There is also another small hill line between the front black land area and the town. Draw this line in as well!
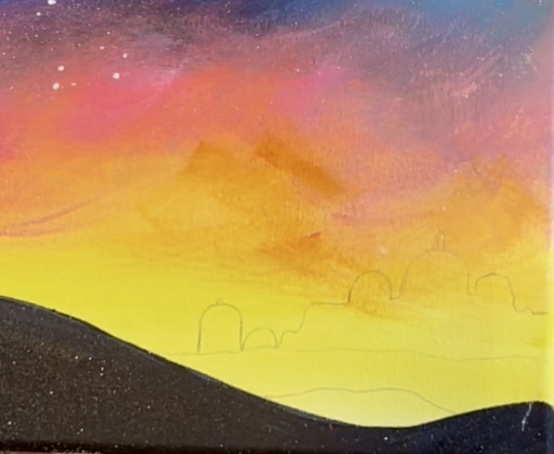
Next, paint the hill that is just behind the black land area. Mix about equal parts black and white together to make a medium to dark gray color. Use the #4 round brush to paint that area in. Then blend a little extra white on the bottom of the hill area and blend it in (I like to make the hills lighter on the bottom and darker on the top for added depth but this is optional).
Next, paint the town of Bethlehem in. Mix a lighter gray color by adding more white to the color you just used. In the video, I mix a little blue in the color so that it looks more like a light gray-blue. Paint the town in using the #4 round brush.
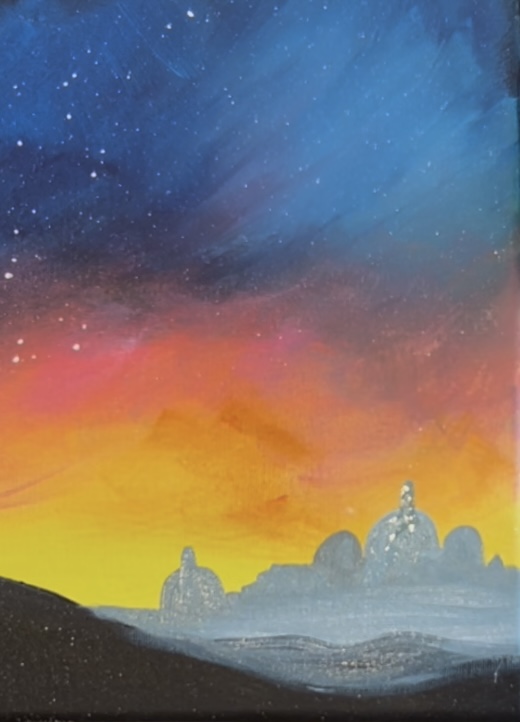
Optional: add some darker colors on the town by using your medium gray color and the #4 round brush. On the left side of the buildings, paint little vertical and horizontal abstract paint marks.
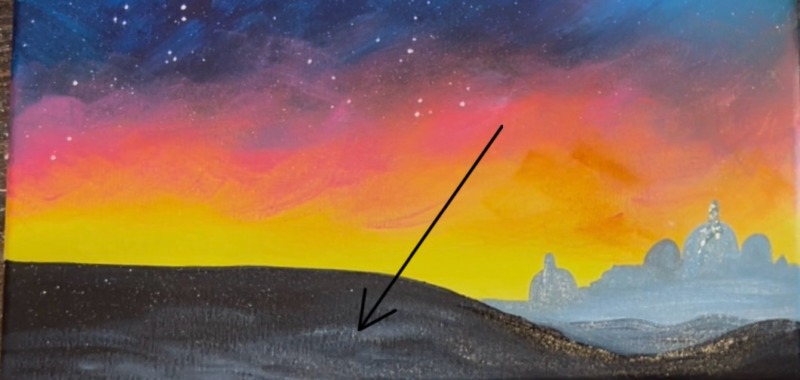
Next, use the #4 round brush (or the 3/4″ flat) to “dry brush” dark to medium gray over the black ground area. This should be very subtle! Later when we paint shadows from the camels, we will be able to see the shadows in that area because of this.
5. Paint Star
Use the #8 long round brush and “titanium white”. Over your light blue area (over the town), paint a 8 pointed star. Start by painting a small circle/ dot in the middle. Then drag this to create 4 points (vertical and horizontal). Make these points thicker on the bottom and pointed at the ends.
You can make this painting simple by leaving the star as is! Or, if you want a more advanced star, follow the steps below for how to make it “glow”.
Before this star dries, use the brush (as a dry brush) to blur/ smear out those lines you just painted. Drag each of the points outwards to make the lines longer. This will blur the color and make it look translucent on the canvas.
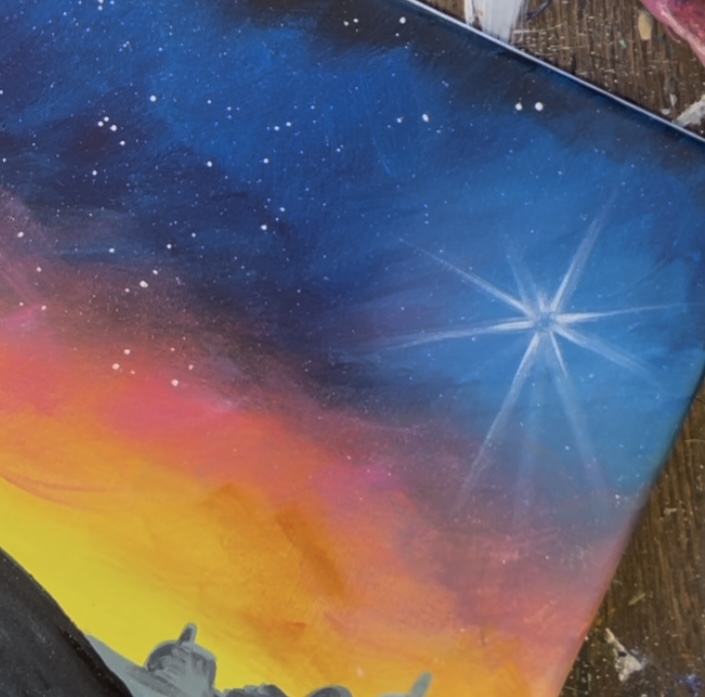
Load the brush into white and then wipe the brush. Paint more diagonal lines on the bottom of the star that extend towards the town. These lines should be translucent and not super bright. You create this effect by using the “dry brush” technique.
Next, repaint the original star to go over your blurry star point lines you just created. Use the #8 long round brush and “titanium white” to paint a bright white star over this but don’t cover all of your longer translucent lines.
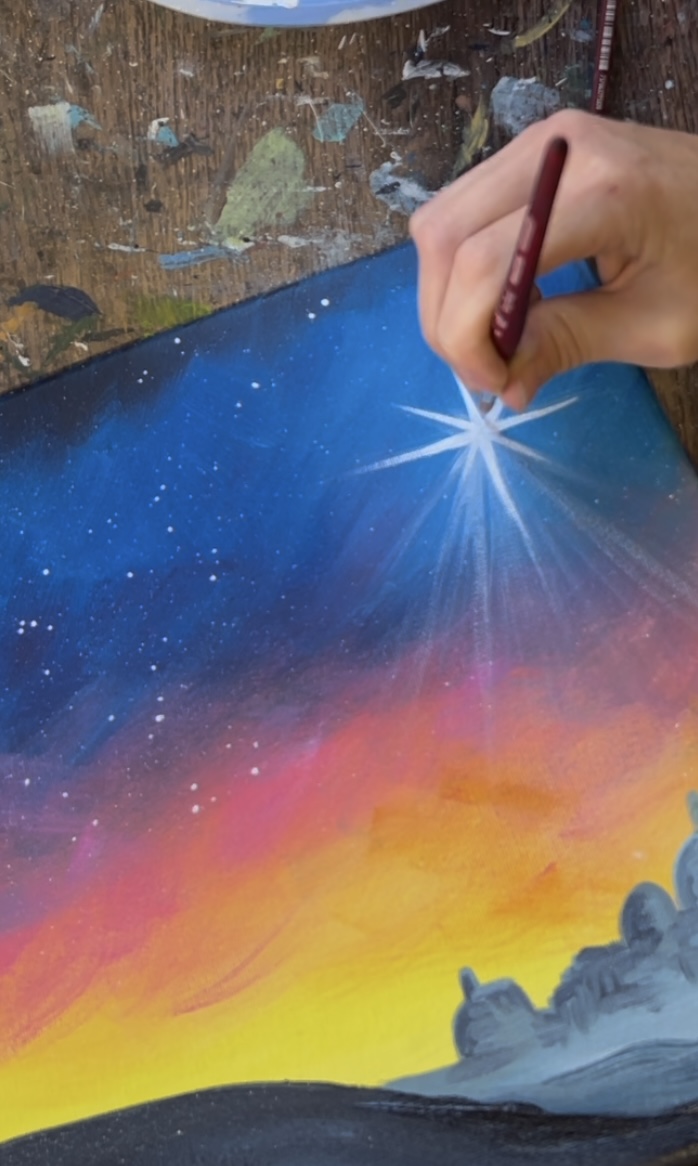
Optional: add a tiny bit of yellow into the middle of the star and drag that out onto the star points.

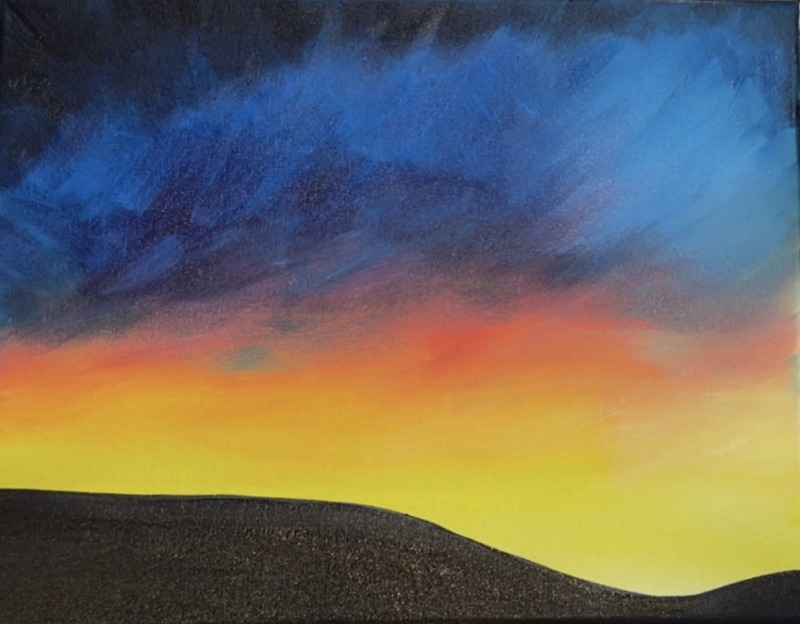
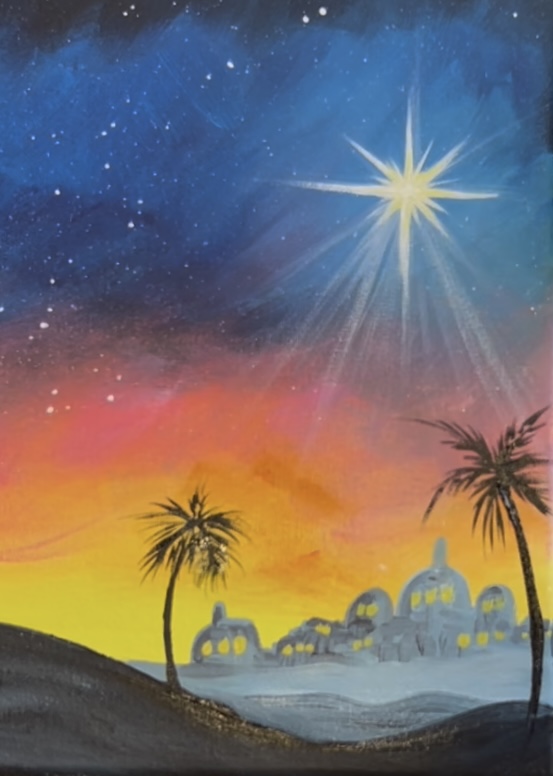
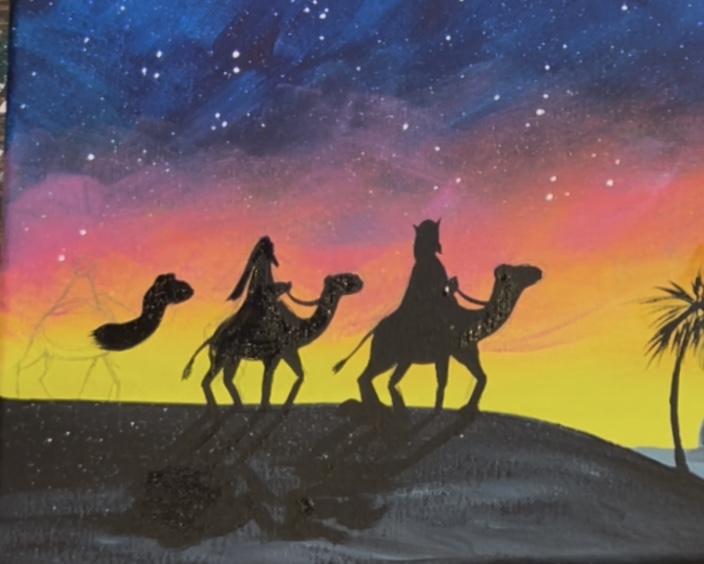
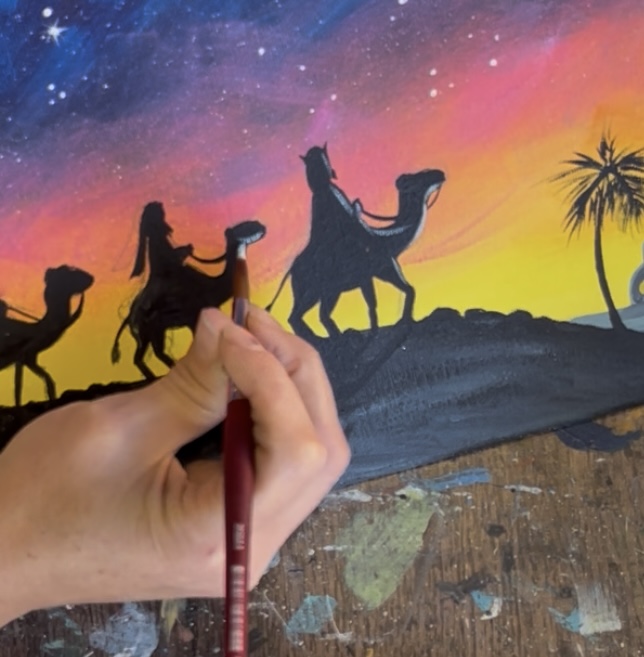
6. Paint Palm Trees
Use the #4 round brush and “mars black” to paint two palm trees that start on the black land area and curve around both sides of the town in the background. Start the tree by painting the trunk first. This is a line that is slightly thicker on the bottom and thinner at the top. Then paint little lines that fan outwards from the top of the tree. These will be the centers of the palm fronds.
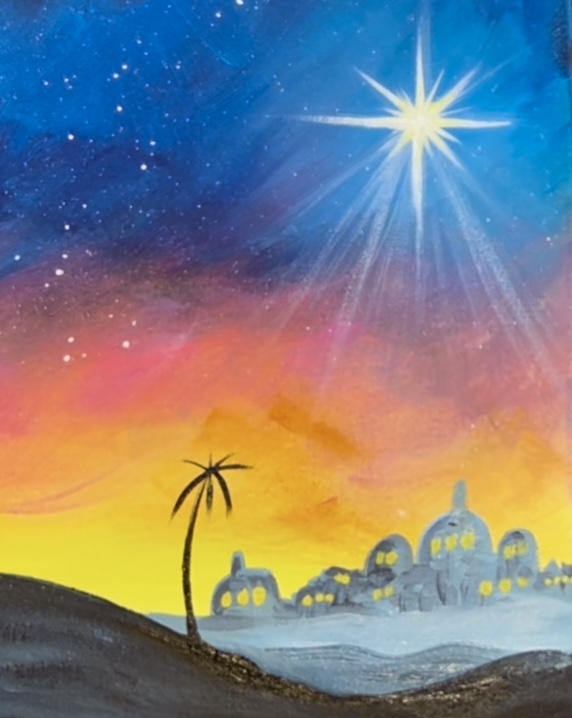
Then use the #8 long round brush to paint little palm fronds on each of the little lines that extend outwards from the top of the tree. Repeat this for the second palm tree.
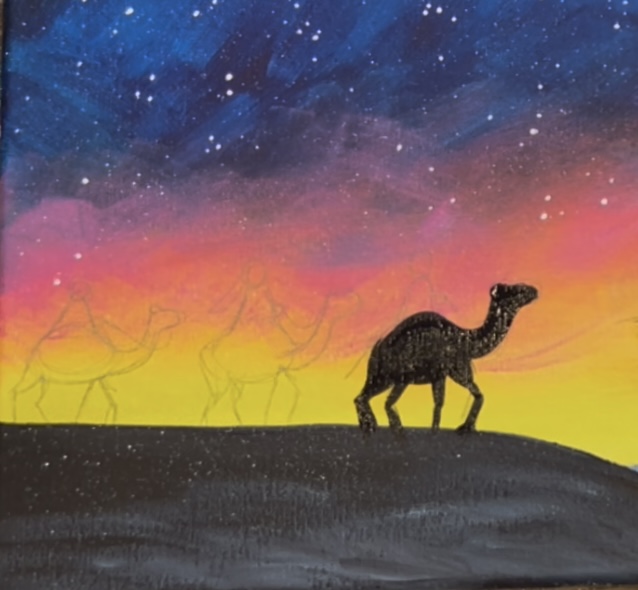
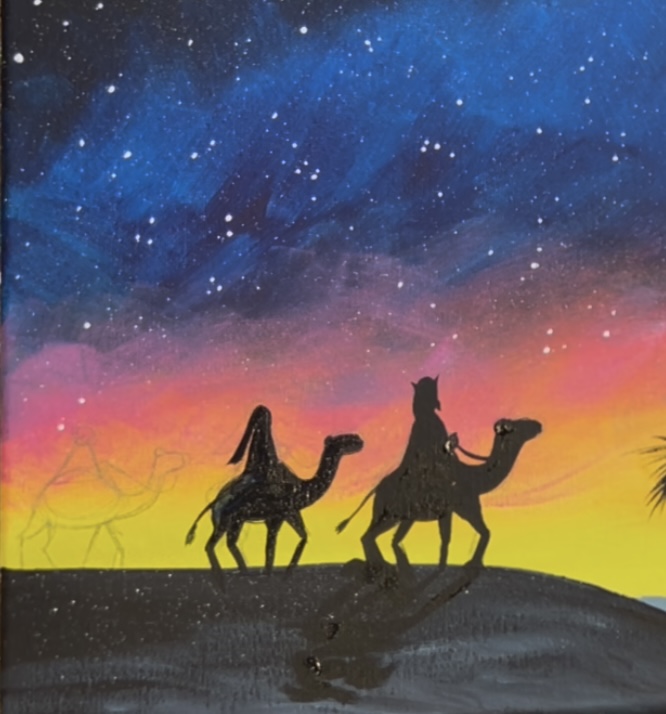
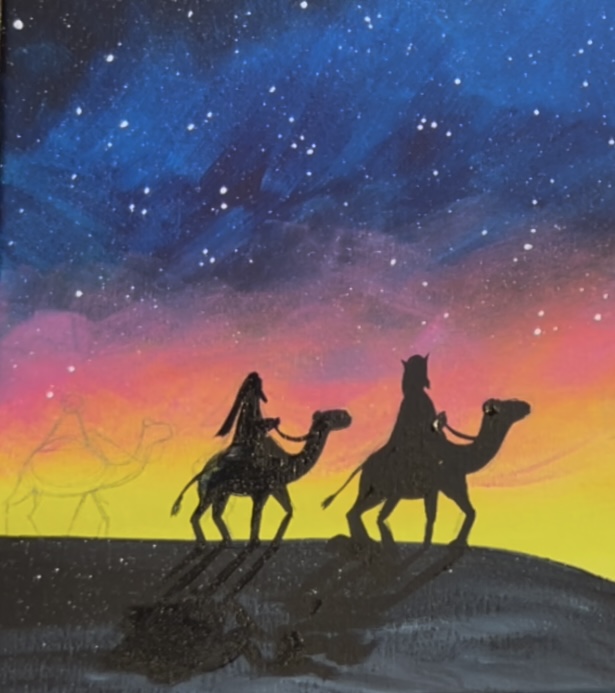
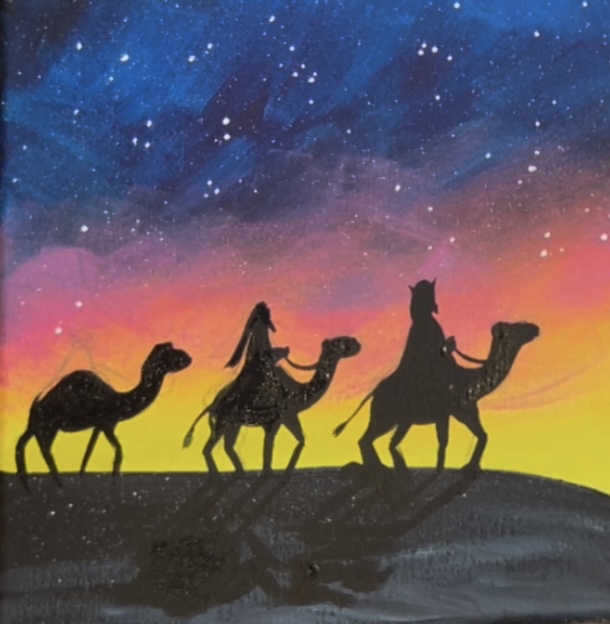
7. Draw & Paint Three Wisemen On Camels
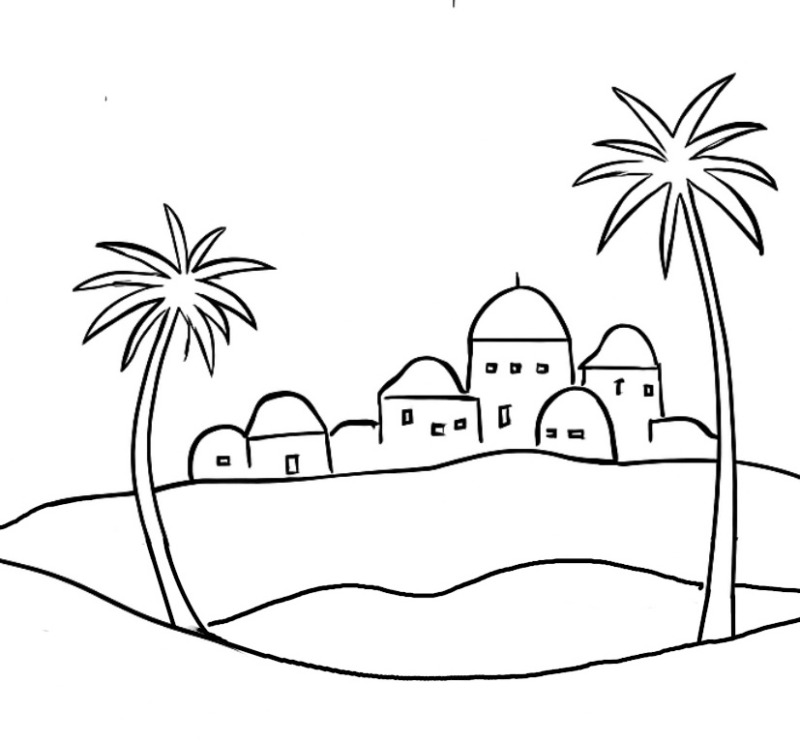
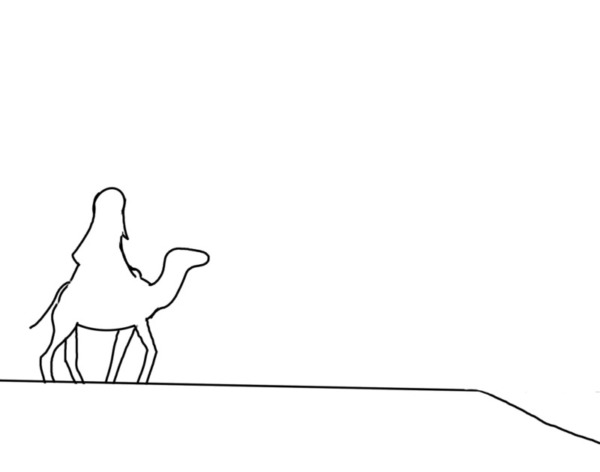
You can use the traceable template for this or hand draw! When I drew these, it was helpful to look at the silhouette template below. I’ll also give you steps for how to draw these. The camels and figures are broken down by simple shapes and lines and the legs can be drawn like “stick figures”. You can do a very basic sketch and then adjust when you paint the silhouettes.
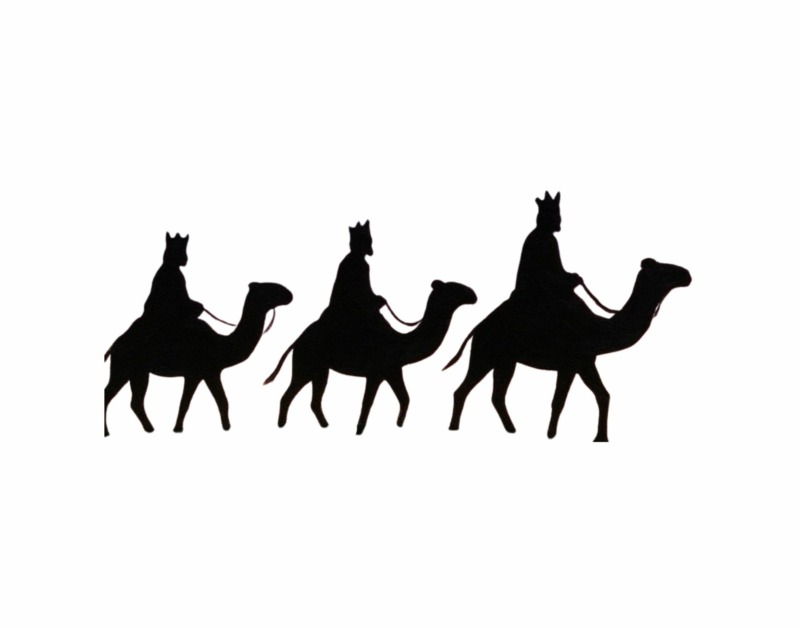
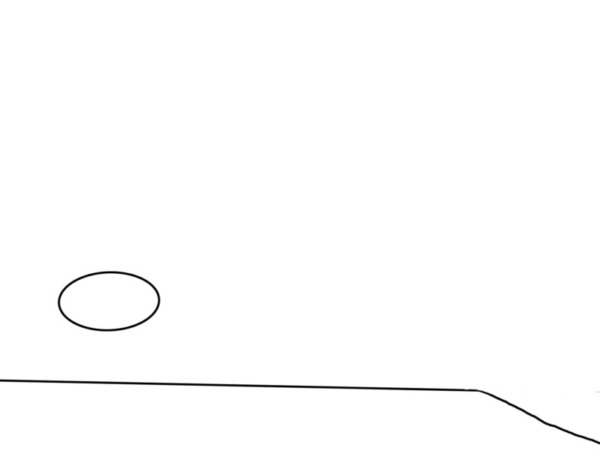
Start by drawing an oval for the camel’s body. Make sure there is enough spacing for three! My three camels/ kings were only about 2.5″ high and 2.5″ wide.
Draw the camel legs like sticks! Bend the front leg forward (the leg to the far right). The next two legs are drawn as sticks as well. The back leg was drawn as a shape.
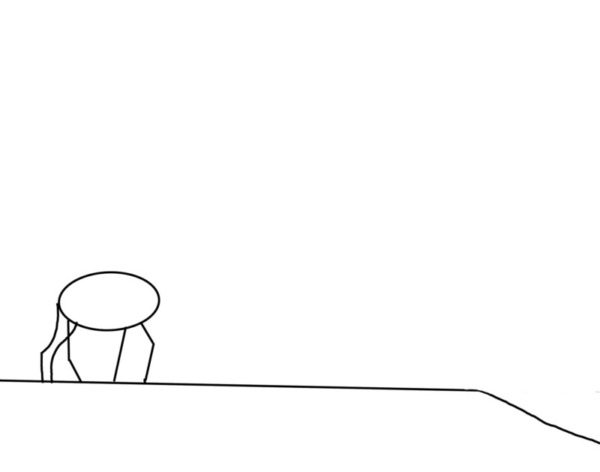
Then draw the camel’s neck and head. Draw a simple line for the tail.
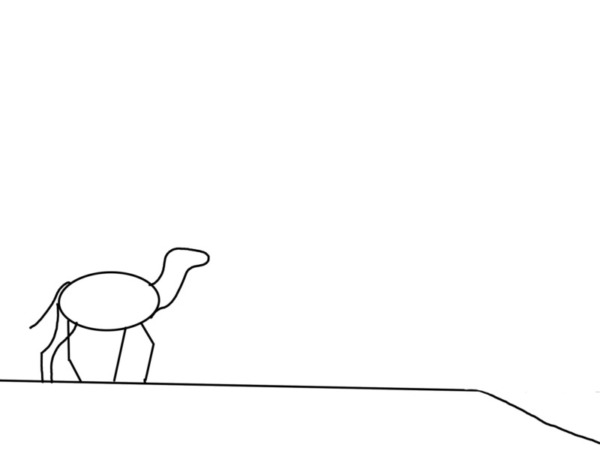
Turn the legs into shapes.
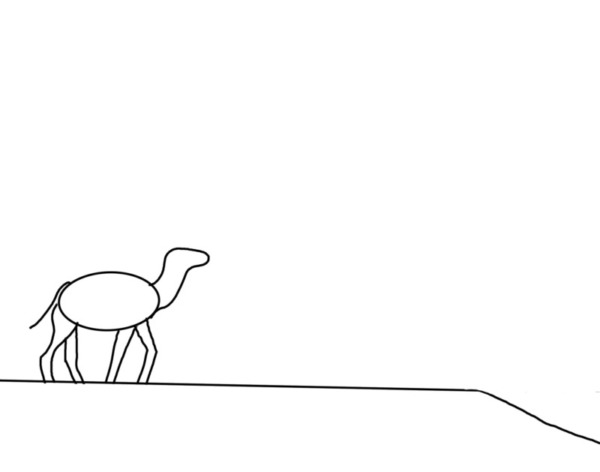
Draw the figure. The body can be a triangular shape with the widest portion on the bottom. The head can be a simple oval shape.
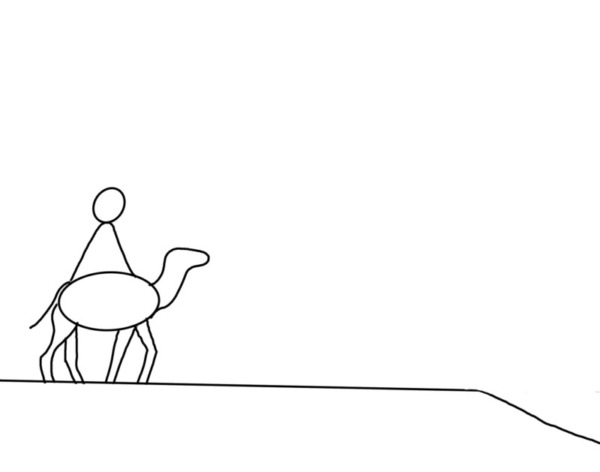
Then you can add more details to the figure such as head coverings, beard and hand. Keep in mine that these shapes will be painted solid black so we don’t need too many details.
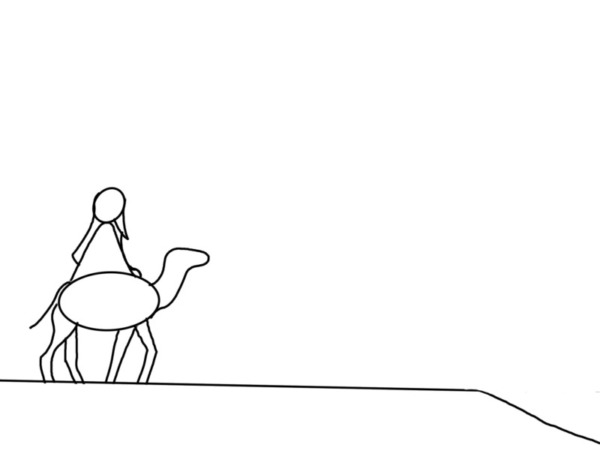
Erase unneeded lines.
Repeat this three more times.

It’s okay if your drawing looks sketch-like. I kept most of the camels’ legs as stick figure-like and did not add much detail to the wisemen.
Use a #4 round brush and “mars black” to paint the camels and three wisemen in. Take your time with this step and do this with short paint strokes. Silhouettes are also very forgiving. So if it doesn’t look “perfectly proportional” that’s okay! Pay close attention to the curves and angles of the lines of the camels. Note that camel legs should look thinner on the bottom and slightly thicker at the top. Also, since the camel’s bodies were drawn as “ovals”, I painted them in to show more of the hump. Pay particular attention to how the camel’s neck curves upwards.
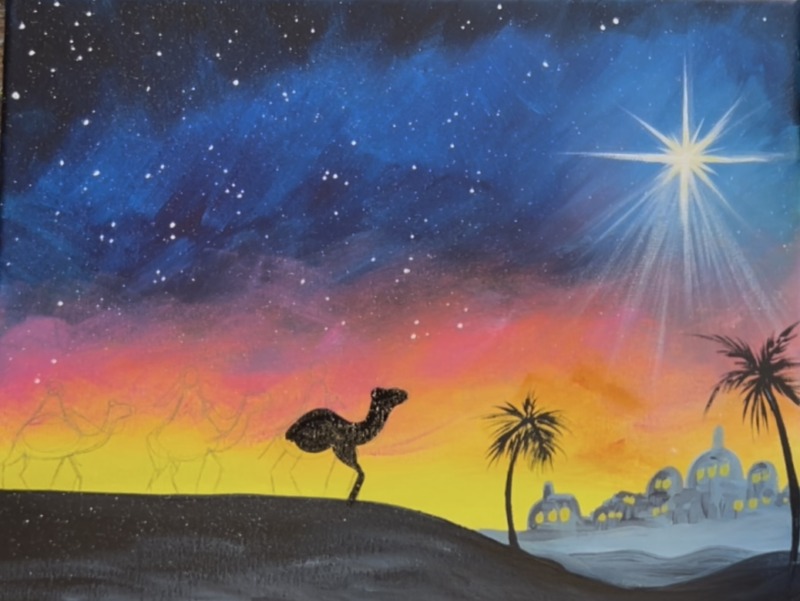
For some of the fine details, you can use the #8 long round brush or even a paint pen! Make sure to paint a tiny half circle on the upper left of the camel’s head for the ear and don’t forget the tail!
Slowly paint the figure on the camel as it was drawn. You can also paint a little hand and a thin line for the rope.
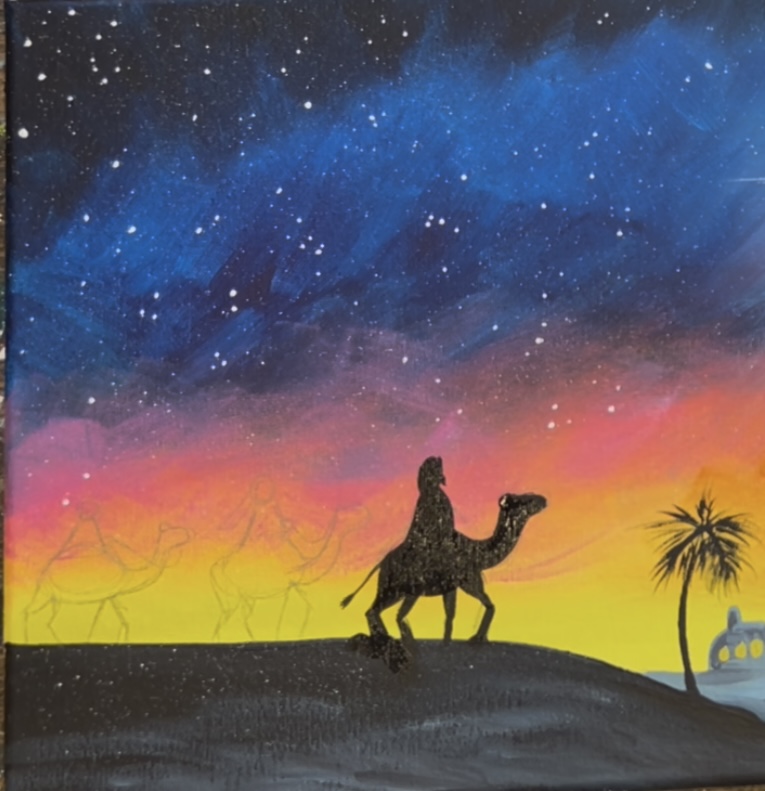
After you paint each of the figures, create shadow on the ground. Earlier, we dry brushed some lighter gray in this solid black area. You’ll be able to see shadow over this when painted over this area! Paint the shadows from the legs of the camels going diagonally. And then paint a “blob” abstract area for the rest of the body of the camel/wisemen.
Repeat this for each of the camels.
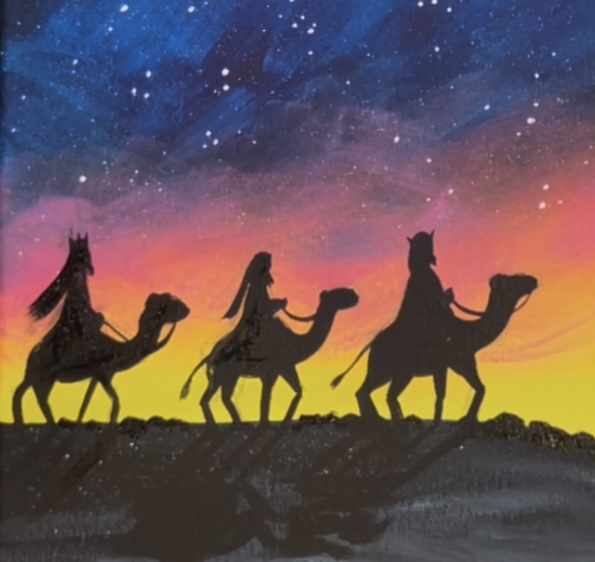
8. Add Highlights To Silhouettes
This really helps to make silhouettes “pop”! Mix a little bit of blue with white to make a light blue color. Use either the #4 round brush or the #8 long round brush to lightly paint right edging on the inside of the silhouette shadows. Contour these lines with the shapes of the figures. When you add these small curves on the shapes, this creates more depth to the shadows so they don’t look very flat.
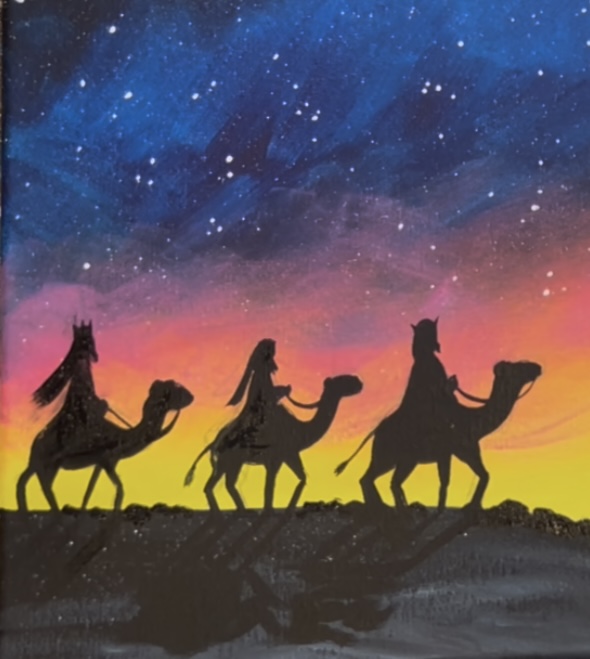
9. Final Touches
Some final touches for this painting can be: adding smaller pointed stars throughout the sky, adding thin white outlining on the town of Bethlehem (just along the edges of the shape) for an added “glow” and another bright white layer on the Christmas star.