
Would you like to save this?
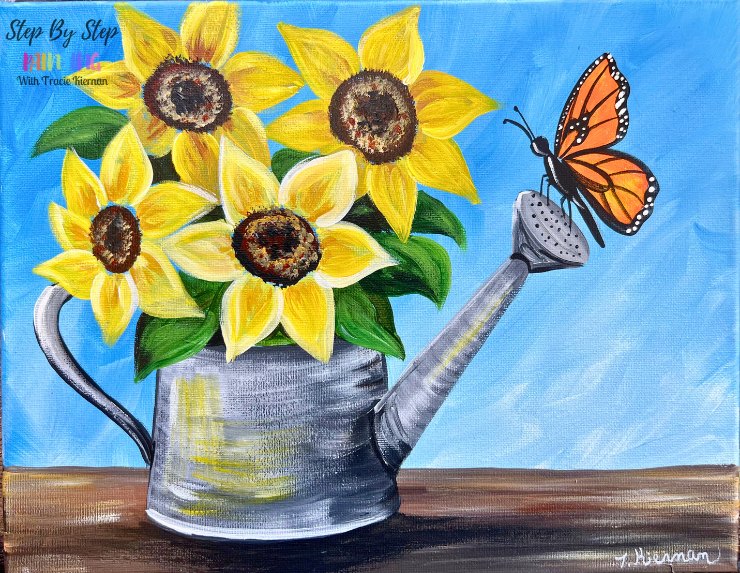
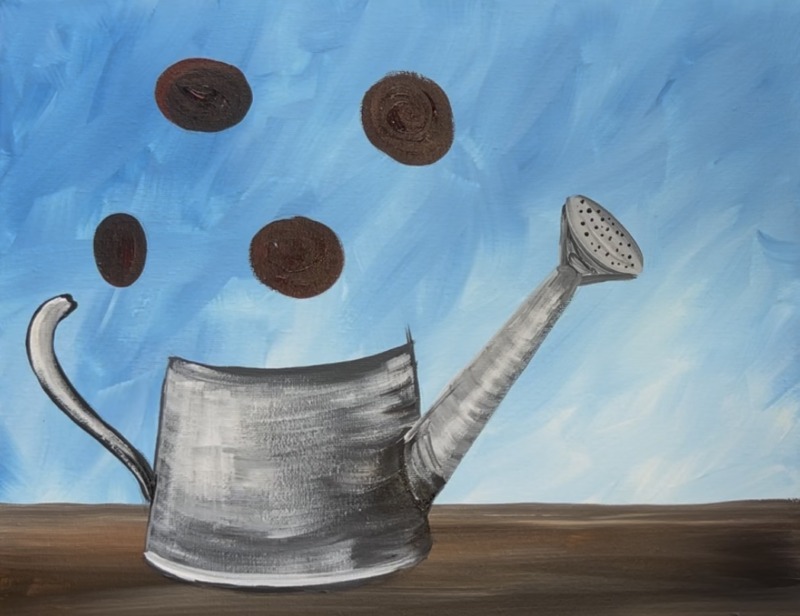
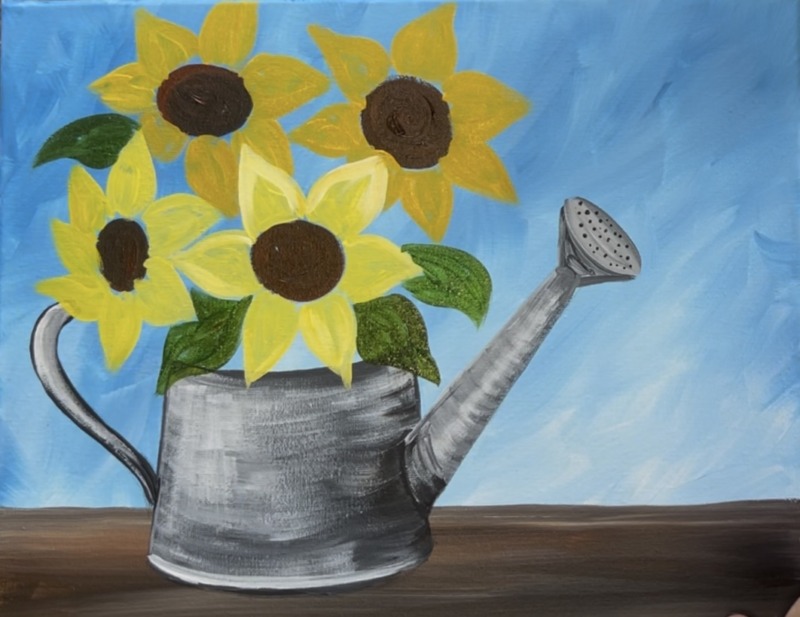
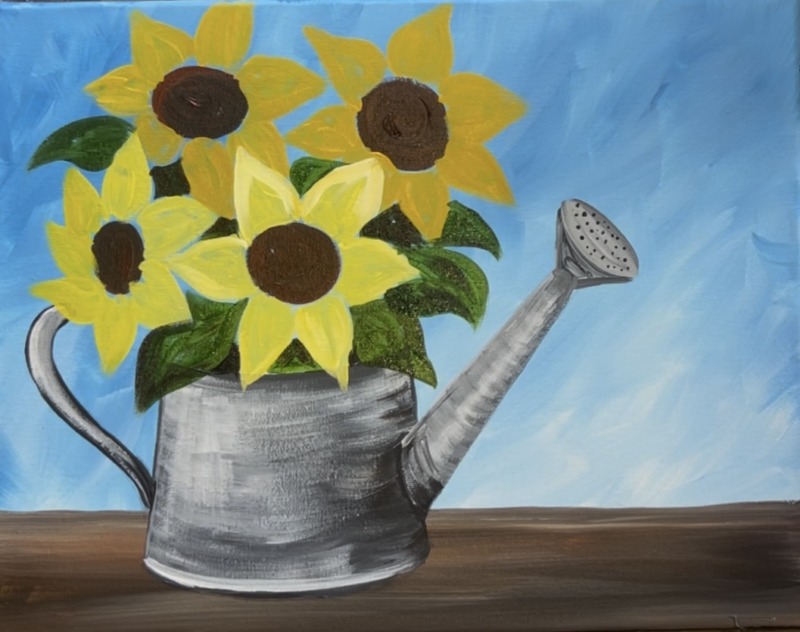
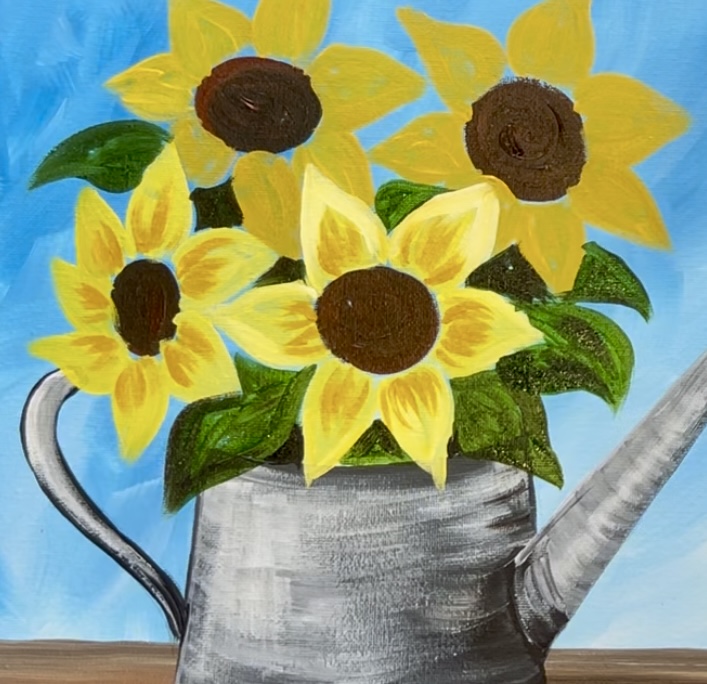
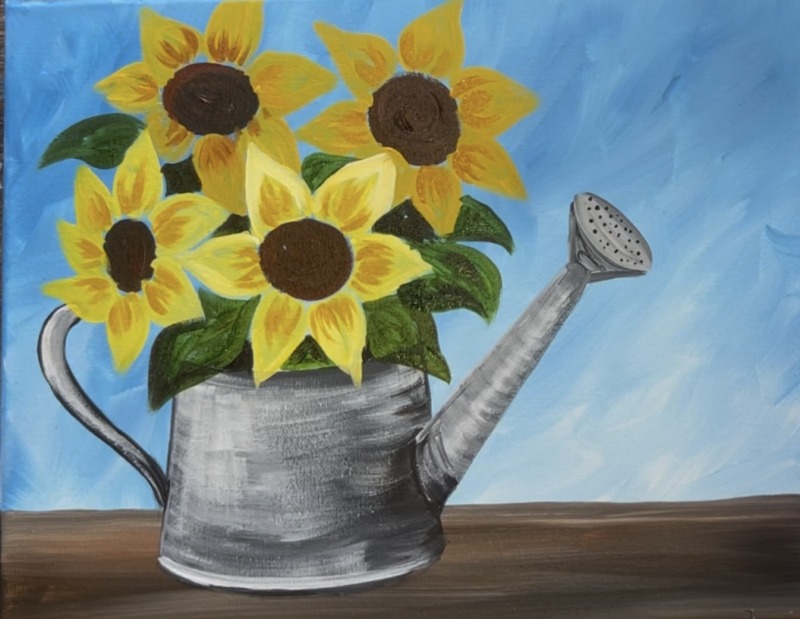
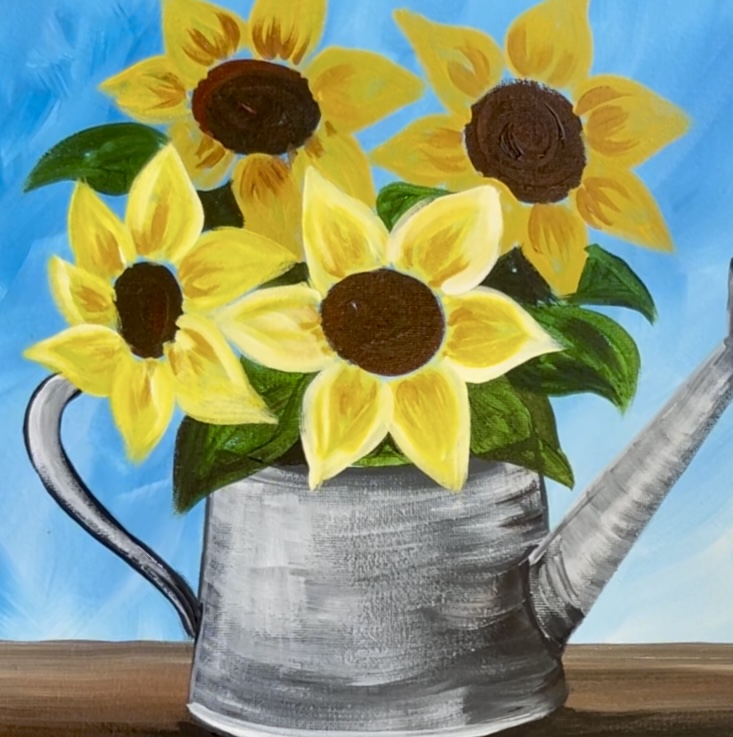
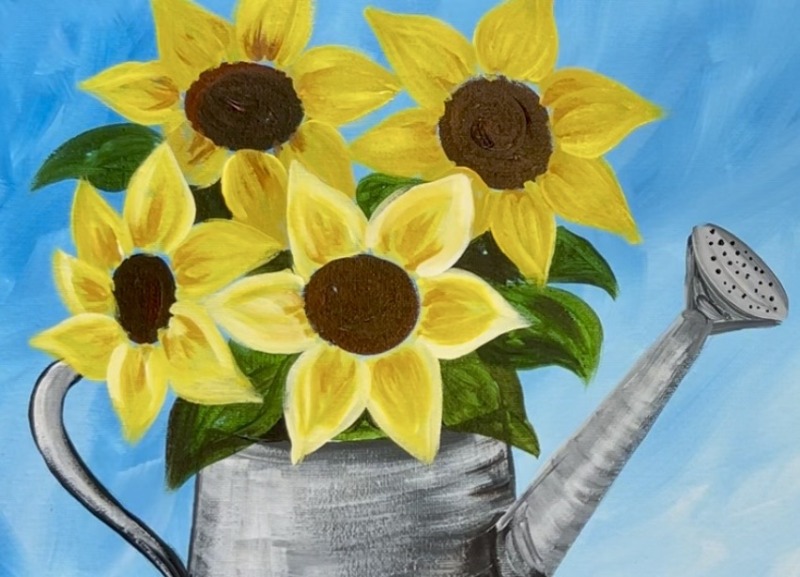
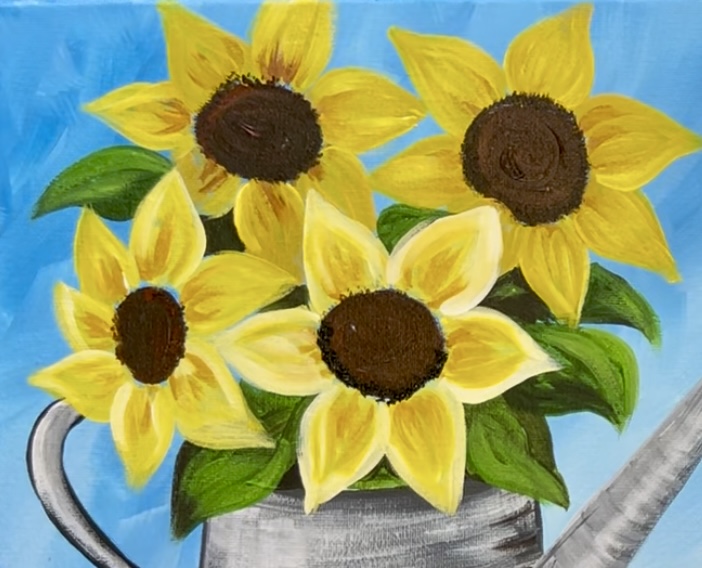
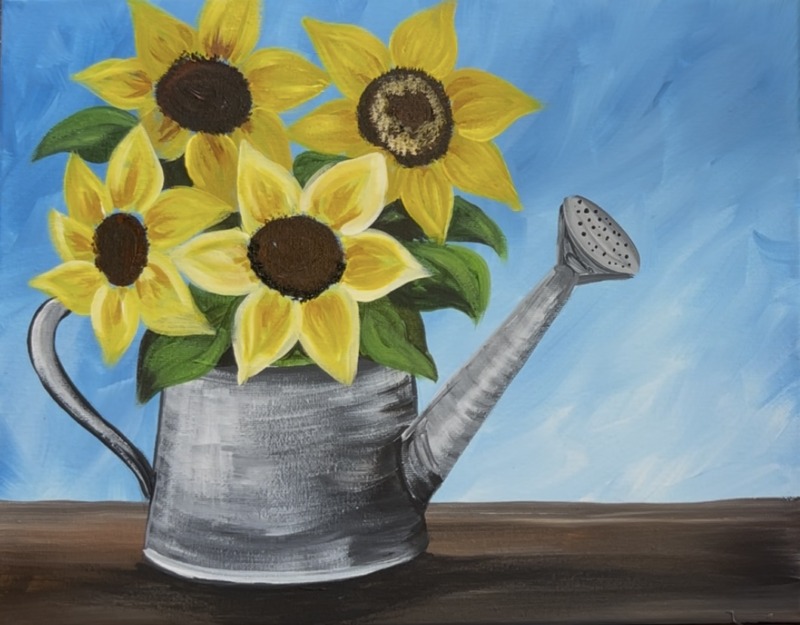
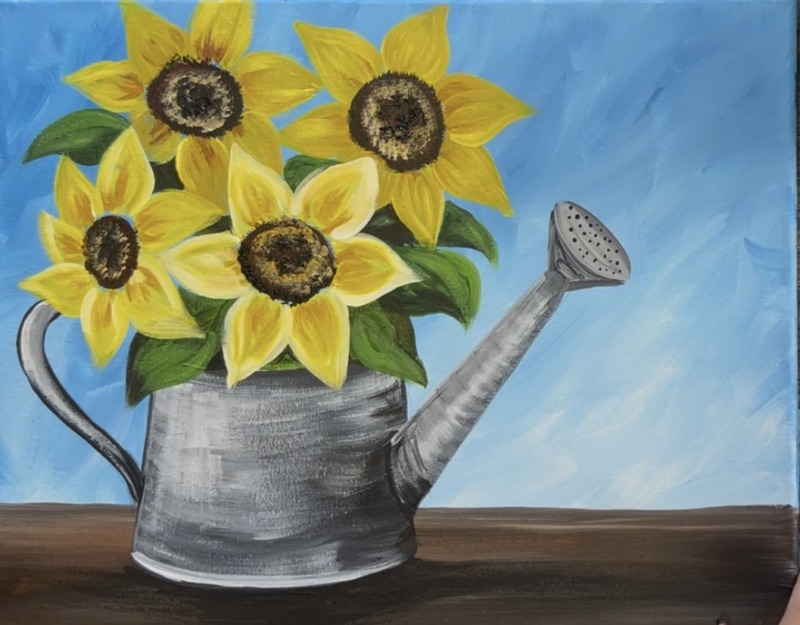
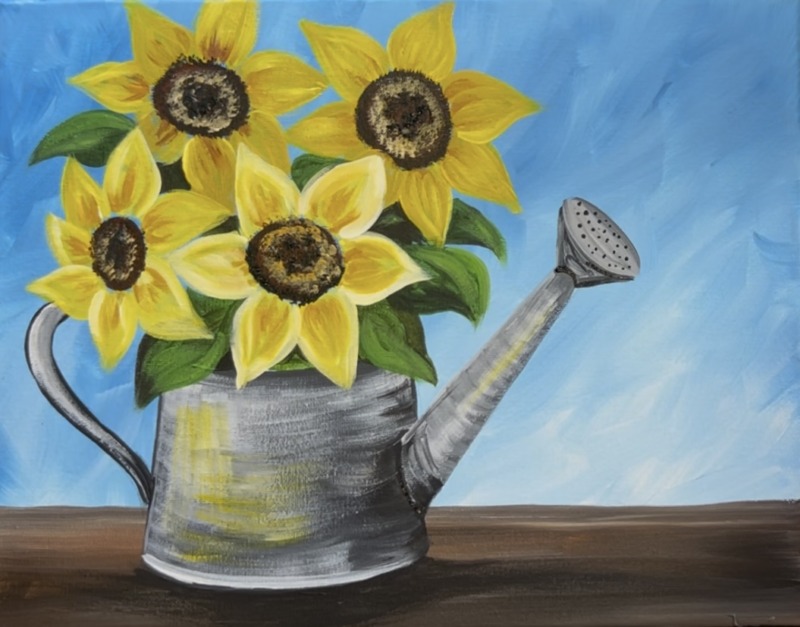
Transform your canvas with the beauty of a bouquet of sunflowers and a whimsical butterfly nestled on a watering can!
This tutorial includes a template for the watering can.
Enjoy and happy painting!
Materials Needed
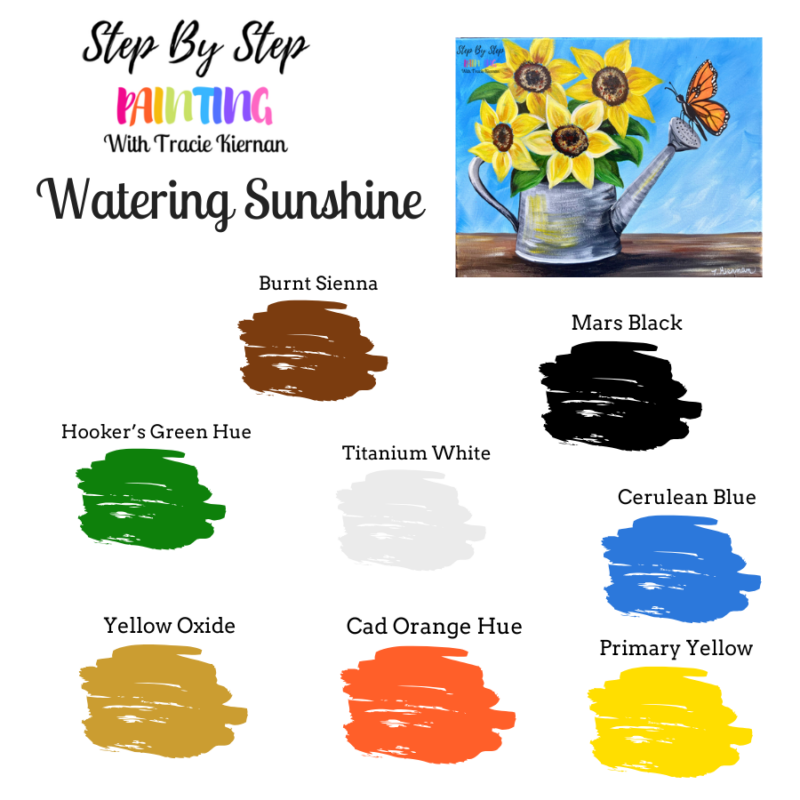
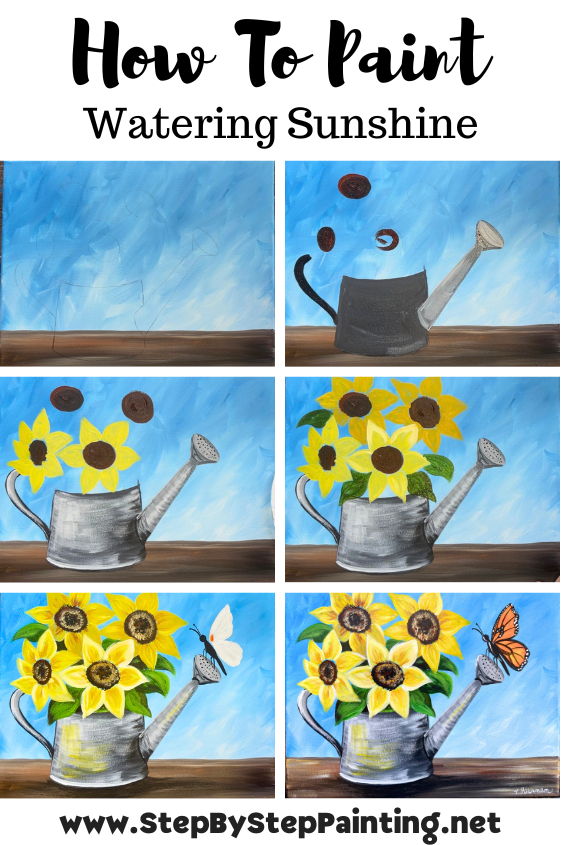
Watering Sunshine - Acrylic Tutorial

Brighten your day with a splash of color! 🌻✨ This whimsical painting of sunflowers and a butterfly in a watering can reminds us to embrace the beauty around us.
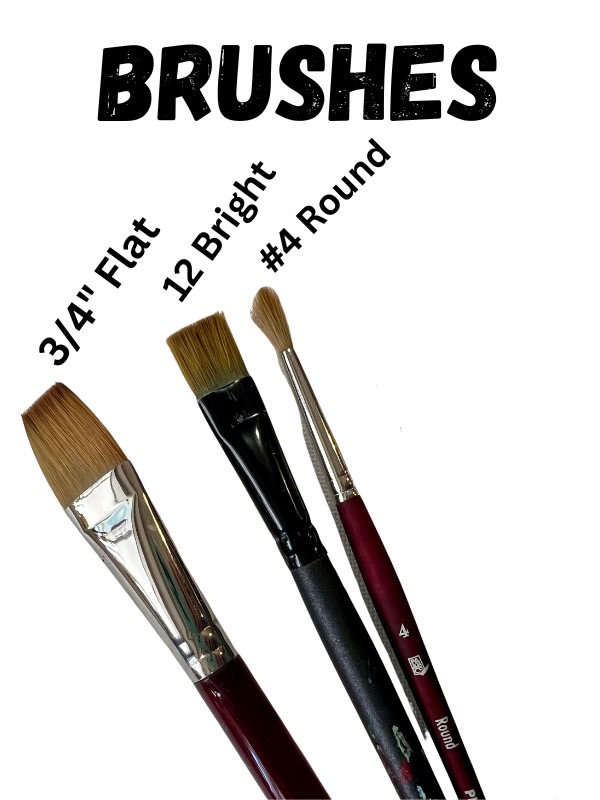
Materials
- 11 x 14 Canvas
- Acrylic Paint
- Brushes
- Traceable Template
- Graphite Paper
- Drawing Pencil
- Ruler
- Toothpick
Colors
- Titanium White
- Mars Black
- Cadmium Orange Hue
- Primary Yellow
- Hooker's Green Hue
- Cerulean Blue
- Burnt Sienna
- Yellow Oxide
Brushes
How To Download This Tutorial:
You can purchase this as a download in my PDF shop. Learn more here!
Color Palette
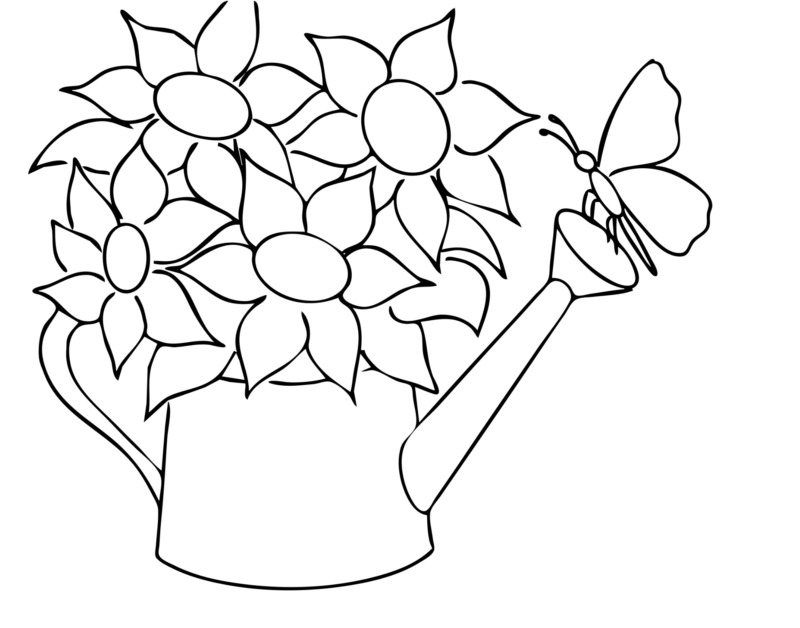
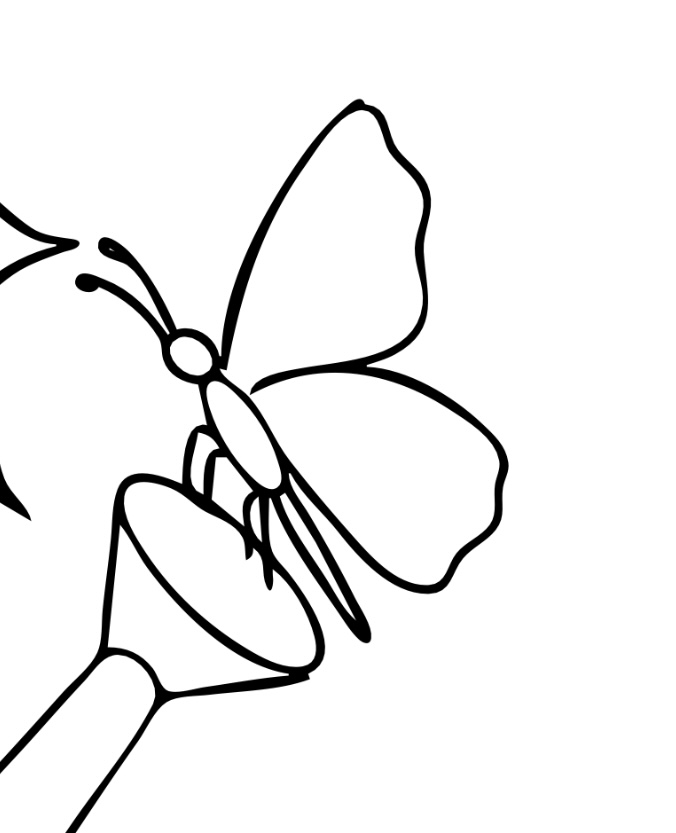
Traceable

Here is a full traceable if you need help with the petals and butterfly:
Directions At A Glance
Video
Step By Step Instructions
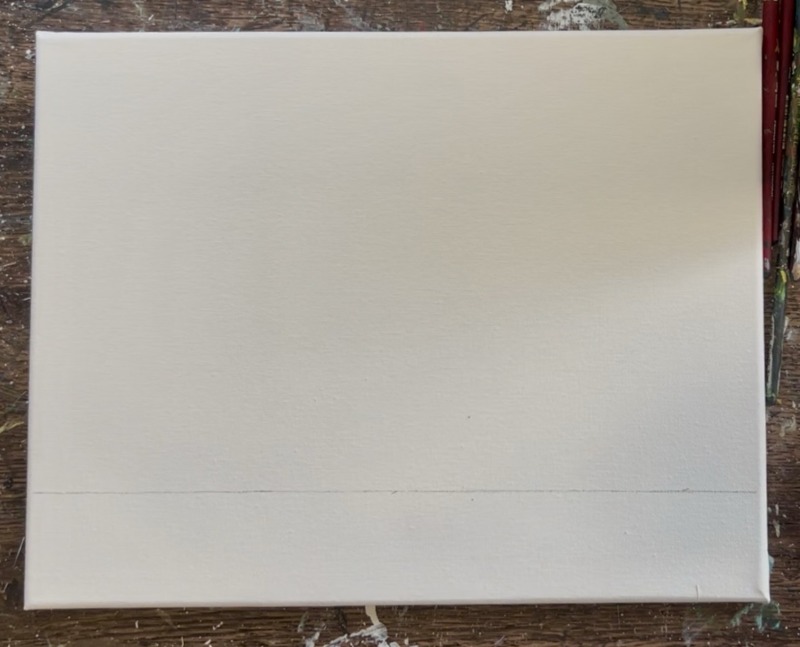
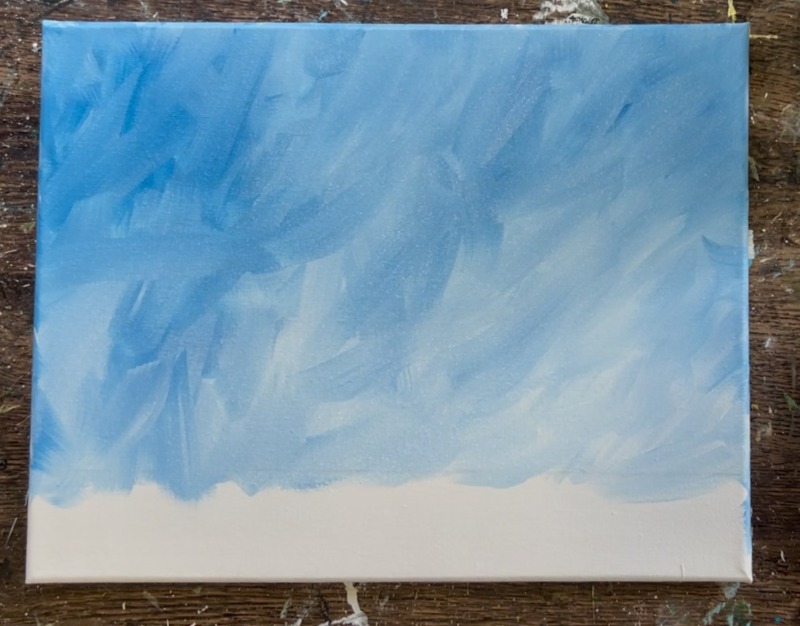
1. Paint Sky & Table
Position your canvas horizontally. Measure about 2″ from the bottom of the canvas and draw a horizontal line with a pencil and ruler.
Load your paint palette with “cerulean blue” and “titanium white”. Use your 3/4″ flat wash brush and load it into both of the colors “blue and white”. Start at the top of your canvas and paint big expressive paints strokes that blend the blue and white together. Paint full width paint strokes that go all angles and cross each other.
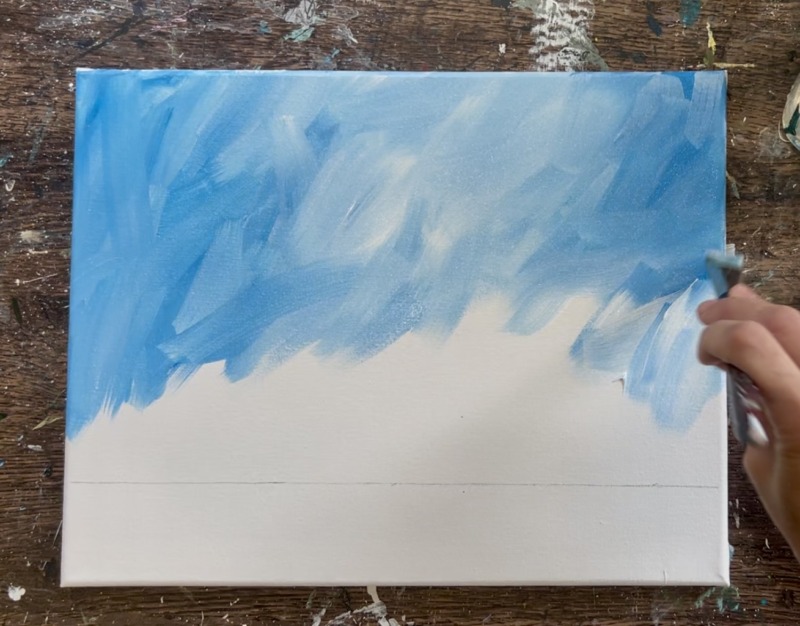
This is more of a textured background with brush strokes showing. You don’t need to blend the color all the way. In fact, it’s going to look more interesting if you have a variation of this blue in the background.
Try to make the sky just slightly darker on the top and lighter on the bottom towards your horizontal line. Do this by adding more blue at the top and more white on the bottom.
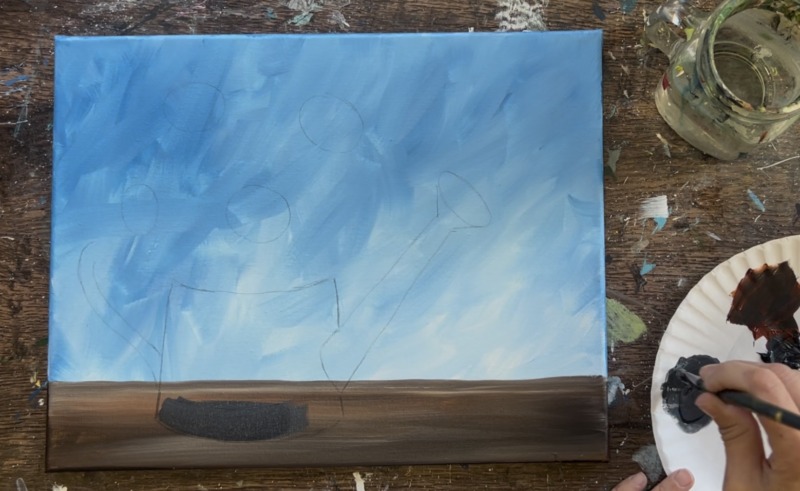
You don’t need to wait for this to dry before going onto the next step. Load your paint palette with the two colors: burnt Sienna, mars black. Also, add a little more titanium white to your palette.
Use the 3/4 flat wash brush. Double load it into the brown and the black (about equal amounts). Paint left and right strokes to start filling in the table area.
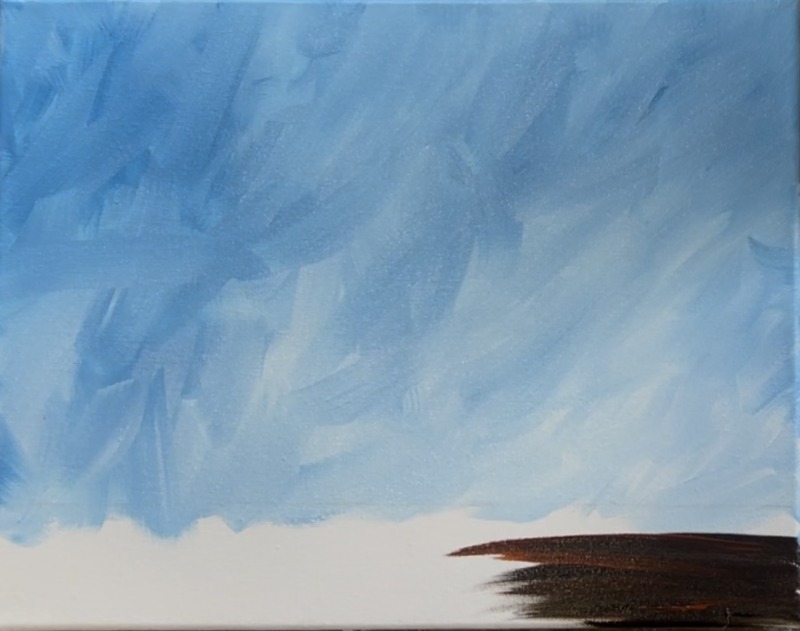
As you fill the table area in, add little bits of white to the brush as well to create some different color variation streaks in the wood table. Paint all of the table with left and right paint strokes and fill in the entire table area up to the horizontal line that you drew.
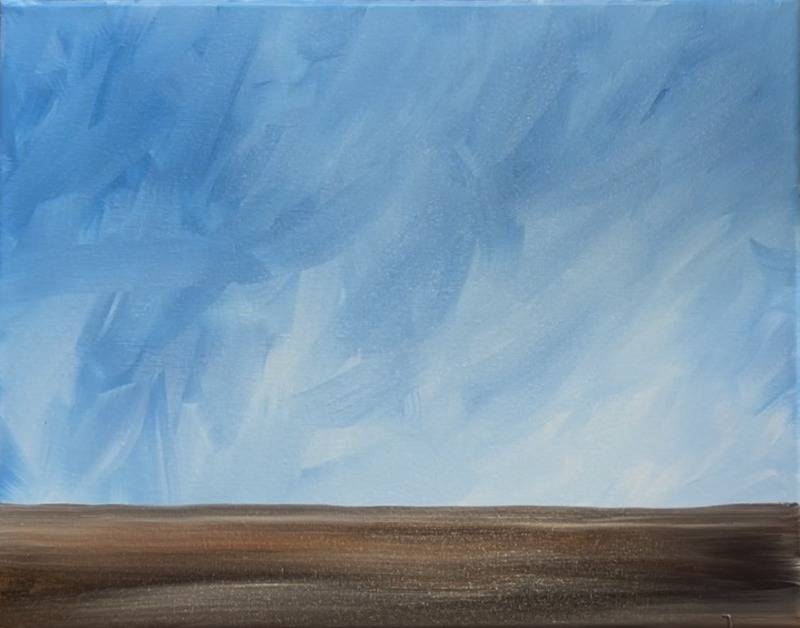
Wait for this to dry before going onto the next step.
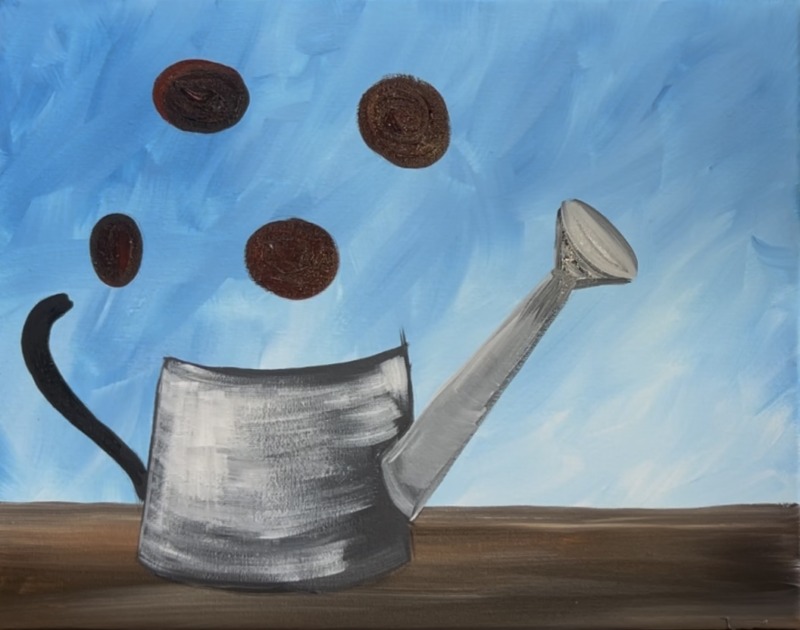
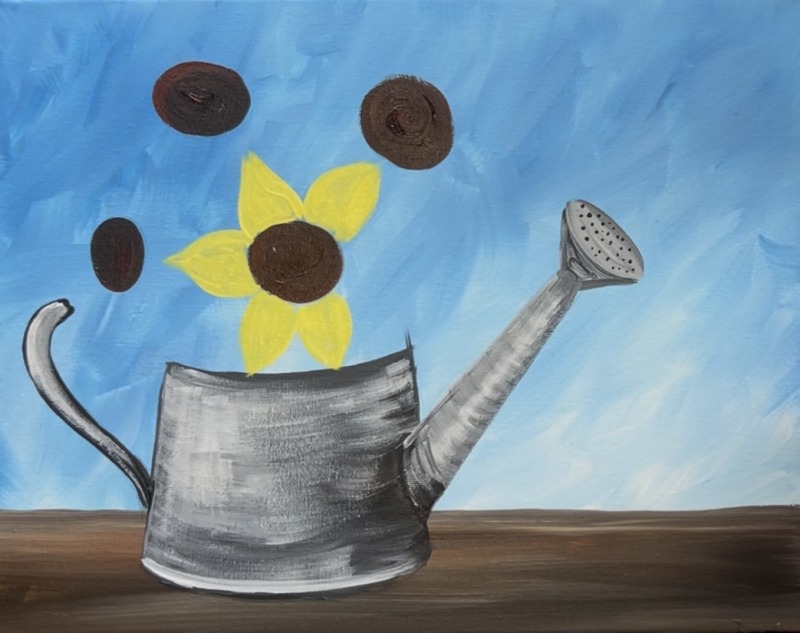
2. Trace/ Transfer Watering Can & Sunflower Circles
Print the template on two papers and tape together. Place a sheet of graphite paper under the template and above the canvas. Position the watering can so that the line is align with the table line (or close to it). Your line may not line up exactly and that is okay!
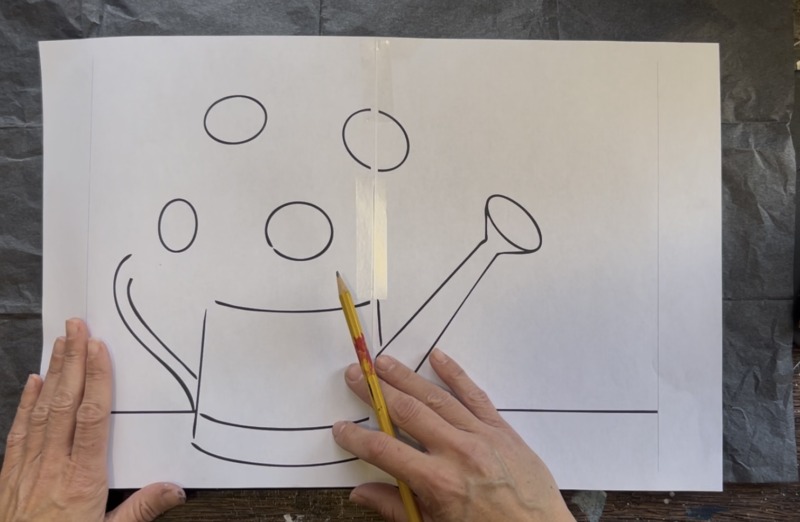
Trace all of the lines. If you are tracing over an area that is darker (such as over the table area) go over your lines multiple times so that it shows up.
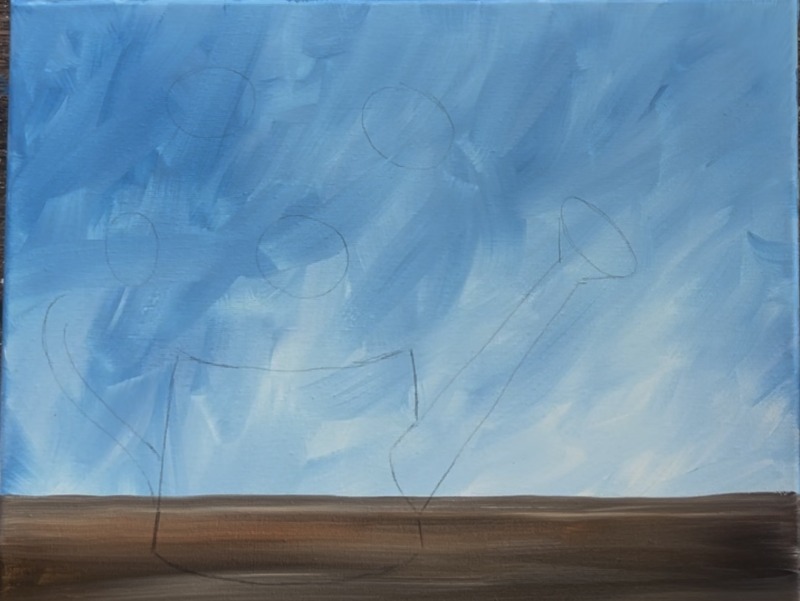
After you are done tracing, lift the template to reveal the watering can drawing.
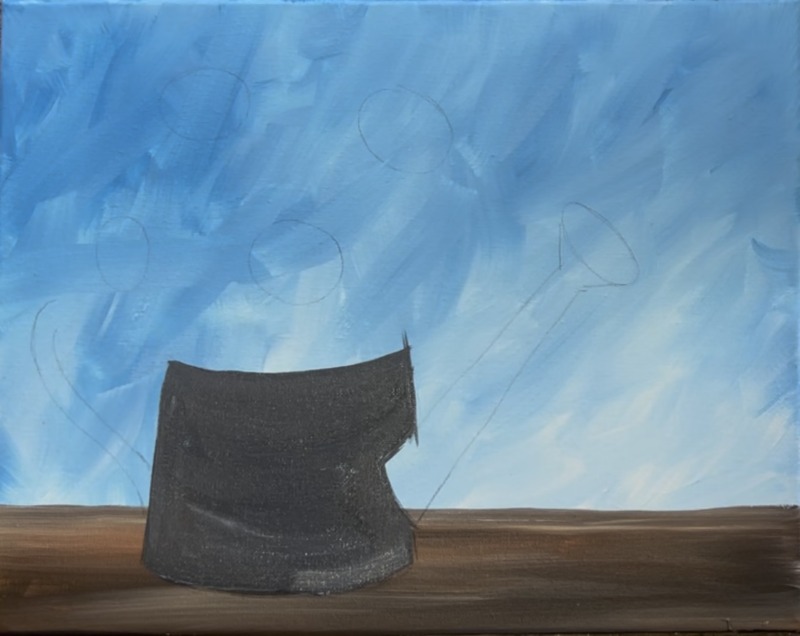
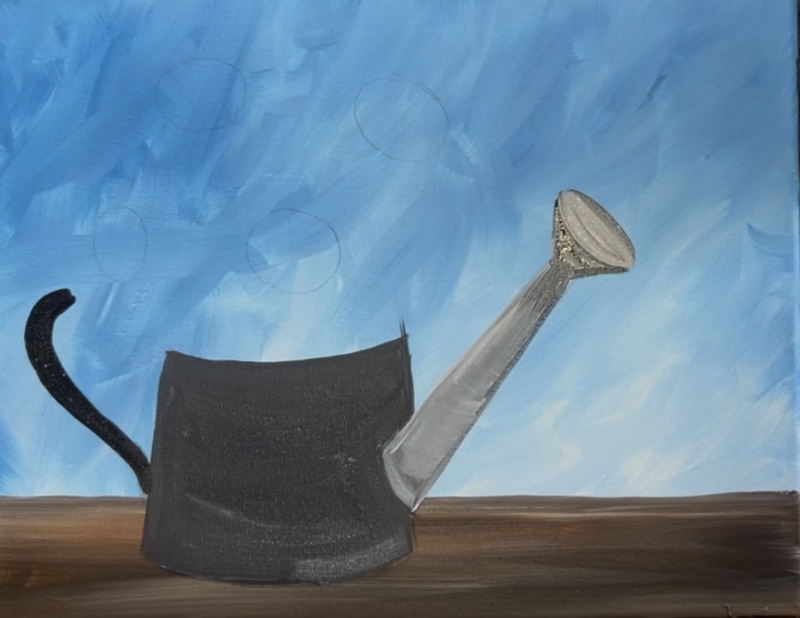
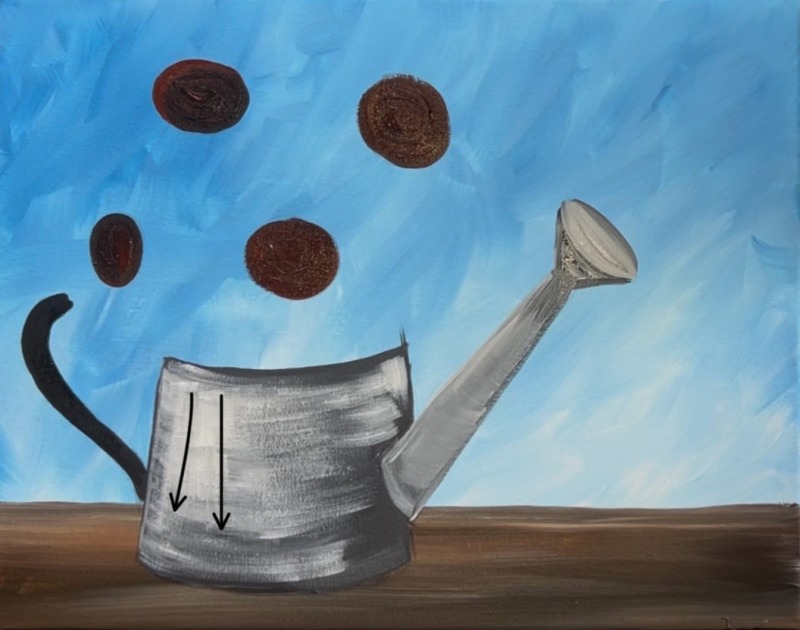
3. Paint Watering Can Foundation
Load your paint palette with “mars black”, “titanium white” and “cerulean blue”. Make a dark blue-gray color by mixing black and white together (about equal parts) and add a little bit of blue into it.
Use the #12 bright brush to paint the container of the watering can. Use the full width of the brush and paint curved directions to fill the can shape. You can use the end of the brush to outline and “cut-in” the shape.
Then mix a lighter gray on your palette by taking that same dark gray you just used and adding white to it. Use the #4 round brush to paint the spout and the spout opening. Add just a little bit more white to the top oval part of the spout opening (where the holes will be). This will make that part stand out more if you paint that lighter.
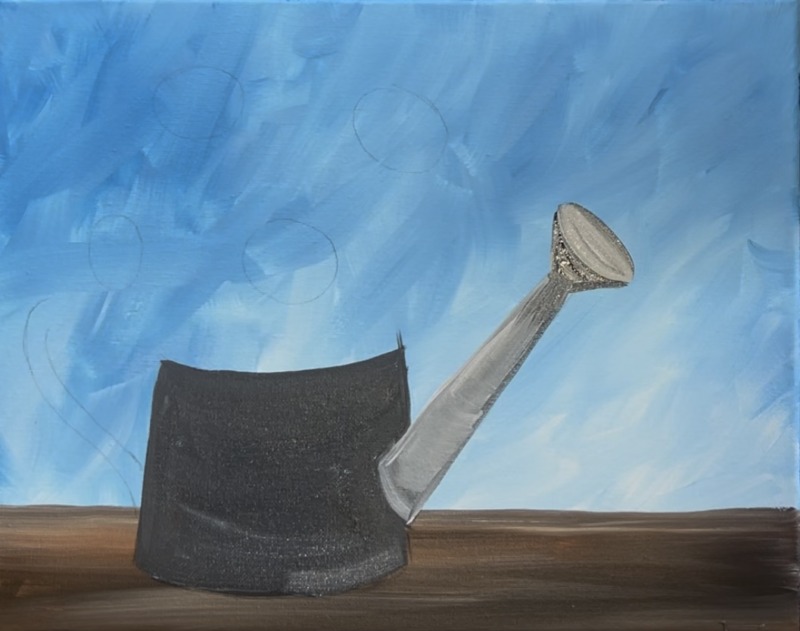
Then paint the handle of the watering can dark gray (darker than the color of the container). You can also just paint the handle black. Use the #4 round brush for the handle as well.
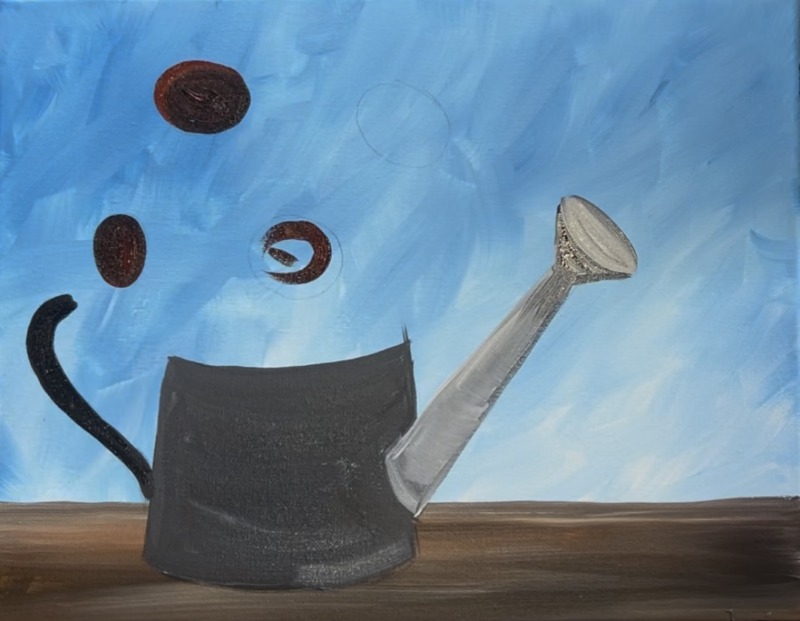
4. Paint Sunflower Circles
Use the #4 round brush. Mix “burnt Sienna” and “mars black” together. Paint each of the circles for the centers of the sunflowers.
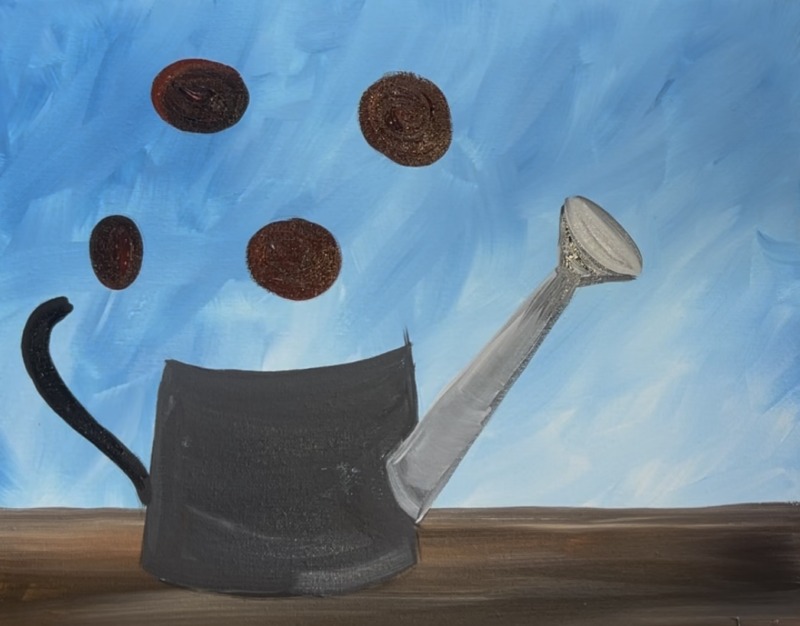
5. Dry Brush Highlights On Watering Can
Make sure the container is dry before doing this step. Use the #12 bright brush and mix a light gray on your palette (the same light gray as the spout). Load the brush into the light gray but wipe off some of the color of the brush.
Then “dry brush” paint strokes going over the darker gray. Do this in a curved direction and paint it very lightly so as to not cover all of the dark gray. You are “glazing over it”.
Paint a few light gray dry brush paint strokes that go in a vertical direction on the container. This gives the watering can some more highlights.
Use either the round brush or the 12 bright brush to highlight the spout of the watering can. Do this with the same light gray color and dry brush white in the center of the spout.
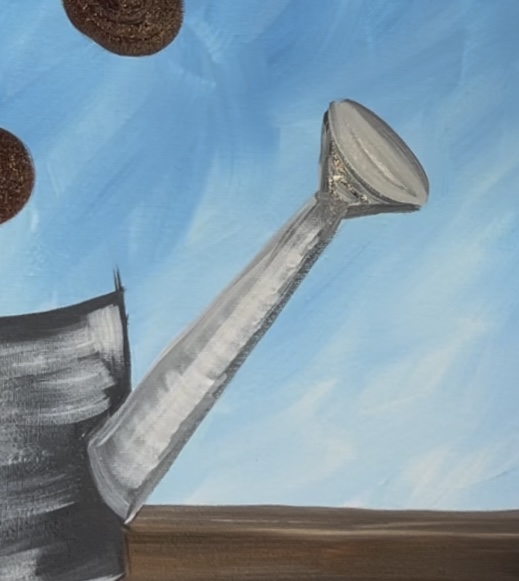
Then paint in curved directions to give the spout more form. I added a little more medium gray color on the edges and curved those paint strokes inwards towards the lighter color center.

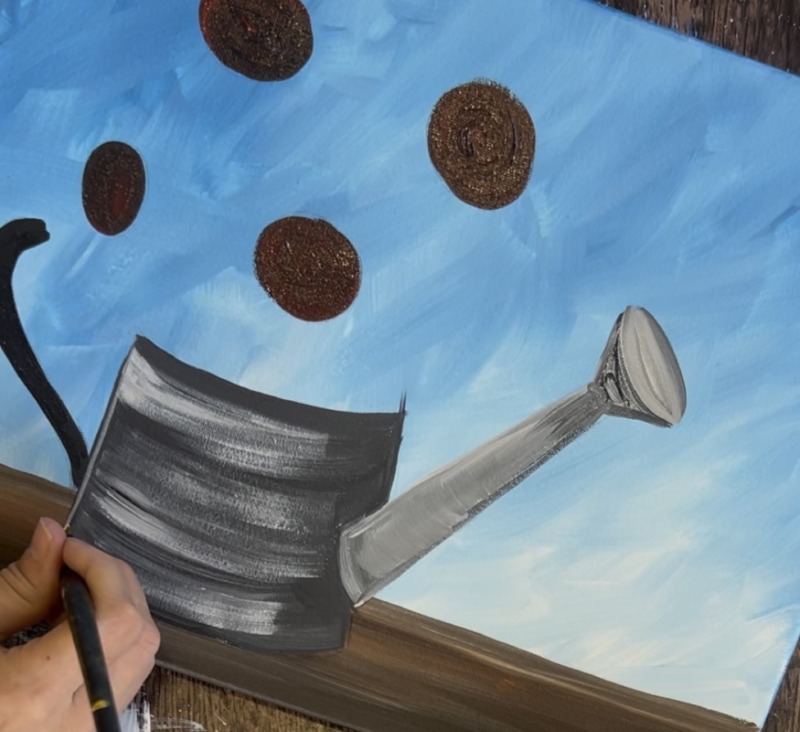
6. Use Toothpick to Paint Dots On Spout Opening
Use a regular pointed toothpick for this step! Dip the toothpick into black paint and paint little dots on the end of the spout opening for the holes.

Then take the #4 round brush and add a light gray highlight in the center of the watering can handle. Leave the edges of it dark.
7. Paint Sunflower Petals (first layer)
Load your palette with “primary yellow”. Mix about equal parts yellow and white together. Then use the #4 round brush to paint petals for the lower sunflower in the middle. Paint the shape of each of the petals and then fill them in with solid yellow-white.
Then paint the next sunflower to the left of this one. This time the petals are going a little different. Paint them in a way so they do not exactly touch the petals of the sunflower on the right. Also, make the petals on the left side of this flower shorter and going more at an angle. This is because this flower is more on its side than the frontal flower we just painted. Feel free to make petals overlap the watering can handle and container portion.
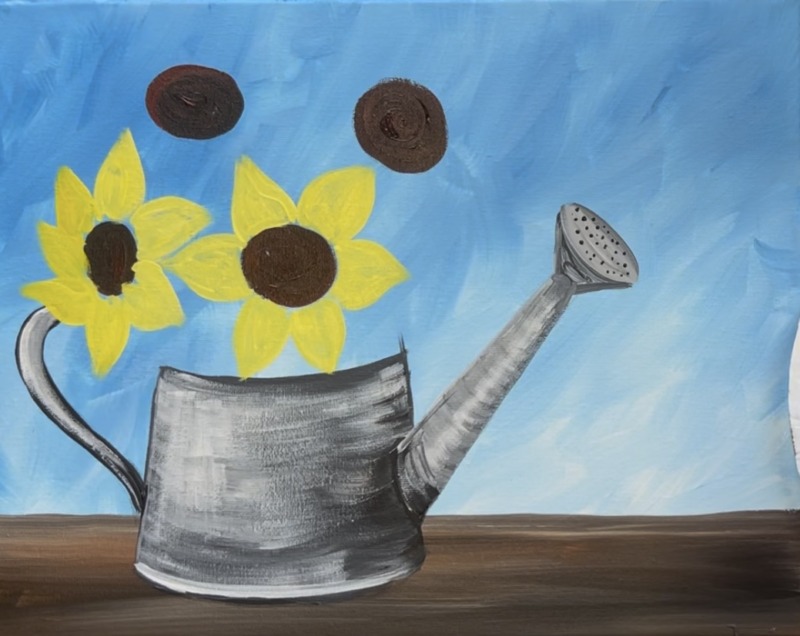
Next, load your palette with the color “yellow oxide”. Use the #4 round brush to paint this next flower. Since this one is in the back, it will be painted darker. Paint it as a frontal view sunflower with full petals of similar sizes. If a petal is in the back of the lower sunflower, paint on the part of the petal that is visible.
Repeat this for the sunflower on the left. Paint petals that are visible. Several go behind the lower two sunflower petals.
We will layer on more color to these sunflowers when this layer dries. This is just the base for our petals.
8. Paint Leaves (first layer)
Load your paint palette with “hooker’s green hue”. Use the #4 round brush to paint leaves. Paint leaves that are similar in shape to the sunflower petals. You can paint them larger if you want. Make them pointed downwards. Feel free to overlap parts of the watering can and fill up blue sky gaps that are visible between the sunflowers.
Use Mars black and green mixed together to fill more of the gaps between floors and also the gap at the top of the watering can. Simply fill that negative space in with this very dark green color.
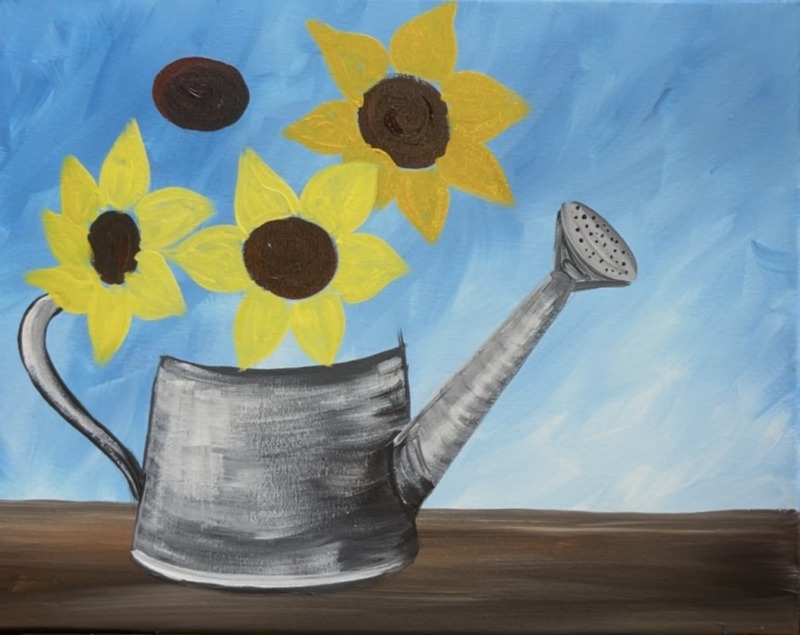
9. Paint Dark Lines on Bottoms Of Sunflower Petals
Use the #4 round brush and “yellow oxide” to paint little curved lines on the bottom base of each of the sunflower petals and drag these lines about halfway up the petals.
Then repeat this for the back petals. Since these petals are already “yellow oxide”, make a darker color that will show up. Mix a little “burnt sienna” into the “yellow oxide” and then paint these same curved lines on the base of each of the petals.
10. Add second coat of yellow to entire petal/ outline edges
Next we will add a second coat of paint to all of our sunflower petals while also outlining the petals to make sure they are overlapping where they need to be overlapping (such as if any of the green leaves went over the petals when you were painting leaves). Adding more yellow layers will make the sunflowers brighter.
Start with the bottom two sunflowers. Mix yellow and white together. Use the #4 round brush to outline edges of petals to really define the shape of each of the petals. Then use just “primary yellow” (you can wipe brush off and load into just yellow). Lightly dry brush yellow over the entire petal but don’t cover all of your dark lines you painted on the bottoms of the petals. It should still show through this layer of paint.
Repeat this for the back flowers but do not add white to the brush. Use yellow to outline edges of petals and then lightly brush over the rest of the petals with yellow without covering all of your dark layer on the bottoms of the petals.
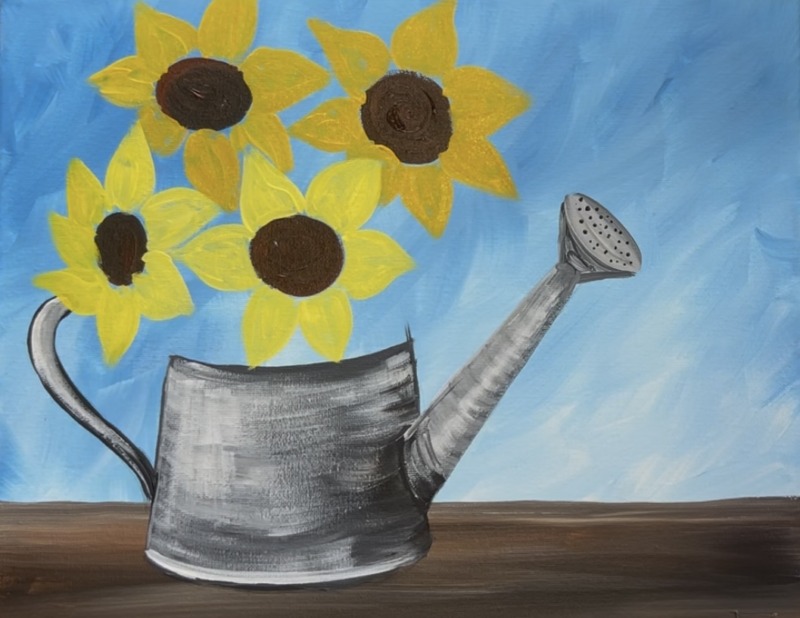
11. Paint Light Green Layer On Leaves
Mix “hooker’s green hue” with “primary yellow” and some “titanium white”. Use the #4 round brush to paint a layer of light green over the sunflower leaves. I chose to lightly paint over parts of the leaves but not cover all of the darker areas. This gives the leaves highlight and makes them stand out a little better.
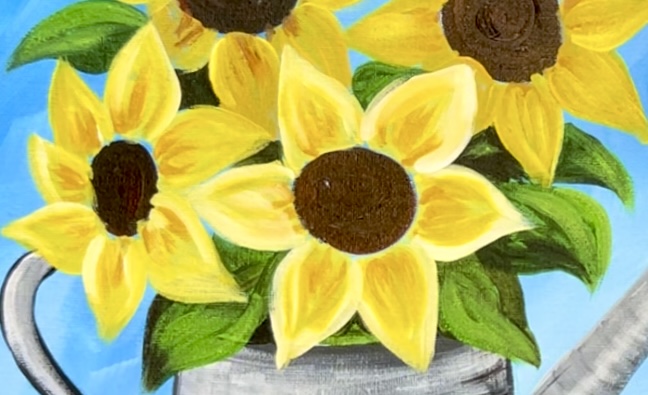
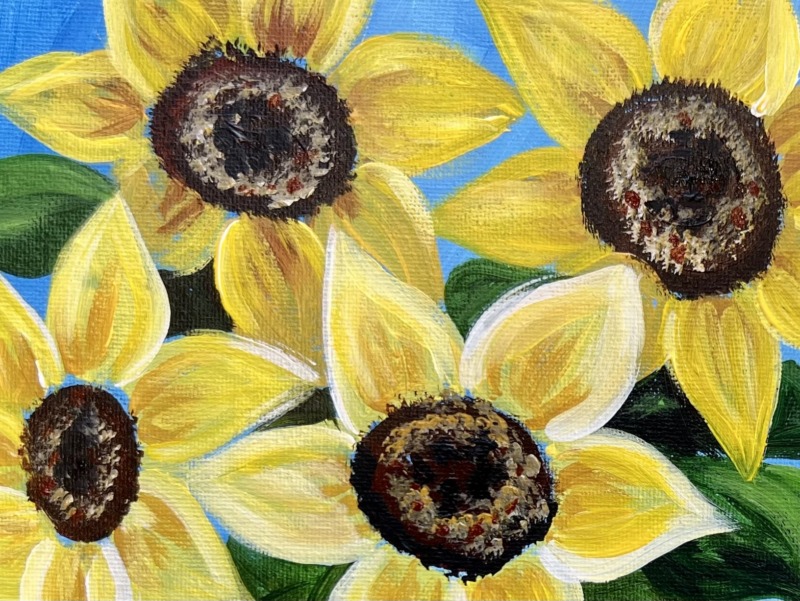
12. Paint Texture On Sunflower Centers
Use a round brush to “stipple” the texture in the centers of the sunflowers. To “stipple” means to stamp or dot the brush to create texture in your paint strokes. You can also do this with a sponge or a “bristle brush”.
Start with “mars black” mixed with “burnt sienna”. Use the end of your round brush to stamp texture along the circumference of each of the sunflower circles. It’s okay if you go outside the line and overlap parts of the bottom of the petals.
Then, without rinsing the brush, add “yellow oxide” and “titanium white” to your brush. If you want, you can mix this lighter color on the palette a bit or have it mix on the canvas. Stamp texture a ring on the inside of each of the sunflower circles. This ring can look “imperfect” and you can vary the color a bit by adding some darker and lighter colors on it. Leave the very center of the sunflower dark.
After painting a light color “ring” on the inside of each of the sunflowers, load just “mars black” on your brush. Stipple texture in the center circle of each of the sunflowers to create a dark circle in the center.
Close up of texture in the center of the sunflowers.
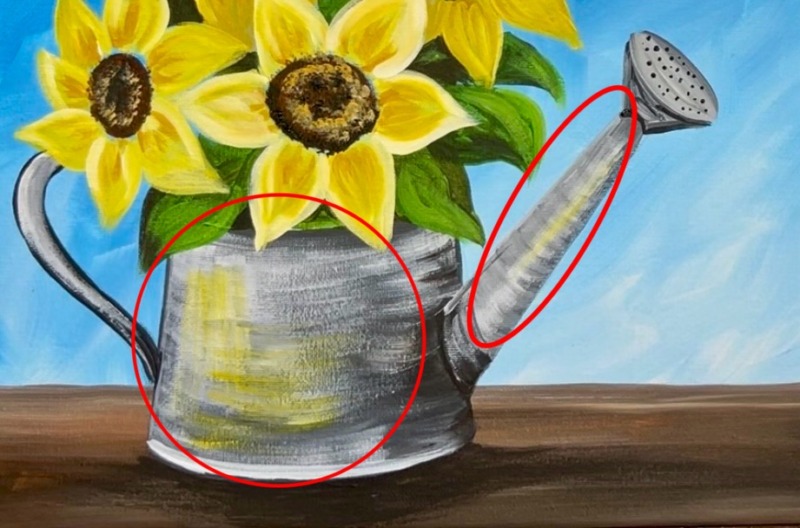
13. Highlight Yellow Reflection On Watering Can
Use a #12 bright brush for this step. Load just “primary yellow” on your brush. Then gently “dry brush” the yellow over the left part of the container where we painted white highlight earlier.
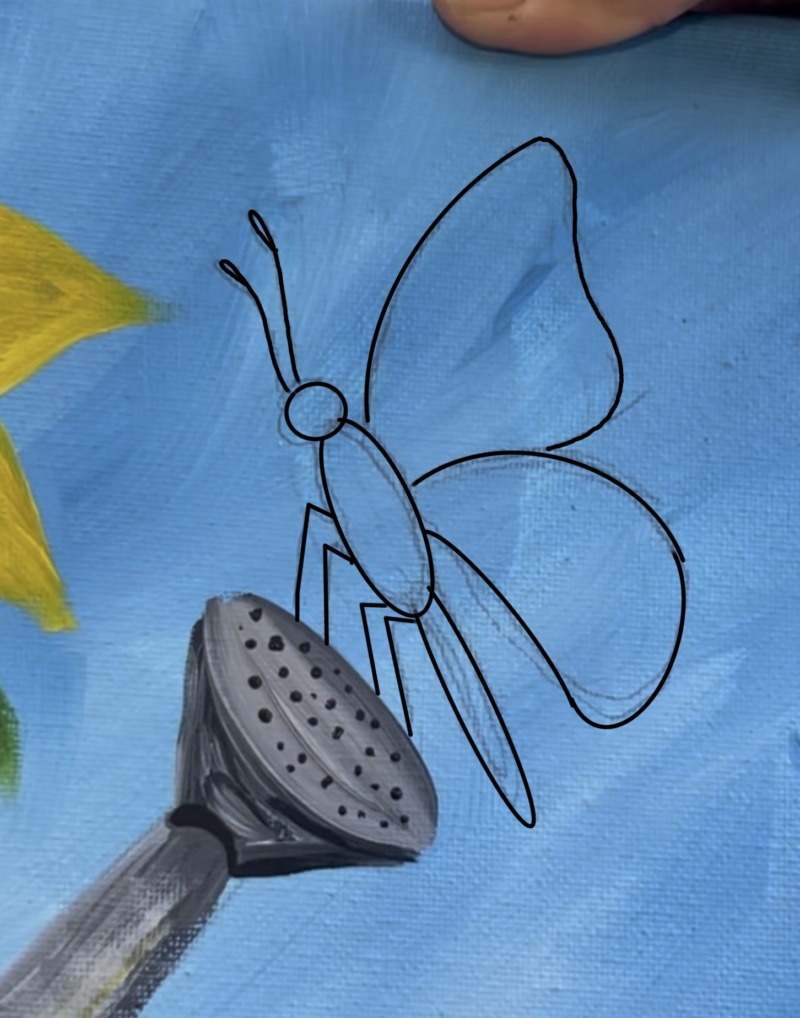
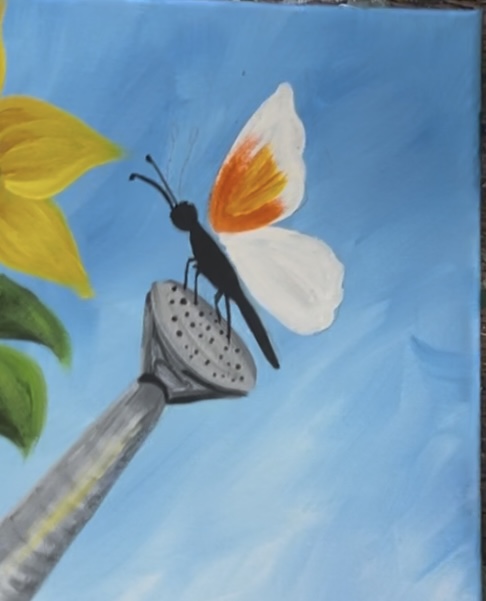
14. Draw Butterfly
Use a pencil to sketch your butterfly on the end of the watering can spout. If you need a traceable for the butterfly, you can download it here.
Start by drawing the head, thorax and abdomen of the butterfly. Do this at an angle just slightly above the watering can spout.
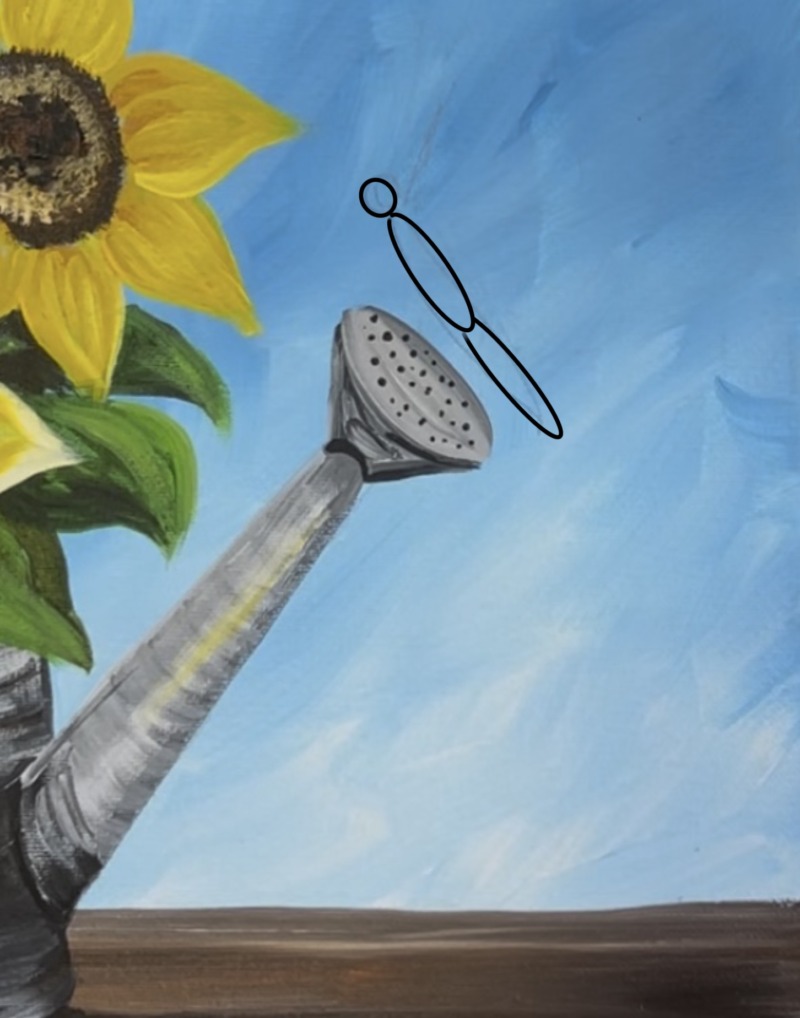
Draw the butterfly wings extending out at a curved angle. Both wings meet together at the “thorax” of the butterfly (that top oval shape).
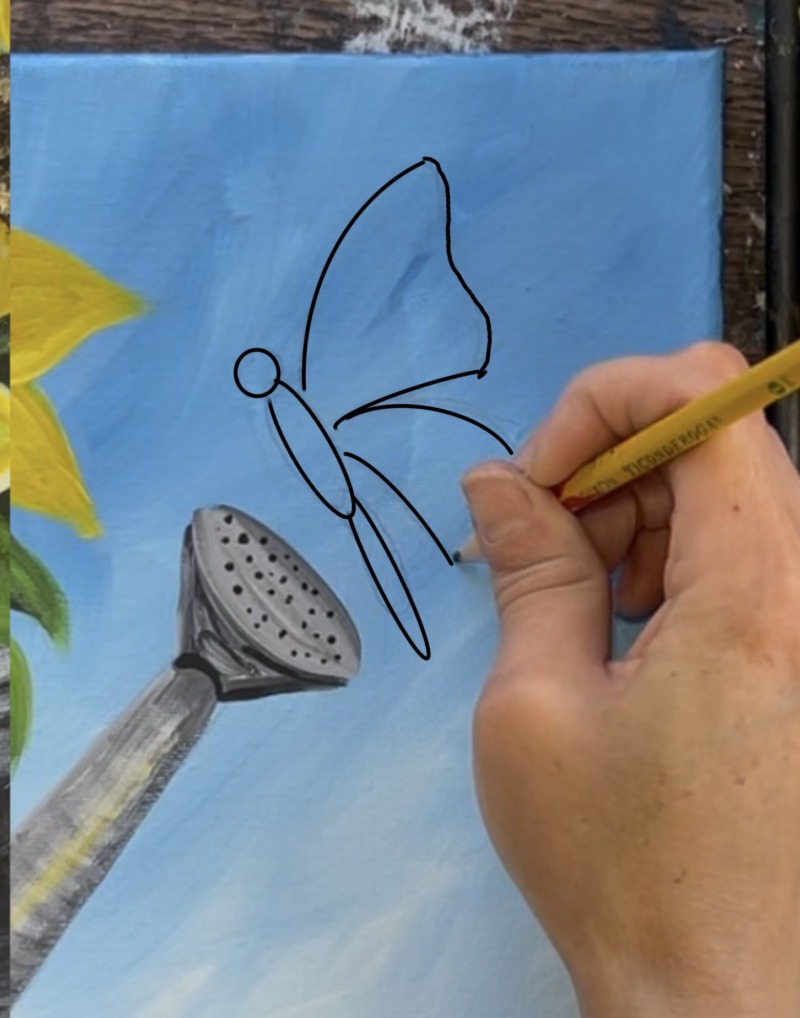
Draw the antennas of the butterfly as well as segmented lines for the legs.
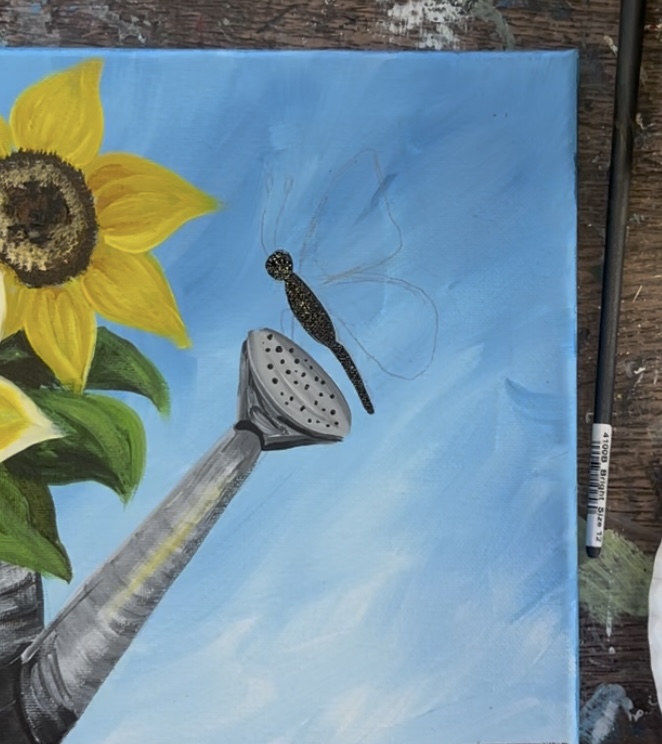
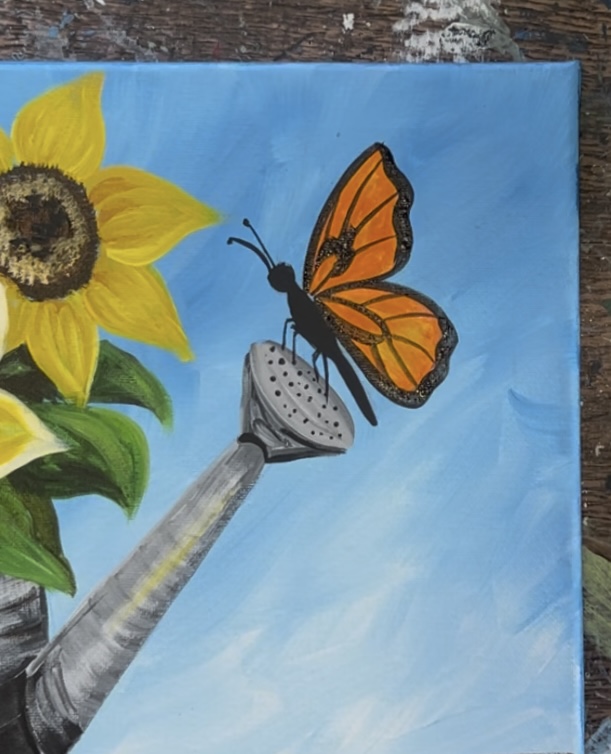
15. Paint Butterfly

Use a #4 round brush and “mars black”. Paint the head and body of the butterfly.
Then use “titanium white” to paint the wings.
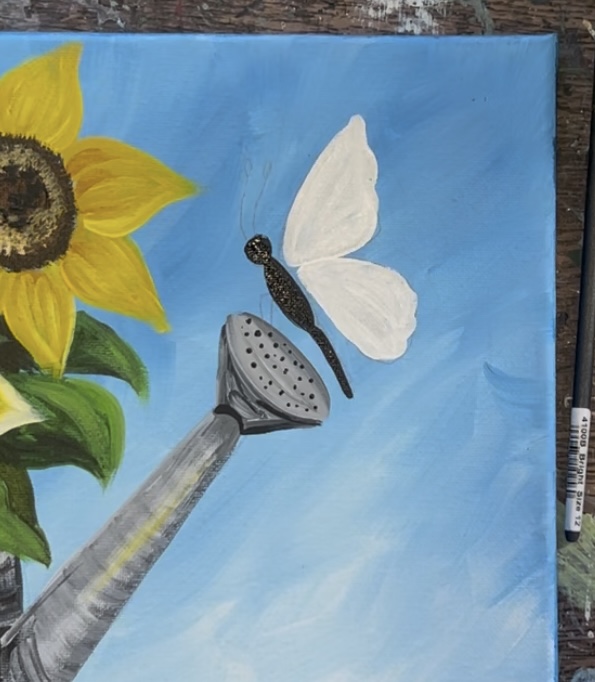
Wait for the white to dry before painting the orange on the wings.
Use “mars black” and the #4 round brush to paint the legs and antenna. Alternatively, you can use a black paint pen or sharpie for that step.
Load your paint palette with “cadmium orange hue”. Use the #4 round brush to paint the wings. If you want, you can mix a little bit of primary yellow into the orange for some color variation. Paint strokes going outwards in a diagonal direction.
Fill all of the white part of the wing with this orange and yellow.
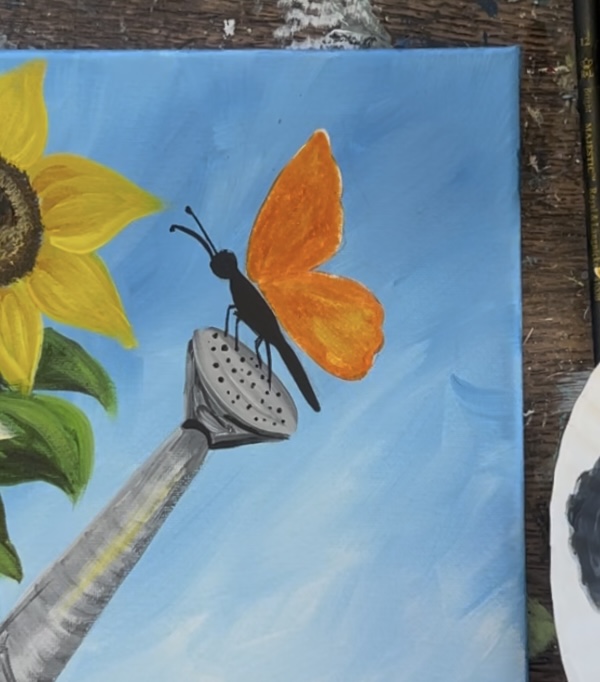
Wait for this to dry.
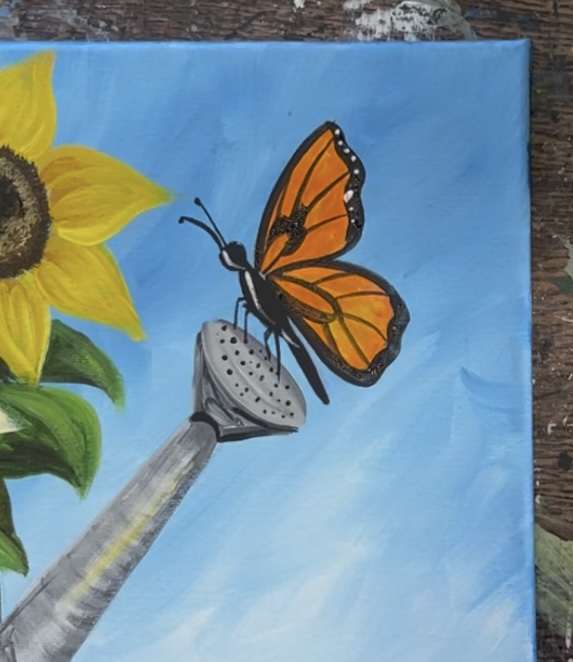
Then use “mars black” to paint the black border on the wings. Make the edges of the wings sort of “scalloped” or “wavy”. The lines on the sides of the wings also go thinner than the far edges of the wings.
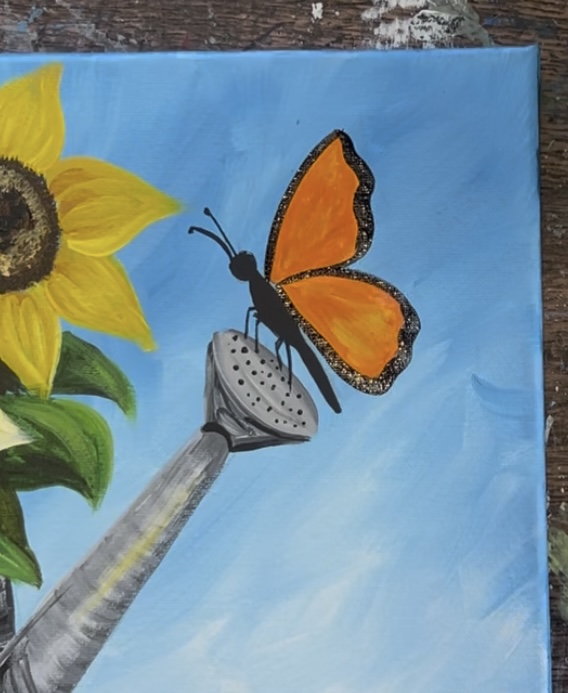
Then paint fine lines for the wing veins. Start by painting a curved line that extends in the middle bottom part of the wing. Then paint diagonal lines that attach to that curved line and extend all the way to the edges of the wing.
Repeat this for the bottom wing. Additionally, I made the center of the top wing have a “scalloped” thicker line.
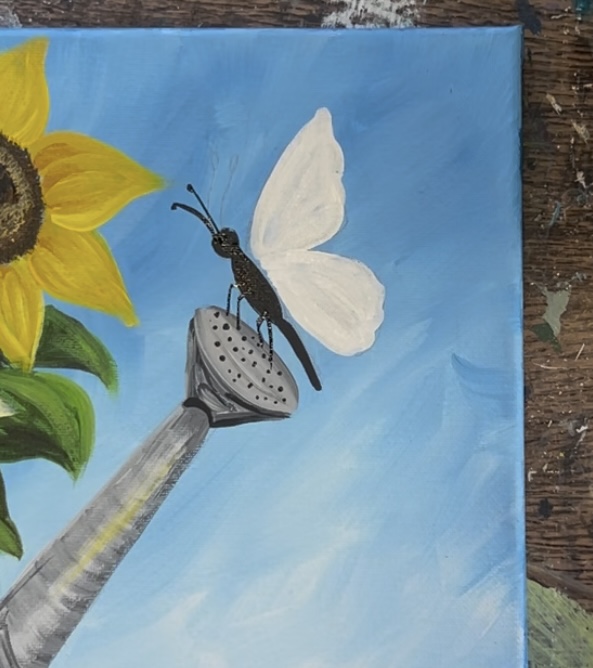
Wait for the black to dry. Then use the round brush and “titanium white” to paint curved line highlights on the head and body of the butterfly.
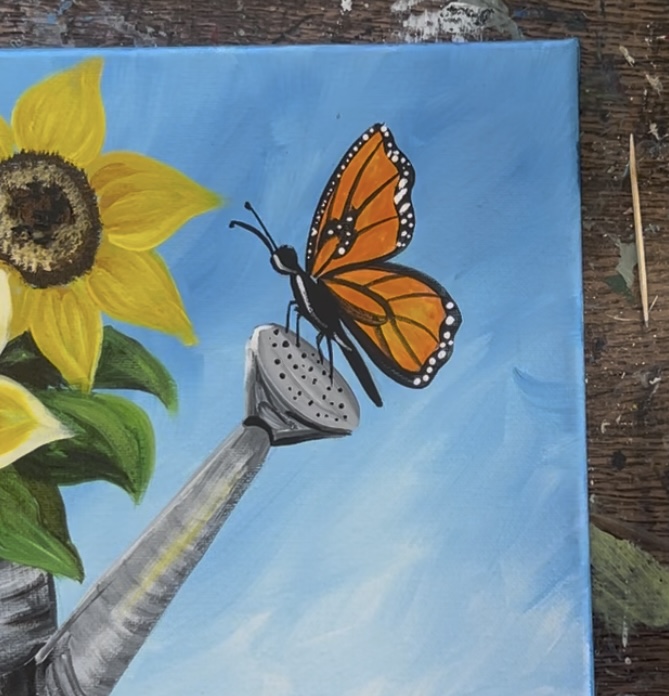
Use a toothpick and “titanium white” to paint the white dots along the black border of the butterfly.
You can vary the sizes of these dots by pressing firmly with the toothpick or pressing lightly.
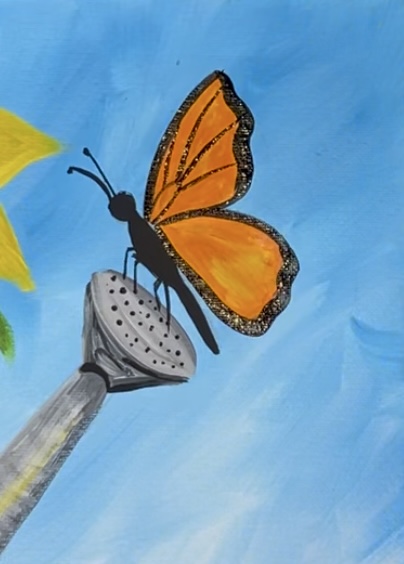
Finished!
That’s it! Sign your name and show it off!