
Would you like to save this?
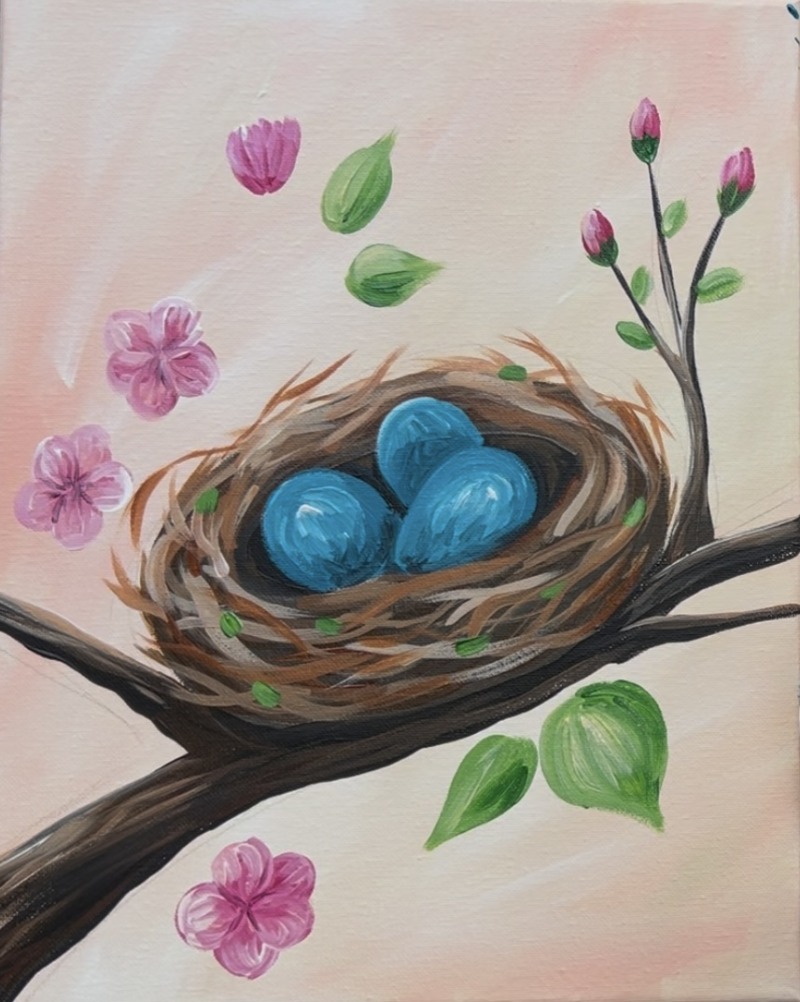
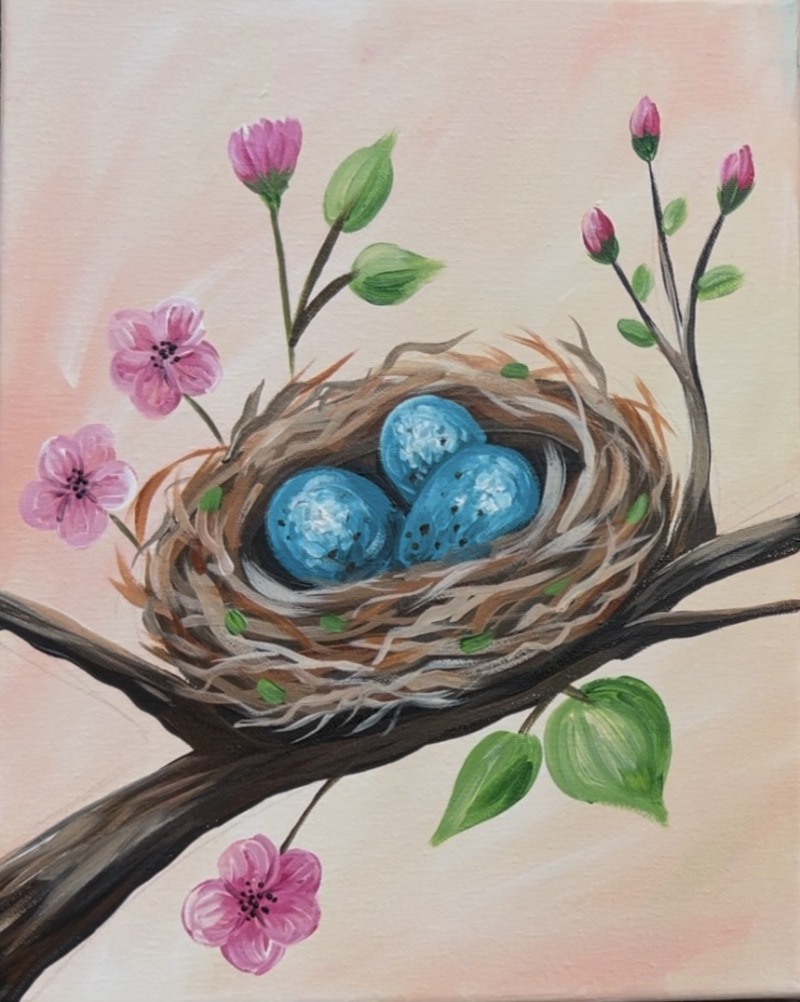
This tutorial will show you how to paint a beautiful and simple bird’s nest with robin’s eggs. Paint new spring blossoms budding through the branches and a simple peach/ pink background!
There is an optional traceable template you print for your canvas or you can draw the simple nest and branches with Tracie.
Enjoy and happy painting!
Materials
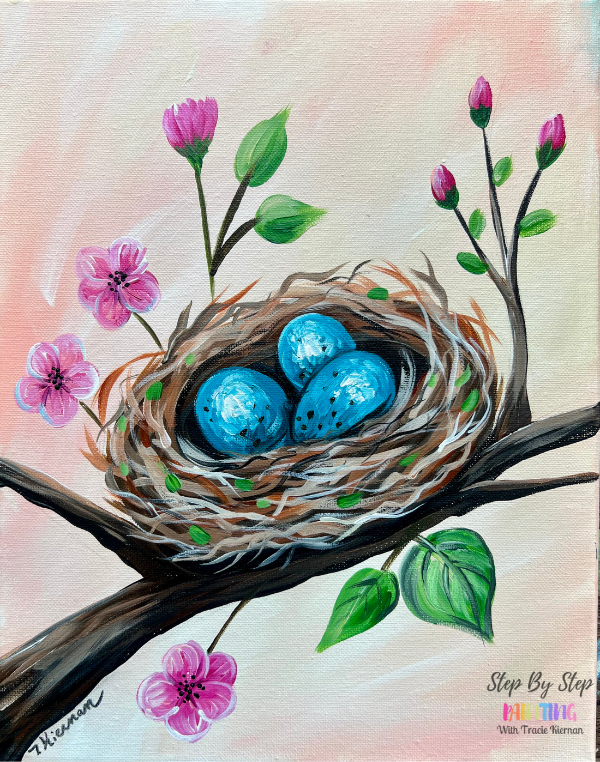
Robin's Nest - Painting Tutorial
Learn how to paint a nest with robin's eggs and beautiful blooming blossoms.
Materials
- 11 x 14 Canvas
- Drawing Pencil
- Paint Brushes
- Acrylic Paint
- Water Cup
- Paint Palette
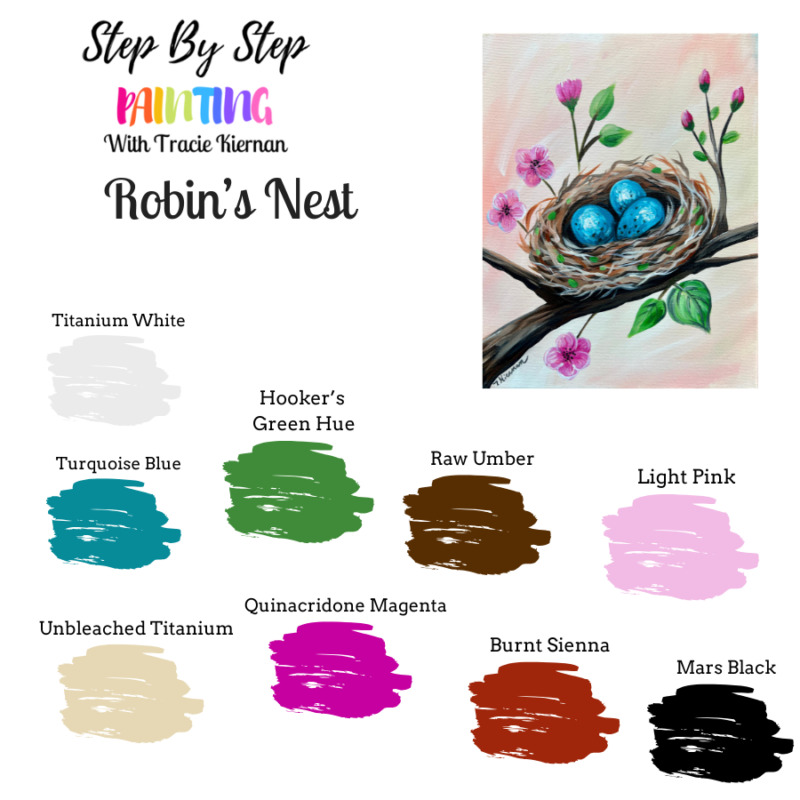
Colors
- Titanium White
- Mars Black
- Quinacridone Magenta
- Light Pink
- Hooker's Green Hue Permanent
- Raw Umber
- Burnt Sienna
- *Turquoise Blue
- Unbleached Titanium
Brushes
- 3/4" Flat
- #12 Bright
- #4 Round
Notes
*If you don't have this turquoise blue, you can mix a little bit of titanium white into phthalo green.
Color Palette
If you are using craft paints or a different brand of paint, you can use the chart below to help you match colors. Often paint conversions aren’t an exact match, however, you can still create this beautiful painting with similar colors!

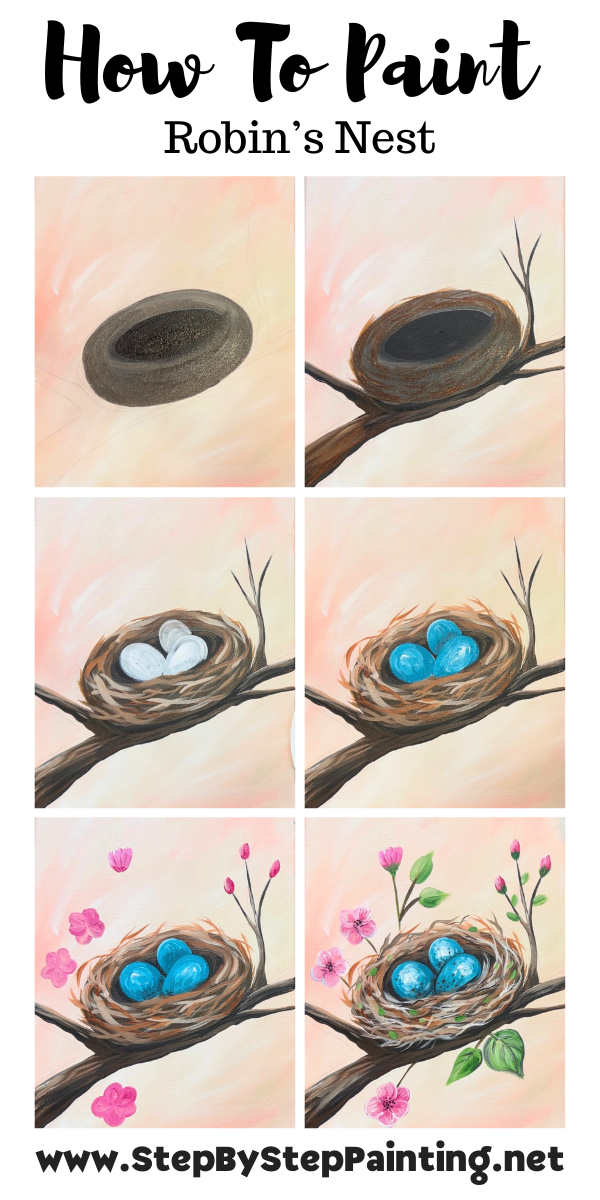
Directions At A Glance
Optional Traceable
Video
Step By Step Instructions
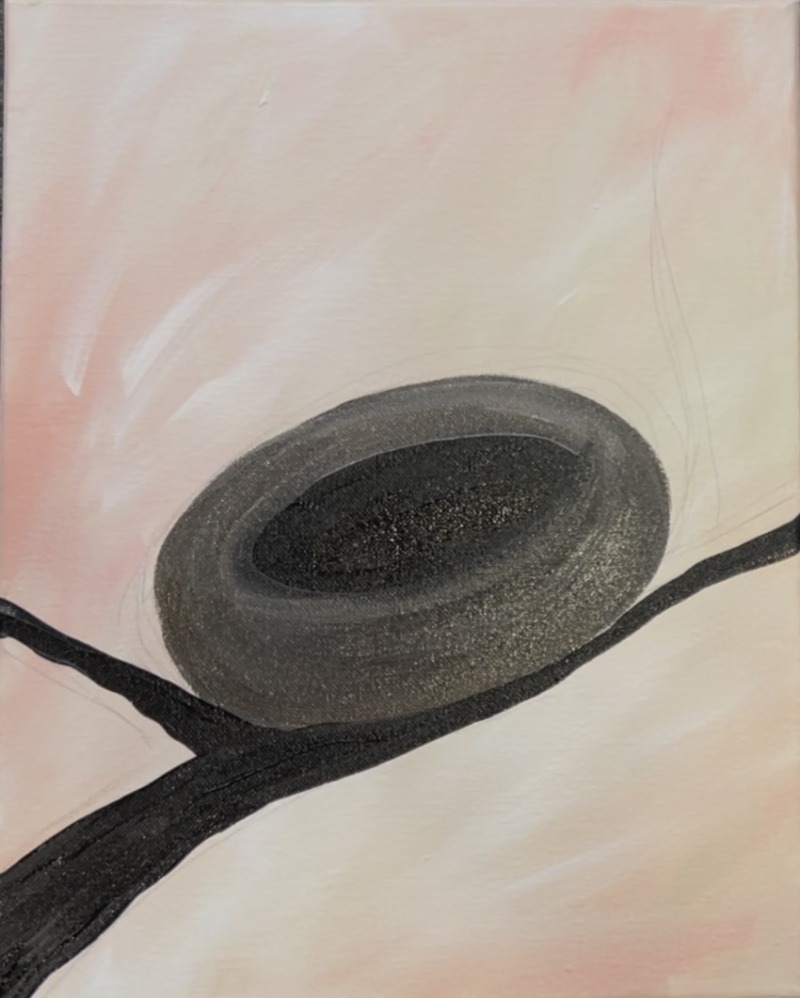
1. Paint Background
Load your paint palette with the three colors: light pink, unbleached titanium and titanium white.
Use the 3/4″ flat brush and triple load it into all three of those colors. Use the full width of the brush to paint large angle paint strokes of these three colors that gently blend together.
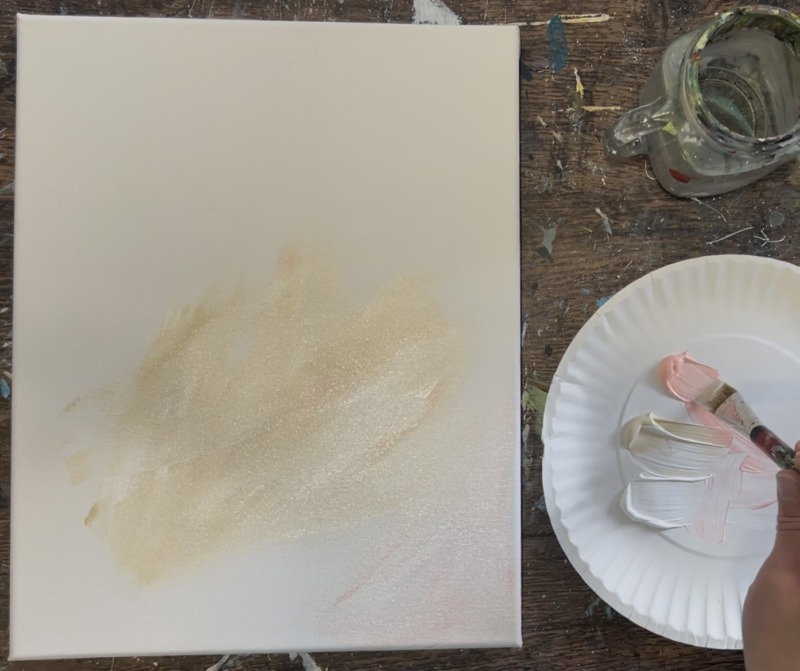
You will create a very light pink/ peach background. Make sure to add just a little more white in there so that it becomes a very light background. We want a light colored background so our nest will have really great contrast.
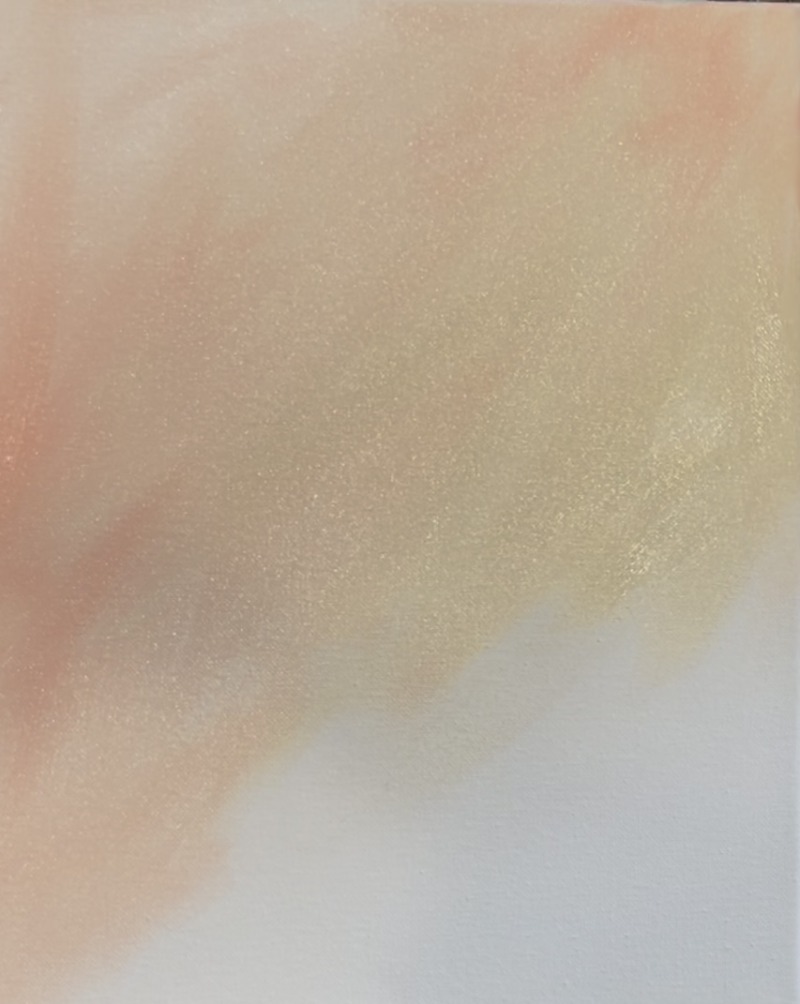
Blend more white into your color. Try not to brush over your colors too much. This will give you some really pretty variations of color in the background.
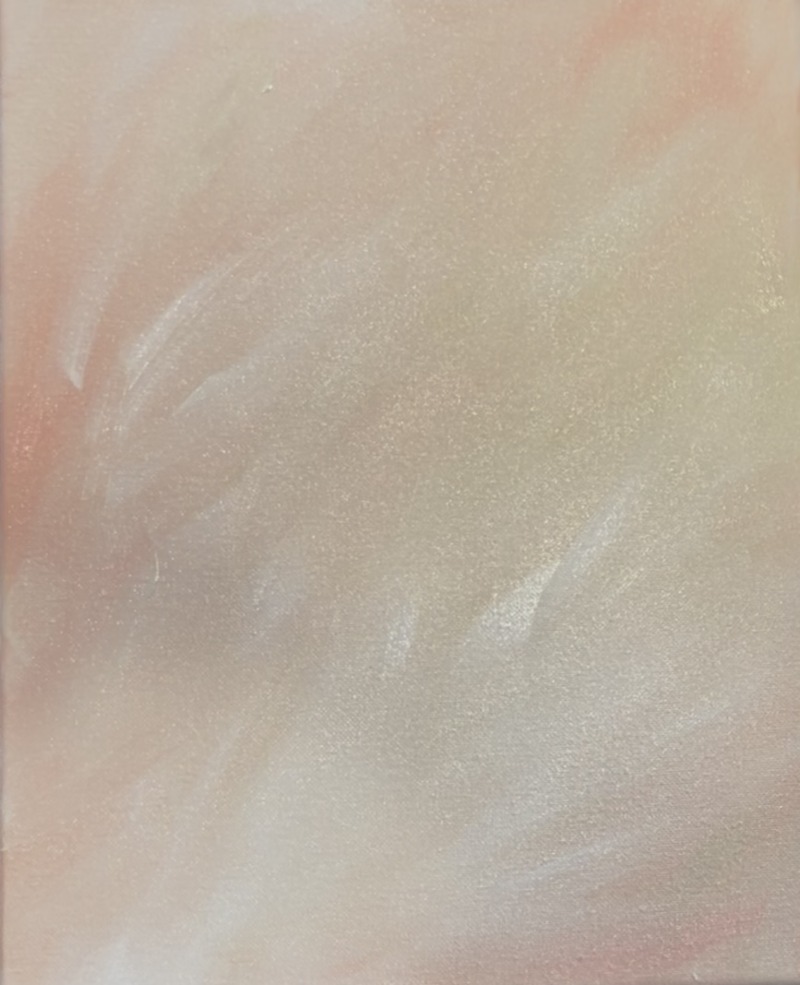
Let this dry before going onto the next step.
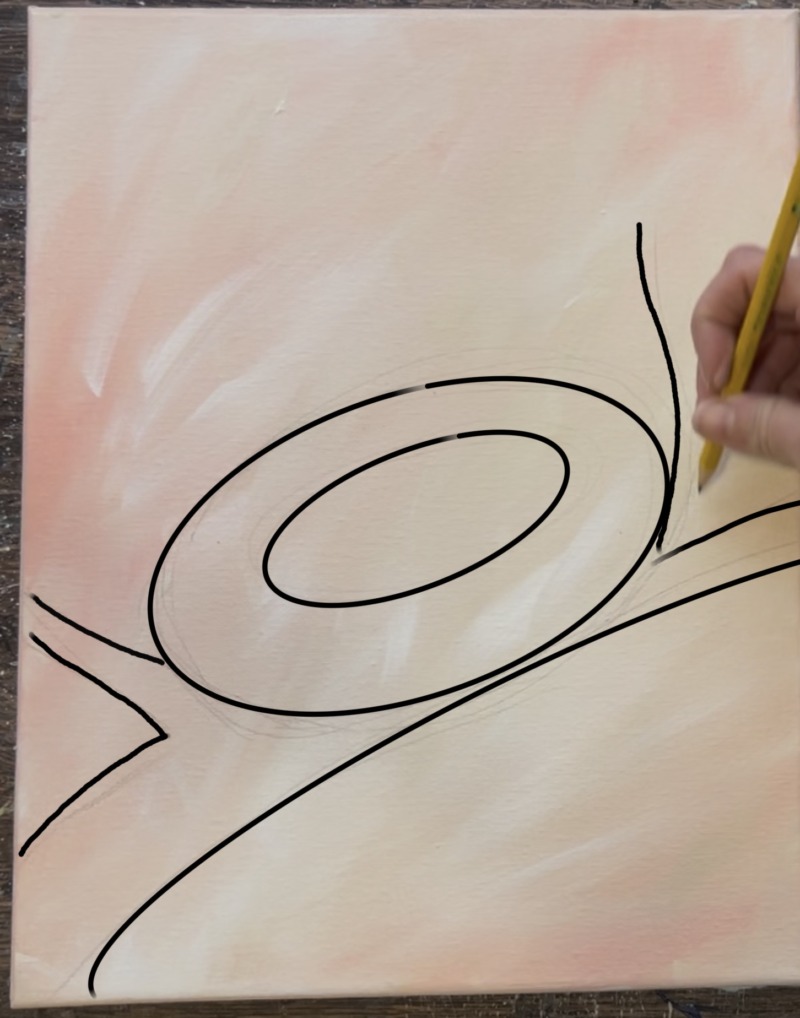
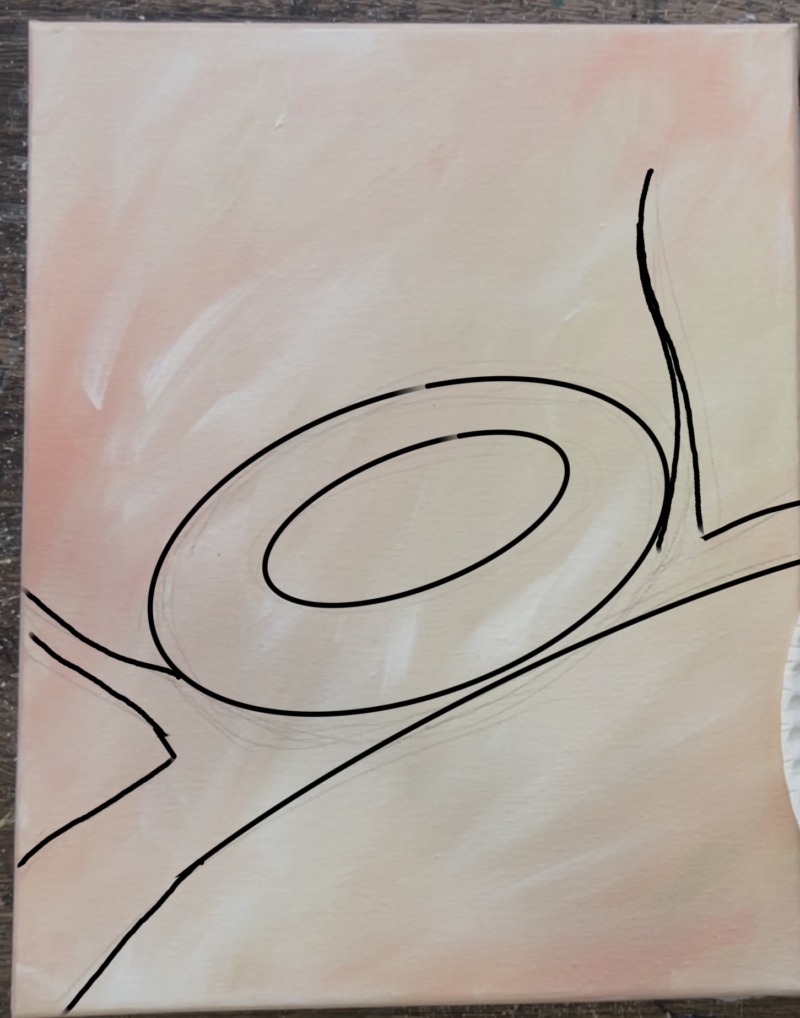
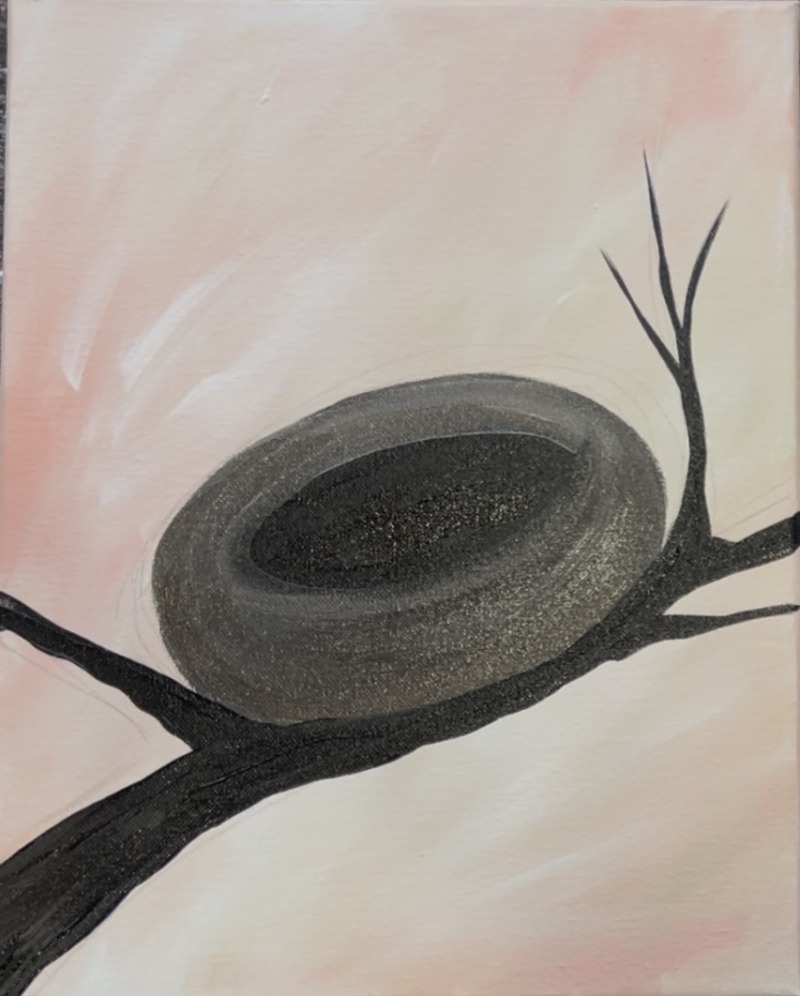
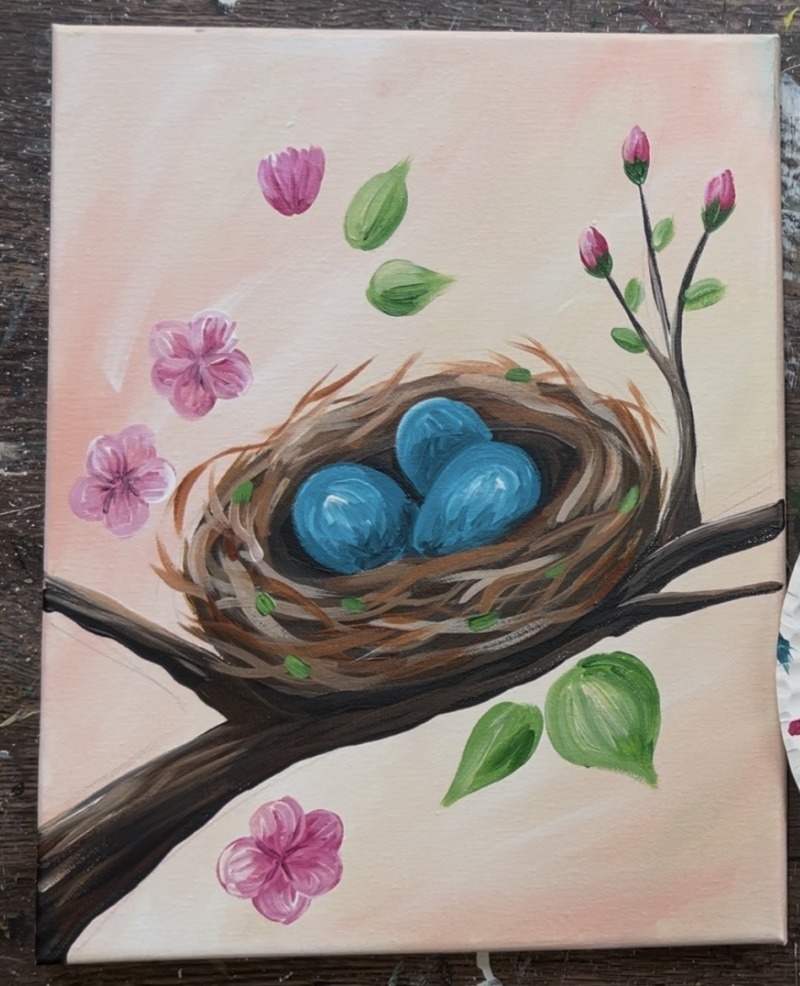
2. Draw Nest
You can use the traceable template for this step to help you draw the nest! Or you can hand draw the nest and tree. It is a very simple drawing.
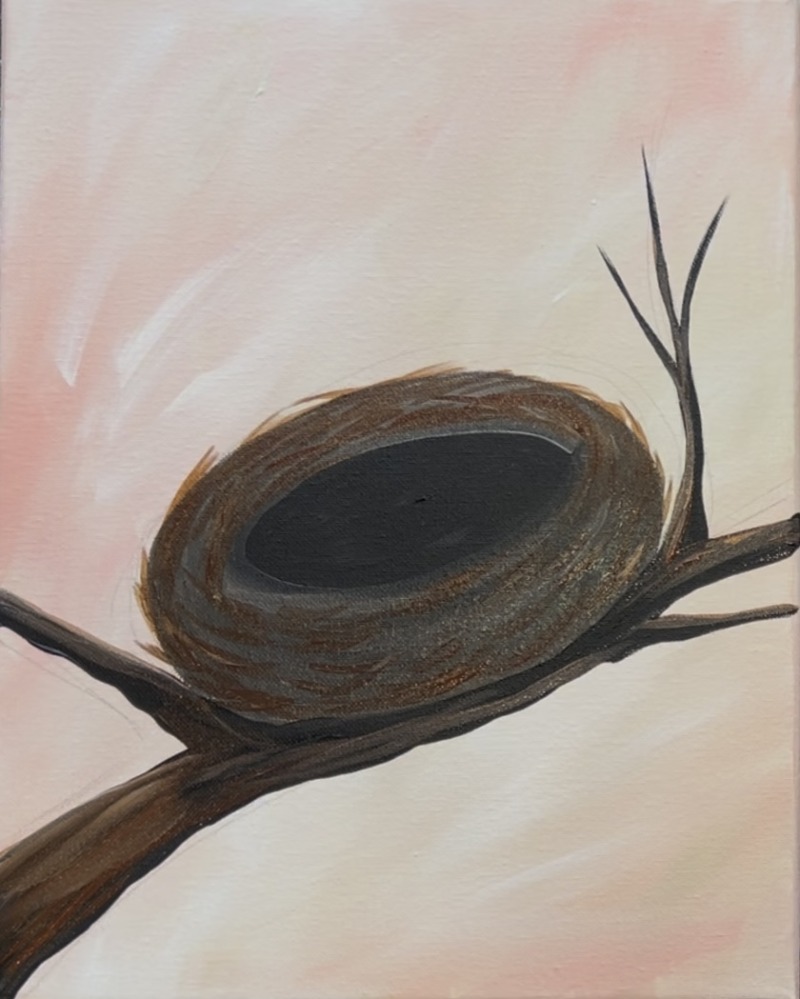
Start out by sketching a donut shape for the nest in the center of the canvas. This is an elongated oval shape. It should be a little wider on the bottom and more narrow in the back because this nest is slightly angled backwards.

After you draw the nest, you can start sketching out the tree. Start by drawing the man branch which starts out wide in the lower left corner of the canvas. Then draw the branch so that it goes under the nest. It splits to a second smaller branch on the left of the nest. Then there is another smaller branch that is growing upwards to the right of the nest.
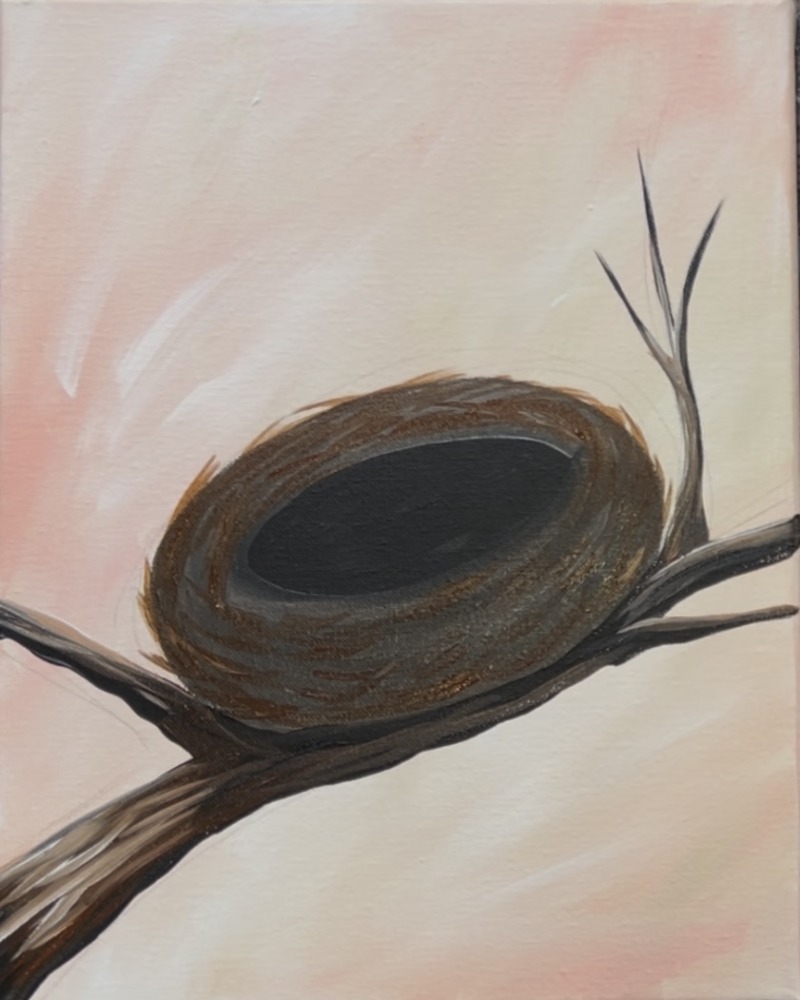
3. Paint Nest Basic Shapes
Next, we will be painting the first layer of the nest! This first layer will be very dark and we will be layering on lighter colors as each dark layer dries.
Use a #12 bright brush to paint the center oval a solid coat of “raw umber” mixed with a little bit of “mars black”.
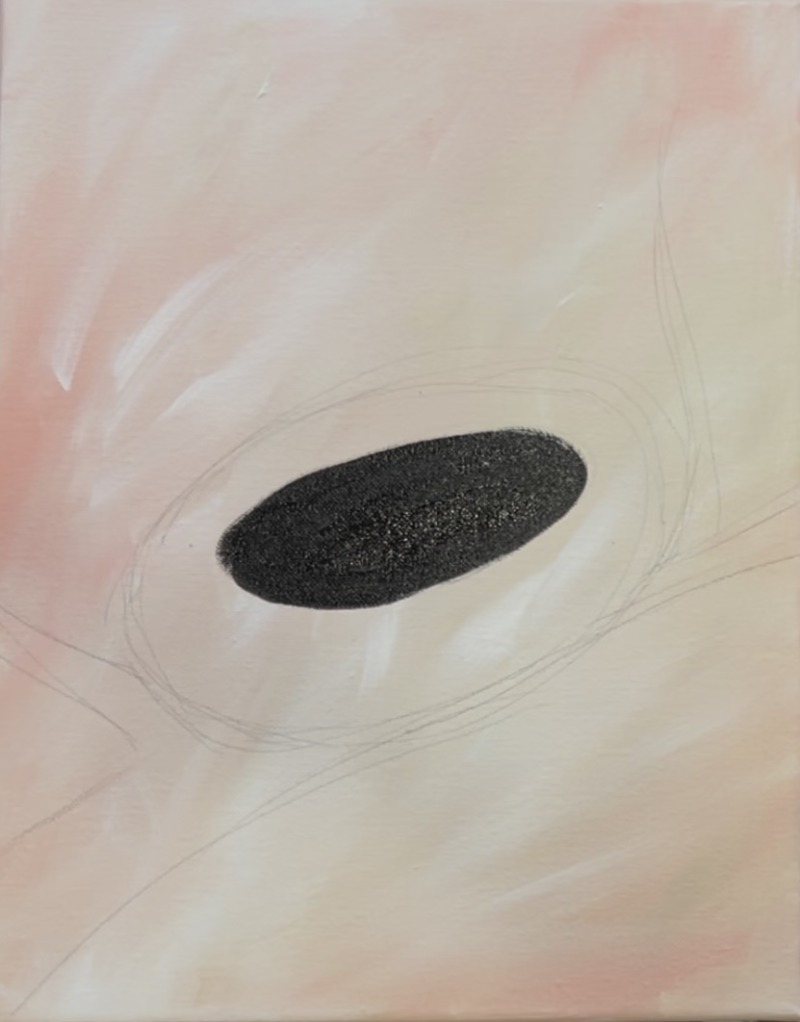
Then paint the donut/ oval shape around the nest opening. This needs to be just a few shades lighter than the middle color so we can see it! Use the same #12 bright brush and the color “raw umber” not mixed with black. Gently paint the outer donut shape of the nest with paint strokes going in a curved direction.

If needed, add just a TINY bit of “titanium white” into this brown to lighten it up just slightly so that it stands out against the dark color in the center. I did this to my brown, you can see a few lighter tints of brown in there and blended it gently with the darker brown.
Let this nest dry before painting any more details on it.
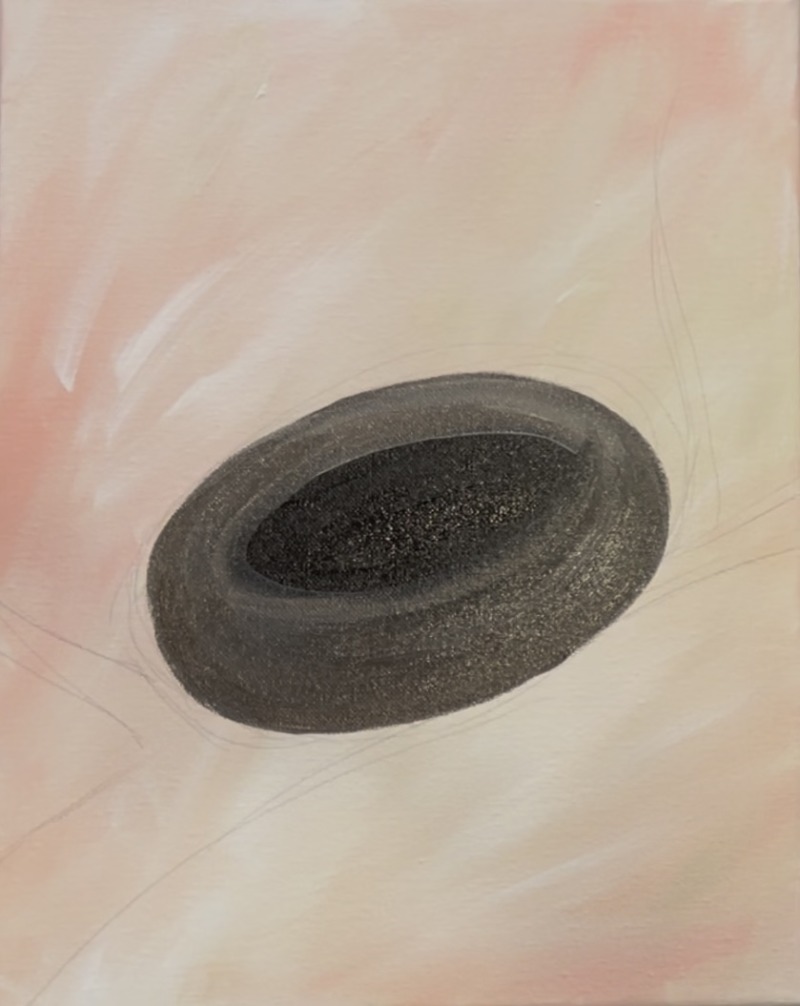
4. Paint Branches
Use the same dark brown and black color that you used in the center of the nest to paint the tree branch. You can use either the #12 bright brush or a round brush to paint these branches. None of these branches overlap the nest so paint the branches so they look like they are going behind the nest and that the nest is nestled/ wedged on the split of the branch.
For the smaller branches that split, you can use either the round brush or the edge of the bright brush on its side. To get the branches to go to a point, release the pressure of the brush (press it very lightly) so the paint strokes go thin.
5. Painting Dark Textures On Nest
We will next add the first textured layers onto the nest. This needs to be dark but still visible against our first dark layer. Load your paint palette with “burnt Sienna”. Mix the “burnt Sienna” into “raw umber”. Use the #12 bright brush and use the end/ tip of the bristles to paint thin horizontal paint strokes that curve with the shape of the nest. Leave a lot of your first layer of the nest still showing through.

Make some of your paint strokes for this texture hang off over the edges of the nest. Don’t paint any of these texture paint strokes on the inside of the nest.
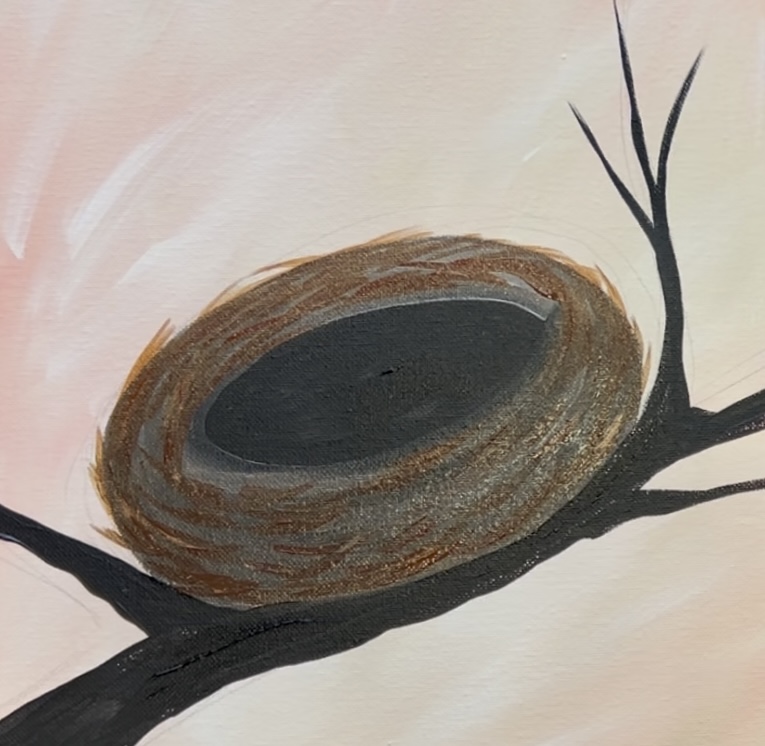
Let this layer dry before layering on your next lighter brown color.
6. Shading and highlighting on tree
To simplify this painting, you can choose to skip this step and keep the branch as a dark silhouette.
As your nest layer is drying, start adding more detail into the branches. Take the same color of the “burnt Sienna” and “raw umber” to lightly paint this lighter brown over your dark layer of branch.
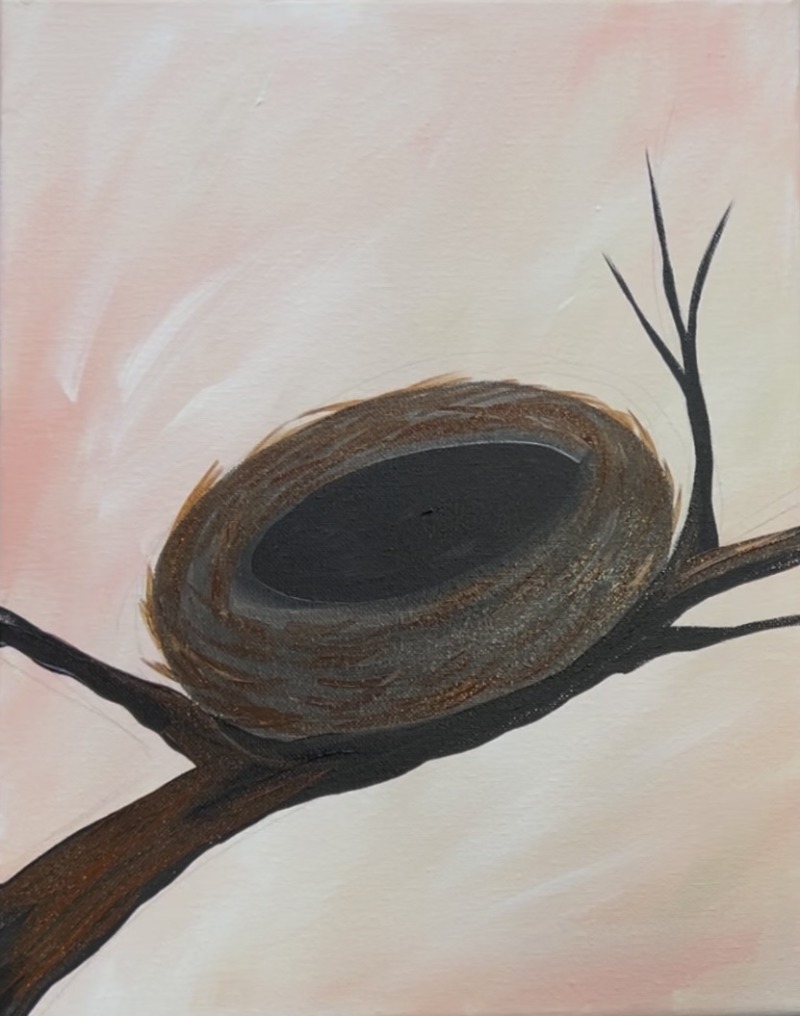
Add a small amount of white into this brown. This will create a lighter tint of brown. Paint one side of the branch and loosely blend it into the rest of the branch. Your “highlight” will be on the top edges of the branch. Leave the branch very shadowy under the nest.
You can also use the #4 round brush for this to loosely paint long lines on the branches that blend with the browns. Adding little bits of white will lighten the brown.
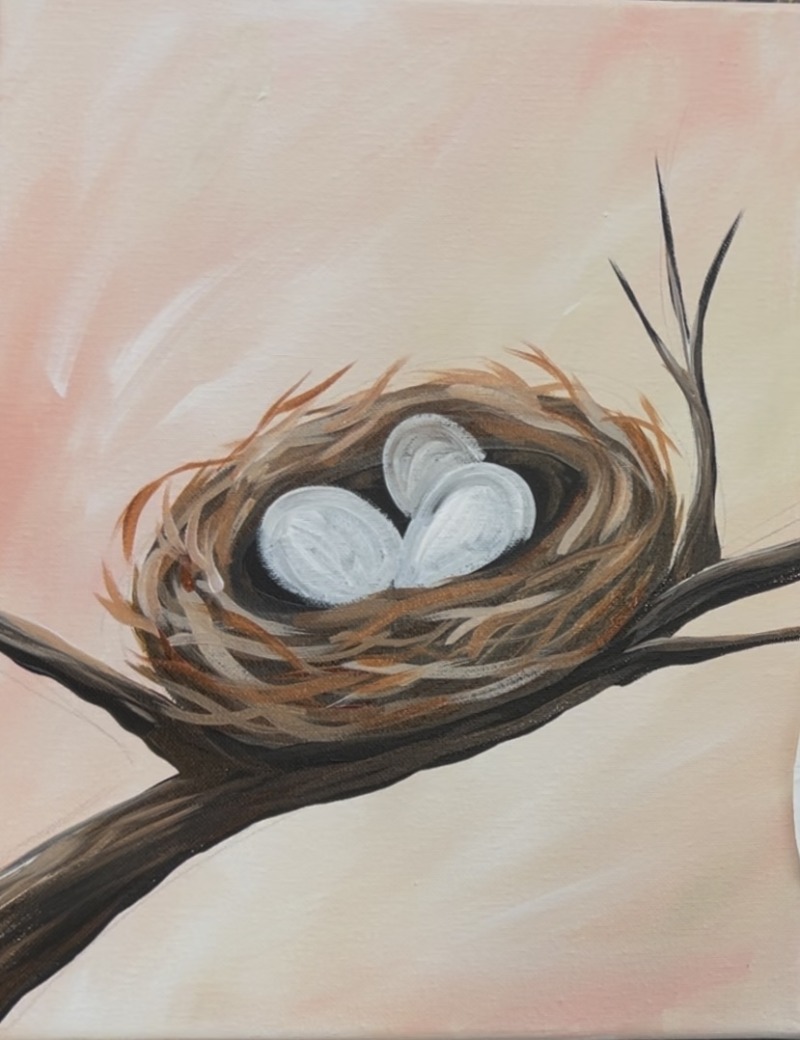
7. Paint White Eggs
Use the #4 round brush and “titanium white” to paint three eggs in the nest. We wouldn’t see the full egg, we would see maybe the top three quarters of it. Also, create some overlapping with the eggs by making one or two behind a front egg.
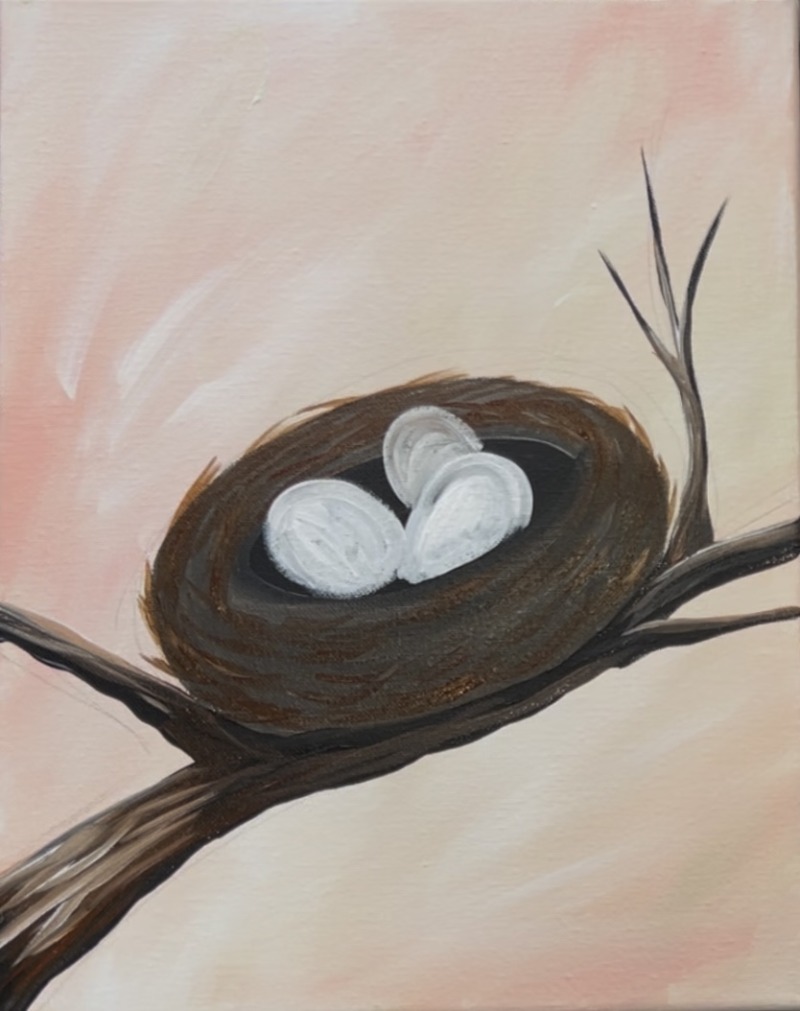
Let this white dry before painting them turquoise.
8. Paint Lighter Textures On Nest
We will be painting a lighter color on the nest next! You will notice that as you paint each layer of texture on the nest, it becomes more three dimensional.
Mix “titanium white” into your two brown colors. Use either the #4 round or the #12 bright (or both) to paint the twig/ nest textures. Let the darker layers still show through.
Mix more white into your brown. Layer on another layer with this lighter brown. You can make some curve and go cross-hatching and also outside the edges of the shape of the nest. Keep in mind that this is a nest and it can be messy! But that is okay!

Add another lighter layer by adding even more white! Paint lighter twig colors but not as much as your previous layers. As you layer on your lighter colors, you will be painting less and less.

I then added another shade of brown. This is just “burnt Sienna” not mixed with the “raw umber”. Use the round brush to paint more twig shapes with these colors. Add white to it if needed. You’re going to now have a nest with so many layers of brown! Make sure you still have dark layers still showing through!
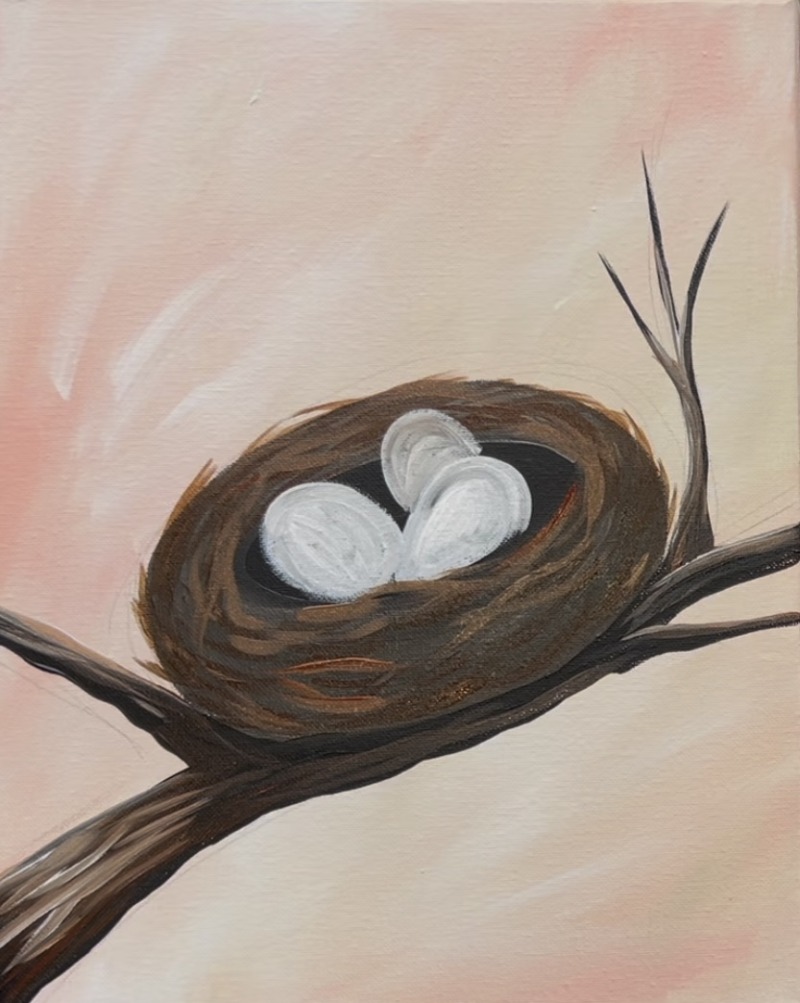
9. Paint Robin’s Eggs Blue
Use the #4 round brush and turquoise blue to paint each of the eggs. Add just a very tiny bit of black into the green and paint a little shadow on the egg behind the front egg. Blend this shadow color into the rest of the egg.
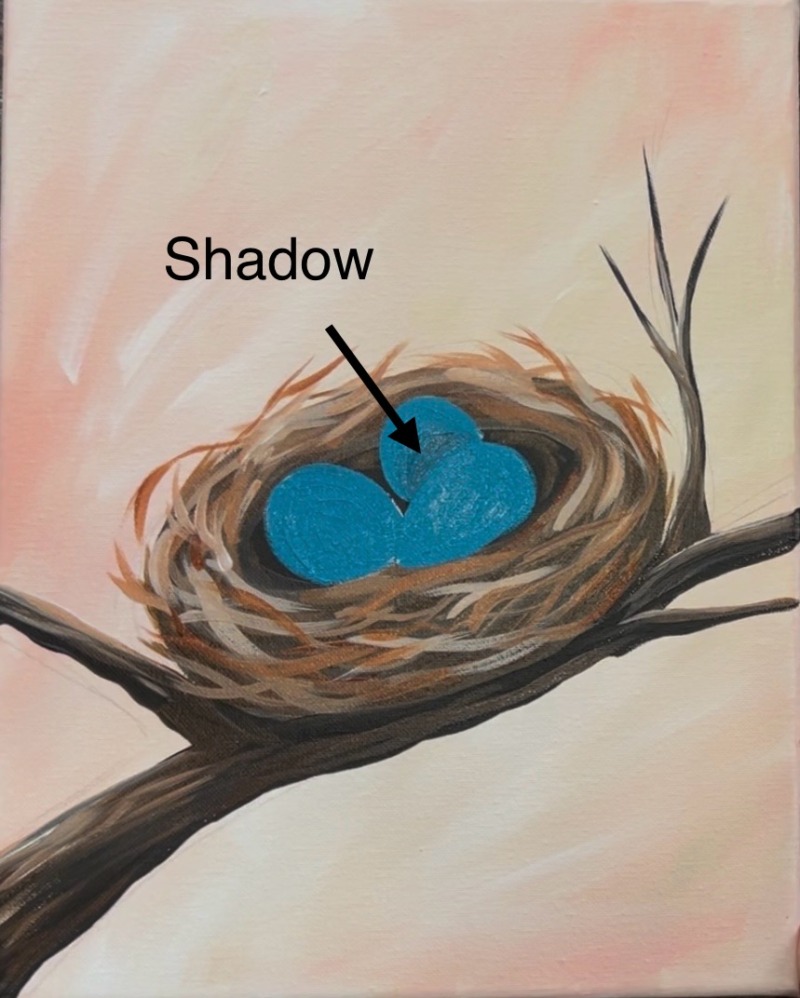
Then rinse the brush. Mix “titanium white” with “turquoise”. Add highlight color to the center top part of the eggs and blend it into the rest of the turquoise. You’ll want to do this highlight on the eggs before your first layer of turquoise dries so the white can blend with the turquoise.
Do this to each of the eggs. We will add brighter white highlights to these eggs later after this dries.
Add just a little more shadow on the bottoms of the eggs. The shadow color is “turquoise” mixed with just a tiny bit of black.

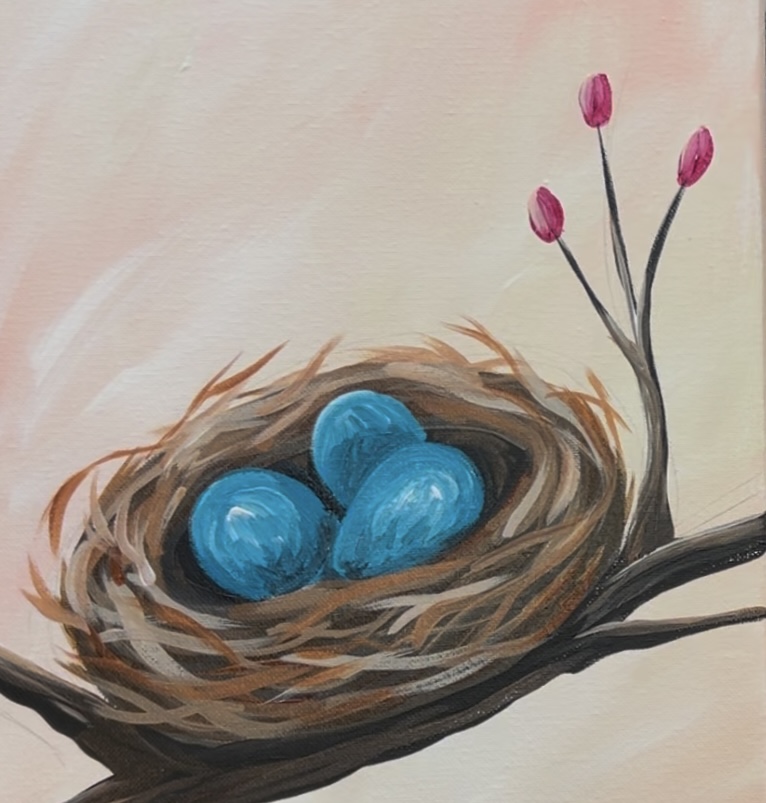
10. Paint Blossoms
Load your paint palette with the color “quinacridone magenta” and “light pink”. Start by painting little oval “buds” on the ends of the smaller branches on the right.
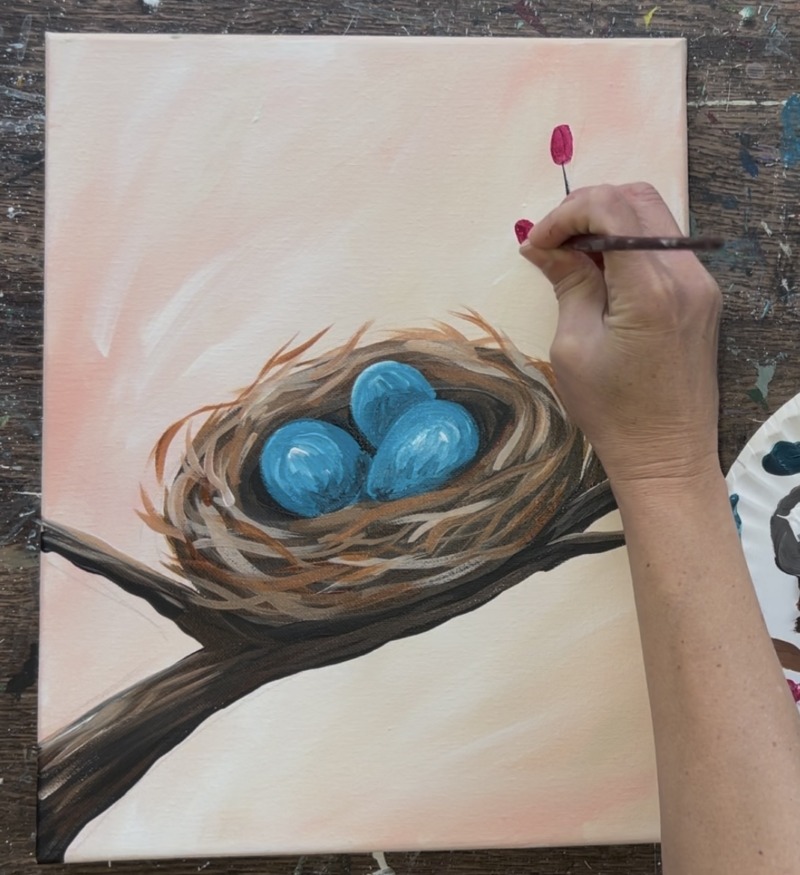
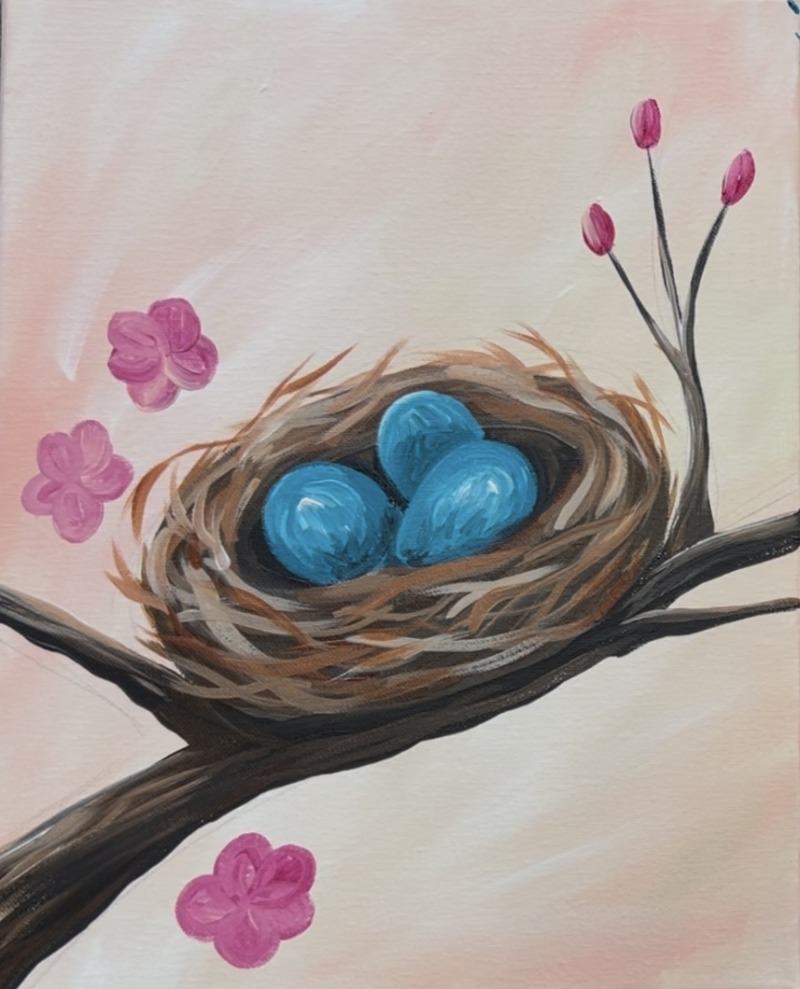
Paint the first layer of that oval with just the “quinacridone magenta”. Then blend just a tiny bit of “light pink” on the top of the buds.
Then use the #4 round brush to paint “floating blossoms” on the left side of the painting. Use a combination of the light pink and the magenta to paint simple 5 petal flowers. I did two blossoms on the left of the nest and one blossom on its side that is slightly opened. I also painted one blossom on the bottom of the painting below the nest and branch.
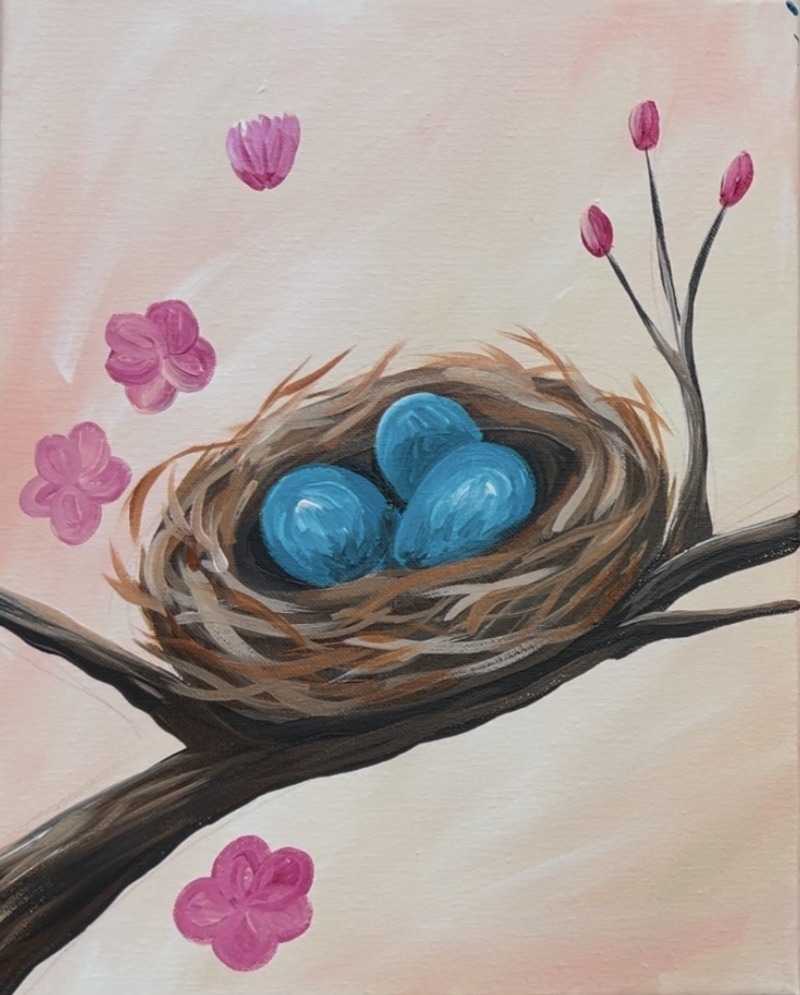
11. Paint Greenery, More Flower Details and Stems
After your “buds” dry, use the color “hooker’s green hue” to paint small leaves and the “sepal” of the flower that slightly overlaps the bottom of the buds. Then mix a small amount of white into your green to create a lighter green. (You can also mix a little “unbleached titanium” into your green. Paint a few “floating leaves”.

Use the green and the #4 round brush to paint a few small leaves inside the nest! Simply paint one stroke oval shapes in the nest and go in the same direction as the twigs.
To add more “color variation” to the leaves, paint one side of the leaves a slightly darker color. You can mix a little brown into the green to darken your green. Then paint the other side of the leaves a lighter color by mixing some white and/or unbleached titanium into the green. Use “titanium white” mixed with “light pink and quinacridone magenta” to create a lighter pink color. Paint the outer parts of the petals so the edges are slightly lighter and the centers of the petals are slightly darker.
Then use the brown to paint branches that connect to the floating flowers and floating leaves.
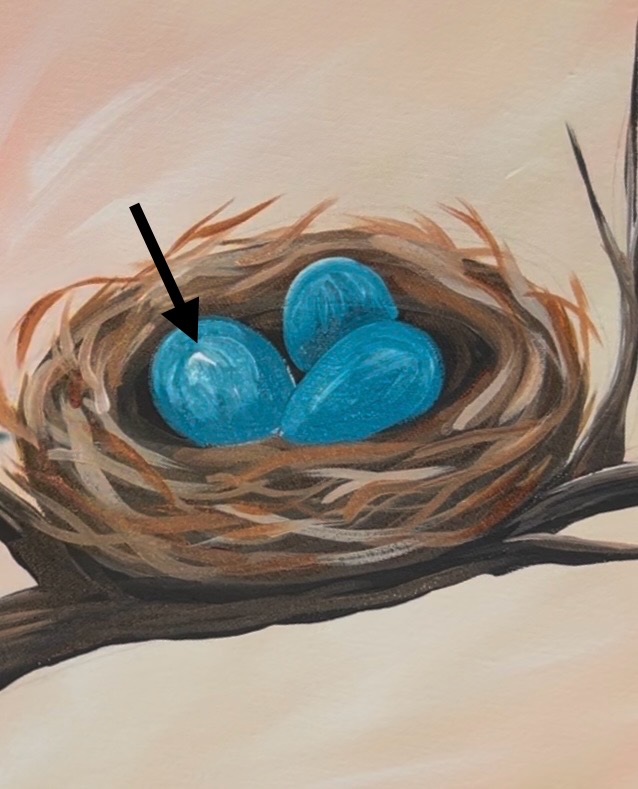
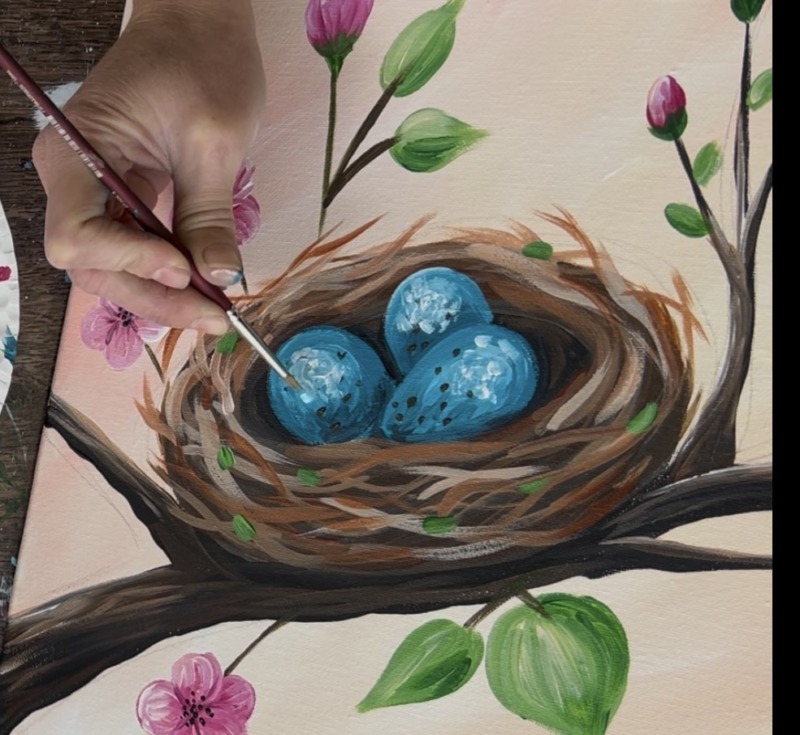
12. Paint speckles on eggs and more highlights
Use “mars black” to paint little black dots in the centers of the blossoms that are facing forward.

Use the round brush and “raw umber” to paint little spots on the robin’s eggs. Then, add just a bit more titanium white in the center parts of the eggs to brighten them a bit. If needed, blend a little more turquoise into the color.
13. Paint final layers on nest texture & leaves
For this final nest texture, I mixed white into both of my browns and also added a little bit of “unbleached titanium” to make my lightest color of brown! Water this color down slightly. Use the #4 round brush and paint wavy lines in your nest that go outside and overlap parts of the branch on the bottom and go outside and overlap parts of the background. These wavy lines are more “twisty” than the previous lines of texture in the nest. This wavy texture adds a pretty touch to the nest! Try not to cover all of your previous layers of brown.
As a final detail for the leaves, add some “vein lines” using “hooker’s green hue” mixed with a tiny bit of black. Loosely paint a middle line on the leaf and paint lines branching outwards.

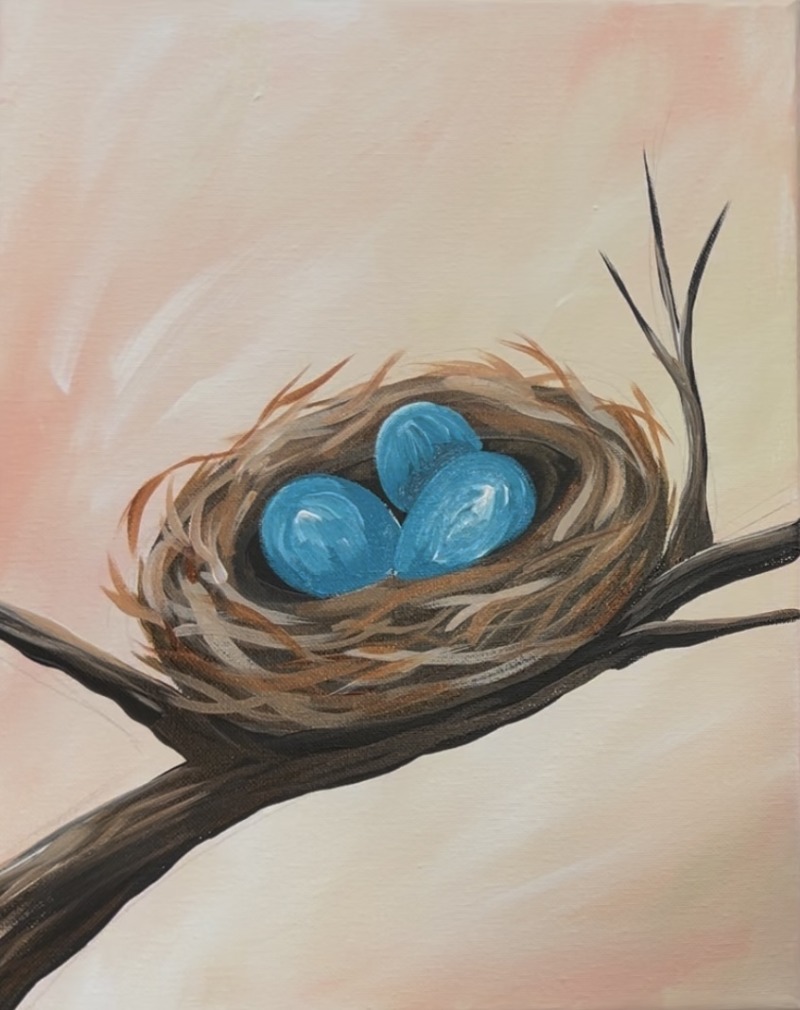
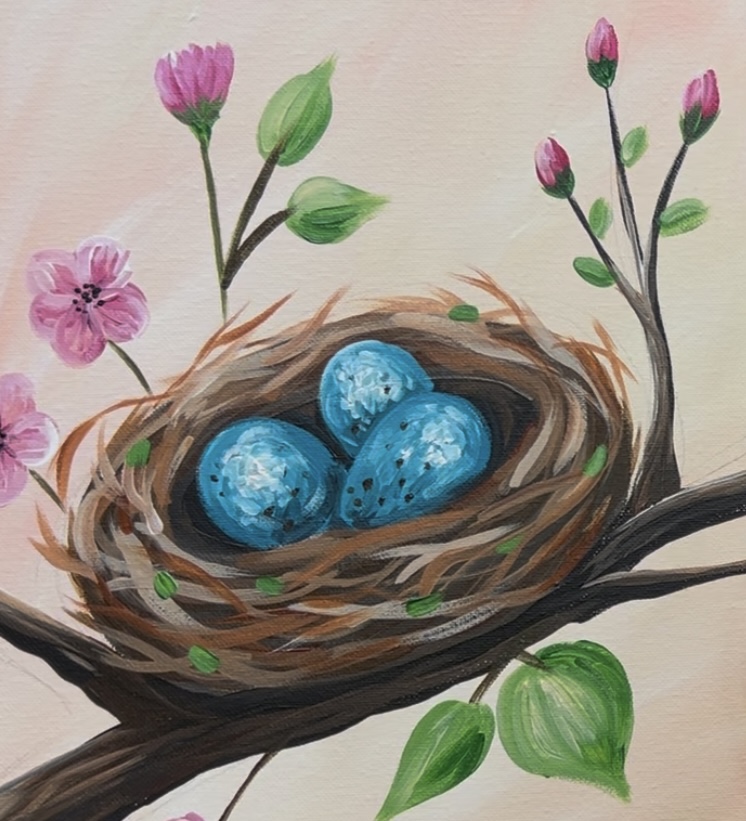
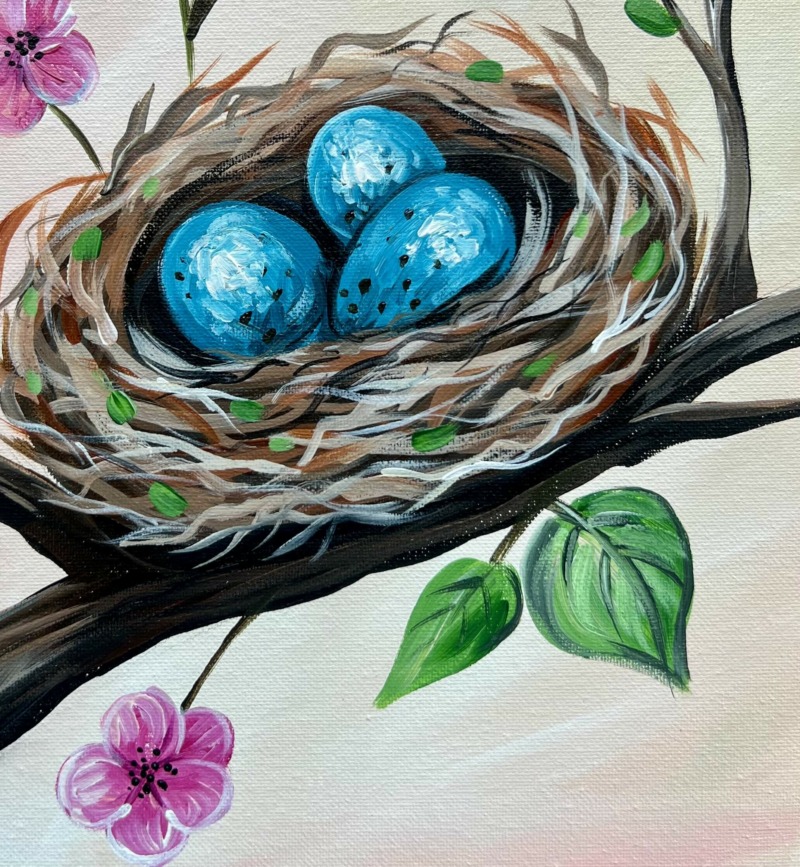
Below is a closeup of the nest, leaves and some of the blooms. I also added a few wavy texture lines with black mixed with brown. There’s also just a little bit of dark brown behind the eggs on the opening of the nest but the rest of the inner part of the nest is very dark with no nest texture.
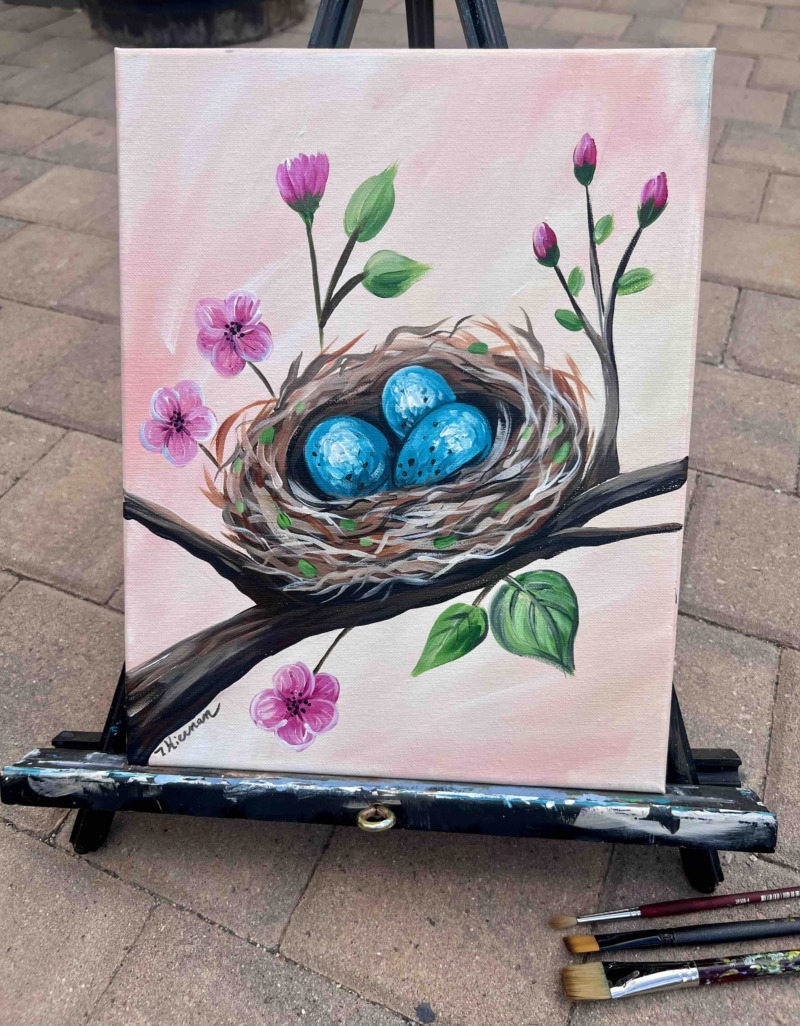
Finished
Sign your name and show it off!