Would you like to save this?
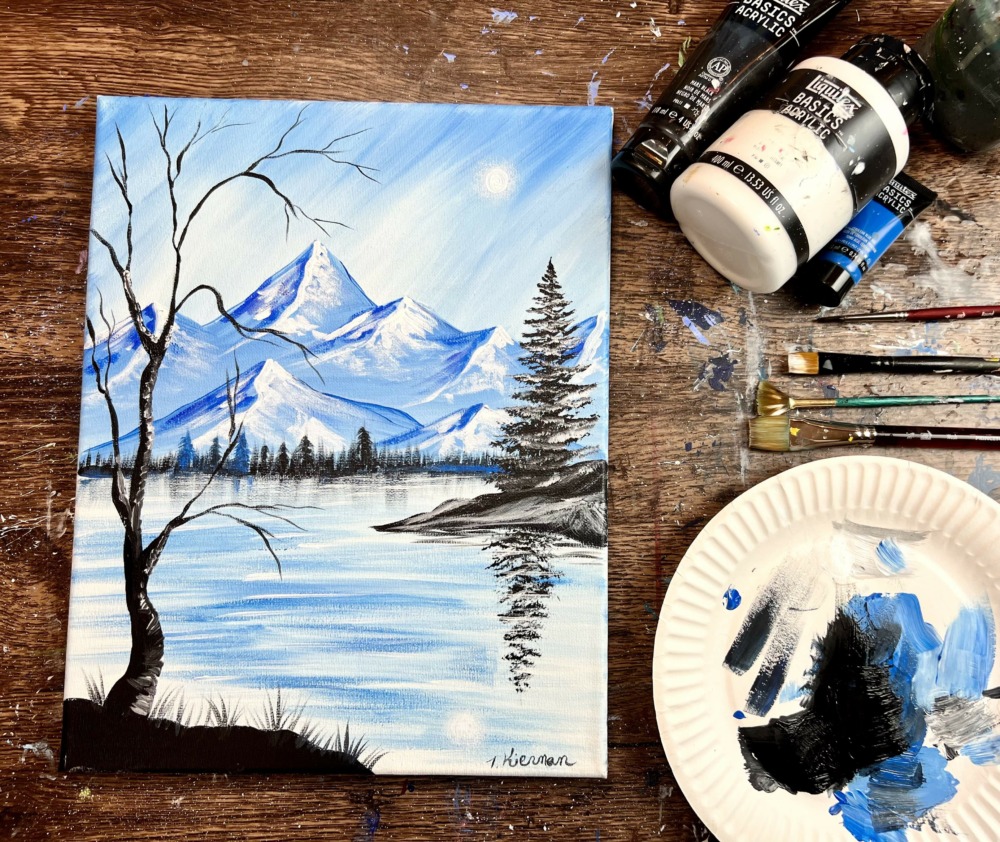
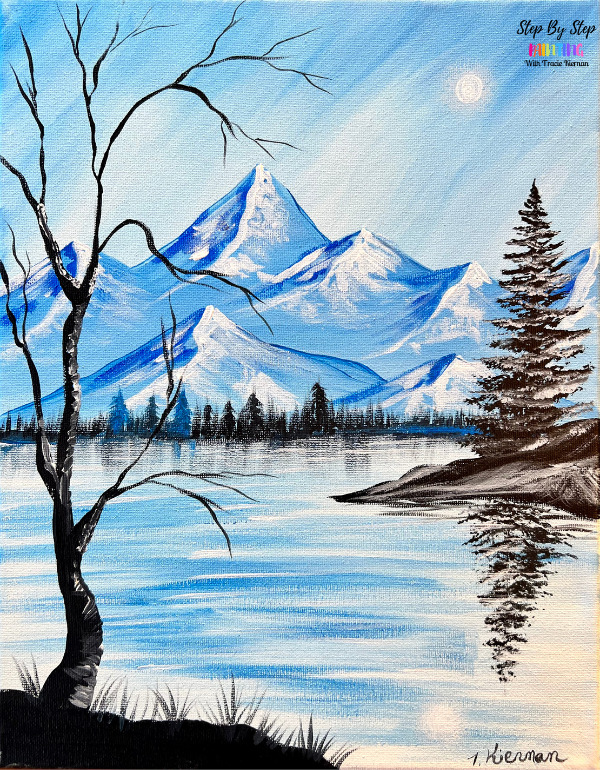
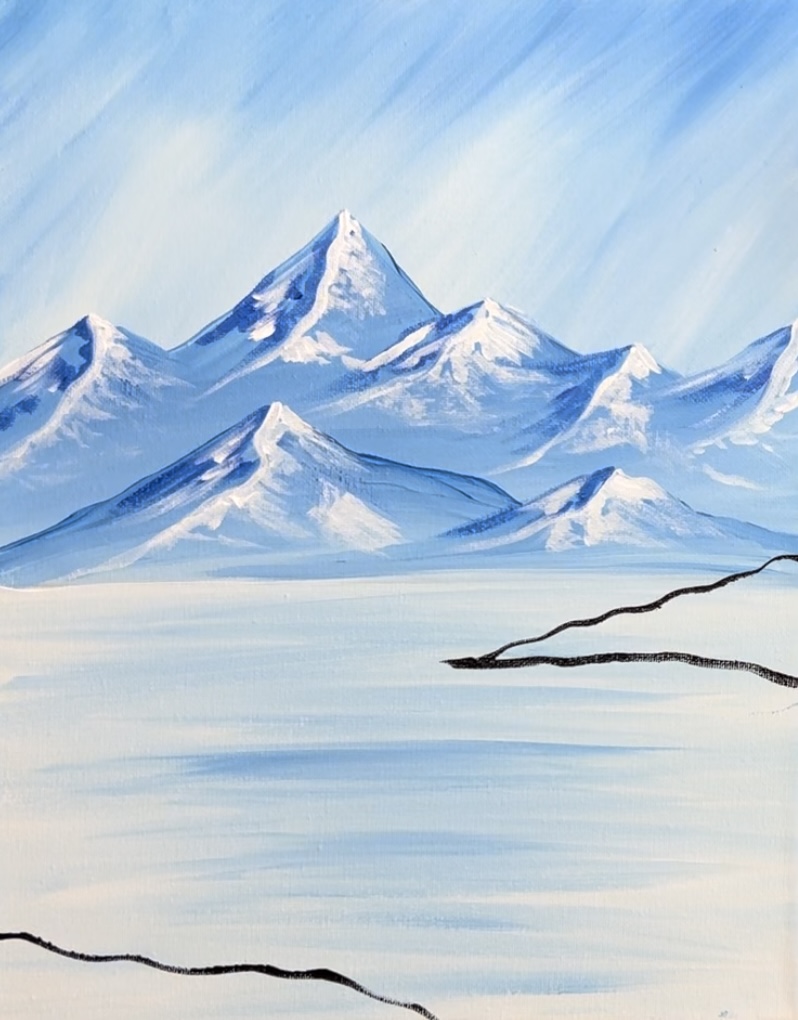
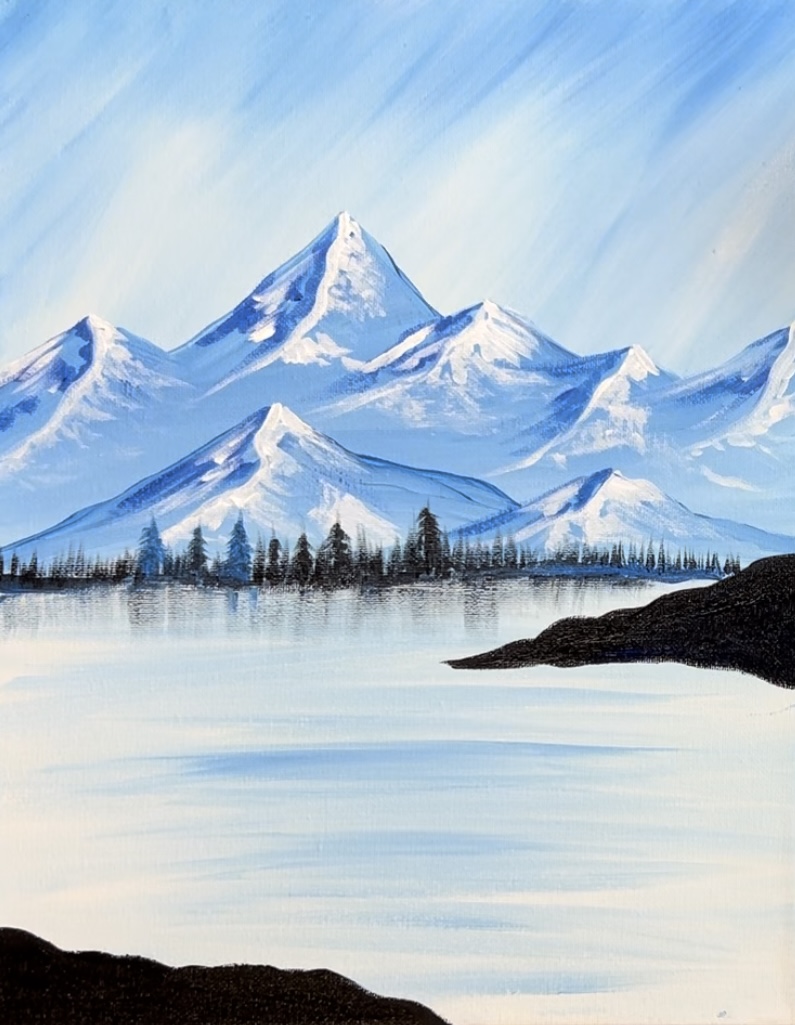
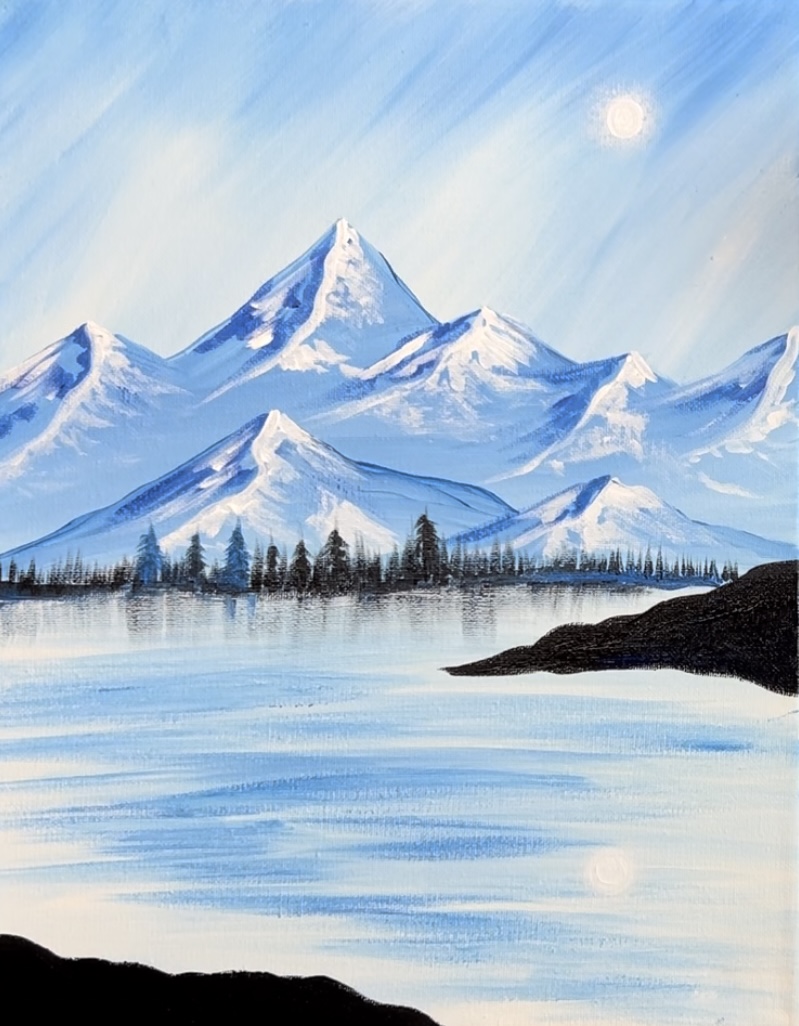
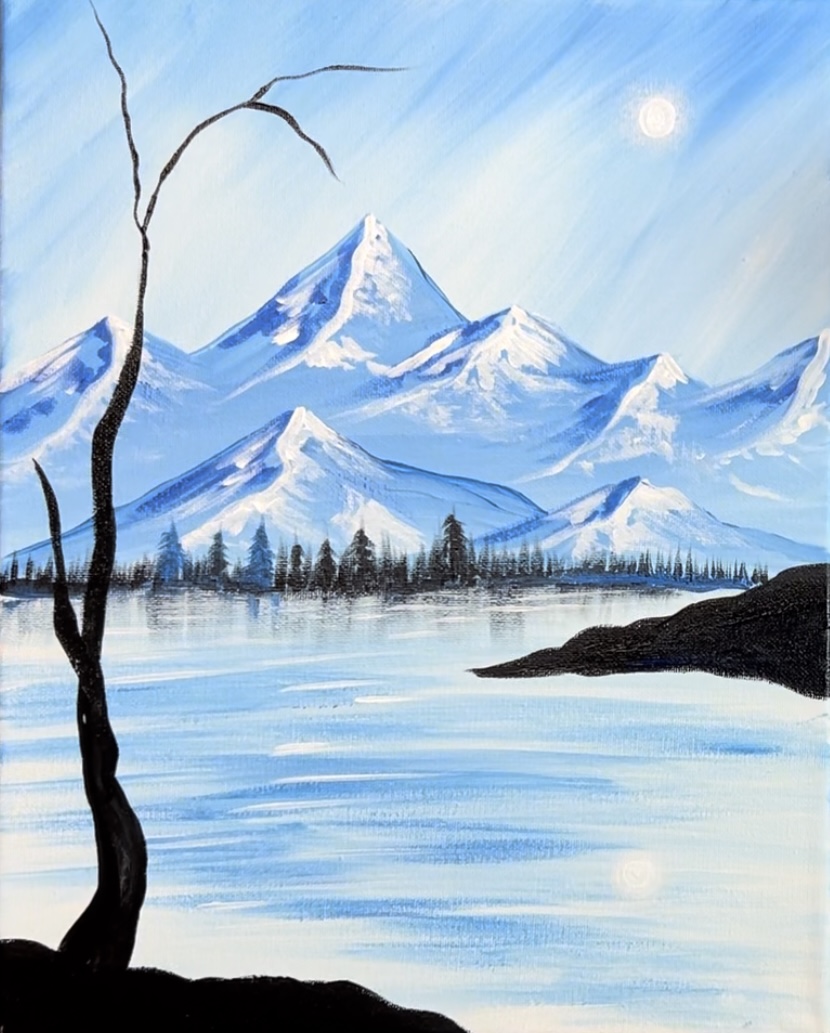
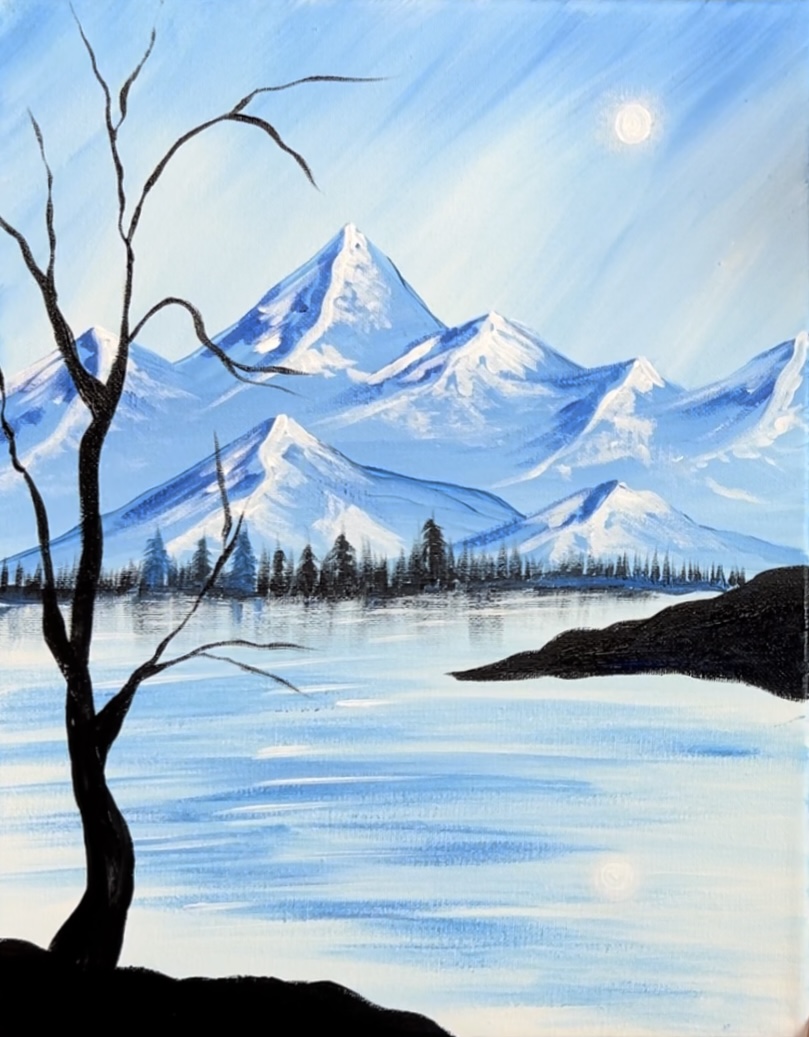
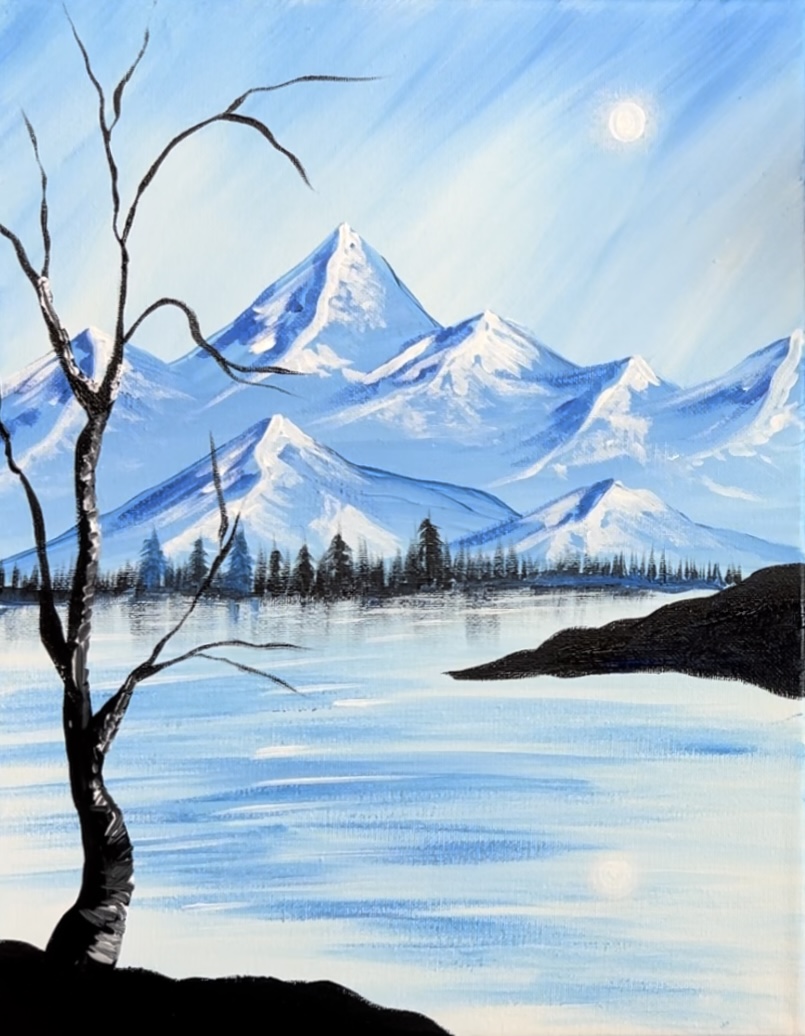
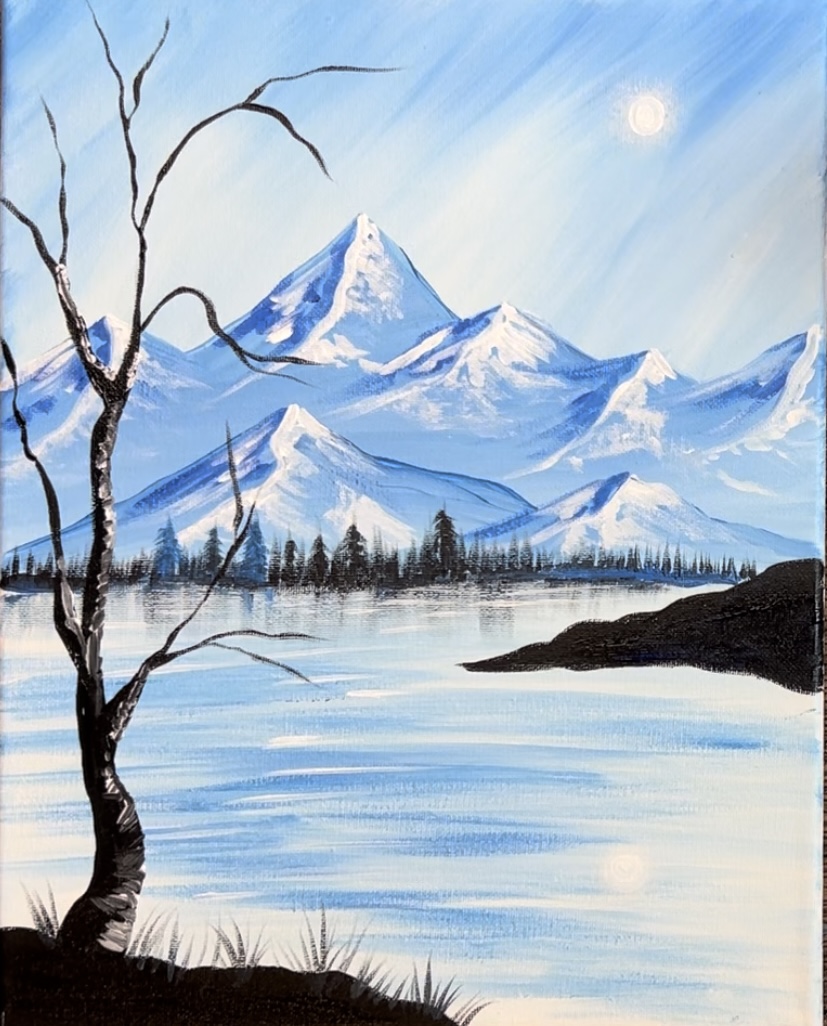
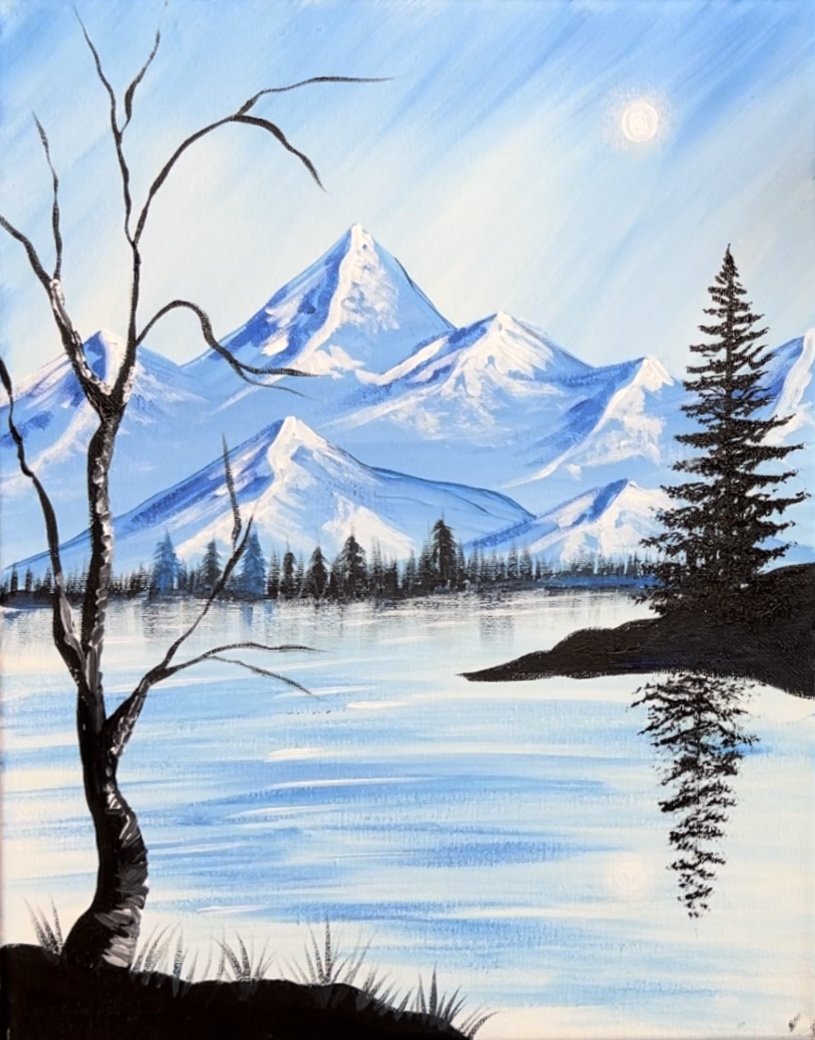
This acrylic painting tutorial demonstrates basic landscape painting techniques. You will learn how to paint a snowy mountain over a lake and two different kinds of trees.

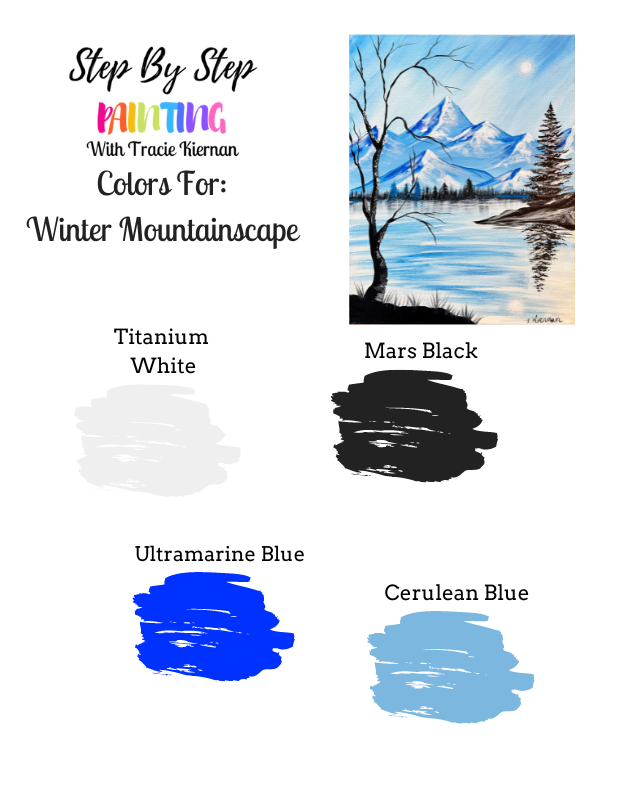
I only used 4 colors for this tutorial! You can also omit one of the blues to make it a 3 color painting. If you love working with a limited color palette, you can see some of my other tutorials that have 5 or less colors.
Enjoy and happy painting!
Materials
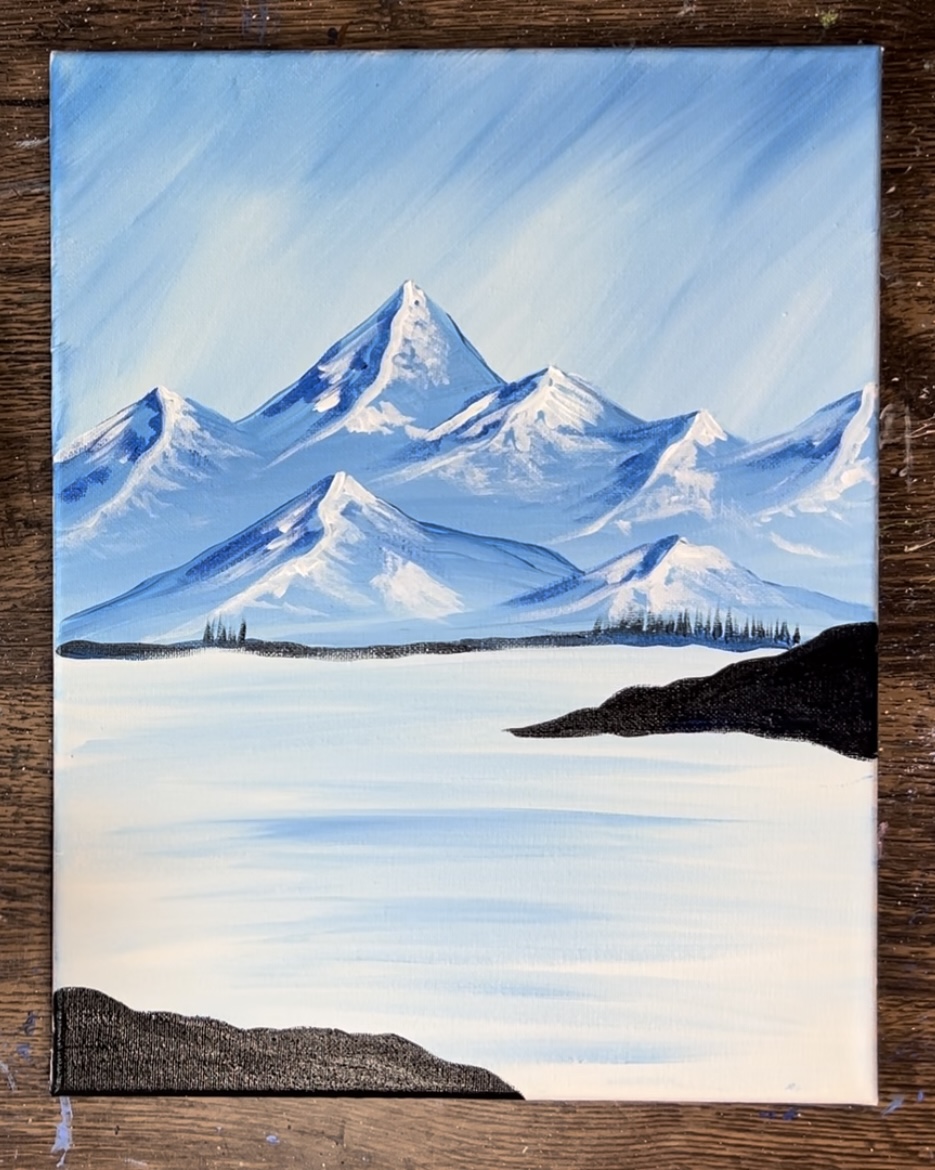
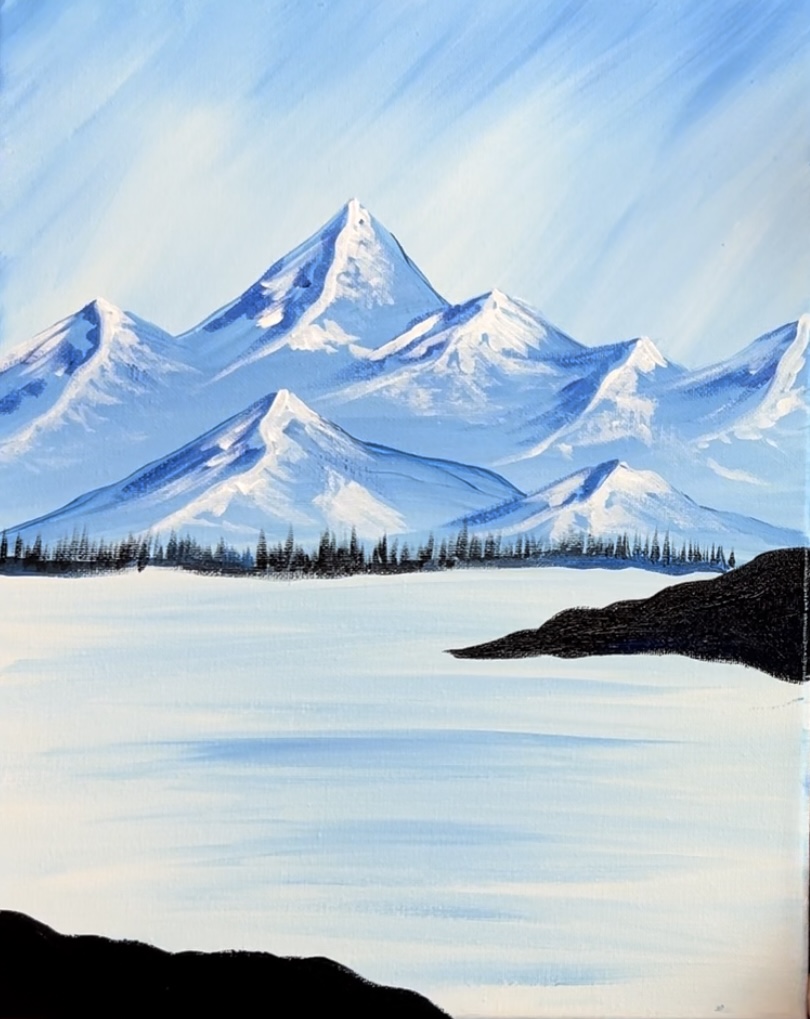
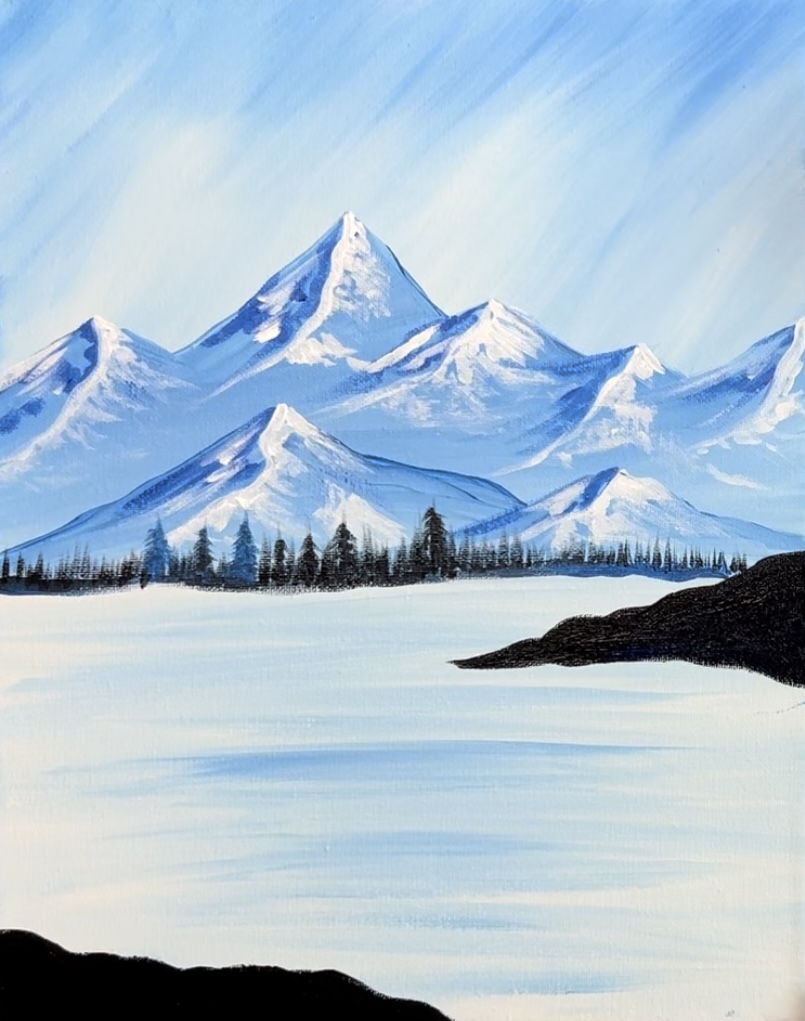
Snowy Mountainscape
Materials
- 11 x 14 Canvas
- Acrylic Paints
- Brushes
- Ruler
- Pencil
Colors
- Titanium White
- Mars Black
- Ultramarine Blue
- Cerulean Blue
Brushes
- 3/4 Flat Brush
- 4 Round Brush
- Fan Brush
- 12 Bright Brush
Color Palette
I used Liquitex BASICS paints for this tutorial. If yo are using a different brand, you can use the color chart below to help you match your colors.
Using Craft Paints?
If you are using craft paints such as the Apple Barrel Craft paints, I would recommend subbing to: white, black, bright blue (add a little white to it) and too blue.
Directions At A Glance
Video
Step By Step Directions
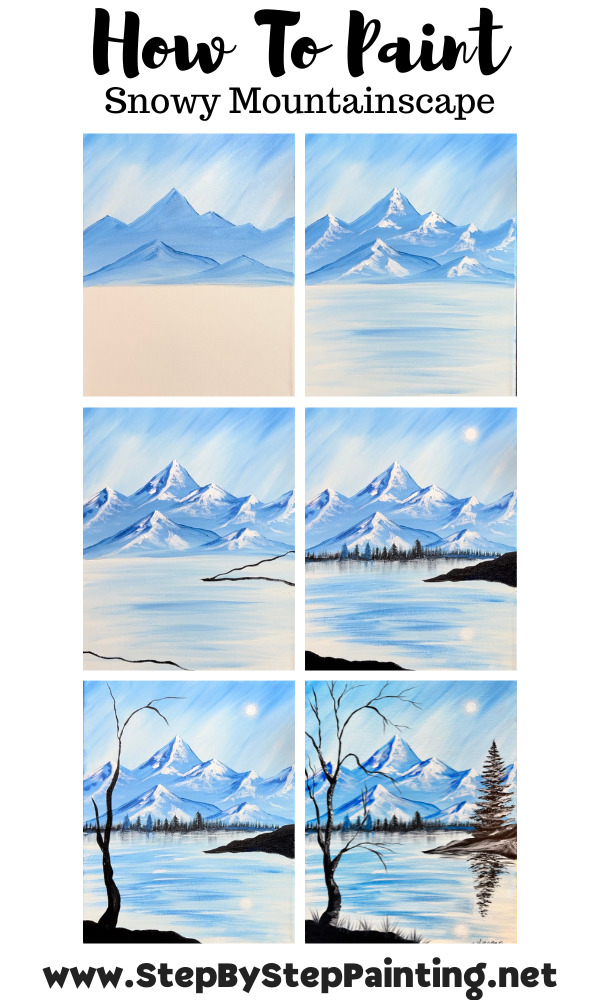
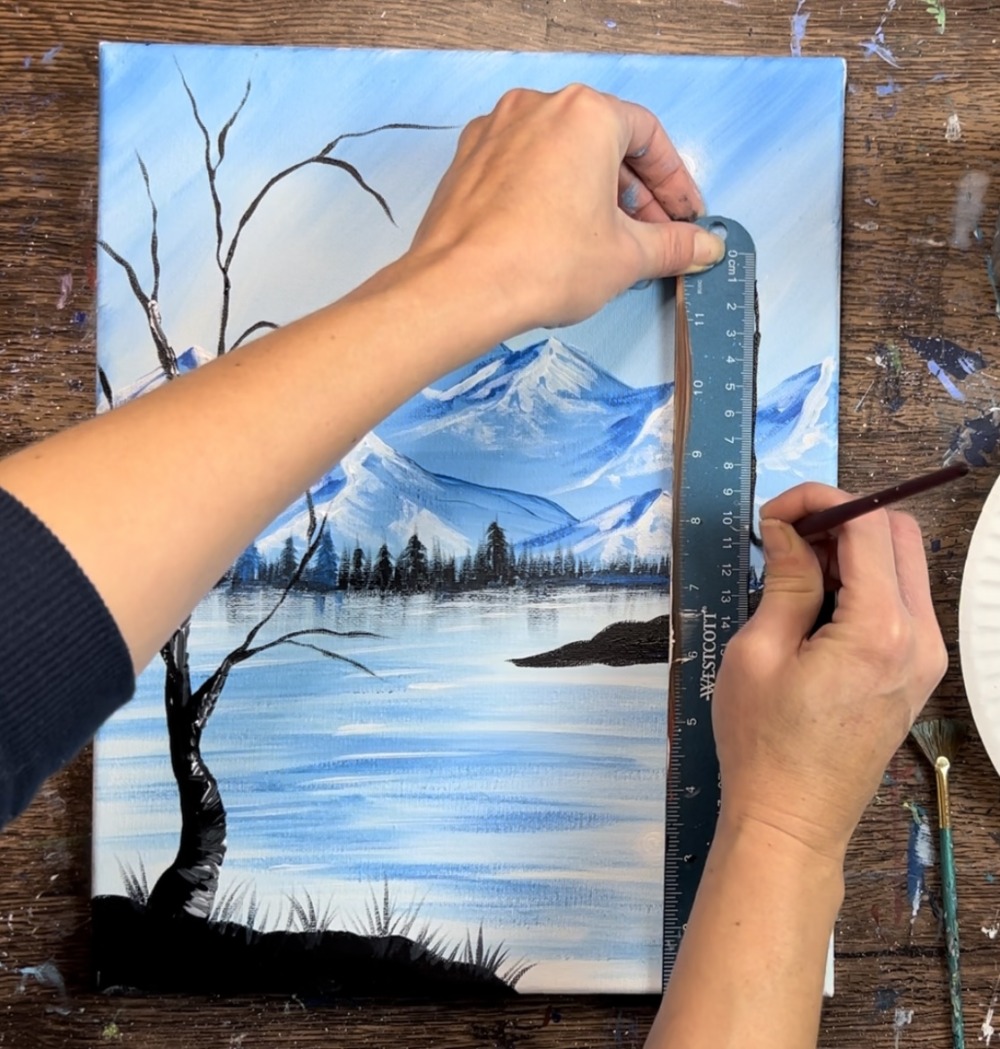
1. Draw Horizon Line
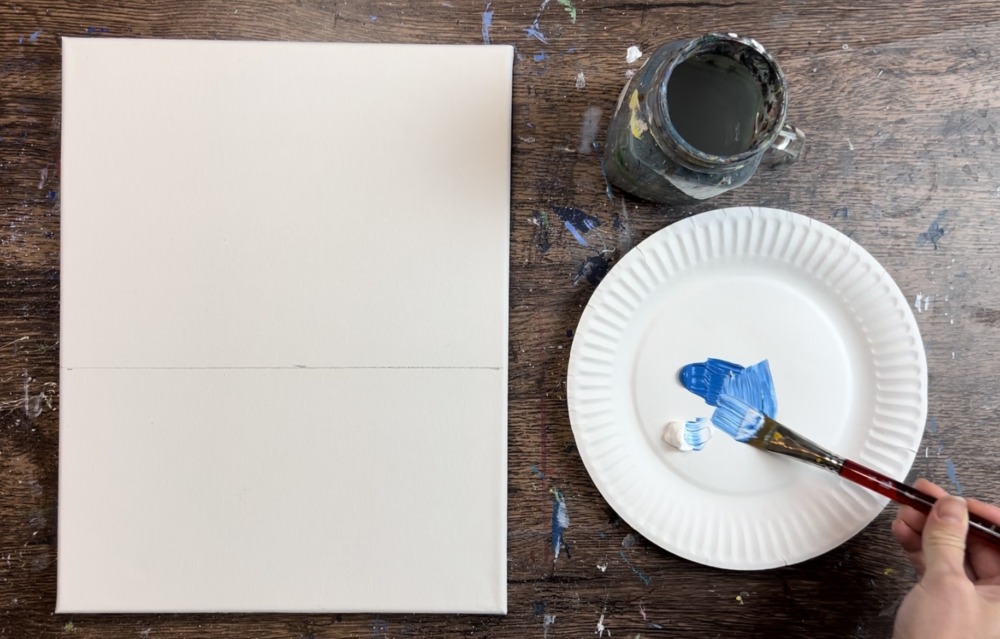
Position your canvas so that it is vertical. Next, measure about 6″ from the bottom of the canvas. Use a ruler or straight edge to draw a horizontal line.
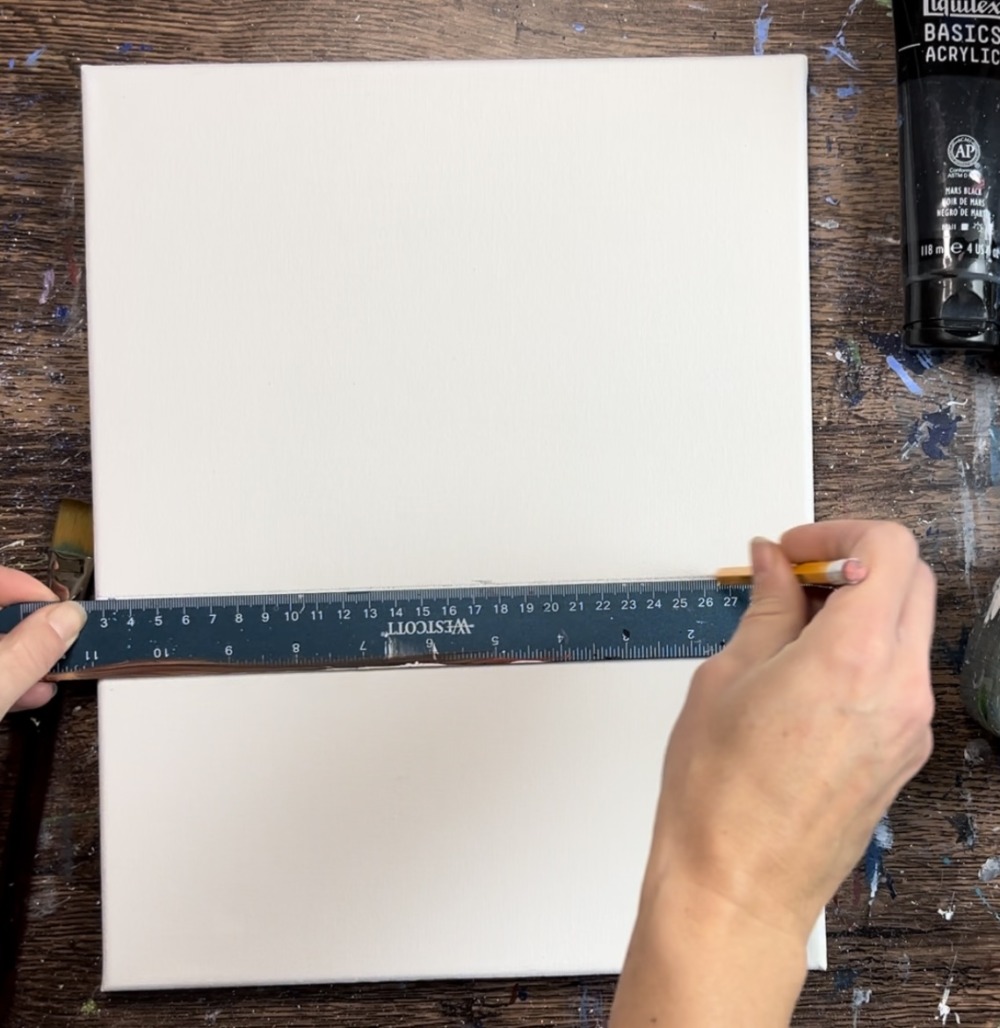
This line will divide the top from the bottom of the landscape painting.
Next, load your palette with cerulean blue and titanium white. On your palette, use a 3/4″ flat wash brush to mix equal parts what and blue together. This will create a lighter tint of that cerulean blue.
2. Paint Sky
Paint the sky using diagonal strokes. Allow your sky to be darker towards the top and lighter towards the middle.
Use the 3/4″ flat wash brush and start with that lighter blue. Paint in diagonal strokes. Then add more white to your brush and blend white diagonal strokes as you work your way further down the canvas.
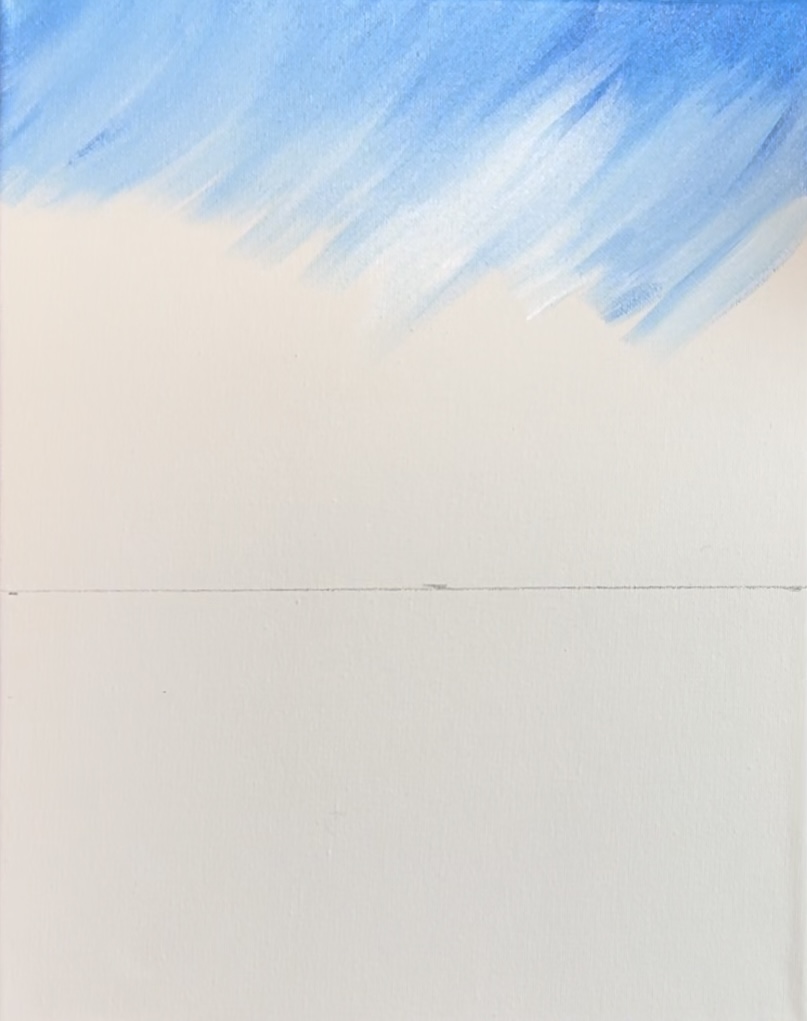
Keep adding more diagonal strokes and allow the sky to get lighter as you work your way down. Add more white to your brush and less blue to create this gradient effect.
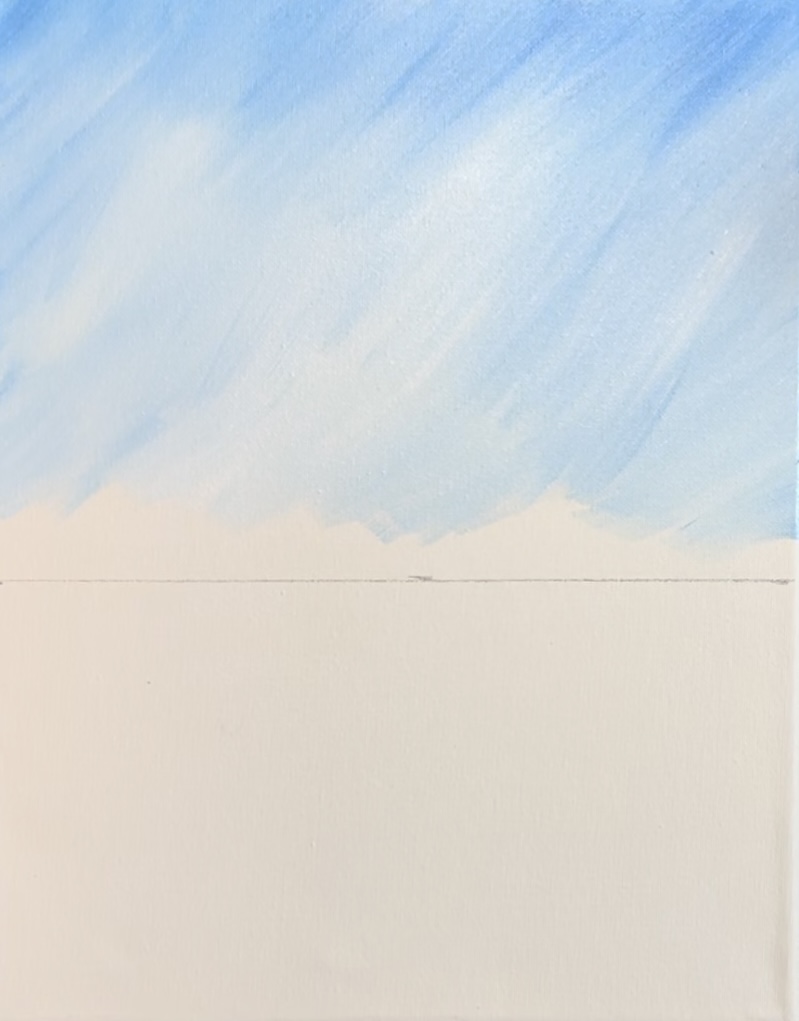
You don’t have to paint all the way down. Leave a small gap above the horizon line.
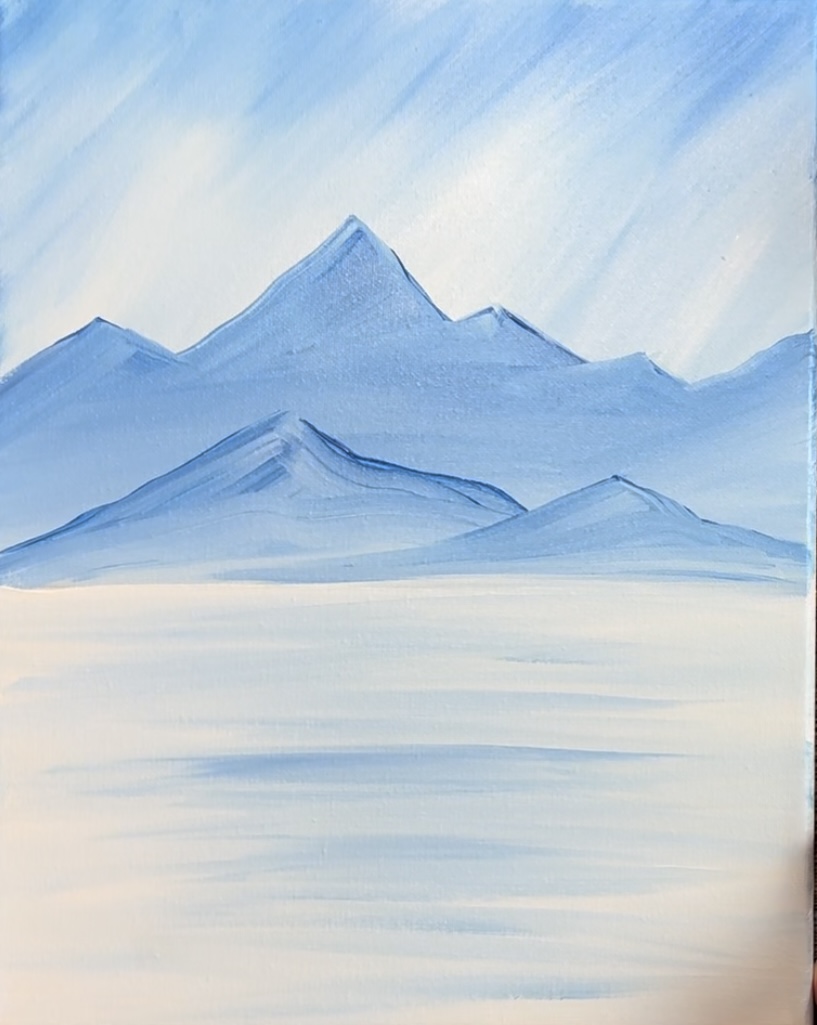
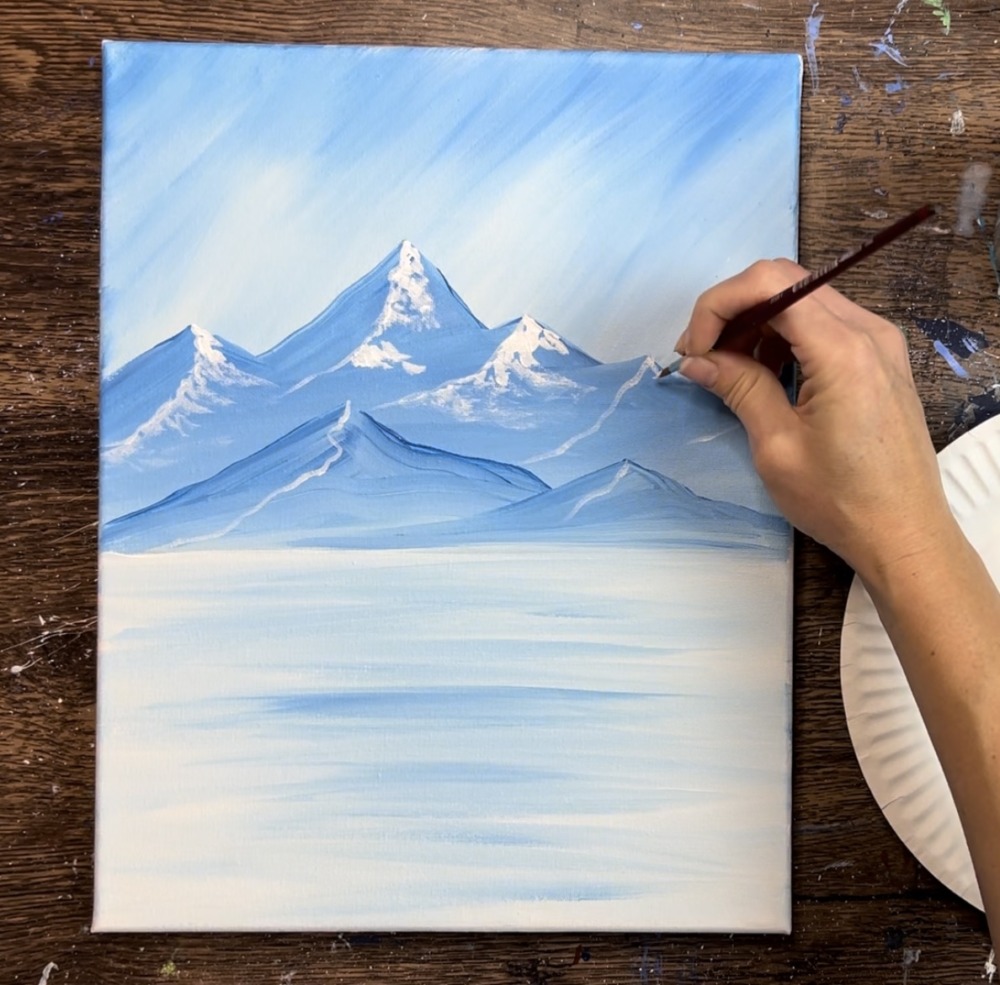
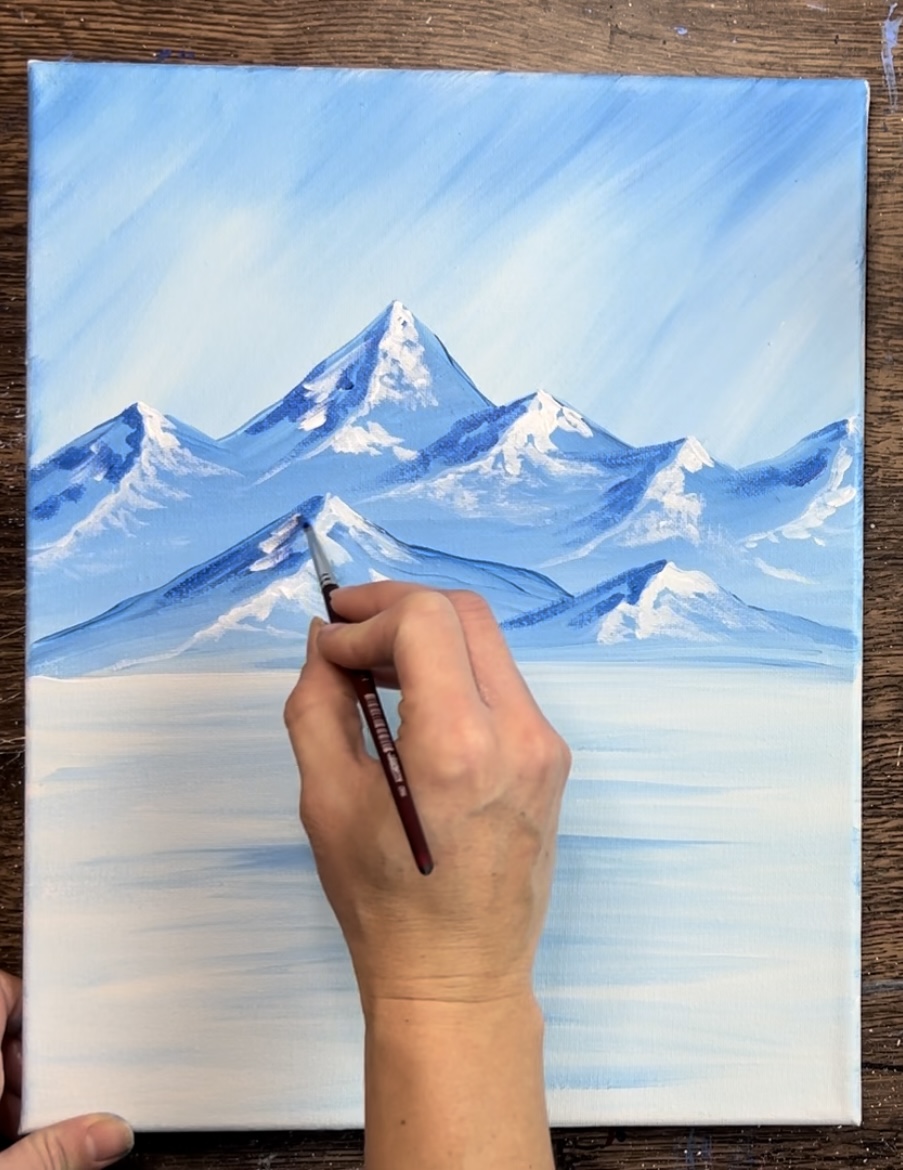
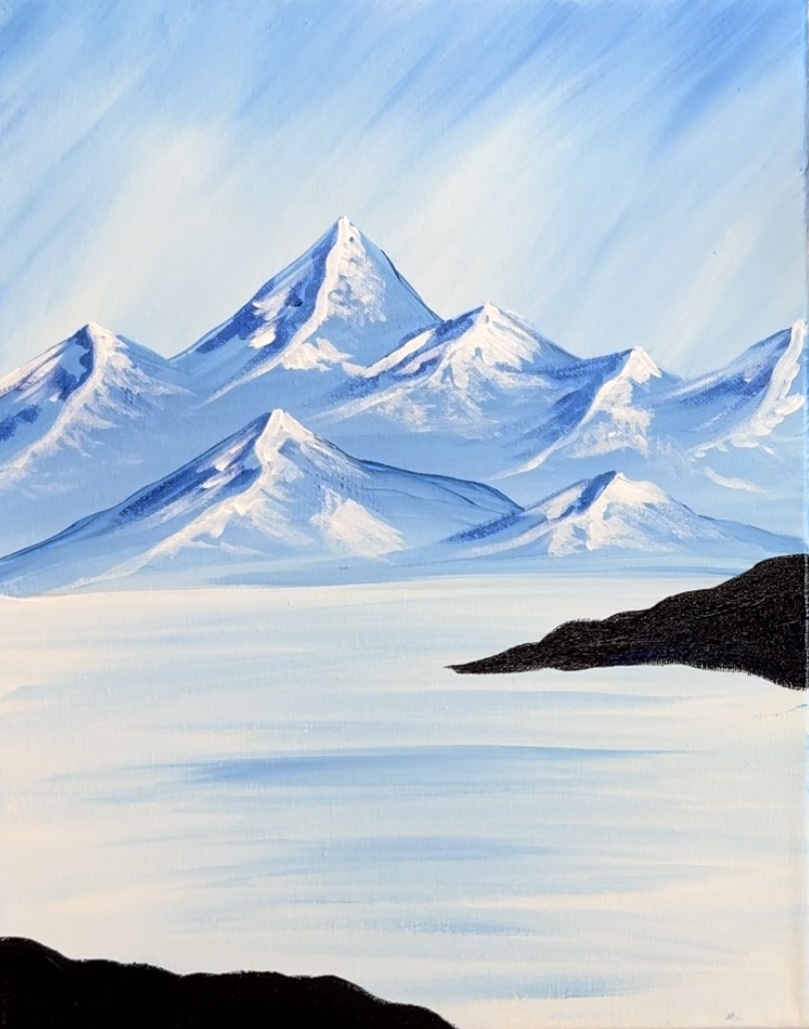
3. Paint Mountains (first layer)
Wipe your 3/4″ flat wash brush off. Then load just the tip of it into cerulean blue. Use the tip of your brush to paint the edges of the mountain peaks. Start on the left and paint the first mountain peak so that it rises to about the midpoint from the horizon line to the top edge of the canvas. Then create another peak that is slightly higher. Create three more lower peaks.
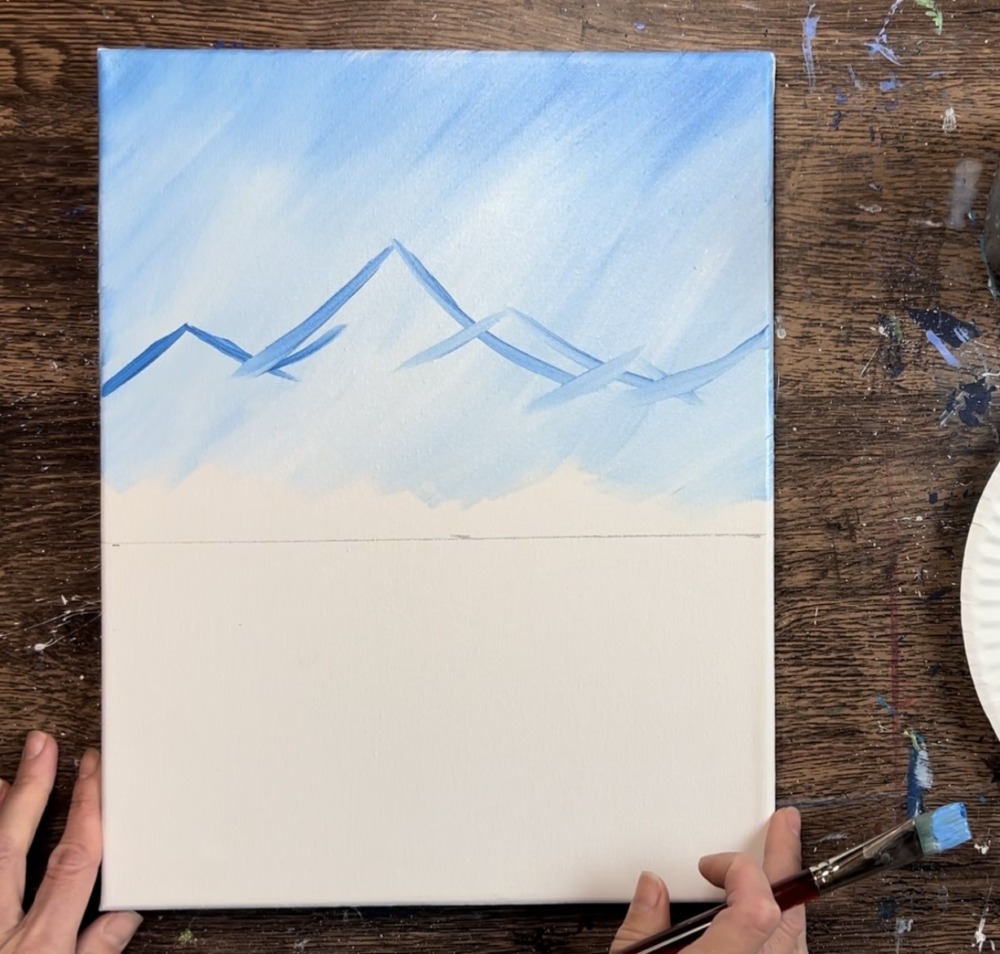
Next, use the cerulean blue (not mixed with white) to fill in the mountains from the line to the horizon line. Use the 3/4″ angle brush to fill this in using angled strokes. Don’t worry about textures or overlapping of the mountain peaks at this point.
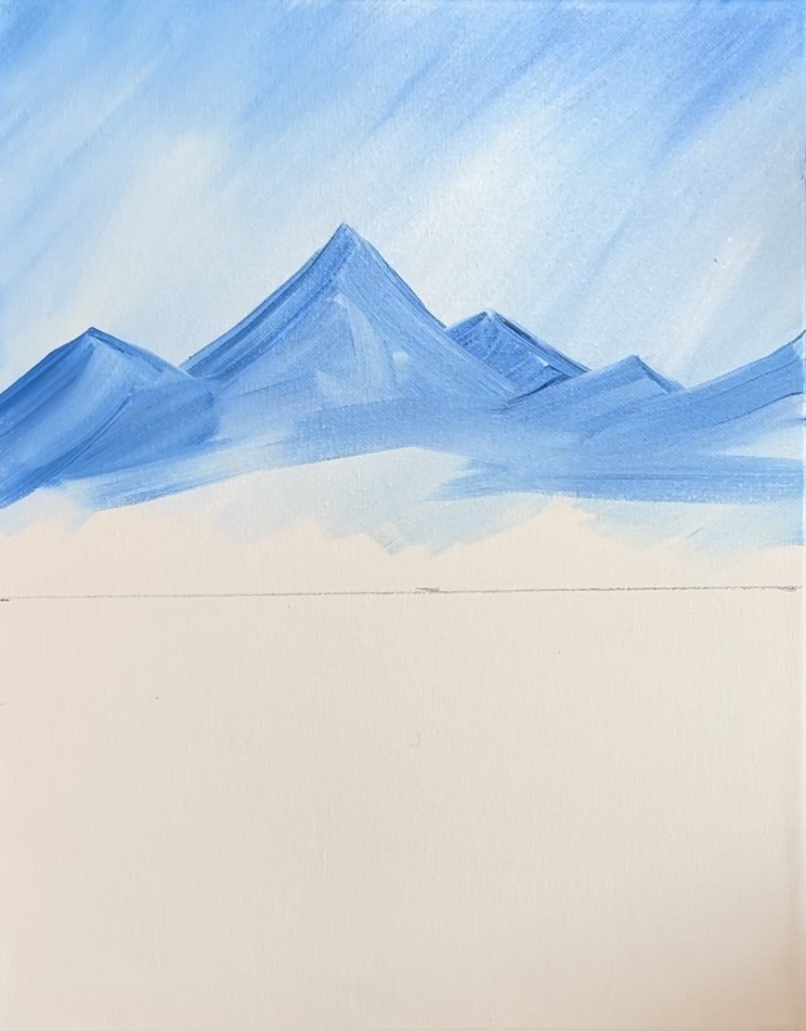
Then load your brush in a small amount of titanium white. Blend the white on the bottom base of the mountain so that it is lighter in this area and darker towards the top of the peaks.

Next, use your 3/4″ wash brush to create two more mountain peaks on the bottom. Then fill them in using the cerulean blue and make them slightly lighter on the bottom.
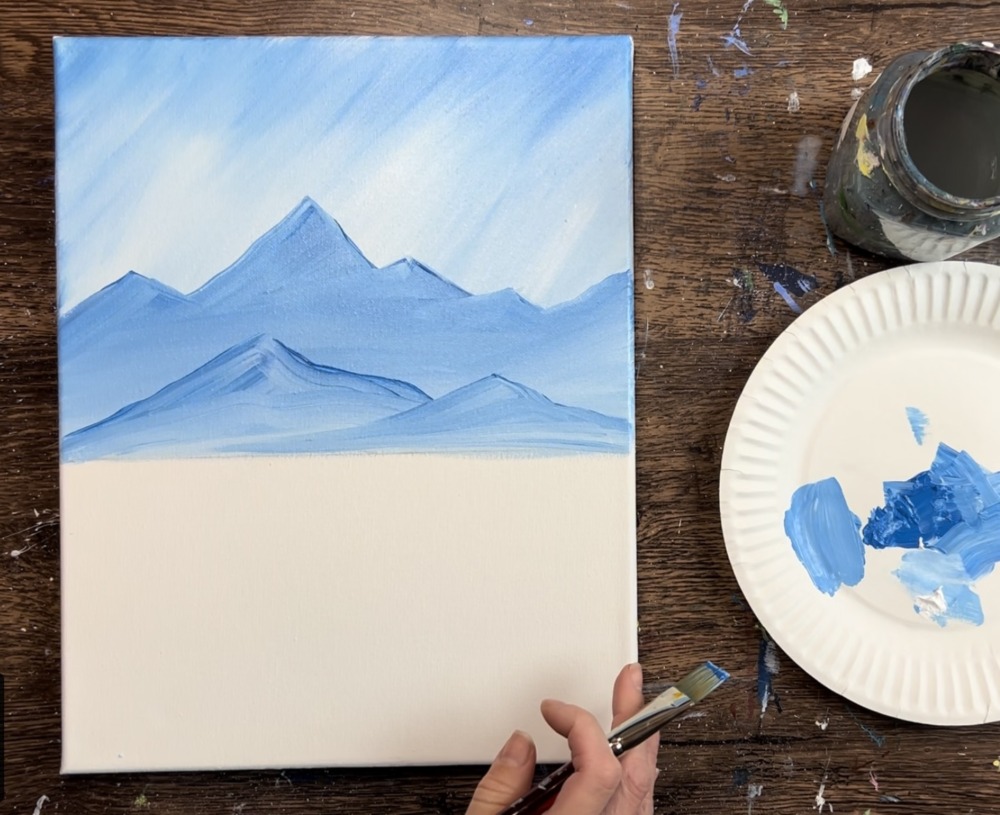
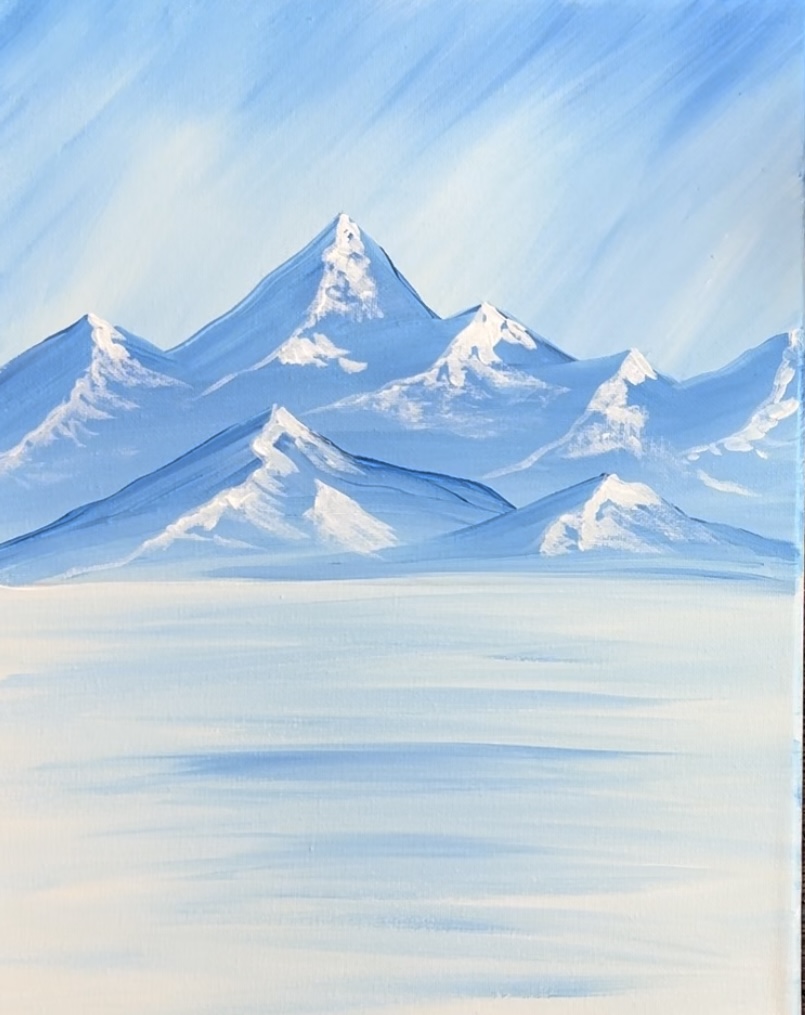
4. Paint Water (first layer)
Use the 3/4″ flat wash brush to paint the lake. This is going to be the entire canvas from the base of the mountain to the bottom edge of the canvas. Use about 3 parts titanium white and 1 part cerulean blue but don’t blend both of the colors all the way.
Paint loose, left and right strokes with the white and blue so that the lake area is filled in. This should be a very light blue color, lighter than the mountains. Leave a few darker blue streaks in the water for water ripples.
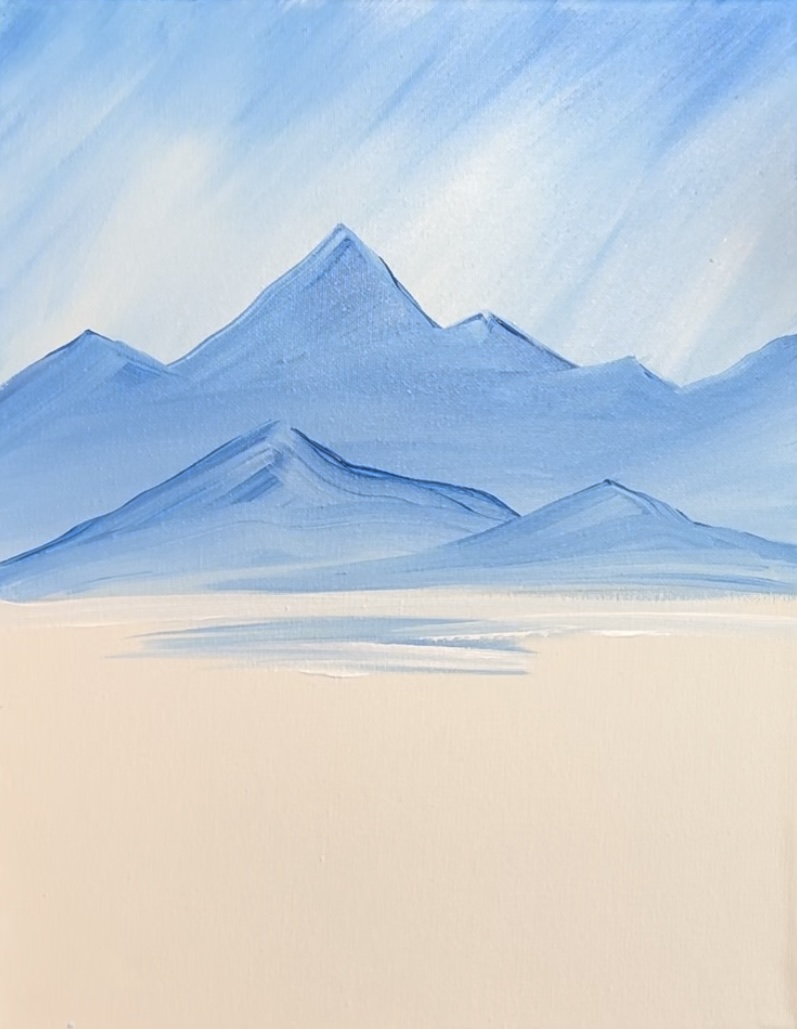
5. Paint Snow On Mountains
To do the snow on the mountains, use your #4 round brush and titanium white. Start out by dividing each of the mountain peaks in half.
Use your round brush to paint a squiggly line going diagonal starting at each of the points and going diagonally to the left.
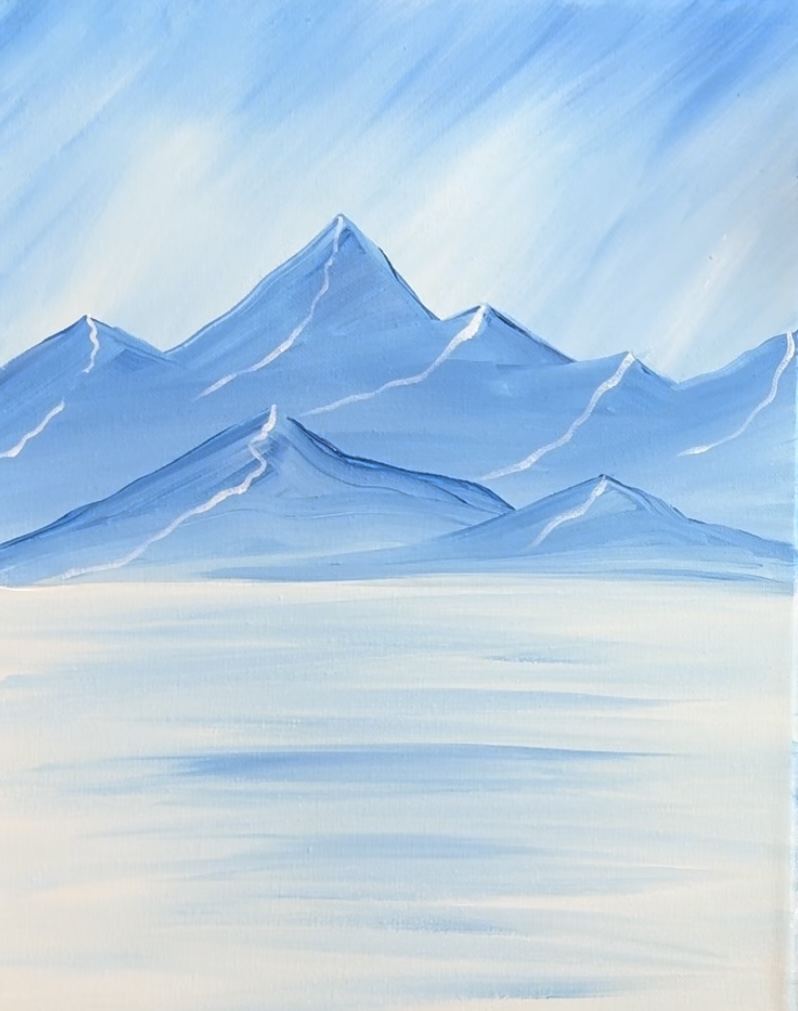
On the right side of this division line will be the white snow and on the left side of the line will be darker, shadowy areas (and some snow too).
Use your round brush for this next step as well. Load just the tip of the brush in white. Then paint blotches of snow that go down in a diagonal direction to the right.
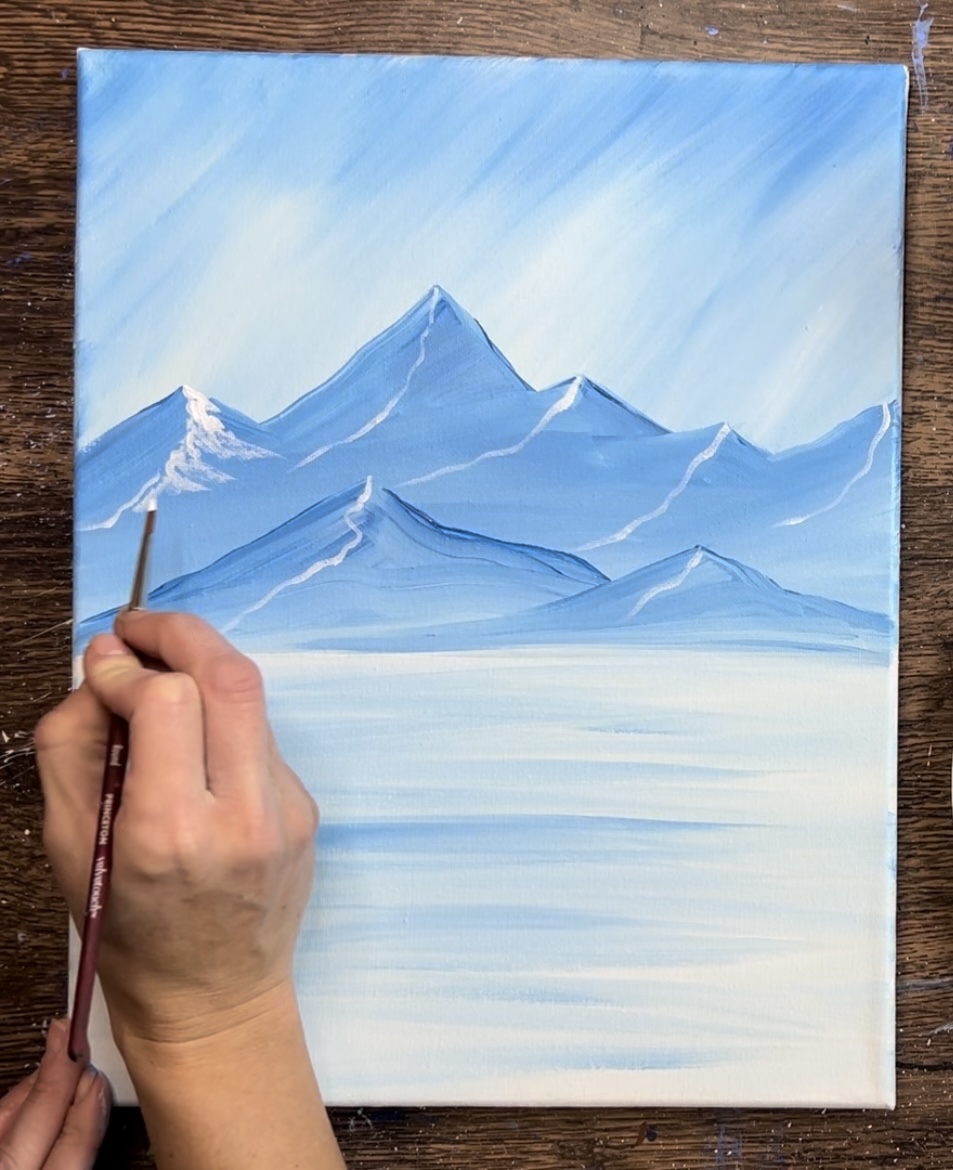
Allow the blotches to be thicker and brighter closest to that division line and sort of fade away and get lighter further to the right of the mountain. Do this to the right side of each of the mountain peaks.
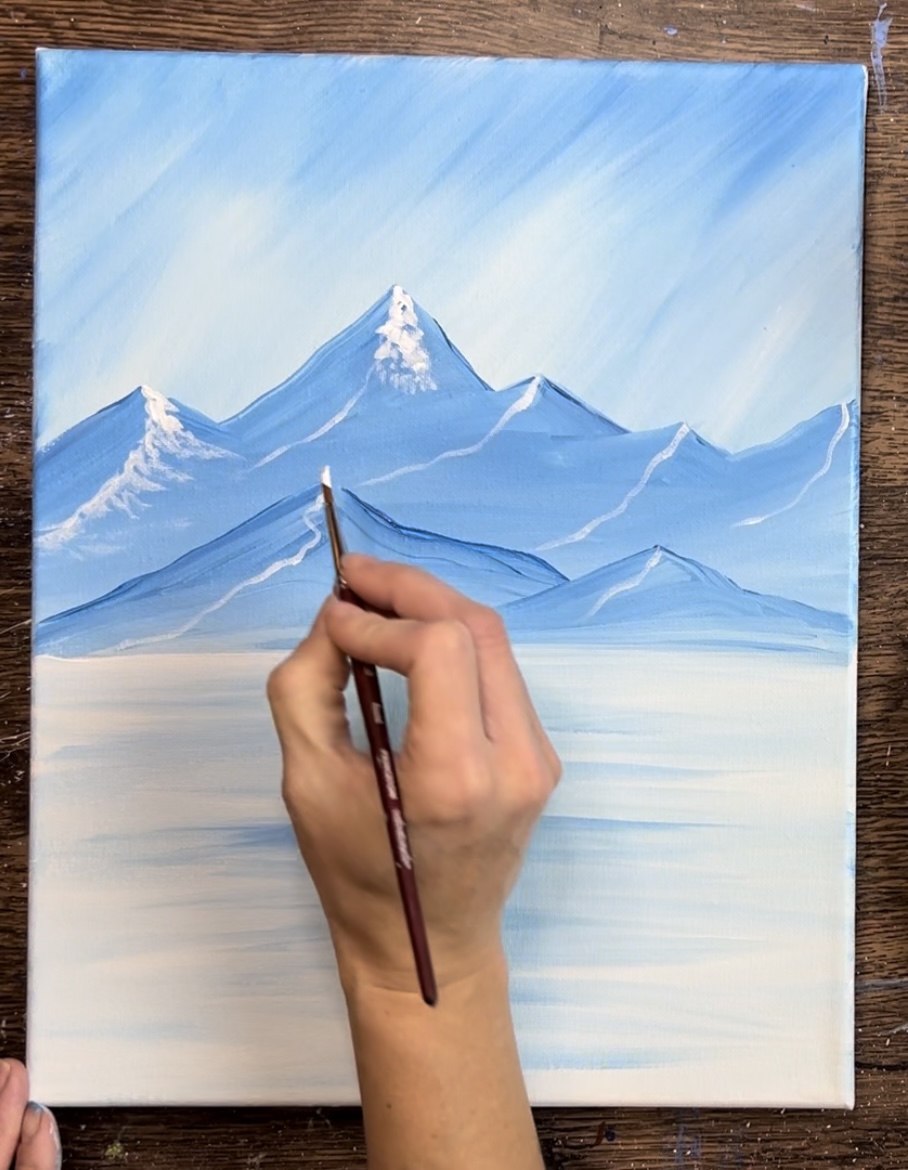
Tip: drag each stroke in a diagonal direction and leave a lot of the darker blue still showing through. It should be very blotchy!
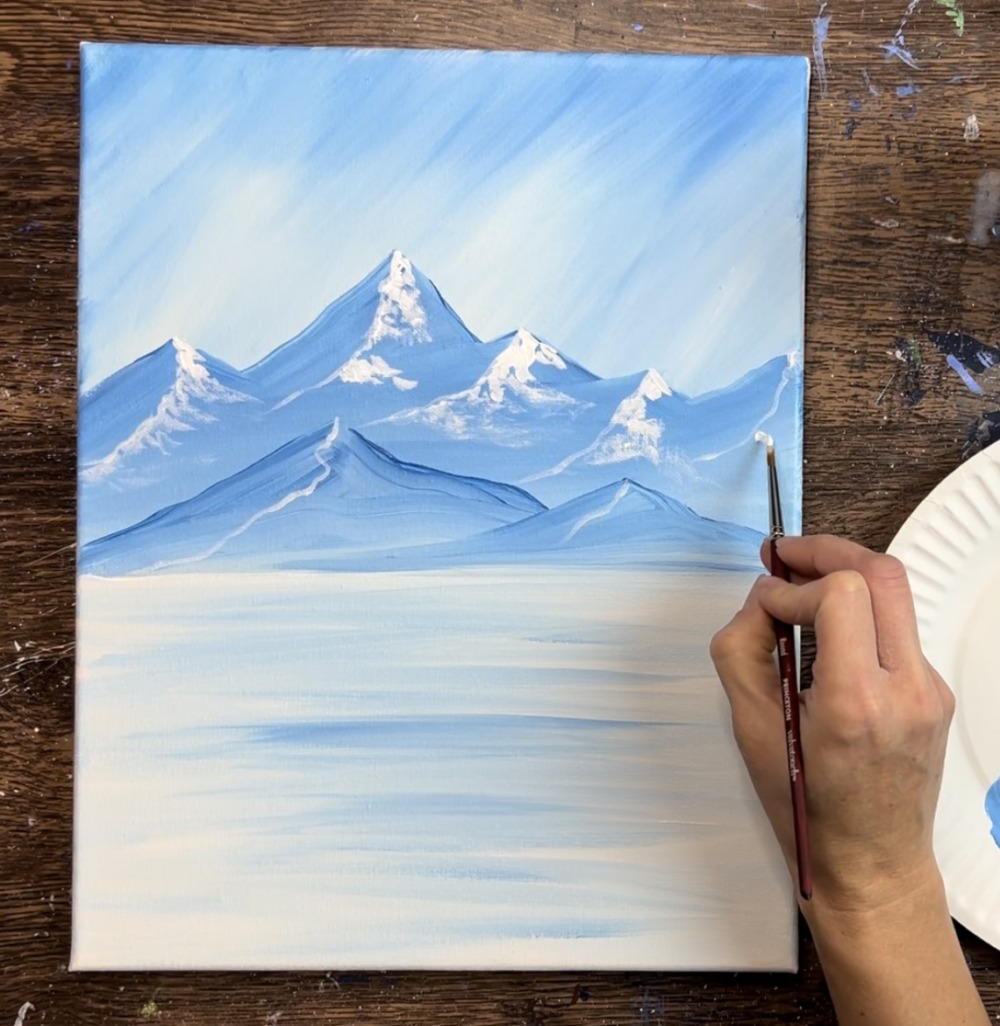
Do the same thing to the lower mountains in the front.
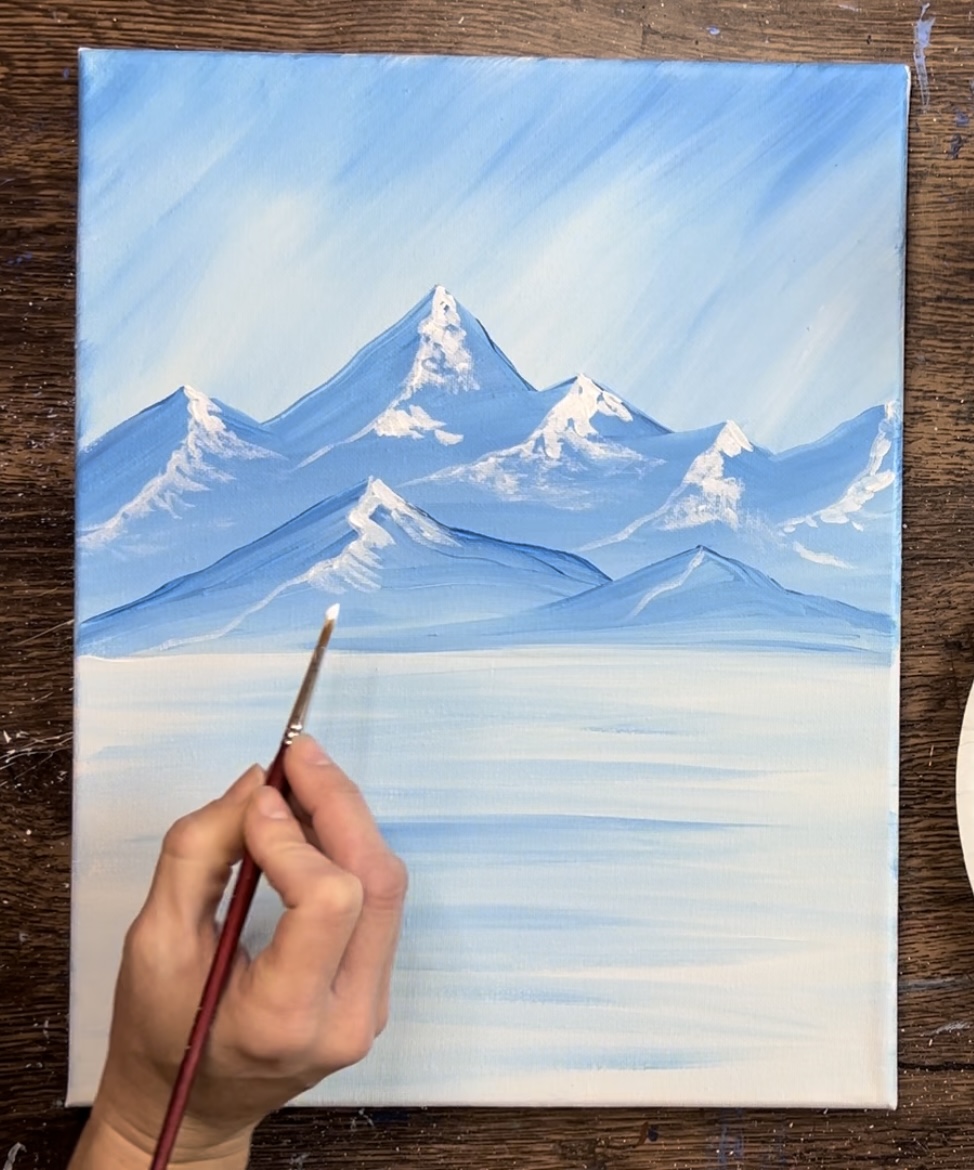
Next, paint darker blotches of shadowy areas on the mountain on the left side of each of the division lines. Load your palette with ultramarine blue. Paint these using the same technique as you did with the white.
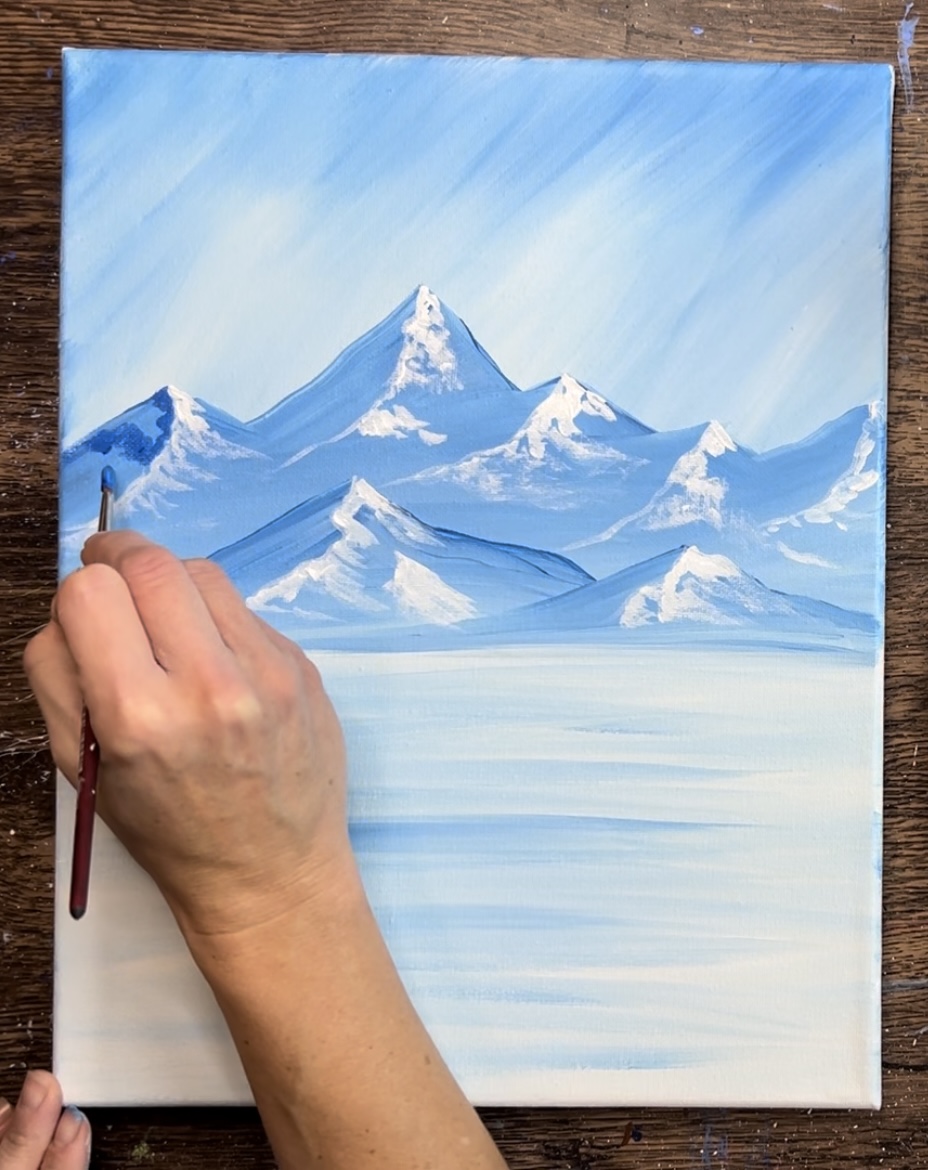
Leave a lot of the blue from the first layer of the mountain still showing through. Do this to the left side of each of the mountain peaks.
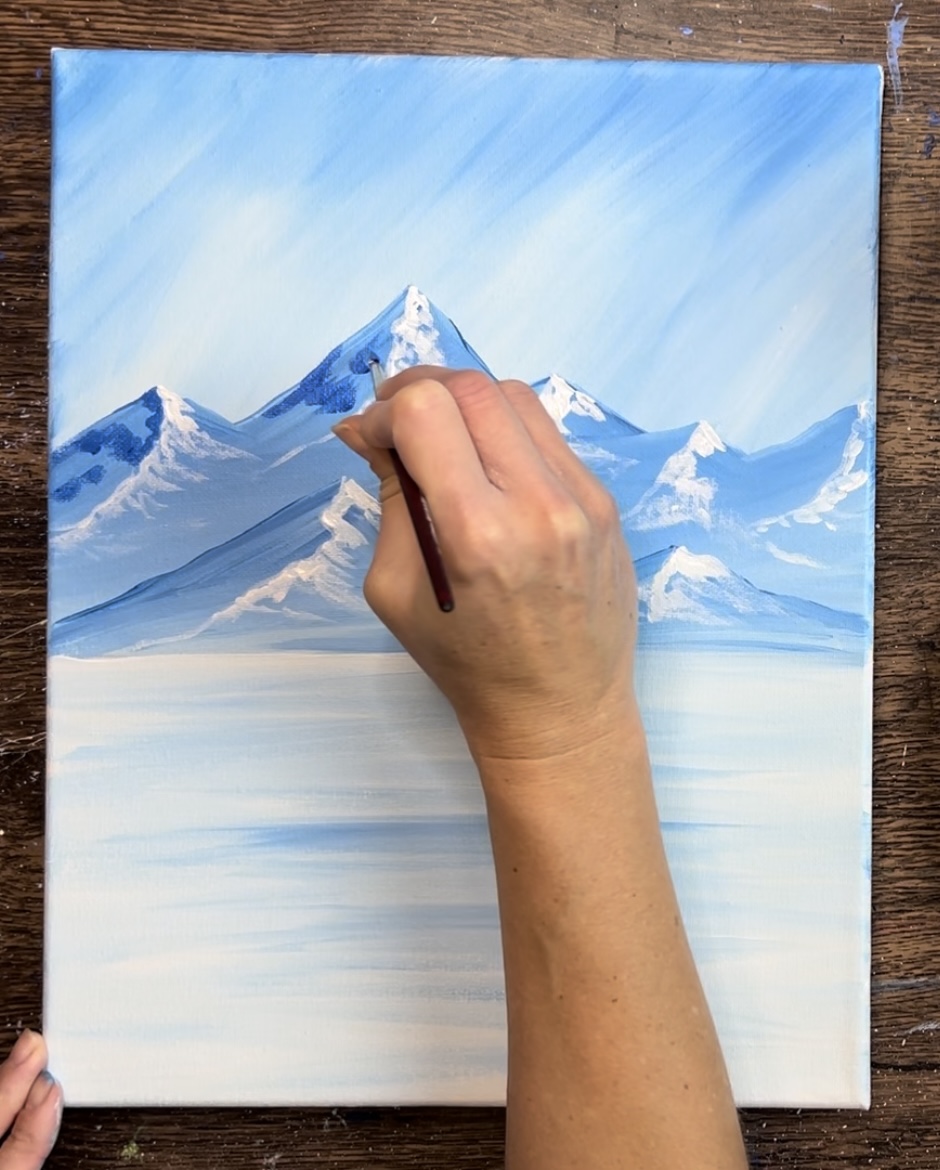
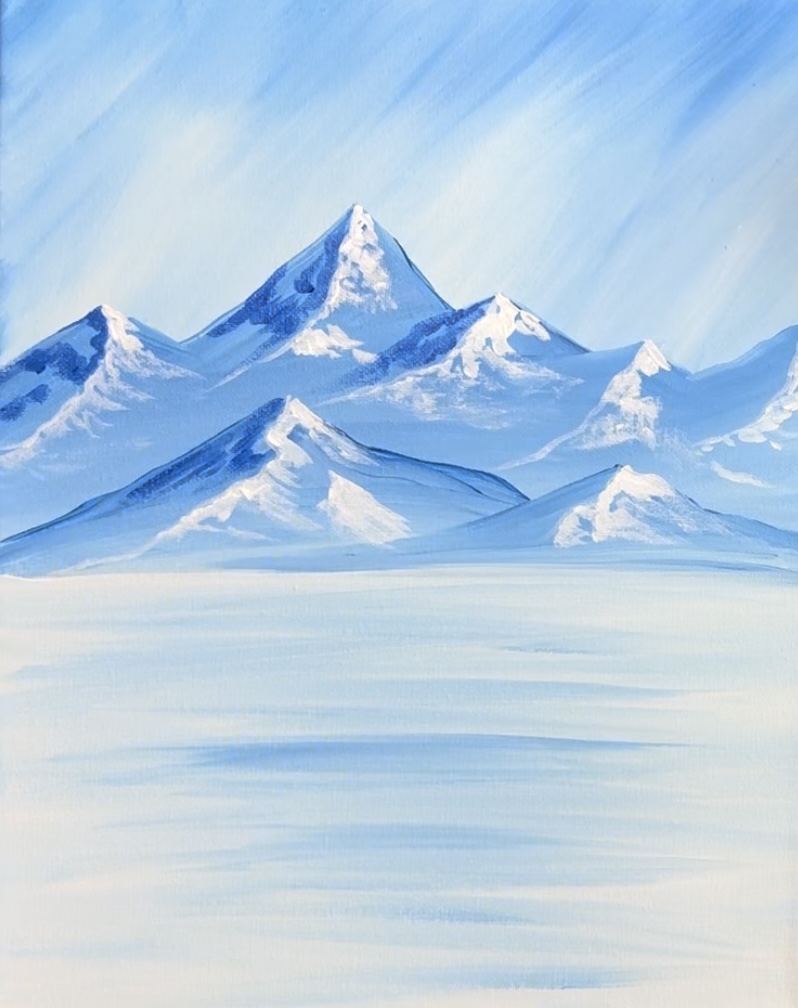
Then add a small amount of white to your round brush. Add a small amount of white blotches to the left side of the mountain peaks. This may overlap some of your darker shadows you just painting. Make sure to do only a small amount. There should be a lot of brighter white on the right and not so much on the left.
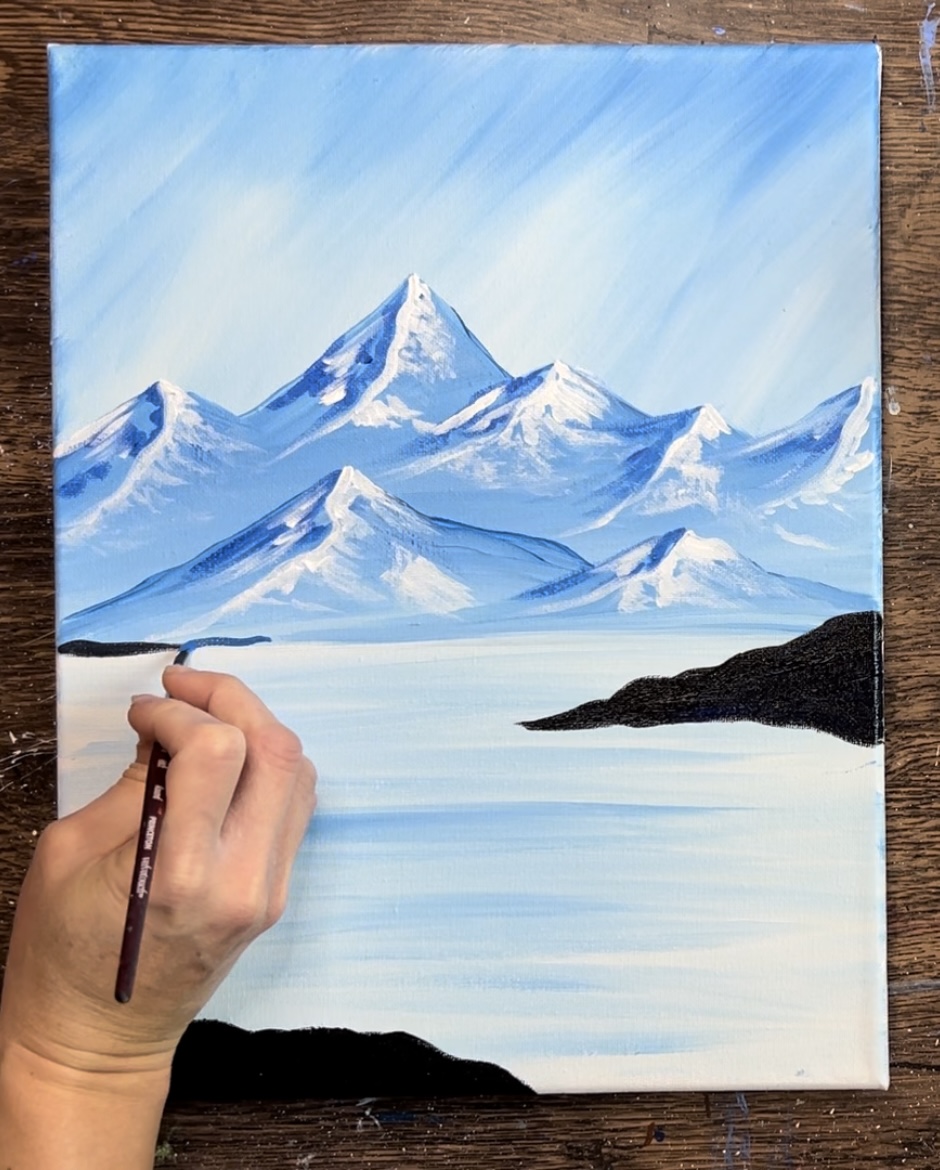
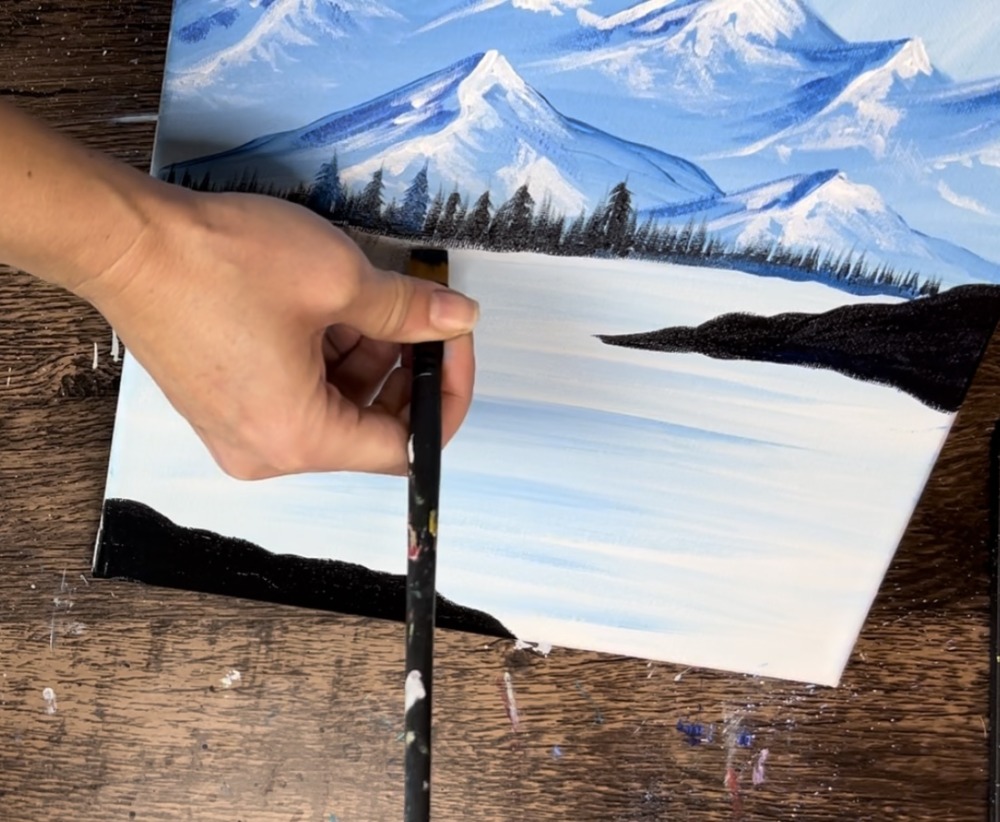
6. Paint Land Areas
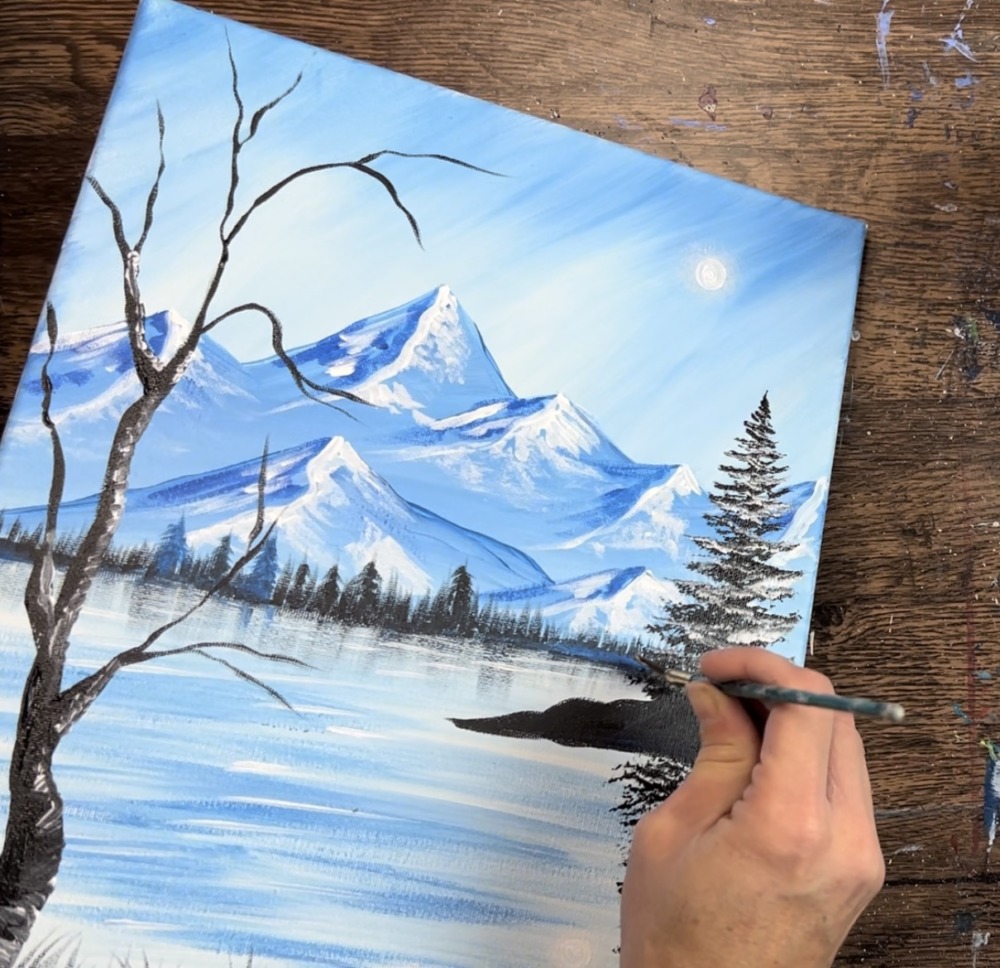
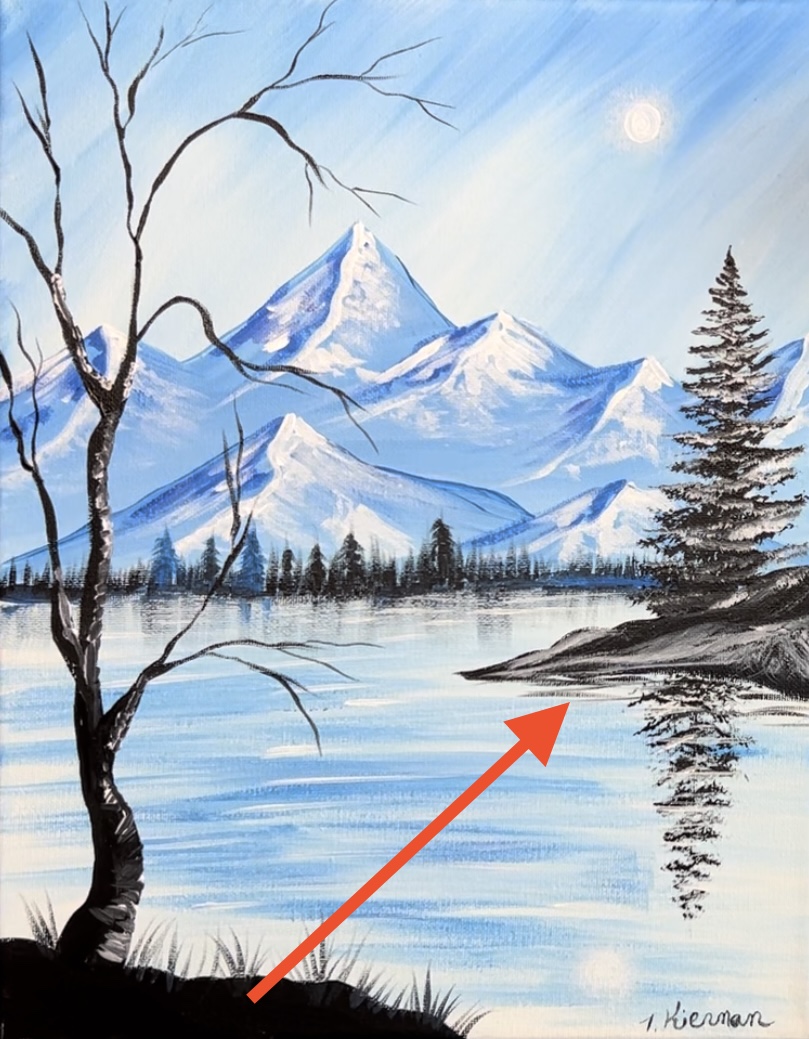
Use your #4 round brush and mars black to paint two land areas. Paint a peninsula area in the upper right. Paint it so that it reaches the mid point of the lake and the height on the right goes a little bit above the horizon line.
Next, paint each of the land areas solid black. Optional: mix some blue into the black to make this a blueish black. Use the 4 round brush to paint these two areas.
7. Paint land & trees in distance
Use the #4 round brush for this technique. First paint a long horizontal land area across the horizon line.
This extends from the far left of the canvas all the way to behind the peninsula on the right. Optional: add a little cerulean blue to the black.

Next, paint vertical lines across this land area to represent pine trees way in the distance. You do not need to add branches to these lines.
Use the 4 round brush to stroke each vertical line starting at the line and stroking upwards. Release the pressure of the brush as you stroke up so the line goes thinner.
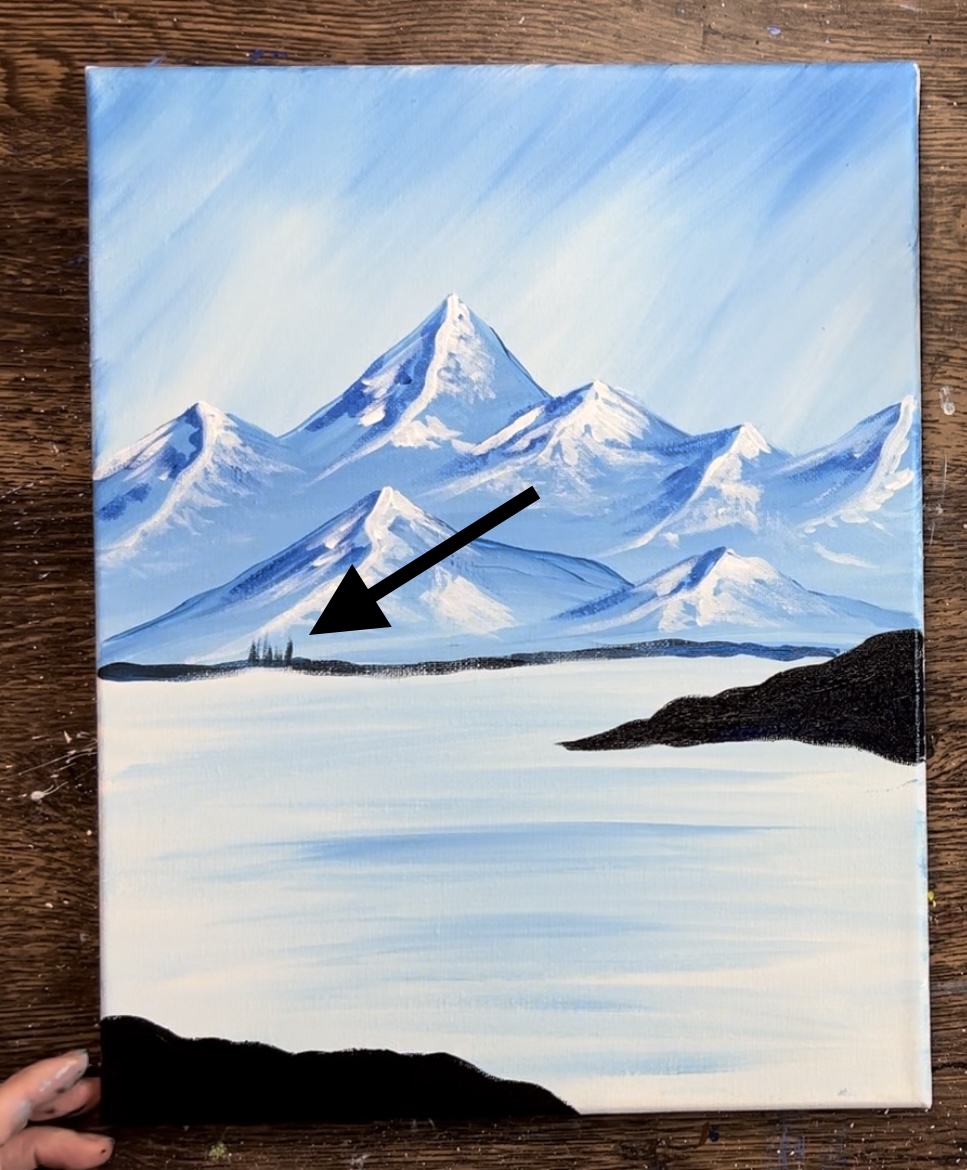
Paint a variety of these lines. Some are taller, some smaller. Some thinner and some thicker. Some of the lines are pure black and some have blue in them (you can load your brush in the blue as well).
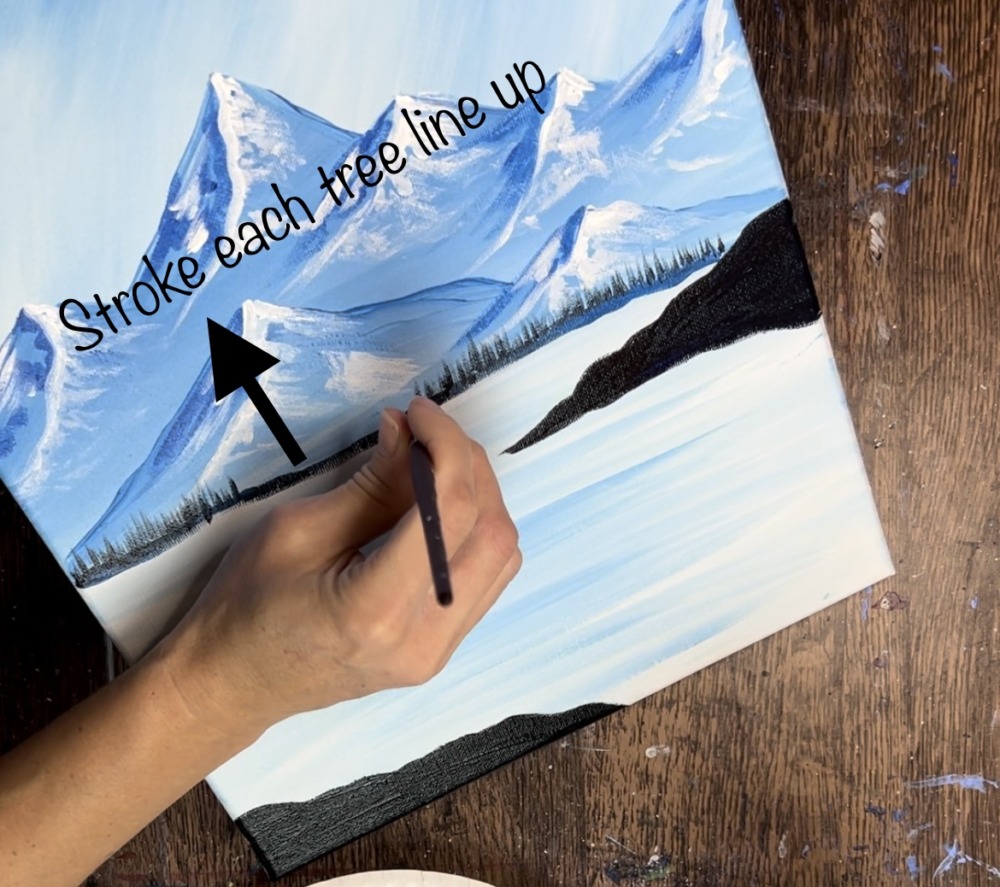
Optional: add some branches to some of the larger trees to make them appear closer.

Next, dry brush reflection in the water under the pine trees. Load your 12 bright brush into mars black. Then wipe the brush off with a soft towel so only a small amount of paint is left on the brush. Apply the paint by stroking just below the pine trees. Stroke downwards.
Do this all across under each of the trees. This “dry brush” creates the illusion that the paint is reflecting in the water.
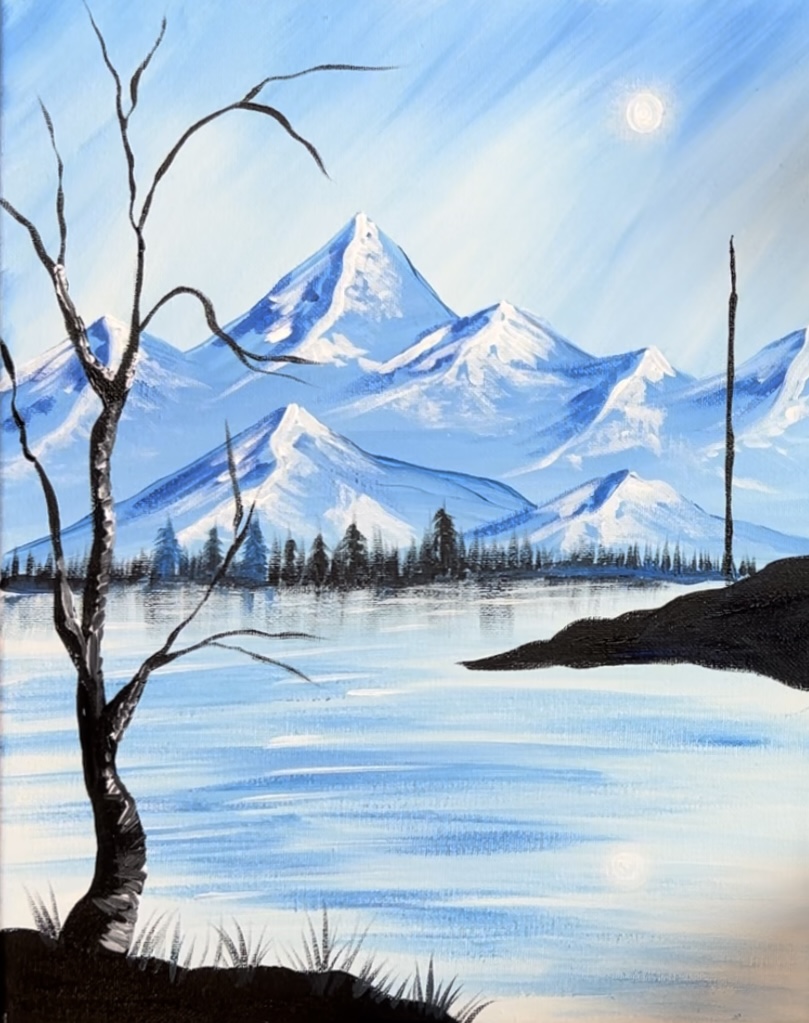
8. Paint sun
Use the #4 round brush and titanium white to paint a small white circle in the upper right part of the sky.
Use your finger to smear the circle so the edges of it become blurry and fade into the rest of the sky.

Then paint a small white circle inside of that larger blurry circle.
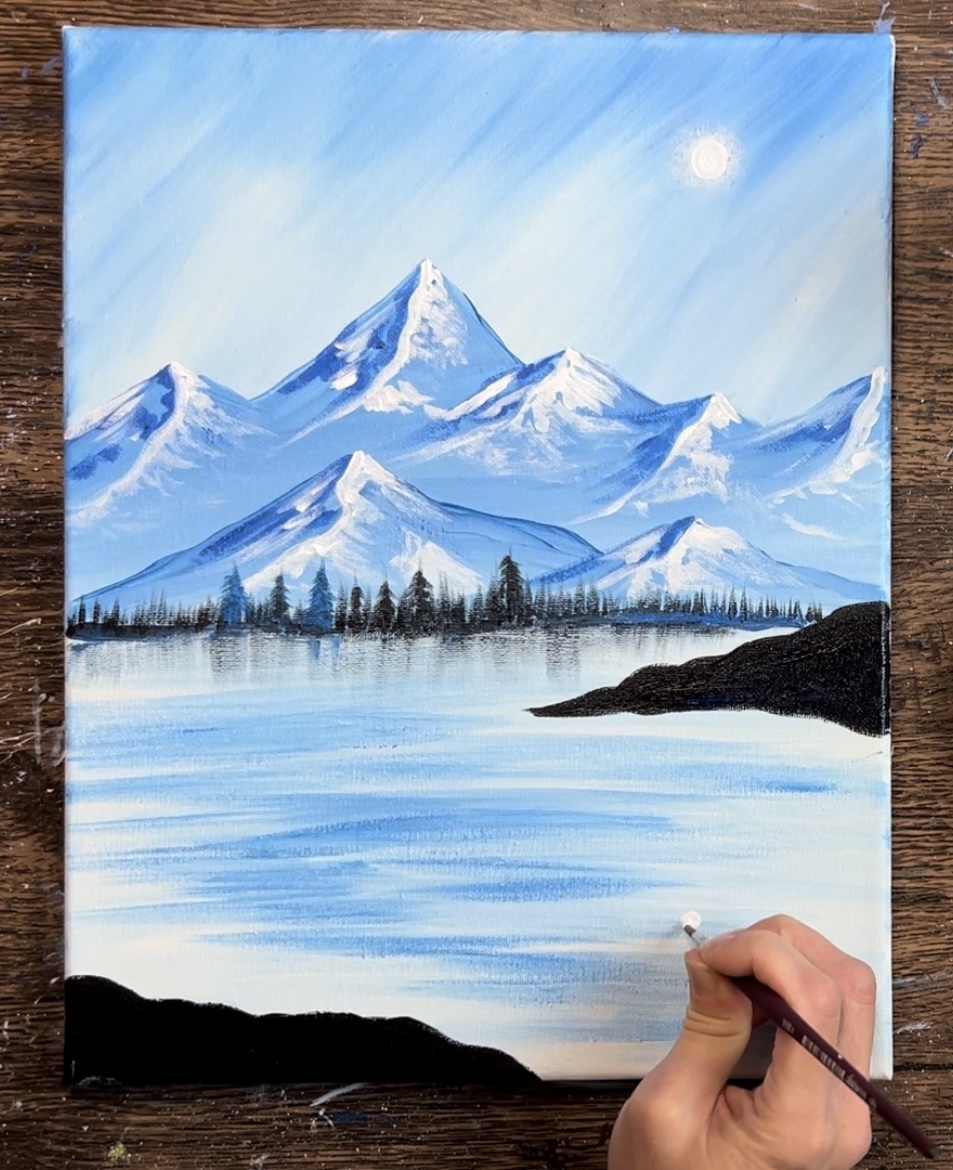
Then paint a reflection of the sun in the water by repainting it using the same technique.
9. Paint water lines
Use the 12 bright brush and titanium white to paint white water reflection lines in the water. The lines that are closest to the horizon line are smaller and more closer together. The lines further down the lake are longer and more spread apart.
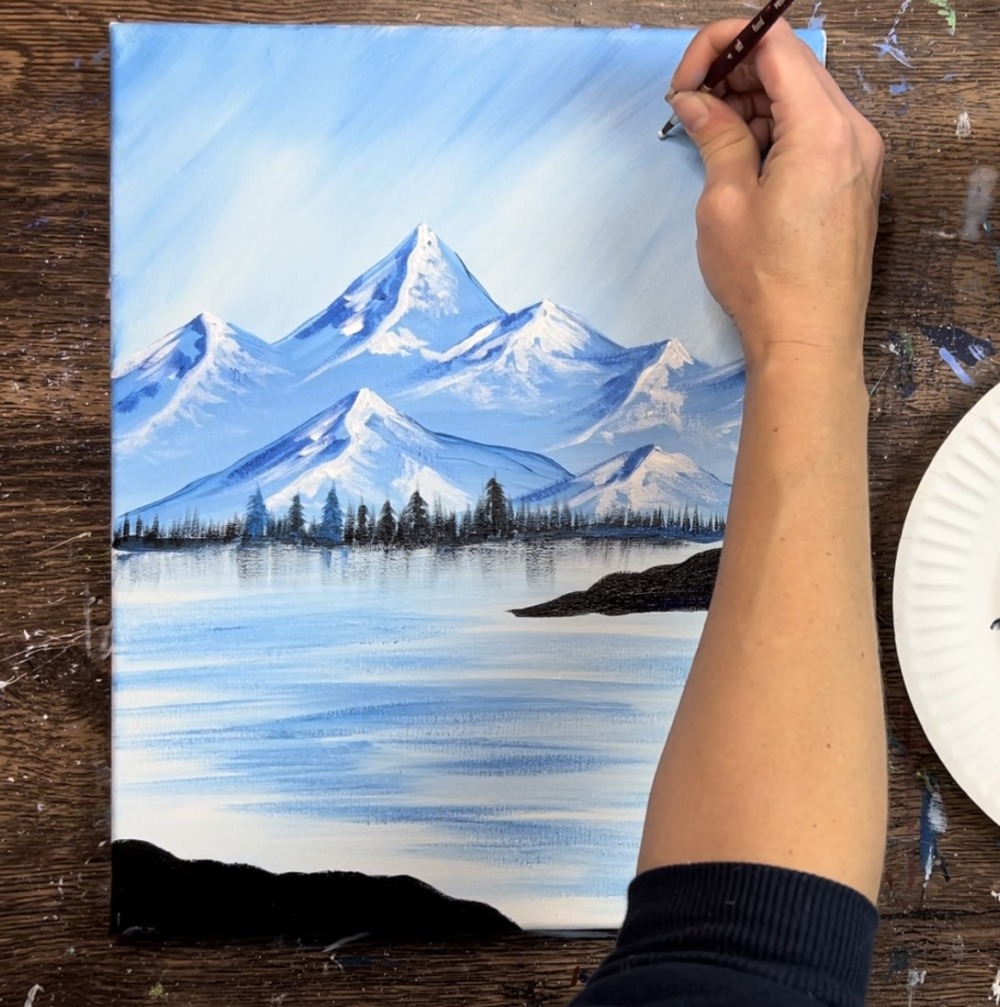
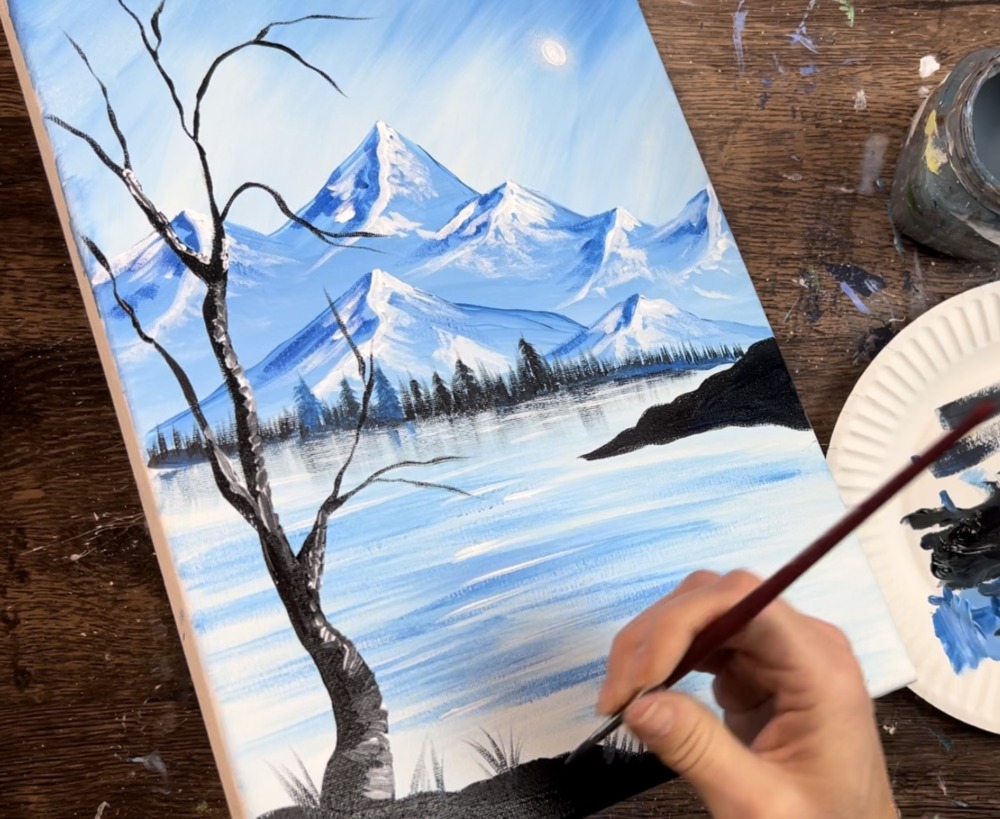
10. Paint tree
Use mars black and the #4 round brush to paint the branch tree. Start at the bottom with a trunk that is slightly thick and then allow the tree trunk to go thinner as it goes up. Release the pressure of the brush to allow the top of the tree to go thinner. Then paint smaller branches stemming out from the main branch.
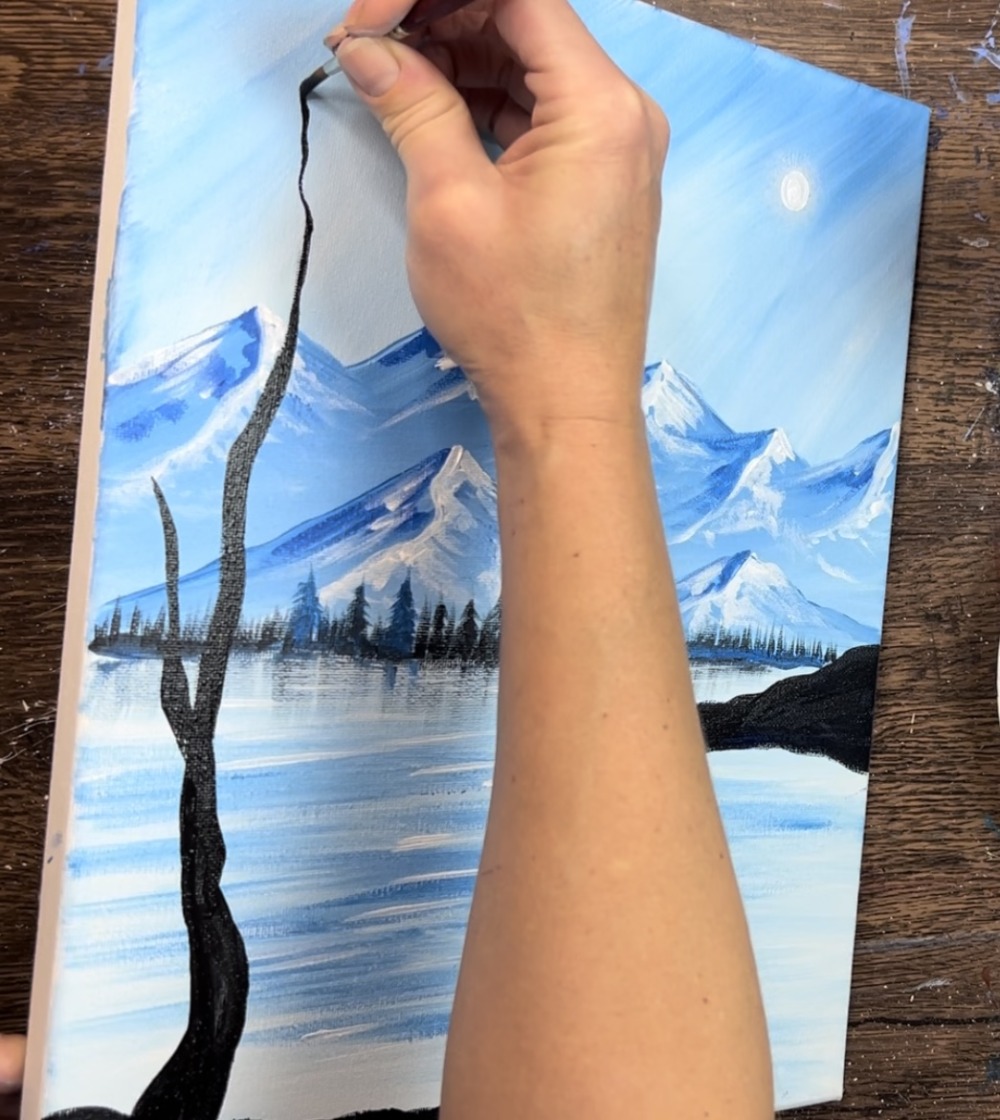
Loosely paint thinner branches that are curving slightly downwards. Use just the tip of the brush and lightly paint the lines so they are thin and somewhat wavy.
Paint a few more lower branches.
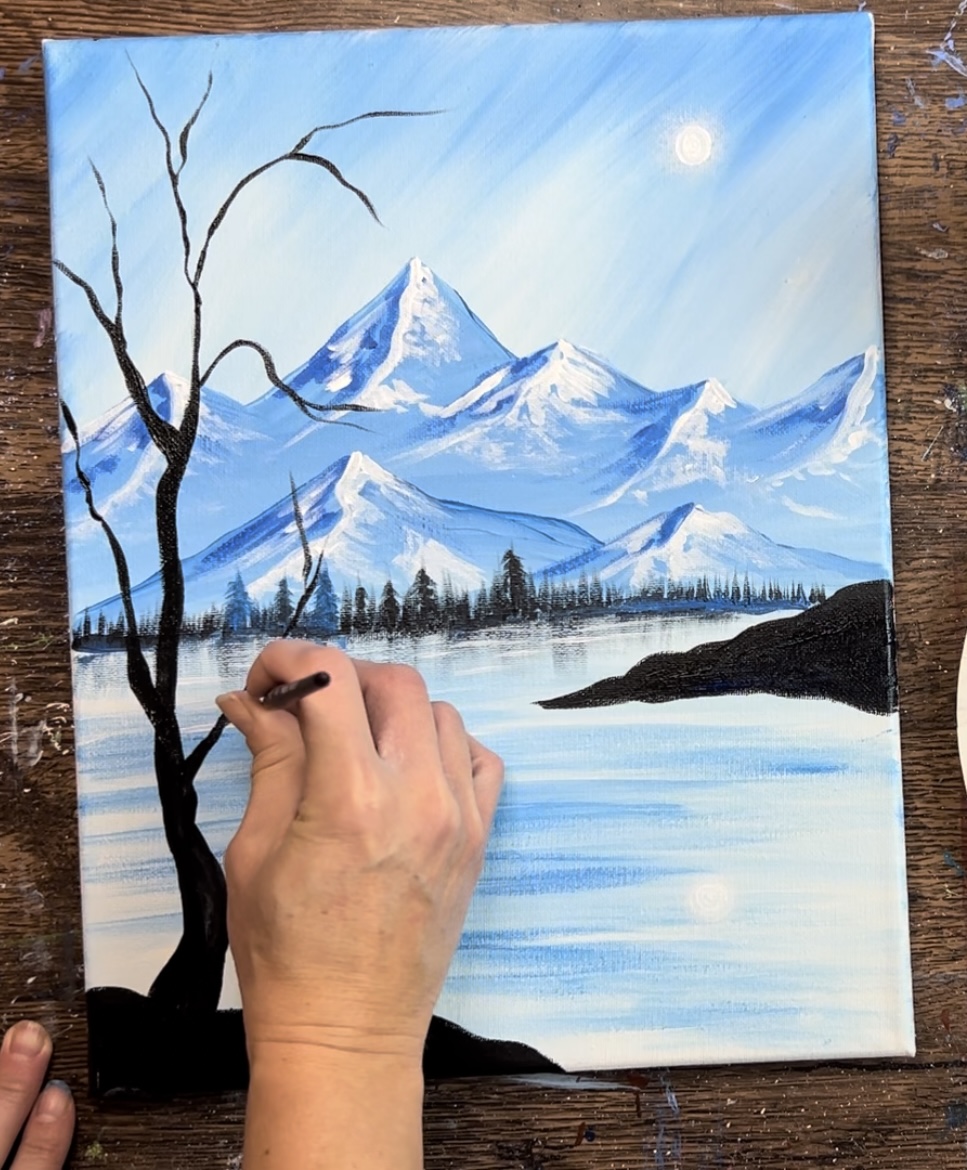
Optional: add a little bit of white to the right side of the tree. Wipe off your brush. Then load it into titanium white. Paint small white marks going from the right side of the tree. These might blend with the black and turn more of a gray but that’s okay.
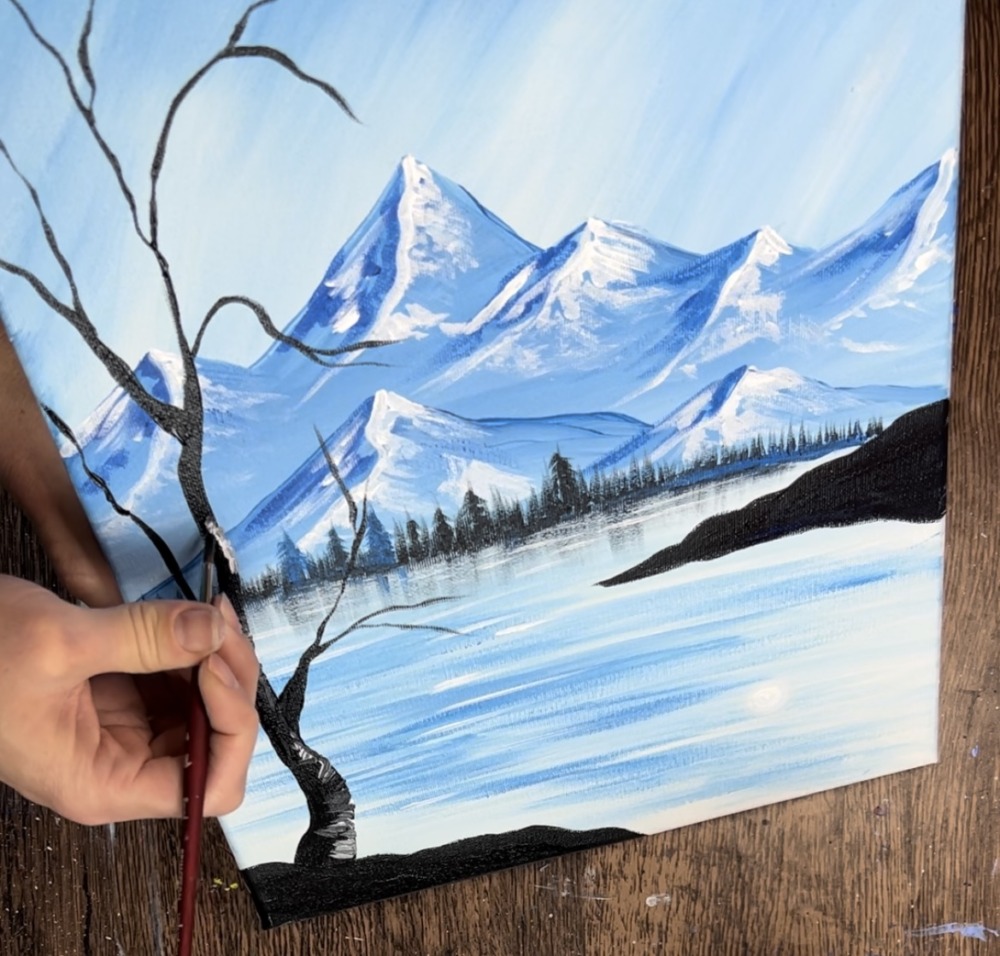
Do this on the right side of the main larger branch parts of the tree.
11. Paint grass
Use the #4 round brush to paint little grass marks on the base of the land near the tree. Paint them going in different angle directions.
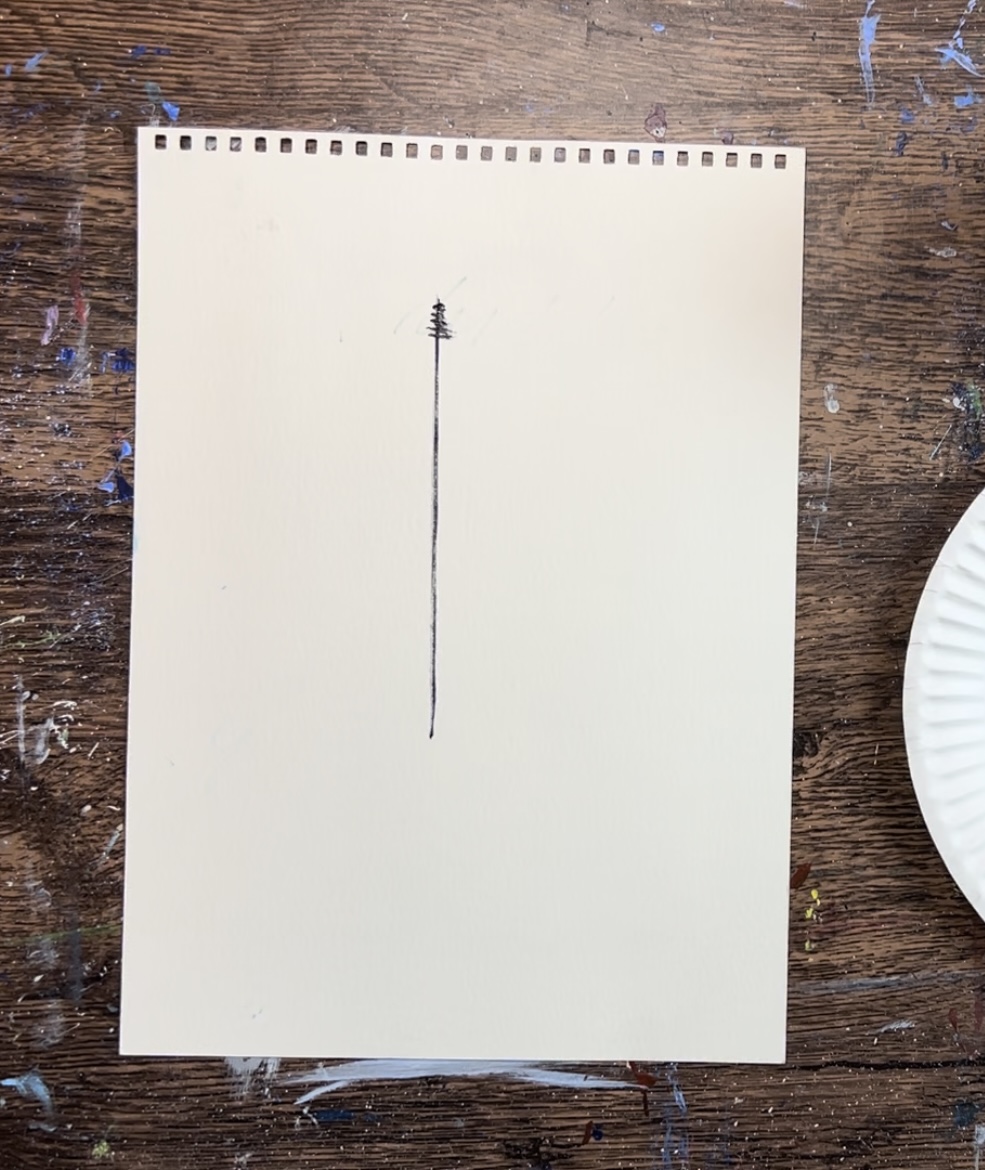
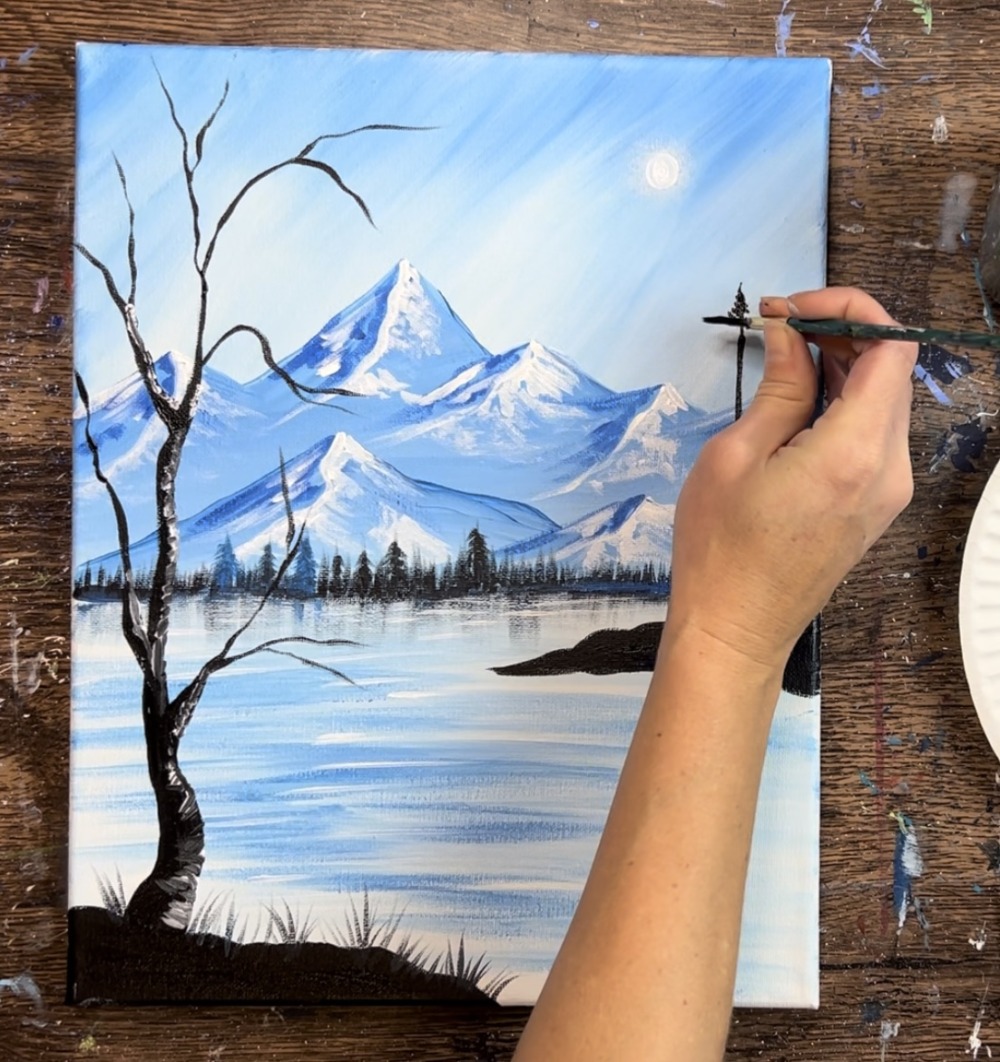
12. Paint pine tree
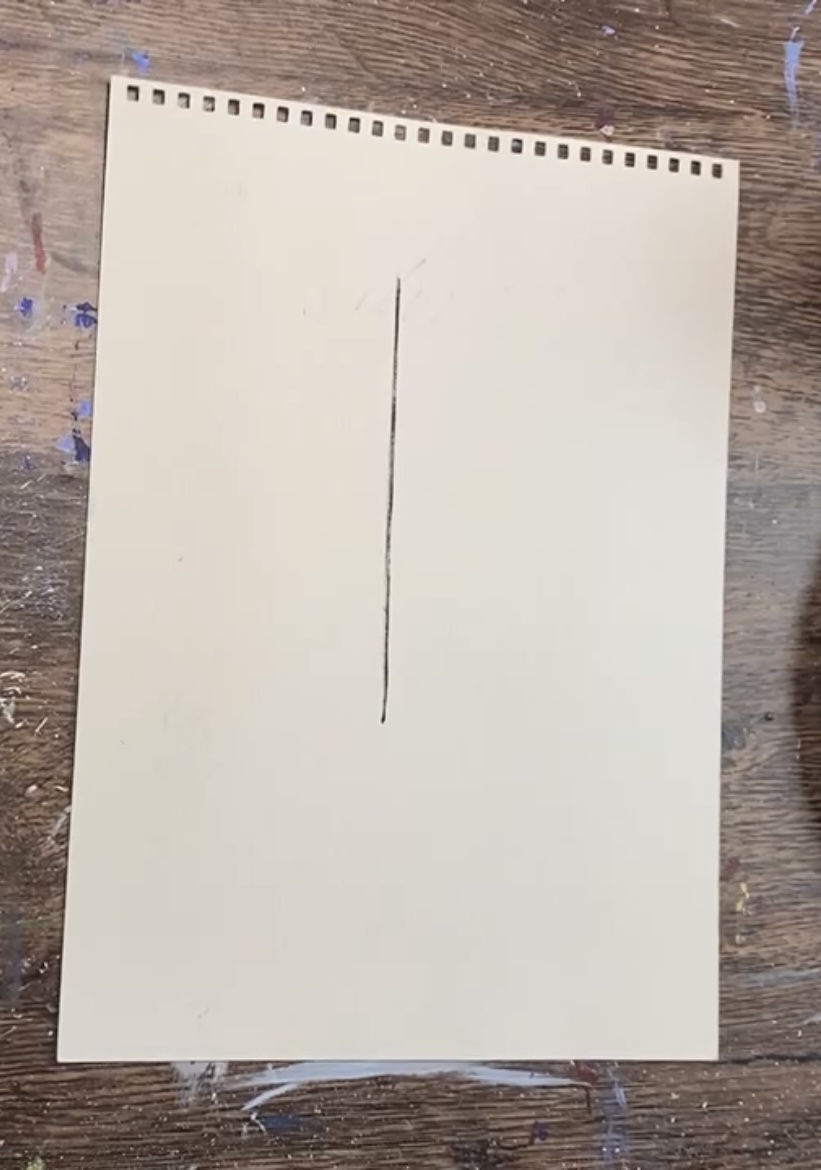
I recommend practicing this fan brush tree first before painting it…
Start by painting a “mars black” vertical line using a ruler and the round brush. This line helps establish the height of the tree.
Load your fan brush into the black. It helps to slightly water the black down so it’s not so thick. Make sure you load the paint so much of it is on the tip of the bristles. Also make sure the bristles are spread out.
Use just the corner of your brush eat first to paint small branches on the very top of the line.
Tap the tip of the brush working in a zig-zag formation (left and right) working your way down the line. The branches should get wider as you work your way down.
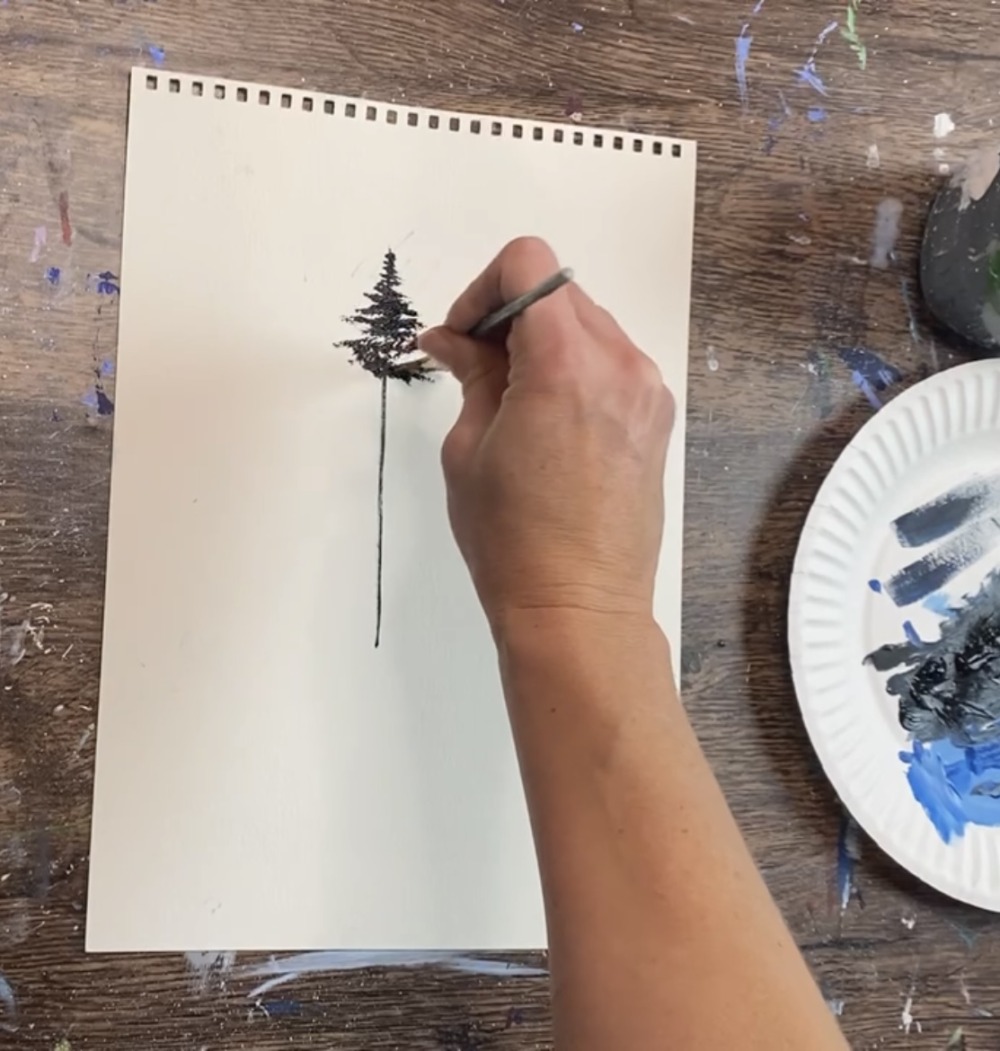
Let the edges of your branches on the left and right slightly curve upwards.
As you work your way to the bottom, allow the branches to get much thicker. You’ll need to apply more pressure to the brush at this point.
Go all the way down the the bottom of the line. You don’t need to paint a base/trunk of the tree.
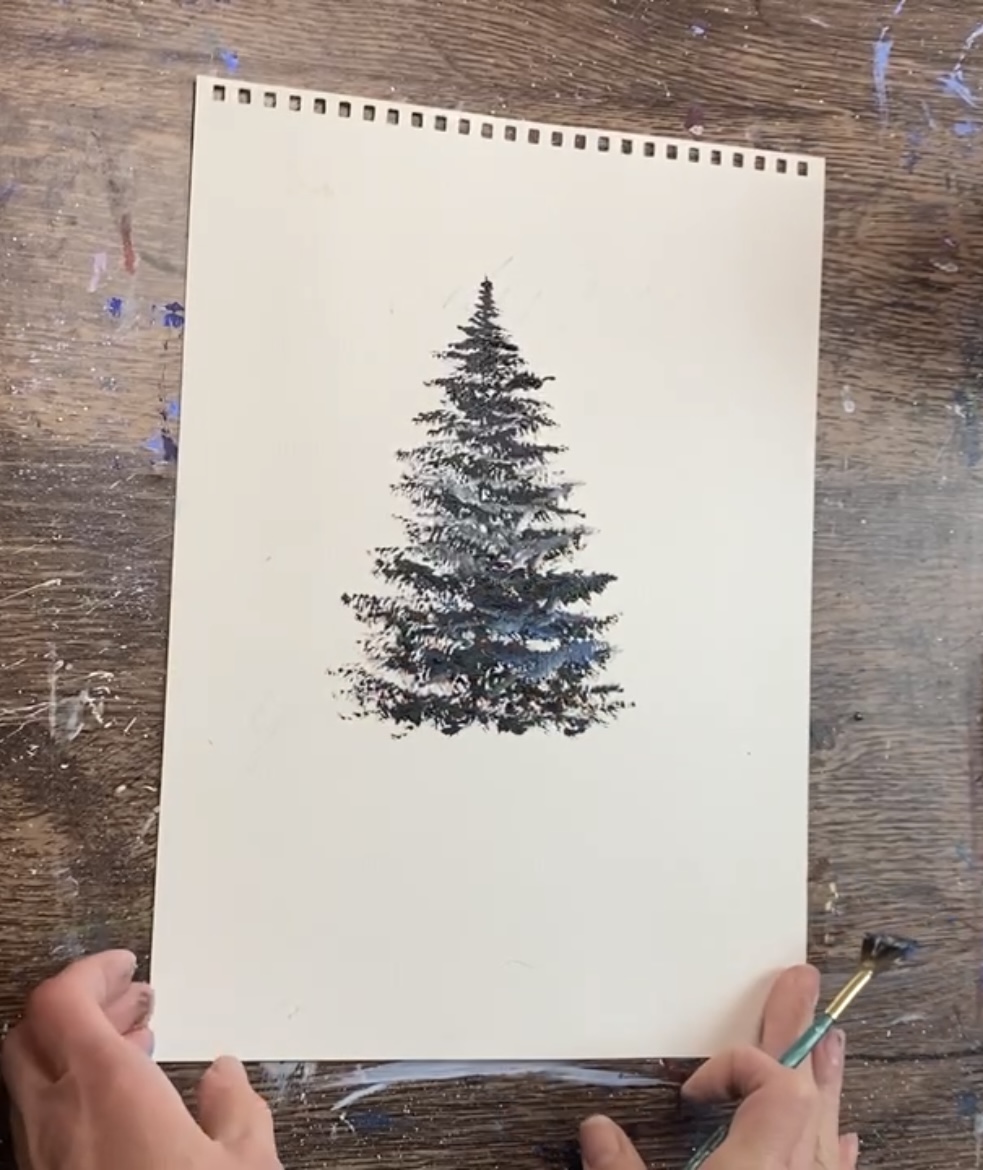
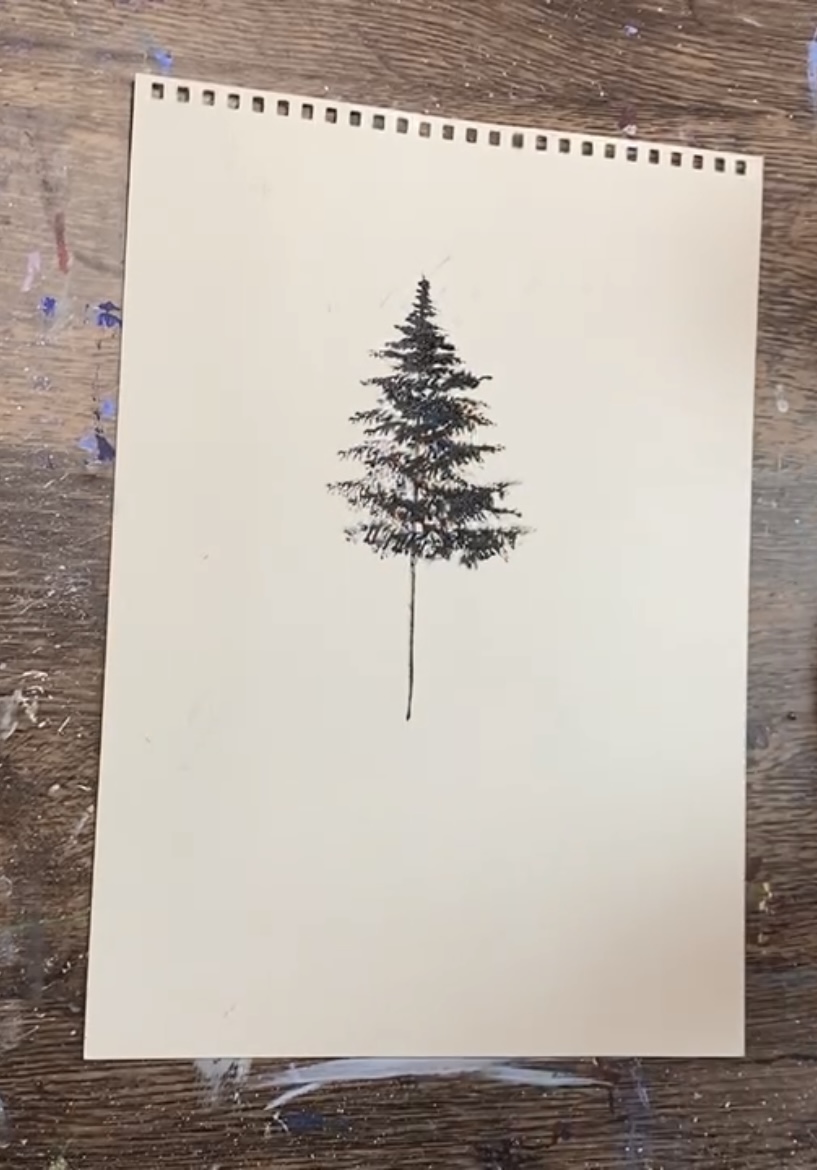
After practice, paint the pine tree using the same technique as described above.
Paint your vertical line where you want your pine tree to be. The height of this line should go above most of the mountain peaks.
Then load your fan brush into the black. Start by using just the corners of the bristles and paint your smaller branches.
Then work your way in a zig-zag formation down to the bottom of the tree to form a conical shape.
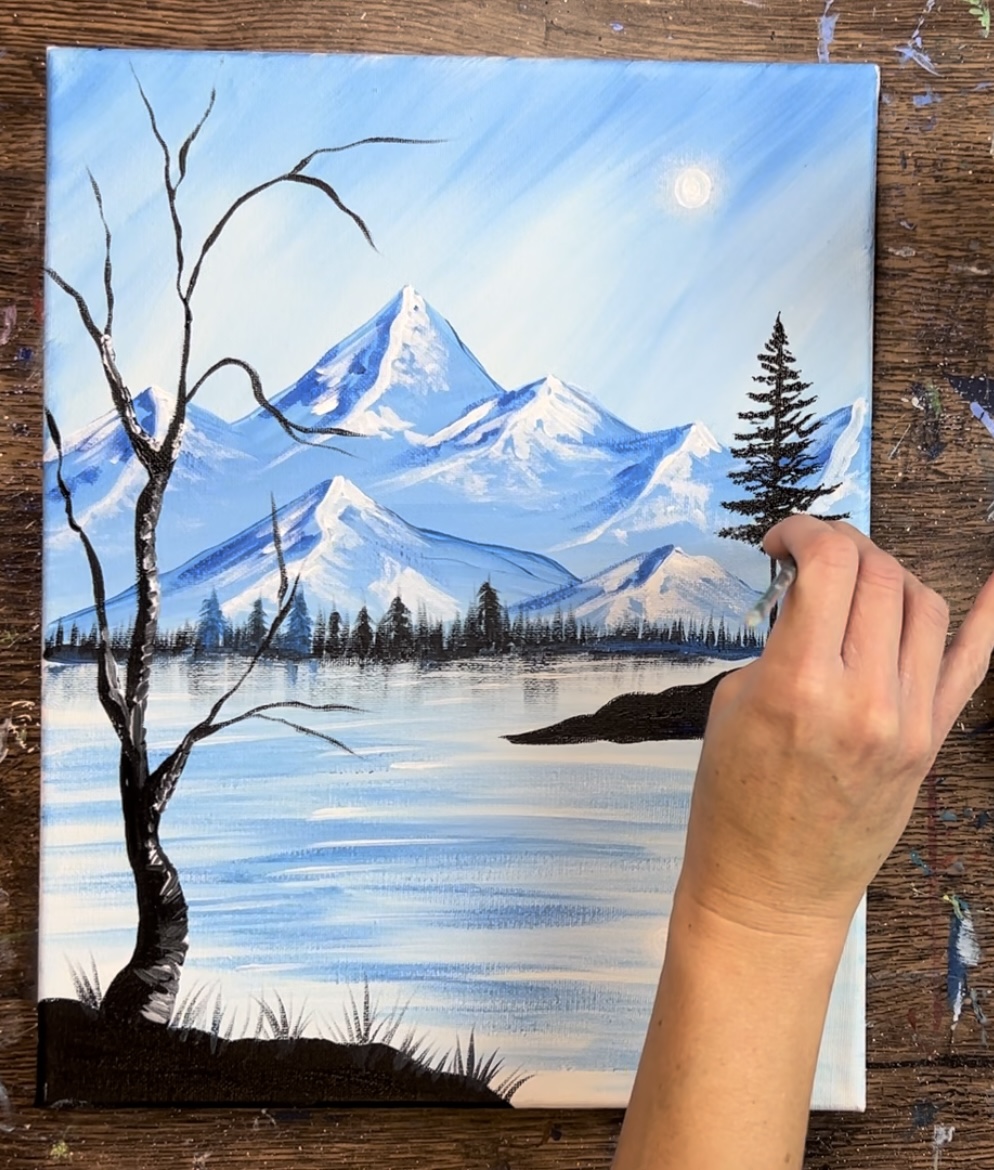
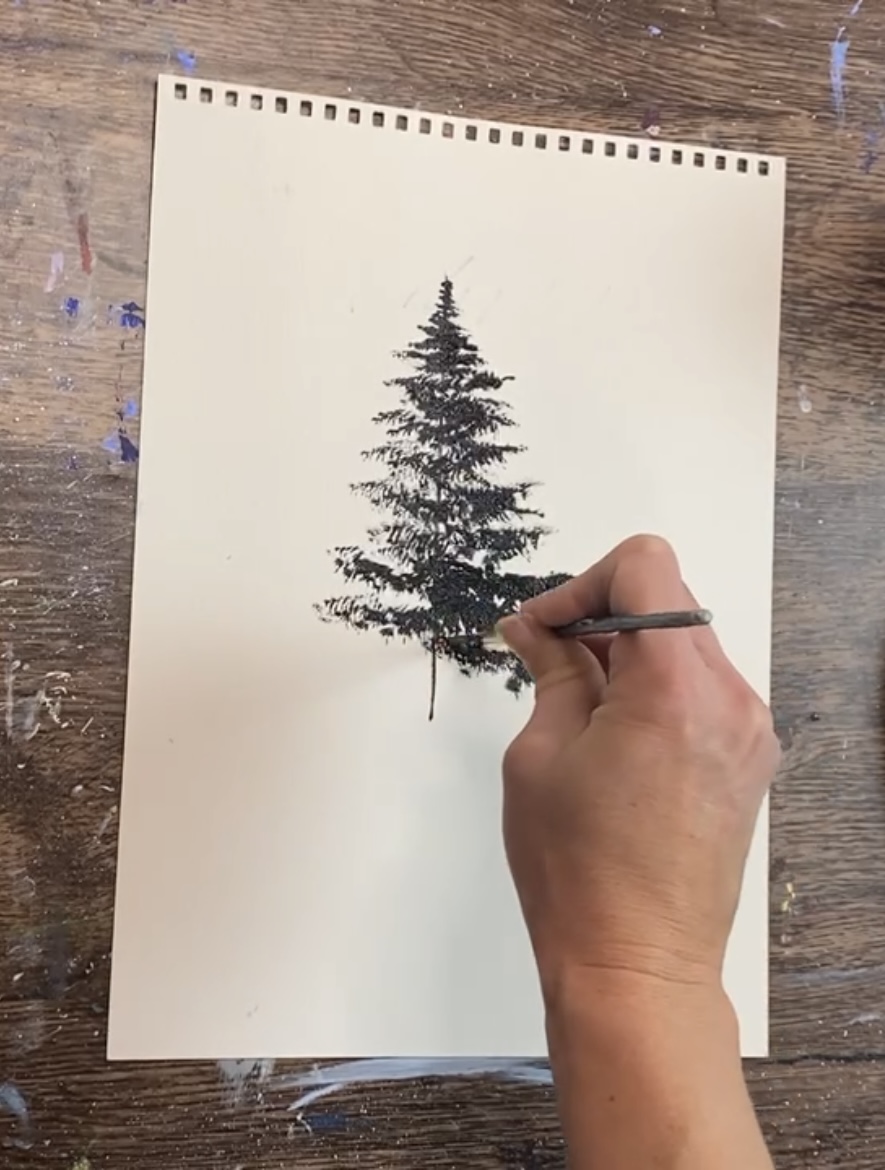
Go all the way down to the peninsula.
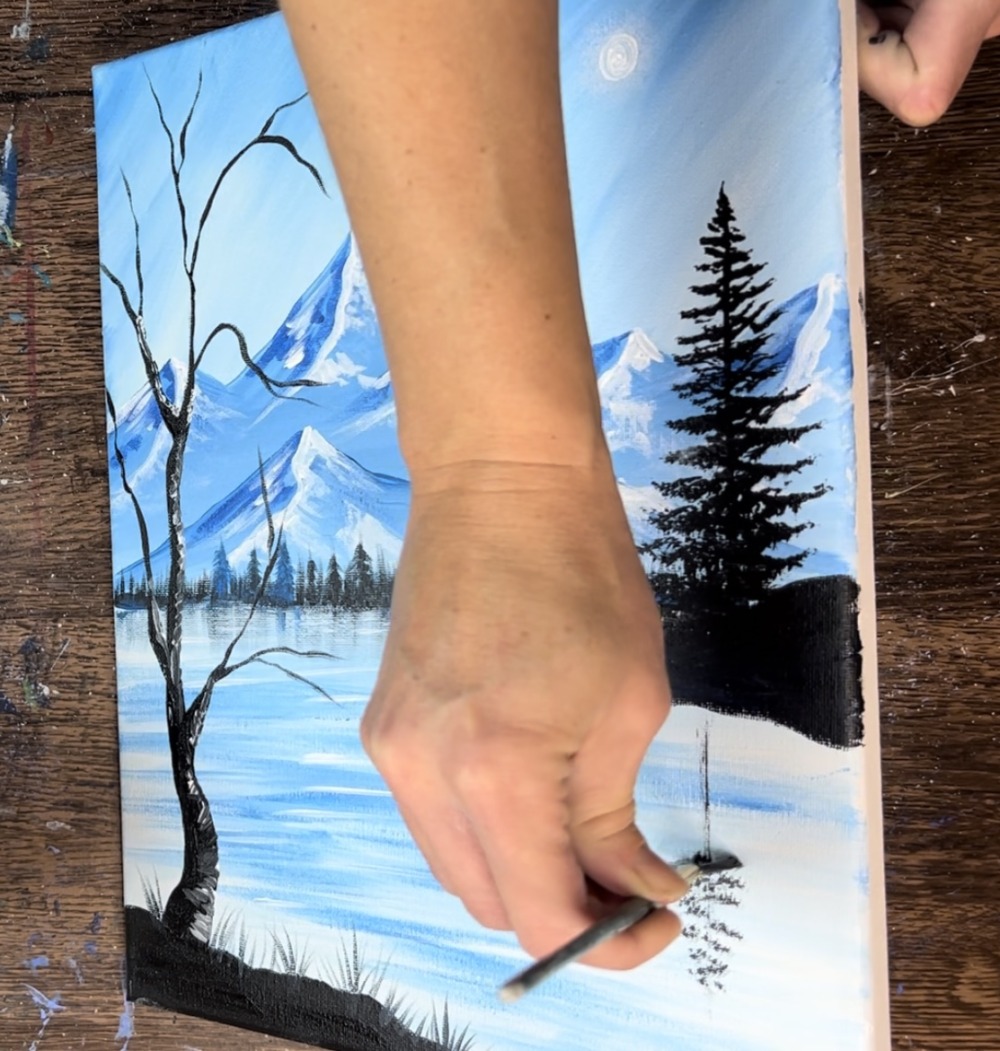
Next, paint a mirror reflection of the tree in the water. Do the same technique (it helps to turn your canvas upside down). The only difference is that the tree reflection doesn’t have to be as detailed.
Next, add a lighter layer to the branches of this tree. Rinse and dry your fan brush. Then load it into titanium white. Add a second layer over your first layers but don’t cover all of the black.
Then add some white to the peninsula/ ground area but don’t cover all of the black.
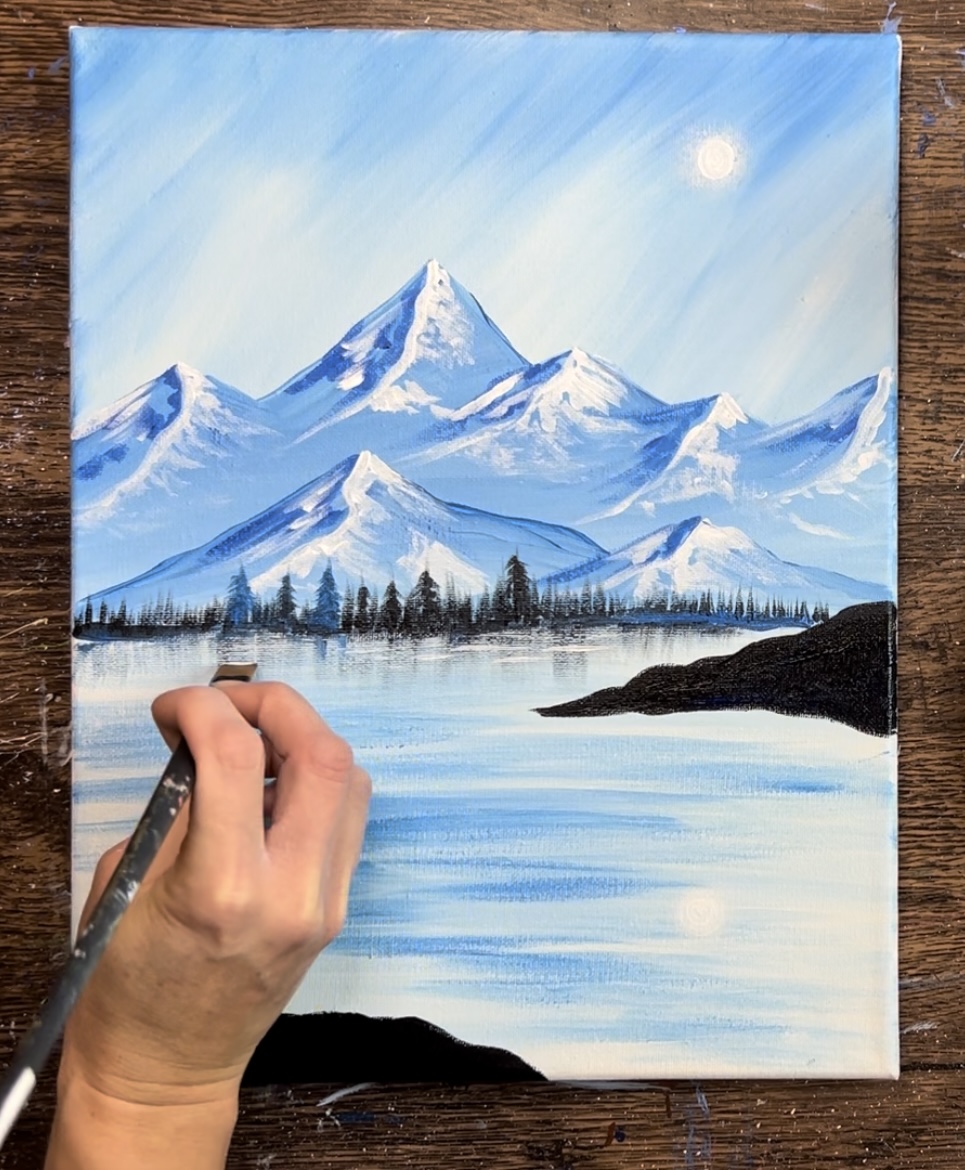
Next, use your #4 round brush and black to paint loose black water lines under the peninsula for reflection of the land in the water.
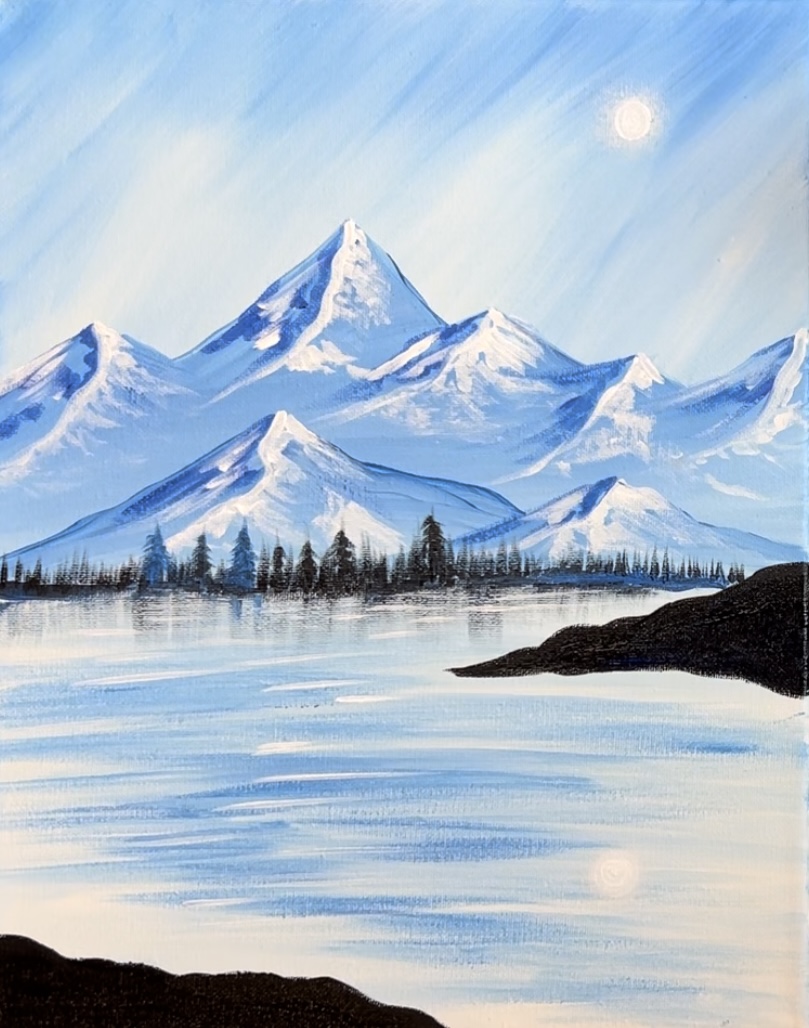
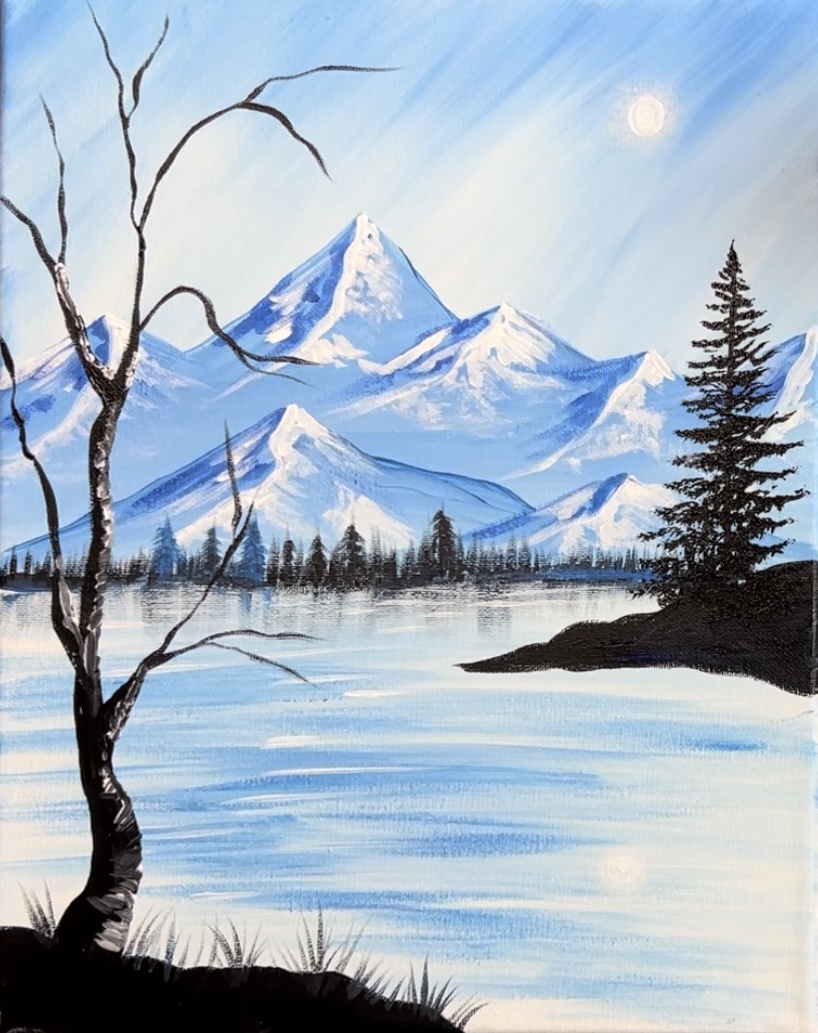
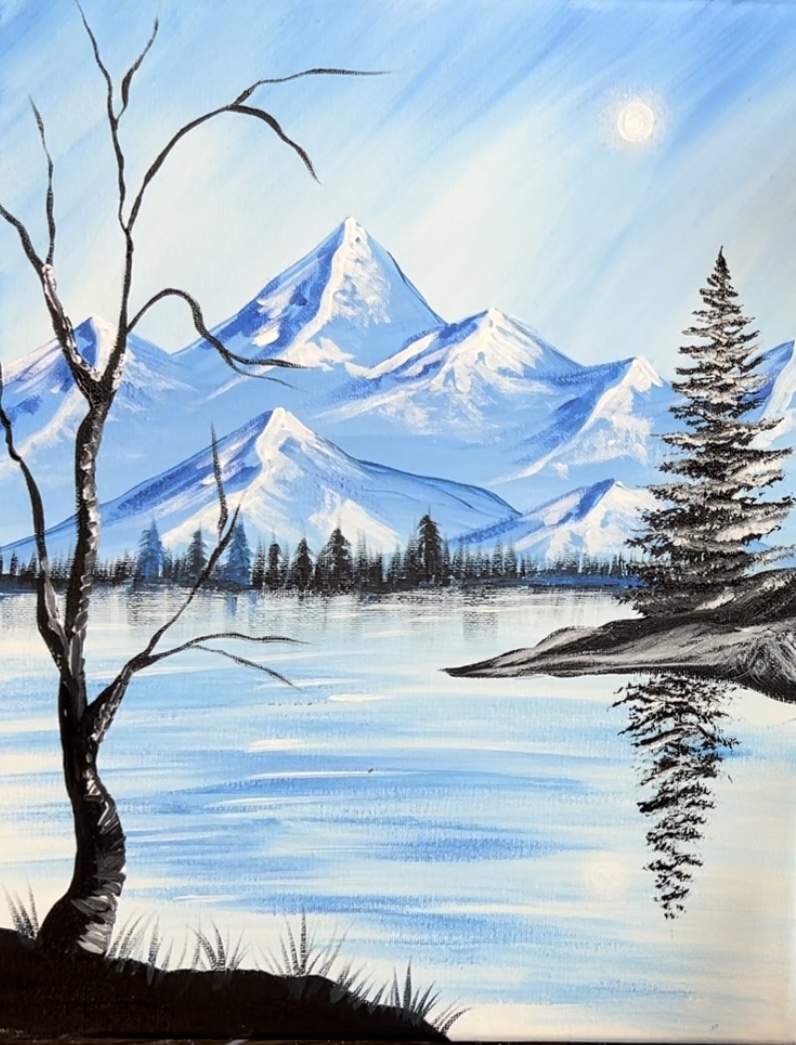
Finished!