

Would you like to save this?
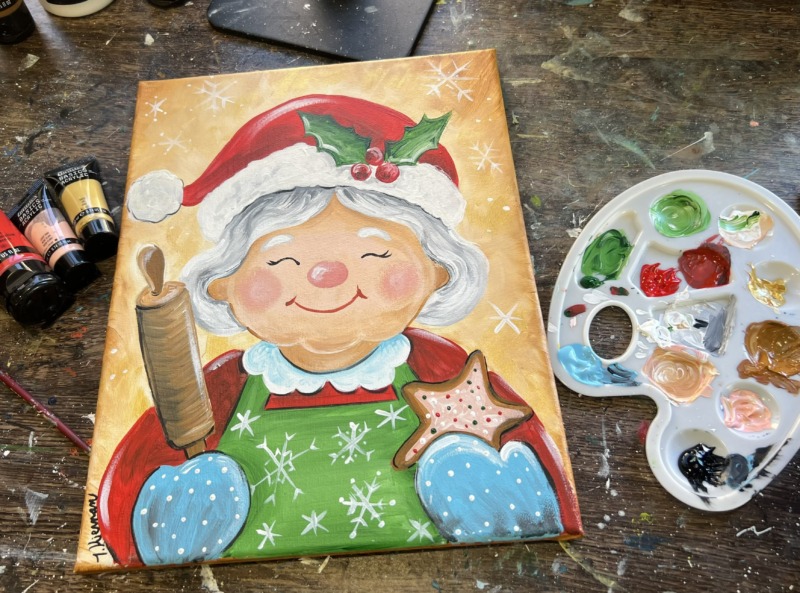
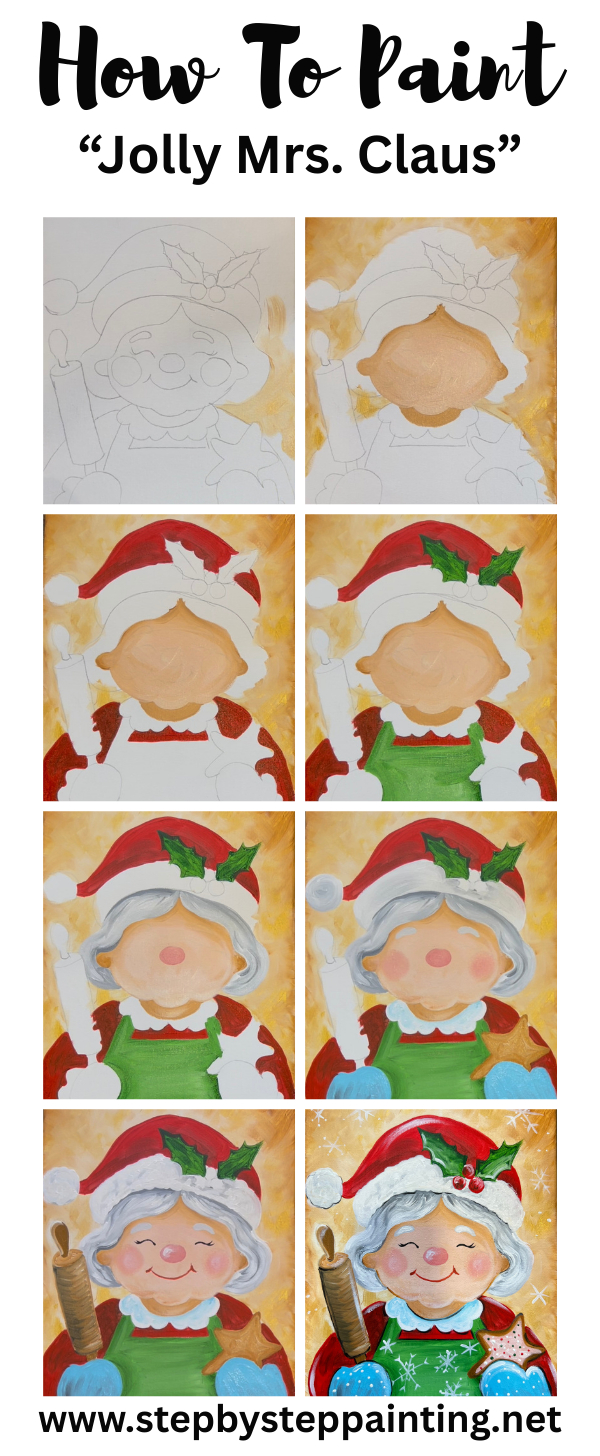
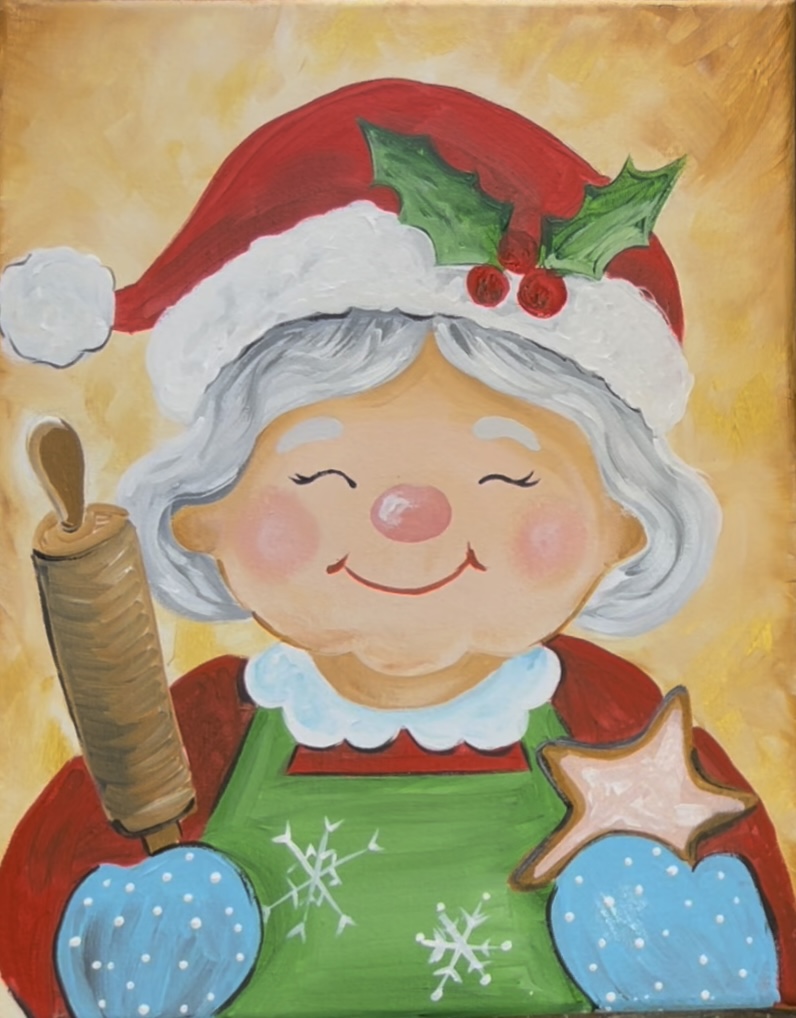
In this cheerful holiday painting, we’ll create a cute, whimsical Mrs. Claus holding a rolling pin in one hand and a freshly baked star-shaped cookie in the other. The background is a soft, glowing blend of warm golden tones that gives the whole piece a cozy Christmas feel.
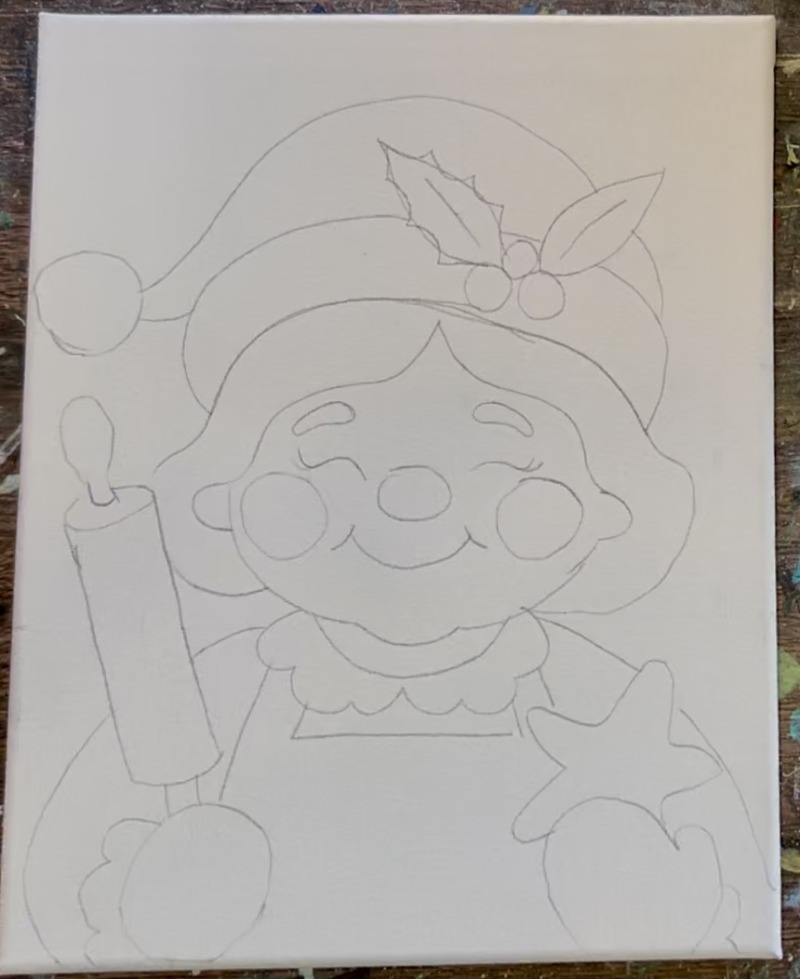
This tutorial has a traceable template for Mrs. Claus which can be printed on two sheets and taped together for an 11 x 14 canvas.
Compliment this painting with Mr. Claus! The tutorial for that painting can be found here.

Enjoy and happy painting!
Materials:
- 11 x 14 Canvas
- Acrylic Paints (I like Liquitex BASICS)
- Brushes (see below)
- Traceable
- Graphite Paper
- Pencil
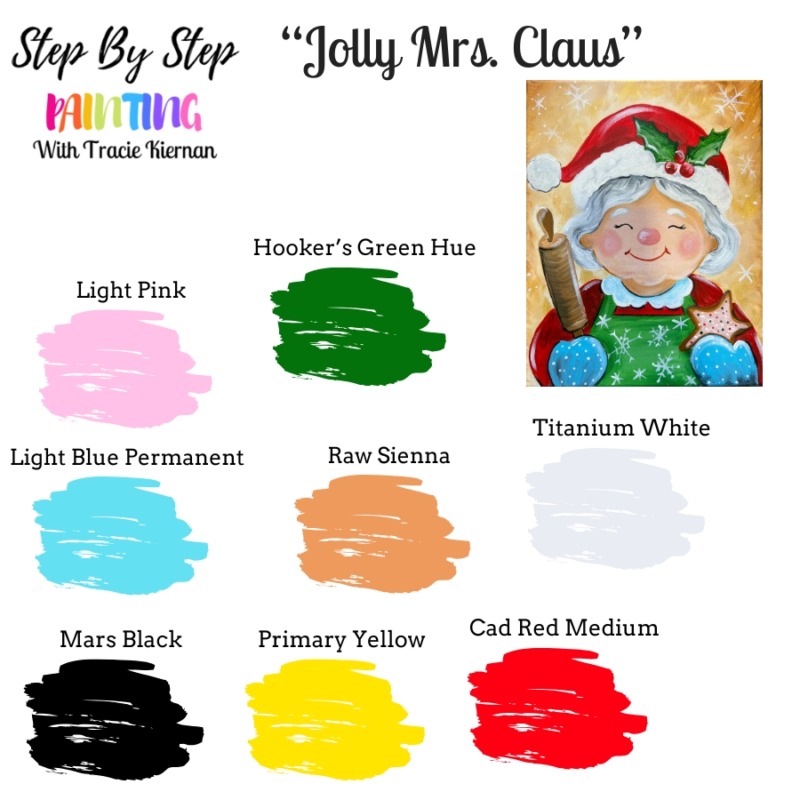
Colors:
- Cadmium Red Medium Hue
- Raw Sienna
- Gold
- Hooker’s Green Hue
- Light Blue Permanent
- Mars Black
- Titanium White
- Light Pink
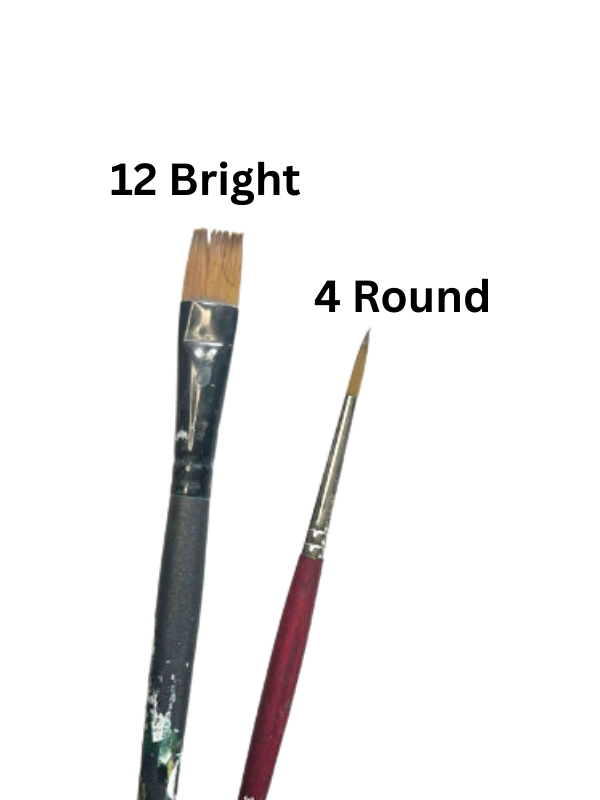
Brushes
*Note: this is a brush that is 1/2″ wide and about 1/2″ long. Some find the 12 bright brushes “too big”. That is because they get labeled differently by brand. The one that I use is a “Royal & Langnickel” Majestic Brush but that are others you can find from Amazon such as this one in a pack.
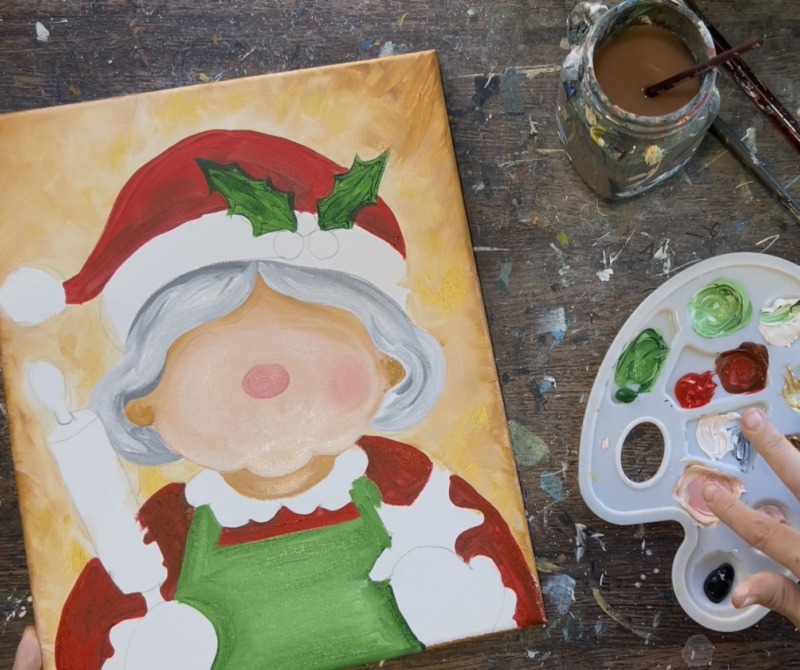
Color Palette:
Traceable
Note: this is going to print on two sheets without a margin (to save on paper). Your printer may cut the middle part off (but you can just continue the lines with a pencil). If you prefer, you can print it on this 4 sheet version where the lines are not cut off.
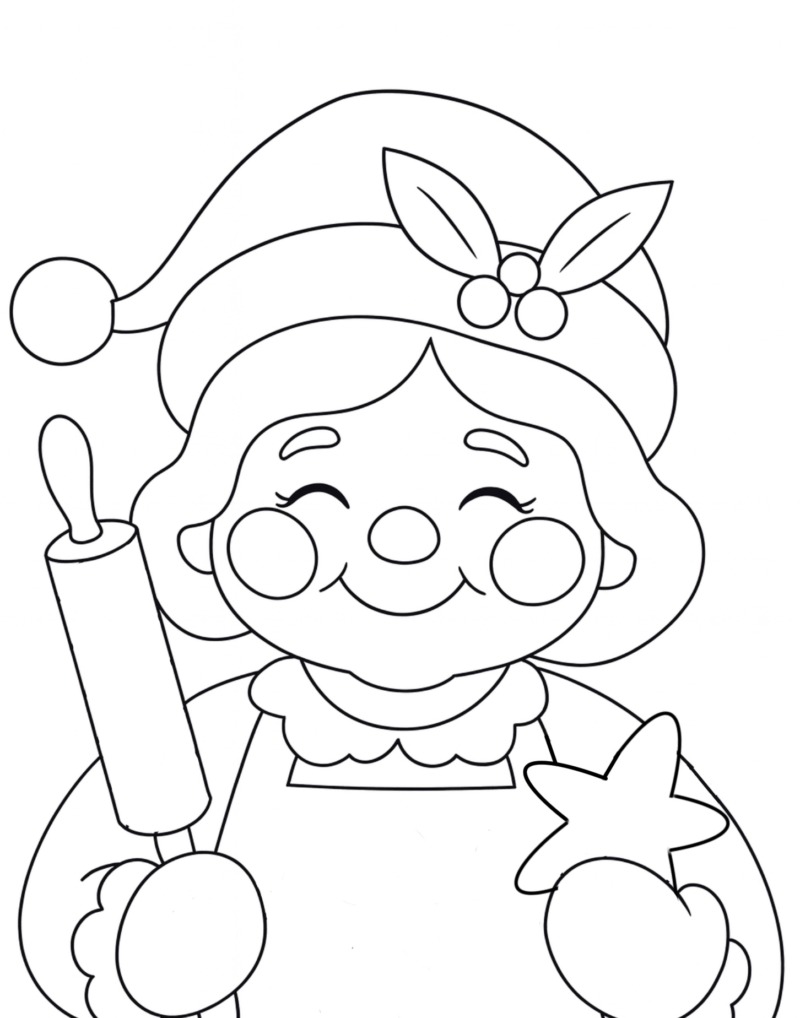
Position the template on the canvas so that it fits on the 11 x 14. Place a sheet of graphite paper below and trace the lines so that the design transfers. Addition canvas sizes can be purchased in my PDF shop!
Directions At A Glance
Video
Step By Step Directions
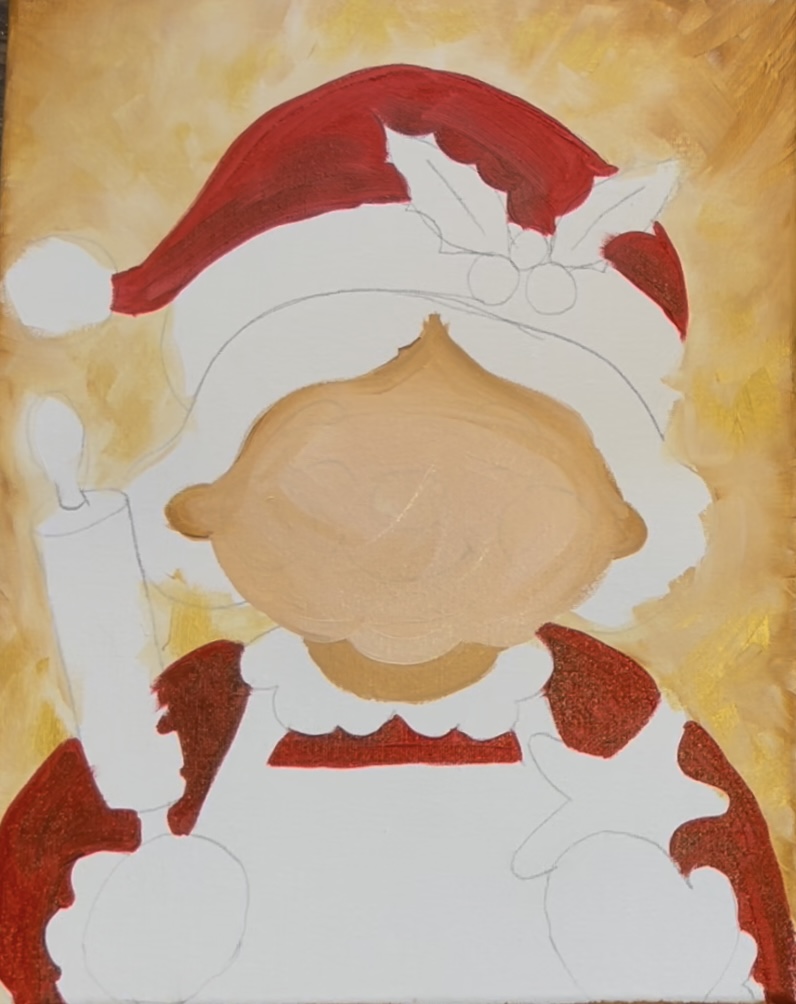
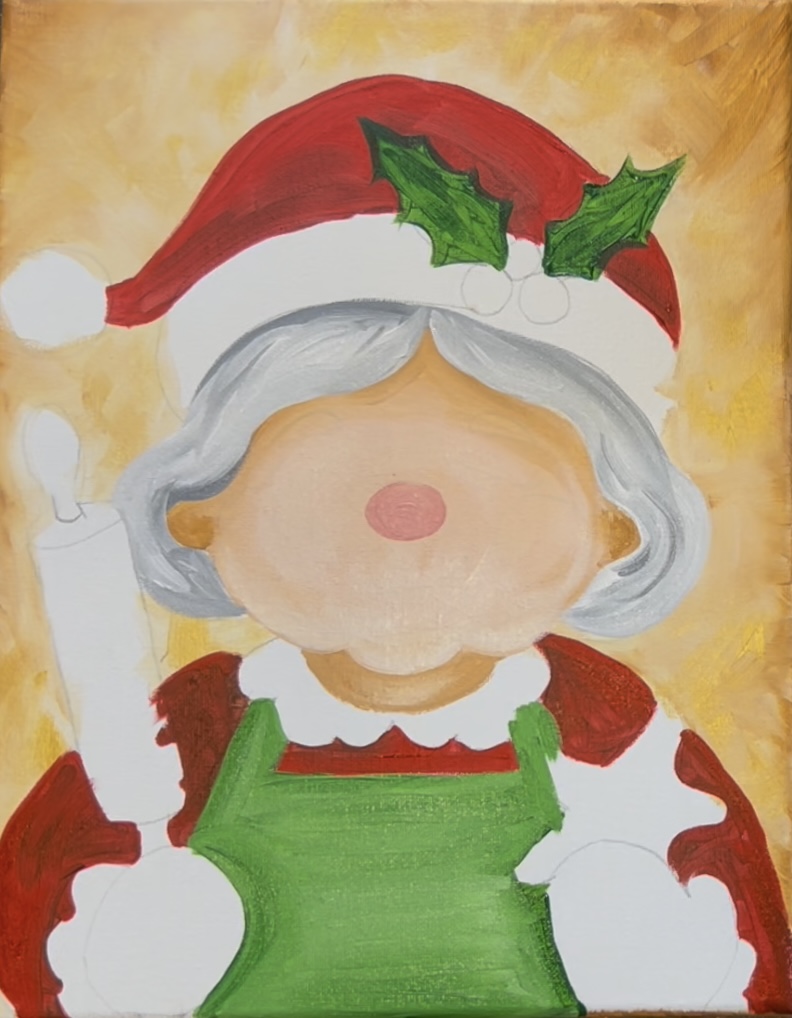
1. Draw or transfer Mrs. Claus pattern to canvas
Use the pattern printable and a sheet of graphite transfer paper. Press firmly with a pencil to trace the lines and have the design transfer to the canvas. It’s best to trace these templates with the canvas flat on the table (not on the easel). Optional: I turned the leaves into more of a “holly leaf” by drawing webbed lines along the edges.
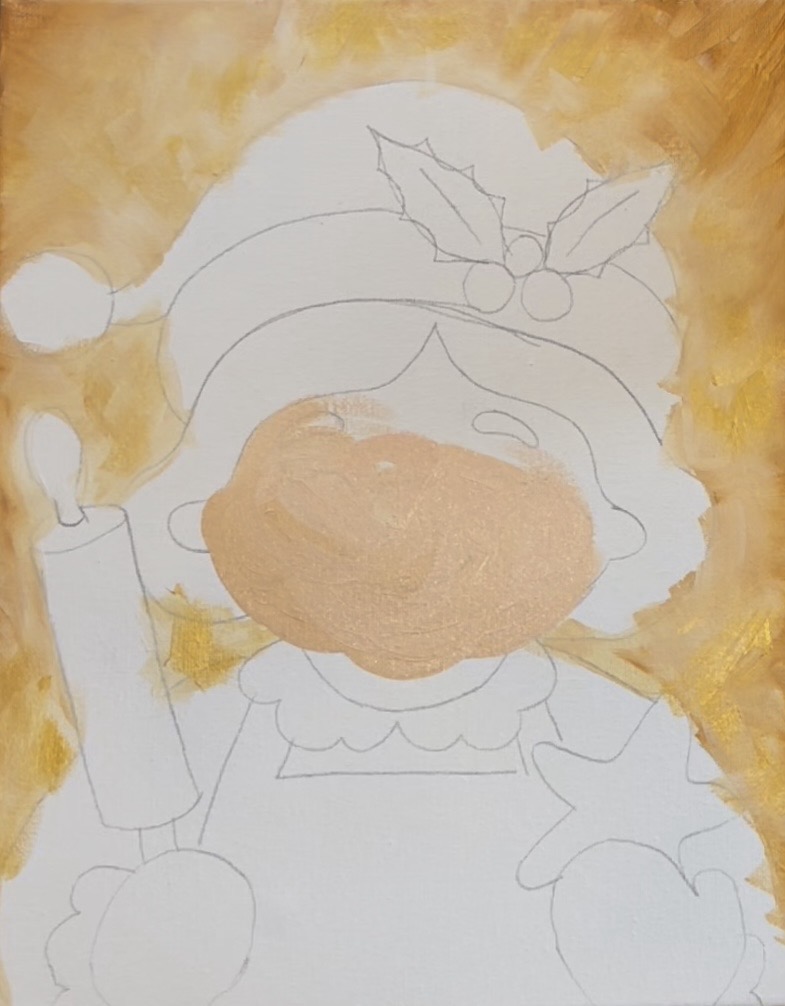
2. Paint Background
Load your paint palette with the colors: titanium white, gold and raw Sienna. Use the #12 bright brush. Triple load it into all three of the colors. Then paint the background all around the Mrs. Claus drawing. Use the full width of the brush for the large areas and paint with sharp, angled brush strokes. Let the colors mix right onto the canvas!
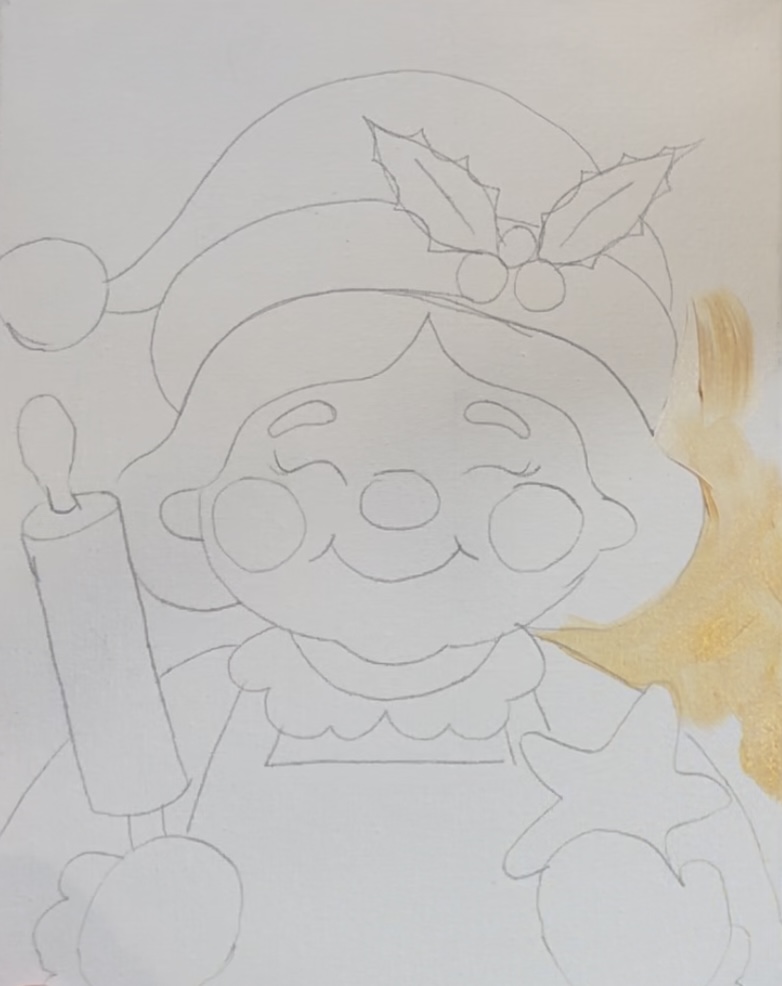
Makes the edges and corners slightly darker by adding more raw Sienna into those areas. Make the areas just around Mrs. Claus slightly lighter by adding more titanium white in those areas.
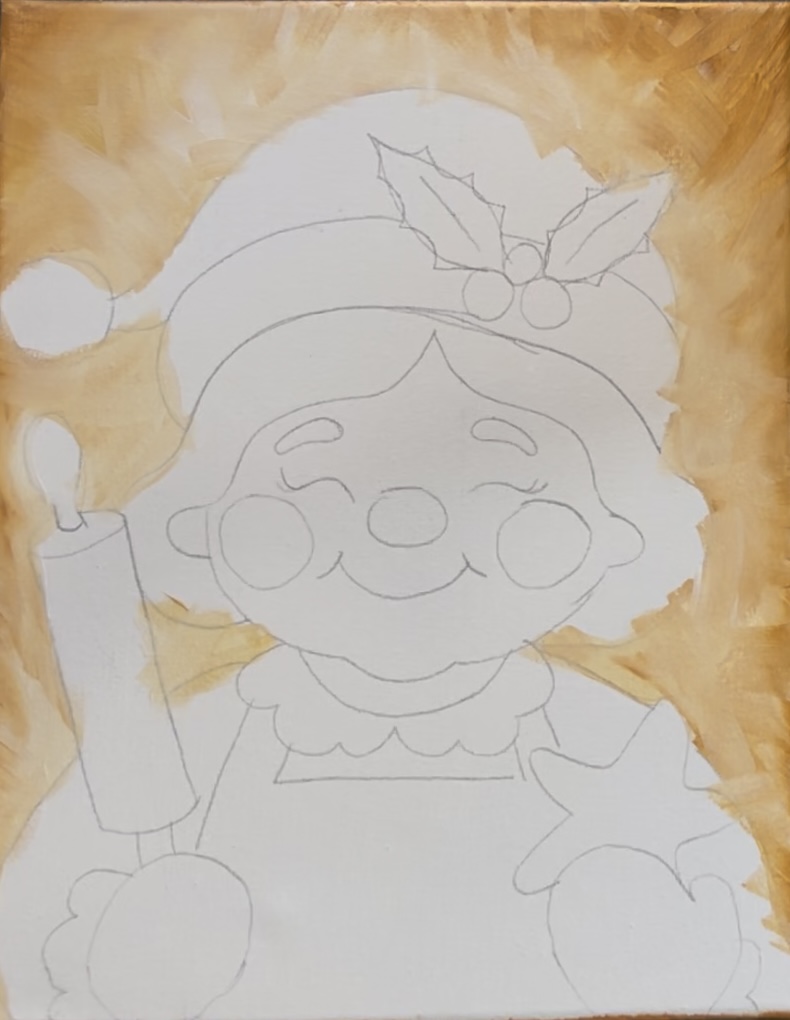
After you fill the background, go back with a clean brush and add just gold to various areas. This will give the background a fun metallic sheen!
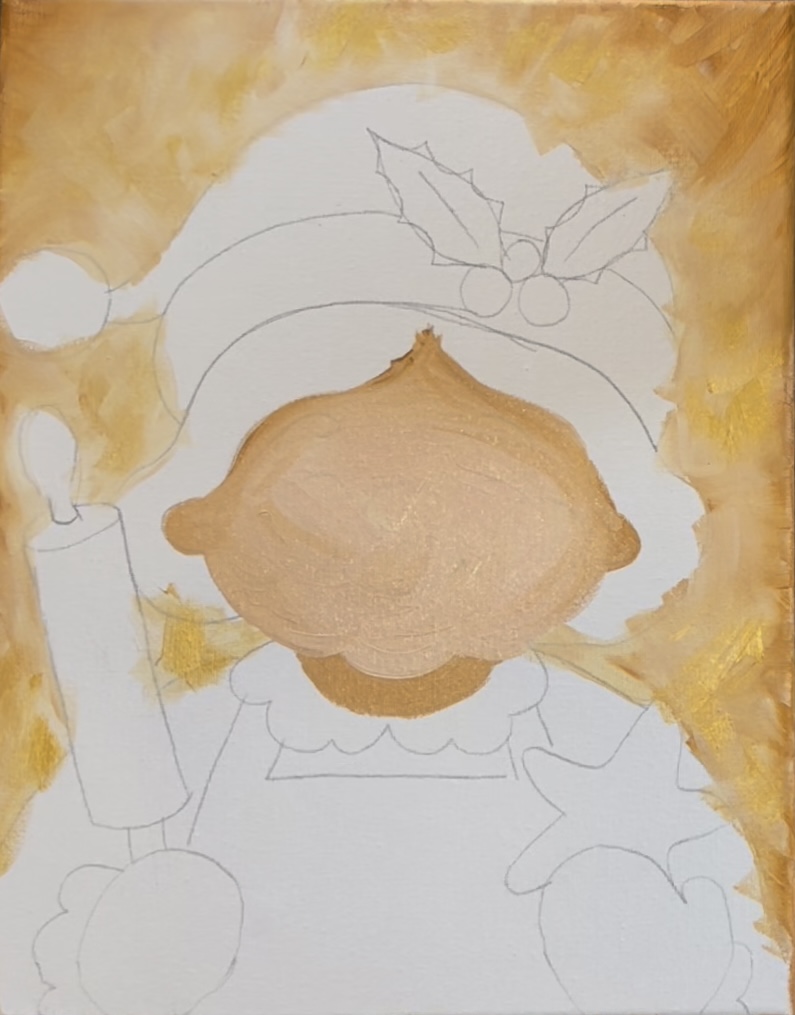
3. Paint Face
Mix on your paint palette: “light pink”, “raw Sienna” and “titanium white (about equal parts all of those colors). Use the #4 round brush to paint the face (excluding the neck and ears). You will have to cover up the drawing of the nose, mouth, etc. but I was able to still see the lines through this layer of paint later. You can also re-draw those lines if needed later on.
Next, blend more “raw Sienna” on the top of her head just under her hair. This needs to be shadowy because the hair is slightly overlapping here. Blend it into the rest of the face color. Then paint the ears and neck with this darker color as well.
4. Paint Hat & Shirt
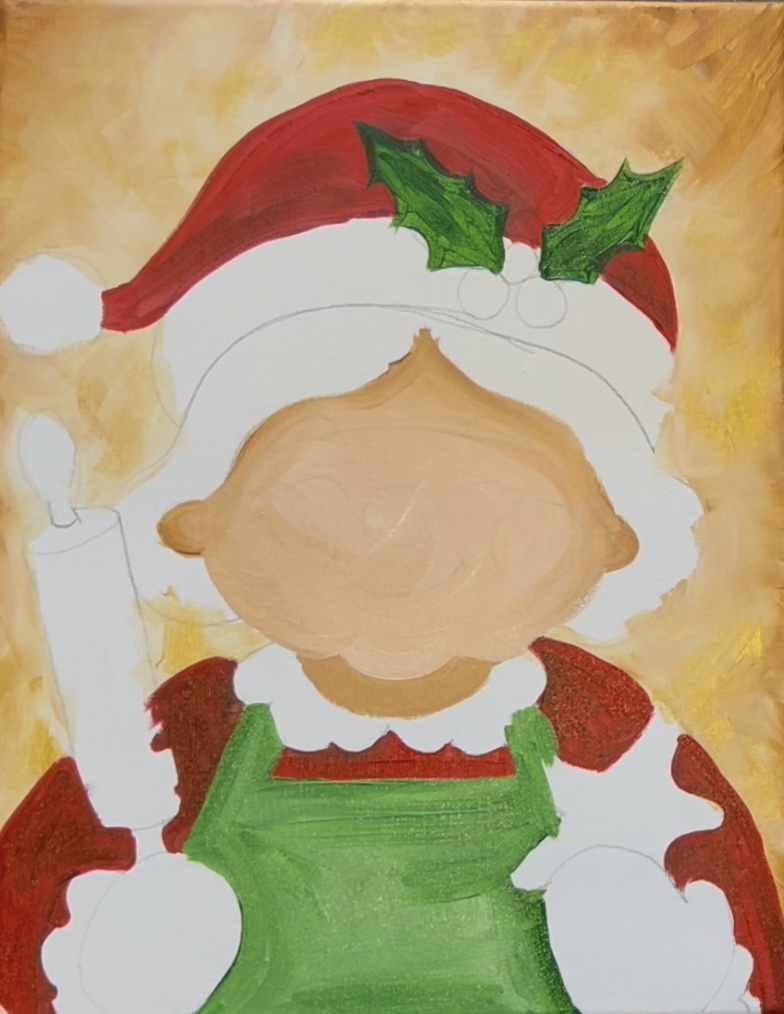
Use the #12 bright brush and “cadmium red medium hue” to paint the hat. Paint around the holly leaves.
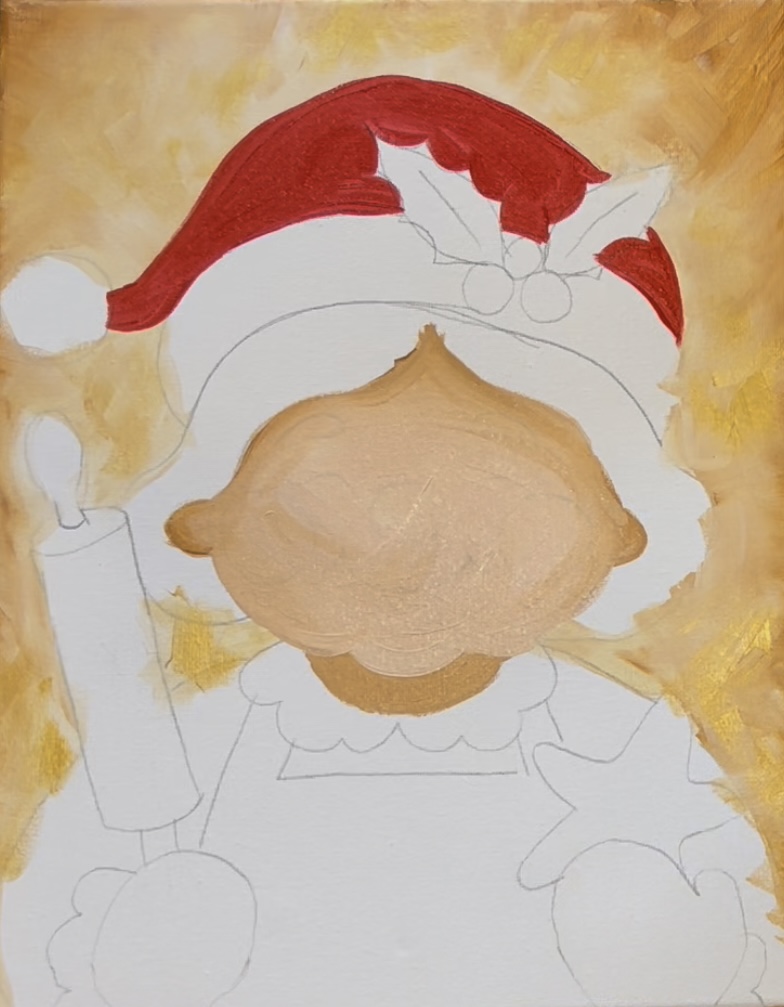
Then create some “shadowing” in the hat. Mix a tiny bit of “hooker’s green hue” into the red to create a darker shade (1 part green to 3 parts red). Blend it into the hat. The shadowy areas are next to the holly leaves and towards the bottom of the hat.
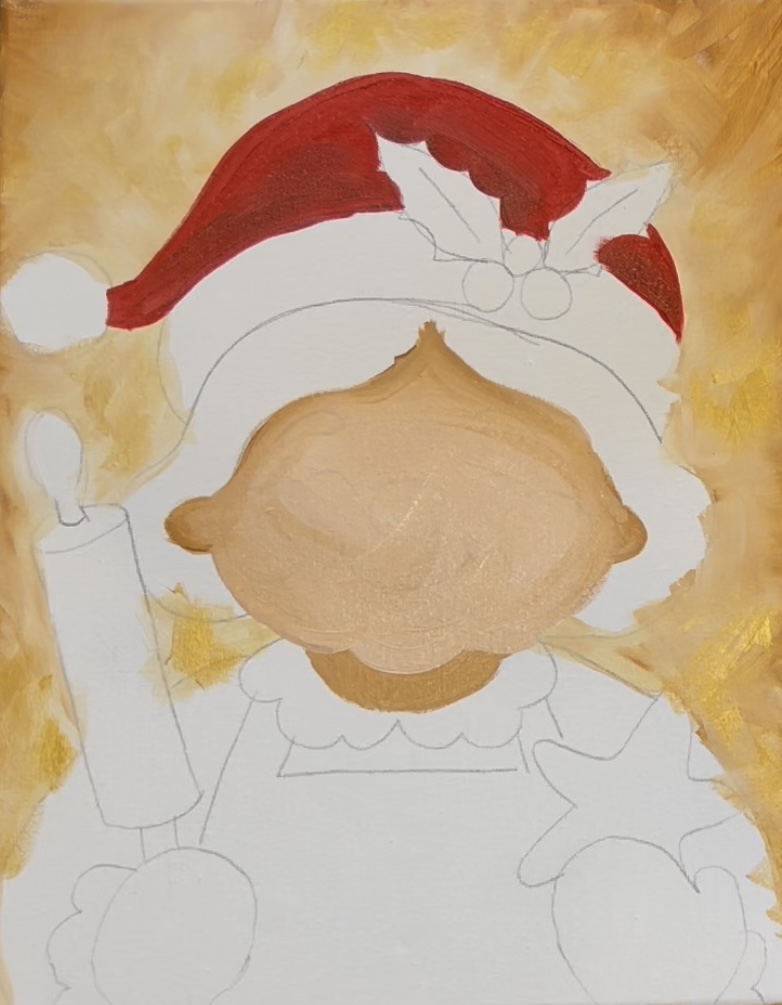
Paint Mrs. Claus’s shirt. Use the same “dark red” color for shadowing in the areas around the rolling pin and cookie.
5. Paint Holly & Apron
Use the #4 round brush and “hooker’s green hue” to paint the holly leaves. Then mix equal parts green and white together. Paint the apron with this light green color. Blend areas of darker green next to her mittens and towards the bottom.
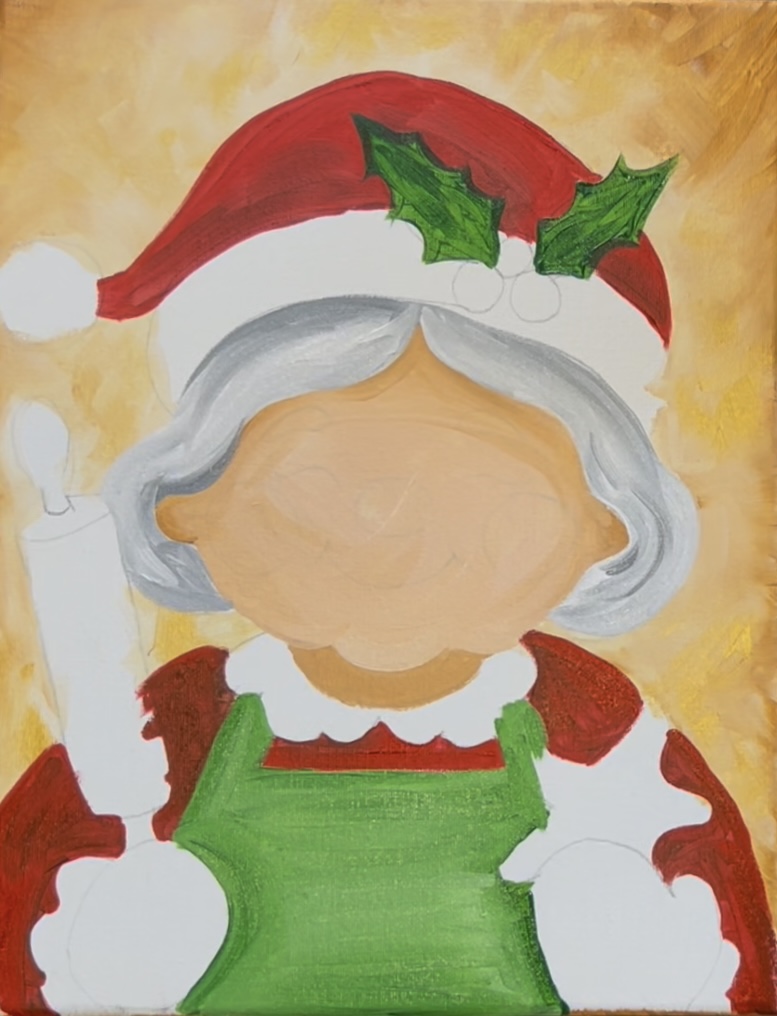
6. Paint Hair
Use the color “mars black” and “titanium white” to paint the hair. Mix a light to medium gray color by mixing about 3 parts white to 1 part black. Add darker gray towards the top of her hair (under the hat) because this part would be more shadowy.
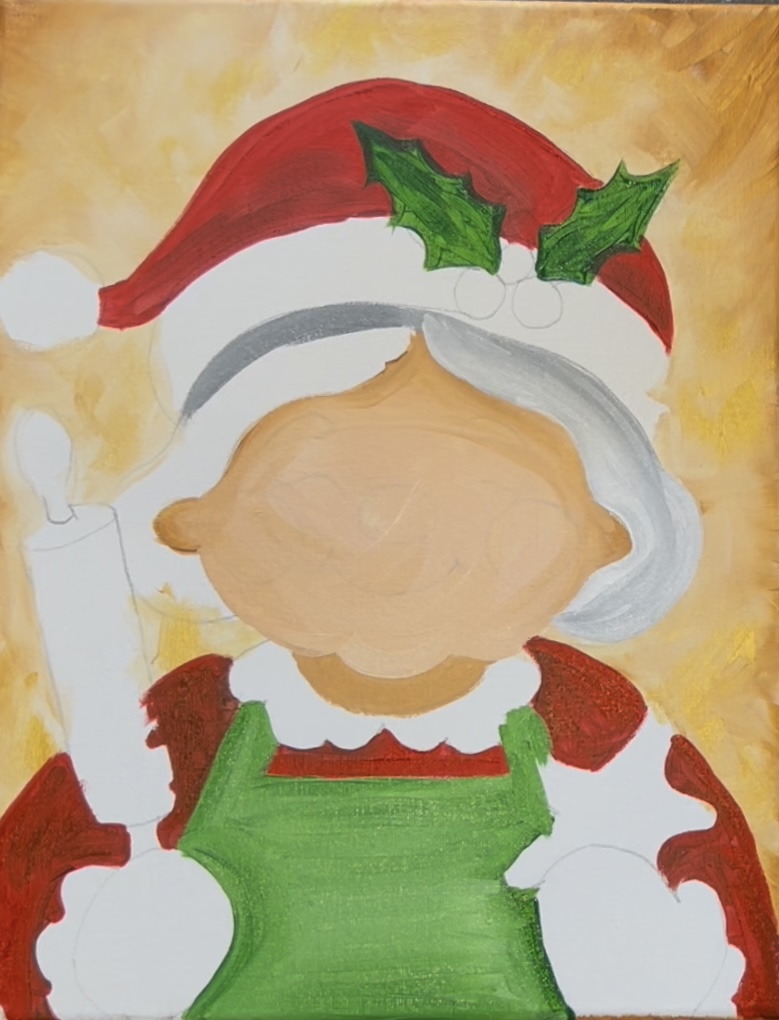
As you paint the hair, blend various shades of light gray and white to create streaks of different grays. Make your paint strokes curve and contour in the direction of the shape of her head. If you want more of a curly look, you can paint strands in more circular paint strokes. Add darker grays towards the areas around her ears. When this layer dries, you can layer on whiter strands of hair.
7. Paint Nose & Cheeks & Eye Brows
To make the color for the nose, mix equal parts cadmium red medium with raw Sienna. Add a little bit of “titanium white” into this color to make it slightly lighter. Use the #4 round brush to paint the oval for her nose.
Then use your index finger to paint her cheeks. Add only a small amount of paint to your index finger and lightly paint the two circles to create her rosy cheeks.
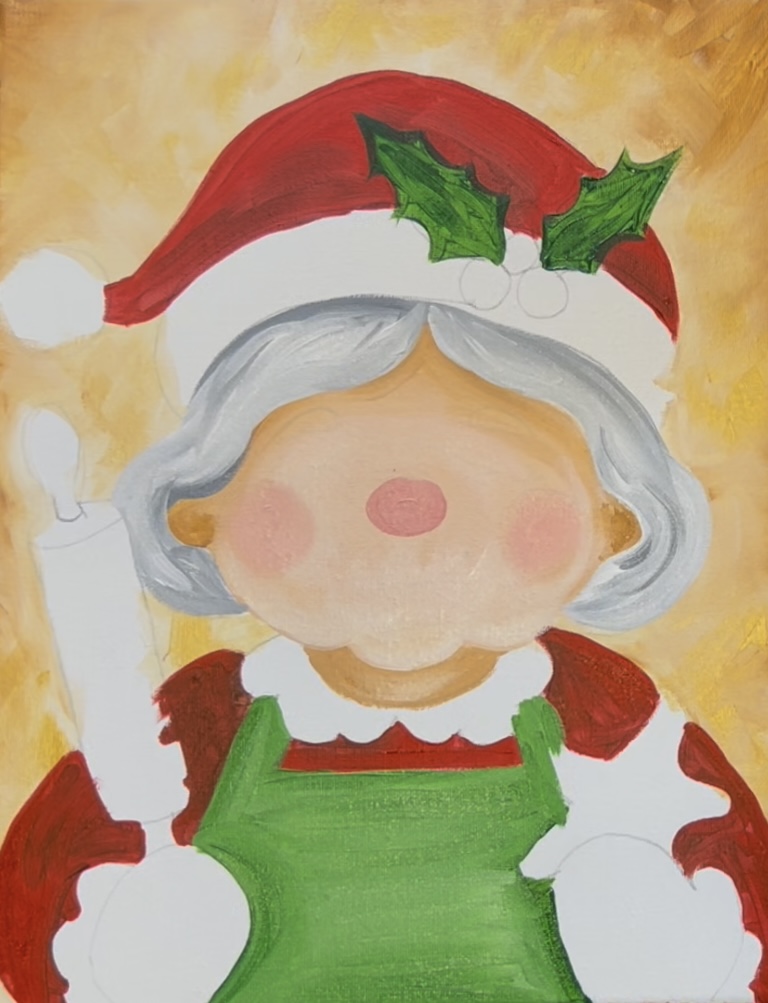
Use titanium white mixed with a tiny bit of mars black to paint both of her eyebrows.
8. Paint Hat Bottom Edging & Ball On Hat
Use titanium white mixed with just a little bit of mars black to paint the bottom white edging of the hat. Paint the ball of the hat as well.
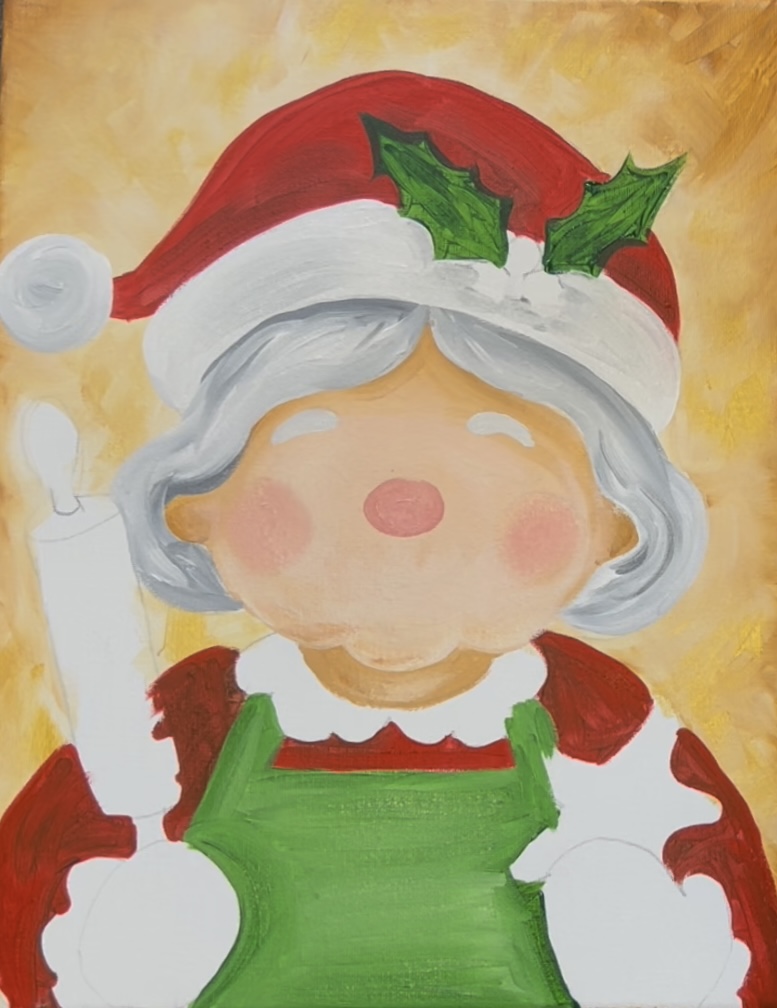
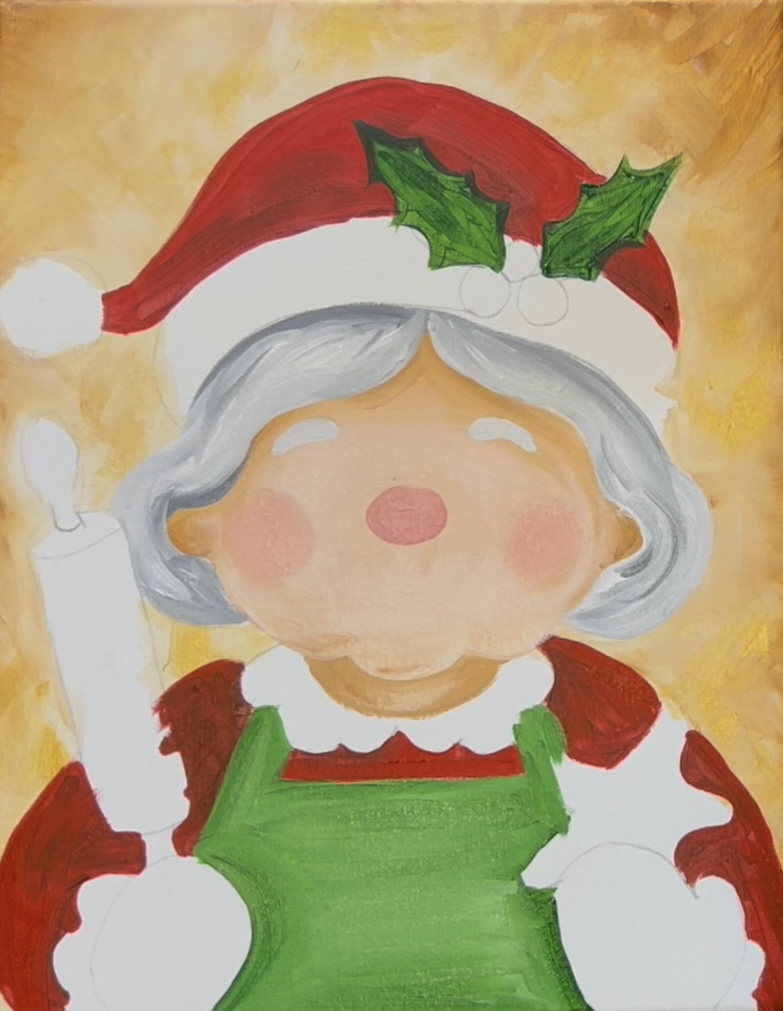
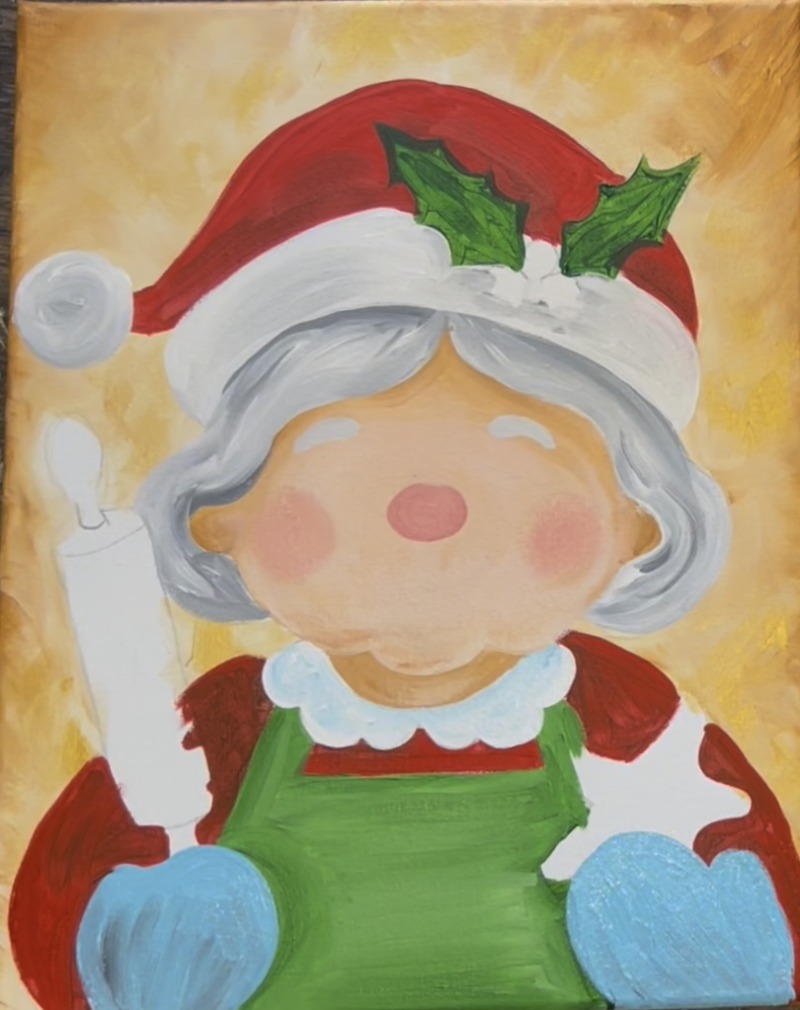
9. Paint Mittens & Cookie
Use “light blue permanent” to paint both of her oven mittens.
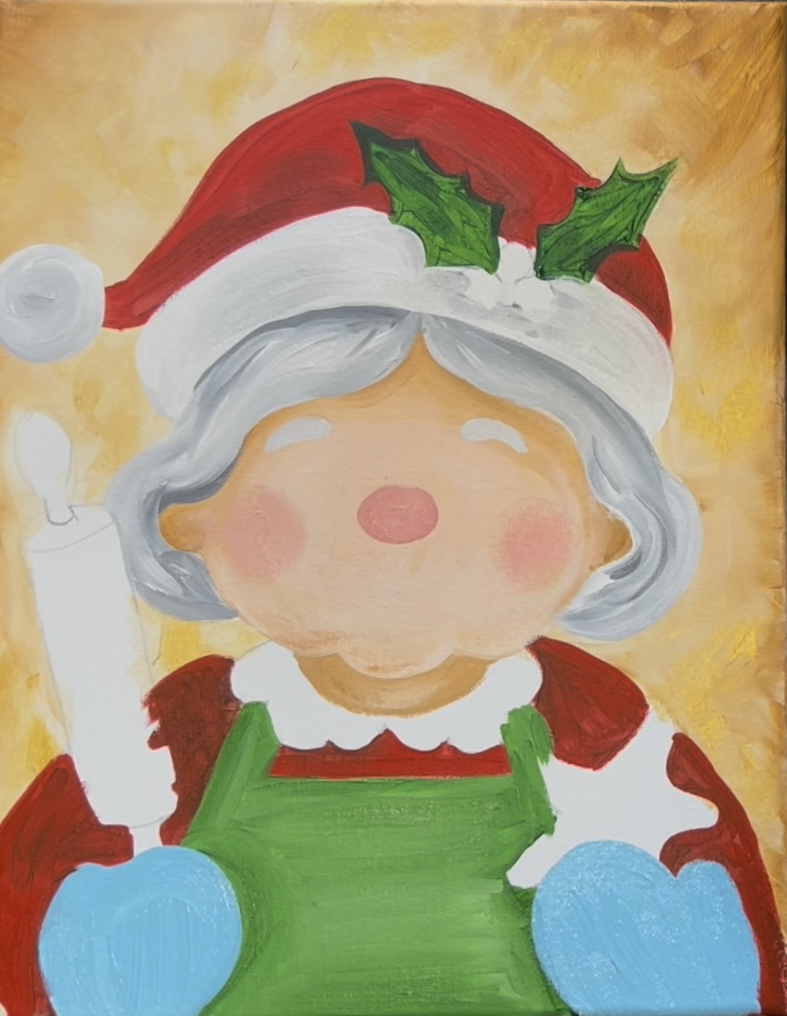
Then blend just a tiny bit of mars black on the bottom of both of the oven mittens. This creates a little shading.
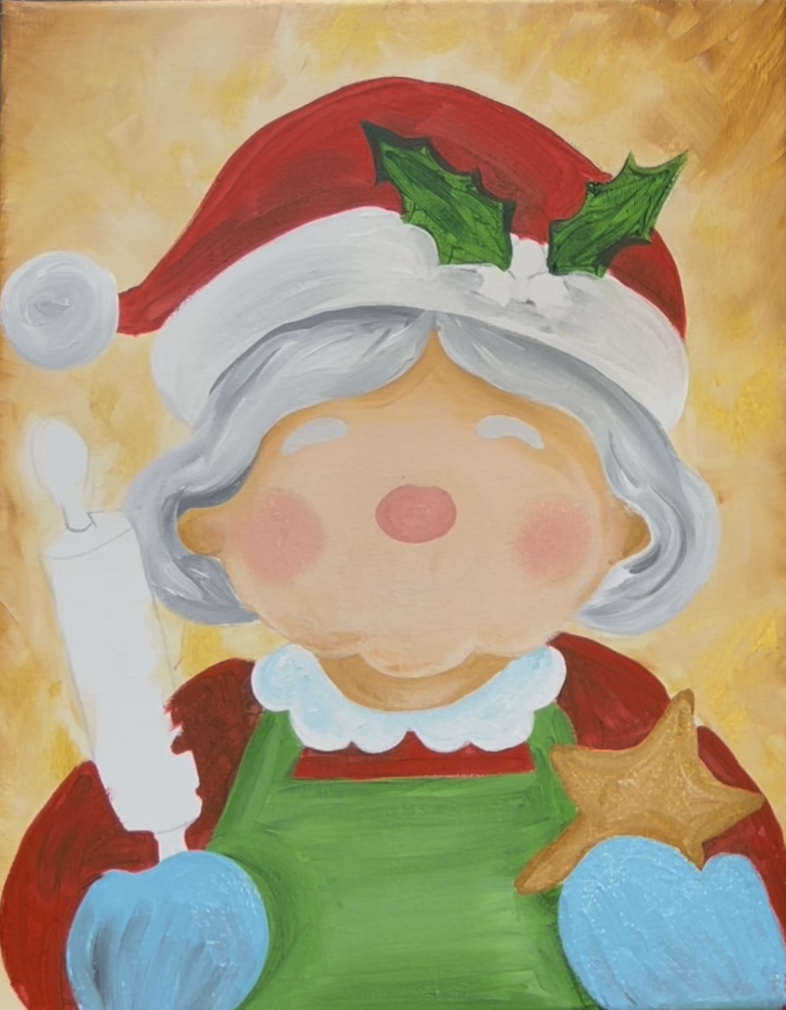
Paint the star cookie with “raw Sienna”.
10. Paint Rolling Pin
Use a combination of raw Sienna (for the base color), titanium white (for lighter colors) and mars black (for shading) to paint the rolling pin. Adding a tiny bit of black into “raw Sienna” makes this brown slightly darker. Paint the handles with this darker brown color.
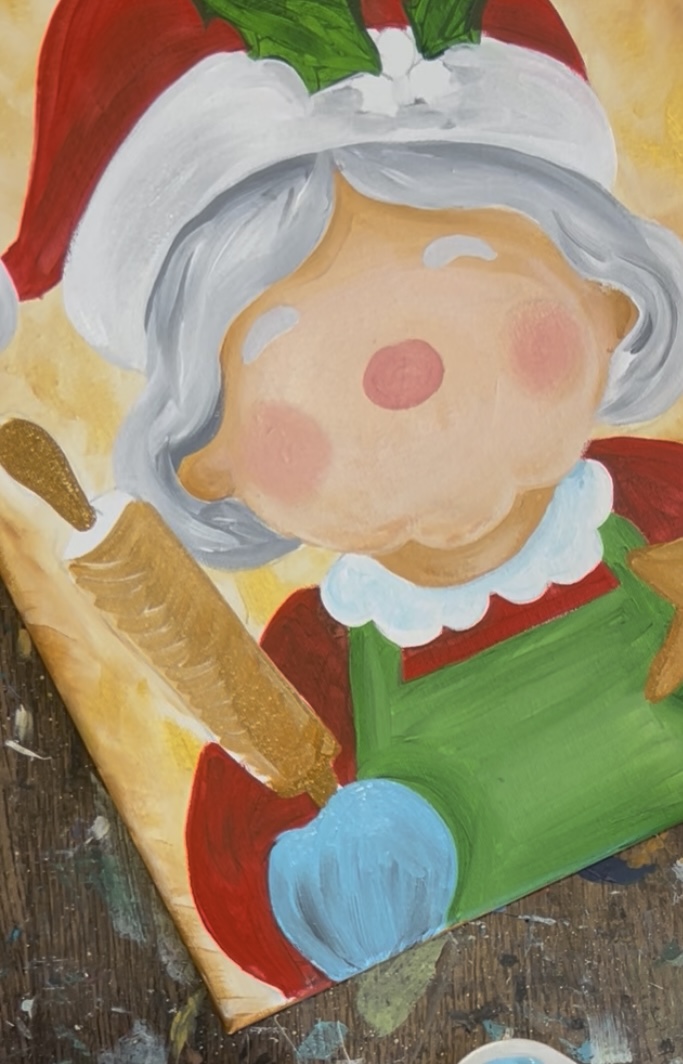
Blend more black on the left side of the rolling pin. Make your paint strokes go in a curved direction to make the rolling pin look more three dimensional.
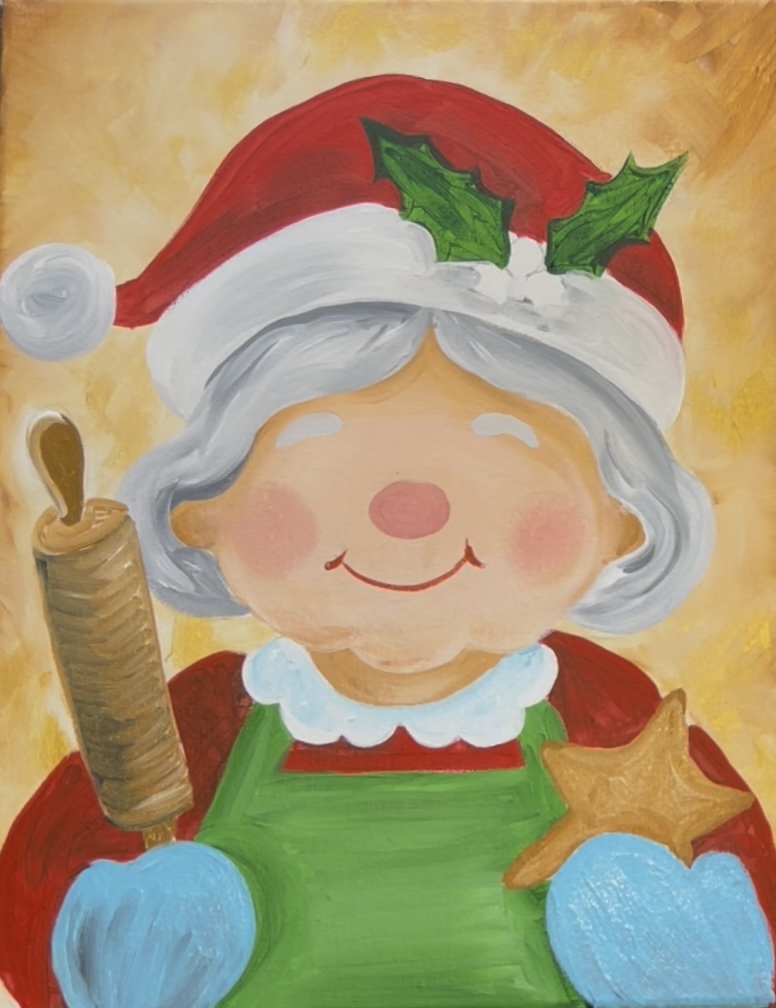
11. Paint Mouth & Eyes
Mix “cadmium red medium” with “raw Sienna” (equal amounts). Use the #4 round brush to paint the mouth. Then use “mars black” and the #4 round brush to paint the eyes (you can also use a paint pen for this step).
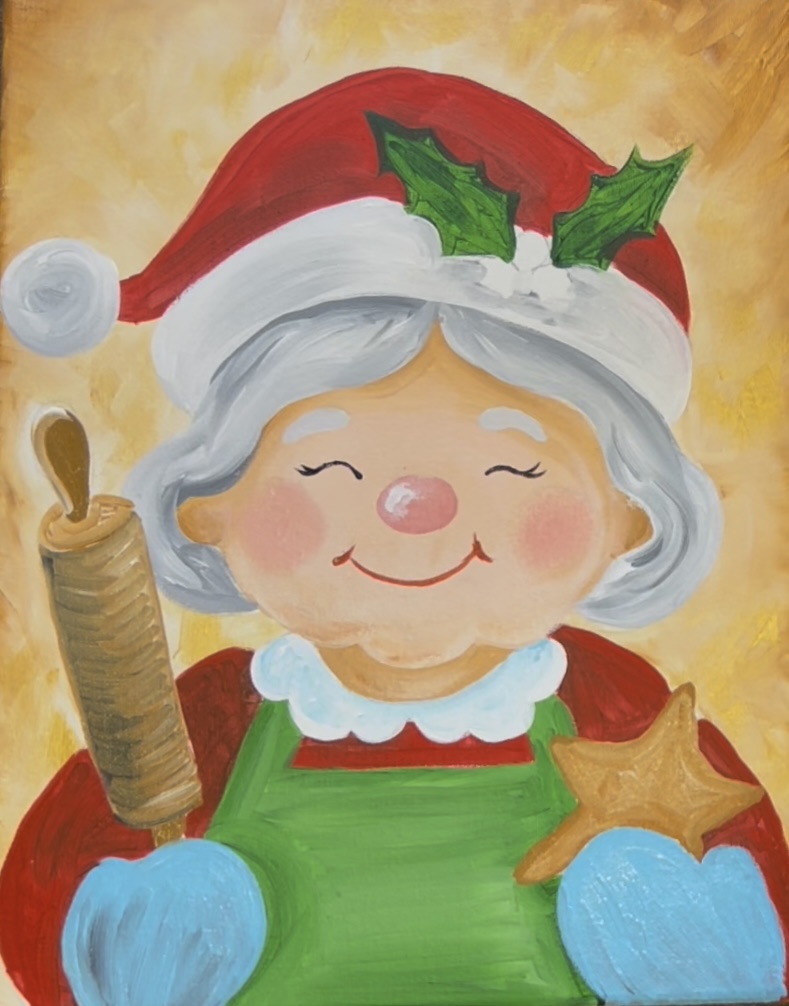
Use “titanium white” to lightly paint a highlight on the left side of her nose. Use your finger to lightly smear the highlight so that it is more subtle. Add a tiny bit of white in the center of both of her cheeks. Use your finger to smear the white in the center of the cheeks to give them just a slight glow.
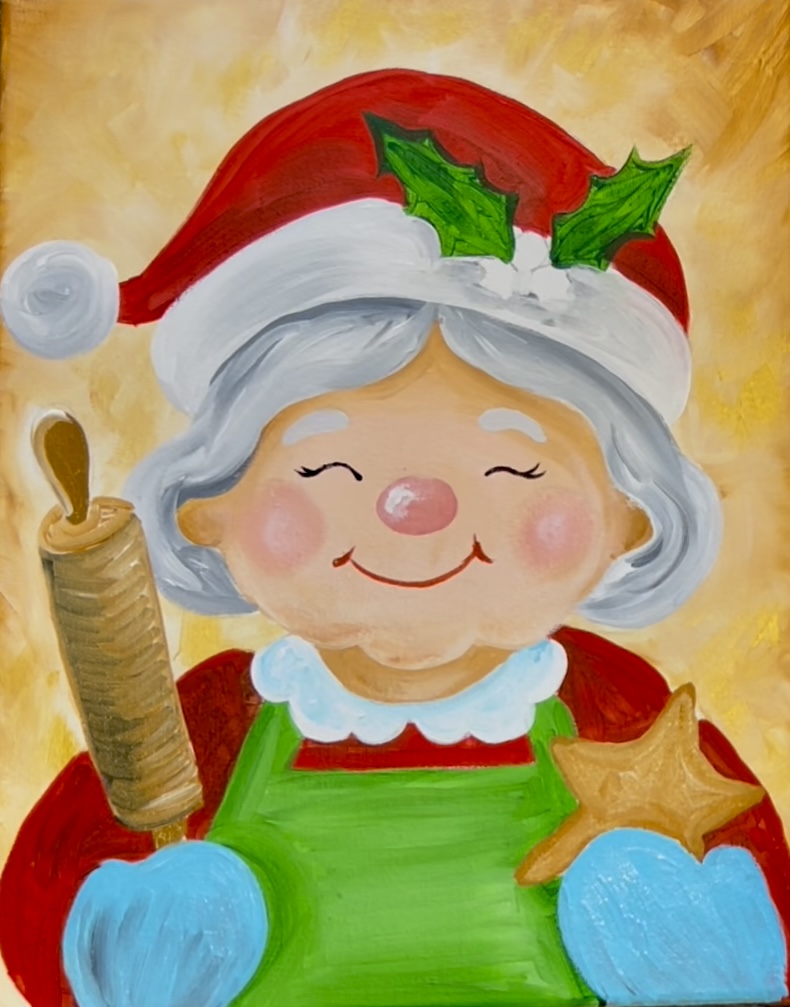
12. Detail On Hat, Holly & Mittens
Use the #4 round brush and “titanium white” to create texture on the hat lining (bottom area). To do this, paint thick paint strokes going in little circular directions. Leave some of your light gray layer showing through. Add some “bumpy” edging along the bottom and top lines of that part of the hat (it will slightly overlap her hair and the red part). Paint a second layer on the ball of the hat.
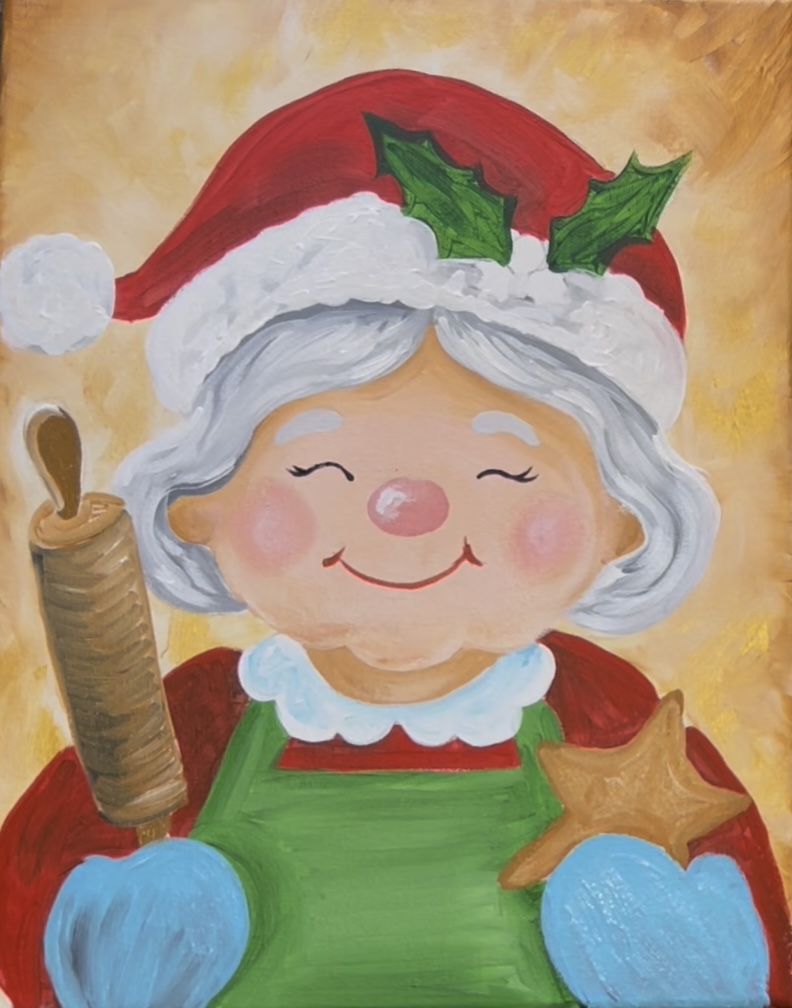
Use the back of your paint brush to paint white dots on the mittens. Also, paint red circles for the berries and use the green to create some blended shadowing on the bottom of the berries. Then add a light green layer to the holly leaves (I painted light green on one side of each of the leaves and blended it to dark green on the other side).

13. Light Outlining & Frosting On Cookie
Lightly outlining helps to create contrast in this style of painting and also helps to define shapes. I lightly outlined the edge of the star cookie with mars black. I also did “loose outlining” on the bottom of the hat, around the mittens, the edges of the apron, bottom of the collar and around the ball of the hat. When you “loosely outline”, you don’t outline the entire line. It’s more of a broken, very thin line that is not continuous.
Use “light pink” and a little bit of “titanium white” to paint frosting on the cookie. Leave some of the dark brown edges of the cookie still showing.
14. Snowflakes & Sprinkles
Use the #4 round brush and “titanium white” to paint snowflakes on her apron. You can also change the patterning on this! Use the back of the paint brush to stamp round sprinkles on the cookie using the colors: green, red and white.
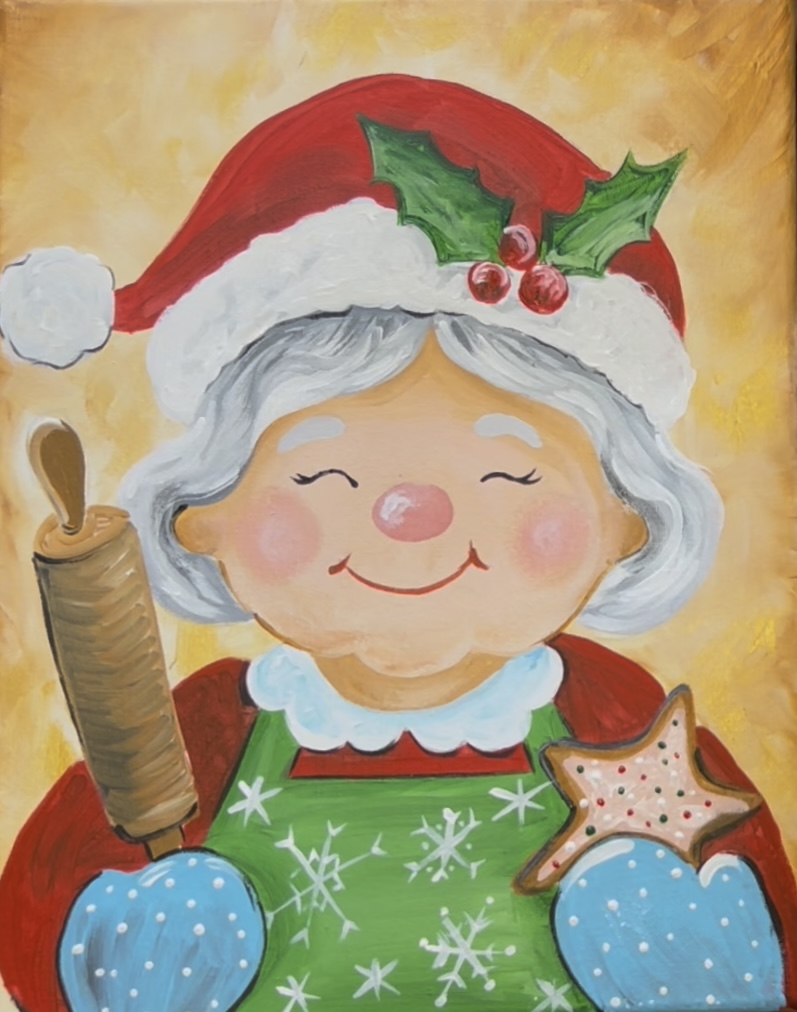
Paint decorative snowflakes in the background using titanium white and the #4 round brush. Dry brush some highlights on the top of the red portion of the hat, on the rolling pin, on the mittens and on the top edges of her sleeves. This helps create an even more stylized whimsical effect for the painting!
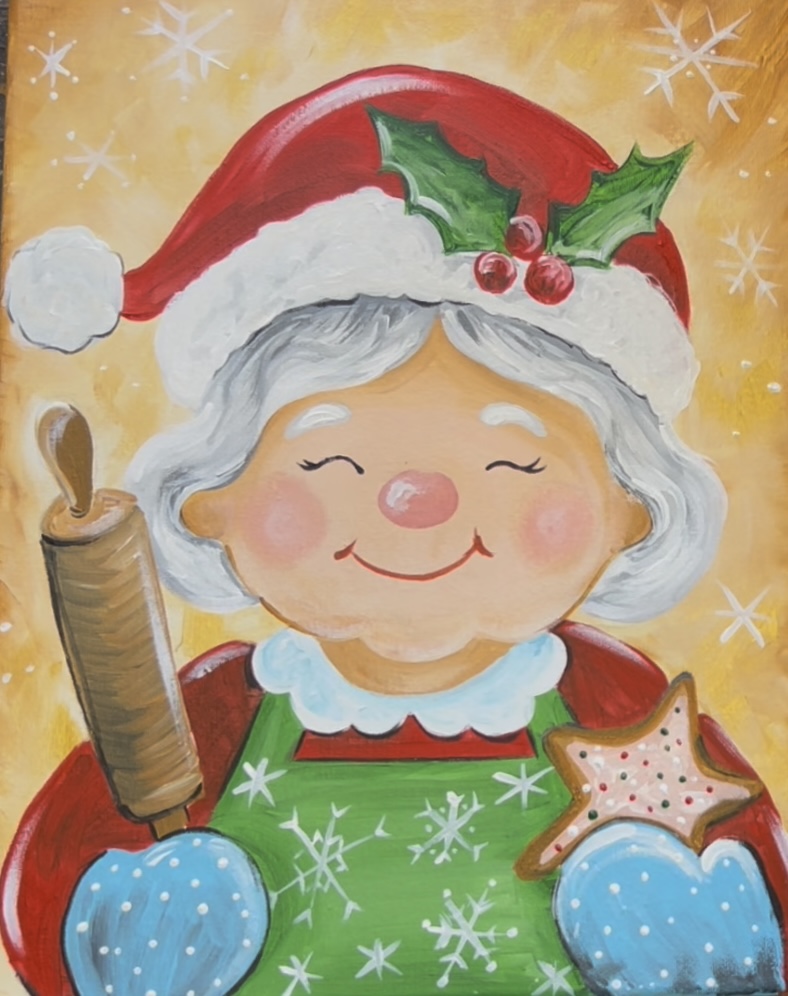
Finished! Final touches as needed and sign your name!
