

Would you like to save this?
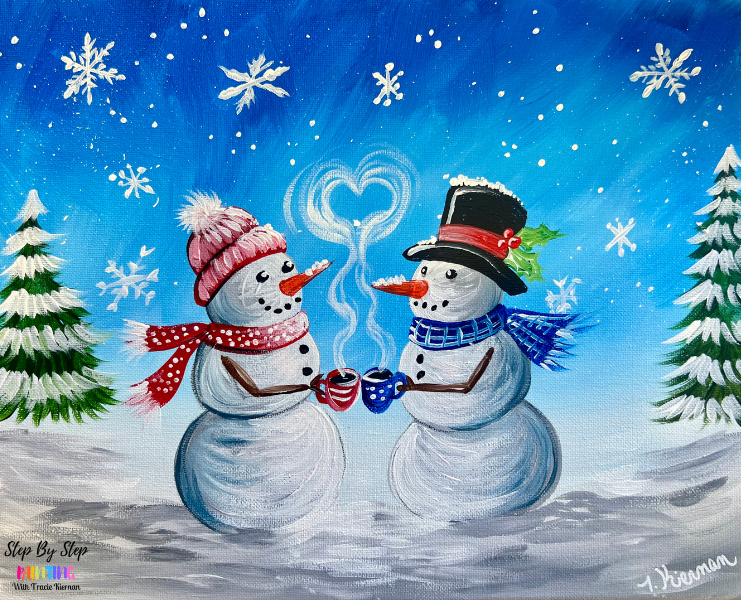
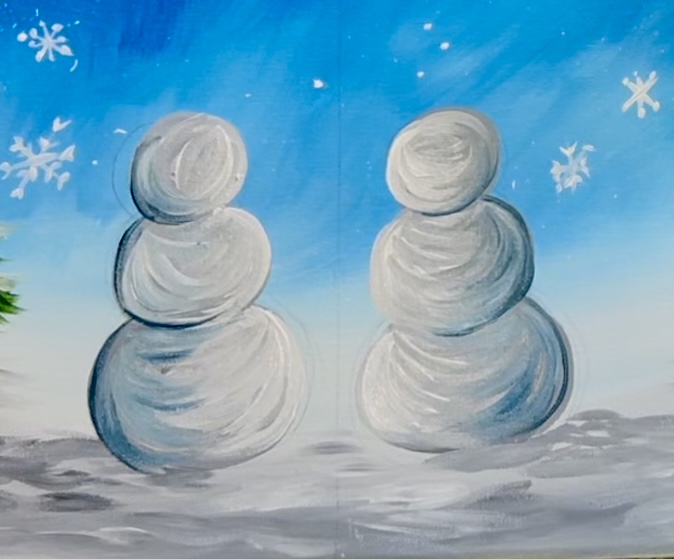
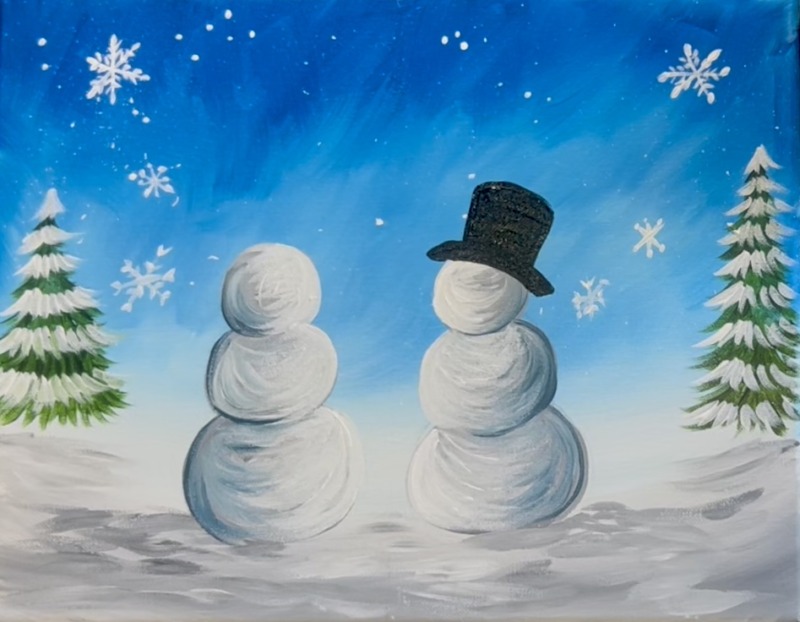
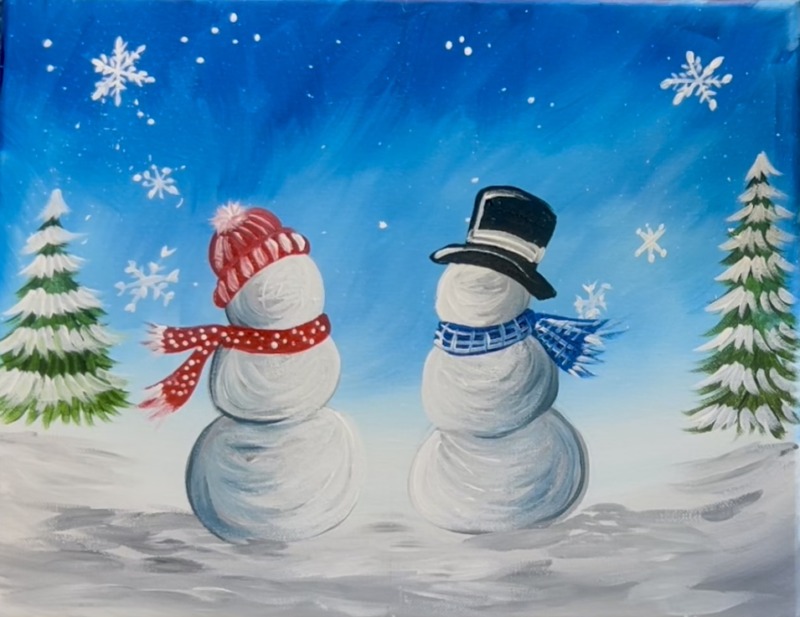
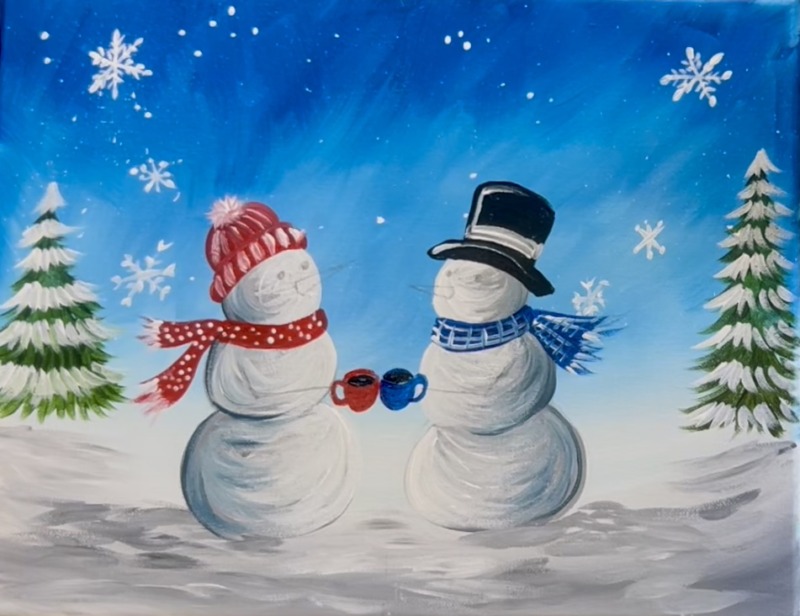
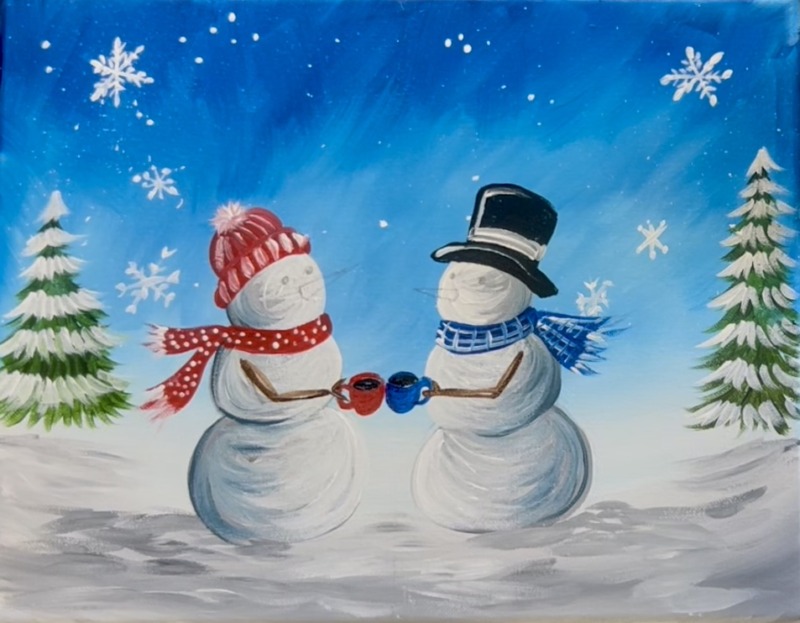
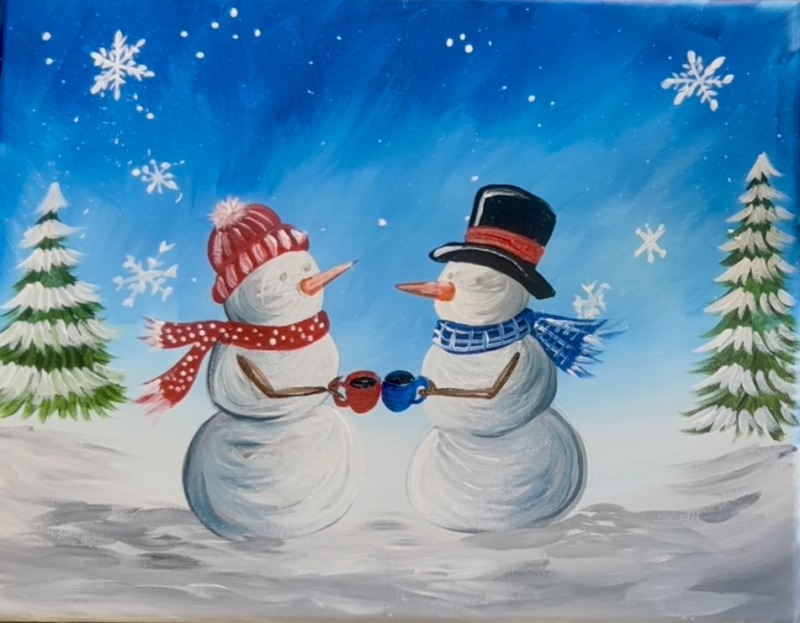
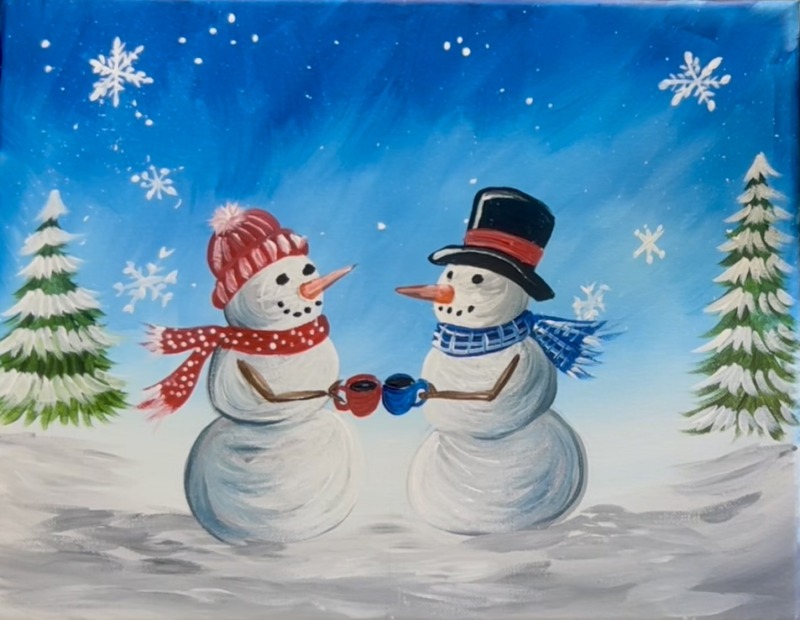
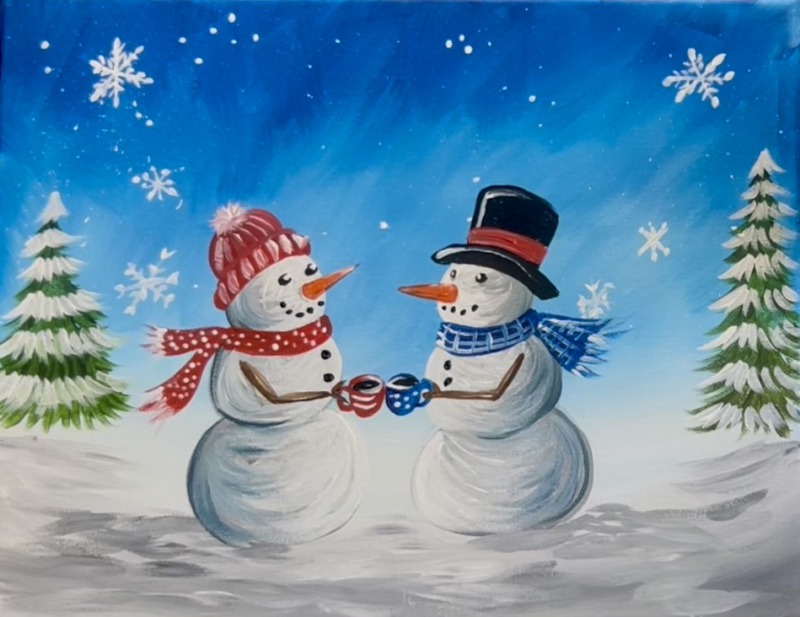
Celebrate the winter season with this cheerful beginner-friendly acrylic painting! In this step-by-step lesson, you’ll learn how to paint two adorable snowmen sharing a cozy moment together under a bright blue winter sky. Their steaming mugs form a heart shape in the air, surrounded by softly falling snowflakes and snowy pine trees.
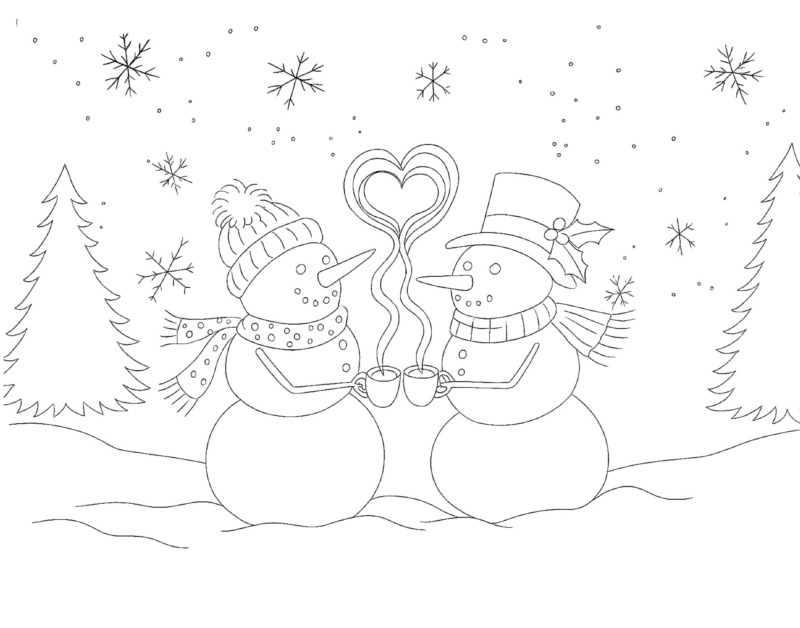
There is an optional traceable template for this one too!
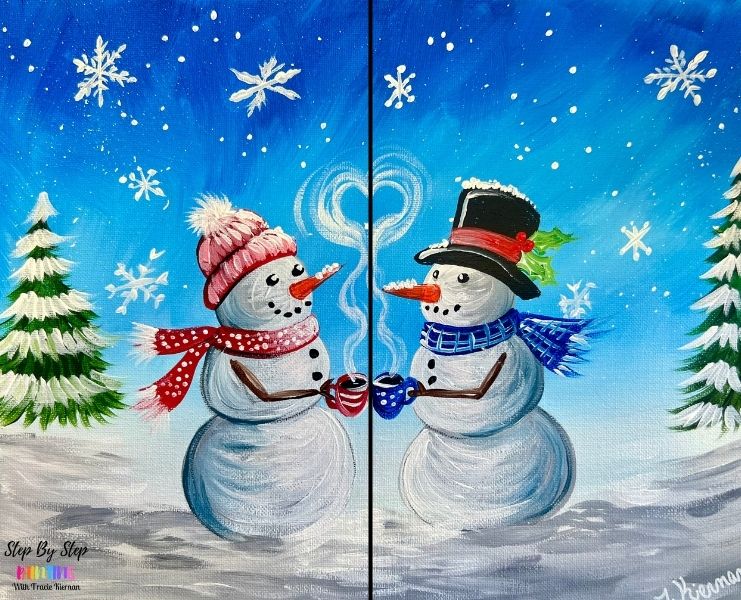
Note: this design can also be modified to be a “couples painting”. That means you can divide it in half and each person can paint their own canvas that fits together to form one painting.
Enjoy and happy painting!
Materials
Warm Wishes - Acrylic Painting Tutorial
Celebrate the winter season with this cheerful beginner-friendly acrylic painting! In this step-by-step lesson, you’ll learn how to paint two adorable snowmen sharing a cozy moment together under a bright blue winter sky. Their steaming mugs form a heart shape in the air, surrounded by softly falling snowflakes and snowy pine trees.
Materials
- 11 x 14 Canvas
- Acrylic Paint
- Brushes
- Toothbrush for splattering (optional)
- Pencil
- Ruler
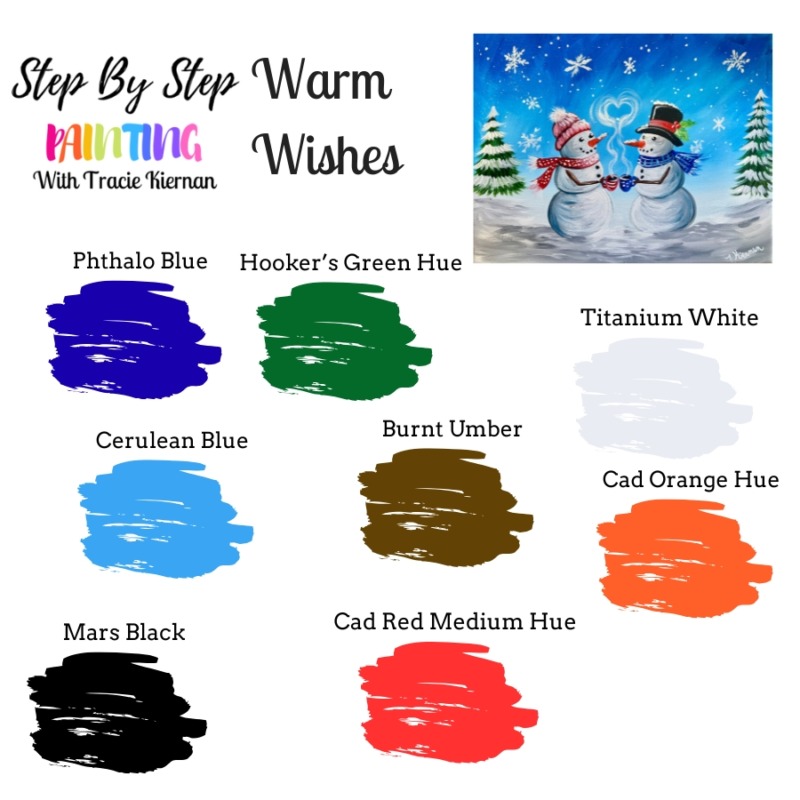
Colors
- Titanium White
- Mars Black
- Cadmium Red Medium Hue
- Cad Orange Hue
- Hooker's Green Hue
- Phthalo Blue
- Cerulean Blue
- Burnt Umber
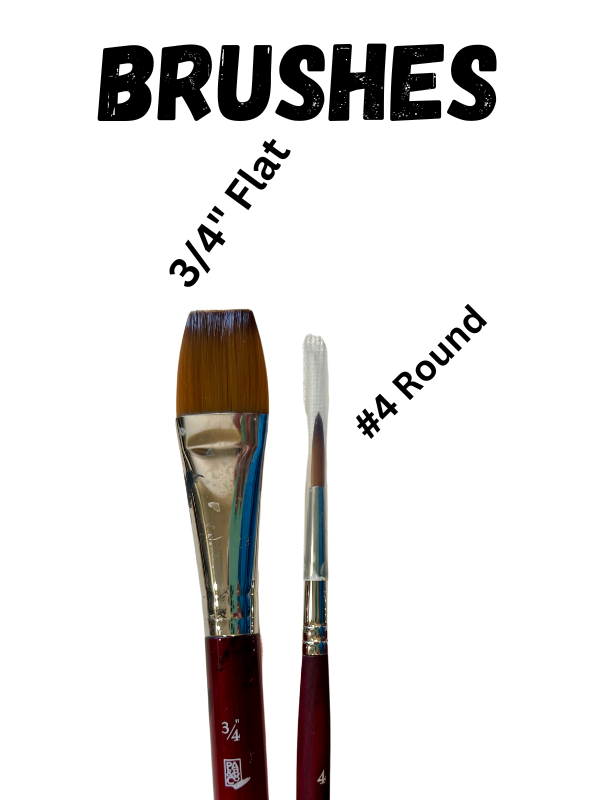
Brushes
- 1" Flat (or 3/4" Flat)
- #4 Round
Download This Tutorial
Available in my PDF shop! You can download different sized traceables, video and PDF instructions for this tutorial. Find out more here!
Color Palette
Brushes
Note: you can use either the 3/4″ flat or 1″ flat.
Directions At A Glance
Traceable (optional)
Video
Step By Step Instructions
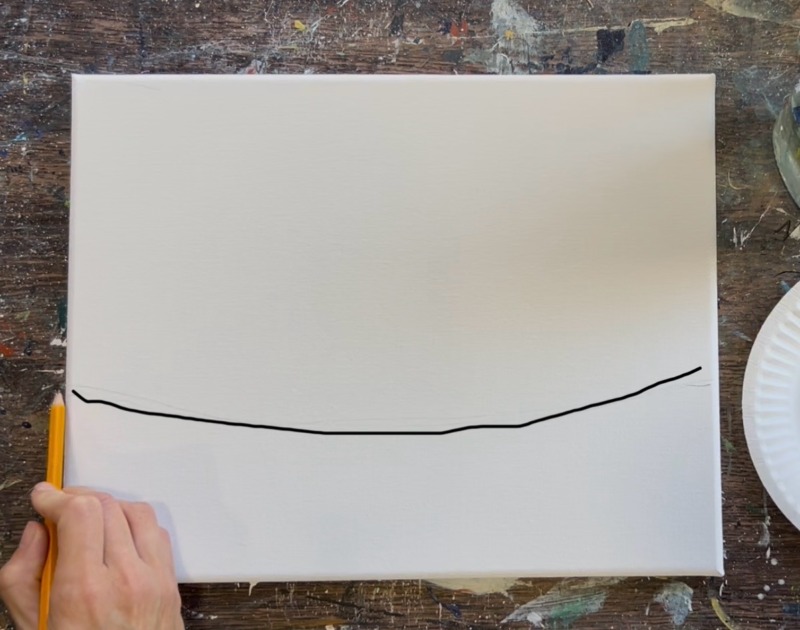
1. Draw an inverted horizon line at 4″
Position your canvas horizontally. Then use a pencil to lightly draw an inverted line (a line that slightly curves down in the middle) at about 4″ from the bottom edge of the canvas. This line will divide where we paint the sky and the ground.
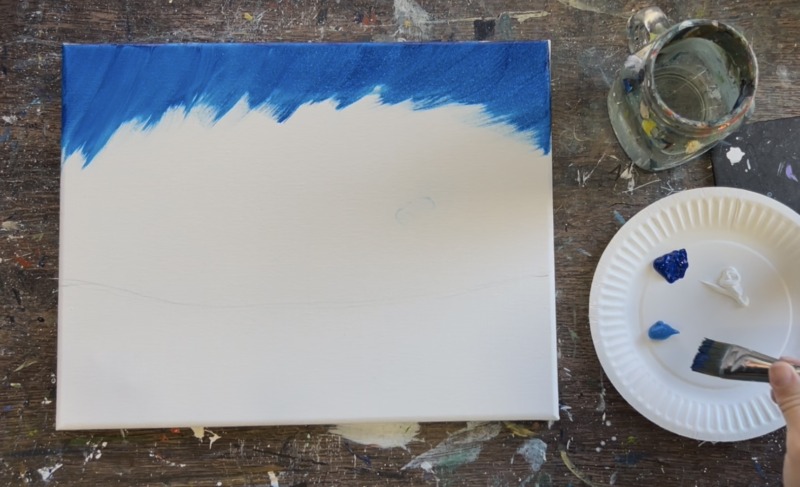
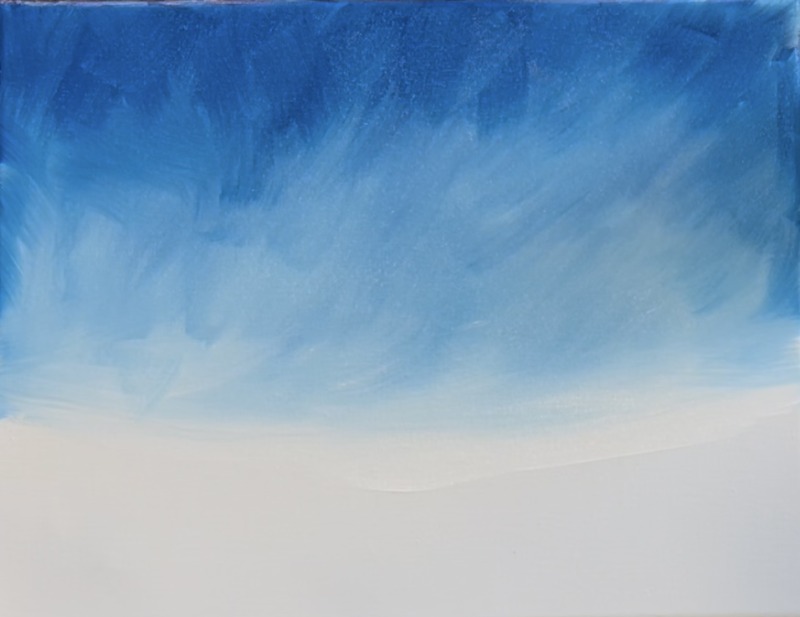
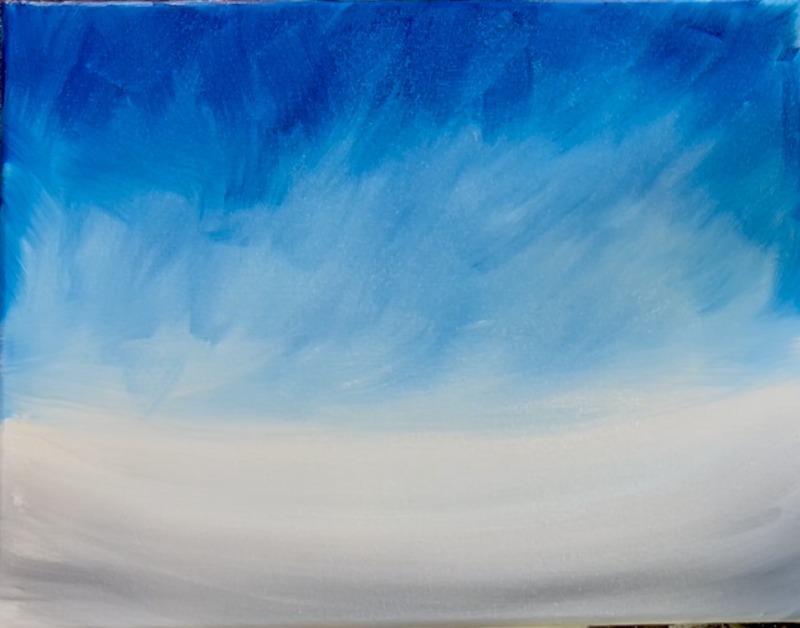
2. Paint The Sky
Load your paint palette with the colors: phthalo blue, cerulean blue and titanium white. Use the *1″ flat brush to paint phthalo blue on the top of the sky. Do this with full width paint strokes going in different angle directions. We will paint a textured sky by painting in “X style” or “Angle paint strokes”. This helps to create a blended sky with color variation! An alternative could be painting left and right paint strokes to create a gradient blend in the sky.
Go down a few inches with this phthalo blue and stop.
*Note: I used a 1″ flat brush for this, however, you can do this with the 3/4″ flat or any large flat brush.
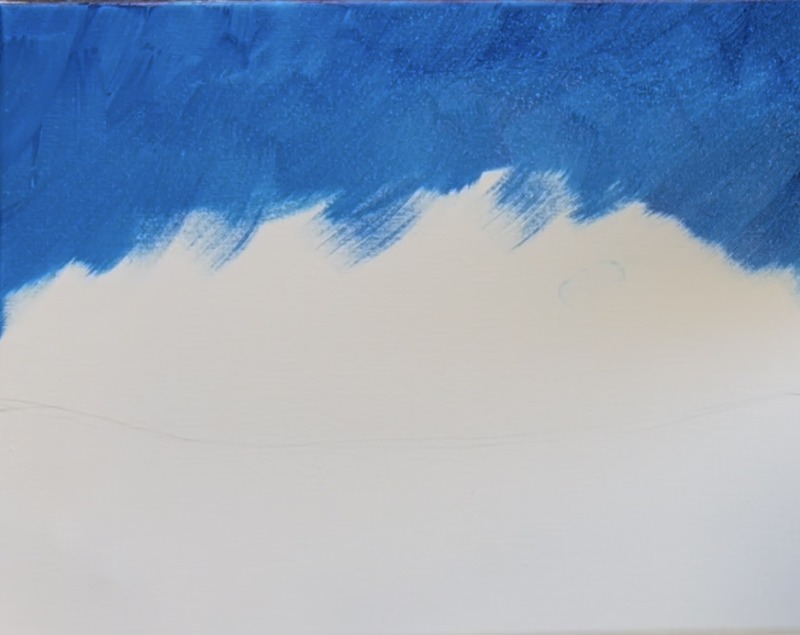
Wipe the brush but do not rinse. Load it into “cerulean blue”. Continue to paint these angle/ “x style” brush strokes and blend the cerulean blue with the phthalo blue. These colors look very similar but the cerulean blue is slightly lighter! Go down to about the halfway point in the sky. Notice there is sort of an “arc” direction in the sky with the center a little higher than the sides.
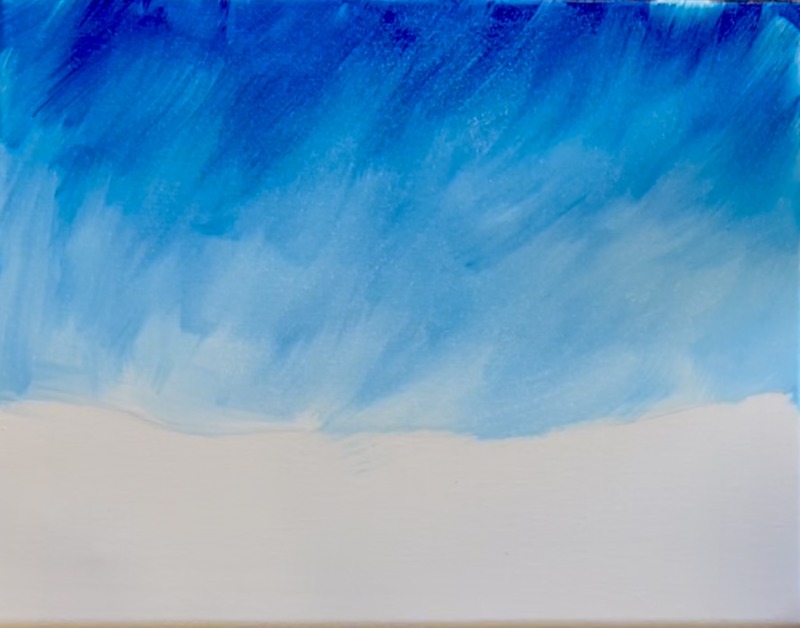
Wipe the brush but do not rinse. Load it into “titanium white”. Then blend your white below your cerulean blue and bring it all the way down to the line you drew. This will create a bright and light blue color. Continue to blend your colors with textured paint strokes. The bottom of the sky is lighter and the top of the sky is darker! If needed, go back with more “phthalo blue” at the top to ensure there is a dark area of blue at the very top.
3. Paint Snowy Ground (first layer)
Rinse the brush. Then load it into “titanium white”. The ground is painted with smooth, full width paint strokes that go all the way across the canvas parallel to the line you drew (that horizon line). Slightly blend the white with the bottom of the sky to create an area of the land that sort of just “disappears” into the sky. You may need to brush over it several times to get it to blend.
Next, load your paint palette with “mars black”. We are going to use this black to blend a shadowy color on the bottom of the canvas. Mix about 3 parts white to 1 part black to make a medium gray color. Apply this gray on the bottom of the canvas and blend it up into the white. Create a gradient of light to dark with the lightest white along the horizon line and the darkest gray color on the bottom edge of the canvas.
4. Splatter Snow Specks
Use a toothbrush for this step (or the flat brush). Load it into white paint that is slightly watered down. Test out a separate surface before flicking the paint on the canvas to make sure the consistency is not too watery but not too thick. Then flick snow dots all around the canvas.

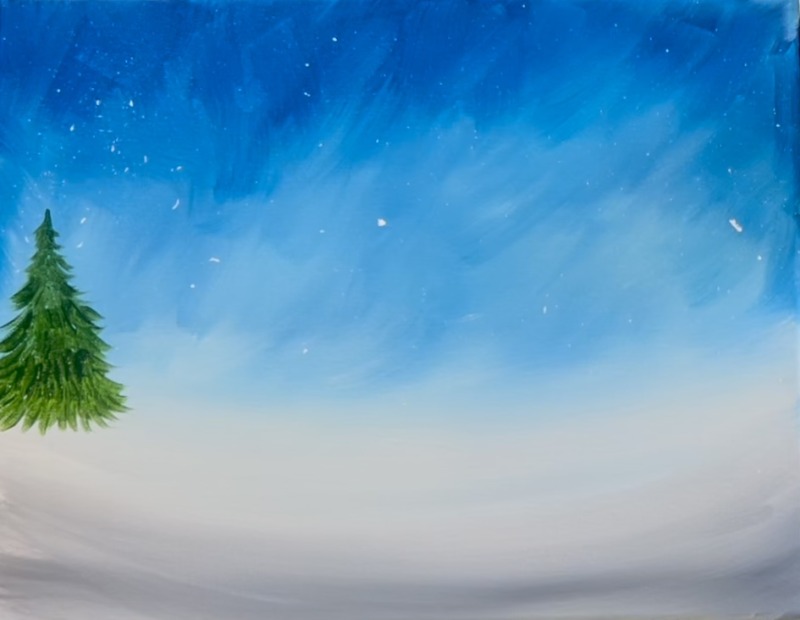
5. Paint Trees
Load your paint palette with “hooker’s green hue”. Use the #4 round brush to paint two pine trees. Start at the top of the tree (about the middle area of the sky). Paint your branch paint strokes but stroking your brush downwards and outwards. As you form the shape of the tree, make the tree wider as you go down.
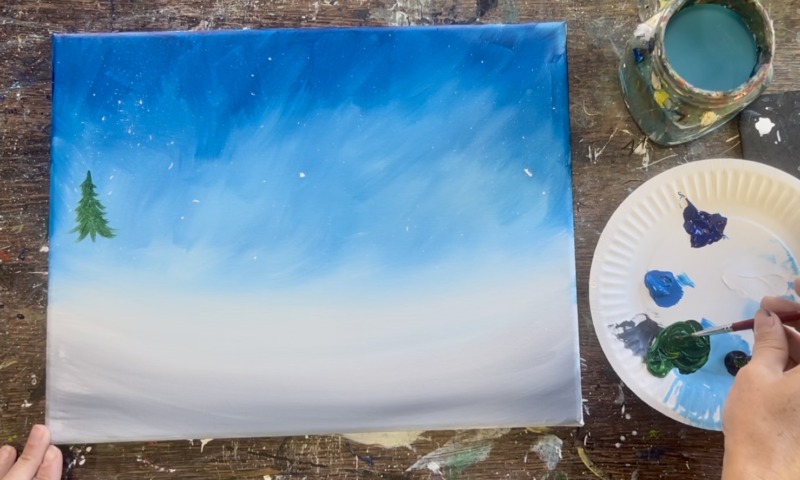
Bring the tree all the way to the snowy ground area and stop.
Repeat this step of the tree on the right. Sometimes it is helpful to paint a vertical line first and then do your tree branches on each side.

Paint each brush by stroking downwards and outwards and make your tree into a triangular shape.
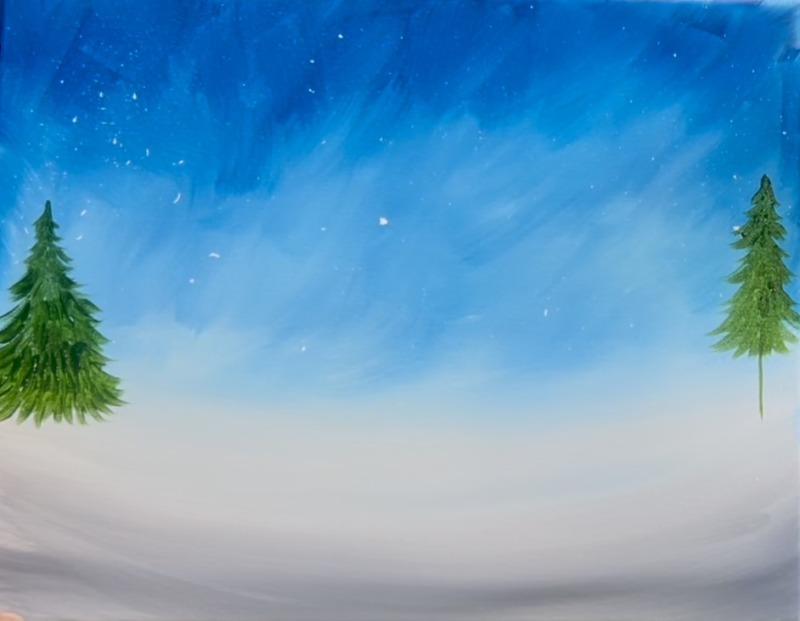
It’s also okay that each tree looks different! I made the tree on the left wider but slightly shorter while the tree on the right is more slender and slightly taller.
Let this layer of green dry before painting snow on the trees.
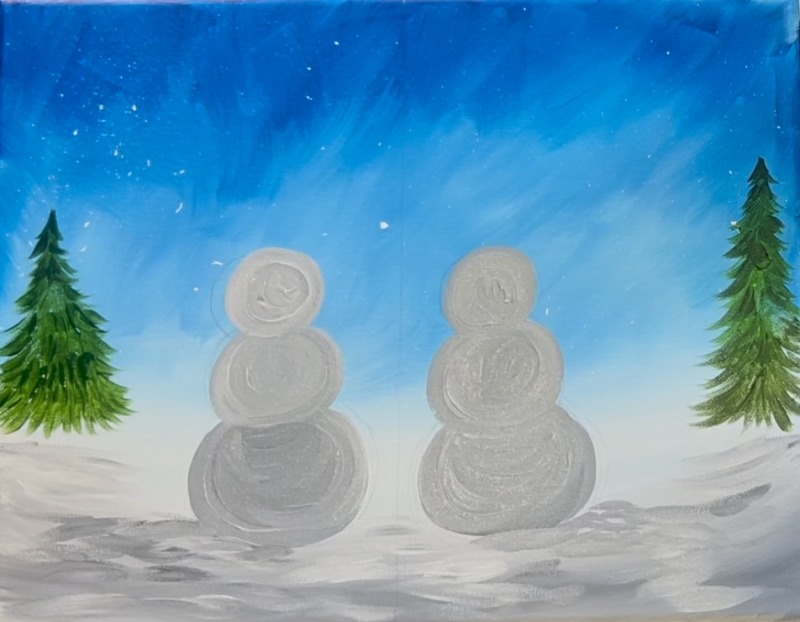
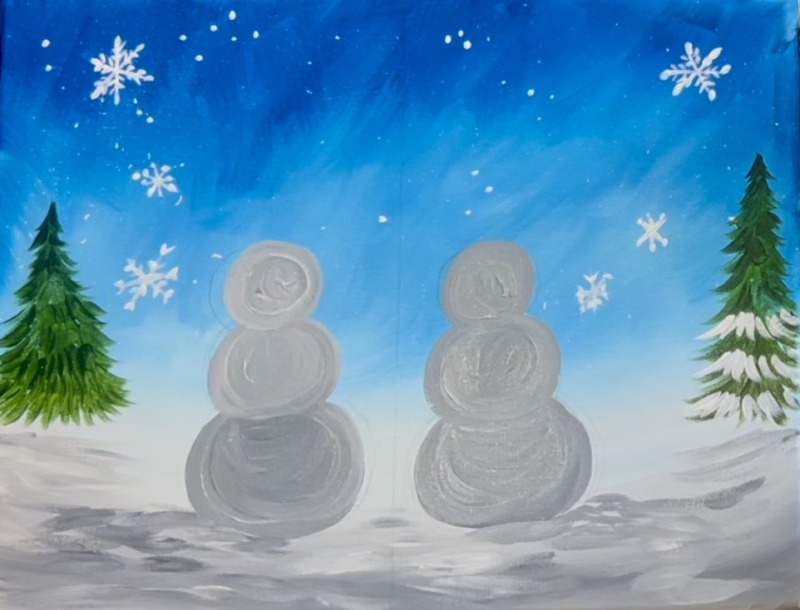
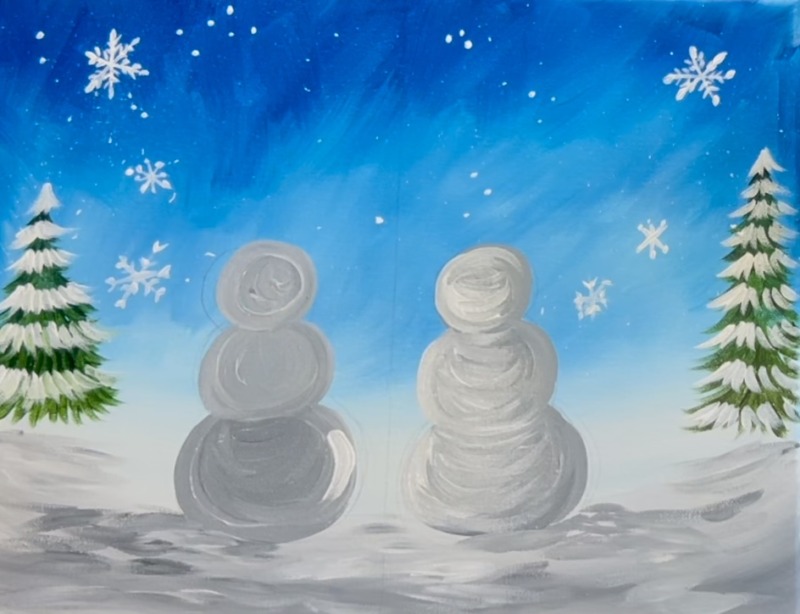
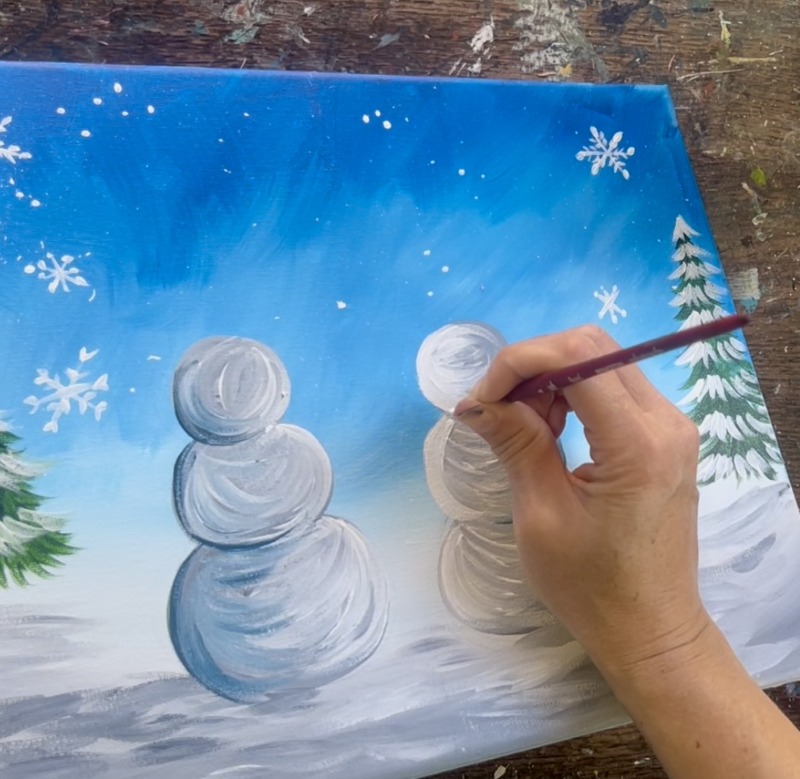
6. Draw & Paint First Layer Of Snow People
Use a pencil and ruler to draw a vertical line down the middle of the canvas. Then draw both of the snow figure shapes. There is about a finger width of space (about 1/2″ to 1/4″) between both of the snow people. Draw three circles that are slightly overlapping each other with the largest circle on the bottom. Also, these circles are a little flatter and oval-like. The bottom ball especially is a little flat on the bottom where it touches the ground.
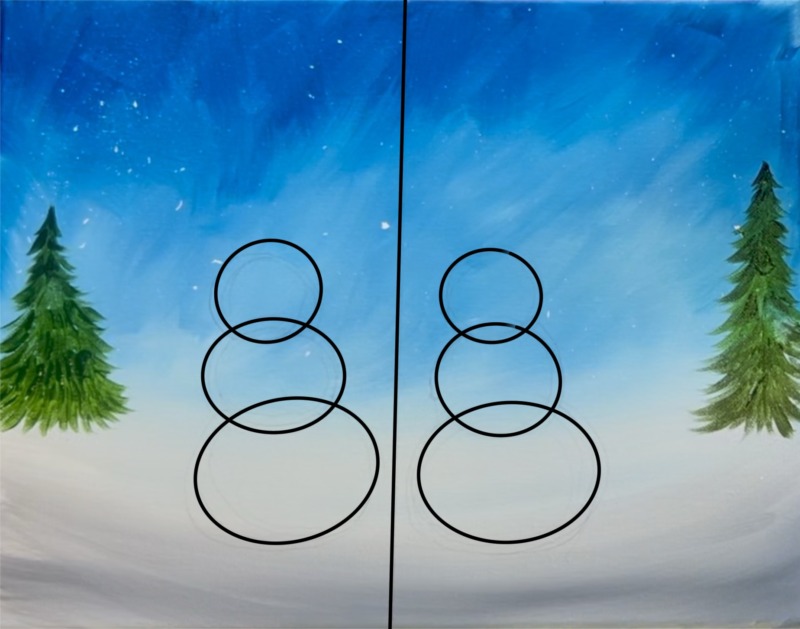
After sketching your circles, mix a medium gray on your palette. Mix about 2 parts white to 1 part black to make a medium gray color. Use a #4 round brush to paint each snow ball for each of the snow people. Start with the bottom ball and then paint the middle and then the top. This will allow it to overlap the way we want the final version to look.

Do this to both of the snow people. This first layer needs to dry before adding our brighter white layer.

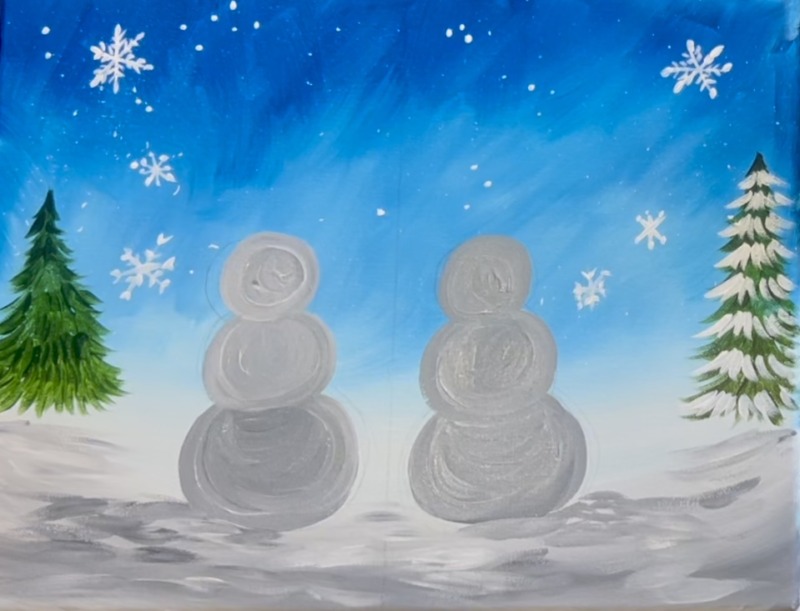
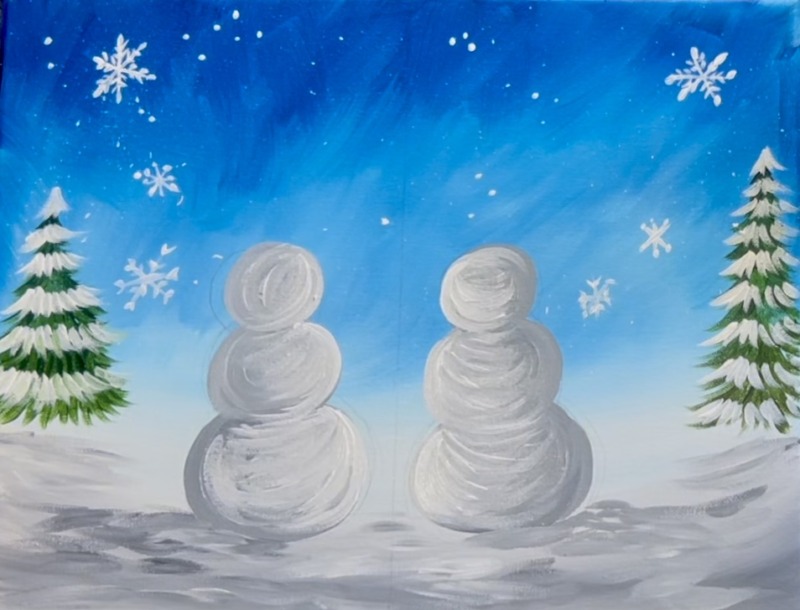
7. Add Shadowing Layers On Show Ground
Use the same gray color you used for the first layer of the snowballs to add some snow shadowing/ texture on the ground. Use the #4 round brush and paint loose paint strokes going in a left and right/ horizontal direction. Paint this direction under the bottom snow ball and then to the side of it. For example, the snowman on the right has this gray layer of snow that extends to the right.
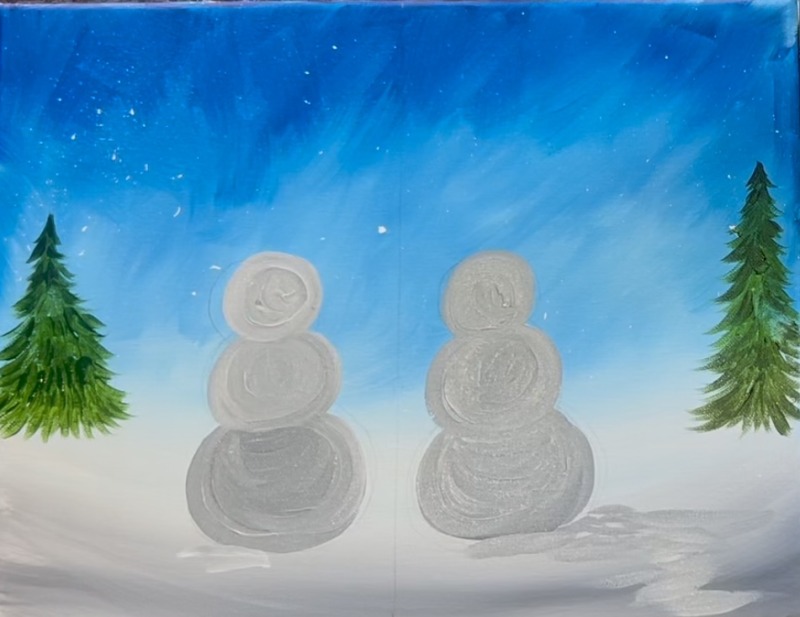
The snowman on the left is a mirror of that, the gray snow texture extends to the left. Add a few more loose gray markings in the snow under the pine trees. If needed, add lighter colors in the snow for some variety. I did not add any snow texture further in the distance where the color blends into the sky because I like the sense of depth that area creates!
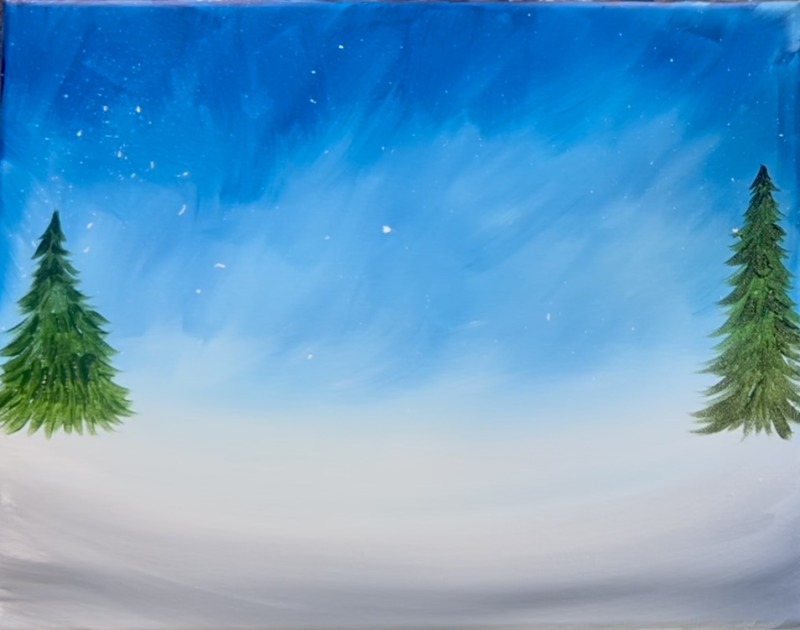
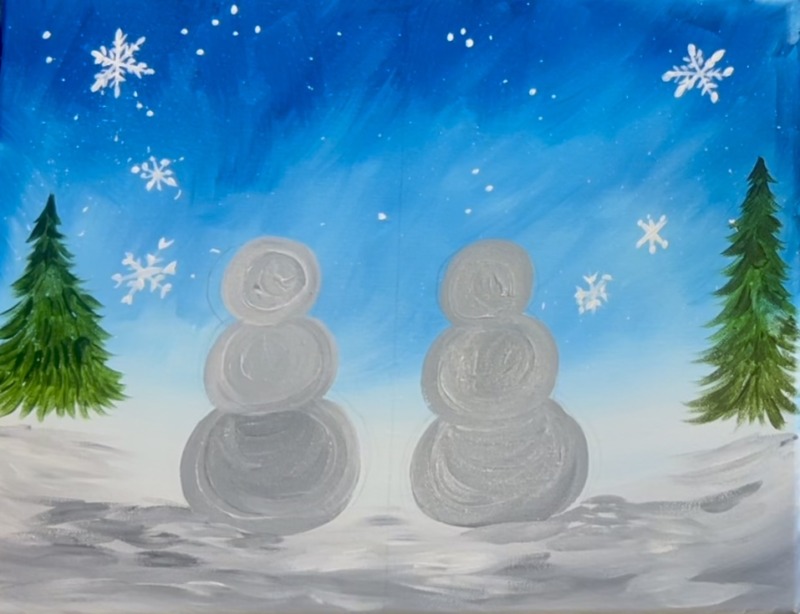
8. Paint Snowflakes
Use the #4 round brush and “titanium white” to paint snowflakes in the sky. Paint an “X” formation and then a line down the middle of the “X” to create 6 points for the snowflake.
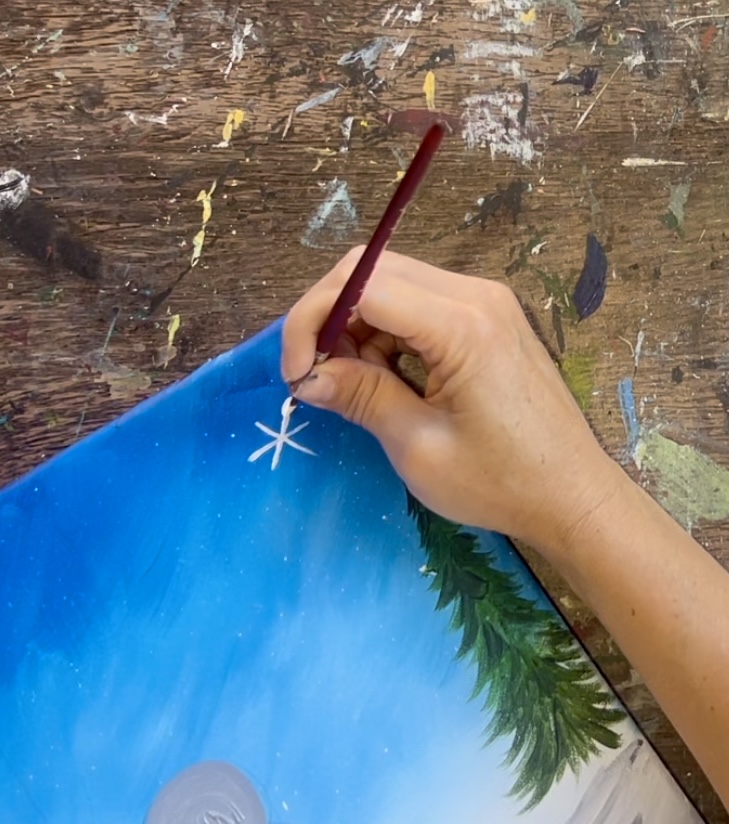
Then paint little diagonal lines extending from each of the lines. Decoration each snowflake in the sky so they are all slightly different. You can make them different sizes too! Also, paint little snow dots throughout the sky.
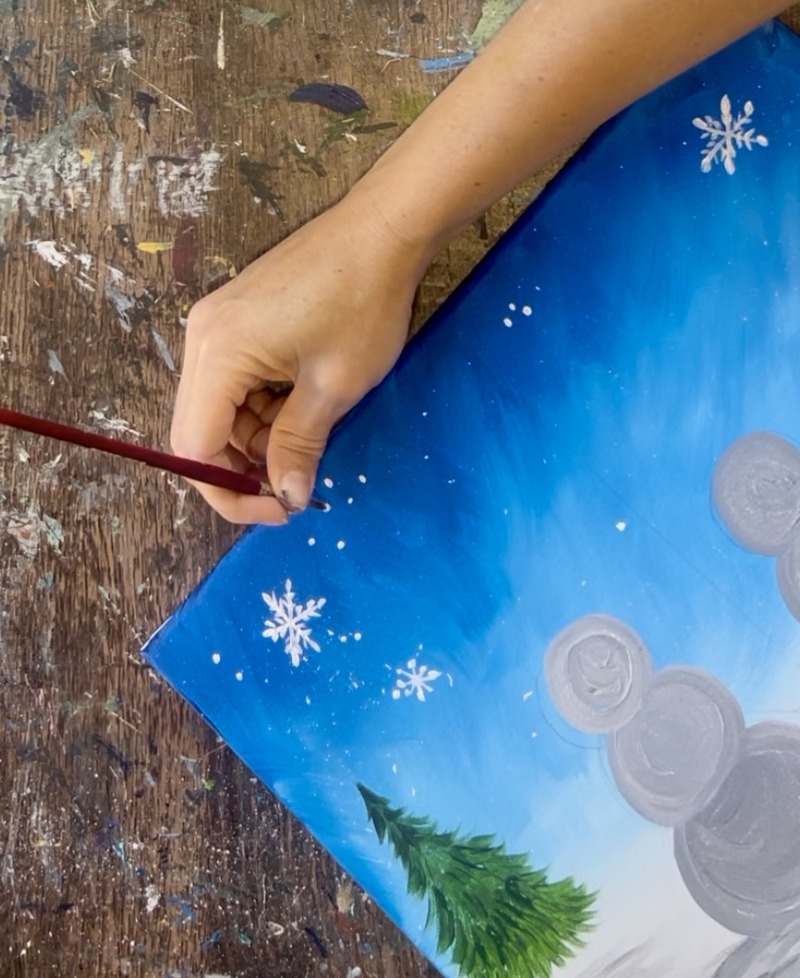
Create as many snowflakes as you want but keep the middle of the sky blank (to allow room for the steam from the mugs later).
9. Snow On Trees
Use the #4 round brush and “titanium white”. Paint the same style branch paint strokes as you did earlier but this time start on the bottom and work your way to the top. Leave a space of dark green in between each of the rows of white branches. You also can leave dark green showing through some of the white.
Do this for both of the trees!
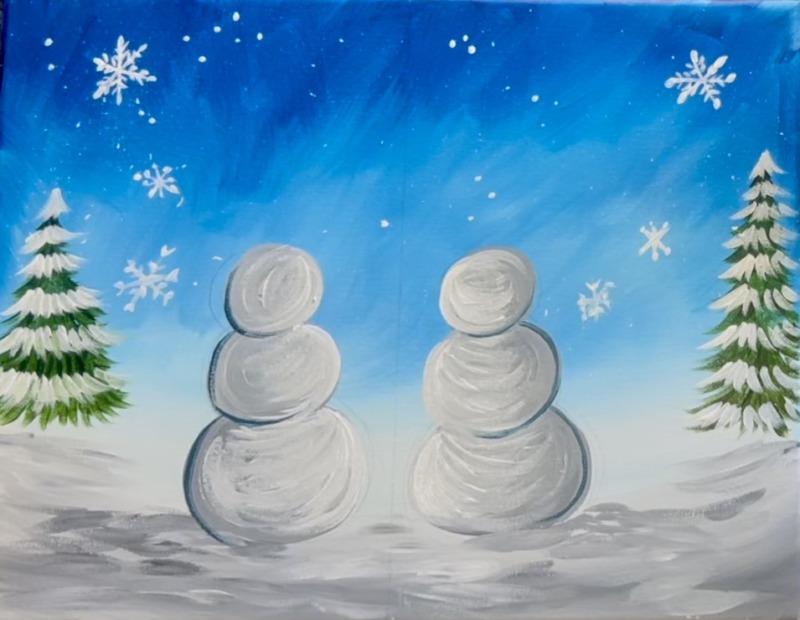
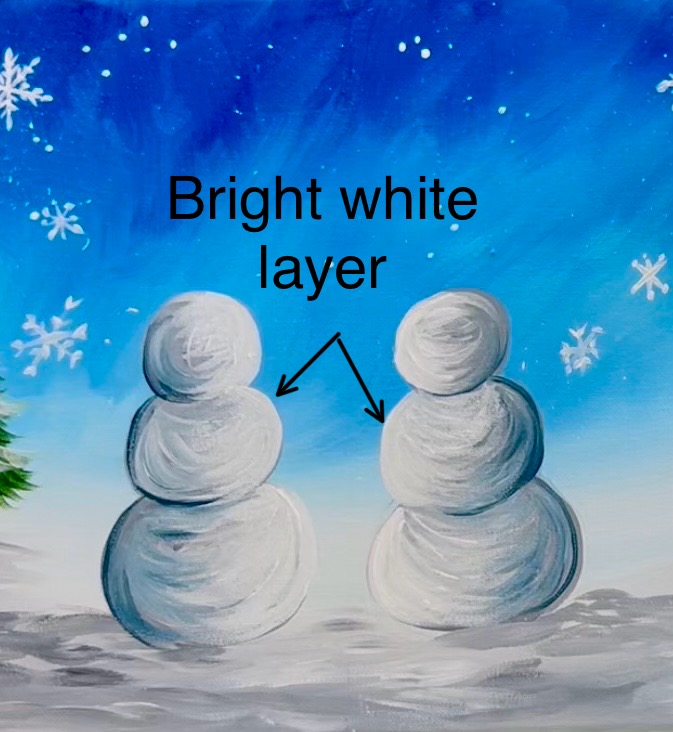
10. Highlight Layers On Snowman Couple
Use the #4 round brush and titanium white. You are going to re-paint the snowballs but only the far left or far right half of them. Start with the snowman on the right and start with the bottom snowball.
Note: the gray layer was still slightly wet and workable so this white layer does end up blending with it a bit. If yours is completely dry, try mixing a white but add just a tiny bit of black to it so it is more of a light gray color and not pure white.
Paint just the left side of the snowball so that it has the brighter color but leave the right side dark where it shows shadowy. This will help your snow balls look “three dimensional”. Drag the white paint strokes in a curved direction but stop about halfway to leave the far right side shadowy.
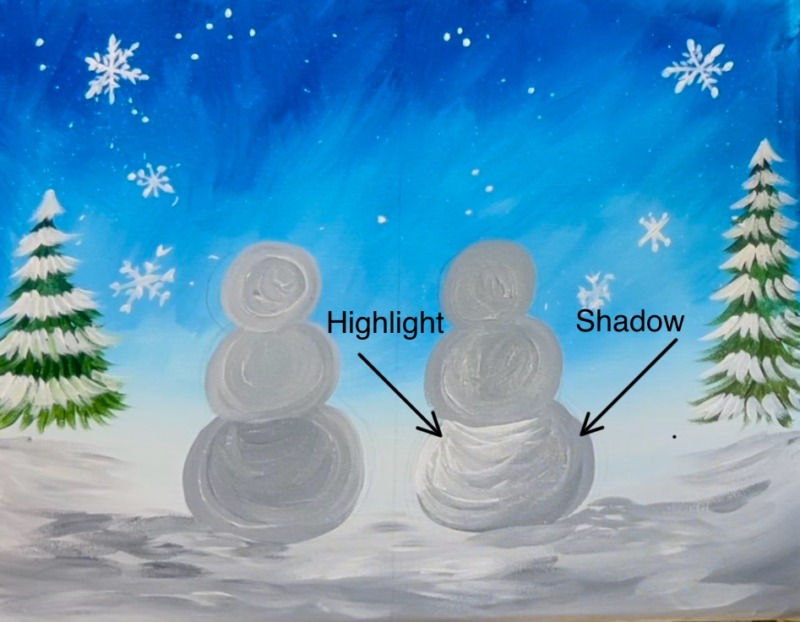
Repeat this for each of the snowballs. Then highlight the snow person on the left. This time the brighter highlight part is on the right side and the shadowy part is on the left (it mirrors the other snowman).
Optional: mix a medium blue gray color on your palette by mixing 1 part black, 2 parts phthalo blue and 4 parts titanium white.
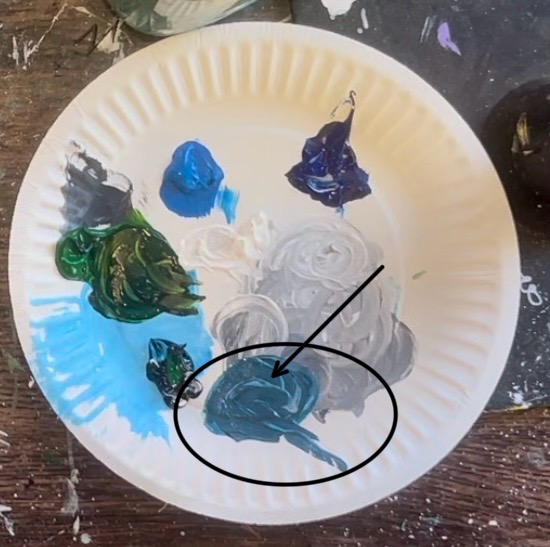
Use this color to lightly outline the far left of each of the snowballs and also the bottom of each of the snowballs .
Dry brush this blue-gray color into some of the shadow area on the back of each of the snow people. Just a little is all that is needed for extra shadowing in the back! If you do too much, you can always go back over it with lighter gray.
Wait for everything to dry (or blow dry everything). Then use an eraser to erase your middle vertical line as well as any leftover pencil lines for the snowballs.
Then use your #4 round brush and pure titanium white to do one final bright layer of white on both of the snow people. Start with the snowman on the right and outline the far left edges of each of the snowballs.
Drag your bright white a little in the center but don’t cover your medium and darker colors from earlier. Do this to each of the snowballs for each snowman.
11. Details On Snowman Couple
Use the #4 round brush and “mars black” to paint the top hat. You want to paint this hat so that it tilts diagonally backwards The bottom part of the hat (the brim) needs to slightly overlap the top of the head. Outline the shape of the hat and fill it in solid black.
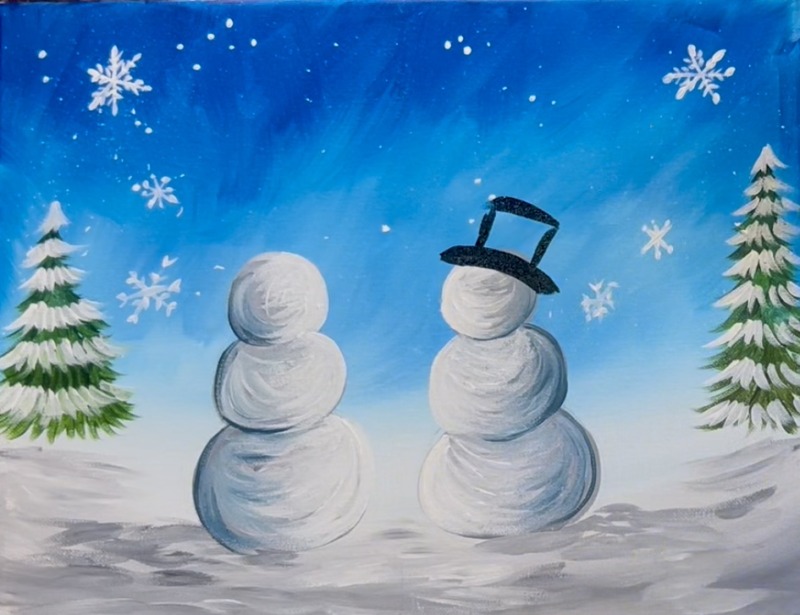
Then load your paint palette with “cadmium red medium hue”. Use the #4 round brush and paint the beanie on the snowman on the left. This also slants backwards diagonally and overlaps part of the top of the head. Paint a thick line for the scarf (in between the top and middle snowballs).
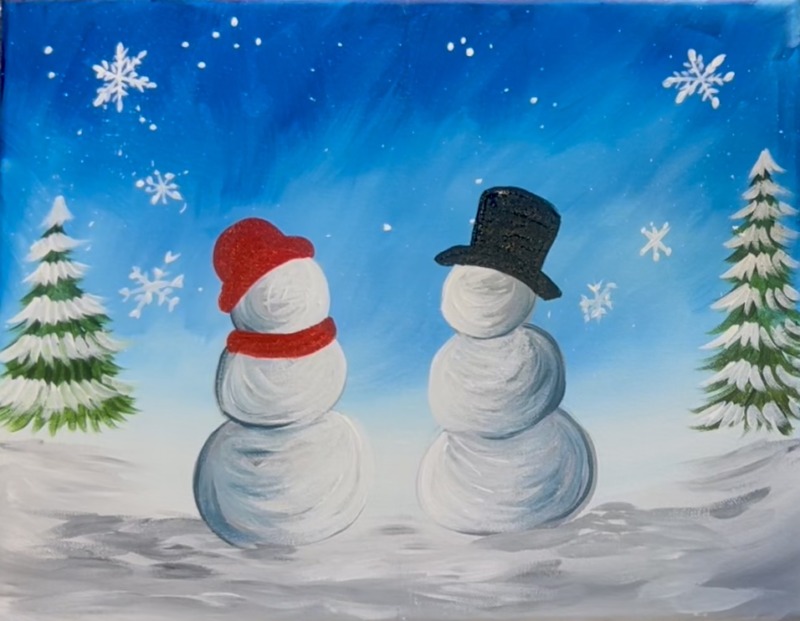
Paint the ends of the scarfs so they extend outwards. Pain the “tassels” so the fray outwards. Do this with paint strokes that fade away or “dry brush style”. Repeat this with “pthahlo blue” for the snowman’s scarf on the right.
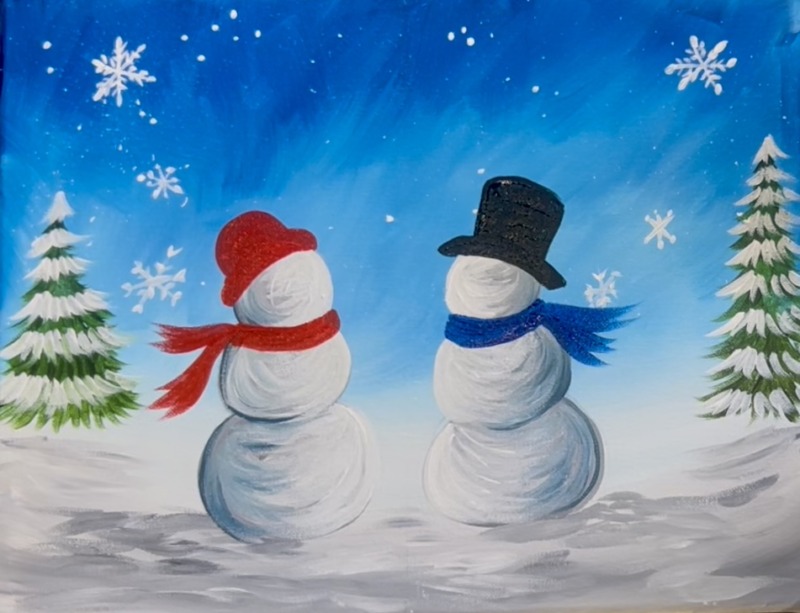
Use titanium white to paint little polka dots on the red scarf. Add white over the tassels. Then paint lines on the beanie bottom edging and the top half circle part of the beanie. Use titanium white to paint to paint a fuzzy circle on the top of the beanie. Drag paint strokes outwards from the center of the circle.
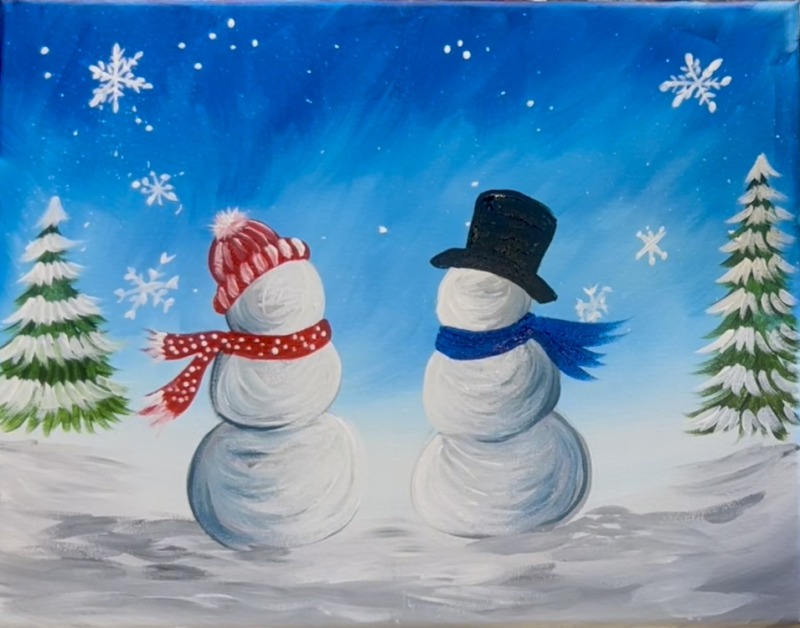
Then use titanium white to paint a checker pattern on the scarf. I did three lines going left and right and then lines going the opposite directions.
Paint a highlight on the hat by painting a white line on the inner left side of the hat. Paint a white “band” across the hat (which will be painted red later).
12. Mugs & Stick Arms
Use a pencil to draw the mugs. Start with the oval opening for both of the mugs and position them so there is only the slightest gap between both of them. Then draw a “U” below each of the ovals. Draw a little “C” for the handles. Keep it very basic!
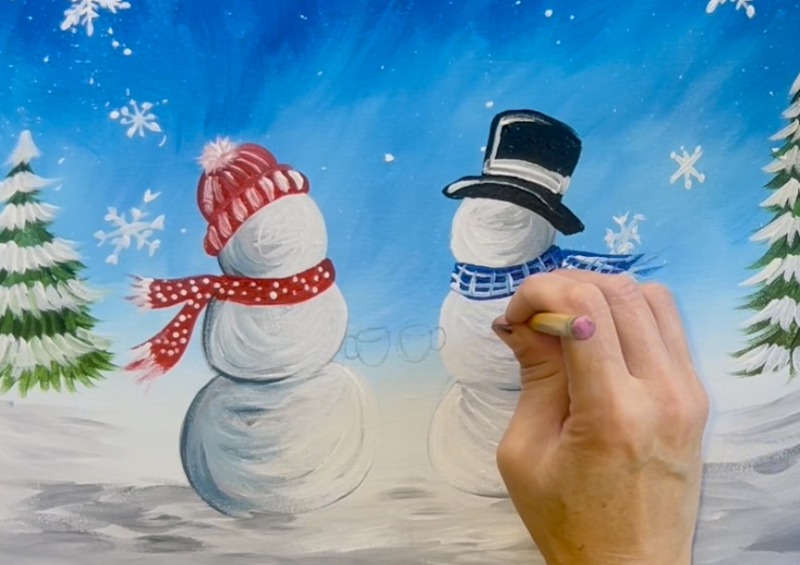
After drawing the mugs, you can draw the sticks so they bend and attach to the mugs. The arm starts towards the back of each of the snow people. Draw the eyes and noses as well! When you draw the noses, make sure you draw them more towards the edge of each of the snowballs because they are facing each other in more of a 3/4 profile view. Draw both of the eyes as well (the eyes are going slightly diagonal down from each other).
Use the #4 round brush to paint the opening of each of the mugs with the color “mars black”.
Then paint each of the mugs. I made them the same color as the scarf (you are welcome to customize the colors). Outline the black oval. Then paint the cup part and the handle part of the mugs.
Load your paint palette with “burnt umber”. Then mix a little white into the brown. Use the #4 round brush to paint the arms and the hand so that it attaches to the handles of the mugs.
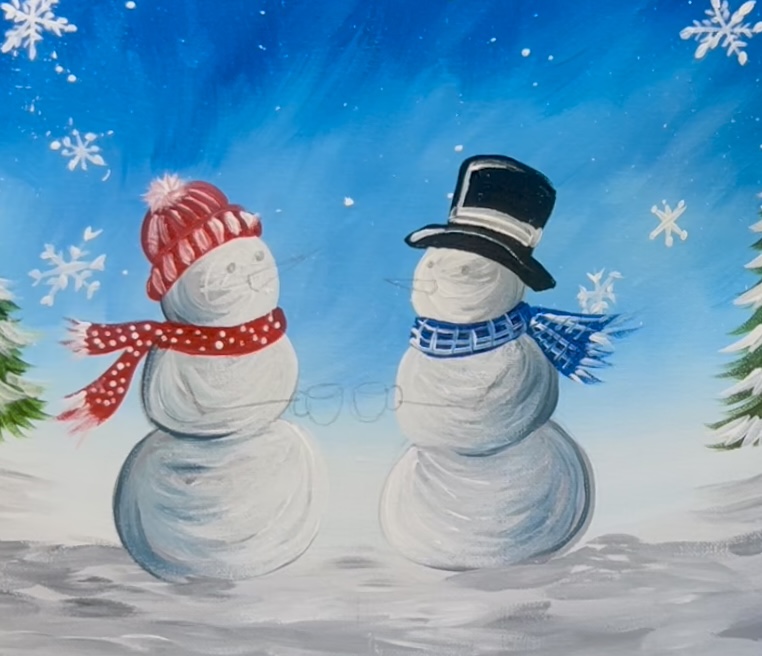
13. Facial Features
Load your paint palette with “cad orange hue”. Paint the carrots. If needed, mix a little white into the orange (this helps the orange to be more opaque and cover the background color).
Use the round brush and “mars black” to paint the eyes and coal dots for the mouth.
Paint the buttons as well! Then, when the black eyes dry, use titanium white to paint one little highlight dot on the far edge of the eye circles. Use white to also paint little designs on the mugs and outline the rim of the cups.
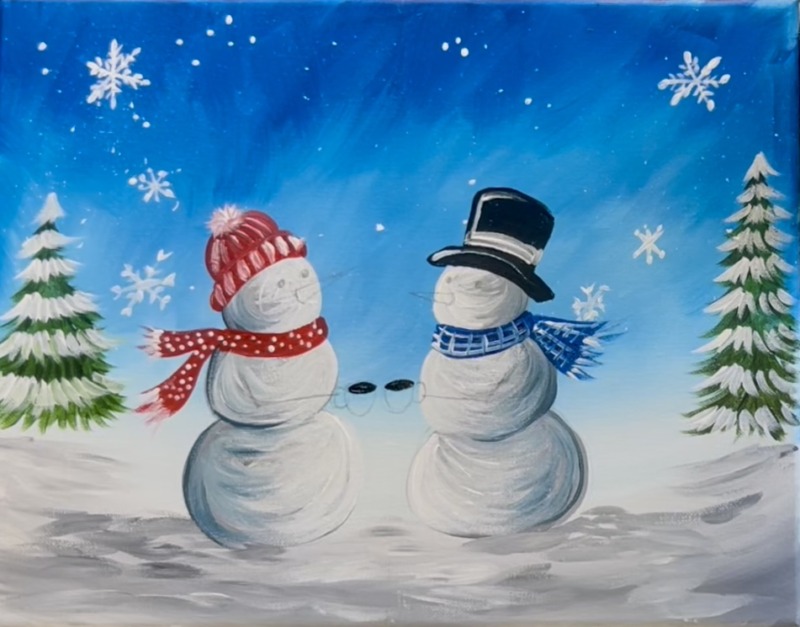
14. Steam From Mugs & Final Details
Dry brush the steam coming up from both of the mugs and form the steam into a heart shape in the middle. When you “dry brush”, load the round brush into white but then wipe excess paint off of the brush. As you apply the color to the canvas, it should look very light and translucent.

Some other final details you can do are: add little snow dots to the top of both of the hats and the carrots. You can also use the “hooker’s green hue” to paint little holly leaves on the top hat and use the “cadmium red medium hue” to paint little berries. I also did another coat of paint on the beanie hat and fuzzy ball on the top.