
Would you like to save this?
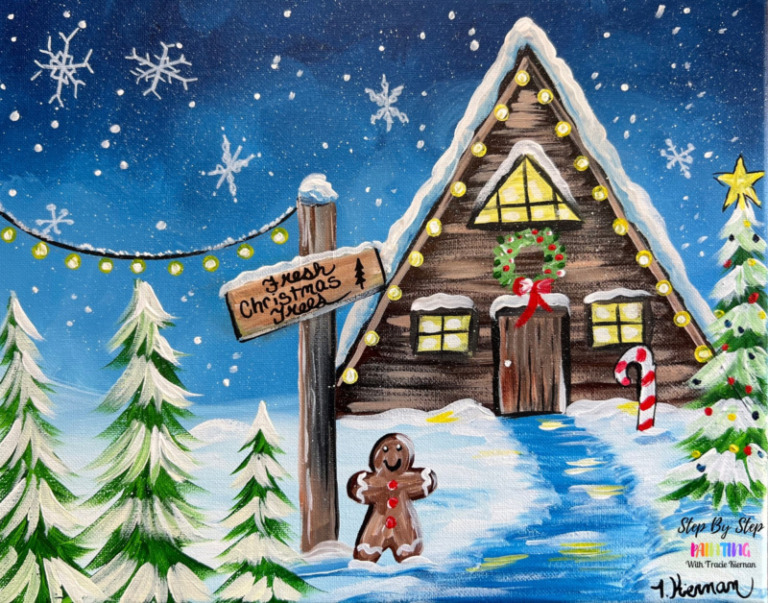
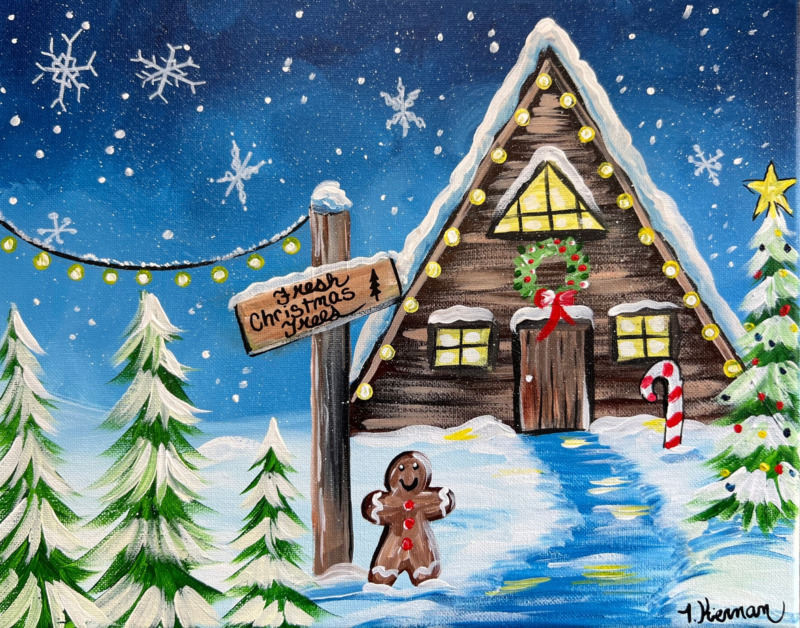
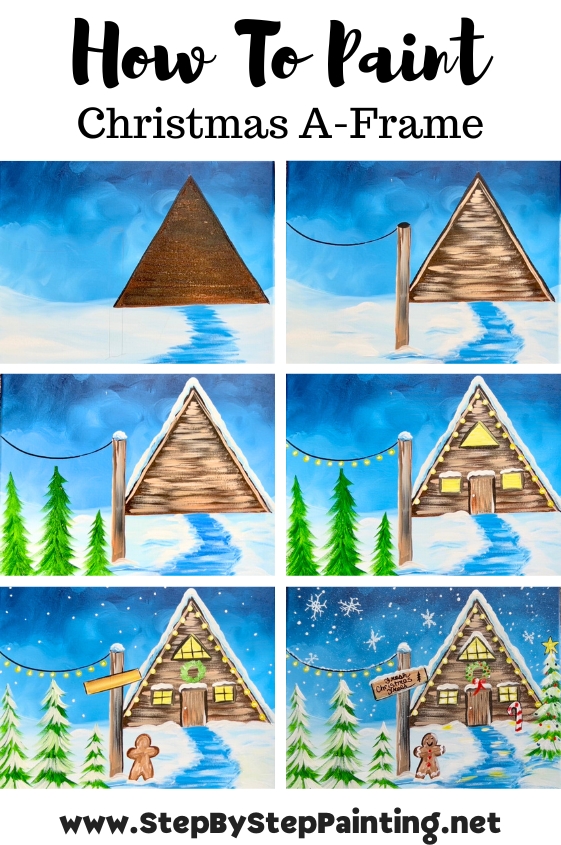
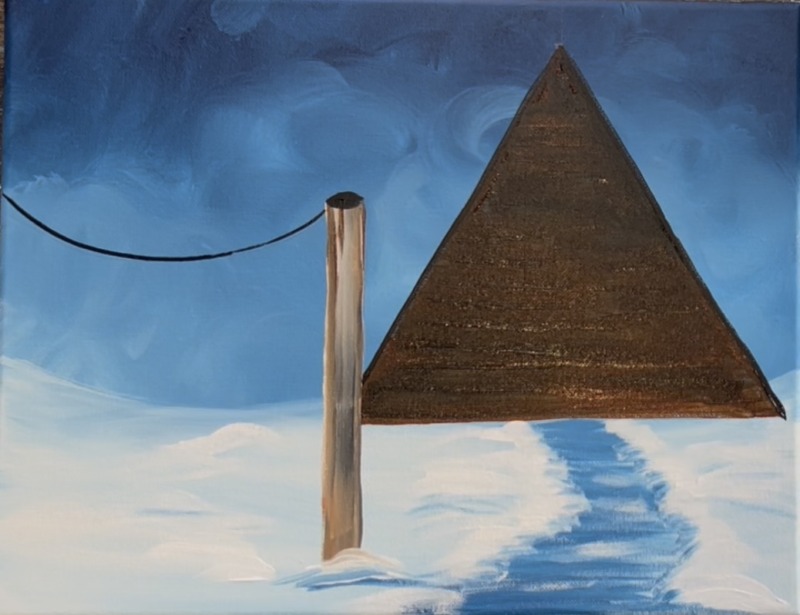
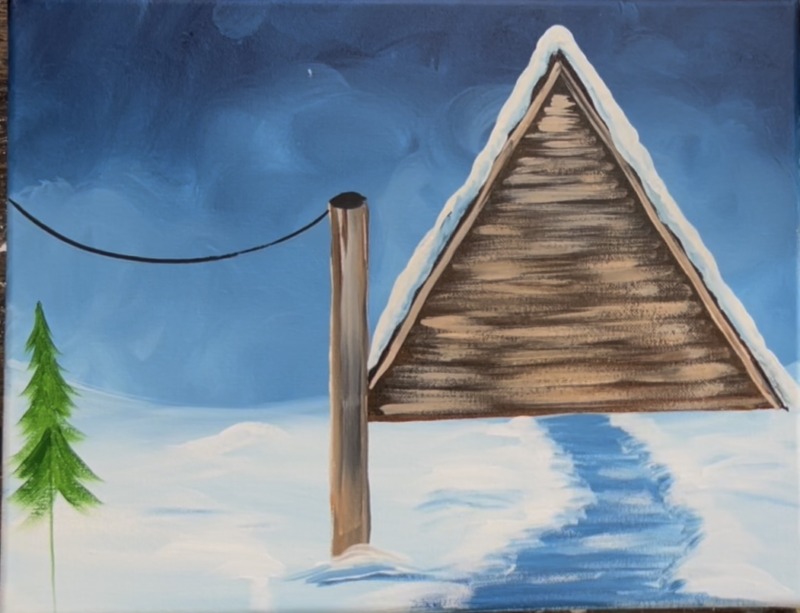
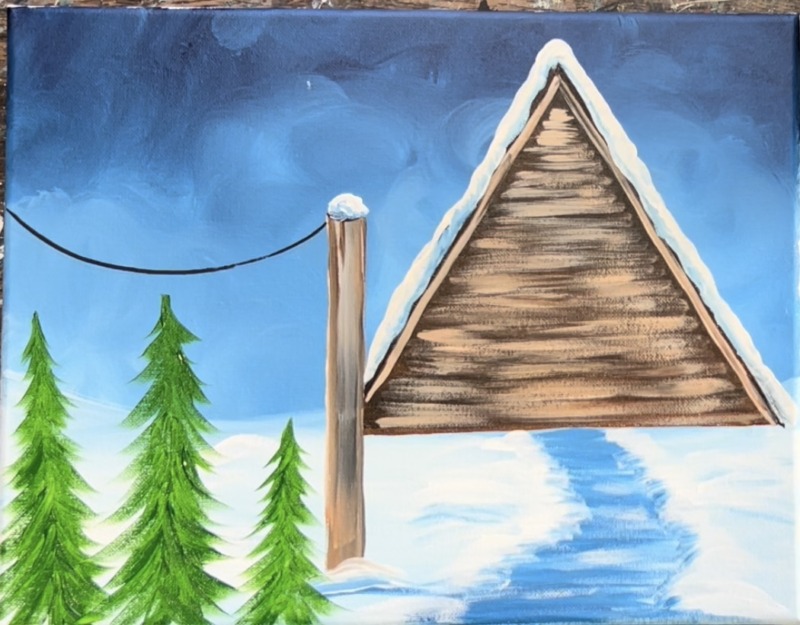
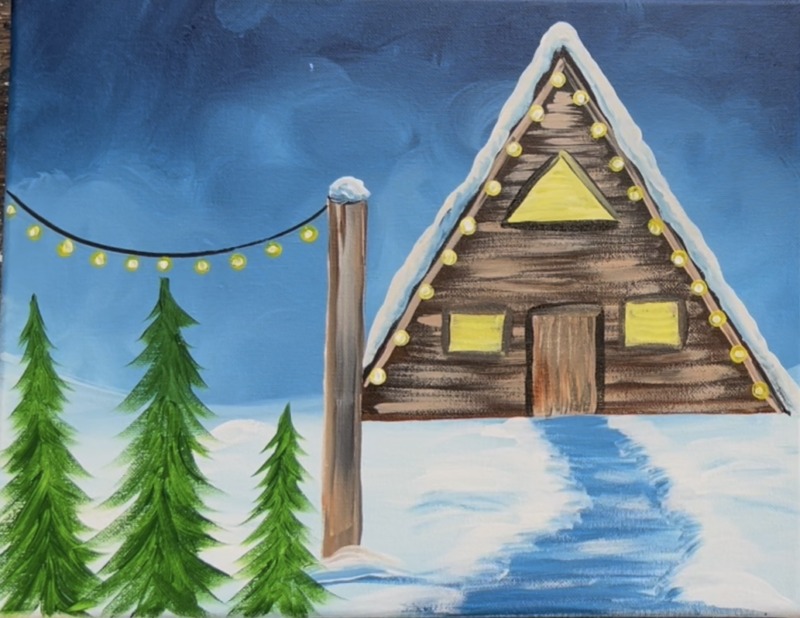
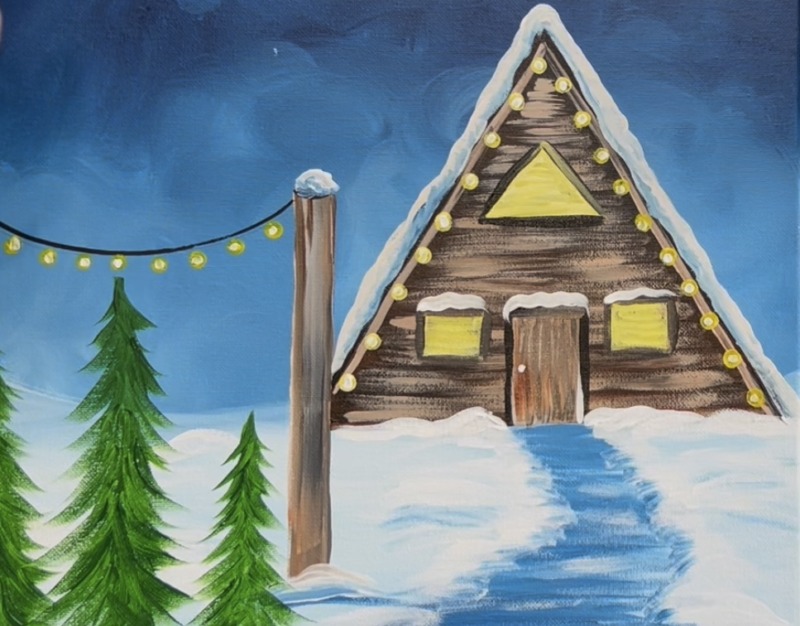
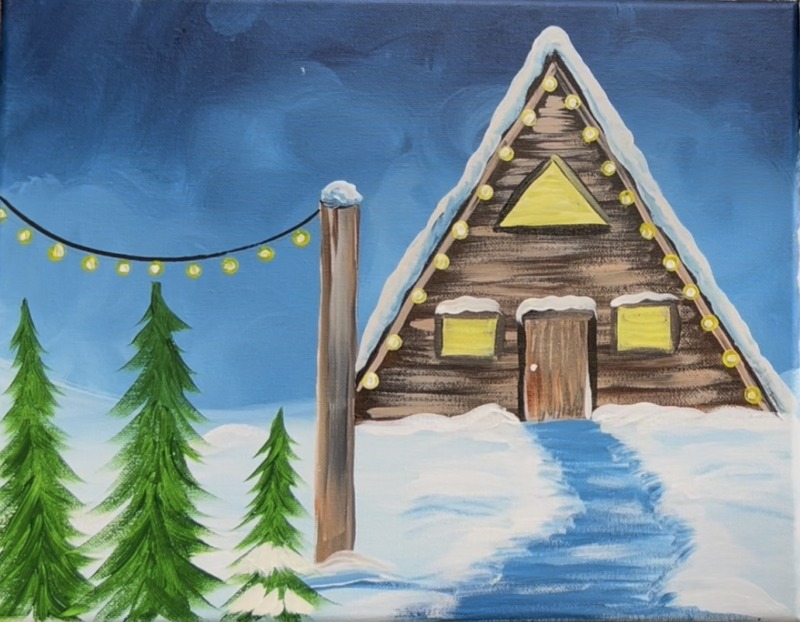
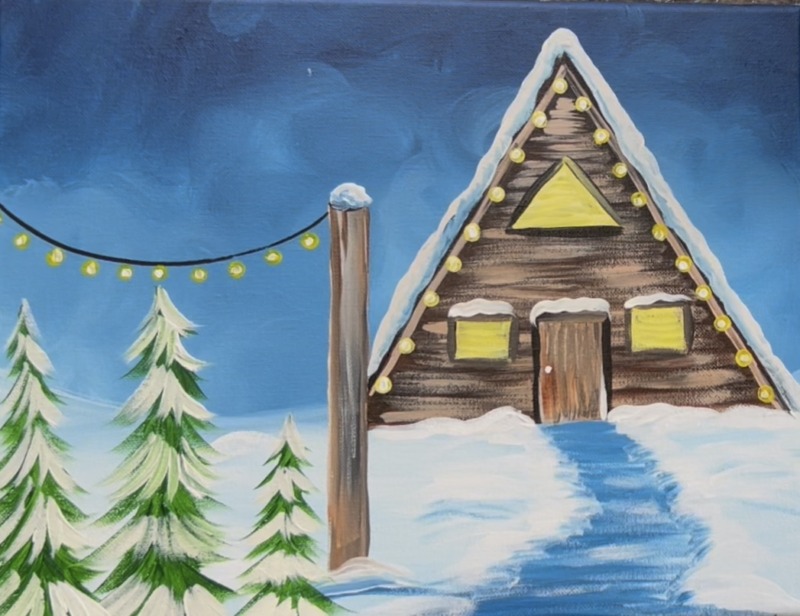
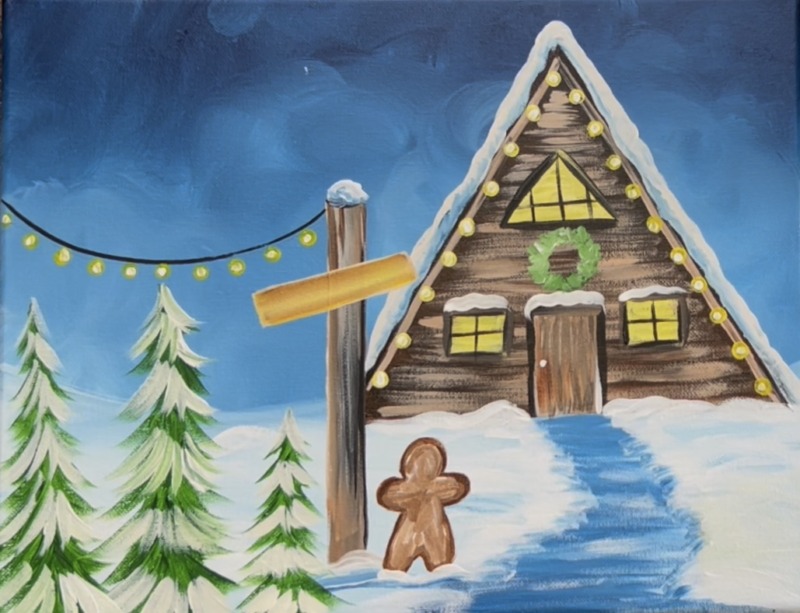
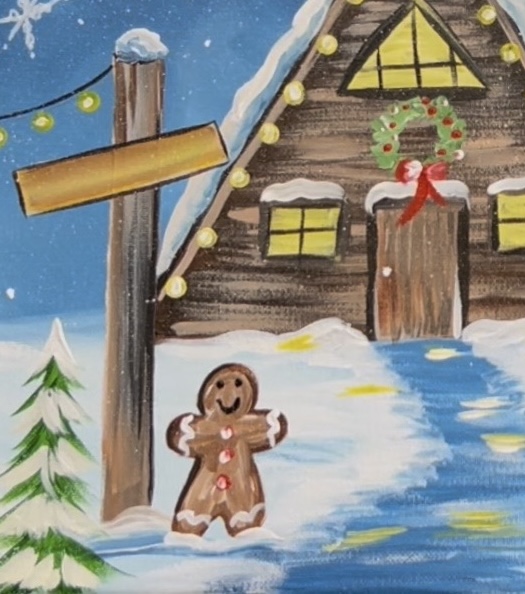
Capture the magic of the holidays with this charming A-frame cabin nestled in a snowy tree farm. There is an adorable gingerbread greeting you under glowing string lights. This painting is fun, festive, and perfect for beginners who want to create a cheerful winter landscape.
Enjoy and happy painting!
Materials
- 11 x 14 Canvas (or any size)
- Acrylic Paints
- Brushes
- Back Of Pencil Eraser (for string lights)
- Toothbrush (for splattering snow)
- Black & White POSCA Paint Pens
- Ruler
- Pencil
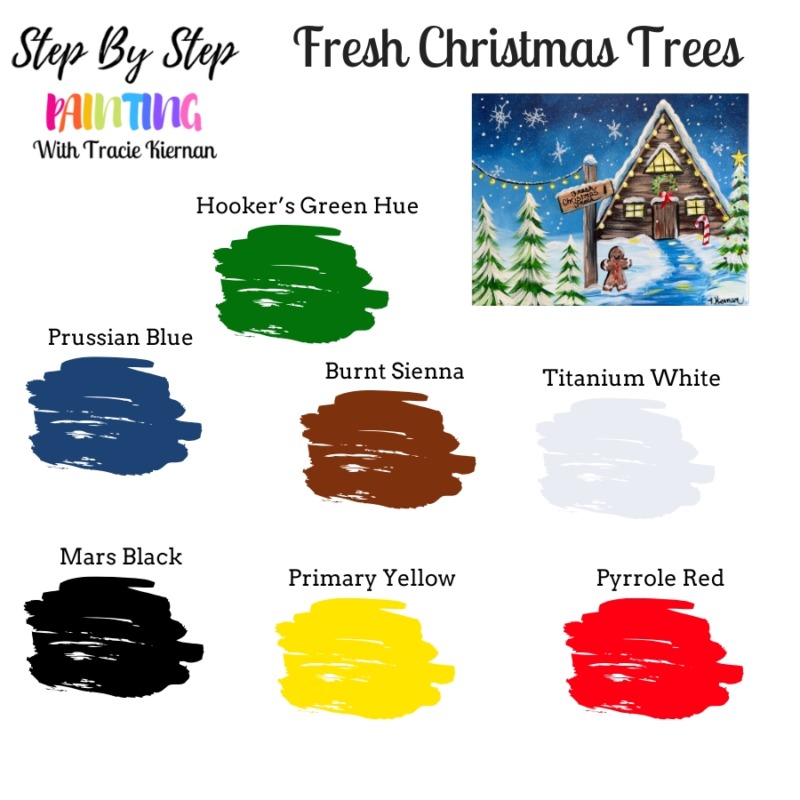
Colors
- Titanium White
- Mars Black
- Pyrrole Red (or any red!)
- Primary Yellow
- Hooker’s Green Hue
- Prussian Blue
- Burnt Sienna
Brushes
- 3/8″ Angle Brush (optional)
- 12 Bright
- 3/4 Flat
- 4 Round
- 8 Long Round (optional)
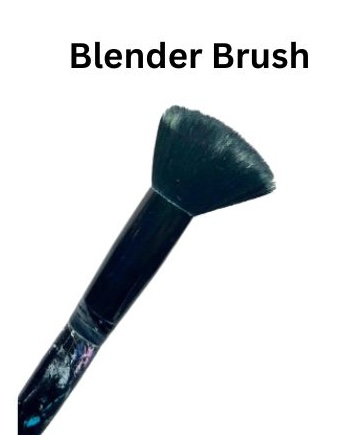
- Blender Brush (optional)
Note: You can probably do this painting with only 3 brushes! The ones listed as optional are helpful for some of the techniques in this painting, however, you can do similar things with the other brushes too!
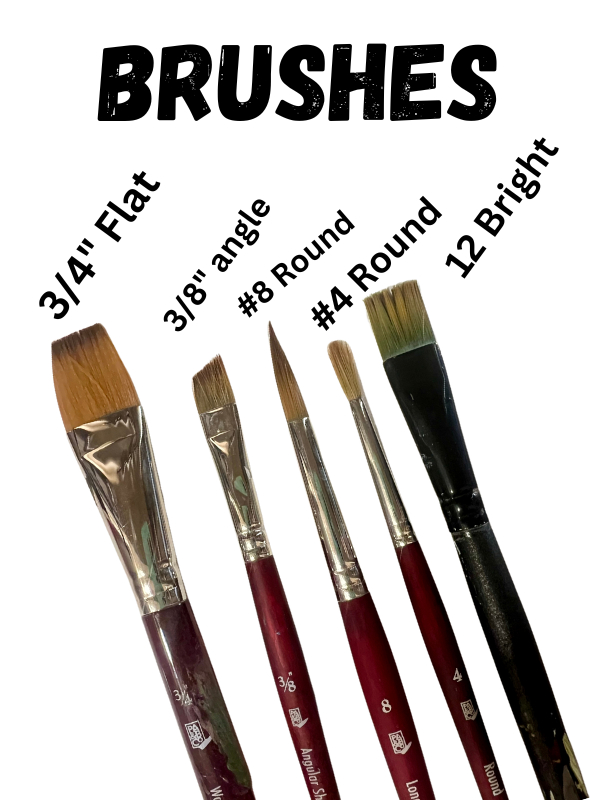
The “blender brush” that I use is actually a makeup brush! It’s labeled as a foundation blending brush and it’s an inexpensive “Elf” brand brush. This has soft bristles that allow for a smooth, blended sky. If you don’t have this brush or don’t want to use it, you can blend with the 3/4″ flat.
Color Palette:
Directions At A Glance:
Video:
Step By Step Directions:
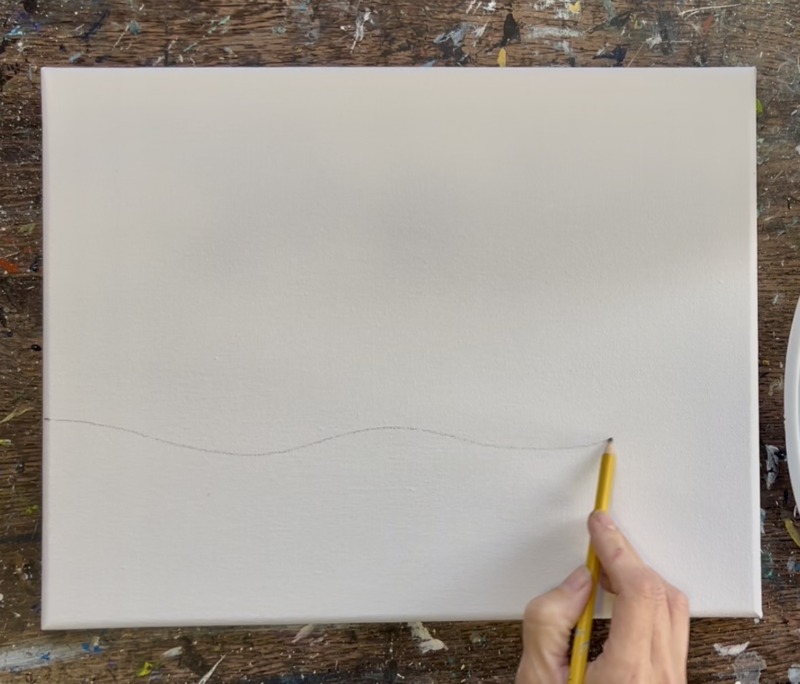
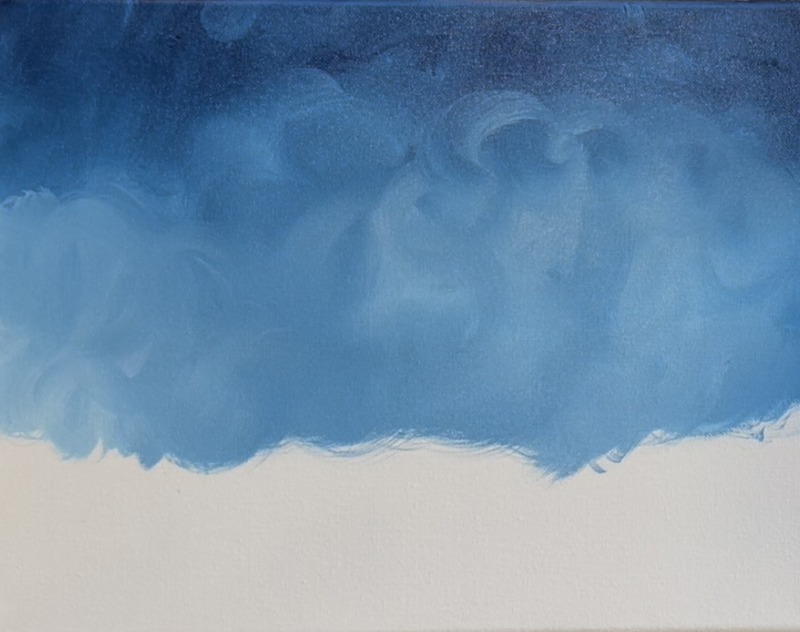
1. Paint Sky
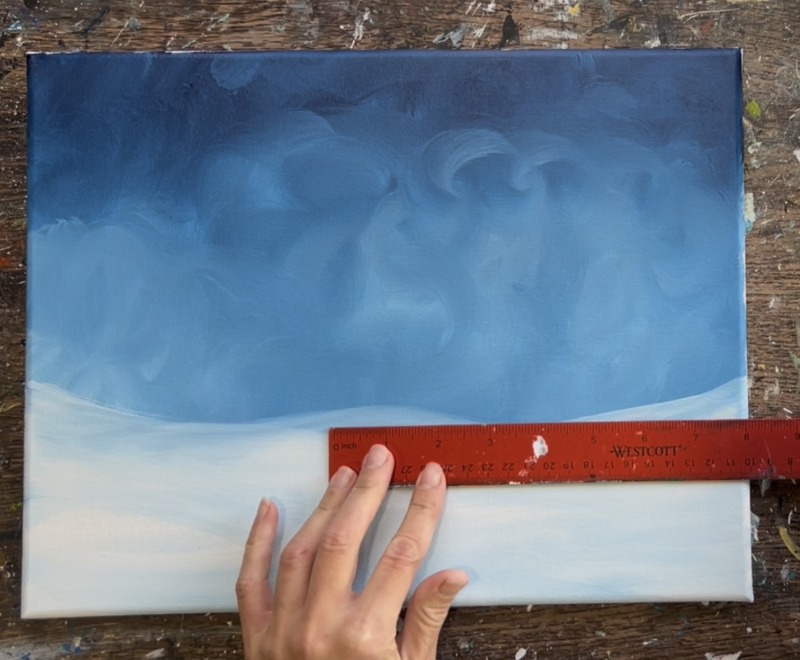
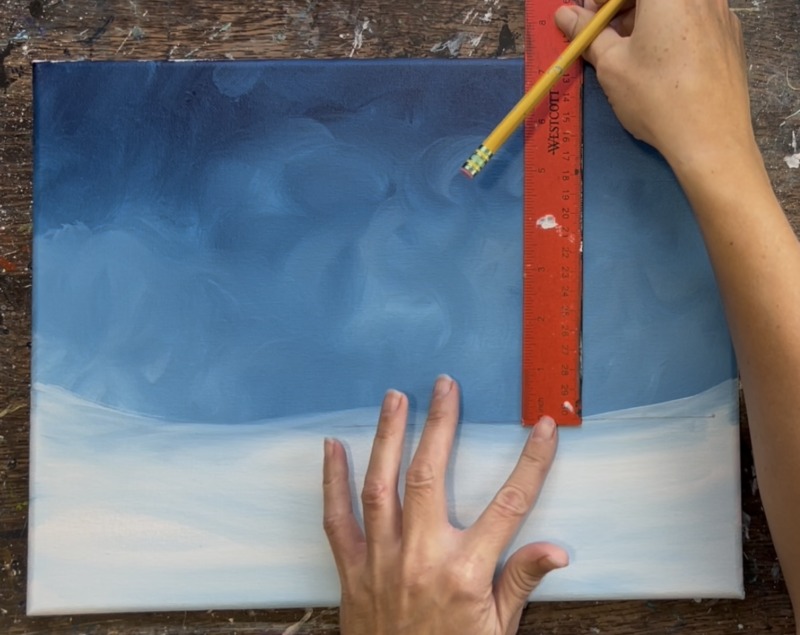
Measure 4″ from the left bottom edge of the canvas. Then draw a loose, wavy line with a pencil. This will be the “horizon line”.
Load your paint palette with the two colors: “Prussian Blue” and “titanium white”. Load your 3/4″ flat wash brush into “Prussian Blue”. At the top of the sky, paint large, angle paint strokes and fill about the top 1″ of the canvas with this dark blue color.
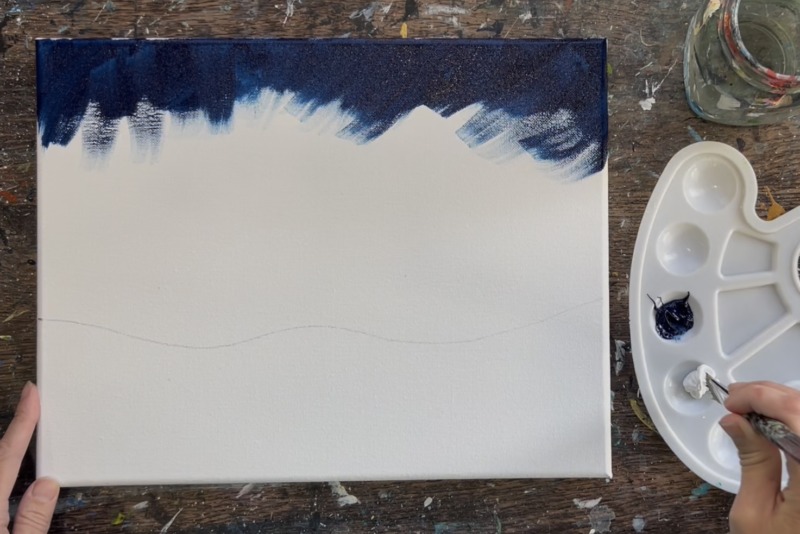
Wipe the brush. Then load it into “titanium white”. Blend the white into the blue so that it becomes light blue. You want the darkest part of the sky to be at the top so don’t blend the white in this area.
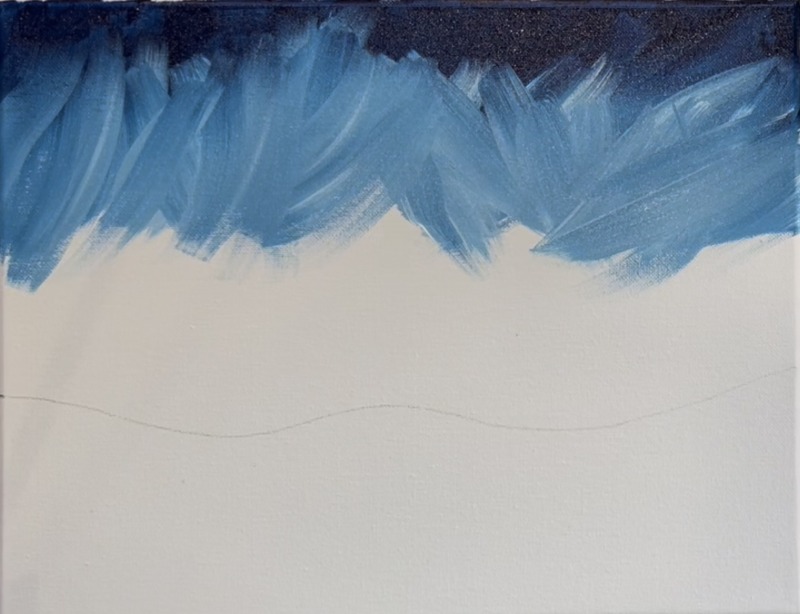
Before this dries, use the round blender brush (dry and no paint on it) to lightly blend your light blue and dark blue. Paint circular/ swirly paint strokes to blend these two colors.
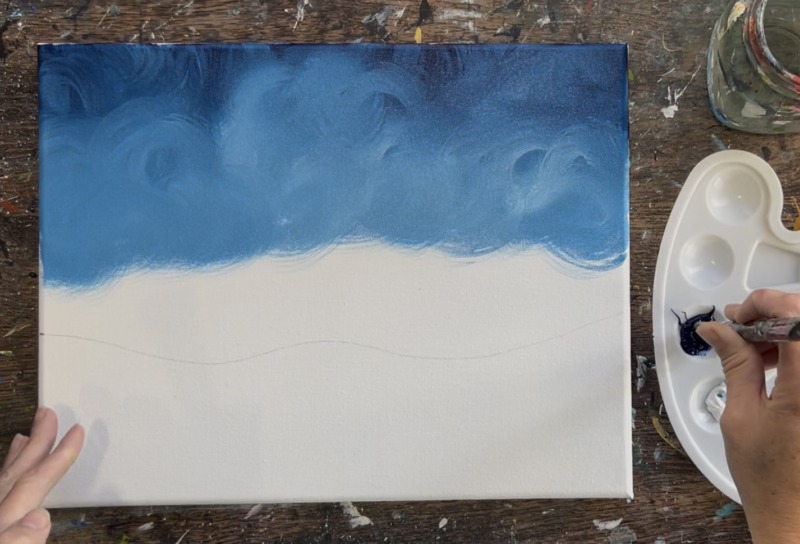
Then go back to the 3/4″ flat brush and add more white towards the bottom of the sky. This will be the brightest part of the sky.
Then use the round brush to blend the color further.
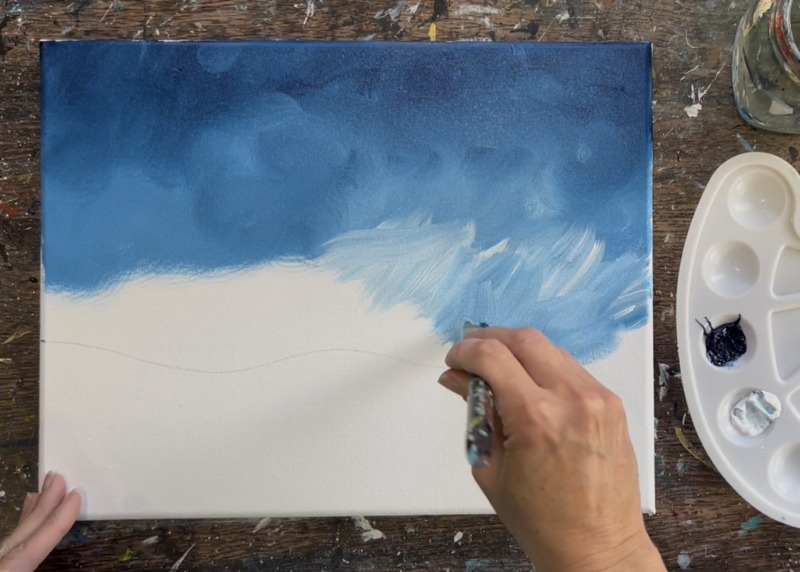
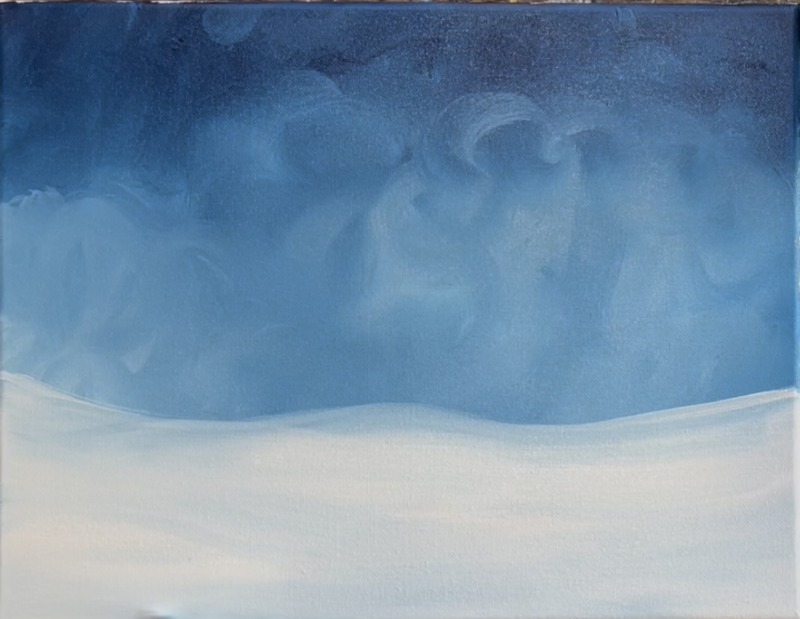
2. Paint Ground
Use the 3/4″ flat brush and “titanium white” to paint the snowy ground. Use the edge of the brush to define the edge of the ground. Paint the rest of the area below the ground with white. Blend in very tiny bits of “Prussian Blue” into this snowy first layer so that it isn’t “pure white” but has areas of light blue blending into it.
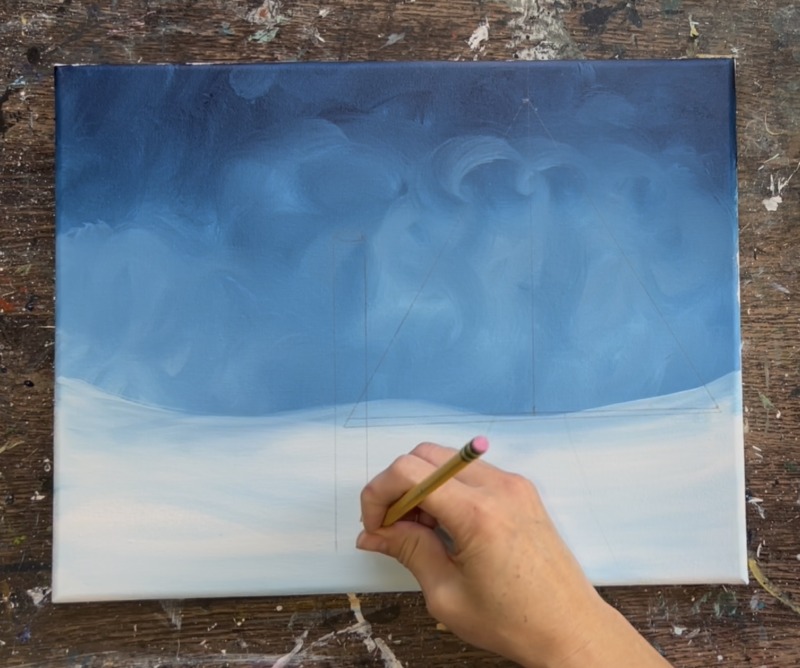
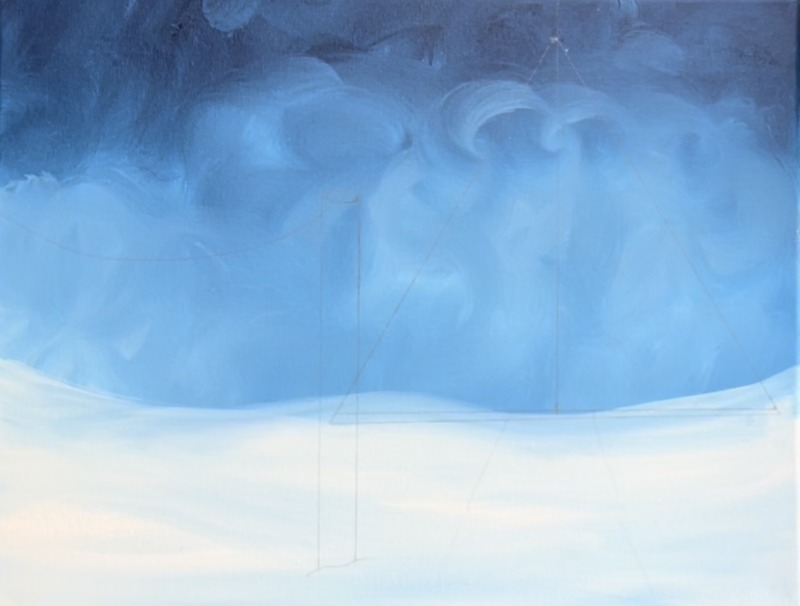
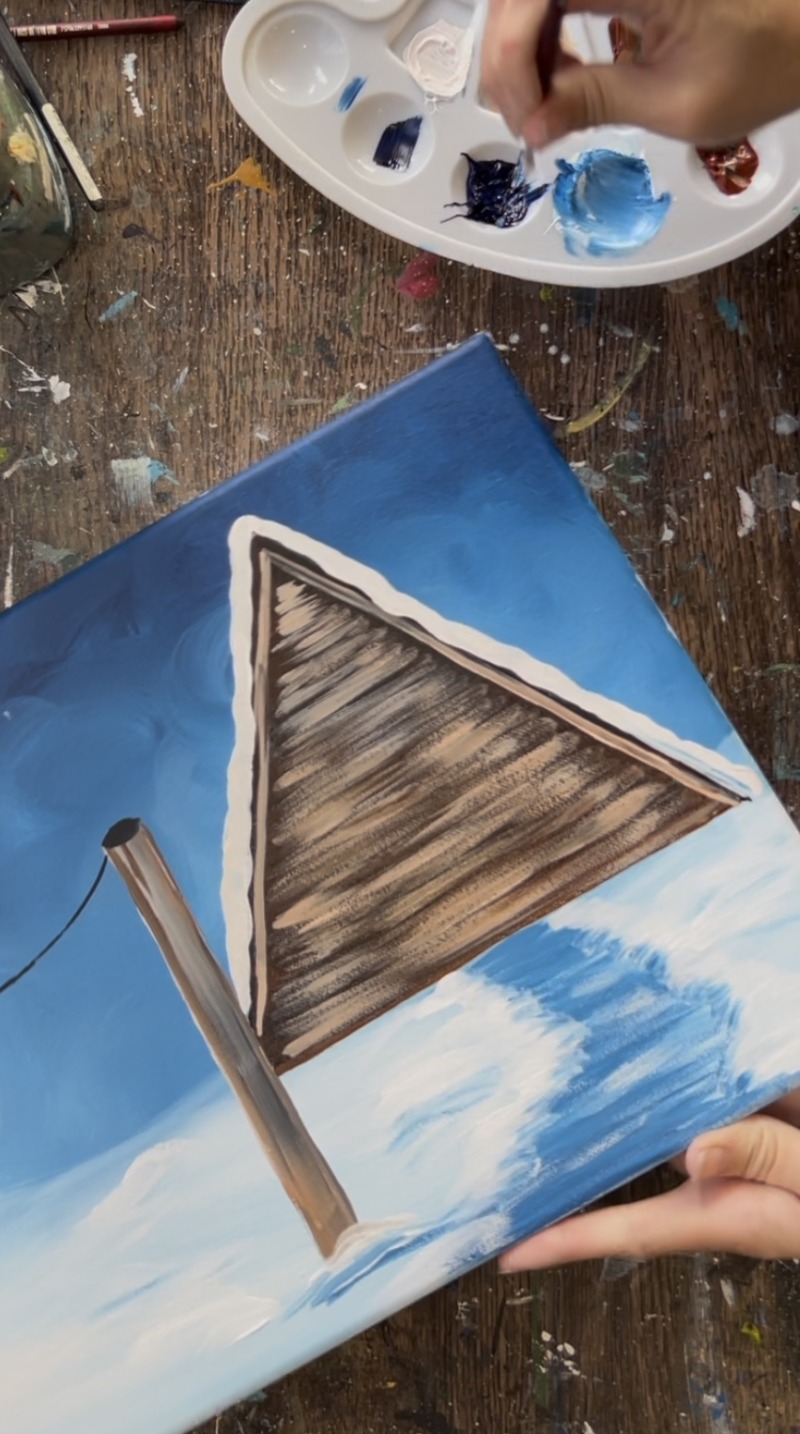
3. Draw A-Frame
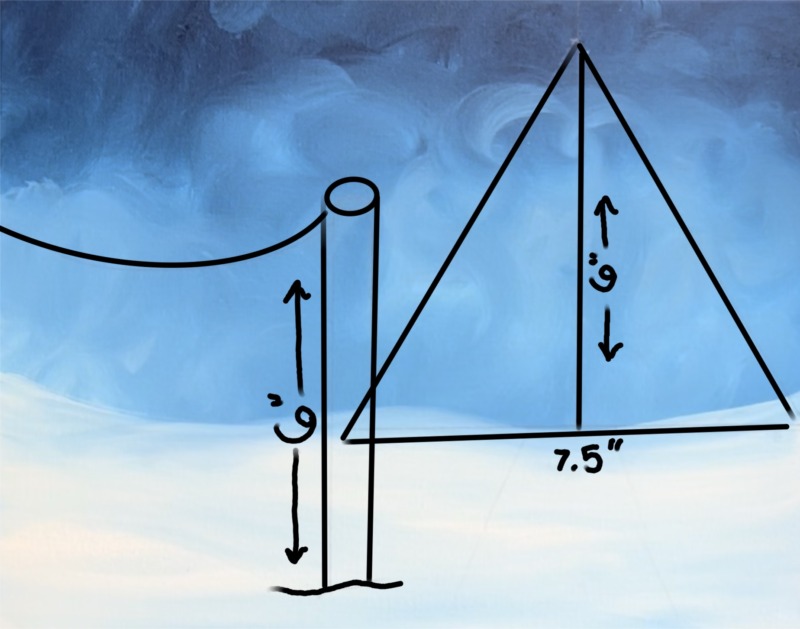
Measure 7.5″ for the horizontal line of the triangle and draw a line. This is positioned just slightly below the “horizon line” and just slightly offset to the left.
Then locate the exact center of that line (3.75″). Draw a vertical line that goes up about 6″.
Then draw the diagonal lines to complete the triangle shape.

Draw the post (which is about 6″ high). This is a slender rectangle shape with an oval on the top.
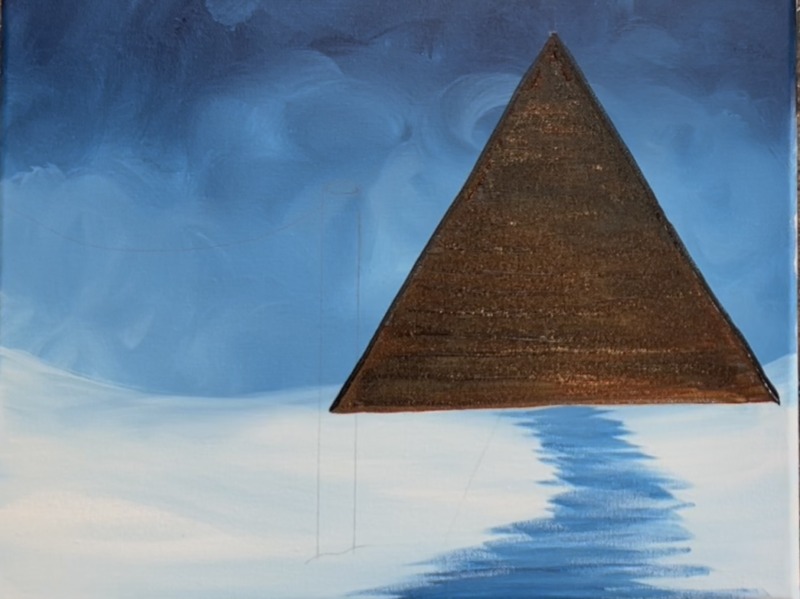
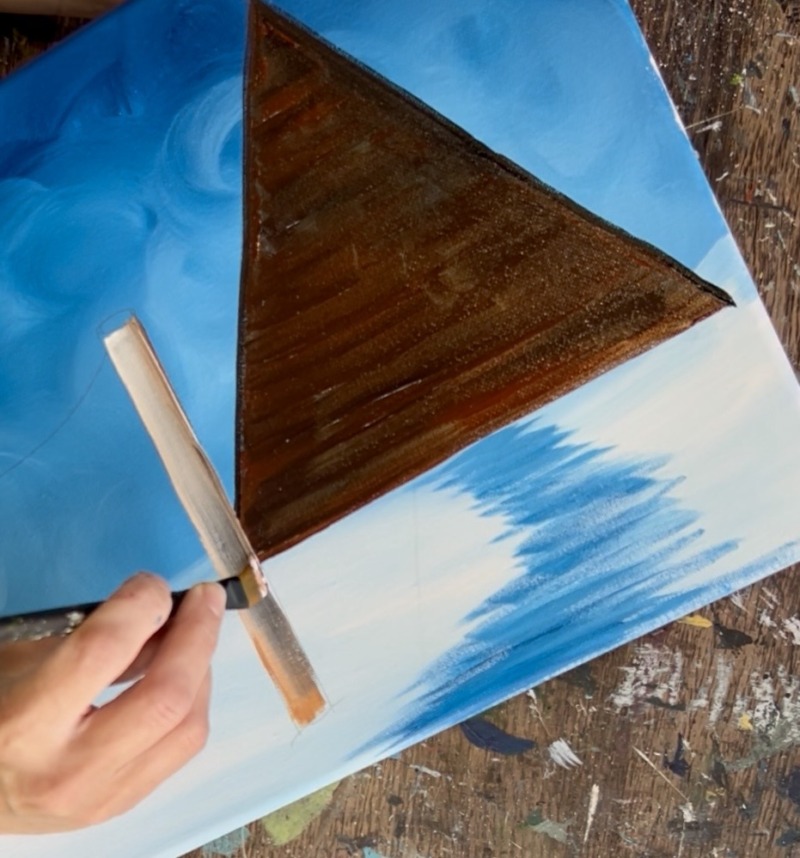
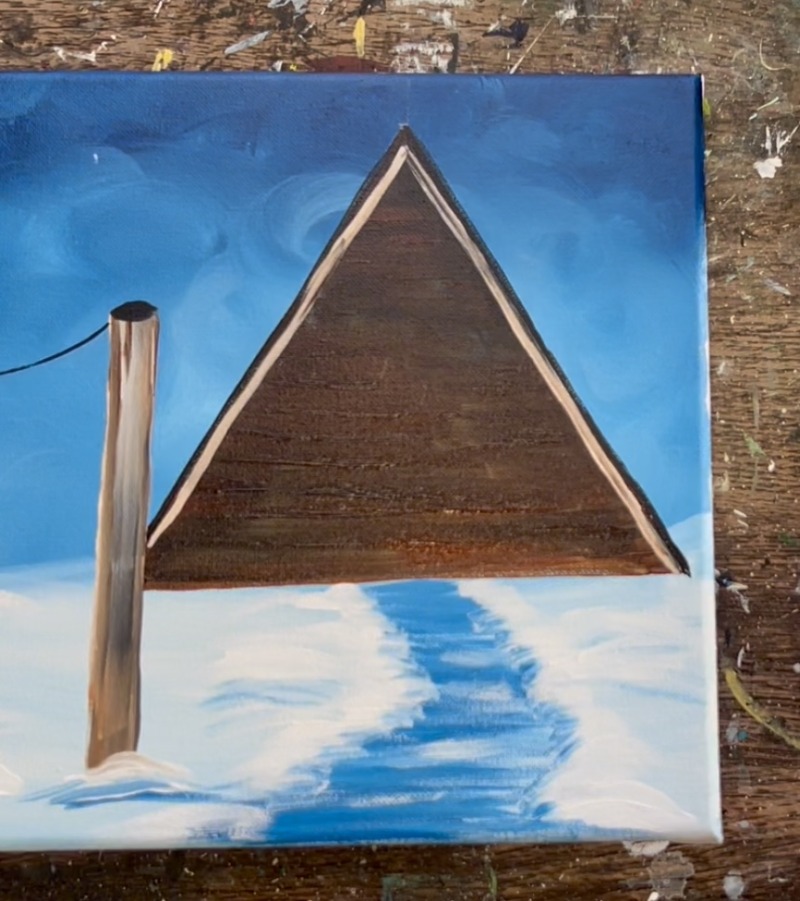
4. Paint First Layer Of Triangle
Use the 3/8″ angle brush for this step (or any flat brush). Mix 2 parts “burnt Sienna” and 1 part “mars black” to make a very dark brown. Use the brush to outline the inner part of the triangle. Then paint all left and right paint strokes to fill the triangle in.

Blend little bits of black into the triangle for more “color variation” in the triangle. Make sure everything is left and right paint strokes going all the way across the triangle shape. This will help to create the “siding texture” in the cabin that we will do in a later step.

Use the 3/8″ angle brush to outline the edge of the roof line with “mars black”.

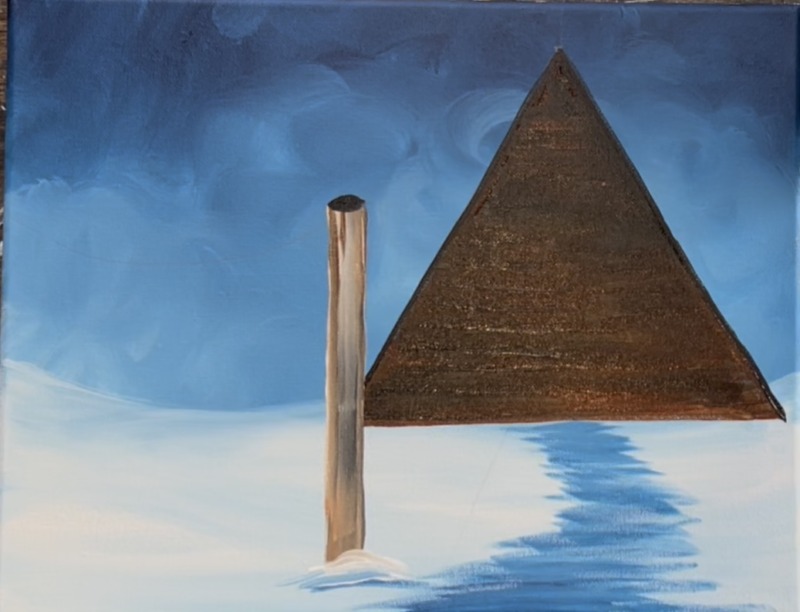
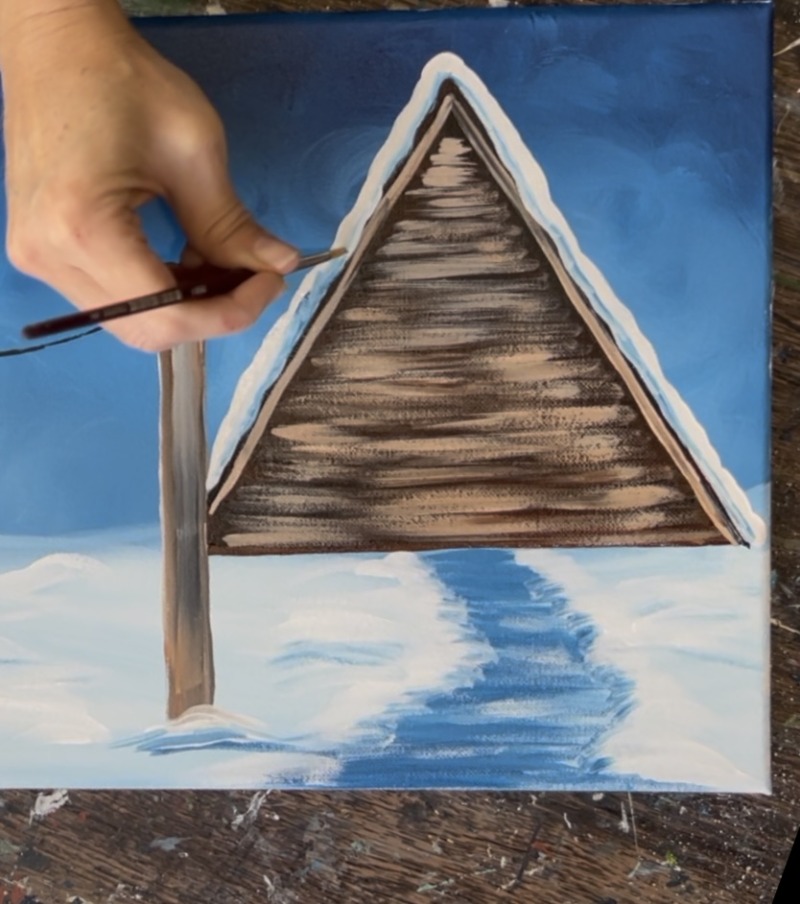
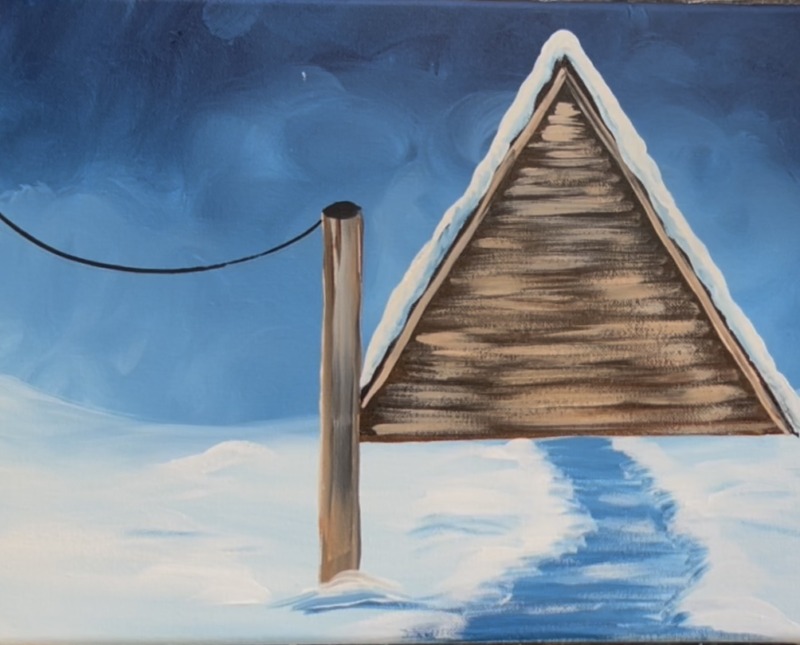
5. Paint Path
Use the #12 bright brush. Mix “Prussian Blue” and “titanium white” (about equal parts). Loosely paint the path below the cabin. It starts out sort of narrow at the bottom of the cabin, slightly turns and gets wider on the bottom edge of the canvas.
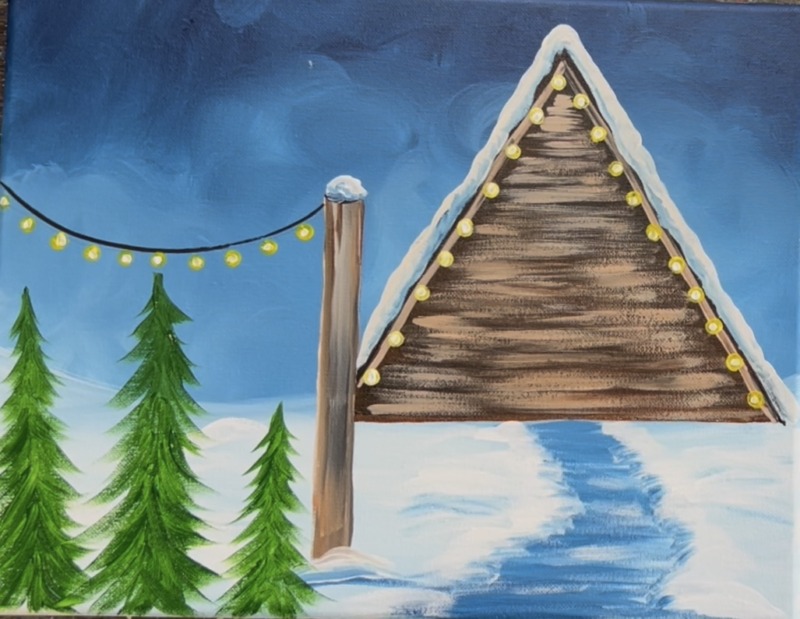
6. Paint Pole & Light String
Use the #12 bright brush to paint the wooden post. Mix “titanium white” with “burnt umber” to make a light brown. Paint the pole using vertical paint strokes. Blend in a little bit of the dark brown and a little bit of black for “color variation”.
Use the #4 round brush and “mars black” to paint the oval on the top of the pole. Then paint a little pile of white snow that overlaps the bottom of the pole.
7. Paint Snow Texture On Ground
Use the #4 round brush and “titanium white” to paint rounded, bunched up snow to the left and right of the edge of the path. This is a thick layer of paint and some of it can overlap the edging of the path.
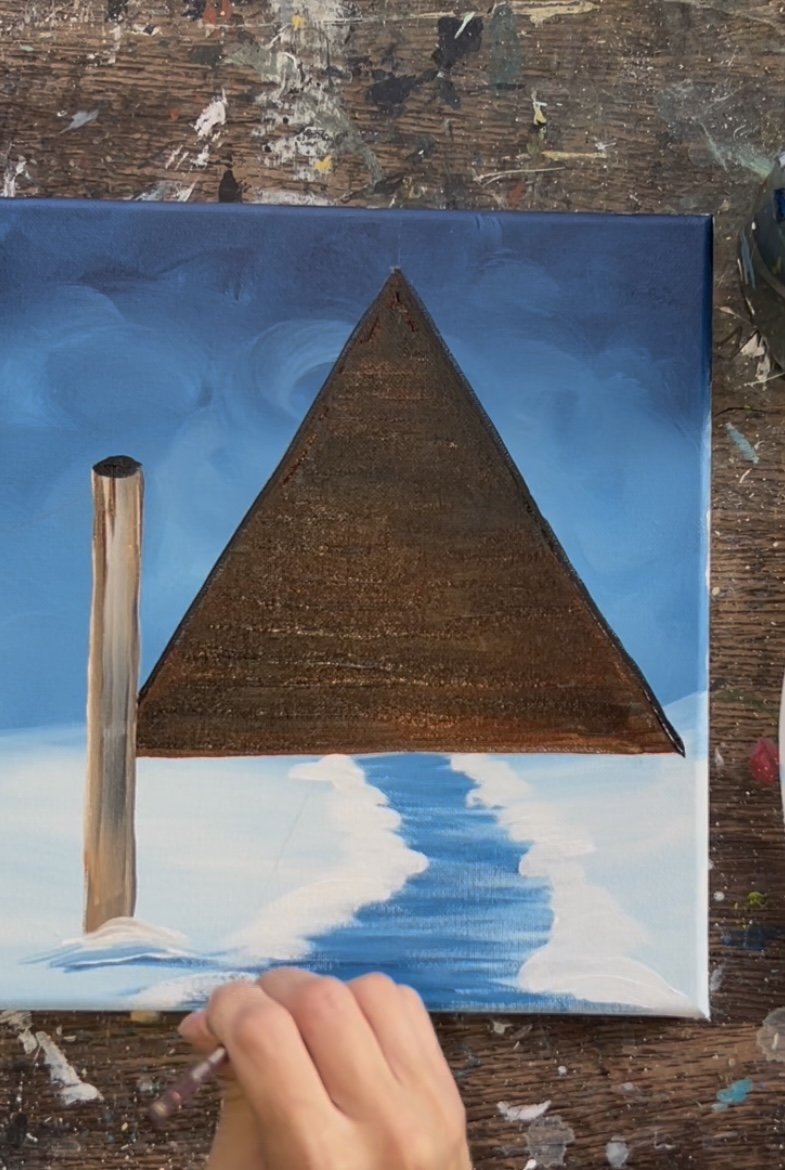
Then blend a little bit of “shadowing” using the “Prussian Blue”. Do this on the edging of the path on the bottom parts of the snow piles. Just a little bit of blue is all that is needed to create shadowing in the snow.
Add thick white snow texture throughout the landscape background.
Use the #4 round brush and “mars black” to paint a curved line that attaches to the pole (for the string of the string lights).
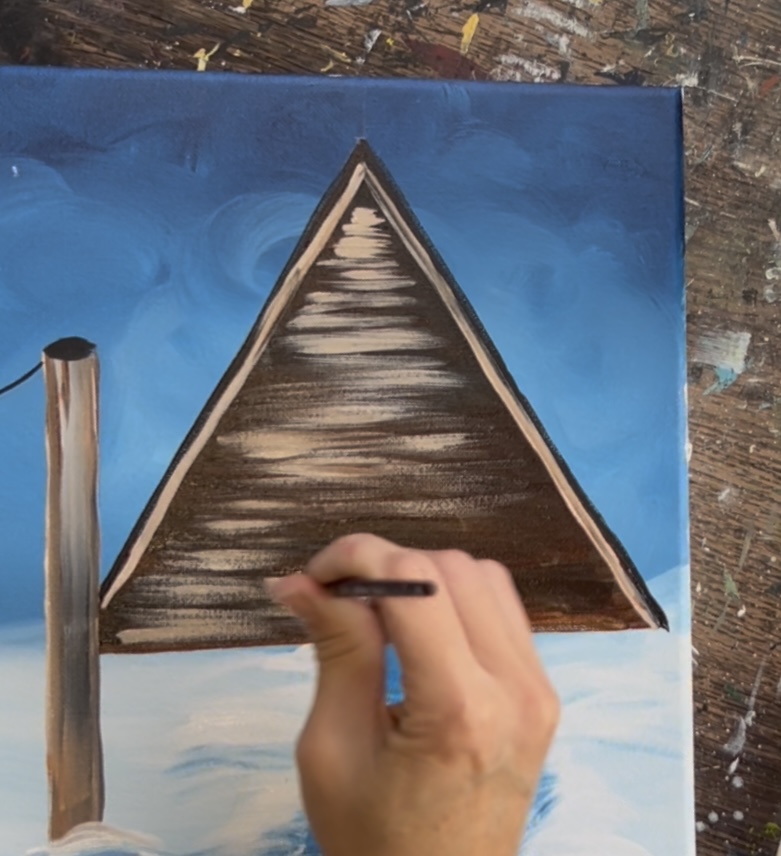
8. Paint Front Siding On Cabin
Use the #4 round brush and the “light brown” color. Outline the inner part of the roofline (the fascia) with light brown.
Then use the same light brown color to paint left and right horizontal paint strokes to create the texture for the front siding of the cabin. Leave a lot of dark brown gaps between the lines and leave dark brown next to the edge of the roofline.
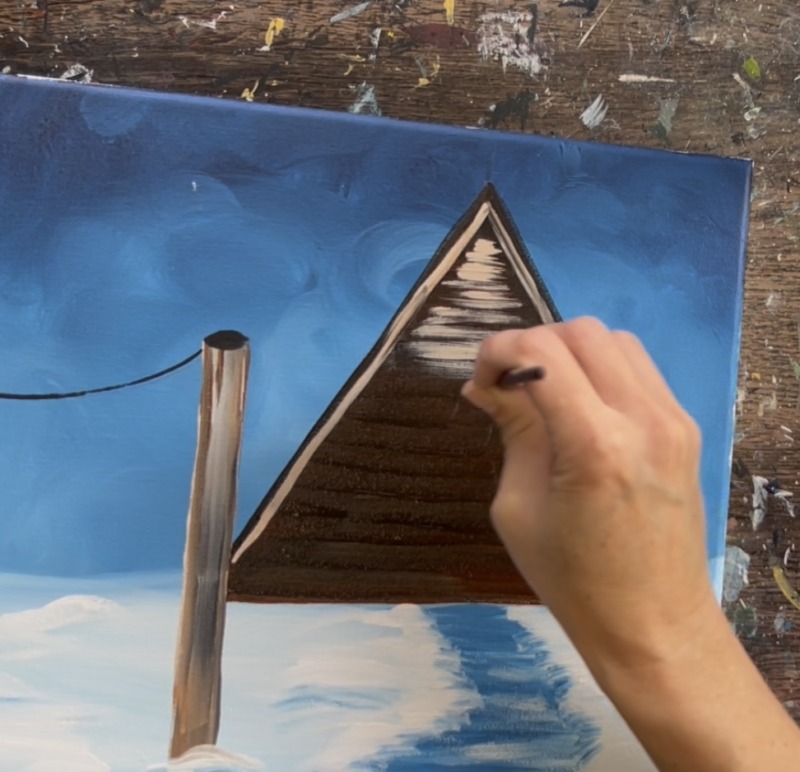
This is very much like a “dry brush style”. A lot of the dark brown is still showing through and this layer of paint is very thin.

9. Paint Snow On Roof
Use the #4 round brush and “titanium white”. Apply snow to the top edges of the a-frame roof.
Use tiny bits of “Prussian Blue” to blend in some shadowing on the bottom of the snow (but leave the top edges of the snow bright white).
10. Paint Trees
Use the #8 long round brush and “hooker’s green hue” to paint a vertical line for the first tree (under the string lights).
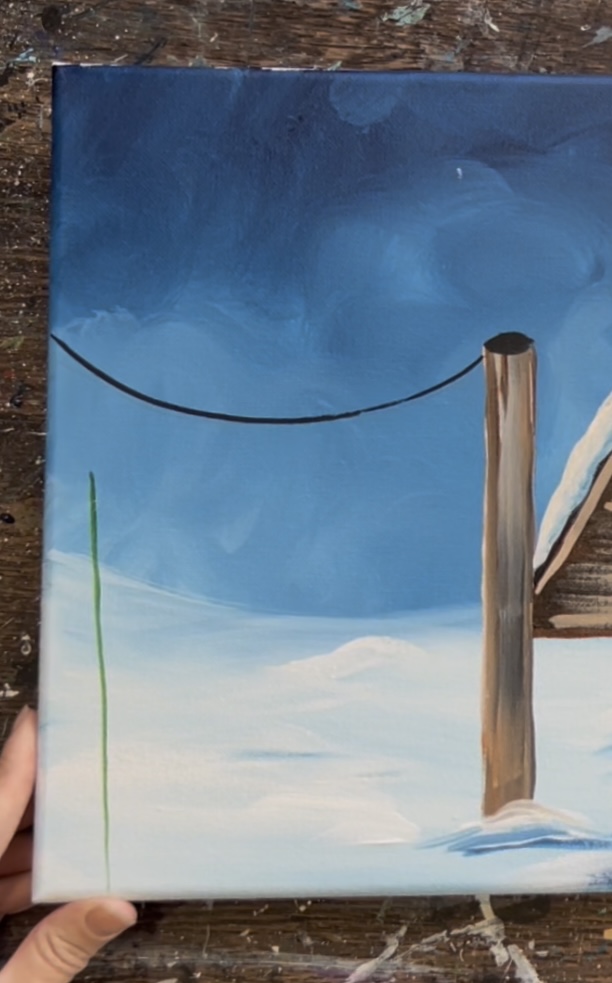
Start at the top of the tree and paint branch brush strokes going downwards and outwards. Repeat this by painting rows of these branch brush strokes and form a conical shape as you work your way down.
The bottom of the tree goes off the bottom edge of the canvas. Repeat this for a second and third tree.
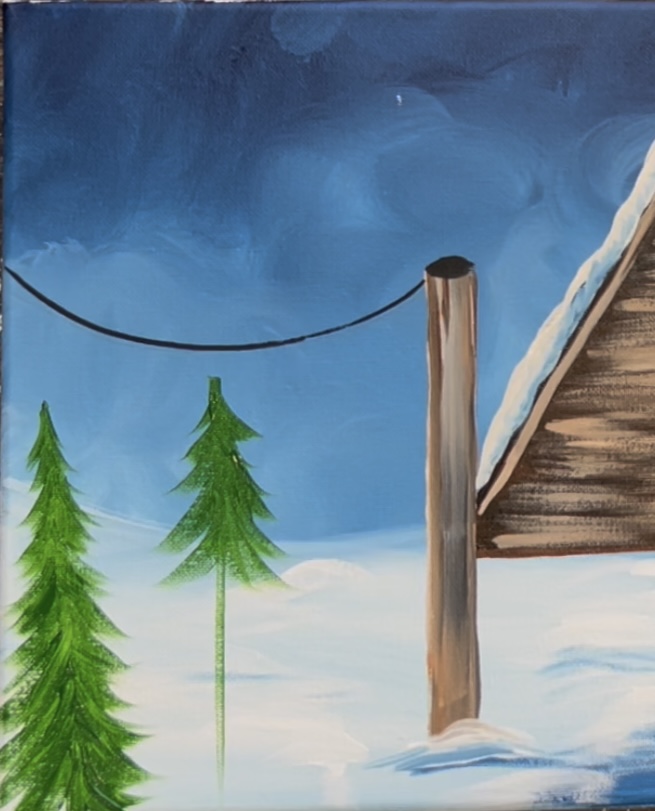
I made each tree varying heights. Also, paint a little bit of snow pile on the top of the pole!
11. Paint String Lights
Use the back of a pencil eraser to paint the string light circles. Load the end of the eraser into just “primary yellow” and stamp little circles going across the string evenly spaced apart.
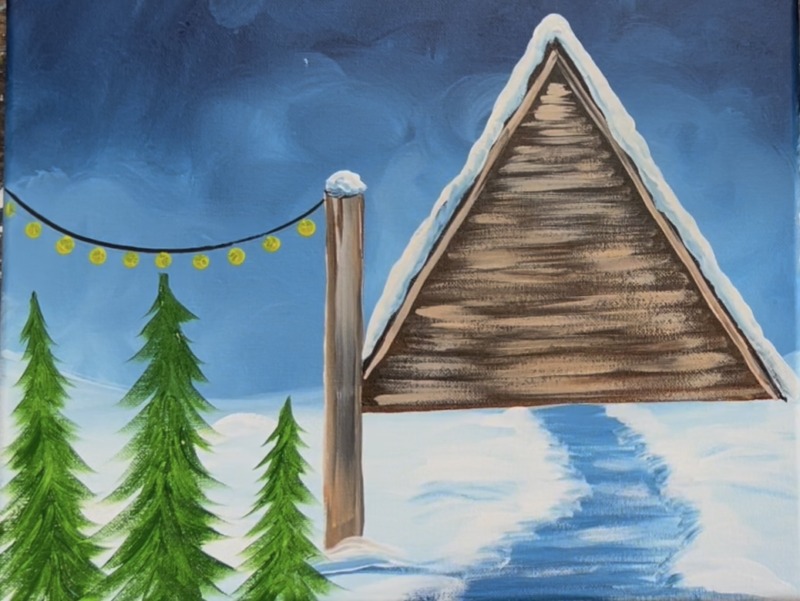
Repeat this for the lights on the cabin. This time, mix yellow and white together and load the eraser into the bright yellow color. Paint the lights a “finger width” apart along the edge of the roofline.
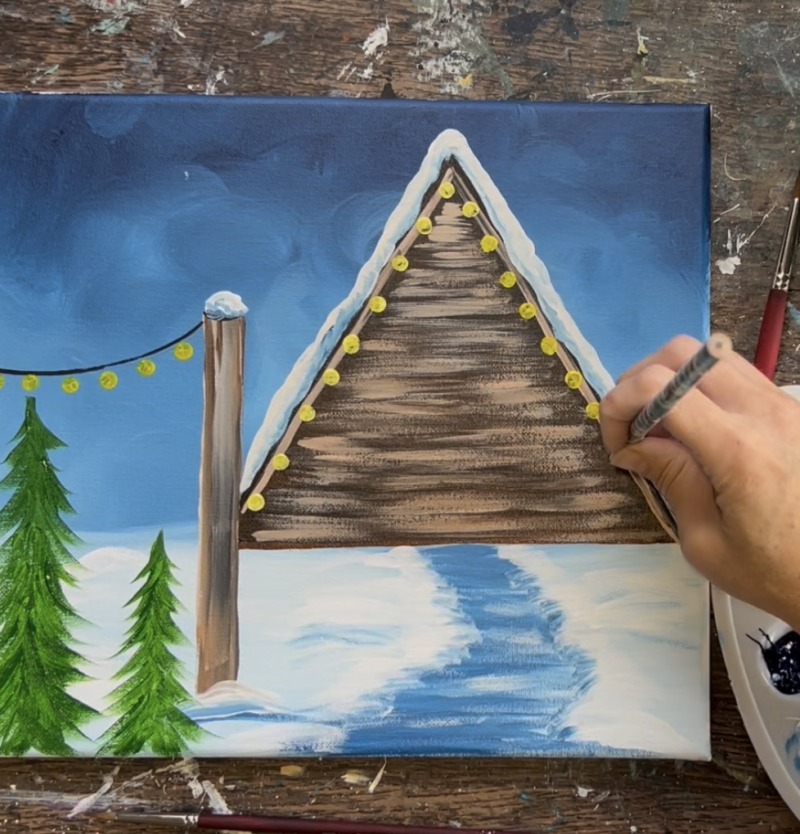
Then take the #4 round brush and “titanium white” to paint a small white dot on the center of each of the circles.
12. Paint Door & Windows
Draw a rectangular door using a pencil (the door that I did was about 2″ high and about 1.5″ wide). Use the #12 bright brush and “burnt Sienna” mixed with “titanium white”. Paint vertical paint strokes. Blend a little brown and white to create some variations in the color (this makes the wood color look “streaky”).

Use the #4 round brush and “mars black” to paint a frame around the door.
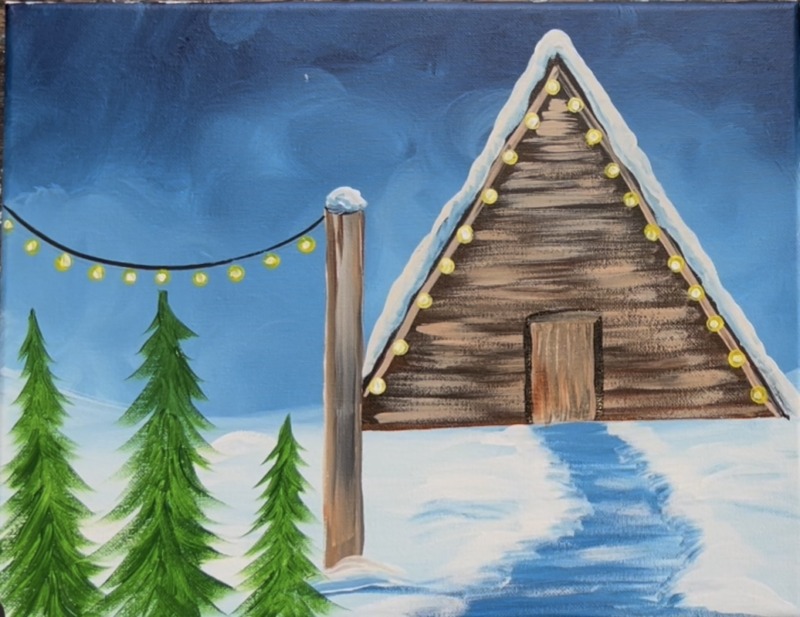
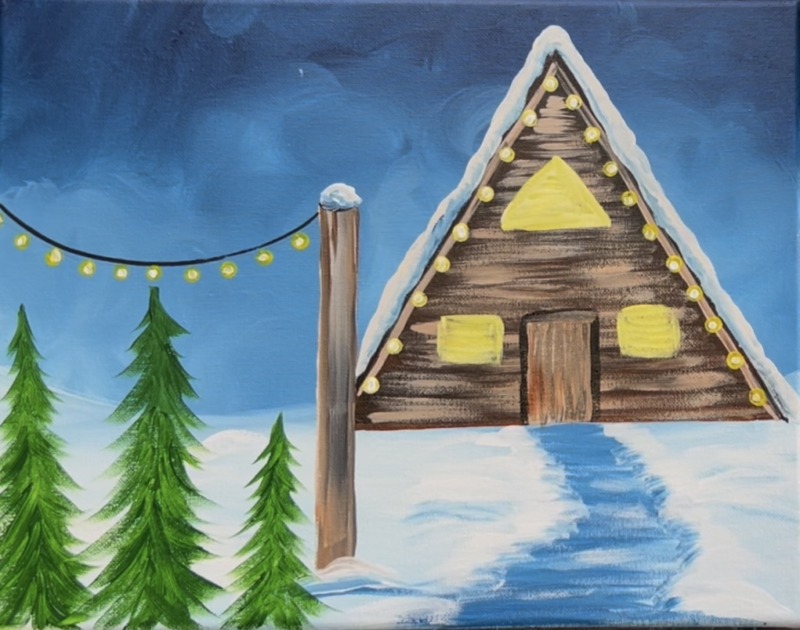
Mix “titanium white” and “primary yellow” on your paint palette (equal amounts). Use the #4 round brush to paint windows. I did a triangular window towards the top of the cabin and two rectangular windows on each side of the door.
Use the #4 round brush and “mars black” mixed with “burnt Sienna” use paint frames around each of the windows.
Paint snow on top of the frames of the door and windows. Then paint snow piling up on the base of the cabin (slightly overlapping it).
13. Paint Snow On Trees
Use the #8 long round brush and “titanium white” to paint snow on the branches of the trees. Start on the bottom of the tree. Paint brush strokes going downwards. Leave a gap and then paint a second row of white branches.
Leave gapes between each of your white branch “rows”. Do this to each of the trees (working from the bottom to the top).
14. Paint Sign & Gingerbread Man
Use the #12 bright brush to paint a sign (optional). Mix white with brown and a little yellow to create a light “cream color” for the sign.
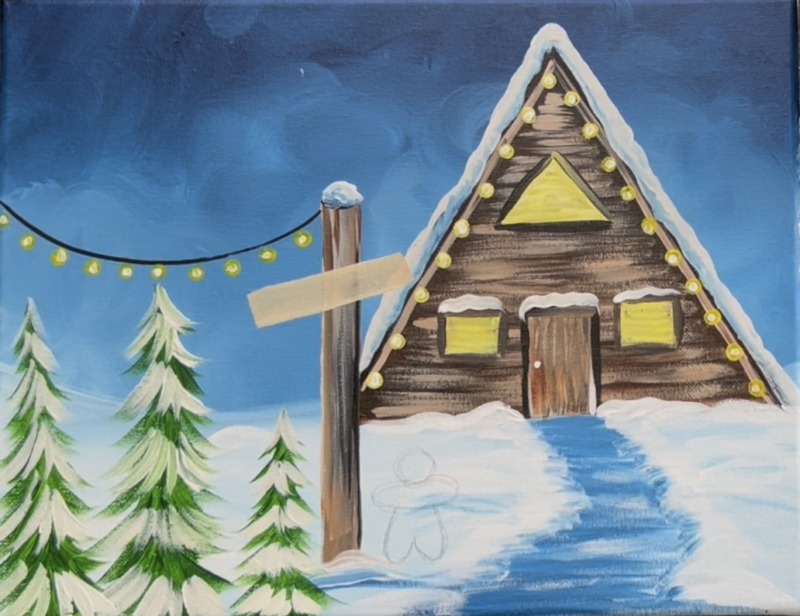
Then draw a gingerbread man with pencil. After drawing, fill the gingerbread man in with “burnt Sienna” and a #4 round brush.
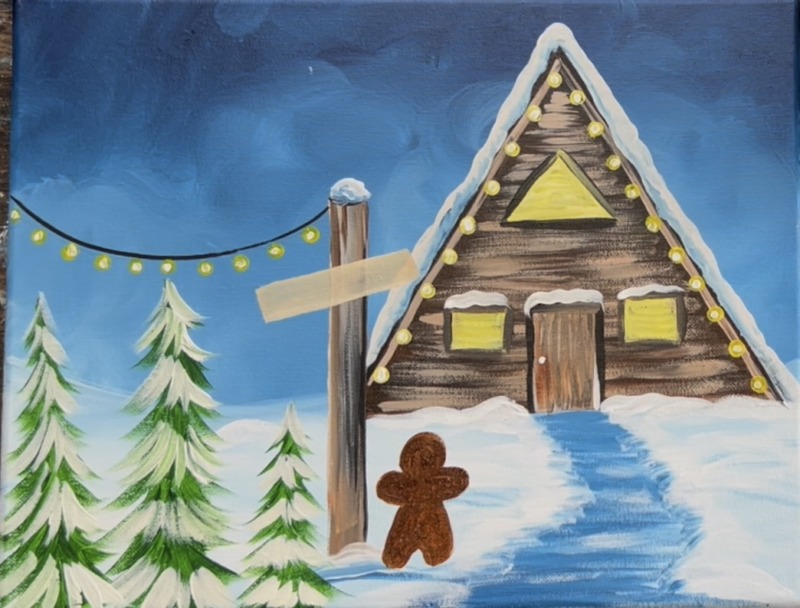
Highlight the gingerbread man. Double load the #4 round brush in white and brown. Then fill the inner part of the gingerbread man shape but leave the edging of it dark brown.
15. Paint Wreath & window lines
Use the #4 round brush and “hooker’s green hue” mixed with “titanium white” (about equal parts) to paint a circle above the door. Then paint little “X’s” around the circle to create the texture of a wreath. After this layer dries, we can paint decorations on the wreath.
Use the #4 round brush and “mars black” to paint the window pane lines.
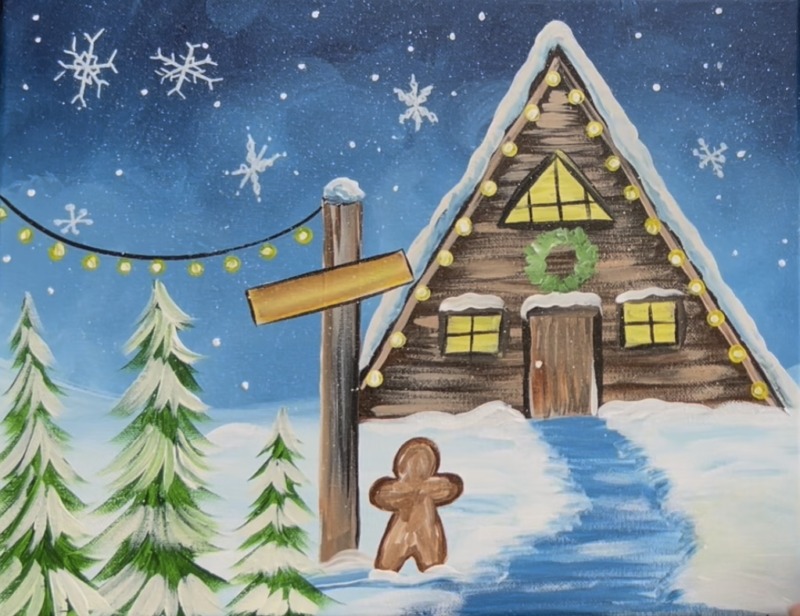
16. Paint Snowflakes
Use a white POSCA paint pen to draw snowflakes around the sky. Draw an “X” and then a line through the “X” to create 6 points. Then decorate each of the points. You can create unique snowflakes all throughout the sky.

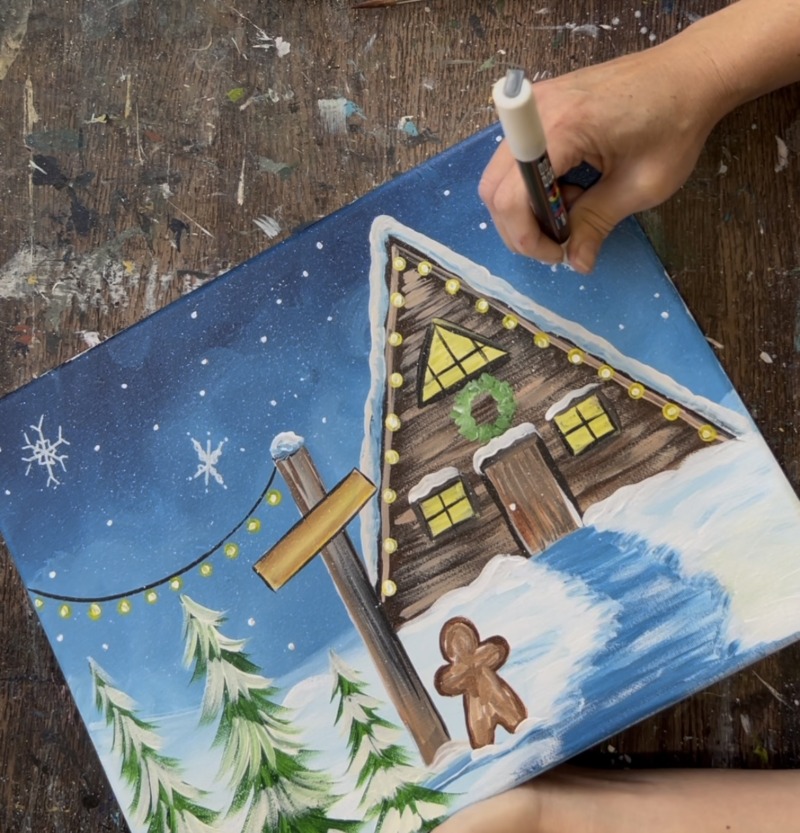
Use the #4 round brush and “titanium white” to paint little snow dots throughout the sky. You can even use a toothbrush (or a flat brush) to flick specks of snow all over the painting!
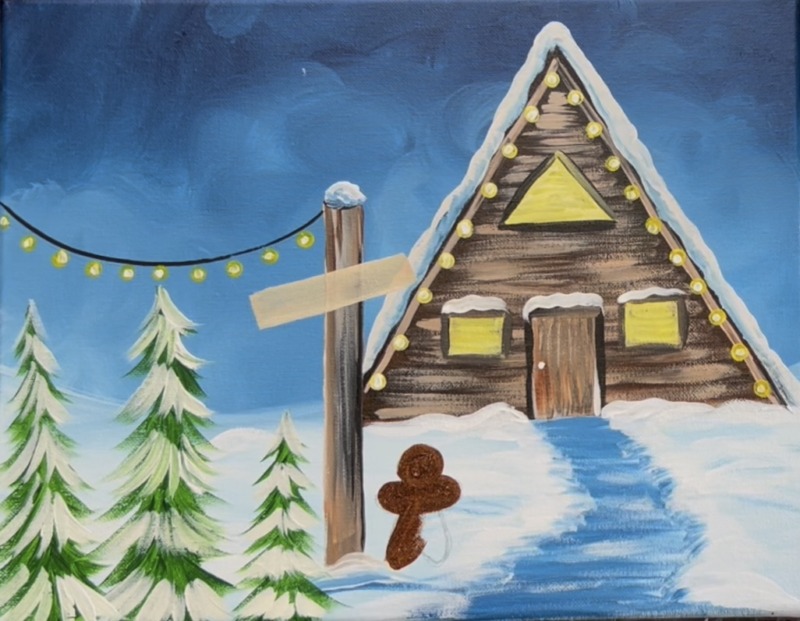
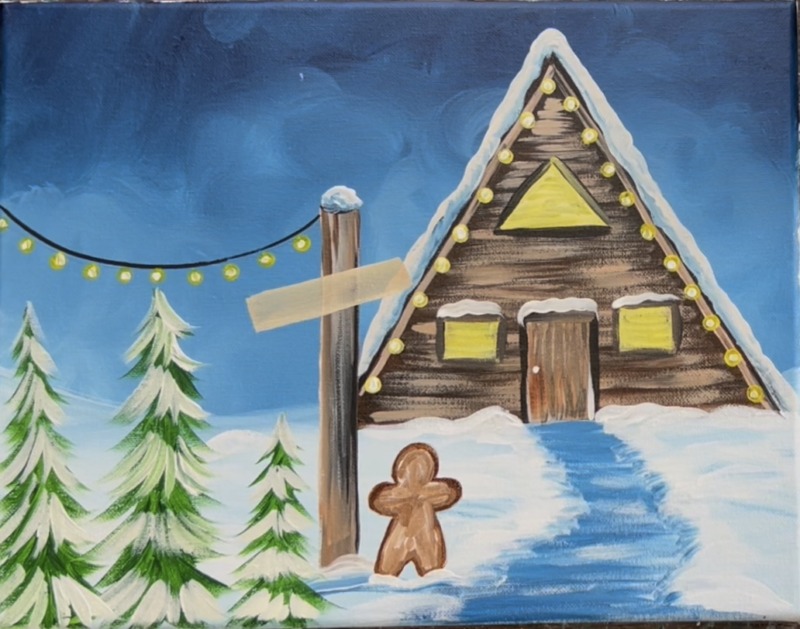
17. Details On Gingerbread , Wreath, Ground & Christmas Tree
Use the #8 round brush to paint another Christmas tree on the right side of the painting. I made this one go off the right edge of the canvas and only slightly overlap the cabin.
Then use a #4 round brush and “yellow” to lightly paint loose, horizontal lines on the path and a little on the snow as reflections from the lights and windows.
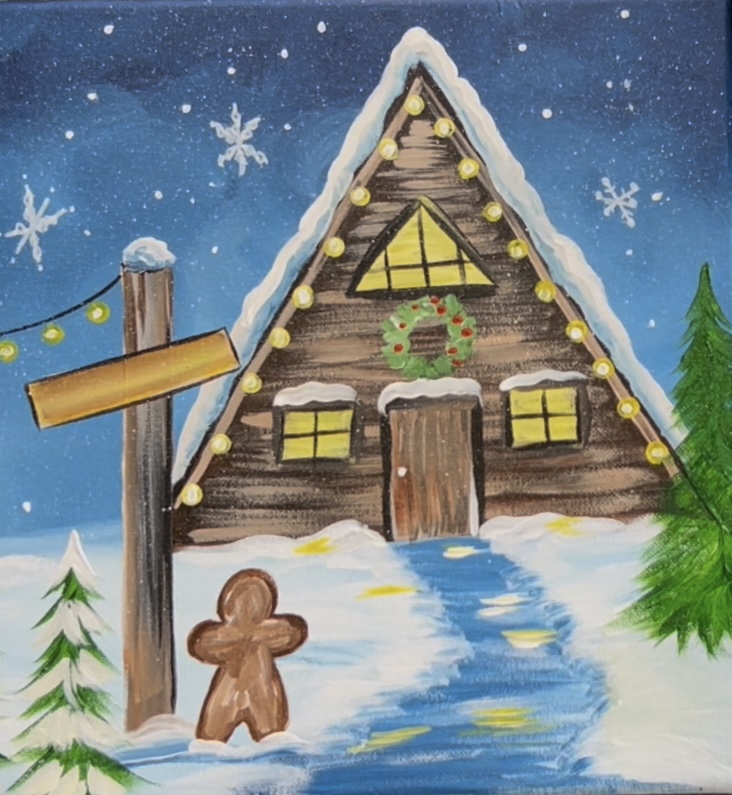
Decorate the wreath by painting little red dots over the greenery and paint a little red bow on the bottom.
Use the #4 round brush to decorate the gingerbread man. Use “pyrrole red” for the buttons, mars black for the eyes and mouth and “titanium white” for the wavy frosting edges on the arms and legs.
After the Christmas tree dries, add “titanium white” snow branches the same way you added snow to the other trees. Then decorate using different colored dots for ornaments and paint a yellow star on the top of the tree.
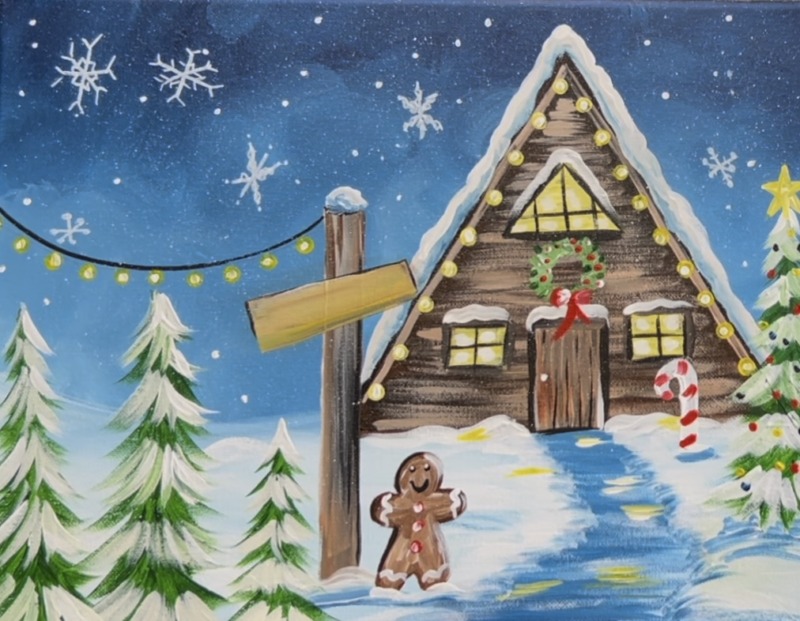
Another detail you can do is add a candy cane in the front of the cabin. I used “titanium white” and the #4 round brush to paint the first layer of the candy cane shape. Then when the white dries, use the “pyrrole red” to paint the stripes.
18. Sign Lettering
Use a paint pen to do optional lettering on the sign! I did “Fresh Christmas Trees”, however, you can do other lettering such as “Ski Lodge”, “Gingerbread House”, “North Pole”, etc.
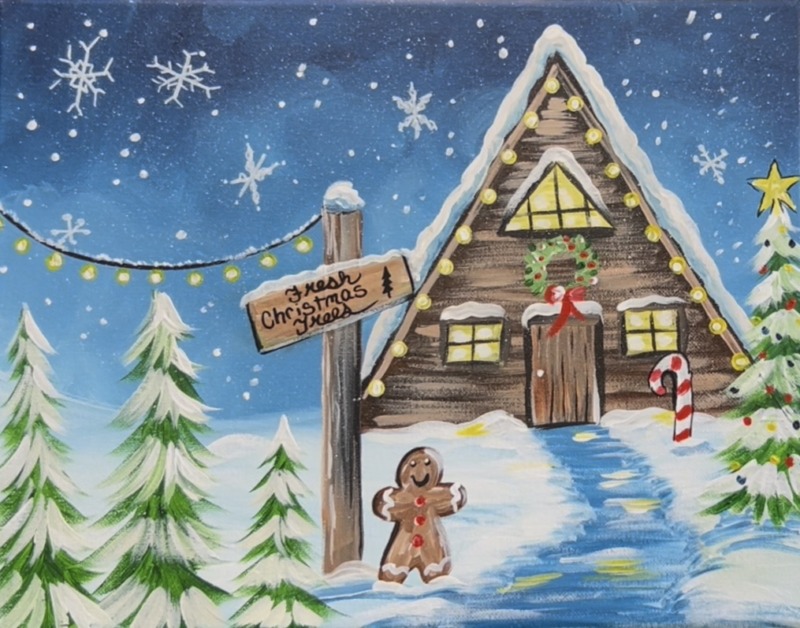
You can also use the black paint pen to outline details in the painting such as the candy cane, start on the tree, the sign, etc. Another final detail you can do is add snow on the sign and little dots of snow on the string lights.